VSI OpenVMS User's Manual
- Operating System and Version:
- VSI OpenVMS x86-64 Version 9.2-2 or higher
VSI OpenVMS IA-64 Version 8.4-1H1 or higher
VSI OpenVMS Alpha Version 8.4-2L1 or higher
Preface
1. About VSI
VMS Software, Inc. (VSI) is an independent software company licensed by Hewlett Packard Enterprise to develop and support the OpenVMS operating system.
2. Intended Audience
This manual is intended for all users of the VSI OpenVMS operating system.
A system manager performs the administrative tasks that create and maintain an efficient computing environment. If you are a system manager or want to understand system management concepts and procedures, refer to the VSI OpenVMS System Manager's Manual.
3. Document Structure
Each chapter describes concepts and procedures for performing computing tasks. Basic information is presented first within each chapter; more complex concepts and procedures are presented last.
3.1. Getting Started
Chapter 1, "Getting Started with the OpenVMS Operating System" describes how to log in and log out of the system, how to change your password, and how to get help.
Chapter 2, "Using DCL to Interact with the System" describes how to use the DIGITAL Command Language (DCL).
Chapter 3, "Storing Information with Files" describes files and how you can use them to store information. It also includes examples for creating, copying, renaming, displaying, deleting, protecting, and printing files.
Chapter 4, "Organizing Files with Directories" describes how to use directories to organize and manage files.
Chapter 5, "Extended File Specifications" describes the extended file specifications environment for OpenVMS Alpha systems using ODS-5.
Chapter 6, "Using Disk and Tape Drives" describes how to reserve tapes or disks for private use. Unlike devices that are shared by a group of users, private devices might not be set up and maintained by a system manager.
Chapter 7, "Using Mail to Communicate with Others" describes how to use the Mail utility (MAIL) to communicate with other users on your system or on any other computer that is connected to your system with the DECnet for OpenVMS network. The chapter includes a sample mail message; step-by-step instructions for reading, sending, replying to, forwarding, and organizing mail messages; a summary of Mail commands; and instructions on how to use the MIME utility.
3.2. Manipulating Text and Records
Chapter 8, "Editing Text Files with EVE" describes EVE, an interactive text editor that is included with the OpenVMS operating system. The chapter describes how to use EVE to create and edit new files or to edit existing files. It includes summaries of EVE commands.
Chapter 9, "Sorting and Merging Files" describes how to use the Sort/Merge utility (SORT/MERGE) to sort records from one or more input files or to merge files that have been sorted. The chapter includes a summary of Sort/Merge command qualifiers.
3.3. Ensuring Security
Chapter 10, "Controlling Access to Resources" describes general security issues such as controlling access to protected objects and accessing data on remote systems.
3.4. Logical Names and Symbols
Chapter 11, "Defining Logical Names for Devices and Files" describes how to create and use logical names to represent files, directories, and devices. The chapter also summarizes the logical names created by the system.
Chapter 12, "Defining Symbols, Commands, and Expressions" describes how to use symbols to represent commands, character strings, and numeric data. The chapter also describes how to combine symbols into expressions to manipulate the values that the symbols represent.
3.5. Programming
Chapter 13, "Introduction to Command Procedures" describes basic techniques used in writing command procedures, which are files that contain DCL commands and data lines used by DCL commands.
Chapter 14, "Advanced Programming with DCL" describes advanced techniques used in writing command procedures. This chapter also describes how to use the PIPE command interactively and within command procedures.
Chapter 15, "Using Lexical Functions to Obtain and Manipulate Information" describes how to use lexical functions within a command procedure to get information about your process or the system environment.
3.6. Managing Processes
Chapter 16, "Understanding Processes and Batch Jobs" describes processes, which are environments created by the OpenVMS operating system that let you interact with the system. The chapter describes how and when to use subprocesses, programs, and batch jobs.
3.7. Reference Sections
Appendix A, "Character Sets" describes the DEC Multinational character set and the DCL character set.
Appendix B, "Annotated Command Procedures" contains complete command procedures that demonstrate the concepts and techniques discussed in Chapters 13, 14, and 15.
4. VSI Encourages Your Comments
You may send comments or suggestions regarding this manual or any VSI document by sending electronic mail to the following Internet address: <docinfo@vmssoftware.com>. Users who have VSI OpenVMS support contracts through VSI can contact <support@vmssoftware.com> for help with this product.
5. OpenVMS Documentation
The full VSI OpenVMS documentation set can be found on the VMS Software Documentation webpage at https://docs.vmssoftware.com.
6. Conventions
The following conventions are used in this manual:
| Convention | Meaning |
|---|---|
Ctrl/X | A sequence such as
Ctrl/x
indicates that you must hold down the key labeled Ctrl while you
press another key (x) or
a pointing device button. |
PF1
X | A sequence such as PF1
X indicates that you
must first press and release the key labeled PF1 and then press and
release another key (x)
or a pointing device button. |
| Enter | In examples, a key name in bold indicates that you press that key. |
… |
A horizontal ellipsis in examples indicates one of the
following possibilities:
|
. . . | A vertical ellipsis indicates the omission of items from a code example or command format; the items are omitted because they are not important to the topic being discussed. |
| ( ) |
In command format descriptions, parentheses indicate that you must enclose choices in parentheses if you specify more than one. In installation or upgrade examples, parentheses indicate the possible answers to a prompt, such as:
|
| [ ] |
In command format descriptions, brackets indicate optional choices. You can choose one or more items or no items. Do not type the brackets on the command line. However, you must include the brackets in the syntax for directory specifications and for a substring specification in an assignment statement. In installation or upgrade examples, brackets indicate the default answer to a prompt if you press Enter without entering a value, as in:
|
| | | In command format descriptions, vertical bars separate choices within brackets or braces. Within brackets, the choices are optional; within braces, at least one choice is required. Do not type the vertical bars on the command line. |
| { } | In command format descriptions, braces indicate required choices; you must choose at least one of the items listed. Do not type the braces on the command line. |
| bold type | Bold type represents the name of an argument, an attribute, or a reason. In command and script examples, bold indicates user input. Bold type also represents the introduction of a new term. |
| italic type | Italic type indicates important information, complete titles of manuals, or variables. Variables include information that varies in system output (Internal error number), in command lines (/PRODUCER=name), and in command parameters in text (where dd represents the predefined code for the device type). |
| UPPERCASE TYPE | Uppercase type indicates a command, the name of a routine, the name of a file, or the abbreviation for a system privilege. |
Example |
This typeface indicates code examples, command examples, and interactive screen displays. In text, this type also identifies website addresses, UNIX command and pathnames, PC-based commands and folders, and certain elements of the C programming language. |
| - | A hyphen at the end of a command format description, command line, or code line indicates that the command or statement continues on the following line. |
| numbers | All numbers in text are assumed to be decimal unless otherwise noted. Nondecimal radixes-binary, octal, or hexadecimal-are explicitly indicated. |
Chapter 1. Getting Started with the OpenVMS Operating System
Logging in
Logging in from a PC
Choosing passwords for your account
Reading informational messages
Types of logins and login classes
Login failures
Changing passwords
Password and account expiration times
Guidelines for protecting your password
Recognizing system responses
Getting help about the system
Logging out of the system
Logging out without compromising system security
Networks
For complete descriptions of all commands referenced in this chapter, refer to the VSI OpenVMS DCL Dictionary and online help.
1.1. Logging In
Logging in consists of gaining access to the system and identifying yourself as an authorized user. When you log in, the system creates an environment from which you can enter commands. This environment is called your process.
The way you log in and out of the OpenVMS operating system depends on how the system is set up at your site. This section provides a general description of logging in to and out of the operating system. Check with your system manager for the procedures specific to your site.
To interact with the operating system, you must log in to a user account. An account is a name or number that identifies you to the system when you log in. That name or number tells the system where your files are stored and the type of access you have to other files.
Your system manager (or whoever authorizes system use at your installation) usually sets up accounts and grants privileges according to your needs. The type of access rights and privileges enabled for your account determine whether you have access to files, images, or utilities that might affect system performance or other users.
To access your account, you need to enter your user name and password. Your system manager usually provides you with your user name and initial password. Your user name identifies you to the system and distinguishes you from other users. Your password is for your protection. If you maintain its secrecy, other users cannot use system resources under your user name.
|
Step |
Task |
|---|---|
|
1 |
The system displays a prompt for your user
name:
Username: Type your user name and press Enter. You have approximately 30 seconds to do this; otherwise, the system "times out." If a timeout occurs, you must start the login procedure again. The system displays your user name on the screen as you type it. For example:
Username: CASEY

       The system prompts you for your password:

Password:
)
|
|
2 |
Type your password and press Enter. The system does not display your password, which is sometimes referred to as "no echo." |
|
3 |
Depending on how your system manager has set up your account, you might be required to enter a second password or use an automatically generated password (see Section 1.3.4, ''Types of Passwords''). |
1.1.1. Successful Logins
If your login is successful, the system displays a dollar sign ($) in the left margin of your screen. The dollar sign is the default DCL prompt; it indicates that the system is ready to use.
Username:  CASEY
Password:
        Welcome to OpenVMS on node MARS
    Last interactive login on Friday, 11-DEC-2002 08:41
    Last non-interactive login on Thursday, 10-DEC-2002 11:05
$
1.1.2. Login Errors
User authorization failureand you are not logged in. If you make a mistake, press Enter and try again. If your password has expired, you need to change your password; the system will automatically display the Set Password: prompt. See Section 1.7, ''Changing Passwords'' for information on changing your password in this instance. If you have any other problems logging in, get help from the person who set up your account.
1.2. Logging In From a PC
In previous times, you would connect to a host computer with a video terminal that consisted of a monitor and a keyboard. All computing power resided on the host computer running the OpenVMS operating system, often located in a central computing room. Today it is more common to work from a personal computer (PC) or workstation that has its own set of independent computing capabilities. In this situation you connect to a host computer running OpenVMS via a terminal emulation program.
A terminal emulation program lets you connect to an OpenVMS system over a TCP/IP network, the Internet, or an intranet. Your interactions with the operating system display on the PC monitor using the interface provided by the terminal emulation program. To connect to OpenVMS in this way, start the terminal emulation program, select the system you want to connect to, and then log in to the OpenVMS operating system as described in this chapter.
1.3. Choosing Passwords for Your Account
Include both numbers and letters in the password. Although a 6-character password that contains only letters is fairly secure, a 6-character password with both letters and numbers is much more secure.
Choose passwords that contain 6 to 10 characters. Adequate length makes passwords more secure. You can choose a password as long as 32 characters.
Do not select passwords from a dictionary or from your native language.
Avoid choosing words readily associated with your computer site or yourself, such as the name of a product or the model of your car.
Choose new passwords each time. Do not reuse old ones.
Your system manager or security administrator may set up additional restrictions, for example, not allowing passwords with fewer than 10 characters or not allowing repeats of passwords.
|
Secure Passwords |
High-Risk Passwords |
|---|---|
|
Nonsense syllables: aladaskgam eojfuvcue joxtyois |
Words with a strong personal association: your name, the name of a loved one, the name of your pet, the name of your town, the name of your automobile, etc. |
|
A mixed string: 492_weid $924spa zu_$rags |
A work-related term: your company name a special project your work group name |
1.3.1. Obtaining Your Initial Password
Typically, when you learn that an account has been created for you on the system, you are told whether a user password is required. If user passwords are in effect, your system manager will usually assign a specific password for your first login. This password has been placed in the system user authorization file (UAF) with other information about how your account can be used.
It is inadvisable to have passwords that others could easily guess. Ask the person creating the account for you to specify a password that is difficult to guess. If you have no control over the password you are given, you might be given a password that is the same as your first name. If so, change it immediately after you log in. The use of first or last names as passwords is a practice so well known that it is undesirable from a security standpoint.
At the time your account is created, you should also be told a minimum length for your password and whether you can choose your new password or whether the system generates the password for you.
1.3.2. Changing Your Initial Password
Log in to your account soon after it is created to change your password. If there is a time lapse from the moment your account is created until your first login, other users might log in to your account successfully, gaining a chance to damage the system. Similarly, if you neglect to change the password or are unable to do so, the system remains vulnerable. Possible damage depends largely on what other security measures are in effect. See Section 1.7, ''Changing Passwords'' for more information on changing passwords.
1.3.3. Restrictions on Passwords
It automatically compares new passwords to a system dictionary. This helps to ensure that a password is not a native language word.
It maintains a history list of your old passwords and compares each new password to this list to be sure that you do not reuse a password.
It enforces a minimum password length, which the system manager specifies in your UAF record.
The system rejects any passwords that it finds in a system dictionary, that you have used before, and that are shorter than the minimum password length specified in your UAF.
1.3.4. Types of Passwords
User password
Required for most accounts. After entering your user name, you are prompted for a password. If the account requires both primary and secondary passwords, two passwords must be entered.
System password
Controls access to particular terminals and is required at the discretion of the security administrator. System passwords are usually necessary to control access to terminals that might be targets for unauthorized use, such as dialup and public terminal lines.
Primary password
The first of two passwords to be entered for an account requiring both primary and secondary passwords.
Secondary password
The second of two passwords to be entered for an account requiring both primary and secondary passwords. The secondary password provides an additional level of security on user accounts. Typically, the primary user does not know the secondary password; a supervisor or other key person must be present to supply it. For certain applications, the supervisor may also decide to remain present while the account is in use. Thus, secondary passwords facilitate controlled logins and the actions taken after a login.
Secondary passwords can be time-consuming and inconvenient. They are justified only at sites with maximum security requirements. An example of an account that justifies dual passwords would be one that bypasses normal access controls to permit emergency repair to a database.
1.3.5. Entering a System Password
Your security administrator will tell you if you must specify a system password to log in to one or more of the terminals designated for your use. Ask your security administrator for the current system password, how often it changes, and how to obtain the new system password when it does change.
| Step |
Task |
|---|---|
| 1 |
Press the Enter key until the terminal responds with the recognition character, which is commonly a bell. |
| 2 |
Type the system password and press Enter. There is no prompt and the system does not display the characters you type. If you fail to specify the correct system password, the system does not notify you. Initially, you might think the system is malfunctioning unless you know that a system password is required at that terminal. If you do not receive a response from the system, assume that you have entered the wrong password and try again. |
| 3 |
When you enter the correct system password, you receive the system
announcement message, if there is one, followed by the Username: prompt. For
example:
MAPLE - A member of the Forest Cluster
     Unauthorized Access is Prohibited

Username: |
1.3.6. Entering a Secondary Password
Your security administrator decides whether to require the use of secondary passwords for your account at the time your account is created. When your account requires primary and secondary passwords, you need two passwords to log in. Minimum password length, which the security administrator specifies in your UAF, applies to both passwords.
As with a single password login, the system allots a limited amount of time for the entire login. If you do not enter a secondary password in time, the login period expires.
     WILLOW - A member of the Forest Cluster
         Welcome to OpenVMS on node WILLOW

Username: RWOODS
Password:           Enter
Password:           Enter

    Last interactive login on Friday, 11-DEC-2002 10:22
$
1.3.7. Password Requirements for Different Types of Accounts
Accounts secured with passwords that you or the security administrator change periodically. This account type is the most common.
Accounts that always require passwords but prohibit you from changing the password. By locking the password (setting the LOCKPWD flag in the UAF), the security administrator controls all changes made to the password.
Restricted accounts limit your use of the system and sometimes require a password.
Open accounts require no password. When you log in to an open account, the system does not prompt you for a password and you do not need to enter one. You can begin entering commands immediately. Because open accounts allow anyone to gain access to the system, they are used only at sites with minimal security requirements.
1.4. Reading Informational Messages
When you log in from a terminal that is directly connected to a computer, the OpenVMS system displays informational system messages, as shown in the following example.
WILLOW - A member of the Forest ClusterUnlawful Access is Prohibited Username: RWOODS Password: You have the following disconnected process:
Terminal Process name Image name VT320: RWOODS (none) Connect to above listed process [YES]: NO Welcome to OpenVMS on node WILLOW
Last interactive login on Wednesday, 11-DEC-2002 10:20
Last non-interactive login on Monday, 30-NOV-2002 17:39
2 failures since last successful login
You have 1 new mail message.
$
| The announcement message identifies the node (and, if relevant, the OpenVMS Cluster name). It may also warn unauthorized users that unlawful access is prohibited. The system manager or security administrator can control both the appearance and the content of this message. |
| A disconnected process message informs you that your process was disconnected at some time after your last successful login but is still available. You have the option of reconnecting to the old process, in the state it was in before you were disconnected. The system displays the disconnected message only when the following conditions exist:
In general, the security administrator should allow you to reconnect because this ability poses no special problems for system security. However, the security administrator can disable this function by changing the setup on terminals and by disabling virtual terminals on the system. For information on setting up and reconnecting to virtual terminals, refer to the VSI OpenVMS System Manager's Manual. |
| A welcome message indicates the version number of the OpenVMS operating system that is running and the name of the node on which you are logged in. The system manager can choose a different message or can suppress the message entirely. |
| The last successful interactive login message provides the time of the last completed login for a local, dialup, or remote login. The system does not count logins from a subprocess whose parent was one of these types. |
| The last successful noninteractive login message provides the time the last noninteractive (batch or network) login completed. |
| The number of login failure messages indicates the number of failed attempts at login. An incorrect password is the only source of login failure that is counted. To attract your attention, a bell rings after the message appears. |
| The new mail message indicates if you have any unread mail messages. |
1.4.1. Suppressing Messages
A security administrator can suppress the announcement and welcome messages, which include node names and operating system identification. Because login procedures differ according to operating system, it is more difficult to log in without this information.
The last login success and failure messages are optional. Your security administrator can enable or disable them as a group. Sites with medium-level or high-level security needs display these messages because they can indicate break-in attempts. In addition, by showing that the system is monitoring logins, these messages can be a deterrent to potential illegal users.
1.4.2. Successful Login Messages
Each time you log in, the system resets the values for the last successful login and the number of login failures. If you access your account interactively and do not specify an incorrect password in your login attempts, you may not see the last successful noninteractive login and login failure messages.
1.5. Types of Logins and Login Classes
Logins can be either interactive or noninteractive. When you log in interactively, you enter a user name and a password. In noninteractive logins, the system performs the identification and authentication for you; you are not prompted for a user name and password.
In addition to interactive and noninteractive logins, the OpenVMS operating system recognizes different classes of logins. How you log in to the system determines the login class to which you belong. Based on your login class, as well as the time of day or day of the week, the system manager controls your access to the system.
1.5.1. Interactive Logins
Local
You log in from a terminal connected directly to the central processor or from a terminal server that communicates directly with the central processor.
Dialup
You log in to a terminal that uses a modem and a telephone line to make a connection to the computer system. Depending on the terminal that your system uses, you might need to execute a few additional steps initially. Your site security administrator can give you the necessary details.
Remote
You log in to a node over the network by entering the DCL command SET HOST. For example, to access the remote node HUBBUB, you enter the following command:$ SET HOST HUBBUB
If you have access to an account on node HUBBUB, you can log in to that account from your local node. You have access to the facilities on node HUBBUB, but you remain physically connected to your local node.
For additional information on remote sessions, see Section 1.12.2, ''Ending a Remote Session''.
1.5.2. Noninteractive Logins
Network Logins
The system performs a network login when you initiate a network task on a remote node, such as displaying the contents of a directory or copying files stored in a directory on another node. Both your current system and the remote system must be nodes in the same network. In the file specification, you identify the target node and provide an access control string, which includes your user name and password for the remote node.
For example, a network login occurs when user GREG, who has an account on remote node PARIS, enters the following command:$ DIRECTORY PARIS"GREG 8G4FR93A"::WORK2:[PUBLIC]*.*;*
This command displays a listing of all the files in the public directory on disk WORK2. It also reveals the password 8G4FR93A. A more secure way to perform the same task would be to use a proxy account on node PARIS. For an example of a proxy login, see Section 10.5.3, ''Using Proxy Login Accounts to Protect Passwords''.
Batch Logins
The system performs a batch login when a batch job that you submitted runs. Authorization to build the job is determined at the time the job is submitted. When the system prepares to execute the job, the job controller creates a noninteractive process that logs in to your account. No password is required when the job logs in.
1.6. Login Failures
|
Failure Indicator |
Reason |
|---|---|
|
No response from the terminal |
A defective terminal, a terminal that requires a system password, or a terminal that is not powered on. |
|
No response from any terminal |
The system is down. |
|
No response from the terminal when you enter the system password |
The system password changed. |
|
System messages: | |
|
"User authorization failure" |
A typing error in your user name or password. The account or password expired. |
|
"Not authorized to log in from this source" |
Your particular class of login (local, dialup, remote, interactive, batch, or network) is prohibited. |
|
"Not authorized to log in at this time" |
You do not have access to log in during this hour or this day of the week. |
|
"User authorization failure" (and no known user failure occurred) |
An apparent break-in has been attempted at the terminal using your user name, and the system has temporarily disabled all logins at that terminal by your user name. |
The following sections describe the reasons for login failure in more detail.
1.6.1. Terminals That Require System Passwords
You cannot log in if the terminal you attempt to use requires a system password and you are unaware of the requirement. All attempts at logging in fail until you enter the system password.
If you know the system password, perform the steps described in Section 1.3.5, ''Entering a System Password''. If your attempts fail, it is possible that the system password has been changed. If you do not know the system password and you suspect that this is the problem, try to log in at another terminal or request the new system password.
1.6.2. Login Class Restrictions
If you attempt a class of login that is prohibited in your UAF record, your login will fail. For example, your security administrator can restrict you from logging in over the network. If you attempt a network login, you receive a message telling you that you are not authorized to log in from this source.
Your security administrator can restrict your logins to include or exclude any of the following classes: local, remote, dialup, batch, or network.
1.6.3. Shift Restrictions
Another cause of login difficulty is failure to observe your shift restrictions. A system manager or security administrator can control access to the system based on the time of day or the day of the week. These restrictions are imposed on classes of logins. The security administrator can apply the same work-time restrictions to all classes of logins or choose to place different restrictions on different login classes.
If you attempt a login during a time prohibited for that login class, your login fails. The system notifies you that you are not authorized to log in at this time.
1.6.4. Batch Jobs During Shift Restrictions
When shift restrictions apply to batch jobs, jobs you submit that are scheduled to run outside your permitted work times are not run. The system does not automatically resubmit such jobs during your next available permitted work time. Similarly, if you have initiated any kind of job and attempt to run it beyond your permitted time periods, the job controller aborts the uncompleted job when the end of your allocated work shift is reached. This job termination behavior applies to all jobs.
1.6.5. Failures During Dialup Logins
Your security administrator can control the number of opportunities you are given to enter a correct password during a dialup login before the connection is automatically broken.
If your login fails and you have attempts remaining, press the Enter key and try again. You can do this until you succeed or reach the limit. If the connection is lost, you can redial the access line and start again.
The typical reason for limiting the number of dialup login failures is to discourage unauthorized users attempting to learn passwords by trial and error. They already have the advantage of anonymity because of the dialup line. Of course, limiting the number of tries for each dialup does not necessarily stop this kind of break-in attempt. It only requires the perpetrator to redial and start another login.
1.6.6. Break-In Evasion Procedures
If anyone has made a number of failed attempts to log in at the same terminal with your user name, the system can respond as though a break-in attempt is in progress. That is, the system concludes that someone is attempting to gain illegal access to the system by using your user name.
At the discretion of your security administrator, break-in evasion measures can be in effect for all users of the system. The security administrator controls how many password attempts are allowed over what period of time. Once break-in evasion tactics are triggered, you cannot log in to the terminal—even with your correct password—during a defined interval. Your security administrator can tell you how long you must wait before reattempting the login, or you can move to another terminal to attempt a login.
If you suspect that break-in evasion is preventing your login and you have not personally experienced any login failures, contact your security administrator immediately. Together, you should attempt another login and check the message that reveals the number of login failures since the last login to confirm or deny your suspicion of break-in attempts. If your system does not normally display the login message, your security administrator can use the Authorize utility (AUTHORIZE) to examine the data in your UAF record. With prompt action, your security administrator can locate someone attempting logins at another terminal.
1.7. Changing Passwords
Changing passwords on a regular basis promotes system security. To change your password, enter the DCL command SET PASSWORD.
The system manager can allow you to select a password on your own or can require that you use the automatic password generator when you change your password. If you select your own password, note that the password must follow system restrictions on length and acceptability (see Section 1.3.3, ''Restrictions on Passwords'').
There is no restriction on how many times you can change your password in a given period of time.
$ SET PASSWORD
Old password:
New password:
%SET-F-INVPWDLEN, password length must be between 12 and 32
characters; password not changed
1.7.1. Selecting Your Own Password
$ SET PASSWORD
New password:
Verification:
If you fail to enter the same new password twice, the password is not changed. If you succeed in these two steps, there is no notification. The command changes your password and Enters you to the DCL prompt.
Even though your security administrator might not require the password generator, you are strongly encouraged to use it to promote the security of your system.
1.7.2. Using Generated Passwords
Note
The password generator uses basic syllabic rules to generate words but has no real knowledge of any language. As a result, it can unintentionally produce words that are offensive.
$ SET PASSWORD Old password:
| The user correctly specifies the old password and presses the Enter key. |
| The system responds with a list of five password choices ranging in length from 8 to 10 characters. Usually, the password that is easiest to pronounce is easiest to remember; therefore, it is the best choice. On OpenVMS VAX systems, representations of the same word divided into syllables are displayed to the right of each password choice (as shown here). |
| The system informs the user that it is possible to request a new list by pressing the Enter key in response to the prompt for a new password. |
| The user enters one of the first five possible passwords and presses the Enter key. |
| The system recognizes that this password is one provided by the automatic password generator and responds with the verification prompt. The user enters the new password again and presses Enter. |
| The system changes the password and responds with the DCL prompt. |
1.7.3. Generated Passwords: Disadvantages
There is a possibility that you might not remember your password choice. However, if you dislike all the password choices in your list or think none are easy to remember, you can always request another list.
There is a potential for disclosure of password choices from the display that the command produces. To protect your account, change your password in private. If you perform the change on a video terminal, clear the display of password choices from the screen after the command finishes. If you use a printing terminal, properly dispose of all hardcopy output.
If you later realize that you failed to protect your password in these ways, change your password immediately. Depending on site policy or your own judgment concerning the length of time your account was exposed, you should notify your security administrator that a security breach could have occurred through your account.
1.7.4. Changing a Secondary Password
To change a secondary password, use the DCL command SET PASSWORD/SECONDARY. You are prompted to specify the old secondary password and the new secondary password, just as in the procedure for changing the primary password. To remove a secondary password, press the Enter key when you are prompted for a new password and verification.
You can change primary and secondary passwords independently, but both are subject to the same change frequency because they share the same password lifetime.
1.7.5. Changing Passwords at Login
Even if your current password has not yet expired, you can change your password when you log in to the system by including the /NEW_PASSWORD qualifier with your user name. When you enter the /NEW_PASSWORD qualifier after your user name, the system prompts you to set a new password immediately after login.
WILLOW - A member of the Forest Cluster

Username: RWOODS/NEW_PASSWORD
Password:
         Welcome to OpenVMS on node WILLOW
            Last interactive login on Tuesday, 7-NOV-2002 10:20
            Last non-interactive login on Monday, 6-NOV-2002 14:20

Your password has expired; you must set a new password to log in
New password:
Verification:
1.8. Password and Account Expiration Times
Your system manager can set up your account so that your password, or the account itself, expires automatically on a particular date and time. Password expiration times promote system security by forcing you to change your password on a regular basis. Account expiration times help to ensure that accounts are available only for as long as they are needed.
1.8.1. Expired Passwords
WARNING – Your password expires on Thursday 11-DEC-2002 15:00
Your password has expired; you must set a new password to log in
New password:
The system prompts you for a new password or, if automatic password generation is enabled, asks you to select a new password from those listed. You can abort the login by pressing Ctrl/Y. At your next login attempt, the system again prompts you to change your password.
1.8.2. Using Secondary Passwords
If secondary passwords are in effect for your account (see Section 1.3.4, ''Types of Passwords''), the secondary password expires at the same time as the primary one. You are prompted to change both passwords. If you change the primary password and press Ctrl/Y before changing the secondary password, the login fails. The system does not record a password change.
1.8.3. Failure to Change Passwords
WARNING -- Your password has expired; update immediately with
SET PASSWORD!
At this point, if you do not change the password or if the system fails before you have the opportunity to do so, you will be unable to log in again. To regain access, see your system manager.
1.8.4. Expired Accounts
If you need your account for a specific purpose for a limited time only, the person who creates your account may specify a period of time after which the account lapses. For example, student accounts at universities are typically authorized for a single semester at a time.
Expired accounts deny logins automatically. You receive no advance warning message before the account expiration date, so it is important to know in advance your account duration. The account expiration resides in the UAF record, which can be accessed and displayed only through the use of the OpenVMS Authorize utility (AUTHORIZE) by users with the SYSPRV privilege or equivalent—normally, your system manager or security administrator.
When your account expires, you receive an authorization failure message at your next attempted login. If you need an extension, follow the procedures defined at your site.
1.9. Guidelines for Protecting Your Password
Illegal system accesses involving the use of a correct password are more often traced to disclosure of the password by its owner than to surreptitious discovery. It is vital that you do not reveal your password to anyone.
Select reasonably long passwords that cannot be guessed easily. Avoid using words in your native language that appear in a dictionary. Consider including digits in your password. Alternatively, let the system generate passwords for you automatically.
Never write down your password.
Never give your password to another user. If another user obtains your password, change it immediately.
Do not include your password in any file, including the body of an electronic mail message. If anyone else reveals a password to you, delete the information promptly.
The character strings that appear in conjunction with your actual password can make it easy for someone to find your password in a file. For example, a quotation mark followed by two colons ("::) always comes after a user name and password in an access control string. Someone attempting to break into the system could obtain your password by searching inadequately protected files for this string. Another way in which you might reveal your password is by using the word "password" in a text file, for example:My password is GOBBLEDYGOOK.
Do not use the same password for accounts on different systems.
An unauthorized user can try one password on every system where you have an account. The account that first reveals the password might hold little information of interest, but another account might yield more information or more privileges, ultimately leading to a far greater security breach.
Before you log in to a terminal that is already on, invoke the secure terminal server feature (if enabled) by pressing the Break key. This is particularly relevant when you are working in a public terminal room.
Change your password every 3 to 6 months. VSI warns against sharing passwords. If you do share your password, change it every month.
Change your password immediately if you have any reason to suspect it might have been discovered. Report such incidents to your security administrator.
Log off a terminal you expect to leave unattended.
Unauthorized users could use the terminal for malicious purposes, such as loading a password-stealing program.
Check your last login messages routinely. Be alert for login failure counts seem unusual. If you observe any unusual failure during a login, change your password immediately and notify your security administrator.
1.10. Recognizing System Responses
By executing the command. Generally, you know your command has executed successfully when the system prompt Enters (by default, the dollar sign).
By executing the command and informing you in a message what it has done.
By informing you of errors, if execution of a command is unsuccessful.
By supplying values (defaults) you have not supplied.
1.10.1. Default Actions
A default is the value supplied by the operating system when you do not specify one yourself. For example, if you do not specify the number of copies as a qualifier for the PRINT command, the system uses the default value 1. The operating system supplies default values in several areas, including command qualifiers and parameters. The defaults that the operating system uses with specific commands are described in each command's entry in the VSI OpenVMS DCL Dictionary.
1.10.2. Informational System Messages
$ PRINT MYFILE.LIS
     Job MYFILE (queue SCALE_PRINT, entry 210) started on SYS$PRINT
Not all commands display informational messages. Successful completion of a command is usually indicated when the DCL prompt Enters. Unsuccessful completion is always indicated by one or more error messages.
1.10.3. System Error Messages
$ CAPY )
%DCL-W-IVVERB, unrecognized command verb - check validity and spelling
 \CAPY\
$
DCL-W-IVVERB
|
DCL |
The OpenVMS facility or component name that Entered the error. In this example, the message is from DCL, the default command interpreter. |
|
W |
A severity level that indicates a warning. Other severity levels include S (success), I (information), E (error), and F (fatal or severe error). |
|
IVVERB |
The type of message. The message can be identified by the mnemonic IVVERB in the OpenVMS system messages documentation or by using the Help Message utility (MSGHLP) described in Section 1.11.3, ''Getting Help on System Messages''. |
$ PRINT NOFILE.DAT
%PRINT-E-OPENIN, error opening CLASS1:[MAYMON]NOFILE.DAT; as input
-RMS-E-FNF, file not found
$
The first message is from the PRINT command. It tells you it cannot open the specified file. The second message indicates the reason for the first; that is, the file cannot be found. RMS refers to the OpenVMS file-handling software, Record Management Services; error messages related to file handling are generally OpenVMS RMS messages.
1.10.4. Checking Your Current Process
If you suspect that your process is not doing what you think it should be doing, press Ctrl/T. Ctrl/T displays a single line of statistical information about the current process. The statistical information includes node and user name, current time, current process, central processing unit (CPU) usage, number of page faults, level of I/O activity, and memory usage, which is listed in number of CPU-specific pages.
GREEN::MCCARTHY 13:45:02 EVE CPU=00:00:03.33 PF=778 IO=295 MEM=315
To refresh the screen, press Ctrl/W.
Ctrl/T is disabled by default. If you know your system is running and Ctrl/T does not display statistical information, you can enable Ctrl/T with the DCL command SET CONTROL=T. Enter the command at DCL level (at the dollar sign ($) prompt), then press Ctrl/T again. Ctrl/T will remain in effect for the duration of your process, unless it is disabled from a program or command such as SET NOCONTROL=T. Note that your terminal must be set to BROADCAST mode for Ctrl/T to display on your screen. BROADCAST mode controls whether reception of broadcast messages (such as those issued by MAIL and REPLY) is enabled. To set your terminal to BROADCAST mode, enter the DCL command SET TERMINAL/BROADCAST at the DCL prompt.
1.11. Getting Help About the System
When you are logged in to the operating system, you can obtain information about using the system and available commands by using the HELP command. You can also get help on system messages by entering the HELP/MESSAGE command as shown in Section 1.11.3, ''Getting Help on System Messages''.
1.11.1. Using Online Help
| Step |
Task |
|---|---|
| 1 |
Enter HELP at the DCL prompt and press Enter. HELP displays a list of topics and the Topic? prompt. |
| 2 |
To see information about one of the topics, type the topic name after the prompt and press Enter. |
| 3 |
If you want information on one of the subtopics, type the name after the prompt and press Enter. HELP displays information about that subtopic. |
| 4 |
To redisplay the SHOW USERS topic and the list of subtopics, enter a question mark (?) at the Subtopic? prompt. If you want to read all of the listed subtopics, enter an asterisk (*). |
| 5 |
If you want information on another topic, press Enter. Help displays the Topic? prompt. |
| 6 |
To exit Help, press Enter until you Enter to the DCL prompt. |
$ HELP

HELP
.
. (HELP message text and subtopics)
.

Topic? SHOW USERS

SHOW

  USERS

     Displays the user name and node name (in a VAXcluster environment)
     of interactive, subprocess, and batch users on the system.

     Format

       SHOW USERS  [username]


    Additional information available:

    PARAMETER  QUALIFIER
    /BATCH     /CLUSTER   /FULL      /INTERACTIVE     /NETWORK   /NODE
    /OUTPUT    /SUBPROCESS
    Examples

SHOW USERS Subtopic? EXAMPLES

SHOW

  USERS

    Examples
.
. (SHOW USERS Examples message text and subtopics, if any)
.
SHOW USERS Subtopic?
SHOW Subtopic?
Topic?
$
1.11.2. Getting Help on Specific Commands
$ HELP SHOW USERS
If you need help but do not know what command or system topic to specify, enter the command HELP with the word HINTS as a parameter. Each task name listed in the HINTS text is associated with a list of related command names and system information topics.
The VSI OpenVMS DCL Dictionary contains more information about the HELP command.
1.11.3. Getting Help on System Messages
$ HELP/MESSAGE
$ HELP/MESSAGE BADACP
$ HELP/MESSAGE/STATUS=%X00038090
$ SHOW SYMBOL $STATUS
  $STATUS == "%X00038090"
The Help Message utility allows you to update the messages database with your own messages or to add comments to existing message descriptions. You can also extract a subset of messages from the messages database to create and print your own customized messages documentation. For details on how to use the Help Message utility, see OpenVMS System Messages: Companion Guide for Help Message Users.
1.12. Logging Out of the System
When you finish using the system, always log out. This prevents unauthorized users from accessing your account and the system. It is also a wise use of system resources; the resources you no longer need are available for other users.
$ LOGOUT
$ LOGOUT
HARRIS logged out at 11-DEC-2002  12:42:48.12
You can log out of the system only when you are at the DCL prompt ($). You cannot enter the LOGOUT command while you are compiling or executing a program, using a text editor (such as EDT or EVE), or running a utility (such as Mail). First you must exit the program, editor, or utility. When the system displays the DCL prompt, you can log out.
1.12.1. Obtaining Accounting Information
$ LOGOUT/FULL
SIMPSON logged out at 11-DEC-2002  12:42:48.12

Accounting information:
 Buffered I/O count:      8005   Peak working set size:    212
 Direct I/O count:         504   Peak virtual size:        770
 Page faults:             1476   Mounted volumes:            0
 Charged CPU time:0 00:00:50.01  Elapsed time:0 02:27:43.06
1.12.2. Ending a Remote Session
Use the remote system's logout procedure (for example, on an OpenVMS system, use the LOGOUT command).
Press Ctrl/Y twice to obtain the host system's prompt, which asks whether you want to abort the remote session. Answer YES (Y) if you want to abort the remote session. This method works regardless of the type of system running on the remote node.
When you end a remote session, the system displays the message "%REM-S-END, control Entered to node NODENAME::" and Enters you to the process on the system from which you made the remote node connection.
1.12.3. Lost Network Connections
If a TCP/IP network connection to a remote system is lost, TCP/IP uses the best-effort delivery protocol, which is a characteristic of network technologies that attempts to deliver data but does not try to recover if there is an error such as a line failure.
If a DECnet network connection to a remote system is lost, DECnet will retransmit your data in an attempt to reestablish communications. If DECnet is unable to reestablish communications within a predetermined timeout period, your connection to the remote system is terminated, and the system displays the message "Path lost to partner."
1.13. Logging Out Without Compromising System Security
Logging out of a session conserves system resources and protects your files. Leaving a terminal on line represents one of the greatest sources of inside break-ins. When you leave your terminal on line and your office open, you have effectively given away your password and your privileges and have left your files and those of the other members of your group unprotected. Any user can easily and quickly transfer all files accessible through your account. A malicious insider could rename and delete your files and any other files to which you have write access. If you have special privileges, especially privileges in the Files or All category, a malicious user can do major damage.
If you are working on a system that does not automatically lock after a determined time of inactivity, you should log out when you leave your office even for a brief period of time. If you have performed remote logins, you must log out of each node.
Prevents others from taking advantage of an open access line. To access the line, someone must know the access number and must personally redial.
Is especially important if the dialup line you use is in a public area or where someone might use the terminal after you.
Saves resources by reducing the required number of dialup lines.
1.14. Networks
When computer systems are linked together, they form a network. Operating systems in an OpenVMS network are able to communicate with each other and share information and resources. Each system in a network is called a network node or host and is identified by a unique name or address. Host and node are used interchangeably, and mean a system connected to a network.
With OpenVMS, you have a choice of networking protocols. You can use the VSI TCP/IP Services for OpenVMS product or VSI's DECnet products within a single network, or you can have an environment where both products exist. VSI's primary network strategy for OpenVMS is TCP/IP, the industry-standard network protocol suite.
1.14.1. Network Nodes
When you are logged in to a network node, you can communicate with other nodes in the network. The node at which you are logged in is called the local node; other nodes on the network are called remote nodes. If you have access to an account on a remote node, you can log in to that account from your local node and perform tasks on that node while remaining connected to your local node.
Section 1.5.2, ''Noninteractive Logins'' describes how to log in to a remote node. Additional tasks you can perform on remote nodes are described in the appropriate chapters of this manual.
1.14.2. Executing Programs over Networks
Because of support provided by TCP/IP and DECnet software, programs can execute across the network as if they were executing locally. Because the network software is integrated within the operating system, it is easy to write programs that access remote files. To access a remote file in an application program, you need only include the name of the remote node and any required access control information in the file specification.
Note
In the examples of remote operations in this manual, proxy accounts enable users to perform operations on remote systems. Proxy accounts are one way users can access remote systems. For additional ways to access remote systems, see the VSI OpenVMS System Manager's Manual.
Chapter 2. Using DCL to Interact with the System
Get information about the system
Work with files
Work with disks, magnetic tapes, and other devices
Modify your work environment
Develop and execute programs
Provide security and ensure that resources are used efficiently
|
Command |
Task |
|---|---|
|
COPY |
Makes a copy of a specified file |
|
COPY/FTP |
Transfers files between hosts over a TCP/IP network |
|
CREATE |
Creates files or directories |
|
DELETE |
Erases a specified file and removes it from a directory |
|
DIRECTORY |
Displays the contents of a directory (list of files) |
|
EDIT |
Invokes the EVE text editor, allowing for viewing or modifying the contents of a text file |
|
LOGOUT |
Ends your terminal session |
|
|
Sends a specified file to a printer for printing |
|
RENAME |
Changes the name or the location of a specified file |
|
SET |
Controls how you see the system on the screen |
|
SHOW |
Displays the status of the system |
|
TYPE |
Displays the contents of a specified file on the screen |
Entering DCL commands
The DCL command line
Rules for entering DCL commands
Entering parameters
Entering qualifiers
Entering dates and times as values
Recalling commands
Editing the DCL command line
Defining terminal keys
Key sequences
Differences in Your Local Environment
Use a different command language interpreter
Change the default action of some standard DCL commands
Disable some DCL commands
Alter some system defaults, such as the DCL prompt
Configure an environment with extended file specifications
For additional information on the commands, qualifiers, and parameters discussed in this chapter, refer to the VSI OpenVMS DCL Dictionary and online help.
2.1. Entering Commands
To enter a DCL command, type the command at the DCL prompt ($) and press Enter. DCL is not usually case sensitive; you can enter commands in either uppercase or lowercase letters.?
$ SHOW TIME
11-DEC-2002  15:41:43
$
2.1.1. Usage Modes
Interactive
In interactive mode, you enter commands from your terminal. One command has to finish executing before you can enter another.
Batch
In batch mode, the system creates another process to execute commands on your behalf. A batch job is a command procedure or program that is submitted to the operating system for execution as a separate user process. After you submit the command procedure for batch execution, you can continue to use your terminal interactively.
Batch jobs and network processes use DCL in batch mode. See Chapter 16, "Understanding Processes and Batch Jobs" for more information about processes.
2.1.2. Types of DCL Commands
Built-in commands
These commands are built into the DCL interpreter and are executed internally.
Commands that invoke programs
DCL calls another program to execute the command rather than executing it internally. The program invoked to execute a command is referred to as a command image. This command image can be either an interactive program, a utility (such as Mail), or a noninteractive program (such as COPY).
Foreign commands
A symbol that executes an image is referred to as a foreign command. A foreign command executes an image whose name is not recognized by the command interpreter as a DCL command. Refer to Chapter 12, "Defining Symbols, Commands, and Expressions" for complete information on symbols.
2.2. The DCL Command Line
DCL, like any language, has its own vocabulary and usage rules. DCL is made up of words (vocabulary) and word order (syntax or format). The following sections describe these two elements and explain how to construct a valid DCL command.
$ PRINT/COPIES = 5 GROCERY.LIS Enter
| DCL prompt The dollar sign ($) is the default DCL prompt. When you work interactively with DCL, DCL displays the prompt when it is ready to accept a command. |
| DCL command A DCL command specifies the name of the command. The command can be a built-in command, a command that invokes a program, or a foreign command. In this example, the DCL command is PRINT. |
| Qualifier A qualifier modifies the action taken by the command. Some qualifiers modify the entire command, while others can modify specific command parameters. Some qualifiers can accept values. Qualifiers are always preceded by a slash (/). In this example, the qualifier is /COPIES. |
| Value A value modifies a qualifier and is often preceded by an equal sign (=). A value can be a file specification, a character string, a number, or a DCL keyword. A keyword is a word reserved for use in certain specified formats. In this example, the value is 5 (for 5 copies). |
| Parameter A parameter specifies what the command acts upon. You must position parameters in a specified order within the command. Examples of parameter values include file specifications, queue names, and logical names. |
| Enter key The Enter key ends the DCL command line and signals to the system that the command is ready for processing. |
Labels
Labels identify lines in command procedures. Use labels only within command procedures, which are described in Chapter 13, "Introduction to Command Procedures" and Chapter 14, "Advanced Programming with DCL".
Keywords
Keywords are words that are defined for use in certain specified formats. You must use keywords exactly as listed in the description of the particular DCL command you want to specify. For example, system, owner, group, and world are DCL keywords for the /PROTECTION qualifier of the SET SECURITY command. A DCL keyword can also have a value assigned to, or associated with, it.
Wildcard characters
Wildcard characters are the asterisk (*), percent sign (%), ellipsis (...), and hyphen (-).
The asterisk (*) is a multi-character wildcard and the percent sign (%) is a single-character wildcard. These wildcard characters can be used within or in place of a file name, file type, or a directory name. The asterisk can also be used in place of the file version number. The ellipsis (...) can be used in the directory name to represent all subdirectories of the current or listed directory. The hyphen (-) can be used in the directory name to represent the level above the current directory.
For information about using wildcard characters with files and directories, see Section 3.2, ''Using Wildcards with File Names'', Section 4.5, ''Using Wildcards to Search the Directory Structure'', and VSI OpenVMS Guide to Extended File Specifications.
2.2.1. Syntax
Just as a spoken language depends on the order of words to create meaning, DCL requires that you put the correct elements of the command line in a specific word order or format.
command/qualifier=value=keyword
command parameter/qualifier
When you enter a DCL command, some parameters are required; they must be entered on the command line. If you do not enter them, the system prompts you to supply the missing information. A line beginning with an underscore (_) means that the system is waiting for your response.
When you are prompted for an optional parameter, press Enter to omit it. At any prompt, after you enter the required parameter, you can enter one or more of the remaining parameters and any additional qualifiers.
Note that you must enclose in quotation marks ("") any parameter containing a slash (/) or at sign (@).
$ TYPE
_File:   WATER.TXT
2.2.2. Canceling Commands
If you press Ctrl/Z after a command prompt, DCL ignores the command and redisplays the DCL prompt.
2.2.3. Using Defaults
Some items, called defaults, need not be specified on the command line. When DCL performs an operation by default, it assigns a command certain values or performs certain functions associated with that command even though you may not have explicitly specified those values or functions when you entered the command. In general, the values and functions are those considered typical or expected by users.
DCL supplies default values in several areas, including command parameters and qualifiers. For parameter defaults, see the sections in this manual that describe the specific DCL command. Qualifier defaults are described in Section 2.5, ''Entering Qualifiers''.
$ PRINT/COPIES=4 MYFILE.TXT
2.2.4. Entering Multiple Line Commands
|
Step |
Task |
|---|---|
|
1 |
End the command line with a hyphen (-) and press Enter. The system displays an underscore (_) followed by the DCL prompt ($). |
|
2 |
Enter the rest of the command line after this prompt. A line beginning with an underscore means that the system is waiting for your response. |
You must include the appropriate spaces between command names, parameters, and so on.
Pressing Enter after the hyphen does not add a space.
There is no restriction to the number of continued lines you can use to enter a command, as long as you do not exceed the 1024-character limit.
You can also enter a long command line without specifying a hyphen; the system automatically wraps text to the next line. However, separating portions of the command lines with hyphens makes the command line easier to read.
$ COPY/LOG FORMAT.TXT,FIGURE.TXT,ARTWORK.TXT -
_$ SAVE.TXT
Pipelining (a sequence of commands)
Input/output redirection
Multiple and conditional command execution
Background processing
For more detailed information, see Section 14.20, ''Using the PIPE Command'' and the description of the PIPE command in the VSI OpenVMS DCL Dictionary: N–Z.
2.3. Rules for Entering DCL Commands
Use any combination of uppercase and lowercase letters. The DCL interpreter translates lowercase letters to uppercase. Uppercase and lowercase characters in parameter and qualifier values are equivalent unless enclosed in quotation marks (" ").
Separate the command name from the first parameter with at least one blank space or a tab.
Separate each additional parameter from the previous parameter or qualifier with at least one blank space or a tab.
Begin each qualifier with a slash (/). The slash serves as a separator and need not be preceded by blank spaces or tabs.
If a parameter or qualifier value includes a blank space or a tab, enclose the parameter or qualifier value in quotation marks.
You cannot specify null characters (<NUL>) on a DCL command line, even if you enclose the null character in quotation marks.
Include no more than 127 elements (parameters, qualifiers, and qualifier values) in each command line.
Each element in a command must not exceed 255 characters. The entire command must not exceed 1024 characters after all symbols and lexical functions are converted to their values.
You can abbreviate a command as long as the abbreviated name remains unique among the defined commands on a system. DCL looks only at the first four characters for uniqueness.
The following commands are equal:$ PRIN/COPI=2 FORMAL_ART.TXT $ PRINT/COPIES=2 FORMAL_ART.TXT
For greater clarity and to ensure that your command procedures are upwardly compatible, do not abbreviate commands in command procedures. See Chapter 13, "Introduction to Command Procedures" and Chapter 14, "Advanced Programming with DCL" for more information about using commands in command procedures.
2.4. Entering Parameters
File specifications are the most common type of parameter. DCL commands can accept input file specifications (files that are acted upon by a command) and output file specifications (files that are created by a command).
- Square brackets ([]) in command descriptions indicate optional items. For example, you do not have to enter a file specification in the following command:
DIRECTORY [file-spec]
- In a command description, anything not enclosed in square brackets is required. For example, you must enter a device name in the following command:
SHOW PRINTER device-name
In general, precede an output file parameter with an input file parameter.
A parameter can be one item or a series of items. If you enter a series of items, separate the items with commas (,) or plus signs (+). Any number of spaces or tab characters can precede or follow a comma or a plus sign. Note that some commands regard the plus sign as a concatenator, not as a separator.
Examples
$ COPY LISTS.TXT FORMAT.TXT
DELETE file-spec[,...]
$ COPY PLUTO.TXT,SATURN.TXT,EARTH.TXT PLANETS.TXT
2.5. Entering Qualifiers
Command
Positional
Parameter
You can abbreviate any qualifier name as long as the abbreviated name remains unique among all qualifier names for the same command. However, to ensure that your command procedures are upwardly compatible, do not abbreviate commands and qualifiers in command procedures.
Commands have default qualifiers; you do not have to specify a qualifier unless it is different from the command default. The following sections describe types of qualifiers and qualifier defaults. The VSI OpenVMS DCL Dictionary contains default information for specific commands.
2.5.1. Command Qualifiers
A command qualifier modifies a command and can appear anywhere in the command line. However, it is a good practice to place the qualifier after the command name. If you are specifying multiple qualifiers, you should place a command qualifier with other command qualifiers that follow the command name.
$ PRINT/QUEUE=LN03_PRINT SATURN.TXT,EARTH.TXT
2.5.2. Positional Qualifiers
A positional qualifier can modify commands or parameters and has different meanings depending on where you place it in the command string. If you place a positional qualifier after the command but before the first parameter, it affects the entire command string. If you place a positional qualifier after a parameter, it affects only that parameter.
$ PRINT/COPIES=2 SPRING.SUM,FALL.SUM
$ PRINT SPRING.SUM/COPIES=2,FALL.SUM
2.5.3. Parameter Qualifiers
A parameter qualifier can be used only with certain types of parameters, such as input files and output files. For example, the BACKUP command accepts several parameter qualifiers that apply only to input and output file specifications.
$ BACKUP *.TXT/CREATED/BEFORE=11-DEC-2002 NEWFILE.TXT
2.5.4. Conflicting Qualifiers
If you use two or more contradictory qualifiers on a command line, the right-most qualifier overrides the others.
Some commands contain conflicting qualifiers that cannot be specified in the same command line. If you use incompatible qualifiers, the command interpreter displays an error message.
$ PRINT MYFILE/COPIES=3/BURST/COPIES=2/NOBURST EARTH.TXT
2.5.5. Values Accepted by Qualifiers
Qualifiers can accept keywords, file specifications, character strings, and numeric values. When you enter a value for a qualifier, separate the qualifier and the value with either an equal sign (=) or a colon (:).
Some qualifier keywords require additional information. In these cases, separate the keyword from its value with a colon or an equal sign.
To specify multiple keywords that require values, enclose the list in parentheses and separate the keyword and value with either an equal sign (=) or a colon (:).
Examples
$ PRINT/COPIES=3 MYFILE.DAT
$ PRINT/COPIES:3 MYFILE.DAT
$ SET SECURITY/PROTECTION:GROUP:RW MYFILE.DAT
$ SET SECURITY/PROTECTION=GROUP=RW MYFILE.DAT
$ SET SECURITY/PROTECTION=(OWNER=RWD,GROUP=RW) myfile.dat
$ SET SECURITY/PROTECTION=(OWNER:RWD,GROUP:RW) myfile.dat
2.6. Entering Dates and Times as Values
Absolute time
Delta time
Combination time (combines absolute and delta time formats)
2.6.1. Absolute Time Format
[dd-mmm-yyyy][:hh:mm:ss.cc]
|
dd |
Day of the month: an integer in the range 1 to 31 |
|
mmm |
Month: JAN, FEB, MAR, APR, MAY, JUN, JUL, AUG, SEP, OCT, NOV, or DEC |
|
yyyy |
Year: an integer |
|
hh |
Hour: an integer in the range 0 to 23 |
|
mm |
Minute: an integer in the range 0 to 59 |
|
ss |
Second: an integer in the range 0 to 59 |
|
cc |
Hundredths of a second: an integer in the range 0 to 99 |
You can truncate the date or the time on the right.
If you specify both a date and a time, include a colon between them.
The date must contain at least one hyphen.
You can omit any of the fields within the date and time as long as you include the punctuation marks that separate the fields.
A truncated or omitted date field defaults to the corresponding fields for the current date.
A truncated or omitted time field defaults to zero.
If you specify a past time in a command that expects the current or a future time, the current time is used.
|
TODAY |
The current day, month, and year at 00:00:00.0 o'clock |
|
TOMORROW |
00:00:00.00 o'clock tomorrow |
|
YESTERDAY |
00:00:00.00 o'clock yesterday |
|
Time Specification |
Result |
|---|---|
|
11-DEC-2002:13 |
1 p.m. on December 11, 2002 |
|
11-DEC |
Midnight at the beginning of December 11 this year |
|
15:30 |
3:30 p.m. today |
|
19– |
Midnight on the 19th day of the current year and month |
|
19–:30 |
12:30 a.m. on the 19th of this month |
2.6.2. Delta Time Format
"+[dddd-][hh:mm:ss.cc]"
|
dddd |
Number of days; an integer in the range 0 to 9999 |
|
hh |
Number of hours; an integer in the range 0 to 23 |
|
mm |
Number of minutes; an integer in the range 0 to 59 |
|
ss |
Number of seconds; an integer in the range 0 to 59 |
|
cc |
Number of hundredths of seconds; an integer in the range 0 to 99 |
If a qualifier is described as a value that can be expressed as an absolute time, a delta time, or a combination of the two, you must specify a delta time as if it were part of a combination time. For example, to specify a delta time value of five minutes from the current time, use "+:5" (not "0-0:5").
You can truncate a delta time on the right.
If you specify the number of days, include a hyphen.
You can omit fields within the time as long as you include the punctuation that separates the fields.
If you omit the time field, the default is zero.
|
Time Specification |
Result |
|---|---|
|
"+3-" |
3 days from now (72 hours) |
|
"+3" |
3 hours from now |
|
"+:30" |
30 minutes from now |
|
"+3-:30" |
3 days and 30 minutes from now |
|
"+15:30" |
15 hours and 30 minutes from now |
2.6.3. Combination Time Format
    "[absolute time][+delta time]"

     [absolute time][-delta time]
The variable fields and default fields for absolute and delta time values are the same as those described in the preceding sections.
Precede the delta time value by a plus or minus sign. Note that the minus sign is the same keyboard key as the hyphen.
Enclose the entire time specification in quotation marks if a plus or minus sign precedes the delta time value.
Omit the absolute time value if you want to offset the delta time from the current date and time.
Specify date and time information as completely as possible.
|
Time Specification |
Result |
|---|---|
|
"+5" |
5 hours from now. |
|
"-1" |
Current time minus 1 hour. The minus sign (-) indicates a negative offset. The 1 is interpreted as an hour, not a day, because it is not followed by a hyphen. |
|
"+:5" |
5 minutes from now. |
|
"-:5" |
Current time minus 5 minutes. |
|
"-1-00" |
Current time minus 1 day. The minus sign (-) indicates a negative offset. The hyphen (-) separates the day from the time field. |
|
"31-DEC:+:5" |
12:05 a.m. on December 31 of the current year. The absolute time specification (before the colon) defaults to midnight on December 31 of the current year. The plus sign (+) indicates a positive offset. |
|
31-DEC:-00:10 |
11:50 p.m. on December 30 of the current year. The absolute time specification (before the colon) defaults to midnight on December 31 of the current year. The minus sign (-) after DEC: indicates a negative offset. |
2.7. Recalling Commands
At the DCL prompt, you can recall previously typed command lines to avoid retyping long command lines. Once a command is displayed, you can reexecute or edit it.
On OpenVMS VAX systems, the recall buffer holds up to 20 previously entered commands.
On OpenVMS Alpha systems, the recall buffer holds up to 254 previously entered commands.
Pressing Ctrl/B
Using up arrow and down arrow keys
Using the RECALL command
2.7.1. Pressing Ctrl/B
Pressing Ctrl/B once recalls the previous command line. Pressing Ctrl/B again recalls the line before the previous line and so on to the last saved command line.
2.7.2. Using Arrow Keys
Using the up arrow and down arrow keys recalls the previous and successive command, respectively. Press the arrow keys repeatedly to move through the commands.
2.7.3. Using the RECALL Command
To examine previously typed command lines, type RECALL/ALL. After reviewing the available commands, you can recall a particular command line by typing RECALL and the number of the desired command.
You can also follow RECALL with the first characters of the command line you want to display. RECALL scans the previous command lines (beginning with the most recent one) and Enters the first command line that begins with the characters you typed.
Examples
$ RECALL/ALL
 1 SET DEFAULT DISK2:[MARSHALL]
 2 EDIT ACCOUNTS.COM
 3 PURGE ACCOUNTS.COM
 4 DIRECTORY/FULL ACCOUNTS.COM
 5 COPY ACCOUNTS.COM [.ACCOUNTS]*
 6 SET DEFAULT [.ACCOUNTS]
$ RECALL 4
After you press Enter, the system displays the fourth command in the list at the DCL prompt. The RECALL command itself is not placed in the buffer.
$ RECALL E
$ EDIT ACCOUNTS.COM
Note
If you are running a utility or an application program that uses OpenVMS screen management software, you can use Ctrl/B and the up arrow and down arrow keys to perform command recall; however, line editing must be enabled. Some utilities that have this feature are Mail, OpenVMS Debugger, Show Cluster, the System Dump Analyzer (SDA), and the EVE editor.
$ RECALL/ERASE
For security reasons, it is good practice to erase the contents of the recall buffer after you have entered commands that include passwords.
2.8. Editing the DCL Command Line
At the DCL command level, you can use many individual keys and key sequences to change what you type. Although different types of terminals have different operating characteristics, most have standard function keys and keys that can be used with line editors.
To see whether line editing is enabled, enter the SHOW TERMINAL command.
$ SHOW TERMINAL

Terminal: _VTA2138:   Device_Type: VT200_Series  Owner: ROHBA
Physical terminal: _TNA2114:
Remote Port Info: Host: 16.32.216.68 Port: 1409

   Input:    9600     LFfill:  0      Width:  80      Parity: None
   Output:   9600     CRfill:  0      Page:   24

Terminal Characteristics:
   Interactive        Echo               Type_ahead         No Escape
   Hostsync           TTsync             Lowercase          Tab
   Wrap               Scope              No Remote          Eightbit
   Broadcast          No Readsync        No Form            Fulldup
   No Modem           No Local_echo      No Autobaud        Hangup
   No Brdcstmbx       No DMA             No Altypeahd       Set_speed
   No Commsync        Line Editing       Overstrike editing No Fallback
   No Dialup          No Secure server   Disconnect         No Pasthru
   No Syspassword     No SIXEL Graphics  No Soft Characters Printer port
   Numeric Keypad     ANSI_CRT           No Regis           No Block_mode
   Advanced_video     Edit_mode          DEC_CRT            DEC_CRT2
   No DEC_CRT3        No DEC_CRT4        No DEC_CRT5        No Ansi_Color
   VMS Style Input
2.8.1. SET TERMINAL Command
You can use the SET TERMINAL command to alter the way in which your terminal edits a DCL command line. By default, changes made with the SET TERMINAL command apply only to the current session. To set the terminal each time you log in, you can include SET TERMINAL commands in your LOGIN.COM file.
$ SET TERMINAL/LINE_EDIT
Insert and Overstrike Modes
You can edit a command line in either insert or overstrike mode. In insert mode, the character you type is inserted to the left of the cursor. In overstrike mode, the character you type overwrites the character indicated by the cursor.
To change editing modes for a single command line, press Ctrl/A (Ctrl/A acts as a toggle). To change edit modes for your session, enter either the SET TERMINAL/INSERT or SET TERMINAL/OVERSTRIKE command.
Text Wrapping
If you use the SET TERMINAL/WRAP command, when you enter more characters than will fit on one line of the screen, the text wraps to the next line. If you use the SET TERMINAL/NOWRAP command, when you enter more characters than will fit on one line of the terminal screen, the last character on the line is typed over.
You can edit only the line where your cursor appears. When text wraps, you cannot use the up arrow key to move the cursor up to edit the previous line. To move the cursor up to the previous line, use the Delete key and delete all the characters in the current line.
2.8.2. Deleting Parts of the Command Line
Pressing the Backspace key moves the cursor backwards and erases the character in that space. If line editing is enabled, you can use Ctrl/U to delete characters from the beginning of the line to the current cursor position. If line editing is not enabled, you can use Ctrl/U to cancel an entire line. The system ignores the line and redisplays the DCL prompt.
2.9. Defining Terminal Keys
A key definition is a string of characters that you assign to a particular terminal key. Use the DEFINE/KEY command. When a key is defined, you can press it instead of typing the string of characters. A key definition usually contains all or part of a command line. Using key definitions, you can customize your keyboard so that you can enter DCL commands with fewer keystrokes. When you press a defined key, the system either displays the command on your terminal or executes the command, depending on whether the command was defined using the /TERMINATE qualifier.
By default, the terminal is set to numeric keypad mode. Use the SET TERMINAL command to redefine the keys on the numeric keypad. For more information, see the descriptions of the SET TERMINAL/APPLICATION_KEYPAD, SET TERMINAL/NONUMERIC, and DEFINE/KEY commands in the VSI OpenVMS DCL Dictionary.
2.10. Key Sequences
In addition to entering DCL commands, you can perform tasks by using specific key sequences. A key sequence is a shortcut or a way to get the system's attention while it is processing another command.
|
Key Sequence |
Function |
|---|---|
|
Ctrl/Z or F10 |
Signals the end of the file for data entered from the terminal. |
|
Enter |
Sends the current line to the system for processing. If you are not already logged in, Enter initiates a login sequence. |
|
Key Sequence |
Function |
|---|---|
|
Ctrl/T |
Momentarily interrupts terminal output to display a line of statistical information about the current process. This display includes your node and user name, the time, the name of the image you are running, and information about system resources used during your current terminal session. You can also use Ctrl/T to determine whether the system is operating. Ctrl/T does not enter information if the system is temporarily unresponsive or if your terminal is set to NOBROADCAST. To use Ctrl/T, you must first enter the SET CONTROL=T command (in the system login command procedure, in your personal login command procedure, or interactively). |
|
Ctrl/Y, Ctrl/C and F6 |
Interrupts command processing. You can disable Ctrl/Y with the command SET NOCONTROL=Y. Under most conditions, Ctrl/Y returns you to the DCL prompt. The program running is still active. You can enter any built-in command then continue the program with the CONTINUE command. Press Ctrl/W to refresh the screen after you enter the CONTINUE command. |
|
Key Sequence |
Function |
|---|---|
|
Ctrl/B or up arrow |
Recalls up to 20 (VAX) or 254 (Alpha) previously entered commands. |
|
Down arrow |
Displays the next line in the recall buffer. |
|
Key Sequence |
Function |
|---|---|
|
Backspace |
Deletes the last character entered. |
|
Ctrl/A and F14 |
Switches between overstrike and insert mode. The default mode (as set with the SET TERMINAL/LINE_EDITING command) is reset at the beginning of each line. |
|
Ctrl/D and left arrow |
Moves the cursor one character to the left. |
|
Ctrl/E |
Moves the cursor to the end of the line. |
|
Ctrl/F or right arrow |
Moves the cursor one character to the right. |
|
Ctrl/H or F12 |
Moves the cursor to the beginning of the line. |
|
Ctrl/I or Tab |
Moves the cursor to the next tab stop on the terminal. The system provides tab stops at every eighth character position on a line. Tab settings are hardware terminal characteristics that, in general, you can modify. The Tab key also works when line editing is disabled. |
|
Ctrl/J |
Deletes the word to the left of the cursor. |
|
Ctrl/K |
Advances the current line to the next vertical tab stop. |
|
Ctrl/L |
Moves the cursor to the beginning of the next page. This use of Ctrl/L is ignored when line editing is enabled. |
|
Ctrl/R |
Repeats the current command line and leaves the cursor positioned where it was when you pressed Ctrl/R. |
|
Ctrl/U |
Deletes all text in the current input line that is to the left of the cursor. |
|
Ctrl/V |
Turns off some of the line editing function keys. For example, if you press Ctrl/V followed by Ctrl/D, a Ctrl/D is generated instead of the cursor moving left one character. Ctrl/D is a line terminator at DCL level. When combined with Ctrl/V, characters that are not line terminators have no effect. Examples are Ctrl/H and Ctrl/J. However, certain control keys, such as Ctrl/U, retain their line editing functions. |
|
Ctrl/X |
Cancels the current line and deletes data in the type-ahead buffer. |
|
F7, F8, F9, F11 |
Reserved by VSI. |
|
Key Sequence |
Function |
|---|---|
|
Ctrl/O |
Alternately suspends and continues display of output to the terminal. Ctrl/O displays as Output off and Output on. |
|
Ctrl/S |
Suspends terminal output until Ctrl/Q is pressed. |
|
Ctrl/Q |
Resumes terminal output suspended by Ctrl/S. |
|
Ctrl/W |
Refreshes the screen display. |
Chapter 3. Storing Information with Files
A file is a system object that contains information. This information can be machine-readable data that the computer understands. It can also be text that you enter and manipulate. The contents of a file might be the text of a document, a program, or a list of addresses. You can examine the contents of a text file by displaying it online or by printing it.
A program, also called an image or an executable image, is a file that contains instructions and data in machine-readable format. Some programs are associated with a DCL command. For example, when you type the DCL command COPY, the system runs the program SYS$SYSTEM:COPY.EXE. Some programs are started by entering the DCL command RUN followed by the program name.
Image files can be supplied by the operating system or by you and usually have the file type .EXE. You cannot examine an image file with the DCL commands TYPE, PRINT, or EDIT because image files do not consist of ASCII characters. Text files contain ASCII characters, which are a standard method of representing the alphabet, punctuation marks, numerals, and other special symbols.
Understanding file names and file specifications
Using wildcards with file names
Other file names
Creating and modifying files
Displaying the contents of files
Deleting files
Protecting files from other users
Printing files
Chapter 5, "Extended File Specifications", for information about file names in an environment using extended file specifications
The VSI OpenVMS DCL Dictionary and online help, for commands discussed in this chapter
The VSI OpenVMS System Manager's Manual, for information about accessing remote nodes
The VSI TCP/IP Services for OpenVMS User's Guide, for information about using TCP/IP user utilities and commands
The VSI OpenVMS DECnet Networking Manual, for information about DECnet networks
The VSI DECnet-Plus for OpenVMS Introduction and User's Guide, for information about DECnet Phase V networks
3.1. Understanding File Names and File Specifications
A file is a unit that the OpenVMS operating system uses to store human-readable and machine-readable data. When you create or name a file, you provide information the system can use to locate and identify the file.
A filename consists of a file name and a file type. The name and type are separated by a period (.). A file also has a version number. You can have several versions of a file. Unless you specify a version number, the system uses the highest existing version number of a file. When you edit a file, the system does not modify the original version, but creates a new output file. By default, the output file has the same name and file type as the original, but has a version number that is one higher than the existing file(s) of the same name.
The file name, file type, and version number form a file specification.
3.1.1. Providing a Complete File Specification
Precisely describes the access path the system uses to locate and identify a file
Can include the directory in which the file is located and the network node on which the file resides
Is also known as a network file specification
You do not have to include all the elements of a complete file specification. However, you must specify enough of the file specification so that, when combined with default components, the system can locate and identify the correct file?.
node::device:[root.][directory]file-name.file-type;version
|
Node |
A network node or host name; applicable only to systems that support TCP/IP or DECnet. Does not apply to files stored on magnetic tape. Should not be used to specify a file on the same system that you are logged in to. |
|
Device |
The term used to refer to a disk or tape drive or other peripheral connected to a computer running the OpenVMS operating system. Each device has a unique name that indicates its type and location. Disks can be formatted as ODS-2 (the default) or ODS-5 (OpenVMS Alpha only). |
|
Directory |
The name of the directory in which a file is stored. Square brackets ([]) or angle brackets (<>) are used to delimit directories. Directories do not apply to files stored on magnetic tape. |
|
File name |
The name of the file. |
|
File type |
Identifies the structure or the type of the file. |
|
Version |
The version number of the file. Versions are identified by a decimal integer number, which is incremented by 1 each time a new version of the file is created. The system automatically assigns a version number unless you specify one. |
3.1.2. Rules for File Specifications
Give the file a name that is meaningful to you. On OpenVMS systems with ODS-2 disks, the file name can have up to 39 characters chosen from the letters A to Z (uppercase or lowercase), the numbers 0 to 9, underscores (_), hyphens (-), tildes (~), and dollar signs ($).
On OpenVMS systems with ODS-5 disks, the combined length of the file name and file extension, including the dot between them, can be up to 236 characters from the ISO Latin-1 character set (some may require the ^ escape character), except the asterisk (*) and the question mark (?). For more information, see the VSI OpenVMS Guide to Extended File Specifications.
Do not use a hyphen as the first character in the file name because some older versions of OpenVMS do not allow it in all forms of a file specification.
The file type begins with a period (.). On OpenVMS systems with ODS-2 disks, the file type can have up to 39 characters (including the period), chosen from the letters A through Z (which may be specified in uppercase or lowercase form), the numbers 0 through 9, underscores (_), hyphens (-), and dollar signs ($).
As stated here, on OpenVMS systems with ODS-5 disks, the length of the file name and file extension combined can be up to 236 characters from the ISO Latin-1 character set.
A version component begins with a semicolon (;) or a period (.). When the system displays file specifications, it displays a semicolon for the version component.
Do not use a directory field to refer to files on magnetic tape. Directories apply only to files on disks.
Include a node name only if your system is part of a network and if the file is on a node other than the one you are logged in to.
On OpenVMS systems with ODS-2 disks, a UFD (User File Directory) name or a subdirectory name can be 39 characters long and can contain characters chosen from the letters A through Z (which may be specified in uppercase or lowercase form), the numbers 0 through 9, underscores (_), hyphens (-), and dollar signs ($). A subdirectory name beginning with a hyphen is not allowed.
On OpenVMS system with ODS-5 disks, the directory name (which includes the four characters in the
.dirfile extension) can be up to 236 characters long and can contain characters chosen from the ISO Latin-1 character set, similar to the file name. See the VSI OpenVMS Guide to Extended File Specifications for more information.On OpenVMS Alpha Version 7.2 or later, the sum of the numbers of characters in all of the subdirectories of the directory and root components (not including brackets and separator periods) should not exceed 512. In addition, UFD and subdirectory names have the same constraints as those for the file name, type, and version components, taking into account the fact that directories are stored as files of the form <directory-name>.DIR;1.
In environments that consist of systems that support extended file specifications and systems that do not, remember that files and directories whose names are beyond the capabilities of the more limited systems will not be accessible from those systems.
Note
Environments with extended file specifications have more benefits than just longer file names and larger character sets. Refer to Chapter 5, "Extended File Specifications" for more specific information about extended file names.
3.1.3. Default File Types Used by DCL Commands
|
File Type |
Contents |
|---|---|
|
.CLD |
Command description file |
|
.COM |
Command procedure file |
|
.DAT |
Data file |
|
.DIF |
Output file created by the DIFFERENCES command |
|
.DIR |
Directory file |
|
.DIS |
Distribution list file for the Mail utility |
|
.EXE |
Executable program image file created by the linker |
|
.HLB |
Help text library file |
|
.HLP |
Input source file for help libraries |
|
.INI |
Initialization file |
|
.LIS |
Listing file created by a language compiler or assembler; default input file for the PRINT and TYPE commands |
|
.LOG |
Batch job output file |
|
.MAI |
Mail message file |
|
.PS |
PostScript format file |
|
.SYS |
System image file |
|
.TJL |
Journal file created by the DECTPU and ACL editors |
|
.TLB |
Text library file |
|
.TMP |
Temporary file |
|
.TPU |
Command file for the EVE editor |
|
.TPU$JOURNAL |
Journal file created by the EVE editor |
|
.TXT |
Input file for text libraries or Mail utility output files |
3.1.4. Default File Types for Language Source Programs
|
File Type |
Contents |
|---|---|
|
.ADA |
Input source file for the VSI Ada compiler |
|
.BAS |
Input source file for the BASIC compiler |
|
.B32 |
Input source file for the VAX BLISS-32 compiler |
|
.C |
Input source file for the VSI C compiler |
|
.COB |
Input source file for the VAX COBOL compiler |
|
.FOR |
Input source file for VSI Fortran compiler |
|
.M64 |
Input source file for the MACRO-64 assembler |
|
.MAP |
Memory allocation map created by the Linker utility |
|
.MAR |
Input source file for the VAX MACRO-32 assembler |
|
.MLB |
Macro library for the MACRO assembler |
|
.MSG |
Source file that specifies the text of messages |
|
.OBJ |
Object file created by a language compiler or assembler |
|
.OLB |
Object module library |
|
.OPT |
Options file for input to the LINK command |
|
.PAS |
Input source file for the Pascal compiler |
|
.PLI |
Input source file for the PL/I compiler |
|
.STB |
Symbol table file created by the Linker utility |
|
.UPD |
Update file of changes for a VAX MACRO source program; also input to the SUMSLP utility |
3.1.5. File Versions
In addition to a file name and file type, every file has a version number. Version numbers are decimal integer numbers from 1 to 32,767 that differentiate versions of a file. When you create a file, the system assigns it the version number 1.
You can have several versions of the same file. Unless you specify a version number, the system uses the highest existing version number of that file. If you specify the version number 0, the system uses the highest existing version. When you modify a file with a command, application, or text editor (such as EVE) that creates a new version of the file, the file name remains the same but the version number is incremented by one.
Precede version numbers with a semicolon or a period. When the system displays file specifications, it displays a semicolon in front of the file version number.
You can refer to versions of a file in a relative manner by specifying a zero or a negative version number. Specifying zero locates the latest (highest numbered) version of the file. Specifying −1 locates the next-most-recent version, −2 the version before that, and so on. To locate the earliest (lowest numbered) version of a file, specify −0 as the version number. Note that you cannot create files with a version number higher than 32767. If you attempt to create a new file with a version number higher than 32767, you will receive an error message.
The /VERSION_LIMIT[=n] qualifier for the CREATE/DIRECTORY, SET DIRECTORY, and SET FILE commands lets you set the maximum number of versions that a specified file or all files in a directory can have. When creating a file, if the total number of versions of that file name exceeds the specified version limit, then the file with the lowest version number is deleted from the directory without notification to the user. For example, if the version limit is 5 and you create the sixth version of a file (ACCOUNTS.DAT;6), the system deletes the first version of the file (ACCOUNTS.DAT;1). To view the version limit on a file, use the DIRECTORY/FULL command on a file name and look at the File Attributes field of the output or use the F$FILE_ATTRIBUTES(filename,"VERLIMIT") lexical function. For detailed information, refer to the VSI OpenVMS DCL Dictionary.
3.1.6. Network Node Names
An OpenVMS node is an individual machine (hardware or virtual) with the OpenVMS operating system installed on it. In a network, the node that you log in on is known as your local node; other nodes in the network are remote nodes. You have to use the node name when you want to specify a file on a remote node.
node["access-control-string"]::
- Node names can contain 1 to 6 alphanumeric characters and must contain at least one alphabetic character. For example:
- AFTP1
- F2OTR2
- MYNODE
A node name (with or without an access control string) must always be followed by a double colon (::).
When you specify a node name, you can include a 0- to 42-character access control string. An access control string contains login information to be sent to the remote node. For more information on access control strings, see Section 3.1.12, ''Access Control String Format''.
Note that the required double colon follows the access control string.
You can use a logical name in place of the node name. For information on logical node names, see Chapter 11, "Defining Logical Names for Devices and Files".
3.1.7. Specifying DECnet-Plus Node Full Names
On OpenVMS systems, you can specify node full names. However, you must have DECnet–Plus software installed for full node names to be recognized.
Spaces
Tabs
The characters: comma (,), quotation marks (" "), slash (/), exclamation point (!), equal sign (=), plus sign (+), at sign (@), apostrophe ('), parentheses (( )), and double colons (::)
A single colon (:) as the first or last character
If a full node name is enclosed in quotation marks (" "), it can contain any characters except unmatched quotation marks. Note that if there are quotation marks within the node name, the quotation marks must be doubled and the entire string, including the quotation marks, must also be enclosed in quotation marks.
Although the OpenVMS software enforces few rules on the syntax of node names, the actual set of valid node names is constrained by the DECnet software running on your system. For further information on full names, refer to the DECnet–Plus documentation. The syntax rules, including valid character codes, are described in detail in the VSI DECnet-Plus for OpenVMS DECdns Management Guide.
"MARY:.UNIVERSITY.""SCIENCE LAB"""
- MYNODE
- MASSACHUSETTS:.BUSINESS.YOURNODE
- A.B;C
3.1.8. Specifying TCP/IP Names and Addresses
With TCP/IP, unless otherwise stated, whenever you specify a host on a command line, you can use its host name, a fully qualified domain name, or its IP address. The relative name of a host is a simple name that does not include the fully qualified domain name; that is, it does not include one or more periods (.). Refer to the VSI TCP/IP Services for OpenVMS User's Guide for the TCP/IP syntax rules.
3.1.9. Accessing Files on Remote Nodes Using DECnet
If a proxy login account exists for you on the remote node, then the system logs you in using that account. A proxy login account allows selected users to log in to a node.
If a proxy login account does not exist, the system uses the default DECnet account for that node as specified by the local system manager.
If you include an access control string, the system uses it to log you in to the remote node. The remainder of the file specification is passed to the remote node and is interpreted there.
Note
Throughout the remainder of this chapter, examples that specify a node name do not always include an access control string. This is because proxy accounts enable users to perform operations on the remote systems in these examples.
3.1.10. Accessing Files on Remote Nodes Using TCP/IP
VSI TCP/IP Services for OpenVMS provides the File Transfer Protocol (FTP) to access and transfer files to and from another host over a network. To use FTP, you need a user account on the OpenVMS system with access to VSI TCP/IP Services for OpenVMS and a user account on the remote FTP host. In some instances, TCP/IP allows you to connect to a remote host without specifying an account and password. If that feature is not enabled, you must supply user authentication information for a remote host. For information on using FTP commands, refer to the VSI TCP/IP Services for OpenVMS User's Guide.
3.1.11. Using Network File Specifications
Conventional
Foreign
Task
In each format, the node specification can include an access control string. For more information, see the DECnet User's Manual for your product and the VSI TCP/IP Services for OpenVMS User's Guide.
3.1.11.1. Conventional File Specification
node::device:[directory]filename.type;version
3.1.11.2. Foreign File Specification
node::"foreign-file-spec-string"
$ COPY BOSTON::"TEST?.DAT" *
3.1.11.3. Task Specification Strings
node::"task-spec-string"BOSTON::"TASK=TEST2"
Note
There are some restrictions when you copy files to or from a UNIX system. For more information, see the VSI OpenVMS Record Management Utilities Reference Manual.
3.1.12. Access Control String Format
node"access-control-string"::
Enclose the access control string in quotation marks (" ") and follow it with a double colon (::).
On OpenVMS systems, the access control string consists of a user name, followed by one or more spaces or tabs and a password. For additional information on access control strings, see Chapter 10, "Controlling Access to Resources".
HIGGINS is a user name on the node BOSTON.
ETUHCARAP is the password associated with that name:
$ DIR BOSTON"HIGGINS ETUHCARAP"::WEASEL2:[BORIS]ACCOUNTS.DAT
3.2. Using Wildcards with File Names
Use wildcard characters to apply a DCL command to multiple files rather than to one file at a time. The command applies to all files that match the portion of the file specification entered.
Many examples in this chapter show the use of wildcard characters in file operations. The use of wildcard characters in DCL commands varies with the individual command.
There are two wildcards available for use with many DCL commands: asterisks (*) and percent signs (%). Both can be used as wildcard characters in directory names, file names, and file types. See Section 4.5, ''Using Wildcards to Search the Directory Structure'' for information about wildcards used with directories. In version components, you can use an asterisk (;*), but not a percent sign or a mix of wildcards and numerals.
On Alpha systems running OpenVMS Version 7.2 or greater, the question mark (?) can be used in place of the percent sign (%).
If you are working in an environment with extended file specifications, refer to Chapter 5, "Extended File Specifications" for information about additional wildcard options.
3.2.1. Asterisk (*) Wildcard Character
An entire field (or a portion of it) in the directory, file name, and file type fields
The entire version number field, but not a portion of it
To manipulate large numbers of files without naming them individually
To limit the files selected to a more specific group
In directory specifications
Examples
$ PRINT [FROGMAN]*.*;*
$ TYPE *.DAT;*
$ DIRECTORY [FROGMAN.*]*.DAT
$ TYPE [*.*.*]AVERAGE.*;*
This file specification selects all versions of all files named AVERAGE with any file type that exists in any second-level subdirectory on the current default disk. For example, this file specification selects [A.B.C]AVERAGE.DAT but not [X.Y]AVERAGE.DAT.
3.2.2. Percent Sign (%) Wildcard Character
Use the percent sign (%) wildcard character as a substitute for any single character in a file specification. You can use the percent sign in the directory, file name, and file type fields. You cannot, however, use the percent sign in the version number field or in ANSI magnetic tape file specifications. The percent sign replaces one character position in a field, but there must be a character to replace.
You can specify the percent sign as many times as necessary and in combination with other wildcard characters.
$ TYPE [JONES.TAXES.PROPERTY]DISTRICT%.DAT
This display would include the files DISTRICT1.DAT, DISTRICT2.DAT, and DISTRICT3.DAT. The file DISTRICT4_5.DAT would not be displayed because it has more than one character after DISTRICT, nor would the file DISTRICT.DAT be displayed.
$ [MA*]INS%%%A*.J*;*
3.3. Other File Names
The following sections describe other types of file names supported in an OpenVMS environment.
3.3.1. Null File Names and File Types
When a file specification component, such as the file name or the file type, is missing, it is often replaced by a default value during the (built-in) parsing operation of the DCL command or utility. For example, the FORTRAN command uses a default file type or .FOR. The following command would cause the FORTRAN compiler to attempt to compile the file FILE.FOR:
$ FORTRAN FILE
$ DIRECTORY FILE
.TMP
TEMP.
3.3.1.1. File References with Null File Types
$ DIRECTORY TEMP. !
Because there is no file name delimiter, it is not possible to make a reference to a file with a null file name. A file reference with no file name will always be interpreted as having a missing file name.
$ DIRECTORY .TMP
3.3.2. Alternate File Names for Magnetic Tapes
"filename".;version
! " % ' ( ) * + , - . / : ; < = > ? & _
In addition, asterisk (*) character is allowed in ANSI magnetic tape file names.
For details, refer to the Guide to OpenVMS File Applications.
3.4. Creating and Modifying Files
The following sections describe how to create and modify files with tools and commands supported in an OpenVMS environment.
You can create and modify text files with an interactive text editor. EVE and EDT are two text editors included in the OpenVMS operating system; other text editors may also be available on your system.
You can also create and modify files by using the DCL commands CREATE, COPY, and RENAME. The following sections describe how to create and modify files using these commands.
If you are working in an environment with extended file specifications, refer to Chapter 5, "Extended File Specifications" for further information about creating and copying files in your environment.
3.4.1. Creating Files
The CREATE command creates a text file. You cannot modify a file with the CREATE command; after you have pressed Enter, you cannot return to a previous line to modify a word. You must use a text editor to modify a file created with the CREATE command. Pressing Ctrl/Z signals the end of the file and returns you to DCL command level.
$ CREATE TEST.TXT
this is a test
12345678
Ctrl/Z
3.4.2. Copying Files
The contents of an existing file in a new file
Many files at a time
Only those files that meet specified criterion by using the /SINCE qualifier with the COPY command
Examples
$ COPY FEES.DAT RECORDS.DAT
$ COPY *.TXT;* [SAVETEXT]*.*;*
$ COPY/SINCE=11-DEC-1999/MODIFIED [JONES.LICENSES.DOG]*.* *
3.4.3. File Concatenation
$ COPY FEES.DAT,FEES1.DAT FEES.DAT
Note that there is no space between the comma after FEES.DAT and the file name FEES1.DAT.
3.4.4. Copying Files from a Remote Node to Your Node Using DECnet
$ COPY CHAOS::DISK2:[PUBLIC]*.* *
3.4.5. Copying Files from Your Node to a Remote Node Using DECnet
Use the COPY command to copy files from your node to another node. If you receive a protection violation or DECnet error message when you attempt to copy a file across systems, you can either use mail to copy the file or you can use an access control string.
$ COPY *.* CHAOS::DISK2:[STAFF_BACKUP]
3.4.6. Copying Files on Remote Systems Using TCP/IP
TCP/IP uses the File Transfer Protocol (FTP) service to access and transfer files to and from another host over a network. To copy files from a remote host to your local host, use the GET command. To copy files from your local host to a remote host, use the PUT command. To use these commands, you must have an active FTP session with a remote host. You can enter any number of FTP commands during the session. For information on using FTP commands, refer to the VSI TCP/IP Services for OpenVMS User's Guide.
$ MAIL/SUBJECT="Fee schedule" FEES.DAT CHAOS::JONES
3.4.7. Using Access Control Strings to Copy Files
To copy files after you have received a protection violation, you can follow the node name in the file specification with an access control string (see Section 3.1.12, ''Access Control String Format'').
$ COPY *.* CHAOS"SMITH SPG96PRT"::DISK2:[STAFF_BACKUP]
3.4.8. Renaming Files
Use the RENAME command to give the file a new name and optionally to locate it in a different directory. Note that after being renamed, the original file no longer exists. When you use the RENAME command, the input and output locations must be on the same device.
$ RENAME FEES.DAT;4 [SAVETEXT]RECORDS.DAT
3.5. Displaying the Contents of Files
The following sections describe how to display the contents of files with tools and commands supported in an OpenVMS environment.
3.5.1. Using the TYPE Command
To display the contents of a file on your screen, enter the TYPE command and the file name at the DCL prompt. You do not have to specify the version number in the file specification because the system displays the latest version of a file by default.
$ TYPE STAFF_VACATIONS.TXT
3.5.2. Controlling the Display
If you specify the /PAGE qualifier to the TYPE command, you can view one screen at a time. The system prompts you to press Enter when you want to see the next screen.
By invoking an interactive text editor (for example, EVE or EDT) with the /READ_ONLY qualifier, you can use interactive editing commands to move around in a file and search for specific sequences of characters. The /READ_ONLY qualifier prevents you from creating a modified version of the file when you exit from the interactive editor.
3.5.3. Displaying Files on Remote Nodes
When using DECnet to display the contents of a file on a remote node, include the node name, disk, and directory in the file specification.
$ TYPE CHAOS::DISK2:[PUBLIC]COMPANY_HOLIDAYS.TXT
When using TCP/IP to display the contents of a file on a remote node, use the FTP VIEW command, and specify the file name. If the file is not in your current working directory, include the directory name in the file specification. Refer to the VSI TCP/IP Services for OpenVMS User's Guide for information on the FTP VIEW command.
3.5.4. Displaying Files with Wildcards
You can use the asterisk (*) wildcard to display all versions of a specific file.
$ TYPE [JONES]LOGIN.COM;*
$ TYPE [JONES]STAFF*.*;*
3.5.5. Displaying Multiple Files
If you specify more than one file in the TYPE command line, the system displays the files in the order you specify. If you use wildcard characters, the system displays the files in alphabetical order.
3.6. Deleting Files
The DELETE command removes files from directories and releases the disk space they occupy for use by other files. When you use the DELETE command, you must specify a version number or the asterisk (*) wildcard character as a version number in each file specification.
$ DELETE POUND.LIS;17
$ DELETE POUND.LIS;16,;17
$ DELETE POUND.LIS;*
When you delete many files with wildcard characters, you might want to confirm each deletion by using the /CONFIRM qualifier. Similarly, you might want to display the names of files as they are deleted. To do this, specify the /LOG qualifier with the DELETE command.
$ DELETE/CONFIRM *.*;*
DISK1:[JONES.LICENSES.DOG]FEES.DAT;4, delete? [N]: Y
DISK1:[JONES.LICENSES.DOG]FEMALE.LIS;6, delete? [N]: Y
DISK1:[JONES.LICENSES.DOG]MALE.LIS;3, delete? [N]: N
DISK1:[JONES.LICENSES.DOG]POUND.LIS;17, delete? [N]: Y
$ DELETE/LOG *.LIS;*
_%DELETE-I-FILDEL, DISK1:[JONES.LICENSES.DOG]FEMALE.LIS;6 deleted (35 blocks)
_%DELETE-I-FILDEL, DISK1:[JONES.LICENSES.DOG]MALE.LIS;3 deleted (5 blocks)
_%DELETE-I-FILDEL, DISK1:[JONES.LICENSES.DOG]POUND.LIS;17 deleted (9 blocks)
3.6.1. Using the PURGE Command
The PURGE command deletes all except the latest version of the specified file (or all files) in the default directory or any other specified directory. Purging old versions of files after updating them enables you to retain more free space on your disk.
$ PURGE/KEEP=2
3.7. Protecting Files from Other Users
Chapter 4, "Organizing Files with Directories" for information on directory protection
Chapter 10, "Controlling Access to Resources" for complete information on changing file protections
3.7.1. Access Control Lists (ACLs)
To prevent other users from accessing your files, you can change the protection or modify the access control list (ACL) of your files. To change the protection or modify the ACL of a file, you must own the file, have control access to the file, or have GRPPRV, SYSPRV, BYPASS, or READALL privilege.
3.7.2. Types of Protection
There are two types of file protection: default and explicit. When a file is created, it usually has the same protections as its parent directory; this is the default protection. If you create a file using the CREATE/PROTECTION command or if you change the protection on an existing file by issuing the SET SECURITY/PROTECTION command, you are using explicit file protection.
Note that to protect a file completely, you must apply the same or greater protection to the directory in which the file resides.
3.8. Printing Files
To print a file or files, use the PRINT command. The PRINT command places your print job (all the files to be printed) in a list of jobs to be printed called a print queue. The file types of the files named in the PRINT command default to .LIS or the last explicitly named file type. The system displays the job name, the queue name, the job number, and status of the job.
By default, the job name is the name of the first (or only) file specification in the PRINT command. After a job is submitted to a queue, you reference it using the job number. After the job is queued, it will be printed when no other jobs precede it in the queue and when the printer is physically ready to print.
$ PRINT POUND,MALE,FEES.DAT
Job POUND (queue SYS$PRINT, entry 202) started on SYS$PRINT
Because the default file type for the PRINT command is .LIS, the files POUND.LIS, MALE.LIS, and FEES.DAT are queued. The job name is POUND, the queue name is SYS$PRINT, and the job number is 202.
3.8.1. Print Job Priority
A print queue can execute only one job at a time. Print jobs are scheduled for printing according to their scheduling priority, and the job with the highest priority is printed first. If more than one job exists with the same priority, the smallest job is usually printed first. Jobs of equal size having the same priority are selected for printing according to their submission time. Priority may also be determined by the system manger or by entering the /PRIORITY qualifier to the PRINT command. For more information on scheduling priorities, refer to the VSI OpenVMS System Manager's Manual.
3.8.2. Displaying Queue Information
|
To display... |
Enter this command... |
|---|---|
|
The queues at your site |
SHOW QUEUE |
|
The status of your print jobs |
SHOW ENTRY |
|
Jobs queued by other users |
SHOW ENTRY/USERNAME= username |
|
Information about a specific job or jobs |
SHOW ENTRY job-name SHOW ENTRY entry-number |
$ SHOW ENTRY

  Entry  Jobname         Username     Blocks  Status
  -----  -------         --------     ------  ------
    202  POUND           JONES            38  Pending
         On stopped printer queue SYS$PRINT)
3.8.3. Print Forms
Determines certain page formatting attributes (such as margins and page length)
Determines whether a job is eligible to print depending on the paper stock specified in the form
If your printing needs are limited, you do not need to use special forms because VSI supplies a systemwide default form (named DEFAULT) for all queues. System managers can also create print forms. If you need to format output or if certain print jobs require special paper, contact your system manager.
3.8.4. Stopping a Print Job
To stop a print job and delete it from the print queue, enter the entry number parameter to the DELETE/ENTRY command.
$DELETE/ENTRY=202
3.8.5. Printing Files on Other Nodes
DECnet or TCP/IP services allow you to print a file on another system.
Send print jobs to a printer connected to a remote network host
Display print queue status
Cancel print jobs
Receive on local OpenVMS system print queues print jobs initiated from a user on a UNIX system
Get a "finished" notification through SMTP mail
Refer to the VSI TCP/IP Services for OpenVMS User's Guide, which describes how to print files using the LPR/LPD commands.
With DECnet, you can print a file on another system, copy that file to the remote node and specify the /REMOTE qualifier to the PRINT command.
$ COPY COMPANY_HOLIDAYS.TXT CHAOS"JONES PANDEMONIUM"::DISK2:[JONES]*
$ PRINT/REMOTE CHAOS::DISK2:[JONES]COMPANY_HOLIDAYS.TXT
Note
Not all qualifiers to the PRINT command are compatible with the /REMOTE qualifier. For example, you cannot queue a job to a specific print queue; all jobs are queued to the default system print queue (SYS$PRINT). See the description of the /REMOTE qualifier to the DCL command PRINT in the VSI OpenVMS DCL Dictionary for a list of PRINT command qualifiers compatible with /REMOTE.
3.8.6. PRINT Command Qualifiers
Print jobs can be controlled in various ways by using qualifiers to the PRINT command. For example, you can specify the number of copies printed or you can request that the system notify you when your print job is complete.
In addition to the qualifiers described in this manual, if you are running DECprint Supervisor software on your system, you can use the /PARAMETER qualifier to print landscape, two-sided, or many other ways. Contact your system manager for a list of print options that are available on your system.
|
Print Operations |
Print Job Commands and Qualifiers |
|---|---|
|
Number of copies: | |
| By job |
PRINT/JOB_COUNT=n? |
| By file |
PRINT/COPIES=n? |
| Specified file only |
file-spec/COPIES=n? |
|
Number of pages |
PRINT/PAGES=? |
|
Print features: | |
|
Flag pages |
PRINT/FLAG=? |
|
Special features |
PRINT/CHARACTERISTICS=? |
|
Double-spacing |
PRINT/SPACE? |
|
Page heading |
PRINT/HEADER? |
|
Notification of job execution |
PRINT/NOTIFY |
|
Delay execution of a job: | |
|
For a specified time |
PRINT/AFTER |
|
Indefinitely |
PRINT/HOLD |
|
Release a delayed job |
SET QUEUE/ENTRY/RELEASE |
|
Display your print jobs |
SHOW ENTRY |
|
Stop a print job: | |
|
Delete job |
DELETE/ENTRY=job-number |
|
Stop current job and begin printing the next job in the queue |
STOP/ABORT |
|
Stop current job and requeue it for printing |
STOP/REQUEUE |
|
Keep a job in a queue after it has completed |
PRINT/RETAIN |
3.8.7. WWPPS Utility (Alpha Only)
Note
Embedding font data in PostScript printable files may increase the size of the file beyond the size that the printer memory can support. If this happens, WWPPS appends an error page to the end of the printed output to notify you that the file size exceeded the printer's capacity.
To print local language characters such as Chinese, Korean, and Japanese, it is recommended that a printer with a minimum of 24MB of memory be used.
Supported Languages
Cyrillic (ISO8859-5)
Greek (ISO8859-7)
Hebrew (ISO8859-8)
Japanese (Super DEC Kanji)
Korean (DEC Korean)
Latin 1 (ISO8859-1)
Latin 2 (ISO8859-2)
Latin 4 (ISO8859-4)
Simplified Chinese (DEC Hanzi)
Thai (TACTIS)
Traditional Chinese (Taiwanese EUC/DEC Hanyu)
Turkish (ISO8859-9)
Unicode
When processing a character, WWPPS checks to see if the character is printable in the current locale. The locale setting is provided by the VSI C for OpenVMS Run-Time Library (RTL) during the OpenVMS installation. Except for files in 16-bit Unicode or ISO 10646 (USC-4) format, you must set the appropriate locale before printing files that contain characters in languages other than English. If the locale setting for the process is not appropriate for the input file, the locale can be set specifically for the print job by using the /LOCALE qualifier.
Supported Codesets
|
Codeset |
Codeset Name |
|---|---|
|
DECHANYU |
DECHanyu for Traditional Chinese (Plane 1 and Plane 2 only) |
|
DECHANZI |
DECHanzi for Simplified Chinese |
|
DECKOREAN |
DECKorean for Korean |
|
GB18030 |
GB18030-2000 for both Simplified Chinese and Traditional Chinese |
|
ISO8859-1 |
ISO Latin-1 |
|
ISO8859-2 |
ISO Latin-2 |
|
ISO8859-5 |
ISO Latin-5 |
|
ISO8859-7 |
ISO Latin-7 |
|
ISO8859-8 |
ISO Latin-8 |
|
ISO8859-9 |
ISO Latin-9 |
|
SDECKANJI |
Super DEC Kanji for Japanese |
|
TACTIS |
TIS-620 for Thai |
All of these codesets are supported by WWPPS, but fonts can be associated with only one language at a time for each codeset.
WWPPS also supports Unicode character conversion for all of these codesets except Thai. A Unicode character is converted to a character in one of these codesets; then the font supporting that codeset is used for the character in the PostScript file. If a character cannot be converted, it is printed as a space.
3.8.7.1. Invoking WWPPS
$ WWPPS :== $SYS$SYSTEM:WWPPS.EXE
$ WWPPS
3.8.7.2. WWPPS Utility Commands
The following list contains descriptions of the commands, parameters, and qualifiers available in the WWPPS utility. Examples follow each description.
EXIT
WWPPS> EXIT
HELP
WWPPS> HELP PRINT
HELP [topic]
PRINT/QUEUE=queue-name [/qualifiers] file-spec
WWPPS> PRINT/QUEUE=PRT_QUEUE/LOCALE=EN_US_ISO8859-1 REPORT.TXT
/COPIES
Specifies the number of copies to be printed. The default number of copies is 1.
/INDENTATION
Specifies the number of characters to indent from the left margin. The default is /INDENTATION=0 (no indentation). The maximum value allowed depends on the specified (or default) values for /PAPER_SIZE and /ORIENTATION./PAPER_SIZE
/ORIENTATION
Maximum value for /INDENTATION
LETTER
PORTRAIT
39
A4
PORTRAIT
38
LETTER
LANDSCAPE
65
A4
LANDSCAPE
67
/LENGTH
Specifies page length as the number of lines. The default length is 66 lines for LETTER size and 68 lines for A4 size.
/LOCALE
Specifies the locale setting in which the WWPPS converts the input file. You do not need to specify /LOCALE for text files in Unicode format (UTF-20).
Locales are constructed using the following convention:language_country_codeset.LOCALE
The language and country are each two characters, as defined by the OSF naming conventions. See the /LOCALE subtopics for possible values. For example, EN_US_ISO8859-1 represents the locale for English spoken in the United States.
By default, WWPPS uses the system-specified or process-specified locale. If there is no system-specified or process-specified locale, the default is /LOCALE=C.
To display the locale specified on your system, enter the following command:$ LOCALE SHOW PUBLIC
Table 3.1, ''Commonly Associated Language Codes and Country Codes'' aligns language codes and country codes that are commonly associated with each other.Table 3.1. Commonly Associated Language Codes and Country Codes Language Code Language Country Code Country CA Catalan ES Spain ES Spanish CS Czech CZ Czech Republic DA Danish DK
Denmark
DE German CH Switzerland DE Germany EL Greek
GR
Greece EN English
GB Great Britain US United States FI Finnish FI Finland FR French BE Belgium CA
Canada
FR
France
HE
Hebrew
IL
Israel
IW
Hebrew
HU
Hungarian
HU
Hungary
IS
Icelandic
IS
Iceland
IT
Italian
IT
Italy
JA
Japanese
JP
Japan
KO
Korean
KR
Korea
LT
Lithuanian
LT
Lithuania
NL
Dutch
NL
Netherlands
NO
Norwegian
NO
Norway
PL
Polish
PL
Poland
PT
Portuguese
PT
Portugal
RU
Russian
RU
Russia
SK
Slovak
SK
Slovakia
SL
Slovene
SI
Slovenia
SV
Swedish
SE
Sweden
TH
Thai
TH
Thailand
ZH
Chinese
HK
Hong Kong
TW
Taiwan
CN
People's Republic of China
The codesets supported on OpenVMS systems are listed under the section called “Supported Codesets” in Section 3.8.7, ''WWPPS Utility (Alpha Only)''.
/ORIENTATION
Specifies the orientation of printed output on the logical page as PORTRAIT (default) or LANDSCAPE.
/PAPER_SIZE
Specifies the size of the paper as LETTER (default) or A4.
/RANGE
Specifies the range of pages to be printed, starting with page number m and ending with page number n. Or, instead of printing a range of pages, you can specify ODD to print only odd-numbered pages or specify EVEN to print only even-numbered pages. By default, the entire document is printed.
/VERTICAL
Specifies vertical writing mode for Chinese, Korean, and Japanese multibyte characters. When /VERTICAL is specified, multibyte characters are rotated counterclockwise by 90 degrees and printed in lines from left to right; when the printed page is rotated 90 degrees clockwise, the characters can be read in vertical lines from right to left. In vertical mode, single-byte characters in languages such as English are still printed horizontally from left to right.
/WIDTH
Specifies the width of the page in columns. Valid values are as follows:80 (for LETTER size paper and PORTRAIT orientation)
132 (for LETTER size paper and LANDSCAPE orientation)
78 (for A4 size paper and PORTRAIT orientation)
136 (for A4 size paper and LANDSCAPE orientation)
The default value is /WIDTH=80.
Chapter 4. Organizing Files with Directories
A directory is a special kind of file that contains the names and locations of files. For example, when the system manager creates a user account for you, a directory will also be created, often with the same name as your username. If your user name is JONES, the directory would be [JONES].
A subdirectory is a directory file within another directory or subdirectory file. Subdirectories let you organize files into meaningful groups. For example, you might have one subdirectory that contains memos and another subdirectory for status reports.
Like a directory, a subdirectory contains names and pointers for the files cataloged within it. A subdirectory can contain an entry for another subdirectory, which can contain an entry for another subdirectory, and so on. This structure (a top-level directory plus subdirectories) is called a hierarchical directory structure.
The files you commonly access are stored on disks. Each disk contains a main directory, known as the master file directory (MFD). The MFD contains a list of user file directories (UFDs). A UFD is referred to as a user's top-level directory. In most cases, a UFD exists for each user on the system. It contains the names of and pointers to files cataloged in a user's directory. Your top-level directory is usually your process default directory. Unless your account has been modified to do otherwise, the system automatically makes your top-level directory your process-default directory when you log in.
The device (disk) and directory components of a complete file specification are often referred to as the file path. The path, combined with the file name and file type (and version) form a complete file specification. A complete file specification contains all of the information that the system needs to locate and identify a file?.
Refer to the Guide to OpenVMS File Applications for more information about how the system applies defaults to partial file specifications.
Directory structures
Understanding directories
Defaults
Protecting directories from other users
Using wildcards to search the directory structure
Working with directories in UIC format
Note
Throughout this chapter, examples that specify a node name do not always include an access control string. This is because proxy accounts enable users to perform operations on the remote systems in these examples.
If you are working in an environment with extended file specifications, directory structures and syntax may differ from the traditional structures described here. For information about working with directories in such an environment, refer to Chapter 5, "Extended File Specifications".
4.1. Directory Structures
Figure 4.1, ''Directory Structure'' shows a sample directory hierarchy. At the top of the structure is the master file directory (MFD). Its directory name is [000000]. The MFD shown contains entries for user file directories including MARTINO.DIR, PUBLIC.DIR, and JONES.DIR. The top-level directory [JONES] is a user file directory named JONES.DIR;1 in [000000].
The sample directory structure in Figure 4.1, ''Directory Structure'' is the basis for many of the examples in this chapter.
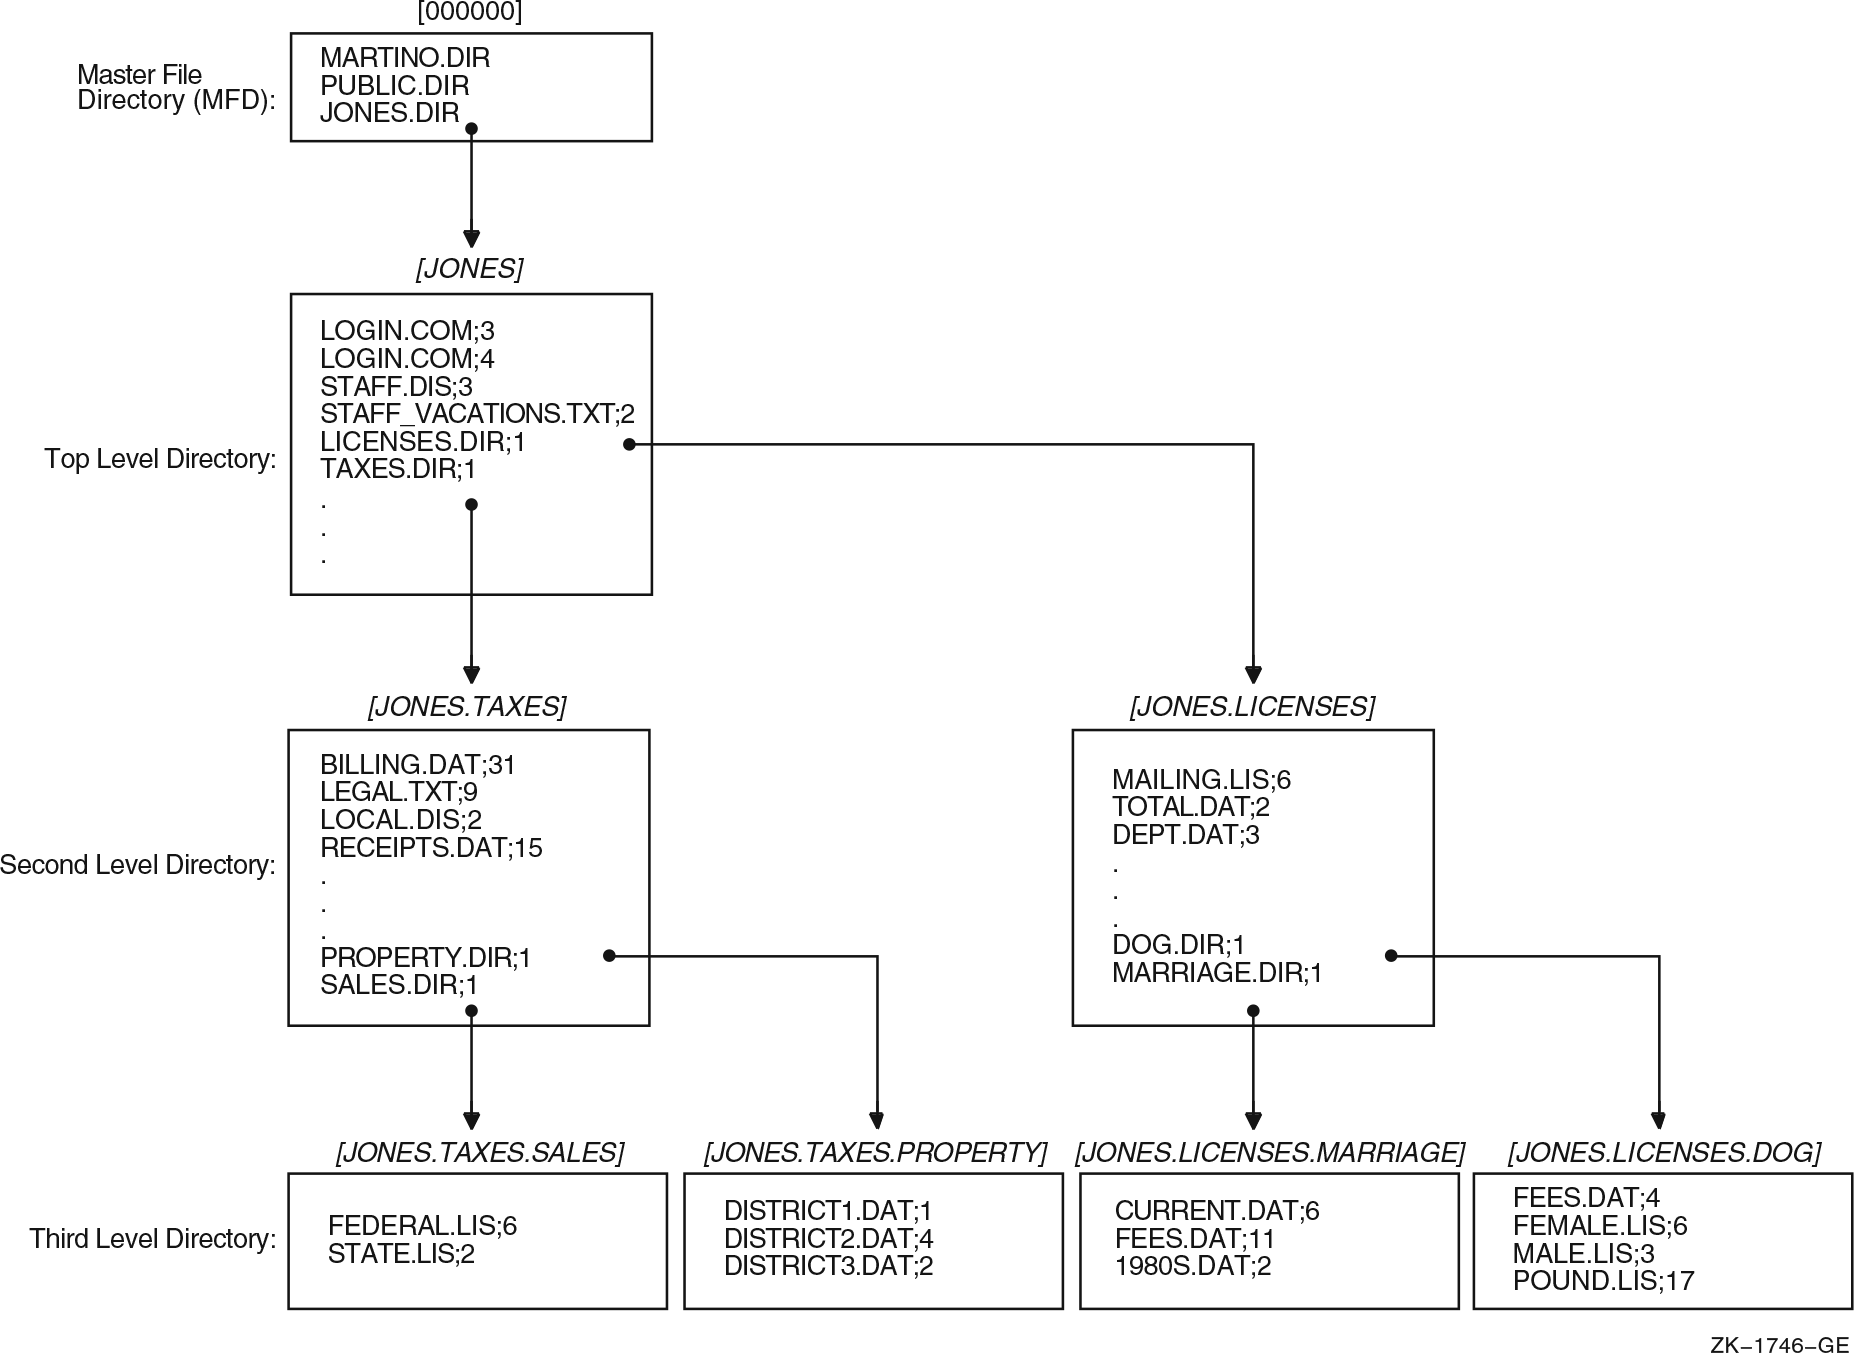 |
Assume that you are user JONES. When you log in, the system places you in [JONES], your default directory.
- [JONES] contains the following four nondirectory files:
- LOGIN.COM;3
- LOGIN.COM;4
- STAFF.DIS;3
- STAFF_VACATIONS.TXT;2
- [JONES] also contains the following two directory files:
- LICENSES.DIR;1
- TAXES.DIR;1
The directory file LICENSES.DIR;1 points to the [JONES.LICENSES] subdirectory.
TAXES.DIR;1 points to the [JONES.TAXES] subdirectory.
The [JONES.LICENSES] subdirectory contains three nondirectory files and two directory files.
The directory file DOG.DIR;1 points to the [JONES.LICENSES.DOG] subdirectory.
MARRIAGE.DIR points to the [JONES.LICENSES.MARRIAGE] subdirectory.
4.2. Understanding Directories
The directory component of a file specification consists of a top-level directory name (such as a UFD) that can be followed by a number of subdirectory names. Subdirectory names are separated by periods (.).
Versions of OpenVMS Alpha prior to Version 7.2 and all versions of OpenVMS VAX support directory components that contain the UFD and no more than seven subdirectory names. OpenVMS Alpha Version 7.2 or later supports 255 names (UFD plus subdirectories) in a directory component.
[directory.subdirectory]
To add one or more levels of subdirectories, add a period and another subdirectory name for each subdirectory (up to the limit). A subdirectory of another subdirectory is specified by concatenating the subdirectory name (with the preceding period) to the name of the subdirectory one level above it in the hierarchy.
On versions prior to OpenVMS Alpha Version 7.2, on any version of OpenVMS VAX, and on OpenVMS Alpha systems using ODS-2 disks, a subdirectory name can contain no more than 39 characters.
On OpenVMS Alpha Version 7.2 or later with ODS-5 disks, subdirectory names are limited by the filename limit since subdirectory files are stored as <subdirectory-name>.DIR;1. The total number of characters within the directory and root components of a file specification (excluding delimiter brackets and periods) should not exceed 512.
4.2.1. Creating Directories
To create a directory, enter the CREATE/DIRECTORY command. If you want to create a subdirectory under your current directory, you do not have to specify the current directory name; you can enter the subdirectory name preceded by a period.
$ CREATE/DIRECTORY [JONES.TAXES]
$ CREATE/DIRECTORY [.LICENSES]
4.2.2. Displaying Directories
To display the names of files in a directory, enter DIRECTORY at the DCL prompt. To list the files in a subdirectory, enter the DIRECTORY command and the subdirectory name preceded by a period.
When you include certain command qualifiers along with the DIRECTORY command, you can retrieve information in addition to the names of the files. For more information on DIRECTORY command qualifiers, refer to the VSI OpenVMS DCL Dictionary or online help.
$ DIRECTORY
Directory DISK1:[JONES]

LICENSES.DIR;1
LOGIN.COM;3
LOGIN.COM;4
STAFF.DIS;3
STAFF_VACATIONS.TXT;2
TAXES.DIR;1

Total of 6 files.
$ DIRECTORY [.LICENSES]
Directory DISK1:[JONES.LICENSES]

DEPT.DAT;3
DOG.DIR;1
MAILING.LIS;6
MARRIAGE.DIR;1
TOTAL.DAT;2

Total of 5 files.
4.2.3. Deleting Directories
| Step |
Task |
|---|---|
| 1 |
Make sure that the directory contains no files. To find out if the directory contains files, enter the DIRECTORY command. When there are no files in the directory, the system displays the
following message:
%DIRECT-W-NOFILES, no files found |
| 2 |
If the directory contains files, copy them to another directory to save them or delete them if you do not want to save them. If the directory contains subdirectories, examine those subdirectories, copy or delete their files, and delete the subdirectories. |
| 3 |
Move to the directory one level above the directory you want to delete. Remember that subdirectories exist as files in directories. When you delete a directory, you delete the file that points to that directory. |
| 4 |
Change the file protection of a directory to allow delete access to the file. Directory files in master file directories require SYSPRV privilege to delete. See Chapter 3, "Storing Information with Files" for more information about file protection. |
| 5 |
Delete the directory file using the DELETE command. |
$ SET DEFAULT [JONES.LICENSES]
$ DIRECTORY
%DIRECT-W-NOFILES, no files found
$ SET DEFAULT [JONES]
$ SET SECURITY/PROTECTION=OWNER:D LICENSES.DIR
$ DELETE LICENSES.DIR;1
4.3. Setting Defaults
To change your default directory, use the SET DEFAULT command. The new default remains in effect until you enter another SET DEFAULT command or log out. To set default to a subdirectory, append the subdirectory name to the name of the directory one level above it.
$ SET DEFAULT [JONES]
$ TYPE STAFF_VACATIONS.TXT
$ SET DEFAULT [JONES.TAXES]
$ TYPE BILLING.DAT
4.3.1. Setting Default to Nonexistent Directories
Note that the operating system allows you to set default to a nonexistent disk or directory. If you have set default to a nonexistent directory, when you try to manipulate a file, the system displays a message stating that the directory does not exist. If you find yourself in a nonexistent disk or directory and cannot carry out a desired operation, set default to an existing disk or directory.
4.3.2. SHOW DEFAULT Command
$ SHOW DEFAULT
  DISK1:[JONES.TAXES]
$ SET DEFAULT [PUBLIC]
$ SHOW DEFAULT
  DISK1:[PUBLIC]
You can use the SET DEFAULT command to change the default device. The default remains in effect until you enter another SET DEFAULT command or log out. You can also specify the device to which you want to set default without including the directory in the command.
$ SHOW DEFAULT
  DISK1:[JONES]
$ SET DEFAULT DISK2:[GROUP]
$ SHOW DEFAULT
  DISK2:[GROUP]
$ SHOW DEFAULT
  DISK1:[JONES]
$ SET DEFAULT DISK2:
$ SHOW DEFAULT
  DISK2:[JONES]
4.3.3. Using Temporary Defaults
If you enter a list of files and do not give a complete file specification for each file in the list, the system applies temporary defaults for node names, device names, and directory names. To substitute your current default directory for a temporary default, use empty square brackets. If you include a node name in a file that appears in a list, you can override the temporary default by using a double colon.
$ COPY [STATS]A.LIS,B.LIS [RESULTS]
Note that the system uses the preceding file specification in the list, [STATS]A.LIS, to determine that the temporary default directory for file B.LIS is [STATS] as well.
$ COPY BASE:[STATS]A.LIS,[TIME]B.LIS,C.LIS [RESULTS]
All three files (A.LIS, B.LIS, and C.LIS) are copied from the BASE device. The A.LIS file is copied from the [STATS] directory. The other two files are copied from the [TIME] directory.
$ COPY [ALPHA]TEST.DAT,[]FINAL.DAT [RESULTS]
4.4. Protecting Directories from Other Users
Note
To protect private files, directory protection alone is not adequate. You must also protect each file within the directory.
By default, top-level directories receive UIC-based protection (S:RWE,O:RWE,G:RE,W:E) and no ACL. Subdirectories receive UIC-based protection from the parent directory. For more information on protection codes, see Section 10.3, ''Interpreting Protection Codes''.
To specify UIC-based protection explicitly when creating a directory, use the /PROTECTION qualifier with the CREATE/DIRECTORY command. You cannot specify an ACL for the directory until the directory is created. To change the UIC-based protection of an existing directory, apply the SET SECURITY/PROTECTION command to the directory file.
You can limit but not prohibit directory access by specifying execute access but not read access. Execute access on a directory permits you to examine and read files that you know are contained in the directory; that means you can examine a file if you already know what the file specification is, but you cannot display a list of the files in the directory. For additional security information, refer to the VSI OpenVMS Guide to System Security.
4.5. Using Wildcards to Search the Directory Structure
From any point in a directory structure, you can refer to another directory or subdirectory in the structure. Do this by specifically naming the directory or subdirectory you want or by using the ellipsis (…) and hyphen (-) wildcard characters. For additional information about wildcards, see Section 3.2, ''Using Wildcards with File Names''.
If you are working in an environment with extended file specifications, refer to Chapter 5, "Extended File Specifications" for further information about searching directory structures with wildcards.
4.5.1. Ellipsis Wildcard Character
$ DIRECTORY [...]
If you begin the directory specification with an ellipsis, the search begins from your current directory. However, if you begin the directory specification with a period, only the subdirectory that is one level lower than the current directory is searched.
To search all top-level directories and their subdirectories from wherever you are in the directory structure, use an asterisk (*) followed by an ellipsis (…).
$ TYPE [JONES...]FEES.DAT
$ TYPE [...SALES]FEDERAL.LIS
$ TYPE [...]DEPT.DAT
$ TYPE [.LICENSES]MAILING.LIS
$ TYPE [...LICENSES...]DEPT.DAT
$ DIRECTORY [*...]
4.5.2. Hyphen (-) Subdirectory Character
Hyphen characters are used as an abbreviated way to specify [sub-]directories above the current process default directory. Each hyphen represents one level. Hyphens can be followed by subdirectory names (with separating periods) to specify other paths down the directory hierarchy.
If you enter so many hyphens that the reference points above the top-level directory, the system displays an error message.
$ TYPE [-]STAFF.DIS
$ TYPE [-.TAXES]BILLING.DAT
$ SET DEFAULT [–]
[—]
[^—]
4.6. Working with Directories in UIC Format
Although this chapter focuses on how to use named directories, you can also specify directory names in UIC format. In UIC format, a 2-part octal number forms a user identification code (UIC) that refers to a user file directory (UFD). Almost every DCL command that accepts a file specification can recognize directory names in UIC format. In general, you do not need to use this format unless you are working with a real-time Resource Sharing Executive (RSX) operating system.
[group,member]
For example, [122,1] is a UIC directory specification representing member 1 in group 122. Directory names in UIC format generally, but not necessarily, correspond to the UIC of the owner of the directory.
Use an octal number in the range of 1 to 37776 to specify the group.
Use an octal number in the range of 0 to 177776 to specify the member.
Do not use the hyphen (-) or ellipsis (…) wildcard as part of the specification.
4.6.1. Using Wildcards with UIC Directories
It is also possible to use the asterisk (*) wildcard to specify a UIC directory. For example, [*,6] indicates all directories with any group number and a member number of 6. The search is limited to directories in UIC format. The directory specification [*,*] locates all directories in UIC format. To locate all named directories as well as all directories in UIC format, use [*].
4.6.2. Translating to Named from UIC Format
Note that you can translate a directory name in UIC format to named format. If necessary, add zeros to the left of the group and member numbers to create a 6-character name.
You cannot combine UIC format and named format. If you have a directory with a name in UIC format and you want to specify one of its subdirectories, translate the UIC format to named format.
[122001]
To refer to the subdirectory [122,1]SUB.DIR, use the named directory [122001.SUB].
Chapter 5. Extended File Specifications
An optional volume structure, On–Disk Structure Level 5 (ODS-5) that supports longer file names with a greater range of legal characters
Deep directories
Taken together, these components provide much greater flexibility for OpenVMS Alpha systems (using Advanced Server for OpenVMS) to store, manage, serve, and access files that have names similar to those in a Windows environment.
OpenVMS users can make use of long file names, new character support, and the ability to have lowercase and mixed-case file names. These new capabilities make file activity on an OpenVMS file server more transparent to Windows users.
OpenVMS system managers can see files on OpenVMS systems with the names specified by Windows users.
Applications developers who are porting applications from other environments that have support for deep directories can use a parallel structure on OpenVMS.
5.1. ODS-5 Volume Structure
Long file names
More characters legal within file names
Preservation of case within file names
5.1.1. Long File Names
Traditional (ODS-2) file specifications follow the 39.39 format, supporting only a single period (.) separating the file name and file type.
$ CREATE This.File.Name.Has.A.Lot.Of.Periods.DAT
$ CREATE -
_$ ThisIsAVeryLongFileName^&ItWillKeepGoingForLotsAndLotsOfCharacters.Exceed -
_$ ingThe39^,39presentInPreviousVersionsOfOpenVMS
$ DIRECTORY


Directory TEST$ODS5:[TESTING]

ThisIsAVeryLongFileName^&ItWillKeepGoingForLotsAndLotsOfCharacters.Exceeding
The39^,39presentInPreviousVersionsOfOpenVMS;1
This^.File^.Name^.Has^.A^.Lot^.Of^.Periods.DAT;1

Total of 2 files.
5.1.2. More Characters Legal Within File Names
Traditional (ODS-2-compliant) file names can use alphanumeric characters (A-Z, a-z, 0-9), the dollar sign ($), underscore (_), and hyphen (-). ODS-5 offers a broader set of characters for naming files.
ISO LATIN-1 and Unicode (UCS-2) Character Sets
ODS-5 supports file names that use the 8-bit ISO Latin-1 character and 16-bit Unicode (UCS-2) character sets. The ISO Latin-1 Multinational character set is a superset of the traditional ASCII character set. In extended file specifications, you can use all characters from the 8-bit ISO Latin-1 Multinational character set except the asterisk (*) and the question mark (?).
Special Characters
The escape character (^) followed by an underscore (_) or a space represents a space.
- The escape character (^) followed by any of the following characters means that the character is to be used as part of a file name, rather than having any special meaning that it might otherwise have in a file specification:
. , ; [ ] % ^ &
You can enter a literal period (.) with or without the escape character (^) in a file name. The system adds the escape character to any periods other than those that act as delimiters for the file type and version number. Literal periods (.) in directory names must be preceded by the escape character.
An escape character followed by a hexadecimal digit requires a second hexadecimal digit. Interpret the two following characters as a hexadecimal value for an arbitrary 1-byte character. For example, ^20 represents a space.
An escape character followed by "U" within a file specification indicates that the four hexadecimal digits that follow are to be interpreted as Unicode. For example, ^U012F.
All characters in file specifications that are not preceded by an escape character (^) are presumed to be ISO Latin-1.
Note
File names containing special characters cannot be accessed from a VAX system. See Section 5.7, ''Working in Mixed Environments'' for more information about mixed-architecture environments.
Interpretation of Period (.)
The use of the period (.) as a literal character in extended file names requires RMS to determine which periods are file name characters and which are delimiters.
$ CREATE Test.1
Test.1;1
Determination of Version Numbers
|
If |
Then |
|---|---|
|
The characters after the last period are all numeric |
The numeric string is determined to be a version number |
|
The characters after the last period are all numeric and preceded by a minus sign (-) |
The numeric string is determined to be a version number |
|
There are more than 5 numeric characters after the last period |
RMS rejects the file name as illegal |
|
There is a nonnumeric character following the last period |
It is interpreted as a file type delimiter |
$ CREATE Test4.3.2.1
Test4^.3.2;1
where 2 is the file type and 1 is the file version.
A version number explicitly delimited by a semicolon (;) must also be 5 or fewer numeric characters, and can be preceded by a minus sign (-).
5.1.3. Preservation of Case
In prior versions of OpenVMS, DCL, and RMS converted all file specifications to uppercase.
$ CREATE KitContents.Txt

$ DIRECTORY

Directory  DISK1:[USER1]

KitContents.Txt;1
$ CREATE CaPri
$ CREATE CAPRI
$ CREATE capri
$ DIRECTORY

Directory  DISK1:[USER1]

CaPri.;1        CaPri.;2        CaPri.;3
5.1.4. Using Wildcards
Single- and multiple-character wildcards function as expected with ODS-5 files. A single-character wildcard represents exactly one character in either the file name or file type, but may not be used in the file version string. A multiple-character wildcard can represent any number of characters (including zero characters) in the file name or file type. A multiple-character wildcard can be used in place of a version string.
5.1.4.1. Wildcard Characters
The asterisk (*) is a multiple-character wildcard.
The percent sign (%) is a single-character wildcard.
The question mark (?) is a single-character wildcard.
Note
An escaped character (such as ^.) or an escape sequence (such as ^EF or ^U0101) is considered a single character for purposes of wildcard matching.
5.1.4.2. Wildcard Syntax
Although DCL preserves the case of extended file names, wildcard matching is case blind.
|
The pattern... |
matches... |
...but does not match |
|---|---|---|
|
A*B;* |
AHAB.;1 |
A.B;1 |
|
A.*.B* |
A^.DISK.BLOCK;1 |
A^.C^.B.DAT;1 |
|
A?B.TXT;* |
A^.B.TXT;5 |
A^.^.B.TXT;1 |
|
*.DAT |
Lots^.of^.Periods.dat;1 |
DAT.;1 |
|
Mil?no.dat |
Milano.dat;1 |
Millaano.dat;1 |
|
NAPOLI.?.DAT |
napoli.q.dat;1 |
napoli.abc77.dat;1 |
5.2. Deep Directory Structures
There can be up to 255 levels of directories.
On ODS-2 the format for a directory name is 39.39.
On ODS-5 the name of each directory can be up to 236 8-bit or 118 16-bit characters long.
$ CREATE/DIRECTORY [.a.b.c.d.e.f.g.h.i.j.k.l.m]
$ CREATE/DIRECTORY
[.AVeryLongDirectoryNameWhichHasNothingToDoWithAnythingInParticular]
Complete file specifications longer than 255 bytes are abbreviated by RMS when presented to unmodified applications.
5.2.1. Directory Naming Syntax
|
CREATE/DIRECTORY. . . |
Result |
|---|---|
|
[Hi^&Bye] |
Hi^&Bye.DIR;1 |
|
[Lots^.Of^.Periods^.In^.This^.Name] |
Lots^.Of^.Periods^.In^.This^.Name.DIR;1 |
5.2.2. Directory ID and File ID Abbreviation
Under some circumstances, a full file specification may contain more characters than the 255 bytes allowed by unmodified applications. If a file specification that such an application needs exceeds 255 bytes in length, RMS generates a shorter file specification by abbreviating the directory to a Directory ID (DID), and if necessary, the filename to a File ID (FID).
TEST$ODS5:[5953,9,0]Alghero.TXT;1
Note that this form of the directory name must have three numbers and two commas to avoid ambiguity with UIC format directory names. With the DIRECTORY command you can view the shorter DID version as well as the full version of a file specification.
5.3. Using the Extended File Specifications Parsing Feature in DCL
The default DCL parsing style for file names is for ODS-2 style file names.
$ SET PROCESS/PARSE_STYLE=EXTENDED
Note that this command has no effect on an OpenVMS VAX system.
$ CREATE MY^[FILE
For additional information, see the description of the SET PROCESS/PARSE_STYLE command in the VSI OpenVMS DCL Dictionary: N–Z.
$ SET PROCESS/PARSE_STYLE=TRADITIONAL
After you enter this command, DCL accepts only ODS-2 file name formats.
5.4. Where You Can Use Extended File Specifications
Some DCL commands and OpenVMS utilities fully support extended file specifications. They have been modified to take advantage of all the features of extended file names. They can accept and handle extended file specifications without error and without modifying their expected case. In addition, they can accept and produce long file specifications that exceed the traditional 255-byte limit in their original form?–without requiring them to be abbreviated in Directory ID (DID) or File ID (FID) format.
DCL commands and OpenVMS utilities with default support have had little or no modification to take advantage of extended file names. These utilities and commands are expected to handle most of the attributes of extended file specifications (such as new characters and deep directory structures) correctly. However, they might create or display file names with the wrong case.
Matching operations in an environment where FID abbreviation is used may not always work as expected. For example, wildcard matching operations may not capture all target file names because the long file names may be represented in their numeric FID-abbreviated form. This restriction specifically applies to matching operations that are performed outside of RMS.
- Wildcards and sticky defaults cannot be used with a FID abbreviation. For example, the following commands are illegal:
$ DIRECTORY a[1,2,3]*.txt
$ COPY a[1,2,3].txt *.txt2
Because a FID abbreviation is a unique numeric representation of one file, it cannot be used to represent or match any other file.
Creating a file using a FID abbreviation is illegal.
For more information about DID and FID abbreviations, refer to the Guide to OpenVMS File Applications.
For more information on a specific command or utility, refer to the appropriate manual in the OpenVMS documentation set.
No Support for Extended File Naming
OpenVMS utilities and commands that do not support extended file names can function on ODS-5 volumes; however, they are restricted to operating with traditional file specifications only. These utilities and commands should be used carefully on ODS-5 volumes because VSI cannot ensure that they will function successfully when they encounter extended file specifications.
No Support for ODS-5
OpenVMS utilities and commands that do not support the ODS-5 volume structure cannot handle extended file names. These utilities and commands should be used carefully on ODS-5 volumes because VSI cannot ensure that they will function successfully even when they only encounter traditional file specifications.
|
Component |
Notes |
|---|---|
|
No ODS-5 Support | |
|
Disk defragmenters |
Unsupported unless a specific defragmentation tool documents that it has been updated to support an ODS-5 volume.? |
|
No Extended File Naming Support | |
|
Code compilers |
Cannot use extended file names for object files. However, code compilers can create applications that support extended names. |
|
INSTALL Known images |
Do not install an image with an extended file name as a known image. |
|
LINK |
Cannot output an image with an extended file name. |
|
MONITOR |
Cannot reliably process extended file names. |
|
Network files (NET*.DAT) |
Do not rename to an extended file name. |
|
Object modules (.OBJ) |
Do not rename to an extended file name. |
|
Page and swap files |
Do not use an extended file name. |
|
SYSGEN |
Do not write a parameter file with an extended file name. |
|
System startup files |
Do not rename to an extended file name. |
5.5. Displaying Files with Extended Names
/STYLE= [CONDENSED | EXPANDED]
This qualifier allows you to control how the modified DCL commands display extended file names and any associated prompts.
The keyword CONDENSED displays the file specification as it is generated to fit within the 255-byte character string limit imposed by many utilities. When necessary, this file specification may contain a DID abbreviation or a FID abbreviation. The keyword EXPANDED displays the file specification that is stored on disk in full and does not contain a DID abbreviation or a FID abbreviation.
The following sections contain examples of using the /STYLE qualifier with the DIRECTORY, TYPE, PURGE, and DELETE commands.
5.5.1. DIRECTORY Command
DIRECTORY/STYLE=(keyword[,keyword])
$ DIRECTORY

Directory TEST$ODS5:[23,1,0]

abcdefghijklmnopqrstuvwxyABCDEFGHIJKLMNOPQRSTUVWXYabcdefghijklmnopqrs
tuvwxyABCDEFGHIJKLMNOPQRSTUVWXYabcdefghijklmnopqrstuvwxyABCDEFGHIJKLM
NOPQRSTUVWXY.abcdefghijklmnopqrstuvwxyABCDEFGHIJKLMNOPQRSTUVWXYabcdef
ghijklmnopqrst;2

Total of 1 file.

Directory TEST$ODS5:[TEST.RANDOMTESTING.RANDOM]

AddressFiles.DIR;1  LOGIN.COM;3         test.1;1       test^.1.clue;1
Travel.LIS;1        whee.;5             work.dat;8

Total of 8 files.

Grand total of 2 directories, 9 files.
$ DIRECTORY/STYLE=(CONDENSED,EXPANDED)

Directory TEST$ODS5:[23,1,0]        TEST$ODS5:[TEST.RANDOMTESTING.RANDO
                                    M]

abcdefghijklmnopqrstuvwxyABCDEFGHIJ abcdefghijklmnopqrstuvwxyABCDEFGHIJ
KLMNOPQRSTUVWXYabcdefghijklmnopqrst KLMNOPQRSTUVWXYabcdefghijklmnopqrst
uvwxyABCDEFGHIJKLMNOPQRSTUVWXYabcde uvwxyABCDEFGHIJKLMNOPQRSTUVWXYabcde
fghijklmnopqrstuvwxyABCDEFGHIJKLMNO fghijklmnopqrstuvwxyABCDEFGHIJKLMNO
PQRSTUVWXY.abcdefghijklmnopqrstuvwx PQRSTUVWXY.abcdefghijklmnopqrstuvwx
yABCDEFGHIJKLMNOPQRSTUVWXYabcdefghi yABCDEFGHIJKLMNOPQRSTUVWXYabcdefghi
jklmnopqrst;2                       jklmnopqrst;2
AddressFiles.DIR;1                  AddressFiles.DIR;1
LOGIN.COM;3                         LOGIN.COM;3
test.1;1                            test.1;1
test^.1.clue;1                      test^.1.clue;1
Travel.LIS;1                        Travel.LIS;1
whee.;5                             whee.;5
work.dat;8                          work.dat;8

Total of 8 files.
DIRECTORY can either use one or both keywords with the /STYLE qualifier.
5.5.2. TYPE Command
$ TYPE/STYLE=(keyword)
$ TYPE/CONFIRM/STYLE=EXPANDED abc*.*rst;2
TYPE TEST$ODS5:[TEST.RANDOMTESTING.RANDOM]abcdefghijklmnopqrstuvwxyzABCDEF
GHIJKLMNOPQRSTUVWXYZabcdefghijklmnopqrstuvwxyzABCDEFGHIJKLMNOPQRSTUVWXYabc
defghijklmnopqrstuvwxyzGHIJKLMNOPQRSTUVWXYabcdefghijklmnopqrst;2 ? [N]: Y

[System outputs contents of file]
5.5.3. DELETE Command
$DELETE/STYLE=(keyword)
In the following examples, the ellipsis (...) represents many characters within the file name. These examples use the CONFIRM qualifier to generate a system message.
$ DELETE/CONFIRM abc*.*.*
DELETE TEST$ODS5:[TEST.RANDOMTESTING.RANDOM]abcAlphabet.stuff;1 ? [N]: Y
DELETE TEST$ODS5:[23,1,0] abcdefg. . .QRSTUVWXY.abcdefg. . .tuvw
xy;1 ? [N]: Y
$ DELETE/CONFIRM/STYLE=EXPANDED abc*.*.*
DELETE TEST$ODS5:[TEST.RANDOMTESTING.RANDOM]abcAlphabet.stuff;1 ? [N]: Y
DELETE TEST$ODS5:[TEST.RANDOMTESTING.RANDOM]abcdefg. . .QRSTUVWX
Y.abcdefg. . .tuvwxy;1 ? [N]: Y
5.5.4. PURGE Command
$ PURGE/STYLE=(keyword)
In the following examples, the ellipsis (...) represents many characters within the file name. These examples use the CONFIRM qualifier to generate a system message.
$ PURGE/CONFIRM
DELETE TEST$ODS5:[23,1,0]abcdefg. . .QRSTUVWXY.abcdefg. . .tuvwxy;1
? [N]: Y
$ PURGE/CONFIRM/STYLE=EXPANDED
DELETE TEST$ODS5:[TEST.RANDOMTESTING.RANDOM]abcdefg. . .QRSTUVWXY.ab
cdefg. . .tuvwxy;1 ? [N]: Y
5.6. Displaying Extended File Names on a Terminal
To display extended file names, your terminal must be set to display the ISO Latin-1 character set. Otherwise, the characters displayed on the terminal might not match those shown by a PC. To view or change the character set displayed on your terminal, use the terminal setup dialog box. The options for selecting the character set to display are usually found in the General tab.
The characters that differ between the DEC Multinational and ISO Latin-1 character sets are listed in Appendix A, "Character Sets".
5.7. Working in Mixed Environments
Create and access deep directory structures on ODS-2 volumes
Read a BACKUP saveset created on an earlier version of OpenVMS
Copy a file with an ODS-5 name to a file with an ODS-2 name on a system running an earlier version of OpenVMS
If you are working in a mixed-version or mixed-architecture OpenVMS Cluster, there are some limitations. Systems running prior versions of OpenVMS cannot mount ODS-5 volumes, correctly handle extended file names, or even see extended file names. Users on a version of OpenVMS prior to Version 7.2 cannot access any files on an ODS-5 volume. This is true regardless of whether the volume is connected physically on a CI or SCSI bus, or by an MSCP or QIO server. Nor can these users create or restore an ODS-5 image saveset. However, they can restore ODS-2-compliant file names from an ODS-5 saveset.
Ability to mount an ODS-5 volume.
Ability to write and manage ODS-2-compliant files on an ODS-5 volume.
See pseudonames (
pISO_LATIN.???orpUNICODE.???) when accessing an ODS-5 file specification.
Your system type and operating system version
Whether your default directory is ODS-2 or ODS-5 based
Whether the destination for a file you are creating is an ODS-2 or ODS-5 volume
OpenVMS 7.2 allows VAX systems to mount ODS-5 volumes; however, users on OpenVMS VAX systems can access only files with ODS-2-compliant file names.
You can choose whether or not to convert a volume to ODS-5 on your OpenVMS Alpha systems. When working in a mixed environment of ODS-2 and ODS-5 volumes, keep in mind the restrictions of ODS-2 file names when creating files on ODS-5 volumes. If you copy a file that has special characters in its name from an ODS-5 to an ODS-2 volume, you must give it an ODS-2 compliant name.
Chapter 6. Using Disk and Tape Drives
This chapter describes general concepts about working with disk and tape drives on an OpenVMS system. Any peripheral connected to an OpenVMS system, including disk and tape drives, is referred to as a device. When you log in you are automatically granted access to your default login device and directory. You can also access public devices and directories. In most cases, the system manager sets up and maintains devices that are shared by a group of users.
Physical device names
Displaying device information
Logical device names
Generic device names
OpenVMS Cluster device names
Volumes and volume sets
Device management
The VSI OpenVMS DCL Dictionary or online help, for information about the commands discussed in this chapter
The VSI OpenVMS System Manager's Manual, Volume 1: Essentials, for information on using devices
The VSI OpenVMS System Management Utilities Reference Manual, for information about the MOUNT command
The VSI OpenVMS Cluster Systems Manual, for information about devices in OpenVMS Cluster environments
6.1. Physical Device Names
Each physical device known to the system is uniquely identified by a physical device name. The physical device name identifies the type of device; for example, a disk drive or a terminal.
A device code, which represents the hardware type
A controller designator, which identifies the hardware controller to which the device is attached
A unit number, which identifies a device on a particular controller.
VTA12, FX09, and DAD44 are examples of disk and tape device names.
For information on specific device-naming formats, refer to the VSI OpenVMS System Manager's Manual.
6.2. Displaying Device Information
To check the densities, volume labels, UICs, and relative volume numbers of mounted volumes, enter the SHOW DEVICES/FULL command.
To display information for all the drives of a particular type configured in the system, specify a generic device code (for example, SHOW DEVICES DK).
To display information for a volume mounted on a specific drive, specify the physical device name (for example, SHOW DEVICES DKA1).
$ SHOW DEVICES DAD40

Device         Device           Error    Volume         Free  Trans Mnt
 Name          Status           Count     Label        Blocks Count Cnt
DAD40:         Mounted wrtlck       0     CHICAGO      540088     1   1
6.3. Logical Device Names
Your system manager can set up logical device names to represent the devices on the system. Logical device names equate a somewhat cryptic device name to a short, meaningful name. You can use these logical device names, rather than the physical device names, to refer to devices.
Chapter 11, "Defining Logical Names for Devices and Files" describes in detail how to use logical names.
6.4. Generic Device Names
A generic device name consists of the device code and omits the specific controller or unit number. When you use a generic device name with a MOUNT or ALLOCATE command, the system locates the first available controller or device unit whose physical name satisfies the portions of the generic device name you specified.
If you omit the controller designation, it is assumed to be A.
If you omit the unit number, it is assumed to be 0.
6.5. OpenVMS Cluster Device Names
An OpenVMS Cluster device name includes the name of the node to which the device is attached and the physical device name, separated by a dollar sign ($). For example, ROXXY$DUA1 refers to disk DUA1 on node ROXXY.
As a general rule, always use a node allocation class device name to identify dual-pathed OpenVMS Cluster disks. It is the only name that all OpenVMS Cluster nodes recognize at all times.
For more information about using the device name format in OpenVMS Cluster environments, refer to VSI OpenVMS Cluster Systems Manual.
$node-allocation-class$ddcu
|
|
A value assigned to the nodes connecting a dual-pathed device. For example, $1$DJA16 identifies a disk that is dual pathed between two nodes that both have a node allocation class value of 1. |
|
|
Represents device code of the hardware device type (for example, the device code DK represents an RZ23 disk). |
|
|
Identifies the hardware controller to which the device is attached. The controller designation, along with the unit number, identifies the location of the device within the hardware configuration of the system. Controllers are designated with alphabetic letters A to Z. |
|
|
Uniquely identifies the unit number of a device on a particular controller. Unit numbers are decimal numbers from 0 to 65535. |
6.6. Volumes and Volume Sets
The OpenVMS operating system recognizes disks and tapes, separate from the actual hardware drives they occupy, as volumes. A volume is an organized collection of data. The system also recognizes volume sets. A volume set consists of two or more related volumes. Binding volumes into a volume set allows you to extend the space available for your files by adding volumes to the same set, rather than by defining multiple, new volumes. The procedures for creating volume sets (as opposed to single volumes) are described in the VSI OpenVMS System Manager's Manual.
6.7. Device Management
|
Step |
Task |
|---|---|
|
1 |
Use the DCL command ALLOCATE to assign the disk drive to your process. |
|
2 |
Use the DCL command INITIALIZE to format the disk volume and write an identifying label on the volume, if needed. |
|
3 |
Use the DCL command MOUNT to make a volume and the files or data it contains accessible to your process. |
6.7.1. Allocating Devices
When you allocate a device, you reserve the device for exclusive use by your process. The device remains allocated to your process until you explicitly deallocate it (with the DCL command DEALLOCATE) or until you log out.
ALLOCATE device-name[:][,...] [logical-name[:]]
|
|
Specifies the drive on which the volume is loaded. The name can be a physical name, a generic name, or a logical name. |
|
|
Specifies an optional logical name to be associated with the device. |
6.7.2. Initializing Volumes
Creates a new file structure on the volume. Any data stored on the disk at the time of initialization is deleted during the initialization process.
Writes a label on the volume to identify it.
Defines the owner UIC and the protection for the volume.
Note
The INITIALIZE command does not prevent you from initializing another user's volume; to be sure the volume you initialize is your own, allocate the device before you initialize the volume.
If you give a volume to another user for initialization (for example, if you lack sufficient privileges to do it yourself), you should provide the volume label, the owner UIC, and the protection code for the volume.
INITIALIZE device-name[:] volume-label
|
|
Specifies the name of the device on which the volume is physically mounted. |
|
|
Identifies the volume. You can specify up to 12 alphanumeric characters for a disk volume or up to 6 alphanumeric characters for a magnetic tape volume. |
Initializing Disk Volumes
By default, the INITIALIZE command builds a Files–11 structure on your new volume. The default format for disk volumes initialized for or by the OpenVMS operating system is called the Files–11 On-Disk Structure Level 2. The INITIALIZE command can also initialize disk volumes in Files–11 On-Disk Structure Level 1 or 5.
You do not need special privileges to override logical protection on a blank disk volume (that is, a volume that has never been written to) or on a disk volume that is owned by your current UIC or by UIC [0,0]. In all other cases, you must have user privilege VOLPRO to initialize a disk volume.
$ INITIALIZE DKA300: ACCOUNTS
$ INITIALIZE/STRUCTURE=5 DKA300: FILES
6.7.3. Mounting Volumes
After allocating a disk volume, you need to mount it in order to use its files. The DCL command MOUNT makes a volume and the files it contains accessible to your process.
The device has not been allocated by another user.
The device protection allows you to allocate the device.
A volume is physically loaded on the specified device.
The label on the volume matches the label you specified.
You can mount a single volume or a volume set. The procedures for creating and mounting volume sets (as opposed to single volumes) are described in the VSI OpenVMS System Manager's Manual.
MOUNT device-name[:][,...] [volume-label[,...]] [logical-name[:]]
|
|
Specifies the physical device name or logical name of the device on which the volume is to be mounted. |
|
|
Specifies the label with which the volume was initialized. You do not need to specify the volume label if you use one of the following MOUNT qualifiers: /FOREIGN, /NOLABEL, or /OVERRIDE=IDENTIFICATION. |
|
|
Defines a name to be associated with the device. If you omit the logical name, the MOUNT command assigns the default logical names DISK$volume-label and TAPE$volume-label to disk and tape drives, respectively. |
6.7.4. Requesting Operator Assistance
Operators can perform the physical mounting (and dismounting) of both system and private volumes. If a volume is already placed in the drive you are going to use, you do not need operator assistance.
MOUNT messages are sent to all operators enabled to receive TAPE and DISK messages. For example, if operator assistance is needed for mounting a disk device, a message is sent to disk operators. If no operator is available (operator is not enabled) to receive and respond to a MOUNT request, a message is displayed to inform you of the situation. You can also specify the /NOASSIST qualifier to avoid operator assistance.
$ MOUNT DKA300: DISK VOL1
%MOUNT-I-OPRQST, PLEASE MOUNT DEVICE _MARS$DKA300:
%MOUNT-I-MOUNTED, DISK mounted on _DKA300:
$ ALLOCATE DKA300:  TEMP
%DCL-I-ALLOC, _MARS$DKA300: allocated
$ INITIALIZE  TEMP:  BACKUP_FILE
$ MOUNT  TEMP:  BACKUP_FILE
%MOUNT-I-MOUNTED, BACKUP_FILE mounted on _DKA300:
$ CREATE/DIRECTORY  TEMP:[ARCHIE]
Before you can place any files on the volume, you must create a directory, as shown by the CREATE/DIRECTORY command.
Mounting a Foreign Disk Volume
$ MOUNT/FOREIGN DISK
%MOUNT-I-MOUNTED, BACKUP_FILE      mounted on DISK$DMA2:
The MOUNT/FOREIGN command makes the contents of your volume available to the system but makes no assumptions concerning its file structure. In the preceding example, MOUNT reports a volume label, indicating that the disk has a Files–11 structure, even though it was mounted as a foreign device. If a disk does not have a recognized file structure, MOUNT does not display a label.
Note that you need the user privilege VOLPRO to mount a Files–11 structured disk with the /FOREIGN qualifier, unless its owner UIC matches your own.
6.8. Accessing Files on Private Devices
To access a file that is on a private device, you must either specify the device name or use the SET DEFAULT command to set default to the device and the directory name.
You can use physical, logical, or generic names to refer to devices. In addition, if your system is part of an OpenVMS Cluster system, certain devices are accessible to all members of an OpenVMS Cluster system. To access a file on a tape volume set, specify any device that has been allocated to it.
Although you can print a file from a privately owned volume, the volume containing the file to be printed must remain mounted until after the file has completed printing.
$ COPY DFILE.DAT TTB4:
The COPY command sends the file DFILE.DAT to the terminal named TTB4. The terminal accepts and displays the file one record at a time. When you use a device name as a file specification, follow the device name with a colon (:).
6.8.1. Dismounting Volumes
When you are done with the files on a disk or tape volume, you can use the DISMOUNT command to dismount the volume. Before a volume is dismounted, the DISMOUNT command checks for conditions that could prevent the dismount from completing. For example, if the volume contains installed swap and page files, installed images, or open user files, DISMOUNT displays an error message indicating that the volume cannot be dismounted.
$ DISMOUNT/NOUNLOAD MTA1:
In this example, the magnetic tape volume is logically dismounted and the tape is rewound but the tape remains physically loaded on drive MTA1.
You should always explicitly dismount a volume with the DISMOUNT command before physically unloading the volume. Wait for the drive to unload before you remove the volume. You can verify that the dismount is complete by entering the DCL command SHOW DEVICES.
A volume is dismounted and unloaded automatically if you log out of the job from which you had mounted the volume. If the system fails, however, the volume is not automatically dismounted. If the device you are dismounting was allocated with an ALLOCATE command, it remains allocated after it is dismounted with the DISMOUNT command. If the device was implicitly allocated by the MOUNT command, the DISMOUNT command deallocates it.
Chapter 7. Using Mail to Communicate with Others
Invoking and exiting mail
Reading messages
Sending messages
Sending mail over networks
Sending messages to multiple users
Manipulating files in mail
Other ways to send messages
Organizing messages
Deleting messages
Printing mail messages
Protecting mail files
Using text editors in Mail
Customizing your Mail environment
Summary of Mail commands
Using the MIME Utility
Enter the HELP MAIL command at the DCL prompt or enter the HELP command at the MAIL> prompt, for more information about Mail commands and qualifiers.
The VSI OpenVMS System Manager's Manual, for more information about controlling the use of Mail through user accounts.
Enter HELP TCPIP_SERVICES at the DCL prompt, for more information about TCP/IP mail commands and qualifiers.
The VSI TCP/IP Services for OpenVMS User's Guide, for more information about sending and receiving mail using TCP/IP services.
The following figure shows a sample mail message and its components.
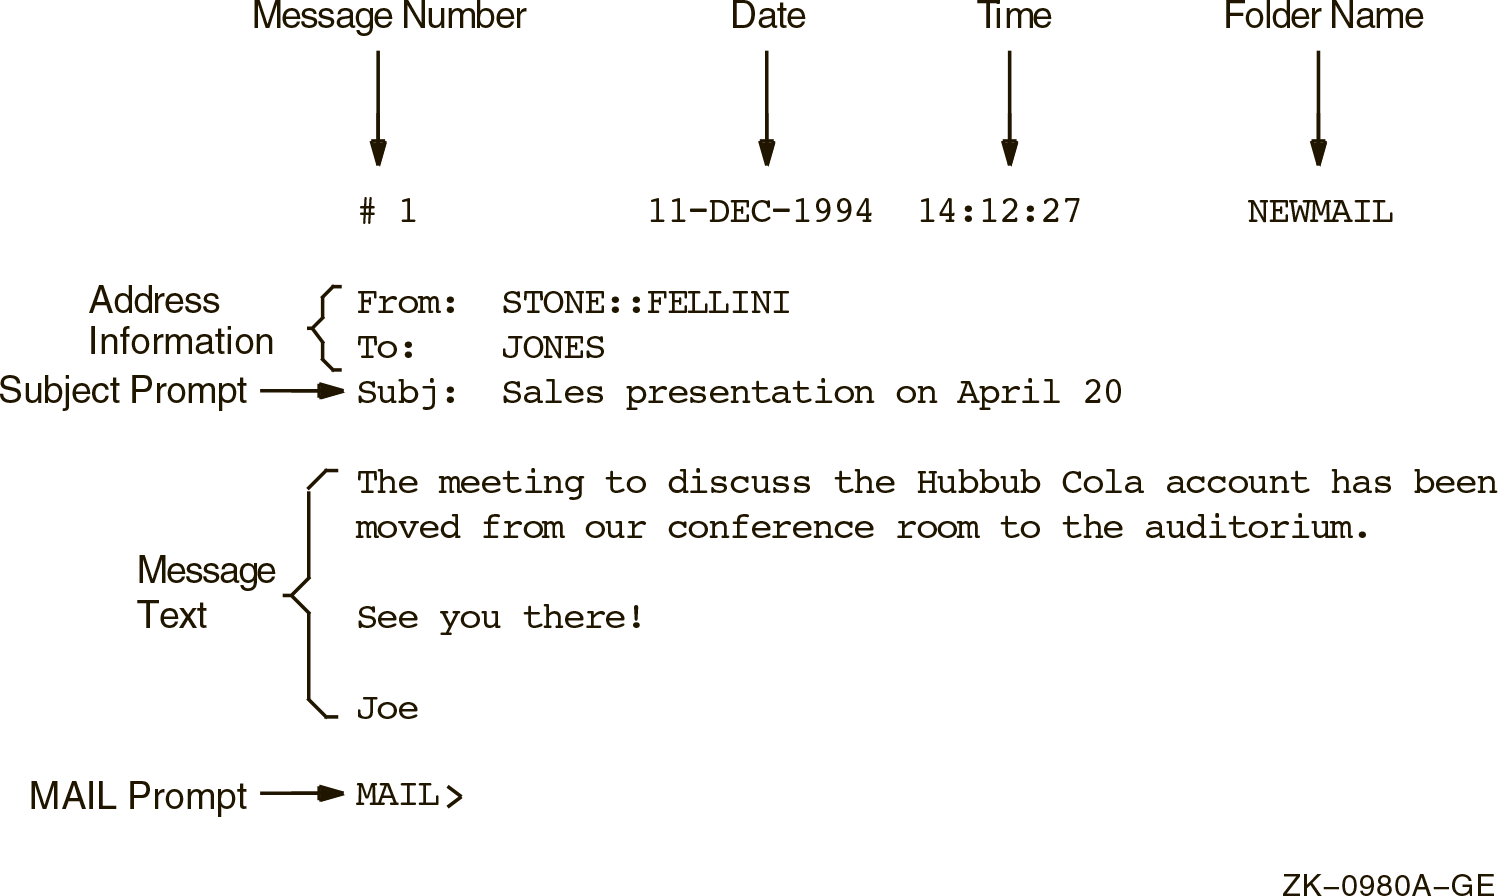 |
7.1. Invoking and Exiting Mail
The following sections describe how to invoke and exit Mail.
7.1.1. Invoking Mail
$ MAIL
MAIL>
Read a mail message
Send a mail message
Reply to a mail message
Forward a mail message
Organize mail messages into files and folders
Delete a mail message
Print a mail message
7.1.2. Exiting from Mail
MAIL> EXIT
$
You can also exit from Mail by pressing Ctrl/Z or by using the QUIT command.
7.2. Reading Messages
Mail stores the messages you receive in mail files, which have the default file type .MAI. In this file, by default, Mail provides two folders that store old and new messages. New messages are automatically placed in a folder called NEWMAIL; old messages are placed in a folder called MAIL. After you read a new message, the message automatically moves from the NEWMAIL folder to the MAIL folder, unless you enter the FILE, MOVE, or DELETE command. Mail deletes the NEWMAIL folder after you have read all new mail messages and either select another folder or exit from Mail.
7.2.1. Reading New Mail
New mail on node DOODAH from STONE::FELLINI (10:02:23)
$ MAIL

You have 1 new message.

MAIL>
If you have more than one new message, press Enter at the MAIL> prompt to read the other messages. When you have read all your new messages, Mail issues the message "%MAIL-E-NOMOREMSG, no more messages" and continues to prompt for commands until you exit Mail.
If you receive a mail message while you are in Mail, enter the READ/NEW command to read the new message.
7.2.2. Reading Old Messages
| Step |
Task |
|---|---|
| 1 |
Enter the SELECT command at the MAIL> prompt. For
example:
MAIL> SELECT MAIL Mail places you in the folder named MAIL. |
| 2 |
To read the first message in your default MAIL folder, press Enter at the MAIL> prompt or enter the READ command. Mail displays the first message (1) in your default mail file. |
| 3 |
To display the next message, press Enter. If the message is too long to display on one screen, press Enter to display the next part of the message. To skip the remainder of a message and display the next message, enter the NEXT command. |
| Step |
Task |
|---|---|
| 1 |
Enter the DIRECTORY command at the MAIL> prompt. To select a subset of messages from the list, use the DIRECTORY command qualifiers /FROM or /SUBJECT. |
| 2 |
Enter the number of the message that you want to read at the MAIL> prompt. Mail displays the message that you selected. |
MAIL> DIRECTORY
                                                          MAIL
# From              Date              Subject
1 STONE::FELLINI    11-DEC-1999       Sales presentation on May 11
2 DOODAH::JONES     11-DEC-1999       Status

MAIL> 2
7.2.3. Searching for Messages
If you have many messages, you can locate a particular message by using the SEARCH command to find a string in one or more of the messages. To search for a string, specify that string as a parameter to the SEARCH command.
Each time you specify a new string, the SEARCH command starts the search at message number 1. To continue searching the folder for messages that contain the specified string, use the SEARCH command without specifying a parameter. To search for the same string in a different folder, enter the SELECT or SET FOLDER folder-name command and continue using the SEARCH command without specifying a parameter.
MAIL> SEARCH "appointment"
7.3. Sending Messages
| Step |
Task |
|---|---|
| 1 |
Enter SEND at the MAIL> prompt. Mail prompts you for the name of the user to receive the message. |
| 2 |
Enter the name of the user receiving the message and press Enter. Mail prompts you for the subject of the message. |
| 3 |
Enter the subject of the message and press Enter. Entering this information is optional. Mail prompts you for the text of the message. |
| 4 |
Enter the text of a message, or just press Enter. Entering this information is optional. |
| 5 |
Press Ctrl/Z to send the message. If you decide not to send the message, press Ctrl/C, which cancels the send operation without exiting from Mail. |
MAIL> SEND
To: THOMPSON
Subj: Meeting on April 20
Enter your message below. Press CTRL/Z when complete, or CTRL/C to quit:
I have some new ideas about the Hubbub Cola account.
Let me know  when you are available to talk about them.


–Jeff
7.4. Sending Mail Over Networks
The following sections describe how to send mail across the network.
7.4.1. Specifying Your Network Protocol
If the node component of the address contains a period (.), the address is interpreted as an Internet address. Mail uses the SMTP protocol by default unless you have previously set up your system to use a different Internet protocol by defining that alternate protocol with the MAIL$INTERNET_TRANSPORT logical name.
If the node component of the address does not contain a period, the address is interpreted as a DECnet address.
However, you can customize your Mail environment to force the system to choose a specific protocol. This option is helpful in cases where a mail address can be interpreted as valid for either the Internet or DECnet protocol.
HYBRID (the default)
If the node component of the address contains a period (.), Mail uses an Internet protocol. If there are no periods, Mail uses the DECnet protocol.
DECNET
Mail always interprets the node component of the address as a DECnet node specification.
SMTP
Mail always interprets the node component of the address as an Internet address specification. The default transport is SMTP unless you use the MAIL$INTERNET_TRANSPORT logical to define an alternate Internet transport.
To modify your Mail environment in any of these ways, VSI recommends that you define the MAIL$INTERNET_MODE and MAIL$INTERNET_TRANSPORT logical names in your LOGIN.COM file. See Chapter 11, "Defining Logical Names for Devices and Files" for complete information about using and defining logical names.
$ DEFINE MAIL$INTERNET_MODE SMTP
When you then specify smith@pluto, Mail interprets this address as an Internet address and uses the SMTP protocol (for example, SMTP%"smith@pluto.xyz.dec.com").
7.4.2. Specifying Node Names
nodename::username
Mail displays a message if the network connection to the remote node is not available. Wait a while, and then try again to send the message.
For additional information on specifying node names, refer to Section 3.1.6, ''Network Node Names''.
MAIL> SEND
To: CHEETA::HIGGINS
7.4.3. Using Internet Mail Addresses
username@company.com
MAIL> SEND
To: J_SMITH@COMPANYNAME.COM, Kate.Muir@school.edu
7.4.4. Using Logical Node Names
You can use a logical name to represent a user's name and node; then you can use the logical name to send mail. Note that Mail ignores any access control information in the node name or logical name.
$ DEFINE HENRY CHEETA::HIGGINS
$ MAIL
MAIL> SEND
To: HENRY
7.5. Sending Messages to Multiple Users
The following sections describe how to send mail to more than one user.
7.5.1. Using Individual Names
You can send mail to several users at the same time in one of two ways: using individual user names at the To: prompt or using a distribution list. To send the same message to several users on the same node by using their user names, enter the user names at the To: prompt and separate them with commas or spaces.
MAIL> SEND
To:      THOMPSON,JONES,BARNEY
Subj:    Meeting on January 9
7.5.2. Creating Distribution Lists
A distribution list is a file that contains a list of users and their node names. You must use a text editor to create distribution lists. Distribution lists are not created within the Mail utility.
Your open file quota (a limit associated with your account) determines the number of different nodes to which you can send mail (at one time) and the depth to which you can nest distribution lists. If you exceed the quota, Mail displays an error message. Ask your system manager to increase your quota or send mail in batches to fewer nodes at one time.
By default, the system looks for a distribution list file with the file type .DIS. If the file containing your distribution list has a different file type, specify the file name and file type at the To: prompt. If you invoke Mail while in one directory and the file containing the distribution list is in another, enter the distribution list's full directory name at the To: prompt.
|
Step |
Task |
|---|---|
|
1 |
Use a text editor to create a distribution list file with the file type .DIS. |
|
2 |
Type one user name per line in the file. |
|
3 |
To include the names of other distribution lists in the file (to "nest" the lists), specify an at sign (@) followed by the name of the distribution list. |
|
4 |
To include comments in the file, enter an exclamation point (!) before the comment. |
! ALLBUDGET.DIS
!
! Budget Committee Members
@BUDGET         ! listed in BUDGET.DIS.
! Staff
  Thompson
  BRUTUS::JONES
  PORTIA::BARNEY
If the file BUDGET.DIS is not in the same directory as the new distribution list file you are creating (ALLBUDGET.DIS), include the file specification for BUDGET.DIS in the new distribution file. Depending on where you create ALLBUDGET.DIS, you might have to specify the device and directory in which BUDGET.DIS is located. See Chapter 3, "Storing Information with Files" for more information about file specifications.
7.5.3. Sending Messages to Distribution Lists
|
Step |
Task |
|---|---|
|
1 |
Invoke Mail. |
|
2 |
Type SEND at the MAIL> prompt and press Enter. |
|
3 |
Type an at sign (@) and the file name of the distribution list at the To: prompt. Press Enter. |
|
4 |
Type the subject of the message at the Subj: prompt and press Enter. |
|
5 |
Enter the text of the message at the text prompt. |
MAIL> SEND
To: @ALLBUDGET
Subj: Tomorrow's Meeting
Enter your message below. Press CTRL/Z when complete, or CTRL/C to quit:

The meeting about the Hubbub Cola account is tomorrow at 2:00.

–Jeff
You can also send a file to a distribution list from DCL level. If you omit the file type .DIS, place quotation marks ("") around the at sign (@) and file name to identify the file as a distribution list. To include a subject, use the /SUBJECT qualifier with the MAIL command.
$ MAIL/SUBJECT="update" MEETING THOMAS,"@FRIENDS.DIS"
$ MAIL NOTICE "@WRITERS"
7.6. Manipulating Files in Mail
|
Step |
Task |
|---|---|
|
1 |
At the MAIL> prompt, enter SEND and the name of the file you want to send. |
|
2 |
At the To: prompt, enter the user name of the person you want to receive the file. |
|
3 |
At the Subj: prompt, enter the subject of the file. |
|
4 |
Press Enter to send the file. To cancel the send operation, press Ctrl/C or Ctrl/Y. Ctrl/C keeps you within Mail; Ctrl/Y returns you to DCL level. |
MAIL> SEND MEMO.TXT
To: EDGELL
Subj: Another memo
When files are copied using the COPY command, the operating system performs data-integrity checking. This check does not occur when sending a file through mail and can cause corrupted files to occur when sending foreign (such as executable) files.
Use discretion when sending large files. Users on some systems may not be able to receive large files (such as PostScript files).
7.6.1. Sending DDIF Files
If the file is a compound document structured according to the DIGITAL Document Interchange Format (DDIF) specification, Mail preserves the OpenVMS RMS file tags and DDIF semantics, for OpenVMS AXP Version 1.0 or VAX/VMS Version 5.2-2 or later systems only. If you try to send mail messages containing DDIF files to operating systems other than OpenVMS or to OpenVMS systems earlier than OpenVMS AXP Version 1.0 or VAX/VMS Version 5.2-2, Mail returns an error message.
7.6.2. Sending Files from DCL
When you send a file from DCL level, Mail is invoked but you do not enter an interactive session, nor do you see the MAIL> prompt. When the file is sent, you return to DCL level automatically. After you have typed the MAIL command with the appropriate qualifiers, press Enter to send the file or press Ctrl/C to cancel the send operation.
No wildcard characters are allowed in the file specification. If you omit the file type, the default file type is .TXT.
If you specify SYS$INPUT as the file specification, you are prompted for the text of the message (while still remaining at the DCL level). For more information on using SYS$INPUT, see Chapter 11, "Defining Logical Names for Devices and Files".
When you are sending a file from DCL level, the argument to the optional /SUBJECT qualifier must be enclosed in quotation marks if it contains any spaces or nonalphanumeric characters.
$ MAIL/SUBJECT="Another memo" MEMO.TXT CHEETA::EDGELL
$ MAIL SYS$INPUT:
To: ARMSTRONG
Enter your message below.  Press CTRL/Z when complete, or CTRL/C to quit:
The text of the message is here.
Ctrl/Z
$
7.6.3. Creating Files from Messages
To create a text file from a message, enter the EXTRACT command and the file name at the MAIL> prompt while you are reading the message. When you exit from Mail, the file is listed in your current directory (unless you specify another directory). If the file is a DDIF file, Mail preserves the OpenVMS RMS file tags and DDIF semantics (VAX/VMS Version 5.2-2 or later).
The mail header is composed of the From:, To:, and Subj: lines. To create a file that does not include header information, specify the /NOHEADER qualifier to the EXTRACT command. If the message has more than one header (for example, a forwarded message), only the topmost header is deleted.
Use the /APPEND qualifier to the EXTRACT command to copy a message to the end of an existing file. Use the /ALL qualifier to copy all the files in the current folder to an existing file.
#1                  01-DEC-1999  14:12:27        NEWMAIL

From:  STONE::FELLINI
To:    Thompson
Subj:  Dates for December sales meetings

Sales meetings in December will be held on the following dates:
      Wednesday Dec. 8, 1999
      Tuesday   Dec. 14, 1999
      Monday    Dec. 20, 1999
      Thursday  Dec. 30, 1999
MAIL> EXTRACT DEC_MEETINGS.TXT
%MAIL-I-CREATED, DISK:[THOMPSON]DEC_MEETINGS.TXTMAIL> READ 3 . . . MAIL> EXTRACT/NOHEADER JANUARY_MEETINGS.TXT %MAIL-I-CREATED, DISK1:[JONES]JANUARY_MEETINGS.TXT;1 created MAIL>
7.6.4. Appending Files to Messages
To append a small file to the end of a mail message automatically, use the SET SIGNATURE_FILE command. The file you specify is automatically (by default) appended to every mail message you send using the ANSWER, FORWARD, MAIL, REPLY, or SEND command. An example of a signature file is a text file that is formatted as a business card, containing the user's company name, address, telephone number, and Internet address.
If you want to selectively append a file to a message or override the default signature file setting, use the /SIGNATURE_FILE[=file-name] qualifier with the ANSWER, FORWARD, MAIL, REPLY, or SEND command.
Use the SHOW SIGNATURE_FILE command to show whether you specified a default signature file. The SHOW ALL command also displays signature file information.
You can also set the default signature file at the DCL level by using the /SIGNATURE_FILE[=file-name] qualifier with the DCL command MAIL.
Note that when you create a mail message that includes a signature file, that message requires more temporary disk space than a conventional message because temporary files are created during the operation. After the message is sent, those temporary files are deleted.
If you do not specify a file type, the default is .SIG.
If you do not specify a directory, the Mail utility searches for the signature file in your mail directory.
MAIL> SET SIGNATURE_FILE BUSINESS_CARD.SIG
MAIL> REPLY/SIGNATURE_FILE=GREETINGS.SIG
7.7. Other Ways to Send Messages
The following sections describe other ways to use the Mail utility to send messages.
7.7.1. Replying to Messages
|
Step |
Task |
|---|---|
|
1 |
Type REPLY at the MAIL> prompt and press Enter. |
|
2 |
Enter your message and press Ctrl/Z to send the message or press Ctrl/C to quit. |
To: STONE::THOMPSON
Subj:  RE: Budget Meeting
Enter your message below. Press CTRL/Z when complete. CTRL/C to quit:
7.7.1.1. Replying to an Address Containing Nested Quotation Marks
In most cases, you can use the Mail command REPLY to reply to mail received from an address containing nested quotation marks. However, if your system does not have this capability, contact your system manager.
7.7.2. Forwarding Messages
To forward a mail message to other users, enter the FORWARD command at the MAIL> prompt after you have read the message. Mail prompts you for the name of the addressee and a subject line. After you enter the requested information, press Enter to send the message.
If you forward a message that consists of a .DDIF file, Mail sends the entire .DDIF file, including .DDIF semantics and the .DDIF tag, to the addressee.
MAIL> FORWARD
To: STONE::JONES
Subj: FYI -  Status of proposed budget meeting
7.7.2.1. SET FORWARD Command
MAIL> SET FORWARD STAR::SMITH
MAIL> SET FORWARD SMITH@Company.com
In this case, all mail sent to OLD::SMITH will be sent to SMITH@Company.com.
Always send a test message to the old account to confirm that the account is forwarding correctly. To avoid creating forwarding loops where mail messages forward infinitely and never arrive, never set an account to forward to itself or another forwarding account. Do not forward OLD::SMITH to OLD::SMITH. Do not forward OLD::SMITH to STAR::SMITH and then forward STAR::SMITH to OLD::SMITH.
MAIL> SHOW FORWARD
Your mail is being forwarded to STAR::SMITH.
MAIL> SET NOFORWARD
MAIL> SHOW FORWARD
You have not set a forwarding address.
Note
In prior versions of the OpenVMS operating system, you had to specify an extra pair of quotation marks if you wanted them included with the SET FORWARD command because the command automatically removed the first pair. Starting with OpenVMS Version 7.0, you need not specify an extra pair of quotation marks because the SET FORWARD command no longer removes the first pair.
7.8. Organizing Messages
The following sections describe how to organize mail messages.
7.8.1. Creating Folders
To organize your mail messages, you can create your own mail files and folders. A mail file contains folders, and a folder contains mail messages. Each folder and file can contain any number of messages.
Typically, you organize your messages by creating folders rather than by creating mail files. As with the default mail folders (NEWMAIL, MAIL, WASTEBASKET), the folders you create are normally stored in the mail file MAIL.MAI. The name of the current folder is displayed in the top right corner of the screen each time you enter a READ or DIRECTORY command. You can work only with messages that are in your current folder.
If your mail file is very large (over 500 blocks), you might want to create separate mail files for the larger folders to improve Mail's performance.
7.8.2. Creating Mail Subdirectories
When you receive mail messages, they are written to files named
MAIL$xxxxxxxxxx.MAI by default and are located in your top-level
directory. Note that the x characters represent a long, random file
specification. Your default mail file, MAIL.MAI, is created in your top-level directory
the first time you receive a mail message.
To avoid the display of .MAI files in your top-level directory, use the Mail command SET MAIL_DIRECTORY. This command creates a mail subdirectory and moves all your .MAI files to that subdirectory. To move the .MAI files from a subdirectory back to your top level directory, use the SET NOMAIL_DIRECTORY command.
To display the name of the subdirectory that contains all your .MAI files, enter SHOW MAIL_DIRECTORY at the MAIL> prompt.
MAIL> SET MAIL_DIRECTORY [.MAIL]
MAIL> SHOW MAIL_DIRECTORY
Your mail file directory is SY$LOGIN:[FRED.MAIL]
7.8.3. Moving Messages into Folders
You can use either the FILE command or the MOVE command to place the current message in a different folder. If the folder does not exist, Mail displays a message asking if you want to create it. After filing the message in the specified folder, Mail automatically deletes the message from the current folder.
7.8.4. Copying Messages Between Folders
The Mail command COPY places a copy of the current message into the folder you specify. If the folder does not exist, Mail displays a message asking if you want to create it.
MAIL> SEARCH MEETING
MAIL> COPY SCHEDULE
Folder SCHEDULE does not exist.
Do you want to create it (Y/N, default is N)?Y
%MAIL-I-NEWFOLDER, folder SCHEDULE created
MAIL> SEARCH
MAIL> COPY SCHEDULE
MAIL> SEARCH
%MAIL-E-NOTFOUND, no messages containing 'MEETING' found
7.8.5. Selecting Folders
SELECT foldername
Selects the specified folder as the current folder. Subsequent Mail commands, such as READ and DIRECTORY, use the selected folder. You do not need to specify a folder name with each command.
SET FOLDER foldername
This command works the same as the SELECT command.
DIRECTORY foldername
Selects the specified folder as the current folder and lists the messages in the folder.
READ foldername
Selects the specified folder as the current folder and displays the specified message (by default, the first message in the folder).
MAIL> DIRECTORY/FOLDER
Listing of folders in SYS$LOGIN:[FRED]MAIL.MAI;1
     Press CTRL/C to cancel listing
MAIL                                  MEETING_MINUTES
MEMOS                                 PROJECT_NOTES
STAFF

MAIL> SELECT MEMOS
7.8.6. Deleting Folders
To delete a mail folder, delete all the messages in the folder or move them to another folder. When you delete all messages in a folder, the empty folder is deleted automatically as soon as you select another folder.
MAIL> SELECT MUSIC
%MAIL-I-SELECTED, 2 messages selected
MAIL> DELETE/ALL
7.8.7. Creating and Accessing Mail Files
You can also create files to organize your mail messages. You use the same commands to create a mail file that you use to create a folder: COPY, MOVE, and FILE. After Mail prompts you for the name of the folder, it also prompts you for a file name. If you enter a new file name at the File: prompt, a new mail file is created.
To work within a mail file other than the default mail file, use the Mail command SET FILE to specify the alternate file. The Mail command SHOW FILE displays the name of the current mail file. When you change mail files, the WASTEBASKET folder of the current mail file is emptied and deleted (if AUTO_PURGE is set) and the mail file is closed.
Figure 7.1, ''Organizing Mail'' shows how a typical user might organize their mail.
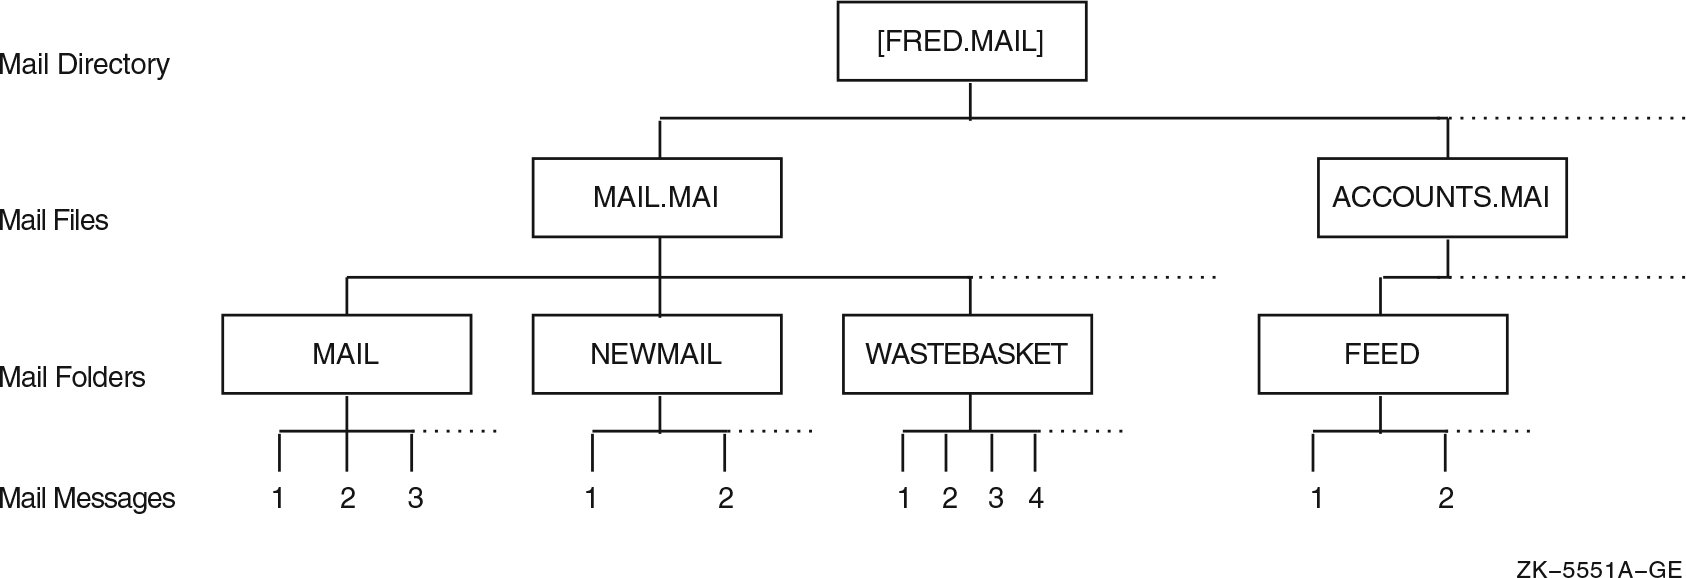 |
MAIL> MOVE
_Folder: FEED
_File: ACCOUNTS
MAIL> SET FILE ACCOUNTS
MAIL> SET FOLDER FEED
MAIL> SHOW FILE
Your current mail file is SYS$LOGIN:[FRED.MAI]ACCOUNTS.MAI;1.
7.8.8. Correcting the Mail Message Count
"%MAIL-W-NONEWMAIL, no new messages"
"%MAIL-E-NOMOREMSG, no more messages"
7.9. Deleting Messages
To delete a mail message from the current folder, either enter the DELETE command while you are reading the message or enter the DELETE command followed by the number (or range of numbers) of the message you want to delete. You can use either the hyphen (-) or the colon (:) to define the range of messages to be deleted.
MAIL> DELETE 4-6,11,12,14:17
7.9.1. Recovering Deleted Messages
When you delete a message, the message is moved to a folder called WASTEBASKET. Deleted messages collect in the WASTEBASKET folder until you exit from the current mail file (either by exiting from Mail or by specifying a different mail file). If you have issued the SET AUTO_PURGE command, when you exit from the current mail file, WASTEBASKET is emptied and the folder itself is deleted. During your interactive Mail session, you can recover any deleted message by moving the message out of the wastebasket folder. You can also empty the WASTEBASKET folder by entering the PURGE command.
MAIL> DELETE 12

MAIL> SELECT WASTEBASKET
%MAIL-I-SELECTED, 1 message selected

MAIL> DIRECTORY
    # top
From                 Date         Subject

    1 FABLES::WEST         11-DEC-1999  Meeting this week

MAIL> MOVE MAIL
7.10. Printing Mail Messages
To print a mail message, enter the PRINT command at the MAIL> prompt. By default, Mail sends your message to the SYS$PRINT queue. Mail files are not sent to a print queue until you press Ctrl/Z, enter the EXIT command, or enter the PRINT/PRINT command.
To specify a different queue, use the PRINT command qualifier /QUEUE. You can also select a different queue by issuing the SET QUEUE queue-name command; this queue will remain your default print queue until you enter another SET QUEUE command, even if you exit Mail.
MAIL> PRINT/QUEUE=AK34$PRINT
MAIL> SET QUEUE AK34$PRINT
7.11. Protecting Mail Files
The following sections describe how to protect mail files.
7.11.1. Default Protection
Mail files (for example, MAIL.MAI) are protected so that no one else can read them and so that you cannot accidentally delete them. The protection code that Mail gives .MAI files is: (S:RW,O:RW,G:,W:). The system (including Mail itself) and the owner (you) can read and write to the file. The group and world are denied all access.
The Mail utility also has default file protection to discourage mail tampering. However, Mail is not completely secure from tampering. Anyone with sufficient privileges can change protection and access mail files.
7.11.2. Security Measures
Use your judgment in responding to mail requests: if a node is outside your local OpenVMS Cluster environment, it is possible that the source node is incorrectly identified, either accidentally or intentionally.
It is best to use discretion in the content of your mail messages and in the selection of your audience.
Never reveal your password or send details about how to use your account. You have no control over information in a mail message once you have sent it.
7.12. Using Text Editors in Mail
The following sections describe how to use text editors in the Mail environment.
7.12.1. Using EVE
You can use a text editor to write a message before you send it. To do so, specify the /EDIT qualifier with the SEND command. After you respond to the To: and Subj: prompts, Mail invokes the text editor. Unless you have selected a different editor, Mail invokes the DECTPU-based EVE editor.
The [End of file] marker moves down as you enter text. For more information about the EVE editor, see Chapter 8, "Editing Text Files with EVE". To send the message, press the Do key and enter the EXIT command. To cancel the send operation, press the Do key and enter the QUIT command.
MAIL> SEND/EDIT
[End of file]


Buffer:  MAIN                     |  Write  | Insert | Forward
Note
Do not edit a .DDIF mail file because you will no longer be able to use the file as a .DDIF file. If you edit a .DDIF mail file, you can access only the text of the file.
7.12.2. Using /EDIT Qualifier Keywords
By specifying the /EDIT qualifier when you invoke Mail, you can use the editor for sending, replying, and forwarding during the ensuing mail session. You can also use keywords with the /EDIT qualifier to set the default for Mail.
To invoke the editor only when you are replying to a message, use the REPLY keyword with the MAIL/EDIT command. To invoke the editor and display the message to which you are replying, use the REPLY keyword with the =EXTRACT option. If you do not specify a keyword with /EDIT, the default is /EDIT=(SEND,REPLY).
To send or reply to a message, EXIT from the editor. To cancel a SEND or REPLY command, enter the QUIT command to exit from the editor.
Examples
$ MAIL/EDIT=(SEND,FORWARD)
$ MAIL/EDIT=(REPLY)
$ MAIL/EDIT=(REPLY=EXTRACT)
7.12.3. Selecting an Editor
By default, Mail invokes the DECTPU-based EVE editor when you specify the Mail command SEND/EDIT. By entering the Mail command SET EDITOR, you can specify that a different editor be invoked instead of EVE. For example, to select the EDT editor, issue the Mail command SET EDITOR EDT. The EDT editor remains your default Mail editor (even if you log out of the system and log back in) until you enter another SET EDITOR command.
To display the name of the selected Mail editor, enter the Mail command SHOW EDITOR.
7.12.4. Using a Command File to Edit Mail
You can define the logical name MAIL$EDIT to be a command file before entering Mail. Then, when you issue any Mail command that invokes an editor, the command file will be called to perform the edit. In the command file, you can also invoke other utilities such as the spell-checker and you can specify any function that can be done in a command file. Refer to Appendix B, "Annotated Command Procedures" for an annotated example of a MAILEDIT.COM command procedure and refer to Chapter 13, "Introduction to Command Procedures" and Chapter 14, "Advanced Programming with DCL" for more information on command files.
7.12.5. Overriding Your Selected Editor
$ DEFINE MAIL$EDIT CALLABLE_EDT
If you issue the SET EDITOR command during a session that was invoked with MAIL$EDIT defined, you override both your permanent selected editor and the current editor setting. To use the command file defined by MAIL$EDIT again, you must exit from Mail and restart it.
7.13. Using the Mail Keypad
You can use the numeric keypad on your keyboard to execute commands in Mail. Most keypad keys can execute two commands.
Figure 7.2, ''Mail Utility Keypad'' shows the Mail keypad. To enter the top command for each key shown, press the appropriate key. To enter the bottom command shown, press the PF1 key first, and then the desired function key.
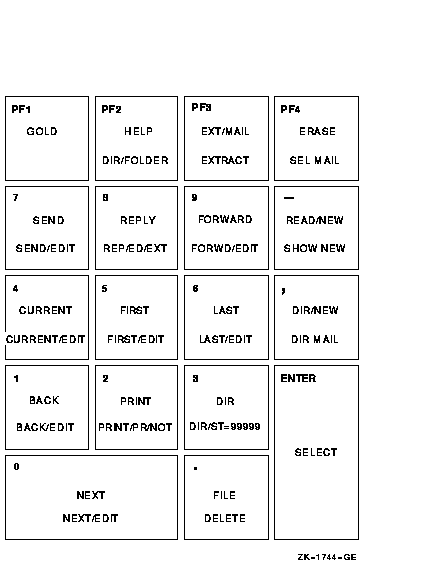
To execute the Mail command SEND, press KP7. To execute the Mail command SEND/EDIT, press the PF1 key first and then press KP7.
7.13.1. Redefining Keypad Keys
You can redefine the keypad keys to execute Mail commands when you are in Mail. Note that the previous definition of the key is superseded when you redefine a key.
Defining keypad keys in Mail is similar to defining keypad keys to execute DCL commands.
MAIL> DEFINE/KEY KP2 "PRINT/PARAM=PAGE_ORIENT=LANDSCAPE"
7.13.2. Assigning Additional Key Definitions
To increase the number of key definitions available on your terminal, use the /STATE qualifier. You can assign many definitions to the same key as long as each definition is associated with a different state. State names can be any alphanumeric string. By specifying states, you can press a key once to enter a command and a second time to enter a qualifier.
MAIL> DEFINE/KEY PF1 "DIRECTORY"/SET_STATE=FOLDER /NOTERMINATE
MAIL> DEFINE/KEY PF1 "/FOLDER" /IF_STATE=FOLDER /TERMINATE
Press PF1 twice to enter the command DIRECTORY/FOLDER. The /TERMINATE qualifier ends the command line so you do not need to press the Enter key.
7.13.3. Creating Permanent Key Definitions
DEFINE/KEY PF1 "DIRECTORY "     /NOTERMINATE    /SET_STATE=folder
DEFINE/KEY PF1 "/FOLDER"        /TERMINATE      /IF_STATE=folder
DEFINE/KEY PF2 "SELECT "        /NOTERMINATE    /SET_STATE=mail
DEFINE/KEY PF2 "MAIL"           /TERMINATE      /IF_STATE=mail
DEFINE/KEY PERIOD "READ "       /NOTERMINATE    /SET_STATE=new
DEFINE/KEY PERIOD "/NEW"        /TERMINATE      /IF_STATE=new
$ DEFINE MAIL$INIT SYS$LOGIN:MAIL$KEYDEF.INI
7.14. Summary of Mail Commands
This section contains a summary of all Mail utility commands. For complete information on qualifiers used with these commands, refer to online help.
See also Section 7.15, ''MIME Utility'' for information about using the MIME utility to read and compose MIME-encoded messages.
7.14.1. Reading Messages
BACK
Displays the message preceding the current or last-read message when the last command issued was READ. When the last command issued was DIRECTORY, the BACK command displays the preceding screen of the directory listing.
CURRENT
Displays the beginning of the message you are currently reading.
DIRECTORY [folder-name]
Displays a list of the messages in the current mail file, including message number, sender's name, date, and subject.
ERASE
Clears your terminal screen.
EXTRACT
Places a copy of the current message into the specified output file. To copy a mail message to a folder in a Mail file, use either the COPY, FILE, or MOVE command.
FIRST
Displays the first message in the current folder.
LAST
Displays the last message in the current folder.
NEXT
Skips to the next message and displays it.
READ [folder-name] [message-number]
Displays your messages. Pressing the Enter key is the same as entering the READ command without parameters.
SEARCH search-string
Searches the currently selected folder for the message containing the first occurrence of the specified text string.
SHOW NEW_MAIL_COUNT
Displays the number of unread mail messages.
7.14.2. Exchanging Messages
ANSWER [filespec]
REPLY [filespec]
Sends a message to the sender of the message you are currently reading or of the one you last read.
FORWARD
Sends a copy of the message you are currently reading (or have just read) to one or more users.
MAIL [filespec]
SEND [filespec]
Sends a message to one or more users.
7.14.3. Removing Messages
DELETE [message-number]
Deletes either the message you are currently reading, a range of messages, or the message you just read, and moves it to the WASTEBASKET folder.
PURGE
Deletes all the messages in the WASTEBASKET folder. When you exit from Mail or enter a SET FILE command (to select a new mail file), an implicit purge is done to empty the WASTEBASKET folder, unless you have previously entered the SET NOAUTO_PURGE command.
SET [NO]AUTO_PURGE
Determines whether Mail empties the WASTEBASKET folder when you enter the EXIT or SET FILE command. When you use the SET NOAUTO_PURGE command, you must enter the PURGE command periodically to delete the messages in the WASTEBASKET folder.
SHOW AUTO_PURGE
Displays whether messages in the WASTEBASKET folder are deleted (purged automatically) when you enter the EXIT or SET FILE command.
7.14.4. Printing Messages
PRINT
Adds a copy of the message you are currently reading to the print queue. The files created by the PRINT command are released to the print queue when you exit from Mail. Multiple messages are concatenated into one print job unless you use the /NOW or /PRINT qualifier.
SET [NO]FORM form-name
SHOW FORM
Sets the default print form for printing done within Mail. The SET NOFORM command clears the default print form. The SHOW FORM command displays the default print form.
SET [NO]QUEUE queue-name
SHOW QUEUE
Sets the default print queue to be used when you enter the PRINT command from within Mail. SET NOQUEUE clears the previously defined print queue and sets the queue to SYS$PRINT, the default print queue. The SHOW QUEUE command displays your default print queue.
7.14.5. Organizing Messages
COPY folder-name [filename]
Copies a message to another folder without deleting it from the current folder. If the specified folder does not exist, it is created.
FILE folder-name [filename]
MOVE folder-name [filename]
Moves the current message to the specified folder and deletes the message from the original folder.
SELECT [folder-name]
SET FOLDER [folder-name]
Establishes a set of messages that you can affect as a group. You can copy or move this set of messages from one folder to another. You can also read and delete, or search and extract a set of messages. In addition, you can use the SELECT and SET FOLDER commands to move from one folder to another.
SET FILE filename
Establishes (or opens) another file as the current mail file. By default, your mail file is MAIL.MAI. If you use the COPY command, the FILE command, or the MOVE command to create other mail files (for example, JOKES.MAI or HISTORY.MAI), you can then use the SET FILE command to open the Mail files.
SHOW FILE
Displays the name of the mail file that is currently open.
SHOW FOLDER [folder-name]
Displays the current folder name.
SET WASTEBASKET_NAME folder-name
Changes the name of the WASTEBASKET folder, which contains messages to be deleted. You can delete all the messages in the WASTEBASKET folder by entering the PURGE command. If AUTO_PURGE is set, when you enter the EXIT command, messages in the WASTEBASKET folder will be deleted. If AUTO_PURGE is set, you can avoid deleting messages in the WASTEBASKET folder by entering the QUIT command.
SHOW WASTEBASKET_NAME
Displays the name of the WASTEBASKET folder.
SHOW DELETED
Displays the amount of deleted message space in the current mail file.
7.14.6. Marking Messages
MARK [message-number]
Sets the current or specified message as marked. Marked messages are displayed with an asterisk (*) in the left column of the directory listing. To select or organize marked messages, use the SELECT command with the /MARKED qualifier.
UNMARK [message-number]
Sets the current or specified message as unmarked. The asterisk (*) in the left column of the directory listing is deleted.
7.14.7. Customizing the Mail Environment
DEFINE/KEY key-name string
Defines a key to execute a Mail command. You can press the key to enter a command instead of typing the command name.
SHOW KEY [key-name]
Displays the key definitions created by the DEFINE/KEY command.
EDIT [filename]
Invokes your selected editor and enables you to edit a message before you send it.
HELP [topic]
Displays information about Mail. To obtain information about individual commands or topics, enter HELP followed by the command or topic name.
SET [NO]CC_PROMPT
Sets the default for determining whether the carbon copy (CC:) prompt appears when sending a message.
SET COPY_SELF command[,command]
Sets the default for determining whether the SEND, REPLY, or FORWARD commands return to the sender a copy of the message being sent.
SHOW COPY_SELF
Displays which command (SEND, REPLY, or FORWARD) automatically sends a copy of the message to you.
SET [NO]SIGNATURE_FILE
Sets the Mail utility to append a signature text file to the end of a mail message automatically whenever you use the ANSWER, FORWARD, MAIL, REPLY, or SEND command.
SHOW SIGNATURE_FILE
Displays information that shows whether you specified a default signature file and, if so, the name of that file. The SHOW ALL command also displays signature file information.
SET EDITOR editor-name
Selects the text editor to be used when you edit a message (for example, with the Mail command SEND/EDIT). You can use any callable editor available on your system. This command overrides any definition that the command procedure MAIL$EDIT has set.
SHOW EDITOR
Displays the name of your selected text editor.
SET [NO]FORWARD address
Sets a forwarding address for your mail.
SHOW FORWARD
Displays the name of your current forwarding address.
SET [NO]MAIL_DIRECTORY [.subdirectory-name]
Specifies that all mail files (file type .MAI) be moved from your SYS$LOGIN directory to the specified subdirectory.
SHOW MAIL_DIRECTORY
Displays the name of the device and directory containing all your .MAI files.
SET [NO]PERSONAL_NAME "text-string"
Appends a text string to the end of the From: field of mail messages you send. You can fill this field with your full name or any other information. Note that your personal name must begin with a letter and may not have two consecutive spaces.
SHOW PERSONAL_NAME
Displays the text string established with the SET PERSONAL_NAME command.
SHOW ALL
Displays detailed information about your current Mail settings.
7.14.8. Exiting or Transferring Control
ATTACH [process-name]
Permits you to switch control of your terminal from your current process to another process in your job. For example, while you are editing a file, you can use the SPAWN command to move to a subprocess (Mail) to read a new mail message. Then, you can enter the ATTACH command to move back to the editing session.
EXIT
Exits from Mail. When you enter the EXIT command, any messages in the WASTEBASKET folder are deleted unless you have issued the command SET NOAUTO_PURGE. You can also exit from Mail by pressing Ctrl/Z.
QUIT
Exits from Mail without emptying the WASTEBASKET folder (deleted messages are not destroyed unless you enter the EXIT command or press Ctrl/Z). The QUIT command performs the same function as Ctrl/Y.
SPAWN [command]
Creates a subprocess of the current process. You can use the SPAWN command to leave Mail temporarily, perform other functions (such as displaying a directory listing or printing a file), and then return to Mail.
7.14.9. Mail File Compression
COMPRESS [filespec]
Makes an indexed mail file smaller. If you do not specify a file name, Mail compresses the mail file that is currently open. If there is no open mail file, Mail compresses the default mail file (MAIL.MAI).
7.14.10. System Management Commands
REMOVE user name
Removes a user record from the system's mail profile, data file SYS$SYSTEM:VMSMAIL_PROFILE.DATA. Requires SYSPRV privileges.
SHOW FORWARD
Displays the name of a user's current forwarding address.
SHOW PERSONAL_NAME
Displays the text string that a user has established with the SET PERSONAL_NAME command.
7.15. MIME Utility
The Multipurpose Internet Mail Extension (MIME) is the standard used to attach nontext files to mail messages. The MIME utility allows you to compose and read MIME-encoded mail messages. With MIME, nontext files, such as graphics or sound files, are encoded and sent as plain text, although that text may not be readable. The MIME utility decodes MIME files to their original form and allows you to create MIME-encoded files, which can be sent as mail messages using the OpenVMS Mail utility.
7.15.1. Invoking the MIME Utility
$ MIME :== $SYS$SYSTEM:MIME.EXE
MIME will only open MIME encoded text files. You need to extract the MIME-encoded message into a text file using Mail first. See Section 7.6.3, ''Creating Files from Messages'' for instructions.
$ MIME file-name.TXT/READ_ONLY indicates that the file is the contents of a message received by the user who intends to decode it. This is the default.
/DRAFT indicates that the file contains a message that was created in a previous session and was opened for WRITE_ACCESS.
The MIME utility does not construct any header information such as the To: or From: fields. It creates only MIME headers and the body text of the message, saving the text in a file to be sent by Mail later. If the file specified to be opened contains such recognizable headers or any RFC822 headers, the file is opened and the default is /READ_ONLY.
If the file specified does not contain any recognizable headers or does not exist, an OPEN FILE ERROR message occurs.
You can establish system-wide defaults for displaying MIME-encoded messages by creating two files: MIME$MAILCAP.DAT and MIME$FILETYPES.DAT.
MIME$MAILCAP.DAT contains an application that defines each locally-recognized content type of MIME-encoded files. MIME$FILETYPES.DAT associates each content type with a file extension. A user can override the defaults by creating these files in SYS$LOGIN.
7.15.2. Initializing the MIME Utility
In the user's VMSmail profile, the MIME utility looks up the user's mail directory and default editor for use with the MIME utility.
The MIME utility reads files MIME$MAILCAP.DAT and MIME$FILETYPES.DAT.
- The MIME utility refers to the following list of internal defaults:
Content types
The MIME utility refers to the list of content types before displaying incoming messages. The list contains content types that the MIME utility recognizes and the information needed to decode each content type into its original format.
The following is an example of a MAILCAP entry, from RFC 1524:image/*; xview %s
You can add content types to the list MIME recognizes by creating a MIME$MAILCAP.DAT file. Example 7.1, ''MIME$MAILCAP.DAT File'' contains an example of a MIME$MAILCAP.DAT file.
File extensions
The MIME utility refers to the list of file extensions while composing outgoing messages. The list contains OpenVMS file extensions and the content type associated with each extension. The MIME utility needs these extensions to be included in the MIME-formatted message body it composes.
Each line in the file-extension list is made up of the following items:extension, content type/subtype, (optionally) Content-Transfer-Encoding string
The following is an example of a line in a file-extension list:doc, application/ms-word, base64
You can add file extensions and matching content types to the list the MIME utility recognizes by creating a MIME$FILETYPES.DAT file, which is described in Table 7.1, ''MIME Utility Optional Files''.
7.15.3. Creating Optional MIME Utility Files
|
File |
Purpose |
|---|---|
|
MIME$MAILCAP.DAT |
For the display and parsing of incoming messages. |
|
MIME$FILETYPES.DAT |
For the assignment of content types to outgoing attached files. |
Place these files in the SYS$LOGIN directory.
7.15.3.1. MIME$MAILCAP.DAT File Processing
The format of the MIME$MAILCAP file originated in RFC 1524, A User Agent Configuration Mechanism for Multimedia Mail Format Information, by N. Borenstein, September, 1993. The MIME utility uses instructions in this file to interpret and display messages and attachments. By following these instructions, the MIME user agent calls external programs to display the content types found in MIME messages.
Note
References to program names must be logical names or valid file specifications.
#
# MIME$MAILCAP.DAT
#
# Local customizations of content types and processing options
#
# Use xv.exe to display images
image/*; xv %s
#
# Use Netscape for html attachments
text/html; netscape %s
#
7.15.3.2. MIME$FILETYPES.DAT File Processing
The optional MIME$FILE_TYPES.DAT file contains lists of OpenVMS file extensions and the MIME content type associated with each one. ADD command processing uses the FILETYPE structure to designate the content type of an OpenVMS file to be attached to a composed message.
The syntax of the file format is similar to that of the MIME$MAILCAP.DAT file, with the "#" character indicating comments. Each line in the file contains a single file extension (without the leading '.'), followed by the content type and subtype to be associated with files that use that extension.
Optionally, the line can include the Content-Transfer-Encoding string (7bit, 8bit, Base64 or Quoted-printable), which is used to encode the contents of the file for transmission in the message. 7bit, 8bit, Base64 or Quoted-printable are the standard MIME encodings and the only ones accepted. If no encoding is specified, the MIME utility uses 7bit.
7.15.4. Extracting MIME-Encoded Files Using the MIME Utility
To extract a MIME-encoded file using the MIME utility, first, open the file you want to decode. You can open the file in one of two ways: by invoking the MIME utility specifying the file name or by opening the file in the MIME utility. EXTRACT extracts the specified attachment to a file in its native file format or in another format specified by the /FDL qualifier.
MIME> OPEN file-name
MIME> READ
MIME> LISTMIME> EXTRACT /ATTACHMENT=n destination-file-nameYou can specify a single attachment by appending the /ATTACHMENT=n qualifier, which specifies the number of the attachment to be extracted. You can also use /FDL=filename, which specifies a File Descriptor Language (FDL) definition file to use when converting the specified attachment into an output file. The numbers for the individual attachments are displayed with the LIST command.
See Section 7.15.6, ''MIME Utility Commands'' for a complete list of commands used in the MIME utility.
7.15.5. Encoding Files Using the MIME utility
$ MIME NEW new-file-nameMIME> OPEN/DRAFT file-nameTo open a file that you created in a previous session, specify the qualifier /DRAFT in the command.
MIME> ADD file-nameFor a complete list of optional qualifiers for this command, see Section 7.15.6, ''MIME Utility Commands''.
To write the current information to the file, use the SAVE command. Once saved, the MIME-encoded file can be sent as a file by the OpenVMS Mail utility.
To exit the MIME utility, enter the QUIT or EXIT command.
See Section 7.15.6, ''MIME Utility Commands'' for a complete list of commands used in the MIME utility.
7.15.6. MIME Utility Commands
The following list contains descriptions of the commands, parameters, and qualifiers available in the MIME utility. Examples follow each description.
/BINARY — Sets content type to "application/octet-stream" and content-transfer-encoding to "base64". This format can be used to represent an arbitrary binary data stream.
/CONTENT_TYPE=type — Overrides the default content type with a specified string, for example "IMAGE/JPEG."
/ENCODING_TYPE={7Bit|8Bit|Base64|Quoted-Printable} — Overrides the default encoding with a specified encoding type.
/MESSAGE — The attachment is a message file (standard RFC822).
/TEXT — The attachment is content type text.
MIME> ADD file-name/TEXTMIME> CLOSE
MIME> EDIT attachment-numberMIME> EXIT
/ATTACHMENT=n — Specifies the number of the attachment to be extracted.
/FDL=filename — Specifies a File Descriptor Language (FDL) definition file to use when converting the specified attachment into an output file.
MIME> EXTRACT file-name/ATTACHMENT=nMIME> HELP
MIME> LIST
MIME> NEW file-name
/DRAFT — The message file is a draft created in a previous session.
/READ — The message is read-only and cannot be updated.
MIME> OPEN file-name/NEW MIME> QUIT
MIME> READ
MIME> REMOVE 1
MIME> SHOW option
MIME> SAVE file-name7.15.7. Error Handling
Fatal (-F-) results in the immediate termination of the program.
Error (-E-) results in the termination of the currently active command while retaining the existing message context.
Warning (-W-) results in the completion of the current command, without interrupting the MIME editing session. However, this does not mean that the command accomplished all its tasks successfully. Check the results for errors.
Chapter 8. Editing Text Files with EVE
Text editors allow you to create and modify text files. With a text editor, you can enter text from a keyboard and modify the text using text editing commands. For example, you can type in data for a report and then rearrange sections, duplicate information, substitute phrases, or format text. You can use text editors to create and modify source files for programming languages. The operating system supports several text editors.
EVE features
Getting help
Beginning an editing session
Entering commands
Saving your edits and exiting from EVE
Moving the cursor
Entering text
Erasing and restoring text
Moving text
Copying text
Box editing
Using pending delete
Finding and replacing text
Using command line qualifiers
Alternate methods to invoke EVE
Journaling and recovery
EVE formatting commands
Using buffers
Creating a subprocess
For additional information about EVE, refer to online help in EVE and the Extensible Versatile Editor Reference Manual.
For information about EDT, refer to the OpenVMS EDT Reference Manual.
Conventions
In this chapter, EVE key names are shown (with the SHOW KEY or HELP KEYS command) by using a slash for control keys, shifted function keys, and Alt key combinations, and a space or a dash for GOLD key sequences. Thus, key combinations that require you to hold down one key (such as Ctrl) while pressing another key are shown with a slash; key combinations in which you press one key after another (such as GOLD-Help) are shown with a space or a dash.
8.1. EVE Features
DECTPU is a high-performance, programmable text processor. With EVE software, you can create and edit text files such as business letters, technical documents, and program source files.
EVE is the default editor on the OpenVMS operating system. Unless you define a different default editor, EVE is invoked when you enter the EDIT command.
Create and edit text files such as letters, reports, program sources, and other documents.
Perform text formatting operations, such as erase, cut, paste, fill, find, replace, and paginate.
Use multiple buffers and windows to view and edit different files in the same editing session.
Define keys for editing operations, including learn sequences (to bind several commands or keystrokes to a single key) and setting the EDT keypad or WPS-PLUS keypad.
Select text in boxes or in linear ranges for cut-and-paste or other edits.
Use wildcards to search for patterns of text.
Execute DCL commands (such as DIRECTORY) from within the editor.
Run DECspell to check a selection or an entire buffer.
Spawn subprocesses or attach to other processes.
Compile and execute DECTPU procedures to extend EVE.
Add to or delete menu items from the DECwindows interface.
Save compiled procedures, menu definitions, key definitions, and other customizations for future sessions.
Use initialization files at startup or during an editing session.
Recover your work by using keystroke or buffer-change journaling when a system failure interrupts your editing session.
Get comprehensive online help on EVE commands, keys, menu items, and other topics, including DECTPU built-in procedures.
Once you know how to invoke EVE and how to enter commands, you can use EVE commands to create and edit files. Using editing keys and commands, you can move the cursor, set buffer mode, and perform editing operations such as entering, erasing, restoring, and moving text.
8.2. Getting Help
Keypad help, which you access with the Help key on your terminal
EVE help, which you access with the HELP command at the EVE command prompt
8.2.1. Using Keypad Help
Press the Help key.
The Help utility displays a diagram of your keypad.
- Follow the directions on the screen to get information on:
EVE commands
To get help on EVE commands, enter a command name or a question mark (?) and press the Enter key.
Defined keys
To get help on a key that you have defined, press that key, or use the SHOW KEY command.
Listing key definitions
To list all key definitions, type the word keys and press the Enter key, or press GOLD HELP. The GOLD key is the PF1 key or NumLock key on the numeric keypad.
Press the Enter key to exit from Help.
8.2.2. Using EVE Help
Press the Do key.
Enter the command HELP.
Use the Prev Screen and Next Screen keys to scroll through the list of available help topics.
Press the Enter key to exit from Help.
To get information about a particular command, enter HELP followed by the command name and press the Enter key. The help text appears on the screen. You can also get help on DECTPU built-in procedures by entering the command HELP TPU.
MOVE BY LINE
Moves the cursor a line at a time in the current direction.
Keys: EVE                          Default VT100 Keypad
      -------------------------------------------------
      F12                               MINUS on keypad
Steps:
1. If necessary, set the direction to move in --- forward or reverse.
2. Use MOVE BY LINE (see key list above).
Usage notes:
o In forward direction, moves to the end of the current line, or to the
  end of the next line, if any.
o In reverse direction, moves to the start of the current line, or to
  the start of the next line, if any.
Related topics:
CHANGE DIRECTION   END OF LINE   LINE   START OF LINE
8.3. Beginning an Editing Session
$ EDIT
On systems where EVE is not the default editor, start EVE with the EDIT/TPU command. When you begin an editing session, you can specify the name of an existing file or a new file you want to create. If you do not specify a file name, EVE prompts you for a file name when you end your editing session if you have added text to the default buffer called Main. See Section 8.18, ''Using Buffers'' for more information on using buffers.
$ EDIT NEWFILE.DAT
[End of file]
| The end-of-file marker marks the end of an EVE buffer. It is visible only on the screen and does not become part of your file. When you add text to the buffer, the end-of-file marker moves down. Depending on the length of your terminal screen, the marker may not be visible when you view the beginning of a buffer that contains many lines of text. |
| A window is an area of your screen that displays a buffer. EVE buffers exist only during the editing session. When you end an editing session, you can save your edits or discard them. |
| A highlighted status line appears at the bottom of the EVE window and provides information about the buffer you are viewing in the window. The status line shows the buffer name, editing status (write or read-only), current mode (insert or overstrike), and current direction (forward or reverse). |
| You use the command line to enter line-mode commands (see Section 8.4, ''Entering Commands''). You get the command line by pressing the Do key. |
| The message window contains an informational message that appears beneath the highlighted status line when you invoke EVE and specify a file name on the command line. The message states either that the file is a new file or that a certain number of lines were read from an existing file. During the editing session, EVE displays other messages in the message window. |
8.4. Entering Commands
Type in commands on the command line interface.
Use defined keys on either the EDT or WPS keypad.
8.4.1. Typing Commands
Press the Do key.
The cursor moves to the command window and EVE prompts you to type a command.
Type a command. You can abbreviate the command by using the first few letters of the command. EVE is not case sensitive. You can use any combination of uppercase and lowercase characters in the command line except when specifying strings for the FIND and REPLACE commands.
Press the Do key or the Enter key.
EVE executes the command or prompts you for further information.
8.4.2. Using Defined Keys
You can use defined keys to enter EVE commands. Each defined key performs one editing command. You can also define your own keys to perform EVE functions.
The mini-keypad (located between the main keyboard keys and the numeric keypad, above the arrow keys)
Certain function keys
Certain control key sequences
Control keys, arrow keys, and the Tab, Return, and Delete keys have the same definitions on all three types of terminal.
Figure 8.1, ''EVE Keys — VT200, VT300, and VT400 Series Terminals'' shows the predefined keys for the VT200, VT300, and VT400 series terminal.
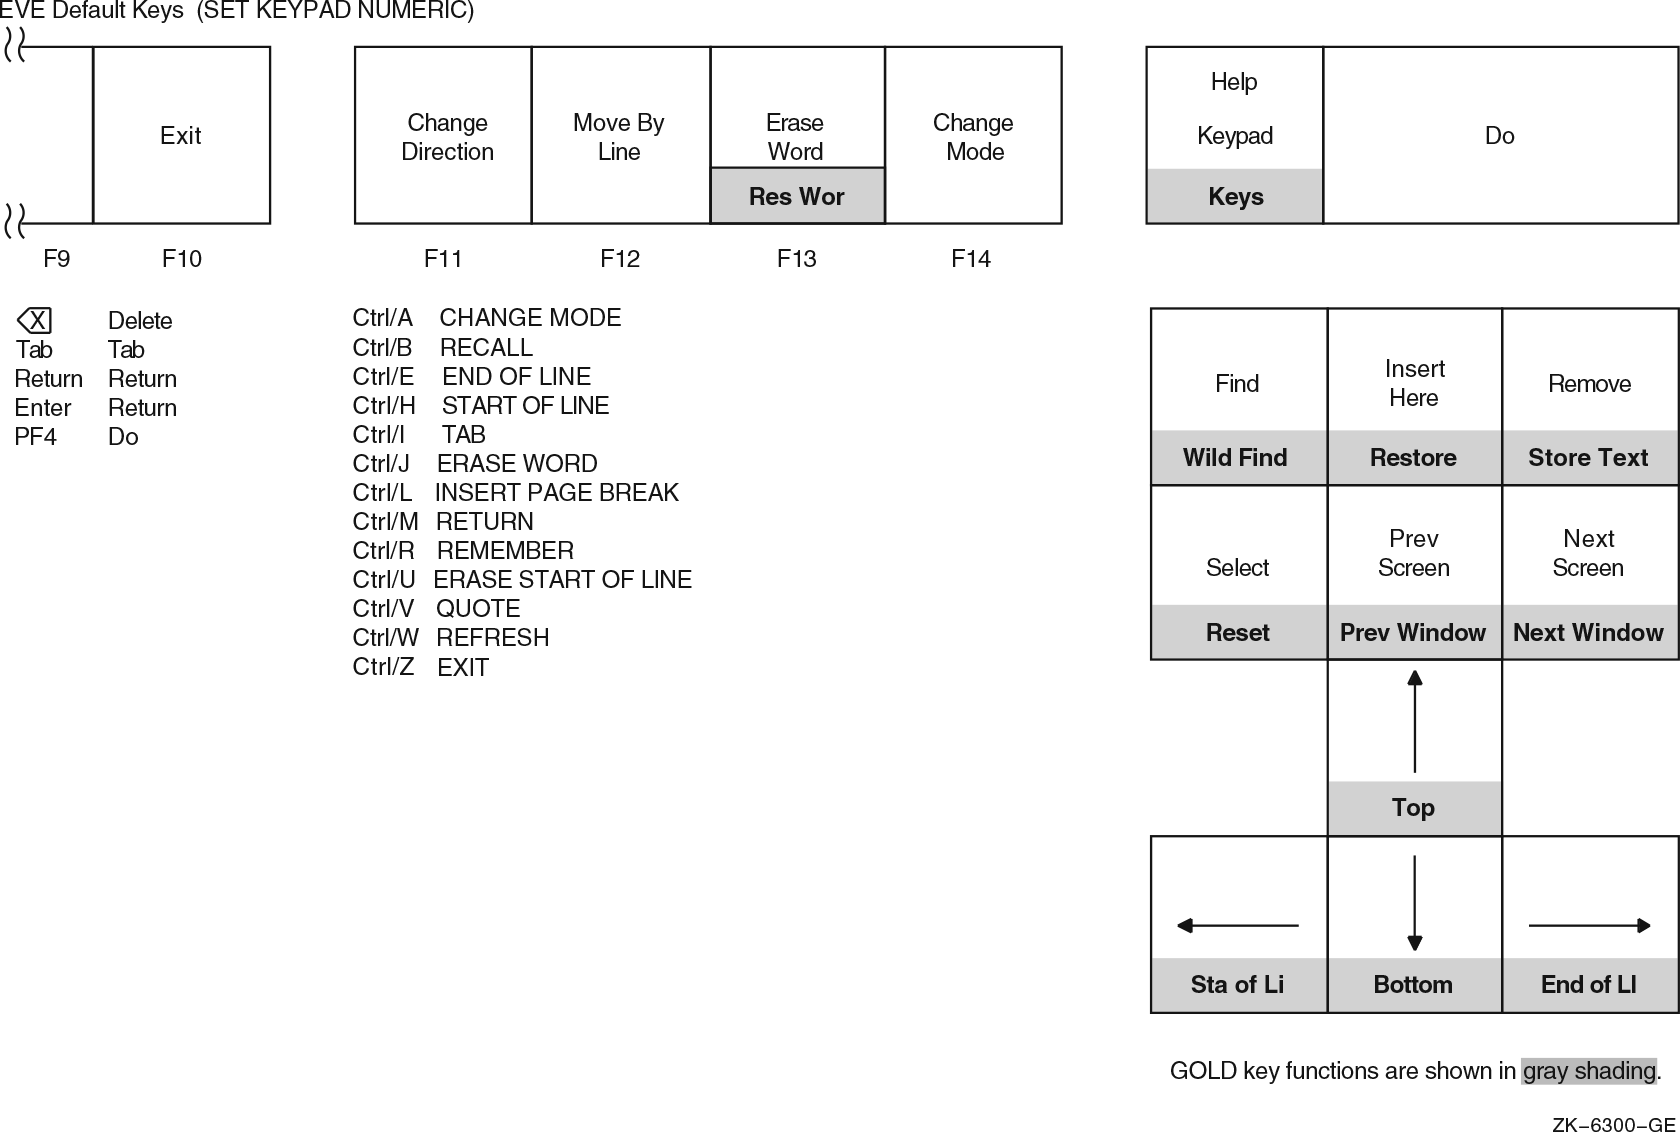 |
On VT100 series terminals, EVE automatically defines most of the numeric keypad keys, the four arrow keys, and certain control keys. Figure 8.2, ''EVE Keys — VT100 Series Terminals'' shows the predefined keys for the VT100 series terminal.
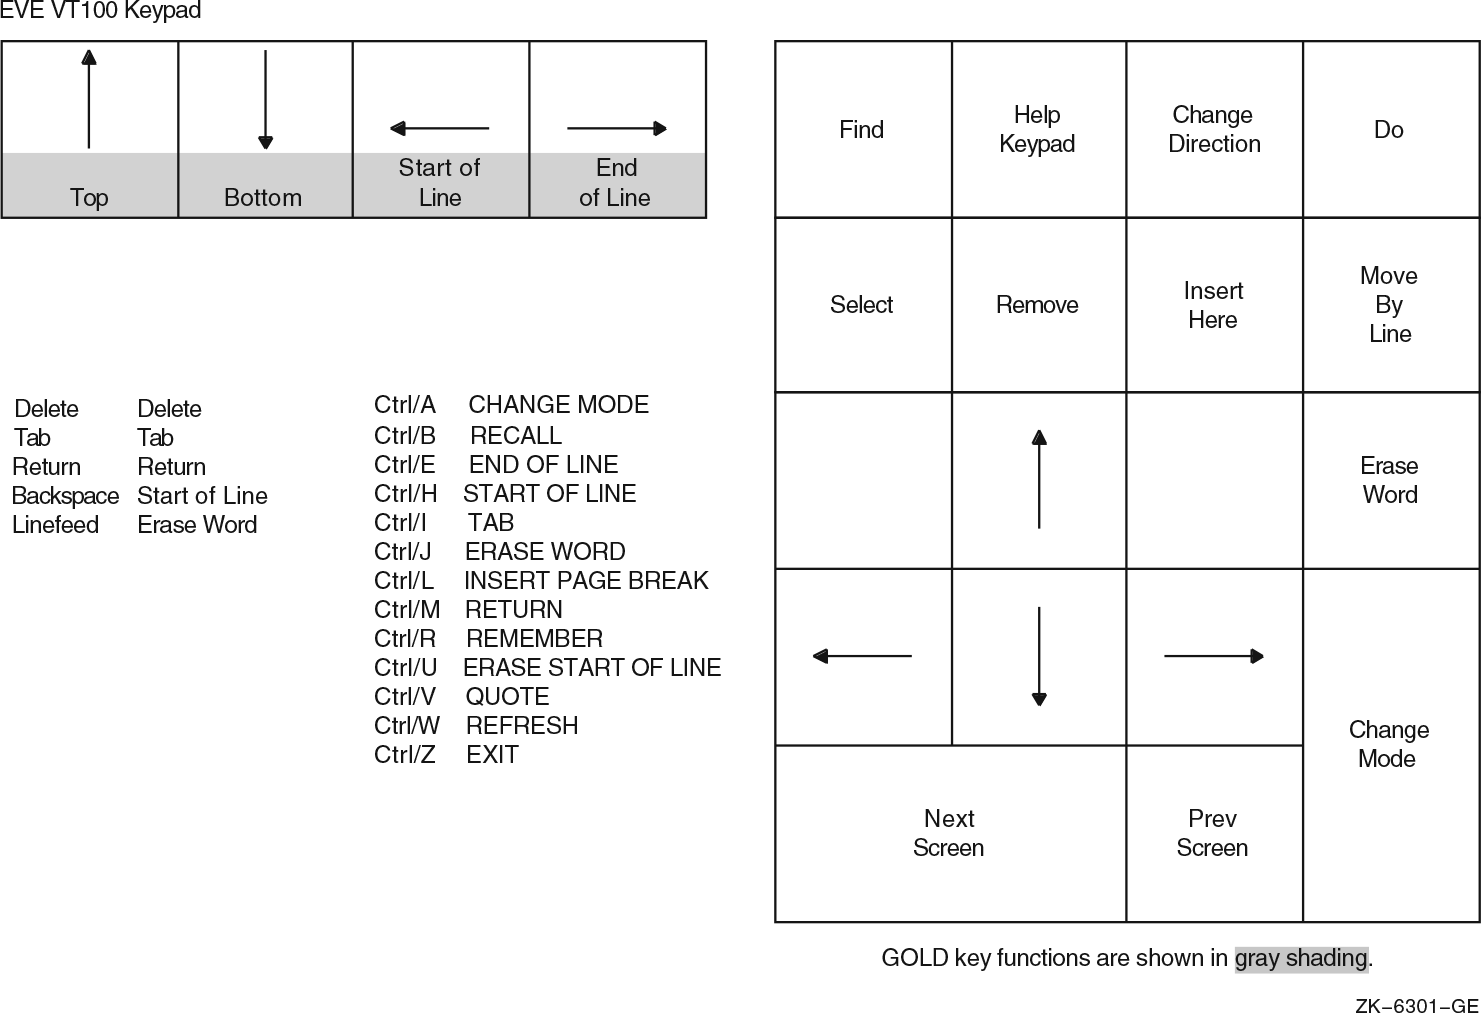 |
8.5. Saving Your Edits and Exiting from EVE
WRITE FILE command
Saves a file without terminating your editing session
EXIT command
Terminates your editing session and saves the changes to your file
QUIT command
Terminates your editing session without saving changes to your file
8.5.1. Using the WRITE FILE Command
Type filename for buffer Main (press RETURN to not write it):
Type the name of the file and press the Enter key to write the buffer to a file.
8.5.2. Using the EXIT Command
To save your edited text, use the EXIT command. You can enter the EXIT command by pressing the F10 key or by pressing Ctrl/Z.
If you have modified the current buffer, EVE creates a new version of the file with the same file name and file type as the original version, with the version number incremented by 1. For example, if you use the EXIT command after modifying a file named FUN.DAT;1, the output file is named FUN.DAT;2.
8.5.3. Using the QUIT Command
To end a session without saving your edits, enter the QUIT command. Type YES (Y) and press the Enter key if you want to quit without saving the edits. If you change your mind and decide to save your edits, type N, press the Enter key, and use the EXIT command to exit from the buffer.
If you have modified buffers other than the current one, EVE asks if you want to save the contents of the other buffers. If you type Y, EVE creates a new version of an existing file, incrementing the version number by 1. EVE prompts for a file name if no file currently exists.
If no buffers have been modified, then EXIT and QUIT are the same. For example, if you use EVE to inspect a file without making edits, you can quit by pressing Ctrl/Z.
Command: QUIT
Buffer modifications will not be saved, continue quitting (Y or N)?
8.6. Moving the Cursor
When editing files with EVE, you move the cursor where you want to perform an editing function. The more quickly and efficiently you move the cursor through the text, the more time you save in your editing session. You can use the keyboard or commands to move the cursor.
|
Key or Key Sequence |
Function |
|---|---|
|
Up arrow key |
Same as MOVE UP. Moves the cursor up one line. On VT100 series terminals, KP5 is also defined as MOVE UP. |
|
Down arrow key |
Same as MOVE DOWN. Moves the cursor down one line. On VT100 series terminals, KP2 is also defined as MOVE DOWN. |
|
Left arrow key |
Same as MOVE LEFT. Moves the cursor one character or column to the left. On VT100 series terminals, KP1 is also defined as MOVE LEFT. |
|
Right arrow key |
Same as MOVE RIGHT. Moves the cursor one character or column to the right. On VT100 series terminals, KP3 is also defined as MOVE RIGHT. |
|
Ctrl/E or GOLD right arrow key |
Same as END OF LINE. Moves the cursor to the end of the current line. |
|
Ctrl/H or GOLD left arrow key |
Same as START OF LINE. Moves the cursor to the beginning of the current line. |
|
GOLD up arrow key |
Same as TOP. Moves the cursor to the top of the current buffer. |
|
GOLD down arrow key |
Same as BOTTOM. Moves the cursor to the bottom of the current buffer. |
|
GOLD Next Screen |
Same as NEXT WINDOW. Moves the cursor to the last position the cursor occupied in the next window on your screen, if you are using two or more windows. |
|
GOLD Prev Screen |
Same as PREVIOUS WINDOW. Moves the cursor to the last position the cursor occupied in the previous window on your screen, if you are using two or more windows. |
|
Command |
Function |
|---|---|
|
BOTTOM |
Moves the cursor to the end of the current buffer. By default, EVE defines GOLD down arrow key as BOTTOM. |
|
CHANGE DIRECTION |
Changes the direction of the current buffer. The direction of the buffer is shown in the status line. |
|
END OF LINE |
Moves the cursor to the end of the current line. By default, EVE defines both Ctrl/E and GOLD right arrow key as END OF LINE. |
|
FORWARD |
Default setting. Sets the direction of the current buffer to forward; that is, to the right and down. The direction of the buffer is shown in the status line. |
|
GO TO |
Moves the cursor to the position you specify, as previously labeled with the MARK command. |
|
LINE |
Moves the cursor to the beginning of a line (specified by the line number). |
|
MARK |
Puts an invisible marker at the current position and associates it with the name you specify. Later, you can return to the marked position by using the GO TO command. |
|
MOVE BY LINE |
In forward direction: moves the cursor to the end of the current line or, if the cursor is already at the end of a line, to the end of the next line. In reverse direction: moves the cursor to the beginning of the current line or, if the cursor is already at the beginning of a line, to the beginning of the previous line. On VT200, VT300, and VT400 series terminals, EVE defines the F12 key as MOVE BY LINE. On VT100 series terminals EVE defines the Minus key on the keypad as MOVE BY LINE. |
|
MOVE BY PAGE |
Moves the cursor to the next or previous page break (form feed), depending on the current direction. If there is no page break in the current direction, the cursor moves to the bottom or top of the buffer. |
|
MOVE BY WORD |
In forward direction: moves the cursor to the beginning of the next word or, if the cursor is already at the end of a line, to the beginning of the next line. In reverse direction: moves the cursor to the beginning of the previous word or, if the cursor is already at the beginning of a line, to the end of the previous line. |
|
NEXT SCREEN |
Scrolls forward in the current buffer by the number of lines in the current window minus one. For example, if the current window is 12 lines long, the NEXT SCREEN command scrolls the cursor forward 11 lines. On VT200, VT300, and VT400 series terminals, EVE defines the E6 key (Next Screen) as NEXT SCREEN. On VT100 series terminals, EVE defines the KP0 key on the keypad as NEXT SCREEN. |
|
NEXT WINDOW or OTHER WINDOW |
Moves the cursor to the next window on your screen, if there is one. The cursor appears in the last location it occupied in that window. EVE defines GOLD Next Screen as NEXT WINDOW. |
|
PREVIOUS SCREEN |
Scrolls backward in the current buffer by the number of lines in the current window minus one. For example, if the current window is 12 lines long, the PREVIOUS SCREEN command scrolls the cursor backward 11 lines. On VT200, VT300, and VT400 series terminals, EVE defines the E5 key (Prev Screen) as PREVIOUS SCREEN. On VT100 series terminals, EVE defines the Period key on the keypad as PREVIOUS SCREEN. |
|
PREVIOUS WINDOW |
Moves the cursor to the previous window on your screen, if there is one. The cursor appears in the last location it occupied in that window. EVE defines GOLD Prev Screen as PREVIOUS WINDOW. |
|
REVERSE |
Sets the direction of the current buffer to reverse; that is, to the left and up. The direction of the buffer is shown in the status line. |
|
SET CURSOR BOUND |
Makes the cursor follow the flow of text. The cursor cannot move into an unused portion of the buffer. Similar to cursor behavior in EDT, WPS, and other editors. |
|
SET CURSOR FREE |
Default setting. You can move the cursor anywhere in the buffer and enter text there. |
|
SET SCROLL MARGINS |
Sets the top and bottom distances at which scrolling begins automatically as you move the cursor up and down. You specify these distances as numbers of lines or as a percentage of the window size. The default setting is 0; that is, scrolling starts when you move past the top or the bottom of the window. |
|
SHIFT LEFT |
Shifts the current EVE window to the left by the number of columns you specify. With SHIFT RIGHT and SHIFT LEFT commands, you can view the undisplayed portion of long lines of text without having to change the width of the window or use 132-column mode. The SHIFT LEFT command shifts the window only if you have used the SHIFT RIGHT command. |
|
SHIFT RIGHT |
Shifts the current EVE window to the right by the number of columns you specify. With SHIFT RIGHT and SHIFT LEFT commands, you can view the undisplayed portion of long lines of text without having to change the width of the window. |
|
START OF LINE |
Moves the cursor to the beginning of the current line. By default, EVE defines both Ctrl/H and GOLD left arrow key as START OF LINE. |
|
TOP |
Moves the cursor to the beginning of the current buffer (upper left corner). By default, EVE defines GOLD up arrow key as TOP. |
Tutorial: Moving the Cursor in EVE
- Invoke EVE and create the buffer SCHEDULE.DAT with the following command:
$ EDIT SCHEDULE.DAT
EVE puts the cursor at the top of the buffer and waits for you to enter text.
- Enter the following text.
Schedule for 1 July
10:00 AM meeting with supervisor
Read and review memo from Sally
Work on Pascal program
The [End of file] marker moves down in the buffer as you enter text and the cursor is positioned at the end of the text you inserted.
Enter the TOP command to move the cursor to the beginning of the file.
Press Ctrl/E to move the cursor to the end of the first line of text. Ctrl/E works the same way in EVE as it does in DCL.
Enter the BOTTOM command to move the cursor to the end of the buffer.
Press the up arrow key to move the cursor up one line to the fourth line of text.
Press the Change Direction key to change the current buffer direction to reverse.
Press the Move by Line key to move the cursor to the beginning of the third line of text.
Enter the command LINE 1 to move the cursor to the beginning of the first line of the buffer.
To exit from EVE, press Ctrl/Z.
8.7. Entering Text
You can enter keyboard characters, entire files, and special nonprinting characters (such as control characters) into the buffer that you are currently editing. You can use the keypad or commands to enter text. You can also add text, files, and special characters to the buffer.
8.7.1. Adding Text
You can type characters at the keyboard and add them to the buffer at the current cursor position. The characters you type either supplement or replace existing characters, depending on whether the buffer is in insert or overstrike mode.
8.7.2. Including Files
You can add an entire file by pressing the Do key and entering the EVE command INCLUDE FILE. Type the file specification at the File to include: prompt and press the Enter key. Regardless of the current mode (insert or overstrike) of the buffer, EVE inserts the entire contents of the specified file into the buffer just before the line where the cursor currently appears.
You can use wildcards in the file specification. If there is more than one match for a file specification with a wildcard, EVE displays a list of choices and prompts you to provide a more complete file specification. If the specified file does not exist, EVE displays a message stating that it could not include the file.
8.7.3. Special Nonprinting Characters
You can use the QUOTE command to add special nonprinting characters by pressing Ctrl/V followed by the special character. For example, to insert an escape character into the buffer, press Ctrl/V followed by Ctrl/[. The special character either supplements or replaces existing characters, depending on whether the buffer is in insert or overstrike mode.
8.7.4. EVE Editing Keys for Entering Text
|
Key or Key Sequence |
Function |
|---|---|
|
Ctrl/A |
Same as the CHANGE MODE command. Changes the editing mode for the current buffer as shown in the highlighted status line. In insert mode, EVE inserts text at the character position, moving existing text to accommodate the insertion. In overstrike mode, EVE overwrites text at the current position. On VT200, VT300, and VT400 series terminals, EVE defines the F14 key as CHANGE MODE. On VT100 series terminals, EVE defines the Enter key on the keypad as CHANGE MODE. |
|
Ctrl/V |
Same as the QUOTE command. You can insert nonprinting characters or control codes. To search for special characters, first press the Find key, then press Ctrl/V and the special character to be found. Activate the search by pressing the Enter key. |
8.7.5. EVE Commands for Entering Text
|
Command |
Function |
|---|---|
|
CHANGE MODE |
Same as Ctrl/A. Changes the current editing mode as shown in the highlighted status line. In insert mode, EVE inserts text at the current position, moving existing text to accommodate the insertion. In overstrike mode, EVE overwrites text at the current position. On VT200, VT300, and VT400 series terminals, EVE defines the F14 key as CHANGE MODE. On VT100 series terminals, EVE defines the Enter key on the keypad as CHANGE MODE. |
|
INCLUDE FILE |
Inserts the contents of the specified file into the current buffer at the line above the cursor position. This is useful for combining files. |
|
INSERT MODE |
Sets the mode of the current buffer to insert, as opposed to overstrike. In insert mode, EVE inserts text at the current position, moving existing text to accommodate the insertion. |
|
OVERSTRIKE MODE |
Sets the mode of the current buffer to overstrike, as opposed to insert. In overstrike mode, EVE overwrites text at the current position. |
|
QUOTE |
Same as Ctrl/V. Enters a nonprinting character or a control code that you specify by pressing a key. You can quote a control code or other character when you enter a string for the FIND or REPLACE commands. For example, you can quote the Tab key to search for tab characters. |
8.7.6. Setting Buffer Mode
Before you begin typing text, check whether your buffer is in insert mode or overstrike mode.
To determine the mode your buffer is in, look at the highlighted status line. If the buffer is in insert mode, text is inserted at the cursor position and text that already appears in the buffer moves to accommodate your insertions. If the buffer is in overstrike mode, text that you type at the keyboard is inserted at the cursor position and the text that already appears in the buffer is overwritten as the cursor moves through it.
To change from one mode to another, press Ctrl/A.
Tutorial: Adding Text in Insert or Overstrike Mode
Invoke EVE to edit the existing file SCHEDULE.DAT.
Check the highlighted status line to ensure that EVE is in insert mode.
If EVE is in overstrike mode, press Ctrl/A to change to insert mode.
Move the cursor to the first letter s in the word supervisor, type Engineering, and press the space bar.
The word Engineering is inserted in your text buffer, and the rest of the text on the line moves to the right.Schedule for 1 July 10:00 AM meeting with Engineering supervisor Read and review memo from Sally Work on Pascal program [End of file] Buffer: SCHEDULE.DAT | Write | Insert | Forward
Press Ctrl/A to change to overstrike mode.
Move the cursor to the letter S in the word Sally and type Peggy.
The word Peggy is placed in the buffer, overwriting the word Sally.Schedule for 1 July 10:00 AM meeting with Engineering supervisor Read and review memo from Peggy Work on Pascal program [End of file] Buffer: SCHEDULE.DAT | Write | Overstrike | Forward
To exit from EVE, press Ctrl/Z.
8.8. Erasing and Restoring Text
With EVE, you can easily erase text or correct mistakes made during an editing session. If you erase text by mistake, you can restore the most recently erased text to its former location or, by moving the cursor, to another location.
To erase text from your buffer, move the cursor to the text you want to erase and press the appropriate editing key or enter the appropriate EVE command.
|
Key or Key Sequence |
Function |
|---|---|
|
Delete key or Delete |
Erases the character to the left of the cursor. Same as the DELETE command. If pending delete is enabled, DELETE erases text in the select range and puts it into the Restore Selection buffer. For more information about using pending delete, see Section 8.9, ''Moving Text''. |
|
Ctrl/J |
Same as ERASE WORD. Erases the current word or, if the cursor is between words, erases the next word. On VT200, VT300, and VT400 series terminals, EVE defines the F13 key as ERASE WORD. On VT100 series terminals, EVE defines the Comma key on the keypad as ERASE WORD. |
|
Ctrl/U |
Same as ERASE START OF LINE. Erases characters left of the cursor to the start of the line. |
|
GOLD Insert Here |
Same as RESTORE. Reinserts, at the current position, the word, line, or sentence that you just erased with an EVE command or editing key. |
|
GOLD F13 |
Same as RESTORE WORD (except with the WPS keypad). Reinserts, at the current position, the word that you last erased. |
|
Command |
Function |
|---|---|
|
DELETE |
Erases the character to the left of the cursor. In insert mode, EVE moves existing text to accommodate the deleted character. In overstrike mode, EVE replaces the character with a space. At the start of a line, DELETE erases the carriage return for the previous line (regardless of mode) and the current line moves up. If pending delete is enabled, DELETE erases text in the select range and puts it into the Restore Selection buffer. For more information about using pending delete, see Section 8.9, ''Moving Text''. |
|
ERASE CHARACTER |
Erases the character the cursor is on. In insert mode, EVE moves existing text to accommodate the deleted character. In overstrike mode, EVE replaces the character with a space. If the cursor is at the end of the line, the carriage return is erased—regardless of the mode—and the next line moves up. |
|
ERASE LINE |
Erases from the current character to the end of the line, appending the next line to the end of the current line. If the cursor is at the end of the line, only the carriage return is erased and the next line moves up. |
|
ERASE PREVIOUS WORD |
Erases the previous word or the word the cursor is on. If the cursor is between words or on the first character of a word, the previous word is erased. If the cursor is in the middle of a word, all of that word is erased (same as ERASE WORD). If the cursor is at the start of a line, the carriage return at the end of the previous line is erased and the current line moves up. |
|
ERASE START OF LINE |
Erases the current line of text, starting with the character left of the cursor until the start of the line. If you are already at the start of a line, nothing is erased. |
|
ERASE WORD |
Erases the current word or, if the cursor is between words, erases the next word. Same as Ctrl/J. On VT200, VT300, and VT400 series terminals, EVE defines the F13 key as ERASE WORD. On VT100 series terminals, EVE defines the Comma key on the keypad as ERASE WORD. If the cursor is at the end of the line, only the carriage return is erased and the next line moves up. |
|
RESTORE |
Reinserts, at the current position, the word, line, or sentence that you last erased with an EVE command or editing key. RESTORE does not restore single characters. EVE defines GOLD Insert Here as RESTORE. |
|
RESTORE CHARACTER |
Reinserts, at the current position, the character you last erased with an EVE command or editing key. In overstrike mode, the restored character replaces the character the cursor is on. In insert mode, the restored character is inserted at the cursor position and existing text moves to accommodate it. |
|
RESTORE LINE |
Reinserts, at the current position, the line that you last erased with an EVE command or editing key. |
|
RESTORE SELECTION |
Reinserts, at the current position, the text last erased with a pending delete operation. For more information about using pending delete, see Section 8.12, ''Using Pending Delete''. |
|
RESTORE WORD |
Reinserts, at the current position, the word that you last erased with an EVE command or editing key. EVE defines GOLD F13 as RESTORE WORD (except with the WPS keypad). |
Tutorial: Erasing and Restoring Text
- Invoke EVE to create the buffer RHYMES.DAT and enter the following text:
She rhymes with tree,
also with bee,
and this one makes three.
Move the cursor to the letter l in the word also. Enter the ERASE LINE command.
EVE erases all characters from the letter l in also to the end of the line and appends the next line to the current line.She rhymes with tree, aand this one makes three.
Move the cursor to the letter y in the word rhymes. Enter the ERASE WORD command.
EVE erases the word rhymes and shifts the remaining text to the left.She with tree, aand this one makes three.
Move the cursor to the second letter a on the second line. Enter the RESTORE LINE command.
EVE restores the last line that was erased, in this case, also with bee, .She with tree, also with bee, and this one makes three.
Move the cursor to the letter w in the word with on the first line. Enter the RESTORE WORD command.
EVE restores the last word that was erased, in this case, rhymes.She rhymes with tree, also with bee, and this one makes three.
To exit from EVE, press Ctrl/Z.
Section 8.9, ''Moving Text'' describes the functions of the SELECT and REMOVE commands, which can be used together to erase text from a buffer.
8.9. Moving Text
You can use EVE commands to select sections of text for copying, moving, deleting, or other editing operations. This section discusses how to move text.
For information on how to move text from one buffer to another, see Section 8.18, ''Using Buffers''.
You can also select a rectangular area (a box) of text rather than a linear range of text to move, erase, or duplicate text. For information about using box editing commands, see Section 8.11, ''Box Editing''.
|
Step |
Task |
|---|---|
|
1 |
Once you have invoked a file in EVE, place the cursor on the first character you want to move. |
|
2 |
Press the Select key. |
|
3 |
Move the cursor to one character beyond the last character you want to move. In reverse direction, move the cursor to the last character, not one beyond. The text to be moved is highlighted in reverse video. If you decide not to remove text from the buffer, press the Select key again to cancel the selection. |
|
4 |
Press the Remove key. EVE deletes the highlighted text from your screen and places it in the Insert Here buffer. |
|
5 |
Press the Insert Here key to insert text. EVE inserts the text at the cursor location. You can insert the text contained in the Insert Here buffer any number of times at any cursor location until you select a new section of text and put that new text in the Insert Here buffer. The Insert Here buffer contains whatever text was last copied or removed. |
|
Key or Key Sequence |
Function |
|---|---|
|
Insert Here |
Same as the INSERT HERE or PASTE command. Inserts, at the current position, text that you removed or copied. |
|
Remove |
Same as the REMOVE or CUT command. Removes the text that is marked with SELECT or highlighted by FIND and places it in the Insert Here buffer. |
|
Select |
Marks text (highlighting it in reverse video) from the initial cursor location to wherever you move the cursor. The text that is highlighted is called the select range. To cancel the selection, press the Select key again or use RESET. |
|
GOLD Select |
Same as RESET. Cancels any of the following and resets the direction of the
buffer to forward:
|
|
GOLD Remove |
Same as the STORE TEXT or COPY command. Copies text that is marked with SELECT or FIND, putting it in the Insert Here buffer. Text that is copied is not removed from its original position. |
|
Command |
Function |
|---|---|
|
INSERT HERE or PASTE |
Inserts the text you copied or removed. By default, EVE defines the E2 key (Insert Here on the minikeypad on VT200, VT300, and VT400 series terminals) and the KP9 key (on VT100 series terminals) as INSERT HERE. |
|
REMOVE or CUT |
Removes the text that was marked with SELECT or highlighted by FIND, and places it in the Insert Here buffer. By default, EVE defines the E3 key (Remove on the minikeypad on VT200, VT300, and VT400 series terminals) and the KP8 key (on VT100 series terminals) as REMOVE. |
|
RESET |
Cancels any of the following and resets the direction of the buffer to
forward:
|
|
RESTORE SELECTION |
Reinserts the text erased by a pending delete operation. For more information about using pending delete, see Section 8.12, ''Using Pending Delete''. |
|
SELECT |
Highlights text in reverse video from the initial cursor location to wherever you move the cursor. The text that is highlighted is called the select range. To cancel the selection, enter the SELECT command again or use RESET. By default, EVE defines the E4 key (Select on the minikeypad on VT200, VT300, and VT400 series terminals) and the KP7 key (on VT100 series terminals) as SELECT. |
|
SELECT ALL |
Highlights all text in reverse video in the current buffer regardless of the cursor position. The text that is highlighted is called the select range. To cancel the selection, enter the SELECT command or use RESET. The SELECT ALL command temporarily disables pending delete to avoid accidentally erasing all of the buffer. |
|
SET NOPENDING DELETE |
Default setting. Disables deletion of selected text when you use the Delete key or type new text. If you select text in the buffer, typing new text adds characters to the select range and using the Delete key erases only the character to the left of the cursor. |
|
SET PENDING DELETE |
Enables pending delete, which lets you quickly erase blocks of text. First enable pending delete, then use the SELECT command to choose the text you want to erase. Erase the text by pressing the Delete key (or any other key on the alpha-numeric keypad). To reinsert what you deleted, move the cursor to where you want the text and enter the RESTORE SELECTION command. The default is SET NOPENDING DELETE. |
|
STORE TEXT or COPY |
Copies text that was marked with SELECT or FIND, placing it in the Insert Here buffer. Text that is copied is not removed from its original position. |
Tutorial: Moving Text
Invoke EVE to edit the file RHYMES.DAT.
Move the cursor to the beginning of the second line of RHYMES.DAT and press the Select key.
Press the down arrow key once.
The second line of text is highlighted.
Press the Remove key.
The second line of text is removed from the current buffer.She rhymes with tree, and this one makes three. [End of file]
Press the Enter key twice and then press the Insert Here key.
The text in the Insert Here buffer is inserted at the current cursor location.She rhymes with tree, also with bee, and this one makes three. [End of file]
To exit from EVE, press Ctrl/Z.
8.10. Copying Text
With the COPY command, you can copy text elsewhere. The STORE TEXT command is the same as the COPY command. You can substitute the STORE TEXT command wherever the COPY command is used in the following example.
Tutorial: Copying Text
Invoke EVE to edit the file RHYMES.DAT.
Move the cursor to the first line of text.
Press the Select key.
Press Ctrl/E to move the cursor to the end of the first line.
Enter the COPY command. The Insert Here buffer now contains a copy of the selected text.
Move the cursor to the line above also with bee, .
- Press the Insert Here key. Your buffer should now look as follows:
She rhymes with tree,

She rhymes with tree,
also with bee,
and this one makes three.
[End of file]
Move the cursor to the beginning of the first line of text. Use the Select key and then the Remove key to delete the first line of text.
To exit from EVE, press Ctrl/Z.
8.11. Box Editing
You can edit text that has rectangular areas, or boxes, as well as standard linear ranges. For example, you can select a box containing a list or columns in a table, and then cut and paste the box or perform some other editing operation on the box.
8.11.1. Selecting a Box of Text
Put the cursor where you want to start the selection – typically, where you want the upper left corner of the box.
Enter the BOX SELECT command.
Move the cursor to where you want the diagonally opposite corner of the box — typically, moving from upper left to lower right.
As you move the cursor, text that you cross is highlighted in bold video (a regular selection uses reverse video). The box is defined by diagonally opposite corners. If you move from upper left to lower right, the character that the cursor is on is outside the box, that is, the lower right corner of the box is left of the cursor.
You can then edit the box by using any of the editing commands that ordinarily work on a linear or a rectangular range. You need not redefine keys. Refer to the Extensible Versatile Editor Reference Manual for further information.
You can use FIND SELECTED if the selection does not cross lines or OPEN SELECTED. You can also use pending delete.
If you are going to make several box edits – for example, in editing multicolumn tables and lists – use the SET BOX SELECT command. SET BOX SELECT redefines several commands and keys as the corresponding BOX commands and makes other editing operations work on boxes instead of linear ranges.
To cancel a box selection, repeat SELECT or BOX SELECT, or use RESET.
8.11.2. Cutting and Pasting a Box of Text
Cutting a box usually pads the area with spaces to keep the column alignment of text to the right of the box. Pasting a box usually overwrites existing text. Tab characters in the box, or that overlap the box, are converted to spaces to keep the column alignment of text.
|
Command |
Function |
|---|---|
|
BOX COPY |
Copies a box of text without removing it, so you can paste it elsewhere. |
|
BOX CUT |
Cuts a box of text so you can paste it elsewhere, usually padding the area with spaces to keep the column alignment of text to the right of the box. |
|
BOX CUT INSERT |
Cuts a box, making text to the right of the box "collapse" to the left, closing the gap. |
|
BOX CUT OVERSTRIKE |
Cuts a box, padding the area with spaces to keep the column alignment of text to the right of the box. |
|
BOX PASTE |
Pastes a box of text you copied or cut, usually overwriting existing text. |
|
BOX PASTE INSERT |
Pastes a box, pushing existing text to the right. |
|
BOX PASTE OVERSTRIKE |
Pastes a box, overwriting existing text. |
|
BOX SELECT |
Selects a box of text. Typically, you start at the upper left corner of the box and move the cursor to where you want the lower right corner. |
|
RESTORE BOX SELECTION |
Puts back (undeletes) a box erased with pending delete, usually overwriting existing text. |
|
SET BOX NOPAD |
Disables padding and overstriking for box editing unless the buffer is in overstrike mode. |
|
SET BOX NOSELECT |
Default setting. Disables box selection, cutting, and pasting. Commands such as SELECT, COPY, and REMOVE use standard linear ranges. To edit boxes, use BOX commands. |
|
SET BOX PAD |
Default setting. Enables automatic padding and overstriking for box editing, regardless of the buffer mode. |
|
SET BOX SELECT |
Enables box selection, making commands such as SELECT, REMOVE, and INSERT HERE the same as the corresponding BOX commands, without having to redefine keys. |
Tutorial: Cutting and Pasting Text
- Invoke EVE to create the buffer CITIES.DAT and enter the following text:
      Rome    Paris   New York
      London  Tunis   Boston
      Tokyo   Bonn    Lisbon
Move the cursor to the left of the letter P in the word Paris. Enter the BOX SELECT command.
Move the cursor two spaces to the right of the second letter n in the word Bonn—the diagonally opposite corner of the box. The text that you cross is highlighted in bold video. Enter the BOX CUT command.
EVE removes the box of text.
Move the cursor to the right of the column that begins with the words New York.
Enter the BOX PASTE command.
EVE pastes the box of text into a new column, as follows:Rome New York Paris London Boston Tunis Tokyo Lisbon Bonn [End of file]
8.11.3. SET BOX SELECT Commands
|
Command |
Effect with SET BOX SELECT |
|---|---|
|
INSERT HERE or PASTE |
BOX PASTE |
|
REMOVE or CUT |
BOX CUT |
|
RESTORE SELECTION |
RESTORE BOX SELECTION |
|
SELECT |
BOX SELECT |
|
STORE TEXT or COPY |
BOX COPY |
You can then select, cut, and paste a box by using the Select, Remove, and Insert Here keys, without having to redefine the keys.
8.12. Using Pending Delete
You can use pending delete to erase selected text. Pending delete refers to erasing a selection by typing new text, pressing the space bar, or by using delete (typically, pressing the Delete key).
With a box selection, pending delete works like BOX CUT, usually padding the area with spaces to keep the column alignment of text to the right of the box.
Pending delete gives you an alternative way of cutting and pasting text because pending delete does not use the Insert Here buffer. For more information about pending delete, see the EVE online help topic called Pending Delete.
8.12.1. Erasing a Selection with Pending Delete
Invoke a file in EVE.
To enable pending delete, use the SET PENDING DELETE command. The default setting is SET NOPENDING DELETE.
Select the text you want to erase. You can use SELECT or BOX SELECT. You cannot use SELECT ALL.
Type new text or use the DELETE command.
8.12.2. Restoring a Selection That Was Erased with Pending Delete
Put the cursor where you want to restore the text. If restoring a box selection, put the cursor where you want the upper left corner of the box to be.
Use RESTORE SELECTION. If a box selection was erased with pending delete, use RESTORE BOX SELECTION. If you used SET BOX SELECT, you can use RESTORE SELECTION (without having to redefine a key).
In insert mode, cutting a box makes text to the right of the box "collapse" to the left, closing the gap. Tab characters to the right of the box are also converted to spaces to keep the column alignment as the text collapses to the left. This method is useful for removing columns from a table or list, such as in turning a 4-column table into a 2-column table. Pasting a box pushes existing text to the right, which is useful for adding columns in the middle of a table.
In overstrike mode, cutting a box pads the area with spaces to keep the column alignment of text to the right of the box. Pasting a box overwrites existing text. The effects are the same as with SET BOX PAD, which is the default setting.
The buffer mode also affects erasing a box with pending delete and restoring an erased box.
8.13. Finding and Replacing Text
With EVE commands, you can search for specific text in a buffer. You can search for every occurrence of specific text, and you can search for text that is on a single line or spans a line break. Also, you can search for text using wildcards. This section describes methods for searching and replacing text.
|
Command |
Function |
|---|---|
|
FIND |
Searches the current buffer for the text string you specify and highlights the found text. The text that is highlighted is called the found range. |
|
FIND NEXT |
Searches for the string of text you last specified with the FIND, REPLACE, or WILDCARD FIND command. |
|
FIND SELECTED |
Searches for a string of text you have selected, rather than for a typed string. The selection cannot cross more than one line. |
|
SET FIND CASE EXACT |
Enables case-exact searches. This is particularly useful to find or replace search strings in lowercase letters only. |
|
SET FIND CASE NOEXACT |
Default setting. Disables case-exact searches so that EVE finds any occurrence if you enter a search string in all lowercase letters. |
|
SET FIND NOWHITESPACE |
Default setting. Sets FIND and WILDCARD FIND commands to match tabs and spaces exactly as you specify in the search string and to search for strings that are entirely on one line. |
|
SET FIND WHITESPACE |
Sets FIND and WILDCARD FIND commands to treat spaces, tabs, and up to one line break as "white space" so you can search for strings of two or more words regardless of how they are separated. |
|
SET WILDCARD VMS |
Default setting on OpenVMS. Enables OpenVMS patterns for WILDCARD FIND. |
|
SHOW WILDCARDS |
Lists the wildcard patterns you can use with WILDCARD FIND. |
|
WILDCARD FIND |
Searches for a pattern of text, using wildcards. |
8.13.1. Finding Text
Use the FIND command to locate specific text in the current buffer. By default, EVE defines the E1 key (Find key on VT200, VT300, and VT400 series terminals and the PF1 key on VT100 series terminals) as the FIND command.
Enter the FIND command.
Type the text (called the search string) that you want to locate.
The current direction of the buffer determines whether EVE first searches in a forward or reverse direction.
If EVE cannot find the string in the current direction but finds it in the opposite direction, EVE prompts you to change direction.
To search in the opposite direction, type YES (Y) and press the Enter key. EVE moves the cursor to the first occurrence of the string in the opposite direction. The current direction in the highlighted status line does not change, however.
8.13.1.1. When a Search String Is Found
When EVE finds the search string, the editor highlights it and moves the cursor to the first letter of the string. Refer to the Extensible Versatile Editor Reference Manual for a listing of the editing commands you can use on a highlighted search string.
To cancel the highlighting, move the cursor off the search string or use the RESET command.
To find the next occurrence of the search string, press the Find key twice or enter the FIND NEXT command.
8.13.2. Setting Case-Exact Searches
If you want to match the case of your search exactly when searching for lowercase occurrences of a string, enter the SET FIND CASE EXACT command. Then when you enter a search string in all lowercase letters, EVE searches only for lowercase occurrences, skipping occurrences that contain uppercase letters.
The setting applies to the FIND, REPLACE, and WILDCARD FIND commands. You can save the setting in your section file or command file for future editing sessions. The default setting is SET FIND CASE NOEXACT.
EVE is sensitive to diacritical (accent) marks and locates only those occurrences of the string in which the diacritical marks are exactly the same. For example, in searching for ë, EVE does not find occurrences of e, é, è, or ê.
Command: SET FIND CASE EXACT
Command: FIND digital
Tutorial: Finding Text
Invoke EVE to edit RHYMES.DAT. The cursor appears on the first letter of the first line of the buffer, and the current direction is forward.
Press the Find key, type the letters ree, and press the Enter key. The cursor moves to the letter r in the word tree and highlights the letters ree.
Press the Find key twice to find the next occurrence of the string ree. The cursor moves to the letter r in the word three and highlights the letters ree.
When a search string is found and highlighted, you can use any command that works on a selected or found range except SPELL. Also, you cannot use a pending delete operation on a found range.
Enter the UPPERCASE WORD command.
The UPPERCASE WORD command changes the case of the highlighted letters from lowercase to uppercase, as shown in the following example:She rhymes with tree, also with bee, and this one makes thREE. [End of file]
Tutorial: Using the FIND SELECTED Command
Copy the text (from the previous tutorial) so that it is displayed twice in the buffer.
Move the cursor to the beginning of the string rhymes with tree, on the first line.
Enter the SELECT command.
Move the cursor to highlight the string and select text. Note that the selection cannot span more than one line.
Enter the command FIND SELECTED.
The cursor moves to the next occurrence of the string rhymes with tree, . The selection is canceled and the found string appears in bold video.
8.13.3. Using Wildcards
You can use wildcards to search for text. The SHOW WILDCARDS command displays wildcard patterns for the current wildcard setting.
Tutorial: Using Wildcards
Position the cursor at the beginning of the buffer.
- Enter the command WILDCARD FIND *ee to search for text strings ending in ee.
She rhymes with tree,
also with bee,
and this one makes thREE.
[End of file]
EVE puts the cursor at the beginning of the line containing the r in tree.
8.13.4. Including White Space in a Search
Use the SET FIND WHITESPACE and SET FIND NOWHITESPACE commands to specify how the WILDCARD FIND and FIND commands treat the blank spaces between words, such as spaces, tabs, and line breaks.
The SET FIND NOWHITESPACE command enables the commands to search for multiword strings on a single line, matching spaces and tabs exactly as they are found. SET FIND NOWHITESPACE is the default search behavior.
The SET FIND WHITESPACE command enables the WILDCARD FIND and FIND commands to search for a string of two or more words regardless of how they are separated. It enables the FIND commands to search for a string that contains a single line break and more than one space or tab between words.
8.13.5. Marking Locations in Text
|
Command |
Function |
|---|---|
|
MARK |
Puts an invisible mark at the current cursor position. The mark exists for the rest of an editing session or until you change it; it is not saved when you exit. |
|
GO TO |
Returns the cursor to the location labeled by the MARK command. If the labeled location is found in another buffer, EVE moves the cursor to the other buffer and puts that buffer into the current window. |
To mark your position, enter the MARK command followed by a label name of your choice. The label name can be one or more printable characters, including alphanumeric and punctuation characters, spaces, and tab characters. To return the cursor to the marked location, enter the GO TO command followed by the label name.
8.13.6. Replacing Text
With the REPLACE command, you can replace a text string in the current buffer with another text string. This is useful if you have spelled a word incorrectly throughout a long file and you want to fix every occurrence of the misspelled word.
8.13.6.1. REPLACE Command and Case Sensitivity
A capitalized version of the old string (first letter uppercase, others lowercase) is replaced by a capitalized version of the new string.
An all-uppercase version of the old string is replaced by an all-uppercase version of the new string (otherwise, the old string is replaced by an all-lowercase version of the new string).
|
Old String |
New String |
Highlight |
Replacement |
|---|---|---|---|
|
butter |
margarine |
butter |
margarine |
|
Butter |
Margarine | ||
|
BUTTER |
MARGARINE | ||
|
BUtteR |
margarine | ||
|
Butter |
margarine |
Butter |
margarine |
|
butter |
Margarine |
butter |
Margarine |
|
Butter |
Margarine | ||
|
BUTTER |
Margarine | ||
|
BUtteR |
Margarine | ||
|
Butter |
Margarine |
Butter |
Margarine |
If you want to find or replace only lowercase occurrences of a string, enter the SET FIND CASE EXACT command. Then if you enter a search string in all lowercase, EVE searches for only lowercase occurrences, skipping occurrences that contain uppercase letters. The setting applies to FIND, REPLACE, and WILDCASE FIND commands.
|
Old String |
New String |
Highlight |
Replacement |
|---|---|---|---|
|
butter |
margarine |
butter |
margarine |
The default case setting is SET FIND CASE NOEXACT.
8.13.6.2. REPLACE Command Responses
|
Response |
Effect |
|---|---|
|
Yes |
Replace this occurrence and find the next one. This is the default response. Press the Enter key. |
|
No |
Skip this occurrence and find the next one. |
|
All |
Replace all occurrences (no further prompting unless EVE finds an occurrence in the opposite direction). |
|
Last |
Replace this occurrence and stop here. |
|
Quit |
Skip this occurrence and stop here. |
8.14. Using Command Line Qualifiers
When you invoke EVE, you can use command line qualifiers to specify advanced EVE editing features. When using the character-cell screen updater, the default insert or overstrike mode is determined by your terminal setting.
|
Qualifier |
Default |
|---|---|
|
Command file |
/COMMAND=TPU$COMMAND.TPU |
|
File creation |
/CREATE |
|
Debugging package |
/NODEBUG |
|
Specifying display mode |
/DISPLAY=CHARACTER_CELL |
|
Initialization file |
/INITIALIZATION=EVE$INIT.EVE |
|
Journaling |
/JOURNAL |
|
Modifying main buffer |
/MODIFY |
|
Specifying output |
/OUTPUT=output-file |
|
Read-only access |
/NOREAD_ONLY |
|
Recovery |
/NORECOVER |
|
Section files |
/SECTION=TPU$SECTION |
|
Start position |
/START_POSITION=(1, 1) |
|
Work file |
/WORK=SYS$SCRATCH:TPU$WORK.TPU$WORK |
8.14.1. Starting in an Alternate Position
Start position qualifiers determine the row and column where the cursor first appears in the buffer that you specified on the command line.
For EVE, the default start position is 1, 1 – row 1, column 1, which is the upper left corner of the buffer. Use of start position qualifiers does not affect the initial cursor position when you create another buffer during the editing session and does not limit the buffer size.
/START_POSITION=(row[, column]
|
/START_POSITION |
You must use the /START_POSITION= qualifier to the EDIT command. |
|
row |
The row that you want the cursor to be at when you invoke EVE. |
|
column |
The column that you want the cursor to be at when you invoke EVE. |
$ EDIT TEST.COM /START_POSITION=(10, 5)
If you want to start at a particular line in a file, you can omit the second parameter (the column).
8.14.2. Using Work Files
Work file qualifiers determine the work file that is used to swap memory for editing very large files. There is one work file per editing session. The work file is a temporary file that is automatically deleted when you exit.
The default work file is named TPU$WORK.TPU$WORK. EVE creates the work file in SYS$SCRATCH unless you specify otherwise.
Define the logical name TPU$WORK. This is useful if you want the work file to be created in an area other than SYS$SCRATCH, such as on a larger disk. You can put the definition in your LOGIN.COM file.
- Use the /WORK= qualifier and specify the work file. This overrides any definition of the TPU$WORK logical name. For example, the following command invokes EVE and specifies the work file to be SYS$SCRATCH:MYWORK.TPU$WORK:
$ EDIT /WORK=MYWORK
If you want the work file to be created in an area other than SYS$SCRATCH, use a complete file specification, including the device (disk) and directory. You cannot use wildcards to specify the work file.
8.14.3. Modifying the Main Buffer
Modifying qualifiers determine whether you can modify the buffers specified on the command line. Modifications do not affect other buffers you create during the editing session.
By default, you can modify the buffer by editing text in it. When you exit, EVE writes out the buffer to a file if the buffer has been modified.
Use /NOMODIFY to examine a file without making any changes. You can then use cursor-movement commands but you cannot change the text.
If you specify neither /MODIFY nor /NOMODIFY, your application determines if you can modify the buffer. EVE's default behavior is to modify the buffer.
$ EDIT /READ_ONLY /MODIFY
In EVE, you can set or change the modification attribute of the buffer by using SET BUFFER commands.
8.15. Alternate Methods to Invoke EVE
You can invoke EVE using four different methods: from search lists, with wildcards, with wildcard directory names, or with multiple input files.
8.15.1. Invoking EVE from a Search List
$ DEFINE STAFFMEMOS HIRING.DAT, PROMOTION.LIS, SALARY.TXT
$  EDIT STAFFMEMOS
In the example, if the first file in the search list exists, EVE copies that file (HIRING.DAT) into a buffer and uses the file name and file type as the buffer name. If the file does not exist, EVE tries to get the second file (PROMOTION.LIS), and so on. If none of the files in the search list exist, EVE creates an empty buffer named HIRING.DAT because that is the first file in the search list.
8.15.2. Invoking EVE with Wildcards
When you invoke EVE to edit an existing file, you can use the asterisk (*) wildcard character as a substitute for some or all of the characters in the file name and file type. To use wildcards in EVE, follow the same rules as using wildcards in DCL. You can use the percent sign (%) wildcard character as a substitute for a single character at a time, and you can use the ellipsis ([...]) wildcard character as a substitute for a directory specification. If only one match is made, the file is displayed on your screen. If more than one match is made, EVE displays a list of matching files and prompts you to provide a more complete file specification. If no match is made, EVE creates a buffer named Main.
If more than one file matches your wildcard request, EVE displays the matching files so you can choose the one you want.
If no matching file is found, EVE creates an empty buffer named Main. If you use a search list or wildcard directory to specify an input file, EVE gets the first matching file found without displaying the $CHOICES$ buffer. For information about using the $CHOICES$ buffer, see the EVE online help topic called Choices Buffer.
$ EDIT *.TXT
If you specify *.TXT, EVE lists the files that match your wildcard request in a second window in a system buffer named $CHOICES$.
8.15.3. Invoking EVE with Wildcard Directory Names
You can use wildcards in a directory name ([...]) to invoke EVE and work either in your current directory or in a subdirectory of the current directory.
- @ (at sign)
- GET FILE
- INCLUDE FILE
- OPEN
- OPEN SELECTED
- RECOVER BUFFER
$ EDIT [...]PINK.TXT
8.15.4. Invoking EVE with Multiple Input Files
You can specify multiple input files on the command line that invokes EVE. The file names must be separated by commas with optional white space. If wildcard characters are present in the file names, EVE displays the matching files only for the first wildcard file name that has more than one match. For the other ambiguous file names, EVE outputs a warning message.
8.16. Journaling and Recovery
Journal files record your edits so that if a system failure interrupts your editing session, you can recover your work.
Buffer-change journaling creates a separate journal file for each text buffer you create. This is the EVE default. Buffer-change journaling works both on DECwindows and on character-cell terminals. You recover one buffer at a time, typically by using RECOVER BUFFER commands in EVE. You can recover buffers from different editing sessions. The recovery restores only your text – it does not restore settings, key definitions, or the contents of system buffers (such as the Insert Here buffer) before the system failure.
You can disable journaling when you invoke EVE by using the /NOJOURNAL qualifier on your command line. This is useful when you use EVE to examine a file without making any edits or for demonstration sessions.
EVE file backups are disabled and cannot be enabled because the OpenVMS file system provides version numbers; therefore, no EVE mechanism is needed.
8.16.1. Using Buffer-Change Journaling
Buffer-change journaling creates a journal file for each text buffer. EVE does not create buffer-change journal files for system buffers such as the Insert Here buffer, DCL buffer, or $RESTORE$ buffer. As you edit a buffer, the journal file records the changes you make, such as erasing, inserting, or reformatting text. When you exit from EVE or when you delete the buffer, the journal files are deleted. If a system failure interrupts your editing session, the journal files are saved. Your last few keystrokes before the system failure may be lost.
|
Command |
Function or Effect |
|---|---|
|
RECOVER BUFFER |
Recovers a specified buffer by using the journal file for the buffer. You can specify the name of the buffer or file you want to recover or the name of the journal file for the buffer. |
|
RECOVER BUFFER ALL |
Recovers all your text buffers, one at a time, by using the journal files for the buffers, if there are any. |
|
SET JOURNALING |
Enables buffer-change journaling for a buffer that you specify. |
|
SET JOURNALING ALL |
Enables buffer-change journaling for all your buffers. This is the default setting. |
|
SET NOJOURNALING |
Disables buffer-change journaling for a buffer that you specify. |
|
SET NOJOURNALING ALL |
Disables buffer-change journaling for all your buffers. |
$ CREATE/DIRECTORY [USER.JOURNAL]
$ DEFINE TPU$JOURNAL [USER.JOURNAL]
You can put the definition in your LOGIN.COM file.
Buffer-change journal files may be quite large (even larger than the text files you edit). Because of the potential size of buffer-change journal files and because there is a journal file for each text buffer, you may want to define TPU$JOURNAL as a directory or subdirectory on a large disk, rather than as SYS$SCRATCH.
Deriving Buffer-Change Journal Names
Buffer-change journal file names are derived from the name of the file or buffer being edited and the default file type for the operating system. To find out the name of the journal file for the current buffer, enter the SHOW command at the EVE prompt. The SHOW command displays the name of your input file, output file, your journal file, and other information about your current buffer.
|
Text Buffer Name |
Buffer-Change Journal File |
|---|---|
|
JABBER.TXT |
JABBER_TXT.TPU$JOURNAL |
|
GUMBO_RECIPE.RNO |
GUMBO_RECIPE_RNO.TPU$JOURNAL |
|
MAIN |
MAIN.TPU$JOURNAL |
|
LATEST NEWS |
LATEST_NEWS.TPU$JOURNAL |
Using Buffer-Change Journaling to Recover Edits
Use the /RECOVER qualifier on the EDIT command line when you invoke EVE.
Use RECOVER BUFFER commands within EVE.
$ EDIT JABBER.TXT
              .
              .
              .
   ***  system failure  ***
              .
              .
              .
$  EDIT JABBER.TXT/RECOVER
Using the RECOVER BUFFER Command
|
Step |
Task |
|---|---|
|
1 |
Invoke EVE and enter the following command to recover your text:
Command: RECOVER BUFFER file-name.txtIf the buffer-change journal file is available, EVE shows the following
information and asks if you want to recover that buffer:
|
|
2 |
Press the Enter key to recover your buffer. If you do not want to recover your buffer, type No and press the Enter key. If you delete or rename the source file for recovery, the recovery fails. The source file is either the file initially read into the buffer (if any) or the last file written before the system failure. If the buffer you want to recover exists (usually the Main buffer), EVE first deletes that buffer and then does the recovery. If the buffer you want to recover has been modified, EVE asks you whether to delete the buffer before recovering. |
How to Recover When You Are Unsure of the File Name
Command: RECOVER BUFFER *
EVE then displays a list of all your available journal files so you can choose the one you want. The list appears in an EVE system buffer named $CHOICES$ in a second window. For information about using the $CHOICES$ buffer, see the EVE online help topic called Choices Buffer.
How to Recover All Buffers
|
Response |
Effect |
|---|---|
|
Yes |
Recovers the buffer and then asks you whether to recover the next buffer, if there is one. This is the default response. Press the Enter key. |
|
No |
Skips this recovery. If there is another buffer to recover, EVE asks you about the other buffer. |
|
Quit |
Cancels – does not recover the buffer and does not continue recovery operations. |
Disabling Buffer-Change Journaling
You can disable buffer-change journaling for a particular buffer by using the SET NOJOURNALING command. To disable buffer-change journaling for all your buffers, use the SET NOJOURNALING ALL command.
Enabling Buffer-Change Journaling
Command: SET JOURNALING JABBER.TXT
If you invoked EVE without journaling and then want to enable buffer-change journaling during the editing session, use the SET JOURNALING ALL command (which is the EVE default).
Command: SET JOURNALING MEMO.TXT
Buffer MEMO.TXT is not safe for journaling
You should first write (save) the buffer by using the WRITE FILE or SAVE FILE command and then enable journaling.
8.17. EVE Formatting Commands
EVE provides commands that let you format your text by setting margins, tabs, and word wrap. You can center lines, take extra white space out of text, and insert page breaks.
|
Key or Key Sequence |
Function |
|---|---|
|
Return or Ctrl/M |
Inserts a carriage return at the current position either to start a new line of text or to terminate a command you are typing. On VT200, VT300, and VT400 series terminals, EVE also defines the Enter key as Return. |
|
Tab or Ctrl/I |
Inserts a tab character at the current position according to the tab modes and at the tab stops currently set. |
|
Ctrl/L |
Inserts a form-feed character at the current position to mark the beginning of a new page. A page break appears as a small double F () and is always on a line by itself. Same as INSERT PAGE BREAK. |
|
Command |
Function |
|---|---|
|
CAPITALIZE WORD |
Changes the case of a word, making the first letter uppercase and the rest of the letters lowercase. Works on a range, box, or single word. |
|
CENTER LINE |
Centers the current line between the left and right margins. The cursor moves with the line, remaining on the same character as the line moves. |
|
CONVERT TABS |
Converts tab characters to the appropriate number of spaces in a box, a range, or the entire buffer. |
|
FILL |
Reformats the current paragraph, range, or box according to the margins of the buffer, so the maximum number of words fits on a line. When you fill a select range or found range, the FILL or FILL RANGE command does not reformat a line that begins with a page break, a DIGITAL Standard Runoff (DSR) command, or DOCUMENT tag; it does reformat the other lines in the range. Filling a range does not delete blank lines. For more information about select range, see Section 8.9, ''Moving Text''. |
|
FILL PARAGRAPH |
Reformats the paragraph that the cursor is in according to the margins set for the buffer. When you fill a paragraph, the FILL command does not reformat a line that begins with a page break, DSR command, or DOCUMENT tag; it does reformat the other lines in the paragraph. |
|
FILL RANGE |
Reformats the range or box according to the current margin settings. When you fill a select range or found range, the FILL or FILL RANGE command does not reformat a line that begins with a page break, DSR command, or DOCUMENT tag; it does reformat the other lines in the range. Filling a range does not delete blank lines. |
|
INSERT PAGE BREAK |
Inserts a form-feed character at the current position to mark the beginning of a new page. A page break appears as a small double F () and is always on a line by itself. By default, Ctrl/L is defined as INSERT PAGE BREAK. |
|
LOWERCASE WORD |
Changes the current word, range, or box to lowercase. |
|
PAGINATE |
Inserts a "soft" page break for a 54-line page. A soft page break appears as a form feed followed by the null character (). When you enter the PAGINATE command, EVE moves back to the previous page break (if any) then checks ahead for page breaks within the next 54 lines. If any soft breaks are found within those 54 lines, EVE removes them. EVE then moves down 54 lines, inserts a soft break, and puts the cursor on the next line. The soft break is inserted on a line by itself. If a hard page break (form feed only) is found within the 54 lines, EVE stops on the line after the hard break, in case you want to erase the break. |
|
SET LEFT MARGIN |
Sets the left margin in the current buffer. The left margin must be greater than 0 but less than the right margin. By default, the left margin is 1 (leftmost column). |
|
SET RIGHT MARGIN |
Sets the right margin for the current buffer. The right margin must be greater than the left margin. By default, the right margin is one less than the width. The width is typically 80, so the default margin is typically 79. |
|
SET PARAGRAPH INDENT |
Specifies the number of spaces to be added to or subtracted from the first line of paragraphs you create or reformat. The default is 0 (no indent). |
|
SET TABS AT |
Sets tab stops at the columns that you specify. The column numbers must be in ascending order and separated by spaces. By default, tab stops are set every eight columns. The command does not affect the hardware tab settings of your terminal. |
|
SET TABS EVERY |
Sets tab stops at the specified interval. By default, tab stops are set every eight columns. The command does not affect the hardware tab settings of your terminal. |
|
SET TABS INSERT |
Default setting. Changes the tab mode so that EVE inserts a tab character at the current column when you press the Tab key. The cursor and text move to the next tab stop. |
|
SET TABS MOVEMENT |
Changes the tab mode so the Tab key becomes a cursor-movement key. Pressing the Tab key moves the cursor to the next tab stop but does not insert a tab character. |
|
SET TABS SPACES |
Changes the tab mode to insert an appropriate number of spaces, rather than a tab character, when the Tab key is pressed. Previously existing tab characters are not affected. |
|
SET TABS INVISIBLE |
Default setting. Makes tab characters invisible on the screen, appearing as white space. |
|
SET TABS VISIBLE |
Makes tab characters visible on the screen, appearing as a small (horizontal tab). |
|
SET NOWRAP |
Disables word wrapping at the right margin of the buffer. To start new lines, press the Enter key or use the FILL command. |
|
SET WRAP |
Default setting. Enables word wrapping at the right margin of the buffer. EVE starts new lines without you pressing the Enter key or using the FILL command. |
|
UPPERCASE WORD |
Changes the current word, range, or box to uppercase. |
8.18. Using Buffers
Buffers are storage areas that exist only during an editing session. When you edit an existing file, EVE reads the contents of the file into a buffer. The highlighted status line contains the name of the buffer, its editing status (read-only or write), editing mode (insert or overstrike), and direction (forward or reverse).
|
Command |
Function |
|---|---|
|
BUFFER |
Puts the specified buffer into the current window and moves the cursor to the last location it occupied in that buffer. If the specified buffer does not exist, creates a new buffer. |
|
DELETE BUFFER |
Deletes a buffer you specify by name. |
|
GET FILE or OPEN |
Puts the specified file into the current EVE window, creating a new buffer if necessary. If the file exists, EVE copies it into a new buffer in the current window. If the file does not exist, EVE creates a new, empty buffer, using the file name and file type for the buffer name. If there already is a buffer by that name, EVE asks for a different name to use. |
|
GO TO |
Returns the cursor to the location labeled by the MARK command. If the labeled location is found in another buffer, EVE moves the cursor to that buffer and puts it into the current window. Section 8.18.5, ''Editing Multiple Buffers'' explains how to use multiple buffers in an editing session. |
|
INCLUDE FILE |
Inserts the contents of the specified file into the current buffer at the line above the cursor location. This is useful to combine files. |
|
NEW |
Creates a new buffer named Main and puts it into the current window. If the buffer Main already exists, EVE asks for a name for the new buffer. |
|
NEXT BUFFER |
Puts the next buffer (if one exists) into the current window and moves the cursor to the last position it occupied in that buffer. This command lets you move from one buffer to another without specifying a buffer name. |
|
OPEN SELECTED |
Opens a file whose name you have selected or found. This command is the same as using the GET FILE or OPEN command without having to type the file name. |
|
REMOVE or CUT |
If you are in the Buffer List buffer, same as DELETE BUFFER. Use the REMOVE command as follows to delete a buffer without typing the buffer name: enter the SHOW BUFFERS command (which puts you in the Buffer List buffer), move the cursor to the name of the buffer you want to delete, and enter the REMOVE command. |
|
SAVE FILE |
Writes the contents of the current buffer to the file associated with the buffer without ending the editing session. If you do not specify a file name with the SAVE FILE command, EVE prompts you for an output file specification. Similar to WRITE FILE. |
|
SAVE FILE AS |
Writes the contents of the current buffer to the file you specify without ending the editing session. For example, if you are editing a file named FIRST.DAT, you can save it as SECOND.TXT. This command does not change the name of the buffer. It does, however, associate the buffer with the file you name so that any subsequent SAVE FILE, WRITE FILE, or EXIT command writes the buffer to the file you named. This command requires you to supply a file specification. |
|
SELECT or RETURN |
If you are in the Buffer List buffer, selects the buffer you specify. Use the SELECT command as follows to select a buffer without typing the buffer name: enter the SHOW BUFFERS command, move the cursor to the name of the buffer you want to select, and enter the SELECT command. |
|
SET BUFFER |
Lets you specify the editing status of the buffer: whether the buffer can be modified or can be written to a file when you exit from EVE. |
|
SHOW |
Displays information about the buffers you have created during the editing session. If more than one buffer is active in your editing session, the SHOW command displays information about the buffer you are currently editing. For information about the other active buffers, press the Do key. To resume editing, press any other key. |
|
SHOW BUFFERS |
Lists the buffers you have created during an editing session. You can move the cursor through the list and specify a particular buffer for viewing by pressing the Select key. |
|
SHOW DEFAULTS BUFFER |
Shows information, such as margins, tab stops, direction, mode, and maximum lines, about the EVE system buffer named $DEFAULTS$. These are the default settings used when you create new buffers. |
|
SHOW SYSTEM BUFFERS |
Lists the system buffers created by EVE, such as the Message buffer, Help buffer, Insert Here buffer, and $RESTORE$ buffer. You can move the cursor through the list and specify a buffer for viewing by pressing the Select key. |
|
WRITE FILE |
Writes the contents of the current buffer to the file associated with the buffer or to the file you specify on the command line without ending the editing session. If the current buffer does not have a file specification associated with it, EVE prompts you for an output file specification. Similar to SAVE FILE. |
8.18.1. Obtaining Buffer Information
Buffer name
Names of the input, output, and buffer-change journal files
Current mode and direction
Number of lines
Margin and screen-width settings
Paragraph indent
WPS word wrap
Wrap indent
Tab stop
If more than one buffer is active during an editing session, EVE prompts you to press the Do key to get information about other buffers.
8.18.2. Deleting a Buffer
To delete a buffer, enter the DELETE BUFFER command and specify the name of the buffer you want to delete. If the buffer is empty or unmodified, EVE deletes it. If, however, the buffer has been modified, EVE prompts you for a choice. Note that the buffer name must be typed in full; no abbreviations are allowed. If you are viewing a buffer that you want to delete, EVE replaces the buffer with the oldest buffer existing in the editing session.
|
Keyword |
Effect |
|---|---|
|
DELETE_ONLY |
Deletes the specified buffer. |
|
WRITE_FIRST |
Writes out (saves) the specified buffer, then deletes it. |
|
QUIT |
Default choice. The buffer is not deleted. |
Command: DELETE BUFFER MYFILE.TXT
That's a modified buffer. Type delete_only, write_first, or quit:
8.18.3. Changing Buffer Status
Use the SET BUFFER command to change the editing status of the buffer; that is, whether the buffer can be modified and whether the buffer will be written to a file after you exit from EVE.
|
Keyword |
Effect |
|---|---|
|
MODIFIABLE |
Default setting. The buffer can be modified. Also restores the previous mode of the buffer (insert or overstrike). |
|
READ_ONLY |
The buffer is not saved (written out) on exiting, even if it has been modified (opposite of WRITE). Also sets the buffer to unmodifiable. However, you can set it to modifiable. |
|
UNMODIFIABLE |
The buffer cannot be modified. Also overrides the mode of the buffer (insert or overstrike). |
|
WRITE |
Default setting. The buffer is saved (written out) on exiting if it has been modified (opposite of READ_ONLY). If a buffer is read-only or unmodifiable, SET BUFFER WRITE makes it modifiable and restores its previous mode (insert or overstrike). |
By default, buffer status is set to MODIFIABLE and WRITE, letting you change the contents of a buffer and save the changed buffer in a file.
Command: SET BUFFER READ_ONLY
Command: SET BUFFER READ_ONLY
Command: SET BUFFER MODIFIABLE
You then can edit the buffer, but it will not be saved when you exit from EVE.
8.18.4. Displaying the Messages Buffer
EVE uses the message window, which appears at the bottom of the screen, to communicate error and informational messages during an editing session. The message window displays the last message in the Messages buffer.
You can display these messages with the BUFFER command. To display the contents of the Messages buffer, press Do and enter the command BUFFER MESSAGES. To return to the buffer you were editing, press Do and enter the BUFFER command followed by the name of the appropriate buffer.
You can also enter the SHOW BUFFERS command to display the buffers you have created and press the Select key to choose a buffer.
8.18.5. Editing Multiple Buffers
You can use several buffers if you want to edit more than one file or if you want temporary storage areas for manipulating blocks of text. You can use one of the following commands to create a new buffer: GET FILE or OPEN, OPEN SELECTED, or BUFFER.
Using the GET FILE Command
To create a new buffer with a file that already exists, enter the GET FILE (or OPEN) command and the name of the file you want to copy to the new buffer. You can use the asterisk (*) wildcard character as a substitute for all or some of the characters in the file name and file type. You can use the percent sign (%) wildcard character as a substitute for one character in the file name and file type, and you can use the ellipsis ([...]) wildcard as a substitute for a directory specification.
Using the OPEN SELECTED Command
Put the cursor on the name of the file you want to open.
Enter the OPEN SELECTED command.
Using the BUFFER Command
To put a specific buffer into the current EVE window, enter the BUFFER command and the name of the buffer you want to put in the current window. You cannot use wildcard characters in buffer names. The asterisk (*) and percent sign (%) are treated as literal characters in a buffer name. If the buffer you specify does not already exist, EVE creates a new buffer.
If the specified file exists, EVE reads the contents of the file into a new buffer and displays the buffer in the current window. If there is more than one match for a file specification with a wildcard, EVE displays a list of choices in the $CHOICES$ buffer and prompts you to provide a more complete file specification. EVE will open the first file it matches if you use a search list or an ellipsis ([...]) wildcard. Otherwise, EVE creates an empty buffer and displays the buffer in the current window.
To change the buffer in the current window, press the Do key, type BUFFER and the name of the buffer you want to display on the screen, and then press the Enter key. If you forget a buffer name, enter the SHOW BUFFERS command to display the names of active buffers in your editing session and specify a buffer with the Select key.
8.18.6. Reading Files into EVE
Invoke EVE with a file specification.
Enter the INCLUDE FILE command and the name of the file you want to include. EVE reads the entire contents of the file into the buffer just before the line where the cursor is located. Using the INCLUDE FILE command does not change the name of the buffer on the status line.
Enter the GET FILE or OPEN command and the name of the file you want to use. Either command creates a new buffer and reads the contents of an existing file into the buffer. The name of the buffer on the status line is the same as the file name you specify with the GET FILE or OPEN command (see Section 8.18.5, ''Editing Multiple Buffers'').
Select or find a file name, then enter the OPEN SELECTED command.
8.18.7. Writing Files from EVE
To write the contents of the current buffer to a file, enter the WRITE FILE command. You can include a file specification with the WRITE FILE command. If you do not include a file specification, EVE uses the input file specification to write the file. If you created the current buffer with the BUFFER or NEW command, EVE prompts you for a file specification to which it writes the file.
Command: GET FILE RHYMES.DAT
    .
    .
    .
Command: WRITE FILE

3 lines written to WORKDISK:[USER]RHYMES.DAT;2
8.18.8. Using Windows
During an EVE editing session, the buffer you are editing is displayed on the screen in a window. A highlighted status line appears at the bottom of the window identifying the name, current editing mode, and current direction of the buffer.
EVE lets you view more than one window on your terminal screen at the same time. For example, you can have two windows on the terminal screen to view and edit different sections of the same buffer.
|
Key or Key Sequence |
Function in a Window Environment |
|---|---|
|
GOLD Next Screen |
Puts the cursor in the next (or other) window. Same as the NEXT WINDOW command. |
|
GOLD Prev Screen |
Puts the cursor in the previous (or other) window. Same as the PREVIOUS WINDOW command. |
|
Command |
Function in a Window Environment |
|---|---|
|
DELETE WINDOW |
Deletes the current window, if you are using more than one window. |
|
ENLARGE WINDOW |
Enlarges the current window by a specified number of lines. For example, ENLARGE WINDOW 5 enlarges the window by five lines. The adjacent window shrinks accordingly. |
|
NEXT WINDOW or OTHER WINDOW |
Puts the cursor in the next (or other) window. |
|
ONE WINDOW |
Restores the current window as a single, large window. EVE deletes all other windows from the screen. The buffers associated with those windows are not deleted. |
|
PREVIOUS WINDOW |
Puts the cursor in the previous (or other) window. |
|
SET WIDTH |
Sets the width of lines displayed on the screen. Specify width as a positive integer. By default, the screen width is your terminal setting (usually 80 columns). If the width is set greater than 80, EVE sets the terminal to 132-column mode for the current editing session. When you exit from EVE, the terminal is restored to the default setting. Setting the width changes the display of text in all windows. |
|
SHIFT LEFT |
Moves the current window to the left a specified number of columns. You can use the SHIFT LEFT command only to reverse the effect of the SHIFT RIGHT command. |
|
SHIFT RIGHT |
Moves the current window to the right a specified number of columns, so you can view columns of characters that do not currently appear on the terminal screen. |
|
SHRINK WINDOW |
Shrinks the current window by a specified number of lines. For example, SHRINK WINDOW 5 shrinks the window by five lines. The adjacent window expands accordingly. |
|
SPLIT WINDOW |
Splits the current window, forming two smaller windows. You can divide the window into more than two parts by specifying a number with the command. For example, SPLIT WINDOW 3 splits the window into three windows. |
|
TWO WINDOWS |
Same as the SPLIT WINDOW 2 command. |
8.18.9. Viewing Two Sections of One Buffer
To view two sections of a file at the same time, use the SPLIT WINDOW command. EVE splits your screen and creates two identical windows. The cursor maintains its position in the buffer but appears only in the bottom window. The buffer name is the same in both status lines.
Displaying two sections of a long file makes moving text within a file efficient. You can select and remove text from one part of the file and insert it into the other. To move the cursor from one window to the other, enter the NEXT WINDOW command.
To remove the second window from the screen and expand the current window to occupy the whole editing area, press the Do key, enter the command ONE WINDOW, and press the Enter key.
8.18.10. Editing Two Buffers
|
Step |
Task |
|---|---|
|
1 |
Create two windows on your screen by entering the SPLIT WINDOW command. EVE splits your screen and creates two windows. The cursor maintains its position in the buffer but appears only in the bottom window. The buffer name in each of the highlighted status lines is the same. |
|
2 |
Use the GET FILE, OPEN, or OPEN SELECTED command to put a second file in the current window. To display a buffer that you created earlier in the editing session in the current window, enter the BUFFER command and the name of the buffer you want to display. Your terminal screen now displays two different buffers. You can select and remove text from one buffer and insert it into the other buffer. To move the cursor from one window to the other, enter the command NEXT WINDOW. |
8.19. Creating a Subprocess
You can create a subprocess to switch between an EVE editing session and DCL command level without terminating your editing session. To create a subprocess, enter the SPAWN command. EVE suspends the current editing session and connects your terminal to a new subprocess. The DCL prompt ($) appears on your terminal screen.
8.19.1. Spawning
The most common reasons to spawn a subprocess are to invoke the Mail utility and to run screen-oriented programs, although your subprocess can invoke any OpenVMS utility or execute any DCL command.
To return to your editing session, log out of the subprocess by entering the DCL command LOGOUT. EVE resumes the editing session, and the cursor appears in the location it occupied before you spawned the subprocess. You can also supply a DCL command as a parameter to the SPAWN command to create a specific subprocess.
[End of file]


Buffer: MAIN                           | Write | Insert | Forward
Command: SPAWN MAIL
The prompt for the Mail utility (MAIL>) appears on the screen. When you exit from Mail, you are automatically logged out of the subprocess and EVE resumes the editing session.
8.19.1.1. Spawning to EVE from DCL
Rather than spawn a process to use DCL, you can spawn a process for an EVE editing session and then attach to the parent DCL process to use DCL commands and utilities.
When you want to return to the DCL command level, use the EVE command ATTACH to return to the parent process.
To resume your editing session, reconnect to the editing subprocess by using the DCL command ATTACH with the process name of the subprocess.
$ SPAWN
%DCL-S-SPAWNED, process SMITH_1 spawned
%DCL-S-ATTACHED, terminal now attached to process SMITH_1


[End of file]


Buffer: MAIN                        | Write | Insert | Forward
Command: ATTACH SMITH

$ ATTACH SMITH_1
Chapter 9. Sorting and Merging Files
Sorts records from one or more input files according to the fields you select and generates one reordered output file
Merges up to 10 (high-performance Sort/Merge utility supports up to 12) input files that have been sorted previously according to the same key fields and generates one output file.
Users can also choose the high-performance Sort/Merge utility, which provides better performance for most Sort and Merge operations. Refer to Section 9.1, ''High-Performance Sort/Merge'' for information.
High-performance Sort/Merge
Sorting files
Specifying collating sequences
Running Sort as a batch job
Merging files
Entering records from a terminal
Using a Sort/Merge specification file
Optimizing a Sort or Merge operation
Summary of Sort/Merge qualifiers
For information on commands used in this chapter, refer to the VSI OpenVMS DCL Dictionary: A–M and VSI OpenVMS DCL Dictionary: N–Z.
For information on how a system manager can improve efficiency when using the Sort/Merge utility, refer to the VSI OpenVMS System Manager's Manual, Volume 1: Essentials.
9.1. High-Performance Sort/Merge
Users can also choose the high-performance Sort/Merge utility, which provides better performance for most Sort and Merge operations.
The high-performance Sort/Merge utility uses the same command line interface as
SORT/MERGE. Any differences between the high-performance
Sort/Merge utility and SORT/MERGE are noted throughout this
chapter.
$ DEFINE SORTSHR SYS$LIBRARY:HYPERSORT.EXE
SORT/MERGE, deassign SORTSHR. The
SORT/MERGE utility is the default if SORTSHR is not defined. Note
Memory allocation differences may limit the high-performance Sort/Merge utility's ability to perform the same number of concurrent sort operations as the Sort/Merge utility can perform in the same amount of virtual memory.
If this situation occurs, you can either increase the amount of virtual memory that is available to the process, or reduce the working set extent. For information on using system parameters to change the amount of virtual memory or reduce the working set extent, refer to the VSI OpenVMS System Management Utilities Reference Manual.
The behavior of the high-performance Sort/Merge utility is the same as SORT/MERGE, except as shown in Table 9.1, ''High-Performance Sort/Merge: Differences in Behavior''.
|
Feature |
High-Performance Sort/Merge Behavior |
|---|---|
|
Key data types |
The H-FLOATING and ZONED decimal data types are not supported. The size of a BINARY data type key must be 1, 2, 4, or 8 bytes. A 16-byte binary key is not supported. Implementation of this feature is deferred to a future OpenVMS release. |
|
Collating sequences |
The National Character Set (NCS) collating sequences are not
supported. Implementation of this feature is deferred to a
future OpenVMS release. Do not specify the name of an NCS
collating sequence for the
You cannot define or modify your own collating sequence through the use of a specification file. Implementation of this feature is deferred to a future OpenVMS release. |
|
Specification files |
Specification files are not supported. Implementation of this
feature is deferred to a future OpenVMS release. Do not use the
|
|
Internal sorting process |
Only the record sort process is supported. Implementation of
this feature is deferred to a future OpenVMS release. You can
specify |
|
Statistical summary information |
The following statistics are currently supported:
The following statistics are unavailable:
Full implementation of this feature is deferred to a future OpenVMS release. |
9.2. Sorting Files
To sort files, use the DCL command SORT. Specify the names of the
files to be sorted, separated by commas, followed by the name of the ordered output file
to be created.
Starting position of the key field in a record (required)
Size of the key (required)
Data type of the key
Order in which the records are sorted
Priority of the key
Begins in the first position of a record
Includes the entire record
Contains character data
Is sorted in ascending order
- In this example, the file NAMES.LST is sorted in ascending order:
$ SORT NAMES.LST BYNAME.LST
This command creates the ordered output file BYNAME.LST, as shown in Figure 9.1, ''List Sorted in Ascending Order''.
Figure 9.1. List Sorted in Ascending Order 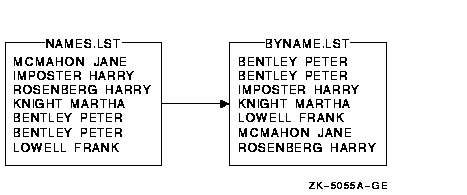
- In this example, the files NAMES.LST and NAMES2.LST are sorted into the ordered output file BYNAME.LST. Sort treats the files as if they were one large file:
$ SORT NAMES.LST,NAMES2.LST BYNAME.LST
See Section 9.9, ''Summary of Sort/Merge Qualifiers'' for a complete list of SORT
qualifiers.
9.2.1. Defining a Key
Use the /KEY qualifier to define a key. When specifying
multiple keys, use a separate /KEY qualifier for each key.
|
Key Element |
Value |
Description | ||
|---|---|---|---|---|
|
Key position |
POSITION:n |
The position of the first byte of the key field within the record. The first byte in a record is position 1. POSITION:n is required. | ||
|
Key size |
SIZE:n |
The length of the key field. SIZE:n is required except for floating-point data. The data type you specify for the key determines what values are acceptable when specifying size. The following table lists the possible values for each type of data and the units used to specify the size of the key. | ||
|
Data |
Valid Range |
Units | ||
| Character | 1 through 32,767 | Characters | ||
| Binary | 1, 2, 4, 8, or 16 (for the high-performance Sort/Merge utility, the size of a binary data type key must be 1, 2, 4, or 8 bytes; support of a 16-byte binary key is deferred to a future OpenVMS release). | Bytes | ||
| Decimal | 1 through 31 | Digits | ||
| Floating-point | No value is necessary. | |||
|
For decimal data, if the decimal sign is stored in a separate byte, that byte is not counted toward the size of the data. If you specify a key that extends beyond the end of a record, Sort treats the missing characters as null characters. | ||||
|
Data type |
CHARACTER |
Character data. CHARACTER is the default data type. | ||
|
BINARY |
Binary data. SIGNED – Signed binary or decimal data. SIGNED is the default for binary and decimal data. UNSIGNED – Unsigned binary or decimal data. | |||
|
F_FLOATING |
F_FLOATING format data. | |||
|
D_FLOATING |
D_FLOATING format data. | |||
|
G_FLOATING |
G_FLOATING format data. | |||
|
H_FLOATING |
On VAX systems, H_FLOATING format data. Not currently supported by the high-performance Sort/Merge utility. | |||
|
S_FLOATING |
On Alpha systems, IEEE S_FLOATING format data. | |||
|
T_FLOATING |
On Alpha systems, IEEE T_FLOATING format data. | |||
|
DECIMAL |
Decimal data. TRAILING_SIGN – Trailing sign decimal data. TRAILING_SIGN is the default for decimal data. LEADING_SIGN – Leading sign decimal data. The leading sign must be in the first position of the field and the field must be left zero padded. OVERPUNCHED_SIGN – Overpunched decimal data. OVERPUNCHED_SIGN is the default for decimal data. SEPARATE_SIGN – Separate sign decimal data. | |||
|
ZONED |
Zoned decimal data. Not currently supported by the high-performance Sort/Merge utility. | |||
|
PACKED_DECIMAL |
Packed decimal data. | |||
|
Sort order |
ASCENDING |
Orders the sorting operation in ascending alphabetical or numerical order. ASCENDING is the default order. | ||
|
DESCENDING |
Orders the sorting operation in descending alphabetical or numerical order. | |||
|
Key priority |
NUMBER:n |
Specifies the order of priority of each key if you do not list multiple keys in the order of their priority. A value of 1 to 255 can be specified. | ||
If the data in the key fields is not character data, you must specify the data type. The following data types are recognized by the Sort/Merge utility:
BINARY, [SIGNED]
BINARY, UNSIGNED
CHARACTER
DECIMAL, LEADING_SIGN, SEPARATE_SIGN [SIGNED]
DECIMAL, LEADING_SIGN, [OVERPUNCHED_SIGN, SIGNED]
DECIMAL [,SIGNED, TRAILING_SIGN, OVERPUNCHED_SIGN]
DECIMAL, [TRAILING SIGN], SEPARATE_SIGN, [SIGNED]
DECIMAL, UNSIGNED
D_FLOATING
F_FLOATING
G_FLOATING
H_FLOATING
S_FLOATING, IEEE (Alpha systems only)
T_FLOATING, IEEE (Alpha systems only)
PACKED_DECIMAL
ZONED
Note
For decimal string data, the Sort/Merge utility reports an invalid digit in the input string differently for VAX and Alpha systems. On VAX systems, you receive a message that the invalid digit (or reserved operand) is converted to a valid decimal string for comparison purposes. On Alpha systems, Sort/Merge performs the same conversion but does not display a message. In both cases, the data from the input file is written to the output file without change.
In Figure 9.2, ''Record Fields in a List'', each record in the file EMPLOYEE.LST consists of three fields: (1) a department name, (2) an account number, and (3) an employee name.

- In this example, EMPLOYEE.LST is sorted by account number, using the /KEY qualifier to describe the account number field:
$ SORT/KEY=(POSITION:5,SIZE:4,DECIMAL) EMPLOYEE.LST BILLING1.LST
This command specifies that the key field (the account number) starts in position 5, is 4 characters long, contains decimal data, and should be sorted in ascending order (the default). Figure 9.3, ''Sorting by Key Field'' shows the results of this Sort operation.
Figure 9.3. Sorting by Key Field 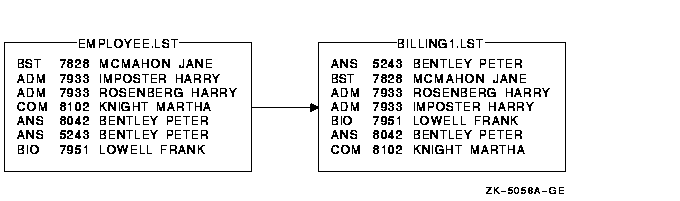
- This example shows how to sort the file EMPLOYEE.LST without specifying a key field:
$ SORT EMPLOYEE.LST BYDEPT.LST
Because no key is specified, Sort assumes the default characteristics. Figure 9.4, ''Sorting with Default Key Records'' shows the result of this Sort operation.
Figure 9.4. Sorting with Default Key Records 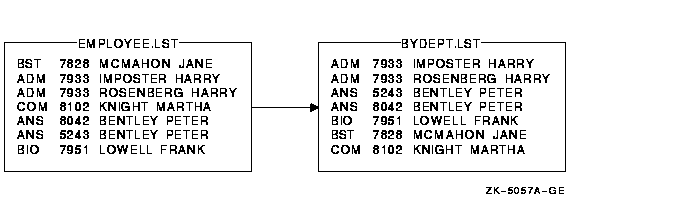
Sort treats each record in EMPLOYEE.LST as one key of character data. In this example, each record includes a department name, an account number, and an employee name. If Sort finds a duplicate department name, it sorts the names by account number. If it then finds a duplicate account number, it sorts by employee name. Note that the account number is part of the record. Unless you specify otherwise, it is treated as character data.
9.2.2. Multiple Key Fields
You can sort with more than one key (up to a limit of 255 keys). You can specify multiple keys in order of their priority with the primary key first, the secondary key next, and so on. Alternately, you can specify a key's priority using NUMBER:n. Each key can be ascending or descending.
$ SORT /KEY=(POSITION:10,SIZE:15,CHARACTER) -
_$ /KEY=(POSITION:5,SIZE:4,DECIMAL) EMPLOYEE.LST BILLING2.LST
Figure 9.5, ''Sorting with Multiple Key Fields'' shows the results of this Sort operation.
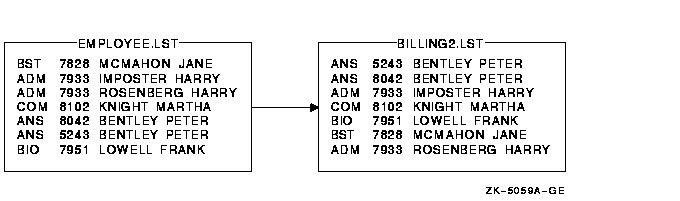
$ SORT/KEY=(POSITION:1,SIZE:3,DESCENDING) -
_$ /KEY=(POSITION:10,SIZE:15) -
_$ EMPLOYEE.LST BILLING3.LST
Figure 9.6, ''Sorting with Multiple Key Fields (Ascending and Descending Order)'' shows the results of this Sort operation.
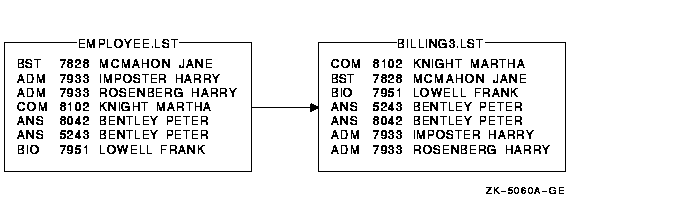
9.2.3. Identical Key Fields
/STABLE
Maintains the input order of records with identical keys. If you use this qualifier when sorting multiple input files, on output, records with equal keys in the first file precede those from the second file and so on.
/NODUPLICATES
Retains only one copy of records with identical keys. If you want to specify which duplicate record to keep, invoke Sort at the program level and specify an equal-key routine.
The /STABLE and /NODUPLICATES qualifiers are incompatible. You cannot specify both qualifiers on the same command line.
$ SORT /KEY=(POSITION:5,SIZE:4)/NODUPLICATES EMPLOYEE.LST BUDGET.LST
Figure 9.7, ''Sorting with Identical Key Fields'' shows the results of this Sort operation.
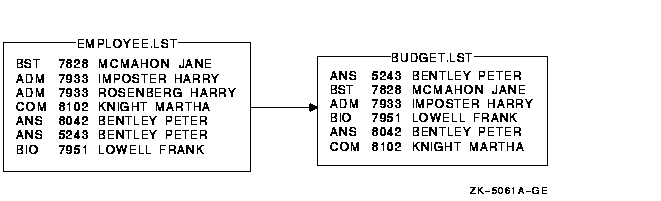
9.2.4. Noncharacter Data
If you sort records that contain items other than character data, specify the data type of each key. In addition, take care in calculating starting positions and sizes because the items being compared can occupy more than 1 byte.
The character data occupies positions 1 to 20 (20 characters).
The first F_floating-point number occupies positions 21 to 24.
The second F_floating-point number occupies positions 25 to 28.
The third F_floating-point number occupies positions 29 to 32.
$ SORT/KEY=(POSITION:29,F_FLOATING) STATS.RAW STATS.SOR
You do not need to specify the size of the floating-point number because it is fixed at four bytes.
9.2.5. Output File Organization
/FORMAT (record format)
When you use this output qualifier, you can define the file record format, length, and block size.
/INDEXED_SEQUENTIAL
Using this qualifier, you can define the output to have indexed sequential file organization. If you specify indexed sequential as the output file organization, you must also do the following:Before you perform the Sort operation, create an empty file to be used as the output file. Sort requires an output file that already exists and is empty.
Include the /OVERLAY qualifier after the name of the output file on the SORT command line. The /OVERLAY qualifier indicates the existing file is to be overlaid with the sorted records of the input file.
/RELATIVE
Using this qualifier, you can define the output to have relative file organization.
/SEQUENTIAL
Using this qualifier, you can define the output to have sequential file organization.
$ SORT/KEY=(POSITION:10,SIZE:15) -
_$ EMPLOYEE.LST BYNAME.LST/SEQUENTIAL
9.2.6. Sorting Process
Sort arranges files using one of the internal processes: record, tag, address, or indexed. The high-performance Sort/Merge utility supports only the record process. Implementation of tag, address, and index processes is deferred to a future OpenVMS release. The process you specify can affect the efficiency of the Sort operation. Refer to Section 9.8, ''Optimizing a Sort or Merge Operation'' for information about optimizing a Sort or Merge operation.
|
Sort Process |
type |
Description |
|---|---|---|
|
Record |
RECORD |
Keeps records intact while sorting and produces an output file consisting of complete records. Record is the default sorting process. |
|
Tag |
TAG |
Sorts the key fields only and then rereads the input file to produce an output file of complete records. The net result is the same as for a complete record sort. A tag sort is useful if disk space is low because it typically uses less work file space during the sorting. In most cases, a tag sort is slower than a record sort because it requires extra time to reread the input file. |
|
Address |
ADDRESS |
Sorts the key fields only and produces an output file that is an index of record file addresses (RFAs) in binary format. An address sort is faster than a record sort but you must write a program to associate the record addresses with the records of the input file. |
|
Indexed |
INDEX |
Sorts the key fields only and produces an output file of keys and RFAs (in binary format). As with an address sort, an index sort is faster than a record sort, but you must write a program to associate the record addresses with the records of the input file. |
9.3. Specifying a Collating Sequence
|
Collating Sequence |
sequence |
Description |
|---|---|---|
|
ASCII |
ASCII |
The default collating sequence for character data. The ASCII sequence orders numbers (0 to 9) first, then uppercase letters (A to Z), and then lowercase letters (a to z). |
|
EBCDIC |
EBCDIC |
Generates an output file that is ordered in EBCDIC sequence. The data remains in the ASCII representation. The EBCDIC sequence orders lowercase letters (a to z) first, then uppercase letters (A to Z), and then numbers (0 to 9). |
|
DEC Multinational character set |
MULTINATIONAL |
The multinational collating sequence collates characters
according to the DEC Multinational character set (refer to Appendix A, "Character Sets"). In the MULTINATIONAL character
sequence, characters are ordered according to the following rules:
|
|
National character set (NCS) |
Collating sequence name |
The named collating sequence must be defined in an NCS library. For more information, see the OpenVMS National Character Set Utility Manual. The high-performance Sort/Merge utility does not support the National Character Set (NCS) collating sequences. Support for NCS collating sequences is deferred to a future OpenVMS release. |
|
User-defined sequence |
(sequence-string) |
Specifies a user-defined collating sequence. User-defined collating sequences are supported only through specification files and not through the command line interface. The high-performance Sort/Merge utility does not support user-defined collating sequences. Support for user-defined collating sequences is deferred to a future OpenVMS release. |
|
Define a collating sequence by specifying a string of single or double characters or ranges of single characters. A double character is any set of two single characters collated as if they were one character. For example, "CH" can be defined to collate as "C". This string should be enclosed in parentheses. You can also represent characters by their corresponding octal, decimal, or hexadecimal values using the radix operators: %O, %D, %X. You must observe the following rules when defining your
collating sequence:
The following string defines a collating sequence in which the
double character LL collates as a single character between L and
M.
("A"-"L","LL","M"-"Z") |
Note
Exercise caution when using the multinational collating sequence to sort or merge files for further processing. Sequence-checking procedures in most programming languages compare numeric characters. Normal sequence checking does not work because the multinational sequence is based on actual graphic characters, not the codes representing those characters.
/COLLATING_SEQUENCE=(SEQUENCE=ASCII,IGNORE=("-"," "))This /COLLATING_SEQUENCE qualifier with an IGNORE option specified results in the following fields being compared as equal before tie breaking:252-3412 252 3412 2523412/COLLATING_SEQUENCE=(SEQUENCE=("A"-"L","LL","M"-"R","RR","S"-"Z"))This /COLLATING_SEQUENCE qualifier defines a sequence in which the double character LL collates as a single character between L and M, and the double character RR collates as a single character between R and S. These double characters would otherwise appear in their usual alphabetical order. By default, this user-defined sequence does not define any other characters, such as lowercase a to z.
9.4. Running Sort as a Batch Job
Batch jobs are programs or DCL command procedures that run independently of your current session. If you are sorting large files, consider submitting the Sort operation as a batch job because the sort will require some time. See Chapter 16, "Understanding Processes and Batch Jobs", Chapter 13, "Introduction to Command Procedures", and Chapter 14, "Advanced Programming with DCL" for more information about batch jobs and command procedures.
9.4.1. Command Procedures
Specify the SORT command in your command procedure just as you would write it on the screen. If your default directory does not contain the files to be sorted, explicitly set your default directory in the command procedure or include the directory in the command file specifications.
$ SUBMIT SORTJOB
! SORTJOB.COM
!
$ SET DEFAULT [USER.PER]   ! Set default to location of input files
$ SORT/KEY=(POSITION:10,SIZE:15) EMPLOYEE.LST BYNAME.LST
$ TYPE BYNAME.LST
$ EXIT
9.4.2. Including Input Records
You can include the input records in the batch job by placing them after the SORT command with one record per line. Individual sort records can be longer than one line.
As with terminal input of records, specify the input file parameter as SYS$INPUT. Use the /FORMAT qualifier to specify the record size in bytes and the approximate file size in blocks. Approximately six 80-character lines equal one block.
$ SUBMIT SORTJOB
! SORTJOB.COM
!
$ SET DEFAULT [USER.PER]
$ SORT/KEY=(POSITION:10,SIZE:15) -
SYS$INPUT-
/FORMAT=(RECORD_SIZE:24,FILE_SIZE:10) -
BYNAME.LST
$ DECK
BST 7828 MCMAHON JANE
ADM 7933 ROSENBERG HARRY
COM 8102 KNIGHT MARTHA
ANS 8042 BENTLEY PETER
BIO 7951 LOWELL FRANK
$ EOD
9.5. Merging Files
The MERGE command combines up to 10 (the high-performance Sort/Merge utility supports up to 12) sorted files into one ordered output file. You can merge input files that have the same format and have been sorted by the same key fields.
%SORT-W-BAD_ORDER, merge input is out of order
You cannot specify a process (/PROCESS) for a Merge operation.
The /CHECK_SEQUENCE qualifier is used only for a merge operation.
$ MERGE BYNAME1.LST,BYNAME2.LST BYNAME3.LST
The output file BYNAME3.LST contains all the records from both files, BYNAME1.LST and BYNAME2.LST, as shown in the following figure:
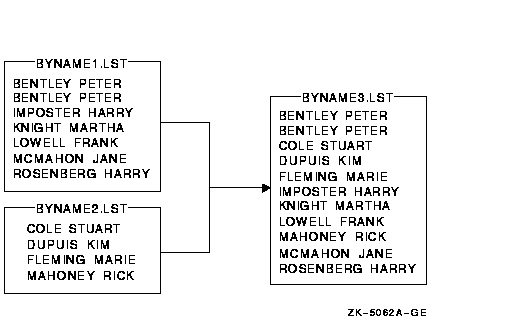
9.5.1. Sorted Files
To merge files that are sorted using a specific key, you must specify the same key with the /KEY qualifier on the MERGE command line.
If you do not specify a key, Merge uses the default key described in Section 9.2, ''Sorting Files''.
$ MERGE/KEY=(POSITION:5,SIZE:4,DECIMAL) -
_$ BILLING1.LST,BILLING4.LST MAILING.LST
The results of the merge are as follows:
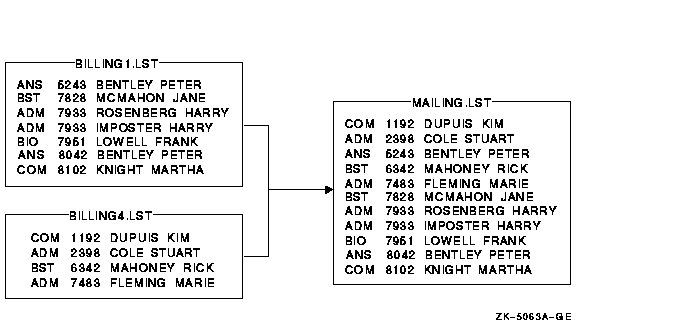
If you want to merge files that you know are in sorted order, you can prevent sequence checking by specifying the /NOCHECK_SEQUENCE qualifier.
9.5.2. Identical Key Fields
As with a Sort operation, when input files contain records with identical key fields, Merge does not necessarily maintain the same order in which the records had appeared in the input file. To maintain the input order of records with identical keys, specify the /STABLE qualifier on the MERGE command line. To retain only one copy of records with identical keys, specify the /NODUPLICATES qualifier.
9.6. Entering Records from a Terminal
|
Step |
Task |
|---|---|
|
1 |
Specify SYS$INPUT as the input file on the SORT or MERGE command line. Use the input file qualifier /FORMAT to specify the size of the longest record, in bytes, and the approximate size of the input file, in blocks. |
|
2 |
Enter the input records on successive lines. End each record by pressing Return. |
|
3 |
Press Ctrl/Z to end the file. |
$ SORT/KEY=(POSITION:8,SIZE:15) -
_$ SYS$INPUT/FORMAT=(RECORD_SIZE:24,FILE_SIZE:10) BYNAME.LST
BST 7828 MCMAHON JANE
ADM 7933 ROSENBERG HARRY
COM 8102 KNIGHT MARTHA
ANS 8042 BENTLEY PETER
BIO 7951 LOWELL FRANK
This sequence of commands creates the output file BYNAME.LST, which contains the sorted records.
9.7. Using a Sort/Merge Specification File
Sort/Merge allows you to maintain sort definitions and to specify more complex sort criteria in specification files. The high-performance Sort/Merge utility does not support specification files. Implementation of this feature is deferred to a future OpenVMS release. You can use any standard editor, or the DCL CREATE command to create a specification file.
Select records to be included in the Sort/Merge operation
Reformat the records in the output file
Use conditional keys or data
Specify multiple record formats
Create or modify a collating sequence
Reassign work files
Store frequently used Sort/Merge operations
After you complete the specification file, specify the file name using the /SPECIFICATION qualifier. The default file type for a specification file is .SRT.
Note
Many of the qualifiers used in the specification file are similar to the DCL qualifiers used in the Sort/Merge command line. Note, however, that the syntax of these qualifiers can be different. For example, the /KEY qualifier at DCL level has different syntax than the /KEY qualifier in the specification file. See Section 9.9.3, ''Specification File Qualifiers'' for a summary of the specification file qualifiers.
Any DCL command qualifiers that you specify on the command line override corresponding entries in the specification file. For example, if you specify the /KEY qualifier in the DCL command line, Sort/Merge ignores the /KEY clause in the specification file.
Sorting by more than one key field if you do not specify the NUMBER:n key element
Describing the output format
Defining multiple record types
When you specify the FOLD, MODIFICATION, and IGNORE keywords with the /COLLATING_SEQUENCE qualifier, you should specify all MODIFICATION and IGNORE clauses before any FOLD clauses. See Section 9.9.3, ''Specification File Qualifiers'' for more information about the /COLLATING_SEQUENCE qualifier.
You can include comments in your specification file by beginning each comment line with an exclamation point (!). Unlike DCL command lines, specification files do not need hyphens (-) to continue the line.
Examples
- This is an example of a specification file that can be used to sort negative and positive data in ascending order:
! Specification file for sorting negative and positive data
! in ascending order
! /FIELD=(NAME=SIGN,POS:1,SIZ:1)
/FIELD=(NAME=AMT,POS:2,SIZ:4)
/CONDITION=(NAME=CHECK1,  TEST=(SIGN EQ "-"))
/CONDITION=(NAME=CHECK2,  TEST=(SIGN EQ " "))
/INCLUDE=(CONDITION=CHECK1,  KEY=(AMT,DESCENDING), DATA=SIGN, DATA=AMT)
/INCLUDE=(CONDITION=CHECK2,  KEY=(AMT,ASCENDING), DATA=SIGN, DATA=AMT)
As you examine the specification file, note the following: This command line defines a field that begins in byte 1 of the record and is 1 byte long. It assigns the field the name SIGN.
This command line defines a field that begins in byte 2 of the record and is 4 bytes long. It assigns the field the name AMT.
This is a condition statement. If there is a negative sign (−) in the SIGN byte, the CHECK1 condition is met.
This is a condition statement. If the SIGN byte is blank, the CHECK2 condition is met.
If the condition CHECK1 is met, then the record is sorted in descending order.
If the condition CHECK2 is met, then the record is sorted in ascending order.
Figure 9.8, ''Output from Using a Specification File'' shows the result of using the specification file on an input file named BALANCES.LIS.
Figure 9.8. Output from Using a Specification File 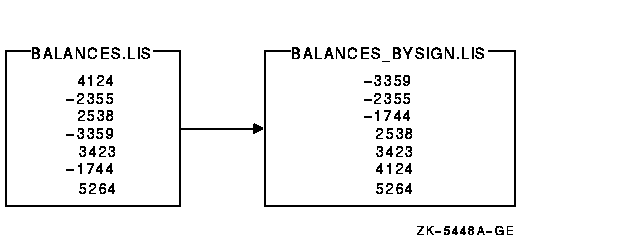
/FIELD=(NAME=RECORD_TYPE,POS:1,SIZ:1)  ! Record type, 1-byte
/FIELD=(NAME=PRICE,POS:2,SIZ:8)               ! Price, both files
/FIELD=(NAME=TAXES,POS:10,SIZ:5)              ! Taxes, both files
/FIELD=(NAME=STYLE_A,POS:15,SIZ:10)           ! Style, format A file
/FIELD=(NAME=STYLE_B,POS:20,SIZ:10)           ! Style, format B file
/FIELD=(NAME=ZIP_A,POS:25,SIZ:5)              ! Zip code, format A file
/FIELD=(NAME=ZIP_B,POS:15,SIZ:5)              ! Zip code, format B file
/CONDITION=(NAME=FORMAT_A,                    ! Condition test, format A
            TEST=(RECORD_TYPE EQ "A"))
/CONDITION=(NAME=FORMAT_B,                    ! Condition test, format B
            TEST=(RECORD_TYPE EQ "B"))
/INCLUDE=(CONDITION=FORMAT_A,                 ! Output format, type A
          KEY=ZIP_A,
          DATA=PRICE,
          DATA=TAXES,
          DATA=STYLE_A,
          DATA=ZIP_A)
/INCLUDE=(CONDITION=FORMAT_B,                 ! Output format, type B
          KEY=ZIP_B,
          DATA=PRICE,
          DATA=TAXES,
          DATA=STYLE_B,
          DATA=ZIP_B)
In this example, two input files from two different branches of a real estate agency are sorted according to the instructions specified in a specification file. The records in the first file that begin with an A in the first position have this format:|A|PRICE|TAXES|STYLE|ZIP| 1 2 10 15 25The records in the second file that begin with a B in the first position and have the style and zip code fields reversed, are as follows:|B|PRICE|TAXES|ZIP|STYLE| 1 2 10 15 20To sort these two files on the zip code field in the format of record A, first define the fields in both records with the /FIELD qualifiers. Then, specify a test to distinguish between the two types of records with the /CONDITION qualifiers. Finally, the /INCLUDE qualifiers change the record format of type B to record format of type A on output.
Note that, if you specify either key or data fields in an /INCLUDE qualifier, you must explicitly specify all the key and data fields for the Sort operation in the /INCLUDE qualifier.
Also note that records that are not type A or type B are omitted from the sort.
/COLLATING_SEQUENCE=(SEQUENCE=
("AN","EB","AR","PR","AY","UN","UL",
"UG","EP","CT","OV","EC","0"-"9"),
MODIFICATION=("'"="19"),
FOLD)
This /COLLATING_SEQUENCE qualifier specifies a user-defined sequence that gives each month a unique value in chronological order. For example, if you want to order a file called SEMINAR.DAT according to the date, the file SEMINAR.DAT would be set up as follows:16 NOV 1983 Communication Skills 05 APR 1984 Coping with Alcoholism 11 Jan '84 How to Be Assertive 12 OCT 1983 Improving Productivity 15 MAR 1984 Living with Your Teenager 08 FEB 1984 Single Parenting 07 Dec '83 Stress — Causes and Cures 14 SEP 1983 Time ManagementThe primary key is the year field; the secondary key is the month field. Because the month field is not numeric and you want the months ordered chronologically, you must define your own collating sequence. You can do this by sorting on the second two letters of each month–in their chronological sequence–giving each month a unique key value.
The MODIFICATION option specifies that the apostrophe (') be equated to 19, thereby allowing a comparison of '83 and 1984. The FOLD option specifies that uppercase and lowercase letters are treated as equal.
The output from this Sort operation appears as follows:14 SEP 1983 Time Management 12 OCT 1983 Improving Productivity 16 NOV 1983 Communication Skills 07 Dec '83 Stress — Causes and Cures 11 Jan '84 How to Be Assertive 08 FEB 1984 Single Parenting 15 MAR 1984 Living with Your Teenager 05 APR 1984 Coping with AlcoholismSee Section 9.3, ''Specifying a Collating Sequence'' for other examples of creating user-defined collating sequences.
/FIELD=(NAME=AGENT,POSITION:20,SIZE:15)
/CONDITION=(NAME=AGENCY,
            TEST=(AGENT EQ "Real-T Trust"
            OR
            AGENT EQ "Realty Trust"))
/DATA=(IF AGENCY THEN "Realty Trust" ELSE AGENT)
In this example, two real estate files are being sorted. One file refers to an agency as Real-T Trust; the other refers to the same agency as Realty Trust. The /CONDITION and /DATA qualifiers instruct Sort to list the AGENT field in the sorted output file as Realty Trust.
/FIELD=(NAME=ZIP,POSITION:60,SIZE:6)
/CONDITION=(NAME=LOCATION,
            TEST=(ZIP EQ "01863"))
/KEY=(IF LOCATION THEN 1
      ELSE 2)
In this example, all the records with a zip code of 01863 will appear at the beginning of the sorted output file. The conditional test is on the ZIP field, defined with the /FIELD qualifier; the condition is named LOCATION. The values 1 and 2 in this /KEY qualifier signify a relative order for those records that satisfy the condition and those that do not.
/FIELD=(NAME=ZIP,POSITION:60,SIZE:6)
/CONDITION=(NAME=LOCATION,
            TEST=(ZIP EQ "01863"))
/DATA=(IF LOCATION THEN "NORTH CHELMSFORD"
       ELSE "Outside district")
In this example, the /CONDITION qualifier tests for the 01863 zip code. The /DATA qualifier specifies that the name of town field will be added to the output record, depending on the test results.
/FIELD=(NAME=FFLOAT,POS:1,SIZ:0,F_FLOATING)
/CONDITION=(NAME=CFFLOAT,TEST=(FFLOAT GE 100))
/OMIT=(CONDITION=CFFLOAT)
In this example, the number 100 is considered to be an F_FLOATING data type because field FFLOAT is defined as F_FLOATING in the /FIELD qualifier.
/FIELD=(NAME=AGENT,POSITION:1,SIZE:5)
/FIELD=(NAME=ZIP,POSITION:6,SIZE:3)
/FIELD=(NAME=STYLE,POSITION:10,SIZE:5)
/FIELD=(NAME=CONDITION,POSITION:16,SIZE:9)
/FIELD=(NAME=PRICE,POSITION:26,SIZE:5)
/FIELD=(NAME=TAXES,POSITION:32,SIZE:5)
/DATA=PRICE
/DATA="  "
/DATA=TAXES
/DATA="  "
/DATA=STYLE
/DATA="  "
/DATA=ZIP
/DATA="  "
/DATA=AGENT
The /FIELD qualifiers define the fields in the records from an input file that has the following format:AGENT ZIP STYLE CONDITION PRICE TAXES
The /DATA qualifiers, which use the field-names defined in the /FIELD qualifiers, reformat the records to create output records of the following format:PRICE TAXES STYLE ZIP AGENT
9.8. Optimizing a Sort or Merge Operation
There are several ways in which you can improve the efficiency of a Sort or Merge
operation, based on your sorting environment. Use the /STATISTICS
qualifier with the SORT or MERGE command to get
information about the variables in your sorting environment.
After you examine the statistics display, consider any of the optimization options presented in the following sections.
SORT or MERGE command with
the /STATISTICS qualifier, you see output similar to the
following:OpenVMS Sort/Merge Statistics Records read: nnn Input record length: nnn Records sorted: nnn Internal length: nnn Records output: nnn Output record length: nnn Working set extent: nnn Sort tree size: nnn Virtual memory: nnn Number of initial runs: nnn Direct I/O: nnn Maximum merge order: nnn Buffered I/O: nnn Number of merge passes: nnn Page faults: nnn Work file allocation: nnn Elapsed time: nn:nn:nn.nn Elapsed CPU: nn:nn:nn.nn
As you examine the fields, note the following:
- Records read
Displays the number of records read by Sort/Merge. Starting from the SORT V2.0 patch kit, this value is saved in the form of the DCL symbol SORT$RECORDS_READ.
- Records sorted
Displays the number of records that have been processed using Sort. This number could be less than the number of records read if a specification file is used to select only certain records for the sort or merge operation. Starting from the SORT V2.0 patch kit, this value is saved in the form of the DCL symbol SORT$RECORDS_SORTED.
- Records output
Displays the number of records written to the output file. This number could be less than the number of records sorted if
/NODUPLICATESwas selected or if I/O errors occurred when the output records were being written. Starting from the SORT V2.0 patch kit, this value is saved in the form of the DCL symbol SORT$RECORDS_OUTPUT.- Working set extent
Displays the number of pages in the process working set extent. This value is used as an upper limit on the size of the sort data structure. Adjusting this value is one way to improve the efficiency of a sort operation.
- Virtual memory
Displays the number of pages of virtual memory added to the Sort image to hold the data.
- Direct I/O and Buffered I/O
The total of the direct and buffered I/O is the number of I/O movements needed to read and write data. The lower this total value is, the more efficient the ordering operation.
- Page faults
The number of page faults indicates how well the data fits into memory. The higher the number of page faults, the less efficient the ordering operation.
- Elapsed time
Displays the total wall clock time used by the sort or merge operation in hours, minutes, seconds, and hundredths of seconds. Starting from the SORT V2.0 patch kit, this value is displayed in the delta time format, and the leading spaces have been removed. This value is saved in the form of the DCL symbol SORT$ELAPSED_TIME.
- Input record length
This value is obtained from the Record Management Services (OpenVMS RMS) unless the user supplies it.
- Internal length
Displays the size in bytes of an internal format node. This includes any keys, data, a word to store the length, record file addresses (RFAs), and converted keys.
- Output record length
Displays the length of the output record. The length is computed from the input record length, the sort process, and the record reformatting requested.
- Sort tree size
Displays the number of records that fit in sort's internal data structure.
- Number of initial runs
Represents how well the data fits into memory.
- Maximum merge order
Displays the maximum number of sorted strings that are merged at one time.
- Number of merge passes
Displays the number of times the Sort utility merges strings until one sorted output string is produced. The number of initial runs and the number of merge passes indicate how well the data fits in memory. The higher these numbers, the further the working set size is from containing the data and the longer the sorting takes.
- Work file allocation
Displays the number of blocks used for the work files. When more than one merge pass is needed, this size is approximately twice the size of the input file allocation.
- Elapsed CPU
Displays the CPU time used by the ordering operation. This number does not include the time spent waiting for I/O operations to complete or time spent waiting while another process executes. Starting from the SORT V2.0 patch kit, this value is displayed in the delta time format, and the leading spaces have been removed. This value is saved in the form of the DCL symbol SORT$ELAPSED_CPU.
9.8.1. Sorting Process
Sort defines four processes for sorting data internally: record, tag, address and indexed. The high-performance Sort/Merge utility supports only the record process. Implementation of tag, address, and index processes is deferred to a future OpenVMS release. RECORD is the default process. The type of process you choose affects the performance of the Sort operation as well as storage requirements. See Section 9.2.6, ''Sorting Process'' for information about the different sort processes.
- How you will use the output file
Because record and tag sorting generate files that contain entire sorted records, these reordered files are ready to be used.
Both address- and index-sorted output files can be processed by a program written in a programming language such as Pascal, Fortran, MACRO, or C.
Address sorting creates an output file of pointers to the records in the input file. This list consists of binary RFAs plus a file number when sorting multiple input files. A program accesses the records by using the pointers.
Index sorting creates an output file containing both RFAs and key fields plus a file number when sorting multiple files. The format of these key fields is the same as in the input files. If the program needs the key field contents for a decision during future processing, select index sorting rather than address sorting.
If you need to reorder records from one file in several ways for different purposes, store several output files from address or index sorting. Use the output files to access the records in the main file in the sorted order that you want.
The temporary storage space available for sorting
Tag sorting uses less temporary storage space than record sorting. Because record sorting keeps the record intact during the sort, it uses much more work space when the files are large. Address and index sorting use little temporary storage space.
The type of input and output device used
Record sorting is the only process that can accept input from cards, magnetic tape, and disks. Output from tag and record sorting can go to any output device. Output from address and index sorting must go to a device that accepts binary data.
The differences in speed
If you plan to retrieve the sorted records at some point in the operation, record sorting is usually the fastest process. Otherwise, address and index sorting are the fastest processes.
9.8.2. Omitting Records and Fields
From a specification file, you can improve Sort efficiency by using the /CONDITION, /INCLUDE, and /OMIT qualifiers to process only those records needed in the output file. The high-performance Sort/Merge utility does not support specification files. Implementation of this feature is deferred to a future OpenVMS release. You can also use specification file qualifiers to reformat records, omitting unnecessary fields from the output file. These qualifiers are not available as command line qualifiers.
9.8.3. Assigning Work Files
During a Sort operation, records from the input file are read into memory. If the allocated memory cannot hold all the records, Sort transfers the sorted data to one or more temporary work files. Merge does not use work files.
The Sort command line qualifier /WORK_FILES=n overrides the number of work files allocated.
- Normally, Sort places work files on the device SYS$SCRATCH and accesses them in an arbitrary order. You can assign work files to specific devices in two ways:
In a specification file, the /WORK_FILES=(device,...) qualifier places the work files on the specified devices. See Section 9.9.3, ''Specification File Qualifiers'' for more information about using the /WORK_FILES qualifier in a specification file.
If you are not using a specification file, you can use the DCL command ASSIGN to assign the work files to specific devices.
Sort uses the SORTWORKn logical names to identify user-specified device names for the workfiles, where n is a value from 0 through 9. For the high-performance Sort/Merge utility, n is a value from 0 to 254. Define a SORTWORKn logical as follows:ASSIGN device: SORTWORKn
For example,$ ASSIGN WORK$2: SORTWORK1 $ ASSIGN WORK$3: SORTWORK2
This example defines SORTWORK1 as the device WORK$2: and SORTWORK2 as the device WORK$3:. For more information on logical names, see Chapter 11, "Defining Logical Names for Devices and Files".
Assign work files to the fastest devices available. For example, random-access, mass storage devices such as disks.
Choose devices with the least activity and the most space available.
Assign each work file to a different physical device to maximize overlapping input and output.
9.8.4. Modifying the Working Set Extent
If Sort requires work files (for example, if you are sorting a large file), a larger working set can increase sort efficiency. However, if your system is used heavily, it might be unable to allocate all the pages in the working set extent to your process. This can result in paging, which occurs when the operating system transfers parts of a process between physical memory and memory on a paging device; only the active part of the process remains in the physical memory. To avoid excessive paging, you can decrease the working set extent for your process. Use the SET WORKING_SET command to decrease the working set extent.
9.9. Summary of Sort/Merge Qualifiers
The following list describes command qualifiers used with the SORT and MERGE commands. To use a command qualifier, include the qualifier immediately after the SORT or MERGE command.
- /[NO]CHECK_SEQUENCE
Applies to the MERGE command only. Verifies the sequence of the records in MERGE input files. Merge checks the sequence of records by default.
The /CHECK_SEQUENCE qualifier checks whether the records of one or more files (up to 10; the high-performance Sort/Merge utility supports up to 12) have been sorted. The records will still be directed to an output file, which you must specify. If you are checking whether records are sorted on a key field other than the entire record, you must specify key information, along with the requesting sequence.
Use the /NOCHECK_SEQUENCE qualifier to prevent Merge from checking the sequence of records.
Example$ MERGE/KEY=(SIZE:4,POSITION:3)/NOCHECK_SEQUENCE - _$ PRICE1.DAT,PRICE2.DAT PRICE.LIS
In this example, the /NOCHECK_SEQUENCE qualifier specifies that the sequence of the input files, PRICE1.DAT and PRICE2.DAT, is not to be checked.
- /COLLATING_SEQUENCE=sequence
Selects one of three predefined collating orders for character key fields, or specifies the name of a National Character Set (NCS) collating sequence to be used in comparing character keys. The high-performance Sort/Merge utility does not support the NCS collating sequences. Support for NCS collating sequences is deferred to a future OpenVMS release. Sort can arrange characters in ASCII (default), EBCDIC, or Multinational sequences.
Example$ SORT/COLLATING_SEQUENCE=MULTINATIONAL - _$ NAMES.DAT,NOM.DAT LIST.LIS
This SORT command arranges the input files NAMES.DAT and NOM.DAT according to the Multinational collating sequence to create the output file LIST.LIS.
- /[NO]DUPLICATES
By default, Sort retains all multiple records with duplicate keys. The /NODUPLICATES qualifier eliminates all but one of multiple records with duplicate keys. The retained records may not appear in the same order as they appeared in the input file. If you want to specify which duplicate record to keep, invoke Sort at the program level and specify an equal-key routine.
The /STABLE and the /NODUPLICATES qualifiers are mutually exclusive.
Example$ SORT/KEY=(POSITION:3,SIZE:5,DECIMAL)/NODUPLICATES - _$ ACCT1,ACCT2 ACCT.LIS
This SORT command arranges the two input files according to the key supplied and eliminates all but one of multiple records with equal keys.
- /KEY=(POSITION:n,SIZE:n[,field,...])
Describes key fields, including the position, size, sorting order (ASCENDING or DESCENDING), priority (NUMBER:n), and data type (such as character, binary, h_floating). By default, Sort reorders a file by sorting entire records with character data in ascending order.
See Section 9.2.1, ''Defining a Key'' for detailed information about the /KEY qualifier.
- /PROCESS=type
Applies to the SORT command only. Defines the internal sorting process. The /PROCESS qualifier allows you to choose one of four processes: record, tag, address, or index. The high-performance Sort/Merge utility supports only the record process. Implementation of tag, address, and index processes is deferred to a future OpenVMS release.
See Section 9.2.6, ''Sorting Process'' for detailed information about the /PROCESS qualifier.
Example$ SORT/KEY=(POS:40,SIZ:2,DESC)/PROCESS=TAG YRENDAVG.DAT - _$ DESCYRAVG.LIS
This Sort operation uses a tag sorting process to create the output file DESCYRAVG.LIS.
- /SPECIFICATION=filespec
The high-performance Sort/Merge utility does not support this qualifier. Implementation of this feature is deferred to a future OpenVMS release.
Identifies a Sort or Merge specification file to be used in a Sort or Merge operation. The default specification file type is .SRT.
See Section 9.7, ''Using a Sort/Merge Specification File'' and Section 9.9.3, ''Specification File Qualifiers'' for information about using specification files.
- /[NO]STABLE
By default, records with equal keys are not guaranteed to be placed in the output file in the order they appear in the input file. The /STABLE qualifier maintains the records in that order.
The /STABLE and /NODUPLICATES qualifiers are mutually exclusive.
Example$ SORT/KEY=(POS:1,SIZ:5,DECIMAL)/STABLE PRICESA.DAT, - _$ PRICESB.DAT,PRICESC.DAT SUMMARY.LIS
In this Sort operation, records with equal keys from PRICESA.DAT will be listed first, followed by those from PRICESB.DAT, followed by those from PRICESC.DAT.
- /[NO]STATISTICS
Displays a statistical summary to SYS$OUTPUT that can be used for optimization. To save these statistics in a file, use the following command:
$ DEFINE/USER SYS$ERROR output-file
The statistical summary contains the following information:Statistic
Description
Records read
The number of records read by Sort or Merge.
Starting from the SORT V2.0 patch kit, this value is saved in the form of the DCL symbol SORT$RECORDS_READ.
Records sorted
The number of records that have been processed using Sort. This number could be less than the number of records read if a specification file is used to select only certain records for the Sort or Merge operation.
Starting from the SORT V2.0 patch kit, this value is saved in the form of the DCL symbol SORT$RECORDS_SORTED.
Records output
The number of records written to the output file. This number could be less than the number of records sorted if /NODUPLICATES was selected or if I/O errors occurred when the output records were being written.
Starting from the SORT V2.0 patch kit, this value is saved in the form of the DCL symbol SORT$RECORDS_OUTPUT.
Working set extent
The number of pages in the process working set extent. This value is used as an upper limit on the size of the sort data structure. Adjusting this value is one way to improve the efficiency of a Sort operation.
Virtual memory
The number of pages of virtual memory added to the Sort image to hold the data.
Direct I/O + buffered I/O
This total is the number of I/O movements needed to read and write data. The lower this total value is, the more efficient the ordering operation.
Page faults
Indicates how well the data fits into memory: the higher the number of page faults, the less efficient the ordering operation.
Elapsed time
The total wall clock time used by the Sort or Merge operation in hours, minutes, seconds, and hundredths of seconds.
Starting from the SORT V2.0 patch kit, this value is displayed in the delta time format, and the leading spaces have been removed. This value is saved in the form of the DCL symbol SORT$ELAPSED_TIME.
Input record length
This value is obtained from the Record Management Services (OpenVMS RMS) unless the user supplies it.
Internal length
The size in bytes of an internal format node. This includes any keys, data, a word to store the length, record file addresses (RFAs), and converted keys.
Output record length
The length of the output record. The length is computed from the input record length, the sort process, and the record reformatting requested.
Sort tree size
The number of records that fit in the Sort internal data structure.
Number of initial runs
One indication of how well the data fits into memory.
Maximum merge order
The maximum number of sorted strings that are merged at one time.
Number of merge passes
The number of times the Sort utility merges strings until one sorted output string is produced. The number of initial runs and the number of merge passes indicate how well the data fits into memory. The higher these numbers, the further the working set size is from containing the data and the longer the sorting takes.
Work file allocation
The number of blocks used for the work files. When more than one merge pass is needed, this size is approximately twice the size of the input file allocation.
Elapsed CPU
The CPU time used by the ordering operation; it does not include time spent waiting for I/O operations to complete or time spent waiting while another process executes.
Starting from the SORT V2.0 patch kit, this value is displayed in the delta time format, and the leading spaces have been removed. This value is saved in the form of the DCL symbol SORT$ELAPSED_CPU.
Example$ SORT/STATISTICS PRICE1.DAT,PRICE2.DAT PRICE.LIS
This SORT /STATISTICS command results in the following statistical display:OpenVMS Sort/Merge Statistics Records read: 793 Input record length: 80 Records sorted: 793 Internal length: 80 Records output: 793 Output record length: 80 Working set extent: 100 Sort tree size: 412 Virtual memory: 433 Number of initial runs: 2 Direct I/O: 22 Maximum merge order: 2 Buffered I/O: 9 Number of merge passes: 1 Page faults: 3418 Work file allocation: 114 Elapsed time: 00:00:05.98 Elapsed CPU: 00:00:03.63
- /WORK_FILES[=n]
Applies to the SORT command only. Increases the number of Sort work files by any number, from 1 to 10 (the high-performance Sort/Merge utility supports up to 255) inclusively, to make each work file smaller. If the available disks are too small or too full for work files, increasing the number of files can improve the efficiency of the Sort operation.
Sort does not create work files until it needs them. If Sort needs work files, it creates two by default (SORTWORK0, SORTWORK1), which are placed in the SYS$SCRATCH directory.
Example$ ASSIGN DRA5: SORTWORK0 $ ASSIGN DB0: SORTWORK1 $ ASSIGN DB1: SORTWORK2 $ SORT/KEY=(POS:1,SIZ:80)/WORK_FILES=3 - _$ STATS1,STATS2,STATS3,STATS4 SUMMARY.LIS
Because the input files in this Sort operation are large files, specifying three work files improves the efficiency of the sort operation.
Note that you can also assign the work files to a specific directory on a device by including the directory name. For example, to assign SORTWORK0 to the [WORKSPACE] directory on DRA5, enter the following command:$ ASSIGN DRA5:[WORKSPACE] SORTWORK0
9.9.1. Input File Qualifier
The following input qualifier should be included immediately after the input file specification in the SORT or MERGE command line:
- /FORMAT=(RECORD_SIZE:n,FILE_SIZE:n)
Defines input file characteristics; allows you to specify or override record or file size. It must be specified immediately after the input file specification in the Sort or Merge command line.
Sort uses input file size information to determine the amount of memory needed, as well as the size of the work files for the Sort operation. If the file size is unknown (for example, you are sorting files that do not reside on disk or standard ANSI magnetic tape), Sort assumes a fairly large file size.
Specify the following qualifier values:RECORD_SIZE:n
Specifies the input file's longest record length (LRL) in bytes. The maximum longest record length that can be specified depends on the file organization:
Sequential 32,767 Relative 16,383 Indexed-sequential 16,362 These values include control bytes for variable records with fixed-length control (VFC) format.
FILE_SIZE:n
Specifies input file size in blocks. The maximum file size accepted is 4,294,967,295 blocks.
You can also use /FORMAT as an output file qualifier. See Section 9.9.2, ''Output File Qualifiers'' for more information.
Example$ SORT/KEY=(POS:40,SIZ:2,DESC) - _$CRA0:YRENDAVG.DAT/FORMAT=(RECORD_SIZE:41,FILE_SIZE:3) - _$DESCYRAVG.LIS
Because the input file YRENDAVG.DAT does not reside on a disk device or ANSI magnetic tape, file organization must be described by the /FORMAT qualifier.
9.9.2. Output File Qualifiers
The following output qualifiers can be used with the SORT and MERGE commands. To use an output file qualifier, include the qualifier immediately after the output file specification in the SORT or MERGE command line.
- /ALLOCATION=n
Specifies the number of blocks, from 1 through 4,294,967,295, to be preallocated to the output file for optimization. Use this qualifier when you know that the output file allocation will differ substantially from the total input file allocation (for example, when reformatting data or omitting records).
The /ALLOCATION qualifier is required if the /CONTIGUOUS qualifier is used.
Example$ SORT/KEY=(POS:1,SIZ:80) STATS.DAT - _$ SUMMARY.LIS/ALLOCATION=1000/CONTIGUOUS
This SORT command allocates 1000 contiguous blocks for the output file SUMMARY.LIS.
- /BUCKET_SIZE=n
Specifies OpenVMS RMS bucket size (the number of 512-byte blocks per bucket) to be used by relative and indexed sequential output disk files for optimization. A value of 1 through 32 is allowed.
If the output file organization is the same as for the input files, the default value is the same as the bucket size of the first input file. If output file organization is different, the default value is 1.
Example$ SORT/KEY=(POS:1,SIZ:80) STATS1.DAT,STATS2.DAT - _$ SUMMARY.LIS/BUCKET_SIZE=16/RELATIVE
This SORT command results in the output file SUMMARY.LIS that has a bucket size of 16 with relative organization.
- /CONTIGUOUS
Requests that the output file be stored in contiguous disk blocks to decrease access time. Must be used with the /ALLOCATION qualifier. By default, Sort/Merge does not allocate contiguous disk blocks for the output file.
Example$ SORT/KEY=(POS:1,SIZ:80) STATS.DAT - _$ SUMMARY.LIS/ALLOCATION=1000/CONTIGUOUS
This SORT command allocates 1,000 contiguous blocks for the output file SUMMARY.LIS.
- /FORMAT=(type:n[,...])
Specifies the output file record format (FIXED:n, VARIABLE:n, or CONTROLLED:n) if it differs from the input file format. You can also specify the size (SIZE:n) or the block size (BLOCK_SIZE:n) of the file records.
If the Sort operation is a record or tag sort, the default output record format is the same as the first input file record format. If the Sort operation is an address or index sort, the default output record format is fixed record format. If the input files have different record formats, Sort provides an output record size that is large enough to contain the largest record in the input files.
You can specify the following qualifier values.BLOCK_SIZE:n
Specifies the output file's block size, in bytes, if you have directed the file to magnetic tape. If the input file is a tape file, the block size of the output file defaults to that of the input file. Otherwise, the output file block size defaults to the size used when the tape was mounted.
Acceptable values for n range from 20 to 65,532. To ensure correct data interchange with other VSI systems, however, specify a block size of not more than 512 bytes. For compatibility with systems that are not made by VSI, the block size should not exceed 2,048 bytes.
CONTROLLED:n
Specifies variable with fixed-length control (VFC) records in the output file.
FIXED:n
Specifies fixed-length records in the output file.
SIZE:n
Specifies the size, in bytes, of the fixed portion of VFC (CONTROLLED) records, up to a maximum of 255 bytes. If you do not specify SIZE, the default is the size of the fixed portion of the first input file. If you specify this size as 0, OpenVMS RMS defaults the value to 2 bytes.
VARIABLE:n
Specifies variable-length records in the output file.
For any qualifier value, you can optionally specify n as the maximum record size (in bytes) of the output records. The maximum record size allowed depends on the file organization:Sequential files
32,767
Relative files
16,383
Indexed-sequential files
16,362
These maximum record size values include control bytes for variable records with fixed-length control (VFC) format.
Example$ SORT/KEY=(POS:1,SIZ:80) STATS.DAT SUMMARY.LIS/FORMAT=FIXED:80
The input file STATS.DAT consists of variable-length records that are 80 bytes in length. The /FORMAT qualifier specifies that the output file, SUMMARY.LIS, consists of fixed-length records.
- /INDEXED_SEQUENTIAL
Defines the file organization for the output file as indexed sequential. Note that the output file must already exist and must be empty. In addition, you must specify that the empty file is to be overlaid with the sorted records by using the /OVERLAY qualifier.
Example$ CREATE/FDL=NEW.FDL AVERAGE.DAT $ SORT/KEY=(POS:1,SIZ:80) DATA.DAT,STATS.DAT - _$ AVERAGE.DAT/INDEXED_SEQUENTIAL/OVERLAY
The CREATE/FDL command creates the empty file AVERAGE.DAT. The SORT command specifies that the output file have an indexed-sequential organization and be written to the empty file AVERAGE.DAT.
- /OVERLAY
Specifies an existing empty file that the output file is to be overlaid on, or written to. The /OVERLAY qualifier is required when you use the /INDEXED_SEQUENTIAL qualifier.
If the input file organization is indexed-sequential, the output file must already exist and be empty. If the output file is not empty, /OVERLAY does not write over the file. Instead, it appends the result of the sort to the existing output file.
You can use the CREATE/FDL utility to create an empty data file. Any attributes that you specify when creating the empty file then become attributes of the Sort output file.
Example$ CREATE/FDL=NEW.FDL AVERAGE.DAT $ SORT/KEY=(POS:1,SIZ:80) STATS.DAT AVERAGE.DAT/OVERLAY
The FDL file NEW.FDL specifies special attributes for the file AVERAGE.DAT. When Sort writes output to that file, the resulting Sort output file has the attributes specified by the FDL file.
- /RELATIVE
Defines the file organization for the output file as relative.
Example$ SORT/KEY=(POS:1,SIZ:80) STATS.DAT SUMMARY.LIS/RELATIVE
Because the input file STATS.DAT is not a relative file and the output file SUMMARY.LIS will be, /RELATIVE qualifies the output file specification.
- /SEQUENTIAL
Defines the file organization for the output file as sequential. This is the default for address and index sorting operations. The default for record and tag sorting operations is the organization of the first input file.
Example$ SORT/KEY=(POS:1,SIZ:80) STATS.DAT SUMMARY.LIS/SEQUENTIAL
Because the input file STATS.DAT is not a sequential file and the output file SUMMARY.LIS will be, /SEQUENTIAL qualifies the output file specification.
9.9.3. Specification File Qualifiers
The following qualifiers can be used in specification files. The high-performance Sort/Merge utility does not support specification files. Implementation of this feature is deferred to a future OpenVMS release. Note that these qualifiers are valid only within a Sort/Merge specification file.
- /CDD_PATH_NAME="cdd-path-name"
Identifies fields and attributes defined for use with the Common Data Dictionary (CDD/Plus) using the CDD/Repository command. Once the fields have been identified, they can then be used later with other specification file qualifiers, such as /KEY, /CONDITION, /INCLUDE, or /OMIT.
/CDD_PATH_NAME can be used in place of or in conjunction with /FIELD statements.
The "cdd-path-name" value is the CDD/Plus record definition within CDD/Plus. You can use the /CDD_PATH_NAME qualifier only if your system has CDD/Plus installed.
Example/CDD_PATH_NAME="employee"
The /CDD_PATH_NAME qualifier identifies the employee record, which had been defined previously in CDD/Plus.
- /[NO]CHECK_SEQUENCE
Applies to the MERGE command only. Specifies whether or not the sequence of records in the input file is checked. By default, Merge checks the sequence of records.
Example/NOCHECK_SEQUENCE
The /NOCHECK_SEQUENCE qualifier overrides the Merge utility's default behavior.
- /COLLATING_SEQUENCE=(SEQUENCE=sequence-type [,MODIFICATION=("char1" operator "char2")] [,IGNORE=character or character range,...] [,FOLD] [,[NO]TIE_BREAK])
Specifies one of three predefined collating sequences (ASCII, EBCDIC, or Multinational) or a user-defined sequence for character key fields. Allows you to modify any of the predefined collating sequences or any previously defined user-defined sequences.
See Section 9.3, ''Specifying a Collating Sequence'' for information about using the ASCII, EBCDIC, and Multinational collating sequences.
You can specify the following qualifier values:SEQUENCE
Specification files support the ASCII, EBCDIC, multinational, and user-defined collating sequences. See Section 9.3, ''Specifying a Collating Sequence'' for information about these collating sequences.
MODIFICATION
Specifies a change to the collating sequence specified in the SEQUENCE option. You can modify the ASCII, EBCDIC, Multinational, or user-defined sequence. The sequence being modified must be specified with the SEQUENCE qualifier even if the sequence is the default (ASCII).
character Specifies a character in the collating sequence. operator Specifies the operator used to compare the characters. You can specify greater than (>), less than (<), or equal to (=). The following kinds of changes are permitted in the MODIFICATION option:
A single or double character can be equated to a single character that has already been assigned a collating value ("a"="A").
A single or double character can collate after a single character that has already been assigned a collating value ("CH">"C").
A single or double character can collate before a single character that has already been assigned a collating value ("D"<"A").
A double character can be equated to a previously defined double character ("CH" = "SH").
A single character can be equated to a double character sequence ("C" = "CH").
IGNORE
Specifies that Sort/Merge ignore a character or character range in the collating sequence when making an initial comparison. Note that, when tie-breaking takes place, Sort/Merge considers the characters specified with the IGNORE value.
FOLD
Specifies that all lowercase letters be given the collating value of their uppercase equivalents. For ASCII, EBCDIC, and user-defined sequences, the lowercase letters are a to z.
Because the lowercase letters in the Multinational sequence already have the collating value of their uppercase equivalents, using FOLD is unnecessary.
[NO]TIE_BREAK
Specifies whether or not Sort/Merge should use numeric values to break any ties between characters that have equivalent values. By default, tie-breaking occurs with the Multinational sequence. Specifying NOTIE_BREAK overrides this default and ensures that no further comparisons are made after the initial comparison.
A TIE_BREAK option must be specified for the ASCII, EBCDIC, and user-defined sequences in order for tie-breaking to occur. TIE_BREAK should be used when specifying the FOLD or MODIFICATION value for the these sequences.
Examples
See Section 9.3, ''Specifying a Collating Sequence'' and Section 9.7, ''Using a Sort/Merge Specification File'' for examples of the use of collating sequences in specification files.
- /CONDITION=(NAME=condition-name, TEST=(field-name operator test-condition [logical-operator...]))
A specification file can be used to change the relative order of a record or to alter the contents of certain fields in a record. You must first use the /CONDITION qualifier to define a conditional test. Once you define a test using the /CONDITIONAL qualifier, you can use that same test with the /KEY or /DATA qualifier to change the order of record. You can also use the test with the /OMIT or /INCLUDE qualifier to change the contents of a record.
If you want to change the order of records in the output file, first specify a condition name with the /CONDITION qualifier and set up a test for what meets that condition. Then, specify the relative order with the /KEY qualifier of the form:/KEY=(IF condition-name THEN value ELSE value)
You can use any values to specify the relative order of the records.
The /CONDITION qualifier also permits you to change the contents of a field in the output records. First specify a condition name, and then set up a test for what meets the condition. Specify the contents you want in the field in a /DATA qualifier of the form:/DATA=(IF condition-name THEN "new-contents" ELSE "new-contents")You can specify the following qualifier values:NAME
Specifies the name of the condition that you are testing. This condition-name can be used in /KEY, /DATA, /OMIT, and /INCLUDE qualifiers after it has been defined using the /CONDITION qualifier.
TEST
Specifies the conditional test.
field-name Specifies the name of the field you are testing. The field-name must be defined previously by the /FIELD qualifier.
operator Specifies the logical or relational operator used in the conditional test. The logical operators that you can use are AND and OR. The relational operators that you can specify are as follows:- EQ = Equal to
- NE = Not equal to
- GT = Greater than
- GE = Greater than or equal to
- LT = Less than
- LE = Less than or equal to
test-condition Specifies the constant or field-name against which you are testing. A constant is specified with the following format:- Decimal_digits (default)
- %Ddecimal_digits
- %Ooctal_digits
- %Xhexadecimal_digits
- "character"
Normally, you do not need to specify the radix operator (%D); however, test-condition will assume the same data type as the field-name.
Examples
See Section 9.7, ''Using a Sort/Merge Specification File'' for examples of the use of the /CONDITION qualifier in specification files.
- /DATA=field-name /DATA=(IF condition THEN "new contents" ELSE "new contents")
Use the /DATA qualifier to eliminate or reorder fields from the output record. Specify the data fields in the order you want them to appear in the output record. A /DATA qualifier must identify every field in the records you are directing to the output file. Only those fields identified by the /DATA qualifier are to be directed to the output file.
You can conditionally change the contents of a field in the output records by first specifying a condition name and then setting up a test for what meets the condition in a /CONDITION qualifier. You then specify the contents you want in the field in a /DATA qualifier of the form:/DATA=(IF condition-name THEN "new-contents" ELSE "new-contents")
You can specify the following qualifier values:field-name
Specifies the name of a field in a record. The field-name must be defined previously in a /FIELD qualifier.
condition-name
Specifies a condition-name that has been defined previously in a /CONDITION qualifier.
new-contents
Specifies how the record is to be altered. The new-contents can be a constant or a field-name that has been defined in a /FIELD qualifier.
Examples
See Section 9.7, ''Using a Sort/Merge Specification File'' for examples of the use of the /DATA qualifier in specification files.
- /FIELD=(NAME=field-name,POSITION:n,SIZE:N, [DIGITS:n,]data-type) /FIELD=(NAME=field-name,VALUE:n,SIZE:N,[DIGITS:n,] data-type)
Defines the fields in the input files when you are altering the order or format of output records. These fields include key fields, fields to be compared, and fields to be directed to the output file. You identify each field by specifying a name, its position and size in the record, and its data type.
Field names must be unique; no duplicate field names are allowed. In addition, you cannot use more than 255 field definitions.
You can also use /FIELD to define a constant and assign it a value of any valid Sort/Merge data type for use in /CONDITION, /DATA, and /KEY statements.
You can specify the following qualifier values:NAME
Specifies the name of the field. The field-name cannot have any embedded spaces, must begin with an alphabetic character, and can be no longer than 31 characters.
POSITION:n
Specifies the position of the field in the record.
VALUE:n
Assigns a value to a constant field for use in a /CONDITION, /DATA, or /KEY statement. If you specify VALUE:n, do not specify /POSITION:n because the field is a constant and not part of an input record.
SIZE:n
Specifies the size of a field containing character or binary data. In the specification file, SIZE implies byte lengths. The data type determines what values are acceptable, as follows:
For character data, the size must not exceed 32,767 characters.
For binary data, the size specified must be 1, 2, 4, 8, or 16 bytes.
For floating-point data, no size is specified.
DIGITS:n
Specifies the size of a field containing decimal data. The size of a field containing decimal data must not exceed 31 digits. Note that DIGITS:n is used only when describing a field containing decimal data.
data-type
Specifies the data type of the field. You are not required to specify the data-type if it is character; Sort assumes character data type by default. See Section 9.2.1, ''Defining a Key'' for a list of the data types recognized by Sort/Merge.
Example/FIELD=(NAME=SALARY,POSITION:10,DIGITS:8,DECIMAL)
This /FIELD qualifier identifies a field in a record by the name SALARY, specifies that it starts in position 10 of the record, is 8 digits long, and consists of decimal data.
- /INCLUDE=(CONDITION=condition[,KEY=...] [,DATA=...])
You can specify that records are to be conditionally included in an output file. After defining a condition in a /CONDITION qualifier, specify record selection in an /INCLUDE qualifier requesting that records satisfying the condition are to be included in the output file.
You can specify multiple /INCLUDE and /OMIT qualifiers in a specification file. The order in which you specify them determines the order the input records are tested for inclusion. After the last /INCLUDE qualifier, all records that have not already been included or explicitly omitted are omitted.
You can unconditionally include any records not previously omitted or included by specifying the /INCLUDE qualifier without a condition.
When sorting multiple record formats, one /INCLUDE qualifier should be specified for each different record format among the records to be sorted. If you do not specify a KEY option within the INCLUDE qualifier, Sort assumes the default key definitions. If the KEY is specified in the /INCLUDE qualifier, the default key definitions are not used. The order of the KEY fields in the /INCLUDE qualifier determines how the internal key is built for sorting. The order of the DATA fields in the /INCLUDE qualifier determines the way the output record is formatted. If you specify a key or data field in an /INCLUDE qualifier, you must define all other key or data fields in the record.
You can specify the following qualifier values:CONDITION
Refers to the condition-name specified in a previous /CONDITION qualifier.
KEY
Defines a key field because the default record type defined in the /KEY qualifier is not being used.
DATA
Defines a data field because the default record type defined in the /DATA qualifier is not being used.
Example/FIELD=(NAME=ZIP,POSITION:20,SIZE:6) /CONDITION=(NAME=LOCATION, TEST=(ZIP EQ "01863")) /INCLUDE=(CONDITION=LOCATION)These /CONDITION and /INCLUDE qualifiers specify that records with the zip code 01863 will be included in the output file.
- /KEY=field-name /KEY=(field-name,order) /KEY=([IF condition THEN value ELSE]...) value [,order]
Specify the key fields to be used in the Sort operation. If you are sorting the entire record using character data, there is no need to specify your key field. Otherwise, specify a /KEY qualifier for each of the keys, in the order of their priority. You can sort on as many as 255 key fields.
There are three ways to use the /KEY qualifier:To identify the key field name.
To identify the key field name and to specify sorting order. In this case, enclose the field name and the order option in parentheses.
- As a conditional qualifier, to change the order of records in the output file. First, specify a condition-name in a /CONDITION qualifier, and set up a test for what meets that condition. Then, specify the relative order in a /KEY qualifier of the form:
/KEY=(IF condition-name THEN value ELSE value)
You can use any values to specify the relative order of the records.
You can specify the following qualifier values:field-name
Specifies the name of the key field. The field-name has been previously specified in a /FIELD qualifier.
order
Specifies the order of the sort. The ASCENDING option specifies ascending order for a Sort or Merge operation. This option is the default. The DESCENDING option specifies descending order for a Sort or Merge operation.
value
Specifies the key. The value can be a constant or a field-name that has been defined in a /FIELD qualifier.
Examples/FIELD=(NAME=SALARY,POSITION:10,DIGITS:8,DECIMAL) /KEY=(SALARY,DESCENDING)
This /KEY qualifier specifies that the key field is SALARY and that the sorting order is descending.
/FIELD=(NAME=ZIP,POSITION:20,SIZE:6)
/CONDITION=(NAME=LOCATION,
            TEST=(ZIP EQ "01863"))
/KEY=(IF LOCATION THEN 1
      ELSE 2)
In this example, all the records with the zip code 01863 are to appear at the beginning of the sorted output file. The conditional test LOCATION (defined in a /CONDITION qualifier) is on the ZIP field (named in a /FIELD clause). The values of 1 and 2 in this /KEY clause signify a relative order for those records that satisfy the condition and those that do not.
- /OMIT=(CONDITION=condition-name)
Specifies that records are to be omitted from the output file based on a condition defined with a /CONDITION qualifier.
First, you must define a condition with the /CONDITION qualifier. Specify your records with an /OMIT qualifier to request any records that satisfy the condition be omitted from your Sort operation. By default, Sort/Merge includes all the other input records in the output file.
You can specify multiple /OMIT and /INCLUDE qualifiers in your specification file. The order in which you specify them determines the order in which the input records are tested for omission. All the records that have not already been included or omitted after the last /OMIT qualifier are included. You can unconditionally omit any records not previously omitted or included by specifying the /OMIT qualifier only.
Example/FIELD=(NAME=ZIP,POSITION:20,SIZE:6) /CONDITION=(NAME=LOCATION, TEST=(ZIP EQ "01863")) /OMIT=(CONDITION=LOCATION)These /CONDITION and /OMIT qualifiers specify that records with the zip code 01863 are to be omitted from your output file.
- /PAD=single-character
Specifies the character Sort will use to expand, or "pad," a string when reformatting records or when comparing strings of unequal length. By default, Sort uses the null character for padding, ensuring conformity with the previous versions. Double characters that can be defined as single characters ("ch" > "c") cannot be used as pad characters. Characters, decimal, octal, or hexadecimal digits can be used.
The pad character should be specified as follows:Use quotation marks for a character. For example, " # " would specify the number sign.
Use decimal radix for decimal digits. For example, %D35 would specify the decimal number 35.
Use octal radix for octal digits. For example, %O043 would specify the octal number 043.
Use hexadecimal radix for hexadecimal digits. For example, %X23 would specify the hexadecimal number 23.
Example/PAD="."
This example of a /PAD qualifier specifies that records will be padded with periods.
- /PROCESS=type
Applies to the SORT command only. Defines the processing method (record, tag, address, or index) for the sorting operation. If you intend to reformat the output records, you cannot use address or index sort. Specify the process type as RECORD, TAG, ADDRESS, or INDEX.
See Section 9.8.1, ''Sorting Process'' for a comparison of the four types of process.
Example/PROCESS=tag
This example of the /PROCESS qualifier specifies that Sort use a tag sorting process.
- /[NO]STABLE
Specifies that records with equal keys are directed to the output file in their input file order. The default condition is /NOSTABLE.
By default, when records are sorted with identical keys, the order of those records in the output file may not be the same as they appeared in the input file. Specifying the /STABLE qualifier in a specification file arranges records with equal keys in the output file in the order of the input files as specified in the command line. If you use this qualifier when sorting multiple input files, on output, records with equal keys in the first file will precede those from the second file and so on.
Example/STABLE
This example of the /STABLE qualifier ensures that records with equal keys will have the same order in the input and output files.
- /WORK_FILES=(device[,...])
Applies to the SORT command only. Reassigns work files to different disk-structured devices to improve performance. Using the /WORK_FILES qualifier in a specification file makes it unnecessary to assign logicals prior to invoking Sort at the command or program level.
Unlike the DCL qualifier /WORK_FILES=n, the specification file qualifier /WORK_ FILES=(device[,...]) specifies work file assignments, not the number of work files.
See Section 9.8.3, ''Assigning Work Files'' for more information about the use of work files.
Example/WORK_FILES=("WRKD$:")This example of a /WORK_FILES qualifier assigns one of Sort's work files to the device WRKD$: because that device has the most space available.
Chapter 10. Controlling Access to Resources
Each system site has unique security requirements. For this reason, every site should have a system security policy that outlines physical and software security requirements for system managers and users. To ensure system security, the OpenVMS operating system controls access to the system and to any object that contains shareable information. These objects, such as devices, volumes, logical name tables, files, and queues, are known as protected objects. All protected objects list a set of access requirements that specify who has a right to access the object in a given manner.
Displaying the rights identifiers of your process
Security profile of objects
Interpreting protection codes
Default file protection
Accessing files across networks
Auditing access to your account and files
The VSI OpenVMS Guide to System Security, for information about protecting objects and system security in general
The VSI OpenVMS DCL Dictionary or online help, for information about commands discussed in this chapter
Security Features
Know the rights identifiers associated with your process — Rights identifiers determine what resources you can access. If your process does not have the appropriate identifiers, you may be unable to access certain protected objects.
See Section 10.1, ''Displaying the Rights Identifiers of Your Process'' for information about displaying your rights identifiers.
Display security profiles of protected objects — A security profile contains information about protected objects. You can change the security profile of objects that you own to make them accessible or inaccessible to other users.
See Section 10.2, ''Security Profile of Objects'' for information about security profiles.
Know how to access files across networks — This can be accomplished by using access control strings or proxy login accounts.
See Section 10.5, ''Accessing Files Across Networks'' for information about accessing remote files.
Audit access to your account and files — This can be accomplished by closely observing any login messages and by working in conjunction with your system manager to audit your files.
See Section 10.6, ''Auditing Access to Your Account and Files'' for information about auditing access to your account and files.
10.1. Displaying the Rights Identifiers of Your Process
All processes that attempt to access protected objects carry credentials known as rights identifiers. All protected objects list a set of access requirements that specify who has a right to access the object in a given manner. If a process' rights identifiers do not match those of the object, access is denied.
$ SHOW PROCESS/ALL
25-NOV-2002 15:23:18.08   User: GREG            Process ID:   34200094
                          Node: ACCOUNTS        Process name: "GREG"

Terminal:           VTA2195:  TNA2170:  (Host: 16.32.123.45 Port: 6789)
User Identifier:    [DOC,GREG]
Base priority:      4
Default file spec:  WORK1:[GREG.FISCAL_96]
Number of Kthreads: 1
Devices allocated:  ACCOUNTS$TWA2:

Process Quotas:
⋮
Process rights:
 INTERACTIVE
 LOCAL
 SALES
 MINDCRIME                         resource

System rights:
 SYS$NODE_ACCOUNTS
| UIC identifier, indicating user Greg is a member of the DOC group |
| Environmental identifier, indicating user Greg is an interactive user |
| Environmental identifier, indicating user Greg is logged in locally |
| General identifier, indicating user Greg is also a member of the SALES group |
| General identifier, indicating Greg holds the MINDCRIME identifier with the resource attribute so he can charge disk space to the identifier |
| Environmental identifier, indicating user Greg is working from the ACCOUNTS node |
10.2. Security Profile of Objects
Because the operating system supports many users simultaneously, it has built-in security mechanisms to prevent one user's activities from interfering with another's. Protection codes, access controls, and hardware design together protect the use of memory, shareable devices, and data so many users can share the system. An object's security profile is comprised of the user identification code (UIC), the ACL, and the protection codes assigned to that object. You can display or modify the security profile of any object that you own.
$ SHOW SECURITY 95_FORECAST.TXT

WORK_DISK$:[GREG]95_FORECAST.TXT;1 object of class FILE
      Owner: [ACCOUNTING,GREG]
      Protection: (System: RWED, Owner: RWED, Group: RE, World)
      Access Control List: <empty>
The display indicates the file 95_FORECAST.TXT is owned by user Greg. It also lists the file's protection code, which gives read, write, execute, and delete access to system users and to the owner. The code grants read and execute access to group users and provides no access to world users. See Section 10.3, ''Interpreting Protection Codes'' for further explanation. There is no ACL on the file.
10.2.1. Modifying a Security Profile
You can provide new values for the owner, protection code, or ACL of a protected object, or you can copy a profile from one object to another by using the SET SECURITY command.
$ SET SECURITY/PROTECTION=(W:RW) 95_FORECAST.TXT
$ SHOW SECURITY 95_FORECAST.TXT

95_FORECAST.TXT object of class FILE

     Owner: [GREG]
     Protection: (System: RWED, Owner: RWED, Group: RE, World: RW)
     Access Control List: <empty>
10.3. Interpreting Protection Codes
[category: list of access allowed (, category: list of access allowed,...)]
|
System |
Any user process or application whose UIC is in the range 1 through 10 (octal), has SYSPRV privilege, or is in the same group as the owner and holds GRPPRV. |
|
Owner |
Any user process or application whose UIC is identical to the UIC of the object. |
|
Group |
Any user process or application whose group UIC is identical to the group UIC of the object. |
|
World |
Any user process or application on the system. |
When specifying more than one user category, separate the categories with commas and enclose the entire code in parentheses. You can specify user categories and access types in any order.
A null access specification means no access, so when you omit an access type for a user category, that category of user is denied that type of access. To deny all access to a user category, specify the user category without any access types. Omit the colon after the user category when you are denying access to a category of users.
|
Read |
Gives you the right to read, print, or copy a disk file. With directory files, read access gives you the right to read or list a file and use a file name with wildcard characters to look up files. Read access implies execute access. |
|
Write |
Gives you the right to write to or change the contents of a file, but not delete it. Write access allows modification of the file characteristics that describe the contents of the file. With directory files, write access gives you the right to insert or delete an entry in the catalog of files. |
|
Execute |
Gives you the right to execute a file that contains an executable program image or DCL command procedure. With a directory file, execute access gives you the right to look up files whose names you know. |
|
Delete |
Gives you the right to delete the file. To delete a file, you must have delete access to the file and write access to the directory that contains the file. |
10.4. Default File Protection
A new file receives the default UIC-based protection and the default access control list (ACL) of its parent directory. An ACL is a collection of entries that define the access rights a user or group of users has to a particular protected object such as file, directory, or device.
You can use either default UIC protection or default ACL protection to override the default UIC-based protection given to new files.
10.4.1. Default UIC Protection
(S:RWED, O:RWED, G:RE, W)
$ SET PROTECTION = (S:RWED,O:RWED,G:RE,W:RE)/DEFAULT
10.4.2. Default ACL Protection
$ SET SECURITY/ACL = (DEFAULT_PROTECTION,S:RWED,O:RWED,G:RE,W:)
[JONES]PERSONAL.DIR
To specify a default identifier ACE to be copied to the ACL of any file subsequently created in the directory, specify the DEFAULT option in the directory file's identifier ACL.
$ SET SECURITY/ACL = (IDENTIFIER=NETWORK,OPTIONS=DEFAULT,ACCESS=NONE) -
_$ [JONES]PERSONAL.DIR
10.4.3. Renaming Files
A renamed file's protection is unchanged. A new version of an existing file receives the UIC-based protection and ACL of the previous version. Use the /PROTECTION qualifier of the BACKUP, COPY, CREATE, and SET FILE commands to override the default UIC-based protection.
10.4.4. Explicit File Protection
You can explicitly specify UIC-based protection for a new file with the /PROTECTION qualifier (valid with the BACKUP, COPY, and CREATE commands).
You can change the UIC-based protection on an existing file with the SET SECURITY/PROTECTION command.
After a file is created and you have created an ACL for the file, you can modify the ACL and add as many entries to it as you want. The protection specified by the ACL overrides the file's user identification code protection.
$ CREATE MAST12.TXT/PROTECTION=(S:RWED,O:RWED,G,W)
$ SET SECURITY/PROTECTION=(S:RWED,O:RWED,G:RE,W) MAST12.TXT
10.5. Accessing Files Across Networks
The following sections describe how to access files across networks.
10.5.1. Access Control Strings
You can include network access control strings in the file specifications of DCL commands that perform operations across the DECnet for OpenVMS network. The access control strings permit a user on a local node to access a file on a remote node.
NODE"username password"::disk:[directory]filename.filetype
Caution
Because access control strings include sufficient information to allow someone to break in to the remote account, they create serious security exposure.
10.5.2. Protecting Access Control Strings
Avoid revealing the information on either hardcopy or video terminals. If you use a hardcopy terminal, dispose of the output properly. If you use a video terminal, clear the screen and empty the recall buffer with the DCL command RECALL/ERASE when the network job is completed. This prevents another user from seeing the password, either by displaying the command line with the Ctrl/B sequence or with the DCL command RECALL/ALL.
Do not place networking commands that include access control strings in command procedures where they would be likely targets for discovery.
If you must put access control strings in your command procedures, provide these files with optimum file protection.
10.5.3. Using Proxy Login Accounts to Protect Passwords
Passwords are not echoed on the terminal where the request originates.
Passwords are not passed between systems where they might be intercepted in unencrypted form.
Passwords are not needed in command files to perform the remote access steps.
Before you can initiate a proxy login, the system or security administrator at the remote node must create a proxy account for you. Proxy accounts, like regular accounts, are created with the OpenVMS Authorize utility (AUTHORIZE). They are usually nonprivileged accounts. Security administrators can allow you access to one default proxy account and up to 15 other proxy accounts. While proxy logins require more setup effort on the part of system managers, they provide more secure network access and eliminate the need for users to enter access control strings.
- The user KMAHOGANY has two user accounts:
An account on node BIRCH with the password "XYZ123ABC"
An account on node WALNUT with the password "A25D3255"
KMAHOGANY has logged in to node BIRCH.
KMAHOGANY wants to copy the file BIONEWS.MEM from the default device and directory of the account on the node WALNUT.
The following figure shows these conditions.
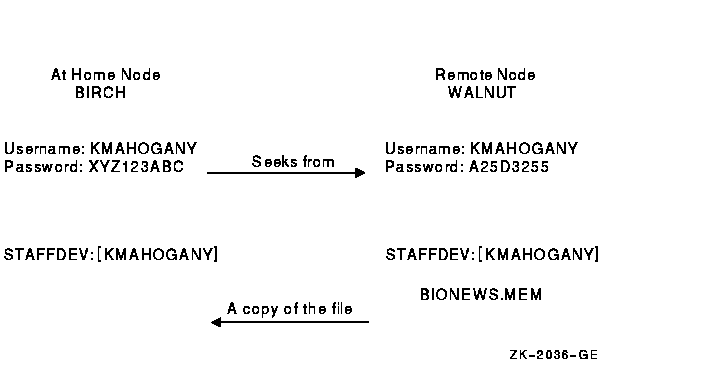
- The user KMAHOGANY could use an access control string to copy the file BIONEWS.MEM, as follows:
$ COPY WALNUT"KMAHOGANY A25D3255"::BIONEWS.MEM BIONEWS.MEM
Notice that the password A25D3255 echoes. Anyone who observes the screen can see it.
- If KMAHOGANY has proxy access from node BIRCH to the account on node WALNUT, the command for copying the file BIONEWS.MEM is as follows:
$ COPY WALNUT::BIONEWS.MEM BIONEWS.MEM
KMAHOGANY does not need to specify a password in an access control string. Instead, the system performs a proxy login from her account on node BIRCH into her account on node WALNUT. There is no exchange of passwords.
10.5.4. General Access Proxy Accounts
The user name GENACCESS.
Access limited to network logins.
A password known only to the owner of the account. None of the remote users need to know it. This helps to protect the account.
The default device and directory STAFFDEV:[BIOSTAFF].
$ COPY WALNUT::[KMAHOGANY]BIONEWS.MEM BIONEWS.MEM
Note that KMAHOGANY must specify the directory [KMAHOGANY] because the file BIONEWS.MEM is not in the default device and directory for the GENACCESS account (STAFFDEV:[BIOSTAFF]). In addition, the protection for the file BIONEWS.MEM must permit access to the GENACCESS account. Otherwise, the command fails.
$ COPY WALNUT"PROXY2"::[KMAHOGANY]BIONEWS.MEM BIONEWS.MEM
This command uses the PROXY2 account to copy the file BIONEWS.MEM from the [KMAHOGANY] directory on node WALNUT.
10.6. Auditing Access to Your Account and Files
Although it is the security administrator's job to monitor the system for possible break-in attempts, you can assist the security administrator in auditing access to your account and files.
10.6.1. Observing Your Last Login Time
The OpenVMS system maintains information in your UAF record about the last time you logged in to your account. Your security administrator decides whether the system should display this information at login time. Sites with medium to high security requirements frequently display this information and ask users to check it for unusual or unexplained successful logins and unexplained failed logins.
If there is a report of an interactive or a noninteractive login at a time when you were not logged in, report it promptly to your security administrator. Also change your password. The security administrator can investigate further by using accounting files and audit logs.
If you receive a login failure message and cannot account for the failure, it is likely that someone has been trying to access your account unsuccessfully. Check your password to ensure that it adheres to all recommendations for password security described in Section 1.9, ''Guidelines for Protecting Your Password''. If not, change your password immediately.
If you expect to see a login failure message and it does not appear or if the count of failures is too low, change your password. Report either of these indications of login failure problems to your security administrator.
The security administrator can select one or more types of events that warrant special attention when they occur. When such an event is detected, the security administrator directs the system to send an audit to the system security audit log file or an alarm to terminals enabled as security operator terminals. For example, the security administrator might identify one or more files for which write access is prohibited. An audit can be enabled or an alarm can be set to indicate attempted access to these files.
If you suspect a break-in to your account, change your password. You might want to request that your security administrator implement auditing on sensitive files.
10.6.2. Events That Can Trigger Security Alarms
|
Example of Events Initiating Security Audits or Alarms | |
|---|---|
|
Installation of images Certain types of file access Volume mounts and dismounts |
Modifications to system and user passwords, system authorization file, network proxy file, or rights database |
|
Access event requested by an ACL file or global section |
Logins, logouts, login failures, break-in attempts |
%%%%%%%%%%%  OPCOM  11-DEC-1999 09:21:11.10  %%%%%%%%%%%
Message from user AUDIT$SERVER on BOSTON
Security audit (SECURITY) on BOSTON, system id: 19424
Auditable event:        Attempted file access
Event time:              11-DEC-1999 09:21:10.84
PID:                    23E00231
Username:               ABADGUY
Image name:             BOSTON$DUA0:[SYS0.SYSCOMMON.][SYSEXE]DELETE.EXE
Object name:            _BOSTON$DUA1:[RWOODS]CONFIDREVIEW.MEM;1
Object type:            file
Access requested:       DELETE
Status:                 %SYSTEM-S-NORMAL, normal successful completion
Privileges used:        SYSPRV
The auditing message reveals the name of the perpetrator, the method of access (successful deletion accomplished by using the program [SYSEXE]DELETE.EXE), time of access (9:21 A.M.), and the use of a privilege (SYSPRV) to gain access to the file. With this information, the security administrator can take action.
10.6.3. Security Audit Log Files
Security audit messages are written to the security audit log file every time any file is accessed and meets the conditions specified in the audit entry of the ACL for that file (see Section 10.6.4, ''Adding ACEs to Sensitive Files''). Access to the file CONFIDREVIEW.MEM, as well as access to any file on the system that is protected with security auditing, prompts an audit record to be written to the security audit log file.
After auditing has been introduced, check with your security administrator periodically to see if any additional break-ins have occurred.
10.6.4. Adding ACEs to Sensitive Files
If you have key files that might have been accessed improperly, you might want to develop a strategy with your security administrator to audit access to the files. Once you review the situation and ensure that you have done everything possible to protect your files with standard protection codes and general ACLs (described in the VSI OpenVMS Guide to System Security), you may conclude that security auditing is required.
To specify security auditing, you can add special access control entries (ACEs) to files you own or to which you have control access. Keep in mind, however, that the audit log file is a systemwide mechanism, so VSI recommends that a site security administrator control the use of file auditing. Although you can add auditing ACEs to files over which you have control, the security administrator has to enable auditing of files on a system level.
If you suspect break-in attempts to your account, the security administrator may temporarily enable auditing for all file access. The security administrator can also enable auditing to monitor read access to your files to catch file browsers.
An access violation of one file frequently indicates access problems with other files. Therefore, the security administrator may need to monitor access to all key files having security-auditing ACEs. When undesired access is gained to key files, the security administrator must take immediate action.
$ SET SECURITY/ACL=(ALARM=SECURITY,ACCESS=READ+WRITE-
_$ +DELETE+CONTROL+FAILURE+SUCCESS) CONFIDREVIEW.MEM
Chapter 11. Defining Logical Names for Devices and Files
A logical name can be used in place of another name to represent system objects such as files, directories, devices, or queues. For example, you might assign a logical name to your default disk and directory. Logical names serve two main functions: they increase readability and file independence.
You can define commonly used files, directories, and devices with short, meaningful logical names. Such names are easier to remember and type than the full file specifications. You can define names that you use frequently in your login command procedure. A system manager can define names that people use frequently in the system startup command procedure.
Logical name characteristics
Using system-defined logical names
Creating logical names
Deleting logical names
Logical name translation
Displaying logical names
Creating and using search lists
Logical name table characteristics
Default logical name tables
Creating logical name tables
Modifying the order of logical name translations
Deleting logical name tables
Process-permanent logical names
For additional information about the commands described in this chapter, refer to the VSI OpenVMS DCL Dictionary or online help.
11.1. Logical Name Characteristics
Are equated to strings (called equivalence strings or equivalence names) or a list of equivalence strings (called search lists). When you use a logical name, the equivalence string is substituted for the logical name.
Are stored in default logical name tables or logical name tables that you create.
Can be shorthand for long file specifications.
Can be defined by you or by the system.
Can be used to keep programs and command procedures independent of physical file specifications. For example, if a command procedure references the logical name ACCOUNTS, you can equate ACCOUNTS to any file on any disk before executing the command procedure.
In general, when a command accepts a system object, the command checks whether the name you provide is a logical name. If the name is a logical name, the system replaces the logical name with its actual value and executes the command.
$ DEFINE COMS DISK7:[WALSH.COMMAND_PROC]
$ SET DEFAULT COMS
$ TYPE COMS:PAYROLL.COM
11.2. Using System-Defined Logical Names
The system creates a set of systemwide logical names for you when you start the system and log in. These logical names allow you to refer to commonly used files or devices without using their physical device names. For a list of these names, see Section 11.9.3, ''System Logical Name Directory''.
Every time you log in, the system creates a group of logical names for your process and places these names in your process table. For a list of these names, see Section 11.9.1, ''Process Logical Name Directory''.
$ DIRECTORY SYS$SYSTEM
$ TYPE SYS$LOGIN:DAILY_NOTES.DAT
11.3. Creating Logical Names
You can create logical names with either the DEFINE command or the ASSIGN command. In this chapter, the DEFINE command is used in the examples.
In general, you create logical names in your process table. Usually, you define logical names in a login command procedure (LOGIN.COM) so you can use the logical name each time you log in. You can also create logical names interactively. However, you can use these logical names only while your current process is active.
The logical names you create in your process table are not available to other users' processes. The system manager or another privileged user can create names in shareable tables, which are accessible to other users. Group and system tables are examples of shareable tables.
For more information about shareable tables, see Section 11.9.4, ''Shareable Logical Name Tables''.
11.3.1. Using the DEFINE Command
DEFINE logical-name equivalence-string[,...]
You can use the same format to create logical names for node names, file specifications, device names, application-specific information, or for other logical names.
By default, the DEFINE command places logical names in your process logical name table (see Section 11.8, ''Logical Name Table Characteristics''), where the logical name is available only to your process and subprocesses. If you want to add logical names to a different logical name table, you can specify a different table with one of the following qualifiers: /JOB, /GROUP, /SYSTEM, or /TABLE=table_name. The first three qualifiers specify the default job, group, and system logical names tables, respectively. The /TABLE=table_name can be used to specify any type of table and is the only qualifier to use when specifying a clusterwide table.
$ DEFINE WORKFILE DISK2:[WALSH.REPORTS]WORK_SUMMARY.DAT
After you define WORKFILE as a logical name, you can use the logical name interchangeably with the equivalence string.
$ DEFINE MY_Q BLDGC_LPS20_ANSI
$ PRINT/QUEUE=MY_Q FABLES.TXT
$ DEFINE/TABLE=LNM$SYSCLUSTER CUSTOMERS
DISK1:[CUSTOMER_VISITS]CUSTOMERS.TXT
11.3.2. Creating Logical Names in Command Procedures for File I/O
You can use logical names in command procedures to perform file I/O (input and output). When you open a file with the OPEN command, you can also create a logical name for the file. Subsequent READ, WRITE, and CLOSE commands can use the logical name instead of the actual file specification to refer to the file.
$ OPEN INFILE DISK3:[WALSH]DATA.DAT
$ READ INFILE RECORD
$ CLOSE INFILE
11.3.3. Rules for Creating Logical Names
Limit the equivalence string and the logical name to no more than 255 characters each. A logical name can contain alphanumeric characters, the underscore (_), the dollar sign ($), and the hyphen (-).
When you specify an equivalence string, include the punctuation marks (colons, brackets, periods) required by a file specification. For example, end a device name with a colon, enclose a directory specification in brackets, and precede a file type with a period.
If a logical name represents only part of a file specification, separate the name from the rest of the file specification with a colon. When you use a logical name to represent a complete file specification, the terminating colon is not needed.
In addition, be sure the logical name is the leftmost component of a file specification.
Optionally, end the logical name with a colon.
Note that the ASSIGN command removes the colon before placing the logical name in a logical name table; the DEFINE command saves the colon as part of the logical name.
If you equate a logical name to one equivalence string, then equate the same logical name to a different equivalence string. The second definition will supersede the first, unless you define them in different logical name tables or define them with different access modes.
$ DEFINE PAY DISK1:[SALES_STAFF]PAYROLL.DAT
$ TYPE PAY
$ DEFINE PAY_FILE DISK1:[SALES_STAFF]PAYROLL
$ TYPE PAY_FILE:*.DAT
$ DEFINE PAY_DIR DISK1:[SALES_STAFF]
$ TYPE PAY_DIR:PAYROLL.DAT
$ DEFINE PAY_DISK DISK1:
$ TYPE PAY_DISK:[SALES_STAFF]PAYROLL.DAT
11.3.4. Translation Attributes
When you create a logical name, you can specify translation attributes that modify how the system interprets the equivalence string.
To apply translation attributes to an equivalence string, use the /TRANSLATION_ATTRIBUTES qualifier to the DEFINE command. This is a positional qualifier. Depending on where you place it on a command line, it can apply translation attributes to all equivalence strings or only to certain ones.
$ DEFINE/TRANSLATION_ATTRIBUTES=CONCEALED DISK DJA3:
$ SHOW DEFAULT
  DISK:[SAM.PUP]
$ SHOW LOGICAL DISK
  "DISK" = "DJA3" (LNM$PROCESS_TABLE)
The logical name DISK represents the physical device DJA3. Thus, the SHOW DEFAULT command displays the logical name DISK rather than the physical device name DJA3. The SHOW LOGICAL command reveals the translation of DISK.
The CONCEALED attribute causes system messages to display the logical name rather than the physical name of a device. Typically, you use the CONCEALED attribute with logical names that represent physical devices. Using concealed devices lets you write programs, write command procedures, and perform other operations without being concerned about which physical device holds the disk or tape. It also lets you use names that are more meaningful than the physical device names.
The TERMINAL attribute prevents iterative translation of a logical name (that is, the equivalence string is not examined to see whether it is also a logical name). The translation is "terminal" (final or completed) after the first translation.
11.3.5. Access Modes
User mode (the outermost and least privileged mode)
Supervisor mode
Executive mode
Kernel mode (the innermost and most privileged mode)
You can use the DCL commands DEFINE or ASSIGN to create logical names in the first three modes (user, supervisor, and executive). By specifying different access modes for each logical name definition, you can equate the same logical name to different equivalence strings in the same logical name table. Note that you must have SYSNAM or SYSPRV privileges to create logical names in executive mode in any logical name table.
User Mode
Logical names created in user mode are temporary. Define a logical name in user mode when you want to use it only for the execution of the next command or image.
$ DEFINE/USER_MODE ADDRESSES DISK1:[SAM.ACCOUNTS]OVERDUE.LIS
$ RUN PAYABLE
Supervisor Mode
When you use the DEFINE command without specifying a mode, DCL creates the logical name in supervisor mode.
$ DEFINE ACCOUNTS DISK1:[ACCOUNTS]CURRENT.DAT
$ DEFINE/EXECUTIVE_MODE ACCOUNTS DISK1:[JANE.ACCOUNTS]OBSOLETE.DAT
Executive Mode
In looking up logical names, all privileged images and utilities such as LOGINOUT bypass the user mode and supervisor mode names and tables. If a logical name is to be used by a privileged image, including a utility, it must be defined in executive or kernel mode in an executive or kernel mode table. Other candidates for logical names defined in executive mode are the names of public directories used by your work group and system resources, such as print queues and system disks.
Kernel Mode
Only the operating system and privileged programs can create logical names in kernel mode.
11.3.6. Creating Logical Node Names
You can use a logical node name in place of a network node name or in place of a node name and an access control string. Once you define a logical node name, you can use it to avoid typing (and displaying) your user name and password on the screen.
Do not begin the logical name with an underscore (_).
End the equivalence string with a double colon (::) and enclose it in quotation marks (" ").
Use two sets of quotation marks ("" "") where you want quotation marks to appear in the access control string.
For information about access control strings, see Section 3.1.6, ''Network Node Names'', Section 3.1.12, ''Access Control String Format'', and Section 10.5, ''Accessing Files Across Networks'' in this manual.
Specify a logical name that contains 1 to 255 characters.
Caution
Do not place a DEFINE command that includes a password in a file (your login command procedure, for example). If others read the file, they will see the password.
$ DEFINE BOS "BOSTON""ADAMS OLMEKIKA""::"
11.3.6.1. Using Logical Node Names in File Specifications
A file specification can contain both a logical node name (which the system translates at the local node) and a logical device name (which the system translates at the remote node). If you use a logical name to represent a node name only, you must include a double colon (::) when you use the logical name in the node position of a file specification.
After the system translates a logical node name at the local node, it parses the rest of the file specification to determine whether the format is valid.
$ DEFINE NYC NEWYRK::
$ TYPE NYC::DOC:[PERKINS]TERM_PAPER.DAT
11.3.6.2. Overriding Access Control Strings
To override the access control string in a logical node name, specify both the logical name and an access control string in the command line.
$ DEFINE BOS "BOSTON""ADAMS OLMEKIKA""::"
$ TYPE BOS"REVERE HTEBAZILE"::RIDE.DAT
$ DEFINE TORONTO "TRNTO""TEST EIZNEKCAM""::"
$ DEFINE TEST1 "TORONTO""TEST NAMWENLUAP""::DBA1:"
$ TYPE TEST1:PROC.DAT
TRNTO"TEST NAMWENLUAP"::DBA1:PROC.DAT
11.3.7. Creating Multiple Logical Names for the Same Object
$ DEFINE $TERMINAL LTA69
$ DEFINE CONSOLE LTA69
11.4. Deleting Logical Names
To delete a logical name, use the DEASSIGN command. When you define logical names in your process and job logical name tables, they are not deleted until your process terminates or they are explicitly deleted by user actions. However, if you specify the /USER_MODE qualifier to the DEFINE command, the logical name is defined in the process logical name table and deleted automatically after executing the next command image.
To delete a logical name ending with a colon, specify two colons. The DEASSIGN command, like the ASSIGN command, removes one colon before it searches the logical name table for a match.
11.5. Logical Name Translation
When the system reads a file specification or device name in a DCL command line, it examines the file specification or device name to see whether the leftmost component is a logical name. If the leftmost component ends with a colon, space, comma, or a line terminator (for example, Enter), the system attempts to translate it as a logical name. If the leftmost component ends with any other character, the system does not attempt to translate it as a logical name.
$ TYPE PUP Enter$ TYPE DISK:PUP Enter$ TYPE [DRYSDALE]PUP Enter11.5.1. Iterative Translation
Logical name translation can be iterative: after the system translates a logical name, it repeats the translation process for any logical names it finds contained within the first logical name.
The system limits the number of levels to which it performs logical name translation. The number of levels varies among system facilities but it is at least nine. If you define more than the system-determined number of levels or if you create a circular definition, an error occurs when the logical name is used.
$ DEFINE DISK DUA1:
$ DEFINE MEMO DISK:[JEFF.MEMOS]COMPLAINT.TXT
DUA1:[JEFF.MEMOS]COMPLAINT.TXT
11.5.2. Missing Fields Filled in with System Defaults
When the system translates a logical name, it fills in any missing fields in a file specification with the current default device, directory, and version number. When you use a logical name to specify the input file for a command, the command uses the logical name to assign a file specification to the output file as well.
If the equivalence string contains a file name and file type, the output file is given the same file name and file type. If the equivalence string does not contain a file type, a default file type is supplied. The file type supplied depends on the command you are using.
When you use logical names in a list of input files, the equivalence string of each logical name provides a temporary default.
$ SET DEFAULT  DBA2:[CASEY]
$ DEFINE MAL DBA1:[MALCOLM]
$ DEFINE HIG [HIGGINS]
$ PRINT ALPHA,MAL:BETA,HIG:GAMMA
- DBA2:[CASEY]ALPHA.LIS
- DBA1:[MALCOLM]BETA.LIS
- DBA1:[HIGGINS]GAMMA.LIS
11.5.3. Default Search Order for Logical Name Translations
Identical logical names can exist in more than one logical name table. When the system translates a logical name in a file specification, it searches a list of logical name tables until it finds a match. The system uses the first match it finds.
The list of logical name tables that are searched is specified in the definition of the logical name LNM$FILE_DEV. The default list consists of the process, job, group, system, and clusterwide system logical name tables. The search order is the same (process, job, group, system, and clusterwide system).
You can modify the search order, as described in Section 11.11, ''Modifying the Order of Logical Name Translations ''.
11.6. Displaying Logical Names
Use the SHOW LOGICAL command to display logical names and their equivalence strings.
Sometimes the definition of a logical name includes another logical name. The SHOW LOGICAL command performs iterative translations. It then displays both the equivalence string and the level of translation. Level numbers are zero based; that is, 0 is the first level, 1 is the second, and so on. To display only the first translation found for a specified logical name, use the SHOW TRANSLATION command. For more information, refer to the VSI OpenVMS DCL Dictionary.
$ SHOW LOGICAL SYS$INPUT
"SYS$INPUT" = "_TTB4:" (LNM$PROCESS_TABLE)
$ SHOW LOGICAL MYDISK
  "MYDISK" = "WORK4" (LNM$PROCESS_TABLE)
1 "WORK4" = "$255$DUA17:" (LNM$SYSTEM_TABLE)
$ SHOW LOGICAL WORKFILE
"WORKFILE" = "DISK2:[WALSH.REPORTS]WORK_SUMMARY.DAT" (LNM$PROCESS_TABLE)
The system displays the logical name, its translation, and the name of the table that contains the logical name.
11.6.1. Specifying a Logical Name Table to Search
By default, the SHOW LOGICAL command searches your process, job, group, system, and clusterwide system tables and displays all matches. However, you can specify a particular logical name table to be searched using the /TABLE qualifier. You can also use the /GROUP, /SYSTEM, /JOB, and /PROCESS qualifiers to display the logical names in the group, system, job, and process logical name tables, respectively.
$ SHOW LOGICAL/TABLE=LNM$PROCESS
(LNM$PROCESS_TABLE)
  "DECW$DISPLAY" = "_WSA30:"
  "SYS$COMMAND" = "_FIFI$VTA65:"
  "SYS$DISK" [super] = "WORK1:"
  "SYS$DISK" [exec] = "WORK1:"
  "SYS$ERROR" = "_FIFI$VTA65:"
  "SYS$INPUT" = "_FIFI$VTA65:"
  "SYS$OUTPUT" [super] = "_FIFI$VTA65:"
  "SYS$OUTPUT" [exec] = "_FIFI$VTA65:"
  "TT" = "_VTA65:"
11.6.2. Displaying Translation Attributes and Access Modes
$ SHOW LOGICAL/FULL SYS$ERROR
  "SYS$ERROR" [exec] = "_PADRAIC$TDA824:" [terminal] (LNM$PROCESS_TABLE)
This example displays the logical name SYS$ERROR in executive mode and shows the translation attribute, terminal.
11.7. Creating and Using Search Lists
When a logical name is equated to several equivalence strings in a single DEFINE (or ASSIGN) command, a search list is created.
If the search list contains only a device, the original default directory is searched.
If the search list contains a device and a directory, both are used to construct a complete file specification.
The system translates the logical name, in the order in which you specified the equivalence strings, until it finds a match.
The command affects only the first file found. At that point, the search ends. If a match is not found, the system reports an error only on the last file it attempts to find.
Note that a search list is not a wildcard; it is a list of places to look.
$ DEFINE GETTYSBURG [JONES.HISTORY],[JONES.WORKFILES]
$ SHOW LOGICAL GETTYSBURG

  "GETTYSBURG" = "[JONES.HISTORY]" (LNM$PROCESS_TABLE)
= "[JONES.WORKFILES]"$ TYPE GETTYSBURG:SPEECH.TXT DISK1:[JONES.HISTORY]SPEECH.TXT;2 Fourscore and seven years ago, our fathers brought forth on this continent a new nation, conceived in liberty, and dedicated to the proposition that all men are created equal. ⋮
Once the TYPE command finds a file named SPEECH.TXT, it ends the search and displays the file.
11.7.1. Using Search Lists with Commands That Accept Wildcards
You can use a search list with a command that accepts wildcards. When you use wildcards, the system forms file specifications by using each equivalence string in the search list. The command operates on each file specification that identifies an existing file.
$ DIRECTORY GETTYSBURG:SPEECH.TXT;*

Directory DISK1:[JONES.HISTORY]

SPEECH.TXT;2     SPEECH.TXT;1

Total of 2 files.

Directory DISK1:[JONES.WORKFILES]

SPEECH.TXT;1

Total of 1 file.

Grand total of 2 directories, 3 files.
$ DIRECTORY SYS$MANAGER:LOGIN.COM,SYS$LOGIN
$ DIRECTORY SYS$MANAGER:LOGIN.COM;,SYS$LOGIN
11.7.2. Using a Search List with the SET DEFAULT Command
When you specify a search list as the first part of the parameter for the SET DEFAULT command, the system assigns the search list name, untranslated, to SYS$DISK. SYS$DISK is a logical name that translates to your default disk. Note that when you specify a search list as the first part of a parameter for the SET DEFAULT command, each equivalence string in the search list must contain a device name.
$ DEFINE FIFI DISK1:[FRED],DISK2:[GLADYS],DISK3:[MEATBALL.SUB]
$ DIRECTORY FIFI:MEMO.LIS
DISK1:[FRED]MEMO.LIS
DISK2:[GLADYS]MEMO.LIS
DISK3:[MEATBALL.SUB]MEMO.LIS
$ SHOW DEFAULT
  DISK2:[MEATBALL.SUB]
$ DEFINE FIFI DISK1:[FRED], DISK2:[GLADYS], DISK3:
$ SET DEFAULT FIFI
$ SHOW DEFAULT
  FIFI:[MEATBALL.SUB]
=   DISK1:[FRED]
=   DISK2:[GLADYS]
=   DISK3:[MEATBALL.SUB]
11.7.3. Using a Search List with the RUN Command
When the RUN command is followed by a search list, the system forms file specifications as described previously. However, the system then checks to see whether any of the files in the list are installed images. The system runs the first file in the search list that is an installed image. Then, the RUN command terminates.
If none of the file specifications are installed images, the system repeats the process of forming file specifications. This time it looks for each file specification on the disk. It runs the first file it finds there. An error message is displayed if none of the specified files is found either in the known file list or on the disk.
11.7.4. Search Order for Multiple Search Lists
A file specification can contain more than one search list. When this occurs, each item in the file name search list is used, while the first device name is held constant. After all the items in the file name search list are combined with the first device name, they are then combined with the second device name. This process continues until each device has been searched.
You can also have iterative (nested) search lists when one name in a search list translates to another search list. If this occurs, the system uses each name in a sublist before continuing to the next upper-level name.
$ DEFINE FILE CHAP1.RNO, CHAP2.RNO
$ DEFINE DISK WORK1:[ROSE], WORK2:[THORN]
$ SET DEFAULT DISK
$ DIRECTORY FILE

Directory WORK1:[ROSE]

CHAP1.RNO;2          CHAP2.RNO;1

Total of 2 files.

Directory WORK2:[THORN]

CHAP1.RNO;1          CHAP2.RNO;1

Total of 2 files.

Grand total of 2 directories, 4 files.
The directory listing for each file name is given, first for WORK1:[ROSE] and second for WORK2:[THORN].
$ DEFINE NESTED FRED.DAT, NEW_LIST, RICKY.DAT
$ DEFINE NEW_LIST ETHEL.DAT, LUCY.DAT
- FRED.DAT
- ETHEL.DAT
- LUCY.DAT
- RICKY.DAT
11.8. Logical Name Table Characteristics
Scope (whether it is shareable or process-private)
Access mode
Name
Parent logical name table
Access control (shareable logical name tables only)
Quota (to limit the amount of pool occupied by its logical names)
During system initialization, several shareable logical name tables are created. When a new process is created, the system creates several other tables, shareable and process-private, for that process. All these tables are shown in Table 11.1, ''Default Logical Name Tables''.
The access mode of a logical name table can be specified when it is created. If not specified, the mode defaults to the access mode from which the table creation was requested, typically supervisor or user mode. A logical name table can contain logical names of its own access mode and of less privileged access modes. A logical name table can be the parent table to another table of the same or less privileged access mode.
A logical name table is identified by its name, which is itself a logical name. As a logical name, each name table name must be contained within a logical name table.
11.8.1. Logical Name Table Directories
Process directory, LNM$PROCESS_DIRECTORY
The process directory contains the names of all process-private tables for that process and its own table name. Each process has its own process-private directory.
System directory, LNM$SYSTEM_DIRECTORY
The system directory contains the names of all shareable tables and its own table name. There is only one LNM$SYSTEM_DIRECTORY per system.
These directories contain names that translate iteratively to table names. All logical name table names and any logical names that translate to tables are kept in these directories.
The parent table of a logical name table is not necessarily a directory table. That is, this hierarchical structure is distinct from the location of logical name table names.
11.8.2. Displaying the Structure of Directory Tables
$ SHOW LOGICAL/STRUCTURE
(LNM$PROCESS_DIRECTORY)
    (LNM$PROCESS_TABLE)
(LNM$SYSTEM_DIRECTORY)
    (LNM$SYSTEM_TABLE)
    (LMF$LICENSE_TABLE)
    (LNM$CLUSTER_TABLE)
        (LNM$SYSCLUSTER_TABLE)
    (LNM$GROUP_000123)
    (LNM$JOB_824E98E0)
            .
            .
            .
This example shows the logical name table names that reside in each logical name table directory. It also shows the relationship between LNM$CLUSTER_TABLE and LNM$SYSCLUSTER_TABLE.
11.9. Default Logical Name Tables
|
Table Name |
Full Table Name |
Logical Name |
Description |
|---|---|---|---|
|
Process Logical Name Tables | |||
|
Process Directory |
LNM$PROCESS_DIRECTORY |
(No other logical name) |
Contains definitions of process-private logical name table names and names that translate iteratively to table names. |
|
Process Table |
LNM$PROCESS_TABLE |
LNM$PROCESS |
Contains process-private logical names, such as SYS$DISK and SYS$INPUT. |
|
Shareable Logical Name Tables | |||
|
System Directory |
LNM$SYSTEM_DIRECTORY |
(No other logical name) |
Contains definitions of shareable logical name table names and names that translate iteratively to table names. |
|
System Table |
LNM$SYSTEM_TABLE |
LNM$SYSTEM |
Contains names shared by all processes in the system, for example, SYS$LIBRARY and SYS$SYSTEM. |
|
Clusterwide System Table |
LNM$SYSCLUSTER_TABLE |
LNM$SYSCLUSTER |
Contains names shared by all processes in an OpenVMS Cluster system. |
|
Clusterwide Parent Table |
LNM$CLUSTER_TABLE |
LNM$CLUSTER |
The parent table for all clusterwide logical name tables, including LNM$SYSCLUSTER_TABLE. |
|
Group Table |
LNM$GROUP_gggggg? |
LNM$GROUP |
Contains names shared by all processes in that UIC group. |
|
Job Table |
LNM$JOB_xxxxxxxx? |
LNM$JOB |
Contains names shared by all processes in the job tree, for example, SYS$LOGIN and SYS$SCRATCH. |
11.9.1. Process Logical Name Directory
|
Name |
Description |
|---|---|
|
LNM$GROUP |
Group logical name defined as LNM$GROUP_gggggg, where gggggg represents your group number. LNM$GROUP_gggggg? is the logical name table used by your UIC group. The table LNM$GROUP_gggggg is cataloged in the system directory table. Therefore, LNM$GROUP is a logical name that translates iteratively to the name of your group logical name table. |
|
LNM$JOB |
Job logical name that is defined as LNM$JOB_xxxxxxxx, where xxxxxxxx? represents a number unique to your job tree. LNM$JOB_xxxxxxxx is the logical name table used by your job. The table LNM$JOB_xxxxxxxx is cataloged in the system directory table. Therefore, LNM$JOB is a logical name that translates iteratively to the name of your job logical name table. |
|
LNM$PROCESS |
Process logical name that translates iteratively to LNM$PROCESS_TABLE, which is the name of your process logical name table. |
|
LNM$PROCESS_DIRECTORY |
Name of your process directory logical name table. |
11.9.2. Process Logical Name Table
Every process on the system has a process logical name table named LNM$PROCESS_TABLE. The names in your process table are available only to your process and any subsequent subprocesses. When you log in, the system creates logical names for your process and places them in your process table.
$CREATE/NAME_TABLE APPLICATION_NAMES
$DEFINE/TAB=LNM$PROCESS_DIRECTORY LNM$PROCESS APPLICATION_NAMES,
LNM$PROCESS_TABLE
|
Name |
Description |
|---|---|
|
SYS$COMMAND |
The initial file (usually your terminal) from which DCL reads input. A file from which DCL reads input is called an input stream. The command interpreter uses SYS$COMMAND to "remember" the original input stream. |
|
SYS$DISK |
The default device established at login or changed by the SET DEFAULT command. |
|
SYS$ERROR |
The default device or file to which DCL writes system error messages generated by warnings, errors, and severe errors. |
|
SYS$INPUT |
The default file from which DCL reads input. |
|
SYS$NET |
The source process that invokes a target process in DECnet for OpenVMS task-to-task communication. When opened by the target process, SYS$NET represents the logical link over which that process can exchange data with its partner. SYS$NET is defined only during task-to-task communication. |
|
SYS$OUTPUT |
The default file (usually your terminal) to which DCL writes output. A file to which DCL writes output is called an output stream. |
|
TT |
The default device name for terminals. |
11.9.3. System Logical Name Directory
|
Name |
Description |
|---|---|
|
LNM$CLUSTER |
Logical name of clusterwide parent table that translates iteratively to LNM$CLUSTER_TABLE. |
|
LNM$DCL_LOGICAL |
DCL logical name that is defined as LNM$FILE_DEV. LNM$DCL_LOGICAL translates iteratively into the list of logical name tables searched and displayed by the SHOW LOGICAL command, the SHOW TRANSLATION command, and the F$TRNLNM lexical function. By default, these commands search and display the process, job, group, system, and clusterwide system logical name tables, in that order. |
|
LNM$DIRECTORIES |
Directory logical name that is defined as LNM$PROCESS_DIRECTORY and LNM$SYSTEM_DIRECTORY. |
|
LNM$FILE_DEV |
Logical name for the search list that is defined as the list of logical name tables searched by the system when processing a file specification. Defined as LNM$PROCESS, LNM$JOB, LNM$GROUP, and LNM$SYSTEM, the system searches the process, job, group, system, and clusterwide system logical name tables, in that order. |
|
LNM$GROUP |
Group logical name that is defined for your group table, LNM$GROUP_gggggg.? |
|
LNM$JOB |
Job logical name that is defined as LNM$JOB_xxxxxxxx.? |
|
LNM$PERMANENT_MAILBOX |
Permanent mailbox logical name that is defined as LNM$SYSTEM. Logical names associated with permanent mailboxes are entered in the logical name table to which the logical name LNM$PERMANENT_MAILBOX iteratively translates. |
|
LNM$SYSCLUSTER |
Logical name for the clusterwide system logical name table that translates iteratively to LNM$SYSCLUSTER_TABLE. |
|
LNM$SYSTEM |
System logical name table name that translates iteratively to LNM$SYSTEM_TABLE, LNM$SYSCLUSTER. |
|
LNM$TEMPORARY_MAILBOX |
Temporary mailbox logical name that is defined as LNM$JOB. Logical names associated with temporary mailboxes are entered in the logical name table to which the logical name LNM$TEMPORARY_MAILBOX iteratively translates. |
11.9.4. Shareable Logical Name Tables
Clusterwide system table
Clusterwide parent table
Group table
Job table
System table
Clusterwide System Table, LNM$SYSCLUSTER_TABLE
LNM$SYSCLUSTER_TABLE is the name of the clusterwide system logical name table. This table contains logical names that are available to all users of the cluster.
You can reference LNM$SYSCLUSTER_TABLE indirectly through the name LNM$SYSCLUSTER. An indirect reference allows you to redefine LNM$SYSCLUSTER as multiple equivalence names and thus include your own tables in it.
Clusterwide Parent Table, LNM$CLUSTER_TABLE
LNM$CLUSTER_TABLE is the parent table for all clusterwide logical name tables, including LNM$SYSCLUSTER_TABLE. Use the logical name LNM$CLUSTER to refer to it.
Group Table, LNM$GROUP_gggggg
The name for your group table is LNM$GROUP_gggggg (gggggg represents your user identification code [UIC] group number). The names in this table are available to all users with the same UIC group number. Every group on the system has a corresponding group logical name table.
You can reference LNM$GROUP_gggggg indirectly through the name LNM$GROUP. An indirect reference allows you to redefine LNM$GROUP_gggggg as multiple equivalence names and thus include your own tables in it. It also eliminates the need to remember your UIC group number and ensures that you are using the most recently defined table.
Job Table, LNM$JOB_xxxxxxxx
The name for your job table is LNM$JOB_xxxxxxxx (xxxxxxxx represents the job information block [JIB] address defined by the system for your job tree).
Your job table contains logical names that are available to all processes in your job tree – your process and any of your subprocesses. There is one job table for each job tree in the system. A job table is shareable so that all processes in a job tree can access it.
You can reference LNM$JOB_xxxxxxxx indirectly through the name LNM$JOB. This indirect reference allows you to redefine LNM$JOB as multiple equivalence names and thus include your own tables in it. Furthermore, by using LNM$JOB, you do not have to locate the JIB address, and you can be sure that you are using the most recently defined job table.
SYS$LOGIN
Your default device and directory when you log in.
SYS$LOGIN_DEVICE
Your default device when you log in.
SYS$REM_ID
For jobs initiated through a DECnet for OpenVMS network connection, the identification of the process on the remote node from which the job was originated. On an OpenVMS operating system, if proxy logins are enabled, this identification is the process's user name; if proxy logins are not enabled, this is the process identification (PID) number. Proxy logins to proxy accounts allow users to access files across the network without specifying an access control string.
SYS$REM_NODE
For jobs initiated through a DECnet for OpenVMS network connection, the name of the remote node from which the job was originated.
SYS$SCRATCH
Default device and directory to which temporary files are written.
System Table, LNM$SYSTEM_TABLE
The name of the system table is LNM$SYSTEM_TABLE. The system table contains logical names that are available to all users of the system at the system level.
The system table is usually referred to indirectly through LNM$SYSTEM, which is defined as the search list LNM$SYSTEM_TABLE, LNM$SYSCLUSTER. Use the name LNM$SYSTEM to include system names local to this node and system names common to all nodes on the cluster.
|
Name |
Description |
Default Address |
|---|---|---|
|
DBG$INPUT |
Default input stream for the OpenVMS Debugger, equated to SYS$INPUT at the process level |
Not applicable |
|
DBG$OUTPUT |
Default output stream for the OpenVMS Debugger, equated to SYS$OUTPUT at the process level |
Not applicable |
|
SYS$COMMON |
Device and directory name for the common part of SYS$SYSROOT |
SYS$SYSDEVICE:[SYSn.SYSCOMMON.], where n is the root directory number of your processor |
|
SYS$ERRORLOG |
Device and directory name of error log data files |
SYS$SYSROOT:[SYSERR] |
|
SYS$EXAMPLES |
Device and directory name of system examples |
SYS$SYSROOT:[SYSHLP.EXAMPLES] |
|
SYS$HELP |
Device and directory name of system help files |
SYS$SYSROOT:[SYSHLP] |
|
SYS$INSTRUCTION |
Device and directory name of system instruction data files |
SYS$SYSROOT:[SYSCBI] |
|
SYS$LIBRARY |
Device and directory name of system libraries |
SYS$SYSROOT:[SYSLIB] |
|
SYS$LOADABLE_IMAGES |
Device and directory of operating system executive loadable images, device drivers, and other executive-loaded code |
SYS$SYSROOT:[SYS$LDR] |
|
SYS$MAINTENANCE |
Device and directory name of system maintenance files |
SYS$SYSROOT:[SYSMAINT] |
|
SYS$MANAGER |
Device and directory name of system manager files |
SYS$SYSROOT:[SYSMGR] |
|
SYS$MESSAGE |
Device and directory name of system message files |
SYS$SYSROOT:[SYSMSG] |
|
SYS$NODE |
Network node name for the local system if DECnet for OpenVMS is active on the system and you are connected to a network |
Not applicable |
|
SYS$PROCDMP |
Directory (set by user) into which image dumps are to be written |
No default setting |
|
SYS$SHARE |
Device and directory name of system shareable images |
SYS$SYSROOT:[SYSLIB] |
|
SYS$SPECIFIC |
Device and directory name for node-specific part of SYS$SYSDEVICE |
SYS$SYSDEVICE:[SYSn.], where n is the root directory number of your processor |
|
SYS$STARTUP |
Device and directory name of system startup files |
A search list that points first to SYS$SYSROOT:[SYS$STARTUP] and then to SYS$MANAGER |
|
SYS$SYSDEVICE |
System disk containing system directories |
Usually SYS$DISK |
|
SYS$SYSROOT |
Device and root directory for system directories |
A search list that points first to SYS$SYSDEVICE:[SYSn.], where n is the root directory number of your processor, and then points to SYS$COMMON |
|
SYS$SYSTEM |
Device and directory of operating system programs and procedures |
SYS$SYSROOT:[SYSEXE] |
|
SYS$TEST |
Device and directory name of User Environment Test Package (UETP) files |
SYS$SYSROOT:[SYSTEST] |
|
SYS$UPDATE |
Device and directory name of system update files |
SYS$SYSROOT:[SYSUPD] |
11.9.5. Default Protection of Shareable Logical Name Tables
|
Table Type |
Table Name |
Default Protection |
|---|---|---|
|
Job Table |
LNM$JOB_xxxxxxxx? |
SYSTEM=RWCD, OWNER=RWCD, GROUP=NO ACCESS, WORLD=NO ACCESS |
|
Group Table |
LNM$GROUP_gggggg? |
SYSTEM=RWCD, OWNER=R, GROUP=R, WORLD=NO ACCESS |
|
System Table |
LNM$SYSTEM_TABLE |
SYSTEM=RWC, OWNER=RWC, GROUP=R, WORLD=R |
|
Clusterwide System Table |
LNM$SYSCLUSTER_TABLE |
SYSTEM=RWC, OWNER=RWC, GROUP=R, WORLD=R |
|
Clusterwide Parent Table |
LNM$CLUSTER_TABLE |
SYSTEM=RWC, OWNER=RWC, GROUP=R, WORLD=R |
|
User-Created Table |
User Specified |
SYSTEM=RWCD, OWNER=RWCD, GROUP=NO ACCESS, WORLD=NO ACCESS |
11.9.6. Privilege and Access Requirements for Managing Shareable Logical Names
|
Table Where Name Resides |
Table Name |
Task |
Privilege or Access Type Required |
|---|---|---|---|
|
Job Table |
LNM$JOB_xxxxxxxx? |
Create or delete logical name |
WRITE (W) access to the table where the name will be created, or from where it will be deleted |
|
Read (translate) logical name |
READ (R) access to the table where the name resides | ||
|
Group Table |
LNM$GROUP_gggggg? |
Create or delete logical name |
WRITE (W) access to the table where the name will be created, or from where it will be deleted, or GRPNAM privilege |
|
Read (translate) logical name |
READ (R) access to the table where the name resides | ||
|
System Table |
LNM$SYSTEM_TABLE |
Create or delete logical name |
System UIC group number (between 0 and the value of system parameter MAXSYSGROUP), or SYSNAM privilege |
|
Read (translate) logical name |
READ (R) access to the table where the name resides | ||
|
Clusterwide System Table |
LNM$SYSCLUSTER_TABLE |
Create or delete logical name |
System UIC group number (between 0 and the value of system parameter MAXSYSGROUP), or SYSNAM privilege |
|
Read (translate) logical name |
READ (R) access to the table where the name resides | ||
|
Clusterwide Parent Table |
LNM$CLUSTER_TABLE |
Create or delete logical name |
System UIC group number (between 0 and the value of system parameter MAXSYSGROUP) |
|
Read (translate) logical name |
READ (R) access to the table where the name resides | ||
|
User-created Table |
User Specified |
Create or delete logical name |
WRITE (W) access to the table where the name will be created, or from where it will be deleted |
|
Read (translate) logical name |
READ (R) access to the table where the name resides |
11.10. Creating Logical Name Tables
The CREATE/NAME_TABLE command creates a logical name table and catalogs it in one of the directory logical name tables. Logical names that identify logical name tables or that translate iteratively to logical name tables must always be entered into one of the directory logical name tables.
11.10.1. Creating Process-Private Logical Name Tables
To create a logical name table that is private to your process, create the table in LNM$PROCESS_DIRECTORY (the default).
A name in a directory table can contain 1 to 31 characters. Only uppercase alphanumeric characters, the dollar sign ($), and the underscore (_) are valid. If you specify a lowercase table name, it is automatically converted to uppercase.
$ CREATE/NAME_TABLE TAX
$ DEFINE/TABLE=TAX CREDIT [ACCOUNTS.CURRENT]CREDIT.DAT
$ SHOW LOGICAL/TABLE=TAX CREDIT

 "CREDIT" = "[ACCOUNTS.CURRENT]CREDIT.DAT"  (TAX)
$ DEFINE/TABLE=LNM$PROCESS_DIRECTORY LNM$PROCESS LNM$PROCESS_TABLE, TAX
11.10.2. Creating Shareable Logical Name Tables
$ CREATE/NAME_TABLE/PARENT_TABLE=LNM$SYSTEM_DIRECTORY NEWTAB
11.10.3. Creating Clusterwide Logical Name Tables
You can create a clusterwide logical name table in the same way that you create other shareable logical name tables. A clusterwide logical name table is a special type of shareable logical name table and is subject to the privilege and access requirements that apply to all shareable logical name tables (see Section 11.10.4, ''Privilege and Access Requirements'').
$ CREATE/NAME_TABLE/PARENT_TABLE=LNM$CLUSTER_TABLE -
_$ new_clusterwide_logical_name_table$ DEFINE/TABLE=new_clusterwide_logical_name_table logical_name - _$ equivalence_string
11.10.4. Privilege and Access Requirements
$ CREATE/NAME_TABLE APPX_FILE_LOCATOR /PARENT=LNM$SYSTEM_DIRECTORY - _$ /PROTECTION = (S:RWD,O:RWD,G:R,W:R)
CREATE (C) access to the parent table
SYSPRV privilege or WRITE (W) access to LNM$SYSTEM_DIRECTORY
DELETE (D) access to the table
SYSPRV privilege or WRITE (W) access to LNM$SYSTEM_DIRECTORY
11.10.5. Modifying the Default Protection
The operating system provides default protection for the shareable logical name tables that it creates and that users create. The default protection is stored in security profiles that a system manager or table owner can modify. For more information, see the VSI OpenVMS Guide to System Security.
Using the /PROTECTION qualifier with the DCL CREATE/NAME_TABLE command. This command lets you set UIC-based protection.
Applying ACL protection to a table already created with the ACL editor or with the SET SECURITY/ACL/OBJECT_TYPE=LOGICAL_NAME_TABLE command.
ACLs for shareable logical name tables are not saved between system boots. You must reestablish ACLs on these logical name tables every time the system is booted.
For more information about applying ACL protection to a shareable logical name table, refer to the SET SECURITY/ACL command in the VSI OpenVMS DCL Dictionary.
11.10.6. Establishing Quotas for Logical Name Tables
Quotas are used to limit the amount of system resources that a given logical name table can consume. The process, group, and system logical name tables have an infinite quota. By default, when you create a logical name table, it too has an unlimited quota.
You can specify a quota to limit the size, in bytes, of a logical name table that you create. Before a logical name is created, the size of its data structure is checked against the quota remaining for the table. If there is insufficient quota available for the new entry, the system displays an error message.
Once you set the quota for a table, you cannot change it. If the table runs out of room, use the DEASSIGN command to delete old logical names. This frees space for your new logical names.
$ CREATE/NAME_TABLE/QUOTA=500 ABC
11.10.6.1. Setting Job Table Quotas
The JTQUOTA value established for the user in the system user authorization file SYSUAF.DAT (if the first image activated by the process was the system image LOGINOUT).
The PQL$_JTQUOTA quota list value specified in the call to the Create Process ($CREPRC) system service.
The /JOB_TABLE_QUOTA qualifier value on the RUN command used to create the detached process.
The SYSGEN parameter PQL_DJTQUOTA (if none of the preceding conditions applies). The standard default value for this parameter is 1024 bytes; however, the system manager can change it. The System Generation utility (SYSGEN) can be used to display and set the values of the parameters PQL_DJTQUOTA (default job logical name table quota) and PQL_MJTQUOTA (minimum job logical name table quota).
A quota value of 0 for a job logical name table means there is no quota. For all practical purposes, the quota is unlimited.
11.11. Modifying the Order of Logical Name Translations
LNM$FILE_DEV defines both the logical name tables that will be searched and the search order for all logical name translations. Generally, you do not need to modify the default search order. However, you may want to add the name of a new, process-private logical name table to be searched first, before the tables specified by LNM$FILE_DEV. Similarly, system managers may want to add the names of one or more shareable logical name tables to be searched before the tables specified by LNM$FILE_DEV.
Create a file that contains the new logical names.
Convert this new file to a new logical name table.
Create a private definition of LNM$FILE_DEV by specifying the process logical name directory table as the parent table.
Add the new logical name table name to the beginning of the table name list in the private definition of LNM$FILE_DEV.
$ CREATE/NAME_TABLE NEWTAB $ DEFINE/TABLE=LNM$PROCESS_DIRECTORY LNM$FILE_DEV - _$ NEWTAB, LNM$PROCESS, LNM$JOB, LNM$GROUP, LNM$SYSTEM
The process-private definition of LNM$FILE_DEV is used instead of the default system version.
Within LNM$FILE_DEV, NEWTAB is listed before the other logical name tables.
To add a new logical name table to the system definition of LNM$FILE_DEV, you must have SYSNAM or SYSPRV privileges.
$ CREATE/NAME_TABLE/PARENT=LNM$SYSTEM_DIRECTORY NEWTAB $ DEFINE/TABLE=LNM$SYSTEM_DIRECTORY LNM$FILE_DEV - _$ NEWTAB, LNM$PROCESS, LNM$JOB, LNM$GROUP, LNM$SYSTEM
$ DEFINE/TABLE=LNM$PROCESS_DIRECTORY - _$ LNM$FILE_DEV LNM$PROCESS,LNM$SYSTEM
11.12. Deleting Logical Name Tables
To delete a logical name table, specify the table that contains it (the system or process directory logical name table) and the name of the table. All logical names in descendant tables (and the descendant tables themselves) are deleted when you delete a parent logical name table.
To delete a shareable logical name table, you must have DELETE access to the table or SYSPRV privilege.
$ DEASSIGN WORKFILE
$ DEASSIGN/TABLE=LNM$PROCESS_DIRECTORY TAX
11.13. Process-Permanent Logical Names
DCL creates process-permanent logical names when you log in. These names remain defined for the life of your process. You cannot deassign these logical names. You can redefine them (by specifying a different equivalence string in a DEFINE command), but if the redefined name is later deassigned, the process-permanent name is reestablished.
SYS$INPUT
Logical name that refers to the default input device or file
SYS$OUTPUT
Logical name that refers to the default output device or file
SYS$ERROR
Logical name that refers to the default device or file to which the system writes messages
SYS$COMMAND
Logical name that refers to the value of SYS$INPUT when you log in
11.13.1. Equivalence Name Differences Between Interactive and Batch Processing
When you use the system interactively, DCL equates SYS$INPUT, SYS$OUTPUT, SYS$ERROR, and SYS$COMMAND to your terminal. However, when you execute command procedures and submit batch jobs, DCL creates new equivalence strings for these logical names.
SYS$INPUT is equated to the command procedure. Therefore, DCL obtains data from the command procedure. This assignment is temporary. After the command procedure terminates, SYS$INPUT regains its original value.
SYS$OUTPUT, SYS$COMMAND, and SYS$ERROR remain equated to the terminal.
SYS$INPUT and SYS$COMMAND are equated to the batch job command procedure.
SYS$OUTPUT and SYS$ERROR are equated to the batch job log file.
When you nest command procedures (that is, when you write a command procedure that executes other command procedures), the equivalence string for SYS$INPUT changes to point to the command procedure that is currently executing. However, the equivalence strings for SYS$OUTPUT, SYS$ERROR, and SYS$COMMAND remain the same unless you explicitly change them.
In addition, when you enter a command that opens a file, DCL opens the file as a process-permanent file. For example, if you open a file with the OPEN command, this file is opened as a process-permanent file. The file remains open until you explicitly close the file or until you log out.
Process-permanent files are stored in a special area in memory. Note that if you keep a large number of files open at the same time, you can exhaust this area. If this occurs, close some of the files (or log out).
11.13.2. Redirecting File I/O Using Process-Permanent Logical Names
You can use process-permanent logical names to redirect file I/O. In command procedures, you can use these names to read data from the terminal and to display data (see Chapter 13, "Introduction to Command Procedures" and Chapter 14, "Advanced Programming with DCL"). Note that DCL ignores new definitions for SYS$INPUT and SYS$COMMAND.
In OpenVMS Version 7.1, the DCL PIPE command was introduced. The PIPE command is an alternate way to redirect file I/O. For information about the PIPE command, refer to the VSI OpenVMS DCL Dictionary: N–Z.
11.13.2.1. Redefining SYS$INPUT
You can redefine SYS$INPUT so that an image, invoked by a command procedure, reads input from the terminal or another file. Because DCL always obtains input from the default input stream, DCL ignores a redefinition of SYS$INPUT.
In the following example, the commands are part of a new command procedure file. The DEFINE command redefines SYS$INPUT to SYS$COMMAND. SYS$COMMAND refers to the terminal, the initial input stream when you logged in. With this new definition, the image invoked by the command procedure obtains input from the terminal rather than from the command procedure file (the default) but only for a certain period.
$ DEFINE/USER_MODE SYS$INPUT SYS$COMMAND $ EDIT/TPU MYFILE.DAT ⋮
11.13.2.2. Redefining SYS$OUTPUT
You can redefine SYS$OUTPUT to redirect output from your default device to another file. When you redefine SYS$OUTPUT, the system opens a file with the name you specify in the logical name assignment. When you define SYS$OUTPUT, all subsequent output is directed to the new file.
Remember to deassign SYS$OUTPUT. Otherwise, output will continue to be written to the file you specified. Note that you can redefine SYS$OUTPUT in user mode (with DEFINE/USER_MODE) to redirect output from an image. This definition is in effect only until the next command image is executed. Once the command image is executed (that is, the output is captured in a file), the logical name SYS$OUTPUT resumes its default value.
When you log in, the system creates two logical names called SYS$OUTPUT. One name is created in executive mode; the other name is created in supervisor mode. You can supersede the supervisor mode logical name by redefining SYS$OUTPUT. If you deassign the supervisor mode name, the system redefines SYS$OUTPUT in supervisor mode, using the executive mode equivalence string. You cannot deassign the executive mode name.
When you redefine SYS$OUTPUT to a file, the logical name contains only the device portion of the file specification even though the output is directed to the file you specify.
If the system cannot open the file you specify when you redefine SYS$OUTPUT, it displays an error message.
After you redefine SYS$OUTPUT, most commands direct output to the existing version of the file. However, certain commands create a new version of the file before they write output.
$ DEFINE SYS$OUTPUT MYFILE.LIS $ SHOW DEVICES
$ DEFINE SYS$OUTPUT TEMP.DAT $ SHOW LOGICAL SYS$OUTPUT $ SHOW TIME $ DEASSIGN SYS$OUTPUT $ TYPE TEMP.DAT "SYS$OUTPUT" = "DISK1:" (LNM$PROCESS_TABLE) 06-MAY-1996 13:26:53
When SYS$OUTPUT is redefined, the equivalence string contains the device name DISK1, not the full file specification.
11.13.2.3. Redefining SYS$ERROR
You can redefine SYS$ERROR to direct error messages to a specified file. However, if you redefine SYS$ERROR so it is different from SYS$OUTPUT (or if you redefine SYS$OUTPUT without also redefining SYS$ERROR), DCL commands send informational, warning, error, and severe error messages to both SYS$ERROR and SYS$OUTPUT. Therefore, you receive these messages twice—once in the file indicated by the definition of SYS$ERROR and once in the file indicated by SYS$OUTPUT. Success messages are sent only to the file indicated by SYS$OUTPUT.
DCL commands and images, which use standard error display mechanisms, send error messages to both SYS$ERROR and SYS$OUTPUT even when SYS$ERROR is different from SYS$OUTPUT. However, if you redefine SYS$ERROR, then run an image that references SYS$ERROR, the image sends error messages only to the file indicated by SYS$ERROR. This is true even if SYS$ERROR is different from SYS$OUTPUT.
11.13.2.4. Redefining SYS$COMMAND
Although you can redefine SYS$COMMAND, DCL ignores your definition. DCL always uses the default definition for your initial input stream. However, if you execute an image that references SYS$COMMAND, the image can use your new definition.
Chapter 12. Defining Symbols, Commands, and Expressions
A symbol is a name that represents a numeric, character, or logical value (such as true or false). When you use a symbol in a DCL command line, DCL replaces the symbol with its value before executing the command.
Entering DCL command lines that include parameters, multiple qualifiers, and values can make for much typing and can be time-consuming. To simplify your interaction with DCL and to save time, you can establish symbols to use in place of commands you type frequently.
You can also use symbols in command procedures to collect, store, and manipulate certain types of data. For more information on command procedures, see Chapter 13, "Introduction to Command Procedures" and Chapter 14, "Advanced Programming with DCL".
Using symbols
Displaying symbols
Using symbols with other symbols
Using symbols to store and manipulate data
Character strings
Using numeric values and expressions
Using logical values and expressions
Converting value types in expressions
Understanding symbol tables
Masking the value of symbols
Understanding symbol substitution
The three phases of command processing
An alternative to using symbols: automatic foreign commands
The VSI OpenVMS DCL Dictionary, for additional information about symbols and their usage
The VSI OpenVMS Command Definition, Librarian, and Message Utilities Manual, for additional information about defining new commands
12.1. About Symbols
As synonyms for commands, parameters, or command lines. Instead of typing a long command line, you can create a symbol to use instead.
To define a foreign command, which allows you to execute an image by entering only the symbol name. The command is "foreign" because it is unknown to DCL.
In command procedure files, to perform programming tasks such as conditional execution and substitution of variables.
You can use symbols as variables in expressions or to pass parameters to and from command procedures. In addition, DCL commands such as READ, WRITE, and INQUIRE use symbols to refer to data records.
$ WORK :== SET DEFAULT DISK1:[JONES.WORK] $ WORK $ SHOW DEFAULT DISK1:[JONES.WORK]
12.1.1. Comparing Logical Names and Symbols
|
Characteristic |
Logical Names |
Symbols |
|---|---|---|
|
Function |
Represent device, directory, file, queue, and other system object specifications. |
Represent commands or portions of command strings. |
|
Usage |
Are used in place of any complete device, directory, file, queue or other system object specification. Logical names must be used as part of a command string parameter to be passed to the file system for translation. |
Are used in place of any command string. Symbols must be used as the first word in a command string to be translated by the command language interpreter. |
|
Storage |
Are stored in your process, job, group, or system logical name table. See Section 11.10, ''Creating Logical Name Tables''. |
Are stored in your global or local symbol table. See Section 12.10, ''Understanding Symbol Tables''. |
|
Creation |
Use either the ASSIGN or DEFINE command to create a logical name. See Section 11.3, ''Creating Logical Names''. |
Use an assignment statement (= or ==) to create a symbol. See Section 12.2, ''Using Symbols''. |
|
Display |
Use either the SHOW LOGICAL or SHOW TRANSLATION command to display a logical name. See Section 11.6, ''Displaying Logical Names''. |
Use the SHOW SYMBOL command to display a symbol. See Section 12.3, ''Displaying Symbols''. |
|
Deletion |
Use the DEASSIGN command to delete a logical name. See Section 11.4, ''Deleting Logical Names''. |
Use the DELETE/SYMBOL command to delete a symbol. See Section 12.2.5, ''Deleting Symbols''. |
12.2. Using Symbols
You can create two types of symbols, local and global. Local symbols are accessible from the current command level and from command procedures executed from the current command level. Global symbols are accessible at all command levels.
You can define a symbol with a character string, a number, a lexical function, a logical value, or another symbol. The symbol name can be 1 to 255 characters long and must begin with a letter, an underscore (_), or a dollar sign ($). In a symbol name, both lowercase and uppercase letters are treated as uppercase.
To create a symbol, use the assignment statement (= or ==) or the string assignment (:= or :==). When you use the string assignment, all alphabetic characters are converted to uppercase and multiple spaces and tabs are compressed to a single space. You can use string assignments to create a symbol that represents a DCL command or to define a foreign command (note that in either case, there is a 255-character limit). To continue a character string over two lines in a string assignment, use a single hyphen.
You can also create symbols by using the READ and INQUIRE commands (see Chapter 13, "Introduction to Command Procedures" and Chapter 14, "Advanced Programming with DCL").
Creating Local Symbols
$ SS = "SHOW SYMBOL"
$ DB := DIRECTORY ACCOUNTS:[BOLIVAR]
Creating Global Symbols
$ DC == "DIRECTORY/SIZE=ALL DISK1:[JONES.TAX]MONEY.LIS"
$ READY :== PRINT/CONFIRM/QUEUE=AKI$LN03/NOTIFY/RESTART $ READY FILE.DAT
12.2.1. Using Symbols to Represent DCL Commands
You can define a symbol to represent a DCL command in your login command file (LOGIN.COM) or interactively at DCL level. When you define the symbol in your login command file, you can use the symbol each time you log in; when you define the symbol interactively, you can use the symbol only during the current process.
If you define a symbol with the same name as a DCL command, your definition overrides the DCL command name. For example, if you define the symbol HELP as the command TYPE HELP.LST, you can no longer invoke the system's Help utility by typing HELP.
12.2.2. Symbol Abbreviation
Use the asterisk (*) to create a symbol that can be abbreviated. Generally, you can use abbreviated symbol definitions in any situation that allows a symbol to be used. Symbols that involve substring replacement are an exception. See Section 12.6.5, ''Replacing Substrings'' for more information.
Note that existing symbols might be superseded. If an existing symbol exactly matches the new symbol at or past the asterisk, the new symbol replaces the existing symbol. In addition, you cannot define another symbol whose name partly matches the existing symbol at or past the asterisk.
$ PR*INT = "PRINT/CONFIRM/QUEUE=AKI$LN03/NOTIFY/RESTART"
To execute the DCL command PRINT with the specified qualifiers, you can enter the symbol or any of its abbreviations.
12.2.3. Defining Foreign Commands
If you equate the file specification of a non-DCL image to a symbol, you can run the image by typing the symbol name. A symbol that runs an image is referred to as a foreign command. A foreign command is an image that is not recognized by the command interpreter as a DCL command. Note that, like each element of a DCL command, a foreign command has a 255-character limit.
The formats for defining a symbol as a foreign command are as follows:
symbol-name :=[=] $image-file-spec symbol-name =[=] "$image-file-spec"
Note that when the dollar sign ($) precedes a file specification at the beginning of a symbol definition, without any space between the dollar sign and the file specification, the request to run the image is implied.
For the image file specification, the default device and directory name is SYS$SYSTEM, the default file type is .EXE, and the default file version number is the highest version.
An alternative to using a foreign command is to define new commands with the Command Definition utility. Refer to the VSI OpenVMS Command Definition, Librarian, and Message Utilities Manual for more information.
There is also a method for executing foreign commands automatically, without specifying symbols. See Section 12.14, ''An Alternative to Using Symbols: Automatic Foreign Commands'' for more information.
$ PRINTALL :== $[ACCOUNTS]PRINTALL
In a command line, PRINTALL could be followed by a parameter.
$ PRINTALL RAT.DAT
12.2.4. Symbol Substitution
The command interpreter looks for symbols enclosed by apostrophes (’) and translates them. Thus, if you use symbols or lexical functions preceded by apostrophes to specify parameters, symbol substitution occurs (see Section 12.12, ''Understanding Symbol Substitution''). Otherwise, the command interpreter does not parse the line. The image must obtain the parameter and perform any parsing or evaluation of the command line.
12.2.5. Deleting Symbols
$ DELETE/SYMBOL/GLOBAL TEMP
12.3. Displaying Symbols
The SHOW SYMBOL command displays the values of symbols. To display the value of a particular symbol, enter the SHOW SYMBOL command followed by the name of the symbol. To display the value of a particular global symbol, include the /GLOBAL qualifier. The SHOW SYMBOL/ALL command displays all local symbols. The command SHOW SYMBOL/ALL/GLOBAL displays all global symbols.
Note that when a symbol has an integer value, the SHOW SYMBOL command displays the value in decimal, hexadecimal, and octal notation.
$ SHOW SYMBOL PR PR*INT = "PRINT/CONFIRM/COPIES=2/QUEUE=DOC$LN03/NOTIFY/RESTART"
$ SHOW SYMBOL TOTAL TOTAL = 4 Hex = 00000004 Octal = 00000000004
12.4. Using Symbols with Other Symbols
After you define a symbol, you can use it as part of the definition of another symbol. DCL interprets a symbol as a character string or a number, depending on the context in which you use the symbol.
$ COUNT = 3
$ TOTAL = COUNT + 1
The result (4) is equated to the symbol TOTAL.
12.4.1. Symbol Concatenation
You can concatenate several symbols to create a long character string by using the plus sign (+). You can also concatenate two or more symbols by placing apostrophes (’) around each symbol name.
For more information about requesting symbol substitution, see Section 12.12.2, ''Symbol Substitution Operators''.
$ DAY1 = "Saturday, " $ DAY2 = "Sunday" $ WEEKEND = DAY1 + DAY2 $ SHOW SYMBOL WEEKEND WEEKEND = "Saturday, Sunday"
$ NAME = "MYFILE" $ TYPE = ".DAT" $ PRINT 'NAME''TYPE'
The PRINT command prints a copy of MYFILE.DAT.
12.4.2. Including Symbols in String Assignments
To include a local symbol in a string assignment, use a colon and an equal sign (:=). To include a global symbol in a string assignment, use a colon and two equal signs (:==). For either type of symbol (local or global), enclose the symbol in apostrophes (’ ’). Otherwise, DCL will not recognize it as a symbol.
If you define a null character string for a symbol, that symbol has a value of 0.
$ BARK := P'COUNT'
In a previous example, COUNT was assigned the integer value 3. In this example, COUNT is converted to a string value and appended to the character P. The local symbol BARK now has the value P3.
$ A = "" $ B = 2 $ C = A + B $ SHOW SYMBOL C C = 2 Hex = 00000002 Octal = 00000000002
12.5. Using Symbols to Store and Manipulate Data
You can use symbols as variables in command procedures. Variables hold values that you calculate or assign as something other than a literal value. For example, you might assign the value of a lexical function to a variable or read the value of a file record into a variable.
An expression is a combination of values. In command procedures, expressions are used in symbol assignment statements (on the right side of the equal sign), in IF statements, in WRITE commands, and as arguments for lexical functions.
When you define a symbol, the left side of the assignment statement defines the symbol name; the right side of the assignment statement contains an expression. Each value (also called an operand) in an expression can be connected to another value by an operator. DCL evaluates the expression and assigns the result to the symbol. If an expression is evaluated as a character string, then the symbol has a string value.
$ BARK = 1 + 2 + 3
The operands are 1, 2, and 3. The operator is the plus sign (+). The evaluated expression is an integer, so the symbol has an integer value.
12.6. Character Strings
A character string can contain any characters that can be printed. Appendix A, "Character Sets" includes tables of the ASCII character set and the DEC Multinational character set. These tables list characters you can include in a character string.
Alphanumeric characters
The uppercase letters A to Z, lowercase letters a to z, digits 1 to 9, dollar sign ($), underscore (_), and hyphen (-).
Special characters
All other characters that can be displayed or printed: exclamation point (!), quotation marks ("), number sign (#), and so on.
Nonprintable characters
All characters that cannot be printed or displayed. In general, nonprintable characters are ignored for display and print purposes. However, several nonprintable characters serve control functions as follows:Character
Function
HT
Starts printing or typing at the next horizontal tab
LF
Starts printing or typing on the next line
FF
Starts printing or typing at the top of the next page
CR
Starts printing or typing at the first space on the same line
ESC
Introduces a terminal escape sequence
SP
Inserts one space
12.6.1. Defining Character Strings
To include quotation marks (") within a string, type two consecutive quotation marks.
To continue a character string over two lines, use a plus sign (for string concatenation) and a hyphen (for continuation).
You cannot use the hyphen continuation character within a quoted character string.
$ PROMPT = "Type ""YES"" or ""NO""" $ SHOW SYMBOL PROMPT PROMPT = "Type "YES" or "NO""
$ HEAD = "MONTHLY REPORT FOR" + - _$ " DECEMBER 1999" $ SHOW SYMBOL HEAD HEAD = "MONTHLY REPORT FOR DECEMBER 1999"
12.6.2. Character String Expressions
A character string expression can contain character strings, lexical functions that are evaluated as character strings, or symbols that have character string values. When you use a character string in an expression, you must enclose it in quotation marks (" "). If you do not use quotation marks, DCL processes the string as a symbol.
Character strings that must appear in quotation marks
Symbols that represent character strings
Lexical functions that are evaluated as character strings
If you perform an operation or comparison between a character string and a number, DCL converts the character string to a number.
String operands can be added (string concatenation), subtracted (string reduction), compared, or replaced with other character strings as described in the following subsections.
$ TEMP = "CAT"
$ TOPIC = "THE" + TEMP
$ COUNT = F$STRING(65)
12.6.3. Character String Operations
Concatenation — The plus sign concatenates two character strings.
Reduction — The minus sign removes the second character string from the first character string.
If the second character string occurs more than once in the first character string, only the first occurrence of the string is removed.
$ COLOR = "light brown" $ WEIGHT = "30 lbs." $ DOG2 = "No tag, " + COLOR + ", " + WEIGHT $ SHOW SYMBOL DOG2 DOG2 = "No tag, light brown, 30 lbs."
$ SHOW SYMBOL DOG2 DOG2 = "No tag, light brown, 30 lbs." $ DOG2 = DOG2 - ", 30 lbs." $ SHOW SYMBOL DOG2 DOG2 = "No tag, light brown"
12.6.4. Comparing Character Strings
When you compare two character strings, the strings are compared character by character. Strings of different lengths are not equal (for example, "dogs" is greater than "dog").
All the characters have been compared, in which case the strings are equal.
The first mismatch occurs.
|
Comparison |
Operator |
Description |
|---|---|---|
|
Equal to |
.EQS. |
Compares one character string to another for equality. |
|
Greater than or equal to |
.GES. |
Compares one character string to another for greater or equal value in the first specified string. |
|
Greater than |
.GTS. |
Compares one character string to another for a greater value in the first specified string. |
|
Less than or equal to |
.LES. |
Compares one character string to another for a lesser or equal value in the first specified string. |
|
Less than |
.LTS. |
Compares one character string to another for a lesser value in the first specified string. |
|
Not equal |
.NES. |
Compares one character string to another for inequality. |
- In the following example, the symbol TEST_NAME is evaluated as 0 (False); the value of the symbol LAST_NAME does not equal the literal "HILL":
$ TEST_NAME = LAST_NAME .EQS. "Hill" $ SHOW SYMBOL TEST_NAME TEST_NAME = 0 …
- In the following example, the symbol TEST_NAME is evaluated as 1 (True); the value of the symbol LAST_NAME is greater than or equal to the literal "HILL":
$ TEST_NAME = LAST_NAME .GES. "HILL" $ SHOW SYMBOL TEST_NAME TEST_NAME = 1 …
- In the following example, the symbol TEST_NAME is evaluated as 1 (True); the value of the symbol LAST_NAME is greater than the literal "HILL.":
$ TEST_NAME = LAST_NAME .GTS. "HILL" $
SHOW SYMBOL TEST_NAMETEST_NAME = 1 … - In the following example, the symbol TEST_NAME is evaluated as 0 (False); the value of the symbol LAST_NAME is not less than or equal to the literal "HILL":
$ TEST_NAME = LAST_NAME .LES. "HILL" $ SHOW SYMBOL TEST_NAME TEST_NAME = 0 …
- In the following example, the symbol TEST_NAME is evaluated as 0 (False); the value of the symbol LAST_NAME is not less than the literal "HILL":
$ TEST_NAME = LAST_NAME .LTS. "HILL" $ SHOW SYMBOL TEST_NAME TEST_NAME = 0 …
- In the following example, the symbol TEST_NAME is evaluated as 1 (True); the value of the symbol LAST_NAME does not equal the literal "HILL":
$ TEST_NAME = LAST_NAME .NES. "HILL" $ SHOW SYMBOL TEST_NAME TEST_NAME = 1 …
12.6.5. Replacing Substrings
symbol-name[offset,size] := replacement-string
symbol-name[offset,size] :== replacement-string
|
|
An integer that indicates the position of the replacement string relative to the first character in the original string. An offset of 0 means the first character in the symbol, an offset of 1 means the second character, and so on. |
|
|
An integer that indicates the length of the replacement string. |
The square brackets are required notation. No spaces are allowed between the symbol name and the left bracket.
Integer values for size and offset values can range from 0 to 768.
The replacement string must be a character string.
The symbol name you specify can be undefined initially. The assignment statement creates the symbol name and if necessary, provides leading or trailing spaces in the symbol value.
You can specify an offset and size to create a symbol that represents a blank line.
Lining up records in columns makes a list easier to read and sort. You can use this format to specify how you want data to be stored.
$ A := PACKRAT $ A[0,4] := MUSK $ SHOW SYMBOL A A = "MUSKRAT"
$ B[4,3] := RAT
$ LINE[0,80]:= " "
$ DATA[0,15] := 'NAME' $ DATA[17,1] := 'GRADE'
12.7. Using Numeric Values and Expressions
Decimal — the ASCII characters 0 to 9
Hexadecimal — the ASCII characters 0 to 9 and A to F
Octal — the ASCII characters 0 to 7
The number you assign to a symbol must be in the range –2147483648 to 2147483647 (decimal). An error is not reported if a number outside this range is specified or calculated but an incorrect value results.
12.7.1. Specifying Numbers
Positive numbers
Specify a positive number by typing the appropriate digits.
Negative numbers
Precede a negative number with a minus sign (−).
Radix
Specify a number in a radix other than decimal by preceding the number (but not the minus sign) with %X for hexadecimal numbers and %0 for octal numbers.
Fractions
A number cannot include a decimal point. In calculations, fractions are truncated. For example, 8 divided by 3 equals 2.
$ DOG_COUNT = 13 $ SHOW SYMBOL DOG_COUNT DOG_COUNT = 13 Hex = 0000000D Octal = 00000000015
$ BALANCE = -15237 $ SHOW SYMBOL BALANCE BALANCE = -15237 Hex = FFFFC47B Octal = 37777742173
$ DOG_COUNT = %XD $ SHOW SYMBOL DOG_COUNT DOG_COUNT = 13 Hex = 0000000D Octal = 00000000015 $ BALANCE = -%X3B85 $ SHOW SYMBOL BALANCE BALANCE = -15237 Hex = FFFFC47B Octal = 37777742173
12.7.2. Internal Storage of Numbers
Numbers are stored internally as signed 4-byte integers, called longwords; positive numbers have values of 0 to 2147483647 and negative numbers have values of 4294967296 minus the absolute value of the number. The number −15237, for example, is stored as 4294952059. Negative numbers are converted back to minus-sign format for ASCII or decimal displays; however, they are not converted back for hexadecimal and octal displays. For example, the number −15237 appears in displays as hexadecimal FFFFC47B (decimal 4294952059) rather than hexadecimal –00003B85.
Numbers are stored in text files as a series of digits using ASCII conventions (for example, the digit 1 has a storage value of 49).
In a numeric expression, the values involved must be literal numbers (such as 3) or symbols with numeric values. In addition, you can use a character string that represents a number (for example, "23" or "−51"). If you perform an operation or comparison between a number and a character string, DCL converts the character string to a number.
- Integers. For example:
$ COUNT = 1
- Lexical functions that are evaluated as integers. For example:
$ B = F$INTEGER("-9" + 23) - Symbols that have integer values. For example:
$ A = B - 6
In the preceding example, the symbol B represents the integer value returned by the F$INTEGER function (−923).
These integer operands can be connected by arithmetic, logical, and comparison operators, as described in the following sections.
12.7.3. Performing Arithmetic Operations
Multiplication
The asterisk (*) multiplies two numbers.
Division
The slash (/) divides the first specified number by the second specified number. If a number does not divide evenly, the remainder is lost. No rounding takes place.
Addition
The plus sign (+) adds two numbers.
Subtraction
The minus sign (-) subtracts the second specified number from the first specified number.
Unary plus and minus
The plus and minus signs change the sign of the number they precede.
Examples
- The following example demonstrates using multiplication when assigning a symbol:
$ BALANCE = 142 * 14 $ SHOW SYMBOL BALANCE BALANCE = 1988 Hex = 000007C4 Octal = 00000003704
- The following example demonstrates using division when assigning a symbol:
$ BALANCE = BALANCE / 14 $ SHOW SYMBOL BALANCE BALANCE = 142 Hex = 0000008E Octal = 00000000216
- The following example demonstrates using addition when assigning a symbol:
$ BALANCE = BALANCE + 37 $ SHOW SYMBOL BALANCE BALANCE = 179 Hex = 000000B3 Octal = 00000000263
- The following example demonstrates using subtraction when assigning a symbol:
$ BALANCE = BALANCE - 15416 $ SHOW SYMBOL BALANCE
BALANCE = -15237 Hex = FFFFC47B Octal = 00000142173 - The following example demonstrates using a unary minus sign to change the sign of the number −142:
$ BALANCE = -(- a142) $ SHOW SYMBOL BALANCE BALANCE = 142 Hex = 0000008E Octal = 00000000216
12.7.4. Comparing Numbers
|
Comparison |
Operator |
Description |
|---|---|---|
|
Equal to |
.EQ. |
Compares one number to another for equality. |
|
Greater than or equal to |
.GE. |
Compares one number to another for a greater or equal value in the first number. |
|
Greater than |
.GT. |
Compares one number to another for a greater value in the first number. |
|
Less than or equal to |
.LE. |
Compares one number to another for a lesser or equal value in the first number. |
|
Less than |
.LT. |
Compares one number to another for a lesser value in the first number. |
|
Not equal to |
.NE. |
Compares one number to another for inequality. |
- In the following example, TEST_BALANCE is evaluated as 1 (True); BALANCE equals − 15237:
$ TEST_BALANCE = BALANCE .EQ. -15237 $ SHOW SYMBOL TEST_BALANCE TEST_BALANCE = 1 …
- In the following example, TEST_BALANCE is evaluated as 1 (True); BALANCE is greater than or equal to −15237:
$ TEST_BALANCE = BALANCE .GE. -15237 $ SHOW SYMBOL TEST_BALANCE TEST_BALANCE = 1 …
- In the following example, TEST_BALANCE is evaluated as 0 (False); BALANCE is not greater than −15237:
$ TEST_BALANCE = BALANCE .GT. -15237 $ SHOW SYMBOL TEST_BALANCE TEST_BALANCE = 0 …
- In the following example, TEST_BALANCE is evaluated as 1 (True); BALANCE is less than or equal to −15237:
$ TEST_BALANCE = BALANCE .LE. -15237 $ SHOW SYMBOL TEST_BALANCE TEST_BALANCE = 1 …
- In the following example, TEST_BALANCE is evaluated as 0 (False); BALANCE is not less than −15237:
$ TEST_BALANCE = BALANCE .LT. -15237 $ SHOW SYMBOL TEST_BALANCE TEST_BALANCE = 0 …
- In the following example, TEST_BALANCE is evaluated as 0 (False); BALANCE equals −15237:
$ TEST_BALANCE = BALANCE .NE. -15237 $ SHOW SYMBOL TEST_BALANCE TEST_BALANCE = 0 …
12.7.5. Performing Numeric Overlays
symbol-name[bit-position,size] = replacement-expression
symbol-name[bit-position,size] == replacement-expression
|
|
An integer that indicates the location relative to bit 0 at which the overlay is to occur. |
|
|
An integer that indicates the number of bits to be overlaid. |
The square brackets ([]) are required notation. No spaces are allowed between the symbol name and the left bracket.
Literal values are assumed to be decimal.
The maximum length for size is 32 bits.
Replacement expression must be a numeric expression.
When symbol-name is either undefined or defined as a string, the result of the overlay is a string. Otherwise, the result is an integer.
$ BELL = 7 $ BELL[5,1] = 1 $ SHOW SYMBOL BELL BELL = 39 Hex = 00000027 Octal = 00000000047
12.8. Using Logical Values and Expressions
The following sections describe how to use logical values and expressions.
12.8.1. Logical Operations
True
A number has a logical value of true if it is odd (that is, the low-order bit is 1). A character string has a logical value of true if the first character is an uppercase or lowercase T or Y.
False
A number has a logical value of false if it is even (that is, the low-order bit is 0). A character string has a logical value of false if the first character is not an uppercase or lowercase T or Y.
$ STATUS = 1 $ IF STATUS THEN DOG_COUNT = 13
$ STATUS = "TRUE" $ IF STATUS THEN DOG_COUNT = 13
12.8.2. Logical Expressions
A logical operation affects all the bits in the number being acted upon. The values for logical expressions are integers, and the result of the expression is an integer as well. If you specify a character string value in a logical expression, the string is converted to an integer before the expression is evaluated.
.NOT.
The operator .NOT. reverses the bit configuration of a logical value. A true value becomes false and a false value becomes true.
.AND.
The operator .AND. combines two logical values as follows:Bit Level
Entity Level
1 .AND. 1 = 1
true .AND. true = true
1 .AND. 0 = 0
true .AND. false = false
0 .AND. 1 = 0
false .AND. true = false
0 .AND. 0 = 0
false .AND. false = false
.OR.
The operator .OR. combines two logical values as follows:Bit Level
Entity Level
1 .OR. 1 = 1
true .OR. true = true
1 .OR. 0 = 1
true .OR. false = true
0 .OR. 1 = 1
false .OR. true = true
0 .OR. 0 = 0
false .OR. false = false
$ SHOW SYMBOL STATUS STATUS = 1 Hex = 00000001 Octal = 00000000001 $ STATUS = .NOT. STATUS $ SHOW SYMBOL STATUS STATUS = -2 Hex = FFFFFFFE Octal = 37777777776
$ STAT1 = "TRUE" $ STAT2 = "FALSE" $ STATUS = STAT1 .AND. STAT2 $ SHOW SYMBOL STATUS STATUS = 0 Hex = 00000000 Octal = 00000000000
$ STAT1 = "TRUE" $ STAT2 = "FALSE" $ STATUS = STAT1 .OR. STAT2 $ SHOW SYMBOL STATUS STATUS = 1 Hex = 00000001 Octal = 00000000001
12.8.3. Logical Operation Results
|
Given That: |
The Results Are: | ||||
|---|---|---|---|---|---|
|
Bit A |
Bit B |
.NOT. A |
A .AND. B |
A .OR. B | |
|
1 |
1 |
0 |
1 |
1 | |
|
1 |
0 |
0 |
0 |
1 | |
|
0 |
1 |
1 |
0 |
1 | |
|
0 |
0 |
1 |
0 |
0 | |
|
Given That: |
The Results Are: | ||||
|---|---|---|---|---|---|
|
Number A |
Number B |
.NOT. A |
A .AND. B |
A .OR. B | |
|
odd |
odd |
even |
odd |
odd | |
|
odd |
even |
even |
even |
odd | |
|
even |
odd |
odd |
even |
odd | |
|
even |
even |
odd |
even |
even | |
12.8.4. Using Values Returned by Lexical Functions
Typically used in command procedures, lexical functions retrieve information from the system, including information about system processes, batch and print queues, and user processes. You can also use lexical functions to manipulate character strings and translate logical names. When you assign a lexical function to a symbol, the symbol is equated to the information returned by the lexical function (for example, a number or character string). At DCL level, you can then display that information with the DCL command SHOW SYMBOL. In a command procedure, the information stored in the symbol can be used later in the procedure. See Chapter 15, "Using Lexical Functions to Obtain and Manipulate Information" for additional information on lexical functions.
F$function-name(args[,...])
The argument list follows the function name with any number of intervening spaces and tabs.
Enclose the argument list in parentheses.
Within the list, specify arguments in exact order and separate them with commas; even if you omit an optional argument, do not omit the comma.
If no arguments are required, type an empty set of parentheses.
Follow the rules for writing expressions: enclose character strings in quotation marks; do not enclose integers, symbols, and lexical functions in quotation marks.
Use lexical functions the same way you would use character strings, integers, and symbols. When you use a lexical function in an expression, DCL automatically evaluates the function and replaces the function with its return value.
$ SUM = F$LENGTH("BUMBLEBEE") + 1
$ SHOW SYMBOL SUM
SUM = 10 Hex = 0000000A Octal = 00000000012Note that each lexical function returns information as either an integer or a character string. In addition, you must specify the arguments for a lexical function as either integer or character string expressions.
For example, the F$LENGTH function requires an argument that is a character string expression and it returns a value that is an integer. In a previous example, the argument "BUMBLEBEE" is a character string expression and the return value (9) is an integer.
You can use a lexical function in any position that you can use a symbol. In positions where symbol substitution must be forced by enclosing the symbol in apostrophes (see Section 12.12, ''Understanding Symbol Substitution''), lexical function evaluation must be forced by placing the lexical function within apostrophes. Lexical functions can also be used as argument values in other lexical functions.
- The following example shows a symbol that is used as an argument:
$ BUG = "BUMBLEBEE" $ LEN = F$LENGTH(BUG) $ SHOW SYMBOL LEN LEN = 9 Hex = 00000009 Octal = 00000000011
When you use the symbol BUG as an argument, do not place quotation marks around it. The lexical function automatically substitutes the value "BUMBLEBEE" for BUG, determines the length, and returns the value 9.
- The following example shows an argument that contains both a symbol and a character string:
$ BUG = "BUMBLEBEE" $ LEN = F$LENGTH(BUG) $ SHOW SYMBOL LEN LEN = 9 Hex = 00000009 Octal = 00000000011 $ LEN = F$LENGTH(BUG + "S") $ SHOW SYMBOL LEN LEN = 10 Hex = 0000000A Octal = 00000000012
The symbol BUG is not enclosed in quotation marks but the string "S" is. The argument must be evaluated before the F$LENGTH function can determine the length. The value represented by the symbol BUG ("BUMBLEBEE") is concatenated with the string "S"; the result is "BUMBLEBEES". The F$LENGTH function determines the length of the string "BUMBLEBEES" and returns the value 10.
- The following example uses another lexical function as the argument for the F$LENGTH function. The F$DIRECTORY function returns the name of your current default directory, including the square brackets. In the following example, the current default directory is [SALMON].
$ LEN = F$LENGTH(F$DIRECTORY()) $ SHOW SYMBOL LEN LEN = 8 Hex = 00000008 Octal = 00000000010
Do not place quotation marks around the F$DIRECTORY function when it is used as an argument; the function is automatically evaluated. The result of the F$DIRECTORY function must be returned before the F$LENGTH function can determine the length. Then, the F$LENGTH function determines the length of your default directory, including the square brackets.
12.8.5. Order of Operations
|
Precedence |
Operation |
|---|---|
|
7 |
Unary plus (+) and minus (–) |
|
6 |
Multiplication (*) and division (/) |
|
5 |
Addition (concatenation) and subtraction (reduction) |
|
4 |
All numeric and character comparisons |
|
3 |
Logical .NOT. operations |
|
2 |
Logical .AND. operations |
|
1 |
Logical .OR. operations |
If an expression contains operators that have the same order of precedence, the operations are performed from left to right. You can override the normal order of precedence (the order in which operation and comparison would be evaluated) by placing operations to be performed first in parentheses. Parentheses can also be nested.
$ RESULT = 4 * (6 + 2) $ SHOW SYMBOL RESULT RESULT = 32 Hex = 00000020 Octal = 00000000040
12.8.6. Evaluating Data Types
The result of DCL's evaluation of a symbol is either a character string or an integer value. The data type (character or integer) of a symbol is determined by the data type of the value currently assigned. The data type is not permanent: if the value changes data type, the symbol changes data type.
An expression has either an integer or a string value, depending on the types of values and the operators used.
$ NUM = "ABC" $ NUM = 2 + 5
any
value stands for a string or an integer.|
Expression |
ResultingValue Type |
|---|---|
|
Integer value |
Integer |
|
String value |
String |
|
Integer lexical function |
Integer |
|
String lexical function |
String |
|
Integer symbol |
Integer |
|
String symbol |
String |
|
+, −, or .NOT. any value |
Integer |
|
Any value .AND. or .OR. any value |
Integer |
|
String + or − string |
String |
|
Integer + or − any value |
Integer |
|
Any value + or − integer |
Integer |
|
Any value * or / any value |
Integer |
|
Any value (string comparison) any value |
Integer |
|
Any value (numeric comparison) any value |
Integer |
12.9. Converting Value Types in Expressions
All the operands in an expression must be of the same value data type before DCL can evaluate the expression. Values either have string or integer data types. String data includes character strings, symbols with string values, and lexical functions that return string values. Integer data includes integers, symbols with integer values, and lexical functions that return integer values. When an expression contains both number and string operands, DCL either converts all strings to integers or all integers to strings.
In general, if you use both string and integer values, the string values are converted to integers. The only exception is when DCL performs string comparisons. In these comparisons, integers are converted to strings.
F$TYPE — Determines the current value type of a symbol
F$INTEGER — Converts a string expression to an integer value
F$STRING — Converts an integer expression to a string value
12.9.1. Converting Strings to Integers
Strings containing numbers are converted to their integer values. For example, the string "45" is converted to the integer 45.
If a character string begins with T, t, Y, or y, it is converted to the integer 1.
If a string begins with any other letter, it is converted to the integer 0.
|
String |
Resulting Integer |
|---|---|
|
"123" |
123 |
|
"12XY" |
0 (False) |
|
"Test" |
1 (True) |
|
"hello" |
0 (False) |
12.9.2. Converting Integers to Strings
|
Integer |
Resulting String |
|---|---|
|
123 |
"123" |
|
1 |
"1" |
|
0 |
"0" |
12.10. Understanding Symbol Tables
Symbols are stored in local or global symbol tables, which are maintained by the operating system.
12.10.1. Local Symbol Tables
DCL maintains a local symbol table for your main process and for every command level that you create when you execute a command procedure, use the CALL command, or submit a batch job. When you create a local symbol, DCL places the symbol in the local symbol table for the current command level. As long as the command level is active, DCL maintains the local symbol table for that command level; when a command level is no longer active, its local symbol table (and all the symbols it contains) is deleted. See Chapter 16, "Understanding Processes and Batch Jobs" for more information about processes, command procedures, and batch jobs.
In addition to the local symbols you create, a local symbol table contains eight symbols that are maintained by DCL. These symbols, named P1, P2, and so on through P8, are used for passing parameters to a command procedure. Parameters passed to a command procedure are regarded as character strings. Otherwise, P1 to P8 are defined as null character strings (""). They are stored in the local symbol table.
12.10.2. Global Symbol Tables
DCL maintains only one global symbol table for the duration of a process and places all global symbols in that table. In addition to the global symbols you create, the global symbol table contains the reserved global symbols. These global symbols give you status information on your programs and command procedures as well as on system commands and utilities.
$STATUS Reserved Global Symbol
$STATUS is the condition code returned by the most recently executed command. The symbol $STATUS conforms to the format of an OpenVMS operating system message code. Applications programs can set the value of the global symbol $STATUS by including a parameter value to the EXIT command. The system uses the value of $STATUS to determine which message, if any, to display and whether to continue execution at the next higher command level. The value of the lowest three bits in $STATUS is placed in the global symbol $SEVERITY.
$SEVERITY Reserved Global Symbol
|
0 |
Warning |
|
1 |
Success |
|
2 |
Error |
|
3 |
Information |
|
4 |
Severe (fatal) error |
$RESTART Reserved Global Symbol
$RESTART has the value TRUE if a batch job was restarted after it was interrupted by a system failure. Otherwise, $RESTART has the value FALSE.
12.10.3. Symbol Table Search Order
The local symbol table for the current command level
Local symbol tables for each previous command level, searching backwards from the current level
The global symbol table
12.11. Masking the Value of Symbols
The following sections describe how to mask the value symbols.
12.11.1. SET SYMBOL Command
By default, all symbols (both global and local) defined in an outer command procedure level are accessible to inner procedure levels. However, you can isolate the local or global symbols in a command procedure from the symbols defined in other command procedures by using the SET SYMBOL command. The SET SYMBOL command masks the values of local and global symbols without deleting them. Thus, if a command procedure executes another command procedure, you can use the same symbol names in both procedures if you specify the SET SYMBOL command in the second procedure.
The SET SYMBOL command also controls whether DCL attempts to translate the verb string (the first word on the command line) as a symbol before processing the line. The default behavior is that the translation is attempted. The advantage to changing this behavior is that a command procedure is not affected by outer-procedure-level environments when it invokes a command.
12.11.2. Symbol Scoping State
The symbol scope is different for local and global symbols. When you exit a procedure level to return to a previous procedure, the symbol scoping context from the previous level is restored for both local and global symbols.
To display the current, general symbol scoping state, use the lexical function F$ENVIRONMENT("SYMBOL_SCOPE"). To display the current verb scoping state, use the lexical function F$ENVIRONMENT("VERB_SCOPE").
Local Symbol Scope
Local symbols are procedure-level dependent. If you define a local symbol in an outer procedure level, the symbol can be read (but not written to) at any inner procedure level. If you assign a value to a symbol that is local to an outer procedure level, a new symbol is created at the current procedure level. However, the symbol in the outer procedure level is not modified.
Procedure level 2 can read and write to level 2 local symbols only.
Procedure level 3 can read (but not write to) level 2 local symbols. Level 3 can also read and write to level 3 local symbols.
Procedure level 4 can read and write to level 4 local symbols only.
Global Symbol Scope
Global symbols are procedure-level independent. The current global symbol scoping context is applied subsequently to all procedure levels.
The /SCOPE=NOGLOBAL qualifier causes all global symbols to become inaccessible for all subsequent commands until either the /SCOPE=GLOBAL qualifier is specified or the procedure exits to a previous level at which global symbols were accessible. In addition, specifying the /SCOPE=NOGLOBAL qualifier prevents you from creating any new global symbols until the /SCOPE=GLOBAL qualifier is specified.
12.12. Understanding Symbol Substitution
In certain contexts, DCL uses a string of characters beginning with a letter as a symbol name or a lexical function. In these contexts, DCL tries to replace the symbol or lexical function with its value. Replacing a symbol with its current value is referred to as symbol substitution. If you use a symbol or lexical function in any other context, you must use a substitution operator to request symbol substitution.
On the right side of an assignment (=) statement
In an argument for a lexical function
In a DEPOSIT, EXAMINE, IF, or WRITE command
At the beginning of a command line when the string is not followed by an equal sign or a colon
In the brackets on the left side of an assignment statement when you are performing substring substitution or numeric overlays (see Section 12.6.5, ''Replacing Substrings'')
- In the following example, COUNT is automatically recognized and evaluated as a symbol:
$ TOTAL = COUNT + 1
- In the second line of this example, the symbol QUERY is automatically evaluated when it is used with the F$LENGTH function. In addition, the F$LENGTH function is automatically evaluated because it is on the right side of an assignment statement:
$ QUERY = "Have we met before?" $ LEN = F$LENGTH(QUERY) + 5 $ SHOW SYMBOL LEN LEN = 27 Hex = 0000001B Octal = 000033
- In the following example, the IF command uses both A and B as symbol names and uses their current values:
$ IF A .EQ. B THEN WRITE SYS$OUTPUT "DONE"
- In the second line of this example, the command interpreter automatically replaces PDEL with its current value and executes the resulting command:
$ PDEL = "DELETE SYS$PRINT/ENTRY=" $ PDEL 181
- In the following example, DCL automatically defines the symbol BELL as the value of 7 and then assigns a new value based on the bracketed values on the left side of the assignment statement.
$ BELL = 7 $ BELL[5,1] = 1 $ SHOW SYMBOL BELL BELL = 39 Hex = 00000027 Octal = 00000000047
12.12.1. Forced Symbol Substitution
$ TYPE 'B'
$ T = "TYPE ''B'"
Forced substitution
From left to right, DCL replaces all strings delimited by apostrophes (or double apostrophes for strings within quotation marks). Symbols preceded by single apostrophes are translated iteratively; symbols preceded by double apostrophes are not.
Automatic substitution
From left to right, DCL evaluates each value in the command line, executing it if it is a command and evaluating it if it is an expression. Symbols in expressions are replaced by their assigned values; this substitution is not iterative.
$ PN = "PRINT/NOTIFY" $ FILE1 = "[BOLIVAR]TEST_CASE.TXT" $ NUM = 1
$ FILE = "'FILE''NUM''" $ PN 'FILE'
In the first command, forced substitution causes NUM to become 1, making FILE’’NUM’ become FILE1. If you enter the command SHOW SYMBOL FILE, you see that FILE = " ’FILE1’ ".
$ PRINT/NOTIFY [BOLIVAR]TEST_CASE.TXT
12.12.2. Symbol Substitution Operators
Apostrophe (’)
Ampersand (&)
The difference between these two operators is the time when the substitution occurs. Symbols preceded by apostrophes are substituted during the first phase of DCL command processing; symbols preceded by ampersands are substituted during the second phase. For more information on the phases of command processing, see Section 12.13, ''The Three Phases of Command Processing''.
The Apostrophe (’)
The apostrophe (’) is the most frequently used substitution operator. Use it to request symbol substitution when you use a symbol in place of a command parameter or qualifier. Use the apostrophes to request symbol substitution on the right side of a string assignment (:=) statement.
To request symbol substitution within a quoted character string, place two apostrophes before the symbol name and one apostrophe after it.
When you use apostrophes to request symbol substitution, you cannot continue the line (with the hyphen continuation character) in the middle of the value that is being substituted.
$ LIT = "LIGHT.BILLS" $ TYPE 'LIT'
$ NAME := REPORT $ FILE := 'NAME'.DAT $ SHOW SYMBOL FILE FILE = "REPORT.DAT"
$ MESSAGE = "Creating file ''NAME'.DAT"
Creating file FRED.DAT
The Ampersand (&)
The ampersand (&) is also a substitution operator that the command interpreter recognizes. In many cases, the apostrophe and the ampersand perform the same function. Ampersands are most effective as substitution operators when they are used with apostrophes to affect the order in which substitution is performed.
The action the command interpreter takes when a symbol is undefined depends on the context of the command. For more information, see Section 12.13.5, ''Undefined Symbols''.
$ TYPE 'NAME' $ TYPE &NAME
$ P1 = "FRED.DAT" $ COUNT = 1 $ TYPE &P'COUNT'
TYPE &P1
TYPE FRED.DAT
$ TYPE 'P''COUNT'
TYPE 1
$ B = "MYFILE.DAT" $ A = "&B" $ TYPE 'A'
The ampersand (&) does not cause symbol substitution when it is used inside quotation marks (" "). Therefore, when the assignment is made, the value of B is not substituted. However, the TYPE command displays MYFILE.DAT. This occurs because the command interpreter first substitutes the value &B for A. Next, it substitutes MYFILE.DAT for the symbol &B. If you were to redefine B, the result of the TYPE command would change accordingly.
Place the ampersand before, but not after, the symbol name.
An ampersand must follow a delimiter (any blank or special character).
You cannot use ampersands to request substitution within character strings enclosed in quotation marks (" ").
You cannot use ampersands to concatenate two or more symbol names.
In general, do not use the ampersand for symbol substitution unless it is required to translate your symbols correctly.
12.13. The Three Phases of Command Processing
The command interpreter performs symbol substitution in three phases.
12.13.1. Phase 1: Command Input Scanning
In command input scanning (also called the lexical input phase), the command interpreter evaluates symbols preceded by apostrophes from left to right. Symbols that are preceded by single apostrophes are translated iteratively, as described in the section called “Phase 1 Substitution”. Symbols preceded by two apostrophes are not translated iteratively.
12.13.2. Phase 2: Command Parsing
The command interpreter analyzes the command line. It checks the first item on the line to see if it is a symbol. If it is, it is evaluated.
The command interpreter evaluates symbols preceded by ampersands from left to right.
Symbol substitution during this phase is not iterative.
12.13.3. Phase 3: Expression Evaluation
The command interpreter evaluates symbols that are preceded by the DEPOSIT, EXAMINE, IF, and WRITE commands.
The command interpreter evaluates symbols within lexical functions.
Symbol substitution during this phase is not iterative.
Note that the command interpreter does not scan any lines that are read as input data by commands or programs executed within a command procedure. Therefore, the command interpreter does not perform symbol substitution within these data lines.
$ RUN AVERAGE 55 57 9999
12.13.4. Repetitive and Iterative Substitution
Repetitive substitution results when more than one type of substitution occurs in a single command line.
Iterative substitution occurs when the command interpreter examines a substituted value to see if the value itself is a symbol. Iterative substitution occurs only when symbols preceded by apostrophes are translated during the first phase of command processing.
Phase 1 Substitution
When you use an apostrophe (’) to request symbol substitution, the command interpreter performs iterative substitution during the first phase of command processing.
Substitution using apostrophes is not iterative when a symbol is included in a quoted character string.
$ MAC = "5" $ A = "'MAC'" $ B = 'A' $ SHOW SYMBOL B B = 5 Hex = 00000005 Octal = 00000000005
The symbol name A is enclosed in apostrophes, so it is replaced with its current value (’MAC’).
Because this value (’MAC’) is also enclosed in apostrophes, the command interpreter replaces MAC with its current value (5).
Because this value (5) has no apostrophes, the first phase of command processing is complete. No further substitution is required during the second or third phases. Therefore, 5 is the final value given to the symbol name B.
$ B = "''A'" $ SHOW SYMBOL B B = "'MAC'"
In this case, B has the value ’MAC’. The symbol name A is replaced only once because substitution is not iterative within quoted character strings.
Phase 2 Substitution
The command interpreter performs iterative substitution automatically only when an apostrophe is in the command line. In some cases, you may want to nest command synonym definitions.
$ MAC = "TYPE A.B" $ EXEC = "'MAC'" $ EXEC
The result is the string ’MAC’. The command interpreter displays an error message because it does not recognize MAC as a command. This error occurs because during the first phase of command processing, no substitution is performed (the string EXEC is not delimited by apostrophes). During the second phase, the string ’MAC’ is substituted for EXEC because EXEC is the first value on the command line. This substitution is not iterative. Therefore, even though ’MAC’ is delimited by apostrophes, no additional substitution is performed.
$ 'EXEC'
In this case, the symbol EXEC is evaluated during the first phase of command processing. Because this substitution is iterative, (’MAC’) is also evaluated and the string TYPE A.B is substituted.
Phase 3 Substitution
The command interpreter performs all substitutions requested by apostrophes and ampersands before the command string is executed.
Commands that automatically perform symbol substitution do so after the first and second phases of command processing.
Note, however, that if substitution does not result in a valid symbol name, the command fails.
$ P1 = "FRED.DAT" $ COUNT = 1 $ IF P'COUNT' .EQS. "" THEN GOTO END
IF P1 .EQS. "" THEN GOTO END
Because this string has no apostrophes, the command interpreter does not perform any more substitution. However, when the IF command executes, it automatically evaluates the symbol name P1 and replaces it with its current value.
$ FILENAME = "A.B" $ IF 'FILENAME' .NES. "" THEN TYPE 'FILENAME'
IF A.B .NES. "" THEN TYPE A.B
$ IF FILENAME .NES. "" THEN TYPE 'FILENAME'
12.13.5. Undefined Symbols
During the first and second phases of command processing, the command interpreter replaces all undefined symbols that are preceded by apostrophes or ampersands with null strings.
During the third phase of command processing, if the command interpreter finds an undefined symbol, it displays a warning message and does not finish processing.
$ FILE := MYFILE'FILE_TYPE' $ SHOW SYMBOL FILE FILE = "MYFILE" $ PRINT 'FILE'
When the symbol FILE is created, the symbol FILE_TYPE is replaced with its current value. If FILE_TYPE is not defined, the command interpreter replaces FILE_TYPE with a null string. The absence of a file type in the file specification causes the PRINT command to use the default file type .LIS. Thus, the file specification is interpreted as MYFILE.LIS.
$ A = 1 $ C = A + B %DCL-W-UNDSYM, undefined symbol - check validity and spelling
The symbol B is undefined, so the command interpreter cannot evaluate the expression.
12.14. An Alternative to Using Symbols: Automatic Foreign Commands
You can also invoke a command procedure (.COM file type) or executable image (.EXE file type) from DCL level without defining a symbol for that procedure. Using automatic foreign commands, DCL can search a specific set of directories for a command procedure or executable image and run it automatically.
DCL-W-IVVERB, unrecognized command verb - check validity and spelling
However, if the logical name DCL$PATH is defined (and is not blank), DCL instead performs an RMS $SEARCH for any file that contains the invalid verb in its file name and DCL$PATH:.* as the default file specification.
If DCL finds a .COM or .EXE file, DCL will automatically execute that file with the rest of the command line as its parameters. This behavior is similar to the PATH options found in DOS, UNIX, and other operating systems.
$ SYSGEN %DCL-W-IVVERB, unrecognized command verb - check validity and spelling $ DEFINE DCL$PATH SYS$SYSTEM,SYS$DISK:[]FOO $ SYSGEN SHOW MAXPROCESSCNT Parameter Name Current Default Min. Max. Unit Dynamic -------------- ------- ------- ------- ------- ---- ------- MAXPROCESSCNT 157 32 12 8192 Processes
$ TYPE SS.COM $ SHOW SYMBOL/LOCAL/ALL $ EXIT $ SS "This is a parameter" P1 = "This is a parameter" P2 = "" P3 = "" P4 = "" P5 = "" P6 = "" P7 = "" P8 = "" $ SS.EXE "This is a parameter" P1 = ".EXE" P2 = "This is a parameter" P3 = "" P4 = "" P5 = "" P6 = "" P7 = "" P8 = ""
In the example, DCL locates SS.COM and acts like "SS" had been a symbol defined as "@SS.COM". The command procedure is activated with the rest of the command line parsed as parameters. Note that "SS.EXE" does not invoke the image SS.EXE, but instead invokes SS.COM with two parameters, the first being the text string ".EXE". This is consistent with the way command parsing and symbol substitution is performed by the OpenVMS operating system.
12.14.1. Using Automatic Foreign Commands
The logical name DCL$PATH can be a search-list type logical.
Only the node, device, and directory portions of each translation of the logical name are used.
Normal logical precedence takes place. Users can override a system definition of DCL$PATH by defining their own. If a system definition exists and the user does not want the feature, it can be turned off by overriding the logical with a definition of " ".
The set of valid characters for DCL verbs and symbol names differs from the set of valid characters for file names. For example, DCL symbols cannot contain a hyphen (-) or start with a dollar sign ($). If the image or procedure you wish to execute is not valid as a DCL symbol name, it cannot be directly invoked by this new feature.
DCL has not parsed the command. It is up to the image being invoked to perform its own command parsing. For C programs, use the "argc" and "argv" parameters to the main() routine. For programs written in other languages, call LIB$GET_FOREIGN to obtain the entire command line, which must then be parsed by the program.
If a directory contains both a command procedure and an executable image, whichever file is found first will be invoked. On OpenVMS systems, directories are in alphabetical order, so a ".COM" file will be found before a ".EXE" file. A network file specification in the DCL$PATH logical pointing to a node running some other operating systems could result in a ".EXE" file being found before a ".COM" file.
Because DCL performs the search with the invalid verb as the file specification and "DCL$PATH:.*" as the default file specification, it is possible to define a logical in such a way that a specific file is found. For example, if you define the logical FOO to be "FOO.EXE", and type "FOO" at the DCL prompt, you will never invoke FOO.COM, only FOO.EXE.
Caution
If you are a privileged user and set your default device and directory to other user accounts, you should not place "SYS$DISK:[]" in the definition of the DCL$PATH logical name. Doing so will cause DCL to search the current directory, where a typographical error or poor placement of the translation within the search list could cause user images in the current directory to be found and mistakenly invoked with privileges.
12.14.2. Automatic Foreign Command Restrictions
You cannot use automatic foreign commands on any versions of the OpenVMS operating system prior to Version 6.2.
Because new verbs can be added to the DCL command table at any time, a command that works with automatic foreign commands one day may not work at a later date.
- The automatic foreign commands feature does not work in all cases. In the following example, DCL (which looks only at the first four characters of any verb) finds a match with the SHOW verb (the first four letters of SHOWME) and executes the SHOW USERS command instead of the SHOWME.COM procedure. If you defined SHOWME as a DCL symbol, then the SHOWME command would invoke SHOWME.COM.
$ DEFINE DCL$PATH SYS$SYSTEM,SYS$DISK:[]FOO $ TYPE SHOWME.COM $ SHOW SYMBOL P1 $ EXIT $ SHOWME USERS OpenVMS User Processes at MARCH 2, 1999 01:40 PM Total number of users = 1, number of processes = 11 Username Interactive Subprocess Batch RSMITH 9 2
Chapter 13. Introduction to Command Procedures
A command procedure is a file that contains DCL commands and data lines used by DCL commands. Some simple command procedures might contain only one or two DCL commands; complex command procedures can function as sophisticated computer programs. When a command procedure runs, the DCL interpreter reads the file and executes the commands it contains.
If your system manager has set up a system login command procedure, it is executed whenever you log in. A system login command procedure lets your system manager ensure that certain commands are always executed when you and other users on the system log in.
After running the system login command procedure, the system runs your personal login command procedure, if one exists. Your personal login command procedure lets you customize your computing environment. The commands contained in it are executed every time you log in. When you log in, the system automatically executes up to two login command procedures (the systemwide login command procedure and your own login command procedure, if it exists).
The person who sets up your account might have placed a login command procedure in your top-level directory. If a login command procedure is not in your top-level directory, you can create one yourself. Name it LOGIN.COM and place it in your top-level directory. Unless your system manager tells you otherwise, the LOGIN.COM file that you create will run whenever you log in.
This chapter is divided into major sections that include the following:
Basic information for writing command procedures
Step-by-step procedure for writing command procedures
Executing command procedures
Exiting, interrupting, and error handling command procedures
Login command procedures
There are two types of DCL command procedures:Simple
Execute a series of DCL commands in the order in which they are written
Complex
Perform program-like functions
13.1. Basic Information for Writing Command Procedures
There are two ways to create command procedures:
Use a text editor such as EVE to create a new file
Use the DCL command CREATE to create a new file
The file that you create can contain command lines, labels, comments, conditional statements, and variables.
13.1.1. Default File Type
The default file type for command procedures is .COM. If you specify the .COM file type when you name a command procedure, you can execute the procedure by specifying the file name only. The SUBMIT and execute procedure (@) commands assume the file type is .COM unless you specify otherwise.
13.1.2. Writing Commands
The following are suggestions for including commands in command procedures:
Use complete names for commands and qualifiers. This will help to ensure that your command procedure is upwardly compatible to future releases of OpenVMS.
- Use continuation lines to make a procedure easier to read. Note that continuation lines do not begin with dollar signs. For example:
$ PRINT LAB.DAT - /AFTER=17:00 - /COPIES=20 - /NAME="COMGUIDE"
13.1.3. Writing Command Lines
When writing command lines:
You must use a dollar sign ($) to begin each line containing a command, comment, or label.
If you want to include a line containing data, omit the dollar sign ($) on that line.
- If you need to include a data line that begins with a dollar sign ($), use the DCL commands DECK and EOD. For example:
$ ! Everything between the commands DECK and EOD $ ! is written to the file WEATHER.COM $ ! $ CREATE WEATHER.COM $ DECK $ FORTRAN SUMMER $ LINK SUMMER $ RUN SUMMER $ EOD $ ! $ ! Now execute WEATHER.COM $ @WEATHER $ EXIT
Note that command lines that do not begin with a dollar sign might be correctly interpreted by DCL, but VSI strongly recommends that any DCL command line start with a dollar sign.
13.2. Using Labels in Command Lines
Labels are used in DCL command procedures to mark the beginning of loops, sections of code, or subroutines. Note the following rules when using labels:
Put labels on separate lines to make loops, subroutines, and conditional code more visible.
Use label names that contain fewer than 255 characters and no blank spaces.
Differentiate labels from commands by placing labels immediately after the dollar sign ($) and by preceding commands with spaces.
End each label with a colon.
You cannot delete labels.
13.2.1. Labels in Local Symbol Tables
As the command interpreter encounters labels, it enters them in a special section of the local symbol table. The amount of space available for labels is limited. If a command procedure uses many symbols and contains many labels, the command interpreter might run out of symbol table space and issue an error message. If this occurs, include the DELETE/SYMBOL command in your procedure to delete symbols as they are no longer needed. Note, however, that you cannot delete labels.
13.2.2. Duplicate Labels
If a command procedure uses the same label more than once, the new definition replaces the existing one in the local symbol table.
When duplicate labels exist, the GOTO command transfers control to the label that DCL has processed most recently. The GOTO command also uses the following rules when processing duplicate labels:
If all duplicate labels precede the GOTO command, control transfers to the label nearest the GOTO command.
If duplicate labels precede and follow the GOTO command, control transfers to the preceding label nearest the GOTO command.
If all duplicate labels follow the GOTO command, control transfers to the label nearest the GOTO command.
13.3. Using Comments in Command Procedures
It is good programming practice to include comments in command procedures. Comments can be helpful when updating or troubleshooting the command procedure. Comments can be used as follows:
At the beginning of a procedure to describe the procedure and the parameters passed to it.
At the beginning of each block of commands to describe that section of the procedure.
To separate command sequences with lines containing both a dollar sign and an exclamation point ($!). This makes it easier to see the outline of the command procedure. If you insert blank lines, the command interpreter interprets them as data lines and produces a message warning you that the data lines were ignored.
The following rules apply when writing comments in command procedures:Use an exclamation point (!) to indicate the beginning of a comment; the command interpreter ignores all text to the right of an exclamation point when the command procedure executes.
To include a literal exclamation point in a command line, enclose the exclamation point in quotation marks (" ").
13.4. How to Write Command Procedures
Before you begin writing a command procedure, perform the tasks interactively that the command procedure will execute. As you type the necessary commands, note any variables and conditionals that are used, and any iterations that occur.
The following sections contain the steps to write a simple command procedure. The example used throughout these sections is a command procedure called CLEANUP.COM. This procedure can be used to clean up a directory.
Definitions
Variable
Data that changes each time you perform a task.
Conditional
Any command or set of commands that can vary and therefore must be tested each time you perform the task.
Iteration
Any command or set of commands that are performed repetitively until a condition is met.
13.5. Steps for Writing Command Procedures
Follow these steps to write a command procedure:
| Step | Task |
|---|---|
| 1 | Design the command procedure. |
| 2 | Assign variables and test conditionals. |
| 3 | Add loops. |
| 4 | End the command procedure. |
| 5 | Test and debug the program logic. |
| 6 | Add cleanup tasks. |
| 7 | Finish the procedure. |
13.5.1. Step 1: Design the Command Procedure
| Step | Task |
|---|---|
| 1 | Decide which tasks your procedure will perform. |
| 2 | Determine any variables your command procedure will use and how they will be loaded. |
| 3 | Determine what conditionals the command procedure requires and how you will test them. |
| 4 | Decide how you will exit from the command procedure. |
| Command | Task Performed |
|---|---|
|
DIRECTORY |
Displays the contents of the current directory |
|
TYPE filespec |
Displays a file |
|
PURGE filespec |
Purges a file |
|
DELETE filespec |
Deletes a file |
|
COPY filespec new-filespec |
Copies a file |
Variables
Any data that changes when you perform a task is a variable. If you create or delete files in your directory, the file names will be different each time you clean your directory; therefore, the file names in CLEANUP.COM are variables.
Conditionals
Any command that must be tested each time you execute a command procedure is considered conditional. Because any or all of the commands in CLEANUP.COM might be executed, depending on the operation you need to perform, each command is conditional.
Design Decisions
|
Task |
How Accomplished |
|---|---|
|
Load variables |
The command procedure gets the file names from the terminal. |
|
Test conditionals |
The command procedure:
|
|
Exit from loop |
You must enter the EXIT command to exit from the loop. |
To make command procedures easier to understand and maintain, write statements so the procedures execute from the first command to the last command.
13.5.2. Step 2: Assign Variables and Test Conditionals
There are many ways to assign values to variables. In this section, we will discuss using the INQUIRE command. For additional methods, see Chapter 14, "Advanced Programming with DCL".
| Step |
Task |
|---|---|
| 1 |
Assign values to variables using the INQUIRE command. |
| 2 |
Determine which action should be taken. |
| 3 |
Test the conditional using IF and THEN statements. |
| 4 |
Write program stubs and insert them into the command procedure as placeholders for commands. |
| 5 |
Write error messages, if necessary. |
13.5.2.1. Using the INQUIRE Command
The INQUIRE command prompts for a value, reads the value from the terminal, and assigns the value to a symbol.
By default, the INQUIRE command:
Converts responses to uppercase
Replaces multiple blanks and tabs with a single space
Removes leading and trailing spaces
Performs apostrophe substitutions if the response includes symbols or lexical functions
The following command line is used in CLEANUP.COM to prompt the user for a command name. The INQUIRE command equates the value entered to the symbol COMMAND.$ INQUIRE COMMAND - "Enter command (DELETE, DIRECTORY, PRINT, PURGE, TYPE)"
13.5.2.2. Preserving Literal Characters
To preserve lowercase characters, multiple spaces and tabs when using the INQUIRE command, enclose your response in quotation marks (" "). To include quotation marks in your response, enclose the quoted text in quotation marks (""text"").
13.5.2.3. Testing Conditionals Using IF and THEN
After the INQUIRE command prompts for a variable, the command procedure must include a statement that determines what action is to be taken. For example, to determine which command to execute, you must include statements in the command procedure that check the command entered by the user against each possible command.
|
If... |
Then... |
|---|---|
|
a match is found, |
execute the command. |
|
a match is not found, |
go on to the next command. |
|
no match is found after all valid commands have been checked, |
output an error message. |
13.5.2.4. Writing Program Stubs
A program stub is a temporary section of code that you use in your procedure while you test the design. Usually, a program stub outputs a message stating the function that it is replacing. After the overall design works correctly, replace each stub with the correct coding.
Example: Assigning Variables and Testing Conditionals
$ INQUIRE COMMAND - "Enter command (DELETE, DIRECTORY, EXIT, PRINT, PURGE, TYPE)" $ IF COMMAND .EQS. "EXIT" THEN EXIT $! $! Execute if user entered DELETE $ DELETE: $ IF COMMAND .NES. "DELETE" THEN GOTO DIRECTORY
| This IF statement tests to see if the command that the user entered (COMMAND) is equal to "DELETE". If COMMAND is equal to DELETE, then the command procedure executes the next command. |
| This statement also includes a GOTO command. A GOTO command is used to change the flow of execution to a label in the procedure. In this case, the procedure will go to the DIRECTORY label if COMMAND is not equal to DELETE. |
| This statement is a program stub. After the logic of the command procedure is tested, this line will be replaced with the actual commands required for a DELETE operation. |
| This is the label for the DIRECTORY subroutine. Note that the labels that identify each command block are the same as the commands on the option list. This allows you to use the symbol COMMAND (which is equated to the user's request) in the GOTO statement. |
| This IF statement tests to see if the "TYPE" command was entered. If "TYPE" was entered, the procedure will output "This is the TYPE section." However, because this is the last command you will be testing for, if the command entered is not "TYPE," the program will display an error message. |
| If all commands have been tested and no valid command name is found, then the program will output, "You have entered an invalid command." |
13.5.3. Step 3: Add Loops
Obtains a value from user input
Processes the command
Repeats the process until the user exits the command procedure
| Step |
Action |
|---|---|
| 1 |
Begin the loop with a label. |
| 2 |
Test a variable to determine whether you need to execute the commands in the loop. |
| 3 |
If you do not need to execute the loop, go to the end of the loop. |
| 4 |
If you need to execute the loop, perform the commands in the body of the loop, then return to the beginning of the loop. |
| 5 |
End the loop. |
$ GET_COM_LOOP: $ INQUIRE COMMAND - $ "Enter command (DELETE, DIRECTORY. EXIT, PRINT, PURGE, TYPE)" $ IF COMMAND .EQS. "EXIT" THEN GOTO END_LOOP $! $! Execute if user entered DELETE $ DELETE: $ IF COMMAND .NES. "DELETE" THEN GOTO DIRECTORY $ WRITE SYS$OUTPUT "This is the DELETE section." $ GOTO GET_COM_LOOP ⋮ $ END_LOOP: $ WRITE SYS$OUTPUT "Directory ''F$DIRECTORY()' has been cleaned" $ EXIT
Once a command executes, control is passed back to the GET_COM_LOOP label until a user enters the EXIT command. When an EXIT command is entered, the procedure outputs a message stating that the directory has been cleaned.
13.5.4. Step 4: End the Command Procedure
| Step |
Action |
|---|---|
| 1 |
Decide where you might need to exit or quit from the command procedure. |
| 2 |
Place EXIT or STOP commands as appropriate. |
13.5.4.1. Using the EXIT Command
Ensure that a procedure does not execute certain lines
End procedures that have more than one execution path
End a command procedure
⋮ $ EXIT ! End of normal execution path $ ERROR_ROUTINE ⋮
$ START: $ IF P1 .EQS. "TAPE" .OR. P1 .EQS. "DISK" THEN GOTO 'P1' $ INQUIRE P1 "Enter device (TAPE or DISK)" $ GOTO START $ TAPE: !Process tape files . . . $ EXIT $ DISK: ! Process disk files . . . $ EXIT
The commands following each of the labels (TAPE and DISK) provide different paths though the procedure. The EXIT command before the DISK label ensures that the commands after the DISK label do not execute unless the procedure branches explicitly to the label.
The EXIT command is not required at the end of procedures because the end-of-file of the procedure causes an implicit EXIT command. However, VSI recommends use of the EXIT command.
13.5.4.2. Using the STOP Command
You can use the STOP command in a command procedure to ensure that the procedure terminates if a severe error occurs. If the STOP command is in a command procedure that is executed interactively, control is returned to the DCL level. If a command procedure is being executed in batch mode, the batch job terminates.
$ ON SEVERE_ERROR THEN STOP
13.5.5. Step 5: Test and Debug the Program Logic
Once you have written the code using program stubs, you should test the overall logic of the command procedure. You should test all possible paths of execution.
| Step |
Action |
|---|---|
| 1 |
Test the program logic by entering each valid command in the command procedure. |
| 2 |
Continue testing the program logic by entering an invalid command. |
| 3 |
Finish testing the program logic by exiting from the command procedure using the EXIT command. |
| 4 |
If necessary, debug the program using the SET VERIFY, SET PREFIX, or SHOW SYMBOL commands. |
$ @CLEANUP Enter command (DELETE, DIRECTORY, EXIT, PRINT, PURGE, TYPE): DELETE This is the DELETE section. Enter command (DELETE, DIRECTORY, EXIT, PRINT, PURGE, TYPE): DIRECTORY This is the DIRECTORY section. . . . Enter command (DELETE, DIRECTORY, EXIT, PRINT, PURGE, TYPE): PRINF You have entered an invalid command. Enter command (DELETE, DIRECTORY, EXIT, PRINT, PURGE, TYPE): EXIT $
13.5.5.1. Debugging Command Procedures
SET VERIFY
Displays each line before it is executed. When an error occurs with verification set, you see the error and the line that generated the error. You can use keywords with the SET VERIFY command to indicate that only command lines or data lines are to be verified.
The SET VERIFY command remains in effect until you log out, you enter the SET NOVERIFY command, or you use the F$VERIFY lexical function to change the verification setting. Chapter 15, "Using Lexical Functions to Obtain and Manipulate Information" contains more information on changing verification settings.
SET PREFIX
If verification is in effect, you can also use the DCL command SET PREFIX to time-stamp a procedure log file by prefixing each command line with the time it is executed.
SHOW SYMBOL
The SHOW SYMBOL command can be used to determine how symbols in the procedure are defined.
Example: Debugging Using the SET VERIFY Command
$ SET VERIFY
$ @CLEAN
$ GET_COM_LOOP:
$ INQUIRE COMMAND -
"Enter command (DELETE, DIRECTORY, EXIT, PRINT, PURGE, TYPE)"
Enter command (DELETE, DIRECTORY, EXIT, PRINT, PURGE, TYPE): EXIT
$ IF COMMAND .EQS. "EXIT" THEN GOTO END_LOP
%DCL-W-USGOTO, target of GOTO not found -
check spelling and presence of labelTo correct the error, change the label to END_LOOP.
Example: Debugging Using the SET PREFIX Command
$ SET VERIFY $ @TEST $ SET DEFAULT SYS$LOGIN $ SHOW DEFAULT USER$:[SMYTHE] $ SET PREFIX "(!5%T) " $ @TEST (17:52) $ SET DEFAULT SYS$LOGIN (17:52) $ SHOW DEFAULT USER$:[SMYTHE]
Example: Debugging Using the SHOW SYMBOL Command
$ SET VERIFY
$ @CLEAN
$ GET_COM_LOOP:
$ INQUIRE COMMAND -
"ENTER COMMAND (DELETE, DIRECTORY, EXIT, PRINT, PURGE, TYPE)"
ENTER COMMAND (DELETE, DIRECTORY, EXIT, PRINT, PURGE, TYPE): EXIT
$ SHOW SYMBOL COMMAND
COMMAND = "EXIT"
$ IF COMMAND .EQS. "exit" THEN GOTO END_LOOP
.
.
.The SHOW SYMBOL command reveals that the symbol COMMAND has the value "EXIT". Because the INQUIRE command automatically converts input to uppercase and the IF statement that tests the command uses lowercase characters in the string "exit", DCL determines that the strings are not equal. To correct the error, make sure that the quoted string in the IF statement is written in capital letters. The rest of the string can use either uppercase or lowercase letters.
13.5.5.2. Enabling Verification During Execution
| Step |
Action |
|---|---|
| 1 |
Press Ctrl/Y to interrupt execution. |
| 2 |
Enter the SET VERIFY command. |
| 3 |
Enter the CONTINUE command to continue execution of the command procedure (with verification enabled). |
13.5.6. Step 6: Add Cleanup Tasks
In general, execution of a command procedure should not change the user's process state. Therefore, a command procedure should include a set of commands that return the process to its original state. This set of commands is usually part of a subroutine that is labeled "CLEAN_UP". Common cleanup operations include closing files and resetting the default device and directory.
| Step |
Task |
|---|---|
| 1 |
Begin the cleanup subroutine with a label, such as CLEAN_UP. |
| 2 |
Test for any open files using the F$GETJPI lexical function. |
| 3 |
Delete any temporary or extraneous files using the DELETE or PURGE command. |
| 4 |
If you have changed any defaults (such as the device or directory), restore them to their original state using the SET DEFAULT command. |
| 5 |
Include an ON CONTROL_Y statement to ensure that the cleanup operations are performed. |
13.5.6.1. Closing Files
If you have any open files, make sure that they are closed before the procedure exits. You can use the lexical function F$GETJPI to examine the remaining open file quota (FILCNT) for the process. If FILCNT is the same at the beginning and end of the command procedure, you know that no files have been left open.
$ FIL_COUNT = F$GETJPI ("","FILCNT")
⋮
$ IF FIL_COUNT .NE. F$GETJPI ("", "FILCNT") THEN -
WRITE SYS$OUTPUT "WARNING – file left open"13.5.6.2. Deleting Temporary or Extraneous Files
If you have created temporary files, delete them. In general, if you have updated any files, you should purge them to delete the previous copies. Before you delete files you have not created, make sure you want to delete them. For example, if you have updated a file that contains crucial data, you might want to make the purging operation optional.
If you change the default device, the directory, or both, reset the original defaults before the command procedure exits. To save the name of the original default directory, use the DEFAULT keyword of the F$ENVIRONMENT lexical function. At the end of the command procedure, include a SET DEFAULT command that restores the saved device and directory.
$ SAV_DEFAULT = F$ENVIRONMENT ("DEFAULT")
.
.
.
$ SET DEFAULT 'SAV_DEFAULT'13.5.6.3. Commonly Changed Process Characteristics
|
Characteristic |
Lexical Function Used to Save |
Lexical Function Used to Restore |
|---|---|---|
|
DCL prompt |
F$ENVIRONMENT |
SET PROMPT |
|
Default protection |
F$ENVIRONMENT |
SET PROTECTION/DEFAULT |
|
Privileges |
F$SETPRV |
F$SETPRV or SET PROCESS/PRIVILEGES |
|
Control characters |
F$ENVIRONMENT |
SET CONTROL |
|
Verification |
F$VERIFY |
F$VERIFY |
|
Message format |
F$ENVIRONMENT |
SET MESSAGE |
|
Key state |
F$ENVIRONMENT |
SET KEY |
For complete descriptions of these lexical functions, refer to the VSI OpenVMS DCL Dictionary.
13.5.6.4. Ensuring Cleanup Operations Are Performed
$ ON CONTROL_Y THEN GOTO CLEAN_UP
For additional information on using the ON CONTROL_Y command, see Chapter 14, "Advanced Programming with DCL".
13.5.7. Step 7: Complete the Command Procedure
| Step |
Task |
|---|---|
| 1 |
Substitute commands for the first program stub in the command procedure. |
| 2 |
Test the command procedure to make sure that the new commands work properly. |
| 3 |
Debug the command procedure, if necessary. |
| 4 |
When the first program stub works, move to the next one, and so on, until all program stubs have been replaced. |
Example: Replacing a Program Stub with Commands
$! Execute if user entered TYPE $ TYPE: $ IF COMMAND .NES. "TYPE" THEN GOTO ERROR $ INQUIRE FILE "File to type" $ TYPE 'FILE' $ GOTO GET_COM_LOOP
$ WRITE SYS$OUTPUT "This is the TYPE section."
Example: CLEANUP.COM Command Procedure
$ GET_COM_LOOP:
$ INQUIRE COMMAND -
"Enter command (DELETE, DIRECTORY, EXIT, PRINT, PURGE, TYPE)"
$ IF COMMAND .EQS. "EXIT" THEN GOTO END_LOOP
$!
$!Execute if user entered DELETE
$ DELETE:
$ IF COMMAND .NES. "DELETE" THEN GOTO DIRECTORY
$ INQUIRE FILE "File to delete? "
$ DELETE 'FILE'
$ GOTO GET_COM_LOOP
$!
$!Execute if user entered DIRECTORY
$ DIRECTORY:
$ IF COMMAND .NES. "DIRECTORY" THEN GOTO PRINT
$ DIRECTORY
$ GOTO GET_COM_LOOP
$!
$!Execute if user entered PRINT
$ PRINT:
$ IF COMMAND .NES. "PRINT" THEN GOTO PURGE
$ INQUIRE FILE "File to print? "
$ PRINT SYS$OUTPUT 'FILE'
$ GOTO GET_COM_LOOP
$!
$!Execute if user entered PURGE
$ PURGE:
$ IF COMMAND .NES. "PURGE" THEN GOTO TYPE
$ PURGE
$ GOTO GET_COM_LOOP
$!
$!Execute if user entered TYPE
$ TYPE:
$ IF COMMAND .NES. "TYPE" THEN GOTO ERROR
$ INQUIRE FILE "File to type"
$ TYPE 'FILE'
$ GOTO GET_COM_LOOP
$!
$ ERROR:
$ WRITE SYS$OUTPUT "You entered an invalid command."
$ GOTO GET_COM_LOOP
$!
$ END_LOOP:
$ WRITE SYS$OUTPUT "Directory ''F$DIRECTORY()' has been cleaned."
$
$ EXIT13.6. Executing Command Procedures
To make a command procedure run, you must execute it. You can execute command procedures:
From within another command procedure
On remote nodes
As parameters or qualifiers to DCL commands
Interactively
As batch jobs
On disk and tape volumes
The following sections describe each of these methods.
13.6.1. Executing Command Procedures from Within Other Command Procedures
You can execute another command procedure from within a command procedure by including an execute procedure (@) command .
$! WRITEDATE.COM $! $ INQUIRE TIME "What is the current time in hh:mm format?" $ @GETDATE 'TIME'
13.6.2. Executing Command Procedures on Remote Nodes
Display the status of services in the local OpenVMS Cluster system that are not provided clusterwide
List the users logged in to the remote node
$ TYPE nodename"username password"::"TASK=command-procedure"
The variables username and
password are the user name and password
for the account on the remote node.
Security Note
Your password will be visible on your terminal when you use the TYPE command with an access control string. Take the appropriate security precautions as described in VSI OpenVMS Guide to System Security.
$!SHOWUSERS.COM $! $ IF F$MODE() .EQS. "NETWORK" THEN DEFINE/USER SYS$OUTPUT SYS$NET $ SHOW USERS
$ TYPE ORIOLE"BIRD BOULDER"::"TASK=SHOWUSERS"
OpenVMS User Processes at 11-DEC-1999 17:20:13.30
Total number of users = 4, number of processes = 4
Username Node Interactive Subprocess Batch
FLICKER AUTOMA 2 1
ROBIN FABLES 1 2 1
DOVE MURMUR 1
DUCK FABLES 1 113.6.3. Executing Command Procedures with DCL Qualifiers or Parameters
You can create a command procedure that specifies DCL command parameters or qualifiers. This type of command procedure is useful when there is a set of parameters or qualifiers that you use frequently with one or more commands.
Enter the execute procedure command (@) in a command line where you would normally specify qualifiers or parameters.
$! This command procedure contains command $! qualifiers for the LINK command. $! /DEBUG/SYMBOL_TABLE/MAP/FULL/CROSS_REFERENCE
$ LINK SYNAPSE@DEFLINK
$! PARAM.COM $! This command procedure contains a list of $! parameters that can be used with commands. $! CHAP1, CHAP2, CHAP3
$ DIRECTORY/SIZE @PARAM
Note
When using the execute procedure command (@), the entire specified file is treated as command input by DCL.
13.6.3.1. Restrictions
You cannot include a space before an execute procedure command (@) when the command procedure begins with a qualifier name.
You must precede the execute procedure command (@) with a space when the command procedure begins with a parameter.
13.6.4. Executing Command Procedures Interactively
To execute a command procedure interactively, enter an execute procedure command (@) followed by the file specification of the command procedure.
$ @WORKDISK:[MAINT.PROCEDURES]SETD ReturnYou can define a symbol name to represent long command lines. You can then use the symbol to execute a command procedure.
$ SETD == "@WORKDISK:[MAINT.PROCEDURES]SETD"
$ SETD ReturnBy default, when you execute a command procedure interactively, the operating system displays output at your terminal. However, you can redirect output to a file by using the /OUTPUT qualifier to the execute command.
When you redirect command procedure output to a file, the procedure sends any error messages to the terminal and to the file that is receiving the output.
$ @SETD/OUTPUT=RESULTS.TXT
Always place the /OUTPUT qualifier immediately after the command procedure name, with no intervening spaces. Otherwise, DCL interprets the qualifier as a parameter to be passed to the procedure.
13.6.5. Executing Command Procedures as Batch Jobs
If you use command procedures that require lengthy processing time (for example, compiling or assembling large programs), submitting these procedures as batch jobs will allow you to continue using your terminal interactively.
To execute a command procedure in batch mode, submit your command procedure to a batch queue (a list of batch jobs waiting to execute) by entering the DCL command SUBMIT. When you submit a job, it is directed to the default batch queue SYS$BATCH where it is added to the end of the queue of jobs waiting to be executed. When the jobs preceding yours are completed, your job is executed. On OpenVMS systems, the number of batch jobs that can execute simultaneously is specified when the batch queue is created by the system manager.
$ SUBMIT JOB1 Job JOB1 (queue SYS$BATCH, entry 651, started on SYS$BATCH))
13.6.5.1. Remote Batch Jobs
If your system is part of a network, you can submit a command procedure as a batch job on a remote node. Within a command procedure, you can use DCL commands to open and close files on remote notes and to read and write records in those files, using the same commands and qualifiers for local files.
13.6.5.2. Restarting Batch Jobs
$RESTART
A global symbol whose value is true if the batch job has been started at least once before this execution. Do not specify a value for $RESTART; the system will assign the appropriate value.
BATCH$RESTART
A global symbol whose value you specify using the SET RESTART_VALUE command.
Using $RESTART and BATCH$RESTART
| Step |
Action |
|---|---|
| 1 |
Begin each possible starting point of the procedure with a label. |
| 2 |
As the first step in each section, equate the value of BATCH$RESTART to the label using the SET RESTART_VALUE command. |
| 3 |
At the beginning of the procedure, test $RESTART. |
| 4 |
If $RESTART is true, issue a GOTO statement using BATCH$RESTART as the transfer label. |
$! SORT_MODULES.COM ! $! Set default to the directory containing $! the library whose modules are to be sorted $ SET DEFAULT WORKDISK:[ACCOUNTS.DATA83] $! $! Check for restarting $ IF $RESTART THEN GOTO "BATCH$RESTART" $! $ EXTRACT_LIBRARIES: $ SET RESTART_VALUE=EXTRACT_LIBRARIES . . . $ CONCATENATE_LIBRARIES: $ SET RESTART_VALUE=CONCATENATE_LIBRARIES . . . $ SORT_FILE: $ SET RESTART_VALUE=SORT_FILE . . . $ EXIT
If this command procedure aborts, it reexecutes from the beginning of the file, from the statement labeled CONCATENATE_LIBRARIES, or from the statement labeled SORT_FILE, depending on the value of BATCH$RESTART. If you were extracting a number of separate modules, you could make each extraction a separate section.
13.6.6. Executing Command Procedures on Disk and Tape Volumes
The following sections describe how to execute command procedures on disk and tape volumes.
13.6.6.1. Executing on Private Disks
When you submit a command procedure with the SUBMIT command, you cannot access files on allocated devices. You can, however, execute a command procedure that is located on a private disk that is mounted with the /SHARE qualifier.
13.6.6.2. Executing on Tape Volumes
The procedure does not invoke any other procedures.
The procedure does not issue any GOTO commands that refer to labels in the procedure preceding the GOTO command.
If either of these conditions occur, you can execute the command procedure by doing the following:Step Action
1. Copy the command procedure to a shared disk volume.
2. Execute the command procedure on the shared disk volume.
13.7. Exiting and Interrupting Command Procedures
When you use any of the methods described in this section to exit from a command procedure, you need to be aware of command levels.
A command level is an input stream for the DCL level interpreter. When you enter commands at your terminal, you are entering commands at command level 0. A simple interactive command procedure (such as CLEANUP.COM) executes at command level 1. When the procedure terminates and the DCL prompt reappears on your screen, you are back at command level 0.
13.7.1. Methods of Exiting
Place an EXIT command in the command procedure
Place a STOP command in the command procedure
Enter Ctrl/Y during the execution of the program
Exiting with the EXIT Command
If an exit is caused by the end of the procedure or an EXIT command, control returns to the next higher command level. You can return a status value to the next higher command level by specifying the value as the parameter of the EXIT command.
Exiting from SUB1 returns you to SUB at the command line following the call to SUB1.
Exiting from SUB returns you to DCL command level.
Exiting with the STOP Command
If an exit is caused by a STOP command, control always returns to DCL command level, regardless of the command level in which the STOP command executes.
If you execute the STOP command in a batch job, the batch job terminates.
Exiting with Ctrl/Y
You can interrupt a command procedure by pressing Ctrl/Y and then using the EXIT or STOP command to terminate the procedure. In this case, both the EXIT and STOP command return you to the DCL level.
$ @TESTALL Return Ctrl/Y $ EXIT Return $
13.7.2. Exit-Handling Routines
When you interrupt a command procedure, if the command (or image) that you interrupt declares any exit-handling routines, the EXIT command gives these routines control. However, the STOP command does not execute these routines.
13.8. Handling Errors
By default, the command interpreter executes an EXIT command when a command results in an error or severe error. This causes the procedure to exit to the previous command level. For other severity levels (success, warning, and informational), the command procedure continues.
There is one exception to the way that the command interpreter handles errors. If you reference a label in a command procedure and the label does not exist (for example, if you include the command GOTO ERR1 and ERR1 is not used as a label in the procedure), the GOTO command issues a warning and the command procedure exits.
When the system issues an EXIT command as part of an error-handling routine, it passes the value of $STATUS back to the previous command level, with one change. The command interpreter sets the high-order digit of $STATUS to 1 so that the command interpreter does not redisplay the message associated with the status value.
$ CREATE DUMMY.DAT\ THIS IS A TEST FILE $ SHOW TIME
$ @TEST %CREATE-E-OPENOUT, error opening DUMMY.DAT\ as output -RMS-F-SYN, file specification syntax error %DCL-W-SKPDAT, image data (records not beginning with "$") ignored $ SHOW SYMBOL $STATUS $STATUS = "%X109110A2" $ WRITE SYS$OUTPUT F$MESSAGE(%X109110A2) %CREATE-E-OPENOUT, error opening !AS as output
13.8.1. Default Error Actions
|
Interrupt |
Default Action |
|---|---|
|
Error or severe error |
Procedure exits to the next command level. |
|
Ctrl/Y at DCL command level or command level 1 |
Procedure is interrupted; the procedure can continue if no other image forces it to exit. |
|
Ctrl/Y at command level lower than level 1 |
Procedure exits to the next higher command level. |
13.9. Other Methods of Error Handling
The following sections describe other methods of handling errors.
13.9.1. ON Command
Performs the action specified by the ON command.
Sets $STATUS and $SEVERITY to indicate the result of the specified ON action. In general, they are set to success.
Resets the default error action (to exit if an error or severe error occurs).
An ON command action is executed only once. Therefore, after a command procedure performs the action specified in an ON command, the default error action is reset.
The action specified by an ON command applies only within the command level in which the command is executed. Therefore, if you execute an ON command in a procedure that invokes another procedure, the ON command action does not apply to the nested procedure.
ON condition THEN [$] command
|
ON Keyword |
Action Taken |
|---|---|
|
WARNING |
Command procedure performs the specified action if a warning, error, or severe error occurs. |
|
ERROR |
Command procedure performs the specified action if an error or severe error occurs. The procedure continues if a warning occurs. |
|
SEVERE_ERROR |
Command procedure performs the specified action if a severe (fatal) error occurs. The procedure continues if a warning or error occurs. |
If an ON command action is established for a specific severity level, the command interpreter performs the specified action when errors of the same or worse severity occur. When less severe errors occur, the command interpreter continues processing the file.
Example: Using the ON Command
$ ON WARNING THEN EXIT
Example: Resuming After an Error
$ ON ERROR THEN GOTO ERR1
If such an error occurs, then the procedure resumes executing at ERR1. $STATUS and $SEVERITY are set to success and the default error action is reset. If a second error occurs before another ON or SET NOON command is executed, the procedure exits to the previous command level. The action specified by an ON command applies only within the command level in which the command is executed. Therefore, if you execute an ON command in a procedure that invokes another procedure, the ON command action does not apply to the nested procedure.
Figure 13.1, ''ON Command Actions'' illustrates ON command actions.

This ON command overrides the default command action (on warning, continue; on error or severe error, exit). If an error or severe error occurs while A.FOR is being compiled, the command procedure continues with the next command.
The default command action is reset if the previous ON command takes effect. Thus, if an error or severe error occurs while both A.FOR and B.FOR are being compiled, the command procedure exits.
If a warning, error, or severe error occurs while C.FOR is being compiled, the command procedure exits.
If the command procedure does not exit before a command is executed, the command action takes effect.
The sample command procedures FORTUSER.COM and CALC.COM in Appendix B, "Annotated Command Procedures" also illustrate the use of the ON command to establish error handling.
13.10. Using the SET NOON Command
You can prevent the command interpreter from checking the status returned from commands by using the SET NOON command in your command procedure, which sets the ON command to NO status. When you use the SET NOON command, the command interpreter continues to place values in $STATUS and $SEVERITY but does not perform any error checking. You can restore error checking with the SET ON command or with an ON command.
When a procedure disables error checking, it can explicitly check the value of $STATUS following the execution of a command or program.
$ SET NOON $ RUN TESTA $ RUN TESTB $ SET ON
$ SET NOON $ FORTRAN MYFILE $ IF $STATUS THEN LINK MYFILE $ IF $STATUS THEN RUN MYFILE $ SET ON
The SET ON or SET NOON command applies only at the current command level; that is, the command level at which the command is executed. If you use the SET NOON command in a command procedure that calls another command procedure, the default error-checking mechanism will be in effect within the nested procedure. Note that SET NOON has no meaning when entered interactively at DCL level.
13.11. Handling Ctrl/Y Interruptions
By default, when you press Ctrl/Y while a command procedure is executing, the command interpreter prompts for command input at a special command level called Ctrl/Y command level. From Ctrl/Y command level, you can enter DCL commands that are executed within the command interpreter and then resume execution of the command procedure with the CONTINUE command. In addition, you can stop the procedure by entering a DCL command that forces the command procedure to stop executing.
This section describes methods of overriding the way that command procedures process Ctrl/Y interruptions by using the ON command.
13.11.1. Stopping Command Procedures
If the command is executed by the command interpreter itself (for example, IF, GOTO, or an assignment statement), the command completes execution before the command interpreter prompts for a command at the Ctrl/Y level.
If the command or program is a separate image (that is, an image other than the command interpreter), the command is interrupted and the command interpreter prompts for a command at the Ctrl/Y level.
At the Ctrl/Y level, the command interpreter stores the status of all previously established command levels so that it can restore the correct status after any Ctrl/Y interrupt.
Enter a DCL command that is executed within the command interpreter.
Among these commands are the SET VERIFY, SHOW TIME, SHOW TRANSLATION, ASSIGN, EXAMINE, DEPOSIT, SPAWN and ATTACH commands. After you enter one or more of these commands, you can resume the execution of the procedure with the CONTINUE command. See Section 14.7.2, ''Redirecting Output from Commands and Images'' for a complete list of commands that are executed within the command interpreter.
When you enter the CONTINUE command, the command procedure resumes execution with the interrupted command or program or with the line after the most recently completed command.
Enter a DCL command that executes another image.
When you enter any command that invokes a new image, the command interpreter returns to command level 0 and executes the command. This terminates the command procedure's execution. Any exit handlers declared by the interrupted image are allowed to execute before the new image is started.
Enter the EXIT or STOP command to terminate the command procedure's execution.
If you use the EXIT command, exit handlers declared by the interrupted image are allowed to execute. However, the STOP command does not execute these routines.
Note
$ MAIL = "mail/edit=(send,reply,forward)"
If you enter Ctrl/Y to interrupt a command procedure that does not include this definition and then enter the command MAIL to send a message, your editor is not invoked automatically.
13.11.2. Stopping Privileged Images
If you interrupt the execution of a privileged image, you can enter only the CONTINUE, SPAWN, or ATTACH commands if you want to save the context of the image. If you enter any other commands (except from within a subprocess that you have spawned or attached to), the privileged image is forced to exit.
13.12. Setting Ctrl/Y Action Routines
The following sections describe how to set Ctrl/Y action routines.
13.12.1. Using the ON Command
$ ON CONTROL_Y THEN EXIT
If a procedure executes this ON command, a subsequent Ctrl/Y interruption during the execution of the procedure causes the procedure to exit. Control is passed to the previous command level.
If the command currently executing is a command executed within the command interpreter, the command completes and the Ctrl/Y action is taken.
If the current command or program is executed by an image other than the command interpreter, the image is forced to exit and the Ctrl/Y action is taken. If the image has declared an exit handler, however, the exit handler is executed before the Ctrl/Y action is taken. The image cannot be continued following the Ctrl/Y action.
13.12.2. Effects of Entering Ctrl/Y
The procedure terminates (as a result of pressing Ctrl/Y, executing an EXIT or STOP command, or a default error condition handling action).
Another ON CONTROL_Y command is executed.
The procedure executes the SET NOCONTROL=Y command (see Section 13.13, ''Disabling and Enabling Ctrl/Y Interruptions'').
A Ctrl/Y action can be specified in each active command level and affects only the command level in which it is specified.
$ ON CONTROL_Y THEN SHOW TIME
Figure 13.2, ''Flow of Execution Following Ctrl/Y Action'' illustrates the flow of execution following Ctrl/Y interruptions.
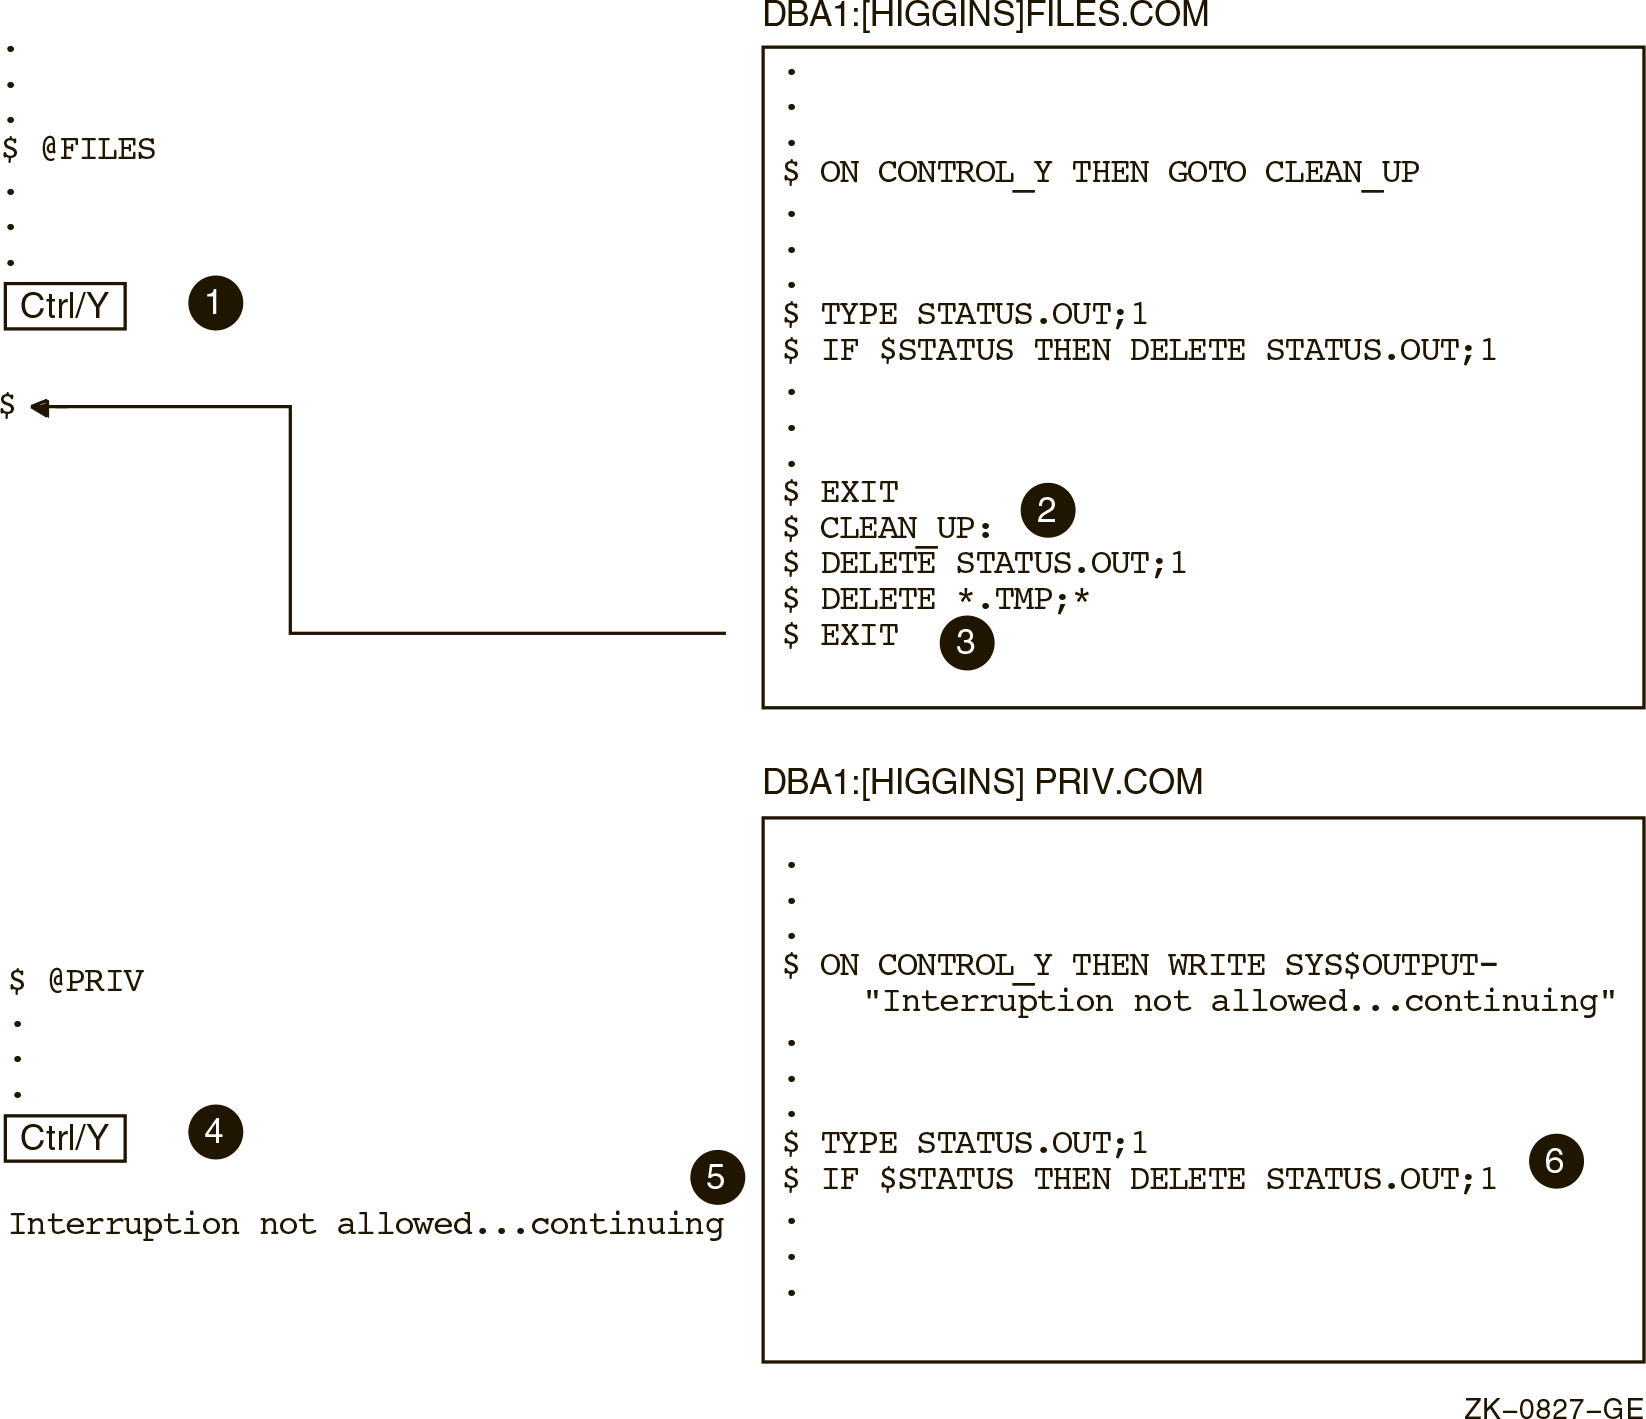 |
The Ctrl/Y interruption occurs during the execution of the TYPE command.
Control is then transferred to the label CLEAN_UP.
After executing the routine, the command procedure exits and returns to the interactive command level.
The Ctrl/Y interruption occurs during the execution of the TYPE command.
The WRITE command specified in the ON command is executed.
The command procedure continues execution at the command following the interrupted command.
Figure 13.3, ''Ctrl/Y in Nested Procedures'' illustrates what happens when Ctrl/Y is pressed during the execution of nested command procedures.
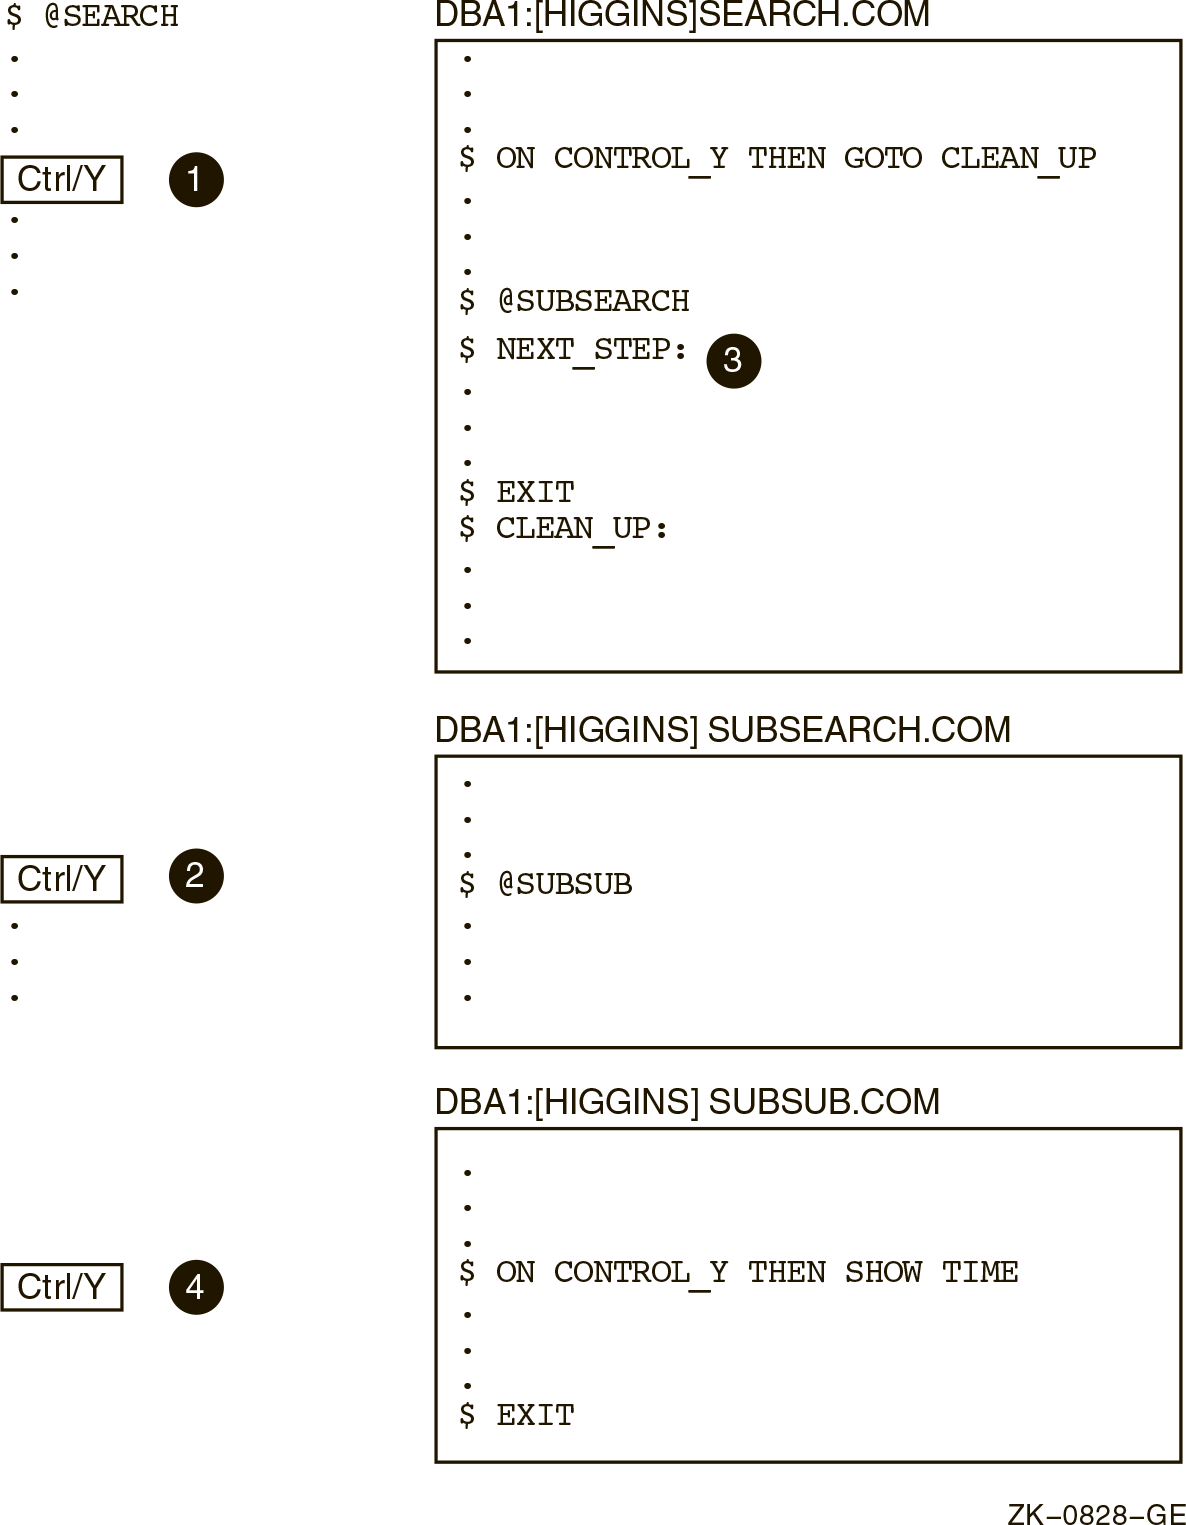 |
If a Ctrl/Y interruption occurs while SEARCH.COM is executing, control is transferred to the label CLEAN_UP.
If a Ctrl/Y interruption occurs while SUBSEARCH.COM is executing, control is transferred to the label NEXT_STEP in SEARCH.COM.
Because no Ctrl/Y action is specified in SUBSEARCH.COM, the procedure exits to the previous command level when a Ctrl/Y interruption occurs.
If a Ctrl/Y interruption occurs while SUBSUB.COM is executing, the SHOW TIME is executed.
13.13. Disabling and Enabling Ctrl/Y Interruptions
The following sections describe how to disable and enable Ctrl/Y interruptions.
13.13.1. Using SET NOCONTROL=Y
The SET NOCONTROL=Y command disables Ctrl/Y handling. That is, if a command procedure executes the SET NOCONTROL=Y command, pressing Ctrl/Y has no effect.
$ SET NOCONTROL=Y $ SET CONTROL=Y
The SET NOCONTROL=Y command disables Ctrl/Y handling and cancels the current ON CONTROL_Y action. The SET CONTROL=Y command enables Ctrl/Y handling. At this point, the default action is reinstated. That is, if Ctrl/Y is pressed during the execution of the procedure, the command interpreter prompts for a command at the Ctrl/Y command level.
You can use the SET NOCONTROL=Y command at any command level. It affects all command levels until the SET CONTROL=Y command reenables Ctrl/Y handling.
13.13.2. Using SET CONTROL=Y
An ON CONTROL_Y command remains in effect until another ON CONTROL_Y or a SET NOCONTROL=Y command executes or the command procedure exits.
To exit from a nonterminating loop when Ctrl/Y is disabled, you must delete your process from another terminal using the DCL command STOP. If you disable the default Ctrl/Y action, reset it as soon as possible. To reset the default Ctrl/Y action, execute the SET NOCONTROL=Y command followed by the SET CONTROL=Y command.
⋮ $! Type a file $ IF COMMAND .NES. "TY" THEN GOTO END_TYPE $ ON CONTROL_Y THEN GOTO END_TYPE $ TYPE 'FILESPEC' $END_TYPE: $! $! Reset default $ SET NOCONTROL=Y $ SET CONTROL=Y ⋮
Note
The ON CONTROL_Y and SET NOCONTROL=Y commands are intended for special applications. VSI does not recommend, in general, that you disable Ctrl/Y interruptions. To exit from a nonterminating loop when Ctrl/Y is disabled, you must delete (from another terminal) the process from which the looping procedure is executing.
13.14. Detecting Errors in Command Procedures Using Condition Codes
When each DCL command in a command procedure completes execution, the command interpreter saves a condition code that describes the reason why the command terminated. This code can indicate successful completion or it can identify an informational or error message.
The command interpreter examines the condition code after it performs each command in a command procedure. If an error that requires special action has occurred, the system performs the action. Otherwise, the next command in the procedure executes.
13.14.1. Displaying Condition Codes ($STATUS)
Bits 0–2 contain the severity level of the message.
Bits 3–15 contain the message number.
Bits 16–27 contain the number associated with the facility that generated the message.
Bits 28–31 contain internal control flags.
When a command completes successfully, $STATUS has an odd value. Bits 0–2 contain a 1 or a 3. When any type of warning or error occurs, $STATUS has an even value. Bits 0–2 contain a 0, 2, or 4. The command interpreter maintains and displays the current hexadecimal value of $STATUS. You can display the ASCII translation of $STATUS by entering the SHOW SYMBOL $STATUS command.
$ CREATE %FILE.LIS %CREATE-E-OPENOUT, error opening %FRED.LIS; as output -RMS-F-WLD, invalid wildcard operation $ SHOW SYMBOL $STATUS $STATUS = " %X109110A2" $ WRITE SYS$OUTPUT F$MESSAGE(%X109110A2) %CREATE-E-OPENOUT, error opening !AS as output
13.14.2. Condition Codes with the EXIT Command
When a command procedure exits, the command interpreter returns the condition code for the previous command in $STATUS. The condition code provides information about whether the most recent command executed successfully.
When you use the EXIT command in a command procedure, you can specify a value that overrides the value that DCL would have assigned to $STATUS. This value, called a status code, must be specified as an integer expression.
When a command procedure contains nested procedures to create multiple command levels, you can use the EXIT command to return a value that explicitly overrides the default condition codes.
$! This is file A.COM $! $ @B . . . $! This is file B.COM $! $ ON WARNING THEN GOTO ERROR . . . $ ERROR: $ EXIT 1
The ON command in B.COM means that if any warnings, errors, or severe errors occur when B.COM is executing, the procedure is directed to the label ERROR. Here, the condition code is explicitly set to 1, indicating success. Therefore, when B.COM terminates, it passes a success code back to A.COM regardless of whether an error occurred.
13.14.3. Determining Severity Levels
| Value |
Severity |
|---|---|
| 0 |
Warning |
| 1 |
Success |
| 2 |
Error |
| 3 |
Information |
| 4 |
Fatal (severe) error |
Note that the success and information codes have odd numeric values, and warning and error codes have even numeric values.
13.14.4. Testing for Successful Completion
$ IF $SEVERITY THEN GOTO OKAY $ IF $STATUS THEN GOTO OKAY
These IF commands branch to the label OKAY if $SEVERITY and $STATUS have true (odd) values. When the current value in $SEVERITY and $STATUS is odd, the command or program completed successfully. If the command or program did not complete successfully, then $SEVERITY and $STATUS are even; therefore, the IF expression is false.
$ IF .NOT. $STATUS THEN …
The command interpreter uses the severity level of a condition code to determine whether to take the action defined by the ON command as described in Section 13.9, ''Other Methods of Error Handling''.
13.15. Using Commands That Do Not Set $STATUS
|
CONTINUE |
DECK |
DEPOSIT |
|
EOD |
EXAMINE |
GOTO |
|
IF |
RECALL |
SET SYMBOL/SCOPE |
|
SHOW STATUS |
SHOW SYMBOL |
STOP |
|
WAIT |
If any of these commands result in a nonsuccessful status, the condition code is placed in $STATUS and the severity level is placed in $SEVERITY.
13.16. Login Command Procedures
A login command procedure is a command procedure that the operating system automatically executes each time you log in. The system also executes this procedure at the beginning of every batch job that you submit.
Systemwide (or group-defined)
Personal
13.16.1. Systemwide Login Command Procedures
They are executed before your personal login command procedure.
When a systemwide login command procedure terminates, it passes control to your personal login command procedure.
They allow your system manager to make sure that certain commands are always executed when you log in.
To establish a systemwide login command procedure, your system manager equates the logical name SYS$SYLOGIN to the appropriate login command procedure. Your system manager can specify that this login command procedure be used for all system users or for a certain group of users.
13.16.2. Personal Login Command Procedures
You can create a personal login command procedure to execute the same commands each time you log in.
Your system manager assigns the file specification for your login command procedure. In most installations, the login command procedure is called LOGIN.COM. Therefore, you should name your login command procedure LOGIN.COM unless your system manager tells you otherwise.
$IF F$MODE() .NES. "INTERACTIVE" THEN EXIT $SET TERMINAL/INSERT $DIR :== DIR/DATE/SIZE $EDIT :== EDIT/EDT $EXIT
13.16.3. Login Command Procedures in Captive Accounts
Your system manager can set up captive accounts by placing the name of a special command procedure in the LGICMD field for your account. If you log in to a captive account, you can perform only functions specified in the command procedure for your account; you cannot use the complete set of DCL commands. For more information about captive accounts, refer to the VSI OpenVMS System Manager's Manual.
13.17. Extended File Specifications and Parsing Styles
$ original_style= f$getjpi("","parse_style_perm")
$ SET PROCESS/PARSE_STYLE=TRADITIONAL
.
.
.
$ SET PROCESS/PARSE_STYLE='original_style'The first command equates 'original_style' with the current parse style. The second command sets the parsing style to TRADITIONAL. The last command resets the parsing style to the original style.
13.18. Using Extended File Names in DCL Command Parameters
Command procedures that use file names as parameters can produce different results in an ODS-5 environment.
Command procedure file specification
Case preservation and $FILE
Ampersand versus apostrophe substitution
See Section 5.3, ''Using the Extended File Specifications Parsing Feature in DCL'' for more information on switching between parsing styles.
13.18.1. Command Procedure File Specification
If indirect command procedures are used, you may need to put quotes around some procedure arguments.
$ create ss.com
$ if p1 .nes. "" then write sys$output "p1 = ",p1
$ if p2 .nes. "" then write sys$output "p2 = ",p2
$ if p3 .nes. "" then write sys$output "p3 = ",p3- Setting the parsing style to TRADITIONAL and running SS.COM produces the following output:
$ set process/parse_style=traditional $ @ss ^ parg2 parg3 p1 = ^ p2 = PARG2 p3 = PARG3Note that the circumflex (^) is the first argument (not an escape character), and that case is not preserved for the p2 and p3 procedure arguments.
- Setting the parsing style to EXTENDED produces the following output when running the same command procedure:
$ set process/parse_style=extended $ @ss ^ parg2 parg3 p1 = ^ PARG2 p2 = PARG3Note that the command procedure recognizes the circumflex (^) as the escape character that identifies the space as a literal character rather than an argument separator, and that "^ PARG2" is the first argument. Case is not preserved.
- Adding quotes to the circumflex (^) produces the following results:
$ @ss "^" parg2 parg3 p1 = ^ p2 = PARG2 p3 = PARG3Because the circumflex (^) is within a quoted string, it is not treated as an escape character.
- Adding quotes to the p3 argument produces the following result:
$ @ss "^" parg2 "parg3" p1 = ^ p2 = PARG2 p3 = parg3Note that case is preserved for the p3 procedure argument.
- When the parsing style is set to TRADITIONAL, the following command treats the circumflex (^) and the parg2 and parg3 strings as procedure arguments, and the command procedure produces the following results:
$ set process/parse_style=traditional $ @ss^ parg2 parg3 p1 = ^ p2 = PARG2 p3 = PARG3 - When the parsing style is set to EXTENDED, the circumflex (^) is treated as an escape character that identifies the space as a literal character. DCL looks for the file "SS^_PARG2.COM" and produces the error shown in the following example:
$ set process/parse_style=extended $ @ss^ parg2 parg3 -RMS-E-FNF, file not found
13.18.2. Case Preservation and $FILE
DCL attempts to preserve the case of file specifications. It can do this only for commands defined with the Command Definition Utility (CDU). DCL preserves case for any item defined in the command definition file (.CLD) with the $FILE parse type.
Refer to the VSI OpenVMS Command Definition, Librarian, and Message Utilities Manual for more information.
13.18.3. Ampersand Versus Apostrophe Substitution
You can use ampersand (&) substitution, as opposed to apostrophe substitution, to preserve case during traditional parsing.
$ set process/parse_style=traditional
$ x = "string"
$ define y 'x'
$ sho log y
"Y" = "STRING" (LNM$PROCESS_TABLE)
$ define y &x
%DCL-I-SUPERSEDE, previous value of Y has been superseded
$ sho log y
"Y" = "string" (LNM$PROCESS_TABLE)Note that the use of the ampersand (&) preserved the case of the character string assigned to the x variable.
Apostrophe substitution takes place before the command line is set to uppercase, and ampersand substitution takes place after the command line is set to uppercase.
$ set process/parse_style=extended
$ define y 'x'
%DCL-I-SUPERSEDE, previous value of Y has been superseded
$ sho log y
"Y" = "string" (LNM$PROCESS_TABLE)
$ define y &x
%DCL-I-SUPERSEDE, previous value of Y has been superseded
$ sho log y
"Y" = "string" (LNM$PROCESS_TABLE)Note that both character strings for the y variable are returned lowercase. This happens because the DEFINE command uses $FILE, which preserves the case.
$ set process/parse=extended $ cre file^ name.doc Contents of an ODS5 file Exit $ set process/parse=traditional $ a = "file^ name.doc" $ type file^ name.doc %DCL-W-PARMDEL, invalid parameter delimiter - check use of special characters \^NAME\ $ type 'a' %DCL-W-PARMDEL, invalid parameter delimiter - check use of special characters \^NAME\ $ type &a Contents of an ODS5 file
Note
Ampersand substitution does not work for foreign commands.
Chapter 14. Advanced Programming with DCL
Advanced DCL programming includes the use of complex command procedures and the DCL command PIPE. You should read this chapter if you have read Chapter 13, "Introduction to Command Procedures" and have basic knowledge of programming in DCL and want to learn more advanced methods.
Complex command procedures can perform programlike functions. You can use variable input in a command procedure, execute sections of the procedure only if certain conditions are true, execute subroutines, or invoke other command procedures.
Performing command procedure input
Using parameters to pass data to nested command procedures
Performing command procedure output
Reading and writing files (file I/O)
Handling file I/O errors
Techniques for controlling execution flow
Creating new command levels
Writing Case statements
Using the PIPE command
14.1. Performing Command Procedure Input
Command procedures frequently require data provided by a user. This data, or input, can be obtained either interactively (as described in Chapter 13, "Introduction to Command Procedures") or noninteractively. This chapter discusses noninteractive input methods, and different interactive methods than those described in Chapter 13, "Introduction to Command Procedures".
You can use the same data each time a command procedure executes. To do this, place the data in the command procedure on data lines following the command that requires the data.
1993, 1994, and 1995 each time the procedure
executes:$ ! CENSUS.COM $ ! $ RUN CENSUS 1993 1994 1995 $ EXIT
14.1.1. Restrictions to Including Data in Command Procedures
Symbols
Logical names
Arithmetic expressions
14.1.2. Other Methods of Inputting Data
Using parameters to pass data
Using parameters to pass data to batch jobs
Using parameters to pass data to nested command procedures
Using the INQUIRE and READ commands to prompt for data
Using the SYS$INPUT logical name to obtain data
14.2. Using Parameters to Pass Data
Place the parameters after the file specification of the command procedure.
You can pass up to eight parameters to a command procedure.
If you pass fewer than eight parameter values, the extra symbols are assigned null values. A null value is a string with no characters and is represented by quotation marks (" ").
Separate the parameters with one or more spaces or tabs.
$ @SUM 34 52 664 89 2 72 87 3
14.2.1. Specifying Parameters as Integers
When you specify an integer as a parameter, it is converted to a string. In the following example, P1 is the string value 24; P2 is the string value 25:
$ @ADDER 24 25
You can use the symbols P1 to P8 in both integer and character string expressions; DCL performs the necessary conversions automatically.
14.2.2. Specifying Parameters as Character Strings
To preserve spaces, tabs, or lowercase characters in a character string, place quotation marks (" ") before and after the string. For example:
$ @DATA "Paul Cramer"
$ @DATA Paul Cramer
In this example, the strings Paul and Cramer are converted to uppercase letters; P1 is PAUL and P2 is CRAMER.
$ @DATA "Paul Cramer" 24 "(555) 111-1111")
- P1 = Paul Cramer
- P2 = 24
- P3 = (555) 111-1111
- P4–P8 = null
14.2.3. Specifying Parameters as Symbols
To pass the value of a symbol, place an apostrophe before and after the symbol. To preserve spaces, tabs, and lowercase characters in the symbol value, enclose the value in three sets of quotation marks. You must also use three sets of quotation marks to include a quotation mark as part of a string.
An alternative is to enclose the text in quotation marks and where a symbol appears, precede the symbol with two apostrophes and follow it with one apostrophe.
$ NAME = "Paul Cramer" $ @DATA 'NAME'
$ NEW_NAME = """Paul Cramer""" $ @DATA 'NEW_NAME'
$ ! DATA.COM $ @NAME "''P1'"
14.2.4. Specifying Parameters as Null Values
$ @DATA "" "Paul Cramer"
In this example, P1 is null and P2 is Paul Cramer.
14.3. Using Parameters to Pass Data to Batch Jobs
To pass parameters to a command procedure executed in batch mode, use the SUBMIT command qualifier /PARAMETERS.
If you execute more than one command procedure using a single SUBMIT command, the specified parameters are used for each command procedure in the batch job.
$ SUBMIT/PARAMETERS=(TODAY,TOMORROW,YESTERDAY) ASK.COM, GO.COM
$ SUBMIT- _$ /PARAMETERS=(DKA100:[ACCOUNT.BILLS]DATA.DAT,DKA100:[ACCOUNT]NAME.DAT) - _$ LIBRARY.COM, SORT.COM
$ @LIBRARY DISK:[ACCOUNT.BILLS]DATA.DAT DISK:[ACCOUNT]NAME.DAT) $ @SORT DISK:[ACCOUNT.BILLS]DATA.DAT DISK:[ACCOUNT]NAME.DAT)
You can also pass data to a batch job by including the data in a command procedure or by defining SYS$INPUT to be a file. The specified parameters are used for each command procedure in the batch job.
14.4. Using Parameters to Pass Data to Nested Command Procedures
You can pass up to eight parameters to nested command procedures. The local symbols P1 to P8 in the nested procedure are not related to the local symbols P1 to P8 in the invoking procedure.
$ ! DATA.COM $ @NAME 'P1' Joe Cooper
- P1 = PAUL
- P2 = CRAMER
- P3 = JOE
- P4 = COOPER
- P5–P8 = null
Note
Data that is not enclosed in quotation marks may be upcased by default.
$ ! DATA.COM $ QUOTE = """ $ P1 = QUOTE + P1 + QUOTE $ @NAME 'P1' "Joe Cooper"
In this example, P1 is Paul Cramer and P2 is Joe Cooper in the command procedure NAME.COM.
14.5. Prompting for Data
You can use the INQUIRE command (as described in Chapter 13, "Introduction to Command Procedures") or the READ command to obtain data for command procedures interactively. Both commands prompt for input and assign the response to a symbol.
|
The INQUIRE command... |
The READ command... |
|---|---|
|
Prompts for a value |
Prompts for a value |
|
Reads the value from the terminal |
Reads the value from the source specified by the first parameter |
|
Assigns the value to a symbol |
Assigns the value to the symbol named as the second parameter |
The READ command accepts all characters typed on the terminal in response to the prompt, as an exact character string value (case, spaces, and tabs are preserved). If you omit the /PROMPT qualifier, the READ command displays Data: as the default prompt.
You can also write command procedures that can either accept parameters or prompt for user input if the required parameters are not specified.
$ READ/PROMPT="Filename: " SYS$COMMAND FILE
$ ! Prompt for a file name if name $ ! is not passed as a parameter $ IF P1 .EQS. "" THEN INQUIRE P1 "Filename" $ COPY 'P1' DISK5:[RESERVED]*.* $ EXIT
Note
If you submit a command procedure for execution as a batch job, DCL reads the value for a symbol specified in an INQUIRE command from the data line following the INQUIRE command. If you do not include a data line, the symbol is assigned a null value.
14.6. Using the SYS$INPUT Logical Name to Obtain Data
Commands, utilities, and other system images get their input from the source specified by the logical name SYS$INPUT, which is the default input stream. In a command procedure, SYS$INPUT is defined as the command procedure file; commands or images that require data look for data lines in the file. However, by redefining SYS$INPUT, you can provide data from your terminal or from a separate input file.
14.6.1. Redefining SYS$INPUT as Your Terminal
You can redefine SYS$INPUT to be your terminal. This enables images called from command procedures to obtain input interactively, rather than from data lines in command procedures.
Note that you must redefine SYS$INPUT to be your terminal if you want to use a DCL command or utility that requires interactive input in command procedures.
$ ! Execute CENSUS getting data from the terminal $ DEFINE/USER_MODE SYS$INPUT SYS$COMMAND $ RUN CENSUS $ EXIT
The DEFINE/USER_MODE command temporarily redefines SYS$INPUT while CENSUS.EXE is running, so CENSUS.EXE obtains its input from the terminal. After CENSUS.EXE completes, SYS$INPUT reverts to its original definition (the command procedure file).
$ ! Obtain a list of your files $ DIRECTORY $ ! $ ! Get file name and invoke the EVE editor $ EDIT_LOOP: $ INQUIRE FILE "File to edit (Press Return to end)" $ IF FILE .EQS. "" THEN EXIT $ DEFINE/USER_MODE SYS$INPUT SYS$COMMAND $ EDIT/TPU 'FILE' $ GOTO EDIT_LOOP
The command procedure prompts for file names until you terminate the loop by pressing the Return key. When you enter a file name, the procedure automatically invokes EVE to edit the file. While the editor is running, SYS$INPUT is defined as the terminal so you can enter your edits interactively.
14.6.2. Defining SYS$INPUT as a Separate File
A command procedure can also get input from a file by defining SYS$INPUT as a file. Note that DCL does not process data lines; command procedures pass text on data lines directly to commands or images. If you include DCL symbols or expressions on data lines, DCL will not substitute values for the symbols or evaluate the expressions. If you use an exclamation point (!) in a data line, the image to which you pass the data processes the exclamation point.
You can also place programs in the command procedure file by specifying the name of the data file as SYS$INPUT. This causes the compiler to read the program from the command procedure rather than from another file.
$ FORTRAN/OBJECT=TESTER/LIST=TESTER SYS$INPUT C THIS IS A TEST PROGRAM A = 1 B = 2 STOP END $ PRINT TESTER.LIS $ EXIT
The FORTRAN command uses the logical name SYS$INPUT to identify the file to be compiled. Because SYS$INPUT equates to the command procedure, the FORTRAN compiler compiles the statements following the FORTRAN command (up to the next line that begins with a dollar sign). When the compilation completes, two output files are created: TESTER.OBJ and TESTER.LIS. The PRINT command then prints the file.
14.7. Performing Command Procedure Output
Displaying data
Redirecting output from commands and images
Returning data from command procedures
Redirecting error messages
14.7.1. Displaying Data
Use the TYPE command to display text that is several lines long and does not require symbol substitution. The TYPE command writes data from the file you specify to SYS$OUTPUT.
$ ! Using TYPE to display lines $ TYPE SYS$INPUT REPORT BY MARY JONES PREPARED APRIL 15, 2002 SUBJECT: Analysis of Tax Deductions for 2002 . . . $ EXIT
Use the WRITE command to write data that contains symbols or lexical functions. Unless you enclose the data in quotation marks (" "), the WRITE command performs symbol substitution automatically.
$ WRITE SYS$OUTPUT "Two files are written." Two files are written.
$ WRITE SYS$OUTPUT "Summary of ""Q & A"" Session" Summary of "Q & A" Session
$ WRITE SYS$OUTPUT "Report by Mary Jones" + - " Prepared April 15, 2002" Report by Mary Jones Prepared April 15, 2002
$ AFILE = "STAT1.DAT" $ BFILE = "STAT2.DAT" $ WRITE SYS$OUTPUT "''AFILE' and ''BFILE' ready." STAT1.DAT and STAT2.DAT ready.
In this example, STAT1.DAT is the translation of the symbol AFILE; STAT2.DAT is the translation of the symbol BFILE.
14.7.2. Redirecting Output from Commands and Images
Use the /OUTPUT qualifier when you invoke the command. DCL commands that accept the /OUTPUT qualifier include: ACCOUNTING, CALL, DIRECTORY, HELP, LIBRARY, RUN (process), SPAWN, and TYPE.
Temporarily redefine SYS$OUTPUT as a file by using the DEFINE/USER_MODE command.
Temporarily define SYS$OUTPUT as a null device (using the DEFINE/USER_MODE command) to suppress output from a command.
$ DEFINE/USER_MODE SYS$OUTPUT SHOW_USER.DAT $ SHOW USERS $ ! $ ! Process the information in SHOW_USER.DAT $ OPEN/READ INFILE SHOW_USER.DAT $ READ INFILE RECORD . . . $ CLOSE INFILE $ EXIT
$ DEFINE/USER_MODE SYS$OUTPUT NL: $ APPEND NEW_DATA.DAT STATS.DAT ⋮
The /USER_MODE qualifier is used to create a temporary logical name assignment that is in effect only until the next image completes. After the command executes, SYS$OUTPUT reverts to the default definition (usually the terminal).
You cannot use the DEFINE/USER_MODE command to redirect output from DCL commands that are executed within the command interpreter. Instead, use the DEFINE command to redefine SYS$OUTPUT and use the DEASSIGN command to delete the definition when you are through with it.
|
= |
ALLOCATE |
ASSIGN |
|
ATTACH |
CALL |
CANCEL |
|
CLOSE |
CONNECT |
CONTINUE |
|
CREATE/LOGICAL_NAME_TABLE |
DEALLOCATE |
DEASSIGN |
|
DEBUG |
DECK |
DEFINE |
|
DEFINE/KEY |
DELETE/SYMBOL |
DISCONNECT |
|
ELSE |
ENDIF |
ENDSUBROUTINE |
|
EOD |
EXAMINE |
EXIT |
|
GOSUB |
GOTO |
IF |
|
INQUIRE |
ON |
OPEN |
|
READ |
RECALL |
RETURN |
|
SET CONTROL |
SET DEFAULT |
SET KEY |
|
SET ON |
SET OUTPUT_RATE |
SET PROMPT |
|
SET PROTECTION/DEFAULT |
SET SYMBOL/SCOPE |
SET UIC |
|
SET VERIFY |
SHOW DEFAULT |
SHOW KEY |
|
SHOW PROTECTION |
SHOW QUOTA |
SHOW STATUS |
|
SHOW SYMBOL |
SHOW TIME |
SHOW TRANSLATION |
|
SPAWN |
STOP |
SUBROUTINE |
|
THEN |
WAIT |
WRITE |
$ DEFINE SYS$OUTPUT TIME.DAT $ SHOW TIME $ DEASSIGN SYS$OUTPUT
14.7.3. Returning Data from Command Procedures
Global symbols and logical names return data from a command procedure to a calling procedure or to DCL command level. You can read a global symbol or a logical name at any command level. Logical names can return data from a nested command procedure to the calling procedure.
$ @DATA "Paul Cramer"
$ ! DATA.COM
$ !
$ ! P1 is a full name.
$ ! NAME.COM returns the last name in the
$ ! global symbol LAST_NAME.
$ !
$ @NAME 'P1'
$ ! NAME.COM
$ ! P1 is a first name
$ ! P2 is a last name
$ ! return P2 in the global symbol LAST_NAME
$ LAST_NAME == P2
$ EXIT
$ ! write LAST_NAME to the terminal
$ WRITE SYS$OUTPUT "LAST_NAME = ''LAST_NAME'"
LAST_NAME = CRAMERDATA.COM invokes the command procedure NAME.COM, passing NAME.COM a full name. NAME.COM places the last name in the global symbol LAST_NAME. When NAME.COM completes, DCL continues executing DATA.COM, which reads the last name by specifying the global symbol LAST_NAME. The command procedure NAME.COM would be in a separate file. It is shown indented in this example for clarity.
$! Obtain the name of a file and then run $! REPORT.EXE to write a report to the file $! $ INQUIRE FILE "Name of report file" $ DEFINE/NOLOG REPORT_FILE 'FILE' $ RUN REPORT $ EXIT
$! Command procedure that updates data files
$! and optionally prepares reports
$!
$ UPDATE:
.
.
.
$ INQUIRE REPORT "Prepare a report [Y or N]"
$ IF REPORT THEN GOTO REPORT_SEC
$ EXIT
$!
$ REPORT_SEC:
$ @REPORT
$ WRITE SYS$OUTPUT "Report written to ", F$TRNLNM("REPORT_FILE")
$ EXIT14.7.4. Redirecting Error Messages
The following sections describe how to redirect error messages.
14.7.4.1. Redefining SYS$ERROR
By default, command procedures send system error messages to the file indicated by SYS$ERROR. You can redefine SYS$ERROR to direct system error messages to a specified file. However, if you redefine SYS$ERROR to be different from SYS$OUTPUT (or if you redefine SYS$OUTPUT without also redefining SYS$ERROR), DCL commands and images that use standard system error display mechanisms send system error level and system severe level error messages to both SYS$ERROR and SYS$OUTPUT. Therefore, you receive these messages twice – once in the file indicated by the definition of SYS$ERROR and once in the file indicated by SYS$OUTPUT. Success, informational, and warning level messages are sent only to the file indicated by SYS$OUTPUT. If you want to suppress system error messages from a DCL command, be sure that neither SYS$ERROR nor SYS$OUTPUT is equated to the terminal.
If you run one of your own images from a command procedure and the image references SYS$ERROR, the image sends system error messages only to the file indicated by SYS$ERROR — even if SYS$ERROR is different from SYS$OUTPUT. Only DCL commands and images that use standard system error display mechanisms send messages to both SYS$ERROR and SYS$OUTPUT when these files are different.
$ ! Purge files in a directory and suppress messages $ ! $ SET DEFAULT 'P1' $ ! Suppress messages $ ! $ DEFINE/USER_MODE SYS$ERROR NL: $ DEFINE/USER_MODE SYS$OUTPUT NL: $ PURGE $ EXIT
14.7.4.2. Suppressing System Error Messages
You can also use the SET MESSAGE command to suppress system messages. By using the qualifiers /NOFACILITY, /NOIDENTIFICATION, /NOSEVERITY, or /NOTEXT, you can suppress the facility name, message identification, severity level, or the message text.
$ ! Purge files in a directory and suppress system messages
$ !
$ SET DEFAULT 'P1'
$ ! Suppress system messages
$ !
$ SET MESSAGE/NOFACILITY -
/NOIDENTIFICATION -
/NOSEVERITY -
/NOTEXT
$ PURGE
$ SET MESSAGE/FACILITY -
/IDENTIFICATION -
/SEVERITY
/TEXT
$ EXIT14.8. Reading and Writing Files (File I/O)
The basic steps in reading and writing files from command procedures are:
| Step |
Action |
|---|---|
| 1 |
Use the OPEN command to open files. This assigns a logical name to the file and specifies whether the file is to be read, written, or both read and written. Subsequent READ, WRITE, and CLOSE commands use this logical name to refer to the file. |
| 2 |
Use the READ or WRITE commands to read or write records to files. Input and output to files is usually accomplished by designing a loop to read a record, process the record, and write the modified record to either the same file or to another file. |
| 3 |
Use the CLOSE command to close files. If you do not include the CLOSE command, files remain open until you log out. |
Note
You do not have to open process-permanent files such as SYS$INPUT, SYS$OUTPUT, SYS$COMMAND, and SYS$ERROR explicitly to read or write to them because the system opens these files for you when you log in.
Using the OPEN command
Writing to files
Using the WRITE command
Using the READ command
Using the CLOSE command
- Modifying files:
Updating records
Creating new output files
Appending records to files
14.9. Using the OPEN Command
The OPEN command opens sequential, relative, or indexed sequential files. The files are opened as process-permanent; they remain open for the duration of your process unless you explicitly close them (with the CLOSE command). While the files are open, they are subject to OpenVMS RMS restrictions on using process-permanent files.
When you open a file, the OPEN command assigns a logical name (specified as the first parameter) to the file (specified as the second parameter) and places the name in the process logical name table. Subsequent READ, WRITE, and CLOSE commands use this logical name to refer to the file.
$ OPEN/READ INFILE DISK4:[MURPHY]STATS.DAT
Note
The logical name in the OPEN command must be unique. If the OPEN command does not work and your commands seem correct, change the logical name in the OPEN command. To display a list of logical name definitions, use the SHOW LOGICAL command.
To ensure that the command procedure can access the correct files, use complete file specifications (for example, DISK4:[MURPHY]STATS.DAT) or use the SET DEFAULT command to specify the proper device and directory before you open a file.
You can also specify shareable files. The /SHARE qualifier enables other opened files. In addition, users can access shareable files with the DCL commands TYPE and SEARCH.
The OPEN/READ command opens the files, assigns logical names to the files, and places record pointers at the beginning of the files. When you open files for reading, you can read but not write records. Each time you read a record, the pointer moves to the next record.
$ OPEN/READ INFILE DISK4:[MURPHY]STATS.DAT $ READ_FILE: $ READ/END_OF_FILE=DONE INFILE DATA $ GOTO READ_FILE $ DONE: $ CLOSE INFILE $ EXIT
Use the OPEN/WRITE command when you want to write to a new file. The OPEN/WRITE command creates a sequential file in print file format. The record format for the file is variable with fixed control (VFC), with a 2-byte record header. The /WRITE qualifier cannot be used with the /APPEND qualifier.
If you specify a file that already exists, the OPEN/WRITE command opens a new file with a version number that is one greater than the existing file.
$ OPEN/WRITE OUTFILE DISK4:[MURPHY]NAMES.DAT $ UPDATE: $ INQUIRE NEW_RECORD "Enter name" $ WRITE OUTFILE NEW_RECORD $ IF NEW_RECORD .EQS. "" THEN GOTO EXIT_CODE $ GOTO UPDATE $ EXIT_CODE: $ CLOSE OUTFILE $ EXIT
The OPEN/APPEND command appends records to the end of an existing file. If you attempt to open a file that does not exist, an error occurs and the file is not opened. The /APPEND qualifier cannot be used with the /WRITE qualifier.
$ OPEN/APPEND OUTFILE DISK4:[MURPHY]NAMES.DAT $ INQUIRE NEW_RECORD "Enter name" $ WRITE OUTFILE NEW_RECORD ⋮ $ CLOSE OUTFILE
The OPEN/READ/WRITE command places the record pointer at the beginning of a file so you can read the first record. When you use this method to open a file, you can replace only the record you have read most recently; you cannot write new records to the end of the file. In addition, a revised record must be exactly the same size as the record being replaced.
$ OPEN/READ/WRITE FILE DISK4:[MURPHY]STATS.DAT
14.10. Writing to Files
| Step |
Action |
|---|---|
| 1 |
Open the file for writing. |
| 2 |
Begin the write loop with a label. File I/O is always done in a loop unless you are writing or reading a single record. |
| 3 |
Read the data to be written. Use the INQUIRE command or the READ command to read data into a symbol. |
| 4 |
Test the data. Check the symbol containing the data. If the symbol is null (for example, if you press Return and enter no data on the line), you have reached the end of the data to be written to the file and you should go to the end of the loop. Otherwise, continue. |
| 5 |
Write the data to the file. Use the WRITE command to write the value of the symbol (one record) to the file. |
| 6 |
Return to the beginning of the loop. You remain within the loop until there is no more data to be written to the file. |
| 7 |
End the loop and close the file. |
$ ! Write a file $ ON ERROR THEN EXIT ! Exit if the command $ ! ! procedure cannot $ ! ! open the file $ OPEN/WRITE IN_FILE DISK4:[MURPHY]STATS.DAT ! Open the file $ ON CONTROL_Y THEN GOTO END_WRITE ! Close the file if you $ ! ! quit execution with $ ! ! Ctrl/Y $ ON ERROR THEN GOTO END_WRITE ! Close the file if an $ ! ! error occurs $WRITE: ! Begin the loop $ INQUIRE STUFF "Input data" ! Prompt for input $ IF STUFF .EQS. "" THEN GOTO END_WRITE ! Test for the end of $ ! ! the file $ WRITE IN_FILE STUFF ! Write to the file $ GOTO WRITE ! Go to the beginning $END_WRITE: ! End the loop $ ! ! $ CLOSE IN_FILE ! Close the file
14.10.1. Creating Files with Unique File Names
To create a file with a unique name, use the F$SEARCH lexical function to see if the name is already in the directory. Refer to the lexical function descriptions in the VSI OpenVMS DCL Dictionary for more information about F$SEARCH.
$ ! FILES.COM $ ! $GET_NAME: $ INQUIRE FILE "File" ! Prompt the user for a file name $ IF F$SEARCH (FILE) .NES. "" ! Make sure the file name is unique $ THEN $ WRITE SYS$OUTPUT "The file already exists" $ GOTO GET_NAME $ ELSE $ OPEN/WRITE IN_FILE 'FILE' ! Open the file with WRITE access $ ENDIF ⋮ $ EXIT
14.11. Using the WRITE Command
The following sections describe how to use the WRITE command.
14.11.1. Specifying Data
Specify data to be written as a character string expression. The WRITE command automatically substitutes symbols and lexical functions.
Write a string to an output file as a literal character string. The WRITE command does not perform symbol substitution on strings enclosed in quotation marks.
Combine literal strings with symbol names. To force symbol substitution, place the entire string within quotation marks and use double apostrophes before the symbol to identify it and a single apostrophe following it.
Another way to combine literal strings with symbol names is to insert a comma before and after the symbol, place quotation marks around the delimited symbol, and enclose the entire character string in quotation marks. For example:$ WRITE OUTFILE "Count is ",COUNT,"."
Use apostrophes in the WRITE command line to force symbol substitution.
Combine literal strings and lexical functions by using apostrophes to force symbol substitution within character strings.
Combine literal strings by using a plus sign (+).
Example
$! Define symbols $! $ CREATED = "File created April 15, 2002" $ COUNT = 4 $ P4 = "fourth parameter" $! $! Open the file DATA.OUT for writing $! $ OPEN/WRITE OUTFILE DISK4:[MURPHY]DATA.OUT $! $ WRITE OUTFILE CREATED
| Specifies the data to be written as a character string expression. |
| Writes the string |
| Combines literal strings with symbol names. |
| Uses an apostrophe in the WRITE command line to force symbol substitution. In this example, the WRITE command substitutes a value for the symbol COUNT and performs symbol substitution on the resulting command string (P4). |
| Combines literal strings and lexical functions. |
| Displays the data written to the output file DATA.OUT by the preceding WRITE commands. |
14.11.2. Using the /SYMBOL Qualifier
When the WRITE command writes a record, it positions the record pointer after the record just written. The WRITE command can write a record that is up to 2,048 bytes long.
The record is longer than 1,024 bytes.
An expression in the WRITE command is longer than 255 bytes.
Refer to the description of the WRITE command in the VSI OpenVMS DCL Dictionary for more information on writing long records.
14.11.3. Using the /UPDATE Qualifier
You can use the WRITE command with the /UPDATE qualifier to change a record rather than insert a new one. To use the /UPDATE qualifier, you must open the file for both reading and writing.
14.12. Using the READ Command
| Step |
Action |
|---|---|
| 1 |
Open the file for reading. |
| 2 |
Begin the read loop with a label. File I/O is always done in a loop unless you are reading or writing a single record. |
| 3 |
Read the data from the file. Use the READ command with the /END_OF_FILE qualifier to read a record and assign its contents to a symbol. The /END_OF_FILE qualifier causes DCL to pass control to the label specified by the /END_OF_FILE qualifier when you reach the end of the file. Generally, you specify the label that marks the end of the read loop. |
| 4 |
Process the data. When you read a file sequentially, process the current record before reading the next one. |
| 5 |
Return to the beginning of the loop. You remain in the loop until you reach the end of the file. |
| 6 |
End the loop and close the file. |
$ OPEN/READ INFILE DISK4:[MURPHY]STATS.DAT !Open the file $ ! $READ_DATA: !Begin the loop $ READ/END_OF_FILE=END_READ INFILE RECORD !Read a record; test for $ ! end of file $ ! Process the data . . . $ GOTO READ_DATA !Go to the beginning $ ! of the loop $END_READ: !End of loop $ CLOSE INFILE !Close the file $ EXIT
When you specify a symbol name for the READ command, the command interpreter places the symbol name in the local symbol table for the current command level. If you use the same symbol name for more than one READ command, each READ command redefines the value of the symbol name. For example, in the preceding example, the READ command reads a new record from the input file (STATS.DAT) each time through the loop. It then uses this record to redefine the value of the symbol RECORD.
14.12.1. Using the /END_OF_FILE Qualifier
When you read from files, you generally read and process each record until you reach the end of the file. By using the /END_OF_FILE qualifier with the READ command, you can construct a loop to read records from a file, process the records, and exit from the loop when you have finished reading all the records.
Note that the labels you specify for /END_OF_FILE qualifiers are subject to the same rules as labels specified for a GOTO command. See Chapter 13, "Introduction to Command Procedures" for more information on using the GOTO command.
You should always use the /END_OF_FILE qualifier when you use the READ command in a loop. Otherwise, when the error condition indicating the end-of-file is returned by the OpenVMS Record Management Services (OpenVMS RMS), the command interpreter performs the error action specified by the current ON command. For example, OpenVMS RMS returns the error status %RMS-E-EOF. This causes a command procedure to exit unless the procedure has established its own error handling.
14.12.2. Using the /INDEX and /KEY Qualifiers
To read records randomly from indexed sequential files, use the READ command qualifiers /INDEX and /KEY. These qualifiers specify that a record should be read from the file by finding the specified key in the index and returning the record associated with that key. If you do not specify an index, the primary index (0) is used.
After you read a record randomly, you can read the remainder of the file sequentially by using READ commands without the /KEY or /INDEX qualifiers.
14.12.3. Using the /DELETE Qualifier
You can use the READ command with the /DELETE qualifier to delete records from indexed sequential files. The /DELETE qualifier causes a record to be deleted from a file after it has been read. Use the /DELETE qualifier with the /INDEX and /KEY qualifiers to delete a record specified by a given key.
For more information about the /DELETE, /INDEX, and /KEY qualifiers, refer to the description of the READ command in the VSI OpenVMS DCL Dictionary.
14.13. Using the Close Command
The CLOSE command closes a file and deassigns the logical name created by the OPEN command. Be sure to close all files you open in a command procedure before the command procedure terminates. If you fail to close an open file, the file remains open when the command procedure terminates and the logical name assigned to the open file is not deleted from the process logical name table.
$ OPEN INFILE DISK4:[MURPHY]STATS.DAT . . . $ CLOSE INFILE
14.14. Modifying Files
Updating records
Creating new output files
Appending records
14.14.1. Updating Records
When you use the updating method to modify records, you can make minor changes to a small number of records in a file. Because this method does not allow you to change the size of a record or the number of records in the file, use it only for files with formatted records (for example, in a data file).
| Step |
Action |
|---|---|
| 1 |
Open the file for both read and write access. |
| 2 |
Use the READ command to read through the file until you reach the record that you want to modify. |
| 3 |
Modify the record. In a sequential file, the text of this record must be exactly the same size as the original record. If the text of the modified record is shorter, pad the record with spaces, adding spaces to the end of the modified record until it is the same length as the original record. If the text of the modified record is longer, you need to create a new file. |
| 4 |
Use the WRITE/UPDATE command to write the modified record back to the file. |
| 5 |
Repeat steps 2 to 4 until you have changed all records you intend to change. |
| 6 |
Use the CLOSE command to close the file. After you close the file, it contains the same version number as when you started, even though individual records have been changed. |
$! Open STATS.DAT and assign it the logical name FILE $! $ OPEN/READ/WRITE FILE DISK4:[MURPHY]STATS.DAT $ BEGIN_LOOP: $! Read the next record from FILE into the symbol RECORD $ READ/END_OF_FILE=END_LOOP FILE RECORD $! Display the record and see if the user wants to change it $! If yes, get the new record. If no, repeat loop $! $ PROMPT: $ WRITE SYS$OUTPUT RECORD $ INQUIRE/NOPUNCTUATION OK "Change? Y or N [Y] " $ IF OK .EQS. "N" THEN GOTO BEGIN_LOOP $ INQUIRE NEW_RECORD "New record" $! Compare the old and new records $! If old record is shorter than new record, issue an $! error message. If old record and new record are the $! same length, write the record. Otherwise pad the new $! record with spaces so it is correct length $! $ OLD_LEN = F$LENGTH(RECORD) $ NEW_LEN = F$LENGTH(NEW_RECORD) $ IF OLD_LEN .LT. NEW_LEN THEN GOTO ERROR $ IF OLD_LEN .EQ. NEW_LEN THEN GOTO WRITE_RECORD $ SPACES = " " $ PAD = F$EXTRACT(0,OLD_LEN-NEW_LEN,SPACES) $ NEW_RECORD = NEW_RECORD + PAD $! $ WRITE_RECORD: $ WRITE/UPDATE FILE NEW_RECORD $ GOTO BEGIN_LOOP $! $ ERROR: $ WRITE SYS$OUTPUT "Error – New record is too long" $ GOTO PROMPT $! $ END_LOOP: $ CLOSE FILE $ EXIT
The system displays the record on the terminal and you are asked whether the record needs to be modified. If you choose to modify the record, a new record is read from the terminal and its length is compared to the length of the original record. If the original record is longer, extra spaces make the new record the same size. If the original record is shorter, the system displays an error message and you are again prompted for a new record.
14.14.2. Creating New Output Files
To make extensive changes to a file, open that file for read access and open a new file for write access. Because you are creating a new output file, you can modify the size of records, add records, delete records, or insert records.
Note
To ensure that the correct file is opened for reading, you must open the existing file for read access before you open the new version for write access.
| Step |
Action |
|---|---|
| 1 |
Open the file for read access. This is the input file, the file you are modifying. |
| 2 |
Open a new file for write access. This is the output file, the file that you are creating. If you give the output file the same name as the input file, the output file will have a version number one greater than the input file. |
| 3 |
Use the READ command to read each record from the file you are modifying. As you read each record from the original file, decide how the record is to be treated. |
| 4 |
Continue reading and processing records until you have finished. |
| 5 |
Use the CLOSE command to close both the input file and the output file. |
|
If The Record is |
Then |
|---|---|
|
Not changed |
Write the same symbol to the new file. |
|
Changed |
Use the INQUIRE command to read a different record into the symbol, then write the modified symbol to the new file. |
|
Deleted |
Do not write the symbol to the new file. |
|
Inserted |
Use a loop to read records into the symbol and to write the symbol to the new file. |
Examples: Modifying Records
- In the following example, the symbol NEW_FILE is written to a new file:
$ ! No change $ WRITE NEW_FILE RECORD
- In the following example, the INQUIRE command is used to write a modified symbol to a new file:
$ ! Change $ INQUIRE NEW_RECORD "New record" $ WRITE NEW_FILE NEW_RECORD
- In the following example, a loop is used to write the symbol to a new file:
$ ! Insertion $LOOP: $ !Get new records to insert $ INQUIRE NEW_RECORD "New record" $ IF RECORD .EQS. "" THEN GOTO END_LOOP $ WRITE NEW_FILE NEW_RECORD $ GOTO LOOP $END_LOOP:
Example: Creating Output Files
$! Open STATS.DAT for reading and assign it $! the logical name INFILE $! Open a new version of STATS.DAT for writing $! and assign it the logical name OUTFILE $! $ OPEN/READ INFILE DISK4:[MURPHY]STATS.DAT $ OPEN/WRITE OUTFILE DISK4:[MURPHY]STATS.DAT $! $ BEGIN_LOOP: $! Read the next record from INFILE into the symbol RECORD $! $ READ/END_OF_FILE=END_LOOP INFILE RECORD $! Display the record and see if the user wants to change it $! If yes, get the new record $! If no, write record directly to OUTFILE $! $ PROMPT: $ WRITE SYS$OUTPUT RECORD $ INQUIRE/NOPUNCTUATION OK "Change? Y or N [Y] " $ IF OK .EQS. "N" THEN GOTO WRITE_RECORD $ INQUIRE RECORD "New record" $! $ WRITE_RECORD: $ WRITE OUTFILE RECORD $ GOTO BEGIN_LOOP $! $! Close input and output files $ END_LOOP: $ CLOSE INFILE $ CLOSE OUTFILE $ EXIT
14.14.3. Appending Records to Files
| Step |
Action |
|---|---|
| 1 |
Use the OPEN command with the /APPEND qualifier to position the record pointer at the end of the file. The /APPEND qualifier does not create a new version of the file. |
| 2 |
Use the WRITE command to write new data records. |
| 3 |
Continue adding records until you are finished. |
| 4 |
Use the CLOSE command to close the file. |
$! Open STATS.DAT to append files and assign
$! it the logical name FILE
$!
$ OPEN/APPEND FILE DISK4:[MURPHY]STATS.DAT
$!
$ BEGIN_LOOP:
$! Obtain record to be appended and place this
$! record in the symbol RECORD
$!
$ PROMPT:
$ INQUIRE RECORD -
"Enter new record (press RET to quit) "
$ IF RECORD .EQS. "" THEN GOTO END_LOOP
$! Write record to FILE
$!
$ WRITE FILE RECORD
$ GOTO BEGIN_LOOP
$!
$! Close FILE and exit
$!
$ END_LOOP:
$ CLOSE FILE
$ EXIT14.15. Handling File I/O Errors
Use the /ERROR qualifier with the OPEN, READ, or WRITE command to suppress system error messages and to pass control to a specified label. If an error occurs during an input or output operation, the /ERROR qualifier overrides all other error-control mechanisms (except the /END_OF_FILE qualifier on the READ command).
$ OPEN/READ/ERROR=CHECK FILE CONTINGEN.DOC . . . $ CHECK: $ WRITE SYS$OUTPUT "Error opening file"
The OPEN command requests that the file CONTINGEN.DOC be opened for reading. If the file cannot be opened (for example, if the file does not exist), the OPEN command returns an error condition and transfers control to the CHECK label.
The error path specified by the /ERROR qualifier overrides the current ON condition established for the command level. If an error occurs and the target label is successfully given control, the reserved global symbol $STATUS retains the code for the error. You can use the F$MESSAGE lexical function in your error-handling routine to display the message in $STATUS.
$ OPEN/READ/ERROR=CHECK FILE 'P1' ⋮ $ CHECK: $ ERR_MESSAGE = F$MESSAGE($STATUS) $ WRITE SYS$OUTPUT "Error opening file: ",P1 $ WRITE SYS$OUTPUT ERR_MESSAGE ⋮
14.15.1. Default Error Actions
If an error occurs while you are using the OPEN, READ, WRITE, or CLOSE command and you do not specify an error action, the current ON command action is taken.
If you use the /END_OF_FILE qualifier, control is passed to the specified label.
If you do not use the /END_OF_FILE qualifier, control is passed to the label specified with the /ERROR qualifier.
If you do not specify either qualifier (/END_OF_FILE or /ERROR), the current ON command action is taken.
14.16. Techniques for Controlling Execution Flow
The normal flow of execution in a command procedure is sequential: the commands in the procedure execute in order until the end of the file is reached. However, you can also control whether certain statements are executed or the conditions under which the procedure should continue executing.
- The DCL commands that you can use to control or alter the flow of execution:
IF, THEN, ELSE
GOTO
GOSUB
CALL
Using command blocks
Writing case statements
Writing loops
14.16.1. Using the IF Command
When one command follows the THEN command, it is not executed and the following command executes.
When a block of commands follows the THEN command and the ELSE command is not specified, the command immediately following the ENDIF command executes.
When the ELSE command is specified, the command or block of commands following the ELSE command executes.
DCL provides two distinct formats for the IF command. The first format executes a single command when the expression specified to the IF command is true, as discussed in Chapter 13, "Introduction to Command Procedures".
DCL also provides a block-structured IF format. The block-structured IF command executes more than one command if the expression specified is true and accepts an optional ELSE statement, which executes one or more commands if the expression is false.
14.16.2. Using the THEN Command
To execute more than one command when an expression is true, specify the THEN command as a verb (a DCL command preceded by a dollar sign) and terminate the resulting block-structured statement with an ENDIF statement.
$ IF expression $ THEN $ command $ command . . . $ ENDIF
14.16.3. Using the ELSE Command
To execute one or more commands when an expression is false, specify the ELSE statement as a verb and terminate the resulting block-structured statement with an ENDIF statement.
$ IF expression $ THEN $ command $ command . . . $ ELSE $ command $ command . . . $ ENDIF
14.16.4. Using Command Blocks
- If you leave the commands in the command procedure, place them after the THEN statement. For example:
$ IF condition $ THEN command command ⋮ $ ENDIF - If you place the commands in a separate procedure, make the call to that command procedure as part of the THEN statement. For example:
$ IF condition $ THEN @command_procedure $ ELSE command $ command $ ENDIF
- You can continue to specify the nonblock-structured IF format and direct flow to a labeled region when the condition specified is met. For example:
$ IF not condition THEN GOTO END_LABEL . . . $END_LABEL:
You can execute a block of commands after the THEN command when the result of the IF expression is true. When you use a block of commands, place the THEN command as the first command on the line following the IF command.
$ IF F$MODE () .EQS. "INTERACTIVE" $ THEN $ SET TERMINAL/DEVICE=VT320 $ SET TERMINAL/WIDTH=132 $ GOTO PROCEED $ ENDIF $ EXIT $PROCEED:
$ INQUIRE DEV "Device to check" $ IF F$GETDVI(DEV, "EXISTS") $ THEN $ WRITE SYS$OUTPUT "The device exists." $ SHOW DEVICE 'DEV' $ SET DEVICE/ERROR_LOGGING 'DEV' $ ELSE $ WRITE SYS$OUTPUT "The device does not exist." $ WRITE SYS$OUTPUT "Error logging has not been enabled." $ ENDIF $ EXIT
When the condition is true, the procedure writes a message to SYS$OUTPUT and executes the SHOW DEVICE and SET DEVICE commands. When the condition is not true, the procedure writes two messages to SYS$OUTPUT.
Include no more than 15 levels of nested IF statements.
Terminate a command block started by a THEN statement with either an ELSE or an ENDIF statement.
Terminate a command block started by an ELSE statement with an ENDIF statement.
Include a THEN statement as the first executable statement following an IF statement.
Do not specify a label on a line containing a THEN or an ELSE statement. You can, however, specify a label on a line containing an ENDIF statement. Programs can branch within the current command block but branching into the middle of another command block is not recommended.
True Expressions
An odd integer value
A character string value that begins with any of the letters Y, y, T, or t
A character string value that contains numbers that form an integer with an odd value (for example, the string "27")
False Expressions
An even integer value
A character string value that begins with any letter other than Y, y, T, or t
A character string value that contains numbers that form an integer with an even value (for example, the string "28")
Writing Expressions
When you use symbols in IF statements, their values are automatically substituted. Do not use apostrophes (’) as substitution operators unless you need to force iterative translation.
String comparison operators end in the letter S. For example, use operators such as .EQS., .LTS., .GES., .LES., and .GTS. to compare strings. By contrast, the operators .EQ., .LT., .GE., .LE., and .GT. are used for comparing integers.
When you test to see whether two strings are equal, the strings must use the same case in order for DCL to find a match. That is, the string "COPY" does not equal the string "copy" or the string "CoPy."
The following examples illustrate expressions that can be used with the IF command. For additional examples, refer to the description of the IF command in the VSI OpenVMS DCL Dictionary.
$ INQUIRE CONT "Do you want to continue [Y/N]" $ IF .NOT. CONT THEN EXIT . . .
$ INQUIRE CHANGE "Do you want to change the record [Y/N]" $ IF CHANGE THEN GOTO GET_CHANGE . . . $ GET_CHANGE: . . .
When the symbol CHANGE is true, the procedure transfers control to the label GET_CHANGE. Otherwise, the procedure executes the command following the IF command.
$ COUNT = 0 $ LOOP: $ COUNT = COUNT + 1 $ IF COUNT .EQ. 9 THEN EXIT $ IF P'COUNT' .EQS. "" THEN EXIT . . . $ GOTO LOOP
The first IF command compares two integers; the second IF command compares two strings. Note that the .EQ. operator is used for the integer comparison and the .EQS. operator is used for the string comparison.
First, the value of COUNT is compared to the integer 9. When the values are equal, the procedure exits; when the values are not equal, the procedure continues. The loop terminates after eight parameters (the maximum number allowed) have been processed.
In the second IF expression, the string value of the symbol P’COUNT’ is compared to a null string to see whether the symbol is undefined. Note that you must use apostrophes to force iterative substitution of the symbol COUNT. For example, when COUNT is 2, the result of the first translation is P2. Then, the value of P2 is used in the string comparison.
$ GET_COMMAND_LOOP:
$ INQUIRE COMMAND -
"Enter command (DELETE, DIRECTORY, EXIT, PRINT, PURGE, TYPE)"
$ IF COMMAND .EQS. "EXIT" THEN @EXIT_ROUTINE14.16.5. Using the GOTO Command
The GOTO command passes control to a labeled line in a command procedure. For additional information on label usage, refer to Chapter 13, "Introduction to Command Procedures". The GOTO command is especially useful within a THEN clause to cause a procedure to branch forward or backward. For example, when you use parameters in a command procedure, you can test the parameters at the beginning of the procedure and branch to the appropriate label.
The target label of a GOTO or GOSUB command cannot be inside either a separate IF-THEN-ELSE construct or a separate subroutine.
$ IF P1 .NES. "" THEN GOTO OKAY $ INQUIRE P1 "Enter file spec" $ OKAY: $ PRINT/COPIES=10 'P1' . . .
If P1 is a null string, the GOTO command is not executed and the INQUIRE command prompts for a parameter value. Otherwise, the GOTO command causes a branch around the INQUIRE command. In either case, the procedure executes the PRINT command following the line labeled OKAY.
$ GOTO TEST_1 $ EXIT $ IF 1.EQ.1 $ THEN WRITE SYS$OUTPUT "What are we doing here?" $ TEST_1: $ WRITE SYS$OUTPUT "Got to the label" $ ENDIF $ EXIT
14.16.5.1. Avoiding Reexecution
| Step |
Action |
|---|---|
| 1 |
Begin each possible starting point in the procedure with a label. |
| 2 |
After the label, use the SET RESTART_VALUE = label-name command to set the restarting point to that label. If the batch job is interrupted after the SET RESTART_VALUE = label-name command executes, the system assigns the appropriate label name to the global symbol BATCH$RESTART when the batch job restarts. |
| 3 |
At the beginning of the procedure, test the value of the symbol $RESTART. If $RESTART is true, execute a GOTO statement using the symbol BATCH$RESTART as the transfer label. |
$RESTART Global Symbol
$RESTART is a reserved global symbol that the system maintains for you. $RESTART is true if one of your batch jobs was restarted after it was interrupted. Otherwise, $RESTART is false. You cannot delete the reserved global symbol $RESTART.
If a command procedure has SET RESTART_VALUE commands in it but you want the job to reexecute in its entirety, enter the SET ENTRY/NOCHECKPOINT command to delete the global symbol BATCH$RESTART. If you restart a job that was interrupted, the job starts executing in the section where it was interrupted.
$ ! Set default to the directory containing $ ! the file to be updated and sorted $ SET DEFAULT DISK1:[ACCOUNTS.DATA84] $ $ ! Check for restarting $ IF $RESTART THEN GOTO 'BATCH$RESTART' $ $ UPDATE_FILE: $ SET RESTART_VALUE = UPDATE_FILE . . . $ SORT_FILE: $ SET RESTART_VALUE = SORT_FILE . . . EXIT
To submit this command procedure as a batch job that can be restarted, use the /RESTART qualifier to the SUBMIT command when you submit the job. Because interrupted jobs begin executing in the section where they are interrupted, if this job is interrupted during the SORT_FILE routine, it starts executing at the label SORT_FILE when it is restarted.
Most of your process environment is not maintained when the system fails. The only symbols maintained across a system failure are $RESTART and BATCH$RESTART. Therefore, you should redefine any symbols or process logical names used in your command procedure after each SET RESTART_VALUE command or in a THEN block that executes if $RESTART is true.
If you define symbols and logical names in a THEN block, the command GOTO ’BATCH$RESTART’ should be the last command in the THEN block.
14.16.6. Using the GOSUB and RETURN Commands
The GOSUB command transfers control to a labeled subroutine in a command procedure. If the label does not exist in the command procedure, the procedure cannot continue executing and is forced to exit. For complete information on labels, refer to Chapter 13, "Introduction to Command Procedures". You can nest the GOSUB command up to 16 times per procedure level.
The GOSUB command is a local subroutine call; it does not create a new procedure level. Consequently, all labels and local symbols defined in the current command level are available to a subroutine invoked with GOSUB.
The RETURN command terminates a subroutine and returns control to the command following the GOSUB command. You can specify a value for $STATUS with the RETURN command that overrides the value that DCL assigns to $STATUS at the end of the subroutine. This value must be an integer between zero and four or an equivalent expression. If you specify a value for $STATUS, DCL interprets this value as a condition code. If you do not specify a value for $STATUS, the current value of $STATUS is saved.
$! $! GOSUB.COM $! $ SHOW TIME $ GOSUB TEST1
| The first GOSUB command transfers control to the subroutine labeled TEST1. |
| The procedure executes the commands in subroutine TEST1, branching to the subroutine labeled TEST2. |
| The RETURN command in subroutine TEST1 returns control to the main command procedure and passes a value of 1 to $STATUS, indicating successful completion. |
| The RETURN command in subroutine TEST2 returns control to subroutine TEST1. Note that this command executes before command 3. |
14.17. Creating New Command Levels
Nest command procedures by using an execute procedure (@) command inside one command procedure to invoke another command procedure (as described in Chapter 13, "Introduction to Command Procedures").
Use the CALL command to call a subroutine that exists within the command procedure.
14.17.1. Using the CALL Command
The CALL command transfers control to a labeled subroutine in a command procedure and creates a new procedure level. The CALL command allows you to keep more than one related command procedure in a single file, making the procedures easier to manage. The subroutine label, which must be unique, can precede or follow the CALL command in the command procedure. Chapter 13, "Introduction to Command Procedures" contains rules for entering subroutine labels.
In addition to the label, you can pass up to eight optional parameters to the subroutine. For complete information on parameters, refer to Section 14.2, ''Using Parameters to Pass Data''.
Sends output to SYS$OUTPUT
Has an optional /OUTPUT qualifier that allows you to direct output from the subroutine to a file
Uses a default file type .LIS for the output file
Does not accept wildcard characters in the output file specification
14.17.1.1. CALL Command Defaults
You can nest subroutines called with the CALL command and procedures called with the execute procedure (@) command to a maximum of 32 command levels.
Unless they are masked using the SET SYMBOL command, local symbols defined in an outer level are available to any inner procedure or subroutine level. Global symbols are available at any command level.
Labels are valid only for the level in which they are defined.
14.17.1.2. Beginning and Ending Subroutines
The SUBROUTINE and ENDSUBROUTINE commands define the beginning and the end of a CALL subroutine. The label defining the entry point to the subroutine immediately precedes the SUBROUTINE command. You can place the EXIT command immediately before the ENDSUBROUTINE command but it is not required to terminate the subroutine. The ENDSUBROUTINE command terminates the subroutine and transfers control to the command line immediately following the CALL command.
Command lines in a subroutine execute only when the subroutine is called with the CALL command. During the line-by-line execution of the command procedure, the command language interpreter skips all commands between the SUBROUTINE and the ENDSUBROUTINE commands.
Subroutine entry points that are defined within another subroutine are local to that subroutine. You cannot call a subroutine if the subroutine entry point is within a separate subroutine block.
If a subroutine entry point is located within an IF-THEN-ELSE block, you cannot call this subroutine from outside the IF-THEN-ELSE block.
Every SUBROUTINE command must have a matching ENDSUBROUTINE command to end the subroutine.
$ CALL BAR $ $ MAIN: SUBROUTINE $ $ BAR: SUBROUTINE $ ENDSUBROUTINE $ $ ENDSUBROUTINE
For this CALL command to work, it must be placed within the SUBROUTINE and ENDSUBROUTINE points.
$ IF 1 $ THEN $ BOB:SUBROUTINE $ ENDSUBROUTINE $ ENDIF $ CALL BOB
The following example includes two subroutines called SUB1 and SUB2. The subroutines do not execute until they are called with the CALL command.
$
$! CALL.COM
$
$! Define subroutine SUB1.
$!
$ SUB1: SUBROUTINE
.
.
.
$ CALL SUB2 !Invoke SUB2 from within SUB1.
.
.
.
$ @FILE !Invoke another command procedure file.
.
.
.
$ EXIT
$ ENDSUBROUTINE !End of SUB1 definition.
$!
$! Define subroutine SUB2.
$!
$ SUB2: SUBROUTINE
$ EXIT
$ ENDSUBROUTINE !End of SUB2 definition.
$!
$! Start of main routine. At this point, both SUB1 and SUB2
$! have been defined but none of the previous commands have
$! been executed.
$!
$ START:
$ CALL/OUTPUT=NAMES.LOG SUB1 "THIS IS P1"
.
.
.
$ CALL SUB2 "THIS IS P1" "THIS IS P2"
.
.
.
$ EXIT !Exit this command procedure file.The CALL command invokes the subroutine SUB1 and directs output to the file NAMES.LOG. Subroutine SUB1 calls subroutine SUB2. The procedure executes SUB2, invoking the command procedure FILE.COM with the execute procedure (@) command. When all the commands in SUB1 have executed, the CALL command in the main procedure calls SUB2 a second time. The procedure exits when SUB2 finishes executing.
14.18. Writing Case Statements
A case statement is a special form of conditional code that executes one out of a set of command blocks, depending on the value of a variable or expression. Typically, the valid values for the case statement are labels at the beginning of each command block. The case statement passes control to the appropriate block of code by using the specified value as the target label in a GOTO statement.
List the labels.
Write the case statement.
Write the command blocks.
14.18.1. Listing the Labels
To list the labels, equate a symbol to a string that contains a list of the labels delimited by slashes (or any character you choose to act as a delimiter). This symbol definition should precede the command blocks.
$ COMMAND_LIST = "/PURGE/DELETE/EXIT/"
14.18.2. Writing the Case Statement
| Step |
Action |
|---|---|
| 1 |
Use the INQUIRE command to get the value of the case variable. |
| 2 |
Use the IF command with F$LOCATE and F$LENGTH to determine whether the value of the case variable is valid. |
| 3 |
If the case variable is valid, execute the case statement (with a GOTO command) to pass control to the appropriate block of code. Otherwise, display a message and exit or request a different case value. |
$GET_COMMAND:
$ INQUIRE COMMAND -
"Command (EXIT,PURGE,DELETE)"
$ IF F$LOCATE ("/"+COMMAND+"/",COMMAND_LIST) .EQ. -
F$LENGTH (COMMAND_LIST) THEN GOTO ERROR_1
$ GOTO 'COMMAND'
.
.
.
$ERROR_1:
$ WRITE SYS$OUTPUT "No such command as ''COMMAND'."
$ GOTO GET_COMMAND14.18.3. Writing the Command Blocks
Each block of commands may contain one or more commands. Begin each command block with a unique label. End each command block by passing control to a label outside the list of command blocks.
$GET_COMMAND: . . . $PURGE: $ INQUIRE FILE $ PURGE 'FILE' $ GOTO GET_COMMAND $ ! $DELETE: $ INQUIRE FILE $ DELETE 'FILE' $ GOTO GET_COMMAND $ ! $EXIT:
14.19. Writing Loops
| Step |
Action |
|---|---|
| 1 |
Begin the loop. |
| 2 |
Perform the commands in the body of the loop. |
| 3 |
Change the termination variable. |
| 4 |
Test the termination variable. If the condition is not met, go to the beginning of the loop. |
| 5 |
End the loop. |
Note that when you test the termination variable at the end of the loop, the commands in the body of the loop are executed at least once, regardless of the value in the termination variable.
$ ! EXAMPLE 1 $ ! $GET_COMMAND: $ INQUIRE COMMAND- "Command (EXIT,DIRECTORY,TYPE,PURGE,DELETE,COPY)" $ COMMAND = F$EXTRACT(0,2,COMMAND) $ IF COMMAND .EQS. "EX" THEN GOTO END_LOOP . . . $ GOTO GET_COMMAND $ END_LOOP: $ ! EXAMPLE 2 $ ! $GET_COMMAND: $ INQUIRE COMMAND- "Command (EXIT,DIRECTORY,TYPE,PURGE,DELETE,COPY)" $ COMMAND = F$EXTRACT(0,2,COMMAND) . . . $ IF COMMAND .NES. "EX" THEN GOTO GET_COMMAND $ ! End of loop
$ NUM = 1 ! Set counter $LOOP: ! Begin loop $ INQUIRE FIL'NUM' "File" ! Get file name $ NUM = NUM + 1 ! Update counter $ IF NUM .LT. 11 THEN GOTO LOOP ! Test for termination $END_LOOP: ! End loop . . .
$! Obtain 10 file names and store them in the $! symbols FILE_1 to FILE_10 $! $ COUNT = 0 $ LOOP: $ COUNT = COUNT + 1 $ INQUIRE FILE_'COUNT' "File" $ IF COUNT .LT. 10 THEN GOTO LOOP $! $ PROCESS_FILES: . . .
The symbol COUNT is used to record the number of times the commands in the loop are executed. COUNT is also used to create the symbol names FILE_1, FILE_2, and so on to FILE_10. Note that the value of COUNT is incremented at the beginning of the loop but is tested at the end of the loop. Therefore, when COUNT is incremented from 9 to 10, the loop executes a last time (obtaining a value for FILE_10) before the IF statement finds a false result.
To perform a loop for a known sequence of values, use the F$ELEMENT lexical function. The F$ELEMENT lexical function obtains items from a list of items separated by delimiters. You must supply the item number, the item delimiter, and the list as arguments for F$ELEMENT.
For more information on how to use the F$ELEMENT lexical function, refer to the VSI OpenVMS DCL Dictionary.
$ FILE_LIST = "1,2,3,A,B,C" $ INDEX = 0 $PROCESS: $ NUM = F$ELEMENT(INDEX,",",FILE_LIST) $ IF NUM .EQS. "," THEN GOTO END_LOOP $ FILE = "CHAP''NUM'" $ ! process file named by FILE . . . $ INDEX = INDEX + 1 $ GOTO PROCESS $END_LOOP: $ EXIT
$ FILE_LIST = "CHAP1/CHAP2/CHAP3/CHAP4/CHAP5" $ NUM = 0 $! $! Process each file listed in FILE_LIST $ PROCESS_LOOP: $ FILE = F$ELEMENT(NUM,"/",FILE_LIST) $ IF FILE .EQS. "/" THEN GOTO DONE $ COPY 'FILE'.MEM MORRIS::DISK3:[DOCSET]*.* $ NUM = NUM + 1 $ GOTO PROCESS_LOOP $! $ DONE: $ WRITE SYS$OUTPUT "Finished copying files." $ EXIT
The first file returned by the F$ELEMENT lexical function is CHAP1, the next file is CHAP2, and so on. Each time through the loop, the value of NUM is increased so that the next file name is obtained. When the F$ELEMENT returns a slash, all the items from FILE_LIST have been processed and the loop is terminated.
14.20. Using the PIPE Command
The PIPE command executes one or more DCL command strings from the same command line. It enables you to perform UNIX-style command processing, such as command pipelining, input/output redirection, and conditional and background execution.
This style of command processing supports the development and use of Internet software, which often expects some form of pipeline command parsing to be present on both host and target systems.
The following sections describe different methods of using the PIPE command to execute DCL commands, how to interrupt a PIPE command, and how to improve subprocess performance. There are also examples.
For complete information about the PIPE command, refer to the VSI OpenVMS DCL Dictionary: N–Z.
PIPE command-sequence ; command-sequence [; command-sequences]...
14.20.1. Using the PIPE Command for Conditional Command Execution
PIPE command-sequence1 && command-sequence2
PIPE command-sequence1 || command-sequence2
14.20.2. Using the PIPE Command for Pipeline Execution
PIPE pipeline-segment-command | pipeline-segment-command [|…]
Each pipeline-segment command runs in a separate subprocess with its SYS$OUTPUT connected to the SYS$INPUT of the next pipeline-segment command. These subprocesses execute in parallel; however, they are synchronized to the extent that each pipeline-segment command, except the first, reads the standard output of its predecessor as its standard input. A pipeline completes execution when the last pipeline-segment command is finished.
It is very common to use "filter applications" in a pipeline. A filter application is a program that takes data from SYS$INPUT, transforms it in a specific way, and writes it to SYS$OUTPUT.
Using SYS$COMMAND
The SYS$COMMAND of a subprocess is normally the same as its SYS$INPUT (if no command procedures are involved). In a pipeline, however, the SYS$COMMAND of a subprocess is set to the SYS$COMMAND of the parent process rather than to the preceding pipe (which is the SYS$INPUT of the pipeline-segment command).
File access methods
A pipeline segment command can only use the RMS sequential file access method to read and write to the pipes. Certain OpenVMS utilities may access their input and output files using methods other than sequential access. These operations are not supported in a pipeline, and will fail, as in the following example:$ PIPE CC/NOOBJ/NOLIS TEST.C | SEARCH SYS$INPUT/WIND=(1,1) "%cc-w-" %SEARCH-F-RFAERR, RMS error using RFA access -RMS-F-RAC, invalid record access mode
In this example, the /WINDOW qualifier for the SEARCH command requires the relative file access method.
Symbol substitution
Be aware of the order in which DCL translates symbols. Symbol substitution takes place during phase 1 of command processing. If you define a symbol as part of a PIPE command, DCL attempts to translate the symbol before performing the command in which the symbol is actually defined. Use the ampersand (&) to defer symbol substitution. For more information, see Section 12.12.2, ''Symbol Substitution Operators''.
Using SYS$PIPE
In most cases, input from the pipe can be obtained by reading the data from SYS$INPUT. However, when a command procedure is invoked as a pipeline segment command, SYS$INPUT is redirected to the command procedure file. To obtain data from the pipe inside a command procedure, the logical SYS$PIPE can be used.
The following is an example of a pipeline DCL application TEE.COM:$ ! TEE.COM - command procedure to display/log data flowing through $ ! a pipeline $ ! Usage: @TEE log-file $ $ OPEN/WRITE tee_file 'P1' $ LOOP: $ READ/END_OF_FILE=EXIT SYS$PIPE LINE $ WRITE SYS$OUTPUT LINE ! Send it out to the next stage of the pipeline $ WRITE tee_file LINE ! Log output to the log file $ GOTO LOOP $ EXIT: $ CLOSE tee_file $ EXIT
To use TEE.COM, enter the following PIPE command:$ PIPE SHOW SYSTEM | @TEE showsys.log | SEARCH SYS$INPUT LEF
The command procedure TEE.COM is used to log the data flowing through the pipeline. It reads in the data from SYS$PIPE instead of SYS$INPUT.
Image verification
In a pipeline, image verification is turned off by default, even when the command SET VERIFY=IMAGE is executed before the PIPE command is entered. This prevents duplication of data records going through the pipeline.
To turn on image verification in a pipeline, an explicit SET VERIFY=IMAGE command must precede the pipeline segment command. You can use a subshell to do this, as follows:$ PIPE ... | (SET VERIFY=IMAGE ; ...) | ...
14.20.3. Using the PIPE Command for Subshell Execution
PIPE ( command-sequence [separator command-sequence]... )
The command sequences in a subshell are executed in a subprocess environment. DCL waits for the subshell to complete before executing the next command sequence. The ( ) separator is similar to the SPAWN/WAIT command.
When using the PIPE command in this format, handle symbol substitution carefully. After defining a symbol, precede subsequent references to that symbol with an ampersand (&) to delay symbol substitution. Otherwise symbol substitution takes place during phase 1 of command processing, at which time the symbol definition is unreliable.
14.20.4. Using the PIPE Command for Background Execution
PIPE command-sequence [ separator command-sequence]... &
DCL does not wait for the command sequences to finish. Control passes back to DCL once the background subprocess is created.
14.20.5. Using the PIPE Command for Input/Output Redirection
- To redirect SYS$INPUT:
PIPE command-sequence < redirected-input-file
- To redirect SYS$OUTPUT:
PIPE command-sequence > redirected-output-file
- To redirect SYS$ERROR:
PIPE command-sequence 2> redirected-error-file
A pipeline-segment command can also redirect its SYS$INPUT, SYS$OUTPUT or SYS$ERROR. However, SYS$OUTPUT redirection is allowed only for the last pipeline-segment command, and SYS$INPUT redirection is allowed only for the first pipeline-segment command.
Redirections are created in supervisor mode. This means that both user-mode applications and DCL commands are affected by the redirections.
The redirected environment only applies to the command sequence or the pipeline-segment command that specifies the redirection syntax. After the execution of the command sequence or pipeline-segment command, the original process input/output environment (for example, SYS$INPUT, SYS$OUTPUT and SYS$ERROR) is restored before command execution continues.
$ PIPE SEARCH TRANS.LOG "alpha" > TRANS.LOG %SEARCH-W-OPENIN, error opening TRANS.LOG;2 as input -RMS-E-FLK, file currently locked by another user
In this example, a new version of TRANS.LOG is created and opened for write access; the SEARCH command then tries to get read access to the most recent version of TRANS.LOG instead of the expected previous version.
When SYS$ERROR is redirected, the redirected error file is only created when the command sequence actually writes to the SYS$ERROR during execution, and there is no existing file with the same name as the redirected error file. If a file with the same name as the redirected error file already exists, that file is opened as the redirected error file. The error output generated by this command sequence is then appended to the end of the redirected error file. This behavior is the same as using the DEFINE or ASSIGN command to redefine SYS$ERROR in supervisor mode.
14.20.6. Interrupting a PIPE Command
You can interrupt a PIPE command by pressing Ctrl/Y. If the PIPE command is executing in a pipeline or a subshell command sequence, the command sequence and the PIPE command are deleted. In this case, a CONTINUE command entered immediately after the interrupt will not resume the execution of the PIPE command.
If the PIPE command is executing a command sequence other than a subshell or a pipeline command sequence, DCL behaves as if the command sequence were entered as a DCL command without the PIPE command verb and interrupted by Ctrl/Y. See Section 13.11, ''Handling Ctrl/Y Interruptions'' for more information about the Ctrl/Y interrupt.
14.20.7. Improving Subprocess Performance
A PIPE command can generate a number of subprocesses during execution. Often, the applications invoked by command sequences do not depend on the process logical names and symbol names. In this case, the spawning of subprocesses can be accelerated by using the /NOLOGICAL_NAMES and /NOSYMBOLS qualifiers, which suppress the passing of process logical names and symbols to the subprocesses created by the PIPE command.
- The following example shows two simple uses of multiple commands with symbol definitions to build useful tools in command procedures:
$ CD_WORK :== PIPE SAVE_DIR=F$DIRECTORY() ; SET DEFAULT FOO:[WORK] $ BACK :== SET DEF 'SAVE_DIR' $ $ CD_WORK ! Switch to working directory $ : $ : $ BACK ! Switch back to home directory $ GET_RECORD :== PIPE READ/END_OF_FILE=CLEANUP IN RECORD ; - F$EDIT(RECORD, "COMPRESS, TRIM") $ $ OPEN IN EMPLOYEE.DAT $ LOOP: $ GET_RECORD $ : $ : $ GOTO LOOP $ $ CLEAN_UP: $ : - The following example shows a compile and link operation. Note that if the compilation does not generate any error, the object file is linked to produce an executable image. If the program compilation generates an error, the linking step is skipped.
$ PIPE cc foo.c && link foo, sys$library:vaxcrtl.olb/lib
- The following example shows how you can use a conditional command execution to easily set up simple error handling control flow in a command procedure. Note that if the image COLLECT_DATA fails, control is directed to CLEAN_UP.
$ PIPE RUN COLLECT_DATA.EXE || GOTO CLEAN_UP $ : $ : $ EXIT $ $ CLEAN_UP: $ : $ :
- The PIPE command in this example creates a background process to handle the copying of a large file.
$ PIPE COPY LARGE_FILE.DAT REMOTE"user password"::[DESTINATION]*.* &
- The following example shows how a subshell command sequence is set up to be done in a subprocess. As a result, changing a process-specific characteristic (for example, the default directory) will not affect the current process after the subshell is finished. Note that the save set is restored in a subdirectory to provide the necessary data to run the program FOO.
$ PIPE (SET DEF [.DATA_DIR] ; BACKUP DATA.SAV/SAV [...]) ; RUN FOO
- The following example uses the pipeline function to identify all hibernating processes on the system in one command:
$ PIPE SHOW SYSTEM | SEARCH SYS$INPUT HIB
- The following example uses the pipeline function to run a test, sort the result, and compare the result to the benchmark file in a single command without generating unnecessary intermediate files:
$ PIPE RUN TEST | SORT/SPECIFICATION=TEST.SRT SYS$INPUT SYS$OUTPUT - | DIFF SYS$INPUT TEST.BENCHMARK
- The following example shows one way a subshell can be specified as a pipe segment command in a pipeline:
$ PIPE ( SET DEF WRK$:[WORK] ; RUN REPORT ) | MAIL SYS$INPUT SMITH
- The following example shows the use of the /PAGE qualifier within a pipeline. The /PAGE function exists in a number of other DCL commands as well and can be used similarly with the PIPE command to form other useful tools.
$ more :== TYPE/PAGE=SAVE SYS$INPUT $ PIPE ANA/RMS PAGE.TXT | more Check RMS File Integrity 26-JAN-2002 16:12:00.06 Page 1 SYS$SYSDEVICE:[TEST]PAGE.TXT;2 FILE HEADER File Spec: SYS$SYSDEVICE:[TEST]PAGE.TXT;2 File ID: (4135,58220,0) Owner UIC: [PIPE] Protection: System: RWED, Owner: RWED, Group: RE, World: Creation Date: 26-NOV-2002 16:08:50.05 Revision Date: 26-NOV-2002 16:09:09.06, Number: 1 Expiration Date: none specified Backup Date: none posted Contiguity Options: none Performance Options: none Reliability Options: none Journaling Enabled: none RMS FILE ATTRIBUTES RETURN/SPACE=More, PREV/NEXT=Scroll, INS/REM=Pan, SELECT=80/132, Q=Quit
Chapter 15. Using Lexical Functions to Obtain and Manipulate Information
Lexical functions return information to a command line or command procedure. The information returned can be about your process, the system, files and devices, logical names, strings, or data types. Lexical functions are identified by the prefix F$.
You can use lexical functions in any context in which you normally use symbols or expressions. In command procedures, you can use lexical functions to translate logical names, to perform character string manipulations, and to determine the current processing mode of the procedure. Many lexical functions return information that you can also get from DCL commands.
How lexical functions work
Obtaining information about your process
Obtaining information about the system
Obtaining information about files and devices
Translating logical names
Manipulating strings
Manipulating data types
For additional information about lexical functions, refer to online help. For more information about the commands discussed in this chapter, refer to the VSI OpenVMS DCL Dictionary.
15.1. Why Use Lexical Functions
- If you use the F$ENVIRONMENT function, you can assign the result to a symbol and then use this symbol later in the procedure. For example:
$ DIR_NAME = F$ENVIRONMENT("DEFAULT") $ SET DEFAULT DISK4:[TEST] . . . $ SET DEFAULT 'DIR_NAME'The F$ENVIRONMENT function returns the current default disk and directory and stores this value in the symbol DIR_NAME. At the end of the procedure, you use the symbol DIR_NAME to restore the default with the SET DEFAULT command.
- If you obtain the value of the current default directory by using the SHOW DEFAULT command, instead of the F$ENVIRONMENT lexical function, you cannot assign this output to a symbol directly. Instead, the procedure is as follows:
$! Redirect the output of the SHOW DEFAULT command to a file. $ DEFINE/SUPERVISOR_MODE SYS$OUTPUT DISK4:[TEST]TEMPFILE.DAT $ SHOW DEFAULT $ DEASSIGN SYS$OUTPUT $! $ OPEN/READ DIR_FILE DISK4:[TEST]TEMPFILE.DAT ! Open the file. $ READ DIR_FILE DIR_NAME, ! Read the file. $ SET DEFAULT 'DIR_NAME' ! Reset the directory. $ CLOSE DIR_FILE ! Close the file. $ DELETE DISK4:[TEST]TEMPFILE.DAT;* ! Delete the file.
15.2. Obtaining Information About Your Process
|
F$DIRECTORY |
Returns the current default directory string. |
|
F$ENVIRONMENT |
Returns information about the command environment for your process. |
|
F$GETJPI |
Returns accounting, status, and identification information about your process or about other processes on the system. |
|
F$MODE |
Shows the mode in which your process is executing. |
|
F$PRIVILEGE |
Indicates whether your process has the specified privileges. |
|
F$PROCESS |
Returns the name of your process. |
|
F$SETPRV |
Sets the specified privileges. This function also indicates whether the specified privileges were previously enabled before you used the F$SETPRV function. |
|
F$USER |
Returns your user identification code (UIC). |
|
F$VERIFY |
Indicates whether verification is on or off. |
|
Characteristic |
Operation |
Command or Lexical Function |
|---|---|---|
|
Control characters |
Save |
F$ENVIRONMENT("CONTROL") |
|
Restore |
SET CONTROL | |
|
DCL prompt |
Save |
F$ENVIRONMENT("PROMPT") |
|
Restore |
SET PROMPT | |
|
Default protection |
Save |
F$ENVIRONMENT("PROTECTION") |
|
Restore |
SET PROTECTION/DEFAULT | |
|
Key state |
Save |
F$ENVIRONMENT("KEY_STATE") |
|
Restore |
SET KEY | |
|
Message format |
Save |
F$ENVIRONMENT("MESSAGE") |
|
Restore |
SET MESSAGE | |
|
Privileges |
Save |
F$PRIVILEGE or F$SETPRV |
|
Restore |
F$SETPRV or SET PROCESS/PRIVILEGES | |
|
Verification |
Save |
F$VERIFY or F$ENVIRONMENT |
|
Restore |
F$VERIFY or SET VERIFY |
If you save process characteristics, you must ensure that an error or Ctrl/Y interruption does not cause the procedure to exit before you restore the original characteristics. See Chapter 13, "Introduction to Command Procedures" for more information on handling errors and Ctrl/Y interruptions.
15.2.1. Changing Verification Settings
You can use the F$VERIFY lexical function to disable verification for the duration of a command procedure. This prevents users from displaying a procedure's contents while executing the procedure.
Procedure verification
Displays each command line as it is being executed
Image verification
Displays each data line as it is being processed
By default, the SET [NO]VERIFY command and the F$VERIFY function turn both types of verification on or off. In general, the procedure and image verification settings in a procedure are the same (both on or both off). However, if you decide to change the settings, save each verification setting separately.
$ ! Enable verification $ ! $ TEMP = F$VERIFY(1) $ LOOP: $ INQUIRE FILE "File name" $ IF FILE .EQS."" THEN EXIT $ PRINT 'FILE' $ GOTO LOOP $ ! Disable verification $ ! $ TEMP = F$VERIFY(0) $ EXIT
$ ! Save each verification state
$ ! Turn both states off
$ SAVE_VERIFY_IMAGE = F$ENVIRONMENT("VERIFY_IMAGE")
$ SAVE_VERIFY_PROCEDURE = F$VERIFY(0)
⋮
$ ! Restore original verification states
$ SAVE_VERIFY_IMAGE = F$VERIFY(SAVE_VERIFY_PROCEDURE,-
SAVE_VERIFY_IMAGE)The F$ENVIRONMENT function returns the current image verification setting and assigns this value to the symbol SAVE_VERIFY_IMAGE. Next, the F$VERIFY function returns the current procedure verification setting and assigns this value to the symbol SAVE_VERIFY_PROCEDURE. The F$VERIFY function disables both image and procedure verification. You can use the F$ENVIRONMENT function to obtain the procedure verification setting before you disable verification with F$VERIFY. However, it is shorter to use F$VERIFY to accomplish both tasks in one command line, as shown in the previous example.
Note
If you are using time-stamping, remember that it applies only if verification is enabled. For more information on time-stamping and the SET PREFIX command, refer to the VSI OpenVMS DCL Dictionary or DCL help.
15.2.2. Changing Default File Protection
$ SAVE_PROT = F$ENVIRONMENT("PROTECTION")
$ SET PROTECTION = (SYSTEM:RWED, OWNER:RWED, GROUP, WORLD)/DEFAULT
⋮
$ SET PROTECTION=('SAVE_PROT')/DEFAULT
$ EXITNote that the F$ENVIRONMENT function returns the default protection code using the syntax required by the SET PROTECTION command. This lets you use the symbol SAVE_PROT with the SET PROTECTION command to restore the original default file protection.
15.3. Obtaining Information About the System
|
F$CONTEXT |
Specifies selection criteria to use with the F$PID function. The F$CONTEXT function enables the F$PID function to obtain information about processes from any node in an OpenVMS Cluster system. |
|
F$CSID |
Returns an OpenVMS Cluster identification number and updates the context symbol to point to the current position in the system's OpenVMS Cluster node list. |
|
F$GETQUI |
Returns information about queues, batch and print jobs currently in those queues, form definitions, and characteristic definitions kept in the system job queue file. |
|
F$GETSYI |
Returns information about your local system or about a node in your OpenVMS Cluster system (if your system is part of an OpenVMS Cluster). |
|
F$IDENTIFIER |
Converts identifiers from named to numeric format or from numeric to named format. |
|
F$MESSAGE |
Returns the message text associated with a status code. |
|
F$PID |
Returns the process identification (PID) number for processes that you are allowed to examine. |
|
F$TIME |
Returns the current date and time. |
15.3.1. Determining Your OpenVMS Cluster Node Name
If your system is part of an OpenVMS Cluster environment where you can log in to many different nodes, you can set the DCL prompt to indicate which node you are currently using. To do this, include the F$GETSYI function in your login command procedure to determine the node name. Then use the SET PROMPT command to set a unique prompt for the node.
If you want to use only a portion of the node name in your prompt string, use the F$EXTRACT function to extract the appropriate characters. See Section 15.6.2, ''Extracting Parts of Strings'' for more information on extracting characters.
$ NODE = F$GETSYI("NODENAME")
$ SET PROMPT = "''NODE'$ "
.
.
.15.3.2. Obtaining Queue Information
You can use the F$GETQUI function to get many types of information about batch and print queues. You must have read access to the job, SYSPRV privilege, or OPER privilege to obtain information about jobs and files in queues.
$ QSTOPPED = F$GETQUI("DISPLAY_QUEUE", "QUEUE_STOPPED", "VAX1_BATCH")
$ IF QSTOPPED THEN GOTO NOBATCH
$ SUBMIT/QUEUE=VAX1_BATCH TEST.COM
$ NOBATCH:
⋮15.3.3. Obtaining Process Information
For all processes on the system if you have WORLD privilege
For all processes in your group if you have GROUP privilege
Only for your process if you have neither GROUP nor WORLD privilege
After you obtain a PID number, you can use the F$GETJPI function to obtain specific information about the process.
$ ! Display the time when this procedure $ ! begins executing $ WRITE SYS$OUTPUT F$TIME() $ ! $ CONTEXT = "" $ START: $ ! Obtain and display PID numbers until $ ! F$PID returns a null string $ ! $ PID = F$PID(CONTEXT) $ IF PID .EQS. "" THEN EXIT $ WRITE SYS$OUTPUT "Pid — ''PID'" $ GOTO START
The system uses the symbol CONTEXT to hold a pointer into the system list of PID numbers. Each time through the loop, the system changes the pointer to locate the next PID number in the list. The procedure exits after all PID numbers have been displayed.
$ CONTEXT = "" $ START: $ ! Obtain and display PID numbers and UICs $ ! $ PID = F$PID(CONTEXT) $ IF PID .EQS. "" THEN EXIT $ UIC = F$GETJPI(PID,"UIC") $ WRITE SYS$OUTPUT "Pid — ''PID' Uic— ''UIC' " $ GOTO START
$ CONTEXT = "" $ START: $ PID = F$PID(CONTEXT) $ IF PID .EQS. "" THEN EXIT $ WRITE SYS$OUTPUT "Pid — ''PID' Uic — ''F$GETJPI(PID,"UIC")'" $ GOTO START
15.3.4. F$CONTEXT Lexical Function
To obtain information about processes from any node in an OpenVMS Cluster system, use the F$CONTEXT function.
$!Establish an error and Ctrl/Y handler
$!
$ ON ERROR THEN GOTO error
$ ON CONTROL_Y THEN GOTO error
$!
$ ctx = ""
$ temp = F$CONTEXT ("PROCESS", ctx, "NODENAME", "*","EQL")
$ temp = F$CONTEXT ("PROCESS", ctx, "USERNAME", "M*,SYSTEM","EQL")
$ temp = F$CONTEXT ("PROCESS", ctx, "CURPRIV", "SYSPRV,OPER", "ALL")
$!
$!Loop over all processes that meet the selection criteria.
$!Print the PID number and the name of the image for each process.
$!
$loop:
$ pid = F$PID(ctx)
$ IF pid .EQS. ""
$ THEN
$ GOTO endloop
$ ELSE
$ image = F$GETJPI(pid,"IMAGNAME")
$ SHOW SYMBOL pid
$ WRITE SYS$OUTPUT image
$ GOTO loop
$ ENDIF
$!The loop over the processes has ended.
$!
$endloop:
$!
$ EXIT
$!
$!Error handler. Clean up the context's memory with
$!the CANCEL selection item keyword.
$!
$error:
$ IF F$TYPE(ctx) .eqs. "PROCESS_CONTEXT" THEN -
-$ temp = F$CONTEXT ("PROCESS", ctx, "CANCEL")  $!
$ EXIT
$!
$ EXIT
| The first call requests that the search take place on all nodes in the OpenVMS Cluster system. |
| The second call requests that only the processes whose user name either starts with an M or is SYSTEM be processed. |
| The third call restricts the selection to those processes whose current privileges include both SYSPRV (system privilege) and OPER (operator) and can have other privileges set. |
| The command lines between the labels "loop" and "endloop" continually call F$PID to obtain the processes that meet the criteria set up in the F$CONTEXT calls. |
| After retrieving each PID number, F$GETJPI is called to return the name of the image running in the process. |
| Finally, the procedure displays the name of the image. |
| In case of error or a Ctrl/Y operation, control is passed to error and the context is closed if necessary. |
| Note the check for the symbol type PROCESS_CONTEXT. If the symbol has this type, selection criteria must be canceled by a call to F$CONTEXT. If the symbol is not of the type PROCESS_CONTEXT, either selection criteria have not been set up yet in F$CONTEXT or the symbol was used with F$PID until an error occurred or until the end of the process list was reached. |
15.4. Obtaining Information About Files and Devices
|
F$DEVICE |
Returns the device names of all devices on a system that meet the specified selection criteria |
|
F$FILE_ATTRIBUTES |
Returns information about file attributes |
|
F$GETDVI |
Returns information about a specified device |
|
F$PARSE |
Parses a file specification and returns the requested field or fields |
|
F$SEARCH |
Searches a directory for a file |
15.4.1. Searching for Devices
To get information on a particular device by using the system service $GETDVI, you must provide the device name to the service. If you do not know the device name, you can find it by using the lexical function F$DEVICE.
The F$DEVICE function allows wildcard searches based on the device name, the device class, or the device type. To do a search based on device type, you must also specify a device class.
You can use the F$DEVICE function in a loop in a command procedure to return device names that match the specified selection criteria. Each time the F$DEVICE function is executed, it returns the next device on the system that matches the selection criteria. Note that devices are returned in no particular order. After the last device name is returned, the next F$DEVICE function call returns a null string.
$ START:
$ DEVICE_NAME = F$DEVICE("*0:","DISK","RA60")
$ IF DEVICE_NAME .EQS. "" THEN EXIT
$ SHOW SYMBOL DEVICE_NAME
$ GOTO START15.4.2. Searching for a File in a Directory
$ FILE = F$PARSE("STATS.DAT","DISK3:[JONES.WORK]",,,"SYNTAX_ONLY")
$ IF F$SEARCH(FILE) .EQS. "" THEN GOTO GET_FILE
$ PROCESS_FILE:
⋮
$ GET_FILE:
$ INQUIRE FILE "File name"
$ GOTO PROCESS_FILE$ IF F$SEARCH("STATS.DAT") .EQS. "" THEN GOTO GET_FILE
$ PROCESS_FILE:
$ NAME = F$PARSE("STATS.DAT",, "NAME")
.
.
.
$ GET_FILE:
$ INQUIRE FILE "File name"
$ GOTO PROCESS_FILE15.4.3. Deleting Old Versions of Files
If a command procedure creates files that you do not need after the procedure terminates, delete or purge these files before you exit from the procedure. Use the PURGE command to delete all versions except the most recent one. Use the DELETE command with a version number to delete a specific version of the file or with a wildcard character in the version field to delete all versions of the file.
$ IF F$SEARCH("TEMP.DAT") .NES. "" THEN DELETE TEMP.DAT;*15.5. Translating Logical Names
|
F$LOGICAL |
Returns the equivalence string for a logical name. |
|
F$TRNLNM |
Returns either the equivalence string or the requested attributes for a logical name. |
Note
The F$TRNLNM function supersedes the F$LOGICAL function that was used in earlier versions of the OpenVMS operating system. You should use F$TRNLNM (instead of F$LOGICAL) to ensure that your command procedure processes logical names using the current system techniques.
In some situations, you may want to use logical names rather than symbols as variables in command procedures. Programs can access logical names more easily than they can access DCL symbols. Therefore, to pass information to a program that you run from a command procedure, obtain the information using a symbol. Then use the DEFINE or ASSIGN command to equate the value of the symbol to a logical name.
You can also use the F$TRNLNM function to determine the value of a logical name and then assign the value to a symbol.
$ ! Make sure that NAMES is defined
$ IF F$TRNLNM("NAMES") .NES. "" THEN GOTO ALL_SET
$ INQUIRE FILE "File with employee names"
$ DEFINE NAMES 'FILE'
$ !
$ ! Run PAYROLL, using the file indicated by NAMES
$ ALL_SET:
$ RUN PAYROLL
.
.
.$ DEFINE NAMES DISK4:[JONES]EMPLOYEE_NAMES.DAT
$ RUN PAYROLL
⋮
$ WRITE SYS$OUTPUT "Finished processing ",F$TRNLNM("NAMES")At the end of the procedure, the WRITE command displays a message indicating that the file was processed.
15.6. Manipulating Strings
|
F$CVTIME |
Returns information about a time string |
|
F$EDIT |
Edits a character string |
|
F$ELEMENT |
Extracts an element from a string in which the elements are separated by delimiters |
|
F$EXTRACT |
Extracts a section of a character string |
|
F$FAO |
Formats an output string |
|
F$LENGTH |
Determines the length of a string |
|
F$LOCATE |
Locates a character or a substring within a string and returns the offset |
15.6.1. Determining Presence of Strings or Characters
One common reason for examining strings is to determine whether a character (or substring) is present within a character string. To do this, use the F$LENGTH and the F$LOCATE functions. If the value returned by the F$LOCATE function equals the value returned by the F$LENGTH function, then the character you are looking for is not present.
$ INQUIRE FILE "Enter file (include version number)"
$ IF F$LOCATE(";", FILE) .EQ. F$LENGTH(FILE) THEN -
GOTO NO_VERSION
.
.
.The F$LOCATE function returns the offset for the semicolon. Offsets start with 0; thus, if the semicolon were the first character in the string, the F$LOCATE function would return the integer 0. If the semicolon is not present within the string, the F$LOCATE function returns an offset that is one more than the offset of the last character in the string. This value is the same as the length returned by F$LENGTH, which measures the length of the string starting with the number 1.
15.6.2. Extracting Parts of Strings
To extract a portion of a string, use either the F$EXTRACT function or the F$ELEMENT function. Use the F$EXTRACT function to extract a substring that starts at a defined offset. Use the F$ELEMENT function to extract part of a string between two delimiters. To use either of these functions, you must know the general format of the string you are parsing. Note that you do not need to use F$EXTRACT or F$ELEMENT to parse file specifications or time strings. Instead, use F$PARSE or F$CVTIME to extract the desired portions of file specifications or time strings.
You can also determine the length of the group name at the same time you extract it.
If a string contains a delimiter that separates different parts of the string, use the F$ELEMENT function to extract the part that you want. You can use F$ELEMENT to obtain different types of access by extracting the portions of the string between the commas. To determine system access, obtain the first element; to determine owner access, obtain the second element; and so on. Note that when you use the F$ELEMENT function, element numbers start with zero. For this reason, use the integer 3 to specify the fourth element.
$ UIC = F$USER()
$ GROUP_LEN = F$LOCATE(",",UIC) - 1
$ GROUP = F$EXTRACT(1,GROUP_LEN, UIC)
$ GOTO 'GROUP'_SECTION
.
.
.
$ WRITERS_SECTION:
.
.
.
$ MANAGERS_SECTION:
.
.
.First, the procedure determines the UIC with the F$USER function. Next, the procedure determines the length of the group name by using F$LOCATE to locate the offset of the comma. The comma separates the group from the user portion of a UIC. Everything between the left bracket and the comma is part of the group name. For example, the group name from the UIC [WRITERS,SMITH] is WRITERS.
After determining the length, the procedure extracts the name of the group with the F$EXTRACT function. The name starts with offset 1 and ends with the character before the comma. Finally, the procedure directs execution to the appropriate label.
$ UIC = F$USER()
$ GROUP = F$EXTRACT(1, F$LOCATE(",",UIC) - 1, UIC)
$ GOTO 'GROUP'_SECTION$ PROT = F$ENVIRONMENT("PROTECTION")
$ SHOW SYMBOL PROT
PROT = "SYSTEM=RWED, OWNER=RWED, GROUP=RE, WORLD"$ PROT = F$ENVIRONMENT("PROTECTION")
$ WORLD_PROT = F$ELEMENT(3,",",PROT)
.
.
.The F$ELEMENT function returns everything between the third comma and the end of the string. Thus, if your default protection allowed read access for world users, the string "WORLD=R" would be returned.
$ PROT = F$ENVIRONMENT("PROTECTION")
$ WORLD_PROT = F$ELEMENT(3,",",PROT)
$ IF F$LOCATE("=", WORLD_PROT) .EQ. F$LENGTH(WORLD_PROT) -
THEN GOTO NO_WORLD_ACCESS
.
.
.15.6.3. Formatting Output Strings
You can use the WRITE command to write a string to a record. To line up columns in a record, you can use the F$FAO function to define record fields and place the process name and user name in these fields. When you use the F$FAO function, use a control string to define the fields in the record; then specify the values to be placed in these fields.
Another way to format fields in a record is to use a character string overlay. Note, however, that the F$FAO function is more powerful than a character string overlay. You can perform a wider range of output operations with the F$FAO function.
$ ! Initialize context symbol to get PID numbers $ CONTEXT = "" $ ! Write headings $ WRITE SYS$OUTPUT "Process Name PID" $ ! $ GET_PID: $ PID = F$PID(CONTEXT) $ IF PID .EQS. "" THEN EXIT $ WRITE SYS$OUTPUT F$GETJPI(PID,"PRCNAM")," ", F$GETJPI(PID,"PID") $ GOTO GET_PID
Process Name PID MARCHESAND 2CA0049C TRACTMEN 2CA0043A FALLON 2CA0043C ODONNELL 2CA00453 PERRIN 2CA004DE CHAMPIONS 2CA004E3
$ ! Initialize context symbol to get PID numbers
$ CONTEXT = ""
$ ! Write headings
$ WRITE SYS$OUTPUT "Process Name PID"
$ !
$ GET_PID:
$ PID = F$PID(CONTEXT)
$ IF PID .EQS. "" THEN EXIT
$ LINE = F$FAO("!16AS !12AS", F$GETJPI(PID,"PRCNAM"), F$GETJPI(PID,"PID"))
$ WRITE SYS$OUTPUT LINE
$ GOTO GET_PIDProcess Name PID MARCHESAND 2CA0049C TRACTMEN 2CA0043A FALLON 2CA0043C ODONNELL 2CA00453 PERRIN 2CA004DE CHAMPIONS 2CA004E3
$ ! Initialize context symbol to get PID numbers $ CONTEXT = "" $ ! Write headings $ WRITE SYS$OUTPUT "Process Name PID" $ ! $ GET_PID: $ PID = F$PID(CONTEXT) $ IF PID .EQS. "" THEN EXIT $ RECORD[0,16]:= 'F$GETJPI(PID,"PRCNAM")' $ RECORD[17,12]:= 'F$GETJPI(PID,"PID")' $ WRITE SYS$OUTPUT RECORD $ GOTO GET_PID
Process Name PID MARCHESAND 2CA0049C TRACTMEN 2CA0043A FALLON 2CA0043C ODONNELL 2CA00453 PERRIN 2CA004DE CHAMPIONS 2CA004E3
15.7. Manipulating Data Types
|
F$CVSI |
Extracts bit fields from a character string and converts the result, as a signed value, to an integer |
|
F$CVUI |
Extracts bit fields from a character string and converts the result, as an unsigned value, to an integer |
|
F$INTEGER |
Converts a string expression to an integer |
|
F$STRING |
Converts an integer expression to a string |
|
F$TYPE |
Determines the data type of a symbol |
15.7.1. Converting Data Types
$ IF P1 .EQS. "" THEN INQUIRE P1 "Value to be converted" $ GOTO CONVERT_'F$TYPE(P1)' $ $ CONVERT_STRING: $ WRITE SYS$OUTPUT "The string ''P1' is converted to ''F$INTEGER(P1)'" $ EXIT $ $ CONVERT_INTEGER: $ WRITE SYS$OUTPUT "The integer ''P1' is converted to ''F$STRING(P1)'" $ EXIT
15.7.2. Evaluating Expressions
Some commands, such as INQUIRE and READ, accept only string data. If you use these commands to obtain data that you want to evaluate as an integer expression, use the F$INTEGER function to convert and evaluate this data.
Note that you must place apostrophes (’ ’) around the symbol EXP when you use it as an argument for the F$INTEGER function. This causes DCL to substitute the value for EXP during the first phase of symbol substitution.
$ INQUIRE EXP "Enter integer expression"
$ RES = F$INTEGER('EXP')
$ WRITE SYS$OUTPUT "Result is",RESEnter integer expression: 9 + 7 Result is 16
The value "9 + 7" is substituted. When the F$INTEGER function processes the argument "9 + 7," it evaluates the expression and returns the correct result.
15.7.3. Determining Whether a Symbol Exists
. . . $ IF F$TYPE(TEMP) .EQS. "" THEN TEMP = "YES" $ IF TEMP .EQS. "YES" THEN GOTO TEMP_SEC ⋮
This procedure tests whether the symbol TEMP has been previously defined. If it has, then the current value of TEMP is retained. If TEMP is not defined, then the IF statement assigns the value "YES" to TEMP.
Chapter 16. Understanding Processes and Batch Jobs
Interpreting your process context
Using subprocesses
Connecting to disconnected processes on virtual terminals
Working with batch jobs
How Processes Are Created
The system creates a process for you when you perform one of the following tasks:Logging in
The system creates a process for each interactive user.
Submitting a batch job
The system creates a process for each batch job. When the batch job is completed, the system deletes the process.
Spawning a subprocess
The system creates a process when you use the SPAWN command.
Running a program
The system creates a process when you run a program using either the /DETACHED qualifier or the /UIC=uic qualifier.
16.1. Interpreting Your Process Context
Characteristics that a process uses, such as privileges, symbols, and logical names, form a process context. The system obtains the characteristics that are unique to your process from the user authorization file (UAF). The UAF lists those users permitted to access the system and defines the characteristics for each user's process. The system manager usually maintains the UAF. It is within your process that the system executes your programs (also called images or executable images) one at a time.
To display the process context for your current process, enter the SHOW PROCESS/ALL command.
11-DEC-2002 13:30:37.12Account name: DOC CPU limit: Infinite Direct I/O limit: 1024 Buffered I/O byte count quota: 119616 Buffered I/O limit: 1024 Timer queue entry quota: 400 Open file quota: 299 Paging file quota: 100080 Subprocess quota: 30 Default page fault cluster: 64 AST quota: 798 Enqueue quota: 5000 Shared file limit: 0 Max detached processes: 0 Max active jobs: 0 Accounting information:
Buffered I/O count: 16424 Peak working set size: 13920 Direct I/O count: 12014 Peak virtual size: 185392 Page faults: 11113 Mounted volumes: 0 Images activated: 68 Elapsed CPU time: 0 00:04:18.55 Connect time: 0 00:08:22.76 Authorized privileges: NETMBX TMPMBX Process privileges:
GROUP may affect other processes in same group TMPMBX may create temporary mailbox OPER operator privilege NETMBX may create network device Process rights:
CLEAVER resource INTERACTIVE LOCAL System rights: SYS$NODE_ZEUS Auto-unshelve: on Image Dump: off Soft CPU Affinity: off Parse Style: Traditional Home RAD: 0 Scheduling class name: none Process Dynamic Memory Area
Current Size (Kb) 128.00 Current Size (Pagelets) 256 Free Space (Kb) 111.18 Space in Use (Kb) 16.81 Largest Var Block (Kb) 109.69 Smallest Var Block (bytes) 8 Number of Free Blocks 10 Free Blocks LEQU 64 Bytes 4 There is 1 process in this job:
CLEAVER (*)
| Current date and time The date and time when the SHOW PROCESS/ALL command is executed. |
| User name The user name assigned to the account that is associated with the process. |
| Process identification (PID) number A unique number assigned to the process by the system. The SHOW PROCESS command displays the PID number as a hexadecimal number. |
| Process name The name assigned to the process. Because process names are unique (within a specific UIC group), the first process logged in under an account is assigned the user name. Subsequent processes logged in under the same account are assigned the terminal name. You can change your process name with the DCL command SET PROCESS/NAME. |
| User identification code (UIC) The group and member numbers (or letters) assigned to the account that is associated with the process (for example, [DOC,CLEAVER]). Part of your UIC identifies the group to which you belong. Within a group, users are allowed to share files or system resources more freely than between groups. |
| Priority The current priority of the process. |
| Default file specification The current device and directory. Change your current defaults with the DCL command SET DEFAULT. |
| Process quotas The quotas (limits) associated with the process. Examine these quotas with the /QUOTAS or /ALL qualifiers of the SHOW PROCESS command. |
| Accounting information The continuously updated account of the process' use of memory and CPU time. Examine this information with the /ACCOUNTING or /ALL qualifiers of the SHOW PROCESS command. |
| Process privileges The privileges granted to your processes. Privileges restrict the performance of certain system activities to certain users. Examine your privileges with the /PRIVILEGES or /ALL qualifiers of the SHOW PROCESS command. |
| Process rights System-defined identifiers that are used in conjunction with access control list (ACL) protection. Identifiers provide the means of specifying the users in an ACL. An ACL is a security tool that defines the kinds of access to be granted or denied to users of an object, such as a file, device, or mailbox. |
| Process dynamic memory area The process' current use of dynamic memory. Dynamic memory is allocated by the system to an image when that image is executing. When that memory is no longer needed by one process, the system allocates it to another process. Examine this information with the /MEMORY or /ALL qualifiers of the SHOW PROCESS command. |
| Processes in this tree A list of subprocesses belonging to the parent process. An asterisk (*) appears after the current process. Examine this list with the SHOW PROCESS/SUBPROCESSES or /ALL command. |
16.2. Using Detached Processes
A detached process is either interactive or noninteractive, depending on the parent process. Either you or the operating system perform the login, depending on the argument you provided to the DCL command RUN or the Create Process system service ($CREPRC). Both RUN and $CREPRC execute the LOGINOUT.EXE image in SYS$SYSTEM.
16.3. Using Subprocesses
The SPAWN command enables you to create a subprocess of your current process. Within this subprocess, you can interact with the system and log out of the subprocess to return to your parent process or switch between your parent process and subprocesses. Only one of your processes is executing at any time.
Each user on the system is represented by a job tree. A job tree is a hierarchy of all your processes and subprocesses with your main process at the top. A subprocess is dependent on the parent process and is deleted when the parent process exits. By default, the subprocess assumes the name of the parent process followed by an underscore and a unique number. For example, if the parent process name is DOUGLASS, the subprocesses are named DOUGLASS_1, DOUGLASS_2, and so on.
16.3.1. Using Subprocesses to Spawn Tasks
To interrupt a task, perform a second task, then return to the original task, you can use Ctrl/Y to interrupt the first task, spawn a subprocess to perform the second task, exit from the subprocess, and then enter the CONTINUE command to return to the first task. By default, when you create a subprocess, the parent process hibernates and you are given control at DCL level within the subprocess. Your default directory is the current directory of the parent process. For example, if you press Ctrl/Y to interrupt an EVE editing session, enter the CONTINUE command and press Ctrl/W to refresh the screen.
16.3.2. Using Subprocesses to Perform Multiple Tasks
To perform a second task while continuing to work on your original task, you can create the subprocess with the SPAWN/NOWAIT command. SPAWN/NOWAIT generates a noninteractive, batch-like subprocess and is used to execute only commands that do not require input.
/OUTPUT qualifier
Indicates that the subprocess should write output to a specified file rather than to the terminal
SPAWN command parameter or /INPUT qualifier
Indicates that the subprocess should execute the specified commands rather than reading input from the terminal
When you specify the /INPUT qualifier of the SPAWN command, the subprocess is created as a noninteractive process that exits upon encountering a severe error or an end-of-file indicator. At DCL level, Ctrl/Z is treated as an end-of-file indicator.
16.3.3. Creating a Subprocess
Because each process you create is unique, commands executed in one process do not usually affect any other process. However, because control of the terminal passes between processes, commands that affect the terminal characteristics (for example, SET TERMINAL) affect any process controlling that terminal. For example, if one process inhibits echoing and exits without restoring it, echoing remains inhibited for the next process that gains control of the terminal. Reset any altered terminal characteristics with the SET TERMINAL command.
$ TYPE MICE.TXT Once the weather turns cold, mice may find a crack in the foundation and enter your house. They are looking for food and shelter from the harsh weather ahead. . . . Ctrl/Y $ SPAWN %DCL-S-SPAWNED, process DOUGLASS_1 spawned %DCL-S-ATTACHED, terminal now attached to process DOUGLASS_1 $ MAIL MAIL> . . . MAIL> EXIT $ LOGOUT Process DOUGLASS_1 logged out at 31-DEC-1999 12:42:12.46 %DCL-S-RETURNED, control returned to process DOUGLASS $ CONTINUE Once inside, they may gnaw through electrical wires and raid your food. Because mice reproduce so quickly, what started as one or two mice can quickly become an invasion. If you seal the cracks and holes on the exterior of your foundation, you can prevent these rodents from ever getting in.
16.3.4. Exiting from a Subprocess
LOGOUT
When you exit from a subprocess with the LOGOUT command, the subprocess is deleted (along with any subprocesses that it created) and you are returned to the parent process.
ATTACH
When you exit from a subprocess with the ATTACH command, the subprocess hibernates and control of your terminal is transferred to the specified process. You must specify either a process name as a parameter to the ATTACH command or a process identification (PID) number as a value of the /IDENTIFIER qualifier of the ATTACH command.
The following example shows how to exit from the subprocess DOUGLASS_1 and attach to the process DOUGLASS:$ ATTACH DOUGLASS %DCL-S-RETURNED, control returned to process DOUGLASS $ SHOW PROCESS 11-DEC-2002 10:34:58.50 User: DOUGLASS Process ID: 2061C478 Node: ALPHAI Process name: "DOUGLASS" Terminal: VTA2195: TNA2170: (Host: 16.32.123.45 Port: 6789) User Identifier: [DOC,DOUGLASS] Base priority: 4 Default file spec: DISK1:[DOUGLASS] Number of Kthreads: 1 Devices allocated: ALPHAI$VTA2195: Soft CPU Affinity: off
16.3.5. Subprocess Context
The subprocess context is the environment that the subprocess inherits from the parent process. By default, a subprocess inherits the following items: defaults, privileges, symbols, logical names, control characters, message format, verification state, and key definitions. Collectively, these items create an environment for the subprocess.
Process identification (PID) number
The system assigns each created subprocess a unique PID number.
Process name
By default, the subprocess name consists of the name of the parent process followed by an underscore and an integer. Use the /PROCESS qualifier of the SPAWN command to specify a process name other than the default. A process name must be unique.
Created commands
Commands that are defined by a parent process using the SET COMMAND command are not copied to a subprocess. To use a created command in a subprocess, you must use SET COMMAND to create that command for the subprocess.
Authorize privileges
When you spawn to a subprocess, the process context contains the privileges of the parent process, not the privileges that you are authorized to enable. For example, if you plan to spawn to a subprocess while in Mail and to perform a privileged operation, you must first set the proper privilege in the parent process before you invoke Mail.
You can use the following SPAWN command qualifiers to prevent the subprocess from inheriting a number of these items:SPAWN Command Qualifier
Items Inhibited or Changed
/CARRIAGE_CONTROL, /PROMPT
DCL prompt
/NOCLI
CLI (command language interpreter; DCL by default)
/NOKEYPAD
Keypad definitions
/NOLOGICAL_NAMES
Logical names
/NOSYMBOL
Symbols
The /SYMBOL and /LOGICAL_NAMES qualifiers do not affect system-defined symbols (such as $SEVERITY and $STATUS) or system-defined logical names (such as SYS$COMMAND and SYS$OUTPUT).
Because copying logical names and symbols to a subprocess can be time-consuming (a few seconds), you may want to use the /NOLOGICAL_NAMES and /NOSYMBOL qualifiers to the SPAWN command unless you plan to use the logical names or symbols in the subprocess. If you use subprocesses frequently, the ATTACH command provides the most efficient way to enter and exit a subprocess. This method allows you to transfer control quickly between the parent process and subprocess rather than repeatedly waiting for the system to create a new subprocess for you.
16.4. Connecting to Disconnected Processes on Virtual Terminals
Note
You can connect only to a virtual terminal process associated with your user identification code (UIC).
16.4.1. Terminal Disconnections
You lose the modem signal between the host and the terminal.
You press the BREAK key on a terminal with the TT2$M_SECURE characteristic set.
You enter the DCL command DISCONNECT.
You enter the DCL command CONNECT/CONTINUE.
If your process is disconnected, you have the option of reconnecting to the old process and returning to the state it was in before you were disconnected. When you log in, the system prompts you as follows:You have the following disconnected process: Terminal Process name Image name VTA52: RWOODS (none) Connect to above listed process [YES]:
If you press the Return key or enter Yes, you are logged out of your current process as if automatic execution of the DCL command CONNECT/CONTINUE had been performed for you. If you enter No or if you delay too long in responding (so that a response period timeout occurs), you remain logged in to your new process. You lose the ability to connect to the old process.
When you have multiple disconnected sessions, you are prompted for the name of the virtual terminal to which you want to reconnect. If you do not want to connect to any of the displayed sessions, enter No.
16.4.2. Removing Disconnected Processes
| Step |
Task |
|---|---|
| 1 |
Enter the DCL command SHOW USERS to determine if you have other disconnected jobs. |
| 2 |
Enter the DCL command CONNECT/LOGOUT to log out of the current process. Connect back through each of the associated virtual terminals (as noted by the terminal prefix VTA) until you reach the last existing process. |
| 3 |
Enter the DCL command LOGOUT. |
16.4.3. Managing Disconnected Processes
Virtual terminals allow you to maintain more than one disconnected process at a time. You must keep in mind, however, that while you are logged in to a virtual terminal, the physical terminal is disconnected. Any I/O requests directed to a device other than the physical terminal associated with your current virtual terminal process will enter a waiting state. The pending process will terminate when the timeout period expires. If, however, you reconnect to the physical terminal that is to receive the I/O request, the process continues from the point at which it entered the waiting state. Naming each process with a name that relates to its context makes it easier to reconnect to the desired process.
For example, a user named SMITH running a process to edit a file might use the SET PROCESS/NAME command to name the process SMITH_EDIT. Later, to continue editing, SMITH can easily determine which process is appropriate.
A system manager can restrict the use of virtual terminals systemwide or on a per terminal basis.
16.5. Working with Batch Jobs
Perform a task interactively while the system executes a program or command procedure in batch mode.
Run command procedures that take a long time to execute.
Execute command procedures or programs after hours.
Run certain programs at a reduced priority (for example, if the program uses a disproportionate amount of system resources).
Perform a task periodically (daily, weekly, etc.)
16.5.1. Submitting Batch Jobs
When you submit a batch job, the system creates a detached process with your account and process characteristics. The system runs the job from that process and deletes the process when the job completes. The system also executes the system login command procedure (SYLOGIN.COM) and your login command procedure (LOGIN.COM) and then executes the command procedures in the batch job. As these procedures execute, output is written to a log file. When the batch job completes, you can print the log file or save it in one of your directories.
To run a job in batch mode, submit your job to a batch queue (a list of batch jobs waiting to execute) by entering the DCL command SUBMIT. When you submit a job, it is directed to the default batch queue SYS$BATCH where it is added to the end of the queue of jobs waiting to be executed. When the jobs preceding yours are completed, your job is executed. On an OpenVMS system, the number of batch jobs that can execute simultaneously is specified when the batch queue is created by the system manager. By default, the SUBMIT command uses a file type .COM.
$ SUBMIT JOB1 Job JOB1 (queue SYS$BATCH, entry 651, started on SYS$BATCH)
The system displays the name of the job, the queue containing the job, and the entry number assigned to the job. You receive the DCL prompt after your job is submitted to the batch queue. If you need to reference your batch job in any DCL commands (DELETE/ENTRY, for example), do so by using the job entry number. You can obtain the job entry number by using the SHOW ENTRY command. Note that if multiple procedures are submitted in a batch job, the batch job terminates when any procedure exits with an error or fatal (severe) system message.
$ SUBMIT/AFTER=23:30 JOB1.COM
When you submit a command procedure for batch execution, the system saves the complete file specification for the command procedure, including the version number. If you update a command procedure after you submit it, the batch job executes the version of the command procedure that you submitted rather than the new version.
Use complete file specifications — When referring to a file in a command procedure or when passing a file to a command procedure, include the device and directory names as part of the file specification.
Use the SET DEFAULT command — Before referring to a file in a command procedure, use the SET DEFAULT command at the beginning of the command procedure to specify the proper device and directory.
As a batch job executes, it writes output to a log file. By default, the log file has the same name as the command procedure you submit with the file type .LOG. When the job is finished, the system prints the log file and deletes it from your directory. See Section 16.5.3, ''Control of Batch Job Output'' for information on saving log files.
Checking for Batch Jobs in Your Login Command Procedure
Each time you submit a batch job, the system executes your login command procedure. You can cause sections of your login command procedure to be included or omitted when you execute batch jobs by using the F$MODE lexical function to test for batch jobs.
IF F$MODE() .EQS. "BATCH" THEN GOTO BATCH_COMMANDS ⋮
IF F$MODE() .NES. "INTERACTIVE" THEN EXIT
You can place this command anywhere in your login command procedure. When you submit a batch job, the system executes your login command procedure only to the point at which the preceding command is placed.
Submitting Multiple Command Procedures
When you enter the SUBMIT command, you can specify several command procedures to be executed in one job. Unless you specify a name with the /NAME qualifier, the SUBMIT command uses the name of the first command procedure as the job name. Note that if an error causes any command procedure in a job to exit, the entire job terminates.
When a batch job executes, the operating context of the first procedure (UPDATE.COM) is not preserved for the second procedure (SORT.COM). The system deletes local symbols created by UPDATE.COM before SORT.COM executes. Global symbols, however, are preserved.
You cannot specify different parameters for individual command procedures within a single job.
$ SUBMIT UPDATE,SORT Job UPDATE (queue SYS$BATCH, entry 207) started on SYS$BATCH
$ SUBMIT UPDATE, SORT/PARAMETERS = - _$ (DISK1:[ACCOUNT.BILLS]DATA.DAT, DISK2:[ACCOUNT]NAME.DAT) $ Job UPDATE (queue SYS$BATCH, ENTRY 208) started on SYS$BATCH
16.5.2. Passing Data to Batch Jobs
Include the data in the command procedure itself.
To include data in a command procedure, place the data on the lines after the command or image.
Use the
DECKandEODcommands as follows:$ DECK lines of data to be included in a batch job $ EODTemporarily define SYS$INPUT as a file.
To define SYS$INPUT temporarily as a file, use the DEFINE/USER_MODE command.
Pass parameters to the command procedure when you submit it for execution.
To pass parameters to a command procedure, use the /PARAMETERS qualifier when you submit the batch job.
Note that you cannot specify different parameters for individual command procedures within a single job. Use separate SUBMIT commands if you need to pass different groups of parameters.
In the following example, data lines are passed to the image AVERAGE.EXE:$! Execute AVERAGE.EXE $ RUN AVERAGE 647 899 532 401 $ EXIT
In the following example, SYS$INPUT is temporarily defined as a file:$ DEFINE/USER_MODE SYS$INPUT STATS.DAT $ RUN AVERAGE $ EXIT
In the following example, the parameters in the file EMPLOYEES.DAT are passed to the command procedure CHECKS.DAT:$ SUBMIT/PARAMETERS=(DISK1:[PAYROLL]EMPLOYEES.DAT) CHECKS Job CHECKS (queue SYS$BATCH, entry 209) started on SYS$BATCH
Note
The SHOW QUEUE/FULL command displays full information about jobs in a batch queue. This display includes any parameters that you pass to the procedure. Therefore, do not pass confidential information (such as a password) to a batch job.
16.5.3. Control of Batch Job Output
By default, the log file has the same name as the first command procedure in the batch job and has the file type .LOG. The system writes output from a batch job to a log file once each minute. To specify a different time interval, include the SET OUTPUT_RATE command in your command procedure.
If you attempt to use the EDT editor to read the log file while the system is writing to it, you receive a message indicating that the file is locked by another user. Wait a few seconds and try again. The EVE editor, however, allows you to read the batch job's log file. By specifying EDIT/TPU/READ_ONLY and the name of the log file, you can use EVE commands to move around the log file and to ensure that any changes you make to the file are not saved. If you omit the /READ_ONLY qualifier and modify the log file in any way, the batch job terminates.
$ IF F$MODE() .EQS. "BATCH" THEN SET NOVERIFY
By default, the log file name is the name under which you submitted the job. Also by default, the log file has the file type .LOG and assumes the device and directory specified by your login defaults. To specify a different log file name when you submit the job, use the /LOG_NAME qualifier to the SUBMIT command.
The batch job log file includes all output to SYS$OUTPUT and SYS$ERROR. It also includes, by default, all command lines executed in the command procedure. To prevent the command lines from being printed, use either the SET NOVERIFY command or the F$VERIFY lexical function in your command procedure. When the job completes, the system writes job termination information (using the long form of the system logout message) to the log file.
If the SET VERIFY command is in effect, you can also learn the exact time when each command is executed by using the SET PREFIX command to time-stamp each command line.
When a batch job fails to complete successfully, you can examine the log file to determine the point at which the command procedure failed and the error status that caused the failure.
Saving Log Files
To save log files, use either the /KEEP or the /NOPRINTER qualifier. The /KEEP qualifier saves the log file after it is printed. The /NOPRINTER qualifier saves the log without printing it. If you specify neither of these qualifiers, the default action occurs; the log file is queued to the default print queue SYS$PRINT and is deleted after it prints. The /KEEP and /NOPRINTER qualifiers save the log file in your default login directory. The log file has the same name as the first command procedure in the batch job and the file type .LOG. To specify an alternate file name or directory name, or both, use the /LOG_FILE qualifier. To rename and save the log file, you must use /LOG_FILE and either /KEEP or /NOPRINTER.
$ SUBMIT/LOG_FILE=DISK2:[JONES.RESULTS]/NOPRINTER - _$ DISK2:[JONES.RESULTS]UPDATE
Reading the Log File
You can use the TYPE command to read the log file to determine how much of the batch job has completed. However, if you attempt to display the log file while the system is writing to it, you receive a message indicating that the file is locked by another user. If this occurs, wait a few seconds and try again.
Including Command Output in the Batch Job Log
Typically, a batch job command procedure that compiles, links, and executes a program creates additional printed output such as a compiler listing or a linker map. To produce printed copies of these files, a batch job command procedure can contain the PRINT commands necessary to print them.
Use the TYPE command instead of the PRINT command in the command procedure. The TYPE command writes to SYS$OUTPUT. In a batch job, SYS$OUTPUT is equated to the batch job log file.
Use qualifiers on appropriate commands to direct the output to SYS$OUTPUT.
Note that if you use this technique, the output files are not saved on disk unless you save the log file.
When the command procedure shown in the following example completes processing, there are three separate output listings: the batch job log, the compiler listing, and the linker map:$ FORTRAN/LIST BIGCOMP $ PRINT BIGCOMP.LIS $ LINK/MAP/FULL BIGCOMP $ PRINT BIGCOMP.MAP
The following example shows how to use qualifiers to direct the output to SYS$OUTPUT:$ FORTRAN/LIST=SYS$OUTPUT BIGCOMP $ LINK/MAP=SYS$OUTPUT/FULL BIGCOMP
When these commands are executed in a batch job, the output files from the compiler and the linker are written directly to the log file.
16.5.4. Changing Batch Job Characteristics
After a job has been submitted to the queue but before the job starts to execute, you can use the SET ENTRY or the SET QUEUE/ENTRY command with the appropriate qualifiers to change characteristics associated with the job.
$ SET QUEUE/ENTRY=209/NAME=NEW_NAME SYS$BATCH $ SET ENTRY 209 /NAME=NEW_NAME
Both of these commands change the name of job number 209 to NEW_NAME.
The following list contains some of the changes you can make with the SET ENTRY or SET QUEUE/ENTRY commands. For a complete list of qualifiers, refer to the VSI OpenVMS DCL Dictionary. Note that most of the qualifiers allowed with the SUBMIT command can also be used with SET ENTRY and the SET QUEUE/ENTRY commands.
Delay processing of a job.
Use the /AFTER qualifier to specify a time after which the job can be executed. Use the /HOLD qualifier to hold a job until you explicitly release it.
Release a job.
Use the /NOHOLD or /RELEASE qualifier to release a job that was submitted with the /HOLD or /AFTER qualifiers.
Send a job to a different queue.
Use the /REQUEUE qualifier to change the queue on which the job will execute.
Change execution characteristics.
Change execution characteristics such as working set default, working set extent, working set size, job scheduling priority, and CPU time limit.
Change the parameters to be passed to a job.
Use the /PARAMETERS qualifier to change the parameters.
16.5.5. SUBMIT Command Qualifiers
- /AFTER Specifies a time after which the batch job can execute. The job remains in the batch queue until the specified time. To hold a job in the queue until you explicitly release it, use the /HOLD qualifier. To release a job that is being held, use the SET ENTRY/RELEASE command.
- /NAME Specifies a name for the batch job. Otherwise, the job name defaults to the file name of the first (or only) command procedure in the job.
- /NOTE Specifies a message string to appear as part of the display for a SHOW QUEUE/FULL command. Allows you to convey information about the job to the operator or system manager.
- /NOTIFY Requests notification of job completion. The system sends a message to your terminal when the batch job finishes executing.
- /PARAMETERS Passes parameters to a batch job.
- /NOPRINTER or /KEEP Saves a batch job log file.
- /QUEUE Sends a batch job to a queue other than SYS$BATCH. To execute a command procedure that is located on a remote node, use the /REMOTE qualifier. This sends the job to SYS$BATCH at the remote node.
- /RESTART Enables you to restart the job if the system fails while the job is executing.
- /RETAIN Keeps a batch job in a queue after it completes. You can use the SHOW QUEUE or SHOW ENTRY commands to see the job's completion status.
16.5.6. Displaying Jobs in Batch Queues
$ SHOW QUEUE BOSTON_BATCH Batch queue BOSTON_BATCH, on BOSTON::
To see complete information on your jobs, use the /FULL qualifier with the SHOW ENTRY or SHOW QUEUE command. To see the status of other jobs in the queue, use the SHOW QUEUE/ALL command.
$ SUBMIT EXCHAN.DAT
Job EXCHAN (queue SYS$BATCH entry 999) started on SYS$BATCH
$ SHOW ENTRY 999
Entry Jobname Username Blocks Status
----- ------- -------- ------ ------
999 EXCHAN BLASS 3 Executing
On batch queue SYS$BATCH
$ SUBMIT/NOPRINTER/PARAMETER=STATS.DAT UPDATE
Job UPDATE (queue SYS$BATCH entry 1080) started on BOSTON_BATCH
$ SHOW QUEUE BOSTON_BATCH
Batch queue BOSTON_BATCH on BOSTON::
Entry Jobname Username Blocks Status
----- ------- -------- ------ ------
1080 UPDATE ODONNELL 36 ExecutingIn the next example, the /FULL qualifier displays statistics about BOSTON_BATCH and characteristics associated with job number 999:
$ SHOW ENTRY/FULL 999
Entry Jobname Username Blocks Status
----- ------- -------- ------ ------
999 EXCHAN BLASS 3 Executing
On batch queue BOSTON_BATCH
Submitted 11-DEC-1999 13:12 /PRIORITY=100
WRKD:[BLASS]EXCHAN.DAT;3
$ SHOW QUEUE/FULL BOSTON_BATCH
Batch queue BOSTON_BATCH, on BOSTON::
/BASE_PRIORITY=3 /JOB_LIMIT=5 /OWNER=[EXEC] /PROTECTION=(S:E,O:D,G:R,W:W)
Entry Jobname Username Blocks Status
----- ------- -------- ------ ------
1080 UPDATE ODONNELL 36 Executing
Submitted 11-DEC-1999 10:46 /KEEP /PARAM=("STATS.DAT") /NOPRINTER /PRIO=4
_BOSTON$DQA2:[ODONNELL]TEMP.COM;1 (executing)$ SHOW QUEUE/ALL BOSTON_BATCH
Batch queue BOSTON_BATCH on BOSTON::
Entry Jobname Username Status
----- ------- -------- ------
923 no privilege Executing
939 no privilege Holding until 11-DEC-1999 19:00
1080 UPDATE ODONNELL ExecutingNote that, unless you are a privileged user, your information is limited to jobs submitted under your account.
16.5.7. Deleting and Stopping Batch Jobs
You can delete batch jobs before or during execution. To delete an entry that is pending or already executing in a batch queue, use the DELETE/ENTRY command. You need special privileges to delete a job that you did not submit. When a job terminates as a result of a DELETE/ENTRY command, the log file is neither printed nor deleted from your directory.
When you terminate a job using the DELETE/ENTRY command, it is handled as an abnormal termination because the operating system's normal job termination activity is preempted. As a result, the batch job log does not, for example, contain the standard logout message that summarizes job time and accounting information. Termination that results either from an explicit EXIT command or STOP command or the implicit execution of either of these commands (as the result of the current ON condition), however, is considered normal termination. The operating system performs proper rundown and accounting procedures after a normal termination.
$ DELETE/ENTRY=210 SYS$BATCH
16.5.8. Restarting Batch Jobs
If the system fails while your batch job is executing, your job does not complete. When the system recovers and the queue is restarted, your job is aborted and the next job in the queue is executed. However, by specifying the /RESTART qualifier when you submit a batch job, you indicate that the system should reexecute your job if the system fails before the job is finished.
By default, a batch job is reexecuted beginning with the first line. See Chapter 13, "Introduction to Command Procedures" and Chapter 14, "Advanced Programming with DCL" for more information about symbols you can add to your command procedures to specify a different restarting point.
In addition to restarting a job after a system failure, you can also restart a job after you explicitly stop the job. To stop a job and then restart it on the same or a different queue, use the STOP/QUEUE/REQUEUE/ENTRY command.
$ STOP/QUEUE/REQUEUE/ENTRY=212 SYS$BATCH
To enter this command, job 212 must have been submitted using the /RESTART qualifier to the SUBMIT command. When the batch job executes for the second time, the system uses the global symbol BATCH$RESTART to determine where to begin executing the job.
16.5.9. Synchronizing Batch Job Execution
You can use the SYNCHRONIZE and WAIT commands within a command procedure to place the procedure in a wait state. The SYNCHRONIZE command causes the procedure to wait for the completion of a specified job. The WAIT command causes the procedure to wait for a specified period of time to elapse.
If you specify a job name with the SYNCHRONIZE command, note that the jobs to be synchronized must be associated with your user name. A job is associated with the user name of the process that submits it. To synchronize jobs for different users, you must use the /ENTRY qualifier with the SYNCHRONIZE command to specify the job entry number.
$ SYNCHRONIZE BATCH25
After this command is executed, the command procedure cannot continue execution until the job identified by the job name BATCH25 completes execution.
$ SYNCHRONIZE/ENTRY=454
Figure 16.1, ''Synchronizing Batch Job Execution'' is an example of command procedures that are submitted for concurrent execution but must be synchronized for proper execution. Each procedure compiles a large source program.
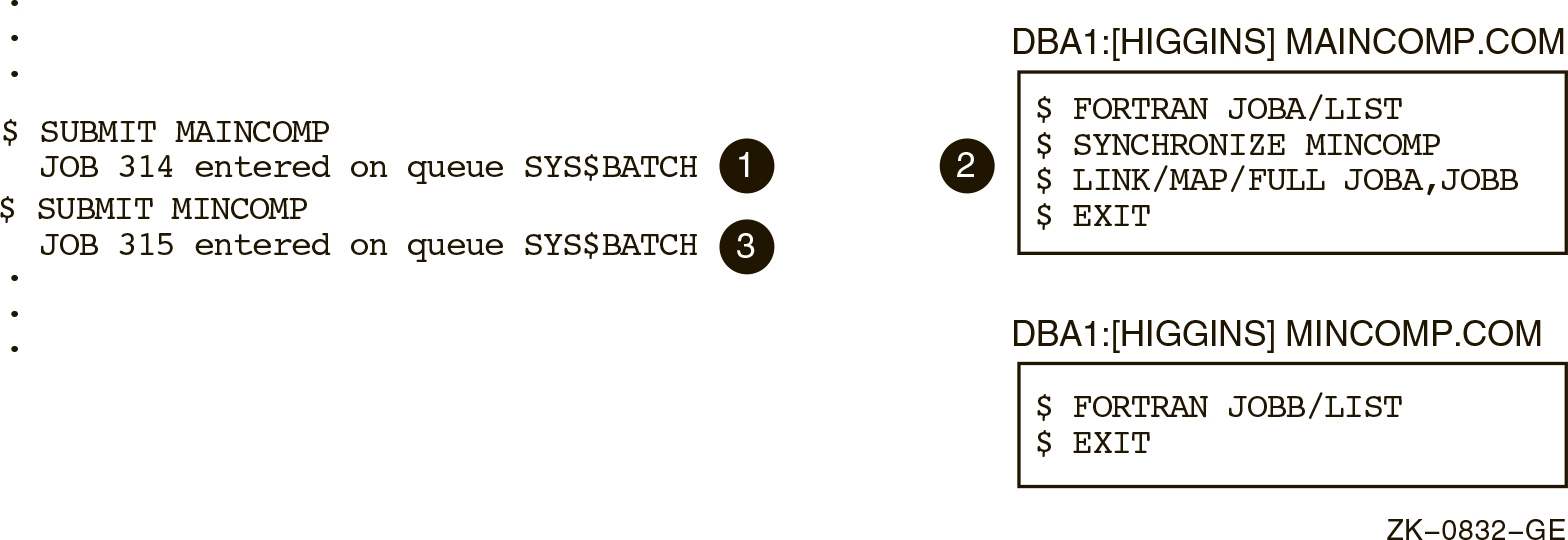 |
As you examine the example, note the following:
Individual SUBMIT commands are required to submit two separate jobs. The first process is created.
After the FORTRAN command is executed, the SYNCHRONIZE command is executed. If job 315 is either current or pending, job 314 will not execute the next command.
If job 315 has completed execution, job 314 continues with the next command.
16.5.10. Using the WAIT Command
The WAIT command is useful for command procedures that must have access to a shared system resource such as a disk or tape drive.
$ TRY:
$ ALLOCATE DM: RK:
$ IF $STATUS THEN GOTO OKAY
$ WAIT 00:05
$ GOTO TRY
$ OKAY:
$ REQUEST/REPLY/TO=DISKS -
"Please mount BACK_UP_GMB on ''F$TRNLNM("RK")'"
⋮If the WAIT command does not complete successfully, the procedure places itself in a wait state. After a 5-minute interval, it retries the request.
The IF command following the ALLOCATE request checks the value of $STATUS. If the value of $STATUS indicates successful completion, the command procedure continues. Otherwise, the procedure executes the WAIT command; the WAIT command specifies a time interval of five minutes. After waiting five minutes, the next command, GOTO, is executed and the request is repeated. This procedure continues looping and attempting to allocate a device until it succeeds or until the batch job is deleted or stopped.
Appendix A. Character Sets
The DEC Multinational Character Set (MCS) consists of a definition of the characters identified by hexadecimal values 00 through FF, inclusive, that was created and used by Digital Equipment Corporation. The DEC MCS is divided into two parts, the ASCII 7-bit character set (identified by hexadecimal values 00 through 7F, inclusive), and the set of 8-bit characters identified by hexadecimal values 80 through FF, inclusive. The DEC MCS is familiar to most users of software created and sold by DIGITAL.
The Unicode Standard Character Set (UCS-2) is a definition, by The Unicode Consortium, of the set of 16-bit characters that can be identified by hexadecimal values 0000 through FFFF, inclusive.
The ISO Latin-1 character set is the UCS-2 definition of the 8-bit characters identified by hexadecimal values 00 through FF, inclusive. The ISO Latin-1 character set definition differs slightly from the DEC MCS definition of the hexadecimal values 80 through FF.
Table A.1, ''DEC Multinational Character Set'' contains the DEC Multinational Character Set (MCS). Table A.1, ''DEC Multinational Character Set'' indicates the characters that differ between the two character sets, and Figure A.1, ''Differences Between DEC Multinational Character Set and ISO Latin-1 Character Set'' shows the differing characters.
Table A.2, ''DCL Character Set'' lists the characters in the DCL character set.
See The Unicode Standard, published by The Unicode Consortium, for details about the Unicode (UCS-2) character set.
|
Hex Code |
MCS Char or Abbrev. |
DEC Multinational Character Name |
|---|---|---|
|
ASCII Control Characters? | ||
|
00 |
NUL |
null character |
|
01 |
SOH |
start of heading (Ctrl/A) |
|
02 |
STX |
start of text (Ctrl/B) |
|
03 |
ETX |
end of text (Ctrl/C) |
|
04 |
EOT |
end of transmission (Ctrl/D) |
|
05 |
ENQ |
enquiry (Ctrl/E) |
|
06 |
ACK |
acknowledge (Ctrl/F) |
|
07 |
BEL |
bell (Ctrl/G) |
|
08 |
BS |
backspace (Ctrl/H) |
|
09 |
HT |
horizontal tabulation (Ctrl/I) |
|
0A |
LF |
line feed (Ctrl/J) |
|
0B |
VT |
vertical tabulation (Ctrl/K) |
|
0C |
FF |
form feed (Ctrl/L) |
|
0D |
CR |
carriage return (Ctrl/M) |
|
0E |
SO |
shift out (Ctrl/N) |
|
0F |
SI |
shift in (Ctrl/O) |
|
10 |
DLE |
data link escape (Ctrl/P) |
|
11 |
DC1 |
device control 1 (Ctrl/Q) |
|
12 |
DC2 |
device control 2 (Ctrl/R) |
|
13 |
DC3 |
device control 3 (Ctrl/S) |
|
14 |
DC4 |
device control 4 (Ctrl/T) |
|
15 |
NAK |
negative acknowlege (Ctrl/U) |
|
16 |
SYN |
synchronous idle (Ctrl/V) |
|
17 |
ETB |
end of transmission block (Ctrl/W) |
|
18 |
CAN |
cancel (Ctrl/X) |
|
19 |
EM |
end of medium (Ctrl/Y) |
|
1A |
SUB |
substitute (Ctrl/Z) |
|
1B |
ESC |
escape |
|
1C |
FS |
file separator |
|
1D |
GS |
group separator |
|
1E |
RS |
record separator |
|
1F |
US |
unit separator |
|
ASCII Special and Numeric Characters | ||
|
20 |
SP |
space |
|
21 |
! |
exclamation point |
|
22 |
" |
quotation marks (double quote) |
|
23 |
# |
number sign |
|
24 |
$ |
dollar sign |
|
25 |
% |
percent sign |
|
26 |
& |
ampersand |
|
27 |
’ |
apostrophe (single quote) |
|
28 |
( |
opening parenthesis |
|
29 |
) |
closing parenthesis |
|
2A |
* |
asterisk |
|
2B |
+ |
plus |
|
2C |
, |
comma |
|
2D |
– |
hyphen or minus |
|
2E |
. |
period or decimal point |
|
2F |
/ |
slash |
|
30 |
0 |
zero |
|
31 |
1 |
one |
|
32 |
2 |
two |
|
33 |
3 |
three |
|
34 |
4 |
four |
|
35 |
5 |
five |
|
36 |
6 |
six |
|
37 |
7 |
seven |
|
38 |
8 |
eight |
|
39 |
9 |
nine |
|
3A |
: |
colon |
|
3B |
; |
semicolon |
|
3C |
< |
less than |
|
3D |
= |
equals |
|
3E |
> |
greater than |
|
3F |
? |
question mark |
|
ASCII Alphabetic Characters | ||
|
40 |
@ |
commercial at sign |
|
41 |
A |
uppercase A |
|
42 |
B |
uppercase B |
|
43 |
C |
uppercase C |
|
44 |
D |
uppercase D |
|
45 |
E |
uppercase E |
|
46 |
F |
uppercase F |
|
47 |
G |
uppercase G |
|
48 |
H |
uppercase H |
|
49 |
I |
uppercase I |
|
4A |
J |
uppercase J |
|
4B |
K |
uppercase K |
|
4C |
L |
uppercase L |
|
4D |
M |
uppercase M |
|
4E |
N |
uppercase N |
|
4F |
O |
uppercase O |
|
50 |
P |
uppercase P |
|
51 |
Q |
uppercase Q |
|
52 |
R |
uppercase R |
|
53 |
S |
uppercase S |
|
54 |
T |
uppercase T |
|
55 |
U |
uppercase U |
|
56 |
V |
uppercase V |
|
57 |
W |
uppercase W |
|
58 |
X |
uppercase X |
|
59 |
Y |
uppercase Y |
|
5A |
Z |
uppercase Z |
|
5B |
[ |
left bracket |
|
5C |
\ |
backslash |
|
5D |
] |
right bracket |
|
5E |
^ |
circumflex |
|
5F |
_ |
underscore |
|
60 |
|
grave accent |
|
61 |
a |
lowercase a |
|
62 |
b |
lowercase b |
|
63 |
c |
lowercase c |
|
64 |
d |
lowercase d |
|
65 |
e |
lowercase e |
|
66 |
f |
lowercase f |
|
67 |
g |
lowercase g |
|
68 |
h |
lowercase h |
|
69 |
i |
lowercase i |
|
6A |
j |
lowercase j |
|
6B |
k |
lowercase k |
|
6C |
l |
lowercase l |
|
6D |
m |
lowercase m |
|
6E |
n |
lowercase n |
|
6F |
o |
lowercase o |
|
70 |
p |
lowercase p |
|
71 |
q |
lowercase q |
|
72 |
r |
lowercase r |
|
73 |
s |
lowercase s |
|
74 |
t |
lowercase t |
|
75 |
u |
lowercase u |
|
76 |
v |
lowercase v |
|
77 |
w |
lowercase w |
|
78 |
x |
lowercase x |
|
79 |
y |
lowercase y |
|
7A |
z |
lowercase z |
|
7B |
{ |
left brace |
|
7C |
| |
vertical line |
|
7D |
} |
right brace (ALTMODE) |
|
7E |
~ |
tilde (ALTMODE) |
|
7F |
DEL |
rubout (DELETE) |
|
Control Characters | ||
|
80 |
[reserved] | |
|
81 |
[reserved] | |
|
82 |
[reserved] | |
|
83 |
[reserved] | |
|
84 |
IND |
index |
|
85 |
NEL |
next line |
|
86 |
SSA |
start of selected area |
|
87 |
ESA |
end of selected area |
|
88 |
HTS |
horizontal tab set |
|
89 |
HTJ |
horizontal tab set with justification |
|
8A |
VTS |
vertical tab set |
|
8B |
PLD |
partial line down |
|
8C |
PLU |
partial line up |
|
8D |
RI |
reverse index |
|
8E |
SS2 |
single shift 2 |
|
8F |
SS3 |
single shift 3 |
|
90 |
DCS |
device control string |
|
91 |
PU1 |
private use 1 |
|
92 |
PU2 |
private use 2 |
|
93 |
STS |
set transmit state |
|
94 |
CCH |
cancel character |
|
95 |
MW |
message waiting |
|
96 |
SPA |
start of protected area |
|
97 |
EPA |
end of protected area |
|
98 |
[reserved] | |
|
99 |
[reserved] | |
|
9A |
[reserved] | |
|
9B |
CSI |
control sequence introducer |
|
9C |
ST |
string terminator |
|
9D |
OSC |
operating system command |
|
9E |
PM |
privacy message |
|
9F |
APC |
application |
|
Other Characters | ||
|
A0 |
[reserved]? | |
|
A1 |
¡ |
inverted exclamation point |
|
A2 |
¢ |
cent sign |
|
A3 |
£ |
pound sign |
|
A4 |
[reserved]? | |
|
A5 |
¥ |
yen sign |
|
A6 |
[reserved]? | |
|
A7 |
§ |
section sign |
|
A8 |
¤ |
general currency sign? |
|
A9 |
© |
copyright sign |
|
AA |
ª |
feminine ordinal indicator |
|
AB |
« |
angle quotation mark left |
|
AC |
[reserved]? | |
|
AD |
[reserved]? | |
|
AE |
[reserved]? | |
|
AF |
[reserved]? | |
|
B0 |
° |
degree sign |
|
B1 |
± |
plus/minus sign |
|
B2 |
2 |
superscript 2 |
|
B3 |
3 |
superscript 3 |
|
B4 |
[reserved]? | |
|
B5 |
µ |
micro sign |
|
B6 |
¶ |
paragraph sign, pilcrow |
|
B7 |
· |
middle dot |
|
B8 |
[reserved]? | |
|
B9 |
1 |
superscript 1 |
|
BA |
º |
masculine ordinal indicator |
|
BB |
» |
angle quotation mark right |
|
BC |
¼ |
fraction one-quarter |
|
BD |
½ |
fraction one-half |
|
BE |
[reserved]? | |
|
BF |
¿ |
inverted question mark |
|
C0 |
À |
uppercase A with grave accent |
|
C1 |
Á |
uppercase A with acute accent |
|
C2 |
 |
uppercase A with circumflex |
|
C3 |
à |
uppercase A with tilde |
|
C4 |
Ä |
uppercase A with umlaut (diaeresis) |
|
C5 |
Å |
uppercase A with ring |
|
C6 |
Æ |
uppercase AE diphthong |
|
C7 |
Ç |
uppercase C with cedilla |
|
C8 |
È |
uppercase E with grave accent |
|
C9 |
É |
uppercase E with acute accent |
|
CA |
Ê |
uppercase E with circumflex |
|
CB |
Ë |
uppercase E with umlaut (diaeresis) |
|
CC |
Ì |
uppercase I with grave accent |
|
CD |
Í |
uppercase I with acute accent |
|
CE |
Î |
uppercase I with circumflex |
|
CF |
Ï |
uppercase I with umlaut (diaeresis) |
|
D0 |
[reserved]? | |
|
D1 |
Ñ |
uppercase N with tilde |
|
D2 |
Ò |
uppercase O with grave accent |
|
D3 |
Ó |
uppercase O with acute accent |
|
D4 |
Ô |
uppercase O with circumflex |
|
D5 |
Õ |
uppercase O with tilde |
|
D6 |
Ö |
uppercase O with umlaut (diaeresis) |
|
D7 |
OE |
uppercase OE ligature? |
|
D8 |
Ø |
uppercase O with slash |
|
D9 |
Ù |
uppercase U with grave accent |
|
DA |
Ú |
uppercase U with acute accent |
|
DB |
Û |
uppercase U with circumflex |
|
DC |
Ü |
uppercase U with umlaut (diaeresis) |
|
DD |
Ÿ |
uppercase Y with umlaut (diaeresis) |
|
DE |
[reserved]? | |
|
DF |
ß |
German lowercase sharp s |
|
E0 |
à |
lowercase a with grave accent |
|
E1 |
á |
lowercase a with acute accent |
|
E2 |
â |
lowercase a with circumflex |
|
E3 |
ã |
lowercase a with tilde |
|
E4 |
ä |
lowercase a with umlaut (diaeresis) |
|
E5 |
å |
lowercase a with ring |
|
E6 |
æ |
lowercase ae diphthong |
|
E7 |
ç |
lowercase c with cedilla |
|
E8 |
è |
lowercase e with grave accent |
|
E9 |
é |
lowercase e with acute accent |
|
EA |
ê |
lowercase e with circumflex |
|
EB |
ë |
lowercase e with umlaut (diaeresis) |
|
EC |
ì |
lowercase i with grave accent |
|
ED |
í |
lowercase i with acute accent |
|
EE |
î |
lowercase i with circumflex |
|
EF |
ï |
lowercase i with umlaut (diaeresis) |
|
F0 |
[reserved]? | |
|
F1 |
ñ |
lowercase n with tilde |
|
F2 |
ò |
lowercase o with grave accent |
|
F3 |
ó |
lowercase o with acute accent |
|
F4 |
ô |
lowercase o with circumflex |
|
F5 |
õ |
lowercase o with tilde |
|
F6 |
ö |
lowercase o with umlaut (diaeresis) |
|
F7 |
oe |
lowercase oe ligature? |
|
F8 |
ø |
lowercase o with slash |
|
F9 |
ù |
lowercase u with grave accent |
|
FA |
ú |
lowercase u with acute accent |
|
FB |
û |
lowercase u with circumflex |
|
FC |
ü |
lowercase u with umlaut (diaeresis) |
|
FD |
ÿ |
lowercase y with umlaut (diaeresis)? |
|
FE |
[reserved]? | |
|
FF |
[reserved]? | |
 |
Symbol | Name | Meaning |
|---|---|---|
@ | At sign | Places the contents of a command procedure file in the command input stream. |
: | Colon | Device name delimiter in a file specification. A double colon (::) is a node name delimiter. A colon also acts as a qualifier delimiter. It separates a qualifier name from its value. |
/ | Slash | Qualifier prefix. |
+ | Plus sign | Parameter separator. With some commands it acts as a parameter concatenator. The plus sign is also recognized as a string concatenation operator, a unary plus sign, and an addition operator in a numeric expression. |
, | Comma | List element separator for parameters or argument lists. |
- | Hyphen | Continuation character. The hyphen is also recognized as a string reduction operator, a unary minus sign, a subtraction operator in a numeric expression, and a directory-searching wildcard character. |
( ) | Parentheses | List delimiters for argument list. Parentheses are also used to indicate the order of operations in a numeric expression. |
[ ] | Square brackets | Directory name delimiters in a file specification. Equivalent to angle brackets. |
<> | Angle brackets | Directory name delimiters in a file specification. Equivalent to square brackets. |
? | Question mark | Help character. |
& | Ampersand | Execution-time substitution operator. Otherwise, a reserved special character. |
| Backslash | Reserved special character. |
= | Equal sign | Qualifier value delimiter. It separates a qualifier name from its argument. The equal sign (=) can also be used as an assignment statement when defining symbols. |
^ | Circumflex | Reserved special character. |
# | Number sign | Reserved special character. |
* | Asterisk | Wildcard character in a file specification. The asterisk is also used as a multiplication operator in a numeric expression and as an abbreviation delimiter in a symbol definition. |
’ | Apostrophe | Substitution operator. |
. | Period | File type and version number delimiter in a file specification. Also used as a subdirectory delimiter. |
; | Semicolon | Version number delimiter in a file specification. |
% | Percent sign | Wildcard character in a file specification. Also used as a radix operator. |
! | Exclamation point | Indicates a comment. |
" | Quotation mark | Literal string delimiter. |
Appendix B. Annotated Command Procedures
The name of the procedure
A listing of the procedure
Notes that explain concepts or techniques used by the procedure
The results of a sample execution of the procedure
B.1. CONVERT.COM Command Procedure
This command procedure converts an absolute time (for a time in the future) to a delta time and determines the time between the current time and the time that you specify. The procedure illustrates the use of the F$TIME and F$CVTIME lexical functions and the use of assignment statements to perform arithmetic calculations and to concatenate symbol values.
Example: CONVERT.COM
$ ! Procedure to convert an absolute time to a delta time. $ ! The delta time is returned as the global symbol WAIT_TIME. $ ! P1 is the time to be converted. $ ! P2 is an optional parameter - SHOW - that causes the $ ! procedure to display WAIT_TIME before exiting $ ! $ ! Check for inquiry $ ! $ IF P1 .EQS. "?" .OR. P1 .EQS. "" THEN GOTO TELL
Notes for CONVERT.COM Command Procedure
| The procedure checks whether the parameter was omitted or whether the value entered for a parameter is the question mark (?) character. In either case, the procedure branches to the label TELL. |
| The procedure uses the F$CVTIME function to verify that the time value is a valid 24-hour clock time; the F$CVTIME returns a warning message if the input time is not valid. If the F$CVTIME function returns an error, the procedure changes the default ON action to direct control to the label BADTIME. The procedure uses the F$ENVIRONMENT function to save the current message setting. It then sets the message format so that no warning or error messages are displayed. After checking the time values, the procedure restores the default ON condition and message format. |
| The procedure checks the format of the parameter. It must be a time value
in the following format: hh:mm The IF command checks (1) that the length of the entered value is 5 characters and (2) that the third character (offset of 2) is a colon. The IF command contains the logical OR operator: if either expression is true (that is, if the length is not 5 or if there is not a colon in the third character position), the procedure branches to the label BADTIME. |
| The F$TIME lexical function places the current time value in the symbol TIME. |
| The F$CVTIME function extracts the "minute" and "hour" fields from the current time (saved in the symbol TIME). Then the F$CVTIME function extracts the "minute" and "hour") fields from the time you want to convert. |
| These assignment statements convert the current and future times to minutes. When you use the symbols MINUTES, HOURS, FUTURE_HOURS, and FUTURE_MINUTES in the assignment statements, the system automatically converts these values to integers. |
| The procedure then subtracts the current time (in minutes) from the future time (in minutes). |
| If the result is less than 0, the future time is interpreted as being on the next day. In this case, the procedure adds 24 hours to the future time and then subtracts the current time. |
| The procedure enters a loop in which it calculates, from the value of MINUTES_TO_WAIT, the number of hours. Each time through the loop, it checks whether MINUTES_TO_WAIT is greater than 60. If it is, the procedure subtracts 60 from MINUTES_TO_WAIT and adds 1 to the accumulator for the number of hours (HOURS_TO_WAIT). |
| When the procedure exits from the loop, it concatenates the hours and minutes values into a time string. The symbols HOURS_TO_WAIT and MINUTES_TO_WAIT are replaced by their character string equivalents and separated with an intervening colon. The resulting string is assigned to the symbol WAIT_TIME, which holds the delta time value for the future time. WAIT_TIME is defined as a global symbol so that it is not deleted when the procedure CONVERT.COM exits. |
| If a second parameter, SHOW, was entered, the procedure displays the resulting time value. Otherwise, it exits. |
| At the label BADTIME, the procedure displays an error message that shows the incorrect value entered as well as the format it requires. After issuing the error message, CONVERT.COM exits. The EXIT command returns an error status in which the high-order digit is set to 1. This suppresses the display of an error message. The procedure explicitly specifies an error status with the EXIT command, so you can execute CONVERT.COM from within another procedure. When CONVERT.COM completes, the calling procedure can determine whether a time was successfully translated. |
| At the label TELL, the procedure displays information about what the procedure does. The TYPE command displays the lines listed in SYS$INPUT, the input data stream. |
Sample Execution for CONVERT.COM Command Procedure
$ SHOW TIME 10-JUN-1999 10:38:26 $ @CONVERT 12:00 SHOW WAIT_TIME = "1:22:00.00"
The SHOW TIME command displays the current date and time. CONVERT.COM is executed with the parameters 12:00 and SHOW. The procedure converts the absolute time 12:00 to a delta time value and displays it on the terminal.
B.2. REMINDER.COM Command Procedure
This command procedure displays a reminder message on your terminal at a specified time. The procedure prompts for the time you want the message to be displayed and for the text of the message. The procedure uses CONVERT.COM to convert the time to a delta time. The procedure then spawns a subprocess that waits until the specified time and displays your reminder message. The procedure illustrates the use of the F$ENVIRONMENT, F$VERIFY, and F$GETDVI functions.
Example: REMINDER.COM
$ ! Procedure to obtain a reminder message and display this
$ ! message on your terminal at the time you specify.
$ !
$ ! Save current states for procedure and image verification
$ ! Turn verification off for duration of procedure
$
$ SAVE_VERIFY_IMAGE = F$ENVIRONMENT("VERIFY_IMAGE")
$ SAVE_VERIFY_PROC = F$VERIFY(0)
$ !
$ ! Places the current process in a wait state until a specified
$ ! absolute time. Then, it rings the bell on the terminal and
$ ! displays a message.
$ !
$ ! Prompt for absolute time
$ !
$
$ GET_TIME:
$ INQUIRE REMINDER_TIME "Enter time to send reminder (hh:mm)"
$ INQUIRE MESSAGE_TEXT "Enter message"
$ !
$ ! Call the CONVERT.COM procedure to convert the absolute time
$ ! to a delta time
$ !
$ @DISK2:[JONES.TOOLS]CONVERT 'REMINDER_TIME'
$ IF .NOT. $STATUS THEN GOTO BADTIME
$ !
$ !
$ ! Create a command file that will be executed
$ ! in a subprocess. The subprocess will wait until
$ ! the specified time and then display your message
$ ! at the terminal. If you are working at a DEC_CRT
$ ! terminal, the message has double size blinking
$ ! characters. Otherwise, the message has normal letters.
$ ! In either case, the terminal bell rings when the
$ ! message is displayed.
$
$ CREATE WAKEUP.COM
$ DECK ! Lines starting with $ are data lines
$ WAIT 'WAIT_TIME'
$ BELL[0,7] = %X07 ! Create symbol to ring the bell
$ IF F$GETDVI("SYS$OUTPUT","TT_DECCRT") .NES. "TRUE" THEN GOTO OTHER_TERM
$ !
$ DEC_CRT_ONLY:
$ ! Create symbols to set special graphics (for DEC_CRT terminals only)
$ !
$ SET_FLASH = "<ESC>[1;5m" ! Turn on blinking characters
$ SET_NOFLASH = "<ESC>[0m" ! Turn off blinking characters
$ TOP = "<ESC>#3" ! Double size characters (top portion)
$ BOT = "<ESC>#4" ! Double size characters (bottom portion)
$ !
$ ! Write double size, blinking message to the terminal and ring the bell
$ !
$ WRITE SYS$OUTPUT BELL, SET_FLASH, TOP, MESSAGE_TEXT
$ WRITE SYS$OUTPUT BELL, BOT, MESSAGE_TEXT
$ WRITE SYS$OUTPUT F$TIME(), SET_NOFLASH
$ GOTO CLEAN_UP
$ !
$ OTHER_TERM:
$ WRITE SYS$OUTPUT BELL,MESSAGE_TEXT
$ WRITE SYS$OUTPUT F$TIME()
$ !
$ CLEAN_UP:
$ DELETE WAKEUP.COM;*
$ EOD
$ !
$ ! Now continue executing commands.
$ !
$ SPAWN/NOWAIT/INPUT=WAKEUP.COM
$ END:
$ ! Restore verification
$ SAVE_VERIFY_PROC = F$VERIFY(SAVE_VERIFY_PROC, SAVE_VERIFY_IMAGE)
$ EXIT
$ !
$ BADTIME:
$ WRITE SYS$OUTPUT "Time must be entered as hh:mm"
$ GOTO GET_TIMENotes for REMINDER.COM Command Procedure
| The procedure uses the F$ENVIRONMENT function to save the image verification setting in the symbol SAVE_VERIFY_IMAGE. Next, the procedure uses the F$VERIFY function to save the procedure verification setting in the symbol SAVE_VERIFY_PROC. The F$VERIFY function also turns off both types of verification. |
| The procedure uses the INQUIRE command to prompt for the time when the reminder message should be sent. This value is used as input to the procedure CONVERT.COM. The procedure also prompts for the text of the message. |
| The procedure executes a nested procedure, CONVERT.COM. Be sure to specify the disk and directory as part of the file specification; this ensures that the system can locate CONVERT.COM regardless of the directory from which you execute REMINDER.COM. CONVERT.COM converts your reminder to a delta time, and returns this time in the global symbol WAIT_TIME. This delta time indicates the time interval from the current time until the time when the message should be sent. If CONVERT.COM returns an error, the procedure branches to the label BADTIME. |
| The procedure uses the CREATE command to create a new procedure, WAKEUP.COM. This procedure is executed from within a subprocess. To allow the CREATE command to read lines that begin with dollar signs, use the DECK and EOD commands to surround the input for the CREATE command. Therefore, all lines between the DECK and EOD commands are written to WAKEUP.COM. |
| WAKEUP.COM performs the following tasks:
|
| After creating WAKEUP.COM, the procedure spawns a subprocess and directs the subprocess to use WAKEUP.COM as the input command file. The /NOWAIT qualifier allows you to continue working at your terminal while the subprocess executes commands from WAKEUP.COM. At the specified time, WAKEUP.COM displays your message on your terminal. Note that, by default, the SPAWN command passes global and local symbols to a subprocess. Therefore, although you provide values for the symbols WAIT_TIME and MESSAGE_TEXT in REMINDER.COM, WAKEUP.COM can also access these symbols. |
| The procedure restores the original verification settings before it exits. |
Sample Execution for REMINDER.COM Command Procedure
$ @REMINDER Enter time to send reminder (hh:mm): 12:00 Enter message: TIME FOR LUNCH %DCL-S-SPAWNED, process BLUTO_1 spawned $ ⋮ TIME FOR LUNCH 11-DEC-1999 12:00:56.99
The procedure prompts for a time value and for your message. Then the procedure spawns a subprocess that displays your message. You can continue working at your terminal; at the specified time, the subprocess rings the terminal bell, displays your message, and displays the time.
B.3. DIR.COM Command Procedure
This command procedure imitates the DCL command DIRECTORY/SIZE=ALL/DATE, displaying the block size (used and allocated) and creation date of the specified files. It illustrates use of the F$PARSE, F$SEARCH, F$FILE_ATTRIBUTES, and F$FAO lexical functions.
Example: DIR.COM
$ !
$ ! Command procedure implementation of DIRECTORY/SIZE=ALL/DATE
$ ! command
$ !
$ SAVE_VERIFY_IMAGE = F$ENVIRONMENT("VERIFY_IMAGE")
$ SAVE_VERIFY_PROCEDURE = F$VERIFY(0)
$ !
$ ! Replace any blank field of the P1 file specification with
$ ! a wildcard character
$ !
$ P1 = F$PARSE(P1,"*.*;*")
$ !
$ ! Define initial values for symbols
$ !
$ FIRST_TIME = "TRUE"
$ FILE_COUNT = 0
$ TOTAL_ALLOC = 0
$ TOTAL_USED = 0
$
$ LOOP:
$ FILESPEC = F$SEARCH(P1)
$ ! Find next file in directory
$ IF FILESPEC .EQS. "" THEN GOTO DONE
$ ! If no more files, then done
$ IF .NOT. FIRST_TIME THEN GOTO SHOW_FILE
$ ! Print header only once
$ !
$ ! Construct and output the header line
$ !
$ FIRST_TIME = "FALSE"
$ DIRSPEC = F$PARSE(FILESPEC,,, "DEVICE") -
+F$PARSE(FILESPEC,,, "DIRECTORY")
$ WRITE SYS$OUTPUT ""
$ WRITE SYS$OUTPUT "Directory ",DIRSPEC
$ WRITE SYS$OUTPUT ""
$ LASTDIR = DIRSPEC
$
$ !
$ ! Put the file name together, get some of the file attributes, and
$ ! type the information out
$ !
$SHOW_FILE:
$ FILE_COUNT = FILE_COUNT + 1
$ FILENAME = F$PARSE(FILESPEC,,, "NAME") -
+ F$PARSE(FILESPEC,,, "TYPE") -
+ F$PARSE(FILESPEC,,, "VERSION")
$ ALLOC = F$FILE_ATTRIBUTES(FILESPEC, "ALQ")
$ USED = F$FILE_ATTRIBUTES(FILESPEC, "EOF")
$ TOTAL_ALLOC = TOTAL_ALLOC + ALLOC
$ TOTAL_USED = TOTAL_USED + USED
$ REVISED = F$FILE_ATTRIBUTES(FILESPEC,"RDT")
$ LINE = F$FAO("!19AS !5UL/!5<!UL!> !17AS",FILENAME,-
USED, ALLOC, REVISED)
$ WRITE SYS$OUTPUT LINE
$ GOTO LOOP
$
$ !
$ ! Output summary information, reset verification, and exit
$ !
$ DONE:
$ WRITE SYS$OUTPUT ""
$ WRITE SYS$OUTPUT "Total of ''FILE_COUNT' files, " + -
"''TOTAL_USED'/''TOTAL_ALLOC' blocks."
$ SAVE_VERIFY_PROCEDURE = F$VERIFY(SAVE_VERIFY_PROCEDURE,SAVE_VERIFY_IMAGE)
$ EXITNotes for DIR.COM Command Procedure
| This procedure uses the F$PARSE function to place asterisks in blank fields in P1, the user-supplied file specification. If you do not specify a parameter when you execute DIR.COM, then the F$PARSE function assigns the value "*.*;*" to P1. This causes DIR.COM to display all files in the current default directory. |
| The F$SEARCH lexical function searches the directory for the file (or files) indicated by P1. If P1 contains any wildcards (asterisks), the F$SEARCH function returns all matching file specifications. After the last file specification has been returned, the procedure branches to the label DONE. |
| The first time through the loop, the procedure writes a header for the directory display. This header includes the device and directory names. To obtain these names, the procedure uses the F$PARSE function. |
| The procedure uses the F$PARSE lexical function to extract the file name from each file specification in the directory. The F$FILE_ATTRIBUTES lexical function then obtains blocks used, blocks allocated, and creation date information about each file. Finally, the F$FAO function formats a single display line for each file in the directory. The F$FAO function uses the file name and file attribute information as arguments. |
| When F$SEARCH returns a null string, the procedure branches to the label DONE and displays summary information showing the total number of files, the total number of blocks used, and the total number of blocks allocated in the directory. |
Sample Execution for DIR.COM Command Procedure
$ @DIR [VERN]*.COM Directory DISK4:[VERN] BATCH.COM;1 1/3 11-DEC-1999 11:43 CALC.COM;3 1/3 11-DEC-1999 11:30 CONVERT.COM;1 5/6 11-DEC-1999 15:23 ⋮ LOGIN.COM;34 2/3 11-DEC-1999 13:17 PID.COM;7 1/3 11-DEC-1999 09:49 SCRATCH.COM;6 1/3 11-DEC-1999 11:29) Total of 15 files, 22/48 blocks.
The procedure returns information on all .COM files in the directory [VERN].
B.4. SYS.COM Command Procedure
This command procedure returns statistics about the current process, all processes in the group (if the current process has group privilege), and all processes on the system (if the current process has world privilege). This procedure illustrates use of the F$PID, F$EXTRACT, and F$GETJPI lexical functions.
Example: SYS.COM
$ !
$ ! Displays information about owner, group, or system processes.
$ !
$ ! Turn off verification and save current settings
$ SAVE_VERIFY_IMAGE = F$ENVIRONMENT("VERIFY_IMAGE")
$ SAVE_VERIFY_PROCEDURE = F$VERIFY(0)
$ CONTEXT = "" ! Initialize PID search context
$ !
$ ! Output header line.
$ !
$ WRITE SYS$OUTPUT " PID Username Term Process " + -
"name State Pri Image"
$ !
$ ! Output process information.
$ !
$LOOP:
$ !
$ ! Get next PID. If null, then done.
$ !
$ PID = F$PID(CONTEXT)
$ IF PID .EQS. "" THEN GOTO DONE
$ !
$ ! Get image file specification and extract the file name.
$ !
$ IMAGNAME = F$GETJPI(PID,"IMAGNAME")
$ IMAGNAME = F$PARSE(IMAGNAME,,,"NAME","SYNTAX_ONLY")
$ !
$ ! Get terminal name. If none, then describe type of process.
$ !
$ TERMINAL = F$GETJPI(PID,"TERMINAL")
$ IF TERMINAL .EQS. "" THEN -
TERMINAL = "-"+F$EXTRACT(0,3,F$GETJPI(PID,"MODE"))+"-"
$ IF TERMINAL .EQS. "-INT-" THEN TERMINAL = "-DET-"
$ IF F$GETJPI(PID,"OWNER") .NE. 0 THEN TERMINAL = "-SUB-"
$ !
$ ! Get more information, put process line together,
$ ! and output it.
$ !
$ LINE = F$FAO("!AS !12AS !7AS !15AS !5AS !2UL/!UL !10AS", -
PID,F$GETJPI(PID,"USERNAME"),TERMINAL,-
F$GETJPI(PID,"PRCNAM"),-
F$GETJPI(PID,"STATE"),F$GETJPI(PID,"PRI"),-
F$GETJPI(PID,"PRIB"),IMAGNAME)
$ WRITE SYS$OUTPUT LINE
$ GOTO LOOP
$ !
$ ! Restore verification and exit.
$ !
$DONE:
$ SAVE_VERIFY_PROCEDURE = F$VERIFY(SAVE_VERIFY_PROCEDURE,SAVE_VERIFY_IMAGE)
$ EXIT
Notes for SYS.COM Command Procedure
| The symbol CONTEXT is initialized with a null value. This symbol will be used with the F$PID function to obtain a list of process identification numbers. |
| The procedure writes a header for the display. |
| The procedure gets the first process identification (PID) number. If the current process lacks group or world privilege, the PID number of the current process is returned. If the current process has group privilege, the first PID number in the group list is returned. The first PID number in the system list is returned if the current process has world privilege. The function continues to return the next PID number in sequence until the last PID number is returned. At this point, a null string is returned, and the procedure branches to the end. |
| The procedure uses the F$GETJPI lexical function to get the image file specification for each PID number. The F$PARSE function extracts the file name from the specification returned by the F$GETJPI function. |
| The procedure uses the F$GETJPI function to get the terminal name for each PID number. The F$EXTRACT function extracts the first three characters of the MODE specification returned by F$GETJPI(PID,"MODE") to determine the type of process. The F$GETJPI function is used again to determine whether the process is a subprocess. |
| The procedure uses the F$GETJPI lexical function to get the user name, process name, process state, process priority, and process base priority for each PID number returned. The F$FAO lexical function formats this information into a screen display. |
Sample Execution for SYS.COM Command Procedure
$ @SYS PID Username Term Process name State Pri Image 00050011 NETNONPRIV -NET- MAIL_14411 LEF 9/4 MAIL 00040013 STOVE RTA6: STOVE LEF 9/4 00140015 MAROT -DET- DMFB0ACP HIB 9/8 F11BAC 00080016 THOMPSON -DET- MTA0ACP HIB 12/8 MTAAACP 00070017 JUHLES TTF1: JUHLES LEF 9/4 ⋮ 00040018 MARCO TTA2: MARCO HIB 9/4 RTPAD 0018001A VERN RTA3: VERN LEF 9/4 0033001B YISHA RTA7: YISHA CUR 4/4 0002004A SYSTEM -DET- ERRFMT HIB 12/7 ERRFMT
This procedure returns information on all processes on the system. The current process has world privilege.
B.5. GETPARMS.COM Command Procedure
This command procedure returns the number of parameters passed to a procedure. You can call GETPARMS.COM from another procedure to determine how many parameters were passed to the calling procedure.
Example: GETPARMS.COM
$ ! Procedure to count the number of parameters passed to a command
$ ! procedure. This number is returned as the global symbol PARMCOUNT.
$ !
$ SAVE_VERIFY_IMAGE = F$ENVIRONMENT("VERIFY_IMAGE")
$ SAVE_VERIFY_PROCEDURE = F$VERIFY(0)
$ !
$ IF P1 .EQS. "?" THEN GOTO TELL
$ !
$ ! Loop to count the number of parameters passed. Null parameters are
$ ! counted until the last non-null parameter is passed.
$ !
$ COUNT = 0
$ LASTNONNULL = 0
$ LOOP:
$ IF COUNT .EQ. 8 THEN GOTO END_COUNT
$ COUNT = COUNT + 1
$ IF P'COUNT' .NES. "" THEN LASTNONNULL = COUNT
$ GOTO LOOP
$ !
$ END_COUNT:
$ !
$ ! Place the number of non-null parameters passed into PARMCOUNT.
$ !
$ PARMCOUNT == LASTNONNULL
$ !
$ ! Restore verification setting, if it was on, before exiting
$ !
$ SAVE_VERIFY_PROCEDURE = F$VERIFY(SAVE_VERIFY_PROCEDURE,SAVE_VERIFY_IMAGE)
$ EXIT
$ !
$ TELL:
$ TYPE SYS$INPUT
This procedure counts the number of parameters passed to
another procedure. This procedure can be called by entering
the following string in any procedure:
@GETPARMS 'P1 'P2 'P3 'P4 'P5 'P6 'P7 'P8
On return, the global symbol PARMCOUNT
contains the number of parameters passed to the procedure.
$ !
$ EXITNotes for GETPARMS.COM Command Procedure
| The procedure saves the current image and procedure verification settings before turning off verification. |
| If a question mark character was passed to the procedure as a parameter, the procedure branches to the label TELL (Note 6). |
| A loop is established to count the number of parameters that were passed to the procedure. The counters COUNT and LASTNONNULL are initialized to 0 before entering the loop. Within the loop, COUNT is incremented and tested against the value 8. If COUNT is equal to 8, the maximum number of parameters has been entered. Each time a non-null parameter is passed, LASTNONNULL is equated to that parameter's number. Each time the IF command executes, the symbol COUNT has a different value. The first time, the value of COUNT is 1 and the IF command checks P1. The second time, it checks P2, and so on. |
| When the parameter count reaches 8, the procedure branches to END_COUNT. The symbol LASTNONNULL contains the count of the last non-null parameter passed. This value is placed in the global symbol PARMCOUNT. PARMCOUNT must be defined as a global symbol so that its value can be tested at the calling command level. |
| The original verification settings are restored. |
| At the label TELL, the TYPE command displays data that is included in the input stream. In command procedures, the input stream is the command procedure file. The TYPE command displays instructions on how to use GETPARMS.COM. |
Sample Execution for GETPARMS.COM Command Procedure
$ @GETPARMS 'P1' 'P2' 'P3' 'P4' 'P5' 'P6' 'P7' 'P8' $ IF PARMCOUNT .NE. 3 THEN GOTO NOT_ENOUGH . . . $NOT_ENOUGH: $ WRITE SYS$OUTPUT - "Three non-null parameters required. Type SORTFILES HELP for info." $ EXIT
$ @SORTFILES DEF 4 Three non-null parameters required. Type SORTFILE HELP for info.
For this procedure to be properly invoked — that is, for the parameters that are passed to SORTFILES to be passed intact to GETPARMS for processing — the symbols P1 to P8 must be enclosed in single quotation marks.
If the return value from GETPARMS is not 3, SORTFILES outputs an error message and exits.
B.6. EDITALL.COM Command Procedure
This command procedure invokes the EDT editor repeatedly to edit a group of files with the same file type. This procedure illustrates how to use lexical functions to extract file names from columnar output. It also illustrates a way to redefine the input stream for a program invoked within a command procedure.
Example: EDITALL.COM
$ ! Procedure to edit all files in a directory with a $ ! specified file type. Use P1 to indicate the file type. $ ! $ ON CONTROL_Y THEN GOTO DONE ! Ctrl/Y action
Notes for EDITALL.COM Command Procedure
| ON commands establish condition handling for this procedure. If Ctrl/Y is pressed at any time during the execution of this procedure, the procedure branches to the label DONE. Similarly, if any error or severe error occurs, the procedure branches to the label DONE. |
| The procedure checks whether a parameter was entered. If not, the procedure prompts for a file type. |
| The DIRECTORY command lists all files with the file type specified as P1. The command output is written to the file DIRECT.OUT. The /VERSIONS=1 qualifier requests that only the highest numbered version of each file be listed. The /NOHEADING and /NOTRAILING qualifiers request that no heading lines or directory summaries be included in the output. The /COLUMNS=1 qualifier ensures that one file name per record is given. |
| The IF command checks the return value from the DIRECTORY command by testing the value of $STATUS. If the DIRECTORY command does not complete successfully, then $STATUS has an even integer value, and the procedure branches to the label ERROR_SEC. |
| The OPEN command opens the directory output file and gives it a logical name of DIRFILE. |
| The READ command reads a line from the DIRECTORY command output into the symbol name NAME. After it reads each line, the procedure uses the DEFINE command to redefine the input stream for the edit session (SYS$INPUT) to be the terminal. Then, it invokes the editor, specifying the symbol NAME as the file specification. When the edit session is completed, the command interpreter reads the next line in the command procedure and branches to the label NEWLINE. When the procedure has edited all files of the specified file type in the directory, it branches to the label DONE. |
| The label DONE is the target label for the /END qualifier on the READ command and the target label for the ON CONTROL_Y and ON ERROR conditions set at the beginning of the procedure. At this label, the procedure performs the necessary cleanup operations. The CLOSE command closes the DIRECTORY command output file; the /ERROR qualifier specifies the label on the next line in the file. This use of /ERROR suppresses any error message that would be displayed if the directory file is not open. For example, this would occur if Ctrl/Y were pressed before the directory file were opened. The second step in cleanup is to delete the temporary directory file. |
Sample Execution for EDITALL.COM Command Procedure
$ @EDITALL DAT * . . . %DELETE-I-FILDEL, device:[directory]DIRECT.OUT;1 deleted (x blocks)
The procedure EDITALL is invoked with P1 specified as .DAT. The procedure creates a directory listing of all files in the default directory whose file types are .DAT and invokes the editor to edit each one. After you finish editing the last file with the file type .DAT, the procedure deletes the temporary file DIRECT.OUT and displays an informational message at your terminal.
B.7. MAILEDIT.COM Command Procedure
This command procedure invokes a text editor in the Mail utility.
Example: MAILEDIT.COM
$ ! Command procedure to invoke an editor for Mail.
$ !
$ ! Inputs:
$ !
$ ! P1 = Input file name.
$ ! P2 = Output file name.
$ !
$ ! If MAIL$EDIT is undefined, Mail will invoke the user's selected
$ ! callable editor set by the mail SET EDITOR command.
$ !
$ ! If MAIL$EDIT is defined to be a command procedure, Mail will create
$ ! a subprocess to edit the mail, but any SET EDITOR command in Mail
$ ! will override the definition of MAIL$EDIT for the remainder of that
$ ! Mail session.
$ !
$ ! Note that this procedure is run in the context of a subprocess.
$ ! LOGIN.COM is not executed. However, all process logical names
$ ! and DCL global symbols are copied. In particular, note that the
$ ! user's individual definition of the symbol EDIT is used if there
$ ! is one. Otherwise, the system default editor is used.
$ !
$ ! The default directory is the same as the parent process
$ !
$ DEFINE /USER SYS$INPUT 'F$TRNLNM("SYS$OUTPUT")'
$ IF P1 .EQS. "" THEN GOTO NOINPUT
$ EDIT /OUTPUT='P2' 'P1'
$ EXIT
$NOINPUT:
$ EDIT 'P2'
$ EXIT
Notes for MAILEDIT.COM Command Procedure
| The DEFINE command allows the editor input to come from the terminal instead of the command file. |
| The IF statement distinguishes between editing a file with a different output file name from editing a file with the same file name. |
| This EDIT command invokes an editor with input and output file names. You
can edit this line to invoke an editor of your choice. For
example: $ RUN XYZ_EDITOR.EXE /INPUT= 'P1' /OUTPUT='P2' |
| This EDIT command invokes an editor with a single file name. You can edit
this line to invoke an editor of your choice. For
example: $ RUN XYZ_EDITOR.EXE /INPUT= 'P2' /OUTPUT='P2' |
Sample Execution for MAILEDIT.COM Command Procedure
$DEFINE MAIL$EDIT MAILEDIT.COM $ MAIL MAIL> SHOW EDITOR Your editor is defined by the file MAILEDIT.COM.
B.8. FORTUSER.COM Command Procedure
Provides a sample of a system-defined login command procedure that controls the terminal environment for an interactive user who creates, compiles, and executes FORTRAN programs. If a user logs in to a captive account where FORTUSER.COM is listed as the login command procedure, the user can execute only the commands accepted by FORTUSER.COM. This procedure also illustrates how to use lexical functions to step through an option table, comparing a user-entered command with a list of valid commands.
Example: FORTUSER.COM
$ ! Procedure to create, compile, link, execute, and debug $ ! FORTRAN programs. Users can enter only the commands listed $ ! in the symbol OPTION_TABLE. $ SET NOCONTROL=Y
Notes for FORTUSER.COM Command Procedure
| The SET NOCONTROL=Y command ensures that the user who logs in under the control of this procedure cannot interrupt the procedure or any command or program in it. |
| The option table lists the commands that the user will be allowed to execute. Each command is separated by a slash. |
| The procedure introduces itself. |
| The symbol name PROMPT is given the value of a label in the procedure. When the procedure is initially invoked, this symbol has the value INIT. The HELP command text terminates with a GOTO command that specifies the label PROMPT. When this text is displayed for the first time, the GOTO command results in a branch to the label HELP. This displays the HELP message that explains the commands that you can enter. Then, the procedure branches back to the label INIT, where the value for PROMPT is changed to "GET_COMMAND". Finally, the procedure branches to the label FILE to get a file name. Thereafter, when the help text is displayed, the procedure branches to the label GET_COMMAND to get the next command. |
| The Ctrl/Y condition action is set to return to the label GET_COMMAND, as is the warning condition action. The procedure prompts for a command and continues to prompt, even if nothing is entered. To terminate the session and return to interactive command level, enter the command DONE. |
| The procedure uses the F$LOCATE and F$LENGTH lexical functions to determine whether the command is included in the list of options. The F$LOCATE function searches for the user-entered command, followed by a slash. For example, if you enter EDIT, the procedure searches for EDIT/. If the command is not included in the option list, then the procedure branches to the label INVALID_COMMAND. If the command is valid, the procedure branches to the appropriate label. |
| At the label INVALID_COMMAND, the procedure writes an error message and displays the help text that lists the commands that are valid. |
| The help text lists the commands that are valid. This text is displayed initially. It is also displayed whenever the user enters the HELP command or any invalid command. |
| At the conclusion of the HELP text, the GOTO command specifies the symbol name PROMPT. When this procedure is first invoked, the symbol has the value INIT. Thereafter, it has the value GET_COMMAND. |
| Each valid command in the list has a corresponding entry in the option table and a corresponding label in the command procedure. For the commands that read input from the terminal, for example, EDIT, the procedure contains a DEFINE command that defines the input stream as SYS$COMMAND. |
| At the label BADFILE, the procedure displays a message indicating that the file must be in the current directory. Then the procedure prompts for another file name. |
| After obtaining a file name, the procedure checks that you have not specified a directory that is different from your current default directory. The procedure then uses the F$PARSE function to extract the file name. Each command supplies the appropriate default file type. Next, the procedure branches back to the label GET_COMMAND to get a command to process the file. |
Sample Execution for FORTUSER.COM Command Procedure
Username: CLASS30
Password:
OpenVMS Version 7.1
OpenVMS FORTRAN Command Interpreter
Enter name of file with which you would like to work.
The commands you can enter are:
FILE Name of FORTRAN program in your current
default directory. Subsequent commands
process this file.
EDIT Edit the program.
COMPILE Compile the program with VAX FORTRAN.
LINK Link the program to produce an executable image.
RUN Run the program's executable image.
EXECUTE Same function as COMPILE, LINK and RUN.
DEBUG Run the program under control of the debugger.
PRINT Queue the most recent listing file for printing.
DONE Return to interactive command level.
HELP Print this help message.
Enter Ctrl/Y to restart this session
File name: AVERAGE
Command: COMPILE
Command: LINK
Command: RUN
Command: FILE
File name: READFILE
Command: EDITThis sample execution illustrates a session in which a user named CLASS30 logs in to the account controlled by the FORTUSER command procedure. The FORTUSER command procedure displays the commands the user is allowed to execute, as well as an instruction for restarting the session. Next, the user specifies the file AVERAGE, compiles, links, and runs it. Then, the user enters the FILE command to begin working on another file.
B.9. LISTER.COM Command Procedure
Prompts for input data, formats the data in columns, and sorts it into an output file. This procedure illustrates the READ and WRITE commands, as well as the character substring overlay format of an assignment statement.
Example: LISTER.COM
$ ! Procedure to accumulate programmer names and document file names.
$ ! After all programmer names and file names are entered, they are
$ ! sorted in alphabetic order by programmer name and printed on
$ ! the system printer.
$ !
$ SAVE_VERIFY_IMAGE = F$ENVIRONMENT("VERIFY_IMAGE")
$ SAVE_VERIFY_PROCEDURE = F$VERIFY(0)
$ !
$ OPEN/WRITE OUTFILE DATA.TMP ! Create output file
$ !
$ ! Loop to obtain programmers' last names and file names,
$ ! and write this data to DATA.TMP.
$ !
$ LOOP:
$ INQUIRE NAME "Programmer (press Return to quit)"
$ IF NAME .EQS. "" THEN GOTO FINISHED
$ INQUIRE FILE "Document file name"
$ RECORD[0,20]:='NAME'
$ RECORD[21,20]:='FILE'
$ WRITE OUTFILE RECORD
$ GOTO LOOP
$ FINISHED:
$ CLOSE OUTFILE
$ !
$ DEFINE/USER_MODE SYS$OUTPUT: NL: ! Suppress sort output
$ SORT/KEY=(POSITION:1,SIZE=20) DATA.TMP DOC.SRT
$ !
$ OPEN/WRITE OUTFILE DOCUMENT.DAT
$ WRITE OUTFILE "Programmer Files as of ",F$TIME()
$ WRITE OUTFILE ""
$ RECORD[0,20]:="Programmer Name"
$ RECORD[21,20]:="File Name"
$ WRITE OUTFILE RECORD
$ WRITE OUTFILE ""
$ !
$ CLOSE OUTFILE
$ APPEND DOC.SRT DOCUMENT.DAT
$ PRINT DOCUMENT.DAT
$ !
$ INQUIRE CLEAN_UP "Delete temporary files [Y,N]"
$ IF CLEAN_UP THEN DELETE DATA.TMP;*,DOC.SRT;*
$ SAVE_VERIFY_PROCEDURE = F$VERIFY(SAVE_VERIFY_PROCEDURE,SAVE_VERIFY_IMAGE)
$ EXITNotes for LISTER.COM Command Procedure
| LISTER.COM saves the current verification setting and turns off verification. |
| The OPEN command creates a temporary file for writing. |
| INQUIRE commands prompt for a programmer name and for a file name. If a null line, signaled by pressing Return, is entered in response to the INQUIRE command prompt, the procedure assumes that no more data is to be entered and branches to the label FINISHED. |
| After assigning values to the symbols NAME and FILE, the procedure uses the character string overlay format of an assignment statement to construct a value for the symbol RECORD. In columns 1 to 21 of RECORD, the current value of NAME is written. The command interpreter pads the value of NAME with spaces to fill the 20-character length specified. Similarly, the next 20 columns of RECORD are filled with the value of FILE. Then, the value of RECORD is written to the output file. |
| After the file has been closed, the procedure sorts the output file DATA.TMP. The DEFINE command directs the SORT command output to the null file NL. Otherwise, these statistics would be displayed on the terminal: The sort is performed on the first 20 columns; that is, by programmer name. The sorted output file has the name DOC.SRT. |
| The procedure creates the final output file, DOCUMENT.DAT, with the OPEN command. The first lines written to the file are header lines, giving a title, the date and time of day, and headings for the columns. |
| The procedure closes the file DOCUMENT.DAT and appends the sorted output file, DOC.SRT, to it. Then, the output file is queued to the system printer. |
| The procedure prompts to determine whether to delete the intermediate files. If a true response (T, t, Y, or y) is entered at the INQUIRE command prompt, the files DATA.TMP and DOC.SRT are deleted. Otherwise, they are retained. |
Sample Execution for LISTER.COM Command Procedure
$ @LISTER
Programmer: WATERS
Document file name: CRYSTAL.CAV
Programmer: JENKINS
Document file name: MARIGOLD.DAT
Programmer: MASON
Document file name: SYSTEM.SRC
Programmer: ANDERSON
Document file name: JUNK.J
Programmer: Return
Delete temporary files [Y,N]:yProgrammer Files as of 31-DEC-1999 16:18:58.79 Programmer Name File Name ANDERSON JUNK.J JENKINS MARIGOLD.DAT MASON SYSTEM.SRC WATERS CRYSTAL.CAV
B.10. CALC.COM Command Procedure
Performs arithmetic calculations and converts the resulting value to hexadecimal and decimal values.
Example: CALC.COM
$ ! Procedure to calculate expressions. If you enter an
$ ! assignment statement, then CALC.COM evaluates the expression
$ ! and assigns the result to the symbol you specify. In the next
$ ! iteration, you can use either your symbol or the symbol Q to
$ ! represent the current result.
$ !
$ ! If you enter an expression, then CALC.COM evaluates the
$ ! expression and assigns the result to the symbol Q. In
$ ! the next iteration, you can use the symbol Q to represent
$ ! the current result.
$ !
$ SAVE_VERIFY_IMAGE = F$ENVIRONMENT("VERIFY_IMAGE")
$ SAVE_VERIFY_PROCEDURE = F$VERIFY(0)
$ START:
$ ON WARNING THEN GOTO START
$ INQUIRE STRING "Calc"
$ IF STRING .EQS. "" THEN GOTO CLEAN_UP
$ IF F$LOCATE("=",STRING) .EQ. F$LENGTH(STRING) THEN GOTO EXPRESSION
$ !
$ ! Execute if string is in the form symbol = expression
$ STATEMENT:
$ 'STRING' ! Execute assignment statements
$ SYMBOL = F$EXTRACT(0,F$LOCATE("=",STRING)-1,STRING) ! get symbol name
$ Q = 'SYMBOL' ! Set up q for future iterations
$ LINE = F$FAO("Decimal = !SL Hex = !-!XL Octal = !-!OL",Q)
$ WRITE SYS$OUTPUT LINE
$ GOTO START
$ !
$ !
$ ! Execute if string is an expression
$ EXPRESSION:
$ Q = F$INTEGER('STRING') ! Can use Q in next iteration
$ LINE = F$FAO("Decimal = !SL Hex = !-!XL Octal = !-!OL",Q)
$ WRITE SYS$OUTPUT LINE
$ GOTO START
$ !
$ CLEAN_UP:
$ SAVE_VERIFY_PROCEDURE = F$VERIFY(SAVE_VERIFY_PROCEDURE,SAVE_VERIFY_IMAGE)
$ EXITNotes for CALC.COM Command Procedure
| The procedure establishes an error-handling condition that restarts the procedure. If a warning or an error of greater severity occurs, the procedure will branch to the beginning where it resets the ON condition. This technique ensures that the procedure will not exit if the user enters an expression incorrectly. |
| The INQUIRE command prompts for an arithmetic expression. The procedure
accepts expressions in either of the following
formats: name = expression expression If you press Return, the procedure assumes the end of a CALC session and exits. If you enter input in the format "name = expression" then the procedure continues executing at the label STATEMENT. Otherwise, the procedure branches to the label EXPRESSION. |
| The procedure executes the assignment statement and assigns the result of the expression to the symbol. Then the procedure extracts the symbol name, and assigns the value of the symbol to Q. This allows you to use either Q or your symbol during the next iteration of the procedure. Next, the procedure displays the result and then branches back to the label START. |
| The procedure evaluates the expression and assigns the result to the symbol Q. This allows you to use Q during the next iteration of the procedure. Next, the procedure displays the result and then branches back to the label START. |
Sample Execution for CALC.COM Command Procedure
$ @CALC Calc:2 * 30Decimal = 60 Hex = 0000003C Octal = 00000000074 Calc:Q + 3Decimal = 63 Hex = 0000003F Octal = 00000000077Calc:TOTAL = Q + 4Decimal = 67 Hex = 00000043 Octal = 00000000103Calc:5 + 7Decimal = 12 Hex = 0000000C Octal = 00000000014Calc:Return$
After each prompt from the procedure, the user enters an arithmetic expression. The procedure displays the results in decimal, hexadecimal, and octal. A null line, signaled by pressing Return on a line with no data, concludes the CALC session.
B.11. BATCH.COM Command Procedure
Accepts a command string, a command procedure, or a list of commands and then executes these commands as a batch job.
Example: BATCH.COM
$ VERIFY_IMAGE = F$ENVIRONMENT("VERIFY_IMAGE")
$ VERIFY_PROCEDURE = F$VERIFY(0)
$!
$! Turn off verification and save current settings.
$! (This comment must appear after you turn verification
$! off; otherwise it will appear in the batch job log file.)
$!
$!
$! If this is being executed as a batch job,
$! (from the SUBMIT section below) go to the EXECUTE_BATCH_JOB section
$! Otherwise, get the information you need to prepare to execute the
$! batch job.
$!
$ IF F$MODE() .EQS. "BATCH" THEN GOTO EXECUTE_BATCH_JOB
$!
$!
$! Prepare to submit a command (or a command procedure) as a batch job.
$! First, determine a mnemonic process name for the batch job. Use the
$! following rules:
$!
$! 1) If the user is executing a single command, then use the verb name.
$! Strip off any qualifiers that were included with the command.
$! 2) If the user is executing a command procedure, then use the file name.
$! 3) Otherwise, use BATCH.
$!
$ JOB_NAME = P1
$ IF JOB_NAME .EQS. "" THEN JOB_NAME = "BATCH"
$ IF F$EXTRACT(0,1,JOB_NAME) .EQS. "@" THEN JOB_NAME = F$EXTRACT(1,999,JOB_NAME)
$ JOB_NAME = F$EXTRACT(0,F$LOCATE("/",JOB_NAME),JOB_NAME)
$ JOB_NAME = F$PARSE(JOB_NAME,,,"NAME","SYNTAX_ONLY")
$ IF JOB_NAME .EQS. "" THEN JOB_NAME = "BATCH"
$!
$!
$! Get the current default device and directory.
$!
$ ORIGDIR = F$ENVIRONMENT("DEFAULT")
$!
$!
$! Concatenate the parameters to form the command string to be executed.
$! If the user did not enter a command string, the symbol COMMAND will have
$! a null value.
$!
$ COMMAND = P1 + " " + P2 + " " + P3 + " " + P4 + " " + -
P5 + " " + P6 + " " + P7 + " " + P8
$!
$!
$! If the user is executing a single command and if both the command and the
$! original directory specification are small enough to be passed as
$! parameters to the SUBMIT command, then submit the batch job now.
$!
$ IF (P1 .NES. "") .AND. (F$LENGTH(COMMAND) .LE. 255) .AND. -
(F$LENGTH(ORIGDIR) .LE. 255) THEN GOTO SUBMIT
$!
$!
$! If the single command to be executed in the batch job is very large, or
$! if you have to prompt for commands to execute in the batch job, then
$! create a temporary command procedure to hold those commands and get the
$! fully expanded name of the command procedure.
$!
$ CREATE_TEMP_FILE:
$ ON CONTROL_Y THEN GOTO CONTROL_Y_HANDLER
$ OPEN/WRITE/ERROR=FILE_OPEN_ERROR TEMPFILE SYS$SCRATCH:'JOB_NAME'.TMP
$ FILESPEC = F$SEARCH("SYS$SCRATCH:" + JOB_NAME + ".TMP")
$!
$! By default, have the batch job continue if it encounters any errors.
$!
$ WRITE TEMPFILE "$ SET NOON"
$!
$! Either write the single large command to the file, or prompt for
$! multiple commands and write them to the file.
$!
$ IF COMMAND .NES. " " THEN GOTO WRITE_LARGE_COMMAND
$
$ LOOP:
$ READ /END_OF_FILE=CLOSE_FILE /PROMPT="Command: " SYS$COMMAND COMMAND
$ IF COMMAND .EQS. "" THEN GOTO CLOSE_FILE
$ WRITE TEMPFILE "$ ",COMMAND
$ GOTO LOOP
$
$ WRITE_LARGE_COMMAND:
$ WRITE TEMPFILE "$ ",COMMAND
$
$!
$! Finish the temporary file by defining a symbol so that you will know
$! the name of the command procedure to delete and then close the file.
$! Define the symbol COMMAND to mean "execute the command procedure
$! you have just created." Then submit the batch job and execute
$! this command procedure in the batch job.
$!
$ CLOSE_FILE:
$ WRITE TEMPFILE "$ BATCH$DELETE_FILESPEC == """,FILESPEC,""""
$ CLOSE TEMPFILE
$ ON CONTROL_Y THEN EXIT
$ COMMAND = "@" + FILESPEC
$!
$!
$! Submit BATCH.COM as a batch job, and pass it two parameters.
$! P1 is the command (or name of the command procedure) to execute.
$! P2 is the directory from which to execute the command.
$!
$ SUBMIT:
$ SUBMIT/NOTIFY/NOPRINT 'F$ENVIRONMENT("PROCEDURE")' /NAME='JOB_NAME' -
/PARAMETERS=("''COMMAND'","''ORIGDIR'")
$ GOTO EXIT
$!
$!
$! The user pressed Ctrl/Y while the temporary command procedure was open.
$! Close the command procedure, delete it if it exists, and exit.
$!
$ CONTROL_Y_HANDLER:
$ CLOSE TEMPFILE
$ IF F$TYPE(FILESPEC) .NES. "" THEN DELETE/NOLOG 'FILESPEC'
$ WRITE SYS$OUTPUT "Ctrl/Y caused the command procedure to abort."
$ GOTO EXIT
$!
$!
$! The temporary command procedure could not be created.
$! Notify the user and exit.
$!
$ FILE_OPEN_ERROR:
$ WRITE SYS$OUTPUT "Could not create sys$scratch:",job_name,".tmp"
$ WRITE SYS$OUTPUT "Please correct the situation and try again."
$!
$!
$! Restore the verification states and exit.
$!
$ EXIT:
$ VERIFY_PROCEDURE = F$VERIFY(VERIFY_PROCEDURE,VERIFY_IMAGE)
$ EXIT
$!
$!
$! BATCH.COM was invoked as a batch job. P1 contains the command
$! to execute and P2 the default directory specification.
$! Return a status code that indicates the termination status of P1.
$!
$ EXECUTE_BATCH_JOB:
$ SET NOON
$ VERIFY_PROCEDURE = F$VERIFY(VERIFY_PROCEDURE,VERIFY_IMAGE)
$ SET DEFAULT 'P2'
$ 'P1'
$ IF F$TYPE(BATCH$DELETE_FILESPEC) .EQS. "" THEN EXIT $STATUS
$ STATUS = $STATUS
$ DELETE /NOLOG 'BATCH$DELETE_FILESPEC'
$ EXIT STATUSNotes for BATCH.COM Command Procedure
| This IF statement tests whether BATCH.COM is executing in batch mode. When you invoke BATCH.COM interactively, you provide (as parameters) a command string or a command procedure that is to be executed as a batch job. If you do not supply any parameters, then BATCH.COM prompts you for commands, writes these commands to a file, and then executes this command procedure as a batch job. After BATCH.COM prepares your commands for execution from a batch job, it uses the SUBMIT command to submit itself as a batch job and executes your commands from this job (see Note 8). When you invoke BATCH.COM as a batch job, the procedure branches to the label EXECUTE_BATCH_JOB. Note that you must specify the command or command procedure to execute as P1 and the default directory as P2 if you execute BATCH.COM in batch mode. |
| These commands prepare the batch job for execution. First, the procedure constructs a name for the batch job. If a command string was passed, then BATCH.COM uses the verb name as the job name. If a command procedure was passed, then BATCH.COM uses the file name. If no input was passed, then BATCH.COM names the job BATCH. |
| The parameters are concatenated to form the command string to be executed. The command string is assigned to the symbol COMMAND. |
| The SUBMIT command cannot pass a parameter that is greater than 255 characters. Therefore, the procedure tests that the command string and directory name are less than 255 characters long. If both strings are less than 255 characters (and if the user did, in fact, pass a command string), then the procedure branches to the label SUBMIT. |
| The procedure establishes a Ctrl/Y handler, so cleanup operations are performed if the user presses Ctrl/Y during this section of the command procedure. |
| The procedure creates a temporary file to contain the commands to be executed. If the user supplies a long command string, the procedure branches to WRITE_LARGE_COMMAND and writes this command to the temporary file. Otherwise, the procedure prompts for the commands to be executed. Each command is written to the temporary file. |
| Before you close the temporary file, write a symbol assignment statement to the file. This statement assigns the file name for the temporary file to the symbol BATCH$DELETE_FILESPEC. After closing the temporary file, the procedure resets the default Ctrl/Y handler. Then the procedure defines the symbol COMMAND so that, when executed, the symbol COMMAND invokes the temporary command file. |
| The procedure submits itself as a batch job, using the defined job name (see Note 2). The procedure also passes two parameters: the command or command procedure to be executed, and the directory from which the command should be executed. Then the procedure branches to the label EXIT (see Note 11). |
| This section performs cleanup operations if the user enters Ctrl/Y while the temporary file is being created. |
| This section writes an error message if the temporary file cannot be created. |
| The procedure resets the original verification settings and then exits. |
| These commands are executed when BATCH.COM runs in batch mode. First, ON error handling is disabled and the user's default verification settings are set. Then the default is set to the directory indicated by P2, and the command or command procedure indicated by P1 is executed. If a temporary file was created, this file is deleted. The completion status for P1 is saved before deleting BATCH$DELETE_FILESPEC. This completion status is returned by the EXIT command. |
Sample Execution for BATCH.COM Command Procedure
$ @BATCH RUN MYPROG Job RUN (queue SYS$BATCH, entry 1715) started on SYS$BATCH
The example uses BATCH.COM to run a program from within a batch job.
B.12. COMPILE_FILE.COM Command Procedure
Compiles, links, and runs a file written in Pascal or FORTRAN. It prompts for a file to process and determines if the file type is .PAS or .FOR. If the file type is not .PAS or .FOR, or if the file does not exist in the current default directory, the command procedure outputs appropriate error messages. This procedure illustrates the use of the IF-THEN-ELSE language construct.
Example: COMPILE_FILE.COM
$! This command procedure compiles, links, and runs a file written in Pascal $! or FORTRAN. $! $ ON CONTROL_Y THEN EXIT $! $ TOP: $ INQUIRE FILE "File to process" $ IF F$SEARCH(FILE) .NES. ""
Notes for COMPILE_FILE.COM Command Procedure
| The IF command uses the F$SEARCH lexical function to search the directory and determine if the file exists. |
| The command block following the THEN command:
|
| If the file you entered at the "File to process:" prompt does not exist in the directory, the command following the ELSE command executes. |
| The ENDIF command ends the IF-THEN-ELSE command language construct. |
| The procedure compiles the FORTRAN program and branches to the LINK label. If an error occurs during the compilation, the procedure branches to the PRINT label. |
| The procedure displays that the program compiled correctly, links and runs the program, and branches to the CLEANUP label. The program branches to the END label if an error occurs. |
| The procedure enters the listing file of the program in the default print queue. |
Sample Execution for COMPILE_FILE.COM Command Procedure
$ @COMPILE_FILE
File to process: RAND.PAS
Successful compilation
%DELETE-I-FILDEL,WORK:[DESCH]RAND.OBJ;1 deleted (3 blocks)
%DELETE-I-FILDEL,WORK:[DESCH]RAND.LIS;1 deleted (9 blocks)
Process another file (Y or N)? N ReturnFor information on case sensitivity, see Chapter 5, "Extended File Specifications".
Record Management Services (RMS) is the OpenVMS facility that assists application programs in processing and managing files. RMS maintains the rules for file specification parsing. Refer to the Guide to OpenVMS File Applications for more information on how RMS applies defaults to partial file specifications.
Parallel qualifiers for the SET QUEUE/ENTRY command allow you to specify these operations for print jobs that are already queued but not yet printing.
Files can also be stored on magnetic tapes, but magnetic tapes do not have directory structures. To access a file stored on tape, use a file specification that contains only file information.
Unmodified programs and utilities may limit or abbreviate complete file specifications to 255 bytes.
If you are typing a long file specification on a DCL command line, DCL still limits the command line length to 255 bytes.
Note that DFO has been modified to support ODS-5 volumes.
The string gggggg represents a six-digit octal number containing the process's UIC group number.
The string xxxxxxxx represents an eight-digit hexadecimal number that is the address of the job information block.
The string gggggg represents a six-digit octal number containing the process's UIC group number.
The string xxxxxxxx represents an eight-digit hexadecimal number that is the address of the job information block.
The string gggggg represents a six-digit octal number containing the process's UIC group number.
The string xxxxxxxx represents an eight-digit hexadecimal number that is the address of the job information block.
The string xxxxxxxx represents an eight-digit hexadecimal number that is the address of the job information block.
The string gggggg represents a six-digit octal number containing the process's UIC group number.
The string xxxxxxxx represents an eight-digit hexadecimal number that is the address of the job information block.
The string gggggg represents a six-digit octal number containing the process's UIC group number.
The ALTMODE and DELETE characters (decimal 125, 126, and 127) are also control characters.
Different character in ISO Latin-1. See Figure A.1, ''Differences Between DEC Multinational Character Set and ISO Latin-1 Character Set''.