VSI OpenVMS on KVM
Configuration Guide
- Operating System:
- VSI OpenVMS x86-64 Version 9.2-2 or higher
1. Installing and Configuring a KVM Virtual Machine
1.1. Before You Begin
This guide explains how to configure a KVM virtual machine on Oracle Linux or Red Hat Enterprise Linux for use with VSI OpenVMS. While other distributions of Linux are not officially supported by VSI, the information presented herein should still be applicable.
There are three methods to configure a KVM virtual machine and each method is suitable for different purposes.
The diagram below shows the scope of customization possibilities depending on the method that you are using – CLI, GUI, or editing the XML file directly.
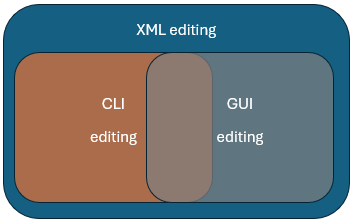
There are pros and cons to each configuration method. Review the table below to decide which method is appropriate for you.
| Pros | Cons | |
|---|---|---|
|
CLI
( |
|
|
|
Virtual Machine Manager GUI
( |
|
Some settings are unavailable. |
|
Web-based GUI (Cockpit) |
|
Limited ability to create virtual machines and change essential settings. |
|
XML editing |
|
Higher risk of configuration errors. |
Regardless of what method you use to configure your KVM virtual machine, all settings will be stored in an XML configuration file.
1.2. Prerequisites
1.2.1. Installation Requirements
Before you proceed with installing your KVM virtual machine (VM), you must perform the following steps from the CLI to configure your environment.
Open your terminal and run the following commands to install and enable the packages required to perform operations with your virtual machine:
sudo dnf install qemu-kvm libvirt virt-install virt-manager
sudo systemctl enable --now libvirtd
Edit the
/etc/libvirt/qemu.conffile in the following way:Uncomment the line
#user = "qemu"by removing the leading hash sign (#) and replaceqemuwith the name of your Linux user or the name of a service account.Uncomment the line
#group = "qemu"by removing the leading hash sign (#) and replaceqemuwithlibvirt.
Important
Make sure that both
userandgroupare set as described above. Otherwise, you will not be able to use your virtual machine.The example below shows what the two lines must look like:
# Some examples of valid values are:
#
#       user = "qemu"   # A user named "qemu"
#       user = "+0"     # Super user (uid=0)
#       user = "100"    # A user named "100" or a user with uid=100
#
user = "username"

# The group for QEMU processes run by the system instance. It can be
# specified in a similar way to user.
group = "libvirt"
Now, for the changes to take effect, execute
sudo systemctl restart libvirtd
1.2.2. VSI OpenVMS Version Requirements
Review the requirements and recommended virtual machine settings for your VSI OpenVMS version:
1.3. Creating a KVM Virtual Machine
Tip
If this is your first time dealing with KVM, VSI recommends that you start by copying and pasting the commands from the CLI examples in the sections below.
The command below will create a virtual machine configuration that works for any supported version of VSI OpenVMS for x86-64. Copy the command and replace the parts in bold with actual values.
networkdev="network_device_name"
mac=$(cat /sys/class/net/$networkdev/address)
sudo virt-install \
--name "vm_name" \
--description "vm_description" \
--memory=8192 \
--vcpus=4 \
--cpu host-model \
--controller type=scsi,model=virtio-scsi \
--disk device=cdrom,path=/path/to/vms/install.iso,bus=sata,boot_order=1 \
--disk path=/path/to/vms/disk.qcow2,\
size=30,bus=scsi,cache=writethrough,sparse=no,boot_order=2 \
--network type=direct,source=$networkdev,source_mode=passthrough,\
mac=$mac,model=virtio-net \
--graphics none \
--machine q35 \
--os-variant none \
--boot loader=/usr/share/OVMF/OVMF_CODE.secboot.fd,loader.readonly=yes,\
loader.type=pflash,loader_secure=yes \
--features vmport.state=off,smm.state=on \
--watchdog model=itco,action=none \
--serial pty \
--noreboot \
--autostart
After the command above is executed, your virtual machine will be installed and configured, but will not be running.
sudo virsh start vm_nameThen, use the following command to connect to the OpenVMS operator terminal:
sudo virsh console vm_nameFor a detailed description of the virt-install command used in the
example above, along with the
recommended settings and alternatives that may depend on your system requirements,
refer to Section 4.1, ''virt-install Command''.
virt-install command, run the
following: man virt-install
Attention
If you are an unprivileged user, perform the steps described in Section 1.6, ''Interacting With a VM as an Unprivileged User'' before you start using your KVM virtual machine.
Caution
VSI does not recommend creating new virtual machines using the Cockpit GUI, as necessary customization options are not available there. However, this can be an easy way to manage your virtual machines once they are created. See Section 1.4, ''Managing Your KVM Virtual Machine'' for more details.
1.4. Managing Your KVM Virtual Machine
Sections below discuss how to perform common tasks with your KVM virtual machine using CLI, Virtual Machine Manager GUI, or by editing the XML configuration directly.
The Cockpit GUI is also a good tool for managing a KVM virtual machine without the need for a terminal, as you can access your virtual machine’s serial console through the web. Further documentation on Cockpit can be found on the following webpage: https://cockpit-project.org/running.html#rhel.
1.4.1. Cloning a Virtual Machine
VSI recommends cloning your KVM virtual machine using CLI to avoid data loss and ensure proper cloning.
Turn off your virtual machine using the
virsh destroy vm_namecommand.Run the following:
virt-clone -o original_vm_name -n new_vm_name --auto-clone --nonsparse
This command will clone the VM along with the associated disks and ensure that they are thick-provisioned.
Note
Thick provisioning of OpenVMS disks corresponds to full preallocation of disk space in KVM virtual machines configuration.
1.4.2. Deleting a Virtual Machine
- Deleting a VM via CLI
Run the following command:
virsh undefine vm_name --nvramThis command will delete the VM but keep the associated disks. If you want to remove the disks as well, add
--remove-all-storageto the command.Caution
If your installation ISO is attached at the time this command is run, it will also be deleted.
- Deleting a VM via Virtual Machine Manager GUI
Open Virtual Machine Manager either from the Application Launcher or by running the
virt-managercommand in your CLI. A new window will open.Right-click on the VM you wish to delete and click in the context menu.
You will be prompted to delete the associated disk files. Select the ones that you want to delete and click . Confirm the delete action if necessary.
1.4.3. Managing Disks
Use the qemu-img command to manage your disks. For the full
documentation on qemu-img, refer to https://www.qemu.org/docs/master/tools/qemu-img.html.
1.4.3.1. Viewing Disk Properties
To view the properties of a disk file, use the following command, specifying the name of your disk file:
qemu-img info disk_file_name.qcow2Note
If the disk file is in use by the virtual machine, you must turn it
off first or add the -U argument on the
qemu-img command. However, using this argument is not
considered safe, because it forces the image to be shared between
processes.
The output will look similar to the following:
image: disk.qcow2
file format: qcow2
virtual size: 1 GiB (1073741824 bytes)
disk size: 1 GiB
cluster_size: 65536
Format specific information:
    compat: 1.1
    compression type: zlib
    lazy refcounts: false
    refcount bits: 16
    corrupt: false
    extended l2: false
Child node '/file':
    filename: disk.qcow2
    protocol type: file
    file length: 1 GiB (1074135040 bytes)
    disk size: 1 GiB
    Format specific information:
        extent size hint: 1048576
Note the difference between virtual size and disk
size. The virtual size is the size that the file is
allowed to expand to, whereas disk size specifies the actual
space it takes up on the host machine.
If your disk is not fully allocated/thick-provisioned, the virtual
size value is likely higher than the disk size
value.
Important
VSI OpenVMS does not support thin-provisioned disks, so you must always check that your disk is thick-provisioned.
1.4.3.2. Creating Disks
Before you create a disk, check the installation guide for your version of OpenVMS for the recommended disk size:
Below is an example of a command that creates a thick-provisioned 20 GB disk.
qemu-img create -f qcow2 -o preallocation=full disk_name.qcow2 20GThe arguments used in this command, along with the recommended options, are explained in the table below.
|
Arguments |
Argument options |
Description |
Recommended options |
|---|---|---|---|
-f | The file format for the disk. |
It is recommended that you use
| |
-o | preallocation=full | Specifies how the disk is provisioned. | You must specify
preallocation=full when creating a new disk
for OpenVMS. |
For the full documentation on the qemu-img command, refer to
https://linux.die.net/man/1/qemu-img.
1.4.3.3. Increasing Disk Size
To resize a hard drive, use the qemu-img resize command. In
the following example, the disk size is expanded by 10 GB.
qemu-img resize --preallocation=full -f qcow2 disk_name.qcow2 +10GNotice the difference in syntax compared to creating a disk. Instead of
using the -o switch, --preallocation=full is
specified. This is necessary to keep the disk thick-provisioned, as by
default, the resize command only extends the virtual size of
the disk, it does not pre-allocate the space for it, effectively converting
the disk to thin-provisioned, which is not supported on OpenVMS.
Caution
VSI does not recommend using the
resize utility to shrink the disk as this can lead to
data loss.
1.4.3.4. Attaching Disk to an Existing Virtual Machine
To attach a disk to an existing VM, you must first identify what device is next available for mounting.
- Execute the following command on your host system to list the devices used by your virtual machine:
sudo virsh domblklist vm_nameThe output will be similar to the following:Target Source -------------------------------------- sda /home/user/X860923OE.ISO sdb /home/user/disk.qcow2
TheTargetcolumn shows the virtual device names that are already in use. In this case,sdccan be the next available virtual device name?. Run the following command, replacing
vm_name,/path/to/disk/disk_name.qcow2, andnew_virtual_device_namewith appropriate values:sudo virsh attach-disk vm_name /path/to/disk/disk_name.qcow2 new_virtual_device_name \ --driver qemu --subdriver qcow2 --cache writethrough --persistent
By default, the disk is attached to the VM as a SCSI device. In order to attach the disk as a SATA device, add
--targetbus
                                    sata
to the command line above.
The arguments used in this command, along with the recommended options, are explained in the table below.
|
Arguments |
Argument options |
Description |
Recommended options |
|---|---|---|---|
--driver | qemu | ||
--subdriver | This should be the same format as the disk, i.e. if your
disk is .qcow2, specify
qcow2. | ||
--cache | The cache mode to be used by the disk. | This is required to be writethrough. | |
--persistent | This makes the disk a permanent attachment. |
For the full documentation on the virsh attach-disk command,
refer to https://www.libvirt.org/manpages/virsh.html#attach-disk.
1.4.3.5. Converting Images
To convert a disk from one format to another, use the following command:
qemu-img convert -f raw -O qcow2 source.img destination.qcow2
Note that this command does not delete the original disk.
The table below explains the arguments used in the qemu-img
convert command.
|
Arguments |
Description |
Recommended options |
-f | The input file format. | |
-O | The output file format. |
It is recommended that you use
|
For the full documentation on the qemu-img convert command,
refer to https://docs.openstack.org/image-guide/convert-images.html.
1.4.4. Managing Network
This section describes multiple ways to manage network and network interfaces for KVM virtual machines.
1.4.4.1. Adding a Network Interface to an Existing Virtual Machine
You can add an additional network interface to an existing virtual machine via CLI, GUI, or by editing XML directly.
- CLI
- Run the following command, replacing
vm_namewith the name of your VM,interface_namewith the name of the interface andaddresswith the MAC address of the interface you want to add:sudo virsh attach-interface vm_name --model virtio \ --target macvTapDirect --type direct --source interface_name \ --config --live --managed --mac address
- GUI
Open Virtual Machine Manager either from the Application Launcher or by running the
virt-managercommand in your CLI. A new window will open.Select the VM that you want to edit and click the button. A new window will open.
Click the light bulb icon (Show virtual hardware details). Then, click the button in the bottom-left corner. A new window will open.
Click Network in the menu on the left.
In the Network source drop-down menu, choose Macvtap device. The Device name field will appear.
Type your host interface name into the Device name field.
Type your host interface MAC address into the MAC address field.
In the Device model drop-down menu, choose virtio.
Click .
When you click on the newly created device in the left menu in the Virtual Hardware Details window, make sure that the Link state field shows a selected checkbox next to "active".
- XML
- Add the following line to your XML configuration file:
<source dev="target_interface" mode='direct'/>
1.4.4.2. Creating Network Bridges
Some installations will require network bridges to be configured. For example, if you have multiple virtual machines that need to communicate using the same physical network card.
A virtual bridge configuration will be dependent on the environment that it needs to work in. VSI recommends following the steps described in the Configuring and managing networking guide by Red Hat Enterprise Linux on how to configure a network bridge on your Linux machine.
Once the bridge has been created, you can replace the
--network line in the virt-install command
with the bridge interface, specifying the MAC of your bridge
interface:
--network=bridge:bridge0,mac=bridge_interface_mac,model='virtio-net'1.4.4.3. Advanced Virtio-net Devices Configuration
If you are using virtio-net, it is important that you understand the different types of virtio-net devices.
When you create a virtio-net device, the model type "virtio" will be used by default:
<interface type="network">
  <mac address="52:54:00:00:00:00"/>
  <source network="default"/>
  <model type="virtio"/>
  <address type="pci" domain="0x0000" bus="0x06" slot="0x00" function="0x0"/>
</interface>
However, the real model is either virtio-transitional or virtio-non-transitional. OpenVMS supports both models and will choose one for you by default.
A virtio-transitional device can work with virtio 0.9 or virtio 1.0 guest drivers and only works with PCI controllers. Note that only up to 9 devices of this type can be attached to a virtual machine at any given time.
A virtio-non-transitional device can only work with virtio 1.0 guest drivers. The libvirt tool will connect the device to PCIe or PCI controller. It allows for more throughput and is therefore the recommended version.
In certain cases, it may be beneficial to explicitly set the model type to
"virtio-non-transitional". You can do so by specifying the model type on the
virt-install command or by editing the XML file.
- CLI
--network type=direct,source=$networkdev,source_mode=passthrough, \ mac=$mac,model=virtio-non-transitional \- XML
<interface type="network">
  <mac address="52:54:00:00:00:00"/>
  <source network="default"/>
  <model type="virtio-non-transitional"/>
  <address type="pci" domain="0x0000" bus="0x06" slot="0x00" function="0x0"/>
</interface>
For more information on the virtio device models, refer to https://libvirt.org/formatdomain.html#virtio-device-models.
1.5. Customizing Your KVM Virtual Machine
If you have found a situation where a given setting needs to be edited, but it is not possible to do so from the CLI or Cockpit GUI, you can edit the XML configuration file in one of the two ways described below.
1.5.1. Editing XML via Virtual Machine Manager GUI
Perform the following steps to edit your XML KVM virtual machine configuration using the Virtual Machine Manager GUI.
Open the Virtual Machine Manager either from the Application Launcher or by running the
virt-managercommand in your CLI. A new window will open.In the top menu of the Virtual Machine Manager window, click → , then select the checkbox Enable XML editing.
Click .
Open the virtual machine you that wish to edit by selecting the VM and clicking the button. A new window will open.
Click the light bulb icon (Show virtual hardware details). Then, in the Overview section, click the XML tab. You can now edit the XML file.
After you have made the necessary changes, click .
Once the XML file is saved, the changed settings will be shown in the Virtual Machine Manager GUI. However, you must reboot the virtual machine for the changes to take effect.
1.5.2. Editing XML via a Linux Text Editor
Warning
Do not attempt to edit the XML configuration file of your virtual machine directly, run the commands specified below instead.
By default, the Vim editor will be used if you run the virsh edit
command to edit the XML file.
EDITOR. For
example, to use the nano editor,
run:sudo EDITOR=/usr/bin/nano virsh edit vm_nameAfter you have edited the XML file, you must reboot the virtual machine for the changes to take effect.
1.6. Interacting With a VM as an Unprivileged User
For an unprivileged user to be able to execute KVM-related commands without
sudo, the following steps must be performed:
Add the unprivileged user to the
libvirtgroup by executing the following command:sudo usermod -aG libvirt usernameWhen logged in as the unprivileged user, run the following:
export
                                LIBVIRT_DEFAULT_URI="qemu:///system"
Tip
This change is not persistent when logging out or restarting the system. To make it persistent, add the
export LIBVIRT_DEFAULT_URI="qemu:///system"command to the~/.bashrcfile. This way, the command will be executed each time the user logs into the system.
1.7. Disabling SELinux File Labeling
You might need to disable the SELinux file labeling in order to use the existing virtual disks, previously assigned to a different virtual machine.
Open your CLI and execute
sudo nano /etc/libvirt/qemu.conf.Uncomment the line
#remember_owner = 1by removing the leading hash sign (#) and set theremember_ownerparameter value to0.Your configuration should look like this:
# Whether libvirt should remember and restore the original # ownership over files it is relabeling. Defaults to 1, set # to 0 to disable the feature. remember_owner = 0- For the changes to take effect, execute the following command:
sudo systemctl restart libvirtd
2. Advanced Configuration Tasks
2.1. Configuring Fibre Channel PCI Passthrough on KVM Virtual Machine
This section describes the configuration steps necessary for setting up Fibre Channel PCI passthrough to an OpenVMS instance running on a KVM virtual machine. This allows OpenVMS to directly access and utilize a physical Fibre Channel Host Bus Adapter (HBA) connected to the host.
Passthrough technology uses an input-output memory management unit (IOMMU) which can be referred to as VT-d on Intel-based hosts and AMD-Vi, AMD-V, or SVM on AMD-based hosts. Throughout this guide, the generic term IOMMU is used, but be aware that the terminology on your system may differ depending on your CPU.
Attention
PCI passthrough is based on PCI slot granularity. That is, all functions of a multi-function PCI device must be assigned to the same virtual machine. For example, a dual-port fibre channel HBA must have both ports (i.e. functions) assigned to the same virtual machine. Individual ports on the same HBA cannot be assigned to more than one virtual machine.
If more than one virtual machine needs to have control over a fibre channel HBA, then there must be more than one fibre channel HBA installed on the host system.
NPIV (N_Port ID Virtualization) is not supported on VSI OpenVMS.
2.1.1. Supported Platforms and Hardware
- Operating systems
Red Hat Enterprise Linux (RHEL) 9.x
Oracle Linux (OL) 9.x
- Host Bus Adapters
Refer to https://vmssoftware.com/products/supported-platforms/ for the full list of supported HBA devices.
- VSI OpenVMS Version
VSI OpenVMS V9.2-3 + Update V3 with the PERF_UPD V1.0 ECO kit installed, or any newer version of VSI OpenVMS x86-64.
- KVM Version
PCI passthrough has been tested on systems running KVM version 9.1.0.
- Linux Kernel Version
Linux kernel version 5.2 or higher.
2.1.2. Enabling IOMMU Support
Attention
Note that the commands from the examples below may require root privileges
to run. Execute sudo -s to be able to run all commands without
specifying sudo.
Before you start setting up PCI passthrough, you must make sure that the IOMMU support is enabled on your host system both on the UEFI/BIOS side and in the Linux kernel. In order to do so, follow the steps described in the sections below.
2.1.2.1. IOMMU Hardware Extensions in UEFI/BIOS
First, you must check whether the IOMMU extensions are enabled in the UEFI/BIOS.
Run the
lscpu | grep -i virtualizationcommand to determine whether virtualization is enabled on your system.On an Intel-based host system, the output will look similar to this:
Virtualization: VT-x
On an AMD-based host system, the output will look similar to this:
Virtualization: AMD-V
If the
lscpu | grep -i virtualizationcommand does not produce any output, the virtualization is disabled on your system. Refer to Section 2.1.2.2, ''Enabling IOMMU Hardware Extensions in UEFI/BIOS'' for next steps.Run the
dmesg | grep -i IOMMUcommand to check whether IOMMU is set to the correct operation mode.If the command returns
Default domain type:
                                            Passthrough
, proceed to Section 2.1.2.3, ''IOMMU Support in Linux Kernel'' to determine whether the IOMMU support is enabled in the Linux kernel.If the command returns
Default domain type:
                                            Translated
, then you need to change the operation mode toPassthroughas described in Section 2.1.2.4, ''Enabling IOMMU in Linux Kernel''.
2.1.2.2. Enabling IOMMU Hardware Extensions in UEFI/BIOS
In order to enable IOMMU support in the UEFI/BIOS, you will need either iLO/iDRAC or physical access to the server.
Access your system UEFI/BIOS settings.
Refer to the documentation for your system to navigate to the virtualization menu.
In the virtualization menu, find the IOMMU setting specific to your system? and select
Enabled.Save your settings.
The IOMMU support is now enabled in the UEFI/BIOS.
Attention
On AMD-based systems and Intel-based systems running OL, enabling the IOMMU support in the UEFI/BIOS will automatically enable it in the Linux kernel, and you can proceed with configuring a fibre channel PCI passthrough, as described in Section 2.1.3, ''Assigning Fibre Channel HBA to Virtual Machine''.
On Intel-based systems running RHEL, you must manually enable the IOMMU support in the Linux kernel. Refer to Section 2.1.2.3, ''IOMMU Support in Linux Kernel'' for next steps.
2.1.2.3. IOMMU Support in Linux Kernel
In addition to enabling the IOMMU hardware extensions in the UEFI/BIOS, the IOMMU support must be enabled in the host kernel.
Check whether the IOMMU support is enabled in the Linux kernel by running
the virt-host-validate command.
If the IOMMU support is enabled, the command output will look similar to this:
.
.
.
  QEMU: Checking for cgroup 'blkio' controller support               : PASS
  QEMU: Checking for device assignment IOMMU support                 : PASS
  QEMU: Checking if IOMMU is enabled by kernel                       : PASS
.
.
.
If the IOMMU support is disabled, the command output will look similar to this:
.
.
.
  QEMU: Checking for cgroup 'blkio' controller support               : PASS
  QEMU: Checking for device assignment IOMMU support                 : PASS
  QEMU: Checking if IOMMU is enabled by kernel                       : WARN (IOMMU appears to be disabled in kernel.
.
.
.
Refer to the next section for steps on how to enable the IOMMU support in the Linux kernel.
2.1.2.4. Enabling IOMMU in Linux Kernel
Follow the steps below to enable the IOMMU support in the Linux kernel.
Regenerate the
GRUBconfiguration with theintel_iommu=onandiommu=ptparameters, using one of the following commands:On Intel-based hosts, run:
sudo grubby --args="intel_iommu=on iommu=pt" --update-kernel DEFAULT
On AMD-based hosts, run:
sudo grubby --args="iommu=pt" --update-kernel DEFAULT
Reboot the system for the changes to take effect.
2.1.3. Assigning Fibre Channel HBA to Virtual Machine
First, identify the appropriate fibre channel HBA to use for PCI passthrough using CLI. Then, you can use the Virtual Machine Manager GUI or Linux Cockpit to assign the device to your virtual machine.
For the full list of supported fibre channel HBA devices, refer to https://vmssoftware.com/products/supported-platforms/.
- Create a text file. For example:
nano iommu_groups.sh
Copy and paste the following script? to list all PCI/PCIe cards that can be used for passthrough into your newly created file:
#!/bin/bash
shopt -s nullglob
for g in $(find /sys/kernel/iommu_groups/* -maxdepth 0 -type d | sort -V); do
    echo "IOMMU Group ${g##*/}:"
    for d in $g/devices/*; do
        echo -e "\t$(lspci -nns ${d##*/})"
    done;
done;
Save the changes and exit the editor.
Add execute permissions to the file containing the script by running the following command:
chmod +x iommu_groups.sh
- Run the script:
./iommu_groups.sh
Your output will look similar to this:. . . IOMMU Group 8: 11:00.0 Fibre Channel [0c04]: QLogic Corp. ISP2722-based 16/32Gb Fibre Channel to PCIe Adapter [1077:2261] (rev 01) 11:00.1 Fibre Channel [0c04]: QLogic Corp. ISP2722-based 16/32Gb Fibre Channel to PCIe Adapter [1077:2261] (rev 01) IOMMU Group 9: 12:00.0 Fibre Channel [0c04]: QLogic Corp. ISP2722-based 16/32Gb Fibre Channel to PCIe Adapter [1077:2261] (rev 01) 12:00.1 Fibre Channel [0c04]: QLogic Corp. ISP2722-based 16/32Gb Fibre Channel to PCIe Adapter [1077:2261] (rev 01) . . .
In your output, find a group that contains a fibre channel HBA that you want to pass through to the virtual machine. The two entries in a group represent PCI addresses and functions that you will need when assigning the fibre channel HBA to your VM.
Use one of the methods below to assign a fibre channel HBA to your virtual machine.
Warning
Make sure to shut down your virtual machine before you assign an HBA device to it.
- Virtual Machine Manager
Open Virtual Machine Manager either from the Application Launcher or by running the
virt-managercommand in your CLI. A new window will open.Select the VM that you want to edit and click the button. A new window will open.
Click the light bulb icon (Show virtual hardware details). Then, click the Add Hardware button in the bottom-left corner. A new window will open.
In the menu on the left, select PCI Host Device.
From the list on the right, you must select and add both entries from the group that you found in this step. Select the first entry and click Finish.You will be redirected to the Virtual hardware details window.
Click the button in the bottom-left corner once again. A new window will open.
From the list on the right, find the second entry for the device you are assigning to your VM. Select the entry and click .
You should now be able to see both entries listed on the right pane of the Virtual hardware details window.
- Cockpit GUI
Using Linux Cockpit to assign PCI devices to virtual machine is the easiest and quickest method. Linux Cockpit performs all of the host operating system interactions required for PCI passthrough.
If Linux Cockpit is not installed on your system by default, refer to the steps described in https://www.redhat.com/en/blog/intro-cockpit on how to install and enable Linux Cockpit (for both RHEL and OL systems).
Log into Linux Cockpit by going to your_linux_system_ip_address:9090 from your browser.
Enter your credentials and click .
In the menu on the left, select .
Click on the name of the VM to which you want to assign a fibre channel HBA. You will see your virtual machine configuration details.
Scroll down to the Host devices section and click Add host device. A pop-up window will open.
Select PCI as the device type to list all the PCI devices available for PCI passthrough.
Select both PCI device entries that you found using this script. Click .
Caution
If you do not assign both functions of a multi-function PCI device to the VM, the host system may crash.
Click to add both functions of the fibre channel HBA device.
You should now see both functions of the device assigned to your virtual machine on the VM configuration page.
- XML
Create two empty XML files on the host. For example:
nano pt_dev_conf_1.xml
nano pt_dev_conf_2.xml
Copy and paste the following XML configuration into each of the newly created files:
<hostdev mode='subsystem' type='pci' managed='yes'>
  <driver name='vfio'/>
  <source>
    <address domain='0x0000' bus='0x00' slot='0x00' function='0x0'/>
  </source>
</hostdev>
Edit the files so that the values in the line
<address domain='0x0000' bus='0x00'
                                                slot='0x00' function='0x0'/>
correspond to each of the entries in the group containing the HBA device you are adding.For example, if you are adding the following device:
11:00.0 Fibre Channel [0c04]: QLogic Corp. ISP2722-based 16/32Gb Fibre Channel to PCIe Adapter [1077:2261] (rev 01)
11:00.1 Fibre Channel [0c04]: QLogic Corp. ISP2722-based 16/32Gb Fibre Channel to PCIe Adapter [1077:2261] (rev 01)
For the first entry, the XML configuration will look like this:
<hostdev mode='subsystem' type='pci' managed='yes'>
  <driver name='vfio'/>
  <source>
    <address domain='0x0000' bus='0x11' slot='0x00' function='0x0'/>
  </source>
</hostdev>
For the second entry, it will look like this:<hostdev mode='subsystem' type='pci' managed='yes'> <driver name='vfio'/> <source> <address domain='0x0000' bus='0x11' slot='0x00' function='0x1'/> </source> </hostdev>Important
The two configurations of the fibre channel HBA device must be saved in separate files.
Save the changes to the XML configuration files.
Run the following command to add the first fibre channel HBA configuration to your virtual machine configuration file:
virsh attach-device --file --persistent pt_dev_conf_1.xmlRun the following command to add the second fibre channel HBA configuration to your virtual machine configuration file:
virsh attach-device --file --persistent pt_dev_conf_2.xmlNote
After you have added both fibre channel HBA configurations, you may safely delete the XML files that you created.
Tip
--host-device argument on the
virt-install command. Specify the PCI addresses of the
appropriate devices that can be found using this
script. For
example:--host-device 11:00.0 --host-device 11:00.1The number of the arguments must be equal to the number of entries in the corresponding group.
2.1.3.1. Verification
You can verify that the fibre channel HBA device has been assigned to the
virtual machine by opening the System Dump Analyzer (SDA) and executing
CLUE CONFIG/ADAPTER in OpenVMS running on your
VM:
$ ANALYZE/SYSTEM

OpenVMS system analyzer

SDA> CLUE CONFIG/ADAPTER
TR Adapter   ...  Hose Bus      ...   Node GSIN   iVec    SCB  Port Slot Device Name / HW-Id
-- ------------------- -------------- ---- ------------------- ---- ---- -------------------
.
.
.
10 PCIE      ...     0 07 PCIE  ...    700 0017    00D0   1500 FGA:    0 QLogic ISP2722 PCIe Fibre
11 PCIE      ...     0 08 PCIE  ...    800 0016    00CF   14F0 FGB:    0 QLogic ISP2722 PCIe Fibre
Alternatively, it is possible to determine whether the fibre channel HBA is assigned to the virtual machine by the presence of the fibre channel FG devices as follows:
$ SHOW DEVICES FG
Device                  Device           Error
Name                    Status           Count
FGA0:                   Online               0
FGB0:                   Online               0
If not yet configured, you can now create storage devices on the storage controller and map them to the fibre channel HBA assigned to the virtual machine. For more information on mapping tape devices, refer to Guidelines for OpenVMS Cluster Configurations. For instructions on how to map fibre channel volumes to OpenVMS guests, refer to your storage array documentation and support.
2.2. Mapping Storage Controllers to Disk Devices
This section provides steps on mapping your virtual disk devices to SATA and virtio-scsi storage controllers for use with VSI OpenVMS on a KVM virtual machine.
Important
OpenVMS supports only SATA and virtio-scsi controllers.
KVM supports a maximum of six disk devices per one SATA controller and a maximum of 255 devices per one virtio-scsi controller. However, VSI does not recommend mapping more than six disk devices to either a SATA or a virtio-scsi storage controller.
Make sure that your VM is shut down before you assign storage controllers to your virtual disk devices.
2.2.1. SATA Controllers
Perform the following steps to map your SATA disk device to a SATA controller.
Open Virtual Machine Manager either from the Application Launcher or by running the
virt-managercommand in your CLI. A new window will open.In the top menu of the Virtual Machine Manager window, click Edit → Preferences, then select the checkbox Enable XML editing.
Click Close.
Open your virtual machine configuration window by selecting the VM and clicking the Open button. A new window will open.
Click the light bulb icon (Show virtual hardware details). From the list on the left, select the SATA disk device to which you want to map a SATA controller.
- In the right pane, open the XML tab and find the following line:
<address type="drive" controller="0" bus="0" target="0" unit="0"/>
Edit the line so that the value of the
controllerattribute is equal to the amount of SATA controllers that already exist in your VM configuration. If there are no SATA controllers in your configuration, specify0as thecontrollervalue.Click Apply. A new SATA controller will appear in the left pane.
Attention
If the new controller did not appear, choose a higher number for the
controllerattribute. - Click on the newly created SATA controller, then open the XML tab in the right pane. Your configuration should look similar to this:
<controller type="sata" index="0">
  <address type="pci" domain="0x0000" bus="0x10" slot="0x03" function="0x0"/>
</controller>
Theindexattribute value is the controller number. In order for the controller to be mapped to the disk device, the values in both the controller and the disk device configuration must be the same. For example:- Controller XML configuration:
<controller type="sata" index="1"> <address type="pci" domain="0x0000" bus="0x10" slot="0x03" function="0x0"/> </controller> - Disk device XML configuration:
<disk type="file" device="disk">
  <driver name="qemu" type="qcow2" cache="writethrough"/>
  <source file="sata_disk.qcow2"/>
  <target dev="sdd" bus="sata"/>
  <address type="drive" controller="1" bus="0" target="0" unit="3"/>
</disk>
You can check whether the disk device has been properly mapped to the controller by selecting the SATA controller in the left pane of the Virtual Hardware Details window and opening the Details tab.
The Devices field will list the devices that are mapped to the selected controller.
2.2.2. Virtio-scsi Controllers
Perform the following steps to map your virtual disk device to a virtio-scsi controller.
Open Virtual Machine Manager either from the Application Launcher or by running the
virt-managercommand in your CLI. A new window will open.In the top menu of the Virtual Machine Manager window, click Edit → Preferences, then select the checkbox Enable XML editing.
Click Close.
Open your virtual machine configuration window by selecting the VM and clicking the Open button. A new window will open.
Click the light bulb icon (Show virtual hardware details).
If you already have a virtio-scsi controller that you want to map to your virtual disk device, proceed to Step 5.
If you want to create a new virtio-scsi controller, perform the following substeps:
Click the button at the bottom of the left pane. A new window will open.
In the left pane, select Controller. In the right pane, make sure that the Type is specified as SCSI and Model is VirtIO SCSI. If necessary, open the drop-down menus and select the specified type and model. Click Finish.
A new virtio-scsi controller will appear in the pane on the left.
In the left pane, click on the virtio-scsi controller that you want to map to your SCSI disk device. Open the XML tab in the right pane.
Your configuration will look similar to this:<controller type="scsi" index="4" model="virtio-scsi"> <address type="pci" domain="0x0000" bus="0x06" slot="0x00" function="0x0"/> </controller>Notice the value of the
indexattribute. You will need to specify the same number as the value of thecontrollerattribute in your disk configuration as described in the next step.In the left pane, click on the SCSI disk device that you want to map to your virtio-scsi controller, then open the XML tab in the right pane.
Your configuration will look similar to this:
<disk type="file" device="disk">
  <driver name="qemu" type="qcow2" cache="writethrough"/>
  <source file="scsi_disk.qcow2"/>
  <target dev="sdc" bus="scsi"/>
  <address type="drive" controller="4" bus="0" target="0" unit="2"/>
</disk>
Make sure that the
controllervalue in the disk configuration matches theindexvalue in the controller configuration as shown above.You can check whether the disk device has been properly mapped to the controller by selecting the SCSI controller in the left pane of the Virtual Hardware Details window and opening the Details tab.
The Devices field will list the devices that are mapped to the selected controller.
2.2.3. Verification on OpenVMS
Boot OpenVMS and execute the appropriate command to see the devices used by the system.
To list the disk devices, issue
SHOW DEVICES DK.To list the controller devices, issue
SHOW DEVICES
                                PK
.
For example:
$ SHOW DEVICES DK

Device                  Device           Error   Volume          Free  Trans Mnt
 Name                   Status           Count    Label         Blocks Count Cnt
DKC0:                   Online               0
DKD500:                 Online               0
DKE3:                   Online               0
DKA0:                   Online wrtlck        0
DKA200:                 Online               0

$ SHOW DEVICES PK

Device                  Device           Error
 Name                   Status           Count
PKB0:                   Online               0
PKC0:                   Online               0
PKD0:                   Online               0
PKE0:                   Online               0
PKA0:                   Online               0
Notice the unit number in the device names. It corresponds to the
unit value in the XML configuration of your disk device. For
the SATA disk devices, the unit number is converted to the
nnn format, whereas for the
virtio-scsi devices, it strictly corresponds to the unit number.
For example, 500 in DKD500: is the unit number in
the nnn format specified in the XML
configuration as follows:
<address type="drive" controller="3" bus="0" target="0" unit="5"/>Execute the SHOW DEVICES device-name
/FULL command to view the details on a particular device.
For information on OpenVMS device naming conventions, refer to https://wiki.vmssoftware.com/Device_Name.
3. Troubleshooting
3.1. KVM Installation and Configuration Issues
This section lists possible errors and their resolution.
3.1.1. Error Messages
command not found
virt-install command, one of the
parameters returns something like
this:--memory=8192: command not found
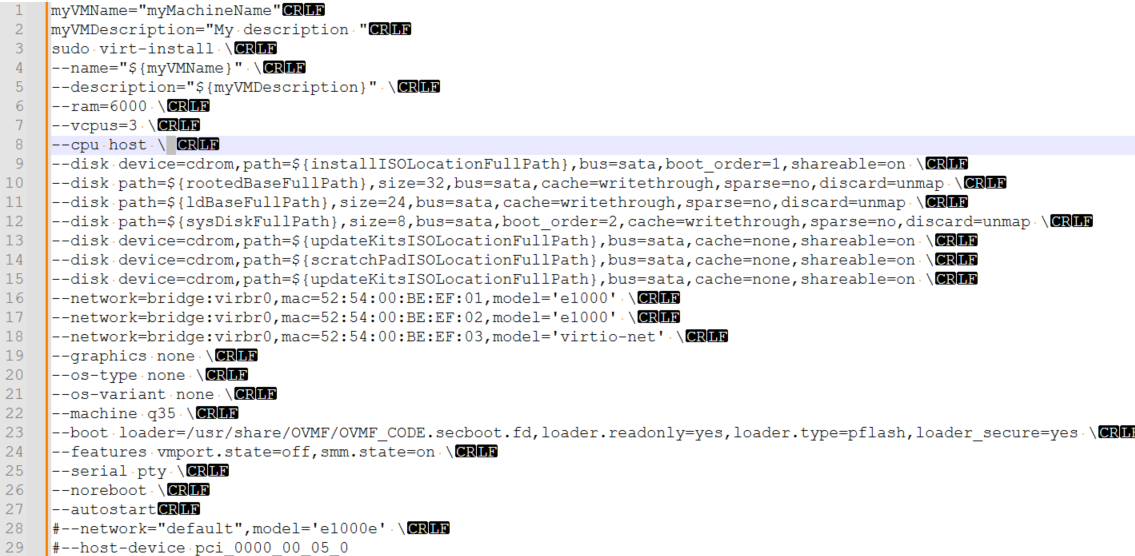
This is most commonly caused by an erroneous space character after a backslash. This has been replicated below with hidden characters enabled for better visualization (see line 8):
No ACPI MCFG table was found.
This processor may not have a PCIe configuration
                                            space.
This error message usually indicates that the wrong chipset was selected:
%%%%%%%%%%% VSI OpenVMS (tm) x86-64 Console %%%%%%%%%%%
_______________________________________________
      THE GUEST CONSOLE HAS BEEN SUSPENDED
     USE A TERMINAL UTILITY FOR OPA0 ACCESS
_______________________________________________
No ACPI MCFG table was found.  This processor may not have a PCIe configuration space.

VSI Primary Kernel SYSBOOT
%SYSBOOT-F-NOPXML, The PXML database could not be initialized
%SYSBOOT-F-NOINITMMMG, Unable to initialize SYSBOOT memory management, status = 00000124
This can be resolved by editing the virtual machine XML as described below in Section 3.1.2, ''Rainbow Screen''.
(virt-manager:54736): Gtk-WARNING **: 08:42:13.294:
                                            cannot open display:
When connecting to a virtual machine via SSH and using the
virt-manager command, the Virtual Machine Manager GUI does not open.
This can be resolved by setting up X11 forwarding on your system or in a terminal emulator.
3.1.2. Rainbow Screen
Your screen renders like this when your virtual machine launches:

This happens because of an incorrectly selected chipset option when configuring the virtual machine.
virt-xml vm_name --edit --convert-to-q35Alternatively, you can manually edit your VM XML configuration file. Make sure
that the <os> element is specified in the following way:
<os firmware="efi">
  <type arch="x86_64" machine="pc-q35-8.2">hvm</type>
  <firmware>
    <feature enabled="no" name="enrolled-keys"/>
    <feature enabled="no" name="secure-boot"/>
  </firmware>
  <loader readonly="yes" type="pflash">/usr/share/OVMF/OVMF_CODE.secboot.fd</loader>
  <bootmenu enable="yes"/>
</os>
3.1.3. The System Does Not Boot From a Selected Device
Add the device to the list of bootable devices in the virtual machine configuration.
Specify the desired device boot order.
- via CLI
To use the nano editor to edit the VM XML configuration, execute the following command:
sudo EDITOR=/usr/bin/nano virsh edit vm_nameThen, add new devices or edit the boot order like so:
<devices> <disk type="file" device="cdrom"> <driver name="qemu" type="raw"/> <source file="/home/user/X860923OE.ISO"/> <target dev="sda" bus="sata"/> <readonly/> <boot order="1"/> <address type="drive" controller="0" bus="0" target="0" unit="0"/> </disk> <disk type="file" device="disk"> <driver name="qemu" type="qcow2" cache="writethrough"/> <source file="/home/user/disk.qcow2"/> <target dev="sdb" bus="scsi"/> <boot order="2"/> <address type="drive" controller="0" bus="0" target="0" unit="1"/> </disk> . . . </devices>- via Virtual Machine Manager GUI
Open Virtual Machine Manager either from the Application Launcher or by running the
virt-managercommand in your CLI. A new window will open.Select the VM that you want to edit and click the Open button. A new window will open.
Click the light bulb icon (Show virtual hardware details) and select Boot Options from the menu of the left.
In the main window, check the boxes next to the listed devices (e.g., SATA CDROM, Virtio Disk) to enable them. Use the arrow buttons on the right to configure the desired boot order.
Click .
The configured devices and their boot order will now be reflected in the Boot Manager.
3.2. IOMMU Configuration Issues
This section describes possible reasons why mapping an HBA device to the host system may fail and ways to resolve the problem.
If you receive errors when trying to configure PCI passthrough, check the following:
Verify that the version of your Linux kernel and KVM support IOMMU functionality.
To check the version of the Linux kernel, run
uname -r.To check the version of KVM, run
/usr/libexec/qemu-kvm --version.Refer to Section 2.1.1, ''Supported Platforms and Hardware'' for the list of supported versions.
Make sure that the IOMMU functionality is part of your host boot process by running the following command:
dmesg | grep -i "iommu"
Your output should look similar to the following:
[    0.000000] Command line: BOOT_IMAGE=(hd1,gpt2)/vmlinuz-5.14.0-611.16.1.el9_7.x86_64 root=/dev/mapper/rhel-root ro resume=/dev/mapper/rhel-swap rd.lvm.lv=rhel/root rd.lvm.lv=rhel/swap rhgb quiet crashkernel=1G-2G:192M,2G-64G:256M,64G-:512M intel_iommu=on iommu_pt
[    0.043575] Kernel command line: BOOT_IMAGE=(hd1,gpt2)/vmlinuz-5.14.0-611.16.1.el9_7.x86_64 root=/dev/mapper/rhel-root ro resume=/dev/mapper/rhel-swap rd.lvm.lv=rhel/root rd.lvm.lv=rhel/swap rhgb quiet crashkernel=1G-2G:192M,2G-64G:256M,64G-:512M intel_iommu=on iommu_pt
[    0.043714] DMAR: IOMMU enabled
[    0.163101] DMAR-IR: IOAPIC id 12 under DRHD base  0xfbffc000 IOMMU 2
[    0.163103] DMAR-IR: IOAPIC id 11 under DRHD base  0xf37fc000 IOMMU 1
[    0.163104] DMAR-IR: IOAPIC id 10 under DRHD base  0xeaffc000 IOMMU 0
[    0.163105] DMAR-IR: IOAPIC id 8 under DRHD base  0xe27fc000 IOMMU 3
[    0.163106] DMAR-IR: IOAPIC id 9 under DRHD base  0xe27fc000 IOMMU 3
[    0.441716] iommu: Default domain type: Translated
[    0.441716] iommu: DMA domain TLB invalidation policy: lazy mode
.
.
.
If thedmesg | grep -i "iommu"command does not produce any output, you can run thefind /sys/kernel/iommu_groups/ -type d -maxdepth 1command, which should produce the output similar to the following:/sys/kernel/iommu_groups/ /sys/kernel/iommu_groups/55 /sys/kernel/iommu_groups/83 . . .
If you do not get any output from either
dmesg | grep -i "iommu"orfind /sys/kernel/iommu_groups/ -maxdepth 1 -type d, go back and make sure you have performed the steps described in Section 2.1.2, ''Enabling IOMMU Support''.Make sure that the necessary drivers are installed and can be loaded by running the
lsmod | grep "kvm"command.On AMD-based hosts, your output will look similar to the following if the drivers are installed:
kvm_amd               245760  4
kvm                  1404928  3 kvm_amd
ccp                   163840  1 kvm_amd
On Intel-based hosts, your output will look similar to the following if the drivers are installed:
kvm_intel              356352  0
kvm                    970752  1 kvm_intel
irqbypass               12288  1 kvm
System Hang
After configuring PCI passthrough, it may be impossible to start OpenVMS on a KVM virtual machine because the system hangs on boot.
Open your CLI and perform the following steps to resolve this issue:
Reboot your OpenVMS system by sending the reset signal to your VM by executing
virsh reset vm_name, and then, at theBOOTMGR>prompt, try booting OpenVMS.If the system still hangs on boot, do the following:
Execute
virsh destroy vm_nameto shut down your VM.Restart your VM by executing
virsh start vm_name.Boot OpenVMS.
If the system still hangs on boot, proceed to the next step.
Deassign both ports of the fibre channel HBA device by running the
virsh nodedev-detach pci_xxxx_xx_xx_xcommand, replacing thexxxx_xx_xx_xwith the PCI addresses for both ports of the device that you found in this step.Boot OpenVMS and check the system version by executing the
PRODUCT SHOW PRODUCT VMS/FULLcommand:$ PRODUCT SHOW PRODUCT VMS/FULL ------------------------ ----------- --------- ------------------------------------ PRODUCT KIT TYPE STATE MAINTENANCE ------------------------ ----------- --------- ------------------------------------ VSI X86VMS VMS V9.2-3 Oper System Installed VSI X86VMS VMS923X_DCL V4.0 VSI X86VMS VMS923X_PCSI V1.0 VSI X86VMS VMS923X_PERF_UPD V1.0 VSI X86VMS VMS923X_UPDATE V3.0 ------------------------ ----------- --------- ------------------------------------Make sure that you are running VSI OpenVMS for x86-64 Version 9.2-3 + Update V3 or higher and have the PERF_UPD V1.0 ECO kit installed.
Try re-assigning the fibre channel HBA device to your VM. If the problem persists, contact VSI Support via
<support@vmssoftware.com>.
3.2.1. Error Messages
error: Failed to start domain 'vm_name'

error: Requested operation is not valid: PCI device xxxx:xx:xx.x is in use by driver QEMU, domain vm_name
When executing the sudo virsh start
vm_name command, the system
produces the errors specified above.
These errors signify that the fibre channel HBA device is in use
by another VM. To resolve this, shut down the virtual machine that
uses the fibre channel HBA and run sudo virsh start
vm_name again.
Alternatively, assign each VM their designated fibre channel HBA device.
4. Reference
4.1. virt-install Command
|
Arguments |
Argument options |
Description |
Recommendation |
|---|---|---|---|
--name= | The name of your virtual machine. Later on, this name will also be used as a virtual machine identifier. | Use a simple name, without spaces or special characters, as this name will be needed in scripts and other settings/selections. | |
--description= | A human-readable textual description of your VM. | Useful when having more than one guest and/or multiple system admins. | |
--memory= | RAM in MB. | Check the installation guide for your version of OpenVMS for the recommended values. | |
--vcpus= | Number of virtual cores. |
Check the installation guide for your version of OpenVMS for the recommended values. If more granularity is needed, it is also possible to specify
the number of sockets and cores per socket. For example:
| |
--cpu | host-model | The CPU model to be used by the guest. | |
--controller
|
| Adds a virtual controller to the virtual machine configuration. | |
--disk
| device=cdrom | Used for loading ISO media (i.e. the operating environment (OE) image). | |
path= | Absolute path for disk images. | ||
|
| OpenVMS on KVM supports only virtio-scsi and SATA controllers. virtio-scsi controllers provide better I/O performance and lesser CPU load. The lsilogic controller and various types of lsisas are not supported (see ). | ||
boot_order= | The order in which the device will boot. | ||
size= |
The disk size in GB. If you are creating a new disk, this parameter is required. If you are going to use an existing disk, this parameter is optional. Refer to Section 1.2.2, ''VSI OpenVMS Version Requirements'' for minimum disk size for your VSI OpenVMS version. | ||
cache=writethrough |
This is the one mode supported by OpenVMS, do not change it. If you do not specify a cache mode, | ||
sparse=no | This option will create thick-provisioned disks, which is a requirement. Thin-provisioned disks are not supported on OpenVMS. | ||
--network=
| bridge= | The name of the bridge will depend on your host settings:
virbr0, br0, bridge0,
etc. | |
|
|
As of OpenVMS V9.2-3, the following network devices are supported:
| ||
mac=your_mac_address | Replace with the MAC address of your Ethernet device that you wish to pass through to your VM. | ||
|
|
This specifies the network pass-through device and the macvtap mode. More details can be found about the different modes at https://libvirt.org/formatdomain.html#setting-the-nic-model. If you require multiple virtual machines to communicate using a single network card, this method is not applicable. See Section 1.4.4.2, ''Creating Network Bridges'' for creating a network bridge to use instead. | ||
--graphics
|
| Graphical console mode. |
Use If you are going to use the Guest Console or other graphical software, such as DECwindows, select the appropriate option. |
--os-variant
| none | Disables OS auto-detection. | |
--machine
| q35 | Chipset selection. |
Essential for UEFI mode. If you have configured this incorrectly the first time, the only way to correct it is via editing the XML file. |
--boot
|
loader=/path/loader.fd loader.readonly=yes loader.type=pflash loader_secure=yes |
This is specific to the Linux distribution. Not only the path, but also the file name can be different. For Red Hat Enterprise Linux and Oracle Linux, the path is
| |
--features
| vmport.state=off
smm.state=on | This is necessary for UEFI. | |
--serial |
|
This option creates a local serial connection to your virtual machine. | |
|
|
This option creates a Telnet TCP/IP-accessible port into your OPA0: terminal. Note that this traffic is not password-protected or encrypted and requires opening the corresponding port in the Linux firewall settings. | ||
--watchdog |
| Watchdog is an agent that monitors the host for a hang or crash and takes an action specified | This is automatically applied to every virtual machine created in
KVM, and while it has no effect on OpenVMS, the none
action is specified to ensure it will not take any action. |
--noreboot | This stops the VM from automatically being rebooted on updates to the configuration from either the GUI, CLI, or XML. | ||
--autostart | Automatically boots the guest VM once the host has booted and KVM core has started. | This option is not the same as the
AUTO BOOT command within the OpenVMS Boot
Manager. VSI recommends that you leave this on, unless you want your
VM to be enabled but switched off after initialization. |
The letters a, b,
c, etc. in the virtual device (target) name
correspond to the unit value in the disk device
configuration and the index value in the
assigned SCSI controller configuration. a
corresponds to the value 0, b
corresponds to 1, etc.
Depending on your system, the name of the IOMMU setting
may be one of the following: Intel (R) VT-d,
AMD (R) IOMMU, AMD I/O Virtualization
Technology, etc.
If you have trouble finding the appropriate setting, refer to the documentation specific to your system.
This script has been sourced from the following webpage: https://wiki.archlinux.org/title/PCI_passthrough_via_OVMF#Ensuring_that_the_groups_are_valid