VSI OpenVMS x86-64 V9.2-3
Release Notes
1. Introduction
VMS Software, Inc. (VSI) is pleased to introduce VSI OpenVMS x86-64 V9.2-3.
This document is intended for all users of VSI OpenVMS x86-64 V9.2-3. Read this document before you install or use VSI OpenVMS x86-64 V9.2-3.
The following documents provide additional information in support of this release:
2. Read These Before You Start
Before you download the VSI OpenVMS x86-64 V9.2-3 installation kit, VSI strongly recommends that you read the notes in this section. These notes provide information about the hypervisors tested by VSI, CPU feature checks for virtual machines, terminal emulator settings, and licensing on OpenVMS x86-64 systems.
Note that if an entry describing a problem or a change in one of the previous release notes (especially for field test versions) is not present in the current release notes, then it is either no longer applicable or has been fixed.
2.1. Supported Disk Types
VSI OpenVMS x86-64 V9.2-3 does not support cluster common system disks.
VSI OpenVMS x86-64 supports SATA disks across all supported hypervisors.
On Oracle VirtualBox, VSI OpenVMS also supports virtio-scsi disks.
On VMware ESXi, VSI OpenVMS also supports the configuration of up to four LSI Logic Parallel SCSI controllers per virtual machine. Note that the LSI Logic SAS controllers are not supported.
Starting with the V9.2-3 release, VSI OpenVMS x86-64 supports the VMware VMDirectPath I/O feature with the HPE SN1100Q fibre channel HBAs for data disks. For more details, refer to Section 3.1.17, ''VMware VMDirectPath I/O Support for Data Disks''
On KVM/QEMU, VSI OpenVMS also supports SCSI disks on a virtio controller. Note that only one virtio-scsi adapter can be configured and used on a VSI OpenVMS x86-64 V9.2-x system. This functionality requires QEMU version 6.2 or later.
2.1.1. VSI OpenVMS Does Not Support Thin-Provisioned Volumes on Any Architecture
VSI OpenVMS does not support thin-provisioned volumes on any hypervisor. Using thin-provisioned disks has not been tested, and may result in poor performance due to fragmentation, system crashes (if there is no space to extend the disk image), and loss/corruption of data on the device. VSI currently has no plans to add thin provisioning support on any hypervisor.
When creating new virtual volumes for VSI OpenVMS, do not enable thin provisioning, even if the hypervisor that you are using supports it.
For information on changing the provisioning of a virtual disk, refer to the hypervisor documentation.
If you have any further questions, please contact VSI support via
<support@vmssoftware.com>.
2.1.2. VSI Recommends Using Write-Through Caching
To limit the risk of data loss in the event of a power outage, VSI recommends that virtual disks are configured to use write-through caching.
Many KVM implementations default to write-back caching. Most KVM GUIs provide an
option to change this to write-through caching, or else it can be changed by specifying
cache='writethrough' in the <driver> tag of the XML configuration file.
This must be done for each disk attached to an OpenVMS virtual machine.
Note
This issue does not apply to default installations of VMware ESXi, which does not perform any disk caching unless a disk caching product (such as VirtuCache) was expressly installed and configured.
2.2. Tested Platforms
VSI OpenVMS x86-64 V9.2-3 can be installed as a guest operating system on KVM, VMware, and VirtualBox virtual machines using the X860923OE.ISO file.
KVM
For KVM, VSI recommends ensuring that your system is up-to-date with KVM kernel modules and the associated packages necessary for your particular Linux distribution.
VSI has tested VSI OpenVMS x86-64 V9.2-3 with KVM on several Linux distributions. The following table includes the Linux distribution and version, as well as the QEMU version:
| Linux Distribution | QEMU Version (package information) |
|---|---|
| Rocky Linux 9.4 | 8.2.0 (qemu-kvm-8.2.0-11.el9_4.6) |
| Ubuntu 22.04.3 LTS | 6.2.0 (Debian 1:6.2+dfsg-2ubuntu6.24) |
| RHEL 9.4 | 8.2.0 (qemu-kvm-8.2.0-11.el9_4.6) |
VMware
VSI has tested VSI OpenVMS x86-64 V9.2-3 with the following VMware products:
| VMware Product | Version Tested by VSI |
|---|---|
| ESXi | V8.0.x (with compatibility of 8, 7.0U2) |
| Workstation Pro | V17 |
| Fusion Pro | V13.5.2 |
VMware Licenses
Starting with VSI OpenVMS x86-64 V9.2-3, all VMware license types are supported if you are connecting to your virtual machine using the Guest Console feature (see Section 3.1.5, ''Guest Console'').
Note, however, that only the VMware vSphere Enterprise or Enterprise Plus license types support virtual serial port connections on VSI OpenVMS x86-64 V9.2-3.
VirtualBox
VSI tests with VirtualBox 7.x and regularly installs patches when they are available.
2.3. MD5 Checksum for the X860923OE.ZIP File
VSI recommends that you verify the MD5 checksum of the X860923OE.ZIP file after it has been downloaded from the VMS Software Service Platform to your target system. The MD5 checksum of X860923OE.ZIP must correspond to the following value:
AF20430EE7763ED65BD42231D27F8A76
To calculate the MD5 checksum, you can use any platform-specific utilities or tools that are available for your system.
2.4. CPU Compatibility Checks for Virtual Machines
VSI OpenVMS x86-64 requires that the CPU supports certain features that are not present in all x86-64 processors. When using virtual machines, both the host system and guest virtual machine must have the required features.
Host System Check
Before downloading the VSI OpenVMS x86-64 V9.2-3 installation kit, VSI recommends that you determine whether your host system has the required CPU features to run VSI OpenVMS x86-64. For this purpose, execute a Python script called vmscheck.py on your host system. This script, along with the accompanying PDF document entitled VMS CPUID Feature Check, can be downloaded from the official VSI OpenVMS x86-64 web page.
The VMS CPUID Feature Check document contains instructions on how to run the script and interpret the results. It also describes script limitations.
Guest Virtual Machine Check
The OpenVMS Boot Manager performs the CPU feature check on the guest virtual machine. The CPU feature check is performed automatically every time the Boot Manager is launched. If the check has passed successfully, the following message is displayed:
Checking Required Processor Features: PASSED
In addition, before booting VSI OpenVMS x86-64 V9.2-3, you can issue the following Boot Manager command to list the compatibility details:
BOOTMGR> DEVICE CPU
Important
VSI OpenVMS x86-64 will not boot on a system that fails either of the following CPU feature checks:
The host system check (via the vmscheck.py script)
The guest virtual machine check (via the OpenVMS Boot Manager).
Note
In case the system has the required CPU features but lacks some of the optional CPU features, the OpenVMS operating system may have noticeably lower performance.
2.5. x86-64 Licensing
During the installation, you will be prompted to register Product Authorization Keys (PAKs) for the base operating environment and any layered products that are not included in the base OS.
For more information about licensing, refer to the relevant section in the VSI OpenVMS x86-64 V9.2-3 Installation Guide.
2.6. Networking Options
VSI OpenVMS x86-64 V9.2 and later provides support for the following network stacks:
VSI TCP/IP Services
VSI DECnet Phase IV
VSI DECnet-Plus
VSI TCP/IP Services V6.0-26 is part of the VSI OpenVMS x86-64 V9.2-3 installation and will be installed along with the operating system. For more information, refer to VSI TCP/IP Services V6.0 Release Notes and other VSI TCP/IP Services documentation available at docs.vmssoftware.com.
During the VSI OpenVMS x86-64 V9.2-3 installation, you will also be offered the option to install either VSI DECnet Phase IV or VSI DECnet-Plus.
2.6.1. VSI DECnet
Install either VSI DECnet Phase IV or VSI DECnet-Plus on VSI OpenVMS x86-64 V9.2-3 and then configure the product you have chosen, just as you would for an OpenVMS Alpha or OpenVMS Integrity release.
If you have DECnet Phase IV installed on your system and you want to use DECnet-Plus, you have to uninstall DECnet Phase IV and then install and configure DECnet-Plus.
Note
If your DECnet installation was not part of the main installation procedure for OpenVMS x86-64, you must update the Memory Disk after you install DECnet. The Memory Disk update ensures that SYS$NETWORK_SERVICES.EXE is loaded on boot. Use the following command:
$ @SYS$UPDATE:SYS$MD.COM
After the next system reboot, you may want to purge the Memory Disk using the following command:
$ PURGE SYS$LOADABLE_IMAGES:SYS$MD.DSK
If you install DECnet as part of the main OpenVMS x86-64 installation procedure, you do not need to update the Memory Disk. The Memory Disk is updated at the end of the OpenVMS x86-64 installation.
After DECnet has been installed and configured, you can set host and copy files to/from other systems running DECnet.
2.6.2. Hypervisor Network Configuration
To understand how to configure your virtual machine network (devices and network configuration), please consult the VirtualBox, KVM, and VMware documentation.
2.6.3. DECnet MAC Address Change May Block All Network Traffic
If DECnet is installed, you may find that network traffic is being blocked. This affects all network traffic, including TCP/IP.
In its default configuration, DECnet will change the MAC address on its network interface to an address starting with "AA-00-04-00", followed by the encoded DECnet address. By default, most hypervisors block traffic after this MAC address change as a safety measure.
To resolve this issue, you can use one of the following methods:
Configure the hypervisor to allow MAC address changes. For instructions on how to do this, refer to the hypervisor documentation. Typically this involves enabling settings called "Promiscuous mode", "MAC address spoofing", "MAC address changes", and "forged transmits" on the virtual network interface, on a virtual switch, or on both. The details differ not only between different hypervisors, but also between different versions of the same hypervisor.
Configure the virtual machine with the MAC address that corresponds to the DECnet address. The method to calculate the MAC address is described in the "Configuring a Cluster Alias" section of the VSI DECnet-Plus for OpenVMS Installation and Configuration Manual. For instructions on how to change the MAC address on the virtual network interface, refer to the hypervisor documentation.
Configure DECnet to not change the MAC address on the interface. If you are running DECnet-Plus and do not need to use Phase IV compatible addressing, you can disable Phase IV addressing by editing SYS$MANAGER:NET$ROUTING_STARTUP.NCL.
For example, you would change the following command:
SET NODE 0 ROUTING CIRCUIT SVA-1 ENABLE PHASEIV ADDRESS = TRUE
to the command below in order to disable Phase IV addressing on the circuit:
SET NODE 0 ROUTING CIRCUIT SVA-1 ENABLE PHASEIV ADDRESS = FALSE
Do not run DECnet. If you do not need to use any DECnet protocols, disable DECnet from starting up.
2.6.4. Re-configuring Applications After Network Configuration Change
On "system" startup (in this context, the word "system" refers to the bare metal hardware/firmware or to the VMS Boot Manager/hypervisor), the "system" scans the I/O buses and presents a list of devices to the OpenVMS boot code, which then loads drivers and calls initialization routines for the devices to be configured for VMS operation. System parameters and other configuration mechanisms (such as I/O auto-configuration) affect what devices are configured in what order.
LAN devices get configured as they are found. Device names, such as EIA, EIB, EIC, and so on, are assigned by the LAN driver according to SYS$CONFIG.DAT. On Alpha, IA-64, and x86-64 bare metal systems, the device names are encoded with the bus type. For example, the names of XMI Ethernet devices start with EX, names of Ethernet PCI devices start with EW, names of FDDI PCI devices start with FW. On x86-64 virtual machines (VMs), there are only EI device names. Pseudo-devices, such as LAN Failover (LL) and VLAN (VL), are also a consideration.
When you add a new hardware device to an Alpha, Itanium, or x86-64 bare metal system, the device names may change the next time the system is booted. For example, if you have EIA, EIB, and EIC devices and replace EIB with a dual-port card, you will see EIA, EIB, EIC, and EID. In addition, the physical connection of each device may change. When the device names change, you must reconfigure the applications on the system that use those devices. For example, TCP/IP may be using EIC (ie2) which needs to be changed to EID (ie3), or a LAN Failover Set may be defined with EIB and EIC but needs to be changed to EIB and EID.
On x86-64 VMs, a similar reconfiguration effort is needed when the LAN device configuration changes. It might be necessary more often since the system network configuration is much easier to change for VMs compared to bare metal systems.
On x86-64 VMware VMs, you can change the network adapter type to E1000, E1000e, or VMXNET 3. Changing the adapter type from VMXNET 3 to E1000 or E1000e requires deleting the existing network adapter and then adding a new one of the desired type. Any changes may require a reconfiguration effort. Note that the order of the devices and the MAC addresses may change.
On x86-64 KVM VMs, you can change the network adapter type to e1000, e1000e, or virtio. Upon reboot, the adapter type will change but the device names and MAC addresses will stay the same. In such cases, no change to the application configuration is required. Other cases, such as adding and removing NICs, may require reconfiguration.
Reconfiguration can be done as follows:
Record the VM NIC configuration before and after adding, removing, or changing NICs.
Make the changes and reboot the system.
Do
MCR LANCP SHOW CONFIGURATION(orSHOW CONFIGURATION/USERS), comparing the adapter types and MAC addresses against the VM NIC configuration.Adjust any applications, such as TCP/IP, as well as LAN Failover and VLAN definitions, to apply to the correct network adapters.
You can adjust the network configuration above using graphical tools such as VMM (KVM), Cockpit (Linux), and GUI (VMware). You can also use command line utilities or edit the XML VM definition files. You can manually assign addresses using these tools, which might help you correlate the devices seen by these tools with the devices that OpenVMS "sees" after boot.
2.7. Layered Products Updates
2.7.1. Default Layered Products
The following layered products will be installed unconditionally with VSI OpenVMS x86-64 V9.2-3:
VSI SSL3
VSI SSL111
VSI OpenSSH
VSI Kerberos
VSI TCP/IP Services
VMSPORTS x86VMS PERL534 V5.40.0
2.7.2. OpenSSL Update
VSI SSL3 V3.0-15 is the default SSL offering on VSI OpenVMS x86-64 V9.2-3.
VSI SSL111 V1.1-1W is also available in this release in order to allow any existing SSL-based customer applications to continue to run. VSI SSL3 is designed to co-exist in parallel with VSI SSL111 by means of using different symbols for different versions.
Warning
SSL111 will not receive updates in future releases, so VSI strongly recommends that applications still using VSI SSL111 be moved to VSI SSL3.
2.7.3. VSI OpenSSH V8.9-1J for OpenVMS
Warning
If you are upgrading to VSI OpenVMS x86-64 V9.2-3 from an earlier version with OpenSSH V8.9-1G or earlier installed, make sure to uninstall VSI OpenSSH from your system before you start the upgrade procedure.
For post-installation and configuration instructions, refer to the relevant section in the VSI OpenVMS x86-64 V9.2-3 Installation Guide.
For a detailed description of the features and bug fixes included in this release of VSI OpenSSH V8.9-1J, please refer to the OpenSSH Version 8.9-1J for VSI OpenVMS Release Notes.
2.7.4. VSI Kerberos V3.3-3 for OpenVMS
VSI OpenVMS x86-64 V9.2-3 includes VSI Kerberos V3.3-3 for OpenVMS.
2.7.5. VSI DECwindows Motif V1.8-2 for OpenVMS
VSI OpenVMS x86-64 V9.2-3 includes VSI DECwindows Motif V1.8-2.
Note that VSI DECwindows Motif will not be installed unconditionally with VSI OpenVMS x86-64 V9.2-3. You will be prompted to install this product during the installation procedure.
2.7.6. VSI OSAK V3.1-2 for OpenVMS
VSI OpenVMS x86-64 V9.2-3 includes VSI DECnet-Plus OSI Applications Kernel (OSAK) V3.1-2.
Note that VSI DECnet-Plus OSAK will not be installed unconditionally with VSI OpenVMS x86-64 V9.2-3 and must be installed manually, if necessary.
2.7.7. ZIP/UNZIP Tools
VSI provides the Freeware executables for managing ZIP archives on OpenVMS x86-64 systems. In VSI OpenVMS x86-64 V9.2-3, the installation procedure automatically puts these files in the following directories on the system disk:
| Folder | Files |
|---|---|
| SYS$COMMON:[SYSHLP.UNSUPPORTED.UNZIP] |
|
| SYS$COMMON:[SYSHLP.UNSUPPORTED.ZIP] |
|
3. New in This Release
This section lists the features and bug fixes introduced in the current release, as well as applicable known issues and limitations.
3.1. New Features
This section lists features introduced in the current release.
3.1.1. ACME Server
Starting with V9.2-3, the ACME Server is available with OpenVMS x86-64.
For a detailed explanation of how to configure the ACME Server, please refer to the relevant section in the VSI OpenVMS Guide to System Security.
External authentication is possible using DECNET and TELNET. The version of OpenSSH shipped with VSI OpenVMS x86-64 V9.2-3 does not currently have external authentication enabled. This issue will be fixed in a future release.
3.1.1.1. VMS ACME Agent
OpenVMS x86-64 V9.2-3 includes the VMS ACME Agent, which enables the use of external authentication on x86-64 systems.
Note that the ACME Server is necessary for external authentication to function. The process for enabling this is described in Section 3.1.1.3, ''Enabling the ACME_SERVER LOGIN Model for $ACM Login Processing''.
3.1.1.2. Installing the Legacy LDAP Extension Module on x86-64
This section describes the procedure for setting up the Legacy LDAP Extension Module on VSI OpenVMS x86-64 V9.2-3 memory disks. The module is required in order to provide external authentication capabilities via the LDAP ACME Agent.
To set up the LDAP Extension Module, perform the following tasks:
Add an entry for the persona extension image to the systems images list:
$ MCR SYSMAN
SYSMAN> SYS_LOADABLE ADD LDAPACME LDAPACME$EXT
SYSMAN> EXIT
Generate a new system images data file:
$ @SYS$UPDATE:VMS$SYSTEM_IMAGES.COM
Reconfigure the node memory disk using the following command procedure:
$ @SYS$UPDATE:SYS$MD.COM
This procedure creates a new system bootable memory disk that contains the LOGINOUT and LDAP components necessary for external authentication processing.
Reboot the system to load the new memory disk.
3.1.1.3. Enabling the ACME_SERVER LOGIN Model for $ACM Login Processing
To enable the ACME_SERVER LOGIN images (SYS$SYSTEM:LOGINOUT.EXE and SETP0.EXE) use the following command procedure:
$ SYS$MANAGER:SYS$LOGIN_SWITCH.COM
This procedure will display a message indicating which login images are currently in use and an option to switch to the other login images. Users must switch to the ACME LOGIN model if that is not already chosen as the default login model.
For a detailed description of the process, refer to the relevant section in the VSI OpenVMS Guide to System Security.
3.1.1.4. Known Issues in VMS ACME Agent
The DECNET IV EVL process may fail to authenticate on startup. Users will see a message similar to the following:
%%%%%%%%%%% OPCOM 25-OCT-2024 12:33:46.60 %%%%%%%%%%%
Message from user AUDIT$SERVER on OM2701
Security alarm (SECURITY) and security audit (SECURITY) on OM2701, system id: 1789
Auditable event: Network login failure
Event time: 25-OCT-2024 12:33:46.60
PID: 00000457
Process name: EVL
Username: DECNET
Image name: OM2701$DKC100:[SYS0.SYSCOMMON.][SYSEXE]LOGINOUT.EXE
Status: %ACME-E-TIMEOUT, requested operation has timed out
The suggested workaround for this issue is to use SYS$MANAGER:SYS$LOGIN_SWITCH.COM to enable LOGIN UAF; the EVL process will then start successfully. The SYS$LOGIN_SWITCH.COM procedure can then be used to switch back to ACME LOGIN authentication.
Note
The SYS$LOGIN_SWITCH.COM procedure moves a copy of LOGINOUT.EXE to the x86-64 memory disk container. Repeated use of this procedure can result in consuming limited free space on the disk container. If the memory disk should become low on free space, the following command can be used to eliminate unused LOGINOUT.EXE images:
$ PURGE SYS$COMMON_MD:[SYSEXE] LOGINOUT.EXE
Warning
Mistakes made when manipulating the memory disk manually can result in an unbootable container.
This issue will be fixed in a patch kit for VSI OpenVMS x86-64 V9.2-3.
3.1.2. Availability Manager
Starting with V9.2-3, OpenVMS x86-64 features the Availability Manager, a real-time monitoring and diagnostic tool. Using this tool, you can examine data from multiple OpenVMS systems simultaneously.
Important
Analyzing data from an x86-64 system requires the use of the Availability Manager Data Analyzer V4.0.
3.1.3. DELTADCL Output Time Format for F$CVTIME
Starting with VSI OpenVMS x86-64 V9.2-3, the F$CVTIME lexical function returns a uniform string in all cases. Previously, some non-standard input strings would return non-standard output as in the following example:
$ WRITE SYS$OUTPUT F$CVTIME("0001:001:00", "DELTA", "DATETIME")
0 0001:001:00.00
Starting with V9.2-3, the following is returned:
$ WRITE SYS$OUTPUT F$CVTIME("0001:001:00", "DELTA", "DATETIME")
0 01:01:00.00
Additionally, a new DELTADCL output time format has been added for the F$CVTIME lexical function. If the output time format is specified as DELTADCL, then the requested information will be returned in the following format: DDDD-HH:MM:SS.CC. This format can also be used as an input for other DCL time-related lexicals and commands.
Important
Previously, a delta time with a leading value of zero days was accepted by DCL. This is no longer accepted. For example, the following command was valid:
$ RUN /DELAY="0 00:00:01" TEST.EXE
and the following command was not valid:
$ RUN /DELAY="1 00:00:1" SELECT.EXE
%DCL-W-IVDTIME, invalid delta time - use DDDD-HH:MM:SS.CC format
\0 100:00:\
From now on, both of the above commands return an error. Delta time must be specified in the format DDDD-HH:MM:SS.CC.
For example, the first command must be changed as follows:
$ RUN /DELAY="0-00:00:01" TEST.EXE
3.1.4. E1000e Network Adapter Support
Starting with V9.2-3, VSI OpenVMS x86-64 supports the E1000e network adapter on VMware ESXi 8 and KVM.
3.1.5. Guest Console
In previous versions of OpenVMS x86-64, all console interactions required a legacy serial port device. Starting with V9.2-3, OpenVMS x86-64 features the Guest Console – an alternative specifically designed for customers who are unable to use serial ports. The Guest Console provides the necessary keyboard driver and terminal emulator functionalities to allow users to interact with the system from the initial boot through the operator login.
To enable the Guest Console, enter the following Boot Manager command:
BOOTMGR> OPA0
Important
The Guest Console requires the OpenVMS Boot Manager version that is shipped with the V9.2-3 release (Boot Manager Build 146 or higher).
Guest Console Limitations
The current implementation of the Guest Console provides a minimal terminal that lacks certain features, such as copying, pasting, and per-line-scrolling (the current version supports per-page-scrolling using the Page Up/Page Down keys). These features may be addressed in a future release of VSI OpenVMS x86-64.
Specific issues are detailed as follows:
The Guest Console uses a fixed-geometry window, which can cause display issues with various editors and utilities. VSI recommends that you issue a
SET
                  TERMINAL/PAGE=xx
command, where xx is the number of lines in the display plus 2. This resolves some of the issues with editors reserving lines for status display. Some experimentation may be required.As the Guest Console uses a runtime driver, some mid-boot messages may be lost. If this is a concern, users may consider using the traditional serial port instead of the Guest Console.
The Guest Console has not been fully tested with MAC keyboards; therefore, users of VMware Fusion are encouraged to try this feature, while being aware that use of a traditional serial port console connection may be a better option for this release.
3.1.6. Images are Installed with /OPEN by Default
Starting with VSI OpenVMS x86-64 V9.2-3, images are installed as open known images by
default. This applies to the ADD and other related commands. A user no
longer needs to add the /OPEN qualifier to get an image installed as an
open known image. The existing behavior of /NOOPEN is maintained. If a
user specifies /NOOPEN, the image is not installed as an open known
image.
3.1.7. Jumbo Frame Support in the LAN Drivers
Enabling jumbo frames for an NIC allows applications to transmit and receive packets with a maximum packet size of 9018 bytes (including CRC), compared to the standard size 1518 bytes (including CRC). This can improve performance by doing data transfers in larger chunks.
Warning
VSI currently does not recommend the use of jumbo frames on OpenVMS VMs.
If you decide to use jumbo frames, take care when doing so. The characteristic applies to all applications running on the NIC, which may lead to buffer size mismatches. Also, not all hypervisors support jumbo frames without issue.
3.1.8. MACRO-32 Improvements for the Debugger
Starting with VSI OpenVMS x86-64 V9.2-3, MACRO-32 provides more detailed information for the debugger, allowing users to address issues more easily.
Additionally, DWARF variable definitions for MACRO (Alpha) registers have been added to allow users to examine those registers.
3.1.9. MACRO-32 /VERSION Qualifier
Starting with VSI OpenVMS x86-64 V9.2-3, a new /VERSION qualifier
has been added on
MACRO-32.
This qualifier causes the compiler to print the compiler version.
3.1.10. MOUNT Command Changes
Previously, when a volume was dual-formatted with both Files-11 and ISO 9660 formats,
the MOUNT command by default would identify the Files-11 file system
and mount it. Starting with VSI OpenVMS x86-64 V9.2-3, if no special qualifiers are added
to the MOUNT command, the ISO 9660 file system will be detected and the
volume will be mounted as /MEDIA_FORMAT=CDROM by default.
The existing MOUNT qualifier /MEDIA now has two
keywords, CDROM and FILES11, which allows the user
to override the default. For example, entering the command MOUNT/MEDIA=FILES11
DKA300 will mount the DKA300 volume as a Files-11 volume. Note that the
/MEDIA qualifier is only useful when mounting dual-formatted
volumes.
To mount different disk volumes systemwide, they must have unique volume labels. This restriction has not changed, but for the ISO 9660 volumes it also applies to the volume set identifier. If you want to mount multiple different ISO 9660 volumes systemwide, they must have both unique volume labels and unique volume set identifiers, since they are part of the volume lock name, which has to be unique in a system or cluster environment.
3.1.11. PCSI Kits Can Be Set to Ignore Non-Default Installation Paths
The POLYCENTER Software Installation (PCSI) utility now supports the IGNORE
DESTINATION_PATH statement. Use this statement if you want your PCSI kit to
always install to the default location
(SYS$SYSDEVICE:[VMS$COMMON] and lower-level subdirectories),
ignoring any user-defined installation paths.
For more information, refer to the POLYCENTER Software Installation Utility Manual.
3.1.12. Supported VMware License Types
With the release of the Guest Console feature (see Section 3.1.5, ''Guest Console''), VSI OpenVMS x86-64 supports all VMware license types.
3.1.13. Support for virtio-net Driver
Starting with V9.2-3, VSI OpenVMS x86-64 supports virtio-net (a para-virtualized NIC). The virtio driver provides another network option for VMs running on Linux/KVM systems. You can find more information about it here.
The virtio driver is called SYS$EVDRIVER.EXE, and devices instantiated by the driver are named EIA, EIB, etc.
The LAN device can be treated as a regular LAN device on the system, with one exception. The virtio devices are not VLAN-capable, so you cannot create VLANs hosted by them. VLAN implementations are enabled by modifying the network switch characteristics to create VLAN networks.
To enable virtio when configuring the device, navigate to the Network Type menu and under Adapter Type select the Virtio option from the drop-down menu.
Your default device will depend on your setup. There are three types of device:
The legacy device was the first implementation, still supported for older drivers that have not been updated.
The non-transitional device is supported by the current version of the virtio specification.
The transitional device is partway between the previous two.
OpenVMS supports only transitional and non-transitional devices. To select something other than the default you must edit the XML description of the VM, or specify the model when adding to a VM via the following virsh commands:
virsh attach-interface --model virtio-net-pci-non-transitional ...
virsh attach-interface --model virtio-net-pci-transitional ...
3.1.14. Support for VMXNET 3 Driver
Starting with V9.2-3, VSI OpenVMS x86-64 supports VMXNET 3 (a para-virtualized NIC). VMXNET 3 provides another network option for VMs running on VMware systems.
The VMXNET 3 driver is called SYS$VMXNET3.EXE, and devices instantiated by the driver are named EIA, EIB, etc.
The LAN device can be treated as a regular LAN device on the system.
To enable VMXNET 3 when configuring the device, navigate to the Network Type menu and under Adapter Type select the VMXNET 3 option from the drop-down menu.
3.1.15. TCP/IP and OpenSSH Automatic Configuration
Starting with VSI OpenVMS x86-64 V9.2-3, users will be prompted to automatically configure the TCP/IP and OpenSSH components during OpenVMS installation. The default for this option is "No".
Important
A DHCP server is required to make use of the automatic configuration option.
3.1.16. Updated Global Page Tables
Starting with V9.2-3, the minimum and default values of the SYSGEN parameter GBLPAGES in VSI OpenVMS x86-64 have been increased to 8,388,608 pagelets (524,288 pages). This provides a minimum of 4 megabytes of global page table and allows OpenVMS to take advantage of larger physical page sizes available on the x86-64 platform.
3.1.17. VMware VMDirectPath I/O Support for Data Disks
Warning
Booting from fibre channel disks is not supported. Cluster common system disks are not supported.
Each VMware virtual machine can be connected to up to two PCI devices. For more information, refer to the VSI OpenVMS x86-64 V9.2-3 Installation Guide.
3.1.18. VMware vMotion Support
Starting with V9.2-3, VSI OpenVMS x86-64 supports the VMware vMotion technology, with the following limitations:
Your VMware ESXi cluster must be configured for vMotion. For details, refer to the official VMware documentation.
vMotion is not compatible with the VMware VMDirectPath I/O (fibre channel passthrough) feature (see Section 3.1.17, ''VMware VMDirectPath I/O Support for Data Disks'').
VSI Guest Console must be used to interact with virtual machines.
For information on how to migrate a live VSI OpenVMS Virtual Machine using VMware vMotion, refer to https://docs.vmssoftware.com/vsi-performing-vmotion/ and this video on the official VSI YouTube channel.
3.2. Fixed Issues
This section lists issues that have been fixed with the current release.
3.2.1. ACCVIO with the sem_open Function
Previously, when the sem_open function was called with a 64-bit string address, an access violation (ACCVIO) would occur. This issue has now been fixed.
3.2.2. Bad Canvas Error Message
Previously, when running the Guest Console, users would sometimes see the following error message:
%GCTERM-E-MEMALOC Bad Canvas
This issue has now been fixed.
3.2.3. BASIC RTL Printing QUADWORD Integers
Previously, the BASIC compiler did not support printing QUADWORD (64-bit) integers. This issue has now mostly been fixed. The PRINT USING statement is an exception, and does not support QUADWORD integers.
3.2.4. CLUE$STARTUP Incorrectly Processes Lists of Possible DOSD Devices
Previously, CLUE$STARTUP could only process the first Dump Off System Disk (DOSD) device in a list of DOSD devices.
This issue has now been fixed.
3.2.5. Clusters Over IP Configuration Template Has Incorrect Record Format
Previously, the configuration template for Clusters Over IP that was supplied with the operating system had an incorrect record format of VFC and record attributes of "Print file carriage control". This sometimes resulted in errors at boot.
This issue has now been fixed.
3.2.6. COBOL Functions Accept 64-bit Addresses
Previously, COBOL functions would only accept 32-bit addresses, and the program would pass 64-bit addresses.
The following intrinsic COBOL functions now function correctly with 64-bit addresses: LOWER-CASE, UPPER-CASE, and REVERSE.
3.2.7. Error Message From TRACEBACK Utility
The TRACEBACK facility no longer outputs the following error message:
Error: last state machine operation was not end_sequence
3.2.8. Error When Polling a File with DEV$M_TRM
Previously, when trying to apply the poll function to a file with DEV$M_TRM, an error was returned. This issue has now been fixed.
3.2.9. Floating-Point Support for Symbolic Debugger
Starting with VSI OpenVMS x86-64 V9.2-3, the Symbolic Debugger includes support for floating-point registers.
3.2.10. Improved Error Codes with the iconv_open Function
The iconv_open function loads two types of .ICONV files: a simple table or a shared library. Previously, if the download failed, the error codes returned were often related to a different file type and did not provide useful information to the user.
The accuracy of error codes returned when calling the iconv_open function has been improved.
3.2.11. INSTALL Utility Image Error
During field testing, an issue was discovered wherein a regression in the INSTALL utility would occur when installing data files as known files. This would produce an error similar to the following:
$ INSTALL CREATE DKA200:[DATA]TEST.DAT
%INSTALL-E-FAIL, failed to CREATE entry for DISK$USER:<DATA>TEST.DAT
-IMGACT-F-NOTNATIVE, image is not an OpenVMS Alpha image
$
The suggested workaround was to add /NOOPEN to the install command
as follows:
$ INSTALL CREATE DKA200:[DATA]TEST.DAT /NOOPEN
This issue has now been fixed. If you implemented the suggested workaround, that change can be safely reverted.
3.2.12. MACRO-32 Cannot Create NOBITS Section
Previously, the MACRO-32 compiler would use the wrong ELF section type for a data psect that was marked with the OVR attribute.
This issue has now been fixed.
3.2.13. MACRO-32 Displays INFO Message for Data PSECTs Marked EXE
The MACRO-32 compiler now correctly displays a WARNING message (rather than an INFO message) for a data psect that is marked with the EXE attribute.
3.2.14. MACRO-32 Division in Complex Operands Produces Wrong Answer
Previously, the division operator inside of an operand expression would sometimes produce the wrong answer. For example, the following operand expression would return the wrong value:
CMPB R2,#<<sym>/2>
This issue has now been fixed.
3.2.15. MACRO-32 Generates Incorrect Code with EVAX Built-Ins
Previously, the MACRO-32 compiler would generate incorrect code when several sequential EVAX built-ins would refer to the same memory location.
This issue has now been fixed.
3.2.16. MACRO-32 Generates Incorrect x86-64 int Instruction
Previously, the MACRO-32 compiler would use the wrong x86-64 int
instruction to signal overflow errors.
This issue has now been fixed.
3.2.17. MACRO-32 INSV Instruction Not Working with Negative Position Operand
Previously, the MACRO-32 INSV instruction did not work correctly if the position operand was negative.
This issue has now been fixed.
3.2.18. MACRO-32 PSECT and LABEL Same Name Disallowed
Previously, a PSECT and a LABEL were unable to use the same name on MACRO-32. This issue has now been fixed.
3.2.19. System Crash on CPU Without AVX Support
Previously, an issue was discovered wherein a system without AVX support would experience a crash on the installation kit media boot.
This issue has now been fixed.
3.3. Features Not Available in VSI OpenVMS x86-64 V9.2-3
The following functionalities, products, and commands are not available in VSI OpenVMS x86-64 V9.2-3:
Process swapping (see Section 5.5, ''VSI OpenVMS x86-64 Will Not Support Swap Files'' of this document)
RAD support
Support for privileged applications, such as:
User-written device drivers
Code that directly calls internal system routines (such as those that manage page tables)
TECO Editor
3.4. Issues Discovered in This Release
3.4.1. Installation Crashes on Selecting Invalid Time Zone
During OpenVMS installation, you will be prompted to enter your time zone information and presented with a list of supported time zones. Entering a value that is not in the list will cause the installation procedure to terminate with an error.
3.4.2. Invisible SATA Devices on ESXi Systems
On VMware ESXi systems, assigning a logical unit number (LUN) higher than 7 to a SATA disk device makes the device invisible to the installed OpenVMS system. It is still possible to use such devices as system disks, however.
Should you need multiple disk devices, the suggested workaround is to create more virtual SATA controllers and assign additional disks to them. Alternatively, you can use SCSI controllers, which allow up to 15 connected devices.
This issue will be fixed in a patch kit for VSI OpenVMS x86-64 V9.2-3.
3.4.3. LsiLogic SCSI Controller Should Not Be Used with KVM
When using virtual SCSI disks on KVM, the controller type should be scsi
and the model name should be virtio-scsi. The following example is correct:
--controller type=scsi,model=virtio-scsi
<controller type='scsi' index='1' model='virtio-scsi'>
Avoid using the lsilogic model name. This unsupported controller model
causes the OpenVMS Boot Manager to incorrectly assign a controller letter, resulting in a
possible mismatch of device names within the operating system. The following example is
incorrect:
--controller type=scsi,model=lsilogic
<controller type='scsi' index='1' model='lsilogic'>
Adding more than five virtio-scsi disks may result in KVM generating an additional controller using the lsilogic model name. This must be fixed by manually editing the XML file and remapping the additional devices to the virtio-scsi controller created earlier in the process. See the following example:
<disk type='file' device='disk'>
  <driver name='qemu' type='raw' cache='writethrough'/>
  <source file='/home/user/vm/scsi_6.raw'/>
  <target dev='sdg' bus='scsi'/>
  <address type='drive' controller='1' bus='0' target='0' unit='6'/>
</disk>
<disk type='file' device='disk'>
  <driver name='qemu' type='raw' cache='writethrough'/>
  <source file='/home/user/vm/scsi_7.raw'/>
  <target dev='sdh' bus='scsi'/>
  <address type='drive' controller='1' bus='0' target='0' unit='7'/>
</disk>
Note
Keep in mind that VSI OpenVMS x86-64 supports only a single virtio-scsi controller, and the system will not be able to display any devices mapped to the virtio-scsi controller other than the first one.
3.4.4. MACRO-32 Unaligned Stack Issue
Some MACRO-32 calls leave the stack unaligned. Usually, this does not cause any issues. However, if the called routine (usually from C) attempts to save floating registers on the stack, the instruction requires an aligned stack. This results in a hardware fault.
The suggested workaround for this issue is to save the argument pointer or stack pointer to a temporary register and then use that during the argument push sequence.
3.4.5. MONITOR Utility Returns Inaccurate Data
When using the MONITOR utility whilst running VSI OpenVMS x86-64 on a virtual machine,
the MONITOR MODES and MONITOR SYSTEM commands output
data that is not accurate.
Virtual machines use a hard tick rate of 10 milliseconds, whereas hardware systems use 1 millisecond. Interrupts and process scheduling are not bound to the hard tick rate, so if for example an interrupt lasts for 2 milliseconds and then user mode code runs for 8 milliseconds, the whole 10 milliseconds will be accounted as interrupt time.
This issue will be fixed in a patch kit for VSI OpenVMS x86-64 V9.2-3.
3.4.6. OS Upgrade Fails with C++ Compiler Installed
When upgrading to VSI OpenVMS x86-64 V9.2-3 from V9.2-2 or E9.2-3 on a system with the C++ compiler installed, the OS upgrade procedure will fail.
As a workaround, use the following command to completely remove the compiler:
$ PRODUCT REMOVE CXX
Afterward, perform the system upgrade as normal. After upgrading, you can install the C++ compiler again.
3.4.7. Possible Issues with BOOT_OPTIONS.COM
To ensure that boot options are applied and recorded consistently, VSI strongly recommends setting up and managing firmware boot options using the built-in platform firmware utilities, as opposed to the BOOT_OPTIONS.COM procedure.
3.4.8. System Upgrade Error Message with OpenSSH V8.9-1H01 Installed
During an OpenVMS upgrade, if you have VSI OpenSSH V8.9-1H01 installed on your system, you will see a message similar to the following:
%PCSI-E-EXERMVFAIL, product supplied EXECUTE REMOVE procedure failed
-CREATE-E-DIRNOTCRE, !AS directory file not created
%PCSI-E-OPFAILED, operation failed
Terminating is strongly recommended. Do you want to terminate? [YES]
Ignore this message. Answer NO and continue the upgrade procedure as normal.
4. Known Issues and Limitations
This section lists the issues and limitations that were introduced or discovered in earlier versions of VSI OpenVMS x86-64 and are still applicable to the current release.
For information about bugs fixed in previous releases of VSI OpenVMS x86-64, refer to the corresponding release notes at https://docs.vmssoftware.com.
4.1. BACKUP/INITIALIZE to a Disk Mounted /FOREIGN Does Not Work
A BACKUP command of the form:
$ BACKUP/INITIALIZE input-disk:[directories...]*.*; output-disk:save-set.bck/SAVE
where the output volume is a disk that has been mounted /FOREIGN,
does not work in VSI OpenVMS x86-64 V9.2-3 and may yield the following
error:
%BACKUP-F-OPENOUT, error opening DKA200:[000000]DKA200$504.BCK; as output
-SYSTEM-W-BADIRECTORY, bad directory file format
This type of operation was originally developed to allow the backup of a large non-removable disk onto a series of smaller removable disks. The feature, referred to as "sequential disk" operation, is described in the VSI OpenVMS System Manager's Manual, Volume 1: Essentials.
As a workaround, initialize and mount an output volume of a size sufficient to hold the
entire backup save set before issuing the BACKUP command as in the
following example:
$ INITIALIZE output-disk: label
$ MOUNT output-disk: label
$ CREATE/DIRECTORY output_disk:[]
$ BACKUP input-disk:[directories...]*.*; output-disk:save-set.bck/SAVE
If a sufficiently large output disk is not available, you can instead create and mount a
volume set using multiple disks with the INITIALIZE and
MOUNT/BIND commands.
4.2. Cluster Nodes Running VSI OpenVMS V9.2 May Cause All x86-64 Cluster Members to Crash
In a mixed-version cluster where at least one node is running VSI OpenVMS x86-64 V9.2, certain conditions might trigger a crash of all x86-64 systems, regardless of which OpenVMS version they run. This can happen when a V9.2 MSCP node that is serving disks to other cluster members gets rebooted. In this case, other x86-64 cluster members will see the disks served by MSCP go into mount verification. Upon the verification completion, the MSCP client node might crash.
The fix for this problem is to upgrade all x86-64 cluster nodes to VSI OpenVMS x86-64 V9.2-1 or later.
4.3. Connecting to a Shared LD Container in a Mixed-Architecture Cluster
In VSI OpenVMS x86-64 V9.2-3, a container file can only be connected as a shared LD device accessible to multiple architectures as follows:
Connect to the file on all OpenVMS Alpha and/or OpenVMS Integrity systems using a command such as:
$ LD CONNECT/ALLOCLASS=1/SHARE DISK$LDTEST:[LD]SHARED_LD.DSK LDA5:
Once all required connections on OpenVMS for Alpha and/or OpenVMS for Integrity systems are complete, you may then connect to the file on any OpenVMS x86-64 systems.
If you connect to the file on an OpenVMS x86-64 system first, any subsequent attempts to connect on an OpenVMS for Alpha and/or OpenVMS for Integrity system will fail with an error message such as:
%LD-F-FILEINUSE, File incompatible connected to other LD disk in cluster
-LD-F-CYLINDERS, Cylinders mismatch
VSI intends to provide an update for OpenVMS for Alpha and OpenVMS for Integrity systems. That update will allow the connections to the shared container file to be performed in any order.
4.4. DECnet Over Wi-Fi
DECnet Phase IV will not work over a Wi-Fi connection. To be able to use DECnet Phase IV on an x86-64 virtual machine and communicate with other systems, you must have the host machine connected via an Ethernet cable.
DECnet-Plus will work over a Wi-Fi connection, but it must be tunnelled through TCP/IP.
4.5. ENCRYPT Utility Does Not Work as Expected
Most operations with the ENCRYPT utility return the following error:
%ENCRYPT-F-ILLALGSEL, algorithm selection unknown, unavailable, or unsupported
This issue will be addressed in a future release of VSI OpenVMS x86-64.
4.6. Privileged Images Linked Using /SYSEXE Should Be Relinked
VSI recommends that any privileged images linked using the
LINK/SYSEXE command in VSI OpenVMS V9.2 or earlier be relinked for the
current release because data structures and interfaces are subject to change between
releases.
Note that the images linked using LINK/SYSEXE in VSI OpenVMS V9.2-1
do not need to be relinked for the current release.
4.7. Running x86-64 Images on Integrity Systems Causes an Access Violation
When you run a VSI OpenVMS x86-64 image on VSI OpenVMS for Integrity Servers, no message from the image activator appears, but an access violation occurs.
This issue will be corrected in a future patch kit for VSI OpenVMS for Integrity Servers.
4.8. VSI FTP Service Might Not Connect Correctly In Virtual Environments
If the FTP service does not work after it has been started, switch to passive mode with the following command:
FTP> SET PASSIVE ON
Passive is ON
In passive mode, the FTP client always initiates a data connection. This is useful in virtual machine environments when there is network address translation (NAT) in your network.
To run this command automatically when you invoke FTP, put it into
SYS$LOGIN:FTPINIT.INI. For the full description of the
SET PASSIVE command, refer to the VSI TCP/IP Services for OpenVMS User’s Guide.
5. Features Specific to VSI OpenVMS x86-64
This section lists features that are specific to VSI OpenVMS x86-64 and as such, are not available in versions of OpenVMS for other architectures.
5.1. Symmetric Multiprocessing (SMP)
VSI OpenVMS x86-64 supports a maximum of 32 CPUs.
5.2. Extended File Cache (XFC)
VSI OpenVMS x86-64 has extended file caching (XFC) enabled by default.
5.3. HYPERSORT Utility Available
The high-performance sort/merge utility (HYPERSORT) is available in VSI OpenVMS x86-64. Enable the utility with the following command:
$ DEFINE SORTSHR SYS$LIBRARY:HYPERSORT.EXE
5.4. Memory Disks
VSI OpenVMS x86-64 uses a boot method called Memory Disk that simplifies the boot process by eliminating boot complexity and decoupling the VSI OpenVMS Boot Manager from a specific device or version of VSI OpenVMS x86-64. Memory Disk is created and deployed automatically during the installation process.
The Memory Disk contains all files that are required to boot the minimum OpenVMS kernel and all files needed to write system crash dumps. Changes such as file modifications or PCSI kit/patch installations require the operating system to execute a procedure to update the Memory Disk container, thus assuring that the next boot will use the new images. A command procedure, SYS$MD.COM, keeps the Memory Disk up-to-date.
If you change anything that affects the boot path or dumping, you must run the command procedure SYS$MD.COM before rebooting. For instance, if you change any files referenced or loaded during booting (up to and including the activation of STARTUP), or any files used by the dump kernel, then you must run SYS$MD.COM.
However, in VSI OpenVMS x86-64 V9.2 and later there are two exceptions to the above statement. If you make any of the following changes that affect the boot path or dumping, you do not need to run SYS$MD.COM:
Use
SYSGEN WRITE CURRENTorSYSMAN PARAMETERS WRITE CURRENT. These commands will access the parameter file on the memory disk directly.Copy a file directly to the memory disk when specifically advised by VSI support specialists to do so.
Use the following command exactly as specified here:
$ @SYS$UPDATE:SYS$MD
No parameters are needed, the defaults should apply.
When SYS$MD.COM completes, you must reboot.
When SYS$MD.COM is invoked, the system will display something like the following:
$ @SYS$UPDATE:SYS$MD
        Created memory disk DKE100:[VMS$COMMON.SYS$LDR]SYS$MD.DSK;1
        - using 184064 blocks in 1 extent with 1010 spare blocks
        - mounted on LDM9323: with volume label MD230120DD6A
        - contains OpenVMS V9.2-3

$
After the next system reboot, purge the memory disk with the following command:
$ PURGE SYS$LOADABLE_IMAGES:SYS$MD.DSK
Note
Do not invoke SYS$MD.COM directly unless you are advised to do so by VSI Support, or when required while following documented procedures. For example, if you load a user-written execlet by running SYS$UPDATE:VMS$SYSTEM_IMAGES.COM, you must then invoke SYS$UPDATE:SYS$MD.COM.
Note
VSI does not recommend changing, moving, or manipulating SYS$MD.DSK or SYS$EFI.SYS (or the underlying EFI partition) in any way. These files are needed to boot the system and are maintained by OpenVMS.
5.5. VSI OpenVMS x86-64 Will Not Support Swap Files
VSI OpenVMS x86-64 does not support swap files. The system’s physical memory should be managed with appropriately sized system memory and page file(s).
The AUTOGEN and SWAPFILES procedures no longer create swap files on the system disk. If a swap file resides on the system disk, it will no longer be installed as part of the system startup.
In the current release, the SYSGEN INSTALL command does not support
the /SWAPFILE qualifier. The use of the qualifier will result in a syntax
error.
Processes may be seen in the Computable Outswapped (COMO) state. This is a transient state for newly created processes. Processes will never appear in the Local Event Flag Wait Outswapped (LEFO) or Hibernate Outswapped (HIBO) states. All performance counters associated with swapping are still present in the system. Various MONITOR displays will show swapping metrics.
5.6. Process Dumps
VSI OpenVMS x86-64 provides support for process dumps. The only method currently
available for analyzing process dumps is using the System Dump Analyzer (SDA). Most SDA
commands that display data about a process can be used to examine the state of the process.
For example, SHOW PROCESS, SHOW CRASH, SHOW
EXCEPTION, SHOW CALL, EXAMINE, and
MAP. Support for the Symbolic Debugger interface will be added in a
future release of VSI OpenVMS x86-64.
5.7. System Crash Dumps
VSI OpenVMS x86-64 system crash dumps are written using a minimal VMS environment called the Dump Kernel. All files used by the Dump Kernel are included in the Memory Disk described in Section 5.4, ''Memory Disks''.
Interleaved Dumps
Starting with the V9.2-1 release, VSI OpenVMS x86-64 supports two system crash dump types: Compressed Selective Dump and Interleaved Dump.
A Compressed Selective Dump is written using only the primary CPU running in the Dump Kernel, while an Interleaved Dump makes use of the available secondary CPUs. If the dump device is a Solid State Disk (SSD), the dump can be written much faster, thus allowing the system to be rebooted sooner.
The DUMPSTYLE parameter specifies which dump type is being used. The default value for the parameter is 9 (Compressed Selective Dump). However, if the system has more than one CPU and the SYS$SYSTEM:MODPARAMS.DAT file does not include a value for the DUMPSTYLE parameter, then, when AUTOGEN runs, it will set the value of DUMPSTYLE to 128 (Interleaved Dump).
In OpenVMS x86-64, the only other pertinent bits in the DUMPSTYLE parameter are bit 1 (full console output: registers, stack, and system image layout) and bit 5 (only dump system memory, key processes, and key global pages). Either or both of these bits can be set in addition to the two base values (9 and 128). Bit 2 (dump off system disk) is no longer required.
Dump Off System Disk
Crash dumps can be written to the system disk or to an alternate disk which is specifically designated for this purpose.
Dumps to the system disk are written to SYS$SYSDEVICE:[SYSn.SYSEXE]SYSDUMP.DMP which can be created or extended using the SYSGEN utility.
Dumps to an alternate device can be set up as described in the example below:
Create a dump file on the desired device using the SYSGEN utility. In this example, we will use the
DKA100:disk.$ RUN SYS$SYSTEM:SYSGEN SYSGEN> CREATE DKA100:[SYS0.SYSEXE]SYSDUMP.DMP /SIZE=200000 SYSGEN> EXIT
Enter the following command:
$ SET DUMP_OPTIONS/DEVICE=DKA100:
You have set
DKA100:as the dump device.
You can view the setting by using the SHOW DUMP_OPTIONS command. The
change is effective immediately, a reboot is not required.
Changes in SET DUMP_OPTIONS
A new qualifier, /MAXIMUM=CPUS=n, has been added
to the SET DUMP_OPTIONS command. This qualifier sets the number of CPUs
used by the Dump Kernel when writing an Interleaved Dump. It has no effect when a Compressed
Selective Dump is used. By default, the Dump Kernel will use all eligible secondary CPUs
that are available in the system, up to a maximum of 10 (including the primary CPU).
Eligible CPUs are those that were halted successfully when the system crashed and that did
not trigger the crash with a MACHINECHK or KRNLSTAKNV
Bugcheck.
The maximum number of CPUs that can be specified in the command is also 10.
System Dump Analysis
VSI strongly recommends that the version of SDA.EXE and
SDA$SHARE.EXE used to analyze a system dump be exactly the same
as the version of OpenVMS that was in use when the system crash occurred. However, it is
often possible to use SDA images from a different version of OpenVMS, provided there are no
major differences between the versions and the warning messages by SDA are ignored (either
%SDA-W-LINKTIMEMISM, or %SDA-W-SDALINKMISM, or both).
New SDA command qualifiers in OpenVMS x86-64
The SDA commands below now have new qualifiers that are specific to OpenVMS x86-64. Also, the format of several output messages has been changed to accommodate the architectural differences.
SHOW DUMP command
The qualifier /PERFORMANCE has been added to display the performance
data collected by the Dump Kernel while writing a dump.
Depending on the additional keywords used, the data displayed by the SHOW
DUMP/PERFORMANCE command can include system information
(/PERFORMANCE=SYSTEM), per-CPU information
(/PERFORMANCE=CPU), and per-process information
(/PERFORMANCE=PROCESS). If no additional keywords are specified with
the command, all information mentioned above will be displayed.
SHOW EXECUTIVE command
The qualifier /SDA_EXTENSION has been added to limit the list of
displayed executive images to those that are paired with SDA extensions. For example,
SWIS$DEBUG.EXE.
SHOW PAGE_TABLE and SHOW PROCESS /PAGE_TABLE commands
The qualifiers /BPTE, /PDE,
/PDPTE, /PML4E, and /PML5E have
been added to allow you to display a specific level of page table entries. The default
behavior is to display the base page table entry (BPTE).
The qualifier /MODE has been added to display the page tables for a
specific mode. The default behavior is to display the page tables for all modes. Valid
keywords are: KERNEL, EXECUTIVE, SUPERVISOR, and USER.
SHOW POOL command
The output for the qualifier /RING_BUFFER is now affected by the
additional qualifiers /ALL and /S2_NPP. The default
behavior for SHOW POOL /RING_BUFFER is to display all entries in the
Nonpaged Pool ring buffer. If /S2_NPP is specified, then the ring buffer
for S2 pool is displayed. If /ALL is specified, then the contents of both
ring buffers are displayed, interleaved by their timestamps.
The qualifier /S2_NPP, when used without
/RING_BUFFER, displays only the S2 pool. The default behavior is to
display all pool types.
The qualifier /USB displays only the nonpaged pool that is reserved
for use by USB devices. The default behavior is to display all pool types.
VALIDATE POOL command
The qualifier /S2_NPP allows validation of only the S2 pool. The
default behavior is to validate all pool types.
The qualifier /USB allows validation of only the nonpaged pool that
is reserved for use by USB devices. The default behavior is to validate all pool
types.
SDA commands and qualifiers not available in VSI OpenVMS x86-64
The following commands and qualifiers are not applicable to VSI OpenVMS x86-64 systems:
SHOW GALAXYSHOW GCTSHOW GLOCKSHOW GMDBSHOW SHM_CPPSHOW SHM_REGSHOW VHPTVALIDATE SHM_CPPEVALUATEandEXAMINE, qualifiers/FPSR,/IFS,/ISR,/PFS, and/PSRSHOW PAGE_TABLEandSHOW PROCESS /PAGE_TABLE, qualifiers/L1,/L2,/L3, and/SPTWSHOW POOL, qualifier/BAPVALIDATE POOL, qualifier/BAP
Other SDA command changes
The COPY command qualifiers /COMPRESS,
/DECOMPRESS, and /PARTIAL cannot be used with an
Interleaved Dump.
5.8. Viewing Call Stack in Pthread Debugger
Starting with VSI OpenVMS x86-64, the call stack can be viewed in the Pthread debugger.
To show the call stack, use the -o C option in the
THREADS command. For example, if the debugger runs in the PTHREAD SDA
extension, the command to show the call stack for thread id 3 is the following:
SDA> PTHREAD THREADS -o "C" 3
Process name: SECURITY_SERVER   Extended PID: 0000008F  Thread data:
"threads -o "C" 3"
-----------------------------------------------------------------------------
thread 3 (blocked, timed-cond) "Process_Proxy_Task", created by pthread
  Stack trace:
     0xffff83000c83b1a5 (pc 0xffff83000c83b1a5, sp 0x00000000024e3228)
     0xffff83000c87b53a (pc 0xffff83000c87b53a, sp 0x00000000024e3230)
     0xffff83000c858493 (pc 0xffff83000c858493, sp 0x00000000024e32e0)
     0xffff83000c852b04 (pc 0xffff83000c852b04, sp 0x00000000024e33f0)
     0xffff83000c8499a3 (pc 0xffff83000c8499a3, sp 0x00000000024e34d0)
     0xffff83000c844e9a (pc 0xffff83000c844e9a, sp 0x00000000024e3800)
     0x0000000080004ad8 (pc 0x0000000080004ad8, sp 0x00000000024e3900)
     0x0000000080007fe6 (pc 0x0000000080007fe6, sp 0x00000000024e3950)
     0xffff83000c8887df (pc 0xffff83000c8887df, sp 0x00000000024e3bd0)
     0xffff83000c83b0ea (pc 0xffff83000c83b0ea, sp 0x00000000024e3f00)
However, the output of the THREADS -o u Pthread debugger command that
shows an SDA SHOW CALL command cannot yet be used in SDA.
SDA> PTHREAD THREADS -o u 3
Process name: SECURITY_SERVER   Extended PID: 0000008F  Thread data:
"threads -o u 3"
------------------------------------------------------------------------
thread 3 (blocked, timed-cond) "Process_Proxy_Task", created by pthread
  Unwind seed for SDA SHOW CALL 00000000024e2e40
SDA> SHOW CALL 00000000024e2e40
00000000.024E2E40 is no valid handle for a call stack start of
00000000.00000000
5.9. Symbolic Debugger
VSI OpenVMS x86-64 includes an initial implementation of the Symbolic Debugger. While many features work, there are some that do not work. These are listed in the following sections. VSI will address these issues in a future release.
5.9.1. Supported Registers
All integer registers (see the table below) are currently supported, including the 32, 16, and 8-bit variants.
| 64-bit registers | %rax, %rbx, %rcx, %rdx,
%rsi, %rdi, %rsp, %rbp,
%r8, %r9, %r10, %r11,
%r12, %r13, %r14,
%r15 |
| 32-bit registers | %eax, %ebx, %ecx, %edx,
%esi, %edi, %esp, %ebp,
%r8d, %r9d, %r10d, %r11d,
%r12d, %r13d, %r14d,
%r15d |
| 16-bit registers | %ax, %bx, %cx, %dx,
%si, %di, %sp, %bp,
%r8w, %r9w, %r10w, %r11w,
%r12w, %r13w, %r14w,
%r15w |
| 8-bit registers | %al, %ah, %bl, %bh,
%cl, %ch, %dl, %dh,
%sil, %dil, %spl, %bpl,
%r8b, %r9b, %r10b, %r11b,
%r12b, %r13b, %r14b,
%r15b |
5.9.2. Language Support Limitations
There is some support for language-specific features when using the
EXAMINE and DEPOSIT commands. However, some of the
more complex data structures may not work correctly and can have unexpected and undefined
behaviour.
5.9.3. Source Line Correlation
In this release, the debugger fully supports source line correlation. Note, however, that the current version of the debugger requires you to use the latest versions of cross-compilers and/or native compilers.
Previous versions of the debugger do not support source line correlation because the previous versions of compilers generate listing line numbers in their debug data, not source lines. In most instances, this will lead to quite a large disparity between the line numbers available to the debugger and the actual line numbers of the source file. This can manifest itself in messages similar to the following:
break at DANCE\pause_actions\%LINE 138517
%DEBUG-I-NOTORIGSRC, original version of source file not found
       file used is SYS$SYSDEVICE:[DEBUG.BLUEY]DANCE.C;1
%DEBUG-W-UNAREASRC, unable to read source file SYS$SYSDEVICE:[DEBUG.BLUEY]DANCE.C;1
-RMS-E-EOF, end of file detected
To work around this issue, VSI recommends you use the debugger with accompanying
source listings to locate relevant lines reported by break points and the
EXAMINE command.
The lack of source line correlation support also means that the
STEP/LINE command does not always work correctly and can behave like
the STEP/INSTRUCTION command.
5.10. User-Written x86-Assembler Modules
User-written x86-Assembler code must follow the VSI OpenVMS calling standard (see the VSI OpenVMS Calling Standard manual) to provide exception handling information that is used by the exception handling mechanism to find a handler in one of the callers of the Assembler module. Without that information, exception handling can only call the last chance handler, which means the application will likely not be able to handle the exception.
See the following example of a user-written x86-Assembler module:
        .vms_module "MYTEST","X-01"
        .text
        .globl  MYTESTRTN
        .align 16
        .type   MYTESTRTN,@function

MYTESTRTN:
        .cfi_startproc
        pushq   %rbp                    // Establish a frame pointer
        .cfi_def_cfa_offset 16          // Record distance to saved PC
        .cfi_offset %rbp, -16
        movq    %rsp,%rbp
        .cfi_def_cfa_register %rbp

        // function body

        movq    %rbp,%rsp               // Restore stack and return
        popq    %rbp
        .cfi_def_cfa %rsp, 8            // Adjust distance to saved PC
        retq
        .size MYTESTRTN, .-MYTESTRTN
        .cfi_endproc
5.11. STABACKIT.COM Deprecated
SYS$UPDATE:STABACKIT.COM has been been deprecated in VSI OpenVMS x86-64. The STABACKIT functionality originally supported Standalone Backup for VAX systems and has long been replaced by SYS$SYSTEM:AXPVMS$PCSI_INSTALL_MIN.COM for OpenVMS Alpha and SYS$SYSTEM:I64VMS$PCSI_INSTALL_MIN.COM for OpenVMS Integrity systems. The referenced command procedures produce a minimal installation of OpenVMS on a target device which may be booted to allow a full backup of the system disk. STABACKIT would offer to run the appropriate procedure for you.
VSI OpenVMS x86-64 V9.2-3 currently does not support minimal installation of the operating system on a non-system disk. Backup options for virtual machines include the ability to perform backup from the host operating system and the ability to checkpoint or clone within the hypervisor. One may also boot from the installation media and choose the DCL subprocess menu entry to perform a backup of the system device.
6. Virtualization Notes
The notes in this section describe known issues and limitations when running VSI OpenVMS x86-64 V9.2-3 as a guest operating system in Oracle VM VirtualBox, KVM, and VMware virtual machines.
6.1. Changing Settings of a Running Virtual Machine May Cause a Hang
Even if the hypervisor appears to allow it, do not change the configuration of a VSI OpenVMS virtual machine while it is running, as this may cause it to hang. Before editing the settings, make sure to power off the virtual machine.
6.2. Time of Day May Not Be Maintained Correctly in Virtual Machine Environments
SET TIME command. If this
does not resolve the problem, enter the following command via the SYSTEM
account:$ @SYS$MANAGER:UTC$SET_TIME.COM
This issue will be addressed in a future release of VSI OpenVMS x86-64.
6.3. System Time on KVM Virtual Machines
On KVM/QEMU systems, when a virtual machine is powered on, the system time is set based
on the value of the CLOCK OFFSET parameter in the configuration file of that virtual
machine. The default value is 'utc'. Depending on the physical location of the
host system, this might lead to differences between system times of the VM and the
host.
To resolve this problem, use the virsh edit command to edit the XML
configuration file of your virtual machine and change the value of the CLOCK OFFSET
parameter to 'localtime', like so:
<clock offset='localtime'>
For more information, see the official documentation for your Linux distribution.
6.4. VirtualBox and Hyper-V Compatibility on Windows 10 and 11 Hosts
Host systems running Windows 10 and 11 that have previously run Microsoft Hyper-V hypervisor may fail the CPU feature checks. The issue is that certain CPU features are supported on the host system (the vmscheck.py script passes), but not on the guest system (the OpenVMS Boot Manager check fails). Primarily, the XSAVE instruction may not be present on the guest system.
This issue persists even if the Hyper-V feature has been removed. This happens because certain Hyper-V services interfere with VirtualBox.
The VirtualBox developers are aware of this issue and are working to improve the interoperability with Hyper-V.
To explicitly disable execution of the Hyper-V services that interfere with VirtualBox, perform the following steps on your Windows host system:
Run Command Prompt as administrator.
In Command Prompt, execute the following command to disable Hyper-V:
bcdedit /set hypervisorlaunchtype off
You will receive the following confirmation message:
The operation completed successfully.
Shut down your Windows host system by executing the following command:
shutdown -s -t 2
Power on and boot your Windows host system again.
The XSAVE instruction should now be available to your VirtualBox guest.
Windows 11 users must additionally disable the Core Isolation feature by performing the following steps:
Type Windows Security in the search box and access it.
Select Device security.
Select Core isolation details.
Set Memory Integrity to off.
Reboot your Windows host system to implement the above change.
Note that some users have also needed to disable Hyper-V functions to resolve this issue. This can be done as follows:
Press Win/R, enter
appwiz.cpl, and then press Enter to open Programs and Features.Select Turn Windows features on or off.
Clear the Hyper-V and Windows Hypervisor Platform check boxes.
Reboot your Windows host system to implement the above change.
Be aware that the steps described above may not be sufficient for some systems. Various resources can be found online to help users who continue to face issues. Users are also advised to contact their system administrator for help.
For more information about the CPU feature checks, see Section 2.4, ''CPU Compatibility Checks for Virtual Machines'' in the Section 2, ''Read These Before You Start'' section.
Tips on How To Determine If Hyper-V Services Impact Your VirtualBox VM
When you launch a VirtualBox guest, look for the icon in the guest window status bar.
A green turtle icon (
 ) indicates that the VirtualBox host is running as a Hyper-V guest
with diminished performance.
) indicates that the VirtualBox host is running as a Hyper-V guest
with diminished performance.An icon with a V symbol (
 ) indicates that you are running directly on a VirtualBox
host.
) indicates that you are running directly on a VirtualBox
host.
View the log file VBox.log.
To open the log file, in the VirtualBox VM Manager window, right-click on the virtual machine entry and select Show Log from the menu.
In the log file, search for "XSAVE".
If it shows "1 (1)", your VM guest has XSAVE.
If it shows "0 (1)", your VM guest has Hyper-V services impacting it.
In the log file, search for "HM". The following message also indicates that Hyper-V is active:
{timestamp} HM: HMR3Init: Attempting fall back to NEM: VT-x is not available
{timestamp} NEM: WHvCapabilityCodeHypervisorPresent is TRUE, so this might work.
6.5. VirtualBox: TCP Ports May Become Unusable After Guest Is Terminated
When running VSI OpenVMS x86-64 as a guest in a VirtualBox VM, TCP console ports may become unusable after a guest session has been terminated. After that, you cannot connect to your VirtualBox VM again. These ports remain in the LISTEN state even after you have disconnected the remote terminal session.
As a workaround, use the following commands to free your TCP ports and connect to your VirtualBox VM:
vboxmanage controlvm <vmname> changeuartmode1 disconnected
vboxmanage controlvm <vmname> changeuartmode1 tcpserver <port>
The VirtualBox developers have indicated that the fix will be provided in an upcoming VirtualBox maintenance release.
6.6. VMware Guest May Fail to Boot After Adding Second SATA Controller
It has been reported that a VMware guest does not boot when a second SATA controller is added to the configuration. In their case, removing the second SATA controller eliminates the issue.
VSI has not observed boot issues when adding a second SATA controller during testing. If you encounter this situation, please report your issue to VSI support.
6.7. Boot Manager Displays Incomplete List of Bootable Devices
If you are running a VMware virtual machine with multiple buses, you may run into a problem with the list of bootable devices displayed by the Boot Manager.
If, after entering the DEVICE command, your Boot Manager display
normally looks similar to the following:
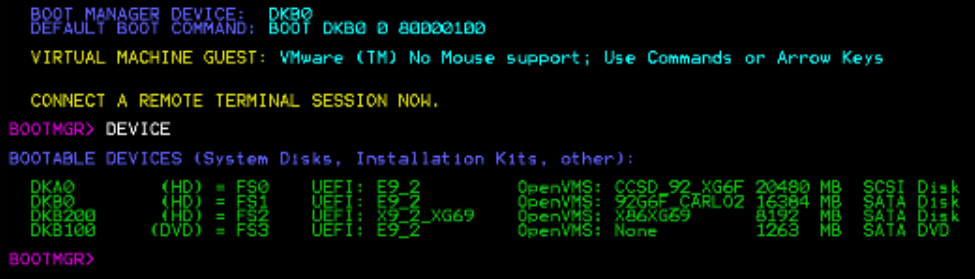
but occasionally, upon shutting down your VMware virtual machine, it appears as shown below:
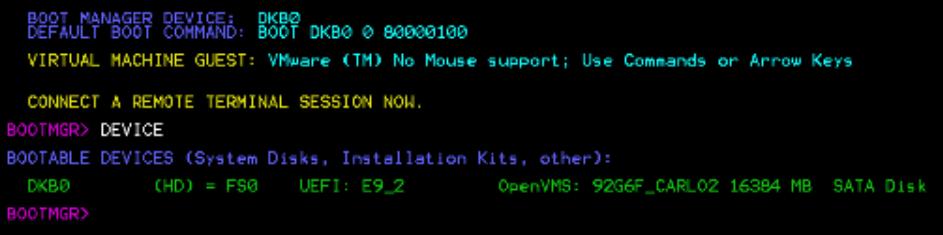
This means, not all of your devices and/or buses have been configured properly. Proceeding to boot your VMware virtual machine from this truncated configuration display may result in an incomplete configuration of your Virtual Machine’s buses and the disk devices on those buses.
This happens because, by default, VMware products do not allow the UEFI Shell to be launched by the platform firmware Boot Option and have the Quick Boot option enabled.
These problems can be resolved by setting the correct values for the
efi.shell.activeByDefault and efi.quickBoot.enabled parameters.
To do so, follow the procedure described in Section 6.8, ''Possible Issues with VMware Virtual Machines''.
6.8. Possible Issues with VMware Virtual Machines
Virtual machines created in VMware hypervisors (ESXi, Workstation Pro, Player, Fusion) may not operate as intended until you manually set the parameters listed in the table below.
Depending on your specific configuration, there may be cases where you may not need to set one or more of these parameters. VSI provides this information in case you experience the issues these parameters address.
| Key/Parameter Name | Value | Description |
|---|---|---|
| efi.serialconsole.enabled | TRUE |
This parameter enables serial console access to the UEFI Shell and VSI OpenVMS Boot Manager. By default, VMware disables serial port console access. Because of this, a remote serial connection only becomes active once OpenVMS is booted (SYSBOOT or beyond). |
| efi.shell.activeByDefault | TRUE | By default, VMware products do not allow the UEFI Shell to be launched by the platform firmware Boot Option. Setting this parameter to TRUE will allow for automatic launching of the Shell. |
| efi.quickBoot.enabled | FALSE | By default, the Quick Boot option is enabled. With Quick Boot enabled, the VM attempts to map only the essential devices to speed up the boot process. However, to make sure that all devices are visible to the VSI OpenVMS Boot Manager, Quick Boot must be disabled. Be aware that on large configurations with hundreds of disks, the boot process can take several minutes. |
Warning
Note that key names are case-sensitive.
To set these parameters for a VMware ESXi virtual machine, follow these steps:
Select your VM and click Edit.
Switch to the VM Options tab.
Expand the Advanced menu.
Under Configuraton Parameters, click Edit Configuration.
Click Add Parameter.
Enter the new key (parameter name) and set the value according to the table above.
Note
Quotes around the values are not required on ESXi.
Click OK.
Repeat steps 5 through 7 to add the other two parameters.
Click Save.
To set these parameters for a virtual machine running under any other VMware product, follow these steps:
Determine the location of your VM configuration file. To do so, perform the following steps:
Select your VM and bring up its Settings window.
Switch to the Options tab.
The directory specified in the Working Directory field is where you will find your VM configuration file (it will be named vm_name.vmx).
Make sure your VM is powered off.
Open the folder that contains your VM configuration file.
Open the file in an editor.
Enter the new keys (parameter names) and set their values according to the table above.
Note
Quotes around the values are required when manually editing VMX files.
Save and close the file.
6.9. One virtio-scsi Adapter Supported on KVM
On KVM/QEMU, only one virtio-scsi adapter can be configured and used on a VSI OpenVMS x86-64 V9.2-x system. Note that this functionality requires QEMU version 6.2 or later.
6.10. OpenVMS Clusters on Virtual Machines
VSI OpenVMS x86-64 supports VirtualBox, KVM, and VMware virtual machines in OpenVMS clusters. Virtual disks can be shared in a cluster via MSCP. Starting with the V9.2-3 release, VSI OpenVMS x86-64 supports direct (non-MSCP) shared disk access via the VMware VMDirectPath I/O feature (see Section 3.1.17, ''VMware VMDirectPath I/O Support for Data Disks''). Cluster common system disks are not supported.
VSI OpenVMS x86-64 was tested in a clustered configuration using V8.4-1H1, V8.4-2,
V8.4-2L1, V8.4-2L2, and V8.4-2L3. VSI has tested 2-node and 3-node clusters with MSCP-served
disks where appropriate, CLUSTER_CONFIG_LAN.COM, and many relevant SET,
SHOW, and SYSMAN commands. Other configurations will
be tested at a later date.
Adding a Node Using a Copy of an Existing System Disk
On VSI OpenVMS x86-64 systems, you must perform an additional step if you use a copy of an existing system disk as the initial system disk of a new node that is being added to a cluster.
In addition to tasks such as modifying the SCSNODE and SCSSYSTEMID parameters and changing the label on the new system disk, you must also change the label for the memory disk. Follow these steps:
Note
The following steps assume that the new system disk is DKA300:, and it is already mounted.
Invoke
LD$STARTUP.COMby using the following command:@SYS$STARTUP:LD$STARTUP.COM
Connect and mount the memory disk container file using the following commands:
$ LD CONNECT DKA300:[VMS$COMMON.SYS$LDR]SYS$MD.DSK LDM LDDEV
$ MOUNT/OVER=ID LDDEV
Note the label of the memory disk. It will be of the form "
MD20345927FD". Change the last letter to create a unique name. For example:$ SET VOLUME LDDEV /LABEL=MD20345927FE
Dismount the memory disk before completing the other setup tasks for the new system disk.
$ DISMOUNT LDDEV
$ LD DISCONNECT LDDEV
7. Layered and Open-Source Products Notes
Layered products and field-test versions of open-source products for VSI OpenVMS x86-64 can be downloaded individually from the VMS Software Service Platform.
Released versions of open-source products for VSI OpenVMS x86-64 can be downloaded from the official VMS Software website.
VSI recommends that you regularly check both resources for up-to-date versions of layered and open-source products for VSI OpenVMS x86-64.
For detailed information about the products, please refer to the associated product release notes bundled with the kits.