VSI OpenVMS Guide to System Security
- Operating System and Version:
- VSI OpenVMS x86-64 Version 9.2-1 or higher
VSI OpenVMS IA-64 Version 8.4-1H1 or higher
VSI OpenVMS Alpha Version 8.4-2L1 or higher
Preface
1. About VSI
VMS Software, Inc. (VSI) is an independent software company licensed by Hewlett Packard Enterprise to develop and support the OpenVMS operating system.
2. Intended Audience
This guide is designed for users and for administrators responsible for protecting operating systems from tampering, observation, or theft of services by unauthorized users. The term security administrator is used in this guide to refer to the person or persons responsible for system security.
3. Document Structure
This guide contains the following information:
Chapter 1, "Understanding System Security" discusses levels of security requirements and describes three sources of security failures.
Chapter 2, "OpenVMS Security Model" introduces the reference monitor concept of security design and provides an overview of the operating system's security features.
Chapter 3, "Using the System Responsibly" provides information for the general user about the login and logout processes and the responsible use of passwords.
Chapter 4, "Protecting Data" and Chapter 5, "Descriptions of Object Classes" describe object protection features in detail.
Chapter 6, "Managing the System and Its Data" describes the general tasks of a security administrator.
Chapter 7, "Managing System Access" describes methods of controlling system access.
Chapter 8, "Controlling Access to System Data and Resources" describes methods of controlling access to system data and resources.
Chapter 9, "Using Encryption" describes how to use encryption, which transforms a file into unrecognizable, unintelligible data, even if someone manages to gain access to it.
Chapter 10, "Security Auditing" describes security-auditing features.
Chapter 11, "System Security Breaches" describes how to recognize when a system is under attack and how to protect and defend your system.
Chapter 12, "Securing a Cluster" describes security-related actions specific to clustered systems, such as setting up common system files and synchronizing authorization data.
Chapter 13, "Security in a Network Environment" describes security considerations for systems using networking.
Chapter 14, "Using Protected Subsystems" describes how to set up and manage protected subsystems.
Appendix A, "Assigning Privileges" provides a summary of all the user privileges available on the operating system and describes who may need them.
Appendix B, "Protection for OpenVMS System Files" lists the protection codes and ownership that VSI provides for critical system files.
Appendix C, "Alarm Messages" provides examples of security alarm messages.
4. Related Documents
Access control list editor (ACL editor)
Accounting utility
Audit Analysis utility
Authorize utility
Backup utility
System Management (SYSMAN) utility
5. VSI Encourages Your Comments
You may send comments or suggestions regarding this manual or any VSI document by sending electronic mail to the following Internet address: <docinfo@vmssoftware.com>. Users who have VSI OpenVMS support contracts through VSI can contact <support@vmssoftware.com> for help with this product.
6. OpenVMS Documentation
The full VSI OpenVMS documentation set can be found on the VMS Software Documentation webpage at https://docs.vmssoftware.com.
7. Conventions
The following conventions are used in this manual:
| Convention | Meaning |
|---|---|
| Ctrl/x | A sequence such as Ctrl/x indicates that you must hold down the key labeled Ctrl while you press another key or a pointing device button. |
| PF1 x | A sequence such as PF1 x indicates that you must first press and release the key labeled PF1 and then press and release another key or a pointing device button. |
... |
A horizontal ellipsis in examples indicates one of the
following possibilities:
|
. . . | A vertical ellipsis indicates the omission of items from a code example or command format; the items are omitted because they are not important to the topic being discussed. |
| ( ) | In command format descriptions, parentheses indicate that you must enclose choices in parentheses if you specify more than one. |
| [ ] | In command format descriptions, brackets indicate optional choices. You can choose one or more items or no items. Do not type the brackets on the command line. However, you must include the brackets in the syntax for OpenVMS directory specifications and for a substring specification in an assignment statement. |
| | | In command format descriptions, vertical bars separate choices within brackets or braces. Within brackets, the choices are optional; within braces, at least one choice is required. Do not type the vertical bars on the command line. |
| { } | In command format descriptions, braces indicate required choices; you must choose at least one of the items listed. Do not type the braces on the command line. |
| bold type | Bold type represents the name of an argument, an attribute, or a reason. Bold type also represents the introduction of a new term. |
| italic type | Italic type indicates important information, complete
titles of manuals, or variables. Variables include information that
varies in system output (Internal error
number), in command lines
(/PRODUCER=name),
and in command parameters in text (where dd
represents the predefined code for the device type). |
| UPPERCASE TYPE | Uppercase type indicates the name of a routine, the name of a file, or the abbreviation for a system privilege. |
monospace type |
Monospace type indicates code examples, command examples, and interactive screen displays. In text, this type also identifies URLs, UNIX commands and pathnames, PC-based commands and folders, and certain elements of the C programming language. |
| Bold monospace type indicates a command or command qualifier. |
| - | A hyphen at the end of a command format description, command line, or code line indicates that the command or statement continues on the following line. |
| numbers | All numbers in text are assumed to be decimal unless otherwise noted. Nondecimal radixes – binary, octal, or hexadecimal – are explicitly indicated. |
Chapter 1. Understanding System Security
Effective operating system security measures help prevent unauthorized access and theft of computer time and any kind of sensitive information, such as marketing plans, formulas, or proprietary software. These measures can also protect equipment, software, and files from damage caused by tampering.
This chapter provides security administrators with an overview of security measures available with the operating system.
1.1. Types of Computer Security Problems
On any system there can be two types of users: authorized and unauthorized. Any person authorized to use the computer system has the right to access the system and its resources according to the authorization criteria set up by the site security administrator. Usage criteria may include the time of day, types of logins, use of different resources like printers and terminals, and so on. Unauthorized users have no right to use the system at all or only at a given time of day, or they have no right to use certain system resources.
User irresponsibility refers to situations where the user purposely or accidentally causes some noticeable damage. One example would be a user who is authorized to access certain files making a copy of a key file to sell.
There is little that an operating system can do to protect sites from this source of security failure. The problem frequently lies in application design deficiencies or inconsistent use of available controls by users and the security administrator. Sometimes the failure to enforce adequate environmental security unwittingly encourages this type of security problem.
Even the best security system will fail if implemented inconsistently. This, along with the failure to motivate your users to observe good security practices, will make your system vulnerable to security failures caused by user irresponsibility. Chapter 3, "Using the System Responsibly" discusses what users can do to help maintain system security.
User probing refers to situations where a user exploits insufficiently protected parts of the system. Some users consider gaining access to a forbidden system area as an intellectual challenge, playing a game of user versus system. Although intentions may be harmless, theft of services is a crime. Users with more serious intent may seek confidential information, attempt embezzlement, or even destroy data by probing. Always treat user probing seriously.
The system provides many security features to combat user probing. Based on security needs, the security administrator implements features on either a temporary or permanent basis. See Chapter 4, "Protecting Data" for information on protecting data and resources with protection codes and access control lists.
User penetration refers to situations where the user breaks through security controls to gain access to the system. While the system has security features that make penetration extremely difficult, it is impossible to make any operating system completely impenetrable.
A user who succeeds in penetrating a system is both skilled and malicious. Thus, penetration is the most serious and potentially dangerous type of security breach. With proper implementation of the OpenVMS security features, however, it is also the rarest security breach, requiring unusual skills and perseverance.
Social engineering refers to situations in which an intruder gains access to a system not by technical means, but by deceiving users, operators, or administrators. Potential intruders may impersonate authorized users over the phone. Potential intruders may request information that gains them access to the system, such as telephone numbers or passwords, or they may request an unwitting operator to perform some action that compromises the security of the system.
As the technical security features of operating systems have strengthened in recent years, social engineering has been a factor in a growing percentage of security incidents. Operator training, administrative procedures, and user awareness are all critical factors to ensure that access is not inadvertently granted to unauthorized persons.
Chapter 8, "Controlling Access to System Data and Resources" explains how to augment the protection of system files and resources.
Chapter 7, "Managing System Access" describes the intrusion detection system and how to set its parameters.
Chapter 10, "Security Auditing" explains how to monitor system activity and be notified by malicious activity.
Chapter 11, "System Security Breaches" suggests how to handle system intrusions.
Chapter 3, "Using the System Responsibly" and Chapter 6, "Managing the System and Its Data" list topics to include in your site training programs.
1.2. Levels of Security Requirements
Each site has unique security requirements. Some sites require only limited measures because they are able to tolerate some forms of unauthorized access with little adverse effect. At the other extreme are those sites that cannot tolerate even the slightest probing, such as strategic military defense centers. In between are many commercial sites, such as banks.
|
Question: Could you tolerate the following event? |
Level of Security Requirements Based on Toleration Responses | ||
|---|---|---|---|
|
Low |
Medium |
High | |
|
A user knowing the images being executed on your system |
Y |
Y |
N |
|
A user knowing the names of another user's files |
Y |
Y |
N |
|
A user accessing the file of another user in the group |
Y |
Y |
N |
|
An outsider knowing the name of the system just dialed into |
Y |
Y |
N |
|
A user copying files of other users |
Y |
N |
N |
|
A user reading another user's electronic mail |
Y |
N |
N |
|
A user writing data into another user's file |
Y |
N |
N |
|
A user deleting another user's file |
Y |
N |
N |
|
A user being able to read sections of a disk that might contain various old files |
Y |
N |
N |
|
A user consuming machine time and resources to perform unrelated or unauthorized work, possibly even playing games |
Y |
N |
N |
If you can tolerate most of the events listed, your security requirements are quite low. If your answers are mixed, your requirements are in the medium to high range. Generally, those sites that are most intolerant to the listed events have very high levels of security requirements.
When you review your site's security needs, do not confuse a weakness in site operations or recovery procedures as a security problem. Ensure that your operations policies are effective and consistent before evaluating your system security requirements.
1.3. Building a Secure System Environment
There are two sources of security problems outside the operating system domain: employee carelessness and facility vulnerability. If you have a careless or malicious employee or your facility is insecure, none of the security measures discussed in this guide will protect you from security breaches.
Most system penetration occurs through these environmental weaknesses. It is much easier to physically remove a small reel of tape than it is to break access protection codes or change file protection.
VSI strongly encourages you to stress environmental considerations as well as operating system protection when reviewing site security.
This book discusses operating system security measures. When deciding which of these measures to implement, it is important for you to assess site security needs realistically. While instituting adequate security for your site is essential, instituting more security than actually necessary is costly and time-consuming.
The most secure system is also the most difficult to use.
Increasing security can increase costs in terms of slower access to data, slower machine operations, and slower system performance.
More security measures require more personnel time.
The operating system provides the basic mechanisms to control access to the system and its data. It also provides monitoring tools to ensure that access is restricted to authorized users. However, many computer crimes are committed by authorized users with no violation of the operating system's security controls.
Therefore, the security of your operation depends on how you apply these security features and how you control your employees and your site. By first building appropriate supervisory controls into your application and designing your application with the goal of minimizing opportunities for abuse, you can then implement operating system and site security features and produce a less vulnerable environment. For an example of one organization's security plan, see Chapter 6, "Managing the System and Its Data".
1.4. Encryption
The OpenVMS operating system provides several data protection schemes. For example, by using UIC-based protection you can protect data by controlling access to files. You can use ACLs to refine access control to specific groups or individual users. For a protection scheme with yet greater security for your data, you can encrypt the files. Encrypting a file transforms it into unrecognizable, unintelligible data, even if someone manages to gain access to it.
1.4.1. Encryption Process
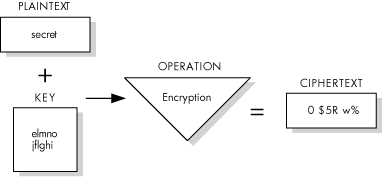
The process of encryption takes readable data, called plaintext, and uses a mathematical algorithm to transform the plaintext into an unreadable, unintelligible form, called ciphertext.
To encrypt the plaintext data, the encryption operation requires a key. The key is a variable that controls the encryption operation. The same plaintext, encrypted with different keys, results in different ciphertext. In addition, repeated encryption of the same plaintext with the same key also results in different ciphertext each time.
OpenVMS Version 8.3 integrates the former Encryption for OpenVMS software product into the operating system. This eliminates the need for a separate product installation and product license. In addition, OpenVMS Version 8.3 and later supports the Advanced Encryption Standard (AES) algorithm.
1.4.1.1. AES Encryption Algorithm
The AES algorithm allows OpenVMS users, system managers, security managers, or programmers to secure their files, save sets, or application data with AES encryption. DES and AES are similar encryption algorithms. They are both block cipher algorithms. However, encryption using AES algorithms is found to be more secure than DES encryption due to the number of rounds the plain text undergoes during its transformation to ciphered text. The number of rounds depend on the key size. For example, a key size of 128 bits invokes 10 rounds of transformation. Similarly, key sizes of 192 bits and 256 bits invoke 12 and 14 rounds, respectively. For more information on AES encryption algorithm, see Chapter 9, "Using Encryption"
1.4.1.2. DES Encryption Algorithm
The algorithm used by OpenVMS is a software implementation of the Data Encryption Standard (DES) defined by the National Bureau of Standards (NBS). The NBS document FIPS-PUB-46 describes the operation of the DES algorithm in detail.
Because the DES algorithm is public knowledge, the security of your ciphertext files depends on the keys you define.
1.4.1.3. Keys
OpenVMS encryption uses two keys:
Key that you provide.
Key that the software randomly generates, called the data key.
The key you provide encrypts the data key, which is stored in the first block of the ciphertext file. The process uses the encrypted data key to encrypt the file. You have the option to encrypt either the data key or the file.
Table 1.2, ''Components of the Encryption Operation'' shows the components of the encryption process.
| Input | Algorithm | Output |
|---|---|---|
| User-supplied data key | Key encryption | Encrypted key |
| Data (plaintext) and the encrypted data key | Data encryption | Encrypted file |
Figure 1.1, ''Encrypting a File'' illustrates the data encryption operation. In this example, the input file contains the text "secret" and the key has been defined as "elmno jflghi." The output file is unreadable text.
1.4.1.4. Decryption
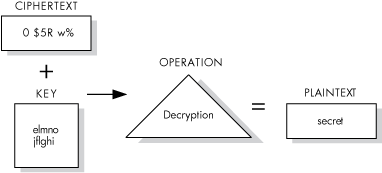
To gain access to the data in an encrypted file, reverse the encryption process by performing the decryption process. Decryption uses a mathematical encryption algorithm to change ciphertext into the original plaintext.
Before decrypting a file, the software checks the validity of the key you provide. This validation is a checksum operation on the encrypted data stored in the first block of the ciphertext file.
When you specify the AES/DES algorithm to decrypt a file, use the key that is identical to the one used in the original encryption process.
Note
Only the correct key can decrypt your file. If you lose or forget the key, you cannot gain access to the data in any understandable, useful form.
Figure 1.2, ''Decrypting a File'' shows the data decryption operation. In this example, the input file holds unreadable text. The key, "elmno jflghi," is the same key that was used to encrypt this file. The output file contains the readable text "secret."
1.4.2. Authentication Process
OpenVMS detects any modification made to both plaintext and ciphertext files. This process is called authentication. Authentication checks for and reports on any changes to:
File data
File location
Authentication key
Security settings
The software calculates two Message Authentication Codes (MACs): one based on file contents and one based on security settings. The software then associates them with one or more files and stores this information. When you subsequently check file integrity, the software recalculates the MACs and compares them against the stored codes.
Note
Currently, MAC authentication is supported only with DES algorithm.
1.4.3. Encryption Interfaces
To define and delete keys, and to encrypt and decrypt files, use the following Encryption interfaces:
DCL commands – for interactive encryption functions. These commands encrypt files and backup save sets. For more information on using DCL commands, see Chapter 9, "Using Encryption".
Callable routines – for application programming. These routines encrypt files and small blocks. For more information, see the VSI OpenVMS Utility Routines Manual.
1.4.4. Compatibility
Encrypted files are fully compatible between OpenVMS systems. You can copy them from system to system and do all remote file operations that OpenVMS systems support for other kinds of files. In addition, you can encrypt files on one system and decrypt them on another system that also runs the Encryption software. Inter-system encryption operations with non-OpenVMS platforms are not supported.
1.5. Common Data Security Architecture (CDSA)
Common Data Security Architecture (CDSA) is deprecated. VSI provides CDSA as part of VSI OpenVMS Versions 8.4-2, 8.4-2L1, and 8.4-2L2 to allow old CDSA signed applications to be run on the system. CDSA will be removed in future VSI OpenVMS releases.
1.6. Secure Sockets Layer (SSL)
Secure Sockets Layer (SSL) is the open standard security protocol for the secure transfer of sensitive information over the Internet. SSL provides three things: privacy through encryption, server authentication, and message integrity. Client authentication is available as an optional function.
Starting with Version 7.3-1, SSL is provided as part of the OpenVMS Alpha operating system. SSL is compatible with OpenVMS Alpha Version 7.2-2 and higher.
Protecting communication links to OpenVMS applications over a TCP/IP connection can be accomplished through the use of SSL. The OpenSSL APIs establish private, authenticated and reliable communications links between applications.
The SSL protocol works cooperatively on top of several other protocols. SSL works at the application level. The underlying mechanism is TCP/IP (Transmission Control Protocol/Internet Protocol), which governs the transport and routing of data over the Internet. Application protocols, such as HTTP (HyperText Transport Protocol), LDAP (Lightweight Directory Access Protocol), and IMAP (Internet Messaging Access Protocol), run on top of TCP/IP. They use TCP/IP to support typical application tasks, such as displaying web pages or running email servers.
SSL addresses three fundamental security concerns about communication over the Internet and other TCP/IP networks:
SSL server authentication—Allows a user to confirm a server's identity. SSL-enabled client software can use standard techniques of public-key cryptography to check whether a server's certificate and public ID are valid and have been issued by a Certificate Authority (CA) listed in the client's list of trusted CAs. Server authentication is used, for example, when a PC user is sending a credit card number to make a purchase on the web and wants to check the receiving server's identity.
SSL client authentication—Allows a server to confirm a user's identity. Using the same techniques as those used for server authentication, SSL-enabled server software can check whether a client's certificate and public ID are valid and have been issued by a Certificate Authority (CA) listed in the server's list of trusted CAs. Client authentication is used, for example, when a bank is sending confidential financial information to a customer and wants to check the recipient's identity.
An encrypted SSL connection—Requires all information sent between a client and a server to be encrypted by the sending software and decrypted by the receiving software, thereby providing a high degree of confidentiality. Confidentiality is important for both parties to any private transaction. In addition, all data sent over an encrypted SSL connection is protected with a mechanism that automatically detects whether data has been altered in transit.
1.7. Kerberos
Kerberos is a network authentication protocol developed by the Massachusetts Institute of Technology (MIT). The Kerberos protocol uses secret-key cryptography to provide strong authentication for client/server applications. Using Kerberos, a client can prove its identity to a server (and vice versa) across an insecure network connection. After a client and server have used Kerberos to prove their identity, they can also encrypt all of their communications to assure privacy and data integrity. For more information about MIT Kerberos, visit https://web.mit.edu/kerberos/.
Starting with OpenVMS Alpha Version 7.3-1 and OpenVMS IA-64 Version 8.2, Kerberos is provided as part of the OpenVMS operating system. Kerberos is compatible with OpenVMS Alpha Version 7.2-2 and higher.
Chapter 2. OpenVMS Security Model
This chapter presents the concepts that guided the design and implementation of the security features and mechanisms incorporated into the operating system. The intent is to provide a framework for thinking about your total system security picture. Subsequent chapters present details about the security features and their use.
2.1. Structure of a Secure Operating System
In the late 1960s, a great deal of research and development was dedicated to the problem of achieving security in multiuser computer systems. Much of the development work involved attempts to find all the things that could go wrong with a system's security and then to correct those flaws one by one. It became apparent to the researchers that this process was ineffective; effective system security could result only from a basic model of the structure of a secure computer system. The reference monitor concept was proposed as such a model and gained wide acceptance.
2.1.1. Reference Monitor Concept
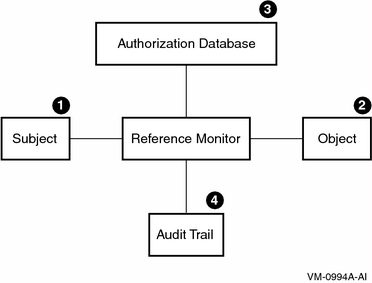
According to the reference monitor concept, a computer system can be depicted in terms of subjects, objects, an authorization database, an audit trail, and a reference monitor, as shown in Figure 2.1, ''Reference Monitor''. The reference monitor is the control center that authenticates subjects and implements and enforces the security policy for every access to an object by a subject.
|
Item |
Element |
Description |
|---|---|---|
|
1 |
Subjects |
Active entities, such as user processes, that gain access to information on behalf of people. |
|
2 |
Objects |
Passive repositories of information to be protected, such as files. |
|
3 |
Authorization database |
Repository for the security attributes of subjects and objects. From these attributes, the reference monitor determines what kind of access (if any) is authorized. |
|
4 |
Audit trail |
Record of all security-relevant events, such as access attempts, successful or not. |
2.1.2. How the Reference Monitor Enforces Security Rules
Mediate every attempt by a subject to gain access to an object
Provide a tamper-proof database and audit trail that are thoroughly protected from unauthorized observation and modification
Remain a small, simple, and well-structured piece of software so that it is effective in enforcing security requirements
These are the requirements proposed for systems that are secure even against penetration. In such systems, the reference monitor is implemented by a security-related subset, or security kernel, of the operating system.
2.2. Implementation of the Reference Monitor
While the OpenVMS operating system does not implement the reference monitor as a security-related subset, or security kernel, its interface to users and system managers does mirror the basic structure dictated by the reference monitor concept. Experience shows that incorporating such a structure is the best way to build a system resistant to probing and to most attempts at penetration.
The following sections describe the OpenVMS operating system's implementation of the reference monitor model.
2.2.1. Subjects
- Must pass security controls
- During process creation
- During information access
- Require identification
- User names
- Passwords
- User identification codes
- Rights identifiers
When a user logs in to use the operating system interactively or when a batch or network job starts, the operating system creates a process that includes the identity of the user. That process gains access to information as the agent for the user, as described in Chapter 4, "Protecting Data".
Processes are vulnerable to security breaches while they are being created and while they are accessing information. The system manages process access to information by using its authorization data and internal mechanisms, such as hardware controls. Because process creation has many areas of security vulnerability, many operating security features concentrate on the area of process (or subject) creation.
When a user attempts to log in to a system, the user provides a user name (a name that will be given to the resulting process) and a password. The password serves as an authenticator that should be known only to the user and to the operating system.
Because a short or obvious password is likely to fail this requirement, the system incorporates many password protection mechanisms that can be invoked by the user or required by the security administrator (see Chapter 7, "Managing System Access"). The operating system is also capable of limiting the number of attempts that an intruder can make to guess a password.
The file of users' passwords is part of the security database that must be protected from unauthorized observation and modification. The system meets this requirement by storing the passwords in a file protected from general access, the system user authorization file (SYSUAF.DAT). The system takes the additional precaution of storing passwords in an encoded form that is hard to use if stolen.
Once the operating system creates a process for a user, it assigns a user identification code or UIC from the user authorization record to that process. The UIC corresponds to the name of the user who created the process (as authenticated by the user's password). In addition, the UIC indicates the user's membership in a group that can correspond to the user's department, project, or function. The system can also attach additional information to the process regarding the creation of the process and the affiliation of the process owner with other groups. This additional information plays a part in the application of the authorization database. (Both Chapter 4, "Protecting Data" and Chapter 8, "Controlling Access to System Data and Resources" discuss UICs.)
2.2.2. Objects
|
Class Name |
Definition |
|---|---|
|
Capability |
A resource to which the system controls access; currently, the only defined capability is the vector processor. |
|
Common event flag cluster |
A set of 32 event flags that enable cooperating processes to post event notifications to each other. |
|
Device |
A class of peripherals connected to a processor that are capable of receiving, storing, or transmitting data. |
|
File |
Files-11 On-Disk Structure Level 2 (ODS-2) or Level 5 (ODS-5) files and directories. |
|
Group global section |
A shareable memory section potentially available to all processes in the same group. |
|
Logical name table |
A shareable table of logical names and their equivalence names for the system or a particular group. |
|
Queue |
A set of jobs to be processed in a batch, terminal, server, or print job queue. |
|
Resource domain |
A namespace controlling access to the lock manager's resources. |
|
Security class |
A data structure containing the elements and management routines for all members of the security class. |
|
System global section |
A shareable memory section potentially available to all processes in the system. |
|
Volume |
A mass storage medium, such as a disk or tape, that is in ODS-2 or ODS-5 format. Volumes contain files and may be mounted on devices. |
2.2.3. Authorization Database
|
File |
Contents |
Data Used to Interpret |
|---|---|---|
|
SYSUAF.DAT |
User names |
Logins |
|
Passwords |
Logins | |
|
UICs |
Access control checks | |
|
NETPROXY.DAT |
User names |
Logins |
|
NET$PROXY.DAT |
User names |
Logins |
|
RIGHTSLIST.DAT |
Rights identifiers |
Access control checks |
|
VMS$OBJECTS.DAT |
UICs |
Access control checks |
|
Protection codes |
Access control checks | |
|
Access control lists |
Access control checks | |
|
VMS$AUDIT_SERVER.DAT |
Auditable events |
Reporting of events |
As Section 2.2.2, ''Objects'' suggests, different objects in the OpenVMS system can be shared with differing levels of flexibility. Protected objects are subject to a protection code. This code specifies whether access is allowed or denied to processes run on behalf of system users, the user who is owner of the object, other members of the UIC group of the owner, and all other users.
In addition to the protection code, objects can be shared under control of access control lists (ACLs). ACLs provide a finer granularity of access control than UIC-based protection, especially for user groups or subsets of groups. ACLs list individual users or groups of users who are to be allowed or denied particular types of access to the object. ACLs specify sharing on the basis of UIC identification as well as other groupings or identifiers that can be associated with a process. For example, it is possible to specify that a file should never be read by a process connected to a terminal on a dialup line. Section 2.2.6, ''Authorization Database Represented as an Access Matrix'' uses an access matrix to explain the concept of an ACL. Section 4.4, ''Controlling Access with ACLs'' gives a general discussion of ACLs and identifiers, and Chapter 8, "Controlling Access to System Data and Resources" explains how you, as security administrators, can create identifiers and construct ACLs for system resources.
2.2.4. Audit Trail
All security-relevant events can be recorded in an audit log file, sent to an operator terminal, or both. A terminal can be designated as a security operator terminal where all auditable events can be displayed. An audit log file provides a permanent record of security events. Many times a security administrator can find a pattern of activity, called an audit trail, by studying the log file.
|
Destination |
Events Audited by Default |
|---|---|
|
Log file or terminal display |
Authorization database changes |
|
Intrusion attempts | |
|
Login failures | |
|
Use of DCL command | |
|
Events triggered by Audit or Alarm ACEs |
The audit log allows users and security administrators to record many events. Because it is time-consuming to examine every event, it is most efficient to audit events that will contribute the most information to your security picture. See Chapter 10, "Security Auditing" for a description of security auditing.
2.2.5. Reference Monitor
In the OpenVMS operating system, the executive performs the role of the reference monitor. All system programs that run in kernel and executive mode help implement the reference monitor, as do the command line interpreter and certain user-mode images that run with privilege. While the volume of code comprising the executive is large, VSI attempts to ensure that none of the code can be used to bypass system security.
Some privileges can grant a user the authority to modify or subvert the reference monitor. For example, a process with the CMKRNL privilege can execute code of its own within the system kernel, gaining access to the reference monitor's internal data and the internal representation of protected objects. Clearly, granting such critical privileges should be severely limited.
Similarly, give privileges such as SYSPRV and SECURITY only to users whose processes help maintain the reference monitor and authorization database.
2.2.6. Authorization Database Represented as an Access Matrix
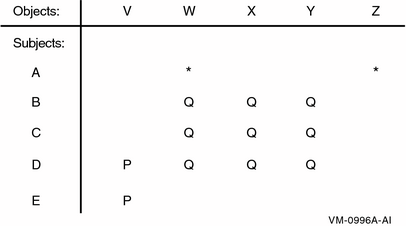
The reference monitor model specifies an authorization database, which describes all access authorizations in the system for all subjects and all objects. This database is often represented as an access matrix, which lists subjects on one axis and objects on the other (see Figure 2.2, ''Authorization Access Matrix''). Each crosspoint in the matrix thus represents the access that one subject has to one object.
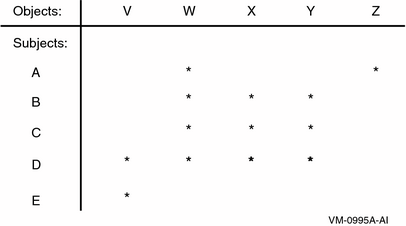
In this access matrix, an asterisk (*) denotes that the subject has access to that object. (Different types of access, such as read and write, are omitted from this example for simplicity.) Thus, subjects B, C, and D all have access to objects W, X, and Y. In addition, subject A has access to objects W and Z, subject D to object V, and subject E to object V.
Breaking up the access matrix by rows yields a capability-based model, in which each subject carries a list of the objects that it can access. Thus, a capability representation of this access matrix would appear as follows:
A: W, Z B: W, X, Y C: W, X, Y D: V, W, X, Y E: V
It is also possible to break up the access matrix by columns, listing for each object the subjects that have access to it. This results in an authority-based model, implemented in the OpenVMS system by ACLs (see Chapter 4, "Protecting Data"). The ACL representation appears as follows:
V: D, E W: A, B, C, D X: B, C, D Y: B, C, D Z: A
The ACL and identifier controls used by the operating system combine the properties of both the capability- and authority-based systems. In OpenVMS systems, both subjects and objects carry identifiers. Subjects can access objects if they have matching identifiers and if the objects' access statements grant the requested access.
The result of combining properties of the capability- and authority-based systems is an extremely powerful and flexible system capable of representing complex access matrices in a compact and convenient manner. Consider what happens to the previous example of an access matrix when some of the cross-points have labels, as shown in Figure 2.3, ''Authorization Access Matrix with Labeled Cross-Points''.
Some labeled cross-points can be grouped and treated as a single entity. Thus, the points that are labeled Q in Figure 2.3, ''Authorization Access Matrix with Labeled Cross-Points'' represent the access that subjects B, C, and D have to objects W, X, and Y. All the Q points can be considered as a single area of interest. The system provides the concept of identifiers to take practical advantage of this grouping of areas of interest.
You can define identifiers to represent the two groups of access, P and Q, in Figure 2.3, ''Authorization Access Matrix with Labeled Cross-Points''. Note that two of the cross-points in the matrix remain unlabeled. Identifiers can also represent individual subjects and thus allow the traditional ACL facility.
The rights list (RIGHTSLIST.DAT) represents the rows of the access matrix and thus corresponds to the capability-based model. For the matrix in Figure 2.3, ''Authorization Access Matrix with Labeled Cross-Points'', you would need the following rights list:
B: Q C: Q D: P, Q E: P
ACLs for the protected objects represent the columns of the access matrix. For this example, you would need the following ACLs:
V: P W: A, Q X: Q Y: Q Z: A
Note that the system structures required to represent the access matrix are simpler than either the traditional capability- or authority-based model and require fewer terms in total. In the example, the difference is slight. However, complexity of the access matrix increases with the square of its size.
2.3. Summary: System Security Design
How are users associated with subjects? What is the reliability of the authentication mechanism?
What objects contain sensitive information in this system or application? Is access to those objects controlled?
Does the authorization database reflect the site's security policy? Who is authorized to gain access to sensitive objects? Are adequate restrictions in place?
Is the audit trail recording enough or too much information? Who will monitor it? How often will it be examined?
What programs are functioning as part of the reference monitor? Which users can modify the security policy and the authorization database? Is this the desired configuration?
These considerations, as well as the underlying reference monitor design, apply equally to a timesharing system, a widespread network, or a single application on a system that grants access to records in a file or database. The operating system provides general mechanisms that users and security administrators must apply to achieve system security. See Chapter 6, "Managing the System and Its Data" for more information on designing and implementing a security policy.
Chapter 3. Using the System Responsibly
This chapter provides basic information on how to use the system securely. If you apply this knowledge consistently and accurately, while observing your site's specific security policies, you can make the difference between a secure system and one that is vulnerable to unauthorized users.
3.1. Choosing a Password for Your Account
Include both numbers and letters in the password. Although a 6-character password that contains only letters is secure, a 6-character password with both letters and numbers is much more secure.
Choose passwords that contain 6 to 10 characters. Adequate length makes passwords more secure. You can choose a password as long as 32 characters for VSI versions of OpenVMS V8.4, and 64 characters for OpenVMS V9 and above.
Do not select passwords from a dictionary or from your native language.
Avoid choosing words readily associated with your computer site or yourself, such as the name of a product or the model of your car.
Choose new passwords each time. Do not reuse old ones.
Your security administrator may set up additional restrictions, for example, not allowing passwords with fewer than 10 characters.
|
Secure Passwords |
Insecure Passwords |
|---|---|
|
Nonsense syllables: aladaskgam eojfuvcue joxtyois |
Words with a strong personal association: your name, the name of a loved one, the name of your pet, the name of your town, the name of your automobile |
|
A mixed string: 492_weid $924spa zu_$rags |
A work-related term: your company name, a special project, your work group name |
3.1.1. Obtaining Your Initial Password
Typically, when you learn that an account has been created for you on the system, you are told whether a user password is required. If user passwords are in effect, you are told to use a specific password for your first login. This password has been placed in the system user authorization file (SYSUAF.DAT) with other information about how your account can be used.
It is inadvisable to have passwords that can be easily guessed. Ask the person creating an account for you to specify a password that is difficult to guess. If you have no control over the password you are given, you might be given a password that is the same as your first name. If so, change it immediately after you log in.
Log in to your account soon after it is created to change your password. If there is a time lapse from the moment when your account is created until your first login, other users might log in to your account successfully, gaining a chance to damage the system. Similarly, if you neglect to change the password or are unable to do so, the system remains vulnerable. Possible damage depends largely on what other security measures are in effect.
At the time your account is created, you should also be told a minimum length for your password and whether you can choose your new password or let the system generate the password for you.
3.1.2. Observing System Restrictions on Passwords
It automatically compares new passwords to a system dictionary. This helps to ensure that a password is not a native language word.
It maintains a history list of your old passwords and compares each new password to this list to be sure that you do not reuse an old password.
It enforces a minimum password length, which the system manager specifies in your UAF record.
3.2. Knowing What Type of Password to Use
There are several types of passwords recognized by the OpenVMS operating system. In general, you need to provide a user password when you log in. In some cases, you might also need to provide a system password to gain access to a particular terminal before logging in with your user password. If you are using a system with high security requirements, you might need to provide a primary password and a secondary password.
|
Password |
Description |
|---|---|
|
User password |
Required for most accounts. After you enter your user name, you are prompted for a password. If the account requires both primary and secondary passwords, you must enter two passwords. |
|
System password |
Controls access to particular terminals and is required at the discretion of the security administrator. System passwords are usually necessary to control access to terminals that might be targets for unauthorized use, such as dialup and public terminal lines. |
|
Primary password |
The first of two user passwords to be entered for an account requiring both primary and secondary passwords. |
|
Secondary password |
The second of two user passwords to be entered for an account requiring both primary and secondary passwords. The secondary password provides an additional level of security on user accounts. Typically, the general user does not know the secondary password; a supervisor or other key person must be present to supply it. For certain applications, the supervisor may also decide to remain present while the account is in use. Thus, secondary passwords facilitate controlled logins and the actions taken after a login. Secondary passwords can be time-consuming and inconvenient. They are justified only at sites with maximum security requirements. An example of an account that justifies dual passwords would be one that bypasses normal access controls to permit emergency repair to a database. |
3.2.1. Entering a System Password
Your security administrator will tell you if you must specify a system password to log in to one or more of the terminals designated for your use. Ask your security administrator for the current system password, how often it changes, and how to obtain the new system password when it does change.
- Press the Return key until the terminal responds with the recognition character, which is normally a bell:
Return <bell> - Enter the system password, and press Return:
ReturnAs this example shows, there is no prompt and no echo of the characters you type. If you fail to specify the correct system password, the system does not notify you. If you do not receive a response from the system, assume that you have entered the wrong password, and try again.
When you enter the correct system password, you receive the system announcement message, if there is one, followed by the "Username:" prompt.
For example:MAPLE - A member of the Forest Cluster Unauthorized Access Is Prohibited Username:
3.2.2. Entering a Secondary Password
Your security administrator decides whether to require the use of secondary passwords for your account at the time your account is created. When your account requires primary and secondary passwords, you need two passwords to log in. Minimum password length, which the security administrator specifies in your UAF record, applies to both passwords.
     WILLOW - A member of the Forest Cluster
         Welcome to OpenVMS on node WILLOW
Username: RWOODS
Password:
Return
Password:
Return

Last interactive login on Friday, 12-DEC-2008 10:22
$
As with a single password login, the system allots a limited amount of time for the entire login. If you do not enter a secondary password in time, the login period expires.
3.3. Password Requirements for Different Types of Accounts
Accounts secured with passwords that you or the security administrator change periodically. This account type is the most common.
Accounts secured with authentication cards that have your password programmed onto the device. Many third-party products support this type of authentication mechanism.
Accounts that always require passwords but prohibit you from changing the password. By locking the password (setting the LOCKPWD flag in the UAF record), the security administrator controls all changes made to the password.
Restricted accounts limit your use of the system and sometimes require a password.
Open accounts require no password; the password is null. When you log in to an open account, the system does not prompt you for a password, and you do not need to enter one. You can begin entering commands immediately. Because open accounts allow anyone to gain access to the system, they are used only at sites with minimal security requirements and should normally be set up as restricted accounts.
3.4. Types of Logins and Login Classes
Logins can be either interactive or noninteractive. When you log in interactively, you enter an OpenVMS user name and a password. In noninteractive logins, the system performs the identification and authentication for you; you are not prompted for a user name and password. (The term interactive, as used here, differs from an interactive mode process defined by the DCL lexical function F$MODE(). For a description of the F$MODE function, see the VSI OpenVMS DCL Dictionary: A–M.)
In addition to interactive and noninteractive logins, the OpenVMS operating system recognizes different classes of logins. How you log in to the system determines the login class to which you belong. Based on your login class, as well as the time of day or day of the week, the system manager controls your access to the system.
3.4.1. Logging In Interactively: Local, Dialup, and Remote Logins
Local
You log in from a terminal connected directly to the central processor or from a terminal server that communicates directly with the central processor.
Dialup
You log in to a terminal that uses a modem and a telephone line to make a connection to the computer system. Depending on the terminal that your system uses, you might need to execute a few additional steps. Your site security administrator can give you the necessary details.
Remote
You log in to a node over the network by entering the DCL command
SET HOST. For example, to access the remote nodeHUBBUB, you enter the following command:$ SET HOST HUBBUB
If you have access to an account on node
HUBBUB, you can log in to that account from your local node. You have access to the facilities on nodeHUBBUB, but you remain physically connected to your local node.
3.4.2. Logging In Using External Authentication
If you are an externally authenticated user, you log in by entering your LAN Manager user ID and password at the OpenVMS login prompts. Your LAN Manager user ID may or may not be the same as your OpenVMS user name.
See Section 7.4, ''Enabling External Authentication'' for more information on logging in with external authentication enabled on your system.
3.4.3. Reading Informational Messages
WILLOW - A member of the Forest ClusterUnlawful Access is Prohibited Username: RWOODS Password: You have the following disconnected process:
Terminal Process name Image name VTA52: RWOODS (none) Connect to above listed process [YES]: NO Welcome to OpenVMS on node WILLOW
Last interactive login on Wednesday, 3-DEC-2008 10:20
Last non-interactive login on Monday, 3-DEC-2008 17:39
2 failures since last successful login
You have 1 new mail message.
$
| The announcement message identifies the node (and, if relevant, the cluster). It may also warn unauthorized users that unlawful access is prohibited. The system manager or security administrator can control both the appearance and the content of this message. |
| A disconnected job message informs you that your process was disconnected at some time after your last successful login but is still available. You have the option of reconnecting to the old process and returning your process to its state before you were disconnected. The system displays the disconnected job message only when the
following conditions exist:
In general, the security administrator should allow you to reconnect to a disconnected job because this ability poses no special problems for system security. However, the security administrator can disable this function by changing the setup on terminals and by disabling virtual terminals on the system. |
| A welcome message indicates the version number of the OpenVMS operating system that is running and the name of the node on which you are logged in. The system manager can choose a different message or can suppress the message entirely. |
| The last successful interactive login message provides the time of the last completed login for a local, dialup, or remote login. (The system does not count logins from a subprocess whose parent was one of these types.) |
| The last successful noninteractive login message provides the time the last noninteractive (batch or network) login finished. |
| The number of login failures message indicates the number of failed attempts at login. (An incorrect password is the only source of login failure that is counted.) To attract your attention, a bell rings after the message appears. |
| The new mail message indicates if you have any new mail messages. |
A security administrator can suppress the announcement and welcome messages, which include node names and operating system identification. Because login procedures differ from system to system, it is more difficult to log in without this information.
The last login success and failure messages are optional. Your security administrator can enable or disable them as a group. Sites with medium-level or high-level security needs display these messages because they can indicate break-in attempts. In addition, by showing that the system is monitoring logins, these messages can be a deterrent to potential illegal users.
Each time you log in, the system resets the values for the last successful login and the number of login failures. If you access your account interactively and do not specify an incorrect password in your login attempts, you may not see the last successful noninteractive login and login failure messages.
3.4.4. When the System Logs In for You: Network and Batch Logins
Noninteractive logins include network logins and batch logins.
The system performs a network login when you start a network task on a remote node, such as displaying the contents of a directory or copying files stored in a directory on another node. Both your current system and the remote system must be nodes in the same network. In the file specification, you identify the target node and provide an access control string, which includes your user name and password for the remote node.
For example, a network login occurs when user Greg, who has an account on remote
node PARIS, enters the following command:
$ DIRECTORY PARIS"GREG 8G4FR93A"::WORK2:[PUBLIC]*.*;*
This command displays a listing of all the files in the public directory on disk
WORK2. It also reveals the password 8G4FR93A. A more
secure way to perform the same task would be to use a proxy account on node
PARIS. For an example of a proxy login, see Section 3.9.2, ''Using Proxy Login Accounts to Protect Passwords''.
The system performs a batch login when a batch job that you submitted runs. Authorization to build the job is determined at the time the job is submitted. When the system prepares to execute the job, the job controller creates a noninteractive process that logs in to your account. No password is required when the job logs in.
3.5. Login Failures: When You Are Unable to Log In
|
Failure Indicator |
Reason |
|---|---|
|
No response from the terminal. |
A defective terminal, a terminal that requires a system password, a terminal that is not powered on, or a communications problem caused by defective wiring or by a misconfigured or malfunctioning modem. |
|
No response from any terminal. |
The system is down or overloaded. |
|
No response from the terminal when you enter the system password. |
The system password changed. |
|
System messages: | |
|
"User authorization failure" |
A typing error in your user name or password. The account or password expired. |
|
"Not authorized to log in from this source" |
Your particular class of login (local, dialup, remote, interactive, batch, or network) is prohibited. |
|
"Not authorized to log in at this time" |
You do not have access to log in during this hour or this day of the week. |
|
"User authorization failure" (and no known user failure occurred) |
An apparent break-in has been attempted at the terminal using your user name, and the system has temporarily disabled all logins at that terminal by your user name. |
The following sections describe the reasons for login failure in more detail.
3.5.1. Using a Terminal That Requires a System Password
You cannot log in if the terminal you attempt to use requires a system password and you are unaware of the requirement. All attempts at logging in fail until you enter the system password.
If you know the system password, perform the steps described in Section 3.2.1, ''Entering a System Password''. If your attempts fail, it is possible that the system password has been changed. Move to a different terminal that does not require a system password, or request the new system password.
If you do not know the system password and you suspect that this is the problem, try logging in at another terminal.
3.5.2. Observing Your Login Class Restrictions
If you attempt a class of login that is prohibited in your UAF record, your login fails. For example, your security administrator can restrict you from logging in over the network. If you attempt a network login, you receive a message stating that you are not authorized to log in from this source.
Network jobs are not terminated when the allocated work shift for network jobs is exceeded. This restriction applies only to new network connections, not to existing ones.
Your security administrator can restrict your logins to include or exclude any of the following classes: local, remote, dialup, batch, or network. (For a description of these classes, see Section 3.4.1, ''Logging In Interactively: Local, Dialup, and Remote Logins'' and Section 3.4.4, ''When the System Logs In for You: Network and Batch Logins''.)
3.5.3. Using an Account Restricted to Certain Days and Times
Another cause of login difficulty is failure to observe your shift restrictions. A system manager or security administrator can control access to the system based on the time of day or the day of the week. These restrictions are imposed on classes of logins. The security administrator can apply the same work-time restrictions to all classes of logins or choose to place different restrictions on different login classes. If you attempt a login during a time prohibited for that login class, your login fails. The system notifies you that you are not authorized to log in at this time.
When shift restrictions apply to batch jobs, jobs you submit that are scheduled to run outside your permitted work times are not run. The system does not automatically resubmit such jobs during your next available permitted work time. Similarly, if you have initiated any kind of job and attempt to run it beyond your permitted time periods, the job controller aborts the uncompleted job when the end of your allocated work shift is reached. This job termination behavior applies to all jobs.
3.5.4. Failing to Enter the Correct Password During a Dialup Login
Your security administrator can control the number of chances you are given to enter a correct password during a dialup login before the connection is automatically broken.
If your login fails and you have attempts remaining, press the Return key and try again. You can do this until you succeed or reach the limit. If the connection is lost, you can redial the access line and start again.
The typical reason for limiting the number of dialup login failures is to discourage unauthorized users attempting to learn passwords by trial and error. They already have the advantage of anonymity because of the dialup line. Of course, limiting the number of tries for each dialup does not necessarily stop this kind of intrusion. It only requires the would-be perpetrator to redial and start another login.
3.5.5. Knowing When Break-In Evasion Procedures Are in Effect
If anyone has made a number of failed attempts to log in at the same terminal with your user name, the system concludes that an intruder is attempting to gain illegal access to the system by using your user name.
At the discretion of your security administrator, break-in evasion measures can be in effect for all users of the system. The security administrator controls how many password attempts are allowed over what period of time. Once break-in evasion tactics are triggered, you cannot log in to the terminal—even with your correct password—during a defined interval. Your security administrator can tell you how long you must wait before reattempting the login, or you can move to another terminal to attempt a login.
If you suspect that break-in evasion is preventing your login and you have not personally experienced any login failures, you should contact your security administrator immediately. Together, you should attempt another login and check the message that reveals the number of login failures since the last login to confirm or deny your suspicion of intrusion attempts. (If your system does not normally display the login message, your security administrator can use the Authorize utility (AUTHORIZE) to examine the data in your UAF record.) With prompt action, your security administrator can locate someone attempting logins at another terminal.
3.6. Changing Your Password
Changing passwords on a regular basis promotes system security. To change your
password, enter the DCL command SET PASSWORD.
The system manager can allow you to select a password on your own or can require that you use the automatic password generator when you change your password. If you select your own password, note that the password must follow system restrictions on length and acceptability (see Section 3.1.2, ''Observing System Restrictions on Passwords''). For example, if your password choice is too short, the system displays the following message:
%SET-E-INVPWDLEN, invalid password length - password not changed
Section 3.1, ''Choosing a Password for Your Account'' provides guidelines and examples for specifying secure passwords.
There is no restriction on how many times you can change your password in a given period of time.
3.6.1. Selecting Your Own Password
If your system manager does not require use of the automatic password generator,
the SET PASSWORD command prompts you to enter the new password.
It then prompts you to reenter the new password for verification, as follows:
$ SET PASSWORD
Return
New password:
Verification:
If you fail to enter the same password twice, the password is not changed. If you succeed in these two steps, there is no notification. The command changes your password and returns you to the DCL prompt.
Even though your security administrator may not require the password generator, you are strongly encouraged to use it to promote the security of your system. Section 3.6.2, ''Using Generated Passwords'' describes how to use generated passwords.
3.6.2. Using Generated Passwords
SET PASSWORD.
(When the system does not require generated passwords, add the
/GENERATE qualifier to SET PASSWORD for a
list of password choices.) The character sequence resembles native language words to
make it easy to remember, but it is unusual enough to be difficult for outsiders to
guess. Because system-generated passwords vary in length, they become even more
difficult to guess.Note
The password generator uses basic syllabic rules to generate words but has no real knowledge of any language. As a result, it can unintentionally produce words that are offensive.
$ SET PASSWORD Old password: Return
| The user correctly specifies the old password and presses the Return key. |
| The system responds with a list of five password choices ranging in length from 8 to 10 characters. There are representations of the same word divided into syllables to the right of each password choice. Usually the password that is easiest to pronounce is easiest to remember and, therefore, the best choice. |
| The system informs the user that it is possible to request a new list by pressing the Return key in response to the prompt for a new password. |
| The user enters one of the first five possible passwords and presses the Return key. |
| The system recognizes that this password is one provided by the automatic password generator and responds with the verification prompt. The user enters the new password again and presses Return. |
| The system changes the password and responds with the DCL prompt. |
One disadvantage of automatic password generation is the possibility that you might not remember your password choice. However, if you dislike all the password choices in your list or think none are easy to remember, you can always request another list.
A more serious drawback of automatic password generation is the potential disclosure of password choices from the display the command produces. To protect your account, change your password in private. If you perform the change on a video terminal, clear the display of password choices from the screen after the command finishes. If you perform the change in a DECwindows environment, use the Clear Lines Off Top option from the Commands menu to remove the passwords from the screen recall buffer. If you use a printing terminal, properly dispose of all hardcopy output.
If you later realize that you failed to protect your password in these ways, change your password immediately. Depending on site policy or your own judgment concerning the length of time your account was exposed, you might decide to notify your security administrator that a security breach could have occurred through your account.
3.6.3. Changing a Secondary Password
To change a secondary password, use the DCL command SET
PASSWORD/SECONDARY. You are prompted to specify the old secondary
password and the new secondary password, just as in the procedure for changing the
primary password. To remove a secondary password, press the Return
key when you are prompted for a new password and verification.
You can change primary and secondary passwords independently, but both are subject to the same change frequency because they share the same password lifetime. See Section 3.7, ''Password and Account Expiration Times'' for information on password lifetimes.
3.6.4. Changing Your Password As You Log In
Even if your current password has not yet expired, you can change your password
when you log in to the system by including the /NEW_PASSWORD
qualifier with your user name, as follows:
  WILLOW - A member of the Forest Cluster

Username: RWOODS/NEW_PASSWORD
Password:
         Welcome to OpenVMS on node WILLOW
         Last interactive login on Tuesday, 4-NOV-2008 10:20
         Last non-interactive login on Monday, 3-NOV-2008 14:20

Your password has expired; you must set a new password to log in
New password:
Verification:
Entering the /NEW_PASSWORD qualifier after your user name
forces you to set a new password immediately after login.
3.7. Password and Account Expiration Times
Your system manager can set up your account so that your password, or the account itself, expires automatically on a particular date and time. Password expiration times promote system security by forcing you to change your password on a regular basis. Account expiration times help to ensure that accounts are available only for as long as they are needed.
3.7.1. Changing an Expired Password
As you approach the expiration time of your password, you receive an advance warning message. The message first appears 5 days before the expiration date and at each subsequent login. The message appears immediately below the new mail message and sounds the bell character on your terminal to attract your attention. The message indicates that your password is expiring, as follows:
WARNING – Your password expires on Thursday 18-DEC-2008 15:00
If you fail to change your password before it expires, you receive the following message when you log in:
Your password has expired; you must set a new password to log in
New password:
The system prompts you for a new password or, if automatic password generation is enabled, asks you to select a new password from those listed (see Section 3.6.2, ''Using Generated Passwords''). You can abort the login by pressing Ctrl/Y. At your next login attempt, the system again prompts you to change your password.
When You Are Using a Secondary Password
If secondary passwords are in effect for your account (see Section 3.2, ''Knowing What Type of Password to Use''), the secondary password may expire at the same time as the primary one. You are prompted to change both passwords. If you change the primary password and press Ctrl/Y before changing the secondary password, the login fails. The system does not record a password change.
When You Fail to Change Your Password
WARNING – Your password has expired; update immediately with
SET PASSWORD!
At this point, if you do not change the password or if the system fails before you have the opportunity to do so, you will be unable to log in again. To regain access, see your system manager.
3.7.2. Renewing an Expired Account
If you need your account for a specific purpose for a limited time only, the person who creates your account may specify a period of time after which the account lapses. For example, student accounts at universities are typically authorized for a single semester at a time.
The system automatically denies access to expired accounts. You receive no advance warning message before the account expiration date, so it is important to know in advance your account duration. The account expiration resides in the UAF record, which can be accessed and displayed only through the use of the Authorize utility (AUTHORIZE) by users with the SYSPRV privilege or equivalent—normally, your system manager or security administrator.
When your account expires, you receive an authorization failure message at your next attempted login. If you need an extension, follow the procedures defined at your site.
3.8. Guidelines for Protecting Your Password
Illegal system access through the use of a known password is most often caused by the owner's disclosing the password. It is vital that you do not reveal your password to anyone.
Select reasonably long passwords that cannot be guessed easily. Avoid using words in your native language that appear in a dictionary. Consider including numbers in your password. Alternatively, let the system generate passwords for you automatically.
Never write down your password.
Never give your password to another user. If another user obtains your password, change it immediately.
Do not include your password in any file, including the body of an electronic mail message. (If anyone else reveals a password to you, delete the information promptly.)
The character strings that appear with your actual password can make it easy for someone to find your password in a file. For example, a quotation mark followed by two colons ("::) always comes after a user name and password in an access control string. Someone attempting to break into the system could obtain your password by searching inadequately protected files for this string. Another way in which you might reveal your password is by using the word "password" in a text file, for example:
My password is GOBBLEDYGOOK.
If you submit a batch job on cards, do not leave your password card where others may be able to obtain your password from it.
Do not use the same password for accounts on different systems.
An unauthorized user can try one password on every system where you have an account. The account that first reveals the password might hold little information of interest, but another account might yield more information or more privileges, ultimately leading to a far greater security breach
Before you log in to a terminal that is already on, invoke the secure terminal server feature (if enabled) by pressing the Break key. The secure server ensures that the OpenVMS login program is the only program able to receive your login and thereby eliminates the possibility of revealing a password to a password grabber program. This is particularly relevant when you are working in a public terminal room.
A password grabber program is a special program that displays an empty video screen, a screen that appears to show the system has just been initialized after a crash, or a screen that shows a nonexistent logout. When you attempt to log in, the program runs through the normal login sequence so you think you are entering your user name and password in a normal manner. However, once the program receives this key information and passes it on to the perpetrator, it displays a login failure. You might think you mistyped your password and be unaware that you have just revealed it to someone else.
Unless you share your password, change it every 3 to 6 months. VSI warns against sharing passwords. If you do share your password, change it every month.
Change your password immediately if you have any reason to suspect it might have been discovered. Report such incidents to your security administrator.
Do not leave your terminal unattended after you log in.
You might think the system failed and came back up again, when actually someone has loaded a password-stealing program. Even a terminal that displays an apparently valid logout message might not reflect a normally logged out process.
Routinely check your last login messages. A password-stealing program cannot actually increase the login failure count, although it looks like a login failure to you. Be alert for login failure counts that do not appear after you log in incorrectly or that are one less than the number you experienced. If you observe this or any other abnormal failure during a login, change your password immediately, and notify your security administrator.
3.9. Network Security Considerations
This section describes how to use access control strings in file specifications and how to use proxy logins to help make network access more secure.
3.9.1. Protecting Information in Access Control Strings
Network access control strings can be included in the file specifications of DCL commands working across the DECnet for OpenVMS network. They permit a user on a local node to access a file on a remote node.
An access control string consists of the user name for the remote account and the user's password enclosed within quotation marks, as follows:
NODE"username password"::disk:[directory]file.type
Avoid revealing the information on either hardcopy or video terminals. If you use a hardcopy terminal, dispose of the output properly. If you use a video terminal, clear the screen, and empty the recall buffer with the DCL command
RECALL/ERASEwhen the network job is completed. This prevents another user from seeing the password, either by displaying the command line with the Ctrl/B key sequence or with the DCL commandRECALL/ALL. DECwindows users can clear the screen with the "Clear Lines Off Top" option from the "Commands" menu. Otherwise, a DECwindows user could use the scroll bar to view previously entered text.Do not place networking commands that include access control strings in command procedures where they would be likely targets for discovery.
If you must put access control strings in your command procedures, provide these files with optimum file protection by using the techniques described in Chapter 4, "Protecting Data".
The use of access control strings in not permitted in an evaluated configuration. Please see your system administrator to determine if your system is running in an evaluated configuration.
To avoid the need for access control strings, you might prefer to use proxy login accounts, which are described in Section 3.9.2, ''Using Proxy Login Accounts to Protect Passwords''.
3.9.2. Using Proxy Login Accounts to Protect Passwords
Passwords are not echoed on the terminal where the request originates.
Passwords are not passed between systems where they might be intercepted in unencrypted form.
Passwords are not needed in command files to perform the remote access steps.
Before you can initiate a proxy login, the system or security administrator at the remote node must create a proxy account for you. Proxy accounts, like regular accounts, are created with the Authorize utility (AUTHORIZE). They are usually nonprivileged accounts. Security administrators can allow you access to one default proxy account and up to 15 other proxy accounts. While proxy logins require more setup effort on the part of system managers, they provide more secure network access and eliminate the need for users to enter access control strings.
- The user KMAHOGANY has two user accounts:
An account on node BIRCH with the password XYZ123ABC
An account on node WALNUT with the password A25D3255
KMAHOGANY has logged in to node BIRCH.
KMAHOGANY wants to copy the file BIONEWS.MEM from the default device and directory of the account on the node WALNUT.
The following diagram illustrates these conditions:
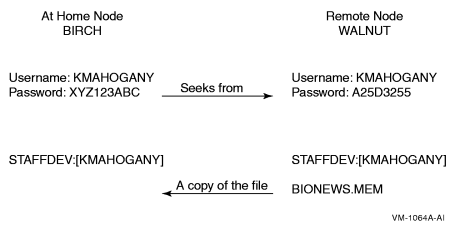
The user KMAHOGANY could use an access control string to copy the
file BIONEWS.MEM, as follows:
$ COPY WALNUT"KMAHOGANY A25D3255"::BIONEWS.MEM BIONEWS.MEM
Notice that the password A25D3255 echoes. Anyone who observes the
screen can see it. In contrast, if KMAHOGANY has proxy access from node
BIRCH to the account on node WALNUT, the command for copying the file
BIONEWS.MEM is as follows:
$ COPY WALNUT::BIONEWS.MEM BIONEWS.MEM
KMAHOGANY does not need to specify a password in an access control string.
Instead, the system performs a proxy login from the account on node BIRCH into the
account on node WALNUT. There is no exchange of passwords.
Using a General Access Proxy Account
The user name GENACCESS.
Access limited to network logins.
A password known only to the owner of the account. (None of the remote users need to know it.) This helps to protect the account.
The default device and directory STAFFDEV:[BIOSTAFF].
If the security administrator grants BIRCH::KMAHOGANY
proxy access to the GENACCESS account, the user KMAHOGANY can copy the file
BIONEWS.MEM by entering the following command:
$ COPY WALNUT::[KMAHOGANY]BIONEWS.MEM BIONEWS.MEM
Note that KMAHOGANY must specify the directory [KMAHOGANY] because
the file BIONEWS.MEM is not in the default device and directory for the
GENACCESS account (STAFFDEV:[BIOSTAFF]). In addition, the
protection for the file BIONEWS.MEM must permit access to the GENACCESS
account. Otherwise, the command fails.
When You Need to Specify the Name of a Proxy Account
If you have access to more than one proxy account on a given node and you do not
want to use the default proxy account, specify the name of the proxy account. For
example, to use a proxy account called PROXY2 instead of the GENACCESS
account (the default), KMAHOGANY enters the following command:
$ COPY WALNUT"PROXY2"::[KMAHOGANY]BIONEWS.MEM BIONEWS.MEM
This command uses the PROXY2 account to copy the file
BIONEWS.MEM from the [KMAHOGANY] directory on node
WALNUT.
3.10. Auditing Access to Your Account and Files
Although it is the security administrator's job to monitor the system for possible intrusions, you can help the security administrator to audit access to your account and files.
This section describes how to monitor your last login time for possible intrusions. It also describes how to work with your security administrator to enable certain types of auditing.
3.10.1. Observing Your Last Login Time
The operating system maintains information in your UAF record about the last time you logged in to your account. Your security administrator decides whether the system should display this information at login time. Sites with medium to high security requirements frequently display this information and ask users to check it for unusual or unexplained successful logins and unexplained failed logins.
If there is a report of an interactive or a noninteractive login at a time when you were not logged in, report it promptly to your security administrator. Also change your password. The security administrator can investigate further by using accounting files and audit logs.
If you receive a login failure message and cannot account for the failure, it is likely that someone has been trying to access your account unsuccessfully. Check your password to ensure that it adheres to all recommendations for password security described in Section 3.8, ''Guidelines for Protecting Your Password''. If not, change your password immediately.
If you expect to see a login failure message and it does not appear or if the count of failures is too low, change your password. Report either of these indications of login failure problems to your security administrator.
3.10.2. Adding Access Control Entries to Sensitive Files
If you have key files that may have been accessed improperly, you may want to develop a strategy with your security administrator to audit access to the files.
Once you review the situation and ensure that you have done everything possible to protect your files with standard protection codes and general ACLs (described in Chapter 4, "Protecting Data"), you may conclude that security auditing is required.
To specify security auditing, you can add special access control entries (ACEs) to files you own or to which you have control access. Keep in mind, however, that the audit log file is a systemwide mechanism, so VSI recommends that a site security administrator control the use of file auditing. Although you can add auditing ACEs to files over which you have control, the security administrator has to enable auditing of files on a system level.
For example, if user RWOODS and his security administrator agree that they must
know when a highly confidential file, CONFIDREVIEW.MEM, is being
accessed, RWOODS can add an entry to the existing ACL for the file
CONFIDREVIEW.MEM, as follows:
$ SET SECURITY/ACL=(AUDIT=SECURITY,ACCESS=READ+WRITE-
_$ +DELETE+CONTROL+FAILURE+SUCCESS) CONFIDREVIEW.MEM
After RWOODS adds the security-auditing entry, the security administrator enables file-access auditing so that access attempts are recorded. See Section 3.10.3.1, ''Auditing File Access'' for more information on file-access auditing.
An access violation of one file frequently indicates access problems with other files. Therefore, the security administrator may need to monitor access to all key files having security-auditing ACEs. When undesired access is gained to key files, the security administrator must take immediate action.
3.10.3. Asking Your Security Administrator to Enable Auditing
A security administrator can direct the operating system to send an audit message to the system security audit log file or an alarm to terminals enabled as security operator terminals whenever security-relevant events occur. For example, the security administrator might identify one or more files for which write access is prohibited. An audit message can be sent to indicate attempted access to these files.
3.10.3.1. Auditing File Access
If you suspect intrusion attempts to your account, the security administrator may temporarily enable auditing for all file access. The security administrator can also enable auditing to monitor read access to your files to catch file browsers.
For example, assume you decide to audit the file
CONFIDREVIEW.MEM, which has a security-auditing ACE
(see Section 3.10.2, ''Adding Access Control Entries to Sensitive Files''). If user ABADGUY accesses
CONFIDREVIEW.MEM and has delete access, the following audit
record is written to the system security audit log file:
%%%%%%%%%%%  OPCOM  6-DEC-2008 07:21:11.10  %%%%%%%%%%%
Message from user AUDIT$SERVER on BOSTON
Security audit (SECURITY) on BOSTON, system id: 19424
Auditable event:        Attempted file access
Event time:             6-DEC-2008 07:21:10.84
PID:                    23E00231
Username:               ABADGUY
Image name:             BOSTON$DUA0:[SYS0.SYSCOMMON.][SYSEXE]DELETE.EXE
Object name:            _BOSTON$DUA1:[RWOODS]CONFIDREVIEW.MEM;1
Object type:            file
Access requested:       DELETE
Status:                 %SYSTEM-S-NORMAL, normal successful completion
Privileges used:        SYSPRV
The auditing message reveals the name of the perpetrator, the method of access
(successful deletion accomplished by using the program
[SYSEXE]DELETE.EXE), time of access (7:21 a.m.),
and the use of a privilege (SYSPRV) to gain access to the file.
With this information, the security administrator can take action.
Note that the security audit message is written to the security audit log file
every time any file is accessed and meets the conditions specified in the audit
entry of the ACL for that file (see Section 3.10.2, ''Adding Access Control Entries to Sensitive Files''). Access
to the file CONFIDREVIEW.MEM, as well as access to any file on the
system that is protected with security auditing, prompts an audit record to be
written to the security audit log file.
After auditing has been introduced, check with your security administrator periodically to see if any additional intrusions have occurred.
3.10.3.2. Additional Events to Audit
|
Events Initiating Security Audits or Alarms | |
|---|---|
|
Logins, logouts, login failures, and break-in attempts Volume mounts and dismounts |
Modifications to:
|
|
Connection or termination of logical links |
Execution of:
|
|
Creation and deletion of selected protected objects |
Installation of images |
|
Selected types of access and deaccess to selected protected objects |
Access event requested by an ACL on a protected object |
|
Successful or unsuccessful use of a privilege or an identifier |
Use of the process control system services, including $CREPRC and $DELPRC |
3.11. Logging Out Without Compromising System Security
Logging out of a session conserves system resources and protects your files. Leaving a terminal on line represents one of the greatest sources of inside intrusions. When you leave your terminal on line and your office open, you have effectively given away your password and your privileges and have left your files and those of the other members of your group unprotected. Any user can easily and quickly transfer all files accessible through your account. A malicious insider could rename and delete your files and any other files to which you have write access. If you have special privileges, especially privileges in the Files or All category, a malicious user can do major damage.
Log out when you leave your office even for a brief period of time. If you have performed remote logins, you must log out of each node. The following sections describe security considerations for logging out of specific types of terminals or sessions.
3.11.1. Clearing Your Terminal Screen
You may want to clear your screen each time you log out from a terminal to ensure that your user name, node name, and operating system are not revealed to anyone else. If you are logging out after a remote login, the name of the node to which you return (the local node) is also revealed. If you access multiple accounts remotely (over the network), the final sequence of logout commands reveals all the nodes and user names that are accessible to you on each node (excluding the name of the furthest node reached). To those who can recognize the operating system from the prompt or a logout message, these displays also reveal the operating system.
If you are using a VT200- or later series terminal, you can clear the screen by pressing the Set-Up key and selecting the item from the resulting menu that corresponds to the DECwindows "Clear Display" menu option on the "Commands" menu.
If you are using a VT100-series terminal, press the Set-Up key. Then press the key marked for reset (the 0 key) followed by the Return key.
Alternatively, to preserve temporary parameters, press the Set-Up key, and then press the key marked 80/132 columns (the 9 key) twice.
After the screen clears, the cursor is positioned at the top of the screen, next
to the DCL prompt. Enter the DCL command LOGOUT at the prompt.
The only information remaining after you log out is your logout command and the
logout completion message, for example:
$ LOGOUT
RDOGWOOD     logged out at 14-AUG-2008 19:39:01.43
3.11.2. Disposing of Hardcopy Output
After you log out from a hardcopy terminal, properly remove, file, or dispose of all hardcopy output that might reveal sensitive information. Your security administrator should provide direction on preferred procedures. Many sites use paper shredders or locked receptacles for this purpose. Handle output that you plan to save just as carefully.
You should also dispose of hardcopy output if the system fails before you log out. In addition, if you will not be present when the system is initialized, turn your terminal off.
3.11.3. Removing Disconnected Processes
Enter the DCL command
SHOW USERSto determine if you have other disconnected jobs.Enter the DCL command
CONNECT/LOGOUTto log out of the current process. Connect back through each of the associated virtual terminals (as noted by the terminal prefix of VTA) until you reach the last existing process.Enter the DCL command
LOGOUT.
3.11.4. Breaking the Connection to a Dialup Line
LOGOUT command with the /HANGUP qualifier.
The /HANGUP qualifier directs the system to automatically break
the connection to the dialup line after you log out.Note
The effectiveness of the /HANGUP qualifier depends on
how your system manager configures your modem line and how the line connects
to the computer. It does not work on lines connected to a terminal
server.
Breaking the connection to a dialup line prevents someone from taking advantage of an open access line. To access the line, someone must know the access number and must personally redial. Breaking the connection is especially important if the dialup line you use is in a public area or where someone might use the terminal after you.
This practice also saves resources by reducing the required number of dialup lines.
3.11.5. Turning Off a Terminal
If your site has moderate or high security requirements, your security administrator may ask you to turn off your terminal after logging out. This resets terminal characteristics and clears memory buffers. Some Trojan horse attacks use hardware frame buffers and the answerback capabilities that are built into newer terminals.
3.12. Checklist for Contributing to System Security
Choose a secure password by following the guidelines in Section 3.1, ''Choosing a Password for Your Account''.
Protect your password, and change it often.
Check your last login messages each time you log in, and report any unexplained messages to your security administrator (Section 3.4.3, ''Reading Informational Messages'').
Use proxy logins when possible (Section 3.4, ''Types of Logins and Login Classes'').
Log out and lock up when you leave your terminal and area (Section 3.11, ''Logging Out Without Compromising System Security'').
Use the
/HANGUPqualifier with your finalLOGOUTcommand from a dialup line (Section 3.11.4, ''Breaking the Connection to a Dialup Line'').Properly dispose of hardcopy output from your terminal (Section 3.11.2, ''Disposing of Hardcopy Output'').
Clear your screen, or turn off your video terminal to erase revealing displays (Section 3.6.2, ''Using Generated Passwords'' and Section 3.11.1, ''Clearing Your Terminal Screen'').
Lock up backup media. Anyone who has the media in hand can access the information that is stored on the tape or disk.
Ask your security administrator to enable security auditing for any protected objects, such as files, that you suspect have been accessed improperly (Section 3.10.3.1, ''Auditing File Access'').
Chapter 4. Protecting Data
This chapter extends the discussion of security design introduced in Chapter 2, "OpenVMS Security Model". It describes how the operating system controls the way a user process or an application can access a protected object.
To summarize, the operating system controls access to any object that contains shareable information. These objects are known as protected objects. Devices, volumes, logical name tables, files, common event flag clusters, group and system global sections, resource domains, queues, capabilities, and security classes fall into this category. An accessing process carries credentials in the form of rights identifiers, and all protected objects list a set of access requirements specifying who has a right to access the object in a given manner.
Describes the types of identification the system assigns to processes to define their access rights to objects (Section 4.1, ''Contents of a User's Security Profile'')
Looks at the access controls that objects can hold (Section 4.2, ''Security Profile of Objects'')
Shows how the operating system processes access requests (Section 4.3, ''How the System Determines If a User Can Access a Protected Object'')
Explains how to control access to objects (Sections 4.4, 4.5, 4.6, 4.7)
Chapter 5, "Descriptions of Object Classes" describes the unique features of each class of protected object.
4.1. Contents of a User's Security Profile
User identification code (UIC) identifying the user
Rights identifiers held by the process
Privileges, if any
4.1.1. Per-Thread Security
OpenVMS Alpha Version 7.2 includes the implementation of thread-level security. This feature, known as per-thread security, allows each execution thread of a multithreaded process to run an independent security profile without impacting the security profiles of other threads in the process.
Security profile information previously contained in various process level data structures and data cells is now stored in a single data structure, the Persona Security Block (PSB), which is then bound to a thread of execution. All associated references within OpenVMS have been redirected accordingly. Every process in the system has at least one PSB that is the natural persona of the process. The natural persona is created during process creation.
Interaction between a thread manager (for example, the thread manager incorporated within VSI POSIX Threads Library) and the security subsystem provides for the automatic switching of profiles while threads are scheduled for execution.
4.1.2. Persona Security Block Data Structure (PSB)
The user's security profile (privileges, rights, and identity information) has shifted from the process level to the user thread level. The security information previously stored in several structures (including the Access Rights Block (ARB), Process Control Block (PCB), Process Header Descriptor (PHD), Job Information Block (JIB), and Control (CTL) region fields) has moved to a new Persona Security Block (PSB) data structure and all references are redirected accordingly. OpenVMS no longer uses some of the fields in these structures. The affected fields are now considered obsolete.
Each process has a persona array containing the addresses of all persona blocks allocated to the process.
UIC
Persona, and system rights chains
Permanent, authorized, and working privileges
Account name
User name
Auditing flags and counters
The kernel threads block (KTB) points to the persona block for the currently active thread.
4.1.3. Previous Security Model
In previous versions of OpenVMS, the information that constitutes a user's security profile was bound at the process level, common to all threads of execution within the process. Figure 4.1, ''Previous Per-Thread Security Model'' illustrates this relationship.
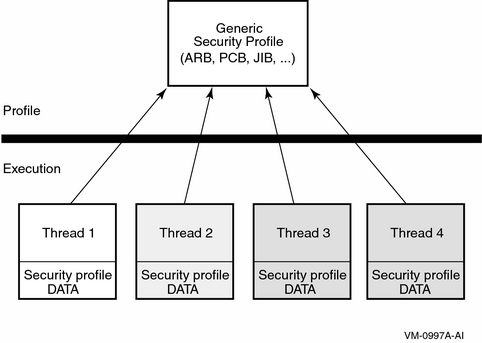
Modifications made to the security profile by one thread are potentially visible to other threads, depending on how the threads perform profile management among themselves.
4.1.4. Per-Thread Security Model
In OpenVMS Version 7.2, each thread of execution can share a security profile with other threads or have a thread-specific security profile. Figure 4.2, ''Per-Thread Security Profile Model'' illustrates these relationships.
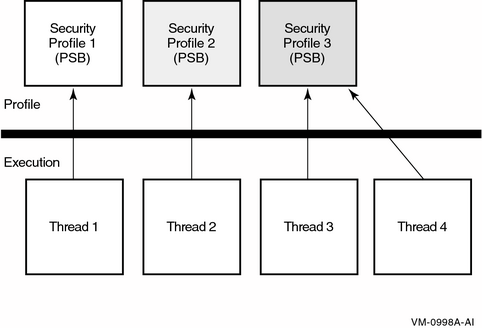
As is the case in the previous model, modifications to a shared profile are potentially visible to all threads that share the profile. However, modifications made to a thread-specific security profile are only applicable to the particular thread.
4.1.5. User Identification Code (UIC)
The first element of a subject's security profile is the user identification code (UIC). Your UIC tells what system group you belong to and what your unique identification is within that group.
4.1.5.1. Format of a UIC
An alphanumeric UIC consists of a member name and, optionally, a group name: [member] or [group,member]
The group and member names can each contain up to 31 alphanumeric characters, at least one of which is alphabetic. The names can include upper- and lowercase characters A through Z, dollar signs ($), underscores (_), and the numbers 0 through 9.
A numeric UIC contains a group number and a member number: [group,member]
The group number is an octal number in the range of 1 through 37776; the member number is an octal number in the range of 0 through 177776. You can omit leading zeros when you are specifying group and member numbers. VSI reserves group 1 and groups 300–377 for its own use.
|
Type of UIC |
Example |
Meaning |
|---|---|---|
|
Alphanumeric |
[USER,FRED] |
Group USER, member FRED |
|
[EXEC,JONES] |
Group EXEC, member JONES | |
|
[JONES] |
Group EXEC, ? member JONES | |
|
Numeric |
[200,10] |
Group 200, member 10 |
|
[3777,3777] |
Group 3777, member 3777 |
4.1.5.2. Guidelines for Creating a UIC
Member names must be unique for each user on the system.
No member can participate in more than one UIC group.
These guidelines exist because the system translates a UIC to a 32-bit value that represents a group number and a member number; the high-order 16 bits contain the group number, and the low-order 16 bits contain the member number. When translating an alphanumeric UIC such as [J_JONES], the operating system equates the member part of the alphanumeric UIC to both the group and member parts of a numeric UIC. The resulting 32-bit numeric UIC is kept in the rights database (which is a file containing information about identifiers, their attributes, and holders). For example, you could not have the two UICs [GROUP1,JONES] and [GROUP2,JONES] on the same system because the member JONES can have only one associated numeric UIC. The member name of the alphanumeric UIC is normally the same as the associated login user name.
4.1.5.3. How Your Process Acquires a UIC
When you log in to a system, the operating system copies your UIC from your user authorization (UAF) record in the system user authorization file (SYSUAF.DAT) and assigns it to your process. It serves as an identification for the life of the process.
By default, detached processes (created by the DCL command SUBMIT or
RUN) and subprocesses (created by the DCL command SPAWN)
take the same UICs as their creators. If you have IMPERSONATE privilege, you can create a
detached process with a different UIC (by using the /UIC qualifier of the
RUN command).
4.1.6. Rights Identifiers
The second element of a subject's security profile is a set of rights identifiers.
A rights identifier represents an individual user or a group of users. Using the Authorize utility (AUTHORIZE), security administrators create and remove identifiers and assign users to hold these identifiers. Rights identifiers can be a temporary way of identifying a group of users because users hold certain identifiers only as long as they are necessary.
4.1.6.1. Types of Identifiers
|
Type |
Description |
Format |
Example |
|---|---|---|---|
|
Environmental identifiers |
Describe different types of users based on their initial entry into the system. |
Alphanumeric strings automatically created by the system. See Section 3.4, ''Types of Logins and Login Classes'' for details. |
BATCH, NETWORK, INTERACTIVE, LOCAL, DIALUP, REMOTE |
|
General identifiers |
Defined by the security administrator. |
Alphanumeric strings of 1 through 31 characters with at least one alphabetic character. Valid characters include numbers 0 through 9, characters A through Z and a through z, the dollar sign ($) and the underscore (_). |
SALES, PERSONNEL, DATA_ENTRY, RESERVE_DESK |
|
UIC identifiers |
Based on a user's identification code (UIC), which uniquely identifies a user on the system and defines the group to which the user belongs. |
Alphanumeric UICs, with or without brackets. Valid characters are the same as those for a general identifier. |
[GROUP1,JONES], [JONES], GROUP1, JONES |
|
Facility identifiers |
Defined by the application. |
Same as a general identifier. See the relevant section in the VSI OpenVMS Programming Concepts Manual, Volume II for details. |
DBM$MOD_SCHEMA |
In addition to the identifiers listed in Table 4.1, ''Major Types of Rights Identifiers'', a system node identifier of the form SYS$NODE_node_name is created by the system startup procedure (STARTUP.COM in SYS$SYSTEM).
4.1.6.2. Process and System Rights Lists
Associated with your process is a rights list that contains all the identifiers granted to it. In addition, there is a system rights list that is shared by all users on the system. The system manager or the system software grants identifiers to the system rights list that are granted to all users currently logged on to the system.
4.1.6.3. Displaying the Rights Identifiers of Your Process
You can display the identifiers for your current process with the SHOW
PROCESS command, for example:
$ SHOW PROCESS/ALL
25-JUN-2008 15:23:18.08   User: GREG            Process ID:   34200094
                          Node: ACCOUNTS        Process name: "_TWA2:"
Terminal:           TWA2:
User Identifier:    [DOC,GREG]
Base priority:      4
Default file spec:  WORK1:[GREG.FISCAL_91]
Devices allocated:  ACCOUNTS$TWA2:
Process Quotas:
  .
  .
  .
Process rights:
 INTERACTIVE
 LOCAL
 SALES
 MINDCRIME                         resource

System rights:
SYS$NODE_ACCOUNTS SHOW PROCESS command displays three types of identifiers:
| UIC identifier, indicating user |
| Environmental identifier, indicating user |
| Environmental identifier, indicating user |
| General identifier, indicating user |
| General identifier, indicating |
| Environmental identifier, indicating user |
4.1.6.4. How Rights Identifiers Appear in the Audit Trail
The rights identifiers of a process also appear in audit records. If a security administrator chooses to audit access to objects, then the operating system can produce a record of which users accessed objects and when. Although a single audit record rarely tells very much, the trail of records can, over a period of time, reveal a pattern of behavior that tells a story.
The following audit record shows that user Greg attempted to delete a file
but was prevented from doing so because he holds the identifier MINDCRIME. The
file 93_FORECAST.DAT has an ACE preventing access by processes with the identifier
MINDCRIME:
Message from user AUDIT$SERVER on FNORD
Security alarm (SECURITY) and security audit (SECURITY) on ACCOUNTS,
                          system id: 19662
Auditable event:     Object deletion
Event information:   file deletion request (IO$_DELETE)
Event time:          24-APR-2008 13:17:24.59
PID:                 34200094
Process name:        _TWA2:
Username:            GREG
Process owner:       [DOC,GREG]
Terminal name:       TWA2:
Image name:          DSA2264:[SYS51.SYSCOMMON.][SYSEXE]DELETE.EXE
Object class name:   FILE
Object owner:        [SYSTEM]
Object protection:   SYSTEM:RWEDC, OWNER:RWEDC, GROUP:RE, WORLD:RE
File name:           _DSA2200:[GREG]93_FORECAST.DAT;1
File ID:             (17481,6299,1)
Access requested:    DELETE
Matching ACE:        (IDENTIFIER=MINDCRIME,ACCESS=NONE)
Sequence key:        00008A41
Status:              %SYSTEM-F-NOPRIV, no privilege for
                     attempted operation
4.1.7. Privileges
A third (optional) element of a subject's security profile is a set of privileges.
Privileges let you use or perform system functions that ordinarily would be denied to you. Security administrators can grant privileges to users under special circumstances so they can perform necessary tasks without changing existing protection authorizations.
Privileges vary in power. Some allow normal network operations; for example, NETMBX and TMPMBX let you send and receive mail across the network. But others, such as SYSNAM, grant the ability to influence system operations. A user with the SYSNAM privilege can modify the system logical name table.
A user's privileges are recorded in the user's UAF record in a 64-bit privilege mask. When a user logs in to the system, the user's privilege vector is stored in the subject's (process) security profile.
SET PROCESS/PRIVILEGES to enable and disable
privileges for which you are authorized, thus controlling the privileges available to the images
you run. Example 4.1, ''Authorized Versus Default Process Privileges'' shows user Puterman has a large number of
authorized privileges, which are available for use when necessary, yet Puterman's
process runs by default with only two privileges enabled: NETMBX and
TMPMBX.$ SHOW PROCESS/PRIVILEGE
 8-OCT-2008 16:58:58.77
User: PUTERMAN  Process ID:   27E00496
Node: FNORD     Process name: "Hobbit"Authorized privileges:

 ACNT      ALLSPOOL  ALTPRI   AUDIT    BUGCHK   BYPASS  CMEXEC    CMKRNL
 DIAGNOSE  DOWNGRADE EXQUOTA  GROUP    GRPNAM   GRPPRV  IMPERSONATE IMPORT
 LOG_IO    MOUNT     NETMBX   OPER     PFNMAP   PHY_IO  PRMCEB    PRMGBL
 PRMMBX    PSWAPM    READALL  SECURITY SETPRV   SHARE   SHMEM     SYSGBL
 SYSLCK    SYSNAM    SYSPRV   TMPMBX   UPGRADE  VOLPRO  WORLD

Process privileges:
 NETMBX               may create network device
 TMPMBX               may create temporary mailbox
4.2. Security Profile of Objects
4.2.1. Definition of a Protected Object
A file in memory or on a storage device
A hardware device or a virtual device
A data structure, such as a common event flag cluster or a logical name table
Section 4.2.5, ''Specifying an Object's Class'' lists the classes of objects that OpenVMS protects; refer to Chapter 5, "Descriptions of Object Classes" for an in-depth description of each class.
4.2.2. Contents of an Object's Profile
The owner of the object. The system uses this element in interpreting the protection code.
The protection code defining access to objects based on the categories of system, owner, group, and world. This protection code controls broad categories of users.
The access control list (ACL) controlling access to objects by individual users or groups of users.
With the exception of files, a new object inherits its security elements from a system-supplied template profile, which the site security administrator may modify. Files have a more complicated inheritance mechanism, one that affords greater control over the security elements of new objects. In all cases, you can assign security elements during object creation rather than using the operating system defaults.
This section gives an overview of protection codes and ACLs. Section 4.4, ''Controlling Access with ACLs'' and Section 4.5, ''Controlling Access with Protection Codes'' explore these protection mechanisms in greater detail. Refer to Chapter 5, "Descriptions of Object Classes" for a description of individual object classes.
4.2.2.1. Owner
The first element of an object's security profile is the UIC of its owner.
In most cases, if you create an object, you are its owner. As the owner, you can modify its security profile. The system automatically assigns your UIC to the object and uses it in making access decisions.
There are some exceptions to the ownership rule. Files owned by resource identifiers do not have a UIC. When a user creates a file in the directory of a resource identifier, the file may be owned by the resource identifier and not the user who created the file (see Section 5.4.5, ''Profile Assignment''). Refer to Chapter 5, "Descriptions of Object Classes" for an explanation of the ownership rules for each object class.
The owner of any object except a file can reassign ownership to another user with the
SET SECURITY/OWNER command, as described in Section 4.2.4, ''Modifying a Security Profile''. Changing the owner of a file usually requires privilege (see
Section 5.4.2, ''Types of Access '').
4.2.2.2. Protection Code
The second element of an object's security profile is the object's protection code.
The system automatically assigns a protection code to each new object. The protection code associated with an object determines the type of access allowed to a user, based on the relationship between the user UIC and the owner UIC With the exception of files and pseudo-terminal (FT) devices, the code a protected object receives is derived from a template profile for the class. (A file's protection code originates from another source, described in Section 5.4, ''Files''.)
Typically, you rely on the protection code to protect an object if the object is to be accessed by: (a) only the owner, (b) all users on the system, or (c) a specific UIC-based group of users. If you want to grant access to specific groups of users outside the UIC group but not to all users on the system, then you need to add an ACL (see Section 4.2.2.3, ''Access Control List (ACL)'').
Interpreting a Protection Code
A protection code defines the access rights for four categories of users: (a) the owner, (b) the users who share the same group UIC as the owner (the group category), (c) all users on the system (the world category), and (d) those with system privileges or rights (the system category). A code lists access rights in a fixed order: the system category (S), then owner (O), then group (G), and then world (W). It has the following syntax:
[user-category: access-allowed (,user-category: access-allowed,...)]
When the operating system processes a request to use a protected object, it compares the user's UIC to the UIC of the object's owner. If the user's UIC is the same as the UIC of the object's owner, the user is granted the access of the owner protection field. Failing a match of UICs, the system progresses through the other user categories. The system tries to find a match of the group fields to determine if there is a common group membership. The system may also evaluate whether the UIC group number indicates the user belongs to the system category of users. The world category applies to all users.
For example, user Jones has a UIC of [14,1], and he tries to read a file that is owned by UIC [14,5]. As Jones is in the same group (14), the system might grant access to the file. The final decision depends on the access rights specified in the protection code.
See Section 4.5, ''Controlling Access with Protection Codes'' for a complete description of how to interpret and create protection codes.
4.2.2.3. Access Control List (ACL)
The third (optional) element of an object's security profile is the object's access control list.
An access control list (ACL) is a collection of entries that define the access rights a user or group of users has to a particular protected object, such as a file, directory, or device.
ACLs may be created by default when an object is created, they may be created by the security administrator, or they may be created by users for objects to which they have control access (see Section 4.6.2, ''Using Control Access to Modify an Object Profile'').
Because security administrators can set up default ACLs, some users may be unaware that
their objects have ACLs and may never change ACLs themselves. (You can use the DCL command
DIRECTORY/SECURITY or SHOW SECURITY to see if there are
ACLs on your files.) Other users are actively involved in creating and maintaining their own
ACLs.
Using ACLs is optional. Although ACLs can enhance the security of objects in any installation through a more detailed definition of who is allowed what kind of access, users have to spend time creating and maintaining the ACLs.
You use the DCL commands SET SECURITY and SHOW
SECURITY for creating and displaying ACLs, although the access control list editor
(ACL editor) is an important utility for more extensive work.
Section 4.4, ''Controlling Access with ACLs'' continues the discussion of ACLs and how to use them.
4.2.3. Displaying a Security Profile
To see the security profile of any protected object, use the DCL command SHOW
SECURITY. For example, the following command requests security information about the
file 93_FORECAST.TXT:
$ SHOW SECURITY 93_FORECAST.TXT WORK_DISK$:[GREG]93_FORECAST.TXT;1 object of class FILE Owner: [ACCOUNTING,GREG] Protection: (System: RWED, Owner: RWED, Group: RE, World) Access Control List: <empty>
The display indicates the file 93_FORECAST.TXT is owned by user
Greg. It also lists the file's protection code, which gives read,
write, execute, and delete access to system
users and the owner. The code grants read and execute access to
group users and provides no access to world users. (See Section 4.5, ''Controlling Access with Protection Codes'' for further explanation.) There is no ACL on the file as
yet.
4.2.4. Modifying a Security Profile
You can provide new values for the owner, protection code, or ACL of a protected object or
even copy a profile from one object to another by using the SET SECURITY
command.
For example, the SHOW SECURITY display in Section 4.2.3, ''Displaying a Security Profile'' shows the file 93_FORECAST.TXT is owned by user
Greg. As owner, he can change the protection code for that file. Originally, the code gave no
access to users in the world category. Now, Greg changes that to allow read and
write access to world users:
$ SET SECURITY/PROTECTION=(W:RW) 93_FORECAST.TXT
The SHOW SECURITY command verifies the new protection code for the
file:
$ SHOW SECURITY 93_FORECAST.TXT 93_FORECAST.TXT object of class FILE Owner: [GREG] Protection: (System: RWED, Owner: RWED, Group: RE, World: RW) Access Control List: <empty>
Section 4.2.5, ''Specifying an Object's Class'' shows how to modify other elements in a profile. Section 4.4, ''Controlling Access with ACLs'' and Section 4.5, ''Controlling Access with Protection Codes'' discuss protection codes and
ACLs extensively. For a full description of the
SET
SECURITY and
SHOW
SECURITY commands, see the
VSI OpenVMS DCL Dictionary: N–Z.
4.2.5. Specifying an Object's Class
Groups of objects that behave in a particular way and have a common set of attributes are divided into classes. Files, queues, and volumes are very common examples. As Table 4.2, ''Classes of Protected Objects'' shows, the operating system supports 11 classes of protected objects.
When you modify the profile of an object, you need to specify the class of the object;
otherwise, the SET SECURITY command assumes the object is a file.
For example, the following command sequence changes the profile of an object and uses the
/CLASS qualifier to identify the object LNM$GROUP as a logical
name table:
$ SET SECURITY /CLASS=LOGICAL_NAME_TABLE-
_$ /OWNER=ACCOUNTING /PROTECTION=(S:RWCD, O:RWCD, G:R, W:R)-
_$ /ACL=((IDENTIFIER=CHEKOV,ACCESS=CONTROL),-
_$ (IDENTIFIER=WU,ACCESS=READ+WRITE)) LNM$GROUPThe SET SECURITY command makes the Accounting group owner
of the logical name table. It changes the protection code to allow read,
write, create, and delete access for the
owner and for system users and to limit group and
world users to read access. Finally, it creates an ACL to allow
control access for user Chekov and to allow read and
write access for user Wu.
The SHOW SECURITY command displays the results of the changes.
$ SHOW SECURITY LNM$GROUP /CLASS=LOGICAL_NAME_TABLE LNM$GROUP object of class LOGICAL_NAME_TABLE Owner: [ACCOUNTING] Protection: (System: RWCD, Owner: RWCD, Group: R, World: R) Access Control List: (IDENTIFIER=[USER,CHEKOV],ACCESS=CONTROL) (IDENTIFIER=[USER,WU],ACCESS=READ+WRITE)
|
Class Name |
Definition |
|---|---|
|
Capability |
A resource to which the system controls access; currently, the only defined capability is the vector processor. |
|
Common event flag cluster |
A set of 32 event flags that enable cooperating processes to post event notifications to each other. |
|
Device |
A class of peripherals connected to a processor that are capable of receiving, storing, or transmitting data. |
|
File |
Files-11 On-Disk Structure Level 2 (ODS-2) or Level 5 (ODS-5) files and directories. |
|
Group global section |
A shareable memory section potentially available to all processes in the same group. |
|
Logical name table |
A shareable table of logical names and their equivalence names for the system or a particular group. |
|
Queue |
A set of jobs to be processed in a batch, terminal, server, or print job queue. |
|
Resource domain |
A namespace controlling access to the lock manager's resources. |
|
Security class |
A data structure containing the elements and management routines for all members of the security class |
|
System global section |
A shareable memory section potentially available to all processes in the system. |
|
Volume |
A mass storage medium, such as a disk or tape, that is in ODS-2 or ODS-5 format. Volumes contain files and may be mounted on devices. |
Refer to Chapter 5, "Descriptions of Object Classes" for a detailed description of each class.
4.2.6. Access Required to Modify a Profile
To modify a security profile, you need control access to the object. An ACL grants control access explicitly, whereas a protection code grants it implicitly to anyone who belongs to the owner or system category. (Refer to Section 4.6.2, ''Using Control Access to Modify an Object Profile'' for a full description of how you can acquire control access.)
4.3. How the System Determines If a User Can Access a Protected Object
Evaluate the access control list (ACL).
If the object has an ACL, the system scans it, looking for an entry that matches any of the user's rights identifiers. If a matching access control entry (ACE) is found, the system either grants or denies access, and further checking of the ACL stops.
When the matching ACE denies access, a user can still gain access either through the system and owner fields of the protection code or through privilege. When an ACL has no matching ACE, the system checks all fields of the protection code.
Evaluate the protection code. If the ACL did not grant access and the object's owner UIC is not zero, the operating system evaluates the protection code. The operating system grants or denies access based on the relationship between the user's identification code (UIC) and the object's protection code.
For cases where an ACL has denied access, the system examines two fields in the protection code—the system and owner fields—to determine if the user is allowed access. The user can still acquire access by being a member of the system or owner categories or by possessing privileges. A user holding GRPPRV (with a matching group UIC) or SYSPRV is granted the access specified for the system category of the protection code.
Look for special privileges.
If access was not granted by the ACL or the protection code, privileges are evaluated.
Users with certain system privileges may be entitled to access regardless of the protection offered by the ACLs or the protection code. The bypass privilege (BYPASS), group privilege (GRPPRV), read all privilege (READALL), or system privilege (SYSPRV) amplifies the holder's access to objects. (See Section 4.6.1, ''How Privileges Affect Protection Mechanisms'' for more information on how privileges affect access.)
Consider access overrides.
For some object classes, access may be granted based on alternate privileges. For example, the queue object allows full access to all queues for users with operator privilege (OPER), and the logical name table object allows access to the system table for users with system name privilege (SYSNAM).
Figure 4.3, ''Flowchart of Access Request Evaluation'' charts the sequence the operating system follows when it evaluates an access request and shows how the controlling components (ACLs, protection codes, privileges, and access overrides) interact.
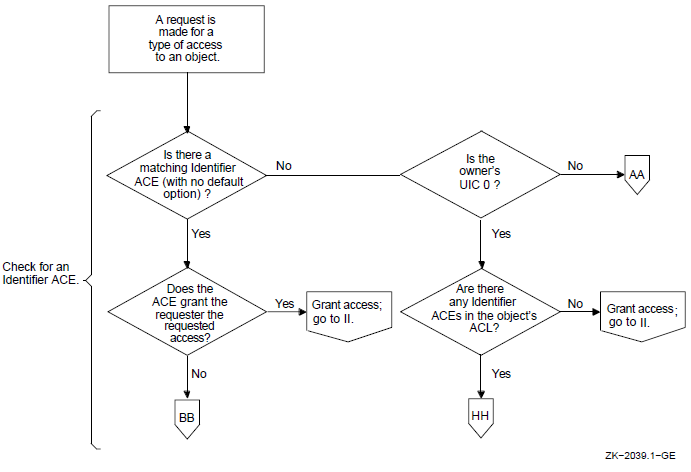
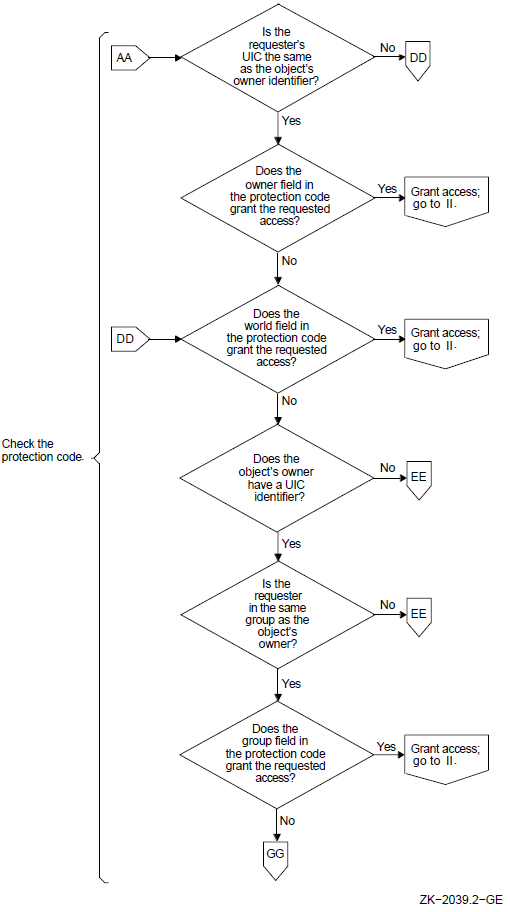
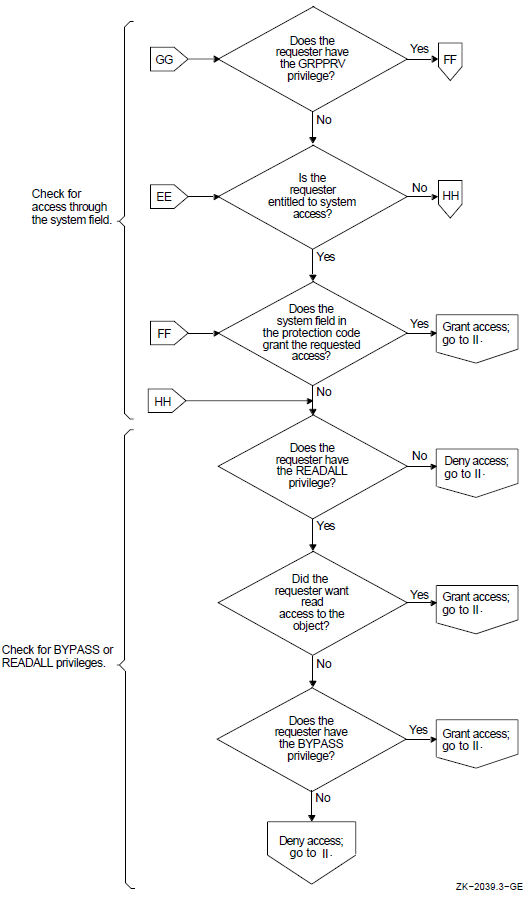
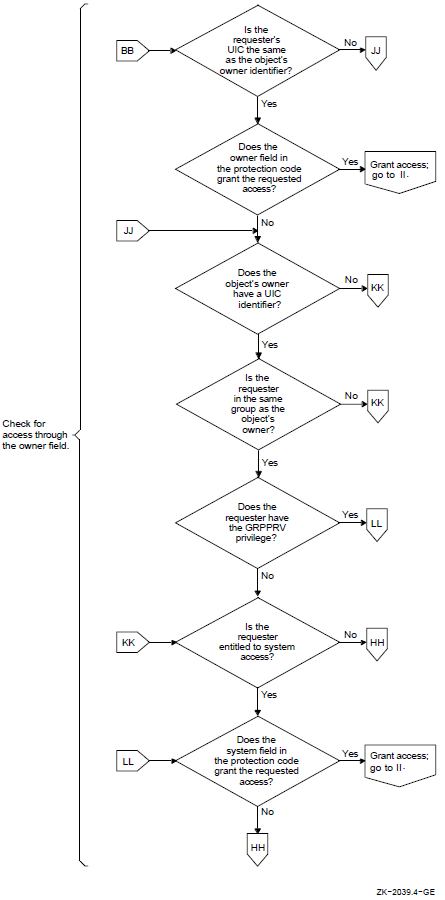
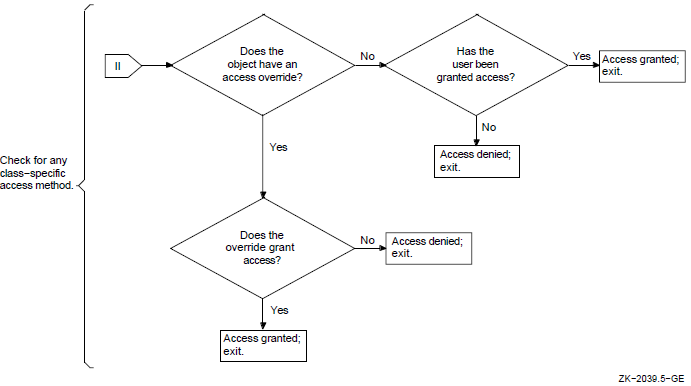
4.4. Controlling Access with ACLs
Section 4.2.2.3, ''Access Control List (ACL)'' introduced access control lists (ACLs) as one element of an object's security profile. This section explores this protection mechanism in depth and provides examples of how to use ACLs effectively to protect objects.
Many users do not need to bother with ACLs because the protection codes that the operating system automatically assigns to objects are often sufficient. But there are times when you need to allow specific users access to your files, for example, when you are working on a common project. Because ACLs are an effective mechanism for protecting critical system files, devices, volumes, and other protected objects, system managers and security administrators use ACLs more often than general users.
4.4.1. Using Identifier Access Control Entries (ACEs)
Each entry in an access control list (ACL) is called an access control entry (ACE). An ACL can have many entries, each of which defines some attribute of an object. There are many kinds of ACEs, which you can read about in the relevant section in the VSI OpenVMS System Management Utilities Reference Manual, Volume I: A–L. Of interest here is the Identifier ACE, which controls access to objects.
An Identifier ACE includes one or more rights identifiers and a list of the types of access the users holding the identifier have permission to exercise. When the system evaluates a user's rights to an object, it scans the object's ACL until it finds an Identifier ACE that matches one or more rights identifiers held by the accessing user; it grants or denies access based on that entry.
The types of access that are granted (or denied) by an ACE depend on the object you are protecting. For example, you can read, write to, execute, and delete a file; whereas you can perform physical and logical operations on a device as well as reading and writing to it. Thus, a file supports read, write, execute, and delete access, and a device supports read, write, physical, and logical access. See Chapter 5, "Descriptions of Object Classes" for information on the types of access other object classes support.
To create an ACL with an Identifier ACE, use the DCL command SET
SECURITY in the following format:
SET SECURITY/ACL=(IDENTIFIER=identifier,ACCESS=access-type)
For example, to let user Fred read your file PROJECT-DATA.TXT, you would enter
the following command:
$ SET SECURITY/ACL=(IDENTIFIER=FRED,ACCESS=READ) PROJECT-DATA.TXT
The term FRED is the member name of a user identification code (UIC). As such,
it serves as a UIC identifier for the entry that grants user Fred read access to
the file PROJECT-DATA.TXT.
4.4.2. Granting Access to Particular Users
Because identifiers define the rights of individual users or groups of users (see Section 4.1.6.1, ''Types of Identifiers''), you use them in an Identifier ACE to define the access granted (or denied) to those who hold them. A UIC identifier easily identifies an individual user or a group of users on the system. When a group of users from diverse functional groups (and therefore, diverse UIC groups) all need access to a protected object, a security administrator creates a general identifier and grants the identifier to all the users who need access.
For example, the following command grants user Pat, who is identified by the UIC identifier
[PAT], read, write, and execute access to a
file located in the ROBERTS directory on DISK1. The ACL denies Pat
delete and control access because it omits them from the access statement:
$ SET SECURITY/ACL=(IDENTIFIER=[PAT],ACCESS=READ+WRITE+EXECUTE)- _$ DISK1:[ROBERTS]JULY-SALES.TXT
A security administrator uses the Authorize utility to create a general identifier and
grant it to all users who need to use it. Assume, for example, that a security administrator has
created and assigned the identifier PAYROLL to employees who need access to a payroll file. For
the holders of the identifier to actually access the file, the administrator has to add an
Identifier ACE to the file. For example, the following command creates an ACL for the
PAYROLL file that gives holders of the PAYROLL identifier read access
to the file:
$ SET SECURITY/ACL=(IDENTIFIER=PAYROLL,ACCESS=READ) PAYROLL.DAT
The order of ACEs in an ACL is important because of the operating system's processing rules. See Section 4.4.6, ''Ordering ACEs Within a List'' for information on ordering ACEs.
4.4.3. Preventing Users from Accessing an Object
Besides providing access to objects, an Identifier ACE is often used to deny certain users access to an object. Some sites might use an ACL to restrict users who log in from a modem or over the network. Other sites might place a restricting ACE on expensive equipment or volumes containing sensitive files.
To deny all access to holders of a particular identifier, use the NONE keyword as the
access type name. For example, the following command denies holders of the environmental
identifier DIALUP any access to the files in the PROJECT-ACCOUNTS
directory:
$ SET SECURITY/ACL=(IDENTIFIER=DIALUP,ACCESS=NONE)- _$ /CLASS=FILE PROJECT-ACCOUNTS.DIR
Denying access with the NONE keyword requires some additional planning. You must position the ACE correctly in the ACL, as Section 4.4.6, ''Ordering ACEs Within a List'' describes, because the operating system grants or denies access based on the first matching ACE. Alternatively, you can eliminate any access allowed through the group or world category of the protection code (see Section 4.3, ''How the System Determines If a User Can Access a Protected Object'' and Section 4.5.5, ''Enhancing Protection for Sensitive Objects'', in particular.) Security administrators may also want to rescind privileges that can override the matching ACE.
4.4.4. Limiting Access to a Device
Although a security administrator may want to provide access to a common file, such as the payroll file described in Section 4.4.2, ''Granting Access to Particular Users'', the administrator would want to ensure that only a limited number of people could use the letter-quality printer designated for printing checks. Otherwise, any holder of the payroll identifier could access the check forms that are always loaded in the printer TTA8.
As the check printer in the current example is never used for logins and no queues are
directed to it, the security administrator can add an ACL to the printer to ensure that only one
user, McGrey, is allowed read and write access. At the
same time, the administrator must block printer access for all other identifier holders. The
following command sequence creates such an ACL:
$ SET SECURITY/ACL=((IDENTIFIER=MCGREY,ACCESS=READ+WRITE)- _$ (IDENTIFIER=*,ACCESS=NONE))/CLASS=DEVICE TTA8
While McGrey acquires read and write access, all
other users are denied access with the NONE keyword, explained in Section 4.4.3, ''Preventing Users from Accessing an Object''. Still, the ACL on the printer TTA8 might not
work exactly as intended until the security administrator modifies the printer's protection
code. See Section 4.5.5, ''Enhancing Protection for Sensitive Objects'' for details.
4.4.5. Limiting Access to an Environment
With an Identifier ACE, it is possible to provide conditional access by combining certain
kinds of identifiers. A common situation is to use a UIC identifier with one of the
environmental identifiers like batch or interactive. (For a complete list of environmental
identifiers, see Section 4.1.6.1, ''Types of Identifiers''.) Thus, a user can access a protected object only when
running in batch mode or interactively but never over a dialup line. For example, the next
command grants user Fred both submit and manage access to
a print queue, but only while he is running a batch job:
$ SET SECURITY/ACL=(IDENTIFIER=[FRED]+BATCH,ACCESS=SUBMIT+MANAGE)-
_$ /CLASS=QUEUE SYSTEM6$LPA04.4.6. Ordering ACEs Within a List
An ACL can contain one entry or many entries. With multiple ACEs, the order of the entries is critical because the system determines access based on the first matching ACE. The operating system searches an ACL sequentially and grants a user the access specified in the first matching ACE, thus ignoring all subsequent entries. See Section 4.3, ''How the System Determines If a User Can Access a Protected Object'' for a description of the evaluation process.
ACEs giving access to critical users belong at the top of the list.
ACEs giving specific access to smaller groups belong before ACEs giving access to larger groups.
ACEs giving more access rights belong before ACEs giving fewer access rights, unless you mean to selectively deny access.
The following ACL on the directory file PROJECT-ACCOUNTS.DIR demonstrates how
to order entries in an ACL. It places ACEs giving access to critical users (Jones
and Fred) at the top of the list and places general ACEs after them. The ACE
denying access goes at the end:
$ SET SECURITY/ACL=( - _$ (IDENTIFIER=[ACCOUNTING,JONES],ACCESS=READ+WRITE+EXECUTE),- _$ (IDENTIFIER=[FRED]+BATCH,ACCESS=READ+WRITE+EXECUTE),- _$ (IDENTIFIER=PAYROLL,ACCESS=READ),- _$ (IDENTIFIER=DIALUP,ACCESS=NONE)) PROJECT-ACCOUNTS.DIR
The ACL on the project accounts directory allows read, write, and
execute access to Jones all the time and to Fred while
he is running a batch job. It gives read access to users holding the
PAYROLL identifier. All users who are logging in from a modem are denied access
unless they gain access through an earlier ACE. For example, Jones, Fred, or holders of the
PAYROLL identifier might be dialing in, but, because their ACE precedes the DIALUP
ACE, they would be granted access.
The next example shows an ACL for the data file STAFFING.DAT. It demonstrates
how you place the entry providing the greatest amount of file access at the top of an
ACL:
$ SET SECURITY/ACL=( - _$ (IDENTIFIER=SECURITY,OPTIONS=PROTECTED,ACCESS=READ+WRITE+EXECUTE+DELETE+CONTROL),- _$ (IDENTIFIER=PERSONNEL,ACCESS=READ+WRITE+EXECUTE+DELETE),- _$ (IDENTIFIER=SECRETARIES,ACCESS=READ+WRITE),- _$ (IDENTIFIER=[PUB,*],ACCESS=READ),- _$ (IDENTIFIER=NETWORK,ACCESS=NONE),- _$ (IDENTIFIER=[SALES,JONES],ACCESS=NONE)) STAFFING.DAT
In this ACL, any users holding the SECURITY identifier obtain maximum access
rights through the first ACE, and users holding the PERSONNEL identifier have the
next greatest access. User Jones is prohibited from any access to the file unless
Jones also happens to hold one of the general identifiers. (This might be an
oversight on the part of the creator of the ACL.) If you want to be absolutely certain that user
Jones cannot gain access to the file, move the entry at the bottom of the ACL to
the top.
4.4.7. Establishing an Inheritance Scheme for Files
You can create a plan for controlling access to files within a directory or a directory structure, develop an appropriate ACL for the files, and then direct the operating system to automatically assign this ACL to new files. To do this, create an Identifier ACE with the Default attribute, and then add the ACE to the directory file cataloging the files you want to affect. Use the OPTIONS keyword to include the Default attribute.
For example, if you want all new files in the directory [MALCOLM] to have an
ACL entry that permits read and write access to users with the
PERSONNEL identifier, you can add the following ACE to the file
MALCOLM.DIR:
$ SET SECURITY/ACL=(IDENTIFIER=PERSONNEL,OPTIONS=DEFAULT,- _$ ACCESS=READ+WRITE) [000000]MALCOLM.DIR
As a result of this ACE, any file created in the [MALCOLM] directory has the
following ACL:
$ SHOW SECURITY APRIL_INTERVIEWS.TXT
WORK_DISK$:[MALCOLM]APRIL_INTERVIEWS.TXT;1 object of class FILE
Owner: [SALES,MALCOLM]
Protection: ...
Access Control List:
(IDENTIFIER=PERSONNEL,ACCESS=READ+WRITE)
.
.
.Notice that the Default attribute does not appear within a new file's ACL but
only in the ACL of directory files. However, any subdirectory created in the
MALCOLM directory automatically has the entry
(IDENTIFIER=PERSONNEL,OPTIONS=DEFAULT,ACCESS=READ+WRITE) as part of its ACL. In
this way, the ACE is propagated throughout the entire directory tree.
The ACE is not applied retroactively to existing versions of files in MALCOLM.DIR. To
attach an ACE to existing files, you can use the /DEFAULT qualifier,
described in Section 4.5.7, ''Restoring a File's Default Security Profile'', or use the following command:
$ SET SECURITY/ACL=(IDENTIFIER=PERSONNEL,ACCESS=READ+WRITE)- _$ [MALCOLM]*.*;*
Any ACE with a Default attribute controls only the propagation of the ACE; it has no effect on access control. To control access to the directory as well as all its files, you have to insert two ACEs in the directory's ACL, as follows:
$ SET SECURITY/ACL=- _$ ((IDENTIFIER=PERSONNEL,ACCESS=READ+WRITE),- _$ (IDENTIFIER=PERSONNEL,OPTIONS=DEFAULT,ACCESS=READ+WRITE))- _$ [000000]MALCOLM.DIR
4.4.8. Displaying ACLs
The DCL command SHOW SECURITY displays an object's ACL. When working
with objects other than files, you must supply a class name as well as the object name. For
example, the following display shows the security attributes of a device called
PPA0. It is owned by the operating system, and its protection code gives full
access (read, write, physical, and logical)
to users in the system and owner categories but no access to
group and world users; its ACL gives control access to user
Svensen:
$ SHOW SECURITY /CLASS=DEVICE PPA0:
_ACCOUNTS$PPA0: object of class DEVICE
Owner: [SYSTEM]
Protection: (System: RWPL, Owner: RWPL, Group, World)
Access Control List:
(IDENTIFIER=[ADMIN,SVENSEN],ACCESS=CONTROL)SHOW SECURITYDIRECTORY/ACLDIRECTORY/SECURITYDIRECTORY/FULLSHOW LOGICAL/FULL/STRUCTURESHOW DEVICE/FULLSHOW QUEUE/FULL
Applications sometimes add a hidden attribute to an ACE to indicate that the ACE should be changed only by the application that adds the ACE. Unless users have the SECURITY privilege, they cannot display a hidden ACE by using DCL commands. The ACL editor does display ACEs holding the Hidden attribute but only to show its relative position within the ACL; however, unauthorized users cannot edit the ACE.
Sometimes you see other kinds of ACEs, unrelated to access control, in an ACL. For example, if the security administrator places a security-auditing ACE on the LN03$PRINT queue, you will see an ACE at the top of the list that has the format (AUDIT=SECURITY,ACCESS=access-types). Such an ACE is part of the security-auditing system and has no effect on access, so you can ignore it.
4.4.9. Adding ACEs to an Existing ACL
Section 4.4.2, ''Granting Access to Particular Users'' through Section 4.4.5, ''Limiting Access to an Environment'' discuss how to
add entries to an empty ACL with the DCL command SET SECURITY. To modify ACLs
extensively, use the ACL editor; however, in many cases the SET SECURITY
command is more appropriate. This section and those that follow describe how to use SET
SECURITY to change an ACL.
To add more entries to an ACL, you can use the /ACL qualifier with the
SET SECURITY command and specify the new ACEs. For example, to give the
writers access to the print queue LN03$PRINT, use the following
command:
$ SET SECURITY/CLASS=QUEUE/ACL=(IDENTIFIER=WRITERS,-
_$ ACCESS=READ+WRITE) LN03$PRINTBy default, the system places the new ACE at the top of the ACL, as you see in the
following SHOW SECURITY display:
$ SHOW SECURITY /CLASS=QUEUE LN03$PRINT _LN03$PRINT: object of class QUEUE Owner: [SYSTEM] Protection: (System: RWPL, Owner: RWPL, Group, World) Access Control List: (IDENTIFIER=WRITERS,ACCESS=READ+WRITE) (IDENTIFIER=[PUB,*],ACCESS=READ) (IDENTIFIER=NETWORK,ACCESS=NONE)
Because the default behavior for SET SECURITY is to place a new ACE at
the top of an ACL, you need to use the /AFTER qualifier if you want to put
the ACE in another position. For example, to position the TRADERS ACE in the
queue's ACL after the WRITERS ACE:
$ SET SECURITY/CLASS=QUEUE/ACL=(IDENTIFIER=TRADERS,ACCESS=WRITE)-
_$ /AFTER=(IDENTIFIER=WRITERS,ACCESS=READ+WRITE) LN03$PRINTThe resulting display confirms the effectiveness of the /AFTER
qualifier. The new ACE is put second in the list:
$ SHOW SECURITY /CLASS=QUEUE LN03$PRINT _LN03$PRINT: object of class QUEUE Owner: [SYSTEM] Protection: (System: RWPL, Owner: RWPL, Group, World) Access Control List: (IDENTIFIER=WRITERS,ACCESS=READ+WRITE) (IDENTIFIER=TRADERS,ACCESS=WRITE) (IDENTIFIER=[PUB,*],ACCESS=READ) (IDENTIFIER=NETWORK,ACCESS=NONE)
4.4.10. Deleting an ACL
The /DELETE qualifier on the SET SECURITY command
erases an ACL. Depending on how the qualifier is used, you can delete all or part of an ACL. For
example, the following command deletes a disk's ACL:
$ SET SECURITY/CLASS=DEVICE/ACL/DELETE DUA0
An ACE can be protected against inadvertent deletion if it holds the
Protected attribute. To eliminate a protected ACE, you need to delete it
explicitly or use the /DELETE=ALL qualifier on the SET
SECURITY/ACL command.
4.4.11. Deleting ACEs from an ACL
You can eliminate a subset of an ACL by listing the unwanted ACEs with the
/ACL qualifier and including the /DELETE qualifier. For
example, the following command deletes the ACEs giving holders of the TRADERS
identifier and the NETWORK identifier write access to volume
DBA0:
$ SET SECURITY/CLASS=VOLUME/ACL=- _$ (IDENTIFIER=TRADERS,ACCESS=WRITE),- _$ (IDENTIFIER=NETWORK,ACCESS=WRITE)/DELETE DBA0:
4.4.12. Replacing Part of an ACL
To replace one contiguous set of ACEs within an ACL with another set, specify the new ACEs
with the /REPLACE qualifier and the ACEs to be deleted with the
/ACL qualifier, as follows:
$ SET SECURITY/CLASS=VOLUME/ACL=(IDENTIFIER=TRADERS,ACCESS=WRITE)- _$ /REPLACE=((IDENTIFIER=RESEARCH,ACCESS=WRITE)- _$ (IDENTIFIER=STATE_DEPARTMENT,ACCESS=READ+WRITE),- _$ (IDENTIFIER=ENERGY_DEPARTMENT,ACCESS=READ+WRITE)- _$ DBA0:
The TRADERS ACE specified by /ACL is deleted. Following the
deletion, the ACEs specified by the /REPLACE qualifier
(RESEARCH, STATE_DEPARTMENT, ENERGY_DEPARTMENT) are
inserted at the location of the old ACE.
4.4.13. Restoring a File's Default ACL
If you want to restore the default ACL to a file, you can use the
/DEFAULT qualifier to the SET SECURITY command. This
qualifier regenerates the full security profile for a file. See Section 4.5.7, ''Restoring a File's Default Security Profile'' for a description.
4.4.14. Copying an ACL
You can copy the security profile of one object to another by using the
/LIKE qualifier to the SET SECURITY command. For example,
you can save a complicated ACL on a nonpermanent object like a logical name table by copying it
to a permanent object such as a file. Some administrators create a file to serve as a template
in copy operations. This way, they can easily transfer an ACL from one object to another. For
example, the following command copies the ACL from file ACL_TEMPLATE.TXT to the
logical name table LNM$GROUP:
$ SET SECURITY/LIKE=NAME=ACL_TEMPLATE.TXT-
_$ /COPY_ATTRIBUTE=ACL/CLASS=LOGICAL_NAME_TABLE LNM$GROUPIf you add the /COPY_ATTRIBUTE qualifier to the /LIKE
qualifier, then you can copy one or two elements rather than the complete profile. Notice the
ACL on the following directory, KITE_FLYING:
$ SHOW SECURITY [000000]KITE_FLYING.DIR;1 -
WORK_DISK$:[000000]KITE_FLYING.DIR;1 object of class FILE
Owner: [PROJECTX]
Protection: (System: RWED, Owner: RWED, Group:, World)
Access Control List:
IDENTIFIER=PROJECTX,ACCESS=READ+WRITE+EXECUTE
IDENTIFIER=PROJECTX,OPTIONS=DEFAULT,ACCESS=READ+WRITE+EXECUTEThe following command copies the ACL from directory KITE_FLYING to the
directory KITE_DESIGNS:
$ SET SECURITY/LIKE=KITE_FLYING.DIR;1 -
_$ /COPY_ATTRIBUTE=ACL KITE_DESIGNS.DIR;1
$ SHOW SECURITY [000000]KITE_DESIGNS.DIR;1 -
WORK_DISK$:[000000]KITE_DESIGNS.DIR;1 object of class FILE
Owner: [ENGINEERING]
Protection: (System: RWED, Owner: RWED, Group:R, World:R)
Access Control List:
IDENTIFIER=PROJECTX,ACCESS=READ+WRITE+EXECUTE
IDENTIFIER=PROJECTX,OPTIONS=DEFAULT,ACCESS=READ+WRITE+EXECUTEThe SET SECURITY/LIKE command does not always duplicate the entire ACL
of the source object. For example, the command does not copy any ACEs from the source ACL that
have the Nopropagate attribute. The command also does not overwrite protected ACEs. It preserves
protected ACEs on the target object and adds them to the ACL being copied. (For example,
applications often use a special type of protected ACE to explain how to display file data
correctly, and these ACEs have to be preserved.)
Refer to the ACL editor documentation in the VSI OpenVMS System Management Utilities Reference Manual, Volume I: A–L for details on the different attributes an ACE can have, and refer to the relevant section in the VSI OpenVMS Programming Concepts Manual, Volume II for a description of all ACE types.
4.5. Controlling Access with Protection Codes
A protection code controls the type of access allowed (or denied) to a particular user or group of users. Access types identify the capabilities required to perform an operation on a protected object. The operating system can have multiple access requirements to complete an operation (see Section 4.7.2, ''Enabling Auditing for a Class of Objects''). A user can gain access to an object as soon as the operating system finds a category within the protection code for which the user qualifies that allows the access requested (provided an ACL does not deny access).
4.5.1. Format of a Protection Code
A protection code has the following format:
[user-category: access-list (, user-category: access-list,...)]
user-category
- System: Members of this category can include any of the following:
Users with low group numbers, usually from 1 to 10 (octal). These group numbers are generally for system managers, security administrators, and system programmers.?
Users with the SYSPRV privilege.
Users with the GRPPRV privilege whose UIC group matches the UIC group of the object's owner.
In access requests to files on a disk volume, users whose UIC matches the UIC of the volume's owner.
Owner: The user with the same UIC as the user who currently owns the object. In general, the creator of an object is entitled to owner access unless explicit action is taken to secure the object from its creator.
Group: All users who are in the same UIC group as the object's owner.
World: All users, including those in the first three categories.
When specifying more than one user category, separate the categories with commas, and enclose the entire code in parentheses. You can specify user categories and access types in any order (although the system always displays them in the order system, owner, group, world).
To deny all access to a user category, specify the user category without any access types. Omit the colon after the user category when you are denying access to a category of users.
Omitting a category entirely means access to the category is unspecified. The current
access allowed that category of user remains unchanged. If the protection code applies to an
object being created (for example, with a COPY/PROTECTION command), the
omitted category is assigned the default value.
access-list
Access types are object-dependent and are described in Chapter 5, "Descriptions of Object Classes". For files, the access types include read (R), write (W), execute (E), and delete (D). The access type is assigned to each user category and is separated from its user category by a colon (:), for example:
SET SECURITY/PROTECTION=(S:RWE,O:RWE,G:RE,W)
4.5.2. Types of Access in a Protection Code
Each category of user can be allowed or denied different types of access. The exact type is dependent on the object being protected. Each object class defines access types appropriate for its class and representative of the ways in which users operate on the data. For example, while the file object supports read, write, execute, and delete access, devices (such as terminals, printers, and disks) support read, write, physical I/O, and logical I/O access. See Chapter 5, "Descriptions of Object Classes" for a listing of the access types each object class supports.
All protected objects also support control access, which allows a user to examine and modify the security elements (ACL, protection code, UIC) and possibly other attributes of the object. Control access is explicitly stated in an ACL but never appears in the UIC-based protection code. All users who qualify for the system or owner categories of a protection code have control access. Users in the group and world categories never receive control access through a protection code, but they could receive access through an ACL. See Section 4.6.2, ''Using Control Access to Modify an Object Profile'' for more information.
The capabilities conveyed by the access types read, write, execute, delete, and control vary depending on the situation where they apply. For example, execute access permits different operations depending on whether it is granted for file access or directory access. Chapter 5, "Descriptions of Object Classes" explains the capabilities that each access type allows for each type of protected object.
4.5.3. Processing a Protection Code
When the system evaluates a protection code, it looks first at the owner field, then at the world field, the group field, and finally the system field. As soon as a user qualifies as a member of the category and that category grants the necessary access, the operating system stops processing the code (see Figure 4.3, ''Flowchart of Access Request Evaluation'').
The following protection code specifies that users in the system and owner categories have
read (R), write (W), execute (E), and delete
(D) access, while users in the group and world categories have only read and
execute access:
$ SET SECURITY/PROTECTION=(SYSTEM:RWED, OWNER:RWED, GROUP:RE, WORLD:RE)- _$ TAXES_91.DAT
When you want to deny access to a user category, you must deny access to all the outermost categories. As Section 4.5.1, ''Format of a Protection Code'' shows, any user process or application qualifies for world access. The group category is more restrictive yet not as restrictive as the owner and system categories.
The following protection code, for example, appears to deny delete access to
the owner category:
$ SHOW SECURITY TAXES_91.DAT
WORK_DISK$:[GREG]TAXES_91.DAT;1 object of class FILE
Owner: [FINANCE,GREG]
Protection: (System: RWED, Owner: RW, Group:RW, World:RWED)
Access Control List: ...However, the owner of the file can still delete the file. Although delete
access is not allowed through the owner category, the system continues to check the
remaining categories for permission to grant access. Because the owner also fits in the
world category (which applies to all users) and the world category is
permitted delete access, the system grants delete access to the owner.
4.5.4. Changing a Protection Code
You can change the UIC-based protection on an existing object with the SET
SECURITY command. The following command modifies the protection code of the file
SURVEY.DIR so that anyone in the system and owner
categories has read, write, execute, and
delete access; whereas members of the group and world
categories have read and execute access:
$ SET SECURITY/PROTECTION=(SYSTEM:RWED,OWNER:RWED, - _$ GROUP:RE,WORLD:RE) SURVEY.DIR
Whenever you omit a category from a protection code, the current access remains unchanged.
For example, consider the protection code for the file RECORDS_91.DAT:
$ SHOW SECURITY RECORDS_91.DAT
WORK_DISK$:[GREG]RECORDS_91.DAT object of class FILE
Owner: [VMS,GREG]
Protection: (System: RWED, Owner: RWED, Group: RWED, World: RE)As it stands, the file RECORDS_91 allows read,
write, execute, and delete access to users in the
system, owner, and group categories; it allows
read and execute access to users in the world category.
The following DCL command resets the protection code for RECORDS_91.DAT to deny
write and delete access to the group category and to
deny all access to the world category:
$ SET SECURITY/PROTECTION=(G:RE,W) RECORDS_91.DAT
The next command confirms the modified protection code. It shows that the
system and owner categories of users continue to hold
read, write, execute, and delete access,
while group users have only read and execute access and
world users have no access.
$ SHOW SECURITY RECORDS_91.DAT
WORK_DISK$:[GREG]RECORDS_91.DAT object of class FILE
Owner: [VMS,GREG]
Protection: (System: RWED, Owner: RWED, Group: RE, World:)4.5.5. Enhancing Protection for Sensitive Objects
Section 4.4.4, ''Limiting Access to a Device'' describes how to place an ACL on an important printer so that only one user can have access to it. Before the ACL can be effective, however, the security administrator has to eliminate all access provided through the printer's protection code by using the following command:
$ SET SECURITY/PROTECTION=(S,O,G,W)/CLASS=DEVICE TTA8:
The security administrator then uses an ACL to assign access explicitly.
For example, to limit access to a queue, you can remove submit access for the world
category. Then you can set up an ACL that specifies which users (from the world category) are
permitted to submit jobs to the queue. The following command stipulates that only holders of the
identifier PROJECTX can submit jobs to the LN03$PRINT queue:
$ SET SECURITY/CLASS=QUEUE/PROTECTION=(W) -
_$ /ACL=(IDENTIFIER=PROJECTX,ACCESS=SUBMIT) -
_$ LN03$PRINTImportant files frequently need special protection. You can prevent users from seeing the contents of a directory by denying them read access. To further protect the files, you can add a Default Protection ACE to the directory file, as Section 4.5.6, ''Providing a Default Protection Code for a Directory Structure'' describes.
4.5.6. Providing a Default Protection Code for a Directory Structure
To specify default protection for new files in a particular directory, place a Default Protection ACE in the ACL of the directory file. The Default Protection ACE affects files that are subsequently created in the directory and in any subdirectories under that directory unless protection is specified for one of those files individually. This ACE type has the following format:
(DEFAULT_PROTECTION[,options],protection-code)
For example, the following ACE specifies that users in the system and
owner categories have read, write, execute,
and delete access to any files subsequently created in the directory and that
group and world users have no access:
$ SET SECURITY/ACL=(DEFAULT_PROTECTION,S:RWED,O:RWED,G,W) ARCHIVE.DIR
Be aware that the default protection is associated only with newly created files – not existing files in the current directory and its subdirectories. If you add a Default Protection ACE to a directory file and want the same protection applied to existing files, you must explicitly change the protection with the following command:
$ SET DEFAULT [ARCHIVE] $ SET SECURITY/PROTECTION=(S:RWED,O:RWED,G,W) [...]*.*;*
4.5.7. Restoring a File's Default Security Profile
The /DEFAULT qualifier of the SET SECURITY command
regenerates the security profile of a file. The /DEFAULT qualifier resets the
protection code, the ACL, and the owner elements of the file to the defaults specified by the
file's parent directory (that is, to the directory's default ACL, default protection ACE, if
any, and owner UIC).
The protection code is propagated from the Default Protection ACE on the directory (if one exists), or else it is propagated from the process default.
The ACL is propagated from the parent directory for those ACEs that have the Default attribute.
The owner is set to the owner of the parent directory. (Be aware that modifying a file's owner generally requires privilege; see Section 5.4.2, ''Types of Access ''.)
With subdirectory files, SET SECURITY assigns the owner, protection, and
ACL elements of the parent directory. SET SECURITY does not copy any ACE on
the source object if it holds the Nopropagate attribute, nor does it change any ACE on the
target object if it holds the Protected attribute. To apply new elements to all versions of the
file, specify ;* in the object name.
Refer to Section 5.4.5, ''Profile Assignment'' for more information on propagation rules.
4.6. Understanding Privileges and Control Access
Although an object can be carefully protected by an ACL and a protection code, a user can still gain access through the use of privilege or control access.
4.6.1. How Privileges Affect Protection Mechanisms
|
BYPASS |
A user with BYPASS privilege receives all types of access to the object, regardless of its protection. |
|
GRPPRV |
A user with GRPPRV privilege whose UIC group matches the group of the owner of the object receives the same access accorded to users in the system category. Thus, the user with GRPPRV privilege is able to manage any of the group's objects. |
|
READALL |
A user with READALL privilege receives read access to the object, even if that access is denied by the ACL and the protection code. In addition, the user can receive any other access granted through the protection code. |
|
SYSPRV |
A user with SYSPRV privilege receives the access accorded to users in the system category. |
When you define ACLs or protection codes for your objects, remember that users with amplified privileges are entitled to special access to objects throughout the system. For example, there is no way to stop a user with the BYPASS privilege from accessing your files. Users with GRPPRV privilege have the power to perform many system management functions for other members of their UIC group. Protection of your objects depends on the judgment of your security administrator in granting these privileges.
4.6.2. Using Control Access to Modify an Object Profile
Any user with control access to an object can change its protection code and ACL and thereby gain access to an object. For all object classes but files, control access also allows a user to modify the object's owner. To modify the owner of a file generally requires privilege (see Section 5.4.2, ''Types of Access '').
You hold an identifier to which the object's ACL gives control access.
You have the same UIC as the owner of the object.
You qualify as a member of the system user category, and the object has an owner with a nonzero UIC. For example, you hold GRPPRV (with a matching group UIC) or SYSPRV. Refer to Section 4.5, ''Controlling Access with Protection Codes'' for a full description of system users.
You hold BYPASS privilege.
Sometimes object classes allow control access through other means. Refer to Section 4.6.3, ''Object-Specific Access Considerations'' and to the individual descriptions of classes in Chapter 5, "Descriptions of Object Classes" for any special conditions that may apply.
4.6.3. Object-Specific Access Considerations
For some objects, access can be granted either by a special privilege (beyond those listed in Section 4.6.1, ''How Privileges Affect Protection Mechanisms'') or by an all-inclusive type of access. This is particularly true of a queue. A user with operator (OPER) privilege is granted all types of access to a queue. A user with manage access implicitly possesses the three other types of queue access: read, submit, and delete. Chapter 5, "Descriptions of Object Classes" lists each object class with its access types and meanings and any special privilege.
4.7. Auditing Protected Objects
Whenever a process uses an object or modifies its security profile (see Section 4.2.4, ''Modifying a Security Profile''), the system can send an alarm to an operator terminal or write a message to the audit log file. By reading the log file, a security administrator can review system activity to see how protected objects are being used, when they are being used, and who is using them.
Exactly which type of information is reported through the auditing system depends on how the security administrator defines the site's requirements. If system administrators choose to have object use audited, they can enable auditing for the appropriate categories of events.
The operating system can filter security-related events and send system administrators messages only when objects are accessed in certain ways. Sites are often more interested in the privileged use of a file or the failure to access a file than in every file access. Such a site can request auditing messages whenever a process fails in accessing a file, but not when it is successful. The system can report how the process exercised, or failed to exercise, the right to access the object in the first place: through a protection code, an ACE, or a privilege.
4.7.1. Kinds of Events the System Audits
Each object class has its own auditing profile, described in Chapter 5, "Descriptions of Object Classes", and so it is possible to receive more information on some classes of objects than on others. For any object, the system can send an auditing message whenever a user or application accesses the object or modifies its security elements. In some instances, the system can send a notification when a process creates an object, stops using it (deaccesses it), or deletes it.
4.7.2. Enabling Auditing for a Class of Objects
When you are auditing object access events, keep in mind that the operating system may check a user's right to an object several times during a single operation. A file operation, for example, can involve checks for both directory and file access. Before a user deletes a file, the system checks for delete access to the file and write access to the directory.
For this reason, it is best for a security administrator to enable auditing for all types
of object access events. For example, to track all instances where a user tries to access a file
but fails, a security administrator would use the /ENABLE=ACCESS=FAILURE=ALL
qualifier to the SET AUDIT command.
For object classes that support deaccess auditing (for example, the file class), once a process gains access to an object, the system does not audit subsequent access attempts to the object unless the process attempts an operation that is incompatible with the access modes previously granted. When this occurs, the system performs an additional protection check that is audited. This access window continues until the object is deaccessed (for example, the file is closed).
4.7.3. Adding Security-Auditing ACEs
Rather than audit an entire class of objects, security administrators and users with control access to an object can single out a specific object for auditing by attaching an Alarm or Audit ACE to it (see Section 3.10.2, ''Adding Access Control Entries to Sensitive Files''). Although you can add an auditing ACE to any file that you own or have control access to, it is best to consult your security administrator before doing so. As with object classes, the security administrator has to enable the ACL auditing category before any auditing messages are generated.
Chapter 5. Descriptions of Object Classes
|
Topic |
Description |
|---|---|
|
Naming rules |
A summary of naming conventions for objects in the class. |
|
Types of access |
Access types supported for the class. Boldface type indicates the abbreviation of an access type, such as R for read access. |
|
Template profile |
The default profile applied to new objects of the class. Site
security administrators can modify the default profiles. Use the
|
|
Privilege requirements |
Privileges, if any, required for certain operations on the object. |
|
Kinds of auditing performed |
Events that trigger an audit event message (assuming the event class is enabled). |
|
Permanence of the object |
Storage of security profiles. Explains if the security elements are stored from one system startup to another and if so, where the elements are stored. |
If a given topic does not apply to a class, the topic is omitted.
5.1. Capabilities
A capability is a resource to which a site controls access, using the standard access control mechanisms. The ability to execute vector instructions is a capability object. Only sites with a vector processor have such an object.
5.1.1. Naming Rules
The only valid name for a capability object is VECTOR.
5.1.2. Types of Access
|
Use |
Gives a process the right to make use of the vector processor |
|
Control |
Gives you the right to change the protection and ownership elements of the object |
5.1.3. Template Profile
|
Template Name |
Owner UIC |
Protection Code |
|---|---|---|
|
DEFAULT |
[SYSTEM] |
S:U,O:U,G:U,W:U |
Modifications to the VECTOR template take effect the next time you boot the system. If you want to change the elements of the VECTOR object after the system is booted, you must modify the object directly. For example:
$ SET SECURITY/CLASS=CAPABILITY/PROTECTION=(S:U,O:U,G:U,W) VECTOR
5.1.4. Kinds of Auditing Performed
|
Event Audited |
When Audit Occurs |
|---|---|
|
Access |
The first time after image activation that the process uses a vector instruction |
5.1.5. Permanence of the Object
The capability object's security profile needs to be reset each time the system starts up.
5.2. Common Event Flag Clusters
A common event flag cluster is a set of 32 event flags that enable cooperating processes to post event notifications to each other.
Event flags in the cluster can be set or cleared to indicate the occurrence of an event. All event flags are contained within clusters of 32 event flags, and each process has access to four clusters (numbered 0 through 3). Two of the clusters are local to a single process. Event flag clusters 2 and 3 are called common event flag clusters and are used for interprocess synchronization. A subject may be associated with up to two common event flag clusters. Each common event flag in a cluster is referenced by an event flag number.
5.2.1. Naming Rules
The name of the object is whatever character string was supplied as an argument to the Associate Common Event Flag Cluster system service ($ASCEFC). Remember that common event flag cluster names are qualified by your UIC group number.
5.2.2. Types of Access
|
Associate |
Gives a process the right to establish an association with the named cluster so the process can access event flags. |
|
Delete |
Gives a process the right to mark a permanent event flag cluster for deletion with the Delete Common Event Flag Cluster ($DLCEFC) system service. The actual deletion occurs once all processes disassociate from the cluster. |
|
Control |
Gives you the right to modify the protection elements of the common event flag cluster. |
5.2.3. Template Profile
|
Template Name |
Owner UIC |
Protection Code |
|---|---|---|
|
DEFAULT |
[0,0] |
S:AD,O:AD,G:A,W |
When the process creating the common event flag cluster supplies a prot argument to $ASCEFC that has a value of 1, then the system modifies the template so the process UIC is the owner, and the protection code denies group access.
5.2.4. Privilege Requirements
Creation of a permanent common event flag cluster requires the PRMCEB privilege. This privilege also grants delete access for permanent clusters.
5.2.5. Kinds of Auditing Performed
|
Event Audited |
When Audit Occurs |
|---|---|
|
Creation |
When the first process to associate with a particular cluster calls $ASCEFC |
|
Access |
Whenever subsequent callers to $ASCEFC associate with the cluster |
|
Deaccess |
When a process calls $DACEFC or associates with another cluster or at image rundown |
|
Deletion |
When the process calls $DLCEFC |
5.2.6. Permanence of the Object
A common event flag cluster and its security profile need to be reset each time a system starts up.
5.3. Devices
A device is a peripheral, physically connected or logically known to a processor and capable of receiving, storing, or transmitting data. A device can be physical, like a disk or terminal, or it can be virtual, like a mailbox or pseudoterminal. Virtual devices are implemented entirely in software. Virtual terminals are considered LOCAL devices. They can be created over the network or on the local system.
5.3.1. Naming Rules
- Most physical device names consist of three parts:
A device code (dd), which represents the hardware device type.
A controller designator (c), which identifies the hardware controller to which the device is attached.
The unit number (u), which uniquely identifies a device on a particular controller.
The maximum length of the device name field, including the controller and the unit number, is 15 characters.
Logical device names equate the somewhat cryptic physical device name to a short, meaningful name. You can use these logical device names, rather than the physical device names, to refer to devices.
A generic device name consists of the device code and omits the specific controller or unit number.
A cluster device name includes the name of the node to which the device is attached and the physical device name, separated by a dollar sign ($).
See the relevant sections in the VSI OpenVMS System Manager's Manual, Volume 1: Essentials and the VSI OpenVMS User's Manual for a full description of device names.
5.3.2. Types of Access
Devices can be shared and thus have concurrent users or be unshared and have a single user.
|
Read |
Gives you the right to read data from the device |
|
Write |
Gives you the right to write data to the device |
|
Physical |
Gives you the right to perform physical I/O operations to the device |
|
Logical |
Gives you the right to perform logical I/O operations to the device |
|
Control |
Gives you the right to change the protection elements and owner of the device |
Unshared devices support only read, write, and control access. The device driver rather than the operating system's security policy defines the access requirements for other types of operations.
5.3.3. Access Requirements for I/O Operations
Assigning a channel with $ASSIGN
Assigning a channel to a nonspooled, nonshareable device requires read access, write access, control access, or any combination. Assigning a channel to a shareable device has no access requirement.
Allocating a device with $ALLOC
Allocating any device with $ALLOC requires read, write, or control access.
$QIO to spooled devices
Access is handled as described for OpenVMS mounted volumes. See the next list item, $QIO to file-oriented devices.
$QIO to file-oriented devices: disks and tapes
With file-oriented devices, logical I/O and physical I/O functions have common elements. Any logical I/O function requires physical or logical access plus read access to read a block (READLBLK) or write access to write a block (WRITELBLK). Any physical I/O function requires physical access plus either read access to read a block (READPBLK) or write access to write a block (WRITEPBLK). Logical and physical I/O also require LOG_IO and PHY_IO privileges, respectively.
Beyond this, access requirements depend on how the volume is mounted:OpenVMS supported volumes
Any virtual I/O to the volume has the same access requirements as the File or Volume class (see Section 5.4, ''Files'' and Section 5.10, ''Volumes'').
Volumes mounted foreign (
/FOREIGN)Virtual read and write functions are converted to logical I/O. All other functions are not processed by the operating system and are sent to the device driver for processing. Physical I/O functions also require PHY_IO privilege.
Devices without a mounted volume
Access to devices without mounted volumes requires privilege.
$QIO to devices that are not file-oriented
With non-file-oriented devices, OpenVMS converts virtual read and write I/O requests to logical I/O before processing them. Other kinds of access requests are not processed by OpenVMS; instead, the request is passed to the device driver for processing.
In general, access requirements for devices that are not file oriented depend on whether the device is shareable or nonshareable:Shareable device
With shareable devices, such as mailboxes, any virtual I/O function other than READVBLK/WRITEVBLK is handled by the system I/O driver program. Any logical I/O function requires privilege or logical access to the device. Any physical I/O function requires privilege or physical access to the device.
Unshareable devices
With unshareable devices, such as terminals or printers, the operating system checks only for read or write access to perform virtual and logical I/O functions. Any physical I/O function requires privilege.
|
Functions Requiring Read Access | ||
|
READHEAD |
READVBLK |
TTYREADALL |
|
READPBLK |
REREADN |
TTYREADPALL |
|
READLBLK |
REREADP | |
|
READTRACKD |
READPROMPT | |
|
Functions Requiring Write Access | ||
|
WRITECHECK |
WRITELBLK |
WRITETRACKD |
|
WRITECHECKH |
WRITEPBLK |
WRITEVBLK |
|
WRITEHEAD |
WRITERET | |
5.3.4. Template Profile
|
Template Name |
Device Type |
Owner UIC |
Protection Code |
|---|---|---|---|
|
BUS |
DC$_BUS |
[SYSTEM] |
S:RWPL, O:RWPL, G, W |
|
CARDREADER |
DC$_CARD |
[SYSTEM] |
S:RWPL, O:RWPL, G, W |
|
COMMUNICATION |
DC$_SCOM |
[SYSTEM] |
S:RWPL, O:RWPL, G, W |
|
DEFAULT |
[SYSTEM] |
S:RWPL, O:RWPL, G:RWPL, W:RWPL | |
|
DISK |
DC$_DISK |
[SYSTEM] |
S:RWPL, O:RWPL, G:R, W |
|
MAILBOX |
DC$_MAILBOX |
[SYSTEM] |
S:RWPL, O:RWPL, G:RWPL, W:RWPL |
|
PRINTER |
DC$_LP |
[SYSTEM] |
S:RWPL, O:RWPL, G, W |
|
REALTIME |
DC$_REALTIME |
[SYSTEM] |
S:RWPL, O:RWPL, G:RWPL, W:RWPL |
|
TAPE |
DC$_TAPE |
[SYSTEM] |
S:RWPL, O:RWPL, G:R, W |
|
TERMINAL |
DC$_TERM |
[SYSTEM] |
S:RWPL, O:RWPL, G, W |
|
WORKSTATION |
DC$_WORKSTATION |
[SYSTEM] |
S:RWPL, O:RWPL, G:RWPL, W:RWPL |
5.3.5. Setting Up Profiles for New Devices
Devices created during system configuration
Devices introduced during system configuration with the system commands CONNECT and LOAD (for example, pseudodevices and workstations) take their profiles from the template appropriate for the device type.
Disks and tapes
Disk or tape devices take their profile from the DISK or TAPE template profile, respectively. Once the device is visible within a cluster, its profile, with any modifications, is retained across system restarts. Changes to the DISK or TAPE template profile after a device has its security profile do not apply to that device; therefore, it is necessary to reset the specific object profile by using the DCL command
SET SECURITY(see Section 4.2.4, ''Modifying a Security Profile'').Devices cloned from template devices
Devices cloned from template devices (for example, Ethernet devices) assume the security profile of the template device from which they are cloned. Template devices are loaded during the autoconfiguration process; at this time, their profile is taken from the profile template appropriate for the device.
Mailboxes
Mailbox devices assume a modified version of the MAILBOX template profile. The system modifies the template so the UIC of the creating process becomes the owner and the protection code is set to the value of the promsk argument to the Create Mailbox ($CREMBX) system service (provided the value is nonzero).
To maintain compatibility with earlier versions of the operating system, the MAILBOX template has a protection code of 0 (allowing all access). Some applications may need a more restrictive default than the template provides. If you do choose to restrict mailbox access, be aware that the more restrictive access can cause applications to fail in ways that are difficult to diagnose.
Terminals
Terminal devices assume a modified version of the TERMINAL template profile.Note
In OpenVMS Version 7.2-1 and earlier, all pseudo-terminal (FT) device protection codes were set by the driver to (S:RWLP,O:RWLP,G,W). In OpenVMS Version 7.3 and later, only device FTA0 is set to this forced protection. This allows the system manager the option of modifying the FTA0 device protection later in the boot process. This new protection is inherited from FTA0 by any new FT devices created thereafter (as well as other settings originating from the SECURITY class DEVICE TERMINAL template profile, such as ACLs).
A system manager can modify FTA0 manually, or change the SYSTARTUP_VMS.COM command procedure. For example:
$ SET SECURITY/CLASS=DEVICE/PROTECTION=(S:RWLP,O:RWLP,G:RW,W:R) FTA0:
If the device protection for FTA0 is left unmodified, the behavior is unchanged from versions of OpenVMS prior to Version 7.3. That behavior is that all terminals except FT pseudo-terminal devices inherit their device protection and other security characteristics from the TERMINAL template profile. All FTA pseudo-terminal devices inherit their protection from FTA0, which by default is set to (S:RWLP,O:RWLP,G,W). Other settings, such as ACLs, are inherited from the TERMINAL template profile. This ensures compatibility with existing applications.
When a user logs in on a terminal, the operating system modifies the profile so the owner becomes the UIC of the process logging in to the terminal. The original security profile for the terminal is restored when the user logs out.
5.3.6. Privilege Requirements
All logical or physical I/O to a spooled device requires privilege.
The LOG_IO privilege allows the user's process to execute the Queue I/O Request ($QIO) system service to perform logical-level I/O operations. LOG_IO privilege is also required for certain device-control functions, such as setting permanent terminal elements.
The PHY_IO privilege allows the user's process to execute the Queue I/O Request ($QIO) system service to perform physical-level I/O operations. The PHY_IO privilege also grants LOG_IO privilege.
To create a permanent mailbox or mark it for deletion requires PRMMBX privilege.
5.3.7. Kinds of Auditing Performed
|
Event Audited |
When Audit Occurs |
|---|---|
|
Access |
For nonshareable devices, when the process calls $ASSIGN; for a shareable device, when the process calls $QIO |
|
Creation |
When a process creates a virtual device like a mailbox |
|
Deletion |
When a process deletes a virtual device like a mailbox |
5.3.8. Permanence of the Object
The profile of clusterwide disks and tapes is stored in the object database VMS$OBJECTS.DAT, but other object profiles have to be reset each time the system starts up.
5.4. Files
A file is a named array of fixed-size (512-byte) data blocks with an associated set of attributes. In OpenVMS systems, the file class includes both data files and directory files. The operating system provides full security protection for individual disk files stored on Files-11 On-Disk Structure Level 2 (ODS-2) or Level 5 (ODS-5) volumes. Tape files are collectively protected by the protection code on the volume but are not protected on an individual basis.
The file object differs from other protected objects in one important way: because files provide more flexibility than any other object class, files do not acquire their profiles from a template. Section 5.4.5, ''Profile Assignment'' describes the rules the operating system applies in assigning a profile.
5.4.1. Naming Rules
A file specification is a string of 1 to 255 characters. See the relevant section in the VSI OpenVMS User's Manual for a full description.
5.4.2. Types of Access
|
Read |
Gives you the right to read, print, or copy a disk file. With directory files, read access gives you the right to read or list a file and use a file name with wildcard characters to look up files. Read access implies execute access. |
|
Write |
Gives you the right to write to or change the contents of a file but not delete it. Write access allows modification of the file elements that describe the contents of the file. Write access allows creation of a new version of an existing file's primary name. With directory files, write access gives you the right to make or delete an entry in the catalog of files. |
|
Execute |
Gives you the right to execute a file that contains an executable program image or DCL command procedure. With a directory file, execute access gives you the right to look up files whose names you know. |
|
Delete |
Gives you the right to delete a file. To delete a file, you must have delete access to the file and write access to the directory that contains the file. To remove or rename a file's primary name also requires delete access. |
|
Control |
Gives you the right to change the protection code and ACL.
You need to satisfy one of the following conditions to
change the owner:
|
5.4.3. Access Requirements
General rules
To access a file, you must have permission to access the file and the volume on which it resides. When attempting to access a file by name, you must have read or execute access to the directory containing the file. An access check of the volume is required before either a directory or a file access is considered. The protection of a directory file can restrict access to files in the directory, so even though a group of users has access to a file, they can be prevented from accessing it by name if they lack proper access to the directory in which the file is located.Note
You can access a file by its file identifier. When users do so, they bypass the directory file protection. Therefore, you must not rely entirely on directory file protection to control access to a file.
For write access
To write to a file, the operating system requires that you have both read and write access.
File ownership changes
To change the ownership of a file, you must have control access and hold both the old and new identifiers with the Resource attribute. (Your own UIC identifier always carries the Resource attribute.)
5.4.4. Creation Requirements
You must have adequate disk space. This includes both available disk blocks and sufficient disk quota (assuming quotas are enabled).
You have read and write access to the previous file version. You must also have delete access to the oldest file version if the file has a nonzero version limit and the new version would exceed this number.
You have write access to the directory where the file is being created.
You have read, write, and create access to the volume on which the file is to be stored.
5.4.5. Profile Assignment
The new file obtains its owner, protection code, and ACL from a number of sources. The ownership assignment of a new file is done independently of protection and ACL.
5.4.5.1. Rules for Assigning Ownership
The identifier matches your process UIC.
You hold the identifier with the Resource attribute.
You hold GRPPRV privilege and the identifier's group number matches your UIC group.
You hold SYSPRV privilege.
The explicit assignment of an owner at creation with the
/OWNER_UICqualifier to theCREATEorCOPYcommandThe previous version
The parent directory
The process UIC
See Section 8.8.1.2, ''Setting Defaults for a Directory Owned by a Resource Identifier'' for a description of how resource identifiers can own files and directories.
5.4.5.2. Rules for Assigning a Protection Code and ACL
The explicit assignment of elements at creation
You can create a file with the
CREATEcommand or theCOPYcommand. You use theCREATE/DIRECTORYcommand in the case of a directory.To assign a protection code when creating a file, add the
/PROTECTIONqualifier to theCOPYorCREATEcommand. After creating the file, you can use theSECURITY/ACLcommand to add an ACL.For example, the following command copies a file from the device
USE1to the default disk directory. The protection code defines the protection for the newly created filePAYSORT.DATso that users withsystemUICs canreadandwriteto the file. Theownerhas all types of access, and other users in the owner'sgroupcanreadandwriteto the file. All other users have no access through the protection code:$ COPY USE1:[PAYDATA]PAYROLL.DAT PAYSORT.DAT - _$ /PROTECTION=(SYSTEM:RW,OWNER:RWED,GROUP:RW,WORLD)
The profile of the previous version of the file, if one exists
Whenever you create a new version of the file, the new version is created with the protection code and ACL of the earlier version (unless, of course, you make an explicit assignment).
A Default Protection ACE and Default ACL on the parent directory
Without either an explicit assignment or a previous version of a file, the operating system looks at the directory where the file is being created.
With data files, the system looks for a Default Protection ACE and assigns the protection code specified by that ACE. (See Section 4.5.6, ''Providing a Default Protection Code for a Directory Structure'' for an example.) If any ACE in the directory's ACL has the Default attribute, then the file inherits that ACE as well. (Refer to Section 4.4.7, ''Establishing an Inheritance Scheme for Files'' for an example.)
With directory files, the system assigns the protection code of the parent directory, less any delete access. If the directory happens to be a top-level directory, the protection is taken from the master file directory (MFD). Newly created subdirectories inherit the ACL of the parent directory, even ACEs with the Default attribute. Only ACEs with the Nopropagate attribute are omitted.
The UIC and protection defaults of the process issuing the command
If the directory ACL does not have a Default Protection ACE, the default process protection is used. The system parameter RMS_FILEPROT establishes this value, and the operating system assigns it to your process during login. However, the value derived at login may be changed with the DCL command
SET PROTECTION/DEFAULT. (For example, you can put this command in your login command procedure to set default protection.) Use the DCL commandSHOW PROTECTIONto display the default process protection.One of the above with provision for the user creating the file
When you create a file in a directory owned by a resource identifier and you hold the identifier with the Resource attribute, the new file inherits its protection code and ACL in the same way as any other file.
The operating system modifies the file's ACL in some cases to provide the creator with access to the new file. If the directory ACL has a Creator ACE, that ACE defines the access the creator has to the file. If the Creator ACE specifies no access, no additional ACE is created. Without such an ACE, the operating system adds an ACE to the file's ACL that gives the creator control access plus the access specified in the owner field of the file's protection code.
5.4.5.3. Using the COPY and RENAME Commands
The output file of a COPY command is treated as a newly
created file and so is assigned a new security profile. The security profiles of
the input files are immaterial.
However, a renamed file by default retains its existing security profile. To
assign a new security profile, as if the file were newly created, use the DCL
command RENAME/INHERIT_SECURITY. This causes the file to be
assigned a security profile.
Section 5.4.5.1, ''Rules for Assigning Ownership'' and Section 5.4.5.2, ''Rules for Assigning a Protection Code and ACL'' explain how a security profile is assigned.
5.4.6. Kinds of Auditing Performed
|
Event Audited |
When Audit Occurs |
|---|---|
|
Access |
When a process opens, reads, writes, or executes a file or inquires about its attributes |
|
Creation |
When a process creates a file |
|
Deaccess |
When a process closes a file |
|
Deletion |
When a process deletes a file |
5.4.7. Protecting Information When Disk Space Is Reassigned
Ordinary file protection mechanisms control who can access a file, but they do not address the problem of protecting old data that remains on disk after a file is deleted.
When a file is deleted, its header is removed from the directory, but its contents remain intact on disk until it is overwritten. Because data exists on a disk, it is necessary to protect deleted or purged file information from disk scavenging.
Overwriting disk blocks before they are allocated
Setting a high-water mark on allocated blocks
5.4.7.1. Overwriting Disk Blocks
A security administrator or user can apply an erasure pattern to individual files on a volume or to a complete volume. An erasure pattern is a repeated sequence of bits written over a file when the file is deleted or purged.
The security administrator can ensure that every block on a volume starts off
with the erasure pattern by specifying the /ERASE qualifier
when the volume is initialized, as follows:
INITIALIZE/ERASE device-name[:] volume-label
If the volume is mounted, the security administrator can automatically apply
the erasure pattern to the space occupied by a file when it is deleted by
specifying the /ERASE_ON_DELETE qualifier, as follows:
SET VOLUME/ERASE_ON_DELETE device-spec[:]Note that this technique has no effect on existing files.
Alternatively, the security administrator may ask users to specify the erasure
pattern on a file-by-file basis by using the /ERASE qualifier
when entering the DCL commands SET FILE,
DELETE, and PURGE.
Security administrators can also write an erase routine by using the $ERAPAT system service. The routine specifies to the system the erasure pattern and number of passes to be used to erase disk blocks.
5.4.7.2. Setting a High-Water Mark
When the operating system allocates disk blocks for a file, it automatically sets a high-water mark. The high-water mark indicates how far the file has been written in its allotted space on the disk. All blocks in the file up to the high-water mark are guaranteed to have been written since they were allocated to the file. Users are not permitted to read beyond the high-water mark and thus cannot read stale data that they did not actually write.
A more conservative but costly technique is to erase all disk blocks before allocation. The erase-on-allocate technique is used when the file is open allowing any form of shared access or nonsequential access. When blocks are erased on allocation, the file's high-water mark is set to point to the end of the newly allocated and erased space.
By default, high-water marking is enabled when the volume is initialized. The
security administrator can disable high-water marking for a specific volume by
using the DCL command SET VOLUME/NOHIGHWATER_MARKING.
5.4.7.3. Accessibility of Data in a File
Once the file system allocates disk blocks for a file, users can read or write to them at any time. The high-water mark identifies the physical end of file, beyond which the user cannot read. However, an application can reposition the logical end-of-file mark and leave data in the area between the logical and the physical end of the file. Any block of file data can later be read, regardless of the logical end-of-file mark.
An application largely determines how allocated disk blocks are managed. For example, OpenVMS RMS services shorten a sequential file by resetting the logical end-of-file position to the beginning of the current record. It does not deallocate space between the end-of-file position and the physical end of the file, nor does it overwrite the records between the end-of-file position and the physical end of the file with an erase pattern.
Thus, blocks written to a file can remain available regardless of the
end-of-file mark. If you want to erase the data between the logical end of the
file and the physical end of the file, your application program must overwrite
the data you want deleted. On OpenVMS systems, a common way to accomplish this
is to create a new version of the file using the DCL command
COPY.
5.4.8. Suggestions for Optimizing File Security
Purge your files regularly. Delete unnecessary files. This keeps your directories to a minimum and simplifies the task of regularly checking the protection and ownership on your files.
Use the DCL command
DIRECTORY/SECURITYregularly to monitor the ownership, protection code, and ACLs on your files. A user who succeeds in obtaining sufficient privilege may change the protection or ownership on your files, allowing access immediately and in the future. If you perform these checks frequently, you can detect and report unexplained changes in file protection or ownership.Pay special attention to the protection on your mail files; normally, they should be accessible only to you and the system (for mail delivery and backups).
When you place ACLs on your files, be sure you know exactly which users hold the identifiers you have specified. (This generally requires consultation with your site security administrator.)
Follow your site security administrator's recommendations to prevent disk scavenging. You may be requested to use the
/ERASEqualifier on theSET FILE,DELETE, andPURGEcommands for some or all of your files.Always protect files and directories that contain command procedures and executable programs. Carefully control the granting of write access to these directories and files. This is particularly important if you have any of the more powerful privileges or access to sensitive files.
Caution
Do not run a command procedure or program given to you by another user unless you inspect it. Inspect a program or procedure to see if it tries to exercise your special privileges or access sensitive files. Test the software in an unprivileged account. Programs or command procedures offered under one guise, when actually intended to penetrate your defenses and disrupt your system security, are sometimes called Trojan horse programs.
5.5. Global Sections
OpenVMS memory management services allow processes to communicate through shared memory pages called global sections. Using global sections, two or more processes can map the same page into their individual virtual address spaces, thereby sharing the same page of code or data.
A global section can provide access to a disk file (called a file-backed global section), provide access to dynamically created storage (called a page file-backed global section), or provide access to specific physical memory (called a page frame number [PFN] global section). A global section object may be either temporary or permanent.
Group global sections are shareable memory sections potentially available to all processes in the same group.
System global sections are shareable memory sections potentially available to all processes in the system.
5.5.1. Naming Rules
The name of the object is a string of 1 to 44 characters. For group global sections, the name is qualified by your UIC group number.
5.5.2. Types of Access
|
Read |
Gives you the right to map the section for read access. |
|
Write |
Gives you the right to map the section for write access. |
|
Execute |
Gives you the right to map the section for read access. Only software running in executive or kernel mode can request this access. |
|
Control |
Gives you the right to modify the protection elements of PFN global sections and page file-backed global sections. |
5.5.3. Template Profile
File-backed global sections share the security profile of the associated disk file. Whenever the profile of the backing file is modified, the global section's profile automatically changes. To modify the protection elements of file-backed global sections, you must modify the backing file instead.
|
Type |
Template Name |
Owner UIC |
Protection Code |
|---|---|---|---|
|
System |
DEFAULT |
[0,0] |
S:RWE,O:RWE,G:RWE,W:RWE |
|
Group |
DEFAULT |
[0,0] |
S:RWE,O:RWE,G:RWE,W:RWE |
The operating system modifies the templates according to the values provided in the prot argument to $CRMPSC. The prot argument is ignored for file-backed sections.
To maintain compatibility with earlier versions of the operating system, the DEFAULT templates have protection codes allowing world access. Some applications may need a more restrictive default than the templates provide. If you do choose to restrict global section access, be aware that the more restrictive access can cause applications to fail in ways that are difficult to diagnose.
5.5.4. Privilege Requirements
The SYSGBL privilege is required to create or delete a system global section. The PFNMAP privilege is necessary to create or delete a page frame section, and the PRMGBL privilege is required to create or delete a permanent global section.
5.5.5. Kinds of Auditing Performed
|
Event Audited |
When Audit Occurs |
|---|---|
|
Creation |
When a page file-backed or a PFN global section is created by the Create and Map Section system service ($CRMPSC). |
|
Access |
When an existing page file-backed or a PFN global section is accessed with either $CRMPSC or the Map Global Section system service ($MGBLSC). The operating system audits access to a file-backed global section as a file access. |
|
Deaccess |
At image or process rundown when the process virtual address space is reset or deleted. |
|
Deletion |
If a process with PRMGBL privilege, PFNMAP privilege, or SYSGBL privilege (in the case of a system global section) deletes a permanent global section, the operating system audits the event through the use of privilege. |
5.5.6. Permanence of the Object
A global section and its security profile need to be reset after every system boot.
5.6. Logical Name Tables
Logical name assignments are maintained in logical name tables. A logical name table can be accessible to only one process, or it can be shareable if its parent table is shareable. All shareable name tables are listed in the LNM$SYSTEM_DIRECTORY, the system directory table. It is shareable logical name tables that the operating system protects.
5.6.1. Naming Rules
The name of a logical name table is a string of 1 to 32 characters.
5.6.2. Types of Access
|
Read |
Gives you the right to look up (translate) logical names in the table |
|
Write |
Gives you the right to create and delete logical names in the table |
|
Create |
Gives you the right to create a descendant logical name table, including the right to use a subset of the dynamic memory allocated to the parent logical name table when creating the descendant logical name table |
|
Delete |
Gives you the right to delete the table |
|
Control |
Gives you the right to modify the protection elements and owner of the table |
5.6.3. Template Profile
|
Template Name |
Owner UIC |
Protection Code |
|---|---|---|
|
DEFAULT |
[0,0] |
S:RW,O:RW,G:R,W:R |
|
GROUP |
[0,*] |
S:RWCD,O:R,G:R,W |
|
JOB |
[0,0] |
S:RWCD,O:RWCD,G,W |
5.6.4. Privilege Requirements
The operating system allows read and write access to the group logical name tables with GRPNAM privilege and to the system logical name table with SYSNAM privilege.
Deletion of a shared table from the system directory requires SYSNAM privilege, and deletion of a logical name from the group directory requires GRPNAM privilege. Deletion of a parent logical name table results in the deletion of all its descendant logical name tables.
Creation or deletion of an inner-mode logical name or logical name table requires SYSNAM privilege (or being in an inner mode).
5.6.5. Kinds of Auditing Performed
|
Event Audited |
When Audit Occurs |
|---|---|
|
Access |
When translating a name, when creating a name or a descendent table, or when deleting a name or a descendent table |
|
Creation |
During access to a parent table for the right to create a table or when the table itself is created |
5.6.6. Permanence of the Object
A logical name table and its security profile must be reset each time the system is rebooted.
5.7. Queues
A queue is a set of jobs to be processed. In general, queues are of two types, generic or execution. No processing takes place in generic queues. Execution queues hold jobs that will execute on an execution queue when one is available. Execution queues can be batch queues, printer queues, server queues, or terminal queues.
5.7.1. Naming Rules
A queue name is a string of 1 to 31 characters, including any alphanumeric character, the dollar sign ($), or the underscore (_).
5.7.2. Types of Access
|
Read |
Gives you the right to see the security elements of either a queue or a job in the queue. |
|
Submit |
Gives you the right to place jobs in the queue. |
|
Delete |
Gives you the right to either delete a job in the queue or modify the elements of a job. |
|
Manage |
Gives you the right to affect any job in the queue. You can start, stop, or delete a queue and change its status and any elements that are unrelated to security. |
|
Control |
Gives you the right to modify the protection elements and owner of a queue. |
Note
When a process receives read or delete access through a protection code, it can operate on only its job in the queue. However, when granted through an ACL, read and delete access allow a process to operate on all jobs in the queue.
5.7.3. Template Profile
|
Template Name |
Owner UIC |
Protection Code |
|---|---|---|
|
DEFAULT |
[SYSTEM] |
S:M,O:D,G:R,W:S |
5.7.4. Privilege Requirements
You need SYSNAM and OPER privileges to stop or start the queue manager. OPER is necessary to either create and delete queues, or to change the symbiont definition.
5.7.5. Kinds of Auditing Performed
|
Event Audited |
When Audit Occurs |
|---|---|
|
Access |
When a job is submitted to the queue and when either a job or queue is modified. |
|
Creation |
When a queue is initialized. |
|
Deletion |
When a process deletes a job from the queue or when the queue itself is deleted. (To enable auditing for queue deletions, enable auditing for manage [M] access to the queue.) |
If access auditing is enabled for both files and queues, one queue operation can generate a number of auditing messages because, within a single operation, the operating system performs several access checks. For example, before a job is executed on a print queue, the system checks to see if you have read access to the file, and it checks for read access again before printing the file.
5.7.6. Permanence of the Object
Queues are permanent objects. They are stored in the system queue database together with their security profiles.
5.8. Resource Domains
Processes that access shared resources can coordinate access using the services of the lock manager. These services allow processes to associate a name with a resource, such as a file or a data structure, to arbitrate access to that resource, and to exchange limited information through a lock value block. The namespaces that catalog resources on which locks can be taken are called resource domains.
A process must become a member of a resource domain to take and release locks and to read and write value blocks associated with resources in that resource domain. A process implicitly joins the system and group domains, but it explicitly joins other domains through a call to the $SET_RESOURCE_DOMAIN system service. Access to all locks and value blocks within a domain is controlled by access to the domain itself.
5.8.1. Naming Rules
A resource domain is identified to $SET_RESOURCE_DOMAIN by a longword binary value. However, the name of the resource domain object is a string containing the resource number interpreted in octal surrounded by brackets [] or angle brackets <>. Alternatively, the name of the resource domain object can be expressed as an identifier enclosed in brackets or angle brackets. The identifier must translate to a UIC value; the group field of the UIC is used as the resource domain number.
5.8.2. Types of Access
|
Read |
Gives you the right to read lock value blocks in the domain, including the right to use the $GETLKI system service to retrieve it |
|
Write |
Gives you the right to write to lock value blocks in the domain |
|
Lock |
Gives you the right to take locks using $ENQ, release locks using $DEQ, and obtain information about the lock database using $GETLKI |
|
Control |
Gives you the right to modify the protection elements of a resource domain |
5.8.3. Template Profile
|
Template Name |
Owner UIC |
Protection Code |
|---|---|---|
|
DEFAULT |
[n,*] |
S:RWL,O:RWL,G:RWL,W |
5.8.4. Privilege Requirements
The SYSLCK privilege allows lock access to the system resource domain (Domain 0).
5.8.5. Kinds of Auditing Performed
|
Event Audited |
When Audit Occurs |
|---|---|
|
Access |
When a process calls $SET_RESOURCE_DOMAIN or $ENQ to join a domain |
|
Creation |
The first time a process joins the resource domain |
|
Deaccess |
When a process called $SET_RESOURCE_DOMAIN or at image or process rundown |
5.8.6. Permanence of the Object
Both the resource domain and its security elements are saved in SYS$SYSTEM:VMS$OBJECTS.DAT.
5.9. Security Classes
An object name
A security profile for new objects of the class
One or more template profiles
A set of access names
Auditing controls
Chapter 8, "Controlling Access to System Data and Resources" discusses how to manage objects in the security class.
5.9.1. Naming Rules
|
CAPABILITY |
COMMON_EVENT_CLUSTER |
|
DEVICE |
FILE |
|
GROUP_GLOBAL_SECTION |
LOGICAL_NAME_TABLE |
|
QUEUE |
RESOURCE_DOMAIN |
|
SECURITY_CLASS |
SYSTEM_GLOBAL_SECTION |
|
VOLUME |
5.9.2. Types of Access
|
Read |
Gives you the right to read a template profile. Template profiles contain the security elements assigned to new objects. |
|
Write |
Gives you the right to modify the values of a template profile. |
|
Control |
Gives you the right to modify the security profile of a security class object. Control access implies read and write access. |
5.9.3. Template Profile
|
Template Name |
Owner UIC |
Protection Code |
|---|---|---|
|
DEFAULT |
[SYSTEM] |
S:RW,O:RW,G:R,W:R |
5.9.4. Kinds of Auditing Performed
|
Event Audited |
When Audit Occurs |
|---|---|
|
Access |
When a process enters the DCL command |
5.9.5. Permanence of the Object
The security profiles of the security class object and all its members are stored in the security object database.
5.10. Volumes
A volume object is one or more ODS-2 or ODS-5 disk volumes. The object consists of multiple volumes when they are part of a bound volume set. Although you might have access to the directories and files on the volume, you cannot access them if you do not have access to the volume itself.
For access information on tapes and foreign volumes, see the relevant section in the
VSI OpenVMS System Manager's Manual, Volume 1: Essentials. See also the description of the
MOUNT command in the
VSI OpenVMS DCL Dictionary: A–M.
5.10.1. Naming Rules
A volume name can be the volume label, the name of the device on which the volume is mounted, or a user-specified logical name. Volume label names can be from 0–12 characters in length.
5.10.2. Types of Access
|
Read |
Gives you the right to examine file names and print and copy files on a volume. |
|
Write |
Gives you the right to modify or write to existing files on a volume. Whether the subject may perform the operation on a specific file is determined by the file's protection. To be meaningful, write access requires read access. |
|
Create |
Gives you the right to create files on a disk volume and to subsequently modify them. Create access also requires read and write access. |
|
Delete |
Gives you the right to delete files on a disk volume, provided the user has proper access rights at the directory and file level. Delete access requires read access. |
|
Control |
Gives you the right to change the protection and ownership elements of the volume. |
5.10.3. Template Profile
|
Template Name |
Owner UIC |
Protection Code |
|---|---|---|
|
DEFAULT |
[0,0] |
S:RWCD,O:RWCD,G:RWCD,W:RWCD |
5.10.4. Privilege Requirements
Users with the VOLPRO privilege always have control access to a volume. Mounting a file-structured volume as foreign requires VOLPRO privilege or control access.
5.10.5. Kinds of Auditing Performed
|
Event Audited |
When Audit Occurs |
|---|---|
|
Access |
During any file system operation |
5.10.6. Permanence of the Object
The security profile for a volume object is saved in the master file directory (MFD) of the disk as [000000]SECURITY.SYS.
Chapter 6. Managing the System and Its Data
Your role as security administrator
Site security policies
Tools for security administrators
Account requirements for a security administrator
Suggestions for training users
Logging the activities of a new user
Tasks to include in your weekly routine
VSI recommends that you read the entire chapter and the three chapters that follow before establishing any security measures. After reading the chapters, you will better be able to decide which security measures are appropriate for your site, and you will have the tools to implement them.
6.1. Role of a Security Administrator
Your role as security administrator is to implement and maintain the organization's security policy. Some organizations include security administrators in the development of the security policy; other organizations charter security administrators to implement and maintain an established policy. For an example of a company security policy, see Section 6.2, ''Site Security Policies''.
As security administrator (or officer), your job is to see that the security policy is implemented and maintained. Regularly monitoring the system for possible security violations and vulnerabilities is absolutely necessary. Whenever you detect problems, you should see that they are corrected.
Many times organizations divide the duties of computer administrators. The security administrator monitors the system and reports problems, and the system manager implements policy and manages the system. In this management structure, the security administrator works in tandem with the system manager. Some system managers choose to employ an accounts clerk to set up user accounts and process the required paperwork justifying the need for an account. This is always a highly trusted individual who essentially acts as a co-system manager. With a division of labor, it is critical for the system manager and security administrator to communicate regularly. The security administrator should report security problems to users or, if necessary, to system managers or the accounts clerk so problems are corrected.
Another division of duties, common to many OpenVMS installations, combines the roles of security administrator and system manager. One person implements the security policy and maintains the system to meet its requirements.
Secure system management, however it is organized, involves training users, setting up accounts and passwords, protecting sensitive system files and resources, and auditing and analyzing security-relevant events. Learning how systems are used and recognizing "normal" system activity are critical to secure management.
6.2. Site Security Policies
An organization's management usually establishes a brief security policy for its employees to emphasize the behavior it expects of them. For example, such a policy may state that employees should not give away company data or share passwords.
The managers of divisions or computer sites develop the detailed security policy. It is a written set of guidelines on the use of passwords and system accounts, physical access to the computer systems, communication devices, and computer terminals, and the types of security-relevant events to audit. These security guidelines might be followed by more specific statements applying to particular operating system environments.
The complexity of a security policy eventually depends on whether the division has high, medium, or low security requirements. Chapter 1, "Understanding System Security" provides a set of questions that can help an organization determine its needs.
|
Security Area |
Site Requirements |
|---|---|
|
Passwords |
Schedule for password changes. |
|
Process for controlling minimum password length and expiration periods. | |
|
Schedule for system password changes. | |
|
Accounts |
Procedure to grant accounts on computer systems, for example, statement of need, signature of requester, requester's manager, system manager, or person setting up the account. (Accounts can never be shared.) |
|
Procedure to deactivate accounts due to organizational changes, for example, employee transfers or terminations. | |
|
Timetable for reauthorizing accounts, usually once every 6 to 12 months. | |
|
Directive to deactivate accounts that are not used on a regular basis. | |
|
Time periods for access. | |
|
Timetable for expiring accounts. | |
|
Procedure for requesting privileges that rigorously controls allocation. | |
|
Requirement to use nonprivileged accounts for privileged users performing normal system activity. | |
|
Schedule for verifying inactive accounts. | |
|
List of approved security tools. | |
|
Security events to audit |
Logins from selected or all sources. |
|
Changes to authorization file records. | |
|
Other uses of privilege and system management actions. | |
|
Modifications to the known file list through the Install utility. | |
|
Modification to the network configuration database, using the network control program (NCP). | |
|
Physical access to the computer room |
A written list of authorized personnel with the reason for access included. Typically, one person would be responsible for keeping this list current. |
|
Storage of a visitor log in a secure area. | |
|
Locked access doors and a documented procedure for assigning keys, key cards, and combinations. (These access controls change periodically and on transfer or termination of employees.) | |
|
Physical access to terminals and personal computers located outside the computer room |
Use of programs to log out terminals that have not been used for a given period of time. |
|
Security awareness programs for the organization (beyond
computer personnel); topics may include:
| |
|
Dialup numbers |
List of authorized users. |
|
Schedule for changing numbers periodically and procedures for notifying users of number changes. | |
|
A policy to minimize publishing dialup numbers. | |
|
Policy about changing passwords periodically and when employees with access are terminated. | |
|
Password protection, either in the modems or terminal servers, or system passwords on host dialup ports. | |
|
Documentation available about:
| |
|
Communications |
Denial of access into privileged accounts if using passwords over TCP/IP, LAT, or Ethernet links. |
|
Use of authentication cards for network logins into privileged accounts. |
6.3. Tools for Setting Up a Secure System
The following chapters describe how to set up a secure system according to your security policy. The Authorize utility (AUTHORIZE) is the primary tool for implementing system security. AUTHORIZE is described fully in the VSI OpenVMS System Management Utilities Reference Manual, Volume I: A–L. The AUTOGEN command procedure, which you use to modify the system parameters file, is described in the relevant sections in the VSI OpenVMS System Manager's Manual, Volume 1: Essentials and the VSI OpenVMS System Management Utilities Reference Manual, Volume I: A–L. Many DCL commands are also important security tools. DCL commands are described in the VSI OpenVMS DCL Dictionary: A–M and DCL Dictionary: N–Z.
6.4. Account Requirements for a Security Administrator
You need an account with privileges to perform the tasks of a security administrator.
SECURITY and AUDIT privileges to enable security auditing and to set up security operator terminals
READALL privilege to review the protection of files and resources
In many cases, a security administrator serves as both the security administrator and the system manager. This person requires a full set of privileges. The VSI OpenVMS System Manager's Manual, Volume 1: Essentials describes the necessary characteristics of a system management account.
Example 6.1, ''Sample Security Administrator's Account'' illustrates a number of AUTHORIZE qualifiers appropriate for a security administrator's account.
In Example 6.1, ''Sample Security Administrator's Account'', any value not specified defaults to the value provided by the default record in SYSUAF.DAT.
$ SET DEFAULT SYS$SYSTEM $ RUN AUTHORIZE UAF> ADD RIRONWOOD/PASSWORD=VALTERSY/UIC=[001,100] - _UAF> /DEVICE=SYS$SYSDEVICE/DIRECTORY=[RIRONWOOD] - _UAF> /OWNER="Russ Ironwood"/ACCOUNT=SECURITY/FLAGS=GENPWD -
| The requirement that the automatic password generator be used to change passwords. |
| The use of a short password lifetime. Measures 1 and 2 are important to protect the account because it affords many valuable privileges and access rights. |
| SECURITY, AUDIT, and READALL privileges allow monitoring of the system but no modification. If you perform the tasks of a system manager, then you would need an account with SYSPRV. With SYSPRV, you can access protected objects by the system protection field and change the owner UIC and protection. You can change an object's protection to gain access to it. |
6.5. Training the New User
Teaching new users about system security is an important security tool. It is important to involve users in security methods and goals; the more they know about the system and how break-ins occur, the better equipped they are to guard against them.
What is the location of the user's account? Specifically, which system, where is it located, what is the proper node name if on a network, and, if the system is part of a cluster, what other nodes are available?
Which terminals can be used for logging in, and where are they located?
Is the account restricted with regard to local, dialup, remote, interactive, network, or batch operations? If so, describe both permitted use and restrictions.
Can the account be accessed by dialing in? If so, provide the access telephone number, and describe the procedure. Specify how many retries are allowed and the maximum number of seconds allowed between each retry before the connection is lost.
Are system passwords implemented for any terminals that the user may be using? If so, describe which terminals, how often the system password is changed, and how the user can learn the new system password.
What is the account duration? When will it expire? From whom should the user request an extension?
What is the user name? What identifiers are held by the user, if any? What are the group and member numbers associated with the user?
What password information is required? Specifically, what is the initial password? Is the password locked? If the password is not locked, how often must the password be changed? What is the minimum length for the password? Is there a secondary password for this account, and who will know it? Is the user free to select passwords, or must they be automatically generated? See Section 3.12, ''Checklist for Contributing to System Security'' for a checklist of good practices for users.
What is the default device and directory?
What is the default protection?
Are there quotas on disk usage? If so, what are the values?
Are there restrictions on use? For example, are there certain days or hours of the day that are suggested or enforced? Explain primary and secondary days if applicable.
Are there files or directories that are shared? If so, provide the details.
Are there ACLs that affect the user? What identifiers does the user need to know?
Which privileges does the user hold and what do they mean?
What is the command language interpreter?
Which type of account is this: open, captive, restricted, or interactive?
Which nodes permit proxy logins for this user, if any?
What are the names of the queues the user may need to use?
What actions should the user take to ensure physical site security, such as locking up materials?
6.6. Logging a User's Session
While users are learning the system, you may choose to monitor terminal sessions if
the user performs an especially sensitive function, such as accessing sensitive data or
controlling a system operation. (Sometimes users may choose to log their own sessions so
they have a record of their actions. If this is the case, they can use the command
SET HOST 0/LOG interactively after their initial login.) This
section describes one method of logging users' sessions by setting up a restricted
account. Many third-party products provide other ways of monitoring sessions that are
more efficient. Regardless of the method you select, you should check with your legal
department to make sure this is acceptable practice.
By using a special restricted account and appropriate command procedures, you can enforce the logging of terminal sessions for selected users. These users would need to log in to the restricted account first and then log in to their own account. The restricted account ensures that the session is logged.
Set up the restricted account USER_LOG as follows:
UAF> ADD USER_LOG /FLAGS=(RESTRICTED,DISMAIL,DISNEWMAIL)- _UAF> /LGICMD=SYS$SYSROOT:[USER_LOG]SESSIONLOG- _UAF> DEV=SYS$SYSROOT: /DIR=[USER_LOG]- _UAF> /NONETWORK /NOBATCH /UIC=[200,256]
The SESSIONLOG.COM command procedure enables logging of the terminal session:
$ ! SESSIONLOG.COM - log in to specified account with terminal session $ ! logging enabled. $ ! $ WRITE SYS$OUTPUT "Please log in to the account of your choice." $ WRITE SYS$OUTPUT "Your terminal session will be recorded." $ WRITE SYS$OUTPUT "" $ ! $ ! Acquire the intended user name and save it in a temporary file. Use $ ! it to name the log file, and pass it as the first line of input to $ ! LOGIN. $ ! $ READ/PROMPT="Username: " SYS$COMMAND USERNAME $ PID = F$GETJPI (0, "PID") $ OPEN/WRITE OUTPUT USERNAME'PID'.TMP $ WRITE OUTPUT USERNAME $ CLOSE OUTPUT $ DEFINE/USER SYS$INPUT USERNAME'PID'.TMP $ SET HOST 0 /LOG='USERNAME'.LOG $ DELETE USERNAME'PID'.TMP;0 $ LOGOUT
Set up each account for which session auditing is to be enforced. The following command sets up the account for user
Smith:UAF> MODIFY SMITH /FLAGS=RESTRICTED /NOLOCAL /NODIALUP - _UAF> /LGICMD=SYS$SYSROOT:[USER_LOG]CHECKLOGSince the restricted login command procedure ensures that the login is coming from the
USER_LOGaccount using aSET HOSTcommand, the session is logged.You may also want to disable batch and network access for each user account to allow only local logins from the
USER_LOGaccount. For example:UAF> MODIFY SMITH/FLAGS=RESTRICTED/NOLOCAL/NODIALUP/NOBATCH - /NONETWORK/LGICMD=SYS$SYSROOT:[USER_LOG]CHECKLOGThe following CHECKLOG.COM command procedure verifies that the user is logging in to the
USER_LOGaccount. For this procedure to work correctly, you must have enabled DECnet proxy accounts as described in Section 13.3.2, ''Setting Up a Proxy Database'':$ ! CHECKLOG.COM - ensure that the account is being logged in to $ ! the USER_LOG account. $ ! $ IF F$MODE () .NES. "INTERACTIVE" THEN EXIT $ ! $ ! Verify that the connection originated from the local node and $ ! from the USER_LOG account. $ ! $ IF F$LOGICAL ("SYS$NODE") .EQS. F$LOGICAL ("SYS$REM_NODE")- _$ .AND. F$LOGICAL ("SYS$REM_ID") .EQS. "USER_LOG"- _$ THEN GOTO OK $ WRITE SYS$OUTPUT "You may log in to this account only with ",- _$ "the USER_LOG account." $ LOGOUT
$ ! $ ! When the login has been verified, enable Ctrl/Y to $ ! release the account, invoke the user's LOGIN.COM, and turn $ ! control over to the user. $ ! $ OK: $ SET CONTROL_Y $ IF F$SEARCH ("LOGIN.COM") .EQS. "" THEN EXIT $ @LOGIN
6.7. Ongoing Tasks to Maintain a Secure System
Use the MONITOR IO report to develop a familiarity with the normal amounts of I/O on your system at various times. Watch for abnormal changes.
Keep informed of the images installed on your system. Use the Install utility (INSTALL) to look for unexpected additions. When monitoring the known file list, compare the current list with a valid hardcopy listing.
Use the AUTHORIZE command
SHOWon a regular basis to check for unauthorized user names.Use the AUTHORIZE command
SHOW/PROXYregularly to quickly recognize all proxy access that you have authorized. Watch for unexpected additions. Remove any remote users who no longer require access. Institute regular communications with system managers at remote nodes.Apply the Accounting utility (ACCOUNTING) on a regular basis to give you a basis of normal amounts of processing time. Watch for unexplained changes.
Regularly check the accounting report produced by ACCOUNTING for known user names, unknown user names, and appropriate hours of system use.
Develop sufficient familiarity with your system's workload so that you notice normal (as well as abnormal) processing activity occurring at unusual hours.
Monitor device allocations routinely with the DCL command
SHOW DEVICEso that you immediately notice any that are unexpected.Become familiar with the recurring types of batch jobs that run on the batch queues and what times they are most likely to run.
Monitor the protection and ownership of critical files with the
DIRECTORY/SECURITYcommand. Watch for unexplained changes in each.Maintain familiarity with the rights list. Keep current listings so that you can recognize identifiers that have been added or new holders of the current identifiers.
Remove identifiers that are not in use. Keep the rights list current.
Regularly review the templates that you use to set up UAF records. Make any necessary changes.
Use the security-auditing features described in Chapter 10, "Security Auditing".
Apply the Audit Analysis utility (ANALYZE/AUDIT) regularly to detect abnormal auditing activity.
When you allow new users to change their initial passwords, assign passwords that users will want to change or use the password generator. Check back to see if you can log in with the password you originally assigned. Where necessary, follow up with the user to determine why the change did not occur as requested.
Try searching unprotected user files for passwords embedded in network access control strings. The password will precede the 3-character terminator ("::). Also search for the noun password, and see if any passwords are revealed nearby.
Check that your users are logging out properly. Make physical checks at the end of normal business hours.
Check that your users have appropriate default protections in place.
Keep informed about your inventory of magnetic tapes, disks, and program listings. Routinely check that inventory for possible indications that physical security has degraded.
Keep your office and all important listings locked up.
Chapter 7. Managing System Access
This chapter explains how you give users access to a system by assigning user accounts and passwords. Descriptions are based on the security needs of a commercial installation with average security needs, where accounts require protection. Descriptions of above-average security needs are also noted. Refer to Chapter 8, "Controlling Access to System Data and Resources" for information on controlling access to system data and resources. See Chapter 6, "Managing the System and Its Data" and Chapter 10, "Security Auditing" for information on auditing user actions.
The Authorize utility (AUTHORIZE) is the primary tool for establishing accounts and passwords. See the relevant section in the VSI OpenVMS System Management Utilities Reference Manual, Volume I: A–L for a description of the utility.
7.1. Defining Times and Conditions for System Access
The level of system access a user enjoys depends on your site requirements, that user's role in the organization, and your management of his or her account. A site with low security requirements and plenty of system resources may allow access at any time of day whereas a site with moderate security requirements may limit logins to daytime hours and permit dialup or network connections only to a subset of users.
|
Categories |
Qualifier |
Description |
|---|---|---|
|
Time of day |
|
By default, a user has full access every day. By specifying an access time, you prevent access at all other times. Identify hours on primary days with the keyword PRIMARY; identify hours on secondary days with the keyword SECONDARY. |
|
|
Specifies hours of access permitted for dialup logins. | |
|
|
Specifies hours of access for interactive logins from local terminals. | |
|
Days of week |
|
Defines the primary and secondary days of the week for logging in. |
|
Mode of operation |
|
Specifies the hours of access permitted for batch jobs. |
|
|
Specifies the hours of access for interactive logins. | |
|
|
Specifies the hours of access permitted for network batch jobs. | |
|
|
Specifies hours during which access is permitted for interactive logins from
network remote terminals (with the DCL command | |
|
Allocation of resources |
|
Specifies the name of the user's default device at login. |
|
|
Specifies the name of the user's default directory at login. | |
|
Validity of account |
|
Specifies the expiration date and time of the account. |
|
|
Disables the account so the user cannot log in. | |
|
External authentication |
|
Specifies that the user is externally authenticated. |
7.1.1. Restricting Work Times
AUTHORIZE qualifiers let you restrict system use to certain days of the week and certain periods of the day. Restricting work times is useful to better balance the workload on your system. Restricting access to accounts is also an effective way of preventing unauthorized use of the system outside of normal working hours.
Define primary and secondary days of the week with the /PRIMEDAYS
qualifier, or conform to the default where primary days are Monday through Friday and
secondary days are Saturday and Sunday. For example, to modify the defaults for a user who
works Tuesday through Saturday, you would specify the /PRIMEDAYS
qualifier as follows:
/PRIMEDAYS=(NOMONDAY,TUESDAY,WEDNESDAY,THURSDAY,FRIDAY,SATURDAY,NOSUNDAY)
Occasionally an operational change occurs that conflicts with the normal day assignments
at your site, such as a holiday falling on a primary day. To override the normal day
assignment, use the DCL command SET DAY, and specify the day-type
interpretation you want for the current day. This requires OPER privilege. Note that this
change applies to all logged-in users, as well as those who will log in during the day. If
users who are currently logged in are unauthorized for the day-type once it changes, they
are logged out of the system at the next hour. The job controller enforces time restrictions
on an hourly basis.
Decide which types of login access should be restricted to certain hours. The login
access qualifiers are: /LOCAL, /REMOTE,
/DIALUP, /INTERACTIVE, /BATCH,
and /NETWORK. However, if your site applies one set of primary and
secondary hours for all types of logins, you can specify the /ACCESS
qualifier, which applies to all modes of access.
The following example shows how to apply the /BATCH qualifier to a
user's account to disable the user from running batch jobs during normal working
hours:
/NOBATCH=(PRIMARY, 9-17)
This specification permits the user to run batch jobs only during the hours of 6:00 p.m. through 8:59 a.m. on primary days but all day on secondary days.
7.1.2. Restricting Modes of Operation
The user has data that should be accessed only through the local node.
Penetration attempts are more likely to occur over a network because of the increased anonymity of the connection.?
Use the AUTHORIZE qualifier /NONETWORK to prevent specific users from
having network access, as shown in the following example:
UAF> ADD JSMITH /NONETWORK, ...
Any of the AUTHORIZE access mode qualifiers (/LOCAL,
/REMOTE, /DIALUP, /INTERACTIVE,
/BATCH, or /NETWORK) can be negated in this manner
to restrict access to the system.
7.1.3. Restricting Account Duration
It is good practice to set an account expiration time that matches the maximum length of time you expect the user to require access. When the expiration time arrives, the system automatically prohibits access to the account. You must still remove the UAF record and delete the user's files.
Use of the /EXPIRATION qualifier also forces you to periodically
review accounts and reauthorize only those that are necessary.
To set the account expiration time, use the AUTHORIZE qualifier
/EXPIRATION in the user's UAF record. For example, the following
qualifier specifies that the user's account will expire on the 30th of December
2008:
/EXPIRATION=30-DEC-2008
7.1.4. Disabling Accounts
You may want to severely restrict the use of certain accounts. For example, you may want
to disable specific accounts used only periodically, such as the SYSTEST and FIELD accounts,
to limit possible misuse of these accounts. Disable the accounts with the
/FLAGS=DISUSER qualifier. Temporarily enable the accounts with the
/FLAGS=NODISUSER qualifier when needed.
7.1.5. Restricting Disk Volumes
Identify the user's default device and directory in the UAF record with the AUTHORIZE
qualifiers /DEVICE and /DIRECTORY. You can limit the
number of blocks available to the user on that disk (and any other disk) through the disk
quota feature of the System Management utility (SYSMAN), as described in the relevant
section in the VSI OpenVMS System Manager's Manual, Volume 1: Essentials.
The volume protection in place on other disks controls how much access a user can obtain
to the disks. The user's privileges, which can be extended or limited through the AUTHORIZE
qualifier /PRIVILEGES, also influence the access available (see Section 8.7, ''Giving Users Privileges'').
7.1.6. Marking Accounts for External Authentication
Mark a user account in the UAF record with the AUTHORIZE qualifier
/FLAGS=EXTAUTH to allow the user to be externally authenticated (see
Section 7.4, ''Enabling External Authentication'' for more information).
7.2. Assigning Appropriate Accounts to Users
The type of system access a user holds largely depends on his or her need for system resources and your site's security requirements. This section describes the types of user accounts that are available on OpenVMS systems and explains why one type of account may be preferable to another. For a step-by-step description of adding user accounts, refer to the relevant section in the VSI OpenVMS System Manager's Manual, Volume 1: Essentials.
7.2.1. Types of System Accounts
Interactive accounts have access to system software. Usually, such an account is considered an individual account.
Limited-access accounts provide controlled login to the system and, in some cases, controlled access to user software. Limited-access accounts ensure that the system and process login command procedures, as well as any command procedures they call, are executed. There are two types of limited accounts: captive and restricted. Guest, proxy, and automatic login accounts are forms of captive and restricted accounts. DECwindows software does not currently support captive or restricted logins in the traditional sense. Once a user is logged in and creates a DECterm window, however, the traditional environment of a captive or restricted account applies.
Both interactive and limited-access accounts can be privileged accounts, and can be externally authenticated, as Section 7.2.2, ''Privileged Accounts'' describes.
|
If Users Need to... |
Type of Account to Create |
|---|---|
|
Perform work of a general nature, such as program development or text editing |
Interactive |
|
Perform routine computer tasks requiring limited activities |
Captive |
|
Run batch operations during unsupervised periods |
Captive |
|
Run applications programs with confidential information |
Captive |
|
Use network applications like MAIL |
Restricted |
|
Access resources on your system from a remote system (in a limited manner) |
Captive or restricted |
|
Use network proxy accounts |
Restricted |
|
Use authentication systems like smart cards |
Restricted |
|
Use accounts created as part of a layered product installation |
Restricted |
|
Perform privileged operations |
Interactive, restricted, or captive |
|
Access resources from a remote system without a password |
Captive |
|
Automatically log in to an application terminal |
Captive or restricted |
|
Log in at the OpenVMS login prompt using their external user IDs and passwords |
Externally authenticated |
You may develop one or more templates that work for many of your users. However, do not oversimplify the process of account creation to the point that you simply apply a template. The danger in relying solely on templates is that you might overlook special considerations that apply to individual users, thereby forfeiting important controls that only you can exercise.
Examine templates regularly to be sure they are valid and reflect the way you want your operations to proceed. Templates become obsolete rapidly.
7.2.1.1. Interactive Account Example
$ SET DEFAULT SYS$SYSTEM $ RUN AUTHORIZE UAF> ADD RDOGWOOD /PASSWORD=TRALAYAM/UIC=[231,010] -
| Only one password is required. |
| The password has a minimum length of |
| The user's password is valid for |
| The user is allowed access during the week and on Saturdays. |
| During those six days, the user has access during a 15-hour period. |
7.2.1.2. Limited-Account Example
Example 7.2, ''Creating a Limited-Access Account'' shows how to create an applications production account where the user is highly restricted. This account is designed to perform two functions: list the grades at State University, and produce mailings to each student's home.
In the example, any value not specified defaults to the value provided by the default record in SYSUAF.DAT.
$ SET DEFAULT SYS$SYSTEM $ RUN AUTHORIZE UAF> ADD REPGRADES /DEVICE=ADMINDEV/DIRECTORY=[REPGRADES] - _UAF> /FLAGS=(CAPTIVE,DISWELCOME,DISNEWMAIL,DISMAIL,DEFCLI) -
| Account users do not see the normal system welcome message. The account may not receive mail. It is restricted to running under control of its login command procedure and the default command interpreter (DCL). |
| The user who initiates the login must specify the password, GROBWACH. |
| When the job is run through a local login, it is restricted to the hours of 8 a.m. through 5:59 p.m., Monday through Friday. Notice that only batch and local logins are allowed, and batch mode does not have time restrictions. |
| The job may not be run over dialup lines or as a remote job. The account also denies network access. |
| The process runs under the control of a special login command procedure (GRADES.COM), which presumably provides the operator with a menu of functions. |
| The process is restricted to the commands defined in the CLI table GRADES_TABLES. |
7.2.2. Privileged Accounts
Privileges determine the functions users are authorized to perform on the system. Any account with privileges beyond TMPMBX and NETMBX is considered privileged. Such an account can be interactive, restricted, or captive.
Limit access to the account. For example, you can prohibit dialup or network access with the
/NODIALUPor/NONETWORKqualifier to discourage outsiders from attempting break-ins from remote locations.Impose security alarms to detect use of the privileges pertaining to file protection: BYPASS, SYSPRV, READALL, and GRPPRV. For information about setting up and monitoring security alarms, see Chapter 10, "Security Auditing".
Use the
/PRIMEDAYSand/NOACCESSqualifiers to restrict the time of day or days of the week that logins can be performed. Select periods of time that can be monitored for appropriate use.Disable the account when not in use with the AUTHORIZE qualifier
/FLAGS=DISUSER.Use a captive login command procedure for additional validation. Captive login command procedures are described in Section 7.2.4, ''Captive Accounts''.
Naturally, you need to set controls on the SYSTEM account. The most secure practice is to disable it for all but batch access and perform system management through individual privileged user accounts, which provide accountability.
Special-Purpose Privileged Captive Accounts
Because the safety of a captive account depends on the integrity of its command procedures, it is inadvisable to set up privileged captive accounts for untrusted users. However, there are some situations that require privilege, and it is safer to perform specific sensitive functions through captive privileged accounts than through general purpose privileged accounts. For example, users who perform backup operations require the READALL privilege. By making the account that performs backups captive, you can ensure that the procedures are carried out according to your system's backup policy.
See Section 7.2.4, ''Captive Accounts'' for guidelines for setting up captive accounts.
7.2.3. Interactive Accounts
Interactive accounts are very common in environments with low to moderate security requirements. They are well suited to work of a general nature, such as program development or text editing. The VSI OpenVMS System Manager's Manual, Volume 1: Essentials explains the procedure for setting up this type of account. Section 7.2.1.1, ''Interactive Account Example'' provides an example.
7.2.4. Captive Accounts
A captive account limits the activities of the user and, when properly administered, denies the user access to the DCL command level. You can set up the account to limit the user to running under the complete control of a specific program or the captive login command procedure.
The primary feature of the captive account is its login command procedure. This type of
account ensures that the system login command procedure
(SYLOGIN.COM) and the process login command procedure (specified
by the /LGICMD qualifier in SYSUAF.DAT), as well
as any command procedures they call, are executed. A user cannot specify any of the
qualifiers shown in Table 7.2, ''Login Qualifiers Not Allowed by Captive Accounts'' to modify the captive command procedures when
logging in.
SPAWN command, or the
INQUIRE command. Because the DISCTLY flag in the UAF record is turned
on, any use of Ctrl/Y fails. If unhandled errors or attempted interrupts
occur, a system error message is generated, and the session is logged out. Unless the
SPAWN command carries the /TRUSTED qualifier, it is
ineffective within a captive account. SPAWN is also disabled from MAIL
and the DEC Text Processing Utility (DECTPU) (as a built-in procedure). The
INQUIRE command is also disabled to prevent the possible execution of
user-specified lexical functions.|
Qualifier |
Description |
|---|---|
|
|
Specifies the name of an alternate command language interpreter |
|
|
Overrides the default login command procedure |
|
|
Disables execution of the default login command procedure |
|
|
Requests an alternate default disk |
|
|
Specifies the name of an alternate CLI table |
7.2.4.1. Setting Up Captive Accounts
You define a captive account with AUTHORIZE by including the following qualifier when creating the account:
/FLAGS=(CAPTIVE)
|
Qualifier |
Action |
|---|---|
|
|
Identifies the captive account login command procedure and overrides the default login command procedure (LOGIN.COM in the user's default directory). |
|
|
Assigns a unique UIC group. Use the following form of the AUTHORIZE
command UAF> SHOW [groupuic,*]
By keeping the account in a separate group, you can ensure that the captive account users can access only world-accessible files and files owned by the captive account. It ensures that the account is not a member of the system group (that is, has a group value less than or equal to 10 8, unless modified by the system parameter MAXSYSGROUP). |
|
|
Sets up the password. With a captive account, either require no password, or lock the password so that only the security administrator can change it. Locked passwords are generally preferable to open captive accounts (those with no password). If you assign a locked password, give that password to all users of the captive account. |
|
|
Sets the subprocess limit to 0, thus preventing the user from spawning out of the account.? |
You may want to disable the welcome announcement and electronic mail for the captive account. This is done by setting the DISWELCOME, DISMAIL, and DISNEWMAIL login flags.
You may want to allow only interactive use of the account from a local terminal. Include the qualifiers
/NODIALUP,/NOREMOTE,/NOBATCH, and/NONETWORKwhen establishing the account.Your application may have special requirements. You may need to impose additional AUTHORIZE qualifiers on the account, such as
/NODIALUP, to restrict modes of operation. Consider imposing restrictions for the periods of the day and days of the week when the process can run.You can define a special set of DCL tables by using the
/CLITABLESqualifier, or you can emulate DCL through the use of a DCL command procedure. It is more efficient to define DCL tables than to resort to a DCL command procedure to emulate DCL. See the description of the Command Definition utility (CDU) in the VSI OpenVMS Command Definition, Librarian, and Message Utilities Manual for help when defining the DCL tables. Be aware that the DCL tables defined by the/CLITABLESqualifier are not used in network jobs, such as those using the TASK object.You can grant privileges, although you rarely need to grant any privilege other than TMPMBX to a captive account.
You can limit the disk quota for the captive account to the amount needed.
7.2.4.2. Guidelines for Captive Command Procedures
Use the DCL command
READ/PROMPTin command procedures. For example, to request the user to enter the date, enter the following command in the command procedure:$ READ/PROMPT="Enter date: " SYS$COMMAND DATE
Avoid use of the
INQUIREcommand in a captive command procedure. It produces an error that, if unhandled by a previous ON declaration, results in deletion of the process.When user input is required, never execute it directly. First compare it to what is expected, and screen for illegal characters such as apostrophe ('), at sign (@), dollar sign ($), quotation mark ("), ampersand (&), or hyphen (-).
Avoid any use of the construction ’x, where x contains a string entered by the user. Never permit a restricted command procedure to attempt an evaluation of a symbol that the user enters. Use of lexical functions could break the command procedure.
Avoid executing a line in a captive command procedure that contains the characters @TT:.
Put Audit ACEs on the captive command procedure and its home directory to detect any modification of the file. See Section 3.10.2, ''Adding Access Control Entries to Sensitive Files'' for more information on Audit ACEs.
If the captive account user is allowed to create or perform other operations on files, make certain that write access to the login command procedure and its directory is denied. The user does need execute access.
If the function of the command procedure requires text preparation, you may need to give users access to a text editor. Use caution, however. Editors such as TECO or DECTPU can be dangerous because users can manipulate files and exit from the editor to the DCL interface. When designing this environment, remember that most text editors are capable of reading and writing files (within the access rights of the account). Provide an editor that gives users the tools they require but does not allow them to escape from the captive environment.
$ if f$mode() .nes. "INTERACTIVE" then $logout $ term = f$logical("SYS$COMMAND") $ if f$locate("_T", term) .eq. 0 then $goto allow $ if f$locate("_OP",term) .ne. 0 then $logout $allow: $ set control=(y,t)
$ deassign sys$input $ previous_sysinput == f$logical("SYS$INPUT") $ on error then goto next_command $ on control_y then goto next_command $ set control=(y,t) $ $next_command: $ on error then goto next_command $ on control_y then goto next_command $ $ if previous_sysinput .nes. f$logical("SYS$INPUT") then deassign sys$input $ read/end=next_command/prompt="$ " sys$command command $ command == f$edit(command,"UPCASE,TRIM,COMPRESS") $ if f$length(command) .eq. 0 then goto next_command $ $ delete = "delete" $ delete/symbol/local/all $ if f$locate("@",command) .ne. f$length(command) then goto illegal_command $ if f$locate("=",command) .ne. f$length(command) then goto illegal_command $ if f$locate("F$",command) .ne. f$length(command) then goto illegal_command $ verb = f$element(0," ",command) $ $ if verb .eqs. "LOGOUT" then goto do_logout $ if verb .eqs. "HELP" then goto do_help $ $ write sys$output "%CAPTIVE-W-IVVERB, unrecognized command \",verb,"\" $ goto next_command $ $illegal_command: $ write sys$output "%CAPTIVE-W-ILLEGAL, bad characters in command line" $ goto next_command $ $do_logout: $ logout $ goto next_command $ $do_help: $ define sys$input sys$command $ help $ goto next_command
7.2.5. Restricted Accounts
Certain limited-access accounts require a less restrictive environment than captive accounts. Accounts under which network objects run, for example, require temporary access to DCL. Such accounts must be set up as restricted accounts, not captive accounts. Restricted accounts are indistinguishable from regular accounts once the login sequence finishes. The purpose behind restricted accounts is to ensure a trusted login wherein SYLOGIN, LOGIN, and their descendants execute completely.
If the restricted flag is set, it is recommended that the
LOGIN.COM is not user-writable or the user cannot modify it and
bypass the login procedure. It is also expected that the LOGIN.COM
has error checking and error handling in place using the various error controls such as the
$ SET NOON or $ ON ERROR THEN LOGOUT.
Note
The purpose of the RESTRICTED flag is to ensure that the user cannot bypass parts of the login procedures. It is not intended to invoke a mechanism by which login procedures containing bugs cause a logout.
Define a restricted account with the Authorize utility by including the following qualifier when creating the account:
/FLAGS=(RESTRICTED)
This flag ensures that the account is noted as restricted. A restricted account provides the same features as those listed for a captive account in Section 7.2.4, ''Captive Accounts'' except that restricted accounts allow the user access to the DCL command level following the execution of the system and process login command procedures.
You may want to provide users with a Ctrl/Y feature at points during the execution of the restricted login command procedure. Include ON CONTROL_Y commands in the procedure where you want to test for the Ctrl/Y features, as shown in Example 7.4, ''Sample Captive Command Procedure for Unprivileged Accounts''.
You may have a restricted command procedure that ultimately turns control over to the user. For example, consider a SYLOGIN.COM command procedure that performs additional security validation; its execution should be guaranteed to ensure its effectiveness. However, once SYLOGIN.COM has done its job, control can be passed to the user. To do this, mark the account as restricted, and enter the DCL command
SET CONTROL=Ywhen you are ready to release control to the user.
7.2.6. Automatic Login Accounts
To force individuals at specific terminals to log in to an application program, create a separate captive account for the application. Then set up automatic logins to the new account for the desired users using the System Management utility (SYSMAN).
Once you set up a terminal for automatic login, it can be used only for the designated account. This is most useful for applications terminals used by people who may be unfamiliar with computers.
The automatic login feature suppresses the user name prompt. All other login features (system password, primary and secondary passwords, and messages) function normally, if enabled.
Passwords are optional. If you want the account to be open to all users where the terminals are located, eliminate the password. When no password is required, the user has no data to enter at login. The operating system logs the terminal in automatically in response to the Break key or the Return key and immediately enters the application if the account is under the control of a captive login command procedure.
Restrict network and dialup access, as appropriate, with the AUTHORIZE qualifiers
/NODIALUP,/NONETWORK, and/NOREMOTE.Set the AUTOLOGIN flag in the account's UAF record. This flag makes the account available only by autologin, batch, and network proxy.
7.2.7. Guest Accounts
Guest accounts are forms of captive or restricted accounts that allow multiple remote users access to resources on your system through a common account. For example, users across the network may need access to your system to report problems or to read corporate memos.
VSI does not recommend the practice of setting up guest accounts. Guest accounts, however unprivileged, offer malicious users a chance to compromise your system security. Most needs for a guest account can be handled by special proxy login accounts, which should also be limited-access accounts.
Use an obscure password for the guest account. Change the password frequently. Never use easily guessed account name and password combinations such as GUEST/GUEST or USER/USER.
Maintain a list of people allowed to use the account. Changing the password regularly helps you keep this list current.
Set up the guest account in a separate UIC group. Make sure that the account is not a member of the system group.
Place the default login command procedure in the directory SYS$MANAGER by using the AUTHORIZE command
MODIFY, as follows:UAF> MODIFY guest-account/LGICMD=SYS$MANAGER:filename.COM
Make the guest account restricted or captive by setting the AUTHORIZE qualifiers
/FLAGS=RESTRICTEDor/FLAGS=CAPTIVE, respectively.If the guest account is set up as a restricted account, limit the number of subprocesses that the account can create to 0 using the AUTHORIZE qualifier
/PRCLM=0.?Assign the guest account only TMPMBX privilege.
To handle error conditions, include the following commands in the default login command procedure:
$ SET ON SET NOCONTROLY ON ERROR THEN LOGOUT/BRIEF
If the system has LOGOUT defined as a global symbol and points to a command procedure (enter the DCL command
SHOW SYMBOL LOGOUTto confirm this), include the following DCL command in the default login command procedure for the account:$ DELETE/SYMBOL LOGOUT/GLOBAL
This command eliminates the possibility that the user could break the restricted account at logout time by pressing Ctrl/Y.
To prevent outsiders from misusing your system resources through the submission of batch jobs under the guest account, include the AUTHORIZE qualifier
/NOBATCHwhen you create the account.Limit the disk quota for the guest account UIC to the amount needed.
Do not allow the DCL command
INQUIREto appear in any of the command procedures.
7.2.8. Proxy Accounts
Generally, proxy login accounts should be set up as restricted accounts. Proxy login accounts permit remote users to access a local account without specifying a password. Section 13.3.3, ''Example of a Proxy Account'' describes proxy login accounts. Note that many recommendations are the same as those for restricted accounts.
7.2.9. Externally Authenticated Accounts
Externally authenticated accounts are those that are marked with the EXTAUTH flag in the user's SYSUAF record. This enables these users to log in at the OpenVMS login prompt using their external user IDs and passwords. See Section 7.4, ''Enabling External Authentication'' for more information on external authentication.
7.3. Using Passwords to Control System Access
A site needing average security protection always requires use of passwords. Sites with more security needs frequently impose a generated password scheme (see Section 7.3.2.4, ''Generated Passwords'') and possibly system passwords as well.
This section describes password management.
7.3.1. Types of Passwords
With the exception of an automatic login account, all users must have at least one password to log in. Sites with moderate or high security requirements may impose additional passwords (see Table 3.2, ''Types of Passwords'').
Externally authenticated users enter their external password at the OpenVMS password prompt. See Section 7.4, ''Enabling External Authentication'' for more information.
This section explains how to assign passwords using DCL and AUTHORIZE commands.
7.3.1.1. Primary Passwords
When you open an account for a new user with AUTHORIZE, you must give the user a user name and an initial password. When you assign temporary initial passwords, observe all guidelines recommended in Section 3.8, ''Guidelines for Protecting Your Password''. Avoid any obvious pattern when you assign passwords. You may want to use the automatic password generator.
/GENERATE_PASSWORD qualifier to either the ADD
or the COPY command. The system responds by offering you a list of
automatically generated password choices. Select one of these passwords, and continue
setting up the account.Note
There are restrictions on using the /GENERATE_PASSWORD
qualifier with the /PWDMINIMUM qualifier. Generated passwords have
an absolute length of 12 characters (see Section 7.3.2.3, ''Requiring a Minimum Password Length''). Whenever
there is a conflict between the value of /PWDMINIMUM and a
generated password, the operating system uses the lesser of the two values.
Passwords you specify with AUTHORIZE are defined as expired by default. This forces
the user to change the initial password when first logging in. See Section 7.3.2, ''Enforcing Minimum Password Standards'' for more information. Be sure to include information on the
first login in your user training so that users know what to expect. If you do not want
the password you define with AUTHORIZE to be pre-expired, add the qualifier
/NOPWDEXPIRED when entering the password. This is necessary for
accounts when users are not permitted to set their own password.
Pre-expired passwords are conspicuous in the UAF record listing. The entry for the date of the last password change carries the following notation:
(pre-expired)
7.3.1.2. System Passwords
All terminals using dialup lines or public data networks for access
Terminals on lines that are publicly accessible and not tightly secured, such as those in computer laboratories at universities
Terminals not frequently inspected
Terminals intended for use only as spare devices
Terminals you want to reserve for security operations
Establish a record in the SYSUAF database for a system password by invoking the Authorize utility and entering the following command:
UAF> MODIFY/SYSTEM_PASSWORD=passwordNote
You need to establish a record in the SYSUAF database only the first time a system password is set up on the system. However, if no record is present, the
SET PASSWORD/SYSTEMcommand returns the following error:%SET-F-UAFERR, error accessing authorization file -RMS-E-RNF, record not found
Decide which terminals require system passwords. Then, for each terminal, enter the DCL command
SET TERMINAL/SYSPWD/PERMANENT. When you are satisfied that you have selected the right terminals, incorporate these commands into SYS$MANAGER:SYSTARTUP_VMS.COM so that the terminal setup work is done automatically at system startup. You can remove the restriction on a terminal at any time by invoking the DCL commandSET TERMINAL/NOSYSPWD/PERMANENTfor that terminal.Choose a system password, and implement it with the DCL command
SET PASSWORD/SYSTEM, which requires the SECURITY privilege. This command prompts you for the password and then prompts you again for verification, just as for user passwords. To request automatic password generation, include the/GENERATEqualifier.
To enable the use of the system password for the remote class of logins (those
accomplished through the DCL command SET HOST), set the appropriate bit
in the default terminal characteristics parameter by using AUTOGEN. This is bit 19
(hexadecimal value 80000) in the parameter TTY_DEFCHAR2. Note
that if you set this bit, you must invoke the DCL command SET
TERMINAL/NOSYSPWD/PERMANENT to disable system passwords for each terminal
where you do not want the feature. As before, consider placing the SET
TERMINAL commands you have tested in
SYS$MANAGER:SYSTARTUP_VMS.COM. Then follow the previously
defined steps to set the system password.
When choosing a system password, follow the recommendations presented in Section 3.8, ''Guidelines for Protecting Your Password''. Choose a string of characters and digits, with a minimum length of 6, that is not a valid word. Although the system password is not subject to expiration, change the password frequently. Always change the system password as soon as a person who knows the password leaves the group. Share the system password only with those who need to know.
The system password is stored in a separate UAF record and cannot be displayed. The
DCL command SET PASSWORD/SYSTEM (the normal means of setting and
changing the system password) requires that you enter the old system password before
changing it. Use the AUTHORIZE command MODIFY/SYSTEM_PASSWORD to change
the system password without specifying the old password, as shown in the following
command:
UAF> MODIFY/SYSTEM_PASSWORD=ABRACADABRA
The primary function of the system password is to form a first line of defense for publicly accessible ports and to prevent potential intruders from learning the identity of the system. However, requiring system passwords can appear confusing when authorized users are unaware that they are required on certain terminals. To avoid false reports of defective terminals or systems, inform your users which terminals allocated for their use require system passwords.
Where system passwords are not applied to either control access through dialup lines
or on publicly accessed lines, few people may know the system password. Operations are
hampered if the personnel who know the password are unavailable, incapacitated, or
forgetful. Solve this problem by invoking AUTHORIZE and entering the
MODIFY/SYSTEM_PASSWORD command. SYSPRV privilege is required.
7.3.1.3. Secondary Passwords
Sites with high-level security concerns can require a second password on user accounts. Typically, the user does not know the secondary password, and a supervisor or other key person must be present to supply it. For certain applications, the supervisor may also decide to remain present while the account is in use. The effectiveness of a secondary password depends on the trustworthiness of the supervisor who supplies it because the supervisor can remove the secondary password by changing it to a null string.
When used on a widespread basis, dual passwords help verify the identity of each user at login time because the supervisor or other key person can check each user.
When used in limited cases, dual passwords single out accounts that can be logged in to only when two persons are present.
Dual passwords also prevent the use of access control strings when users access accounts through DECnet software.
Sites with medium security requirements may use dual passwords as a tool when there are unexplained intrusions after the password has been changed and use of the password generator has been enforced. Select problem accounts, and make them a temporary target of this restriction. If the problem goes away when you institute personal verification through the secondary password, you know you have a personnel problem. Most likely, the authorized user is revealing the password for the account to one or more other users who are abusing the account.
Implement dual passwords with the AUTHORIZE qualifier /PASSWORD.
For example, to impose dual passwords on a new account, invoke AUTHORIZE and use the
following form of the ADD command:
UAF> ADD newusername /PASSWORD=(primarypwd, secondarypwd)
To impose a secondary password on an existing account, use the following form of the
MODIFY command:
UAF> MODIFY username /PASSWORD=("", secondarypwd)
/FLAGS=GENPWD qualifier has
been specified for this account, the secondary password can be changed only under the
control of the automatic password generator. You cannot use wildcards in the user name
parameter to apply a secondary password to multiple users with a single command.Note
While you can specify secondary passwords for accounts requiring remote access
through the DCL command SET HOST, you cannot specify them for
accounts requiring network file access using access control strings. If an account
with a secondary password is to be used for network access (for example, remote file
access), you must set up proxy access for all remote nodes from which the account may
be accessed.
7.3.1.4. Console Passwords
The console terminal controls operation of the CPU and, consequently, operation of the system. Sites with high security requirements should consider using the password security feature when it is available.
Commands that examine or modify memory and registers, such as
SET,EXAMINE,DEPOSIT,FIND, andSHOW.Commands that transfer control of the CPU from the console monitor to another program, such as
BOOTandSTART. Invoking the default boot, which requires aBOOTcommand with no parameters, is not a privileged command and is allowed without the password.
Enter the privileged command:
>>> SET PSWD
In response, the console prompts for a password:
1 >>>
Enter the new password, and press the Return key. Note that the console does not display the password as you enter it.
The password must be a hexadecimal string of characters (0 through 9 and A through F) with a length of exactly 16 characters.
If the password character string is of the right length, the console prompts for you to reenter the new password for verification:
2 >>>
Reenter the new password, and press Return. Again, note that the password is not displayed.
Enable the password security feature with the following command:
>>> SET PSE 1
To place the workstation in privileged mode and make all console commands accessible,
use the LOGIN command. The SHOW PSE command displays
the current status of the password feature.? To disable the feature, use the SET PSE command with a 0
argument.
Because the password is stored in nonvolatile memory, you must call the Customer Support Center if you forget it.
7.3.1.5. Authentication Cards
Rather than distribute passwords and account information, some sites choose to provide system users with hand-held devices called authentication cards or smart tokens.
Authentication devices have the user's password programmed onto them. Depending on the complexity of the hardware design, these devices can support additional login information (for example, an account name and billing reference number). A variety of authentication devices are available from third-party vendors. Such devices are supported by a software module that communicates with the login program (LOGINOUT.EXE). See the relevant section in the VSI OpenVMS Utility Routines Manual for a description of the LOGINOUT routines supporting authentication cards.
7.3.2. Enforcing Minimum Password Standards
You can use AUTHORIZE to impose minimum password standards for individual users. Specifically, qualifiers and login flags provided by AUTHORIZE control how soon passwords will expire, whether the user is forced to change passwords at expiration, and the minimum password length.
7.3.2.1. Expiring Passwords
With the AUTHORIZE qualifier /PWDLIFETIME, you can establish the
maximum length of time that can elapse before the user is forced to change the password or
lose access to the account. By default, the value of /PWDLIFETIME is 90
days. You can change the frequency requirements for user password changes by specifying a
different delta time value for the qualifier. For example, to require a user to change the
password every 30 days, you would specify the qualifier as
/PWDLIFETIME=30-0.
The /PWDLIFETIME qualifier applies to both primary and secondary
user passwords but not to the system password. Each primary and secondary password for a
user is subject to the same maximum lifetime. However, the passwords can change at
separate times. As soon as the user completes a password change, that individual
password's clock is reset; the new password value can exist unchanged for the length of
time dictated by /PWDLIFETIME.
/NOPWDLIFETIME specifies that primary and secondary
passwords do not expire.Note
Specifying /NOPWDLIFETIME removes the default behavior that
initial passwords be reset. However, if you want to have initial passwords reset but
you do not want password expiration, you can specify
/PWDLIFETIME="9999-".
AUTHORIZE also provides two login flags related to primary and secondary password
expiration. These flags, PWD_EXPIRED and
PWD2_EXPIRED, are specified with the /FLAGS
qualifier. The first flag, PWD_EXPIRED, is set after the primary
password expires and the user has had one last chance to change the password and has
failed to do so. The second flag, PWD2_EXPIRED, is set after the
secondary password expires and the user has had one last chance to change the secondary
password and has failed to do so. If either PWD_EXPIRED or
PWD2_EXPIRED is set, the account is disabled for logins because
the user failed to employ the last chance to change the password during the last
login.
As soon as the user successfully changes the password, the system resets the flags, as appropriate. The flag PWD_EXPIRED becomes NOPWD_EXPIRED as soon as the primary password is changed. Similarly, the flag PWD2_EXPIRED becomes NOPWD2_EXPIRED as soon as the secondary password is changed. As security administrator, you may choose to invoke AUTHORIZE and reset the flags, giving the user another chance to reset the password.
The use of a password lifetime forces the user to change passwords regularly. The lifetime can be different for different users. Users with access to critical files generally should have the shortest password lifetimes.
Note
SYS$PASSWORD_HISTORY_LIFETIME should be made larger than the UAF parameter PWDLIFETIME. If you set the SYS$PASSWORD_HISTORY_LIFETIME value to less than PWDLIFETIME, passwords will expire out of the history file before they expire in SYSUAF. This defeats the purpose of the password history file. For more information about PWDLIFETIME parameter, see Section 7.3.2.2, ''Enforcing Change of Expired Password''.
The LGI$PASSWORD_NOCHANGE_DAYS and LGI$EXPIRATION_WARNING_DAYS logicals are systemwide, executive-mode logical names.
You can define the LGI$PASSWORD_NOCHANGE_DAYS logical to set the minimum number of days before the user can change the password.
The LGI$EXPIRATION_WARNING_DAYS logical can be defined to set the number of days prior to the expiration of password when the user shall start receiving the password expiration warning messages.
7.3.2.2. Enforcing Change of Expired Password
By default, users are forced to change expired passwords when logging in. Users whose
passwords have expired are prompted for new passwords at login. This password feature is
valid only when a password expiration date is specified with the
/PWDLIFETIME qualifier.
To disable forced password changes, specify the following qualifier to the
ADD or the MODIFY command:
/FLAGS=DISFORCE_PWD_CHANGE
Once you disable the forced password feature, you can reenable it by clearing the login flag, as shown in the following:
/FLAGS=NODISFORCE_PWD_CHANGE
Note
If secondary passwords are in effect and both primary and secondary passwords have expired, the user is forced to change both passwords. If the user changes the primary password and presses Ctrl/Y before changing the secondary password, the user is logged out, and no password change is recorded.
7.3.2.3. Requiring a Minimum Password Length
With the AUTHORIZE qualifier /PWDMINIMUM, you can direct that all
password choices, both primary and secondary, must contain a minimum number of characters.
Users can still specify passwords up to the maximum length of 32 characters for VSI
versions of OpenVMS V8.4, and 64 characters for OpenVMS V9 and above.
A user's minimum password length is either the default of 6 characters or another
value established by the /PWDMINIMUM qualifier (provided the number is
10 or less).
On Alpha systems, the password generator creates passwords of the exact length specified but limited to 10 characters.
The password generator creates passwords that range in length
between n and n+2, where the minimum length
n is a value ranging from 1 to 10. So the length of a generated
password (/GENERATE_PASSWORD or SET
PASSWORD/GENERATE) can conflict with the value provided with the
/PWDMINIMUM qualifier.
When there is a conflict between n and the value set by the
/PWDMINIMUM qualifier, the operating system uses the lesser value,
but never more than 10. For example, if you specify a length of 25 with the
/PWDMINIMUM qualifier, the operating system generates passwords of 10
to 12 characters. The system does not notify you of the difference in values.
The length of a generated password produced by the AUTHORIZE qualifier
/GENERATE_PASSWORD comes from the Pwdminimum field of the source UAF
record: the DEFAULT record or the UAF record copied. The Pwdminimum field is updated with
the value set by /PWDMINIMUM, so passwords created with SET
PASSWORD/GENERATE use the new value.
The system password is not subject to a minimum length. Guidelines that apply to user passwords are equally applicable to system passwords. Choose system passwords that are 1 to 32 characters long for VSI versions of OpenVMS V8.4, and 64 characters for OpenVMS V9 and above.
7.3.2.4. Generated Passwords
The /FLAGS=GENPWD qualifier in AUTHORIZE lets you force use of the
automatic password generator when a user changes a password. At some sites, all accounts
are created with this qualifier. At other sites, the security administrator may be more
selective.
If users will have access to sensitive data that must not be compromised by an intrusion, require them to use the password generator.
If your policy is to request voluntary use of the password generator and users are not
cooperating, you can force users to use the password generator by adding the
/FLAGS=GENPWD qualifier to pertinent user accounts. You can also add
the AUTHORIZE qualifier /FLAGS=LOCKPWD to user accounts to prevent
users from changing passwords. Only you will be authorized to change passwords.
7.3.2.5. Site Password Algorithms
The operating system protects passwords from disclosure through encryption. OpenVMS algorithms transform passwords from plaintext strings into ciphertext, which is then stored in the system user authorization file (SYSUAF.DAT). Whenever a password check is done, the check is based on the encrypted password, not the plaintext password. The system password is always encrypted with an algorithm known to the operating system.
The /ALGORITHM qualifier in AUTHORIZE allows you to define which
algorithm the operating system should use to encrypt a user's password. Your choices are
the current OpenVMS algorithm or a site-specific algorithm. You can specify the encryption
algorithm independently for each account's primary and secondary passwords. The syntax is
as follows:
/ALGORITHM=keyword=type [=value]
To assign the OpenVMS password encryption algorithm for a user, you would enter a command like the following:
UAF> MODIFY HOBBIT/ALGORITHM=PRIMARY=VMS
If a site-specific algorithm is selected, you must give a value to identify the algorithm, for example:
UAF> MODIFY HOBBIT/ALGORITHM=CURRENT=CUSTOMER=128
The relevant section in the VSI OpenVMS Programming Concepts Manual, Volume II
provides directions for using a customer algorithm. You must create a site-specific system
service in which you write code that recognizes the algorithm number you choose and
encrypts the password appropriately. This number has to correspond with the number used in
the AUTHORIZE command MODIFY/ALGORITHM.
Whenever a user is assigned a site-specific algorithm, AUTHORIZE reports this
information in the display provided by the SHOW command.
7.3.3. Screening New Passwords
The system generally compares new passwords against a system dictionary stored in SYS$LIBRARY to ensure that a password is not a native language word. It also maintains a history list of a user's passwords and compares each new password against this list to guarantee that an old password is not reused. You can screen passwords further by developing and installing an image that filters passwords for words that are particularly sensitive to a site.
7.3.3.1. System Dictionary
The DCL command SET PASSWORD takes a user's proposed password,
converts it to lowercase (if necessary), and compares it to entries in a system dictionary
to ensure that a password is not a native language word. If a proposed password is found
in the dictionary, it is rejected as a valid user password, and the user has to provide
another.
Create a file containing passwords you would like to add to the dictionary. Each password should be on a separate line and in lowercase, as follows:
$ CREATE LOCAL_PASSWORD_DICTIONARY.DATA somefamous localheroes Ctrl/ZEnable SYSPRV and merge your local additions:
$ SET PROCESS/PRIVILEGE=SYSPRV $ CONVERT/MERGE/PAD LOCAL_PASSWORD_DICTIONARY.DATA - _$ SYS$LIBRARY:VMS$PASSWORD_DICTIONARY.DATA
You can disable the dictionary search by using AUTHORIZE with the DISPWDDIC option to
the /FLAGS qualifier.
7.3.3.2. History Lists
The operating system maintains a list of a user's passwords from the last 365 days and compares each proposed password against this list to ensure that passwords are not reused.
Once a user successfully creates a new password, the system enters the old password on the history list and updates the file. The password history list can hold a large number of words, but it is limited to 60 by default. If this number is exceeded, the user has to use generated passwords. A password remains on the password history list for 365 days (or the default set by SYS$PASSWORD_HISTORY_LIFETIME). Whenever a user account is deleted, the system removes all password records belonging to that account.
DEFINE, you can change the defaults for the
capacity and lifetime of the password history list to any of the values indicated in Table 7.4, ''Defaults for Password History List''.|
System Logical Name |
Default |
Min |
Max |
Units |
|---|---|---|---|---|
|
SYS$PASSWORD_HISTORY_LIFETIME |
365 |
1 |
28000 |
Days |
|
SYS$PASSWORD_HISTORY_LIMIT |
60 |
1 |
2000 |
Absolute count |
$ DEFINE/SYSTEM/EXEC SYS$PASSWORD_HISTORY_LIMIT 100There is a correspondence between the lifetime of a password history list and the number of passwords allowed on the list. For example, if you increase the password history lifetime to 4 years and your passwords expire every 2 weeks, you would need to increase the password history limit to at least 104 (4 years times 26 passwords a year). The password history lifetime and limit can be changed dynamically, but they should be consistent across all nodes on the cluster.
Sites using secondary passwords may need to double the password limit to account for the secondary password storage.
The password history list is located in SYS$SYSTEM. You can
move the list off the system disk by using the logical name
VMS$PASSWORD_HISTORY. Define this logical name as
/SYSTEM/EXEC, and place it in
SYS$MANAGER:SYLOGICALS.COM.
You disable the history search with the DISPWDHIS option to the
/FLAGS qualifier in AUTHORIZE.
7.3.3.3. Site-Specific Filters
Besides screening passwords against a system dictionary and a history list, you can develop a site-specific password filter to ensure that passwords are properly constructed and are not words readily associated with your site. A filter can check for password length, the use of special characters or combinations of characters, and the use of product names or personnel names.
To create a list of site-specific words, you write the source code, create a shareable image, install the image, and, finally, enable the policy by setting a system parameter. See the relevant section in the VSI OpenVMS Programming Concepts Manual, Volume II for instructions.
Installing and enabling a site-specific password filter requires both SYSPRV and CMKRNL privileges. Multiple security alarms are generated when the password filter image is installed if INSTALL and SYSPRV file-access auditing are enabled and the required change to the system parameter is noted on the operator console.
Caution
The two global routines let you obtain both the proposed plaintext password and its equivalent quadword hash value. All security administrators should be aware of this feature because its subversion by a malicious privileged user will compromise the system's security.
VSI recommends that you place security Alarm ACEs on the password filter image and its parent directory. See the relevant section in the VSI OpenVMS Programming Concepts Manual, Volume II for instructions.
7.3.4. Password Protection Checklist
Make certain the passwords on the standard accounts like SYSTEM are secure and changed regularly. You can disable accounts (for example, FIELD and SYSTEST) with the AUTHORIZE qualifier
/FLAGS=DISUSERwhen they are not in use.Do not permit an outside or in-house service organization to dictate the password for an account they use to service your system. Such service groups tend to use the same password on all systems, and their accounts are usually privileged.
On seldom-used accounts, set the AUTHORIZE qualifier
/FLAGS=DISUSER, and enable the account only when it is needed. Change the password immediately after each use, and notify the service group of the new password when they need it next.Delete accounts no longer in use.
Do not leave listings of user names where they can be read or stolen because they can be used as a basis for system attack. If you do need listing files, use ACLs to limit access only to selected individuals.
Maintain adequate protection of authorization files. Note that the system user authorization file (SYSUAF.DAT), the network proxy authorization file (NETPROXY.DAT), and the rights list (RIGHTSLIST.DAT) are owned by the system account ([SYSTEM]). Do not create any other user accounts in this group. Normally the default UIC-based file protection for these authorization files is adequate. The system account also owns the file NET$PROXY.DAT.
Make certain that all users have unique UICs.
Avoid giving multiple users access to the same account.
Protect telephone numbers for dialup lines connected to your system, and consider setting a system password (
SET TERMINAL/SYSPASSWORD) on dialup lines.If your system has accounts available to outside users, such as guest accounts or accounts for direct customer inquiry, make these accounts captive (limited-access) accounts contained by captive command procedures (see Section 7.2.4, ''Captive Accounts'' for information about setting up captive accounts).
Make captive all accounts that do not require a password.
Extend privileges to users carefully.
Protect your own files using all the techniques recommended in Section 5.4.8, ''Suggestions for Optimizing File Security''.
Ensure that the files containing components of the operating system are adequately protected (see Section 8.9.2, ''Protecting System Files'').
Use the AUTHORIZE qualifiers
/NOINTERACTIVEand/NOBATCHwhen setting up proxy login accounts to permit only file access from other nodes. Interactive and batch logins are disabled for the account.
7.4. Enabling External Authentication
External authentication allows users to log in at the OpenVMS login prompt using their external user IDs and passwords. When successfully authenticated, the external user ID is mapped to the appropriate OpenVMS user name and the correct user profile is obtained.
Important
OpenVMS provides an LDAP-based ACME agent that is integrated into the operating system. In this document, this component is referred to as the integrated LDAP ACME agent, while the OpenLDAP-based implementation is referred to as the OpenLDAP ACME agent.
The integrated LDAP ACME agent and the OpenLDAP ACME agent are mutually exclusive. Configure and enable only one LDAP-based authentication solution on a system.
For further information, refer to the VSI OpenLDAP ACME Agent for OpenVMS Configuration and User Guide and the most recent version of the VSI OpenLDAP for OpenVMS Release Notes and Installation Guide available at https://docs.vmssoftware.com/.
To enable external authentication, the system administrator must perform the following tasks:
- For VSI OpenVMS x86-64 Version 9.2-3 and later:
Configure the ACME SERVER and ACME authentication agents
Set up either the integrated LDAP extension module or the OpenLDAP ACME agent
Switch the login process from the default UAF LOGIN to the ACME LOGIN
Mark user accounts in the SYSUAF file
- For VSI OpenVMS Alpha and IA-64 Version 8.4-1H1 and later:
Configure the ACME SERVER and ACME authentication agents
Switch the login process from the default UAF LOGIN to the ACME LOGIN
Mark user accounts in the SYSUAF file
For OpenVMS Alpha and IA-64 Versions 8.3—8.4:
Configure the ACME SERVER and ACME authentication agents
Install the ACMELOGIN kit
Mark user accounts in the SYSUAF file
7.4.1. Configuring the ACME SERVER and ACME Authentication Agents
The ACME SERVER is a multithreaded server that supports one or more authentication policies. Each authentication policy is applied by installing and configuring an ACME authentication agent.
Important
The integrated LDAP external authentication agent and the OpenLDAP external authentication agent provide alternative LDAP-based authentication mechanisms. Configure and enable only one of these agents on a system. Simultaneous use of both LDAP agents is not supported.
For detailed information about the Authentication and Credentials Management Extensions (ACME) subsystem, see Section 7.4.16, ''Authentication and Credentials Management Extensions (ACME) Subsystem''.
For a list of generic commands that you can use to configure the ACME SERVER, see Section 7.4.16.3, ''ACME Subsystem Controls''.
OpenVMS supports the following ACME authentication agents:
VMS ACME Authentication Agent:
The VMS ACME authentication agent provides the standard OpenVMS authentication policy. The VMS ACME authentication agent is always required for a complete operational environment, though there are other external authentication agents.
No separate installation or configuration steps are required for this authentication agent. However, if you start the ACME_SERVER process manually using the
SET SERVER ACMEcommands, you must configure the VMS ACME software in order to grant persona-based credentials. Use the following commands to start the ACME_SERVER process and configure ACME authentication agents:$ SET SERVER ACME/START/LOG
$ SET SERVER ACME/CONFIG=(NAME=VMS,CRED=VMS)
$ SET SERVER ACME/ENABLE
Integrated LDAP External Authentication Agent:
The integrated LDAP external authentication agent validates a user name and password against directory servers such as Active Directory and Enterprise Directory.
For information on how to install the integrated LDAP external authentication agent, refer to the VSI OpenVMS ACME LDAP Installation and Configuration Guide. Alternatively, refer to SYS$HELP:ACMELDAP_STD_CONFIG_INSTALL.PDF or SYS$HELP:ACMELDAP_STD_CONFIG_INSTALL.TXT (the PDF version includes images along with the installation procedure).
OpenLDAP External Authentication Agent:
The OpenLDAP external authentication agent validates a user name and password against an LDAP-compliant directory server, such as a Microsoft Active Directory domain controller or an OpenLDAP server, using the VSI OpenLDAP ACME agent.
For information on installing and configuring the OpenLDAP external authentication agent, refer to the VSI OpenLDAP ACME Agent for OpenVMS Configuration and User Guide.
Kerberos External Authentication Agent:
The Kerberos SIP kit is installed during the installation of OpenVMS.
7.4.2. Installing the Integrated LDAP Extension Module on x86-64
This section describes the procedure for setting up the integrated LDAP extension module on VSI OpenVMS x86-64 systems. The module is required in order to provide external authentication capabilities via the integrated LDAP ACME agent.
To set up the integrated LDAP extension module, perform the following tasks (on a cluster, complete these steps on any one node that boots from a particular system disk):
Add an entry for the persona extension image to the systems images list:
$ MCR SYSMAN SYSMAN> SYS_LOADABLE ADD LDAPACME LDAPACME$EXT SYSMAN> EXIT
Generate a new system images data file:
$ @SYS$UPDATE:VMS$SYSTEM_IMAGES.COM
Reconfigure the node memory disk using the following command procedure:
$ @SYS$UPDATE:SYS$MD.COM
This procedure creates a new system bootable memory disk that contains the LOGINOUT and LDAP components necessary for external authentication processing.
Reboot the system to load the new memory disk.
7.4.3. Switching Between UAF LOGIN and ACME LOGIN
The default non-SYS$ACM-enabled variant (UAF LOGIN)
The SYS$ACM-enabled variant (ACME LOGIN) that supports external authentication
$ @SYS$MANAGER:SYS$LOGIN_SWITCH.COM You are currently using UAF LOGIN. This procedure will switch to using ACME LOGIN Do you want to continue? (YES or NO): Yes The replacement procedure is complete.
If you run SYS$LOGIN_SWITCH on the system that uses a common system disk in an OpenVMS cluster, you must run the following commands on all cluster members using the common system disk:
$ INSTALL REPLACE LOGINOUT $ INSTALL REPLACE SETP0
To check the image identification, use the following commands:
$ ANALYZE/IMAGE/INTER SYS$COMMON:[SYSEXE]LOGINOUT.EXE $ ANALYZE/IMAGE/INTER SYS$COMMON:[SYSEXE]SETP0.EXE
You will see output similar to the following:
$ ANALYZE/IMAGE/INTER SYS$COMMON:[SYSEXE]LOGINOUT.EXE
This is an OpenVMS IA64 (Elf format) executable image file
Image Identification Information, in section 3.
Image name: "LOGIN_ACME"
Global Symbol Table name: "LOGIN_ACME"
Image file identification: "LOGIN_ACME"
Image build identification: "XFW1-C6E-000000"
Link identification: "Linker I02-37"
Link Date/Time: 9-MAR-2021 22:45:26.17
$ ANALYZE/IMAGE/INTER SYS$COMMON:[SYSEXE]SETP0.EXE
This is an OpenVMS IA64 (Elf format) executable image file
Image Identification Information, in section 3.
Image name: "SETP0_ACME"
Global Symbol Table name: "SETP0_ACME"
Image file identification: "LOGIN_ACME"
Image build identification: "XFW1-C6E-000000"
Link identification: "Linker I02-37"
Link Date/Time: 9-MAR-2021 22:46:01.27When you complete switching between the login processes on your system, it is recommended to log in with any user account to test the LOGINOUT replacement.
7.4.4. Installing the ACMELOGIN Kit
OpenVMS Versions 8.3—8.4 provide the SYS$ACM-enabled LOGINOUT.EXE and SETP0.EXE images for external authentication with the ACMELOGIN PCSI kit. This ACMELOGIN PCSI kit has to be extracted from SYS$UPDATE:ACME_DEV_KITS.BCK and installed.
See the SYS$HELP:ACME_DEV_README.TXT for the detailed information on installing the SYS$ACM-enabled LOGINOUT.EXE and SETP0.EXE images.
Also, see Section 7.4.16, ''Authentication and Credentials Management Extensions (ACME) Subsystem'' for more details on how external authentication works when SYS$ACM system service is used with DCL commands to operate on the ACME subsystem.
7.4.5. Marking User Accounts in the SYSUAF File
Each externally authenticated user must have an entry in the SYSUAF file from which account information such as account restrictions and quotas are fetched during login.
The user name in the SYSUAF record can be the same or different from the user name entered at the user name prompt. It depends on user name mapping support provided by the authentication agent, which validates the user.
For example, Kerberos external authentication supports one to one mapping where the user name entered and the user name in the SYSUAF file must be same.
At the user level, external authentication is enabled by a flag, EXTAUTH, in the SYSUAF record for the user. When set, the EXTAUTH flag denotes that the user is to be externally authenticated. For example, in the Authorize utility, you can enter commands similar to the following:
$ SET DEFAULT SYS$SYSTEM
$ RUN AUTHORIZE
UAF> ADD username /FLAGS=([NO]EXTAUTH)
UAF> MODIFY username /FLAGS=([NO]EXTAUTH)For more information on the Authorize utility EXTAUTH flag, see the relevant section in the VSI OpenVMS System Management Utilities Reference Manual, Volume I: A–L. For more information on the UAI$V_EXTAUTH bit of the UAI$_FLAGS item code, see the SYS$GETUAI system service in the VSI OpenVMS System Services Reference Manual: A–GETUAI and the SYS$SETUAI system service in the VSI OpenVMS System Services Reference Manual: GETUTC–Z.
7.4.6. SYS$ACM External Authentication
The LOGINOUT.EXE and SETP0.EXE (SET PASSWORD) images, provided with the ACMELOGIN kit (upon extracting SYS$UPDATE:ACME_DEV_KITS.BCK), utilize the SYS$ACM system service for user authentication and password changes. With these images installed, login and password change requests are sent to the SYS$ACM service and handled by the ACME_SERVER process’s authentication agents. The effect must be transparent to users, layered products, and applications.
SYS$ACM-enabled external authentication (OpenVMS Version 8.3 and later) has the following characteristics:
External authentication is controlled by
SET SERVER ACMEcommands.SET SERVER ACME/TRACEwrites diagnostic information to SYS$MANAGER:ACME$SERVER.LOG for debugging purposes.LOGINOUT.EXE and SETP0.EXE utilize the SYS$ACM system service for authentication and password changes.
/LOCALrequires the VMSUATH flag on the target OpenVMS account.Users are prompted for a new LAN Manager password when their current LAN Manager password has expired.
LAN Manager last login information is displayed during login.
7.4.7. Overriding External Authentication
Users can enter the /LOCAL_PASSWORD qualifier after their OpenVMS
user name at the login prompt to inform OpenVMS to perform local authentication instead of
external authentication. Users should specify their OpenVMS user name and password when
using the /LOCAL_PASSWORD qualifier.
The SYSUAF flag /VMSAUTH denotes that the account can use standard (SYSUAF) authentication when the EXTAUTH flag requires external authentication. An application specifies the OpenVMS domain of interpretation when calling SYS$ACM to request standard OpenVMS authentication for a user account that normally uses external authentication.
See the VSI OpenVMS Utility Routines Manual for more information on the /LOCAL_PASSWORD
qualifier to LOGINOUT.
7.4.8. Impact on Layered Products and Applications
Certain layered products and applications that use an authentication mechanism based on the traditional SYSUAF-based user name and password (for example, software that calls $HASH_PASSWORD or $GETUAI/$SETUAI to alter, fetch, or verify OpenVMS passwords) encounter problems in either of the following cases:
When external authentication is used in an environment where a given user's external user ID and OpenVMS user name are different
Where the user's SYSUAF password is different from the external user password
In such cases, the symptom is a user authentication failure from the layered product or application.
For externally authenticated users, the normal system authorization database (SYSUAF.DAT) is used to construct the OpenVMS process profile (UIC, privileges, quotas, and so on) and to apply specific login restrictions. However, there are two key differences between externally authenticated users and normal OpenVMS users. The following is true for externally authenticated users:
The password stored in the SYSUAF is not the password used to verify the user.
The user name stored in the SYSUAF and used to identify the OpenVMS process is not necessarily the same as the external user ID used to authenticate the user during login.
OpenVMS attempts to keep a user's SYSUAF and external user password synchronized to minimize these problems. An up-to-date copy of the user's external password is kept in the SYSUAF, but this is not the case if, for example, the external password contains characters that are invalid in OpenVMS, or if SYSUAF password synchronization is disabled by the system manager. When the external password length exceeds the limit supported by OpenVMS, the external passwords are still synchronized with SYSUAF; however, the username cannot be used for local login.?
If you enable external authentication, VSI recommends you do the following to minimize incompatibility with layered products or applications that use traditional SYSUAF-based authentication:
Do not disable password synchronization.
Limit external user passwords to those characters from the OpenVMS valid password character set (A—Z, 0—9, underscore (_), and dollar sign ($)).
Limit external user maximum password length to the limits supported by OpenVMS (32 characters for VSI versions of OpenVMS V8.4, and 64 characters for OpenVMS V9 and above).
Assign users the same user name in both the external authentication service and OpenVMS.
Do not assign the same user name or user ID to more than one user.
The $GETUAI and $SETUAI system services do not support external passwords. These services operate only in passwords stored in the SYSUAF, and updates are not sent to the external authentication service. Sites using software that makes calls to these services to check passwords or updates must not enable external authentication. VSI expects to provide a new programming interface to support external passwords in a future release.
7.4.9. Setting a New Password
If you are an externally authenticated user, the DCL command SET
PASSWORD sends the password change request to the external authenticator and
changes your password on your OpenVMS system.
A system manager can set an externally authenticated user's password by using a utility provided by the external authenticator. Using this method, the new password is propagated to the external authenticator immediately.
7.4.10. Case Sensitivity in Passwords and User Names
You can enter a case-sensitive user name at the OpenVMS username prompt if you enclose it in quotes. If you do not enclose the user name in quotes, LOGINOUT converts the user name to uppercase characters.
However, all user name entries in the SYSUAF file are stored in uppercase characters. A case insensitive search is performed in the SYSUAF file to locate the user record.
Valid characters for external user IDs and passwords belong to the standard IBM extended (8-bit) ASCII character set. LOGINOUT and SET PASSWORD pass these strings case preserved, although the external authentication service uppercases both strings according to this character set.
External passwords can contain characters that are not valid in OpenVMS passwords. If an external password contains a character that is invalid in an OpenVMS password, password synchronization is not performed and a message is issued.
OpenVMS passwords are limited to the 7-bit ASCII characters A—Z, 0—9, _, and $.
7.4.11. User Name Mapping and Password Verification
To be externally authenticated, a user provides his or her external user ID and password at the OpenVMS login prompt. When performing user name mapping, OpenVMS first tries to locate a match in the SYSUAF and uses that name if it finds a match; otherwise, it queries the external authentication database for a matching user ID. When successfully authenticated, the LAN Manager user ID is mapped to the appropriate OpenVMS user name to obtain the correct user profile, and the login sequence is completed.
External authentication is supported for interactive logins (including DECwindows) and network logins where a proxy is used or a user ID/password is supplied.
If you have external authentication enabled on your system, target user names specified in DECnet proxies or Auto-Login (ALF) databases must exist in the SYSUAF. Externally-authenticated users who want to use DECnet proxies must have the same user name in the SYSUAF file and LAN Manager database.
When using DECnet proxies, it is important to maintain unique user names across OpenVMS and LAN Manager domains. If the same user name appears in the SYSUAF file and LAN Manager database identifying two different users, the use of this user name as a proxy is ambiguous. LOGINOUT treats the name as an OpenVMS user name for login purposes, even though the same name in LAN Manager may map to a different OpenVMS user name. This occurs because name-mapping rules specify that OpenVMS attempt to find a match in the SYSUAF before LAN Manager.
Externally authenticated users are considered to have a single password and are not subject to normal OpenVMS password policy (password expiration, password history, minimum and maximum password length restrictions), but are instead subject to any defined external authenticator policy. All other OpenVMS account restrictions remain in effect, such as disabled accounts, modal time restrictions, quotas, and so on.
Externally authenticated users are identified by having the EXTAUTH flag set in their SYSUAF record. OpenVMS users whose accounts do not have the EXTAUTH flag set are not affected by external authentication.
7.4.12. Password Synchronization
Although passwords are verified using the external authenticator database, OpenVMS attempts to keep the external and SYSUAF password fields synchronized.
Password synchronization is enabled by default.
Synchronization takes place at the completion of a successful externally authenticated login. If the external password is different than the password stored in the SYSUAF file, LOGINOUT updates the SYSUAF password field with the external password. Synchronization may not be possible due to the different sets of valid characters allowed by OpenVMS and the external authenticator.
For SYS$ACM-enabled external authentication, if required, the password synchronization can be selectively turned off. See the section called “System Parameter SECURITY_POLICY Bit Mask Values” for more information on the SECURITY_POLICY system parameter, which controls the enabling and disabling of password synchronization.
7.4.13. VSI DECnet-Plus Requirement
Users with the EXTAUTH bit set in their SYSUAF account record cannot use explicit access control strings with systems running DECnet-Plus unless their externally authenticated password is all uppercase characters.
For example, if you enter the following command:
$ DIRECTORY nodename "username password"::
where nodename is a system running DECnet-Plus and username is an EXTAUTH account, DECnet-Plus converts the string supplied in the password to uppercase characters before it is passed to the external authentication agent.
There are two workarounds:
If you are using DECnet-Plus and you want to use explicit access control strings, define an uppercase NT password.
Set up a proxy account on your DECnet-Plus nodes so that you do not have to use explicit access control strings to perform functions.
7.4.14. DECnet-Plus and NET_CALLOUTS Parameter
To run DECnet-Plus for OpenVMS with external authentication enabled, set the system parameter NET_CALLOUTS to 255. This causes user verification and proxy lookups to be done in LOGINOUT rather than DECnet.
7.4.15. Failed Connection Attempts on POP Server
The Post Office Protocol (POP) server does not use external authentication to authenticate connection attempts on the OpenVMS system. This causes connection attempts to fail if either of the following conditions exist:
The external user ID is different from the OpenVMS user name.
The OpenVMS password is not synchronized with the external user password.
7.4.16. Authentication and Credentials Management Extensions (ACME) Subsystem
This section describes how the SYS$ACM system service provides external authentication capability to applications that have to authenticate a user on an OpenVMS system.
The Authentication and Credentials Management Extensions (ACME) subsystem provides authentication and persona-based credential services. Applications can use these services to interact with the user to perform one or more of the following functions:
User authentication
Password change
Persona creation and modification
ACME supports standard OpenVMS authentication and external authentication policies; therefore, applications utilize the same mechanisms as used by the system's LOGINOUT and SET PASSWORD components.
7.4.16.1. ACME Subsystem Overview
The ACME subsystem consists of the following components:
SYS$ACM system service
SYS$ACM is a context-driven system service. The service is designed so that applications adapt themselves transparently to various authentication dialogs without requiring changes to the application. Applications call SYS$ACM to perform functions such as authenticate-principal and change-password. Upon successful authentication, the service can return a complete security profile of the user in the form of a persona. For further information about SYS$ACM, see the relevant sections in the VSI OpenVMS System Services Reference Manual: A–GETUAI and the VSI OpenVMS Programming Concepts Manual, Volume II.
ACME_SERVER process
The ACME_SERVER process is a multithreaded server that supports one or more authentication policies. Each authentication policy is installed by configuring an ACME agent shareable image that "plugs in" to the ACME_SERVER process by way of a standard interface. The server manages the authentication sequence by calling each ACME agent in turn, according to a defined sequence of phases. ACME agents are also responsible for adhering to certain rules regarding how agents can interact during an authentication sequence.
The ACME_SERVER process must be restarted if the installed password policy is changed.
ACME agents or authentication agents
ACME agents each define a single authentication policy that augments or replaces portions of the standard OpenVMS authentication policy. OpenVMS currently supports the following ACME authentication agents:
VMS authentication agent
Integrated LDAP external authentication agent
OpenLDAP external authentication agent
Kerberos external authentication agent
For more information on how to install and configure these authentication agents, see Section 7.4.1, ''Configuring the ACME SERVER and ACME Authentication Agents''.
DCL commands
SETandSHOW SERVER ACMEYou can configure and manage the ACME subsystem by using the
SETandSHOW SERVER ACMEcommands.
7.4.16.2. ACME Agent Operational Environment
The ACME subsystem supports multiple ACME agents that can interact with each other to complete an authentication request. These interactions must occur in a controlled manner.
When a user authentication dialog is in process, one ACME agent is the controlling agent and the other agents operate in the background as secondary agents.
The controlling agent directs the user name and password prompts and is ultimately responsible for validating the user. The secondary agents can display messages, request additional passwords, issue credentials, or reject the authentication request, depending on how each agent is configured to interact with other agents.
7.4.16.3. ACME Subsystem Controls
Operational control of the ACME subsystem includes the following:
the section called “Start, Stop, Restart, and Configure ACME_SERVER Process and ACME Agents”
Methods and commands to start, stop, restart, and configure ACME_SERVER and ACME agents.
the section called “Other ACME Agent Commands”
Commands to show ACME_SERVER status, set tracing levels, and the number of ACME_SERVER threads.
the section called “SYSUAF Flags”
Select accounts that are eligible for standard and external authentication and password synchronization. The SYSUAF user flags are EXTAUTH, VMSAUTH, and DISPWDSYNCH.
the section called “System Parameter SECURITY_POLICY Bit Mask Values”
Controls certain ACME subsystem features on a systemwide basis.
Start, Stop, Restart, and Configure ACME_SERVER Process and ACME Agents
The ACME_SERVER process starts automatically upon system boot, with the VMS ACME agent configured.
Start or Restart ACME_SERVER With All Required ACME Agents Configured by Default
OpenVMS Version 8.3 and later uses a site specific startup procedure, SYS$MANAGER:ACME$START.COM. You can edit the SYS$MANAGER:ACME$START.COM to enable the configuration of the various ACME agents that are required and also the order in which the agents are started.
The SYS$MANAGER:ACME$START.COM is run as a result of one of the following conditions:
SET SERVER ACME/START=AUTOcommand is issued.SET SERVER ACME/RESTARTcommand is issued.Unexpected condition causes an automatic server restart.
If you enable agents other than VMS ACME agent, edit the SYSTARTUP_VMS.COM procedure also to include the following command after all the dependent ACME agents:
$ SET SERVER ACME/RESTART
This ensures that all the required ACME agents are started automatically upon system boot.
The executive-mode logical name ACME$START is used to locate this file.
ACME Agent Ordering
The ACME_SERVER can be configured to enable the agent in a specific order. When the user enters the username, at the user name prompt, the ACME agents are called in the order in which it is enabled. The first agent to successfully map the user's principal name to a valid user name within its domain, validates the user.
The ordering of the ACME agents is important if the same principal name exists in two or more ACME agent domains. The first agent to map it successfully controls the authentication request.
By default, however, it is recommended that the VMS ACME agent is configured first. For example, if the Kerberos authentication agent is configured on OpenVMS and the order of startup for OpenVMS and Kerberos ACME agent is such that the Kerberos agent is started first, only those accounts belonging to Kerberos can login.
If the startup order is changed, you can change it back to the default order by performing the following procedure:
Edit the SYS$MANAGER:ACME$START.COM (this file is available on OpenVMS Version 8.3 and later) to search for the section (near the end of the command procedure) where you can specify the desired agent ordering. Change the last line (beginning with AGENT_LIST) so that it appears in the procedure.
$! A specific agent ordering can be specified in AGENT_LIST. $! $! If the list is empty, the agents will be enabled in the order that $! they were configured. Some agent startup procedures may alter $! the agent order. You can override that ordering here. Consult the $! agent documentation you are using to ensure that the ordering you $! specify is supported by that agent. $! $! For example $! $! AGENT_LIST = "VMS,MSV1_0" $! $! will enable the VMS and MSV1_0 agents (and only those agents) in $! that order. $! $ AGENT_LIST = "VMS,ACME_KRB_DOI"
Note
User applications can be developed to directly call SYS$ACM system service and direct it to specific ACME agent overriding the order.
Steps to Manually Configure the Various ACME Agents
To start or stop the server manually, use the following commands:
$ SET SERVER ACME/START $ SET SERVER ACME/EXIT [/ABORT]
On providing a manual SET SERVER ACME/START command, all the ACME
agents including the VMS ACME agent have to be configured manually.
VMS ACME Agent:
To configure the VMS ACME agent, use the following command:
$ SET SERVER ACME/CONFIGURE=(NAME=VMS,CRED=VMS)
Integrated LDAP ACME Agent:
To configure the integrated LDAP ACME agent, run the YS$STARTUP:LDAPACME$STARTUP-STD.COM command procedure or use the following command:
$ SET SERVER ACME/CONF=(NAME=LDAP-STD,FACILITY=LDAPACME,CRED=LDAP)
Note
To use the integrated LDAP ACME agent, the ACMELDAP_STD kit must be installed and configured. For more information, see Section 7.4.1, ''Configuring the ACME SERVER and ACME Authentication Agents''.
OpenLDAP ACME Agent:
To configure the OpenLDAP ACME agent, run the SYS$STARTUP:LDAPACME2$STARTUP-STD.COM command procedure or use the following command:
$ SET SERVER ACME/CONF=(NAME=LDAP-STD,FACILITY=LDAPACME2,CRED=LDAP)
Note
To use the OpenLDAP ACME agent, the VSI OpenLDAP kit must be installed and configured. For more information, refer to the most recent version of the VSI OpenLDAP for OpenVMS Release Notes and Installation Guide available at https://docs.vmssoftware.com/.
Kerberos ACME Agent:
To configure the Kerberos ACME agent, run SYS$STARTUP:KRB$STARTUP_KERBEROS_ACME.COM command procedure or use the following command:
$ SET SERVER ACME/CONFIGURE=(NAME=ACME_KRB_DOI, - _$ FACILITY=KRB,CREDENTIAL=KRB)
Note
To use the Kerberos agent, the Kerberos ACME agent must be installed and configured. For more information, see Section 7.4.1, ''Configuring the ACME SERVER and ACME Authentication Agents''.
When the ACME agents are configured, enable them using the following command:
$ SET SERVER ACME/ENABLE[=NAME=agent]Error information is written to the ACME subsystem log file, SYS$MANAGER:ACME$SERVER.LOG.
Other ACME Agent Commands
To view the state of the ACME subsystem, use the following command:
$ SHOW SERVER ACME [/FULL] [/AGENT=agent]Problems can be diagnosed by turning on tracing:
$ SET SERVER ACME/TRACE=nFor more information on the SHOW SERVER
ACME_SERVER and SET SERVER
ACME_SERVER commands, see the VSI OpenVMS DCL Dictionary: N–Z.
To configure the number of worker threads, use the following command:
$ SET SERVER ACME/CONFIG=THREAD_MAX
This command is ignored on IA-64 servers because only one worker thread is active.
Note
Do not increase the number of threads on IA-64 servers. Increasing the number of threads on IA-64 servers might lead to ACME_SERVER process crash and login failures.
SYSUAF Flags
These flags can be manipulated by SYS$SETUAI, SYS$GETUAI, and the AUTHORIZE utility on Alpha and IA-64 systems.
| Flag | Description |
|---|---|
| EXTAUTH | External authentication is enabled for the user, when this flag is set in the SYSUAF record. |
| VMSAUTH |
When this flag is set, the user account can use standard (SYSUAF) authentication, even if the EXTAUTH flag is set for the user, which requires external authentication. An application specifies the OpenVMS domain of interpretation (DOI) when calling SYS$ACM to request standard OpenVMS authentication for a user account that normally uses external authentication. Users can enter the |
| DISPWDSYNCH | Do not synchronize the external password for this account. See the GUARD PASSWORD control bit in the SECURITY_POLICY system parameter for systemwide password synchronization control. |
System Parameter SECURITY_POLICY Bit Mask Values
The following security policy bits control systemwide ACME subsystem operation on Alpha:
Guard Passwords
Set this bit to disable password synchronization among ACME agents on a systemwide basis. This is functionally equivalent to the SYS$SINGLE_SIGNON logical name bit mask value 4 for LOGINOUT.
The hexadecimal value is 200.
Allow NoAuthorization
Set this bit to allow privileged applications to successfully authenticate a user whose principal name maps to a SYSUAF record that is either expired or whose modal restrictions would otherwise prevent the account from being used. A SYSUAF record that is disabled or password-expired (in the case of traditional VMS authentication) cannot be bypassed in this manner. An application with SECURITY privilege specifies the SYS$ACM ACME$M_NOAUTHORIZE function modifier to override authorization checks.
The hexadecimal value is 400.
Ignore ExtAuth and VMSAuth SYSUAF flags
Set this bit to allow any record in the SYSUAF file to be mapped using external authentication.
The hexadecimal value is 800.
7.4.16.4. Authentication Policies
An authentication policy is defined by a particular combination of user identification, authentication, and authorization attributes. Policy attributes include:
Identification syntax
Includes simple user name and combination of domain/realm/principal name.
Authentication token mechanism
Token reuse filters
Includes password dictionary, password history, password legal character set, password minimum and maximum lengths, forced change schedule, and expiration.
Intrusion detection
Case sensitivity
Access restrictions
Includes time of day, day of week, and type of access.
User account controls
Includes account lock (disable) and account expiration.
Credential information
Includes user and group identifiers and privileges.
The following authentication policies are supported at present:
Standard OpenVMS policy
Integrated LDAP authentication policy
OpenLDAP authentication policy
Kerberos authentication policy
OpenVMS Policy
The OpenVMS policy is a rich, case-insensitive, password-based authentication policy that includes single-password or dual-password accounts, password expiration, password lock, password expiration, minimum password lengths, system-generated passwords, intrusion detection and evasion, password dictionary and history filters, modal access restrictions, account expiration, and account lock.
A user's credential information consists of the user's group and member identifier code (UIC), privileges, and rights identifiers. This information is stored in the system authorization (SYSUAF.DAT) and rights identifier (RIGHTSLIST.DAT) databases.
The system authorization database also contains information about how and when the user can access the system. These modal restrictions limit access based on time of day, day of week, and type of access (for example, dialup, remote, or batch).
OpenVMS credentials are stored in a persona. A persona is a protected, kernel-based data structure.
Integrated LDAP Authentication Policy
The integrated LDAP authentication policy is based on the Lightweight Directory Access Protocol. It supports validation against the user name and password located on the Directory Server, mapping the user to the OpenVMS user name in the SYSUAF file. For more information on LDAP, see the SYS$HELP:ACMELDAP_STD_CONFIG_INSTALL.PDF or SYS$HELP:ACMELDAP_STD_CONFIG_INSTALL.TXT.
The credentials, such as the user and group identifiers and privileges, use the standard OpenVMS policy.
OpenLDAP Authentication Policy
The OpenLDAP authentication policy is also based on the Lightweight Directory Access Protocol (LDAP) and provides external authentication capabilities similar to those described for the integrated LDAP authentication policy. It supports validation against an LDAP-compliant directory server, mapping the user to the OpenVMS user name in the SYSUAF file.
The credentials, such as the user and group identifiers and privileges, use the standard OpenVMS policy.
Refer to the VSI OpenLDAP ACME Agent for OpenVMS Configuration and User Guide for more information about the OpenLDAP ACME agent.
Kerberos Authentication Policy
The Kerberos authentication policy is based on the Kerberos protocol. It supports validation against the user name and password located on the Kerberos key distribution center database. The Kerberos principal name must be the same as the OpenVMS user name in SYSUAF.
The credentials, such as the user and group identifiers and privileges, use the standard OpenVMS policy.
7.5. Controlling the Login Process
This section describes many operating system features designed to secure systems from unauthorized users.
7.5.1. Informational Display During Login
This section describes how you can control the display of various pieces of information that appear by default at login time, such as announcement, welcome, last login, and new mail messages. So that you can understand the effect of login restrictions, it also describes how the operating system processes the login fields of the system user authorization file (SYSUAF.DAT). In addition, this section describes the use of the secure server and how to set up intrusion detection.
7.5.1.1. Announcement Message
To provide an announcement message on your system, define the system logical name SYS$ANNOUNCE in the site-specific startup command procedure SYS$MANAGER:SYSTARTUP_VMS.COM. The relevant section in the VSI OpenVMS System Manager's Manual, Volume 1: Essentials describes how to do this. The announcement message appears at login.
The definition you provide here affects all users on the system. Because this message may provide a clue to the identity of the operating system, you may decide not to display it.
7.5.1.2. Welcome Message
Similar to the announcement message, the welcome message is controlled through a system logical name, SYS$WELCOME. If you do not define SYS$WELCOME, a standard welcome message is provided for all users. This welcome message reveals the operating system and version number, as well as the node if SYS$NODE is defined.
To define another message for SYS$WELCOME, you can create a text file containing the message. To display the contents of this file, use the following line in SYSTARTUP_VMS.COM:
$ DEFINE/SYSTEM SYS$WELCOME "@SYS$MANAGER:WELCOME.TXT"
To disable the welcome message, place the following DCL command in SYS$MANAGER:SYSTARTUP_VMS.COM. This command prints a blank line in place of the standard welcome message:
$ DEFINE/SYSTEM SYS$WELCOME " "
If you prefer to selectively disable the message for individual users, you can use the
AUTHORIZE qualifier /FLAGS=DISWELCOME on individual UAF records.
7.5.1.3. Last Login Messages
By default, the system displays three messages that provide information about the last
logins and the number of failed login attempts (see Section 3.4.3, ''Reading Informational Messages''). You
can selectively disable the appearance of these three messages. Enter the AUTHORIZE
qualifier /FLAGS=DISREPORT for specific users.
7.5.1.4. New Mail Announcements
By default, the system tells users the number of new mail messages when they log in.
You can prevent users from receiving this notice by specifying the AUTHORIZE qualifier
/FLAGS=DISNEWMAIL.
The new mail announcement is primarily a user convenience, not a security issue. If a user with a restricted account cannot invoke the Mail utility (MAIL), then you might want to disable the new mail message at the same time you prohibit mail access. The following AUTHORIZE qualifier accomplishes both tasks:
/FLAGS=(DISMAIL,DISNEWMAIL)
7.5.2. Limiting Disconnected Processes
Virtual terminals let users maintain more than one disconnected process at a time. Virtual terminals are also required by the secure server feature (see Section 7.5.4, ''Using the Secure Server''). You may want to restrict the use of virtual terminals. For example, if you are concerned about the amount of nonpaged pool, you may not want to enable this feature on a systemwide basis.
Virtual terminals can be disabled at the terminal, user, or system level:
To prevent particular terminals from being used as virtual terminals, use the DCL command
SET TERMINAL/PERMANENT/NODISCONNECT.To prevent specific users from attaching to disconnected processes, set the AUTHORIZE qualifier
/FLAGS=DISRECONNECTfor those users.?To disable virtual terminals on a systemwide basis, remove the DISCONNECT attribute from the system parameter TTY_DEFCHAR2.
You can also set the amount of time allowed for reconnection to less than the default of 15 minutes with the system parameter TTY_TIMEOUT. A process that remains disconnected for longer than the timeout value is automatically logged out by the system. Limiting the connection time tends to minimize the number of users who receive messages, but it also affects the usefulness of the connection feature.
For more information on setting up and reconnecting to virtual terminals, see the relevant section in the VSI OpenVMS System Manager's Manual, Volume 1: Essentials.
7.5.3. Providing Automatic Login
You can assign accounts to particular terminals to enable an automatic login feature (see Section 7.2.6, ''Automatic Login Accounts''). This feature permits users to log in without specifying a user name. The operating system associates the user name with the terminal (or terminal server port) and maintains these assignments in the file SYS$SYSTEM:SYSALF.DAT, referred to as the automatic login file or the ALF file. Maintain this file with the following System Management utility (SYSMAN) commands:
| Task | Command | Example |
|---|---|---|
| Adding terminal/user name association | ALF ADD | ALF ADD TTA5 RENOLDS |
| Adding terminal server/user name association | ALF ADD/PORT | "M34C3/LC-1-2" RENOLDS |
| Displaying records in ALF file | ALF SHOW | ALF SHOW TTA5 ALF SHOW /USERNAME=PONTRE |
| Removing terminal/user name association | ALF REMOVE | ALF REMOVE TTA3 ALF REMOVE /USERNAME=DOUGLAS |
The ALF file consists of one record for each terminal on which automatic logins are enabled. Each record consists of two fields: the device name or terminal server port name of the terminal, followed by the user name of an account. The device names must be unique within the file. However, the same user name can occur in any number of records; that is, one account can be automatically logged in to an unlimited number of terminals.
The ALF file is an indexed file that does not need to be purged, but it should be backed up after a modification.
7.5.4. Using the Secure Server
Section 3.8, ''Guidelines for Protecting Your Password'' describes password grabbers as a class of programs designed to steal passwords from unsuspecting users who log in to terminals left on. The operating system provides a secure terminal server that stops any currently executing process before the start of a login at that terminal.
Invoke the secure server separately for each terminal with the following DCL command:
$ SET TERMINAL/PERMANENT/SECURE/DISCONNECT term-idThe user must then press the Break key followed by the Return key to start a login. The login proceeds as usual.
If you apply the secure server to all terminals, you can make the login procedure
consistent throughout the site by putting the SET TERMINAL commands in
the site-specific startup command procedure. However, certain applications that may use the
terminal as a communications line need to use the Break key for their own
purposes, which would be incompatible with the secure terminal server.
The secure terminal server feature is also incompatible with autobaud handling. However, because autobaud handling is necessary only on modem terminals (switched and dialup terminals), the modem handling on such terminals performs the equivalent of secure server functions. For secure operation, set up the terminal characteristics as follows:
For local terminals (direct-wired), use the following
SET TERMINALqualifiers:/NOMODEM/SECURE/DISCONNECT/NOAUTOBAUD/PERMANENT
For switched terminals (data-switch and dialup), use the following
SET TERMINALqualifiers:/MODEM/AUTOBAUD/NOSECURE/DISCONNECT/PERMANENT
Specify the /DIALUP qualifier if the terminal port is accessible
through a telephone line or the equivalent, regardless of the path (direct modem, data
switch, terminal server, or public data network).
Always specify the /DISCONNECT qualifier to guard against password
grabbers. To prevent disconnected jobs from filling up your system, set the system parameter
TTY_TIMEOUT to a low timeout value, which determines when
disconnected processes are deleted.
If you decide to apply the secure server to individual terminals, include directly wired terminals located in public areas or remote, unsecured areas. Terminals never used for local or dialup logins are not subject to this security problem. Terminals closely supervised during logins may also not require this measure.
7.5.5. Detecting Intruders
Occasionally people fail to log in correctly because they enter an expired password or make a typing error. But not all failures are benign: some occur because an unauthorized person is trying to log in through an expired account or with an unknown user name or is attempting to guess passwords on a valid account.
The operating system is sensitive to login failures. After one failure, it begins to monitor the terminal, terminal server connection, or network connection where the login is taking place. At first, the operating system records unsuccessful logins in an intrusion database. As failures continue, the operating system not only records failures but takes restrictive measures. The person attempting login is monitored more closely and limited to a certain number of login retries within a limited period of time. Once a person exceeds either the retry or time limitation, he or she cannot log in for a while, even with a valid user name and password. At a later point, the restriction eases, and login is allowed once again.
7.5.6. Understanding the Intrusion Database
The DCL command SHOW INTRUSION displays the contents of the intrusion
database; Example 7.6, ''Intrusion Database Display'' shows a sample display. The database captures the
following types of information on login failures:
| Field | Description |
|---|---|
| Intrusion class |
The general source of failure:
|
| Type |
Severity of login failure:
The system parameters for threshold count (LGI_BRK_LIM) and monitoring period (LGI_BRK_TMO) define when a suspect becomes an intruder. |
| Count | Number of login failures associated with a particular source. |
| Expiration | Date and time when a suspect's record is deleted or when an intruder is allowed another chance to log in. When an intruder's record reaches its expiration time, it becomes a suspect, and the failure count is reset to LGI_BRK_LIM. The expiration time is reset to the old expiration plus LGI_BRK_TMO. |
| Source |
Origin of the login failure:
|
Whenever the system detects an intruder, it sends an auditing message to the security
operator terminal or the log file to alert you. Using the DCL command SHOW
INTRUSION, you can display the source and type of intrusion. For example, Example 7.6, ''Intrusion Database Display'' shows a problem with a user named MAPLE who is logging in over the
network. The user has tried to log in 8 times. Because the user failed to log in within the
monitoring period, the operating system suspended all logins from
OMNI:.BOSTON.BIRCH::MAPLE. Example 7.6, ''Intrusion Database Display'' gives a
more detailed explanation of how the system decides to suspend logins.
Notice that many suspects appear in the display. Sometimes users forget their passwords
or type them incorrectly. To remove an entry from the database, use the DCL command
DELETE/INTRUSION_RECORD.
$ SHOW INTRUSION
Intrusion Type Count Expiration Source NETWORK SUSPECT 1 2-Jan-2009 13:20:30.89 PCD025:: Intrusion Type Count Expiration Source NETWORK SUSPECT 5 2-Jan-2009 13:36:39.42 DENIM::SYSTEM NETWORK SUSPECT 2 2-Jan-2009 13:25:17.30 N1KDO::SYSTEM Intrusion Type Count Expiration Source NETWORK SUSPECT 2 2-Jan-2009 13:07:57.95 OMNI:.LOWELL.ASH::TESTER NETWORK INTRUDER 8 2-Jan-2009 11:06:50.51 OMNI:.BOSTON.BIRCH::MAPLE Intrusion Type Count Expiration Source NETWORK SUSPECT 2 2-Jan-2009 13:20:10.09 JETTE::TIPH NETWORK SUSPECT 1 2-Jan-2009 13:21:40.75 FTSR::TFREDERICK
7.5.7. How Intrusion Detection Works
Once a login failure occurs, a user becomes a suspect and is monitored for further failures for a period of time. The operating system tolerates only so many login failures by the suspect during this given period of time before it declares the source of login failure to be an intruder. In other words, suspects become intruders by exceeding their allowed chances for login during the monitoring period.
The chance count, set by the system parameter LGI_BRK_LIM, defines how many times a person can try logging in; the standard limit is five times. The chance parameter works in tandem with a time factor controlled by the system parameter LGI_BRK_TMO. At each login failure, the suspect's monitoring period is increased by the value of LGI_BRK_TMO. Thus, with each failure, the suspect is monitored for a longer period of time.
Table 7.5, ''Intrusion Example'' illustrates a situation where evasive action results when user George fails five times to log in. At each failure, the monitoring period is extended by 5 minutes. On the fifth failure, the operating system labels George an intruder and refuses to log him in. Notice that the example assumes the parameters LGI_BRK_LIM and LGI_BRK_TMO are both set to 5.
| Time of Login Failure | Failure Count | Extension of Monitoring Period |
|---|---|---|
| 6:00 | 0 | George fails to log in, and the system starts to monitor logins from George's terminal. It monitors for the next 5 minutes. |
| 6:00:30 | 1 | Thirty seconds later, with 4.5 minutes left in the monitoring period, George fails again. The monitoring period is extended by 5 minutes. Thus, the system monitors George for login failures during the next 9.5 minutes. |
| 6:01 | 2 | Thirty seconds later, 9 minutes remain in his monitoring period, and the system extends it by 5 minutes. |
| 6:02 | 3 | One minute later, George has 13 minutes in his monitoring period, and the system extends it by 5 minutes. |
| 6:02:30 | 4 | Thirty seconds later, George has 17.5 minutes in the monitoring period, and the system extends it by 5 minutes. Thus, the system monitors George for login failures during the next 22.5 minutes. |
| 6:04:30 | 5 | Two minutes later, George makes a sixth attempt. Even though the monitoring period allows the time, he runs out of chances. He becomes an intruder and can no longer access the system. |
7.5.8. Setting the Exclusion Period
An intruder can be excluded temporarily or permanently, depending on system settings:
Temporary exclusion is controlled by the product of LGI_HID_TIM and a random number between 1 and 1.5. At the end of the temporary exclusion period, the subject is reclassified as a suspect. The monitoring period of the suspect is set by the value of LGI_BRK_TMO. For the new monitoring period, the failure count is set to LGI_BRK_LIM, allowing one more chance to log in before the subject is reclassified as an intruder.
Permanent exclusion results if LGI_BRK_DISUSER is set because this enables the DISUSER flag in a user authorization record when the operating system detects an intrusion.
Enabling the LGI_BRK_DISUSER parameter can have serious consequences because that user name is disabled until you manually intervene. If LGI_BRK_DISUSER is enabled, a malicious user can put all known accounts, including yours, out of service in a short time. To recover, you must log in on the system console where the SYSTEM account is always allowed to log in.
7.5.9. System Parameters Controlling Login Attempts
Table 7.6, ''Parameters for Controlling Login Attempts'' describes the system parameters controlling login and intrusion detection.
| If You Want to Control... | Set the Parameter | Description |
|---|---|---|
| Login time period | LGI_PWD_TMO |
Allows time to:
|
| Number of times a person can try to log in over a phone line or network connection | LGI_RETRY_LIM | Allows a person to retry the login sequence without losing the phone connection or network link as long as the retry time (LGI_RETRY_TMO) allows. Someone can reconnect and reattempt login as long as the break-in limit (LGI_BRK_LIM) has not been exceeded during the monitoring period. |
| Interval between login attempts over phone lines or network connection | LGI_RETRY_TMO | Specifies the number of seconds allowed between login attempts after a login failure. If there is no user response after a login failure for LGI_RETRY_TMO seconds, LOGINOUT disconnects the session. |
| Number of login chances | LGI_BRK_LIM | Specifies the number of login failures during the monitoring period that triggers evasive action. The failure count applies independently to login attempts by each user name, terminal, and node. |
| Length of failure monitoring period | LGI_BRK_TMO | Indicates the time increment added to the suspect's expiration time each time a login failure occurs. Once the expiration period passes, prior failures are discarded, and the subject is given a clean slate. |
| Association of user name and terminal name in intrusion database source name | LGI_BRK_TERM | Controls whether failures from terminal class logins are counted by terminal, by user (the default), or by user across all terminals. LAT is tracked back to the originating port based on the contents of the TT_ACCPORNAM field. |
| Duration of login denial | LGI_HID_TIM | Specifies the duration of login denial. The value of this parameter times a random number (between 1 and 1.5) determines the actual length of evasive action when the failure count has exceeded LGI_BRK_LIM. |
| Intruder's account | LGI_BRK_DISUSER | Enables the DISUSER flag in user's authorization record, permanently locking out that account. |
7.5.10. Security Server Process
The Security Server process, which is created as part of the normal operating system startup, performs the following tasks:
Creates and manages the system's intrusion database
Maintains the network proxy database file (NET$PROXY.DAT)
The system uses the intrusion database to keep track of failed login attempts. This
information is scanned during process login to determine if the system should take
restrictive measures to prevent access to the system by a suspected intruder. You can
display the contents of this database by issuing the DCL command SHOW
INTRUSION, as shown in Example 7.6, ''Intrusion Database Display''. You can delete information
from the database by issuing the DCL command DELETE/INTRUSION.
The network proxy database file (NET$PROXY.DAT) is used during network connection processing to determine if a specific remote user may access a local account without using a password. You can manage the information in this database with the Authorize utility.
Chapter 8. Controlling Access to System Data and Resources
This chapter describes how you design user groups and provide users with the identification (UICs, identifiers, privileges) they need to do their work. As part of the discussion, the chapter shows how to assign proper protection codes and ACLs to objects so that the user can work efficiently while, at the same time, system data and resources are properly protected. The chapter assumes you are familiar with the material in Chapter 4, "Protecting Data" and Chapter 5, "Descriptions of Object Classes".
8.1. Designing User Groups
As you design user groups, remember that the groups you establish have an impact on data and resource protection and influence those who receive the GROUP, GRPNAM, and GRPPRV privileges. You may want to map out the functions you expect your users to perform. Look for groups of users involved with a common function, such as accounting, engineering, marketing, and personnel.
Think ahead to future plans in your organization. Incorporate these ideas into your strategy. You can fine-tune the group design at any time, but it is most important to gain a perspective on the logical groupings according to the functions your users perform.
Sharing: Users who typically share data and control of processes should be arranged in the same group.
Protection: Users who should not have access to each other's data or control each other's processes should be assigned to separate groups.
However, there are limitations to UIC group design. You may want to give only a few members of your UIC group access to files that you own, or you may want to grant access to your files to members of several UIC groups without having to grant world access. These limitations are described in Section 8.1.2, ''Limitations to UIC Group Design''.
8.1.1. Example of UIC Group Design
|
Department |
Employee |
Function |
|---|---|---|
|
Executive |
Samuel Gibson |
President |
|
Olivia Westwood |
Treasurer Head of Computer Operations | |
|
Accounting |
Carlo Ruiz |
Payroll |
|
Rich Smith |
Bookkeeping | |
|
Rod Jacobs |
Clerk | |
|
Ruth Crandall |
Clerk | |
|
Marketing |
Jason Chang |
Forecasting |
|
Alana Mack |
Sales Reporting | |
|
Shipping |
Scott Giles |
Inventory Control |
|
Administration |
Jane Simon |
Correspondence Management Paycheck Printing |
The fact that the company has been organized into departments suggests that individuals in the same department perform many of the same functions. For example, the advantage of grouping all the employees who perform bookkeeping tasks for the company in the accounting department is that employees can easily communicate with one another and gain access to the data they must share.
As the system manager of Rainbow Paint's computer resources, Olivia Westwood will set up UIC groups based on the existing organizational structure. For example, the employees in the accounting department (Ruiz, Smith, Jacobs, and Crandall) could be members of the UIC group ACCOUNTING. Setting up the UIC group in this way ensures that user Ruiz has easy access to data from user Smith, and so on.
Effective department organization ensures that only selected employees will have access to all data and employees in the company. For example, one of the functions of the accounting department concerns payroll. Because payroll information is confidential, employees in the shipping and marketing departments should not have access to that information.
As the system manager of Rainbow Paint's computer resources, Westwood sets up the UIC groups—ACCOUNTING, EXECUTIVE, MARKETING, SHIPPING, and ADMINISTRATION—corresponding to the various departments in the company. Members of a UIC group can be given common access to files, as shown in the following example:
$ SET SECURITY/PROTECTION=G:RWE GROUP_STATS.DAT
With this command, the owner of the file GROUP_STATS.DAT allows each member of the UIC group read, write, and execute access to the file.
8.1.2. Limitations to UIC Group Design
In some cases, UIC-based protection does not present the best solution to your object protection needs. If users in several UIC groups need access to common files and other resources on the system, the only UIC-based alternatives are to give world access to the object (all users can access the object) or to grant extended privileges to each user. Neither choice is desirable.
You may also need to allow users in a UIC group several types of access to files; you may want to deny access to the object to some users in the same group. Again, UIC-based protection does not offer a good solution to meet these needs.
Access control lists (ACLs), described in the following sections, offer another way to protect files and other objects on the system.
As the site security administrator, it is extremely important to familiarize yourself with the subtleties of the UIC categories, as described in Section 4.5, ''Controlling Access with Protection Codes''. Putting users in certain UIC groups may grant them system privileges, and a user with system privilege has control access to any protected object on the system. The SYSPRV privilege is given by default to all UIC groups less than or equal to 10, but the actual range for the system UIC category is determined by the value of the MAXSYSGROUP system parameter. Putting users with the GRPPRV privilege in groups that own system files might also cause security problems.
8.2. Naming Individual Users in ACLs
Rather than attempting to restructure UIC groups to solve data and resource protection problems, you may be able to achieve your goals by using access control lists (ACLs). (Section 4.4, ''Controlling Access with ACLs'' provides a detailed description of ACLs.) The UIC can serve as an identifier in an ACE, so you can easily construct ACLs that allow specific users across various UIC groups access to an object.
For example, consider the ACL that you might construct to allow specific users from the Rainbow Paint Company to access the file PAYROLL.DAT:
(IDENTIFIER=OWESTWOOD,ACCESS=READ+WRITE+EXECUTE+DELETE) (IDENTIFIER=CRUIZ,ACCESS=READ+WRITE+EXECUTE+DELETE) (IDENTIFIER=RSMITH,ACCESS=READ+WRITE+EXECUTE+DELETE) (IDENTIFIER=JSIMON,ACCESS=READ) (IDENTIFIER=SGIBSON,ACCESS=READ)
8.3. Defining Sharing of Rights
Many users often share the same access needs, and an ACL consisting strictly of UIC identifiers can become too lengthy. To shorten the ACL, you can include environmental identifiers, which are system-defined, or create general identifiers (see Table 4.1, ''Major Types of Rights Identifiers'').
When creating general identifiers, you design the names of the identifiers you want on your system and compose the set of holders for the identifiers. Then you add the identifiers to the rights database and assign the identifiers to the intended users.
For example, the Rainbow Paint Company decided to add the identifier PAYROLL to the rights database. The holders of that identifier were all users who needed read, write, execute, and delete access to PAYROLL.DAT: OWESTWOOD, CRUIZ, and RSMITH.
Once the identifier and its holders were defined, the security administrator used the following ACL to specify the same type of access to PAYROLL.DAT:
(IDENTIFIER=PAYROLL,ACCESS=READ+WRITE+EXECUTE+DELETE) (IDENTIFIER=JSIMON,ACCESS=READ) (IDENTIFIER=SGIBSON,ACCESS=READ)
8.4. Conditionalizing Identifiers for Different Users
A final step in designing ACLs and identifiers is to consider how and when different identifiers are going to be used. Users often need to hold an identifier for different reasons, such as updating databases or performing system operations. For this reason, you may want to qualify the use of an identifier.
There are several ways to qualify identifiers. One way is to use environmental identifiers, and another is to add special attributes to identifiers, as described in Section 8.6.7, ''Customizing Identifiers''.
Environmental identifiers describe different types of users based on their initial entry into the system. These identifiers—local, dialup, remote, interactive, network, and batch—let you define a large potential group of users according to their use of the system. Typically, these types of identifiers are used in combination with other identifiers.
For example, the following ACE permits user Martin to have read, write, execute, and delete access to the object only when logged in from a local terminal:
(IDENTIFIER=MARTIN+LOCAL,ACCESS=READ+WRITE+EXECUTE+DELETE)
You can use the environmental identifiers in ACLs to deny access to an entire class of logins. For example, the following ACE denies access to all dialup users:
(IDENTIFIER=DIALUP,ACCESS=NONE)
In assigning these environmental identifiers to users in a DECwindows environment, remember that DECwindows processes can be virtually any type of process. For example, a user may choose to run DECwindows Mail in a batch job. Even though the process is communicating interactively with a user through a DECwindows workstation, it is still classified as a batch job.
8.5. Designing ACLs
Using shorter ACLs with general identifiers has several advantages. The operating system processes shorter ACLs more rapidly. In addition, when employees change but the functions remain the same, you do not have to change every ACL across the system. Instead, you change the holders of the identifier. If employees leave the project, you can edit their records in RIGHTSLIST.DAT so they no longer hold the identifier, or if they leave the company, you can remove their user authorization file (UAF) records altogether. When new employees are hired for the same jobs, grant the new users the right to hold the identifier. The new users then have the same ACL-based access as the former users.
Your overall design should consider the types of files and other objects on your system and the protection needs of each. If you have successfully designated groups and identifiers, you should be able to easily design ACLs and define standard protection. Time spent clarifying the common access needs of your users simplifies the design of identifiers and ACLs. You will also simplify the job for your users who place ACLs on their files.
Do not use ACLs indiscriminately. They consume paged system dynamic memory when files are open. They also require additional processing time. ACLs are best applied where protection is really needed. If your ACLs become too long (for example, more than 200 entries or so), you might consider grouping users into discrete categories and creating general identifiers.
At the same time, do not create excessive numbers of identifiers. In particular, do not grant too many identifiers to one user. Having a user hold more than 10 or 20 identifiers may result in excessive time spent processing ACLs. If you find an individual holding too many identifiers, you may want to reconsider how your groups are structured. Or, if this is an exception case, consider putting the individual directly on the necessary ACLs.
For more information on defining identifiers, see Section 8.6, ''Populating the Rights Database'' and the description of AUTHORIZE in the VSI OpenVMS System Management Utilities Reference Manual, Volume I: A–L. For more information about creating and maintaining ACLs, see Chapter 4, "Protecting Data". For extensive work, using the access control list editor (ACL editor) is appropriate; the ACL editor is described in the relevant section in the VSI OpenVMS System Management Utilities Reference Manual, Volume I: A–L.
8.6. Populating the Rights Database
Once you have designed the names of the identifiers you want on your system and composed the set of holders for the identifiers, use AUTHORIZE to add the identifiers to the rights database and assign the identifiers to the intended users. These associations are kept in the rights database (RIGHTSLIST.DAT), which you maintain as you add or remove users and identifiers.
Initially, the rights database is created at system installation and is located in the [SYSEXE] directory. At creation, it contains the names of the environmental identifiers. As you add users to the authorization file, one identifier is added for each authorized user. The identifier, called a UIC identifier, is associated with the user's UIC and user name.
There is also an identifier in the rights database equivalent to each UIC group name. When you add a new user as the first member of a new UIC group and you specify an account group name with the user, an identifier corresponding to the account group name is added to the rights database, as shown in the following example:
$ SET DEFAULT SYS$SYSTEM
$ RUN AUTHORIZE
UAF> ADD ROB/PASSWORD=SP0152/UIC=[014,006] -
_UAF> /DIRECTORY=WORK:[ROB]/ACCOUNT=MGMT
UAF-I-ADDMSG, user record successfully added
UAF-I-RDBADDMSGU, identifier ROB value: [000014,000006] added to RIGHTSLIST.DAT
UAF-I-RDBADDMSGU, identifier MGMT value: [000014,177777] added to RIGHTSLIST.DATBecause the account name MGMT is specified when adding ROB's account and no UIC group of that name exists, the MGMT identifier is added to the rights database.
Each site adapts its own rights database according to actual use and needs.
Note that when you use AUTHORIZE to add, remove, or change user names in the system user authorization file (SYSUAF.DAT), AUTHORIZE makes corresponding changes for you in RIGHTSLIST.DAT so that the rights list corresponds to SYSUAF.DAT.
Because of the automatic creation and maintenance of the rights database, you seldom need to
use the AUTHORIZE command CREATE/RIGHTS. However, if the rights database is
damaged or deleted, you can create a new one with this command.(See the relevant section in the
VSI OpenVMS System Management Utilities Reference Manual for
more information.
8.6.1. Displaying the Database
You should regularly display the rights database to check that it is correct and current.
Two AUTHORIZE commands are used for this: SHOW/IDENTIFIER and
SHOW/RIGHTS. To display all holders of an identifier, use the
SHOW/IDENTIFIER command, as shown in the following example:
UAF> SHOW/IDENTIFIER/FULL NETWORK
Use the asterisk (*) wildcard to display all holders of all identifiers on the system, as follows:
UAF> SHOW/IDENTIFIER/FULL *
To display the identifiers held by a particular user, use the
SHOW/RIGHTS command, as follows:
UAF> SHOW/RIGHTS/USER=ROBIN
Use the asterisk wildcard to display all identifiers held by all users, as follows:
UAF> SHOW/RIGHTS/USER=* UAF> SHOW/RIGHTS/USER=[*,*]
The first command displays users alphabetically. The second command displays users according to UICs.
8.6.2. Adding Identifiers
You add identifiers to the rights list with the AUTHORIZE command
ADD/IDENTIFIER, for example:
UAF> ADD/IDENTIFIER PAYROLL identifier PAYROLL value %X80080011 added to RIGHTSLIST.DAT
To grant users an identifier with any of the attributes described in Section 8.6.7, ''Customizing Identifiers'', you must name that attribute when adding the identifier. For example, to allow users to add or modify an identifier, specify the Dynamic attribute:
UAF> ADD/IDENTIFIER PROJECT_TEAM1 /ATTRIBUTES=DYNAMIC
8.6.3. Restoring the Rights Database
If you accidentally deleted the rights list and it cannot be recovered from a backup copy,
recreate RIGHTSLIST.DAT by entering the
CREATE/RIGHTS command, followed by the ADD/IDENTIFIER
command, as follows:
UAF> CREATE/RIGHTS
{message}
UAF> ADD/IDENTIFIER/USER=* or ADD/IDENTIFIER/USER=[*,*]
{messages}The ADD/IDENTIFIER command generates a UIC identifier in the rights list
corresponding to each user name in SYSUAF.DAT. To complete the task,
use the ADD/IDENTIFIER command to add all general identifiers that were lost.
Then redefine the holders of the identifiers with GRANT/IDENTIFIER commands,
as described in Section 8.6.4, ''Assigning Identifiers to Users''.
8.6.4. Assigning Identifiers to Users
After adding identifiers, you associate users as holders of the existing identifiers by
using the AUTHORIZE command GRANT/IDENTIFIER, as shown in the following
example:
UAF> GRANT/IDENTIFIER PAYROLL MARTIN UAF-I-GRANTMSG, identifier PAYROLL granted to MARTIN UAF> GRANT/IDENTIFIER PAYROLL IPPOLITO UAF-I-GRANTMSG, identifier PAYROLL granted to IPPOLITO
To give user Martin the EXECUTIVE identifier in addition to the PAYROLL identifier would
require another use of the GRANT/IDENTIFIER command. You can introduce only
one holder association at a time with the GRANT/IDENTIFIER command.
In all cases shown above, AUTHORIZE associates the PAYROLL identifier with the UIC identifier corresponding to the user, specifically Martin and Ippolito. Both the identifiers must exist in the rights database.
8.6.5. Removing Holder Records
When a user leaves the company, remove the UAF record for that user. Notify the managers of all sites where that user has access to proxy accounts to remove proxy access information in the remote node's NETPROXY.DAT file. When you run AUTHORIZE to remove a user's UAF record, AUTHORIZE also removes the user's connections as a holder of identifiers in the rights database. However, if a departed user is the only remaining holder of a given identifier, remove that identifier to avoid future confusion.
8.6.6. Removing Identifiers
Remove all occurrences of the identifier from ACLs on the system. For example, the following command removes the obsolete identifier
87SUMMERfrom the ACL of multiple files:$ SET SECURITY/ACL=(IDENTIFIER=87SUMMER)- _$ /DELETE/LOG *.*;*
You receive errors for files that do not contain the ACE, but the ACE is deleted from all files that do contain it.
Remove the identifier from the rights database with the AUTHORIZE command
REMOVE/IDENTIFIER. For example, use the following AUTHORIZE command to remove the identifier87TERM3:UAF> REMOVE/IDENTIFIER 87TERM3 {message}
Identifiers in hexadecimal format in an ACE indicate that a general identifier has been deleted from the rights database. Similarly, if you see an identifier displayed as a numeric UIC, the original identifier was a UIC that has been removed. Delete ACEs with numeric UIC or hexadecimal identifiers.
It is wise not to reuse UICs after an employee leaves. The new employee may gain some or all of the access rights of the previous employee through ACL entries that still reference the old UIC in numeric format.
To rename an identifier, use the AUTHORIZE command RENAME/IDENTIFIER in
the following format:
$ RENAME/IDENTIFIER old-identifier new-identifier
Renaming an identifier preserves the set of resources available through that identifier. ACLs containing the renamed identifier automatically display the new identifier name.
8.6.7. Customizing Identifiers
|
Dynamic attribute |
Allows holders of the identifier to remove and to restore the identifier from the
process rights list by using the DCL command |
|
Resource attribute |
Allows holders of the identifier to charge disk space to the identifier. It is used for file objects. |
|
Subsystem attribute |
Allows holders of the identifier to create and maintain protected subsystems by assigning the Subsystem ACE to the application images in the subsystem. |
|
No Access attribute |
Makes any access rights of the identifier null and void. This attribute is intended as a modifier for a resource identifier or for purposes unrelated to access control. |
|
Holder Hidden attribute |
Prevents someone from getting a list of users who hold an identifier unless that person owns the identifier. |
|
Name Hidden attribute |
Allows holders of an identifier to have it translated (either from binary to ASCII or vice versa), but prevents unauthorized users from translating the identifier. |
Read access to RIGHTSLIST.DAT overrides the Holder Hidden and Name Hidden attributes. The rights list by default denies access to world users; it has a protection of S:RWED,O;RWED,G:R,W:.
The following sections describe each attribute and explain when you might want to add them to some of your site's identifiers.
8.6.7.1. Dynamic Attribute
Once you grant an identifier to a user, processes created by that user hold the identifier
for the life of the process. However, if you grant the identifier with the Dynamic attribute,
the user who holds the identifier can use the DCL command SET RIGHTS_LIST to
add or remove the identifier or its attributes from the process rights list as needed.
To allow users to modify an identifier, specify the Dynamic attribute when adding the identifier to the rights database by using AUTHORIZE, as shown in the following example:
$ SET DEFAULT SYS$SYSTEM
$ RUN AUTHORIZE
UAF> ADD/IDENTIFIER MGMT101 /ATTRIBUTES=DYNAMICTo allow specific holders of the identifier to modify the identifier, include the Dynamic attribute when granting the identifier, as follows:
UAF> GRANT/IDENTIFIER MGMT101/ATTRIBUTES=DYNAMIC SCHWARTZ
User Schwartz could then use the following command to remove the MGMT101
identifier from the process rights list:
$ SET RIGHTS_LIST/DISABLE MGMT101
Users who hold identifiers with the Dynamic and Resource attributes can also use the
SET RIGHTS_LIST command to remove only the Resource attribute on the
identifier.
Because users might be able to circumvent intended security policy by removing their identifiers, be careful when granting users an identifier with the Dynamic attribute. If an identifier is used in an ACL to deny access to users who hold that identifier with the Dynamic attribute, users may be able to gain access to the object through another ACL entry by removing the identifier from their process rights lists.
8.6.7.2. Holder Hidden Attribute
Sites with high security requirements can conceal the holders of certain identifiers, thereby preventing malicious users from determining which accounts are more interesting to target for break-ins.
You place the attribute on an identifier the user holds by using the AUTHORIZE command
MODIFY/IDENTIFIER, for example:
UAF> MODIFY/IDENTIFIER /ATTRIBUTES=HOLDER_HIDDEN SECRET_PROJECT
Now the prober cannot discover who is on the secret project.
8.6.7.3. Name Hidden Attribute
Sites with high security requirements can hide the names of identifiers. For example, sites implementing mandatory access controls can hide the names of identifiers associated with their security categories. This prevents people from seeing the names of identifiers unless they personally hold them. When an identifier holds the Name Hidden attribute, the operating system refuses to translate the identifier from its binary value to ASCII or from ASCII to the binary value unless the requesting process holds the identifier.
To assign the attribute to an identifier, use the AUTHORIZE command
MODIFY/IDENTIFIER:
UAF> MODIFY/IDENTIFIER SECRET_NEWS /ATTRIBUTES=NAME_HIDDEN
8.6.7.4. No Access Attribute
The No Access attribute allows a process to hold an identifier but not have the identifier considered in determining access rights to the object.
For example, a user with the Resource and No Access attributes can charge disk space to the identifier but not have access to objects owned by the identifier. Or a system manager can manage data and perform tasks connected with the data but cannot read from or write to any of the files.
You can allow file space to be owned by and charged to an identifier yet prevent the files from being accessed in any way. Use AUTHORIZE to specify the No Access attribute with the Resource attribute when adding the identifier to the rights database, as shown in the following example:
UAF> ADD/IDENTIFIER/ATTRIBUTES=(RESOURCE,NOACCESS)- _UAF> MGMT101
To limit the rights of users holding an identifier with the Resource attribute, grant the identifier with the No Access attribute as well as the Resource attribute to all desired users:
UAF> GRANT/IDENTIFIER/ATTRIBUTES=(RESOURCE,NOACCESS)- _UAF> MGMT101 SCHWARTZ
8.6.7.5. Resource Attribute
Consumption of disk space is generally charged to the creator of each file by subtracting the disk space from the file owner's disk quota. System managers and security administrators might prefer to track the use of disk space according to logical groups of users (such as departments or projects) rather than individual users. General identifiers are used to specify these groups. Thus, when general identifiers own directories, disk space used by files created in the directories may be charged to the identifier rather than the UIC of the file's creator.
To allow file space to be owned by and charged to an identifier, use AUTHORIZE to specify the Resource attribute when adding the identifier to the rights database, as shown in the following example:
UAF> ADD/IDENTIFIER MGMT101 /ATTRIBUTES=RESOURCE
Grant the identifier with the Resource attribute to all desired users:
UAF> GRANT/IDENTIFIER MGMT101/ATTRIBUTES=RESOURCE SCHWARTZ
Modify the directory to allow read and write access to the resource identifier:
$ SET SECURITY/ACL=(- _$ (IDENTIFIER=MGMT101,ACCESS=READ+WRITE) - _$ (IDENTIFIER=MGMT101,OPTIONS=DEFAULT,ACCESS=READ+WRITE))- _$ INVENTORY.DIR
Change the ownership of the parent directory so that any files in it are owned by the identifier by default:
$ SET SECURITY/OWNER=MGMT01 INVENTORY.DIR
Because resource identifier MGMT101 is going to own any file you create in directory INVENTORY.DIR, you use ACEs to determine the type of file access you receive. Include a Creator ACE (CREATOR,ACCESS=READ+WRITE+EXECUTE+DELETE) to set the access granted to the file's creator. Alternatively, you can let the system assign an ACE; its ACE grants control access to the file's creator plus the access specified in the owner field of the protection code. You can set up the protection code by including a Default Protection ACE in the ACL for INVENTORY.DIR, for example, (DEFAULT_PROTECTION, ACCESS=O:RW). (Refer to Section 8.8.1.2, ''Setting Defaults for a Directory Owned by a Resource Identifier'' for further information.)
Not everyone who holds the identifier will also hold the Resource attribute associated with that identifier. If you create a file in a directory owned by an identifier but you do not have the Resource attribute for that identifier, the file will be owned by your UIC, and the required disk space is subtracted from your disk quota.
8.6.7.6. Subsystem Attribute
You can authorize users to manage protected subsystems by granting them a subsystem identifier with the Subsystem attribute. This empowers users to enable images to access the objects managed by the subsystem. (See Chapter 14, "Using Protected Subsystems" for a discussion of protected subsystems.)
In the following example, user Schwartz is given the authority to create a subsystem with the identifier MAIL_SUBSYSTEM. Schwartz is also given control access to the application image to set access controls:
$ SET DEFAULT SYS$SYSTEM
$ RUN AUTHORIZE
UAF> ADD/IDENTIFIER MAIL_SUBSYSTEM /ATTRIBUTES=SUBSYSTEM
UAF> GRANT/IDENTIFIER MAIL_SUBSYSTEM -
_UAF> /ATTRIBUTES=SUBSYSTEM SCHWARTZ
UAF> Exit
$ SET SECURITY/ACL=(IDENTIFIER=MAIL_SUBSYSTEM,ACCESS=CONTROL)-
_$ MEMBER_LIST.EXE8.6.8. Modifying a System or Process Rights List
As a privileged security administrator, you can use the SET RIGHTS_LIST
command to modify the rights list of any process on the system or to modify identifiers in the
system rights list. Adding an identifier to the system rights list effectively grants it to all
users. You can also use the SET RIGHTS_LIST command to add attributes to
existing identifiers.
A possible use of the system rights list is to enable site-specific environmental conditions. For example, a batch job scheduled to run at 8:00 a.m. could add the following identifier:
$ SET RIGHTS_LIST/SYSTEM/ENABLE DAY_SHIFT
Another batch job scheduled for 5:00 p.m. could remove the identifier DAY_SHIFT:
$ SET RIGHTS_LIST/SYSTEM/DISABLE DAY_SHIFT
The effect is to enable access to protected objects with the identifier DAY_SHIFT during the 8:00 a.m. to 5:00 p.m. period.
The command in the next example modifies a process rights list by adding the SALES identifier to the rights list of the process DEDNAM. Specifying the Resource attribute allows the holders of the SALES identifier to charge disk space to it:
$ SET RIGHTS_LIST/ENABLE/ATTRIBUTES=RESOURCE/PROCESS=DEDNAM SALES
8.7. Giving Users Privileges
Some system activities are limited to users who hold specific privileges. These restrictions protect the integrity of the operating system's performance and, thus, the integrity of service provided to users. Grant privileges to each user on the basis of two factors: (a) whether the user has a legitimate need for the privilege and (b) whether the user has the skill and experience to use the privilege without disrupting the system.
A user's privileges are recorded in the user's UAF record in two privilege vectors. One vector stores the authorized privileges, and the other vector stores the default privileges. The default privileges are the subset of authorized privileges that a user process receives at login.
When a user logs in to the system, the user's privilege vector is stored in the header of
the user's process. In this way, the user's privileges are passed on to the process created for
the user. Users can use the DCL command SET PROCESS/PRIVILEGES to enable and
disable privileges for which they are authorized.
The operating system monitors and audits the use of privilege. You can enable auditing for specific privileges and examine the audit log file to see what privileges were used to execute DCL commands or system services. See Chapter 10, "Security Auditing" for further information.
8.7.1. Categories of Privilege
None: No privileges
Normal: Minimum privileges to effectively use the system
Group: Potential to interfere with members of the same group
Devour: Potential to consume noncritical systemwide resources
System: Potential to interfere with normal system operation
Objects: Potential to compromise object security
All: Potential to control the system
|
Category |
Privilege |
Activity Permitted |
|---|---|---|
|
None |
None |
Deny activities requiring privileges |
|
Normal |
NETMBX TMPMBX |
Create network connections Create temporary mailbox |
|
Group |
GROUP GRPPRV |
Control processes in the same group Gain access through the system protection field of the group's objects |
|
Devour |
ACNT ALLSPOOL BUGCHK EXQUOTA GRPNAM PRMCEB PRMGBL PRMMBX SHMEM |
Disable accounting Allocate spooled devices Make bugcheck error log entries Exceed disk quotas Insert group logical names in the name table Create/delete permanent common event flag clusters Create permanent global sections Create permanent mailboxes Create/delete structures in shared memory |
|
System |
ALTPRI AUDIT OPER PSWAPM WORLD SECURITY SYSLCK |
Set base priority higher than allotment Generate audit records Perform operator functions Change process swap mode Control any process Perform security-related functions Lock systemwide resources |
|
Objects |
DIAGNOSE IMPORT MOUNT READALL SYSGBL VOLPRO |
Diagnose devices Mount a nonlabeled tape volume Execute mount volume QIO Possess read access to all system objects Create systemwide global sections Override volume protection |
|
All |
BYPASS CMEXEC CMKRNL IMPERSONATE DOWNGRADE LOG_IO PFNMAP PHY_IO SETPRV SHARE SYSNAM SYSPRV UPGRADE |
Disregard protection Change to executive mode Change to kernel mode Create detached processes of arbitrary UIC Write to a lower secrecy object or lower an object's classification Issue logical I/O requests Map to specific physical pages Issue physical I/O requests Enable any privilege Access devices allocated to other users Insert system logical names in the name table Access objects through the system protection field Write to a higher integrity object or raise an object's integrity level |
8.7.2. Suggested Privilege Allocations
Appendix A, "Assigning Privileges" lists all user privileges and includes recommendations on when to grant them. When allocating user privileges, be conservative.
|
Type of User |
Minimum Privileges |
|---|---|
|
General |
TMPMBX, NETMBX |
|
Operator |
OPER |
|
Group manager |
GROUP, GRPPRV |
|
System manager/administrator |
SYSPRV, OPER, SYSNAM, CMKRNL? |
|
Security administrator |
SECURITY, AUDIT, READALL |
8.7.3. Limiting User Privileges
Granting privileges allows users those privileges until you remove them. To avoid such blanket permission, you may want to grant privileges on an as-needed basis. For example, certain users may need to run a program requiring one of the more powerful privileges. You can install the program with the necessary privilege by using the Install utility (INSTALL). Section 8.7.4, ''Installing Images with Privilege'' discusses installing privileged images in more detail.
Establish a limited group of users who know about the account and are informed how to use it.
Create two accounts for the user, giving the privileges to one account but not to the other. In this case, the user would have the same UIC and the same default directory in each account. (This is the only case where VSI recommends shared UICs, because there is still only one actual user.) If you decide to adopt this dual account practice, avoid obvious user names that reveal which account is the privileged account.
With both options, you can place special restrictions on the privileged account, such as long passwords, brief password lifetimes, restricted hours, and limited modes of operation (no dialup, network, remote, or batch logins). In addition, limited account durations would force frequent consideration of privilege requirements.
Yet another alternative is to use protected subsystems, which are described in Chapter 14, "Using Protected Subsystems", and thereby eliminate the need for any system privileges.
8.7.4. Installing Images with Privilege
A user cannot execute an image that requires a privilege the user does not possess unless the image is installed as a known image with the privilege in question. (See the relevant section in the VSI OpenVMS System Management Utilities Reference Manual, Volume I: A–L for instructions on installing known images.) Execution of a known image with privileges grants those privileges to the user process executing the image for the duration of the image's execution. Thus, you should install images with amplified privileges (other than the normal VSI-supplied configuration) only after ensuring that the privileges are required by the image's function and that the image operates safely. Also consider restricting access to the image to a selected set of users.
Images installed with privileges are activated with all amplified privileges enabled. For maximum safety, images designed to run with amplified privilege should use the $SETPRV system service to disable all amplified privileges immediately on activation, and enable them only when they are needed.
Install SDA.EXE with the CMKRNL privilege, as follows:
$ INSTALL SDA.EXE /PRIVILEGED=CMKRNL
Place an ACL on SDA.EXE, and also set the UIC-based protection to deny all access to the world category of users, as follows:
$ SET SECURITY/ACL=(IDENTIFIER=SDA,ACCESS=EXECUTE)- _$ SYS$SYSTEM:SDA.EXE $ SET SECURITY/PROTECTION=(WORLD) SYS$SYSTEM:SDA.EXE
- Use the
AUTHORIZEcommand to confirm that the users who hold the SDA identifier are those intended to run the program. If necessary, make adjustments to this list of users.Note
All images that you install with privilege must be linked with the
/NOTRACEBACKqualifier to prevent online debugging and traceback.VSI ensures that all system programs that are supplied with the operating system (such as the SDA) are linked with the
/NOTRACEBACKqualifier to prevent online debugging or traceback.
8.7.5. Restricting Command Output
Some DCL commands behave differently depending on the privileges that the user holds.
For example, unless a user holds the GROUP or WORLD privilege, the SHOW
PROCESS command limits the display of process information to the user's process. A
user with GROUP privilege can display other processes in the user's UIC group; a user with WORLD
privilege can display any process on the system.
8.8. Setting Default Protection and Ownership
After designing user groups and identifiers, you need to address which protected objects your users need permission to access and which ones can be unrestricted. Become familiar with the default protection of new objects, shown in Chapter 5, "Descriptions of Object Classes", and when necessary modify the defaults, as shown in the following sections.
The procedure for setting up object protection and ownership defaults varies, depending on whether the object is a file or another class of protected object.
8.8.1. Controlling File Access
The system parameter RMS_FILEPROT sets the systemwide default for file protection. You can change the value of RMS_FILEPROT with AUTOGEN. However, the effectiveness of this value may be overridden by any of the following defaults.
The DCL command
SET PROTECTION/DEFAULTcan specify the file protection placed on files created or modified by the user during the terminal session. While the command typically appears in the user's login command procedure, the user can also enter this command at any time during a session to override the value set by a previousSET PROTECTION/DEFAULTcommand. TheSET PROTECTION/DEFAULTcommand negates the influence of the systemwide protection for this user.The default protection for the specific directory can be specified in an ACL applied to the directory. If a Default Protection ACE exists for the directory, all new files added to the directory, including subdirectories and their files, are subject to this protection code. This code overrides the systemwide default and the user-specified default (if any).
In special cases where the file being created is not owned by the user identification code (UIC) of the process creating the file (for example, when a directory is owned by a resource identifier), the default protection for the new file can be modified by a Creator ACE within the directory's ACL. Refer to Section 5.4.5, ''Profile Assignment'' for a discussion of the Creator ACE.
Also consider the protection imposed on the volume through the DCL command SET
VOLUME/PROTECTION. This protection code, if specified, prevents a user from accessing
any part of the volume, regardless of the protection code on the directory or the file. If no
volume protection is specified with the SET VOLUME command, the volume is
accessible to all users.
The assignment of file ownership affects the outcome of any protection check. The operational effect of this combined protection structure is depicted in Figure 8.1, ''Flowchart of File Creation''.
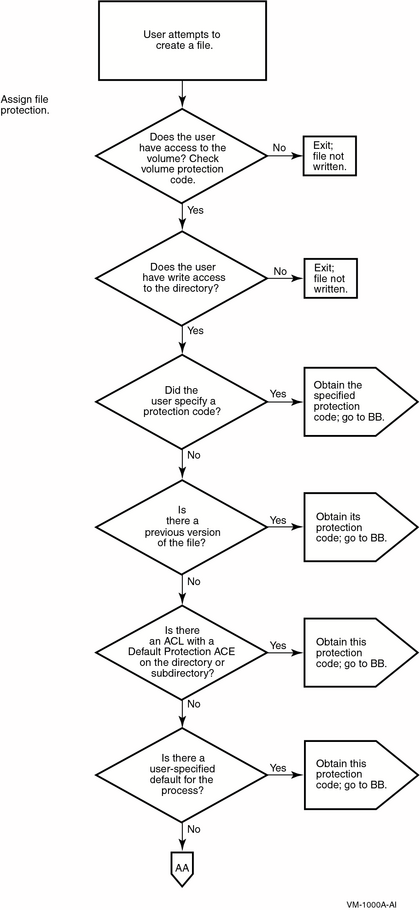
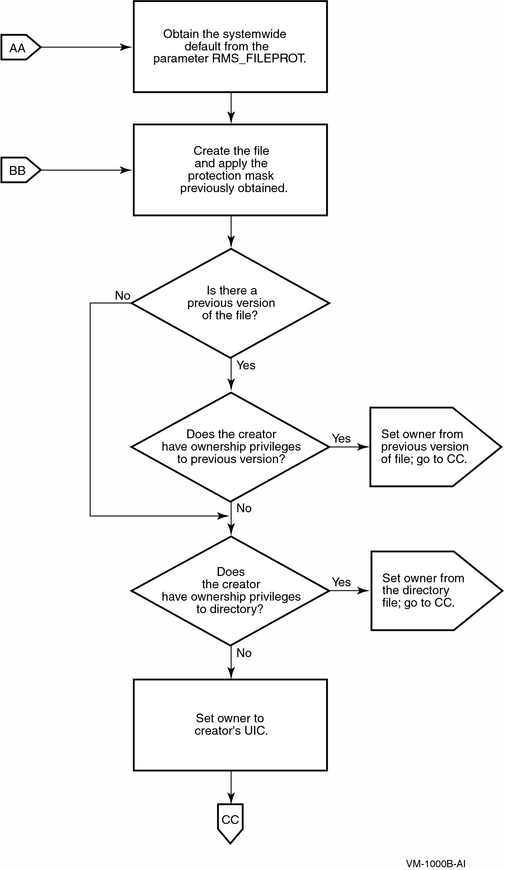
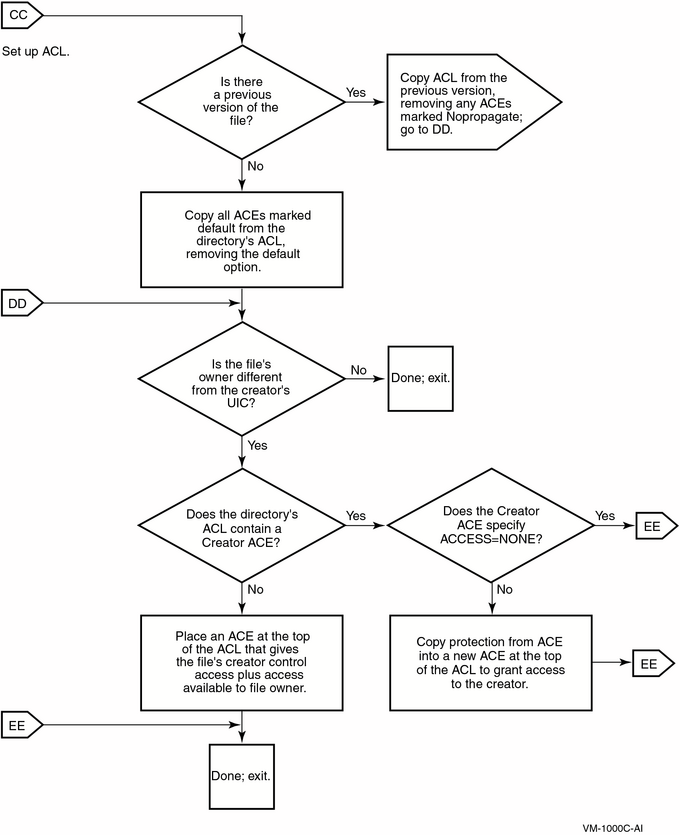
8.8.1.1. Adjusting Protection Defaults
You may want to make adjustments to control default behavior. The systemwide default protection code specified by the system parameter RMS_FILE PROT sets the user's default protection to the following:
(S:RWED,O:RWED,G:RE,W)
Assume that the volume protection has been set by the operator to the following:
(S:RWED,O:RWED,G:R,W)
The file protection on the directory [PROJECT] has been set to the following:
(S:RWED,O:RW,G:R,W)
If all the files created in the subdirectory [PROJECT.DIARY] demand more protection, you, or any user who has control access to the directory, could define a specific default protection code for this specific directory with an ACL consisting of a Default Protection ACE, as follows:
(DEFAULT_PROTECTION,S:RWED,O:RWED,G,W)
The following DCL command would provide the desired default protection:
$ SET SECURITY/ACL=(DEFAULT_PROTECTION,S:RWED,O:RWED)- _$ [PROJECT]DIARY.DIR
SET SECURITY/PROTECTIONCOPY/PROTECTIONAPPEND/PROTECTIONCREATE/PROTECTION
Once the default protection code is replaced, the new code becomes the default and is propagated to subsequent versions of the file.
If you provide a special login command procedure for some of your users, you may want to
supplement the systemwide default process protection specified by the system parameter
RMS_FILEPROT for this group of users. Add the SET
PROTECTION/DEFAULT command to the login command procedure to specify the default
process protection, as follows:
$ SET PROTECTION=(S:RWED,O:RWED,G,W)/DEFAULT
Files created in users' directories receive this default protection code unless explicitly overridden.
8.8.1.2. Setting Defaults for a Directory Owned by a Resource Identifier
To allow for more flexible data management as well as more accurate accounting of disk space, you can set up a directory that is owned by a resource identifier and rely on ACLs to control access to the directory and to files created within it.
The ACL can limit file access to all project members holding the project identifier. To achieve this kind of access restriction, you add an Identifier ACE to define the group's access to files. A second Identifier ACE is added that duplicates the first but holds the Default attribute. It is the Default attribute that ensures the ACE is copied to all files created within the directory. Sometimes a third ACE is necessary—a Default Protection ACE, depending on the default protection code for the directory. A Default Protection ACE establishes the protection code for the directory's files. (As Section 4.3, ''How the System Determines If a User Can Access a Protected Object'' explains, if an ACL denies access to a file, it is still possible to gain access through a protection code.)
In addition to limiting the group's access to files, an ACL can control the type of access users have to files that they have created within the common directory. Because the file is created in the resource identifier's directory, the resource identifier owns the file. For users to access files they have created, the operating system normally gives control access to the file's creator plus the access specified in the owner field of the protection code. However, you can modify this behavior by adding a Creator ACE to the directory's ACL. A Creator ACE defines the type of access users have to files they have created in the project's directory.
8.8.1.2.1. Setting Up the Resource Identifier
A security administrator used the following command sequence to set up the project identifier PROJECTX and grant it to members of the project. Notice that the identifier is added to the rights database with the resource identifier, and it is also granted to users with the resource identifier. The project identifier needs to carry the Resource attribute so it can own disk space:
$ RUN SYS$SYSTEM:AUTHORIZE
UAF> ADD/IDENTIFIER PROJECTX /ATTRIBUTES=RESOURCE
UAF> GRANT/IDENTIFIER PROJECTX user1 /ATTRIBUTES=RESOURCE
UAF> GRANT/IDENTIFIER PROJECTX user2 /ATTRIBUTES=RESOURCE
.
.
.8.8.1.2.2. Setting Up the Directory of a Resource Identifier
When a project- or department-specific identifier is the owner of a directory, the space used by files created in the directory can be charged to the appropriate department or project rather than to the individual who creates them. When users work on multiple projects, they can charge their disk space requirements to the related project rather than to their personal accounts.
In setting up a directory for a resource identifier, you first create the disk quota
authorization for the project identifier. For example, the following command invokes the
System Management utility (SYSMAN) and assigns the identifier PROJECTX
2000 blocks of disk quota with 200 blocks of overdraft:
$ RUN SYS$SYSTEM:SYSMAN
SYSMAN> DISKQUOTA ADD PROJECTX /PERMQUOTA=2000 /OVERDRAFT=200After setting up the disk quota, you create the project directory. For example, the
following DCL command creates the project directory [PROJECTX] and establishes
the identifier PROJECTX as its owner:
$ CREATE/DIRECTORY [PROJECTX] /OWNER=[PROJECTX]
8.8.1.2.3. Setting Up the ACL
In setting up the directory [PROJECTX], you use an ACL to provide file access to project members. The following example shows how several ACEs are used to define access:
$ SET SECURITY [PROJECTX] /ACL= (- _$ (DEFAULT_PROTECTION,S:RWED,O:RWED,G,W),-
| The Default Protection ACE sets up a protection code for files created within the directory. The ACE denies access to group and world users. |
| The first Identifier ACE gives holders of the PROJECTX identifier read, write, and execute access to the directory. |
| The second Identifier ACE guarantees that all files created in the directory will carry the first Identifier ACE. |
| The Creator ACE specifies that a user who creates a file in the PROJECTX directory will receive read, write, execute, and delete access to it. |
Thus, when project member Crandall creates the file SEPTEMBER-REPORTS.TXT in the [PROJECTX] directory, the file receives the following security profile:
$ SHOW SECURITY/CLASS=FILE [PROJECTX]SEPTEMBER-REPORTS.TXT
SEPTEMBER-REPORTS.TXT object of class FILE
Owner: [PROJECTX]
Protection: (System: RWED, Owner: RWED, Group, World)
Access Control List:
(IDENTIFIER=CRANDALL,ACCESS=READ+WRITE+EXECUTE+DELETE)
(IDENTIFIER=PROJECTX,ACCESS=READ+WRITE+EXECUTE)Project members are not allowed to delete (or control) files created by others; however, the Creator ACE gives them delete access to files they have created.
Without a Creator ACE, project members each have complete access to files they have created in the directory. For example, Crandall would receive the following access to files created in the project directories:
$ SHOW SECURITY/CLASS=FILE [PROJECTX]SEPTEMBER-REPORTS.TXT
SEPTEMBER-REPORTS.TXT object of class FILE
Owner: [CRANDALL]
Protection: (System: RWED, Owner: RWED, Group, World)
Access Control List:
(IDENTIFIER=CRANDALL,OPTIONS=NOPROPAGATE,ACCESS=READ+WRITE+EXECUTE+DELETE+CONTROL)
(IDENTIFIER=PROJECTX,ACCESS=READ+WRITE+EXECUTE)To negate this behavior, you can add a Creator ACE to the ACL that specifies ACCESS=NONE.
8.8.2. Setting Defaults for Objects Other Than Files
With the exception of files and pseudo-terminal (FT) devices, all classes of protected
objects offer one or more template profiles that provide security elements for new objects. You
can thus use a single mechanism to establish the default protection code, ACL, and ownership
elements for objects. The operating system always stores these values so they are available from
one system startup to the next. The SHOW SECURITY command displays the
current default values for your particular site. Refer to Chapter 5, "Descriptions of Object Classes" for
a listing of the operating system's default values.
The operating system generates the security profiles of new objects from data stored by security class objects. These objects are all logical constructs used to keep track of such class elements as the valid access types, the templates, and the types of auditing that have been enabled. As Figure 8.2, ''Security Class Object'' shows, every class of protected object has a member in the security class. All members have a security profile template, except for files, which have their own rules.
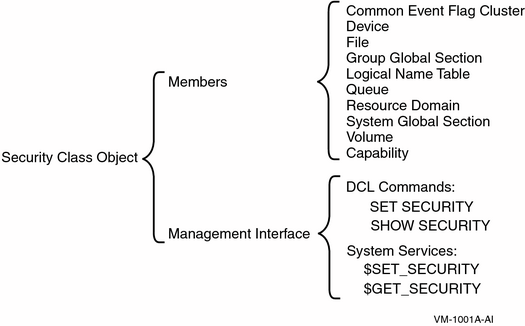
8.8.2.1. Displaying Class Defaults
To display any class template, use the SHOW
SECURITY/CLASS=SECURITY_CLASS command. The following command, for example, displays
templates available for logical name tables. The logical name table object has the following
three templates:
$ SHOW SECURITY/CLASS=SECURITY_CLASS LOGICAL_NAME_TABLE
.
.
.
Template: GROUP
Owner: [TTSY,SYSTEM]
Protection: (System: RWCD, Owner: R, Group: R, World:R)
Access Control List: <empty>
Template: JOB
Owner: [TTSY,SYSTEM]
Protection: (System: RWCD, Owner: RWCD, Group, World)
Access Control List: <empty>
Template: DEFAULT
Owner: [TTSY,SYSTEM]
Protection: (System: RW, Owner: RW, Group, World)
Access Control List: <empty>All objects in the security class are protected in the same manner as other objects. For
this reason, any SHOW SECURITY display of a security class object begins
with the security profile for the object itself. The following display shows a profile for the
logical name table object in the security class. The object is owned by the system, and its
protection code allows read access to any user category but allows write access only to system
and owner categories.
$ SHOW SECURITY/CLASS=SECURITY_CLASS LOGICAL_NAME_TABLE
LOGICAL_NAME_TABLE object of class SECURITY_CLASS
Owner: [SYSTEM]
Protection: (System: RW, Owner: RW, Group: R, World: R)
Access Control List: <empty>8.8.2.2. Modifying Class Templates
Security administrators and users with control access to a security class object can modify the elements of a given template with the following command:
$ SET SECURITY/CLASS=SECURITY_CLASS/PROFILE=TEMPLATE=template-nameThe following command modifies the MAILBOX template for the device class. It
changes the template values from a protection of S:RWPL,O:RWPL,G:RWPL,W:RWPL to a protection
that disallows group and world access.
$ SET SECURITY/CLASS=SECURITY_CLASS/TEMPLATE=MAILBOX - _$ /PROTECTION=(S:RWPL,ORWPL,G,W) DEVICE
The operating system applies this value to all new mailboxes. To
change the protection for each existing mailbox, enter an explicit SET
SECURITY command for each existing mailbox. For example:
$ SET SECURITY/CLASS=DEVICE - _$ /PROTECTION=(S:RWPL,ORWPL,G,W) mailbox_name
The operating system saves the default object protections specified in security templates, so rebooting the system automatically ensures that all objects created after the reboot are created with the new default protections.
Note
In OpenVMS Version 7.2-1 and earlier, all pseudo-terminal (FT) device protection codes were set by the driver to (S:RWLP,O:RWLP,G,W). In OpenVMS Version 7.3 and later, only device FTA0 is set to this forced protection. This allows the system manager the option of modifying the FTA0 device protection later in the boot process. This new protection is inherited from FTA0 by any new FT devices created thereafter (as well as other settings originating from the SECURITY class DEVICE TERMINAL template profile, such as ACLs).
A system manager can either modify FTA0 manually, or change the SYSTARTUP_VMS.COM command procedure. For example:
$ SET SECURITY/CLASS=DEVICE/PROTECTION=(S:RWLP,O:RWLP,G:RW,W:R) FTA0:
If the device protection for FTA0 is left unmodified, the behavior is unchanged from versions of OpenVMS prior to Version 7.3. That behavior is that all terminals, except FT pseudo-terminal devices, inherit their device protection and other security characteristics from the TERMINAL template profile. All FTA pseudo-terminal devices inherit their protection from FTA0, which by default is set to (S:RWLP,O:RWLP,G,W). Other settings, such as ACLs, are inherited from the TERMINAL template profile. This ensures compatibility with existing applications.
The DCL command SHOW SECURITY displays all available templates with the
site values. Chapter 5, "Descriptions of Object Classes" lists the default system values.
8.9. Added Protection for System Data and Resources
This section describes additional ways to restrict the data and resources available to users.
8.9.1. Precautions to Take When Installing New Software
When you install new software, you must address several security concerns. You want to ensure that you are not admitting software that will in any way corrupt or undermine your usual security precautions. You must also consider whether to install the software with any privileges. This section discusses the security aspects of installing new software.
8.9.1.1. Potentially Harmful Programs
Pass privileges of the person running the program back to the author of the program
Allow unauthorized access to the system
Change protection of system files
Patch the system (add special software to the operating system)
Create jobs that scan for easily guessed passwords
To protect your system from this type of intrusion, always buy software from reputable sources. When training new users, stress the importance of avoiding use of software from an unknown source.
Another risk to programs and directories is known as the virus. While Trojan horse software must rely on the innocent user to unwittingly accept the damaging software by using it, the virus requires no user cooperation. It is a program that takes advantage of faulty file protection, working its way through your system and modifying command procedures and executable programs. By modifying command procedures, it can propagate by making use of user access rights and privileges.
Viruses are less of a problem in the OpenVMS environment than in an environment of personal computers. The OpenVMS protection features and the environment's larger scale and diversity make virus attacks more difficult. However, no environment that permits the sharing of software and data is immune from virus attacks.
The user's login command procedure is a prime target for this type of security breach. Login command procedures generally contain easily modified DCL commands and are executed regularly.
ACLs are also targets. File protection designed with users sharing access privileges allows this type of program to run through many users' programs, acquiring new privileges along the way.
Well-designed file protection is critical for protection from this type of security breach. Make sure that likely targets cannot be modified by users. For example, set up file protection so that your login command procedure permits at most read access to all other users. Also make sure the directory containing the login command procedure permits write access only to users in the system and owner categories.
Because most damage occurs when programs like these reach a target account with privileges, users with privileges should be especially cautious with the protection of their root directory, executable files, and command procedures. To deter Trojan horse attacks, users should never execute a command procedure or run an image in a privileged account without inspecting the command procedure or the image's sources. Application images should be rebuilt from source to ensure that the binary image reflects the accompanying source.
8.9.1.2. Installing Programs with Privilege
Some software requires privilege to run. You can extend the privilege to all users you expect will need to run the software, or you can install the program with the required privileges. When you install privileged software, you allow users to execute it whether or not they personally possess the required privilege. In effect, you extend the privilege to the process while it runs the software. While this offers some advantages, it also introduces several security-related dangers. Section 8.7, ''Giving Users Privileges'' describes these options in greater detail.
8.9.2. Protecting System Files
Even on the most open system, you will want protection for the system software. Normally, VSI delivers system programs and databases with adequate UIC protection. However, if for any reason you are dissatisfied with the default protection, you can change it with the techniques outlined in Chapter 4, "Protecting Data", provided you have the necessary SYSPRV privilege. You might also add an ACL to any file that you decide needs additional protection.
You can obtain a full listing of system files from the system manager's account during an OpenVMS installation with the following DCL command:
$ DIRECTORY/SECURITY/OUTPUT=SYSTEM_FILES.LIS SYS$SYSROOT:[*...]VSI recommends you generate such a listing and store it for reference. Regularly compare
these values with current system file protection to ensure that no tampering has occurred. (The
DCL commands DIRECTORY/SECURITY/OUTPUT and DIFFERENCES
facilitate such checks.)
On Alpha systems, you can obtain a listing of system files and their protections from the read-only compact disc distribution media. Your OpenVMS software should have this set of protection codes following a correct installation.
|
Command |
Function |
|---|---|
|
|
Displays the ACL for the file |
|
|
Displays the file owner's UIC |
|
|
Displays the file's protection code |
|
|
Combines and displays file information produced by |
|
|
Invokes the access control list editor (ACL editor) |
|
|
Establishes the default protection to be applied to all files subsequently created |
|
|
Modifies the security profile of any object: the owner, protection code, and ACL |
|
|
Displays the ownership, UIC protection code, and ACL of a protected object |
Caution
If you reinstall MAIL.EXE with certain privileges, you must
carefully consider possible ramifications, including the potential for security breaches. For
example, because MAIL.EXE confers its privileges on any user who
invokes the Mail utility, that user will inherit those privileges if the user creates a
subprocess from within Mail by specifying the SPAWN command.
As indicated, VSI provides default protection for the system programs that it provides. However, if you have a special requirement, you might examine the potential of ACLs for your needs. For example, you might use ACLs to restrict the use of system programs such as compilers.?
You might also ask if there are cases where you do not want some or all of your users to be able to initialize media. If there are, you can put an ACL to good use on the system program SYS$SYSTEM:INIT.EXE. Ensure that you grant no access to the world category in the UIC-based protection code. Then create an ACL for the file that grants access to specific users.
Similarly, if a department in your company has paid for a license to a software product, you may want to make that software available to them but not to others. Ensure that the world category receives no access through the standard UIC-based protection code, and create an entry in the ACL for that file that allows access through the department's identifier.
You may also find that ACL protection is relevant to protect your applications databases, limiting the access to certain users or to protected subsystems.
8.9.3. Restricting DCL Command Usage
Impose ACLs on the system program files in the directories SYS$SYSROOT:[SYSEXE] and SYS$SYSROOT:[SYSLIB].
Set the AUTHORIZE flag DISIMAGE to prevent use of the MCR or the
RUNcommand. This prevents users from executing system or user-written images or from executing images defined as foreign commands. Because the DISIMAGE flag is enforced by the DCL command language interpreter (CLI), you must ensure that the account for which the DISIMAGE flag is set has access to the DCL CLI only. Use the DISIMAGE flag in conjunction with the AUTHORIZE flag DEFCLI or within a restricted account.?Remove or modify DCL command definitions, and rebuild the DCL tables (see the VSI OpenVMS Command Definition, Librarian, and Message Utilities Manual for a description of how to create command definitions). Use the
/CLITABLESqualifier in the user's UAF record to specify the modified tables. Also specify/FLAGS=DEFCLIto ensure that the user can log in only with the specified command language interpreter (CLI) and tables. Protect the original DCL tables from unauthorized access by imposing ACLs on the system program files in the directories SYS$SYSROOT:[SYSEXE] and SYS$SYSROOT:[SYSLIB]. In particular, protect SYS$LIBRARY:DCLTABLES.EXE and SYS$SYSTEM:CDU.EXE.
8.9.4. Encrypting Files
File encryption refers to the process of applying an algorithm to data to conceal its content. Decryption reverses the operation and converts encoded information back to its original content. If you need to copy proprietary software onto media for removal to another site, you might use file encryption. The software on the media is useless without the correct decryption code.
Different file encryption systems, both software and hardware, are available. Consult your VSI support channel for information on which products are available in your country.
8.9.5. Protecting Disks
Disk scavenging is the process of reading magnetic imprints of data after deletion of the file header following a purge or delete operation. (When users delete files from the system, only the file header is deleted.) Until the data is overwritten, it is a potential target for disk scavenging. Sites with medium or high security needs should be concerned about this procedure.
After establishing overall security features, restrict access to disks containing valuable information by using UIC-based volume protection. Because disk scavenging is frequently performed by authorized users, consider implementing erasure patterns and high-water marking, as described in the following sections.
8.9.5.1. Erasing Techniques
The inclusion of the
/ERASEqualifier with theDELETEor thePURGEcommand causes the system to write an erasure pattern of zeros over the entire file location when you delete or purge that file. You can encourage users to use this qualifier voluntarily or make inclusion automatic by including the following command definitions in the system login command procedure (usually SYS$MANAGER:SYLOGIN.COM):DEL*ETE :== "DELETE/ERASE" PUR*GE :== "PURGE/ERASE"
However, any user can bypass these definitions by adding the
/NOERASEqualifier to theDELETEor thePURGEcommand.To guarantee erase-on-delete, turn on the feature for the entire volume by using the DCL command
SET VOLUME/ERASE_ON_DELETE. When files are deleted, this command overwrites all files on the volume with the erasure pattern of zeros.To completely erase the volume and enable erase-on-delete for the volume at volume initialization, use the DCL command
INITIALIZE/ERASE.By default, when erase-on-delete is enabled, the operating system writes a default data security erase (DSE) pattern of zeros, applied during a single write operation over the area. If you feel that the default pattern of zeros or the single rather than multiple number of erasures does not suit your requirements, you can use the $ERAPAT (Get Security Erase Pattern) system service to write a customized erasure pattern. See the description of $ERAPAT in the VSI OpenVMS System Services Reference Manual: A–GETUAI for more information.
For sites with high-level security requirements, a random pattern is preferable to a fixed pattern. The technology is already available that can detect and use faint residual magnetic impressions. Thus, if you conclude there is sufficient danger that a disk might be removed and read using some of this specialized analysis equipment, you may need to rewrite the erasure pattern several times. You can learn how to customize the data security erase pattern to fit your needs by studying the information provided in the file SYS$EXAMPLES:DOD_ERAPAT.MAR.
Employ erasing patterns only on disks where the security needs are the greatest. Erasures are time-consuming and affect system performance.
8.9.5.2. Prevention Through High-Water Marking
High-water marking refers to a technique that tracks the furthest extent to which each file has been written and prohibits user attempts at reading data beyond that point.
The operating system implements true high-water marking for all sequential, exclusively accessed files, such as the set of files output from various text editors, compilers, and linkers, that is, most files a process writes. The high-water mark is updated in the file header whenever the logical end-of-file mark is updated (usually when the file is closed).
For shared files (both indexed and sequential), the operating system uses the principle of erase-on-allocate to achieve a result similar to true high-water marking. When a file is about to be created or extended, the system determines how much disk space (the extent of the file) is required and applies the security erasure pattern of zeros to the areas (extents) it allocates for writing. The file is then written into the area just erased for it. Thus, if any user gains access to the file (including its full extent) and attempts to read the area beyond where the file has been written, only the data security erase pattern is readable.
By default, the operating system turns on high-water marking for all volumes. High-water marking is a deterrent to disk scavenging attempts. However, it does require additional I/O, which affects system performance.
You can turn off high-water marking and erase-on-allocate on a volume-by-volume basis by
specifying the DCL command SET VOLUME/NOHIGHWATER_MARKING.
8.9.5.3. Summary of Prevention Techniques
Provide tight physical security, particularly on those disks with the most valuable information.
Provide tight volume protection through UIC-based protection.
Encourage the use of the
/ERASEqualifier when key files are purged or deleted through user participation or volume enforcement.Permit default high-water marking on your most valuable disks.
8.9.6. Protecting Backup Media
You can guard against data loss or corruption by creating copies of your files, directories, and disks. In case of a problem, you can restore the backup copy and continue your work. Secure media storage and controlled access to media are essential parts of the process. It is best to store backup media off site.
8.9.6.1. Backing Up Disks
Having an effective backup schedule is critical to protect your data. By performing regularly scheduled backup operations, you prevent the loss of accidentally deleted or damaged files.
Refer to the relevant section in the VSI OpenVMS System Management Utilities Reference Manual, Volume I: A–L for information about performing backups and setting up backup schedules. Be aware that the Backup utility (BACKUP) does not implement security policy; you must direct it explicitly. It runs with the security profile of the operator, which can often be privileged.
8.9.6.2. Protecting a Backup Save Set
Limiting access to backup save sets is an important part of system security. The file system treats a backup save set as a single file, whether it is stored on disk or on magnetic tape. Therefore, anyone with access to a save set can read any file in the save set. BACKUP does not check protection on individual files.
To maintain system security, it is crucial that you protect save sets adequately. Assign
restrictive protection to save sets on disk and to magnetic tape volumes by using the output
save-set qualifiers /BY_OWNER and /PROTECTION.
Sufficient protection can prevent nonprivileged users from mounting a save-set volume or from
reading files from a save set. You should also take physical security precautions with save
sets stored off line by keeping backup media in locked cabinets.
When you write a save set to a Files-11 disk or a sequential disk and do not specify the
/PROTECTION qualifier, BACKUP applies the process default protection to
the save set. If you specify /PROTECTION, any protection categories that you
do not specify default to your default process protection.
Protection information is written to the volume header record of a magnetic tape and
applies to all save sets stored on the tape. Therefore, the output save-set qualifiers
/BY_OWNER and /PROTECTION are effective on magnetic
tape save sets only if you specify the output save-set qualifier /REWIND.
This qualifier allows the tape to rewind to its beginning, to write the protection data to the
volume header record, and to initialize the tape. If you specify
/PROTECTION, any protection categories that you do not specify default to
your default process protection. If you do not specify /REWIND with the
/PROTECTION and /BY_OWNER qualifiers, the magnetic tape
retains its existing protection. However, specifying /REWIND alone results
in a magnetic tape without any protection.
The following example illustrates how a directory is backed up to tape:
$ BACKUP _FROM: [PAYROLL] _TO: MFA2:KNOX.BCK/LABEL=BANK01 -
| The contents of the directory |
| The output save-set qualifier |
| The output save-set qualifier |
| The output save-set qualifier |
8.9.6.3. Retrieving Files from Backup Save Sets
Anyone who has access to a save set can read any file in the save set. Never give a copy of your backup media to a user; a malicious user could restore the files from the tape or disk and compromise the security of the system.
When a nonprivileged user wants to restore a particular file, do not lend the volume containing the save set. You could give away access to all the files on the volume. The safest way to restore a particular file is to restore the file selectively, as shown in the following example:
$ BACKUP MTA0:JULY.BCK/SELECT=[JONES.TEXTPROC]LASTMONTH.DAT - _$ [*...]/BY_OWNER=ORIGINAL
The selected file is restored with its original directory, ownership, and protection. In this way, the file system determines if the user is permitted access to the file.
8.9.7. Protecting Terminals
The next sections describe the controls available for restricting the use of terminals.
8.9.7.1. Restricting Terminal Use
Through the device object class template TERMINAL, the operating system sets up terminals to be accessible to the SYSTEM account only. When a user logs in, the operating system transfers ownership from a system UIC to the UIC of the current process.
Assign a system password.
Set the terminal to
/NOTYPE_AHEAD, making it impossible to log in.
The application of system passwords limits the use of those terminals to users who know the system password.
8.9.7.2. Restricting Application Terminals and Miscellaneous Devices
To make terminals accessible to certain users as application terminals, you may want to
change any or all of the device's security characteristics. You can include the DCL command
SET SECURITY/CLASS=DEVICE for specific terminals (with appropriate
protection codes) in the command procedure
SYS$MANAGER:SYSTARTUP_VMS.COM. This DCL command can limit access to
any device that is not file structured. You might also place an ACL on the device to limit user
access.
8.9.7.3. Configuring Terminal Lines for Modems
When configuring terminal lines for modems, never set the /COMMSYNC
qualifier to the DCL command SET TERMINAL (or the
TT$M_COMMSYNC characteristic for the TTDRIVER interface) on a line
with a modem hookup that is intended for interactive use.
The qualifier disables the modem terminal characteristic that disconnects a user process
from the terminal line in case of a modem phone line failure. With the
/COMMSYNCH qualifier enabled, the next call on the terminal line could be
attached to the previous user's process. The /COMMSYNC qualifier is intended
to allow connection of asynchronous printers and other devices to terminal ports by using modem
signals as flow control.
Chapter 9. Using Encryption
9.1. Defining Keys
To encrypt or decrypt any file, a key has to be created first.
To define a key, enter the ENCRYPT/CREATE_KEY command:
$ ENCRYPT/CREATE key-name key-value [qualifiers]
where
| key-name | is the name of the key. |
| key-value | is the value you assign to the key. |
| qualifiers | are options that control the format of the key value or where the key is stored. |
For AES keys, the /AES qualifier must be added:
$ ENCRYPT/CREATE_KEY keyname "This is my secret key" /AES
This generates an AES key with a key length of 21 characters. You can specify a key of
any length as long as it meets the key-length minimum requirement and does not exceed
Encrypt's maximum number of characters (approximately 240). For more information on the
/AES qualifier, see the relevant section in the
VSI OpenVMS DCL Dictionary: A–M.
In order to specify the key algorithm, use the /KEY_ALGORITHM
qualifier. The default key algorithm is DESCBC for DES keys and AESCBC128 when the
/AES qualifier is used. For more information, see Section 9.2.7.2, ''/DATA_ALGORITHM Qualifier''.
9.1.1. Specifying the Key Name
To specify key-name on the
ENCRYPT/CREATE_KEY command line, specify a character string
using the following rules:
Valid length: 1 to 243 characters.
Valid: alphanumeric characters, dollar signs, and underscores.
Case sensitive: no.
To help you remember the name, use one that has meaning to you.
Note
Key names beginning with ENCRYPT$ are reserved to OpenVMS.
9.1.2. Specifying the Key Value
To specify key-value on the
ENCRYPT/CREATE_KEY command line, use either a text string or
a hexadecimal constant, using the following rules:
ASCII text string (default):
Length: 8 to 240 characters.
The string is not case sensitive.
If you use any non-alphanumeric characters, for example, space characters, enclose them in quotation marks.
Example: This command defines a key named HAMLET with character
string value And you yourself shall keep the key of it:
$ ENCRYPT/CREATE_KEY HAMLET _ Key value: "And you yourself shall keep the key of it"
Hexadecimal constant:
Use the
/HEXADECIMALqualifier.Valid characters: 0 to 9, A to F.
Valid minimum length: 15 characters.
Do not enclose the value in quotation marks.
Example: The following command defines a key named ARCANE with
hexadecimal value 2F4A98F46BBC11D:
$ ENCRYPT/CREATE_KEY/HEX ARCANE 2F4A98F46BBC11D
In addition, when you specify key-value, do not use weak keys. These are key values with a pattern of repeated characters or groups of characters. Using a pattern results in an encrypted form that might be easy for unauthorized users to decrypt. For example, the hexadecimal constant 0101010101010101 and the text string 'abcabcabc' are weak keys.
Using weak keys might produce the following consequences:
Security of encrypted data may be at risk.
Encryption may be the same as decryption.
Encryption with one weak key followed by encryption with another weak key may result in the original plaintext.
VSI supplies a table of known weak keys. The software checks keys you define against this table and displays an error message when you supply a weak key.
9.1.3. Verifying Key Creation
To verify the successful creation of a key, use the /LOG
qualifier. For example, this command reports that the key HAMLET is
defined:
$ ENCRYPT/CREATE_KEY/LOG HAMLET _ Key value: "And you yourself shall keep the key of it" %ENCRYPT-S-KEYDEF, key defined for key name = HAMLET
The following example verifies an AES key:
$ ENCRYPT/CREATE MY_KEY "This is a sample ASCII key value" /AES/LOG %ENCRYPT-S-KEYDEF, key defined for key name = MY_KEY
The key is flagged as an AES key to distinguish it from a DES key.
9.1.4. Specifying Key Storage Tables
When you define a key, it is stored in encrypted form in a key storage table. The key value is stored under the key name. When you encrypt files, the process takes this stored information and does the following:
It compresses the key value taken from the key storage table into a key consisting of 8 bytes of binary digits.
It ensures the odd parity of each byte by modifying one of two things for each byte:
Sign bit, as needed (default)
Low bit (bit 0) (if you specify the
/HEXADECIMALqualifier)
For text string key values, it converts letters to uppercase, reduces multiple consecutive spaces to one space, removes some punctuation characters, and compresses the key string.
As a result, you do not have to remember the exact syntax of the key value. For example, if you define a key value with two spaces between each word, you do not have to remember this spacing to specify the key again.
Key storage tables determine which users can access keys. The following key storage tables control user access:
Process key storage table (default) — accessible only to the process that defined the keys within the table.
If you are defining a key that is intended for use by other processes, specify the appropriate qualifier (
/JOB,/GROUP, or/SYSTEM) so that the intended users of the key can access it.Job key storage table — accessible only to processes within the same job tree as the process that defined the keys within the table.
Group key storage table — accessible to users in the same UIC group as the process that defined the keys in the table.
System storage table — accessible to all system users.
To enter keys into the key storage tables, use the following
ENCRYPT/CREATE_KEY qualifiers:
/PROCESS(default)/JOB/GROUP(requires GRPNAM or SYSPRV privilege)/SYSTEM(requires SYSPRV privilege)Defines a key that anyone working on the system can use to encrypt his or her files. Because the key is stored in encrypted form, they cannot see the value of the key. The key is available for use until the system is rebooted.
For example, the following command defines a key named
SYSMASTERand places it in the system key storage table:$ ENCRYPT/CREATE_KEY/SYSTEM SYSMASTER _$ Key Value: "The human heart has hidden treasures, in secret kept, in silence sealed"
9.1.5. Maintaining Keys
When you encrypt a file, the key you use is like a password to that file. It is important to keep it secret. In addition, ensure that you remember the key value. You need both the key and the value to decrypt the file.
A key stored in the process key storage table lasts for the life span of the process that defined the keys in the table. Like other process-specific structures, the process key storage table disappears when you log out.
Key values that are meaningful to you are the most memorable, but avoid easily guessed choices such as your nickname or the make of your car. Never post a key name or value in your office or store it online. Like operating system passwords, increasing the length of a key value lessens the possibility of discovery.
The DES algorithm requires that a key value has a minimum length of eight non-null characters. To improve the security of the key value, specify more than eight characters.
For the AES algorithm, the minimum required key sizes are as follows:
128-bit mode = 16-byte key
192-bit mode = 24-byte key
256-bit mode = 32-byte key
9.2. Encrypting Files
After you define a key with the ENCRYPT/CREATE_KEY command, use this key
to encrypt files. Enter the ENCRYPT command. In addition to the key,
specify a plaintext file. The syntax of the ENCRYPT command is as
follows:
$ ENCRYPT file-spec key-name [qualifiers]
where
| file-spec | is the plaintext input file specification. |
| key-name | is the name of the key. |
| qualifiers | are options that control the encryption process or the selection of files you want to encrypt. |
The following example shows how to define the key and to encrypt a
testfile.txt file with the defined key using AES and DES
algorithms:
$ ENCRYPT/CREATE_KEY/AES MY_AES_KEY16 "My AES Key length>16" $ ENCRYPT testfile.txt MY_AES_KEY16 /DATA_ALGORITHM=AESCBC128 /KEY_ALGORITHM=AESCBC128 $! $ ENCRYPT/CREATE_KEY/AES MY_AES_KEY24 "TEST My AES Key length>24" $ ENCRYPT testfile.txt MY_AES_KEY24 /DATA_ALGORITHM=AESCBC192 /KEY_ALGORITHM=AESCBC192 $! $ ENCRYPT/CREATE_KEY/AES MY_AES_KEY32 "TEST TEST TEST My AES Key length>32" $ ENCRYPT testfile.txt MY_AES_KEY32 /DATA_ALGORITHM=AESCBC256 /KEY_ALGORITHM=AESCBC256 $! $ ENCRYPT/CREATE_KEY MY_DES_KEY "This is My DES Key" $ ENCRYPT testfile.txt MY_DES_KEY
If an AES key is required, the /DATA_ALGORITHM and
/KEY_ALGORITHM have to be specified with an AES algorithm.
By default, encryption uses the DESCBC data algorithm, if the
/DATA_ALGORITHM qualifier is not specified.
By default, encryption uses the DESCBC key algorithm, if the
/KEY_ALGORITHM qualifier is not specified.
9.2.1. Input File Specification
For the plaintext file specified on the ENCRYPT command line,
use a file that resides on disk and that is not a directory file.
To specify multiple input files, use wildcard characters in the file
specification. To control file selection, specify the appropriate
ENCRYPT command qualifiers. Do not use wildcard characters to
specify directory files or files containing bad blocks.
9.2.2. Output File Specification
The result of the encryption operation is a ciphertext file. One ciphertext file is created for each input file that is encrypted.
By default, the ENCRYPT command writes each ciphertext file to
a separate output file with the same name except that it has a version number one
higher than that of the current input file.
To specify an alternate output file specification, use the
/OUTPUT qualifier. Specify only the file specification parts
that you want to change from the defaults. For example, the following command
encrypts all the files in the current directory that match the wildcard file
specification *.COM. The /OUTPUT qualifier specifies
that any output files created have a file type of .ENC.
FRANCISSCOTT is the key used to encrypt the files:
$ ENCRYPT *.COM /OUTPUT=.ENC FRANCISSCOTT
Do not specify a file that already exists. For example, you cannot name the output file NEWS.DAT;2 if NEWS.DAT;2 already exists. However, specifying NEWS.DAT as both the input and output files is valid.
9.2.3. Displaying Processing Information
By default, information about the encryption operation is not displayed. To
display information about file encryption operations on
SYS$COMMAND, use the /SHOW
qualifier. The /SHOW qualifier has the format:
/SHOW=keywordor
/SHOW=keyword-listSpecify one or more of the following keywords:
FILES
STATISTICS
9.2.3.1. FILES Keyword
The FILES keyword displays the file specifications of the input and output
files. For example, /SHOW=FILES in the following command
specifies that each input and output file specification be displayed as it is
encrypted:
$ ENCRYPT/SHOW=FILES *.COM FRANCISSCOTT %ENCRYPT-S-ENCRYPTED, DISK2:[FLYNN]MOVE.COM.2 encrypted to DISK2:[FLYNN]MOVE.COM;3 (8 blocks) . . .
9.2.3.2. STATISTICS Keyword
Use the STATISTICS keyword to display encryption stream statistics after the completion of each file operation. The statistics displayed are:
Bytes processed
Internal records processed
CPU time consumed within the encryption algorithm
The following command specifies that encryption stream statistics be displayed on SYS$COMMAND:
$ ENCRYPT/SHOW=STATISTICS *.COM FRANCISSCOTT
%ENCRYPT-S-STATISTICS, encryption stream statistics:
Total Records: 65
Total Bytes: 4083
Total Time: 00:00:01.63
.
.
.9.2.4. Specifying Files to Encrypt
To specify multiple input files, use the ENCRYPT command with
wildcard characters in the input file specification.
The following ENCRYPT command qualifiers can help you select
files:
/BACKUP/BEFORE/BY_OWNER/CONFIRM/EXCLUDE/EXPIRED/MODIFIED/SINCE
9.2.4.1. /BACKUP Qualifier
The /BACKUP qualifier selects files for encryption
according to the date of their most recent backup. This qualifier is meaningful
only when used with either the /BEFORE or the
/SINCE qualifier. The /BACKUP
qualifier has the format:
/BACKUP/BEFORE[=time]or
/BACKUP/SINCE[=time]where
time is an OpenVMS time.
If you do not specify a time, TODAY is used. TODAY is the current day, month, and year at 00:00:00.
The following command selects for encryption all files in the current
directory matching the wildcard file specification of *.COM that
had backup copies made before 00:00:00 15-APR-2009:
$ ENCRYPT/BACKUP/BEFORE=15-APR-2009 *.COM FRANCISSCOTT
Do not use the /BACKUP qualifier with either the
/EXPIRED or the /MODIFIED
qualifier.
9.2.4.2. /BEFORE Qualifier
The /BEFORE qualifier selects files for encryption that
have a creation time before the time specified with the qualifier. The
/BEFORE qualifier has the format:
/BEFORE[=time]where
time is an OpenVMS time.
If you do not specify a time, TODAY is used. TODAY is the current day, month, and year at 00:00:00.
The following command selects for encryption all files in the current
directory matching the wildcard file specification of *.COM that
were created before 00:00:00 15-APR-2009:
$ ENCRYPT/BEFORE=15-APR-2009 *.COM FRANCISSCOTT
9.2.4.3. /BY_OWNER Qualifier
The /BY_OWNER qualifier allows you to select files for
encryption that have a particular owner User Identification Code (UIC). If no
UIC is specified with the qualifier, the UIC of the current process is used. The
/BY_OWNER qualifier has the format:
/BY_OWNER=uicwhere
uic is the UIC of the owner of the file.
The following command selects for encryption all files in the current
directory owned by the user whose UIC is [FLYNN] that match the
wildcard file specification of *.COM:
$ ENCRYPT/BY_OWNER=[FLYNN] *.COM FRANCISSCOTT
9.2.4.4. /CONFIRM Qualifier
By default, all input files specified on the command line are processed
without confirming that those files are selected for encryption. Use the
/CONFIRM qualifier if you want a prompt with the name of
each file selected for encryption. Your response determines whether or not a
particular file is encrypted, as follows:
| Response | Meaning |
|---|---|
| YES | Encrypt the file. |
| NO or Return | Do not encrypt the file. This is the default. |
| QUIT or Ctrl/Z | Do not encrypt the file or any subsequent files. |
| ALL | Encrypt the file and all subsequent files. |
The following command selects for encryption all files in the current
directory matching the wildcard file specification of *.COM.
Because the /CONFIRM qualifier is specified, the user is
prompted on a file-by-file basis to confirm that each file is to be encrypted.
Because the prompt is answered in the affirmative for the file
MOVE.COM;3, the output file MOVE.COM;4 is
created:
$ ENCRYPT/CONFIRM *.COM FRANCISSCOTT Encrypt DISK2:[FLYNN]MOVE.COM;3 ? [N] YES
9.2.4.5. /EXCLUDE Qualifier
Use the /EXCLUDE qualifier to exclude one or more files
from an encryption operation. If a file matches the file specification provided
with the /EXCLUDE qualifier, the file will not be encrypted.
The /EXCLUDE qualifier has the format:
/EXCLUDE=(file-spec[,...])where
file-spec is the name of the file to remain unencrypted.
Wildcard characters are allowed in the file specification. There is no default
for the file specification. Because directory files are never encrypted, you
need not specify them with the /EXCLUDE qualifier. However,
if you do specify /EXCLUDE=*.DIR, you will not get the
following warning message:
%ENCRYPT-W-FILNODIR, file encryption of directories is not supported, filename.dir.
The following command selects for encryption all files in the current
directory that match the wildcard file specification of *.COM,
except LOGIN.COM, which is specified with
/EXCLUDE:
$ ENCRYPT/EXCLUDE=LOGIN.COM *.COM FRANCISSCOTT
9.2.4.6. /EXPIRED Qualifier
The /EXPIRED qualifier selects files for encryption
according to the dates on which they expire. (The expiration date is set with
the SET FILE /EXPIRATION_DATE command.) This qualifier is
meaningful only when used with either the /BEFORE or the
/SINCE qualifier. The /EXPIRED
qualifier has the format:
/EXPIRED/BEFORE[=time]or
/EXPIRED/SINCE[=time]where
time is an OpenVMS time.
If you do not specify a time, TODAY is used. TODAY is the current day, month, and year at 00:00:00.
The following command selects for encryption all files in the current
directory matching the wildcard file specification of *.COM that
expire after 00:00:00 15-APR-2009:
$ ENCRYPT/EXPIRED/SINCE=15-APR-2009 *.COM FRANCISSCOTT
Do not use the /EXPIRED qualifier with either the
/BACKUP or the /MODIFIED
qualifier.
9.2.4.7. /MODIFIED Qualifier
The /MODIFIED qualifier selects files for encryption
according to the dates on which they were last modified. This qualifier is
meaningful only when used with either the /BEFORE or the
/SINCE qualifier. The /MODIFIED
qualifier has the format:
/MODIFIED/BEFORE[=time]or
/MODIFIED/SINCE[=time]where
time is an OpenVMS time.
If you do not specify a time, TODAY is used. TODAY is the current day, month, and year at 00:00:00.
The following command selects for encryption all files in the current
directory matching the wildcard file specification of *.COM that
were modified after 00:00:00 15-APR-2009:
$ ENCRYPT/MODIFIED/SINCE=15-APR-2009 *.COM FRANCISSCOTT
Do not use the /MODIFIED qualifier with either the
/BACKUP or the /EXPIRED
qualifier.
9.2.4.8. /SINCE Qualifier
The /SINCE qualifier selects for encryption files that have
a creation date after the time specified with the qualifier. The
/SINCE qualifier has the format:
/SINCE[=time]where
time is an OpenVMS time.
If you do not specify a time, TODAY is used. TODAY is the current day, month, and year at 00:00:00.
The following command selects for encryption all files in the current
directory matching the wildcard file specification of *.COM that
were created after 00:00:00 15-APR-2009:
$ ENCRYPT/SINCE=15-APR-2009 *.COM FRANCISSCOTT
9.2.5. Deleting Encrypted Files
By default, when the ENCRYPT software encrypts an input file and writes the resulting output file, the input file is retained. However, do not encrypt a file and then leave the plaintext file online if you are concerned about the security of the file.
You can use the DCL DELETE command with the
/ERASE qualifier to remove the contents of the plaintext file
from the disk, or you can use the following qualifiers with the
ENCRYPT command:
/DELETE/ERASE
9.2.5.1. DELETE Qualifier
The /DELETE qualifier deletes the input file after the
encryption operation completes and the output file is written and closed. If you
have multiple versions of the input file, they are not all deleted.
/DELETE acts on only the version of the input file that
you encrypted.
To delete the unencrypted input file from the disk, use the
/DELETE qualifier. The following command specifies that
the SAVEDMAIL.MAI file be encrypted using the
TWENTYFIVECENTS encryption key. Because the
/DELETE qualifier is specified, the input file is deleted
after the encrypted output file is written:
$ ENCRYPT/DELETE SAVEDMAIL.MAI TWENTYFIVECENTS
Note
There may be scenarios when the ENCRYPT/COMPRESS
command executes without error, but decryption fails. This can be
catastrophic if the /DELETE qualifier is used, deleting
the original BACKUP save-set file during the encrypt operation. Therefore,
it is recommended not to use /DELETE qualifier along with
the /COMPRESS qualifier.
9.2.5.2. /ERASE Qualifier
When you delete or purge a file, the file's header record is destroyed so that
the file can no longer be accessed by normal means. The information in the file,
however, stays on the disk until it is overwritten. Disk scavenging is a
technique used to obtain such file data from a disk. To thwart disk scavenging,
use the /ERASE qualifier with the /DELETE
qualifier. When you specify /ERASE, the OpenVMS operating
system overwrites the location in which the input file was stored with the data
security pattern. The data no longer exists.
The following command specifies that after SAVEDMAIL.MAI is
encrypted, the input file is erased with the data security pattern before being
deleted:
$ ENCRYPT/DELETE/ERASE SAVEDMAIL.MAI TWENTYFIVECENTS
9.2.6. Encryption Algorithms
Files are encrypted using a randomly generated data key. One benefit of this procedure is that two files identical in plaintext form and encrypted with the same command are not identical in their encrypted form.
The Encryption for OpenVMS implementation of DES uses the following modes of the DES algorithm:
Cipher Block Chaining (DESCBC)
Electronic Code Book (DESECB)
Cipher Feedback (DESCFB)
These modes perform the encryption operation differently, as follows:
DESCBC (default)
Input is taken in 8-byte blocks.
DESCBC performs an exclusive OR operation (XOR) on each block. (An XOR is a bit-by-bit modulo-2 addition without carrying. For example, the result of performing an XOR on the binary numbers 001 and 111 is 110.)
The first XOR operation is performed on the first block of input and the initialization vector. (An initialization vector is used to start the chaining of data because there is no ciphertext to affect the encryption of the first block of data.)
The resulting block is encrypted.
The next XOR operation is performed on the resulting block of ciphertext and the next block of plaintext, and so on.
If fewer than 8 bytes are left for the last iteration, the block is padded with bytes of arbitrary value.
Each block of 8 bytes is encrypted under the same key value.
The DESCBC algorithm is used to encrypt the data key and the initialization vector. The encrypted key and initialization vector are stored with the encrypted file. The DESCBC algorithm is also used by default to encrypt the file data.
DESECB
Input is taken in 8-byte blocks.
If the input consists of less than 8 bytes, it is padded with nulls.
Each block is processed under the DES algorithm with the same key.
The result is an 8-byte block of output that is independent of all other blocks of output.
DESCFB
Input is taken as a series of 1-byte quantities.
They are shifted to the left and concatenated with the results of previous iterations.
DESCFB uses an initialization vector in the first iteration.
Only the exact number of bytes specified in the input are used.
The output byte count equals the input byte count (no padding).
AES algorithm uses the following modes:
Cipher block chaining:
AESCBC128 (default)
AESCBC192
AESCBC256
Electronic code book:
AESECB128
AESECB192
AESECB256
Cipher feedback:
AESCFB128
AESCFB192
AESCFB256
Output feedback:
AESOFB128
AESOFB192
AESOFB256
For details about the advantages of each mode, see one of the numerous texts available on this subject.
9.2.7. Encryption Algorithm Qualifiers
You can choose an encryption algorithm for encrypting either the data key or the file data. Figure 9.1, ''Relationship of Keys and Algorithms'' illustrates the relationship of encryption keys and algorithms. The figure shows that:
To encrypt the key — use the
/KEY_ALGORITHMor/KEY_ALGORITHM=AESmmmkkkqualifier to specify an algorithm other than the default DESCBC or AESCBC128 algorithms.To encrypt the file — use the
/DATA_ALGORITHMor/DATA_ALGORITHM=AESmmmkkkqualifier to specify an algorithm other than the default DESCBC or AESCBC128 algorithms.
Here, mmm indicates the mode CBC, ECB, CFB, or OFB; and kkk indicates 128, 192, or 256 bits.
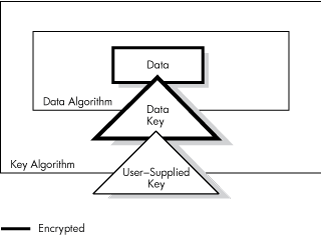
The qualifier you use affects the decryption procedure:
If you use the
/DATA_ALGORITHMqualifier to encrypt, you do not need to specify this algorithm when you decrypt.If you use the
/KEY_ALGORITHMqualifier to encrypt, you do need to specify this algorithm when you decrypt.
9.2.7.1. /KEY_ALGORITHM Qualifier
To specify an algorithm other than the default, to encrypt the key and
initialization vector, use the /KEY_ALGORITHM qualifier.
This qualifier has the format:
/KEY_ALGORITHM={DESCBC (default)|AESmmmkkkFor example, the following command uses the DESCFB algorithm with
the TWENTYFIVECENTS key to protect the data key and the
initialization vector:
$ ENCRYPT/KEY_ALGORITHM=DESCFB SAVEDMAIL.MAI TWENTYFIVECENTS
You can use /KEY_ALGORITHM=AES as a shortcut for specifying
AESCBC128. For example:
$ ENCRYPT file-name key-name /KEY_ALGORITHM=AES
9.2.7.2. /DATA_ALGORITHM Qualifier
To specify an algorithm for encrypting files other than the default, use the
/DATA_ALGORITHM qualifier. This qualifier has the
format:
/DATA_ALGORITHM={DESCBC (default)|AESmmmkkkFor example, the following command encrypts the SAVEDMAIL.MAI
file using the Cipher Feedback mode of the DES algorithm
(DESCFB):
$ ENCRYPT/DATA_ALGORITHM=DESCFB SAVEDMAIL.MAI TWENTYFIVECENTS
If you use the default value of DESCBC for the
/DATA_ALGORITHM qualifier when encrypting a file, this
qualifier is optional for decrypting the file.
You can use /DATA_ALGORITHM=AES as a shortcut for
specifying AESCBC128. For example:
$ ENCRYPT file-name key-name /KEY_ALGORITHM=AES /DATA_ALGORITHM=AES
9.2.8. Specifying AES Data Algorithm and AES Key Algorithm
To select an algorithm other than the DESCBC default when encrypting files,
ENCRYPT accepts the data and key algorithm qualifiers with the DCL
ENCRYPT command and the key algorithm qualifier with the
DECRYPT command.
When encrypting files with AES, specify both /DATA_
ALGORITHM=AESmmmkkk and
/KEY_ALGORITHM=AESmmmkkk:
mmm defines the AES mode: ECB, CBC, CFB, or OFB
kkk defines the key size: 128, 192, or 256 bits (for 16-, 24- or 32-byte keys)
The key must match the key algorithm. An AES key must be used with an AES key
algorithm, and a DES key must be used with the DES key algorithm. The data algorithm
defaults to DES if the /DATA_
ALGORITHM=AESmmmkkk qualifier is not specified
for the ENCRYPT command. When using DES keys and
/KEY_ALGORITHM=DES, the data is protected with a strong
algorithm, but the key is not.
Note
The capability of mixing AES with DES keys and data algorithms is disabled and any attempt to mix the algorithms results in an ENCRYPT$_AESMIXDES error condition.
When decrypting files with AES, specify only the /KEY_
ALGORITHM=AESmmmkkk qualifier. The reason for
this is that the key algorithm is used to decrypt the random-key record that
contains the random key, which is then used to decrypt the data records of the file.
Specifying the data algorithm is not necessary and it gives an
unrecognized-qualifier error message.
Note
For an encrypt operation, if the /DATA_ALGORITHM=AES is
specified without the /KEY_ALGORITHM, an error occurs. The
default algorithm DESCBC is used to encrypt the random key record that contains
the random key and file information. However, the user key must match the key
algorithm; if not, an error occurs. For example, consider that the key-name is
an AES key name and value. When the key is fetched from the logical name table
and then is decrypted with the DES master key, the key decrypts garbage, and the
operation fails with the following error message:
%STR-F-FATINTERR, fatal internal error
9.2.9. File Compression
To reduce the size of the plaintext file before encrypting it, use the
/COMPRESS qualifier. Data compression can save media space
when physically transporting encrypted files and can save time when electronically
transporting encrypted files across a network.
Compression efficiency depends on the structure of the data in your file. Evaluate
a performance tradeoff when deciding whether or not to use this qualifier.
Decryption is generally faster on a compressed file, but encryption takes longer.
You might choose to use the /COMPRESS qualifier when the
following conditions apply:
The file will be decrypted many times.
The file is at least 200 disk blocks in size.
The following command compresses the SAVEDMAIL.MAI file before
encrypting it:
$ ENCRYPT/COMPRESS SAVEDMAIL.MAI TWENTYFIVECENTS
If you use the /COMPRESS qualifier when encrypting a file, you
need not specify this qualifier when decrypting the file. If necessary, the file is
automatically decompressed when it is decrypted.
Note
Do not use /DELETE qualifier with
/COMPRESS because there may be scenarios when the
ENCRYPT/COMPRESS command executes without error, but
decryption fails. This can be catastrophic if the /DELETE
qualifier is used, deleting the original BACKUP save-set file during the encrypt
operation.
9.2.10. Displaying the Version Number
To identify the version of Encryption software running on your system, use the
/VERSION qualifier. For example:
$ ENCRYPT/VERSION Copyright (c) Compaq 2001, Digital Equipment Corporation. 1978, 1997. All rights reserved. Compaq Encryption V1.6)
9.3. Authenticating Files
Authentication is the checking of files to determine whether or not they have been modified.
The ENCRYPT/AUTHENTICATE command detects any modification of either
plaintext or ciphertext files. The software calculates a Message Authentication Code
(MAC) based on the contents of the files and associates it with one or more files. An
additional MAC is created that is based on security settings unless you specifically
request that the security MAC not be created. At a later time, when you want to check
file integrity, the software recalculates the MACs and then compares the current and
stored MACs. Before you use the ENCRYPT/AUTHENTICATE command,
complete the process that associates MACs with files.
Note
AES (Advanced Encryption Standard) is not supported with
/AUTHENTICATE qualifier.
The ENCRYPT/AUTHENTICATE command has the following syntax:
$ ENCRYPT/AUTHENTICATE file-spec key-name [qualifiers]
where
| file-spec | is the name of the file you want to check. |
| key-name | is the name of the key. Specify a 1-to-243-character string. |
| qualifiers | are options that control the encryption process or the selection of files you want to encrypt. |
A summary report on the authentication operation is displayed on SYS$OUTPUT.
The following qualifiers are valid with
ENCRYPT/AUTHENTICATE:
/[NO]DATABASE[=file-spec]Specifies a file in which to store binary MAC values created by using the file contents as input
/LOGDisplays the results of the authentication operation for each file
/MULTIPLE_FILESIndicates that the file-spec parameter represents a list of file names to be checked
/[NO]OUTPUT[=file-spec]Specifies a file in which to store readable MAC values
/[NO]SECURITY[=file-spec]Generates a MAC using the file's security settings: owner, protection settings, and optional ACL, and specifies the file in which to store the binary MAC values
/[NO]UPDATEAssociates new MAC values with one or more files
In addition, you can use all the file selection qualifiers available to the
ENCRYPT command: /BACKUP,
/BEFORE, /BY_OWNER,
/CONFIRM, /EXCLUDE,
/EXPIRED, /MODIFIED, and
/SINCE.
The following sections describe how to use the /DATABASE,
/LOG, /SECURITY, /OUTPUT,
and /UPDATE qualifiers with
ENCRYPT/AUTHENTICATE.
9.3.1. Associating MACs with Files
To associate MACs with a file or to replace former MAC values with new MAC values,
use the /UPDATE qualifier. The /UPDATE
qualifier updates two different MACs created from file contents and from security
settings. The following command creates MAC values for all files in the current
directory:
$ ENCRYPT/AUTHENTICATE *.* whitehen /UPDATE %ENCRYPT-I-SUMMARY1, Summary: Files successfully authenticated: 0 %ENCRYPT-I-SUMMARY2, Files failing authentication: 0 %ENCRYPT-I-SUMMARY3, Files not in database: 3 %ENCRYPT-I-SECSUMM1, Summary: Security settings authenticated: 0 %ENCRYPT-I-SECSUMM2, Security settings failing authentication: 0 %ENCRYPT-I-SECSUMM3, Security settings not in database: 3
Two sets of summary information are displayed: the first set applies to the MAC values generated from the file contents, and the second set applies to the MAC values generated from the security settings. Because this is the first time MACs are associated with these files, none are reported as authenticated (summary message 1 for each set) or as having failed authentication (summary message 2 for each set). The last message in each set reports that no previous MACs were associated with these files.
The MACs are stored in a binary database. Therefore, you cannot specify
/NODATABASE or /NOSECURITY with
/UPDATE.
9.3.2. Checking Files
With no other qualifiers, the ENCRYPT/AUTHENTICATE command
compares previous MACs with current MACs. In addition, the software reports on files
with no currently associated MACs.
The following command reports on the status of all the files in the current directory:
$ ENCRYPT/AUTHENTICATE *.* whitehen %ENCRYPT-I-NOUPDATE, database will not be updated with new authentication codes %ENCRYPT-I-SUMMARY1, Summary: Files successfully authenticated: 3 %ENCRYPT-I-SUMMARY2, Files failing authentication: 0 %ENCRYPT-I-SUMMARY3, Files not in database: 0 %ENCYRPT-I-SECSUMM1, Summary: Security settings authenticated: 3 %ENCYRPT-I-SECSUMM2, Security settings failing authenticated: 0 %ENCYRPT-I-SECSUMM3, Security settings not in database:0
9.3.3. Specifying a File for MACs Generated from File Contents
A database file stores MAC values in binary format. By default, binary MAC values
created from the file contents are stored in
SYS$LOGIN:ENCRYPT$MAC.DAT. You can use the
/DATABASE qualifier to store the MAC values in an alternate
file.
The following command selects an alternate file in which to store the MAC values:
$ ENCRYPT/AUTHENTICATE *.com whitehen /DATABASE=[MACS]MACCHECK.DAT /UPDATE %ENCRYPT-I-NEWDB, New authentication code database has been created %ENCRYPT-I-SUMMARY1, Summary: Files successfully authenticated: 0 %ENCRYPT-I-SUMMARY2, Files failing authentication: 0 %ENCRYPT-I-SUMMARY3, Files not in database: 6
When you specify /NODATABASE, the MAC values are not stored.
The next time you use the ENCRYPT/AUTHENTICATE command, the files
are treated as new since there are no current MAC values to check.
9.3.4. Specifying a Security MAC File
MAC entries based on security settings are automatically generated and stored in a
security database when the /UPDATE qualifier is used. If you do
not want to generate a MAC value based on security settings, use the
/NOSECURITY qualifier on the
ENCRYPT/AUTHENTICATE command line.
The entries in the security database are generated by using the security settings:
owner, protection settings, and an ACL if one is associated with the file. By
default, security MAC values are stored in the database
ENCRYPT$SEC.DAT. You can use the
/SECURITY qualifier to store security MAC values in an
alternate file.
The following command selects an alternate file in which to store security MAC values:
$ ENCRYPT/AUTHENTICATE *.com seveneleven /SECURITY=SECURITYMAC.DAT /UPDATE %ENCYRPT-I-NEWSECDB, New authentication security settings database has been created %ENCRYPT-I-SUMMARY1, Summary: Files successfully authenticated: 0 %ENCRYPT-I-SUMMARY2, Files failing authentication: 0 %ENCRYPT-I-SUMMARY3, Files not in database: 3 %ENCRYPT-I-SECSUMM1, Summary: Security settings authenticated: 0 %ENCRYPT-I-SECSUMM2, Security settings failing authentication: 0 %ENCRYPT-I-SECSUMM3, Security settings not in database: 3
9.3.5. Specifying a Listing File
In addition to a binary MAC database, Encryption stores MAC values and status information in readable form. By default, readable MAC values are stored in SYS$LOGIN:ENCRYPT$MAC.LIS.
To store readable values in an alternate file, use the /OUTPUT
qualifier. The file extension defaults to .LIS. For
example, this command specifies SYS$LOGIN:08MAC.LIS as the
listing file:
$ ENCRYPT/AUTHENTICATE *.* whitehen /OUTPUT=08MAC %ENCRYPT-I-NOUPDATE, database will not be updated with new authentication codes %ENCRYPT-I-SUMMARY1, Summary: Files successfully authenticated: 6 %ENCRYPT-I-SUMMARY2, Files failing authentication: 0 %ENCRYPT-I-SUMMARY3, Files not in database: 0
To display the listing on SYS$OUTPUT, enter the following command:
$ TYPE 08MAC.LIS
File Integrity Report 22-APR-2009 10:50:22.62 Compaq Encryption V1.6 Page 1
Authentication database: DISK_1:[000000.SCRATCH]ENCRYPT$MAC.DAT;1
File name Stored MAC Current MAC Status
================================== ================= =========== ======
DISK_1[SCRATCH]EXAMPLE.FILE;1 90E70CB4E8E96BBF (same)
owner: [1,1] prot: (RWED, RWED, RWED, )
DISK_1[SCRATCH]PICTURE.SLS;1 FCAD115A72E7934A (same)
owner: [1,1] prot: (RWED, RWED, RWED, )
DISK_1[SCRATCH]RELEASE.TXT;1 11375BD8D504ABB3 (same)
owner: [1,1] prot: (RWED, RWED, RWED, )
DISK_1[SCRATCH]RELEASE_NOTES.PS;3 2632027C133A8B5F (same)
owner: [1,1] prot: (RWED, RWED, RWED, )
DISK_1[SCRATCH]SCHEDULE.LIST;3 852D440358FBFF95 (same)
owner: [1,1] prot: (RWED, RWED, RWED, )
DISK_1[SCRATCH]WATCH_MAIL.COM;5 B75D00EC4991662C (same)
owner: [1,1] prot: (RWED, RWED, RWED, )
Summary: Files successfully authenticated: 6
Files failing authentication: 0
Files not in database: 0
Summary: Security settings authenticated: 6
Security settings failing authentication: 0
Security settings not in database: 0To suppress the creation of this listing, use the /NOOUTPUT
qualifier.
9.3.6. Logging the Authentication Operation
To display the results of the authentication operation on each file, use the
/LOG qualifier. For example, the following command displays
the results of each file authentication on your terminal screen:
$ ENCRYPT/AUTHENTICATE/LOG *.* whitehen %ENCRYPT-I-NOUPDATE, database will not be updated with new authentication codes %ENCRYPT-S-AUTHMATCH, File DISK_1:[SCRATCH]EXAMPLE.TXT;1 successfully authenticated %ENCRYPT-S-SECAUTHMATCH, Security settings for DISK_1:[SCRATCH]EXAMPLE.TXT successfully authenticated %ENCRYPT-S-AUTHMATCH, File DISK_1:[SCRATCH]TEST.TXT;1 successfully authenticated. %ENCRYPT-S-SECAUTHMATCH, Security settings for DISK_1:[SCRATCH]TEST.TXT successfully authenticated %ENCRYPT-S-AUTHMATCH, File DISK_1:[SCRATCH]RELEASE.TXT;2 successfully authenticated. %ENCRYPT-S-SECAUTHMATCH, Security settings for DISK_1:[SCRATCH]RELEASE.TXT successfully authenticated %ENCRYPT-I-SUMMARY1, Summary: Files successfully authenticated: 6 %ENCRYPT-I-SUMMARY2, Files failing authentication:0 %ENCRYPT-I-SUMMARY3, Files not in database:0 %ENCRYPT-I-SECSUMM1, Summary: Security settings authenticated: 6 %ENCRYPT-I-SECSUMM2, Security settings failing authentication:0 %ENCRYPT-I-SECSUMM3, Security settings not in database:0
9.4. Deleting Key Definitions
When a key outlives its usefulness, delete it from a key storage table. Enter the
ENCRYPT/REMOVE_KEY command and specify the name under which the
encrypted key value was stored in the key table. The key name is the character string
previously defined with an ENCRYPT/CREATE_KEY command.
The ENCRYPT/REMOVE_KEY command has the following format:
$ ENCRYPT/REMOVE_KEY key-name [qualifiers]
By default, the ENCRYPT/REMOVE_KEY command deletes the key
definition from the process key storage table. Logging out a process also removes a key
definition from the process key storage table.
To remove a key definition from the job, group, or system storage table, specify the
/JOB, /GROUP, or /SYSTEM
qualifier with the ENCRYPT/REMOVE_KEY command. Just as you need
privileges to create group or system keys, you need privileges to delete them.
For example, the following command deletes the HAMLET key from the system
key storage table:
$ DECRYPT/REMOVE_KEY HAMLET /SYSTEM
To verify key removal, use the /LOG qualifier with the
ENCRYPT/REMOVE_KEY command. The following command reports that
the key HAMLET is removed:
$ ENCRYPT/REMOVE_KEY HAMLET /SYSTEM/LOG %ENCRYPT-S-KEYDEL, key deleted for key name = HAMLET
9.5. Decrypting Files
To gain access to the data in an encrypted file, decrypt the file using the
DECRYPT command. Follow these steps:
Specify the same key used to encrypt the file.
See if you need to redefine the key using the
ENCRYPT/CREATE_KEYcommand. For example, if the key was in the process key storage table and the process logged out, the key is no longer defined.Specify the algorithm with the
/KEY_ALGORITHMqualifier, if you did not encrypt the file with the default algorithm.
$ DECRYPT file-spec key-name [qualifiers]
where
| file-spec | is the name of the file. |
| key-name | is the name of the key. |
| qualifiers | are options that control the decryption process or the selection of files you want to decrypt. |
See the following example:
$ ENCRYPT/CREATE_KEY/AES MY_AES_KEY16 "My AES Key length>16" $ ENCRYPT testfile.txt MY_AES_KEY16 /DATA_ALGORITHM=AESCBC128 /KEY_ALGORITHM=AESCBC128 $ DECRYPT testfile.txt MY_AES_KEY16 /KEY_ALGORITHM=AESCBC128 $! $ ENCRYPT/CREATE_KEY/AES MY_AES_KEY24 "TEST My AES Key length>24" $ ENCRYPT testfile.txt MY_AES_KEY24 /DATA_ALGORITHM=AESCBC192 /KEY_ALGORITHM=AESCBC192 $ DECRYPT testfile.txt MY_AES_KEY24 /KEY_ALGORITHM=AESCBC192 $! $ ENCRYPT/CREATE_KEY/AES MY_AES_KEY32 "TEST TEST TEST My AES Key length>32" $ ENCRYPT testfile.txt MY_AES_KEY32 /DATA_ALGORITHM=AESCBC256 /KEY_ALGORITHM=AESCBC256 $ DECRYPT testfile.txt MY_AES_KEY32 /KEY_ALGORITHM=AESCBC256 $! $ ENCRYPT/CREATE_KEY MY_DES_KEY "This is My DES Key" $ ENCRYPT testfile.txt MY_DES_KEY $ DECRYPT testfile.txt MY_DES_KEY
9.5.1. Input File Specification
For the ciphertext file, which is the file to be decrypted, specify a file that resides on disk and that is not a directory file.
To specify multiple input files to the DECRYPT command, use
wildcard characters in the file specification. To control file selection, specify
the appropriate DECRYPT command qualifiers. Do not use wildcard
characters to specify directory files or files containing bad blocks.
9.5.2. Output File Specification
The result of the decryption operation is a plaintext file. One plaintext file is
created for each input file that is decrypted. By default, the
DECRYPT command writes each plaintext file to a separate
output file with a file specification that defaults to the input file specification
with a version number that is one higher than that of the input file.
You can specify an alternate output file specification with the
/OUTPUT qualifier. When specifying the
/OUTPUT qualifier, you specify those parts of the file
specification that you want to be different from the defaults. You do not need to
specify an entire file specification; any fields omitted in the file specification
default to the input file specification.
For example, the following DCL command selects for decryption all files in the
current directory matching the wildcard file specification of *.ENC.
The /OUTPUT qualifier specifies that any output files created
have a file type of COM:
$ DECRYPT *.ENC/OUTPUT=.COM FRANCISSCOTT
9.5.3. Displaying Processing Information
By default, information about the decryption operation is not displayed on
SYS$COMMAND. To display this information, use the
/SHOW qualifier. The /SHOW qualifier has
the format:
/SHOW=keywordor
/SHOW=keyword-listSpecify one or more of the following keywords:
FILES
STATISTICS
9.5.3.1. FILES Keyword
Use the FILES keyword to display the input and output file specifications as
decryption proceeds. For example, /SHOW=FILES in the
following command specifies that each input and output file specification be
displayed as it is decrypted:
$ DECRYPT/SHOW=FILES *.COM FRANCISSCOTT %ENCRYPT-S-DECRYPTED, DISK2:[FLYNN]MOVE.COM.3 decrypted to DISK2:[FLYNN]MOVE.COM;4 (8 blocks) . . .
9.5.3.2. STATISTICS Keyword
Use the STATISTICS keyword to display encryption stream statistics after the completion of each file decryption operation. The statistics displayed are:
Bytes processed
Internal records processed
CPU time consumed within the encryption algorithm
The following command specifies that the decryption stream statistics be displayed on SYS$COMMAND:
$ DECRYPT/SHOW=STATISTICS *.COM FRANCISSCOTT
%ENCRYPT-S-STATISTICS, encryption stream statistics:
Total Records: 65
Total Bytes: 4083
Total Time: 00:00:00:01.63
.
.
.9.5.4. Specifying Files to Decrypt
You can use the DECRYPT command to specify multiple input files
by using wildcard characters in the input file specification. The command also
provides the following qualifiers for selecting files:
/BACKUP/BEFORE/BY_OWNER/CONFIRM/EXCLUDE/EXPIRED/MODIFIED/SINCE
The following sections describe these qualifiers.
9.5.4.1. /BACKUP Qualifier
The /BACKUP qualifier selects files for decryption
according to the date of their most recent backup. This qualifier is meaningful
only when used with either the /BEFORE or the
/SINCE qualifier. The /BACKUP
qualifier has the format:
/BACKUP/BEFORE[=time]or
/BACKUP/SINCE[=time]where
time is an OpenVMS time.
If you do not specify a time, TODAY is used. TODAY is the current day, month, and year at 00:00:00.
The following command selects for decryption all files in the current
directory matching the wildcard file specification of *.COM that
had backup copies made before 00:00:00 15-APR-2009:
$ DECRYPT/BACKUP/BEFORE=15-APR-2009 *.COM FRANCISSCOTT
Do not use the /BACKUP qualifier with either the
/EXPIRED or the /MODIFIED
qualifier.
9.5.4.2. /BEFORE Qualifier
The /BEFORE qualifier selects files for decryption that
have a creation date before the time specified with the qualifier. The
/BEFORE qualifier has the format:
/BEFORE[=time]where
time is an OpenVMS time.
If you do not specify a time, TODAY is used. TODAY is the current day, month, and year at 00:00:00.
The following command selects for decryption all files in the current
directory matching the wildcard file specification of *.COM that
were created before 00:00:00 15-APR-2009:
$ DECRYPT/BEFORE=15-APR-2009 *.COM FRANCISSCOTT
9.5.4.3. /BY_OWNER Qualifier
Use the /BY_OWNER qualifier to select files for decryption
that have a particular owner User Identification Code (UIC). If no UIC is
specified with the qualifier, the UIC of the current process is used. The
/BY_OWNER qualifier has the format:
BY_OWNER=uicwhere
uic is the UIC of the owner of the file.
9.5.4.4. /CONFIRM Qualifier
By default, all input files specified on the command line are processed
without confirming that each file is selected for decryption. Use the
/CONFIRM qualifier if you want a prompt with the name of
each file selected for decryption. Your response controls whether or not a
particular file is decrypted.
You can choose any of the following responses:
| Response | Meaning |
|---|---|
| YES | Decrypt the file. |
| NO or Return | Do not decrypt the file. This is the default. |
| QUIT or Ctrl/Z | Do not decrypt the file or any subsequent files. |
| ALL | Decrypt the file and all subsequent files. |
The following command selects all files in the current directory matching the
wildcard file specification of *.COM for decryption. Because the
/CONFIRM qualifier is specified, the user is prompted on
a file-by-file basis to confirm that each file is to be decrypted. Because the
prompt is answered in the affirmative for the file MOVE.COM;3, the
output file MOVE.COM;4 is created:
$ DECRYPT/CONFIRM *.COM FRANCISSCOTT Decrypt DISK2:[FLYNN]MOVE.COM;3 ? [N] YES
9.5.4.5. /EXCLUDE Qualifier
Use the /EXCLUDE qualifier to exclude one or more files
from a decryption operation. If a file matches the file specification provided
with the qualifier, the file is not decrypted. The /EXCLUDE
qualifier has the format:
/EXCLUDE=((file-spec)[,...])where
file-spec is the file specification of the file to remain encrypted.
When specifying only one file, you can omit the parentheses. Wildcard
characters are allowed in the file specification. With the
/EXCLUDE qualifier, there is no default for the file
specification.
Since directory files are never encrypted, you need not specify them with the
/EXCLUDE qualifier. However, if you do specify
/EXCLUDE=*.DIR, you will not get the following warning
message
%ENCRYPT-W-FILNODIR, file encryption of directories is not supported, filename.dir.
The following command selects for decryption all files in the current
directory that match the wildcard file specification of *.COM,
except LOGIN.COM, which is specified with
/EXCLUDE:
$ DECRYPT/EXCLUDE=LOGIN.COM *.COM FRANCISSCOTT
9.5.4.6. /EXPIRED Qualifier
The /EXPIRED qualifier selects files for decryption
according to the dates on which they expire. (The expiration date is set with
the SET FILE/EXPIRATION_DATE command.) This qualifier is
meaningful only when used with either the /BEFORE or the
/SINCE qualifier. The /EXPIRED
qualifier has the format:
/EXPIRED/BEFORE[=time]or
/EXPIRED/SINCE[=time]where
time is an OpenVMS time.
If you do not specify a time, TODAY is used. TODAY is the current day, month, and year at 00:00:00.
The following command selects for decryption all files in the current
directory matching the wildcard file specification of *.COM that
expire after 00:00:00 15-APR-2009:
$ DECRYPT/EXPIRED/SINCE=15-APR-2009 *.COM FRANCISSCOTT
Do not use the /EXPIRED qualifier with either the
/BACKUP or the /MODIFIED
qualifier.
9.5.4.7. /MODIFIED Qualifier
The /MODIFIED qualifier selects files for decryption
according to the dates on which they were last modified. This qualifier is
meaningful only when used with either the /BEFORE or the
/SINCE qualifier. The /MODIFIED
qualifier has the format:
/MODIFIED /BEFORE[=time]or
/MODIFIED /SINCE[=time]where
time is an OpenVMS time.
If you do not specify a time, TODAY is used. TODAY is the current day, month, and year at 00:00:00.
The following command selects for decryption all files in the current
directory matching the wildcard file specification of *.COM that
were modified after 00:00:00 15-APR-2009:
$ DECRYPT/MODIFIED/SINCE=15-APR-2009 *.COM FRANCISSCOTT
Do not use the /MODIFIED qualifier with either the
/BACKUP or the /EXPIRE
qualifier.
9.5.4.8. /SINCE Qualifier
The /SINCE qualifier selects files for decryption that have
a creation date after the time specified with the qualifier. The
/SINCE qualifier has the format:
/SINCE[=(time)]where
time is an OpenVMS time.
If you do not specify a time, TODAY is used. TODAY is the current day, month, and year at 00:00:00.
The following command selects for decryption all files in the current
directory matching the wildcard file specification of *.COM that
were created after 00:00:00 15-APR-2009:
$ DECRYPT/SINCE=15-APR-2009 *.COM FRANCISSCOTT
9.5.5. Deleting Decrypted Files
By default, the input file is retained after a file is decrypted and written to the resulting output file. To save space, after you have decrypted a file, you may want to remove the encrypted file from your disk.
You can use the DCL DELETE command with the
/ERASE qualifier to remove the contents of the file from the
disk, or you can use the /DELETE and /ERASE
qualifiers with the DECRYPT command.
9.5.5.1. /DELETE Qualifier
The /DELETE qualifier deletes the input file after the
decryption operation completes and the output file is written and closed. If you
have multiple versions of the input file, they are not all deleted.
/DELETE acts on only the version of the input file that
you encrypted.
The following command specifies that the SAVEDMAIL.MAI file be
decrypted using the TWENTYFIVECENTS encryption key. Because the
/DELETE qualifier is specified, the input file is deleted
after the output file is written:
$ DECRYPT/DELETE SAVEDMAIL.MAI TWENTYFIVECENTS
9.5.5.2. /ERASE Qualifier
To prevent disk scavenging, use the /ERASE qualifier with
the /DELETE qualifier. For example, the following command
decrypts the SAVEDMAIL.MAI file using the
TWENTYFIVECENTS encryption key, erases the input file with the
data security pattern, and deletes the file:
$ DECRYPT/DELETE/ERASE SAVEDMAIL.MAI TWENTYFIVECENTS
With the following command, the SAVEDMAIL.MAI file is decrypted
using the TWENTYFIVECENTS encryption key, but the input file is not
erased with the data security pattern before being deleted:
$ DECRYPT/DELETE/NOERASE SAVEDMAIL.MAI TWENTYFIVECENTS
9.5.6. Algorithm Qualifiers
The algorithm qualifier you use to encrypt determines the correct decryption procedure:
If you use the
/DATA_ALGORITHMqualifier to encrypt, do not specify this algorithm when you decrypt.If you use the
/KEY_ALGORITHMqualifier to encrypt, specify this algorithm when you decrypt.
The /KEY_ALGORITHM qualifier has the format:
/KEY_ALGORITHM=(algorithm)where
algorithm is one of the following values:
DESCBC (the default)
DESECB
DESCFB
For example, if SAVEDMAIL.MAI is encrypted with
/KEY_ALGORITHM=DESCFB, decrypt the file with the same
/KEY_ALGORITHM=DESCFB qualifier, as follows:
$ ENCRYPT/KEY_ALGORITHM=DESCFB SAVEDMAIL.MAI TWENTYFIVECENTS $ DECRYPT/KEY_ALGORITHM=DESCFB SAVEDMAIL.MAI TWENTYFIVECENTS
9.6. Encrypting Save Sets
The OpenVMS BACKUP utility provides protection against file or volume corruption by
creating functionally equivalent backup copies. Files created by BACKUP are called
save sets and are written in BACKUP format so
that only BACKUP can interpret the data in a save set. When you create save sets, you
can also encrypt them by using the BACKUP/ENCRYPT command.
Note
Standalone BACKUP, which is a version of the BACKUP utility that runs without the
support of the OpenVMS operating system, does not support the
/ENCRYPT qualifier.
The BACKUP/ENCRYPT command requires a key. All the files in the
save set are encrypted under the same key. When you use the /ENCRYPT
qualifier to specify a write operation for an encrypted save set, the BACKUP utility
creates a key by generating a 16-byte random number from the time of day and other
transient data. To make this random number even more random, BACKUP encrypts this
16-byte value once using itself as a key with the DESCBC algorithm. The first eight
bytes of the result are used as the encrypting key for the save set, and the second
eight bytes are used as the initialization vector for the context area.
One benefit of this procedure is that two save sets created with the same command from the same set of files are not identical in their encrypted form.
You can override the system-generated encrypting key and initialization vector by issuing either of the following commands:
ENCRYPT/CREATE_KEYBACKUP/ENCRYPT=(VALUE=key-value)
For greater security, specify the /ENCRYPT qualifier with no
parameters. The software prompts you for a key value. When you enter it, the software
does not echo what you type and, for verification, prompts you to retype the
value.
If you define a key with the ENCRYPT/CREATE_KEY command, specify
that key name on the BACKUP command line with the
/ENCRYPT=(NAME=(key-name))
qualifier.
By default, BACKUP encrypts save set data using the DESCBC algorithm. The key and algorithm you specify to override the defaults are used to encrypt only the data key and the initialization vector.
BACKUP places the result of the encryption operation in the save set as a BACKUP attribute subrecord of the BACKUP summary record. At the time of a save set restore or listing operation, BACKUP uses the system-generated key or the key you supplied to decrypt the data key and the initialization vector value.
The BACKUP command qualifier /SAVE_SET is both
an input save set qualifier and an output save set qualifier, as follows:
When you specify the
/SAVE_SETand/ENCYRPTqualifiers with an output save set specification, BACKUP writes file data (including file names and attributes) in an encrypted form into the save set.When you specify
/SAVE_SETwith an input save set specification, BACKUP uses the decryption key specified to access the file name, attributes, and data from the save set records. The ENCRYPT option decrypts the data files after BACKUP reads the data files from the save set medium and processes them according to the remaining qualifiers of theBACKUPcommand.
The following example creates an encrypted BACKUP file of the default directory, as follows:
$ ENCRYPT/CREATE_KEY SANFRANCISCO "A city set on a hill cannot be hid" $ BACKUP/ENCRYPT=(NAME=SANFRANCISCO) * MKA600:28JULSAVE.BCK /SAVE_SET
ENCRYPT/CREATE_KEYdefines a key,SANFRANCISCO, with this value:A city set on a hill cannot be hid.BACKUP /ENCRYPTsaves all the files in the default directory in a save set named28JULSAVE.BCKand encrypts the save set.On device
MKA600:, the data used to encrypt the file names, attributes, and all the other file data are encrypted with the default encryption algorithm DESCBC. The process uses the key defined asSANFRANCISCO.
The following example creates a save set of the latest version of all the files on a
disk. The save set is encrypted using the DESCFB algorithm and the key
value Make peace:
$ BACKUP/ENCRYPT=(VALUE="Make peace",ALGORITHM=DESCFB) *.* 28JULSAVE - _$ /SAVE_SET
9.6.1. Restoring Files
When you encrypt a save set, BACKUP does not store the information within the save
set. Consequently, to decrypt an encrypted save set, specify
/ENCRYPT with the RESTORE command so that
BACKUP searches for the data encryption control record.
If you restore an unencrypted save set and mistakenly specify
/ENCRYPT, BACKUP ignores the incorrect qualifier. If you try
to restore an encrypted saveset without the /ENCYRPT qualifier or
with a key name, you get the error message:
%BACKUP-F-ENCSAVSET, save set is encrypted, /ENCRYPT must be specified
The following commands restore file SALARY.DAT from a save set
created with a BACKUP/ENCRYPT command:
$ ENCRYPT/CREATE_KEY CASTERBRIDGE "And all her shining keys" $ BACKUP/ENCRYPT=(NAME=CASTERBRIDGE) _$ From: MKA600:28JULSAVE.BCK /SELECT=SALARY.DAT _$ To: SALARY28J.DAT
BACKUP tries to decrypt an encrypted save set by:
Decrypting the encryption data that was saved in an attribute subrecord.
Comparing a 32-bit checksum of the decrypted data key with the stored value.
If there is a match, BACKUP assumes the data key is valid and restores the save set.
If BACKUP finds a mismatch, which is likely if the data key or algorithm you specified in the BACKUP command is incorrect, the utility displays:
%BACKUP-F-ENCKEYMAT, the supplied decryption key does not yield a readable save set
9.6.2. Encrypting Distribution Files
The BACKUP/ENCRYPT command can create a distribution disc that
is useful only to a customer who has the key used to encrypt the save sets in the
distribution kit.
In the following example, three keys are defined with
ENCRYPT/CREATE_KEY commands. With each of these keys, a
software distribution disc is created with each product encrypted into its
respective save set under a unique key:
$ ENCRYPT/CREATE_KEY SDXKEY "SDX V9.0 kit 99804034671838302" $ BACKUP /ENCRYPT=(NAME=SDXKEY) /REWIND - _From: MASTER:[SDXKIT]*.* MKA600:SDXKIT /SAVE_SET $ ENCRYPT/CREATE_KEY RQPKEY "RQP V4.5 kit FWTEBCJDITROEMMKAZXRYTC" $ BACKUP /ENCRYPT=(NAME=RQPKEY) - _From: MASTER:[RQPKIT]*.* MKA600:RQPKIT /SAVE_SET $ ENCRYPT/CREATE_KEY WOLKEY "WOL V2.0 kit 28374UEJDTLHGD84JF849SK95KD0" $ BACKUP /ENCRYPT=(NAME=WOLKEY) - _From: MASTER:[WOLKIT]*.* MKA600:WOLKIT /SAVE_SET
The resulting save sets can be restored on a customer's system only if the customer has received the appropriate key by licensing arrangement.
For example, the following commands restore save set WOLKIT:
$ ENCRYPT/CREATE_KEY WOLKEY "WOL V2.0 kit 28374UEJDTLHGD84JF849SK95KD0" $ BACKUP/ENCRYPT=(NAME=WOLKEY) MKA600:WOLKIT /SAVE_SET SYSTEM:[RQPKIT]*.*
In the following example, the save set SDXKIT is restored without
typing the key name and key value on the command line. Instead, the
BACKUP/ENCRYPT command prompts for this information, which is
not echoed on your screen:
$ BACKUP/ENCRYPT/REWIND MKA600:SDXKIT /SAVE_SET SYSTEM:[SDXKIT]*.* Enter Key Value: (input not echoed) Verify: (input not echoed)
Chapter 10. Security Auditing
This chapter describes how to use and manage the OpenVMS auditing system. It explains how you can monitor security-relevant activity on your system by recording events as they occur on the system and subsequently analyzing this audit log.
10.1. Overview of the Auditing Process
Auditing is the recording of security-relevant activity as it occurs on the system and the subsequent analysis of this audit log. With auditing, you can monitor users' activity on the system and, if necessary, reconstruct events leading up to attempts to compromise the security of your system. Thus, it is not as much a method of protecting the system and its data as a method of analyzing and recording system use.
Anything that has to do with a user's access to the system or to a protected object within the system is considered a security-relevant activity. Such activities are called events. Typical events include the following:
Logins, logouts, or login failures
Changes to the authorization database
Access to a protected object, such as a file, device, or global section
Changes in privileges or the security attributes of protected objects
The operating system can record both successful and unsuccessful events. Sometimes the unsuccessful can be more revealing. For example, it is less important to record that a programmer displayed a file to which he had access than that the same programmer tried to but was prevented from displaying a protected file.
The event message itself can be written to two places: an audit log file or an operator terminal that is enabled to receive security class messages. As Example 10.1, ''Sample Alarm Message'' shows, a message contains the following data:
Date and time of the message
Type of event
Date and time the event occurred
The process identification (PID) of the user who caused the event
Additional information in auditing messages is specific to the type of event. See Example 10.1, ''Sample Alarm Message'' for examples of different messages.
%%%%%%%%%%% OPCOM 25-JUL-2008 16:07:09.20 %%%%%%%%%%% Message from user AUDIT$SERVER on GILMORE Security alarm (SECURITY) on GILMORE, system id: 20300 Auditable event: Process suspended ($SUSPND) Event time: 25-JUL-2008 16:07:08.77 PID: 30C00119 Process name: Hobbit Username: HUBERT Process owner: [LEGAL,HUBERT] Terminal name: RTA1: Image name: $99$DUA0:[SYS0.SYSCOMMON.][SYSEXE]SET.EXE Status: %SYSTEM-S-NORMAL, normal successful completion Target PID: 30C00126 Target process name: SMISERVER Target username: SYSTEM Target process owner: [SYSTEM]
10.2. Reporting Security-Relevant Events
Beyond a certain set of default reporting (see Table 10.1, ''Event Classes Audited by Default''), the kind of security event information you receive depends on the kind of information you select from a long list of possible events. This section explains how to enable the reporting of security event information. Specifically, it discusses the following topics:
Ways to generate event messages
Types of events the system can report
Sources of event information
10.2.1. Ways to Generate Audit Information
Whenever you install or upgrade your system, the OpenVMS operating system automatically audits a limited number of events. These event categories, which are shown in Table 10.1, ''Event Classes Audited by Default'', represent major changes in the security of your system. Depending on your site's requirements, you may want to enable other forms of reporting.
You can have the operating system report on security-related activity in three different ways:
By enabling a category of events for auditing. For example, all login failures or all changes to system parameters can be reported.
By attaching an access control entry (ACE) to a protected object. For example, any time a user modifies a particular file, a message can be generated.
By modifying a user's authorization record so the system audits all operations performed from the account.
10.2.1.1. Auditing Categories of Activity
Security-relevant events are divided into a number of categories called
event classes. The operating system audits
several event classes by default (see Table 10.1, ''Event Classes Audited by Default''). If the security requirements at your site justify
additional auditing, you enable security auditing for additional event classes
by using the DCL command SET AUDIT.
To enable auditing for different event classes, use the following command format:
$ SET AUDIT/ENABLE=event-class[,...] {/ALARM | /AUDIT}The command requires two qualifiers to enable events:
The
/ENABLEqualifier defines the event classes you want audited. See Table 10.3, ''Kinds of Security Events the System Can Report'' for a list of event classes.The
/AUDITqualifier or the/ALARMqualifier defines the destination for the event message.The
/AUDITqualifier directs the message to the audit log file, whereas the/ALARMqualifier directs the message to an operator terminal that has been enabled to receive security event messages. Critical events should be reported as both audits and alarms; less critical events can be written to a log file for later examination. The default event classes listed in Table 10.1, ''Event Classes Audited by Default'' are audited as both alarms and audits.
The operating system begins auditing the new events on all nodes of the
cluster as soon as you enable them. It continues auditing until you explicitly
disable the classes with the /DISABLE qualifier. The current
auditing configuration is recorded in
SYS$MANAGER:VMS$AUDIT_SERVER.DAT and so it is
preserved across system boots.
For more information about the SET AUDIT command, see the
relevant section in the
VSI OpenVMS DCL Dictionary: N–Z.
| Class | Description |
|---|---|
| ACL | Access to any object holding a security-auditing ACE. |
| Audit | All uses of the SET AUDIT command. This
category cannot be disabled. |
| Authorization |
All changes to the authorization database:
|
| Break-in | All intrusion attempts: batch, detached, dialup, local, network, remote. |
| Logfailure | All login failures: batch, dialup, local, remote, network, subprocess, detached, server. |
To see the event classes your site currently audits, enter the DCL command
SHOW AUDIT. Example 10.3, ''Auditing Events for a Site with Moderate Security Requirements'' displays the audit settings for a site with moderate
security requirements.
10.2.1.2. Example of Enabling Event Classes
Although you can enable auditing for every possible class of security activity
(/ENABLE=ALL), such an approach can result in an
excessive number of auditing messages and generates too much information to
analyze in a meaningful way. Therefore, VSI suggests that you evaluate your
needs, as described in Section 10.3.1, ''Assessing Your Auditing Requirements'', and
selectively audit system activity.
You can enable auditing of event classes with different levels of granularity. You can use the following methods:
Enable a class
To enable auditing for all login failures, for example, you enable the logfailure class by entering the following command:
$ SET AUDIT/AUDIT/ENABLE=LOGFAILURE=ALL
As a result of this command, the audit server reports all login failures in the security audit log file.
Enable a subset of a class
With certain events, you may want to be more selective in the kinds of reporting you enable. For example, it makes more sense to enable network and remote login events rather than to enable all login events.
To enable auditing of only the network and remote logins, enter the following command:
$ SET AUDIT/AUDIT/ENABLE=LOGIN=(NETWORK,REMOTE)
Enable successful, unsuccessful, or privileged events
Event messages that report on normal system use can easily be eliminated if you enable only unsuccessful event reports or reports for activity performed through a certain privilege.
When auditing access events to protected objects, in particular, you need to define your information requirements more finely than you would with event classes like logins or use of the Install utility. Files and certain other protected objects are accessed so often that full enabling of the related access event class can result in an overwhelming number of event messages—so many that they can possibly mask the unusual events that do require investigation. For this reason, it is recommended that you enable access auditing only for unusual conditions, such as unsuccessful or privileged access events.
To enable auditing of unsuccessful file access events, enter the following command:
$ SET AUDIT/AUDIT/ENABLE=ACCESS=FAILURE/CLASS=FILE
Notice that the previous command enables auditing for all failed file accesses, not just failed read or write access attempts. This is recommended because access operations can be quite involved: what appears to be a simple write operation can involve several types of access. (For example, before writing to the file, the operation requires access to the volume and read access to the directory as well as access to the file within it.)
Example 10.2, ''Audit Generated by an Object Access Event'' displays an event message from a file access failure. User
Robinsontried to delete the fileFOO.BAR, but an ACE on the file prevented it. Apparently,Robinsonholds the identifierMINDCRIME, and an Identifier ACE onFOO.BARdenies access to those holding such an identifier. Furthermore, because the system owns the file,Robinsoncannot gain delete access to the file through the protection code either.
Message from user AUDIT$SERVER on BILBO Security alarm (SECURITY) and security audit (SECURITY) on BILBO, system id: 19662 Auditable event: Object deletion Event information: file deletion request (IO$_DELETE) Event time: 24-APR-2008 13:17:24.59 PID: 47400085 Process name: Hobbit Username: ROBINSON Process owner: [ACCOUNTING,ROBINSON] Terminal name: OPA0: Image name: DSA2264:[SYS51.SYSCOMMON.][SYSEXE]DELETE.EXE Object class name: FILE Object owner: [SYSTEM] Object protection: SYSTEM:RWED, OWNER:RWED, GROUP:RE, WORLD:RE File name: _DSA2200:[ROBINSON]FOO.BAR;1 File ID: (17481,6299,1) Access requested: DELETE Matching ACE: (IDENTIFIER=MINDCRIME,ACCESS=NONE) Sequence key: 00008A41 Status: %SYSTEM-F-NOPRIV, no privilege for attempted operation
10.2.2. Attaching a Security-Auditing ACE
As Section 10.2.1.1, ''Auditing Categories of Activity'' describes, auditing access to protected objects requires careful thought because this type of event occurs so frequently. Too many event messages can overwhelm you and possibly mask the unusual events that do require investigation.
A more selective method of auditing protected objects is to include an auditing ACE in an object's access control list (ACL) and enable the ACL event class. With this approach, only access to objects with security-auditing ACEs results in an event message, not all objects of a class.
You can use two different types of auditing ACEs, depending on where you want the event reported. Alarm ACEs direct event messages to the operator terminal; whereas Audit ACEs direct event messages to the audit log file. Table 10.2, ''Access Control Entries (ACEs) for Security Auditing'' summarizes the auditing ACEs, and the relevant section in the VSI OpenVMS System Management Utilities Reference Manual, Volume I: A–L provides a full description of them. See Table 11.1, ''System Files Benefiting from ACL-Based Auditing'' for a list of system files benefiting from auditing ACEs.
| ACE Type | Description |
|---|---|
| Alarm ACE |
Writes an event message to the operator terminal whenever the object is accessed in the specified manner. It has the following syntax: (ALARM=SECURITY[,OPTIONS=options],ACCESS=access-type[+access-type...]) |
| Audit ACE |
Writes an event message to the security audit log file whenever the object is accessed in the specified manner. It has the following syntax: (AUDIT=SECURITY [,OPTIONS=options],ACCESS=access-type[+access-type...]) |
You attach an ACE to sensitive objects by using the DCL command SET
SECURITY/ACL or the access control list editor (ACL editor). Always
include the SUCCESS or FAILURE keyword (or both) in the ACCESS statement of an
auditing ACE.
It is a good idea to define auditing ACEs for critical system files that are not automatically audited, such as the automatic login file SYSALF.DAT, the operator log file OPERATOR.LOG, or the system accounting file ACCOUNTING.DAT. Do not monitor all access conditions, however, because such an approach can generate a large volume of messages, many of which are not useful. For example, tracking successful write operations to OPERATOR.LOG probably will not produce interesting information, but tracking unsuccessful attempts probably will.
You can add auditing ACEs to any protected object, although files are the most common objects to audit. You may want to add an auditing ACE to either a print queue that is handling sensitive documents or to a terminal to catch attempted password grabbers (see Section 3.8, ''Guidelines for Protecting Your Password'').
10.2.2.1. Example of Adding an Auditing ACE
To establish an Alarm ACE for the file ACCOUNTING.DAT, enter the
following command:
$ SET SECURITY/ACL=(ALARM=SECURITY,ACCESS=DELETE+CONTROL+SUCCESS+FAILURE)- _$ SYS$MANAGER:ACCOUNTING.DAT
The ACL event class is enabled by default, but if it has been disabled at a site, you must enter the following command to reenable the use of auditing ACEs:
$ SET AUDIT/ALARM/AUDIT/ENABLE=ACL
10.2.3. Modifying a User Authorization Record
Sometimes you may see users acting in a suspicious way. Perhaps they are logging in from a number of terminals or logging in at unusual times of the day or the week. You can monitor users' actions by modifying the auditing attribute in their user authorization records. Run the AUTHORIZE utility and set the Audit flag.
Note that setting the AUDIT flag generates an extremely large number of audit
messages. The following command sequence modifies the account of user
Robin:
$ RUN SYS$SYSTEM:AUTHORIZE UAF> MODIFY ROBIN/FLAGS=AUDIT %UAF-I-MDFYMSG, user record(s) updated
With the Audit flag set, the operating system audits the user's process. The audit log file contains a report of any action the user performs that the operating system is capable of auditing (see Section 10.2.4, ''Kinds of System Activity the Operating System Can Report''). You can use the Audit Analysis utility to review the user's actions. For example, to get a report on the activities of user Robin, enter the following command:
$ ANALYZE/AUDIT/SELECT=(FLAGS=MANDATORY,USERNAME=ROBIN) - _$ SECURITY.AUDIT$JOURNAL
See Section 10.5, ''Analyzing a Log File'' for a full description of the Audit Analysis utility.
10.2.4. Kinds of System Activity the Operating System Can Report
With the DCL command SET AUDIT, you can enable auditing for one
or more of the event classes shown in Table 10.3, ''Kinds of Security Events the System Can Report''. Many of the events classes have keywords permitting you to define a subset of
the event class.
| Event Class | Description |
|---|---|
| Access | Access requests to all objects in a class. You can audit selected types of access, both privileged and nonprivileged, to all protected objects of a particular class. |
| ACL | Events requested by a security Audit or Alarm ACE in the ACL of an object. |
| Authorization | Modification of any portion of SYSUAF.DAT, NETPROXY.DAT, NET$PROXY.DAT, or RIGHTSLIST.DAT. |
| Breakin | Intrusion attempts. |
| Connection | Logical link connections or terminations through SYSMAN, VSI DECwindows Motif for OpenVMS, or an interprocess communication (IPC) call. |
| Create | Creation of a protected object. |
| Deaccess | Deaccess from a protected object. |
| Delete | Deletion of a protected object. |
| Identifier | Use of identifiers as privileges. |
| Install | Modifications made to the known file list through the Install utility. |
| Logfailure | Unsuccessful login attempts. |
| Login | Successful login attempts. |
| Logout | Logouts. |
| Mount | Volume mounts and dismounts. |
| NCP | Modification to the network configuration database, using the network control program (NCP). |
| Privilege | Successful or unsuccessful use of privilege. |
| Process | Use of one or more of the process control system services. |
| SYSGEN | Modification of a system parameter with the System Generation utility (SYSGEN) or AUTOGEN. |
| Time | Modification of system time. |
10.2.4.1. Suppression of Certain Privilege Audits
Although a site may enable the privilege event class, the operating system does not report every event in this class. It suppresses the following types of audits:
Successful use of privileges with which an image is installed
For example, the image SHOW.EXE is installed with WORLD privilege. When unprivileged users enter the
SHOW SYSTEMcommand, SHOW.EXE uses WORLD privilege to perform wildcard $GETJPI system service calls. This use of WORLD privilege is not audited. However, if the same unprivileged users attempt to use theSHOW PROCESScommand to display process attributes for a process that they do not have access to, the operation fails. This lack of WORLD privilege is audited even though SHOW.EXE is installed with WORLD privilege.Successful use of a lesser privilege than installed with the image
When an image is installed with a greater privilege than used, the lesser privilege is not audited if the request is successful. For example, if an image installed with CMKRNL privilege successfully executes a $CMEXEC system service call, the use of the CMEXEC privilege is not audited. The following relationships exist:
Greater Privilege Privilege It Implies PRMMBX TMPMBX CMKRNL CMEXEC SYSNAM GRPNAM WORLD GROUP SYSPRV GRPPRV BYPASS SYSPRV, GRPPRV, READALL, DOWNGRADE, UPGRADE Any use of SETPRV privilege by an image installed with SETPRV
Although the operating system does not audit use of SETPRV, it does audit the use of any privilege enabled with SETPRV. VSI recommends that you install an image with the privileges that it actually needs and avoid installing images with SETPRV.
With protected subsystems, successful access by using a subsystem identifier
10.2.4.2. Suppression of Certain Process Control Audits
Although a site may enable the process event class, the operating system does not report every event in this class. It suppresses the following types of audits:
Server processes created with the DCL command
RUN/TRUSTEDor the Create Process system service ($CREPRC) with the PRC$M_TCB flag setServer applications that do need to audit information regarding their clients can set the auditing flags NSA$M_SERVER or CHP$M_SERVER, which override the process no-audit setting for the duration of the auditing call.
Process control events inside your process's job tree that have the same UIC as the requestor
You do not see any process control audits when granting or revoking identifiers to or from your own process. However, events related to the use of $CREPRC and $DELPRC are always audited.
10.2.5. Sources of Event Information
Applications and system programs can contribute security event information by calling the following system services:
$AUDIT_EVENT
$CHECK_PRIVILEGE
$CHKPRO and $CHECK_ACCESS
10.2.5.1. Audit Event ($AUDIT_EVENT) System Service
The operating system calls the $AUDIT_EVENT system
service every time a security-relevant event occurs on the system. By looking at
the SET AUDIT settings, the system service determines whether
you enabled auditing for the event. When the event is enabled for alarms or
audits, $AUDIT_EVENT generates an audit record that
identifies the process (subject) involved and lists event information supplied
by its caller.
10.2.5.2. Check Privilege ($CHECK_PRIVILEGE) System Service
The operating system calls the $CHECK_PRIVILEGE
system service any time a user attempts to perform a privileged function. (The
current set of OpenVMS privileges is listed in Appendix A, "Assigning Privileges".) The
system service performs the privilege check and looks at the SET
AUDIT settings to determine whether you enabled privilege
auditing. When privilege auditing is enabled,
$CHECK_PRIVILEGE generates an audit record. The
audit record identifies the process (subject) and privilege involved, provides
the result of the privilege check, and lists supplemental event information
supplied by its caller. Privilege audit records usually contain the DCL command
line or system service name associated with the privilege check.
10.2.5.3. Check Protection ($CHKPRO) and Check Access ($CHECK_ACCESS) System Services
The operating system calls the $CHKPRO system service
any time a process (subject) attempts to access a protected object. The system
service performs the access arbitration according to the rules described in
Section 4.3, ''How the System Determines If a User Can Access a Protected Object''. By looking at the SET
AUDIT settings for the associated object class, the service also
determines whether you enabled auditing for the associated object access event.
When an alarm or an audit is required, $CHKPRO
generates an audit record that identifies the process (subject) and object
involved and includes the final outcome and any supplemental event information
supplied by its caller.
Privileged server processes use the $CHECK_ACCESS system service to determine whether their clients should be allowed access to the protected objects being served. The $CHECK_ACCESS system service provides a calling interface appropriate for servers and is layered on top of the $CHKPRO service. As a result, it performs object access auditing in the same manner as $CHKPRO.
10.3. Developing an Auditing Plan
As system manager or site security administrator, you have to determine the level of security required at your site before you can understand which security events to audit.
10.3.1. Assessing Your Auditing Requirements
Assessing your auditing requirements is a two-step process:
Determine your site's general security requirements: are they high, moderate, or low? Table 1.1, ''Event Tolerance as a Measure of Security Requirements'' provides some guidance on determining your security needs.
Once you know your site's needs, see the Table 10.4, ''Events to Monitor Depending on a Site's Security Requirements'' for a suggested list of event classes to enable.
After developing a general notion of your site requirements, you need to consider how much security reporting is realistic. Balance the suggestions in Table 10.4, ''Events to Monitor Depending on a Site's Security Requirements'' with the following site factors:
The sensitivity of the data at your site
The amount of time you have to analyze log files
The disk space you have available
Your knowledge of a security threat: where is it coming from or likely to come from
The tuning requirements of your system (See Section 10.3.3, ''Considering the Performance Impact'' for information about performance impact.)
| Low | Medium | High | |
|---|---|---|---|
| Goal | Monitor local events with high impact | Track changes to system definition | Monitor database changes; track use of process control system services |
| Classes to Enable as Alarms | ACL, authorization, break-in (all types), logfailure (all types) | Same as low category plus use of SECURITY privilege | Same as medium category plus INSTALL, time, SYSGEN, unsuccessful privilege use |
| Classes to Enable as Audits | ACL, authorization, breakin (all types), logfailure (all types) | All of low category plus INSTALL; time; SYSGEN; privilege; logins (all types); logouts (all types); access of files through BYPASS, SYSPRV, and READALL privileges; unsuccessful access to files, devices, and volumes | All of medium category plus identifier, process, unsuccessful access to protected objects, NCP |
In Table 10.4, ''Events to Monitor Depending on a Site's Security Requirements'', the event classes suggested for a low-security site are the default settings for the operating system. If these classes are not the current defaults on your system, you can enable them with the following command:
$ SET AUDIT/ALARM/AUDIT - _$ /ENABLE=(ACL,AUTHORIZATION,BREAKIN:ALL,LOGFAILURE:ALL)
In a site with moderate security requirements, you want to audit events that can redefine your system. You watch for changes to system files, system time, or system parameters. You also monitor image installations and the use of privilege. Example 10.3, ''Auditing Events for a Site with Moderate Security Requirements'' shows the auditing setting for a site with moderate security requirements.
System security alarms currently enabled for:
Authorization
Breakin: dialup,local,remote,network,detached
System security audits currently enabled for:
ACL
Authorization
INSTALL
Time
SYSGEN
Breakin: dialup,local,remote,network,detached
Login: batch,dialup,local,remote,network,subprocess,detached,server
Logfailure: batch,dialup,local,remote,network,subprocess,detached,server
Logout: batch,dialup,local,remote,network,subprocess,detached,server
Privilege use:
ACNT ALLSPOOL ALTPRI AUDIT BUG BYPASS CMEXEC CMKRNL
DIAGNOSE DOWNGRADE EXQUOTA GROUP GRPNAM GRPPRV IMPORT IMPERSONATE
LOG_IO MOUNT NETMBX OPER PFNMAP PHY_IO PRMCEB PRMGBL
PRMMBX PSWAPM READALL SECURITY SETPRV SHARE SHMEM SYSGBL
SYSLCK SYSNAM SYSPRV TMPMBX UPGRADE VOLPRO WORLD
Privilege failure:
ACNT ALLSPOOL ALTPRI AUDIT BUGCHK BYPASS CMEXEC CMKRNL
DIAGNOSE DOWNGRADE EXQUOTA GROUP GRPNAM GRPPRV IMPORT IMPERSONATE
LOG_IO MOUNT NETMBX OPER PFNMAP PHY_IO PRMCEB PRMGBL
PRMMBX PSWAPM READALL SECURITY SETPRV SHARE SHMEM SYSGBL
SYSLCK SYSNAM SYSPRV TMPMBX UPGRADE VOLPRO WORLD
FILE access:
SYSPRV: read,write,execute,delete,control
BYPASS: read,write,execute,delete,control
READALL: read,write,execute,delete,controlTo enable the settings for a moderate level of auditing, assuming the default events are already in effect, enter the following set of commands:
$ SET AUDIT/ALARM/AUDIT/ENABLE=PRIVILEGE=(SUCCESS:SECURITY,FAILURE:SECURITY) $ SET AUDIT/AUDIT/ENABLE=(INSTALL,SYSGEN,TIME,PRIVILEGE=(SUCCESS,FAILURE)) $ SET AUDIT/AUDIT/ENABLE=ACCESS=(BYPASS,SYSPRV,READALL)/CLASS=FILE $ SET AUDIT/AUDIT/ENABLE=ACCESS=FAILURE/CLASS=(FILE,DEVICE,VOLUME)
A site with high security requirements expands its auditing breadth to include network activity. It needs to monitor changes to the network database, the use of identifiers as privileges, and privileged file access. Monitor all file access through SYSPRV, BYPASS, or READALL privilege, and watch both successful and unsuccessful file access through GRPPRV privilege. To enable the settings for a high level of auditing, assuming a medium level is in effect, enter the following set of commands:
$ SET AUDIT/ALARM/ENABLE=(INSTALL,SYSGEN,TIME,PRIVILEGE=(FAILURE:ALL) ) $ SET AUDIT/AUDIT/ENABLE=(CONNECTION,IDENTIFIER,NCP,PROCESS:ALL) $ SET AUDIT/AUDIT/ENABLE=ACCESS=FAILURE/CLASS=*
To enable all auditing:
$ SET AUDIT/AUDIT/ENABLE=ALL/CLASS=*
To disable all auditing:
$ SET AUDIT/AUDIT/DISABLE=ALL/CLASS=*
See Table 10.4, ''Events to Monitor Depending on a Site's Security Requirements'' for more suggestions of event classes to enable.
10.3.2. Selecting a Destination for the Event Message
The operating system can report a security event as either an alarm or an audit (see Section 10.2.1.1, ''Auditing Categories of Activity''). Which form you select depends on the nature of the event. Real-time events or events that should be treated immediately, such as break-in attempts or changes to the system user authorization file (SYSUAF.DAT), are classes to enable as both alarms and audits. Less critical events can be enabled just as audits. Unless you have a hardcopy operator terminal, the alarm record is quickly superseded by other system messages. Audit event records, which are written to the system security audit log, are saved so you can study them in volume.
There is an advantage to studying event messages. Many times an isolated auditing message offers little insight, but numerous audit records reveal a pattern of activity that might indicate security violations. With auditing of object access, for example, a security administrator can see a pattern of time, types of objects being accessed, and other system information that, in total, paint a complete picture of system activity. Section 10.5, ''Analyzing a Log File'' describes how to produce reports from audit log files.
10.3.3. Considering the Performance Impact
The default auditing performed by the operating system primarily tracks changes to the authorization databases. System events like changes to the system user authorization file (SYSUAF.DAT) or the installation of images do not occur too often and therefore are not a drain on system resources.
Auditing additional event classes, particularly access events and privilege events, can consume significant system resources if a site enables the event classes without understanding how their system is used and without evaluating the value of the audit information. In this respect, implementation of the audit reporting system is similar to system tuning: it takes a little while to reach the appropriate level of reporting that is free of spurious details. For this reason, VSI recommends you turn auditing on in phases, not all at once, and gradually add or subtract event classes until you reach a satisfactory balance. Use the following guidelines:
Evaluate your auditing requirements, as described in Section 10.3.1, ''Assessing Your Auditing Requirements''.
Be selective in auditing object access events. Object access events occur all the time and therefore have the greatest impact on system performance. Audit file-access failures in most cases rather than successful file access, or put auditing ACEs on key files rather than enable auditing for the entire file class.
Examine the layered products you are running so you understand which privileges they may use. Also become familiar with site-specific procedures, such as the use of the READALL privilege during a backup operation. Because privilege events occur frequently, they have a great impact on system performance.
Enable a few event classes at a time and then add or subtract, if necessary, until you have sufficient event information. The more classes you enable, the more overhead you have and the fewer resources you have for useful work on the system.
Two commands in particular generate a large number of audit messages:
The DCL
PIPEcommand can create a large number of subprocesses to execute a singlePIPEcommand. This can mean a potential increase in auditing events that are related to subprocess activities (for example, process creation, process deletion, login, logfailure, and logout).The UAF command
MODIFY USER/FLAG=AUDITgenerates a very large number of audit messages. It is not usually necessary to set this flag; if you have a particular AUDIT enabled, you do not need to have the user flag set as well.
10.4. Methods of Capturing Event Messages
The operating system can send event messages to an audit log file or to an operator terminal. If a site wants additional copies, it can send duplicate messages to a remote log file or an application listener mailbox.
10.4.1. Using an Audit Log File
The operating system writes all security event messages to the latest version of the security audit log file. This log file is created by default during system startup in the SYS$COMMON:[SYSMGR] directory and named SECURITY.AUDIT$JOURNAL. Table 10.5, ''Characteristics of the Audit Log File'' describes some of its more notable characteristics.
| Characteristic | Advantage |
|---|---|
| Binary | A binary file requires the least amount of disk space. |
| Clusterwide | A clusterwide file, when processed by the Audit Analysis utility, results in one report of security-relevant events in the cluster. |
| Sequential record format | A sequential record format is easily analyzed by user-written programs. See the relevant section in the VSI OpenVMS System Management Utilities Reference Manual, Volume I: A–L for a description of the message format of the security audit log file. |
Ordinarily, all cluster events are written to a single audit log file. The use of one security audit log file in a cluster results in a single record of all security-relevant events on the system. For this reason, one clusterwide log file is preferable to node-specific audit logs, which lose the interrelationship of events across the cluster, thus producing an incomplete analysis of security events. You can, if you wish, create node-specific audit logs (see Section 10.4.1.1, ''Maintaining the File''), but this is not the recommended procedure.
The usefulness of the security audit log file depends upon the procedures you adopt:
Maintain the log file so events are recognized early and the file does not get too big (see Section 10.4.1.1, ''Maintaining the File'').
Routinely review the log file and scrutinize suspicious activity (see Section 10.5, ''Analyzing a Log File'').
10.4.1.1. Maintaining the File
The security audit log file continues to grow until action is taken, so you must devise a plan for maintaining it.
Typically, sites rename each day's log file and create a new one. To open a new, clusterwide version of the security audit log file, use the following command:
$ SET AUDIT/SERVER=NEW_LOG
To create a new, node-specific log, precede the SET
AUDIT/SERVER=NEW_LOG command with the command SET
AUDIT/DESTINATION=filespec
where the file specification includes a logical name that resolves to a
node-specific file (for example,
SYS$SPECIFIC:[SYSMGR]SECURITY).
Once you have opened the new log, rename the old version with a name that incorporates a beginning or ending date for the data.
To save space on the system disk, you may want to copy the file to another disk and delete the log from the system disk. Even sites with a dedicated auditing disk, which is common to environments with high security requirements, may want to relocate the old version to make space for future messages.
Once you archive the file, run the Audit Analysis utility on the old log (see Section 10.5.2, ''Invoking the Audit Analysis Utility''). By archiving this file, you maintain a clusterwide history of auditing messages. If you ever discover a security threat on the system, you can analyze the archived log files for a trail of suspicious user activity during a specified period of time.
10.4.1.2. Moving the File from the System Disk
To relocate the file from the SYS$COMMON:[SYSMGR] directory, edit the command procedure SYSECURITY.COM. This procedure executes each time the system is rebooted, before the audit server is started.
To relocate the file, perform the following steps:
Change the startup sequence by adding a line to SYSECURITY.COM that directs the operating system to mount the designated auditing disk before the audit server process is started rather than after. For example:
$ IF .NOT. F$GETDVI("$1$DUA2","MNT") - _$ THEN MOUNT/SYSTEM $1$DUA2 AUDIT AUDIT$ /NOREBUILDThe command in this example mounts a volume labeled
AUDITon$1$DUA2and makes it available systemwide.MOUNTalso assigns the logical nameAUDIT$.Move the audit server database to the auditing disk, if you choose. The database remains small and fairly stable so this step is not essential.
To move the database, add a second line to SYSECURITY.COM to define the system logical name VMS$AUDIT_SERVER. (The line follows the one that mounts the auditing disk.) In the command, define a system logical name and assign it to the VMS$AUDIT_SERVER data file on the disk with the logical name AUDIT$. For example:
$ DEFINE/SYSTEM/EXEC VMS$AUDIT_SERVER AUDIT$:[AUDIT]VMS$AUDIT_SERVER.DAT
This command redirects the audit server database to the volume on $1$DUA2, which was mounted in Step 1.
From the DCL level, redirect the security audit log file to the volume mounted in SYSECURITY.COM (see Step 1). Use the
SET AUDITcommand to update the audit server database with the new location of the security audit log file, and instruct the audit server process on each node in the cluster to begin using the file. For example:$ SET AUDIT/JOURNAL=SECURITY - _$ /DESTINATION=AUDIT$:[AUDIT]SECURITY
Do not repeat this command on each system restart.
If you use a logical name in the specification of the security audit log file, it must be defined as a
/SYSTEMlogical name in SYSECURITY.COM.
10.4.2. Enabling a Terminal to Receive Alarms
The operating system sends alarm messages to terminals enabled for security class messages. In most cases, these security alarms appear on the system console by default. Because messages scroll quickly off the screen, it is a good practice to enable a separate terminal for security class messages and disable message delivery to the system console. Choose either a terminal in a secure location that provides hardcopy output or have dedicated staff monitor the security operator terminal. Any number of terminals can be enabled as security operators.
To set up a terminal to receive security class alarms, enter the following DCL command from the designated terminal:
$ REPLY/ENABLE=SECURITY
For long-term use of a specific terminal, you can modify your site-specific
startup command procedure to automatically enable the terminal. For example, the
following command lines in a startup command procedure disable the delivery of
security alarms to the system console and enable alarms on terminal
TTA3:
$ DEFINE/USER SYS$COMMAND OPA0: $ REPLY/DISABLE=SECURITY $ DEFINE/USER SYS$COMMAND TTA3: $ REPLY/ENABLE=SECURITY
The authorization and SYSGEN event classes occasionally produce such lengthy alarm messages that the messages get truncated. For this reason, it is best to enable these classes for both alarms and audits. When an alarm message is truncated, the text indicates it is incomplete. As long as you have enabled the classes for audit messages, you can use ANALYZE/AUDIT to display the complete message.
10.4.3. Secondary Destinations for Event Messages
The operator terminal and the audit log file are the primary destinations for security event messages. A site can choose to send copies of audit messages to a remote log file (called an archive file) or a listener mailbox.
10.4.3.1. Using a Remote Log File
The operating system allows workstations and other users with limited management resources to duplicate their audit log file on another node. This secondary log, the security archive file, is then available on a remote node to a security administrator who has the skills to analyze the file. In some situations, the archive file can also provide insurance should the local audit log file be tampered with in some way. One node can direct auditing messages to an archive file. Once enabled, the audit server writes a copy of each auditing message to the security archive file as well as to the security audit log file.
Note
Each node in a cluster must have its own archive file. An archive file cannot be shared by multiple nodes in a cluster.
Use the following procedure to write security audit messages to a remote security archive file:
Log in to the node where the archive file is located and create an account for the audit server. Assign the account a username (like AUDIT_ARCHIVE) and make the account unprivileged with only network access. Be sure that the account has access to the device and directory containing the security archive file:
$ SET DEFAULT SYS$SYSTEM $ RUN AUTHORIZE UAF> ADD AUDIT_ARCHIVE /ACCESS=NETWORK /DEVICE=WORK2- _UAF> /DIRECTORY=[AUDIT_ARCHIVE]
Add a proxy account on the remote node for AUDIT$SERVER. This allows the audit server process to write data to its account on the remote node. For example, the following commands grant the audit server process on node
SMLNODproxy access to theAUDIT_ARCHIVEaccount on nodeBIGNOD:UAF> ADD/PROXY SMLNOD::AUDIT$SERVER AUDIT_ARCHIVE/DEFAULT UAF> EXIT
See Section 13.3.2, ''Setting Up a Proxy Database'' for further information about setting up proxy accounts.
Log out from the remote node. On the local node, enable archiving of the log file to the node by entering the following command:
$ SET AUDIT/ARCHIVE=ALL/DESTINATION=BIGNOD::WORK2:- _$ [AUDIT_ARCHIVE]SMLNOD_MAY_93.AUDIT$JOURNAL
You must supply a complete directory specification. If you include any logical names, ensure the local audit server process can translate them.
To create a new archive file, rename the current file; the next time the system starts up, it creates a new one for you.
If the network goes down, messages intended for the security archive file are lost. Security operator terminals receive notice of the lost connection and the number of lost messages. Once the network is up, the audit server reestablishes connection to the original archive file and continues writing event messages.
Analyzing the security archive file is identical, in most respects, to analysis of the security audit log file. You can analyze a remote security archive file at any time, even while the file is open. See Section 10.5, ''Analyzing a Log File'' for more information.
10.4.3.2. Using a Listener Mailbox
As an additional feature of the security auditing facility, you can create a listener device to receive a binary copy of all security-auditing messages. (A listener device is a permanent or temporary mailbox that you create with the Create Mailbox [$CREMBX] system service.) You can set up an application to receive and process auditing information and react to events as they occur on the system. Each system can have one listener device, and it can receive only events that are occurring on the local node.
To enable the listener device to receive security-auditing messages, execute
the SET AUDIT/LISTENER command in the following
format:
$ SET AUDIT/LISTENER=device-nameFor the device-name parameter, supply either the logical name specified when you created the mailbox or the equivalence name of the mailbox, in the form of MBAn, where n represents the unit number of the mailbox. If you create the device as a temporary mailbox, you must use the Get Device and Volume Information ($GETDVI) system service to return the mailbox device name.
To disable an audit listener device, enter the following command:
$ SET AUDIT/NOLISTENER
10.5. Analyzing a Log File
Collecting security audit messages in the security audit log file is useless without periodically reviewing it for suspicious activity. You use the Audit Analysis utility (ANALYZE/AUDIT) to examine the data in the security audit log file.
ANALYZE/AUDIT generates a report from the log file so that you become familiar with normal activity on your system and can easily spot atypical activity. It summarizes events for you and plots where activity is occurring on the cluster. The utility also helps you analyze atypical activity because it is capable of selecting a subset of information from an audit report and of providing fuller information for your analysis. While the analysis of a single audit log file might not be significant, audit records can, over time, reveal a pattern of activity that indicates security violations.
10.5.1. Recommended Procedure
This section describes how to analyze audit log files on your system. Although the way you use ANALYZE/AUDIT depends upon the security needs at your site, there are a number of common steps that you should follow, regardless of the extent to which you use the utility. Before you can recognize potential security problems, you need to become familiar with the normal operation of your system. Then you can develop a procedure for generating and reviewing audit reports on a periodic basis. Whenever your regular analysis of audit log files leads you to suspect a security problem, you should perform a detailed investigation of selected security events.
Know What Is Normal
As a security administrator, you should be able to answer the following questions before analyzing an audit log file:
What are the typical hours of operation for most users of the system?
Are there specific users who normally operate with advanced privileges?
Which images generate system security events as part of other applications?
Are there any regular batch or network jobs that run at specific times of the day?
By knowing the answers to these questions, you can eliminate false alarms, which otherwise may cause you to wrongly suspect a security problem.
Periodically Analyze the Audit Report
The most common type of report to generate is a brief, daily listing of events. You can create a command procedure that runs in a batch job every evening before midnight to generate a report of the day's security event messages. (You can use the same procedure to create a new version of the audit log, see Section 10.4.1.1, ''Maintaining the File''.)
The following example shows the
ANALYZE/AUDITcommand line to generate this report:$ ANALYZE/AUDIT/SINCE=TODAY/OUTPUT=31DEC2000.AUDIT - _$ SYS$MANAGER:SECURITY.AUDIT$JOURNAL
$ MAIL/SUBJECT="Security Events" 31DEC2000.AUDIT SYSTEM The first command in this example produces an audit
report named 31DEC2000.AUDIT, which contains one-line descriptions of all the security event messages generated during the current day. The second command mails the file to the security
administrator for examination.Depending on the number of security events that you are auditing on your system, it can be impractical to review every audit record written to the audit log file. In this case, you can select a specific set of records from the log file, such as all audit records related to changes in the authorization database and break-in attempts, or all events occurring outside normal business hours.
Analyze any subprocess-related audits with the knowledge that a pipe subprocess (created by the DCL
PIPEcommand) can generate the audits. ThePIPEcommand can create a large number of subprocesses to execute a singlePIPEcommand. This can mean a potential increase in auditing events that are related to subprocess activities (for example, process creation, process deletion, login, logfailure, and logout).It is important that you review audit reports as soon as possible. The sooner you inspect the reports, the sooner you become aware of any possible breach of security on the system and can determine the extent of the problem. You can make the inspection of the previous day's audit report a regular part of your morning routine, or you can create a program that reviews the report and notifies you through the Mail utility (MAIL) when suspicious events appear.
Scrutinize Suspicious Activity
If, during your review, you find any security events that appear suspicious or out of place, like login attempts outside normal business hours, then use the Audit Analysis utility to perform a more detailed inspection of the security audit log file. A full report can help you determine which security events logged to the audit log file warrant a more thorough investigation.
The following command generates a full report of selected security audit records:
$ ANALYZE/AUDIT/FULL/SINCE=TODAY/OUTPUT=31DEC2000.AUDIT - _$ /EVENT_TYPE=(BREAKIN,RIGHTSDB,SYSUAF) $ MAIL/SUBJECT="Security Events" 31DEC2000.AUDIT SYSTEM
The audit report for December 31, 2000 contains information on all intrusion attempts and all modifications to the system user authorization file (SYSUAF.DAT) and the rights database (RIGHTSLIST.DAT).
10.5.2. Invoking the Audit Analysis Utility
The Audit Analysis utility is the tool you use to produce a meaningful report from a binary log file. This section and the sections that follow describe how to use the utility, but see the VSI OpenVMS System Management Utilities Reference Manual, Volume I: A–L for complete documentation of the utility's commands and qualifiers.
To invoke the Audit Analysis utility, use the following DCL command:
$ ANALYZE/AUDIT file-nameFor the file-name parameter, substitute the name of the file from which audit reports are to be generated. The default name of the security audit log file is SECURITY.AUDIT$JOURNAL. You must specify the directory: SYS$MANAGER.
10.5.3. Providing Report Specifications
With the Audit Analysis utility, you are able to extract all or some of the security event messages from a single audit log and produce reports with various levels of detail.
The audit report reflects events from the set of event classes a site has enabled
(see Section 10.2, ''Reporting Security-Relevant Events''). You can tailor the
report so only a subset of events are extracted. The selection criteria can be based
on time, on event class, or on field of data within the event message. (See the
documentation of the /SELECT qualifier in the
VSI OpenVMS System Management Utilities Reference Manual, Volume I: A–L.) Table 10.6, ''Qualifiers for the Audit Analysis Utility'' summarizes the qualifiers that determine the content of the
report.
| Type | Qualifier | Description |
|---|---|---|
| Content | /BEFORE | Extracts event messages logged before the specified time. |
/SINCE | Extracts event messages logged after the specified of time. | |
/EVENT_TYPE | Extracts event messages of a specific event class (see Table 10.3, ''Kinds of Security Events the System Can Report''). | |
/SELECT | Extracts event messages based on data in the messages. (For
example, /SELECT=USERNAME=JSNOOP lists only
security event messages generated by user JSNOOP.) | |
/IGNORE | Excludes event messages from the report based on data in the messages. | |
| Format | /BRIEF | Produces a report with one line of information about each record in the audit log file, such as the type of event, when it occurred, and the terminal from which it originated (see Example 10.4, ''Brief Audit Report''). This is the default. |
/FULL | Provides all possible data for each record in the audit log file being processed (see Example 10.5, ''One Record from a Full Audit Report''). Appendix C, "Alarm Messages" provides sample alarm messages for each event class. | |
/SUMMARY | Lists the total number of audit messages for each event class in the log file being analyzed (see Example 10.6, ''Summary of Events in an Audit Log File''). It can also plot the aggregate events per hour on each node. | |
/BINARY | Produces a binary file so you can extract records for further analysis using your own data reduction tools. See the VSI OpenVMS System Management Utilities Reference Manual, Volume I: A–L for a description of the audit message record format. | |
| Destination | /OUTPUT | Specifies the report destination. By default, it goes to SYS$OUTPUT. |
ANALYZE/AUDIT produces audit reports in different formats (see Table 10.6, ''Qualifiers for the Audit Analysis Utility''). The utility produces a one-line summary of each record in the log file by default. Brief, one-line reports are most useful for routine analysis of a log file. The more detailed full reports provide the detail necessary for analyzing records of a suspicious nature. If you are interested in archiving portions of a log file, the binary listing lets you store a subset of an audit log file.
A summary report helps you identify potential security problems quickly. For each class of security event, a summary report can list the total number of audit messages extracted from the security audit log file being analyzed. A summary report can also display a plot of auditing activity, based on the system generating the event message, the time when it occurred, and the total number of events seen.
Example 10.4, ''Brief Audit Report'' shows a brief report of all the
security audit events logged to the system security audit log file. In the
ANALYZE/AUDIT command that generates the report, substitute
the name of your audit log file.
$ ANALYZE/AUDIT/BRIEF SYS$MANAGER:SECURITY.AUDIT$JOURNAL
Date / Time Type Subtype Node Username ID Term -------------------------------------------------------------------------- 1-NOV-2000 16:00:03.37 ACCESS FILE_ACCESS HERE SYSTEM 5B600AE4 1-NOV-2000 16:00:59.66 LOGIN SUBPROCESS GONE ROBINSON 3BA011D4 1-NOV-2000 16:02:37.31 LOGIN SUBPROCESS GONE MILANT 000000D5 1-NOV-2000 16:06:36.40 LOGFAIL LOCAL SUPER MBILLS 000000E5 _TTA1: [vellip]
Example 10.5, ''One Record from a Full Audit Report'' shows one record from a full
format audit report. In the ANALYZE/AUDIT command that generates
the report, substitute the name of your audit log file.
$ANALYZE/AUDIT/FULL SYS$MANAGER:SECURITY.AUDIT$JOURNAL
Security audit (SECURITY) on FNORD, system id: 19728 Auditable event: Object access Event time: 6-AUG-2000 11:54:16.21 PID: 3D200117 Process name: Hobbit Username: PATTERSON Process owner: [ACCOUNTING,PATTERSON] Terminal name: RTA1: Object class name: LOGICAL_NAME_TABLE Object name: LNM$SYSTEM_DIRECTORY Access requested: WRITE Status: %SYSTEM-S-NORMAL, normal successful completion Privileges used: SYSPRV
Example 10.6, ''Summary of Events in an Audit Log File'' shows a summary report. In the
ANALYZE/AUDIT command that generates the report, substitute
the name of your audit log file.
$ ANALYZE/AUDIT/SUMMARY SYS$MANAGER:SECURITY.AUDIT$JOURNAL
Total records read: 9701 Records selected: 9701 Record buffer size: 1031 Successful logins: 542 Object creates: 1278 Successful logouts: 531 Object accesses: 3761 Login failures: 35 Object deaccesses: 2901 Breakin attempts: 2 Object deletes: 301 System UAF changes: 10 Volume (dis)mounts: 50 Rights db changes: 8 System time changes: 0 Netproxy changes: 5 Server messages: 0 Audit changes: 7 Connections: 0 Installed db changes: 50 Process control audits: 0 Sysgen changes: 9 Privilege audits: 91 NCP command lines: 120
10.5.4. Using the Audit Analysis Utility Interactively
When you send output to a terminal, you can analyze an audit log file interactively. At any time during the display of a listing, you can interrupt the report being displayed by pressing Ctrl/C. This automatically initiates a full listing and gives you the Command> prompt. In command mode, you can advance or return to earlier records in the report and study them in greater detail.
At the Command> prompt, you can enter any of the
ANALYZE/AUDIT commands listed in the
VSI OpenVMS System Management Utilities Reference Manual, Volume I: A–L to modify the analysis
criteria, change position within the audit report, or toggle between full and brief
displays. To return to an audit report listing, enter the
CONTINUE command.
10.5.5. Examining the Report
When a routine analysis of an audit log file leads you to suspect that the security of your system has been compromised (through an actual or attempted intrusion, repeated login failures, or any other suspicious security events), you can investigate the source of the security event through a more detailed inspection of the security audit log file.
For example, assume that you see the security events shown in Example 10.7, ''Identifying Suspicious Activity in the Audit Report'' during a routine inspection of the previous day's audit report.
Date / Time Type Subtype Node Username ID Term -------------------------------------------------------------------------- [vellip] 26-OCT-2000 16:06:09.17 LOGFAIL REMOTE BOSTON KOVACS 5BC002EA _RTA14: 26-OCT-2000 16:06:22.01 LOGFAIL REMOTE BOSTON KOVACS 5BC002EA _RTA14: 26-OCT-2000 16:06:34.17 LOGFAIL REMOTE BOSTON KOVACS 5BC002EA _RTA14: 26-OCT-2000 16:06:45.50 LOGFAIL REMOTE BOSTON KOVACS 5BC002EA _RTA14: 26-OCT-2000 16:07:12.39 LOGIN REMOTE BOSTON KOVACS 5BC002EA _RTA14: 26-OCT-2000 16:23:42.45 SYSUAF SYSUAF_ADD BOSTON KOVACS 5BC002EA _RTA14: [vellip]
The security events displayed in the report shown in Example 10.7, ''Identifying Suspicious Activity in the Audit Report'' indicate that user Kovacs logged in to the system following four unsuccessful login attempts. Shortly after logging in, user Kovacs created a new account in the system user authorization file (SYSUAF.DAT).
At this point, you must determine whether this behavior is normal or abnormal. Is user Kovacs authorized to add new user accounts to the system? If you believe that the security of your system has been compromised, use the following command to generate a more detailed report from the security audit log file to determine if damage has been done to your system:
$ ANALYZE/AUDIT/FULL/SINCE=01-JUN-2003:16:06
The command in this example generates a full report of all security audit events written to the audit log file since user Kovacs first attempted to log in to the system. In a full format report, all the data for each record in the audit log file is displayed. Using the full report, you can determine the name of the remote user who logged in under the local KOVACS account and the node from which the login was made, as shown in Example 10.8, ''Scrutinizing a Suspicious Record''.
.
.
.
Security alarm (SECURITY) and security audit (SECURITY) on BOSTON,
system id: 20011
Auditable event: Remote interactive login failure
Event time: 01-JUN-2003 16:06:09.17
PID: 5BC002EA
Username: KOVACS
Terminal name: _RTA14:
Remote nodename: NACHWA Remote node id: 7300
Remote username: FOLLEN
Status: %LOGIN-F-INVPWD, invalid password
.
.
.
Security alarm (SECURITY) and security audit (SECURITY) on BOSTON,
system id: 20011
Auditable event: Remote interactive login
Event time: 01-JUN-2003 16:07:12.39
PID: 5BC002EA
Username: KOVACS
Terminal name: _RTA14:
Remote nodename: NACHWA Remote node id: 7300
Remote username: FOLLENThe information displayed in Example 10.8, ''Scrutinizing a Suspicious Record'' indicates that the login failures and subsequent successful login were made by user Follen from the remote node NACHWA. Your next step is to determine whether the security events were generated by user Follen or by someone who has broken into the remote node NACHWA through the FOLLEN account.
10.6. Managing the Auditing Subsystem
This section discusses how to manage the auditing system. Management tasks include the following:
Enabling and disabling startup of the audit server process
Changing the point in startup when the operating system initiates auditing
Choosing the number of outstanding messages that trigger process suspension
Choosing the audit server response to memory exhaustion
Maintaining the accuracy of message time-stamping
Adjusting the transfer of messages from system auditing buffers to disk
Choosing the amount of disk space periodically allocated to the system audit log
10.6.1. Tasks Performed by the Audit Server
The operating system creates the audit server as a detached process during system startup to perform the following tasks:
Create a clusterwide security audit log file (SECURITY.AUDIT$JOURNAL) in SYS$COMMON:[SYS$MGR]
Control the logging of security events to the log file and the delivery of alarms to any operator terminals enabled to receive security class messages
Enable auditing of a site-defined set of security events
Monitor disk and memory resources
Maintain a database of security-auditing characteristics
The audit server sends informational and error messages to the operator communication manager (OPCOM). OPCOM broadcasts these messages to operator terminals and writes the messages to the operator log file.
Example 10.9, ''Default Characteristics of the Audit Server'' displays the audit server's
initial operating values. These settings are stored in the audit server database,
VMS$AUDIT_SERVER.DAT in
SYS$COMMON:[SYSMGR]. Any time you modify
security-auditing characteristics by using the DCL command SET
AUDIT, the audit server database is updated. Each time the system is
rebooted, it takes the auditing values from this database.
$ SHOW AUDIT/ALL
List of audit journals: Journal name: SECURITY Journal owner: (system audit journal) Destination: SYS$COMMON:[SYSMGR]SECURITY.AUDIT$JOURNAL Monitoring: enabled Warning thresholds, Block count: 100 Duration: 2 00:00:00.0 Action thresholds, Block count: 25 Duration: 0 00:30:00.0 Security auditing server characteristics: Database version: 4.4 Backlog (total): 100, 200, 300 Backlog (process): 5, 2 Server processing intervals: Archive flush: 0 00:01:00.00 Journal flush: 0 00:05:00.00 Resource scan: 0 00:05:00.00 Final resource action: purge oldest audit events Security archiving information: Archiving events: none Archive destination: System security alarms currently enabled for: ACL Authorization Breakin: dialup,local,remote,network,detached Logfailure: batch,dialup,local,remote,network,subprocess,detached,server System security audits currently enabled for: ACL Authorization Breakin: dialup,local,remote,network,detached Logfailure: batch,dialup,local,remote,network,subprocess,detached,server
10.6.2. Disabling and Reenabling Startup of the Audit Server
All operating systems start the audit server process and OPCOM by default.
If the physical memory or disk storage space on your system is especially limited and logging of security-related events is not important, you can remove the audit server and OPCOM processes from the system startup procedure. Before you do so, be aware that cluster object support requires the audit server (see Chapter 12, "Securing a Cluster"). The following example shows how you would remove these processes with the System Management utility (SYSMAN):
$ SET PROCESS/PRIVILEGES=(OPER,BYPASS) $ RUN SYS$SYSTEM:SYSMAN SYSMAN> STARTUP SET DATABASE STARTUP$STARTUP_VMS SYSMAN> STARTUP DISABLE FILE VMS$CONFIG-050_OPCOM.COM/NODE=* SYSMAN> STARTUP DISABLE FILE VMS$CONFIG-050_AUDIT_SERVER.COM /NODE=* SYSMAN> EXIT $ SET PROCESS/PRIVILEGES=(NOOPER,NOBYPASS)
To delete the audit server process and shut down security auditing on the system, enter the following commands on each node in the cluster:
$ SET AUDIT/ALARM/AUDIT/DISABLE=ALL/CLASS=* $ SET AUDIT/SERVER=EXIT
You can restart security auditing and OPCOM on the system by executing the following DCL command lines:
$ @SYS$SYSTEM:STARTUP OPCOM $ @SYS$SYSTEM:STARTUP AUDIT_SERVER
To start the OPCOM and the audit server processes for all subsequent system boots, reverse your previous edits of the system startup procedure. Use the following SYSMAN commands:
$ SET PROCESS/PRIVILEGES=(OPER,BYPASS) $ RUN SYS$SYSTEM:SYSMAN SYSMAN> STARTUP SET DATABASE STARTUP$STARTUP_VMS SYSMAN> STARTUP ENABLE FILE VMS$CONFIG-050_OPCOM.COM/NODE=* SYSMAN> STARTUP ENABLE FILE VMS$CONFIG-050_AUDIT_SERVER.COM - _SYSMAN> /NODE=* SYSMAN> EXIT $ SET PROCESS/PRIVILEGES=(NOOPER,NOBYPASS)
See the relevant section in the VSI OpenVMS System Management Utilities Reference Manual, Volume II: M–Z for more information about SYSMAN.
10.6.3. Changing the Point in Startup When the Operating System Initiates Auditing
Ordinarily, the operating system starts sending audit-event messages just before SYSTARTUP_VMS.COM executes. However, a site that is not interested in receiving audit-event messages during startup can alter this behavior by redefining the logical name SYS$AUDIT_SERVER_INHIBIT.
To change the point where the operating system begins to deliver security event messages, add the following line to the SYS$MANAGER:SYLOGICALS.COM command procedure:
$ ! $ DEFINE /SYSTEM /EXECUTIVE SYS$AUDIT_SERVER_INHIBIT yes $ !
A system manager can choose another phase of system startup to initiate auditing,
perhaps at the end of SYSTARTUP_VMS. However, be sure to
initiate auditing before allowing any general logins to the system (that is, before
any SET LOGINS/INTERACTIVE command). To initiate delivery of
auditing messages, add the following line to the appropriate command file:
$ ! $ SET AUDIT/SERVER=INITIATE $ !
10.6.4. Choosing the Number of Outstanding Messages That Trigger Process Suspension
Unless the audit server controls the influx of messages, it is possible under some conditions to run out of memory. A very slow I/O device, a disk space problem, or even a sudden onslaught of messages can exceed the server's ability to write messages to disk. To prevent memory exhaustion, the audit server constantly monitors the total number of outstanding messages and tallies the number of messages contributed by each active process. If the server receives more events than it can log to disk, it begins applying flow control to those processes generating audit events.
10.6.4.1. Controlling Message Flow
Message volume is controlled on a per-process basis. Table 10.7, ''Controlling the Flow of Audit Event Messages'' shows the three stages of flow control.
| Control Stages | Total Message Backlog (Default) | Process Backlog Limit (Default) |
|---|---|---|
| 1 | 100 | 5 |
| 2 | 200 | 2 |
| 3 | 300 | None |
When there are 100 messages in memory, the operating system suspends any process that has five or more outstanding messages. Once a process has all its messages written to the log file, it can resume processing.
When there are 200 messages in memory, the operating system suspends any process that has submitted two or more messages until all messages are written to disk.
When there are 300 messages in memory, any process with messages in memory is suspended until all messages are written to disk.
You can establish site-specific values for controlling messages by using the
/BACKLOG qualifier to the SET AUDIT
command. For example, the following command raises the action thresholds so that
the operating system starts controlling the influx of messages when it has 125
unprocessed messages in its queue and a contributing process has eight messages
outstanding:
$ SET AUDIT/BACKLOG=(TOTAL=(125,250,350),PROCESS=(8,4) )
10.6.4.2. Preventing Process Suspension
Naturally, the operating system never suspends certain critical processes. Realtime processes and any of the following processes are exempt:
| CACHE_SERVER | CLUSTER_SERVER |
| CONFIGURE | DFS$COM_ACP |
| DNS$ADVER | IPCACP |
| JOB_CONTROL | NETACP |
| NET$ACP | OPCOM |
| REMACP | SHADOW_SERVER |
| SMISERVER | SWAPPER |
| TP_SERVER | VWS$DISPLAYMGR |
| VWS$EMULATORS |
You can prevent the suspension of a process by adding its process identifier
(PID) to the process exclusion list. Use the following form of the SET
AUDIT command:
SET AUDIT/EXCLUDE=process-idBe aware that processes (PIDs) are not automatically removed from the process
exclusion list when processes log out of the system. To remove a process from
the exclusion list, use the SET AUDIT/NOEXCLUDE command.
Processes excluded by the operating system cannot be removed.
10.6.5. Reacting to Insufficient Memory
When processes on the exclusion list (see Section 10.6.4.2, ''Preventing Process Suspension'') produce so many audit messages that the audit server runs out of memory, the default behavior of the audit server is to remove old event messages until memory is available. It saves the most current messages.
The audit server has other alternatives when it encounters memory limitations:
| Option | Description |
|---|---|
| Crash | Crash the system if the audit server runs out of memory. |
| Ignore_New | Ignore new event messages until memory is available. New event messages are lost but event messages in memory are saved. |
| Purge_Old (default) | Remove old event messages until memory is available for the most current messages. |
To alter the default behavior of the audit server and instruct it to ignore all new audit messages rather than purge the old ones, enter the following command:
$ SET AUDIT/SERVER=FINAL_ACTION=IGNORE_NEW
The audit server runs with a fixed virtual memory limit (PGFLQUOTA) of 20,480 pages. This may be further limited by the size of page files installed on the system. You can adjust the size of page files by running AUTOGEN. Whenever it detects a page file problem, AUTOGEN automatically resets the size to alleviate the problem.
10.6.6. Maintaining the Accuracy of Message Time-Stamping
If you are auditing a set of security events in which the order of occurrence is important, all clocks within a cluster need to remain synchronized. This ensures that message time-stamping on all nodes in the cluster closely reflects the order in which events occurred.
Because each node in a cluster configuration maintains time independently, it is
possible for cluster times to drift apart over time. To prevent drifting, use the
SYSMAN command CONFIGURATION SET TIME at regular intervals. See
the relevant section in the
VSI OpenVMS System Management Utilities Reference Manual, Volume II: M–Z for a sample command procedure
that you can run every hour to maintain clock synchronization to within a
second.
10.6.7. Adjusting the Transfer of Messages to Disk
The audit server stores security event messages in memory and periodically transfers groups of messages from its buffers to the audit log file on disk. Usually, the audit server transfers auditing messages every 5 minutes and archived messages (see Section 10.4.3.1, ''Using a Remote Log File'') every minute. Except for some high-security environments and instances where extreme numbers of audit messages are being generated on the system, this default should be sufficient.
High-security sites can transfer event messages to disk at higher than normal rates by modifying the interval of log transfer operations. The following command, for example, changes the audit server's characteristics so it writes event messages to the audit log file every 2 minutes:
$ SET AUDIT/INTERVAL=JOURNAL_FLUSH=00:02
Frequent message transfers can impact system performance, however, because the system performs more I/O operations rather than store messages in the system buffers associated with the audit server process.
To immediately force all audit messages to the log file, enter the following command:
$ SET AUDIT/SERVER=FLUSH
10.6.8. Allocating Disk Space for the Audit Log File
The audit server constantly monitors the disk space allocated to the security audit log file to ensure there is adequate space for event messages. Whenever the file runs low on available blocks, the audit server extends the audit log file. If disk resource limitations prevent the server from allocating more blocks to the log file, it takes one of the following actions:
Warns you by sending warning messages to the operator terminal. This occurs by default when less than 100 disk blocks are available.
The following command changes the default so the warning occurs when 150 blocks are available:
$ SET AUDIT/JOURNAL=SECURITY /THRESHOLD=WARNING=150
Takes action by suspending processes that are generating audit records. (Certain processes are immune to this: see Section 10.6.4.2, ''Preventing Process Suspension''.) When resource monitoring is enabled for the log file, process suspension occurs when less than 25 disk blocks are available.
To modify the action threshold to 50 blocks, enter the following command:
$ SET AUDIT/JOURNAL=SECURITY /THRESHOLD=ACTION=50
The threshold values may be expressed in blocks or as a delta time. Delta time values are multiplied by the average space consumption rate to yield a number of blocks. The maximum of the block and time threshold values is used as the active threshold value.
10.6.9. Error Handling in the Auditing Facility
Resources consumed by the OpenVMS security-auditing facility vary with the number and type of system events being recorded. Three different error conditions can develop related to the auditing facility:
The audit server can run out of memory. Section 10.6.5, ''Reacting to Insufficient Memory'' describes different methods of handling the situation.
The disk storing the audit log file can run out of space.
The network connection for a remote log file (archive file) can break.
This section discusses the default behavior of the auditing system in monitoring disk space and logging to an archive file.
10.6.9.1. Disabling Disk Monitoring
The audit server monitors the audit log file and regularly pre-extends its disk
block allocation to ensure there is adequate space for incoming event messages.
Whenever disk space is unavailable, the server first warns you through operator
messages and then resorts to suspending certain contributing processes (see
Section 10.6.8, ''Allocating Disk Space for the Audit Log File''). If you find many processes
suspended for no apparent reason, it is probably because your audit disk is
full. Once you correct the disk space problem, you can resume suspended
processes with the SET AUDIT/SERVER=RESUME command (rather
than wait for the next resource scan).
You can disable resource monitoring altogether by entering the following command:
$ SET AUDIT/JOURNAL=SECURITY/RESOURCE=DISABLE
However, if you disable disk resource monitoring, you eliminate the opportunity to receive warning messages until it is too late. The audit server begins to suspend processes that are generating too many audits, as Section 10.6.4, ''Choosing the Number of Outstanding Messages That Trigger Process Suspension'' describes, and if it runs out of memory, the server takes the action described in Section 10.6.5, ''Reacting to Insufficient Memory'': it ignores messages, purges old messages, or, possibly, crashes the system.
Once disk space becomes available, the audit server extends the log file and resumes any processes it suspended.
10.6.9.2. Losing the Link to a Remote Log File
If you are writing auditing messages to a remote log file, as described in Section 10.4.3.1, ''Using a Remote Log File'', the link between the local and remote node can fail. Should this happen, the audit server broadcasts a warning message to all operator terminals and attempts to reestablish the link every minute until the connection is made.
Chapter 11. System Security Breaches
Appropriate responses once a breach is suspected or confirmed. Site guidelines should help determine whether to increase site security (eliminating all possibility of further compromise), put proactive measures in place to apprehend the offender, or collect evidence to initiate a criminal or civil suit. Each decision has its own set of rules and guidelines.
Appropriate contacts and resources outside of the site that may be needed should such an event occur. For example, a company might want to become familiar with local, state, and federal authorities (as applicable), local phone carriers (security division), and the VSI support groups.
This chapter describes how to recognize when an attack on the system is in progress or has taken place and what countermeasures can be taken.
11.1. Forms of System Attacks
Hunting for access lines
Hunting for passwords
Attempting a break-in
Changing or creating user authorization file (UAF) records
Granting/stealing extra privileges
Introducing apparently innocent software (Trojan horse software) that is intended to steal user passwords or do other damage to the system
Introducing viruses in command procedures and programs to gain access to privileged accounts
Scavenging disks
Using a node as a gateway to other nodes
11.2. Indications of Trouble
Reports from users
- System monitoring, for example:
Unexplained changes or behavior in applications or normal processes
Unexplained messages from OPCOM or the audit server
Unexplained changes to user accounts in the system authorization database (privilege changes, protections, priorities, quotas)
11.2.1. Reports from Users
Files are missing.
There are unexplained forms of last login messages, such as successful logins the user did not perform or unexplained login failures.
A user cannot log in, suggesting the user password might have been changed since the last successful login or some other form of tampering has occurred.
Break-in evasion appears to be in effect, and the user cannot log in.
Reports from the
SHOW USERScommand indicate that the user is logged in on another terminal when the user did not do so.A disconnected job message appears during a login for a process the user never initiated.
Files exist in the user's directories that the user did not create.
Unexplained changes have been found in the protection or ownership of user files.
Listings appear that are generated under the user name without the user requesting the listing.
A sudden reduction occurs in the availability of resources, such as dialup lines.
Follow up promptly when one of these items is reported to you. You must confirm or deny that the condition exists. If you find the complaint is valid, seek a cause and solution.
11.2.2. Monitoring the System
A user appears on the
SHOW USERSreport that you know could not be currently logged in.You observe an unexplained change in the system load or performance.
You discover media or program listings are missing or notice other indications that physical security has degraded.
Your locked file cabinet has been tampered with, and the list of authorized users has disappeared.
You find unfamiliar software in the system executable image library [SYSEXE] or in [SYSLIB].
You observe unfamiliar images running when you examine the
MONITOR SYSTEMreport.You observe unauthorized user names when you enter the DCL command
SHOW USER. When you examine the listing that the Authorize utility (AUTHORIZE) produces with theSHOWcommand, you find that those users have been given system access.You discover proxy users that you never authorized.
The accounting report reveals unusual amounts of processing time expended recently, suggesting outside access.
You observe unexplained batch jobs on the batch queues.
You observe unexpected device allocations when you enter the
SHOW DEVICEcommand.You observe a high level of processing activity at unusual hours.
The protection codes or the access control lists (ACLs) change on critical files. Identifiers are added, or holders of identifiers are added to the rights list.
There is high personnel turnover or low morale.
All these conditions warrant further investigation. Some indicate that you already have a problem, and some may have simple explanations, while others may indicate serious potential problems.
11.3. Routine System Surveillance
Accounting utility (ACCOUNTING)
Authorize utility (AUTHORIZE)
Install utility (INSTALL)
System Management utility (SYSMAN)
Proper use of such mechanisms should help you verify settings, alert you to problems, and allow you to intervene. This section describes the most important system surveillance mechanisms–ACCOUNTING and ANALYZE/AUDIT.
11.3.1. System Accounting
Unfamiliar user names
Unfamiliar patterns of use, such as unusual activity for a particular time of day or day of week
Use of an unusual amount of resources
Unfamiliar sources of login, such as network nodes or remote terminals
11.3.2. Security Auditing
As the security administrator, you can have the operating system report on security-related
activity by enabling categories of events for auditing using the DCL command
SET AUDIT. Using the Audit Analysis utility (ANALYZE/AUDIT),
you can periodically review event messages collected in the security audit log file.
(See Chapter 10, "Security Auditing" for a full description of the
process.)
Ordinarily, enable audits rather than alarms for security-related events because the audit records are written to the system security audit log where you can study them in volume and archive log files for future reference. While an isolated auditing message may offer little insight, numerous audit records produce a pattern of security violations. For example, with auditing of object access, you can see a pattern of time, types of objects being accessed, and other system information that, in total, paint a picture of how the system is being used at different times of day.
To enable audits for unsuccessful access to files, devices, and volumes, enter the following command:
$ SET AUDIT/AUDIT/ENABLE=ACCESS=FAILURE/CLASS=(FILE,DEVICE,VOLUME)
This command records unsuccessful access events in the security audit log file but sends no alarms to the operator terminal.
Enable security alarms for real-time events or events that should be reviewed immediately, for example, intrusion attempts or changes to the system user authorization file (SYSUAF.DAT). For example, to enable alarms for modification to the known file list and changes to system time, enter the following command:
$ SET AUDIT/ALARM/ENABLE=(INSTALL,TIME)
This command sends event messages to the operator terminal. To keep a hardcopy record of these alarms, use a hardcopy operator terminal, or enable the events as both alarms and audits.
Enable security auditing for login failures and break-ins. This is the best way to detect probing by outsiders (and insiders looking for accounts). All sites needing security should enable alarms for these events.
Enable security auditing for logins. Auditing successful logins from the more suspicious sources like remote and dialup users provides the best way to track which accounts are being used. An audit record is written before users logging in to a privileged account can disguise their identity.
Enable security auditing for unsuccessful file access (ACCESS=FAILURE). This technique audits all file-protection violations and is an excellent method of catching probers.
Apply ACL-based file access auditing to detect write access to critical system files. The most important files to audit are shown in Table 11.1, ''System Files Benefiting from ACL-Based Auditing''. You may want to audit only successful access to these files to detect penetration, or you may want to audit access failures to detect probing as well.
Note that some of the files in Table 11.1, ''System Files Benefiting from ACL-Based Auditing'' are written during normal system operation. For example, SYSUAF.DAT is written during each login, and SYSMGR.DIR is written when the system boots.Table 11.1. System Files Benefiting from ACL-Based Auditing Device and Directory
File Name
SYS$SYSTEM
AUTHORIZE.EXE
F11BXQP.EXE
LOGINOUT.EXE
DCL.EXE
JOBCTL.EXE
SYSUAF.DAT
NETPROXY.DAT
RIGHTSLIST.DAT
STARTUP.COM
VMS$OBJECTS.DAT
SYS$LIBRARY
SECURESHR.EXE
SECURESHRP.EXE
SYS$MANAGER
VMS$AUDIT_SERVER.DAT
SY*.COM
VMSIMAGES.DAT
SYS$SYSROOT
[000000]SYSEXE.DIR
[000000]SYSLIB.DIR
[000000]SYS$LDR.DIR
[000000]SYSMGR.DIR
Enable security auditing for modifications to system parameters or the known file list (
/ENABLE=(SYSGEN,INSTALL)).Audit use of privilege to access files (either write access or all forms of access). Implement the security audit with the keywords ACCESS=(SYSPRV,BYPASS,READALL,GRPPRV). Note that this class of auditing can produce a large volume of output because privileges are often used in normal system operation for such tasks as mail delivery and operator backups.
Table 6.1, ''Example of a Site Security Policy'' provides further discussion of recommended sets of security events to audit.
11.4. Handling a Security Breach
Detection of a problem
Identification of the perpetrator
Prevention of further security violations
Repair of damage
The following sections describe these phases for both attempted and successful break-ins.
In all phases, train personnel to retain information and data as evidence, should there be a need to apprehend and prosecute the perpetrator.
11.4.1. Unsuccessful Intrusion Attempts
Unsuccessful intrusion attempts include situations where someone has attempted to guess passwords or browse through files.
11.4.1.1. Detecting Intrusion Attempts
Reports from users about unexplained login failures
Unusual system activity or unavailability of dialup lines
Security alarms for login failures, break-in attempts, and file-protection violations
Examination of the intrusion database
11.4.1.2. Identifying the Perpetrator
Enabling file auditing simplifies identification of file browsers. If, however, browsing is being initiated from another node in the network, you must inspect the network server log file (NETSERVER.LOG) that corresponds to the times of the protection violations. Coordinate your investigation with the security administrator at the remote node.
Identifying a perpetrator who is guessing passwords is considerably more difficult, especially when the source is anonymous, as from a dialup line. Usually, you must trade identification for prevention. Often the only way to positively identify an outsider attempting to enter the system requires that you permit further attempts while establishing the perpetrator's identity.
11.4.1.3. Preventing Intrusion Attempts
The prevention phase for this kind of attack involves preventing the would-be intruder from actually gaining access to the system and making future attempts more difficult.
Password Guessing
Make certain your users choose appropriate passwords. Consider use of the password generator (see Section 7.3.2.4, ''Generated Passwords'').
Enable system passwords at the points of entry. While a minor inconvenience to your users, system passwords are the best protection against further probing. If you already had a system password enabled, change it (see Section 7.3.1.2, ''System Passwords'').
Enable auditing of successful logins to catch the event if the intruder succeeds in getting in (see Section 11.3.2, ''Security Auditing'').
File Browsing
If you can identify the perpetrator, take action as established at your site.
Warn your users about the importance of adequate protection of their files, and consider inspecting the protection of user files.
If file browsing from other nodes in the network becomes a persistent problem, eliminate the default FAL account and authorize individual users through proxy login accounts (see Section 13.3.2, ''Setting Up a Proxy Database'').
11.4.2. Successful Intrusions
A successful security breach can include a successful password guessing scheme, theft or modification of either information or system resources, and placement of damaging software on the system. An intrusion may require a considerable amount of time to repair, depending upon the skill and intent of the perpetrator.
11.4.2.1. Identifying the Successful Perpetrator
Identification is often the most difficult part of handling an intrusion. First, you must establish whether the perpetrator is an authorized user or not. This determines the nature of the preventive measures that you will take. However, the distinction between insiders and outsiders may be difficult to achieve.
Tradeoff Between Identification and Prevention
You may have to make a tradeoff between a positive identification of the intruder and preventing future attacks. Often, the data available initially does not allow complete identification. If it is important to identify the perpetrator, you will often find it necessary to permit continued intrusions while you analyze the intrusion activity. Increase your auditing. Consider planting traps in system procedures that are under your control (such as SYLOGIN.COM) to obtain additional information. Increase your system backup efforts to permit easier recovery if files become damaged.
Identification of Outsiders
Identifying external intruders is particularly difficult, especially if they use any switched forms of communication (such as dialup lines or public data networks). DECnet for OpenVMS software provides many features to help you trace the activity through the network back to the source node. If a local terminal is involved, physical surveillance may be appropriate.
When a switched connection is involved, one of the major computer security problems is the telephone system itself. Tracing a telephone or public data network connection is time-consuming. Chasing an intruder through the telephone system is likely to take months and will require the assistance of law enforcement authorities. The existence of multiple long-distance telephone services compounds the problem by increasing the number of organizations with whom you must deal.
As a result, identifying an outside intruder is usually worthwhile only when you have sustained substantial financial damage. In many cases, it may be more useful if you concentrate on preventing recurrences of the problem.
11.4.2.2. Securing the System
Restore SYSUAF.DAT, NETPROXY.DAT, NET$PROXY.DAT and RIGHTSLIST.DAT (if damaged) from backups. Alternatively, generate listings of the files and inspect them closely, looking for improper entries, additional privileges, and changed UICs. If you are unsure of when SYSUAF.DAT might first have been modified, inspect it carefully regardless of whether you are using a backup copy or proceeding with the existing one. Be sure all authorization files are secure.
The perpetrator may have discovered passwords by browsing either through files or from other nodes in the network and may be using seldom accessed accounts for personal use. Change passwords for accounts, and have your users appear in person to learn their new passwords. At a minimum, change passwords on all privileged accounts. Do not use the same new password for all accounts.
A sophisticated penetrator may have planted ways to provide future access to the system even though you have taken the obvious steps of securing your system. Therefore, you may have to restore selected components of the OpenVMS software from backups or from your OpenVMS distribution kit. If the intruder was an outsider, the two critical components are LOGINOUT.EXE and NETACP.EXE, which validate all entries to the system.
However, if the intruder was an authorized user, restore all system files from backup copies. Authorized users can make use of a wide variety of illicit software patches (called trap doors) that they insert in the executive (SYS.EXE), the file system (F11BXQP.EXE), DCL, and other system files. The penetrator may have planted damaging software in any piece of software or command procedure likely to be used by a privileged user. Thus, complete assurance of a secure system requires a wholesale restoration of files from backups. Also reinstall any image (even from layered products) installed with privileges because it can also be used for a trap door. An alternate strategy is to restore trustworthy copies of the obvious targets of attack and to rely on increased auditing for a period of time to catch suspicious events.
Consider implementing additional security features, such as system passwords, password generation, increased auditing, and more stringent file protection to prevent a recurrence.
11.4.2.3. Repair After a Successful Intrusion
After an intrusion, restore corrupted files. Decide whether it is appropriate either to do a wholesale restoration of your system's data or to repair problems as they are discovered. Look for modifications to file protection that would have created paths for viruses and for Trojan horses that were introduced into the system and may still reside there.
Chapter 12. Securing a Cluster
This chapter describes concerns for security administrators of clustered systems. Clustered systems refer to those systems using hardware and software that permit sharing of disks, resources, and a common operating system among various computers. To properly secure your cluster, you should be familiar with the information in the VSI OpenVMS Cluster Systems Manual.
The VSI OpenVMS Cluster Systems Manual describes the tasks of the cluster manager. The cluster manager's job is the same as that of any system manager, but the cluster manager has to implement changes across many nodes. The security administrator for a cluster generally requires the same training and skills as a cluster manager, and at some cluster sites, the same person serves in the role of security administrator as well as cluster manager. At other sites, there may be one or more security administrators in addition to a cluster management team.
When a site separates the security administrator function from the cluster management function, coordination, cooperation, and communication between these functions becomes vital. As in previous chapters, this chapter uses the title of security administrator to refer to individuals who have the responsibility for system security, regardless of what other responsibilities they hold.
12.1. Overview of Clusters
Clustered systems provide a uniform computing environment that is highly scalable, highly available, and secure. It is critical that there be a single set of authorized users and that these users be able to have processes executing on any cluster member.
Lock manager system services ($ENQ/$DEQ) (to provide a framework for building distributed applications)
File and record management subsystems (coordinated through the lock manager)
Batch and print services
Process control system services
Security auditing system
Within a cluster, authorization data for users and the security profiles of objects must be consistent across all nodes so that each cluster member makes the same access control decision when presented with a particular user's access request for a particular object. Section 12.2, ''Building a Common Environment'' and Section 12.3, ''Synchronizing Authorization Data'' describe how to achieve a single security domain.
12.2. Building a Common Environment
Within a cluster, access control is mediated by individual nodes using a common set of authorization information. In the single security domain model, a process, acting on behalf of an authorized individual, requests access to a cluster-visible object, and a coordinating node determines the outcome by comparing its copy of the common authorization database with the security profile for the object being accessed. This model enforces security only when the authorization information and the object security profiles are consistent across all nodes in the cluster.
Maintain a common set of data, as described in Section 12.2.1, ''Required Common System Files'', Section 12.2.2, ''Recommended Common System Files'', and Section 12.2.3, ''Synchronizing Multiple Versions of Files''
Execute changes to system parameters consistently When changing any LGI system parameters, use the System Management utility (SYSMAN) (see Section 12.8, ''Using the System Management Utility'').
12.2.1. Required Common System Files
The easiest way to ensure a single security domain is to maintain a single copy of each of the files listed in Table 12.1, ''System Files That Must Be Common in a Cluster'' on one or more cluster-mounted disks. As soon as any required file is created on one node, it must be created or commonly referenced on all remaining cluster members. When a cluster is configured with multiple system disks, you can use system logical names to ensure that only a single copy of each file exists.
|
File |
Description |
|---|---|
|
NETOBJECT.DAT |
Contains the DECnet object database. Among the information contained in this file is the list of known DECnet server accounts and passwords. |
|
NETPROXY.DAT NET$PROXY.DAT |
Contains the network proxy database. This file is maintained by the Authorize utility (AUTHORIZE). |
|
QMAN$MASTER.DAT |
Contains the master queue manager database. This file contains the security information for all shared batch and print queues. If two or more nodes intend to participate in a shared queuing system, a single copy of this file must be maintained on a shared disk. |
|
RIGHTSLIST.DAT |
Contains the rights identifier database. This file is maintained by AUTHORIZE and by various rights identifier system services. |
|
SYSALF.DAT |
Contains the system autologin file. This file is maintained by the System Management utility (SYSMAN). |
|
SYSUAF.DAT |
Contains the system user authorization file. This file is maintained by AUTHORIZE and modifiable through the Set User Authorization Information ($SETUAI) system service. |
|
SYSUAFALT.DAT |
Contains the system alternate user authorization file. This file serves as a backup to SYSUAF.DAT and is enabled through the SYSUAFALT system parameter. |
|
VMS$OBJECTS.DAT |
Contains the cluster-visible object database. Among the information contained in this file are the security profiles for all cluster-visible objects. |
12.2.2. Recommended Common System Files
Although VSI does not require that the files listed in Table 12.2, ''System Files Recommended to Be Common'' be common to all cluster members, it does recommend that the data in the files be fully synchronized. Table 12.3, ''Using Multiple Versions of Required Cluster Files'' explains how to coordinate these files and suggests possible consequences of poor synchronization.
|
File |
Description |
|---|---|
|
VMS$AUDIT_SERVER.DAT |
Contains information related to security auditing, such as enabled security-auditing events and the destination of the system security audit log file. |
|
VMS$PASSWORD_HISTORY.DATA |
Contains the system password history database. This file is maintained by the SET PASSWORD utility. |
|
VMSMAIL_PROFILE.DATA |
Contains the system mail database. This file is maintained by the Mail utility (MAIL). It holds mail profiles for all system users as well as a list of all mail forwarding addresses in use on the system. |
|
VMS$PASSWORD_DICTIONARY.DATA |
Contains the system password dictionary. The system password dictionary is a list of English words and phrases that cannot be used as account passwords. |
|
VMS$PASSWORD_POLICY |
Contains any site-specific password filters. This file is created and installed by the security administrator or system manager. (See Section 7.3.3.3, ''Site-Specific Filters'' for details on password filters.) |
12.2.3. Synchronizing Multiple Versions of Files
Using shared files is not the only way of achieving a single security domain. Some sites may have requirements for multiple copies of one or more of these system files on different nodes in a cluster. As long as the security information available to each node in the cluster is exactly the same, these sites operate in a single security domain.
|
File |
Coordination Required |
Result of Poor Synchronization |
|---|---|---|
|
VMS$AUDIT_SERVER.DAT |
Update after any |
Possible partitioning of auditing domains |
|
NETOBJECT.DAT |
Update all versions after any NCP |
Unexplained network login failures and unauthorized network access |
|
NETPROXY.DAT NET$PROXY.DAT |
Update all versions after any |
Unexplained network login failures and unauthorized network access |
|
RIGHTSLIST.DAT |
Update all versions after any change to any identifier or holder records. |
Possible unauthorized system access and unauthorized access to protected objects |
|
SYSALF.DAT |
Update all versions after any SYSMAN |
Unexplained login failures and unauthorized system access |
|
SYSUAF.DAT |
Update all versions so the fields listed in Table 12.4, ''Fields in SYSUAF.DAT Requiring Synchronization'' are synchronized for each user record. |
Possible unexplained login failures and unauthorized system access. |
|
SYSUAFALT.DAT |
Update all versions after any change to any authorization records in this file. |
Possible unexplained login failures and unauthorized system access |
|
VMS$OBJECTS.DAT |
Update all versions after any change to the security profile of a cluster-visible object or after new cluster-visible objects are created. (See Section 12.5, ''Protecting Objects'' for details.) |
Possible unauthorized access to protected objects |
|
VMSMAIL_PROFILE.DATA |
Update all versions after any changes to mail forwarding parameters. |
Possible authorized disclosure of information |
|
VMS$PASSWORD_ |
Update all versions after any password change. |
Possible violation of the system password policy |
|
VMS$PASSWORD_ |
Update all versions after any site-specific additions. |
Possible violation of the system password policy |
|
VMS$PASSWORD_ |
Install common version on all nodes. |
Possible violation of the system password policy |
12.3. Synchronizing Authorization Data
On a cluster, all elements of the user authorization data should exist in a common database. These authorization elements include the system user authorization files (SYSUAF.DAT and its backup SYSUAFALT.DAT), the rights database (RIGHTSLIST.DAT), the network authorization file (NETPROXY.DAT) and its object database file (NETOBJECTS.DAT), which are present on all OpenVMS systems, and optionally, the autologin file, SYSALF.DAT.
|
Internal Name |
$SETUAI Item Code |
|---|---|
|
UAF$R_DEF_CLASS |
UAI$_DEF_CLASS |
|
UAF$Q_DEF_PRIV |
UAI$_DEF_PRIV |
|
UAF$B_DIALUP_ACCESS_P |
UAI$_DIALUP_ACCESS_P |
|
UAF$B_DIALUP_ACCESS_S |
UAI$_DIALUP_ACCESS_S |
|
UAF$B_ENCRYPT |
UAI$_ENCRYPT |
|
UAF$B_ENCRYPT2 |
UAI$_ENCRYPT2 |
|
UAF$Q_EXPIRATION |
UAI$_EXPIRATION |
|
UAF$L_FLAGS |
UAI$_FLAGS |
|
UAF$B_LOCAL_ACCESS_P |
UAI$_LOCAL_ACCESS_P |
|
UAF$B_LOCAL_ACCESS_S |
UAI$_LOCAL_ACCESS_S |
|
UAF$B_NETWORK_ACCESS_P |
UAI$_NETWORK_ACCESS_P |
|
UAF$B_NETWORK_ACCESS_S |
UAI$_NETWORK_ACCESS_S |
|
UAF$B_PRIME_DAYS |
UAI$_PRIMEDAYS |
|
UAF$Q_PRIV |
UAI$_PRIV |
|
UAF$Q_PWD |
UAI$_PWD |
|
UAF$Q_PWD2 |
UAI$_PWD2 |
|
UAF$Q_PWD_DATE |
UAI$_PWD_DATE |
|
UAF$Q_PWD2_DATE |
UAI$_PWD2_DATE |
|
UAF$B_PWD_LENGTH |
UAI$_PWD_LENGTH |
|
UAF$Q_PWD_LIFETIME |
UAI$_PWD_LIFETIME |
|
UAF$B_REMOTE_ACCESS_P |
UAI$_REMOTE_ACCESS_P |
|
UAF$B_REMOTE_ACCESS_S |
UAI$_REMOTE_ACCESS_S |
|
UAF$R_MAX_CLASS |
UAI$_MAX_CLASS |
|
UAF$R_MIN_CLASS |
UAI$_MIN_CLASS |
|
UAF$W_SALT |
UAI$_SALT |
|
UAF$L_UIC |
Not applicable |
Use SYSMAN if you choose to create an autologin file and maintain the file in the common
authorization database with your authorization files and rights database. On clustered systems,
the autologin file must include the cluster node name as a prefix to the terminal name. For
example, the terminal TTA0 on node WILLOW would be represented as
WILLOW$TTA0. See Section 12.8, ''Using the System Management Utility'' for an overview of SYSMAN.
12.4. Managing the Audit Log File
The audit server database VMS$AUDIT_SERVER.DAT contains information about events to be audited, the location of the audit log file, and information used to monitor its consumption of resources.
The audit log file resides in SYS$COMMON:[SYSMGR]. If you should
decide to redirect the audit log off the system disk, it is important to redirect it uniformly
across all nodes on the cluster. You use the command SET
AUDIT/JOURNAL=SECURITY/DESTINATION= filename. Make sure that the
file name you assign resolves to the same file throughout the cluster, not a file unique to each
node. The VSI OpenVMS Cluster Systems Manual describes
the procedure in detail.
12.5. Protecting Objects
|
Class |
Visibility in Cluster |
Location of Profile |
|---|---|---|
|
Capabilities |
Visible only to local node. |
Stored on local node. |
|
Devices |
Some can be visible cluster-wide. |
Profiles stored in VMS$OBJECTS. |
|
Files |
Visible cluster-wide. |
Stored in file header. |
|
Global sections |
Visible only to local node. |
Stored on local node. |
|
Logical name tables |
Visible only to local node. |
Stored on local node. |
|
Queues |
Visible cluster-wide. |
Stored in job-controller queue database (see Table 12.1, ''System Files That Must Be Common in a Cluster''). |
|
Resource domains |
Visible cluster-wide. |
Stored in VMS$OBJECTS. |
|
Security class |
Visible cluster-wide. |
Stored in VMS$OBJECTS. |
|
Volumes |
Can be visible cluster-wide. |
Stored on the volume. |
12.6. Storing Profiles and Auditing Information
The audit server creates and maintains the security elements of cluster-wide objects in a database called VMS$OBJECTS.DAT, located in SYS$COMMON:[SYSEXE]. You should ensure that the object database is present on each node in the cluster by specifying a file name that resolves to the same file through the cluster, not to a file that is unique to each node.
To reestablish the logical name after each system boot, define the logical in SYSECURITY.COM. The command procedure SYSECURITY.COM has to be defined before the audit server starts up.
Audit and alarm settings for all objects, established through the DCL command
SET AUDITTemplate profiles for all security profiles, as described in Chapter 5, "Descriptions of Object Classes"
Security profiles for all resource domain objects, all security class objects, and all cluster-visible devices (see Section 12.5, ''Protecting Objects'')
This database is updated whenever characteristics are modified, and the information is distributed so that all nodes participating in the cluster share a common view of the objects.
You cannot change security profiles or create protected objects when the object server is absent and cannot update the cluster database VMS$OBJECTS.DAT. However, you can modify the system parameter SECURITY_POLICY to allow security profile changes to protected objects on a local node (bit 4) or the creation of protected objects on a local node (bit 5).
12.7. Cluster-Wide Intrusion Detection
Cluster-wide intrusion detection extends protection against attacks of all types throughout the cluster. Intrusion data and information from each system is integrated to protect the cluster as a whole.
You can set the SECURITY_POLICY system parameter on the member systems in your cluster to maintain either a local or a cluster-wide intrusion database of unauthorized attempts and the state of any intrusion events.
If bit 7 in SECURITY_POLICY is cleared, all cluster members are made aware if a system is under attack or has any intrusion events recorded. Events recorded on one system can cause another system in the cluster to take restrictive action. (For example, users attempting to log in are monitored more closely and are limited to a certain number of login retries within a limited period of time. Once users exceed either the retry or time limitation, they cannot log in.)
For information on the system service $DELETE_INTRUSION, see theVSI OpenVMS System Services Reference Manual: A–GETUAI. For the system services $SCAN_INTRUSION and $SHOW_INTRUSION, see the VSI OpenVMS System Services Reference Manual: GETUTC–Z.
For information on the DCL command DELETE INTRUSION, see the
VSI OpenVMS DCL Dictionary: A–M. For the DCL command SHOW INTRUSION, see the
VSI OpenVMS DCL Dictionary: N–Z.
12.8. Using the System Management Utility
The System Management utility (SYSMAN) is a facility supporting the cluster work of the security administrator. Through its centralized management of nodes and clusters, SYSMAN lets you perform system management tasks from your local node that the utility executes on all nodes in the target environment.
To use SYSMAN requires OPER privilege on the local node and authorization for the OPER privilege on any remote node. The utility does not require a password when you are operating within a cluster in your own account. The operating system audits any logical link connections or any operation in which the utility requires a password.
System managers using SYSMAN should be careful that logical names are set to the same name on each node.
12.9. Managing Cluster Membership
Clustered systems use a group number and a cluster password to both allow multiple independent clustered systems to coexist on the same extended local area network (LAN) and to prevent accidental access to a cluster by unauthorized computers. The group number uniquely identifies each cluster system on a LAN. The cluster password serves as an additional check to ensure the integrity of individual clusters on the same LAN that accidentally use identical group numbers. The password also prevents an intruder who discovers the group number from joining the cluster.
The cluster group number and password (in encrypted form) are maintained in the cluster authorization file, SYS$COMMON:[SYSEXE]CLUSTER_AUTHORIZE.DAT. This file is created during installation of the operating system if you indicate that you want to set up a local area or mixed interconnect cluster. The installation procedure then prompts you for the cluster group number and password.
Under normal conditions, you need not alter records in the CLUSTER_AUTHORIZE.DAT file interactively. However, if you suspect a security breach, you may want to change the cluster password. In that case, you use SYSMAN to make the change. The file is accessible only to users with the SYSPRV privilege. Note that if you change either the group number or the password, you must reboot the entire cluster.
If your configuration has multiple system disks, each disk must have a copy of CLUSTER_AUTHORIZE.DAT. You must run SYSMAN to update all copies.
SYSMAN> SET CLUSTER_AUTHORIZATION/GROUP_NUMBER=65353 SYSMAN> SET ENVIRONMENT/CLUSTER/NODE21 SYSMAN> SET PROFILE /PRIVILEGE=SYSPRV SYSMAN> CONFIGURATION SET CLUSTER_AUTHORIZATION/PASSWORD=HOOVER %SYSMAN-I-CAFOLDGROUP, existing group will not be changed %SYSMAN-I-GRPNOCHG, Group number not changed %SYSMAN-I-CAFREBOOT, cluster authorization file updated The entire cluster should be rebooted.
12.10. Using DECnet Between Cluster Nodes
The cluster environment provides such a rich resource-sharing model (which includes files
and volumes, disk and tape devices, and batch and print queues) that it is usually unnecessary to
directly access another cluster node through DECnet software. Nonetheless, there are situations
where resources may not be uniformly shared across the cluster. This is particularly true in
mixed interconnect or local area cluster configurations, where you may choose to limit cluster
access to a satellite's disk or tape volumes. In such cases, users need to use the DCL command
SET HOST or some form of network access to access a satellite's resources
from other cluster members. See Section 13.3, ''Proxy Access Control'' for more information on network
access through proxy logins.
Chapter 13. Security in a Network Environment
Security in a network environment is even more sensitive than security in a single-system environment. Security is also harder to achieve because of operational complexities and the decentralization of control that commonly exist in networks. The larger the network, the more difficult the problem of establishing control and communication between security administrators of the numerous nodes.
There are limitations to the degree of security any networking site can expect to achieve due to limitations currently present in networking technology. Being sensitive to potential problems can help you avoid operations that could increase the security exposure in your network. This chapter helps you recognize these problem areas and adjust your operations accordingly.
VSI TCP/IP Services for OpenVMS
DECnet-Plus for OpenVMS (DECnet Phase V)
DECnet for OpenVMS (DECnet Phase IV)
13.1. Managing Network Security
Privileges for access to the network. To perform any kind of network activity, all network users must have TMPMBX and NETMBX privileges. Privileged users hold privileges in addition to TMPMBX and NETMBX.
Access control. To connect to a networked node, a user needs explicit access information, a proxy account, an application account, or a default DECnet account (see Section 13.2, ''Hierarchy of Access Controls'').
Routing initialization passwords for connecting local nodes to remote nodes over synchronous or asynchronous lines (see Section 13.5, ''Specifying Routing Initialization Passwords'').
13.1.1. Requirements for Achieving Security
Common security policy
There must be a correspondence between the initiating process on the source machine and the process on the target machine that works on behalf of the initiating process (see Figure 13.1, ''The Reference Monitor in a Network''). This correspondence must be managed by the two reference monitors and must be consistent with the security policy intended on the target machine (which is ultimately responsible for protecting the object). See Chapter 2, "OpenVMS Security Model" for a description of the reference monitor.
Shared access control information
The authorization database on the target machine must have some access authorization, such as an account or a proxy, that corresponds to the initiating process on the source machine.
Protected circuits, lines, terminals, and processors
There must be a protected means of communication between the two reference monitors (source and target) so that correspondence between the local and remote subjects can be reliably established and authenticated.
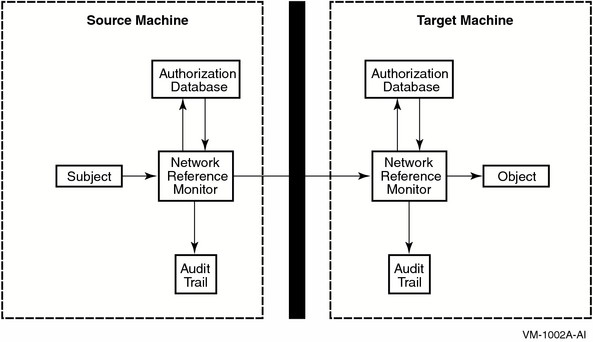
13.1.2. Auditing in the Network
SET AUDIT command. Possible audits include:Use of NCP commands. Each NCP command line is audited along with its completion status.
Use of privilege. In a network environment, much of this privilege use is related to the use of the OPER privilege in modifying the volatile network database.
Initiation and termination of connections.
13.2. Hierarchy of Access Controls
The network user on the local node can explicitly supply access control information. If this is the case, the remote node uses the access control information. See Section 13.2.1, ''Using Explicit Access Control'' for information about explicit access control.
The local node checks to see if outgoing proxy access is enabled for a local node or an application. If proxy is enabled, the local node sends the initiating user name in the connect request. If proxy is also enabled on the remote node, the DECnet software determines if the initiating user has proxy access. See Section 13.2.2, ''Using Proxy Logins'' and Section 13.3, ''Proxy Access Control'' for information about proxy access control.
When the remote node sees that no access control has been specified and that no proxy is applicable, it checks the configuration database. If the database contains an application user name, it uses that name. See Section 13.2.3, ''Using Default Application Accounts'' and Section 13.4, ''Using DECnet Application (Object) Accounts'' for information about default application accounts.
If there is no default application user name in its configuration database, the remote node checks the configuration database for default nonprivileged DECnet user name information. If the information is there, the remote node uses the default nonprivileged DECnet user name. See Section 13.4, ''Using DECnet Application (Object) Accounts'' for information about the default DECnet account.
Finally, if none of these sources supply the information, the connection fails.
13.2.1. Using Explicit Access Control
In the OpenVMS node specification, the access control string consists of the user name for the remote account and the user's password enclosed within quotation marks:
NODE "username password"::disk:[directory]file.type
In the following, user
PUTERMANuses an access control string to copy the fileBIONEWS.MEM:$ COPY WALNUT"PUTERMAN A25D3255"::BIONEWS.MEM BIONEWS.MEM
If you want to execute an NCP command on a remote node, you can do so by specifying a user name and password. In the following example, you can display all characteristics information about the application
MAILon the remote nodeTORONTO:NCP> TELL TORONTO USER A_JOHNSTON PASSWORD XZZOQ87 SHOW OBJECT- _NCP> MAIL CHARACTERISTICS
13.2.2. Using Proxy Logins
A proxy login enables a user logged in at a remote node to be logged in automatically to a specific account at the local node, without having to supply any access control information. Note that a proxy login is not the same as an interactive login. A proxy login means that specific network access operations can be executed, such as a copy operation. By contrast, an interactive login requires a user to supply a user name and password before the user can perform any interactive operations.
To establish a proxy login on the local node, the remote user must have a default proxy account on the local node that maps to a local user name. The remote user assumes the same file access, rights, and privileges as the local user name. You can use the proxy login capability to increase security because it minimizes the need to specify explicit access control information in node specifications passed over the network or stored in command procedures.
Note that network applications can also be assigned proxy login access.
The use of access control strings is not permitted in an evaluated configuration. Proxy login accounts should be used in the evaluated configuration.
13.2.3. Using Default Application Accounts
Another form of access control specific to network applications is default account information used by inbound connects from remote nodes that send no access control information. Because the remote node supplies no access control information, the local node uses the default information you specify for the application to make the connection.
You can use the following command to store default access control information about the application in the network configuration database:
NCP> SET OBJECT FAL USER JILL
13.3. Proxy Access Control
Section 13.2.2, ''Using Proxy Logins'' defines the concept of proxy logins. You can authorize
proxy access when you encounter situations where users either on different nodes or in different
groups want to share files on your system and you are reluctant to give out passwords or to set
the directory and file protection to W:RWE. With proxy logins, there is no need to embed
passwords in commands to copy a file across the network. There is also no need to allow world
read access to a file for file transfers. The user enters the following form of the DCL command
COPY to a default proxy account:
COPY remotenode::file-spec file-spec
To copy a file over the network using proxy access from an account other than the default, the user includes the name of the proxy account in the access control string of the DCL command, as follows:
COPY remotenode"proxyacct"::file-spec file-spec
13.3.1. Special Security Measures with Proxy Access
Proxy access is a selective merging of the authorization databases of the affected systems. Therefore, the security is only as good as the security of the least secure node.
Do not enable incoming proxy access to sensitive data.
Set up nonprivileged proxy accounts. If an account does need privilege, be sure those privileges cannot damage your system.? If your site has high security requirements, do not grant network or remote access to privileged user names.
Extend proxy access only to nodes that are always or almost always on the network.? You must create a balance between using proxies and having access control strings with passwords traveling over the network. A workstation or personal computer on the network that is capable of impersonating a node is also capable of monitoring network messages and thus capturing passwords. Ultimately, you must ensure that all nodes connected to your local network have some level of trustworthiness.
Exercise caution when authorizing users. Ideally, you should receive a formal authorization request from the security administrator at the remote site.
Examine any login command procedures for a proxy account. Make certain that they follow the recommendations in Section 7.2.4.2, ''Guidelines for Captive Command Procedures'' for login command procedures in captive accounts. Login command procedures should reside in a well-protected directory owned by a user other than the owner of the proxy account. They should prohibit write access for those who use the account.
13.3.2. Setting Up a Proxy Database
The proxy database on the target node must contain a source node's node synonym and source user name combination that matches the remote source node's node synonym and source user name. In Example 13.1, ''Sample Proxy Account'', for example, the security administrator adds a proxy for KMahogany. KMahogany must access the proxy account from node Birch.
The target node's user authorization file must contain a source user name that matches the proxy database entry's target source user name. Example 13.1, ''Sample Proxy Account'' assumes that the SYSUAF.DAT file on node Birch has a user authorization record for KMahogany.
Incoming proxy access must be enabled for the target node in the configuration database. See Section 13.3.2.1, ''Enabling and Disabling Incoming Proxy Access''.
Incoming proxy access must be enabled for the target application in the configuration database. See Section 13.3.2.1, ''Enabling and Disabling Incoming Proxy Access''.
Outgoing proxy must be enabled on the originating node for the node itself and for all applications that expect to use proxy.
You can control the use of proxy logins at the local node. Use AUTHORIZE to create and modify the permanent proxy database.
The default network proxy authorization file is NET$PROXY.DAT. However, AUTHORIZE maintains the file NETPROXY.DAT for compatibility, for support of many layered products, and for translation of DECnet for OpenVMS (Phase IV) node names.
Each network proxy entry can map a single remote user to multiple proxy user names on the local node (one default proxy user name and up to fifteen additional proxy user names). If you are going to have access to more than one proxy account from the same node and login name, indicate which proxy account should be the default. The proxy database entry identifies the user in the form of nodename::username or nodename::[group,member].
For example, to create a proxy file at a local node and add a default proxy entry mapping
user Martin on remote node BOSTON to user Allen at the
local node, enter the following commands:
$ SET DEFAULT SYS$SYSTEM
$ RUN AUTHORIZE
UAF> CREATE/PROXY
UAF> ADD/PROXY BOSTON::MARTIN ALLEN/DEFAULT
UAF> EXIT|
Command |
Argument |
Description |
|---|---|---|
|
ADD/PROXY |
node::remoteuser localuser[,...] |
Adds proxy access for the specified user. |
|
CREATE/PROXY |
Creates a network proxy authorization file. | |
|
LIST/PROXY |
Creates a listing file of all proxy accounts and all remote users with proxy access to the accounts. | |
|
MODIFY/PROXY |
node::remoteuser |
Modifies proxy access for the specified user. |
|
REMOVE/PROXY |
Deletes proxy access for the specified user. | |
|
SHOW/PROXY |
* node::remoteuser |
Displays proxy access allowed for the specified user. |
13.3.2.1. Enabling and Disabling Incoming Proxy Access
You can control proxy access to your node and to particular applications.
Controlling Proxy Access to a Node
To accept proxy connections to your node, set the incoming proxy attribute in the executor database in the following way:
NCP> SET EXECUTOR INCOMING PROXY ENABLE
To deny proxy connections to your node, set the outgoing proxy attribute in the following way:
NCP> SET EXECUTOR INCOMING PROXY DISABLE
If proxy access to the node is disabled, the system ignores any proxy connection request.
A comparable set of steps is necessary on the originating node so that proxy data is transmitted in the connect request message. Set proxy attributes for both the node and for all applications that expect to use proxy, for example:
NCP> SET EXECUTOR OUTGOING PROXY ENABLE NCP> SET OBJECT MAIL PROXY BOTH NCP> SET OBJECT MAIL PROXY INCOMING NCP> SET OBJECT MAIL PROXY OUTGOING
In general, enabling outgoing proxy is a good idea, even if the target node does not enable proxy for the object, because enabling outgoing proxy puts the originating user name in the connect message. Thus the user name is available for accounting and audit logs on the target node. Be aware that a small number of DECnet applications depend on the nonproxy form of the connect message (for example, some use the connect message space for application information rather than user names) and do not function if outgoing proxy is enabled.
Controlling Proxy Access to an Application
To allow proxy access to a particular application, you must enable the proxy access for
both the node and the application. In addition, specify the name of the application in the
SET OBJECT command. For example, the following enables proxy access to the
application NML:
NCP> SET EXECUTOR INCOMING PROXY ENABLE NCP> SET OBJECT NML INCOMING PROXY ENABLE
To disable proxy access to an application, identify the application in the SET
OBJECT command, and set the incoming proxy attribute to disable. For example, the
following disables proxy access to the application FAL:
NCP> SET OBJECT FAL INCOMING PROXY DISABLE
If incoming proxy is enabled for the application but the proxy access for the node is disabled, the system in effect ignores any proxy access request to the application.
13.3.2.2. Removing Proxy Access
Remove proxy access to the system when it is no longer needed. Invoke AUTHORIZE, and enter the following command to remove proxy access:
UAF> REMOVE/PROXY BOSTON::MARTIN
13.3.2.3. Procedure for Creating a Proxy Account
Define the purpose of the account, its name, and which network users will be admitted.
Create the local account, if necessary, with AUTHORIZE; if the account already exists, make sure it is restricted and defined as /NOINTERACTIVE, /NOBATCH, and /NETWORK.
Review the privileges on the account. Generally, avoid granting privileges to proxy login accounts.
Create the network proxy authorization file, if necessary, with the AUTHORIZE command
CREATE/PROXY(the system usually creates it automatically).Allow as many remote users as necessary access to the proxy account with the AUTHORIZE command
ADD/PROXY.Check the default protection on the directory, and customize it as necessary.
Examine any login command procedure specified by the
/LGICMDqualifier to theADDcommand. In captive accounts, make certain that the login command procedure follows the recommendations in Section 7.2.4.2, ''Guidelines for Captive Command Procedures''. It should reside in a well-protected directory owned by a user other than the owner of the proxy account. It should prohibit write access for those who use the account.Notify the security administrator at the remote node about which users from that node have been authorized for access to your node.
13.3.3. Example of a Proxy Account
WALNUT wants to create a general access account called GENACCESS. At
the same time, the administrator wants to take steps to allow proxy logins by three users from
the node BIRCH: KMahogany, PSumac, and
WPine, as well as two users from the node WILLOW:
RDogwood and WCherry. No network proxy authorization file currently
exists.$ SET DEFAULT SYS$SYSTEM $ RUN AUTHORIZE UAF> ADD GENACCESS /PASSWORD=WHYNADGUM/UIC=[236,043] - _UAF> /DEVICE=STAFFDEV/DIRECTORY=[GENACCESS] - _UAF> /OWNER="Security Mgmt"/ACCOUNT=SEC - _UAF> /FLAGS=(DISWELCOME,DISNEWMAIL,GENPWD,DISMAIL) - _UAF> /NOBATCH/NOINTERACTIVE/MAXDETACH=8 - _UAF> /LGICMD=LOGIN/MAXACCTJOBS=10 %UAF-I-ADDMSG, user record successfully added %UAF-I-RDBADDMSGU, identifier GENACCESS value [000236,000043] added to rights database %UAF-I-RDBADDMSGU, identifier SEC value [000236,177777] added to rights database UAF> CREATE/PROXY UAF> ADD/PROXY BIRCH::KMAHOGANY GENACCESS/DEFAULT %UAF-I-NAFADDMSG, proxy from OMNI:.BOSTON.BIRCH::KMAHOGANY to GENACCESS added UAF> ADD/PROXY BIRCH::PSUMAC GENACCESS/DEFAULT %UAF-I-NAFADDMSG, proxy from OMNI:.BOSTON.BIRCH::PSUMAC to GENACCESS added UAF> ADD/PROXY BIRCH::WPINE GENACCESS/DEFAULT %UAF-I-NAFADDMSG, proxy from OMNI:.BOSTON.BIRCH::WPINE to GENACCESS added UAF> ADD/PROXY WILLOW::RDOGWOOD GENACCESS/DEFAULT %UAF-I-NAFADDMSG, proxy from OMNI:.BOSTON.WILLOW::RDOGWOOD to GENACCESS added UAF> ADD/PROXY WILLOW::WCHERRY GENACCESS/DEFAULT %UAF-I-NAFADDMSG, proxy from OMNI:.BOSTON.WILLOW::WCHERRY to GENACCESS added UAF> SHOW/PROXY *::* Default proxies are flagged with a (D) OMNI:.BOSTON.BIRCH::KMAHOGANY GENACCESS (D) OMNI:.BOSTON.BIRCH ::PSUMAC GENACCESS (D) OMNI:.BOSTON.BIRCH ::WPINE GENACCESS (D) OMNI:.BOSTON.WILLOW ::RDOGWOOD GENACCESS (D) OMNI:.BOSTON.WILLOW ::WCHERRY GENACCESS (D) UAF> EXIT {messages} $ DIRECTORY/SECURITY SYS$STAFF:[000000]GENACCESS.DIR ⋮ $ DIRECTORY/SECURITY SYS$STAFF:[GENACCESS]LOGIN.COM ⋮
13.4. Using DECnet Application (Object) Accounts
DECnet object accounts These are individual accounts for specific network objects (for example, MAIL) automatically configured on your system. These provide more accountability of remote access to an object than the default DECnet account provides (for example, an object can have a captive account with a login command procedure that grants or denies access to the object based on the remote node name or user name).
Default DECnet account This type of account allows all network objects general access to the system. It is appropriate for systems with low security requirements (for example, a local area network of systems located within a site with no outside connections or dialup lines). The default DECnet user name lets users perform certain network operations, such as the exchange of electronic mail between users on different nodes, without having to supply a user name and password. The default DECnet user name is also used for file operations when access control information is not supplied. For example, it lets remote users access local files on which the file protection has been set to allow world access. If you do not want remote users accessing your node, do not create a default DECnet user name. See Section 13.4.3, ''Removing Default DECnet Access to the System'' for information about removing default DECnet accounts.
13.4.1. Summary of Network Objects
You should understand the function of the network objects supplied with the OpenVMS operating system before you determine the access control to apply to them. This section provides a description of the most common network objects.
FAL
The file access listener (FAL) is the remote file access facility. FAL is an image that receives and processes remote file access requests for files at the local node.
Use of general FAL access is strongly discouraged. Open access allows general network access to any files marked world-accessible. It also allows remote users to create files in any directory with world write access.
Sites with high security requirements, or sites where it is difficult to recognize all the intended users, should not create a FAL account. To control which users gain access, these sites may establish one or more proxy accounts for specific purposes (see Section 13.3, ''Proxy Access Control'').
MAIL is an image that provides personal mail services for OpenVMS systems. In most cases, allow the MAIL object general access to the system.
MIRROR
MIRROR is an image used for particular forms of loopback testing. For example, MIRROR is run during the DECnet phase of the UETP test package.
MOM
MOM is the Maintenance Operations Module. The MOM image downline loads unattended systems, transferring a copy of an operating system file image from an OpenVMS node to a target node. The MOM object is established during a system installation.
NML
NML is the network management listener. Remote users with access to NML can use NCP TELL commands to gather and report network information from your DECnet databases.
PHONE
PHONE is an image that allows online conversations with users on remote OpenVMS systems. Note that if you allow default DECnet access to PHONE, anyone in the network can get a list of users currently logged in to the local system and attempt a login using the list of user names.
TASK
Through the default DECnet account, the TASK object allows arbitrary command procedures (including those that might be used in intrusions) to be executed on your system.
Note that if you do not allow default DECnet access on your system or if you disable default DECnet access to the TASK object, you can allow remote user-written command procedures (tasks) to run on your system through the use of access control strings or proxy access.
VPM
VPM is the Virtual Performance Monitor Server. Access to VPM is required to use the cluster monitoring features of the Monitor utility (MONITOR).
13.4.2. Configuring Network Objects Manually
The command procedure NETCONFIG.COM configures the network objects on your system automatically, and the command procedure NETCONFIG_UPDATE.COM updates the network objects automatically.
Create a top-level directory for each network object, and specify a unique owner UIC and group UIC. For example, the following command sequence creates a top-level directory for the MAIL object on the system disk:
$ SET DEFAULT SYS$SPECIFIC:[000000] $ CREATE/DIRECTORY [MAIL$SERVER]/OWNER_UIC=[376,374]
Table 13.2, ''Network Object Defaults'' lists the directory names, user names, and UICs used by the NETCONFIG.COM and NETCONFIG_UPDATE.COM command procedures to create accounts for specific network accounts. For consistency, you should specify the same information when manually creating network object accounts.
Note that the MOM object is created by the operating system during installation.
Using AUTHORIZE, create an account for the object, and use a generated password.?
For example, the following command sequence sets up an account for the MAIL object:
$ RUN SYS$SYSTEM:AUTHORIZE UAF> ADD MAIL$SERVER/OWNER=MAIL$SERVER DEFAULT - _UAF> /PASSWORD=MDU1294B/UIC=[376,374]/ACCOUNT=DECNET - _UAF> /DEVICE=SYS$SPECIFIC: /DIRECTORY=[MAIL$SERVER] - _UAF> /PRIVILEGE=(TMPMBX,NETMBX) /DEFPRIVILEGE=(TMPMBX,NETMBX) - _UAF> /FLAGS=(RESTRICTED,NODISUSER,NOCAPTIVE) /LGICMD=NL: - _UAF> /NOBATCH /NOINTERACTIVE
The AUTHORIZE command
SHOW MAIL$SERVERdisplays the network account set up for the MAIL object, as shown in Example 13.2, ''UAF Record for MAIL$SERVER Account''.Use the NCP
DEFINEcommand to associate the user name and password of the account with the specified object in the network database, as follows:$ RUN SYS$SYSTEM:NCP NCP> DEFINE OBJECT MAIL USER MAIL$SERVER PASSWORD MDU1294B NCP> EXIT
Repeat steps 1 through 3 for each network object.
When finished, remove default DECnet access from the executor database, and remove the default DECnet account from the SYSUAF (see Section 13.4.3, ''Removing Default DECnet Access to the System'').
Finally, reboot the system to copy changes made to the permanent executor and object databases to the running system.
Username: MAIL$SERVER Owner: MAIL$SERVER Account: MAIL$SERVER DEFAULT UIC: [376,374] ([DECNET,MAIL$SERVER]) CLI: DCL Tables: Default: SYS$SPECIFIC:[MAIL$SERVER] LGICMD: Login Flags: Restricted Primary days: Mon Tue Wed Thu Fri Sat Sun Secondary days: Primary 000000000011111111112222 Secondary 000000000011111111112222 Day Hours 012345678901234567890123 Day Hours 012345678901234567890123 Network: ##### Full access ###### ##### Full access ###### Batch: ----- No access ------ ----- No access ------ Local: ----- No access ------ ----- No access ------ Dialup: ----- No access ------ ----- No access ------ Remote: ----- No access ------ ----- No access ------ Expiration: (none) Pwdminimum: 6 Login Fails: 0 Pwdlifetime: (none) Pwdchange: (none) Last Login: (none) (interactive), (none) (non-interactive) Maxjobs: 0 Fillm: 16 Bytlm: 12480 Maxacctjobs: 0 Shrfillm: 0 Pbytlm: 0 Maxdetach: 0 BIOlm: 12 JTquota: 1024 Prclm: 0 DIOlm: 6 WSdef: 180 Prio: 4 ASTlm: 16 WSquo: 200 Queprio: 0 TQElm: 10 WSextent: 0 CPU: (none) Enqlm: 20 Pgflquo: 25600 Authorized Privileges: TMPMBX NETMBX Default Privileges: TMPMBX NETMBX
13.4.3. Removing Default DECnet Access to the System
Caution
Before deleting your default DECNET account, as described in this section, use the NCP
command SHOW KNOWN OBJECTS and the Authorize utility (AUTHORIZE) to verify
that all network objects and layered products that use network objects have network accounts
set up in the system user authorization file (SYSUAF.DAT). Otherwise, network objects and
layered products that use network objects may not work as expected.
To do this, remove access to the DECNET account in the network configuration database, and delete the DECNET account from the SYSUAF.
Removing Default DECnet Access
Execute the following NCP commands to remove the default DECnet access from the network executor database:
NCP> DEFINE EXECUTOR NONPRIVILEGED USER DEFAULT_DECNET NCP> PURGE EXECUTOR NONPRIVILEGED PASSWORD
The DEFAULT_DECNET user specified in the first command is a nonexistent user account that is specified for auditing purposes only. (A network login failure message is written to the security audit log file each time access to your system is attempted through the [nonexistent] DEFAULT_DECNET account.)
Deleting the DECNET Account
Using AUTHORIZE, remove the DECNET account from SYSUAF, as follows:
$ SET DEFAULT SYS$SYSTEM
$ RUN AUTHORIZE
UAF> REMOVE DECNET
UAF> EXITDelete any files in the [DECNET] directory structure.
Modifying the Volatile Configuration Database
To have the change take effect immediately, modify the volatile database with the following NCP commands:
NCP> SET EXECUTOR NONPRIVILEGED USER DEFAULT_DECNET NCP> CLEAR EXECUTOR NONPRIVILEGED PASSWORD
13.4.4. Setting Privilege Requirements for Remote Object Connections
You can select specific privileges to control the use of DECnet objects that are specified during network configuration. In such instances, it becomes a privileged operation either to connect to a privileged DECnet object or use an outgoing DECnet object.
For example, the following command establishes the requirement that users initiating a DECnet connection to the remote object MAIL must possess the OPER and SYSNAM privileges:
NCP> DEFINE OBJECT MAIL OUTGOING CONNECT PRIVILEGES OPER,SYSNAM
This mechanism is a useful way of limiting access to certain DECnet applications to privileged users or programs. However, in order to be effective, the privilege requirement must be imposed consistently on all nodes in the network.
13.5. Specifying Routing Initialization Passwords
Point-to-point connections are connections over synchronous and asynchronous lines. For point-to-point connections, especially over dialup lines, you can use routing initialization passwords to verify that the initiating node is authorized to form a connection with your node. Each end of a point-to-point circuit can establish a verifier to transmit to the other node and specify a verifier expected from the other node. Before the link is established, each node verifies that it received the expected verifier from the other node.
Passwords are usually optional for point-to-point connections but are required for dynamic asynchronous connections. To provide for increased security when a remote node requests a dynamic asynchronous connection (which is normally maintained only for the duration of a telephone call), the node requesting the dynamic connection supplies a password, but the node receiving the login request is prevented from revealing a password to the requesting node. The network address, node name, and password of the requesting node has to match the local system's routing authorization data.
13.5.1. Establishing a Dynamic Asynchronous Connection
Note
A dynamic asynchronous connection to an OpenVMS node can be initiated from any node that supports the DECnet asynchronous DDCMP protocol.
On an OpenVMS node, you can perform steps 1 and 2 of the dynamic asynchronous connection process before you turn on the network at your node (step 3). The later steps of the process (starting with step 4) must occur when the line is being switched to DECnet.
Log in to the SYSTEM account and enter the following commands interactively (or include them in the SYS$MANAGER:SYSTARTUP_VMS.COM command procedure before you boot the system). These commands load the asynchronous driver NODRIVER (
NOA0) and installDYNSWITCHsoftware on your system.$ RUN SYS$SYSTEM:SYSGEN SYSGEN> CONNECT NOA0/NOADAPTER SYSGEN> EXIT $ INSTALL:=$SYS$SYSTEM:INSTALL $ INSTALL/COMMAND INSTALL> CREATE SYS$LIBRARY:DYNSWITCH/SHARE - _ /PROTECT/HEADER/OPEN INSTALL> EXIT
The system manager of the remote OpenVMS node must also enter these commands.
Additionally, the system manager at the remote OpenVMS node must enter the commands given below. These commands enable the use of virtual terminals for the terminal line that is to be switched, and set the DISCONNECT characteristic for the terminal line (the virtual terminal capability permits the process to continue running if the physical terminal you are using becomes disconnected):
$ RUN SYS$SYSTEM:SYSGEN SYSGEN> CONNECT VTA0/NOADAPTER/DRIVER=TTDRIVER SYSGEN> EXIT $ SET TERMINAL/EIGHT_BIT/PERMANENT/MODEM/DIALUP - _$ /DISCONNECT device-name:
where device-name is the name of the terminal port to which the dynamic asynchronous connection is made.
Establish the required transmit password at the originating end of the dynamic asynchronous dialup link. The transmit password is the password sent to the remote node during connection startup. Use NCP to enter a command to define the transmit password for the remote node. The password can contain one to eight alphanumeric characters and should not contain any spaces. Specify the following commands:
$ RUN SYS$SYSTEM:NCP NCP> DEFINE NODE node-id TRANSMIT PASSWORD password NCP> EXIT
where node-id is the name of the remote node with which your node is forming a connection.
In the following example, the node name of your local node is LOCALA, the transmit password is PASSA, and the remote node with which you are creating a dynamic asynchronous dialup link is REMOTC:
$ RUN SYS$SYSTEM:NCP NCP> DEFINE NODE REMOTC TRANSMIT PASSWORD PASSA NCP> EXITFor each remote node with which you will create a dynamic asynchronous DECnet dialup link, you must define a transmit password in a separate command.
The system manager for the node at the other end of the connection must define that same password as a receive password for your node (the password expected to be received from your node). The remote system manager should also specify the parameter INBOUND ROUTER or INBOUND ENDNODE, to indicate the type of node (router or end node) that is expected to initiate the dynamic connection. These are the commands the remote manager should enter:
$ RUN SYS$SYSTEM:NCP NCP> DEFINE NODE node-id - _ RECEIVE PASSWORD password INBOUND node-type NCP> EXITFor example, if your node
LOCALAis an end node and your transmit password isPASSA, the manager atREMOTCshould issue the following command:$ RUN SYS$SYSTEM:NCP NCP> DEFINE NODE LOCALA RECEIVE PASSWORD PASSA INBOUND ENDNODE NCP> EXITEnsure that DECnet is running on both nodes for the remaining steps. If you have not already done so, turn on the network by entering the following command (and request that the remote system manager also do so):
$ @SYS$MANAGER:STARTNETIf the network was already running before you began the dynamic asynchronous connection procedure, enter these commands to cause the permanent database entry to be entered in the volatile database:
$ RUN SYS$SYSTEM:NCP NCP> SET NODE node-id ALL NCP> EXITThe remaining steps can be performed by any OpenVMS user with NETMBX privilege. Log in to your local OpenVMS system, and enter the following DCL command on your terminal to cause your process to function as a terminal emulator (which makes the remote terminal appear to be a local terminal connection):
SET HOST/DTE device-name:where device-name is the name of your local terminal port that is connected to the modem. If both systems use modems with autodial capabilities, you can optionally include the
/DIALqualifier on theSET HOST/DTEcommand to cause automatic dialing of the modem on the remote node, as follows:SET HOST/DTE/DIAL=number device-name:If you are not using automatic dialing, dial in to the remote node manually.
Once the dialup connection is made and you receive the remote OpenVMS system welcome message, log in to your account on the remote node.
While logged in to your account on the remote node, enter the following command to cause the line to be switched to a DECnet line automatically:
$ SET TERMINAL/PROTOCOL=DDCMP/SWITCH=DECNET
The following message indicates that the DECnet link is being established:
%REM-S-END - control returned to local-nodename:: $
To check whether the communications link has come up, specify the following command on the local system:
$ RUN SYS$SYSTEM:NCP NCP> SHOW KNOWN CIRCUITS NCP> EXITThe resulting display should list a circuit identified by the mnemonic TT or TX, depending on the asynchronous device installed on the line, and indicate that it is in the ON state.
When the DCL prompt appears on your terminal screen, you can begin to communicate with the remote node over the asynchronous DECnet connection.
As an alternative to switching the terminal line to a DECnet line automatically (as described in previous step 7), you can switch the line manually. If you originate a dynamic connection to an OpenVMS node from a node that is not running OpenVMS software, manual switching is required; from an OpenVMS system, it is optional. If you are originating the connection from a node that is not running OpenVMS software, follow system-specific procedures to log in to the remote OpenVMS node by means of terminal emulation.
Once you are logged in to the remote node, two steps are required to perform manual switching:Using your account on the remote OpenVMS node, specify the
SET TERMINALcommand described in step 7, but add the/MANUALqualifier:$ SET TERMINAL/PROTOCOL=DDCMP/SWITCH=DECNET/MANUAL
You receive the following message from the remote node indicating the remote system is switching its line to DECnet use:
%SET-I-SWINPRG The line you are currently logged over is becoming a DECnet lineYou should exit from the terminal emulator and switch your line manually to a DECnet line. The procedure depends on the specific operating system on which you are logged in.
The following example shows how an OpenVMS user originating a dynamic connection would perform this procedure:Exit from the terminal emulator by pressing the backslash (\) key and the Ctrl key simultaneously on your OpenVMS system.
Enter the following command to switch your terminal line to a DECnet line manually:
$ SET TERMINAL/PROTOCOL=DDCMP TTA0:
TTA0is the name of the terminal port on the local node.Enter NCP commands to turn on the line and circuit connected to your terminal port TTA0 manually, as in the following example:
$ RUN SYS$SYSTEM:NCP NCP> SET LINE TT-0-0 RECEIVE BUFFERS 4 - _ LINE SPEED 2400 STATE ON NCP> EXITAsynchronous DECnet is then started on the local OpenVMS node.
- You can terminate the dynamic asynchronous link in one of two ways:
Break the telephone connection.
Run NCP and turn off either the asynchronous line or circuit. The two commands you can use are as follows:
$ RUN SYS$SYSTEM:NCP NCP> SET LINE dev-c-u STATE OFF NCP> SET CIRCUIT dev-c-u STATE OFF NCP> EXITIf either of the above NCP commands is entered at the remote node, the line returns to terminal mode immediately. If the command is entered at the local (originating) OpenVMS node, the remote line and circuit remain on for approximately four minutes and then the line returns to terminal mode.
Figure 13.2, ''A Typical Dynamic Asynchronous Connection'' shows the establishment of a dynamic asynchronous connection. The commands that must be entered at each end of the connection are shown in Example 13.3, ''Sample Commands for a Dynamic Asynchronous Connection''.

Commands issued at both the local OpenVMS node (LOCALA) and the remote OpenVMS node (REMOTC):
$ RUN SYS$SYSTEM:SYSGEN SYSGEN> CONNECT NOA0/NOADAPTER SYSGEN> EXIT $ INSTALL:=$SYS$SYSTEM:INSTALL $ INSTALL/COMMAND INSTALL> CREATE SYS$LIBRARY:DYNSWITCH/SHARE/PROTECT/HEADER/OPEN INSTALL> EXIT
Commands issued at the remote node (REMOTC):
$ RUN SYS$SYSTEM:SYSGEN SYSGEN> CONNECT VTA0/NOADAPTER/DRIVER=TTDRIVER SYSGEN> EXIT $ SET TERMINAL/EIGHT_BIT/PERMANENT/MODEM/DIALUP/DISCONNECT TTB0: $ RUN SYS$SYSTEM:NCP NCP> DEFINE NODE LOCALA RECEIVE PASSWORD PASSA INBOUND ENDNODE NCP> SET NODE LOCALA ALL NCP> EXIT
Commands issued at the local node (LOCALA):
$ RUN SYS$SYSTEM:NCP
NCP> DEFINE NODE REMOTC TRANSMIT PASSWORD PASSA
NCP> SET NODE REMOTC ALL
NCP> EXIT
$ SET HOST/DTE/DIAL=8556543 TTA0:After dialing in automatically to REMOTC, log in to your account on REMOTC.
$ SET TERMINAL/PROTOCOL=DDCMP/SWITCH=DECNET %REM-S-END - control returned to LOCALA: $
13.6. Sharing Files in a Network
Discourage users from sharing passwords and changing file and directory protection codes to grant the world category read or execute access. Grant BYPASS or READALL privilege cautiously.
The easiest way to share files on an occasional basis in a network environment is through the Mail utility. You mail the file to the intended recipient; there is no exposure of passwords, and the file is not made accessible to other users. However, there is the disadvantage of having to ask the file owner and wait for their response every time you want access. For an ongoing activity involving frequent access to shared files, it is better to set up proxy accounts and ACLs on the directories and files.
13.6.1. Using the Mail Utility
The easiest way for a user to transfer a text file to another user is to invoke the Mail
utility (MAIL) and to send the user a copy of the file. This method is reasonably secure,
because passwords need not be revealed and the original protection of the file is not changed.
The receiving user simply includes a new file name with the MAIL command
EXTRACT/NOHEADER to place a copy in the user's own directory. The copy
automatically acquires the user's default protection. The user then uses the MAIL command
DELETE to remove the copy from the mail file.
13.6.2. Setting Up Accounts for Local and Remote Users
A network manager may need to admit a number of users from outside nodes into a directory on the local node for a specific task. Therefore, you create a proxy account and add the proxy access to admit the outsiders into that one account (see Section 13.3.2.3, ''Procedure for Creating a Proxy Account''). If there are local users who need to share the files in this account's directory, then you provide that access and protect the files from outsiders by placing ACLs on the directory and files.
The security administrator at the node where the files will reside (BNORD) creates the special account SALES_READER. The SALES_READER account is set up as a captive account with mail disabled. The default directory is [SALESINFO], which has the following default protection code:
(S:RWED,O:RWED,G:R,W)
Note that this protection code permits users in the same group as SALES_READER on the home node BNORD to read the files. Furthermore, only the users in the system category or the owner category, or those who have privileges that give them such access, can update the files in the directory. ACLs are used to further define the access, as described in step 3.
The security administrator uses the AUTHORIZE command
ADD/PROXYto add the proxy access for the outside users. For example, to extend proxy access to userJacksonon nodeDEXTERand userGoodwinon nodeBANGOR, the commands would be as follows:UAF> ADD/PROXY DEXTER::JACKSON SALES_READER/DEFAULT UAF> ADD/PROXY BANGOR::GOODWIN SALES_READER/DEFAULT
If later it becomes clear that other users at the home node BNORD need access and they do not belong to the same group as SALES_READER, ACLs could be added to the files in the directory [SALESINFO]. For example, suppose
R. Grantneeds control access to all the files andJ. Martinezneeds read access to all the files. The following two DCL commands would define the ACL for the directory and then propagate it to all existing files:$ SET SECURITY/ACL=- _$ ((IDENTIFIER=R_GRANT,ACCESS=CONTROL),- _$ (IDENTIFIER=J_MARTINEZ,ACCESS=READ))- _$ ((IDENTIFIER=R_GRANT,OPTIONS=DEFAULT,ACCESS=CONTROL),- _$ (IDENTIFIER=J_MARTINEZ,OPTIONS=DEFAULT,ACCESS=READ))- _$ [000000]SALESINFO.DIR $ SET SECURITY/DEFAULT *.*;*
13.6.3. Admitting Remote Users to Multiple Accounts
When a small number of outside users need access, for differing reasons, to files requiring special protection, set up access to multiple proxy accounts, and apply extensive ACLs.
Access Requirements to CENTRL::PROJ:[DESGN_PROJECTS]
Owned by [DESIGNERS,MGR]
Users & Nodes
Subdirectory LEVI Subdirectory BETSEY
Project Files Project Files
LEVIGRAY*.* BETSEYHARLOW*.*
FRISCO::ALBION R RW
FRISCO::ELTON R RW
LA::IRVING R RW
CENTRL::DIANTHA RWED NONE
CENTRL::BRITTANIA RWED NONE
CENTRL::ALBERT NONE RWED
CENTRL::DELIA NONE RWED
BOS::AYLMER RW R
WASH::LAVINA RW RThe security administrator at headquarters uses AUTHORIZE to create new proxy accounts on node CENTRL for the remote users Albion, Elton, Irving, Aylmer, and Lavina. These accounts should be captive, disallow mail, and be restricted to network access only. The accounts are even restricted to a subset of DCL through CLI tables. The default directory should be [DESGN_PROJECTS] for each user. The manager decides it makes sense to put them into the DESIGNERS group to match their proposed uses of the files.
Presumably, accounts already exist for users Diantha, Brittania, Albert, and Delia. They need not necessarily belong to the same group. They will be informed which device and directory to use for their work.
The next step is to add the proxy records to the network proxy authorization file with the following AUTHORIZE commands:
UAF> ADD/PROXY FRISCO::ALBION ALBION/DEFAULT UAF> ADD/PROXY FRISCO::ELTON ELTON/DEFAULT UAF> ADD/PROXY LA::IRVING IRVING/DEFAULT UAF> ADD/PROXY BOS::AYLMER AYLMER/DEFAULT UAF> ADD/PROXY WASH::LAVINA LAVINA/DEFAULT
The security administrator at node CENTRL places an ACL on the top-level directory for [
DESGN_PROJECTS] with the following DCL command:$ SET SECURITY/ACL=(DEFAULT_PROTECTION,S:RWED,O,G,W) - _$ [000000]DESGN_PROJECTS.DIR
This ensures that no one outside of the system category of users can gain any UIC-based access to the files in the directory or any of the subdirectories unless they possess the BYPASS privilege. In fact, this restriction applies to those five users in the group DESIGNERS as well. The plan is for all files to possess ACLs that will admit the select group of users. It is desirable to propagate this protection code to all the files in this directory and its subdirectories. The ACLs that will be placed on the files for further protection will take precedence when one of these users actually seeks access to a file.
- Two subdirectories are created in [DESGN_PROJECTS]:
[DESGN_PROJECTS.LEVI]
[DESGN_PROJECTS.BETSEY]
The security administrator uses the ACL editor to place the following additional ACEs in the ACL for the top-level directory:
DESGN_PROJECTS.DIR (IDENTIFIER=DIANTHA,OPTIONS=PROTECTED,ACCESS=EXECUTE) (IDENTIFIER=BRITTANIA,OPTIONS=PROTECTED,ACCESS=EXECUTE) (IDENTIFIER=ALBERT,OPTIONS=PROTECTED,ACCESS=EXECUTE) (IDENTIFIER=DELIA,OPTIONS=PROTECTED,ACCESS=EXECUTE) (IDENTIFIER=AYLMER,OPTIONS=PROTECTED,ACESS=EXECUTE) (IDENTIFIER=LAVINA,OPTIONS=PROTECTED,ACCESS=EXECUTE) (IDENTIFIER=ALBION,OPTIONS=PROTECTED,ACCESS=EXECUTE) (IDENTIFIER=ELTON,OPTIONS=PROTECTED,ACCESS=EXECUTE) (IDENTIFIER=IRVING,OPTIONS=PROTECTED,ACCESS=EXECUTE)
These protected ACEs ensure that only the select nine users can access the top-level directory. As no one receives write or delete access to the top directory through the ACL, the directory and subdirectories are generally protected from deletion and renaming of files. Of course, the system category of user obtains write and delete access through the UIC-based protection.
Next, the security administrator creates ACLs on the subdirectories. The ACEs that are required are shown for their respective subdirectories:
[DESGN_PROJECTS]LEVI.DIR (IDENTIFIER=DIANTHA,OPTIONS=PROTECTED,ACCESS=READ+WRITE+EXECUTE+CONTROL) (IDENTIFIER=DIANTHA,OPTIONS=DEFAULT+PROTECTED,ACCESS=READ+WRITE+EXECUTE +DELETE+CONTROL) (IDENTIFIER=BRITTANIA,OPTIONS=PROTECTED,ACCESS=READ+WRITE+EXECUTE+CONTROL) (IDENTIFIER=BRITTANIA,OPTIONS=DEFAULT+PROTECTED,ACCESS=READ+WRITE+EXECUTE +DELETE+CONTROL) (IDENTIFIER=AYLMER,OPTIONS=PROTECTED,ACCESS=READ+WRITE) (IDENTIFIER=AYLMER,OPTIONS=DEFAULT+PROTECTED,ACCESS=READ+WRITE) (IDENTIFIER=LAVINA,OPTIONS=PROTECTED,ACCESS=READ+WRITE) (IDENTIFIER=LAVINA,OPTIONS=DEFAULT+PROTECTED,ACCESS=READ+WRITE) (IDENTIFIER=ALBION,OPTIONS=PROTECTED,ACCESS=READ) (IDENTIFIER=ALBION,OPTIONS=DEFAULT+PROTECTED,ACCESS=READ) (IDENTIFIER=ELTON,OPTIONS=PROTECTED,ACCESS=READ) (IDENTIFIER=ELTON,OPTIONS=DEFAULT+PROTECTED,ACCESS=READ) (IDENTIFIER=IRVING,OPTIONS=PROTECTED,ACCESS=READ) (IDENTIFIER=IRVING,OPTIONS=DEFAULT+PROTECTED,ACCESS=READ) [DESGN_PROJECTS]BETSEY.DIR (IDENTIFIER=ALBERT,OPTIONS=PROTECTED,ACCESS=READ+WRITE+EXECUTE+CONTROL) (IDENTIFIER=ALBERT,OPTIONS=DEFAULT+PROTECTED,ACCESS=READ+WRITE+EXECUTE +DELETE+CONTROL) (IDENTIFIER=DELIA,OPTIONS=PROTECTED,ACCESS=READ+WRITE+EXECUTE+CONTROL) (IDENTIFIER=DELIA,OPTIONS=DEFAULT+PROTECTED,ACCESS=READ+WRITE+EXECUTE +DELETE+CONTROL) (IDENTIFIER=ALBION,OPTIONS=PROTECTED,ACCESS=READ+WRITE) (IDENTIFIER=ALBION,OPTIONS=DEFAULT+PROTECTED,ACCESS=READ+WRITE) (IDENTIFIER=ELTON,OPTIONS=PROTECTED,ACCESS=READ+WRITE) (IDENTIFIER=ELTON,OPTIONS=DEFAULT+PROTECTED,ACCESS=READ+WRITE) (IDENTIFIER=IRVING,OPTIONS=PROTECTED,ACCESS=READ+WRITE) (IDENTIFIER=IRVING,OPTIONS=DEFAULT+PROTECTED,ACCESS=READ+WRITE) (IDENTIFIER=AYLMER,OPTIONS=PROTECTED,ACCESS=READ) (IDENTIFIER=AYLMER,OPTIONS=DEFAULT+PROTECTED,ACCESS=READ) (IDENTIFIER=LAVINA,OPTIONS=PROTECTED,ACCESS=READ) (IDENTIFIER=LAVINA,OPTIONS=DEFAULT+PROTECTED,ACCESS=READ)Note that both preceding ACLs include two ACEs for each identifier. The first ACE controls the access to the subdirectory. It denies delete access for the protection of the subdirectory and is not propagated to all the files created in the subdirectory. The second ACE for each identifier will automatically propagate to all files added to its respective subdirectories because of the inclusion of the Default attribute. Furthermore, the Protected attribute ensures that all the ACEs are protected from deletion except by specific action.
LEVIGRAYMEM3.MEM is printed at node
WASH:$ COPY CENTRL::LEVIGRAYMEM3.MEM LP:
However, if user Lavina tries to edit this file, the attempt fails because user Lavina is denied write access through the ACL.
If there were many users involved in this scheme, it would soon become worthwhile to grant additional identifiers to the users. For example, each user that would be allowed read access to the files in the LEVI subdirectory might be given the identifier LEVI_READER, and so forth. The ACLs could then be shortened.
Chapter 14. Using Protected Subsystems
For the most part, the OpenVMS operating system bases its security controls on user identity. Protected objects, such as files and devices, are accessible to individual users or groups of users. If an object's ACL or protection code allows a user the necessary access, then the user can use that object by using any available software (see Chapter 4, "Protecting Data" for a description of OpenVMS object protection).
In a protected subsystem, an application protected by normal access controls serves as a gatekeeper to objects belonging to the subsystem. Users have no access to the subsystem's objects unless they execute the application serving as gatekeeper. Once users run the application, their process rights list acquires identifiers giving them access to objects owned by the subsystem. As soon as they exit from the application, these identifiers and, therefore, the users' access rights to objects are taken away.
This chapter describes protected subsystems and explains how to build them.
14.1. Advantages of Protected Subsystems
With protected subsystems, you have a mechanism to provide conditional access to data that is not available with traditional OpenVMS access controls. Traditionally, you give users privileges to bypass protection codes or access control lists (ACLs). In giving these privileges, however, you grant users a wide class of access (refer to Appendix A, "Assigning Privileges" for information on the power different privileges carry). Protected subsystems avoid extensive privilege use by individual users.
Protected subsystems give you an alternative to installing images with privilege. Writing a secure privileged image requires skill, and failures can compromise system security.
Protected subsystems give you an alternative to creating protected shareable images (also called user-written system services).
Protected subsystems make system management easier because unprivileged users can manage them without much assistance from you. See Section 14.5, ''System Management Requirements'' for details on system management requirements.
14.2. Applications for Protected Subsystems
Protected subsystems have many applications, from databases to common system management situations.
One use for a protected subsystem might be a group membership list that you want to make available to all group members. The list contains the names, addresses, personnel numbers, and interests of group members. When the membership list is set up as a protected subsystem, all members of the group can read selected information and update specific types of information.
A protected subsystem might also solve the problem of confidential information being sent to printers in public areas. You could write an application to filter data for sensitive information. Confidential files would be sent to printers in restricted areas, while public files would be sent to any available printer. Any user with execute access to the application could use the restricted printers, but only through the protected subsystem.
14.3. How Protected Subsystems Work
A protected subsystem is an application that, when run, causes the process running the application to be granted one or more identifiers. For as long as a user runs the subsystem, the user's process rights list carries these additional identifiers. Figure 14.1, ''How Protected Subsystems Differ from Normal Access Control'' shows how a protected subsystem adds a second level of access control to traditional controls.
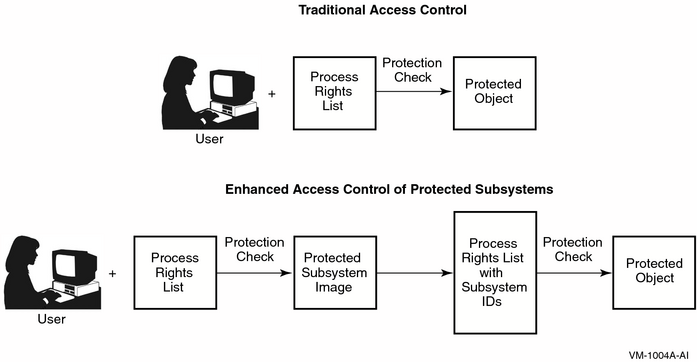
Users with execute access to the application gain access to the subsystem. Once in the subsystem, users can work with the data files and other resources of the subsystem.
A subsystem can have several identifiers because the resources consumed by the subsystem (the files, printers, and so forth) can be protected differently.
Possession of subsystem identifiers is limited to the period users are executing the
application. Once the users exit from the application, the identifiers are removed from
their process rights lists. Subsystem identifiers are also removed from the rights list
whenever users enter a Ctrl/Y sequence or attempt to create a
subprocess with the DCL command SPAWN.?
SECSRV$CLIENT
SECSRV$COMMUNICATION
SECSRV$OBJECT
14.4. Design Considerations
Someone developing an application for a protected subsystem must link the application
images without the /DEBUG or /TRACEBACK
qualifiers.
Although this kind of subsystem often precludes the need for privilege, applications can be installed with privilege. For example, some applications may need the PRMGBL privilege to create permanent global sections, or they may need the AUDIT privilege to send security audit records to the system security audit log file. VSI does discourage the installation of a protected subsystem application with privileges in the All category. This category includes such privileges as BYPASS, CMKRNL, and SYSPRV—privileges that allow a user to subvert OpenVMS access controls. See Table 8.2, ''OpenVMS Privileges'' for a list of OpenVMS privileges and Appendix A, "Assigning Privileges" for a description of the privileges.
Subsystem designers need to generate a list of identifiers that are necessary for it to operate as intended. Then the designers approach you, as the security administrator, to make the preparations described in Section 14.5, ''System Management Requirements''.
14.5. System Management Requirements
Although an unprivileged user can build and manage a protected subsystem, you need to be involved at two points in the process: at the beginning to create the necessary identifiers for the subsystem and at the end to mount the volume with the protected subsystem.
Ensure the SUBSYSTEM attribute is enabled on all volumes, which contain protected subsystems. To do this, you can use either the
MOUNTcommand or theSETcommand as shown in the following example:$ MOUNT/SUBSYSTEM $DKA0: WORK1If the device is already mounted without the
/SUBSYSTEMqualifier, you can set the subsystem attribute using theSETcommand as follows:SET VOLUME/SUBSYSTEM $DKA0:Create identifiers for the subsystem, each with the Subsystem attribute. The Subsystem attribute empowers the identifier's holder to manage the subsystem.
Grant these subsystem identifiers with Subsystem attributes to the people who will serve as managers of the subsystem. This enables them to assign the subsystem identifier to the images that make up the subsystem.
Give the subsystem managers control access to application images. They need control access so they can add Subsystem ACEs to the image ACLs.
Give the subsystem managers control access to existing resources that are to be managed by the protected subsystem.
Although subsystem managers may need control access to key system resources, the ACL on the objects limits their access rights to only those resources. This may not be as dangerous as installing an image with SYSPRV.
$ SET DEFAULT SYS$SYSTEM $ RUN AUTHORIZE UAF> ADD/IDENTIFIER MEMBERS_SUBSYSTEM-
| Use AUTHORIZE to create a subsystem identifier called
|
| Make |
| Give |
Note that you create the subsystem identifier MEMBERS_SUBSYSTEM with the Resource attribute. This allows disk space to be charged to the identifier MEMBERS_SUBSYSTEM and not the individuals accessing the subsystem. (When using the Resource attribute, be careful to set the appropriate ACLs on directories [see Section 8.8.1.2.3, ''Setting Up the ACL''].)
14.6. Building the Subsystem
Create a Subsystem ACE containing the subsystem identifier in the ACLs of the application images. A Subsystem ACE has the following format:
(SUBSYSTEM,{IDENTIFIER=identifier[,ATTRIBUTES=attributes]})Grant access to the objects managed by the subsystem. You need to add an Identifier ACE to the ACL of the various objects belonging to the subsystem. Each Identifier ACE contains one of the subsystem identifiers in the following format:
(IDENTIFIER=identifier, ACCESS=access-type[+...])
In the following example, the subsystem manager uses the DCL command SET
SECURITY to associate the subsystem identifier with the images that make
up the subsystem. First, the subsystem manager adds a Subsystem ACE with the identifier
MEMBERS_SUBSYSTEM to the ACL of the application image
MEMBER_LIST.EXE:
$ SET SECURITY/ACL=(SUBSYSTEM,IDENTIFIER=MEMBERS_SUBSYSTEM,- _$ ATTRIBUTES=RESOURCE) MEMBER_LIST.EXE
Then the subsystem manager adds an Identifier ACE with the subsystem identifier
MEMBERS_SUBSYSTEM to the data files managed by the subsystem:
$ SET SECURITY/ACL=(IDENTIFIER=MEMBERS_SUBSYSTEM,- _$ ACCESS=READ+WRITE) MEMBER_DATA*.DAT
The DCL command SHOW SECURITY displays the security attributes of
the files. For example:
$ SHOW SECURITY MEMBER_LIST.EXE
MEMBER_LIST.EXE object of class FILE
Owner: [STAFF]
Protection: (System: RWED, Owner: RWED, Group, World: RE)
Access Control List: (SUBSYSTEM,IDENTIFIER=MEMBERS_SUBSYSTEM,ATTRIBUTES=RESOURCE)$ SHOW SECURITY MEMBER_DATA*.DAT
MEMBER_DATA_1.DAT object of class FILE
Owner: MEMBERS_SUBSYSTEM
Protection: (System: RWED, Owner: RWED, Group, World)
Access Control List: (IDENTIFIER=MEMBERS_SUBSYSTEM,ACCESS=READ+WRITE)
MEMBER_DATA_2.DAT object of class FILE
Owner: MEMBERS_SUBSYSTEM
Protection: (System: RWED, Owner: RWED, Group, World)
Access Control List: (IDENTIFIER=MEMBERS_SUBSYSTEM, ACCESS=READ+WRITE)14.7. Enabling Protected Subsystems on a Trusted Volume
A person with the SECURITY privilege can enable subsystems on a volume by using the
/SUBSYSTEM qualifier on the MOUNT command. By
default, subsystems are enabled only on the system disk. For other disks, you need to
enable subsystems every time a volume is mounted.
In the following example, a security administrator uses the MOUNT
command with the /SUBSYSTEM qualifier to enable the processing of
Subsystem ACEs on device DUA0. Assume that this disk contains the subsystem
with the identifier MEMBERS_SUBSYSTEM:
$ MOUNT /SUBSYSTEM /SYSTEM DUA0: DOC WORK8
You can turn the processing of Subsystem ACEs on and off dynamically with the DCL
command SET VOLUME /SUBSYSTEM. This command is especially useful for
the system disk, which is not mounted using the MOUNT command.
Any person mounting a subsystem is responsible for knowing what is on the volume being mounted. Without this knowledge, an operator or system manager can inadvertently subvert system security. For example, it is easy for a user with privileges on one cluster to put an application holding a subsystem identifier on a volume and then take the volume to a naive operator on another cluster and request that it be mounted. Because the application holds an appropriate subsystem identifier, it feigns membership in a subsystem for which it is unauthorized. Therefore, mount volumes of only those users whom you trust, or thoroughly search a volume for Subsystem ACEs before you mount it with subsystems enabled.
14.8. Giving Users Access
They can create special identifiers for resources belonging to the subsystem that they do not want all members to access and add ACEs to these resources.
They can use compound expressions in ACEs and thus grant access conditionally. For example, the following ACE grants access to MEMBERS_ADMIN when running MEMBERS_SUBSYSTEM but not to MEMBERS_ADMIN alone nor to other users holding the MEMBERS_SUBSYSTEM identifier:
(ID=MEMBERS_SUBSYSTEM+MEMBERS_ADMIN, ACCESS=READ+WRITE)
Remember that as long as users are executing the application image for the subsystem, their process rights list contains the subsystem identifier as well as their normal identifiers. However, as soon as users interrupt or exit from the application, their process rights list loses the subsystem identifier, and they lose access rights to the objects in the subsystem. Subsystem identifiers are not propagated by default when subprocesses are spawned.
14.9. Example of a Protected Subsystem
R. D. Taylor Inc., a company specializing in building supplies, decides to set up a protected subsystem for its purchasing and accounts payable departments. Although the departments are in different parts of the company, they share a common database for recording purchases from suppliers.
When the company's inventory drops below the desired level, the purchasing department is directed to order required supplies. Purchasing personnel find suppliers (if necessary), assign purchase order numbers, and issue a purchase orders.
When the goods arrive, the receiving and quality control departments check the contents against what was ordered, ensure the goods meet quality standards, and put the goods into inventory. Once the shipment is processed, the information goes to the accounts payable department, which settles the invoices.
Administrators in the accounts payable department check the invoices against purchase orders and run a payments program to calculate the monies due to suppliers each week. Payments are recorded in a database, and checks are printed on a printer loaded with company checks.
It gives purchasing personnel the right to reference or record purchase orders in the company database, and it gives personnel in the accounts payable department the right to verify suppliers' invoices. Purchasing personnel with these tasks hold the SUPPLIERS_ORDERS identifier. Accounts payable personnel hold the ACCOUNTS_PAYABLE identifier. These employees run ORDERS.EXE to update the supplier information. The program stores data in ORDERS.DAT.
It gives trusted administrators in the accounts payable department the right to update databases, calculate payments due, and print checks. (One printer, loaded with company checks, is used for this purpose.) These administrators hold the ACCOUNTS_PAYABLE identifier.
The administrators run PAYMENTS.EXE to perform these tasks. The program records payments made in the data file PAYMENTS.DAT.
The company appoints one employee, McGrey, to design and manage the subsystem. Figure 14.2, ''Directory Structure of the Taylor Company's Subsystem'' illustrates the directory structure of the Taylor subsystem, and Example 14.6, ''Subsystem Command Procedure'' shows the command procedure McGrey wrote to implement it.
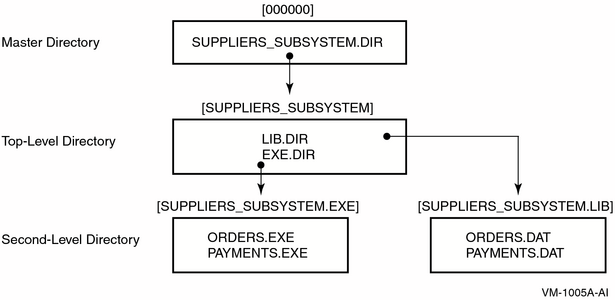
14.9.1. Protecting the Top-Level Directory
McGrey implements a directory structure in which users can gain access to the subsystem only by holding an appropriate identifier: purchasing personnel hold the identifier SUPPLIERS_ORDERS, and the accounts payable administrators hold the identifier ACCOUNTS_PAYABLE. As subsystem manager, McGrey holds the identifier SUPPLIERS_SUBSYSTEM.
$ DIRECTORY/SECURITY SYS$SYSDEVICE:[000000]SUPPLIERS_SUBSYSTEM.DIRDirectory SYS$SYSDEVICE:[000000] SUPPLIERS_SUBSYSTEM.DIR;1 SUPPLIERS_SUBSYSTEM (RWE,RWE,,)(IDENTIFIER=SUPPLIERS_ORDERS,OPTIONS=DEFAULT,ACCESS=EXECUTE) (IDENTIFIER=ACCOUNTS_PAYABLE,OPTIONS=DEFAULT,ACCESS=EXECUTE) (IDENTIFIER=*,OPTIONS=DEFAULT,ACCESS=NONE) Total of 1 file.
| The directory's protection code gives read, write, and execute access to users in the system and owner categories but no access to group or world users. Therefore, group and world users have to gain access through the ACL. |
| A Creator ACE ensures that users creating files in this directory have no special access to them (see Section 8.8.1.2, ''Setting Defaults for a Directory Owned by a Resource Identifier'' for information on Creator ACEs). |
| A Default Protection ACE denies group and world users access to files created in directory. |
| McGrey holds the subsystem identifier SUPPLIERS_SUBSYSTEM. This ACE gives McGrey read, write, and control access so McGrey can manage the subsystem directories and images. |
| Holders of the SUPPIERS_ORDERS identifier have execute access so they can access files in subdirectories. |
| Holders of the ACCOUNTS_PAYABLE identifier have execute access so they can access files in subdirectories. |
| Users holding any other identifiers have no access. |
| McGrey added the Default attribute to all Identifier ACEs and includes them here so all Identifier ACEs are propagated to subdirectory ACLs. |
14.9.2. Protecting Subsystem Directories
$ DIRECTORY/SECURITY SYS$SYSDEVICE:[SUPPLIERS_SUBSYSTEM...]
Directory SYS$SYSDEVICE:[SUPPLIERS_SUBSYSTEM] EXE.DIR;1 SUPPLIERS_SUBSYSTEM (RWE,RWE,,)
| [SUPPLIERS_SUBSYSTEM.EXE] has the same protection code and ACL as the parent directory shown in Section 14.9.1, ''Protecting the Top-Level Directory''. Subsystem users need to run programs stored in this directory. |
| [SUPPLIERS_SUBSYSTEM.LIB] has the same protection code but a more restrictive ACL because only the subsystem manager and the subsystem images need access. |
14.9.3. Protecting the Images and Data Files
Directory SYS$SYSDEVICE:[SUPPLIERS_SUBSYSTEM.EXE] ORDERS.EXE;1 SUPPLIERS_SUBSYSTEM (RWED,RWED,,)
| All subsystem users, those holding the SUPPLIERS_ORDERS or ACCOUNTS_PAYABLE identifier, can run ORDERS.EXE. |
| Only subsystem images and holders of the ACCOUNTS_PAYABLE identifier can run PAYMENTS.EXE. |
| The data files for the subsystem reside in [SUPPLIERS_SUBSYSTEM.LIB]. Only the subsystem images and McGrey can access them. |
14.9.4. Protecting the Printer
$ SHOW SECURITY/CLASS=QUEUE TTA1
TTA1 object of class QUEUE
Owner: [SYSTEM]
Protection: (System: M, Owner: D, Group, World)
Access Control List:
(IDENTIFIER=SUPPLIERS_SUBSYSTEM+ACCOUNTS_PAYABLE,-
ACCESS=READ+SUBMIT+MANAGE+DELETE)
(IDENTIFIER=*,ACCESS=NONE)14.9.5. Command Procedure for Building the Subsystem
$ SET NOON
$ OLD_PRIV = F$SETPRV("NOALL,SYSPRV,CMKRNL,OPER")
$ OLD_DEFAULT = F$ENVIRONMENT("DEFAULT")
$
$ ON CONTROL_Y THEN GOTO LEAVE
$
$ IF P1 .EQS. "REMOVE" THEN GOTO CLEANUP
$ IF P1 .EQS. "VERIFY" THEN SET VERIFY
$!
$! Create the subsystem identifier and the identifiers for personnel
$! performing two different tasks.
$!
$ SET DEFAULT SYS$SYSTEM
$ RUN AUTHORIZE
ADD/IDENTIFIER SUPPLIERS_SUBSYSTEM/ATTRIBUTES=(RESOURCE,SUBSYSTEM)
ADD/IDENTIFIER SUPPLIERS_ORDERS
ADD/IDENTIFIER ACCOUNTS_PAYABLE
!
! Grant the subsystem identifier to the subsystem manager: McGrey.
!
GRANT/IDENTIFIER SUPPLIERS_SUBSYSTEM MCGREY/ATTRIBUTE=(RESOURCE,SUBSYSTEM)
$!
$! Set up the print queue.
$!
$ INITIALIZE/QUEUE/START TTA1
$ SET SECURITY/ACL=(-
(ID=SUPPLIERS_SUBSYSTEM+ACCOUNTS_PAYABLE,ACCESS=READ+SUBMIT+MANAGE+DELETE), -
(ID=*,ACCESS=NONE) )/PROTECTION=(G,W)/CLASS=QUEUE TTA1:
$!
$! Create the directory root to hold the subsystem.
$!
$!
$! Assume that we logged in as McGrey.
$!
$ SET RIGHTS_LIST/ENABLE SUPPLIERS_SUBSYSTEM/ATTRIBUTE=(RESOURCE,SUBSYSTEM)
$ SET DEFAULT SYS$SYSDEVICE:[SUPPLIERS_SUBSYSTEM]
$!
$! Create the directories for the images and the data files.
$!
$ CREATE/DIR [SUPPLIERS_SUBSYSTEM.EXE]/PROTECTION=(G,W)
$ CREATE/DIR [SUPPLIERS_SUBSYSTEM.LIB]/PROTECTION=(G,W)
$ SET SECURITY/ACL=( (ID=SUPPLIERS_ORDERS,ACCESS=EXECUTE), -
(ID=ACCOUNTS_PAYABLE,ACCESS=EXECUTE), -
(ID=SUPPLIERS_ORDERS,OPTIONS=DEFAULT,ACCESS=EXECUTE), -
(ID=ACCOUNTS_PAYABLE,OPTIONS=DEFAULT,ACCESS=EXECUTE) )/DELETE -
[SUPPLIERS_SUBSYSTEM]LIB.DIR
$!
$! Emulate the creation of the subsystem images.
$!
$ SET DEFAULT [.EXE]
$ CREATE ORDERS.MAR
.ENTRY START,0
$setpri_s pri=#0
10$: BRB 10$
ret
.END START
$ MACRO ORDERS
$ LINK ORDERS
$ SET SECURITY/PROTECTION=(W:RWED) ORDERS.MAR;*,.OBJ;*
$ DELETE ORDERS.MAR;*,.OBJ;*
$ COPY ORDERS.EXE PAYMENTS.EXE
$!
$! Apply the appropriate protection to the images.
$!
$ SET SECURITY/ACL=(ID=SUPPLIERS_ORDERS,ACCESS=EXECUTE)/DELETE PAYMENTS.EXE
$ SET SECURITY/ACL=(SUBSYSTEM,ID=SUPPLIERS_SUBSYSTEM,ATTRIBUTES=RESOURCE) ORDERS.EXE
$ SET SECURITY/ACL=(SUBSYSTEM,ID=SUPPLIERS_SUBSYSTEM,ATTRIBUTES=RESOURCE) PAYMENTS.EXE
$!
$! Create and protect the data files used by the applications.
$!
$ SET DEFAULT [-.LIB]
$ CREATE ORDERS.DAT
$ CREATE PAYMENTS.DAT
$ SET SECURITY/ACL=( (ID=SUPPLIERS_SUBSYSTEM,ACCESS=READ+WRITE), -
(ID=*,ACCESS=NONE) ) ORDERS.DAT
$ SET SECURITY/LIKE=(NAME=ORDERS.DAT) PAYMENTS.DAT
$!
$! Show the directory structure and the queue protection.
$!
$ SET DEFAULT 'OLD_DEFAULT'
$ DEFINE SYS$OUTPUT SUBSYS.LIS
$ DIRECTORY/SECURITY SYS$SYSDEVICE:[000000]SUPPLIERS_SUBSYSTEM.DIR
$ DIRECTORY/SECURITY SYS$SYSDEVICE:[SUPPLIERS_SUBSYSTEM...]
$ SHOW SECURITY/CLASS=QUEUE TTA1
$ DEASSIGN SYS$OUTPUT
$
$ LEAVE:
$ IF P1 .EQS. "VERIFY" THEN SET NOVERIFY
$ SET DEFAULT 'OLD_DEFAULT'
$ SET PROC/PRIV=('OLD_PRIV')
$ EXIT
$
$ CLEANUP:
$ SET PROC/PRIV=BYPASS
$ SET DEFAULT SYS$SYSDEVICE:[000000]
$ DELETE [SUPPLIERS_SUBSYSTEM...]*.*.*
$ DELETE [SUPPLIERS_SUBSYSTEM]EXE.DIR;
$ DELETE [SUPPLIERS_SUBSYSTEM]LIB.DIR;
$ DELETE SUPPLIERS_SUBSYSTEM.DIR;
$ STOP/QUE/NEXT TTA1
$ DELETE/QUEUE TTA1
$ GOTO LEAVEAppendix A. Assigning Privileges
Whether the user has the skill and experience to use the privilege without disrupting the system
Whether the user has a legitimate need for the privilege
None: No privileges
Normal: Minimum privileges to use the system effectively
Group: Potential to interfere with members of the same group
Devour: Potential to consume noncritical systemwide resources
System: Potential to interfere with normal system operation
Objects: Potential to compromise the security of protected objects (files, devices, logical name tables, global sections, and so on)
All: Potential to control the system
A user's privileges are recorded in the user's UAF record in a 64-bit privilege mask. When
a user logs in to the system, the user's privileges are stored in the header of the user's
process. In this way, the user's privileges are passed on to the process created for the
user. Users can use the DCL command SET PROCESS/PRIVILEGES to enable and
disable privileges for which they are authorized and to further control the privileges
available to the images they run. Moreover, any user with the SETPRV privilege can enable
any privilege.
Table 8.2, ''OpenVMS Privileges'' lists the privileges by category and gives brief, general definitions of them. The following sections describe all privileges available on OpenVMS systems in detail; each section title identifies the privilege category (Normal, Devour, and so on). For each privilege, the appendix describes the capabilities granted by the privilege and the users who should receive them.
A.1. ACNT Privilege (Devour)
The ACNT privilege lets a process use the RUN (Process) command and the Create Process ($CREPRC) system service to create processes in which accounting is disabled. A process in which accounting is disabled is one whose resource usage is not logged in the current accounting file.
A.2. ALLSPOOL Privilege (Devour)
The ALLSPOOL privilege lets the user's process allocate a spooled device by executing
the Allocate Device ($ALLOC) system service or by using the DCL
command ALLOCATE.
The $ALLOC system service lets a process allocate or reserve a device for its exclusive use. A shareable mounted device cannot be allocated.
Grant this privilege only to users who need to perform logical or physical I/O operations to a spooled device. Ordinarily, the privilege of allocating a spooled device is granted only to symbionts.
A.3. ALTPRI Privilege (System)
Increase its own base priority
Set the base priority of a target process
Change the priority of its batch or print jobs
SET
PROCESS/PRIORITY. As a rule, this system service lets a process set its
own base priority or the base priority of another process. However, one process can set
the priority of a second process only if one of the following conditions applies:The process calling the $SETPRI system service has the same UIC as the target process.
The calling process has process control privilege (GROUP or WORLD) over the target process.
With ALTPRI, a process can create a detached process with a priority higher than its
own. It creates such a process by using an optional argument to the Create Process
($CREPRC) system service or to the DCL command
RUN/PRIORITY.
ALTPRI also lets you adjust the scheduling priority of a job ($SNDJBC) to a value even greater than that established with the system parameter MAXQUEPRI.
Do not grant this privilege widely; if unqualified users have the unrestricted ability to set base priorities, fair and orderly scheduling of processes for execution can easily be disrupted.
A.4. AUDIT Privilege (System)
The AUDIT privilege allows software to append audit records to the system security audit log file using one of four system services: $AUDIT_EVENT, $CHECK_PRIVILEGE, $CHKPRO, or $CHECK_ACCESS. In addition, the $AUDIT_EVENT system service allows all components of an audit message to be specified. As a result, this privilege permits the logging of events that appear to have come from the operating system or a user process.
Grant this privilege only to trusted images that need to append audit messages to the system audit log file. Users possessing this privilege can provoke a system failure by attempting to log invalid events with the NSA$M_INTERNAL flag set.
A.5. BUGCHK Privilege (Devour)
The BUGCHK privilege allows the process either to make bugcheck error log entries from user, supervisor, or compatibility mode (EXE$BUG_CHECK) or to send messages to the system error logger ($SNDERR). Restrict this privilege to VSI-supplied system software that uses the Bugcheck facility.
A.6. BYPASS Privilege (All)
Modification of all user authorization records (SYSUAF.DAT)
Modification of all rights identifier and holder records (RIGHTSLIST.DAT)
Modification of all DECnet object passwords and accounts (NETOBJECT.DAT)
Unlimited access to all files on all volumes
Grant this privilege with extreme caution because it overrides all object protection. It should be reserved for use by well-tested, reliable programs and command procedures. The SYSPRV privilege is adequate for interactive use because it ultimately grants access to all objects while still providing access checks. The READALL privilege is adequate for backup operations.
|
Task |
Interface |
|---|---|
|
Perform file system operations: | |
|
Modify file ownership |
SET SECURITY/OWNER, $QIO request to F11BXQP |
|
Access a file that is marked for deletion |
$QIO request to F11A ACP or F11BXQP |
|
Access a file that is deaccess locked |
$QIO request to F11A ACP or F11BXQP |
|
Override creation of an owner ACE on a newly created file |
$QIO request to F11BXQP |
|
Clear the directory bit in a directory's file header |
$QIO request to F11BXQP |
|
Operate on an extension header |
$QIO request to F11BXQP |
|
Acquire or release a volume lock |
$QIO request to F11BXQP |
|
Force mount verification on a volume |
$QIO request to F11BXQP |
|
Create a file access window with the no access lock bit set |
$QIO request to F11BXQP |
|
Specify null lock mode for volume lock |
$QIO request to F11BXQP |
|
Access a locked file |
$QIO request to F11BXQP |
|
Enable or disable disk quotas on a volume |
$QIO request to F11BXQP |
|
Operate on network databases: | |
|
Display permanent network database records |
NCP |
|
Display permanent DECnet object password |
NCP |
|
Display volatile DECnet object password |
NCP |
|
Adjust discretionary or mandatory access controls: | |
|
Read a user authorization record |
$GETUAI |
|
Modify a user authorization record |
$SETUAI |
|
Modify mailbox protection |
$QIO request to the mailbox driver (MBDRIVER) |
|
Modify shared memory mailbox protection |
$QIO request to the mailbox driver (MBXDRIVER) |
|
Bypass discretionary or mandatory object protection |
$CHKPRO |
|
Miscellaneous: | |
|
Initialize a magnetic tape |
$INIT_VOL |
|
Unload an InfoServer system |
$QIO request to the InfoServer system (DADDRIVER) |
A.7. CMEXEC Privilege (All)
The CMEXEC privilege allows the user's process to execute the Change Mode to Executive ($CMEXEC) system service.
This system service lets a process change its access mode to executive mode, execute a specified routine, and then return to the access mode that was in effect before the system service was called. While in executive mode, the process is allowed to execute the Change Mode to Kernel ($CMKRNL) system service.
Grant this privilege only to users who need to gain access to protected and sensitive data structures and internal functions of the operating system. If unqualified users have unrestricted access to sensitive data structures and functions, the operating system and service to other users can be easily disrupted. Such disruptions can include failure of the system, destruction of all system and user data, and exposure of confidential information.
A.8. CMKRNL Privilege (All)
The CMKRNL privilege allows the user's process to execute the Change Mode to Kernel ($CMKRNL) system service.
This system service lets a process change its access mode to kernel mode, execute a specified routine, and then return to the access mode that was in effect before the system service was called. While in kernel mode, a process can enable any system privilege.
A process holding both CMKRNL and SYSNAM can set the system time.
Grant this privilege only to users who need to execute privileged instructions or who need to gain access to the most protected and sensitive data structures and functions of the operating system. If unqualified users have unrestricted use of privileged instructions and unrestricted access to sensitive data structures and functions, the operating system and service to other users can be easily disrupted. Such disruptions can include failure of the system, destruction of all system and user data, and exposure of confidential information.
|
Task |
Interface |
|---|---|
|
Modify a multiprocessor operation |
START/CPU, STOP/CPU |
|
Modify systemwide RMS defaults |
SET RMS/SYSTEM |
|
Suspend a process in kernel mode |
SET PROCESS/SUSPEND=KERNEL |
|
Modify another process' rights list or its nondynamic identifier attributes |
SET RIGHTS_LIST |
|
Grant an identifier with modified attributes |
SET RIGHTS/ATTRIBUTE |
|
Modify the system rights list |
SET RIGHTS_LIST/SYSTEM |
|
Change a process UIC |
SET UIC |
|
Modify the number of interlocked queue retries |
$QIO request to an Ethernet 802 driver (DEBNA/NI) |
|
Connect to a device interrupt vector |
$QIO request to an interrupt vector (CONINTERR) |
|
Start or modify a line in Genbyte mode |
$QIO request to a synchronous communications line (XGDRIVER) |
|
Set the spin-wait time on the port command register |
$QIO request to an Ethernet 802 driver (DEBNA) |
|
Modify a known image list |
INSTALL |
|
Process the following item codes:
|
Send to Job Controller system service ($SNDJBC) |
|
Create a detached process with unrestricted quotas |
RUN/DETACHED, $CREPRC |
|
Examine the internals of the running system |
ANALYZE/SYSTEM |
A.9. DIAGNOSE Privilege (Objects)
The DIAGNOSE privilege lets a process run online diagnostic programs and intercept and copy all messages written to the error log file.
|
Task |
Interface |
|---|---|
|
Issue a $QIO request with associated diagnostic buffer |
$QIO |
|
Modify the number of interlocked queue retries |
$QIO request to an Ethernet 802 driver (DEBNA/NI) |
|
Set the spin-wait time on the port command register |
$QIO request to an Ethernet 802 driver (DEBNA) |
|
Access the Diagnostic and Utilities Protocol (DUP) class driver |
$QIO request to the DUP class driver used by SET HOST/HSC (FYDRIVER) |
|
Execute a special passthrough function in the SCSI generic class driver |
$QIO request to the SCSI driver (GKDRIVER) |
|
Process a diagnostic buffer |
$QIO request to a TU58 magnetic tape (TUDRIVER) |
A.10. DOWNGRADE Privilege (All)
The DOWNGRADE privilege permits a process to manipulate mandatory access controls. The privilege lets a process write to an object of lower secrecy, in violation of the Bell and LaPadula confinement (*) property. This privilege is reserved for enhanced security products like the Security Enhancement Service software (SEVMS).
A.11. EXQUOTA Privilege (Devour)
The EXQUOTA privilege allows the space taken by the user's files on given disk volumes to exceed any usage quotas set for the user (as determined by UIC) on those volumes.
A.12. GROUP Privilege (Group)
- Suspend Process ($SUSPND)
- Resume Process ($RESUME)
- Delete Process ($DELPRC)
- Set Priority ($SETPRI)
- Wake ($WAKE)
- Schedule Wakeup ($SCHDWK)
- Cancel Wakeup ($CANWAK)
- Force Exit ($FORCEX)
With GROUP privilege, a user's process can control another process in the same group.
The user's process is allowed to examine other processes in its own group by executing
the Get Job/Process Information ($GETJPI) system service. A
process with GROUP privilege can issue the SET PROCESS command for
other processes in its group.
GROUP privilege is not needed for a process to exercise control over, or to examine, subprocesses that it created or other detached processes of its UIC. You should, however, grant this privilege to users who need to exercise control over the processes and operations of other members of their UIC group.
A.13. GRPNAM Privilege (Devour)
The GRPNAM privilege lets the user's process bypass discretionary access controls and insert names into (and delete names from) the logical name table of the group to which the process belongs by the use of the Create Logical Name ($CRELNM) and Delete Logical Name ($DELLNM) system services.
In addition, the privileged process can issue the DCL commands
ASSIGN and DEFINE to add names to the group
logical name table and the DCL command DEASSIGN to delete names from
the table. The privilege allows the use of the /GROUP qualifier with
the DCL commands MOUNT and DISMOUNT (as well as
the system services $MOUNT and
$DISMOUNT) when sharing volumes among group members.
Do not grant this privilege to all users of the system because it allows the user's process to create an unlimited number of group logical names. When unqualified users have the unrestricted ability to create group logical names, excessive use of system dynamic memory can degrade system performance. In addition, a process with the GRPNAM privilege can interfere with the activities of other processes in the same group by creating definitions of commonly used logical names such as SYS$SYSTEM.
A.14. GRPPRV Privilege (Group)
When the process's group matches the group of the object owner, the GRPPRV privilege
gives a process the access rights provided by the object's system protection field.
GRPPRV also lets a process change the protection or the ownership of any object whose
owner group matches the process's group by using the DCL command SET
SECURITY.
Grant this privilege only to users who function as group managers. If this privilege is given to unqualified users who have no need for it, they can modify group UAF records to values equal to those of the group manager. They can increase resource allocations and grant privileges for which they are authorized.
|
Task |
Interface |
|---|---|
|
Modify object ownership |
SET SECURITY/OWNER, $QIO request to F11BXQP |
|
Read or modify a user authorization record |
$GETUAI, $SETUAI |
|
File system operations: |
$QIO request to F11BXQP |
|
A.15. IMPERSONATE Privilege (All) (Formerly DETACH)
Processes can create detached processes that have their own UIC without the IMPERSONATE privilege, provided the processes do not exceed their MAXJOBS and MAXDETACH quotas. However, the IMPERSONATE privilege becomes valuable when a process wants to specify a different UIC for the detached process. There is no restriction on the UIC that can be specified for a detached process if you have the IMPERSONATE privilege. Thus, there are no restrictions on the files, directories, and other objects to which a detached process can gain access. The IMPERSONATE privilege also lets a process create a detached process with unrestricted quotas. A process can create detached processes by executing the Create Process ($CREPRC) system service.
In addition, IMPERSONATE grants the ability to create a trusted server process using
the DCL command RUN/DETACH. Trusted processes are exempt from the
normal system security auditing policy.
Note
The IMPERSONATE privilege was formerly called the DETACH privilege. For backwards compatibility, if you specify DETACH in a command line, the command continues to work properly.
A.16. IMPORT Privilege (Objects)
The IMPORT privilege lets a process manipulate mandatory access controls. The privilege lets a process mount unlabeled tape volumes. This privilege is reserved for enhanced security products like SEVMS.
A.17. LOG_IO Privilege (All)
The LOG_IO privilege lets the user's process execute the Queue I/O Request ($QIO) system service to perform logical-level I/O operations. LOG_IO privilege is also required for certain device control functions, such as setting permanent terminal characteristics. A process with the typical privileges of NETMBX and TMPMBX that also holds LOG_IO and SYSNAM can reconfigure the Ethernet using the Phase IV network configuration procedure, NICONFIG.COM.
Usually, process I/O requests are handled indirectly by use of an I/O package such as OpenVMS Record Management Services (RMS). However, to increase their control over I/O operations and to improve the efficiency of I/O operations, skilled users sometimes prefer to handle the interface between their process and a system I/O driver program directly. They can do this by executing $QIO; in many instances, the operation called for is a logical-level I/O operation. Note that logical level functions are permitted without LOG_IO privilege on a device mounted with the /FOREIGN qualifier and on non-file-structured devices.
Grant this privilege only to users who need it because it allows a process to access data anywhere on the selected volume without the benefit of any file structuring. If this privilege is given to unqualified users who have no need for it, the operating system and service to other processes can be easily disrupted. Such disruptions can include the destruction of information on the system device, the destruction of user data, and the exposure of confidential information.
|
Task |
Interface |
|---|---|
|
Issue physical I/O calls to a private, non-file-structured device |
$QIO |
|
Modify the following terminal attributes: HANGUP SET_SPEED SECURE_SERVER |
SET TERMINAL (or TTDRIVER) /[NO]HANGUP /[NO]SET_SPEED /[NO]SECURE_SERVER |
A.18. MOUNT Privilege (Normal)
The MOUNT privilege lets the user's process execute the mount volume QIO function. The use of this function should be restricted to system software supplied by VSI.
A.19. NETMBX Privilege (Normal)
The NETMBX privilege lets a process perform functions related to a DECnet computer network. For example, it allows a process to switch a terminal line to an asynchronous DECnet protocol or assign a channel to a network device. Grant this privilege to general users who need to access the network.
A.20. OPER Privilege (System)
The OPER privilege allows a process to use the Operator Communication Manager (OPCOM) process to reply to user's requests, to broadcast messages to all terminals logged in, to designate terminals as operators' terminals and specify the types of messages to be displayed on these operators' terminals, and to initialize and control the log file of operators' messages. In addition, this privilege lets the user spool devices, create and control all queues, and modify the protection and ownership of all non-file-structured devices.
Grant this privilege only to the operators of the system. These are the users who respond to the requests of ordinary users, who tend to the needs of the system's peripheral devices (mounting reels of tape and changing printer forms), and who attend to all the other day-to-day chores of system operation. A nonprivileged user can log in on the console terminal to respond to operator requests, for example, to mount a tape.
|
Task |
Interface |
|---|---|
|
Modify device protection |
SET PROTECTION/DEVICE |
|
Modify device ownership |
SET PROTECTION/DEVICE/OWNER |
|
Access the System Management utility |
SYSMAN |
|
Perform operator tasks: | |
|
Issue a broadcast reply |
REPLY, $SNDOPR |
|
Cancel a system operator request |
REPLY/ABORT, $SNDOPR |
|
Initialize the system operator log file |
$SNDOPR |
|
Reply to a pending system operator request |
REPLY/TO, REPLY/PENDING, REPLY/INITIALIZE_TAPE, $SNDOPR |
|
Issue a system operator request |
REQUEST, $SNDOPR |
|
Enable system operator classes |
REPLY/ENABLE, $SNDOPR, $SNDMSG |
|
Disable system operator classes |
REPLY/DISABLE, $SNDOPR |
|
Send a broadcast message |
$BRKTHRU, $BRDCST |
|
Write an event to the operator log |
$SNDOPR |
|
Initialize a system operator log |
REPLY/LOG, $SNDOPR |
|
Close the current operator log |
REPLY/NOLOG, $SNDOPR |
|
Send a message to an operator |
REPLY, $SNDOPR |
|
Enable or disable autostart |
$SNDJBC (SJC$_DISABLE_AUTO_START, SJC$_ENABLE_AUTO_START) |
|
Stop all queues |
$SNDJBC (SJC$_STOP_ALL_QUEUES_ON_NODE) |
|
Modify the characteristics of devices: | |
|
Modify device availability |
SET DEVICE/[NO]AVAILABLE |
|
Modify device dual-porting |
SET DEVICE/[NO]DUAL_PORT |
|
Modify device error logging |
SET DEVICE/[NO]ERROR_LOGGING |
|
Modify device spooling |
SET DEVICE/[NO]SPOOLED |
|
Modify default definitions of days: | |
|
Set default day type to PRIMARY |
SET DAY/PRIMARY |
|
Set default day type to SECONDARY |
SET DAY/SECONDARY |
|
Return day type to DEFAULT |
SET DAY/DEFAULT |
|
Modify or override login limits: | |
|
Modify interactive login limit |
SET LOGIN/INTERACTIVE |
|
Modify network login limit |
SET LOGIN/NETWORK |
|
Modify batch login limit |
SET LOGIN/BATCH |
|
Create and modify queues: | |
|
Bypass discretionary access to a queue | |
|
Create a queue |
$SNDJBC (SJC$_CREATE_QUEUE) |
|
Define queue characteristics |
$SNDJBC (SJC$_DEFINE_CHARACTERISTICS) |
|
Define forms |
$SNDJBC (SJC$_DEFINE_FORM) |
|
Delete characteristics |
$SNDJBC (SJC$_DELETE_CHARACTERISTICS) |
|
Delete forms |
$SNDJBC (SJC$_DELETE_FORM) |
|
Set the base priority of batch processes |
$SNDJBC (SJC$_BASE_PRIORITY) |
|
Set the scheduling priority of a job |
$SNDJBC (SJC$_PRIORITY) |
|
Start accounting |
SET ACCOUNTING/ENABLE, $SNDJBC (SJC$_START_ACCOUNTING) |
|
Stop accounting |
SET ACCOUNTING/DISABLE, $SNDJBC (SJC$_STOP_ACCOUNTING) |
|
Operate the LAT device: | |
|
Transmit LAT solicit information message |
$QIO request to a LAT port driver (LTDRIVER) |
|
Set static rating for LAT service |
$QIO request to a LAT port driver (LTDRIVER) |
|
Read last LAT response message buffer |
$QIO request to a LAT port driver (LTDRIVER) |
|
Change port type from dedicated to application |
$QIO request to a LAT port driver (LTDRIVER) |
|
Change port type from application to dedicated |
$QIO request to a LAT port driver (LTDRIVER) |
|
Modify tape operations: | |
|
Specify number of file window-mapping pointers |
MOUNT/WINDOWS, $MOUNT |
|
Mount a volume with an alternate ACP |
MOUNT/PROCESSOR, $MOUNT |
|
Mount a volume with alternate cache limits |
MOUNT/CACHE, $MOUNT |
|
Modify write caching for a tape controller |
MOUNT/CACHE, $MOUNT |
|
Modify ODS1 directory FCB cache limit |
SET VOLUME/ACCESSED, MOUNT/ACCESSED, $MOUNT |
|
Perform network operations: | |
|
Connect to an object while executor state is restricted | |
|
Read network event-logging buffer |
NETACP |
|
Modify network volatile database |
NETACP |
|
Access the permanent database for an update |
DECnet/NML |
|
Connect to a DECnet circuit |
$QIO request to the DECnet downline load and loopback class driver (NDDRIVER) |
|
Display the permanent DECnet service password |
NCP |
|
Display the volatile DECnet service password |
NCP |
|
Control character conversion by terminals: | |
|
Load terminal fallback table |
TFU, $QIO request to the terminal fallback driver (FBDRIVER) |
|
Unload terminal fallback table |
TFU, $QIO request to the terminal fallback driver (FBDRIVER) |
|
Establish system default terminal fallback table |
TFU, $QIO request to the terminal fallback driver (FBDRIVER) |
|
Control cluster operations: | |
|
Request expected votes modification |
SET CLUSTER/EXPECTED_VOTES |
|
Request MSCP serving of a device |
SET DEVICE/SERVED |
|
Request quorum modification |
SET CLUSTER/QUORUM |
|
Add an adapter to the failover list |
$QIO request to the DEBNI BI bus NI driver (EFDRIVER) |
|
Remove an adapter from the failover list |
$QIO request to the DEBNI BI bus NI driver (EFDRIVER) |
|
Set an adapter to be the current adapter |
$QIO request to the DEBNI BI bus NI driver (EFDRIVER) |
|
Set the new adapter test interval |
$QIO request to the DEBNI BI bus NI driver (EFDRIVER) |
|
Privileges |
Task |
Interface |
|---|---|---|
|
OPER and CMKRNL |
Mount a volume with a private ACP |
MOUNT/PROCESSOR, $MOUNT |
|
OPER and LOG_IO |
Set the system time |
SET TIME, $SETIME |
|
OPER and SYSNAM |
Start or stop the queue manager |
START/QUEUE/MANAGER, STOP/QUEUE/MANAGER, $SNDJBC |
|
OPER and VOLPRO |
Initialize a blank tape or override access checks while initializing a blank tape |
$INIT_VOL, MOUNT, $MOUNT |
A.21. PFNMAP Privilege (All)
The PFNMAP privilege lets a user's process create and map page frame number (PFN) global sections to specific pages of physical memory or I/O device registers, no matter who is using the pages or registers. Such a privileged process can also delete PFN-based global sections with the system service $DGBLSC.
Exercise caution when granting this privilege. If unqualified user processes have unrestricted access to physical memory, the operating system and service to other processes can be easily disrupted. Such disruptions can include failure of the system, destruction of all system and user data, and exposure of confidential information.
A.22. PHY_IO Privilege (All)
The PHY_IO privilege lets the user's process execute the Queue I/O Request ($QIO) system service to perform physical-level I/O operations.
Usually, process I/O requests are handled indirectly by use of an I/O package such as OpenVMS Record Management Services (RMS). However, to increase their control over I/O operations and to improve the efficiency of their applications, skilled users sometimes prefer to handle directly the interface between their process and a system I/O driver program. They can do this by executing the $QIO system service; in many instances, the operation called for is a physical-level I/O operation.
Grant the PHY_IO privilege only to users who need it; grant this privilege even more carefully than the LOG_IO privilege. If this privilege is given to unqualified users who have no need for it, the operating system and service to other users can be easily disrupted. Such disruptions can include the destruction of information on the system device, the destruction of user data, and the exposure of confidential information.
|
Task |
Interface |
|---|---|
|
Access an individual shadow-set member unit |
$ASSIGN, $QIO |
|
Create or delete a watchpoint |
$QIO request to the SMP watchpoint driver (WPDRIVER) |
|
Map an LTA device to a server/port (IO$_TTY_PORT!IO$M_LT_MAPPORT) |
$QIO request to a LAT port driver (LTDRIVER) |
|
Issue the following I/O requests:
|
$QIO |
|
Modify the following terminal attributes: HANGUP SET_SPEED SECURE_SERVER |
SET TERMINAL or the terminal driver (TTDRIVER) /[NO]HANGUP /[NO]SET_SPEED /[NO]SECURE_SERVER |
|
Issue IO$_ACCESS (diagnostic) function to DEBNA/NI device driver |
$QIO request to a synchronous communications line (XGDRIVER) |
|
Enable Ethernet promiscuous mode listening | |
|
Issue IO$_ACCESS (diagnostic) function to Ethernet common driver |
A.23. PRMCEB Privilege (Devour)
The PRMCEB privilege lets the user's process create or delete a permanent common event flag cluster by executing the Associate Common Event Flag Cluster ($ASCEFC) or the Delete Common Event Flag Cluster ($DLCEFC) system service. Common event flag clusters enable cooperating processes to communicate with each other and thus synchronize their execution.
Grant this privilege with care. If permanent common event flag clusters are not explicitly deleted, they tie up space in system dynamic memory, which may degrade system performance.
A.24. PRMGBL Privilege (Devour)
The PRMGBL privilege lets the user's process create or delete permanent global sections by executing the Create and Map Section ($CRMPSC) or the Delete Global Section ($DGBLSC) system service. In addition, a process with this privilege (plus CMKRNL and SYSGBL privileges) can use the Install utility (INSTALL).
Global sections are shared structures that can be mapped simultaneously in the virtual address space of many processes. All processes see the same code or data. Global sections are used for reentrant subroutines or data buffers.
Grant this privilege with care. If permanent global sections are not explicitly deleted, they tie up space in the global section and global page tables, which are limited resources.
A.25. PRMMBX Privilege (Devour)
The PRMMBX privilege lets the user's process create or delete a permanent mailbox by executing the Create Mailbox and Assign Channel ($CREMBX) system service or the Delete Mailbox ($DELMBX) system service. The privilege also allows the creation of temporary mailboxes with the $CREMBX service.
Mailboxes are buffers in virtual memory that are treated as if they were record-oriented I/O devices. A mailbox is used for general interprocess communication.
Do not grant PRMMBX to all users of the system. Permanent mailboxes are not automatically deleted when the creating processes are deleted and, thus, continue to use a portion of system dynamic memory. System performance degrades as system dynamic memory becomes scarce.
A.26. PSWAPM Privilege (System)
The PSWAPM privilege lets the user's process control whether it can be swapped out of the balance set by executing the Set Process Swap Mode ($SETSWM) system service. A process must have this privilege to lock itself in the balance set (to disable swapping) or to unlock itself from the balance set (to enable swapping).
With this privilege, a process can create a process that is locked in the balance set
(swap mode is disabled) by using an optional argument to the Create Process
($CREPRC) system service or, when the DCL command
RUN is used to create a process, by using the
/NOSWAPPING qualifier of the RUN command.
Furthermore, a process can lock a page or range of pages in physical memory using the
Lock Pages in Memory ($LCKPAG) system service.
Grant this privilege only to users who need to lock a process in memory for performance reasons. Typically, this will be a real-time process. If unqualified processes have the unrestricted ability to lock processes in the balance set, physical memory can be held unnecessarily and thereby degrade system performance.
A.27. READALL Privilege (Objects)
The READALL privilege lets the process bypass existing restrictions that would otherwise prevent the process from reading an object. However, unlike the BYPASS privilege, which permits writing and deleting, READALL permits only the reading of objects and allows updating of such backup-related file characteristics as the backup date. See the relevant sections in the VSI OpenVMS System Management Utilities Reference Manual, Volume I: A–L and the VSI OpenVMS System Manager's Manual, Volume 1: Essentials for a discussion of backup operations.
READALL is intended to be an adequate privilege for backing up volumes, so grant this privilege to operators so they can perform system backups.
|
Task |
Interface |
|---|---|
|
Read a user authorization record |
$GETUAI |
|
Display permanent network database records |
NCP |
A.28. SECURITY Privilege (System)
The SECURITY privilege lets a process perform security-related functions such as
modifying the system password with the DCL command SET
PASSWORD/SYSTEM or modifying the system alarm and audit settings using the
DCL command SET AUDIT. The privilege not only lets a user process
start and stop the audit server process with SET AUDIT, it also
permits the process to use SET AUDIT to modify the characteristics of
the auditing database, including those of the audit server, the system audit journal,
the security archive file, resource monitoring, and the audit, alarm, or failure
mode.
Grant this privilege only to security administrators. Irresponsible users who obtain this privilege can subvert the system's security mechanisms, lock out users through improper application of system passwords, and disable security auditing.
|
Task |
Interface |
|---|---|
|
Display system auditing information about the system audit log file, audit server settings, and so on |
SHOW AUDIT |
|
Display Hidden ACEs |
SHOW SECURITY |
|
Display the system intrusion list or delete a record |
SHOW INTRUSION, DELETE/INTRUSION |
|
Enable the security operator terminal |
REPLY/ENABLE=SECURITY, $SNDOPR |
|
Enable protected subsystems on a volume |
MOUNT/SUBSYSTEM, $MOUNT, SET VOLUME/SUBSYSTEM |
A.29. SETPRV Privilege (All)
The SETPRV privilege lets the user's process create processes whose privileges are
greater than its own either by executing the Create Process
($CREPRC) system service with an optional argument or by
issuing the DCL command RUN to create a process. A process with this
privilege can also execute the DCL command SET PROCESS/PRIVILEGES to
obtain any desired privilege.
Exercise the same caution in granting SETPRV as in granting any other privilege because SETPRV lets a process enable any or all privileges.
A.30. SHARE Privilege (All)
The SHARE privilege lets processes assign channels to devices allocated to other processes or to a nonshared device using the Assign I/O Channel ($ASSIGN) system service.
Grant this privilege only to system processes such as print symbionts. Otherwise, an irresponsible user can interfere with the operation of devices belonging to other users.
A.31. SHMEM Privilege (Devour)
The SHMEM privilege lets the user's process create global sections and mailboxes (permanent and temporary) in memory shared by multiple processors if the process also has appropriate PRMGBL, PRMMBX, SYSGBL, and TMPMBX privileges. Just as in local memory, the space required for a temporary mailbox in multiport memory counts against the buffered I/O byte count limit (BYTLM) of the process.
The privilege also lets a user's process create or delete an event flag cluster in shared memory using the Associate Common Event Flag Cluster ($ASCEFC) or the Disassociate Common Event Flag Cluster ($DACEFC) system service.
A.32. SYSGBL Privilege (Files)
The SYSGBL privilege lets the user's process create or delete system global sections by executing the Create and Map Section ($CRMPSC) or the Delete Global Section ($DGBLSC) system service. In addition, a process with this privilege (plus the CMKRNL and PRMGBL privileges) can use the Install utility (INSTALL).
Exercise caution when granting this privilege. System global sections require space in the global section and global page tables, which are limited resources.
A.33. SYSLCK Privilege (System)
The SYSLCK privilege lets the user's process lock systemwide resources with the Enqueue Lock Request ($ENQ) system service or obtain information about a system resource with the Get Lock Information ($GETLKI) system service.
Grant this privilege to users who need to run programs that lock resources in the systemwide resource namespace. However, exercise caution when granting this privilege. Users who hold the SYSLCK privilege can interfere with the synchronization of all system and user software.
A.34. SYSNAM Privilege (All)
The SYSNAM privilege lets the user's process bypass discretionary access controls and
insert names into the system logical name table and delete names from that table by
using the Create Logical Name ($CRELNM) and Delete Logical Name
($DELLNM) system services. A process with this privilege
can use the DCL commands ASSIGN and DEFINE to add
names to the system logical name table in user or executive mode and can use the
DEASSIGN command in either mode to delete names from the
table.
To mount a system volume or to dismount a system or group volume with the appropriate mount or dismount command or system service, you must have the SYSNAM privilege.
Grant this privilege only to the system operators or to system programmers who need to define system logical names (such as names for user devices, library directories, and the system directory). Note that a process with SYSNAM privilege could redefine such critical system logical names as SYS$SYSTEM and SYSUAF, thus gaining control of the system.
|
Task |
Interface |
|---|---|
|
Access a MAIL maintenance record |
|
|
Modify a MAIL forward record |
|
|
Declare a network object |
NETACP |
|
Create an IPC association |
$IPC |
|
With CMKRNL, add or remove an identifier to system rights list |
SET RIGHTS_LIST/SYSTEM, $GRANTID, $REVOKID |
A.35. SYSPRV Privilege (All)
The SYSPRV privilege lets a process access protected objects by the system protection field and also read and modify the owner (UIC), the UIC-based protection code, and the ACL of an object. Even if an object is protected against system access, a process with SYSPRV privilege can change the object's protection to gain access to it. Any process with SYSPRV privilege can add, modify, or delete entries in the system user authorization file (SYSUAF.DAT).
Exercise caution when granting this privilege. Normally, grant this privilege only to system managers and security administrators. If unqualified users have system access rights, the operating system and service to others can be easily disrupted. Such disruptions can include failure of the system, destruction of all system and user data, and exposure of confidential information.
|
Task |
Interface |
|---|---|
|
Modify a file's expiration date |
SET FILE/EXPIRATION |
|
Modify the number of interlocked queue retries |
$QIO request to an Ethernet 802 driver (DEBNA/NI) |
|
Set the spin-wait time on the port command register |
$QIO request to an Ethernet 802 driver (DEBNA) |
|
Set the FROM field in a mail message |
MAIL routines |
|
Access a MAIL maintenance record |
|
|
Modify or delete a MAIL database record |
|
|
Modify the group number and password of a local area cluster |
CLUSTER_AUTHORIZE component of SYSMAN |
|
Perform transaction recovery, join a transaction as coordinator, transition a transaction |
DECdtm software |
|
Task |
Interface |
|---|---|
|
Initialize a magnetic tape |
$INIT_VOL |
|
Override creation of an owner ACE on a newly created file |
$QIO request to F11BXQP |
|
Clear the directory bit in a directory's file header |
$QIO request to the F11BXQP, SET FILE/NODIRECTORY |
|
Acquire or release a volume lock |
$QIO request to F11BXQP |
|
Force mount verification on a volume |
$QIO request to F11BXQP |
|
Create a file access window with the no access lock bit set |
$QIO request to F11BXQP |
|
Specify null lock mode for a volume lock |
$QIO request to F11BXQP |
|
Access a locked file |
$QIO request to F11BXQP |
|
Disable disk quotas on volume |
$QIO request to F11BXQP |
|
Enable disk quotas on volume |
$QIO request to F11BXQP |
A.36. TMPMBX Privilege (Normal)
The TMPMBX privilege lets the user's process create a temporary mailbox by executing the Create Mailbox and Assign Channel ($CREMBX) system service.
Mailboxes are buffers in virtual memory that are treated as if they were record-oriented I/O devices. A mailbox is used for general interprocess communication. Unlike a permanent mailbox, which must be explicitly deleted, a temporary mailbox is deleted automatically when it is no longer referenced by any process.
Grant this privilege to all users of the system to facilitate interprocess communication. System performance is not likely to be degraded by permitting the creation of temporary mailboxes, because their number is controlled by limits on the use of system dynamic memory (BYTLM quota).
A.37. UPGRADE Privilege (All)
The UPGRADE privilege lets a process manipulate mandatory access controls. The privilege allows a process to write to an object of higher integrity, in violation of the Biba confinement (*) property. This privilege is reserved for enhanced security products like SEVMS.
A.38. VOLPRO Privilege (Objects)
Initialize a previously used volume with an owner UIC different from the user's own UIC
Override the expiration date on a tape or disk volume owned by another user
Use the
/FOREIGNqualifier to mount a Files-11 volume owned by another userOverride the owner UIC protection of a volume
The VOLPRO privilege permits control only over volumes that the user's process can
mount or initialize. Volumes mounted with the /SYSTEM qualifier are
safe from a process with the VOLPRO privilege as long as the process does not also have
the SYSNAM privilege.
Exercise extreme caution when granting the VOLPRO privilege. If unqualified users can override volume protection, the operating system and service to others can be disrupted. Such disruptions can include destruction of the database and exposure of confidential information.
|
Task |
Interface |
|---|---|
|
Dismount a volume |
DISMOUNT/ABORT, $DISMOU |
|
Initialize a volume |
$INIT_VOL |
|
Mount foreign multivolume magnetic tape set |
MOUNT/MULTI_VOLUME |
|
Override volume labels or accessibility |
$MOUNT |
|
Initialize blank tape |
REPLY/BLANK_TAPE, $SNDOPR |
|
Override access while initializing a magnetic tape after a file access error |
$INIT_VOL |
|
Override write-locking of volume on errors |
$MOUNT |
|
Override write protection of former shadow set member |
$MOUNT |
|
Override volume expiration, protection, or ownership |
$MOUNT |
A.39. WORLD Privilege (System)
- Suspend Process ($SUSPND)
- Resume Process ($RESUME)
- Delete Process ($DELPRC)
- Set Priority ($SETPRI)
- Wake ($WAKE)
- Schedule Wakeup ($SCHDWK)
- Cancel Wakeup ($CANWAK)
- Force Exit ($FORCEX)
The user's process is also allowed to examine processes outside its own group by
executing the Get Job/Process Information ($GETJPI) system
service. A process with WORLD privilege can issue the SET PROCESS
command for all other processes. Any process with WORLD privilege can also obtain
information about a lock held by a process in another group using the Get Lock
Information ($GETLKI) system service.
To exercise control over subprocesses that it created or to examine these subprocesses, a process needs no special privilege. To affect or examine other processes inside its own group, a process needs only the GROUP privilege. You should, however, grant this privilege to users who need to affect or examine processes outside their own group.
Appendix B. Protection for OpenVMS System Files
This appendix lists OpenVMS system files and their protections so you can monitor them regularly to ensure that no tampering has occurred. Section B.1, ''Standard Ownership and Protection'' identifies the protection codes and ownership assigned to the files and calls out any exceptions. Section B.2, ''Listing of OpenVMS System Files'' lists the system files supplied on OpenVMS media.
See Chapter 8, "Controlling Access to System Data and Resources", particularly Section 8.9.2, ''Protecting System Files'' for a discussion of how to protect OpenVMS system files.
B.1. Standard Ownership and Protection
The system (SYSTEM) owns all OpenVMS system files except one. The directory MOM$SYSTEM is owned by UIC [376,375].
All files in SYS$SYSDEVICE:[VMS$COMMON], except those listed in Table B.1, ''Exceptions to Standard OpenVMS System File Protection'', have a protection code of S:RWED,O:RWED,G:RWED,W:RE.
|
Files |
Protection | |
|---|---|---|
|
[VMS$COMMON] | ||
|
DECW$DEFAULTS.DIR |
MOM$SYSTEM.DIR |
S:RWE,O:RWE,G:RE,W:RE |
|
SYS$KEYMAP.DIR |
SYS$LDR.DIR | |
|
SYS$STARTUP.DIR |
SYSCBI.DIR | |
|
SYSERR.DIR |
SYSEXE.DIR | |
|
SYSFONT.DIR |
SYSHLP.DIR | |
|
SYSLIB.DIR |
SYSMAINT.DIR | |
|
SYSMGR.DIR |
SYSMSG.DIR | |
|
SYSTEST.DIR |
SYSUPD.DIR | |
|
VUE$LIBRARY.DIR | ||
|
[VMS$COMMON.SYS$KEYMAP] | ||
|
DECW.DIR |
S:RWE,O:RWE,G:RE,W:RE | |
|
[VMS$COMMON.SYS$KEYMAP.DECW] | ||
|
SYSTEM.DIR |
USER.DIR |
S:RWE,O:RWE,G:RE,W:RE |
|
[VMS$COMMON.SYSEXE] | ||
|
ISL_LVAX_061.SYS |
ISL_SVAX_061.SYS |
S:RWED,O:RWED,G:RE,W:RE |
|
NETPROXY.DAT |
S:RWE,O:RWE,G:RWE,W | |
|
NET$PROXY.DAT |
S:RWE,O:RWE,G:RWE,W | |
|
MSGHLP$MAIN.EXE |
S:RE,O:RE,G:RE,W:RE | |
|
RIGHTSLIST.DAT |
S:RWED,O:RWED,G:R,W | |
|
SYSUAF.DAT |
S:RWE,O:RWE,G:RWE,W | |
|
VMS$OBJECTS.DAT |
S:RWE,O:RWE,G:RE,W | |
|
[VMS$COMMON.SYSFONT] | ||
|
DECW.DIR |
PS_FONT_METRICS.DIR |
S:RWE,O:RWE,G:RE,W:RE |
|
VWS.DIR |
XDPS.DIR | |
|
[VMS$COMMON.SYSFONT] | ||
|
DECW.DIR |
PS_FONT_METRICS.DIR |
S:RWE,O:RWE,G:RE,W:RE |
|
VWS.DIR |
XDPS.DIR | |
|
[VMS$COMMON.SYSFONT.DECW] | ||
|
100DPI.DIR |
75DPI.DIR |
S:RWE,O:RWE,G:RE,W:RE |
|
COMMON.DIR |
CURSOR16.DIR | |
|
CURSOR32.DIR |
USER_100DPI.DIR | |
|
USER_75DPI.DIR |
USER_COMMON.DIR | |
|
USER_CURSOR16.DIR |
USER_CURSOR32.DIR | |
|
[VMS$COMMON.SYSHLP] | ||
|
DECW.DIR |
VMSDOC.DIR |
S:RWE,O:RWE,G:RE,W:RE |
|
MSGHLP$ENGLISH.EXE |
S:RE,O:RE,G:RE,W:RE | |
|
EXAMPLES.DIR |
S:RWE,O:RWE,G:RE,W:RE | |
|
[VMS$COMMON.SYSLIB] | ||
|
CDA$ACCESS.EXE |
DECW$DWTLIBSHR.EXE |
S:RW,O:RWED,G:R,W:R |
|
DECW$PRINTWGTSHR.EXE |
DECW$XLIBSHR.EXE | |
|
MSGHLP$ENGLISH.EXE |
MSGHLP$SHARE.EXE |
S:RE,O:RE,G:RE,W:RE |
|
VMS$PASSWORD_ |
S:RE,O:RE,G,W | |
|
XDPS$DPSBINDINGSSHR.EXE |
XDPS$DPSCLIENTSHR.EXE |
S:RW,O:RWED,G:R,W:R |
|
XDPS$DPSLIBSHR.EXE |
XNL$SHR.EXE | |
|
[VMS$COMMON.SYSMGR] | ||
|
SECURITY.AUDIT$JOURNAL |
S:RWED,O:RWED,G:RE,W | |
|
VMS$AUDIT_SERVER.DAT |
S:RWE,O:RWE,G:RE,W | |
|
WELCOME.TEMPLATE |
WELCOME.TXT |
S:RWED,O:RWED,G:RE,W:RE |
|
[VMS$COMMON.VUE$LIBRARY] | ||
|
SYSTEM.DIR |
USER.DIR |
S:RWE,O:RWE,G:RE,W:RE |
B.2. Listing of OpenVMS System Files
The following sections display system files in the order produced by the DCL command
DIRECTORY.
B.2.1. Files in Top-Level Directories
Directory SYS$SYSDEVICE:[VMS$COMMON] ALPHA_TOOLS.DIR;1 CDA$LIBRARY.DIR;1 CDE$DEFAULTS.DIR;1 CDSA.DIR;1 DECS$BOOK.DIR;1 DECW$BOOK.DIR;1 DECW$DEFAULTS.DIR;1 DECW$I18N_LOCALE.DIR;1 DECW$INCLUDE.DIR;1 DIA$TOOLS.DIR;1 VSI-I64VMS-DWMOTIF-H0107--1.REFERENCE_PCSI$DESCRIPTION;1 VSI-I64VMS-DWMOTIF-H0107--1.REFERENCE_PCSI$TLB;1 VSI-I64VMS-DWMOTIF_SUPPORT-V0804--1.PCSI;1 VSI-I64VMS-OPENVMS-V0804--5.PCSI$DESCRIPTION;1 VSI-I64VMS-OPENVMS-V0804--5.PCSI$TLB;1 VSI-I64VMS-VMS-V0804--2.PCSI$DESCRIPTION;1 VSI-I64VMS-VMS-V0804--2.PCSI$TLB;1 KERBEROS.DIR;1 MOM$SYSTEM.DIR;1 SAMBA.DIR;1 SSL.DIR;1 SYS$CONFIG.DIR;1 SYS$I18N.DIR;1 SYS$KEYMAP.DIR;1 SYS$LDR.DIR;1 SYS$STARTUP.DIR;1 SYS$ZONEINFO.DIR;1 SYSCBI.DIR;1 SYSERR.DIR;1 SYSEXE.DIR;1 SYSFONT.DIR;1 SYSHLP.DIR;1 SYSLIB.DIR;1 SYSMAINT.DIR;1 SYSMGR.DIR;1 SYSMSG.DIR;1 SYSTEST.DIR;1 SYSUPD.DIR;1 TCPIP$LIB.DIR;1 TDC.DIR;1 TNT.DIR;1 VUE$LIBRARY.DIR;1 WBEMPROVIDERS.DIR;1 WBEM_SERVICES.DIR;1 XDPS$INCLUDE.DIR;1 Total of 45 files. $
Directory SYS$SYSDEVICE:[VMS$COMMON.DECW$DEFAULTS] SYSTEM.DIR;1 USER.DIR;1 Total of 2 files.
B.2.2. Files in SYS$KEYMAP
Directory SYS$SYSDEVICE:[VMS$COMMON.SYS$KEYMAP] DECW.DIR;1 XKB.DIR;1 Total of 2 files. Directory SYS$SYSDEVICE:[VMS$COMMON.SYS$KEYMAP.DECW] EURO_SYSTEM.DIR;1 SYSTEM.DIR;1 USER.DIR;1 Total of 3 files.
B.2.3. Files in SYS$LDR
Directory SYS$SYSDEVICE:[VMS$COMMON.SYS$LDR] ACME.EXE;1 CNX$DEBUG.EXE;1 CPULOA.EXE;1 DCLDEF.STB;1 DDIF$RMS_EXTENSION.EXE;1 DECDTMDEF.STB;1 DECW$XTDRIVER.EXE;1 ERRORLOG.EXE;1 ERRORLOG.STB;1 EXC$DEBUG.EXE;1 EXCEPTION.EXE;1 EXCEPTION.STB;1 EXCEPTION_MON.EXE;1 EXCEPTION_MON.STB;1 EXEC_INIT.EXE;1 EXEC_INIT.STB;1 F11BXQP.EXE;1 F11BXQP.STB;1 FC$GLOBALS.STB;1 FLT$DEBUG.EXE;1 GLXDEF.STB;1 GSP$SYMBOLS.STB;1 IMAGE_MANAGEMENT.EXE;1 IMAGE_MANAGEMENT.STB;1 IMGDEF.STB;1 IO$DEBUG.EXE;1 IODEF.STB;1 IO_ROUTINES.EXE;1 IO_ROUTINES.STB;1 IO_ROUTINES_MON.EXE;1 IO_ROUTINES_MON.STB;1 ISCSI$INITIATOR_SERVICES.EXE;1 ISCSI$SYMBOLS.STB;1 KRB$ACME_KRB_PERSONA_EXT.EXE;1 LAT$RATING.EXE;1 LCK$DEBUG.EXE;1 LDAPACME$EXT.EXE;1 LES$CHECK_LICENSE.EXE;1 LES$LES_V30.EXE;1 LES$NETMAN.EXE;1 LES$NETMANLDR.EXE;1 LES$PROFILE.EXE;1 LES_SYMBOLS.STB;1 LNM$DEBUG.EXE;1 LOCKING.EXE;1 LOCKING.STB;1 LOGICAL_NAMES.EXE;1 LOGICAL_NAMES.STB;1 MESSAGE_ROUTINES.EXE;1 MESSAGE_ROUTINES.STB;1 MSCP.EXE;1 MTX$DEBUG.EXE;1 MULTIPATH.EXE;1 MULTIPATH.STB;1 MULTIPATH_MON.EXE;1 MULTIPATH_MON.STB;1 NET$ALIAS.EXE;1 NET$ALIAS.STB;1 NET$CSMACD.EXE;1 NET$DRIVER.EXE;1 NET$DRIVER.STB;1 NET$FDDI.EXE;1 NET$LOOP_APPLICATION.EXE;1 NET$MESSAGE.EXE;1 NET$MOPS0.EXE;1 NET$MOPS0.STB;1 NET$OSDRIVER.EXE;1 NET$OSDRIVER.STB;1 NET$OSVCM.EXE;1 NET$OSVCM.STB;1 NET$ROUTING_ES.EXE;1 NET$ROUTING_ES.STB;1 NET$ROUTING_IS.EXE;1 NET$ROUTING_VCM.EXE;1 NET$SESSION_CONTROL.EXE;1 NET$SESSION_CONTROL.STB;1 NET$TPCONS.EXE;1 NET$TPCONS.STB;1 NET$TRACER.EXE;1 NET$TRANSPORT_NSP.EXE;1 NET$TRANSPORT_NSP.STB;1 NET$TRANSPORT_OSI.EXE;1 NET$TRANSPORT_OSI.STB;1 NETDEF.STB;1 NT_EXTENSION.EXE;1 NT_EXTENSION.STB;1 PCS$DEBUG.EXE;1 PGQ$ISP23XX_SYMBOLS.STB;1 PGQ$SYMBOLS.STB;1 PKD$GLOBALS.STB;1 PKM$GLOBALS.STB;1 PKR$GLOBALS.STB;1 PRF$DEBUG.EXE;1 PROCESS_MANAGEMENT.EXE;1 PROCESS_MANAGEMENT.STB;1 PROCESS_MANAGEMENT_MON.EXE;1 PROCESS_MANAGEMENT_MON.STB;1 RECOVERY_UNIT_SERVICES.EXE;1 RECOVERY_UNIT_SERVICES.STB;1 REQSYSDEF.STB;1 RMS$DEBUG.EXE;1 RMS.EXE;1 RMSDEF.STB;1 SCSDEF.STB;1 SECURITY.EXE;1 SECURITY.STB;1 SECURITY_MON.EXE;1 SECURITY_MON.STB;1 SHELL16K.EXE;1 SHELL16K.STB;1 SHELL32K.EXE;1 SHELL32K.STB;1 SHELL64K.EXE;1 SHELL64K.STB;1 SHELL8K.EXE;1 SHELL8K.STB;1 SPL$DEBUG.EXE;1 SSPI.EXE;1 SWIS$DEBUG.EXE;1 SYS$ACPI.EXE;1 SYS$ACPI0006.EXE;1 SYS$AGDRIVER.EXE;1 SYS$ASNDRIVER.EXE;1 SYS$BASE_IMAGE.EXE;1 SYS$BUTTON_SUPPORT.EXE;1 SYS$CLUSTER.EXE;1 SYS$CLUSTER.STB;1 SYS$CLUSTER_MON.EXE;1 SYS$CLUSTER_MON.STB;1 SYS$CMDRIVER.EXE;1 SYS$CMIDRIVER.EXE;1 SYS$CTDRIVER.EXE;1 SYS$CVBTDRIVER.EXE;1 SYS$CVDRIVER.EXE;1 SYS$DADDRIVER.EXE;1 SYS$DEDRIVER.EXE;1 SYS$DKBTDRIVER.EXE;1 SYS$DKDRIVER.EXE;1 SYS$DNBTDRIVER.EXE;1 SYS$DNDRIVER.EXE;1 SYS$DQBTDRIVER.EXE;1 SYS$DQDRIVER.EXE;1 SYS$DUDRIVER.EXE;1 SYS$DVDRIVER.EXE;1 SYS$DZADRIVER.EXE;1 SYS$DZCDRIVER.EXE;1 SYS$DZDRIVER.EXE;1 SYS$EFI.SYS;1 SYS$EGBTDRIVER.EXE;1 SYS$EHBTDRIVER.EXE;1 SYS$EHCIDRIVER.EXE;1 SYS$EI1000.EXE;1 SYS$EI1000_MON.EXE;1 SYS$EIBTDRIVER.EXE;1 SYS$EIDRIVER.EXE;1 SYS$EIDRIVER_MON.EXE;1 SYS$EIGBTDRIVER.EXE;1 SYS$ER57711.EXE;1 SYS$ER57711_MON.EXE;1 SYS$ERBTDRIVER.EXE;1 SYS$EW1000A.EXE;1 SYS$EW1000A_MON.EXE;1 SYS$EW5700.EXE;1 SYS$EW5700_MON.EXE;1 SYS$EW57711.EXE;1 SYS$EW57711_MON.EXE;1 SYS$EWBTDRIVER.EXE;1 SYS$EWDRIVER.EXE;1 SYS$EWDRIVER_DE500BA.EXE;1 SYS$EWXFRAME.EXE;1 SYS$EWXFRAME_MON.EXE;1 SYS$FBDRIVER.EXE;1 SYS$FGEDRIVER.EXE;1 SYS$FTDRIVER.EXE;1 SYS$FWDRIVER.EXE;1 SYS$GHDRIVER.EXE;1 SYS$GKDRIVER.EXE;1 SYS$GLBTDRIVER.EXE;1 SYS$GLDRIVER.EXE;1 SYS$GLDRIVER_MON.EXE;1 SYS$GSPBTDRIVER.EXE;1 SYS$GSPDRIVER.EXE;1 SYS$HIDDRIVER.EXE;1 SYS$HUBDRIVER.EXE;1 SYS$HWP0001.EXE;1 SYS$HWP0004.EXE;1 SYS$IKUDRIVER.EXE;1 SYS$IKXDRIVER.EXE;1 SYS$IMUDRIVER.EXE;1 SYS$IMXDRIVER.EXE;1 SYS$INDRIVER.EXE;1 SYS$INXDRIVER.EXE;1 SYS$IPC_SERVICES.EXE;1 SYS$IPI0001.EXE;1 SYS$ISA_SUPPORT.EXE;1 SYS$ISLBTDRIVER.EXE;1 SYS$KBDDRIVER.EXE;1 SYS$KBXDRIVER.EXE;1 SYS$LADDRIVER.EXE;1 SYS$LAN.EXE;1 SYS$LAN_CSMACD.EXE;1 SYS$LAN_FDDI.EXE;1 SYS$LASTDRIVER.EXE;1 SYS$LDDRIVER.EXE;1 SYS$LLDRIVER.EXE;1 SYS$LPDRIVER.EXE;1 SYS$LTDRIVER.EXE;1 SYS$MADDRIVER.EXE;1 SYS$MDBTDRIVER.EXE;1 SYS$MDDRIVER.EXE;1 SYS$MEMORYDISK.DAT;1 SYS$MKDRIVER.EXE;1 SYS$MME_SERVICES.EXE;1 SYS$MME_SERVICES.STB;1 SYS$MOUDRIVER.EXE;1 SYS$MOXDRIVER.EXE;1 SYS$NAME_SERVICES.EXE;1 SYS$NAME_SERVICES.STB;1 SYS$NETWORK_SERVICES.EXE;1 SYS$NETWORK_SERVICES.STB;1 SYS$NISCA_BTDRIVER.EXE;1 SYS$NTA.EXE;1 SYS$NTA.STB;1 SYS$OHBTDRIVER.EXE;1 SYS$OHCIDRIVER.EXE;1 SYS$OPDRIVER.EXE;1 SYS$PCIE_SUPPORT.EXE;1 SYS$PCI_SUPPORT.EXE;1 SYS$PEDRIVER.EXE;1 SYS$PEDRIVER.STB;1 SYS$PEDRIVER_MON.EXE;1 SYS$PEDRIVER_MON.STB;1 SYS$PGABTDRIVER.EXE;1 SYS$PGADRIVER.EXE;1 SYS$PGQBTDRIVER.EXE;1 SYS$PGQDRIVER.EXE;1 SYS$PIPEDRIVER.EXE;1 SYS$PKADRIVER.EXE;1 SYS$PKDBTDRIVER.EXE;1 SYS$PKDDRIVER.EXE;1 SYS$PKMBTDRIVER.EXE;1 SYS$PKMDRIVER.EXE;1 SYS$PKQ160DRIVER.EXE;1 SYS$PKQBTDRIVER.EXE;1 SYS$PKRBTDRIVER.EXE;1 SYS$PKRDRIVER.EXE;1 SYS$PKW160DRIVER.EXE;1 SYS$PKWBTDRIVER.EXE;1 SYS$PKWDRIVER.EXE;1 SYS$PLATFORM_INFO.DAT;1 SYS$PLATFORM_SUPPORT.EXE;1 SYS$POWER_SUPPORT.EXE;1 SYS$PPPDRIVER.EXE;1 SYS$RMDRIVER.EXE;1 SYS$RMDRIVER.STB;1 SYS$RTTDRIVER.EXE;1 SYS$SCS.EXE;1 SYS$SCS.STB;1 SYS$SCS_MON.EXE;1 SYS$SCS_MON.STB;1 SYS$SEDRIVER.EXE;1 SYS$SHDRIVER.EXE;1 SYS$SMDRIVER.EXE;1 SYS$SRBTDRIVER.EXE;1 SYS$SRDRIVER.EXE;1 SYS$TRANSACTION_SERVICES.EXE;1 SYS$TTDRIVER.EXE;1 SYS$TUDRIVER.EXE;1 SYS$UCEDRIVER.EXE;1 SYS$UCFDRIVER.EXE;1 SYS$UGDRIVER.EXE;1 SYS$UHBTDRIVER.EXE;1 SYS$UHCIDRIVER.EXE;1 SYS$USBDRIVER.EXE;1 SYS$USER_MEMORYDISK.DAT;1 SYS$USER_MEMORYDISK.TEMPLATE;1 SYS$UTC_SERVICES.EXE;1 SYS$VCON_SUPPORT.EXE;1 SYS$VGABTDRIVER.EXE;1 SYS$VLANDRIVER.EXE;1 SYS$VM.EXE;1 SYS$VM.STB;1 SYS$WSDRIVER.EXE;1 SYS$XFCACHE.DSF;1 SYS$XFCACHE.EXE;1 SYS$XFCACHE.STB;1 SYS$XFCACHE_MON.EXE;1 SYS$XFCACHE_MON.STB;1 SYS$XXDRIVER.EXE;1 SYS$YCDRIVER.EXE;1 SYS$YTDRIVER.EXE;1 SYSDEF.STB;1 SYSDEVICE.EXE;1 SYSDEVICE.STB;1 SYSGETSYI.EXE;1 SYSGETSYI.STB;1 SYSLDR_DYN.EXE;1 SYSLDR_DYN.STB;1 SYSLICENSE.EXE;1 SYSLICENSE.STB;1 SYSTEM_DEBUG.DSF;1 SYSTEM_DEBUG.EXE;1 SYSTEM_PRIMITIVES.EXE;1 SYSTEM_PRIMITIVES.STB;1 SYSTEM_PRIMITIVES_MIN.EXE;1 SYSTEM_PRIMITIVES_MIN.STB;1 SYSTEM_SYNCHRONIZATION.EXE;1 SYSTEM_SYNCHRONIZATION.STB;1 SYSTEM_SYNCHRONIZATION_MIN.EXE;1 SYSTEM_SYNCHRONIZATION_MIN.STB;1 SYSTEM_SYNCHRONIZATION_UNI.EXE;1 SYSTEM_SYNCHRONIZATION_UNI.STB;1 TCPIP$BGDRIVER.EXE;1 TCPIP$BGDRIVER.STB;1 TCPIP$DNFSDRIVER.EXE;1 TCPIP$INETACP.STB;1 TCPIP$INETDRIVER.EXE;1 TCPIP$INETDRIVER.STB;1 TCPIP$INET_GLOBALS.STB;1 TCPIP$INTERNET_SERVICES.EXE;1 TCPIP$INTERNET_SERVICES.STB;1 TCPIP$IPSEC_GLOBALS.STB;1 TCPIP$IPSEC_SERVICES.EXE;1 TCPIP$IPSEC_SERVICES.STB;1 TCPIP$NET_GLOBALS.STB;1 TCPIP$NFS_GLOBALS.STB;1 TCPIP$NFS_SERVICES.EXE;1 TCPIP$NFS_SERVICES.STB;1 TCPIP$PROXY_GLOBALS.STB;1 TCPIP$PROXY_SERVICES.EXE;1 TCPIP$PROXY_SERVICES.STB;1 TCPIP$PWIPACP.STB;1 TCPIP$PWIPDRIVER.EXE;1 TCPIP$PWIPDRIVER.STB;1 TCPIP$PWIP_GLOBALS.STB;1 TCPIP$SDA_GLOBALS.STB;1 TCPIP$TNDRIVER.EXE;1 TCPIP$TNDRIVER.STB;1 TCPIP$TN_GLOBALS.STB;1 TDC_EXEC_C$I_V840-0203-0020.EXE;1 TMSCP.EXE;1 TQE$DEBUG.EXE;1 TR$DEBUG.EXE;1 VMS$FORGE_WORD.DATA;1 VMS$SYSTEM_IMAGES.DATA;1 VMS$SYSTEM_IMAGES.TEMPLATE;1 VMS_EXTENSION.EXE;1 VMS_EXTENSION.STB;1 Total of 348 files. $
B.2.4. Files in SYS$STARTUP and SYS$ERR
Directory SYS$SYSDEVICE:[VMS$COMMON.SYS$STARTUP] ACME$STARTUP.COM;1 AMDS$STARTUP.COM;1 CDSA$INITIALIZE.COM;1 CDSA$INSTALL_IMAGES.COM;1 CDSA$UPGRADE.COM;1 CLUE$STARTUP.COM;1 DDTM$XA_SHUTDOWN.COM;1 DDTM$XA_STARTUP.COM;1 DDTM$XG_START_SERVER.COM;1 DECDTM$SHUTDOWN.COM;1 DECDTM$STARTUP.COM;1 DECW$STARTXTERMINAL.COM;1 DNS$CLERK_STARTUP.COM;1 DNS$CLERK_STARTUP_V.COM;1 DNS$CLERK_STARTUP_VMS.COM;1 DNS$CLERK_STOP.COM;1 DNS$CLERK_STOP_V.COM;1 DNS$CLERK_STOP_VMS.COM;1 DTSS$STARTUP.COM;1 ENCRYPT_START.COM;1 ESS$LAD_STARTUP.COM;1 ESS$LAD_STARTUP.DAT;1 ESS$LAD_STARTUP.TEMPLATE;1 ESS$LAST_STARTUP.COM;1 ESS$LAST_STARTUP.DAT;1 ESS$LAST_STARTUP.TEMPLATE;1 ESS$STARTUP.COM;1 ICC$STARTUP.COM;1 ICC$SYSTARTUP.COM;1 ICC$SYSTARTUP.TEMPLATE;1 IPC$STARTUP.COM;1 ISCSI$INITIATOR_SHUTDOWN.COM;1 ISCSI$INITIATOR_STARTUP.COM;1 KRB$CONFIGURE.COM;1 KRB$SHUTDOWN.COM;1 KRB$STARTUP.COM;1 KRB$STARTUP_KERBEROS_ACME.COM;1 LAN$STARTUP.COM;1 LAT$CONFIG.COM;1 LAT$STARTUP.COM;1 LD$STARTUP.COM;1 LDAPACME$CONFIG-STD.INI_TEMPLATE;1 LDAPACME$STARTUP-STD.COM;1 LDAP_LOCALUSER_DATABASE.TXT_TEMPLATE;1 LICENSE_CHECK.EXE;1 NET$LES_STARTUP.COM;1 NET$ROUTING_STARTUP.COM;1 NET$STARTUP.COM;1 NTA$STARTUP.COM;1 NTA$STARTUP_AUTHENTICATED_RPC.COM;1 NTA$STARTUP_NT_ACME.COM;1 REG$STARTUP.COM;1 SAMBA$DEFINE_ROOT.COM;2 SAMBA$DEFINE_ROOT.COM;1 SAMBA$SHUTDOWN.COM;1 SAMBA$STARTUP.COM;1 SSL$SHUTDOWN.COM;1 SSL$SHUTDOWN.COM_OLD;2 SSL$SHUTDOWN.COM_OLD;1 SSL$STARTUP.COM;1 SSL$STARTUP.COM_OLD;2 SSL$STARTUP.COM_OLD;1 SYS$NET_SERVICES.COM;1 SYS$NET_SERVICES_DECNET.COM;1 SYS$POWER_MONITOR_STARTUP.COM;1 SYS$SMHANDLER_STARTUP.COM;1 TCPIP$SHUTDOWN.COM;1 TCPIP$STARTUP.COM;1 TDC$STARTUP.COM;1 TDF$UTC_STARTUP.COM;1 TNT$SHUTDOWN.COM;1 TNT$STARTUP.COM;1 USB$RUN_UCM_SERVER.COM;1 VMS$BASEENVIRON-050_INDICT_SERVER.COM;1 VMS$BASEENVIRON-050_LIB.COM;1 VMS$BASEENVIRON-050_SMISERVER.COM;1 VMS$BASEENVIRON-050_VMS.COM;1 VMS$CONFIG-050_ACME_SERVER.COM;1 VMS$CONFIG-050_AUDIT_SERVER.COM;1 VMS$CONFIG-050_CACHE_SERVER.COM;1 VMS$CONFIG-050_CSP.COM;1 VMS$CONFIG-050_ERRFMT.COM;1 VMS$CONFIG-050_JOBCTL.COM;1 VMS$CONFIG-050_LMF.COM;1 VMS$CONFIG-050_OPCOM.COM;1 VMS$CONFIG-050_SECURITY_SERVER.COM;1 VMS$CONFIG-050_SHADOW_SERVER.COM;1 VMS$CONFIG-050_VMS.COM;1 VMS$DECW_AUTOGEN.COM;1 VMS$DECW_CHECK_PARAMS.COM;1 VMS$DEVICE_STARTUP.COM;1 VMS$END-050_COORDINATED.COM;1 VMS$INITIAL-050_CONFIGURE.COM;1 VMS$INITIAL-050_LIB.COM;1 VMS$INITIAL-050_VMS.COM;1 VMS$LAYERED.DAT;1 VMS$LAYERED.TEMPLATE;1 VMS$LPBEGIN-050_SMHANDLER.COM;1 VMS$LPBEGIN-050_STARTUP.COM;1 VMS$PHASES.DAT;1 VMS$VMS.DAT;1 VPM$STARTUP.COM;1 WBEM_SERVICES$SHUTDOWN.COM;1 WBEM_SERVICES$SHUTDOWN.COM_OLD;2 WBEM_SERVICES$SHUTDOWN.COM_OLD;1 WBEM_SERVICES$STARTUP.COM;1 WBEM_SERVICES$STARTUP.COM_OLD;2 WBEM_SERVICES$STARTUP.COM_OLD;1 Total of 108 files. $
B.2.5. Files in SYSEXE
Directory SYS$SYSDEVICE:[VMS$COMMON.SYSEXE] ACC.EXE;1 ACLEDT.EXE;1 ACME_SERVER.EXE;1 ACPIDUMP.EFI;1 ADMTOOL.EXE;1 AGEN$FEEDBACK.EXE;1 ALIAS$SYMBOLS.STB;1 ALPHA_CHECKSUM.EXE;1 AMDS$AM_RM_DIAG.EXE;1 AMDS$RMCP.EXE;1 ANALAUDIT.EXE;1 ANALYZBAD.EXE;1 ANALYZOBJ.EXE;1 ANALYZRMS.EXE;1 ANALYZSSL.EXE;1 AUDIT_SERVER.EXE;1 AUTHORIZE.EXE;1 BACKUP$MANAGER.EXE;1 BACKUP.EXE;1 BADBLOCK.EXE;1 BIOSUTIL.EFI;1 BIRTHS.MSGHLP;1 CDA$CONVERT.EXE;1 CDA$PACK.EXE;1 CDA$UNPACK.EXE;1 CDDVD$CP.EXE;1 CDI$TRACE.EXE;1 CDI_CACHE_DUMP.EXE;1 CDRECORD.EXE;1 CDSA$CERTGEN.EXE;1 CDSA$ISSUER.EXE;1 CDSA$MDS_INSTALL.EXE;1 CDSA$MOD_INSTALL.EXE;1 CDSA$OUTPUT_ERROR.EXE;1 CDSA$REVOKE.EXE;1 CDSA$REVOKE_INSTALL_LIBSHR.EXE;1 CDSA$SIGN.EXE;1 CDSA$VALIDATE.EXE;1 CDSA$VALIDATE_INSTALL_LIBSHR.EXE;1 CDSA$X5092XML.EXE;1 CDU.EXE;1 CHECKSUM.EXE;1 CHGSYSPAR.EXE;1 CIA.EXE;1 CLU$PARAMS.DAT;9 CLU$PARAMS.OLD;8 CLU$PARAMS.OLD;7 CLU$PARAMS.OLD;6 CLU$PARAMS.OLD;5 CLU$PARAMS.OLD;4 CLU$PARAMS.OLD;3 CLU$PARAMS.OLD;2 CLU$PARAMS.OLD;1 CLU$SYNCH.DAT;1 CML.EXE;1 CONFIGURE.EXE;1 CONVERT.EXE;1 CONVERT_OLD.EXE;1 COPY.EXE;1 CREATE.EXE;1 CREATEFDL.EXE;1 CSP.EXE;1 CSPMOUNT_CLIENT.EXE;1 CSPSWVERS.EXE;1 CTF$CONFIG.EXE;1 CTF$DCP.EXE;1 CTF$SERVER.EXE;1 CTF$SYMBOLS.STB;1 CTF$UI.EXE;1 CTI$SYMBOLS.STB;1 CWLOGINIT.EXE;1 DBGHK$HOST_KERNEL.COM;1 DBGHK$HOST_KERNEL.EXE;1 DBGHK$PRCDUMP_KERNEL.COM;1 DBGHK$PRCDUMP_KERNEL.EXE;1 DBGHK$SYSDUMP_KERNEL.COM;1 DBGHK$SYSDUMP_KERNEL.EXE;1 DCE$ADD_ID.EXE;1 DCE$DCED.EXE;1 DCE$RPCCP.EXE;1 DCE$RPCPERF_CLIENT.EXE;1 DCE$RPCPERF_SERVER.EXE;1 DCL.EXE;1 DDIF$VIEW.EXE;1 DDTM$XG_SERVER.EXE;1 DEATHS.MSGHLP;1 DECNET_LOC_REGISTER.EXE;1 DECNET_REGISTER.EXE;1 DECNET_REGISTER_LNO.EXE;1 DECSOUND.EXE;1 DECW$BOOKREADER.EXE;1 DECW$CALC.EXE;1 DECW$CALENDAR.EXE;1 DECW$CARDFILER.EXE;1 DECW$CBI.EXE;1 DECW$CLOCK.EXE;1 DECW$CONFIG.EXE;1 DECW$DWT_DECNET.EXE;1 DECW$DWT_FONT_DAEMON.EXE;1 DECW$DWT_STARTXTDRIVER.EXE;1 DECW$ENDSESSION.EXE;1 DECW$FONTCOMPILER.EXE;1 DECW$LBXPROXY.EXE;1 DECW$MAIL.EXE;1 DECW$MESSAGEPANEL.EXE;1 DECW$MWM.EXE;1 DECW$NOTEPAD.EXE;1 DECW$PAINT.EXE;1 DECW$PAUSESESSION.EXE;1 DECW$PRINTSCREEN.EXE;1 DECW$PROXYMANAGER.EXE;1 DECW$PUZZLE.EXE;1 DECW$SERVER_MAIN.EXE;1 DECW$SESSION.EXE;1 DECW$SETSHODIS.EXE;1 DECW$STARTLOGIN.EXE;1 DECW$TERMINAL.EXE;1 DECW$TERMINAL_CREATE.EXE;1 DECW$UILMOTIF.EXE;1 DECW$UILMOTIF_TIE_SUPPORT.EXE;1 DECW$WAITFORSM.EXE;1 DECW$WINMGR.EXE;1 DECW$WML.EXE;1 DECW$WML_TIE_SUPPORT.EXE;1 DECW$WSCUST.EXE;1 DECW$WSINIT.EXE;1 DECW$XAUTH.EXE;1 DECW$XFS.EXE;1 DECW$XKBCOMP.EXE;1 DECW$XKBEVD.EXE;1 DELETE.EXE;1 DIA$STUB.EXE;1 DIFF.EXE;1 DIRECTORY.EXE;1 DISKQUOTA.EXE;1 DISMOUNT.EXE;1 DNS$ADVER.EXE;1 DNS$ADVER_V.EXE;1 DNS$ADVER_VMS.EXE;1 DNS$ANALYZE.EXE;1 DNS$ANALYZE_V.EXE;1 DNS$ANALYZE_VMS.EXE;1 DNS$CONFIGURE.EXE;1 DNS$CONTROL.EXE;1 DNSBROWSER.EXE;1 DNSCP.BPT;1 DNSCP.MBF;1 DSMDECDNS.EXE;1 DSRINDEX.EXE;1 DSRTOC.EXE;1 DTEPAD.EXE;1 DTR.COM;1 DTRECV.EXE;1 DTSEND.EXE;1 DTSS$SERVICE.EXE;1 DTSS$SET_TIMEZONE.EXE;1 DUMP.EXE;1 EDF.EXE;1 EDT.EXE;1 EFI$BCFG.EXE;1 EFI$CP.EXE;1 EFI$SET.EXE;1 EFI$SHOW.EXE;1 EFICHK.EFI;1 ELV$EVENT.DAT;1 ELV$HEADER.DAT;1 ELV.EXE;1 ENCRYPT$AUTH.EXE;1 ENCRYPT$FAC.EXE;1 ENCRYPT$NUL_ALG.EXE;1 ERRFMT.EXE;1 ESIS$SYMBOLS.STB;1 ESS$INFOSERVER.EXE;1 ESS$ISL_STARTUP.COM;1 ESS$ISL_VMSCLIENT.EXE;1 ESS$LADCP.EXE;1 ESS$LASTCP.EXE;1 EVL.COM;1 EVL.EXE;1 EXCHANGE$NETWORK.EXE;1 EXCHANGE.EXE;1 F11CACP.EXE;1 F11DACP.EXE;1 FAL.COM;1 FAL.EXE;1 FASTPATH_SERVER.EXE;1 FILESERV.EXE;1 FIRM_REV_MATRIX.DAT;1 FSINFO.EXE;1 FSLSFONTS.EXE;1 FTP.EFI;1 FTPCTRL.EFI;1 FTPD.EFI;1 GCU.EXE;1 GENCAT.EXE;1 GICAP.RULES;1 GICAP.RULES_LIST;1 HLD.COM;1 VSI-I64VMS-AVAIL_MAN_BASE-X0804-0C92.PCSI$DATABASE;1 VSI-I64VMS-CDSA-V0204-322.PCSI$DATABASE;1 VSI-I64VMS-DECNET_PLUS-V0804.PCSI$DATABASE;1 VSI-I64VMS-DWMOTIF-H0107.PCSI$DATABASE;1 VSI-I64VMS-DWMOTIF_SUPPORT-V0804.PCSI$DATABASE;1 VSI-I64VMS-VSIBINARYCHECKER-V0101.PCSI$DATABASE;1 VSI-I64VMS-KERBEROS-V0301-152.PCSI$DATABASE;1 VSI-I64VMS-OPENVMS-V0804.PCSI$DATABASE;1 VSI-I64VMS-SAMBA-T0102.PCSI$DATABASE;1 VSI-I64VMS-SSL-V0104-334.PCSI$DATABASE;1 VSI-I64VMS-TCPIP-V0507-11.PCSI$DATABASE;1 VSI-I64VMS-TDC_RT-V0203-20.PCSI$DATABASE;1 VSI-I64VMS-VMS-V0804.PCSI$DATABASE;1 VSI-I64VMS-WBEMCIM-V0296-0A100211.PCSI$DATABASE;1 VSI-I64VMS-WBEMPROVIDERS-V0200-4.PCSI$DATABASE;1 HPBINARYCHECKER.EXE;1 HPVMINFO.EXE;1 I64VMS$PCSI_INSTALL.COM;1 I64VMS$PCSI_INSTALL_LP.COM;1 I64VMS$PCSI_INSTALL_MESSAGES.COM;1 I64VMS$PCSI_INSTALL_MIN.COM;1 IA64_LINK.EXE;1 ICAPINIT.EXE;1 ICAPMANAGE.EXE;1 ICAP_MODIFY.EXE;1 ICAP_NOTIFY.EXE;1 ICAP_SERVER.EXE;1 ICAP_STAT.EXE;1 ICONV.EXE;1 ICONVC.EXE;1 IFCONFIG.EFI;1 IMGDMP_RIGHTS.EXE;1 INDICTMENT_SERVER.EXE;1 INIT.EXE;1 INSTALL.EXE;1 INS_STARTUP.COM;1 IPB.EXE;1 IPCACP.EXE;1 IPCDEF.STB;1 ISCSI$CONTROL_PROGRAM.EXE;1 JBC$COMMAND.EXE;1 JBC$JOB_CONTROL.EXE;1 KRB$CONFINFO.EXE;1 KRB$KADMIN.EXE;1 KRB$KADMIND.EXE;1 KRB$KADMIN_LOCAL.EXE;1 KRB$KDB5_UTIL.EXE;1 KRB$KDESTROY.EXE;1 KRB$KERBEROS.EXE;1 KRB$KILL.EXE;1 KRB$KINIT.EXE;1 KRB$KLIST.EXE;1 KRB$KPASSWD.EXE;1 KRB$KPROP.EXE;1 KRB$KPROPD.EXE;1 KRB$KRB5KDC.EXE;1 KRB$KTUTIL.EXE;1 KRB$KVNO.EXE;1 KRB$XMKERBEROS.EXE;1 LANACP.EXE;1 LANCP.EXE;1 LATACP.EXE;1 LATCP.EXE;1 LATSYM.EXE;1 LCKMGR_SERVER.EXE;1 LD$UTILITY.EXE;1 LDAP_LOAD_LOCALUSER_DATABASE.EXE;1 LDLOCALE.EXE;1 LES$ACP_V30.COM;1 LES$ACP_V30.EXE;1 LES$FINDPTMAX.EXE;1 LES$STARTUP_V30.EXE;1 LIBRARIAN.EXE;1 LMCP.EXE;1 LMF$LICENSE.LDB;1 LMF$LURT.DAT;1 LMF$OE.DAT;1 LMF.EXE;1 LOAD_UNICODE_TABLE.EXE;1 LOCALE.EXE;1 LOCALEDEF.EXE;1 LOGINOUT.EXE;1 LTPAD.EXE;1 MACRO.EXE;1 MAIL.COM;1 MAIL.EXE;1 MAILEDIT.COM;1 MAIL_SERVER.EXE;1 MDMANAGER.EXE;1 MESSAGE.EXE;1 MIME.EXE;1 MIRROR.COM;1 MIRROR.EXE;1 MOM.COM;1 MOM.EXE;1 MONITOR.EXE;1 MSA$UTIL.EXE;1 MSGHLP$MAIN.EXE;1 MTAAACP.EXE;1 NCL.EXE;1 NCP.EXE;1 NCS.EXE;1 NET$ACP.EXE;1 NET$ACP.STB;1 NET$CCR.EXE;1 NET$DEBUG.EXE;1 NET$EVENT_DISPATCHER.EXE;1 NET$LES_CONTROL.DAT;1 NET$LOAD.EXE;1 NET$MGMT.EXE;1 NET$MIRROR.EXE;1 NET$MOP.EXE;1 NET$MOP.STB;1 NET$QIO_SYMBOLS.STB;1 NET$SERVER.COM;1 NET$SERVER.EXE;1 NET$SYMBOLS.STB;1 NETWORKS.DAT;1 NETWRK$NETWORK.EXE;1 NEWPARAMS.DONE;8 NEWPARAMS.DONE;7 NEWPARAMS.DONE;6 NEWPARAMS.DONE;5 NEWPARAMS.DONE;4 NEWPARAMS.DONE;3 NEWPARAMS.DONE;2 NEWPARAMS.DONE;1 NPARDELETECLASS.EXE;1 NSPTP$SYMBOLS.STB;1 OPCCRASH.EXE;1 OPCOM.EXE;1 OPENVMS$FTP.EXE;1 OPENVMS$FTPDIR.EXE;1 OPENVMS$RCP.EXE;1 OPENVMS$RLOGIN.EXE;1 OPENVMS$TELNET.EXE;1 OPENVMS$TN3270.EXE;1 OSITP$SYMBOLS.STB;1 OSVCM$SYMBOLS.STB;1 PATCH.EXE;1 PCSI$FILE_SYSTEM.PCSI$DATABASE;1 PCSI$MAIN.EXE;1 PCSI$PROCESSOR.PCSI$DATABASE;1 PCSI$ROOT.PCSI$DATABASE;1 PHONE.EXE;1 PING.EFI;1 PPPD$LOGGER.EXE;1 PPPD$UTIL.EXE;1 PROTOCOLS.DAT;1 PRTSMB.EXE;1 QMAN$QUEUE_MANAGER.EXE;1 QUEMAN.EXE;1 RECLAIM.EXE;1 RECOVER.EXE;1 REG$CP.EXE;1 REGISTRY$SERVER.EXE;1 REMACP.EXE;1 RENAME.EXE;1 REPLY.EXE;1 REQUEST.EXE;1 RESOLV.CONF;1 RIGHTSLIST.DAT;1 RMSREC$SERVER.EXE;1 ROUTE.EFI;1 RTPAD.EXE;1 RUNDET.EXE;1 RUNOFF.EXE;1 SA1_STARTUP.COM;1 SANCP.EXE;1 SAS$UTIL.EXE;1 SA_STARTUP.COM;1 SCACP.EXE;1 SCL$SYMBOLS.STB;1 SDA.EXE;1 SDA_DEBUG.EXE;1 SEARCH.EXE;1 SECURITY_SERVER.EXE;1 SET.EXE;1 SETAUDIT.EXE;1 SETBAUD.EFI;1 SETFILENOMOVE.COM;1 SETFILENOSHELV.COM;1 SETFILENOSHELV.EXE;1 SETP0.EXE;1 SETPREFER.EXE;1 SETRIGHTS.EXE;1 SETSHOSECUR.EXE;1 SETSHOSERVER.EXE;1 SETSHOSHADOW.EXE;1 SETSHOWPATH.EXE;1 SETWATCH.EXE;1 SHADOW_SERVER.EXE;1 SHOW.EXE;1 SHUTDOWN.COM;1 SHWCLSTR.EXE;1 SMGBLDTRM.EXE;1 SMGMAPTRM.EXE;1 SMGTERMS.TXT;1 SMISERVER.EXE;1 SMPUTIL.EXE;1 SORTMERGE.EXE;1 STACONFIG.EXE;1 STARTUP.COM;1 STARTUP_NET.NSH;1 STOPREM.EXE;1 SUBMIT.EXE;1 SUMSLP.EXE;1 SYS$BASE_IMAGE.MAP;1 SYS$CONFIG.DAT;1 SYS$DAYLIGHT_SAVING.EXE;1 SYS$NET_SERVICES_SHUTDOWN.COM;1 SYS$READ_TIME_ZONE_RULE.EXE;1 SYS$SETBOOT.EXE;1 SYS$SMHANDLER.COM;1 SYS$SMHANDLER.EXE;1 SYS$TIMEZONE.DAT;17 SYS$TIMEZONE.DAT;16 SYS$TIMEZONE.DAT;15 SYS$TIMEZONE.DAT;14 SYS$TIMEZONE.DAT;13 SYS$TIMEZONE.DAT;12 SYS$TIMEZONE.DAT;11 SYS$TIMEZONE.DAT;10 SYS$TIMEZONE.DAT;9 SYS$TIMEZONE.DAT;8 SYS$TIMEZONE.DAT;7 SYS$TIMEZONE.DAT;6 SYS$TIMEZONE.DAT;5 SYS$TIMEZONE.DAT;4 SYS$TIMEZONE.DAT;3 SYS$TIMEZONE.DAT;2 SYS$TIMEZONE.DAT;1 SYS$TIMEZONE_SRC.DAT;1 SYS$USER_CONFIG.DAT;1 SYSBOOT.EXE;1 SYSGEN.EXE;1 SYSINIT.EXE;1 SYSMAN.EXE;1 SYSUAF.DAT;1 SYSUAF.TEMPLATE;1 TCPIP$ARP.EXE;1 TCPIP$BIND-CHECKCONF.EXE;1 TCPIP$BIND-CHECKZONE.EXE;1 TCPIP$BIND_RUN.COM;1 TCPIP$BIND_SERVER.EXE;1 TCPIP$BOOTP.EXE;1 TCPIP$BOOTP_RUN.COM;1 TCPIP$CONFIGURATION.DAT;1 TCPIP$CONVERT.COM;1 TCPIP$CONVERT.FDL;1 TCPIP$DHCP_BPASCIITODBMOD.EXE;1 TCPIP$DHCP_BPISAMTOASCII.EXE;1 TCPIP$DHCP_CLIENT.EXE;1 TCPIP$DHCP_CLIENT_CONF.EXE;1 TCPIP$DHCP_CLIENT_RUN.COM;1 TCPIP$DHCP_CLIENT_SHOWDHC.EXE;1 TCPIP$DHCP_DBDUMP.EXE;1 TCPIP$DHCP_DBMODIFY.EXE;1 TCPIP$DHCP_DBREGISTER.EXE;1 TCPIP$DHCP_DBSHOW.EXE;1 TCPIP$DHCP_GUI.EXE;1 TCPIP$DHCP_RUN.COM;1 TCPIP$DHCP_SERVER.EXE;1 TCPIP$DHCP_SHOWDBS.EXE;1 TCPIP$DHCP_SIGNAL.EXE;1 TCPIP$DIG.EXE;1 TCPIP$DNFSACP.EXE;1 TCPIP$DNSSEC-KEYGEN.EXE;1 TCPIP$DNSSEC-SIGNZONE.EXE;1 TCPIP$ECHO_SERVER_PLUS.EXE;1 TCPIP$ESNMP_SERVER.EXE;1 TCPIP$EXE.ADF;1 TCPIP$FAILSAFE.EXE;1 TCPIP$FAILSAFE_RUN.COM;1 TCPIP$FINGER.EXE;1 TCPIP$FINGER_SERVER.EXE;1 TCPIP$FINGER_SRVR_RUN.COM;1 TCPIP$FTP_CHILD.EXE;1 TCPIP$FTP_CLIENT.EXE;1 TCPIP$FTP_RUN.COM;1 TCPIP$FTP_SERVER.COM;1 TCPIP$FTP_SERVER.EXE;1 TCPIP$GATED.EXE;1 TCPIP$HLB.ADF;1 TCPIP$HOST.DAT;1 TCPIP$HOST.EXE;1 TCPIP$HR_MIB.EXE;1 TCPIP$IFCONFIG.EXE;1 TCPIP$IMAP_RUN.COM;1 TCPIP$IMAP_SERVER.EXE;1 TCPIP$IMAP_STOP.EXE;1 TCPIP$INETACP.EXE;1 TCPIP$INETDRIVERSTOP.EXE;1 TCPIP$INETPPE.EXE;1 TCPIP$IP6RTRD.EXE;1 TCPIP$IP6RTRD_RUN.COM;1 TCPIP$IP6_TESTADDR.EXE;1 TCPIP$IPSEC_CONFIG.DB_TEMPLATE;1 TCPIP$IPSEC_CONFIG.EXE;1 TCPIP$IPSEC_PM.EXE;1 TCPIP$IPSEC_RUN.COM;1 TCPIP$IPTUNNEL.EXE;1 TCPIP$LBROKER.EXE;1 TCPIP$LBROKER_RUN.COM;1 TCPIP$LOCKD.EXE;1 TCPIP$LOCKD_RUN.COM;1 TCPIP$LPD_RCV.EXE;1 TCPIP$LPD_RECV_RUN.COM;1 TCPIP$LPD_SMB.EXE;1 TCPIP$LPD_UTILITIES.EXE;1 TCPIP$LPQ.EXE;1 TCPIP$LPRM.EXE;1 TCPIP$LPRSETUP.EXE;1 TCPIP$METRIC.EXE;1 TCPIP$METRICVIEW.EXE;1 TCPIP$METRIC_RUN.COM;1 TCPIP$MIBCOMP.EXE;1 TCPIP$MLB.ADF;1 TCPIP$MOSY.EXE;1 TCPIP$MOUNTD.EXE;1 TCPIP$MOUNTD_RUN.COM;1 TCPIP$ND6HOST.EXE;1 TCPIP$ND6HOST_RUN.COM;1 TCPIP$NETSTAT.EXE;1 TCPIP$NETWORK.DAT;1 TCPIP$NFSSTAT.EXE;1 TCPIP$NFS_RUN.COM;1 TCPIP$NFS_SERVER.EXE;1 TCPIP$NSLOOKUP.EXE;1 TCPIP$NSUPDATE.EXE;1 TCPIP$NTP.EXE;1 TCPIP$NTPDATE.EXE;1 TCPIP$NTPDC.EXE;1 TCPIP$NTPQ.EXE;1 TCPIP$NTPTRACE.EXE;1 TCPIP$NTP_KEYGEN.EXE;1 TCPIP$NTP_RES_CHILD.EXE;1 TCPIP$NTP_RUN.COM;1 TCPIP$OBJ.ADF;1 TCPIP$OLB.ADF;1 TCPIP$OS_MIBS.EXE;1 TCPIP$PCNFSD.EXE;1 TCPIP$PCNFSD_RUN.COM;1 TCPIP$PEERNAME.EXE;1 TCPIP$PING.EXE;1 TCPIP$POP_RUN.COM;1 TCPIP$POP_SERVER.EXE;1 TCPIP$POP_V57_ROLLOVER.EXE;1 TCPIP$PORTMAPPER.EXE;1 TCPIP$PORTM_RUN.COM;1 TCPIP$PROXY.DAT;1 TCPIP$PWIPACP.EXE;1 TCPIP$PWIPSHUT.EXE;1 TCPIP$RCP.EXE;1 TCPIP$REXEC_RUN.COM;1 TCPIP$RIPQUERY.EXE;1 TCPIP$RLOGIN.EXE;1 TCPIP$RMT.EXE;1 TCPIP$RNDC-CONFGEN.EXE;1 TCPIP$RNDC.EXE;1 TCPIP$ROUTE.DAT;1 TCPIP$ROUTE.EXE;1 TCPIP$ROUTED.EXE;1 TCPIP$RPCGEN.EXE;1 TCPIP$RPCINFO.EXE;1 TCPIP$RSH.EXE;1 TCPIP$RSH_RUN.COM;1 TCPIP$SERVICE.DAT;1 TCPIP$SMTP_RECEIVER.EXE;1 TCPIP$SMTP_RECV_RUN.COM;1 TCPIP$SMTP_SFF.EXE;1 TCPIP$SMTP_SYMBIONT.EXE;1 TCPIP$SMTP_UTILITIES.EXE;1 TCPIP$SMTP_V57_ROLLOVER.EXE;1 TCPIP$SNMPI.EXE;1 TCPIP$SNMP_REQUEST.EXE;1 TCPIP$SNMP_RUN.COM;1 TCPIP$SNMP_TRAPRCV.EXE;1 TCPIP$SNMP_TRAPSND.EXE;1 TCPIP$SSH_RCMD.COM;1 TCPIP$SSH_RUN.COM;1 TCPIP$SSH_SCP2.EXE;1 TCPIP$SSH_SFTP-SERVER2.EXE;1 TCPIP$SSH_SFTP2.EXE;1 TCPIP$SSH_SSH-ADD2.EXE;1 TCPIP$SSH_SSH-AGENT2.EXE;1 TCPIP$SSH_SSH-KEYGEN2.EXE;1 TCPIP$SSH_SSH-SIGNER2.EXE;1 TCPIP$SSH_SSH2.EXE;1 TCPIP$SSH_SSHD2.EXE;1 TCPIP$STATD.EXE;1 TCPIP$STATD_RUN.COM;1 TCPIP$STB.ADF;1 TCPIP$SYSCONFIG.EXE;1 TCPIP$SYSCONFIGDB.EXE;1 TCPIP$TCPDUMP.EXE;1 TCPIP$TELNET.EXE;1 TCPIP$TELNETSYM.EXE;1 TCPIP$TELNET_RUN.COM;1 TCPIP$TELNET_SERVER.EXE;1 TCPIP$TFTP.EXE;1 TCPIP$TFTP_RUN.COM;1 TCPIP$TLB.ADF;1 TCPIP$TRACE.EXE;1 TCPIP$TRACEROUTE.EXE;1 TCPIP$TTCP.EXE;1 TCPIP$UCP.EXE;1 TCPIP$UUDECODE.EXE;1 TCPIP$UUENCODE.EXE;1 TCPIP$VERSIONS.EXE;1 TCPIP$WHOIS.EXE;1 TCPIP$XDM.EXE;1 TCPIP$XDMW.EXE;1 TCPIP$XDM_RUN.COM;1 TCPIP$XDM_XSESSION.COM;1 TCPIPV4.EFI;1 TDF$SET_TIMEZONE.EXE;1 TECO32_TV_AV.EXE;1 TERMTABLE.EXE;1 TERMTABLE.TXT;1 TFF$MASTER.DAT;1 TFU.EXE;1 TNT$EXCLUDED_SYMBIONTS.DAT;1 TNT$HELPER.EXE;1 TNT$SERVER.EXE;1 TNT$UTILITY.EXE;1 TPCONS$SYMBOLS.STB;1 TPSERV.EXE;1 TPU.EXE;1 TYPE.EXE;1 UCX$LPD_SMB.EXE;1 UCX$SERVICE.DAT;1 UCX$TELNETSYM.EXE;1 UCX$UCP.EXE;1 UNIDATA2.DAT;1 UNLOCK.EXE;1 USB$UCM_CLIENT.EXE;1 USB$UCM_DEVICES.DAT;1 USB$UCM_SERVER.EXE;1 UTC$CONFIGURE_TDF.EXE;1 VERIFY.EXE;1 VMOUNT.EXE;1 VMS$OBJECTS.DAT;1 VMS$PDF_CREATE_SYSDIRS.COM;1 VMSHELP.EXE;1 VMS_BCFG.EFI;1 VMS_LOADER.EFI;1 VMS_SET.EFI;1 VMS_SHOW.EFI;1 VMS_SPCFG.EFI;1 VPM.EXE;1 VPM_SERVER.EXE;1 VUE$MASTER.EXE;1 WBM.EXE;1 WWPPS.EXE;1 XGCP.EXE;1 ZIC.EXE;1 Total of 655 files. $
B.2.6. Files in SYSHLP
Directory SYS$SYSDEVICE:[VMS$COMMON.SYSHLP] ACLEDT.HLB;1 ACMELDAP_STD_CONFIG_INSTALL.PDF;1 ACMELDAP_STD_CONFIG_INSTALL.TXT;1 ACME_DEV_GUIDE.PDF;1 ACME_DEV_README.TXT;1 ANALAUDIT$HELP.HLB;1 ANLRMSHLP.HLB;1 BKM$HELP.HLB;1 CDSA024.RELEASE_NOTES;1 CIFS_REL_NOTES.PDF;1 CIFS_REL_NOTES.PS;1 CIFS_REL_NOTES.TXT;1 CTF$HELP.HLB;1 DBG$HELP.HLB;1 DBG$UIHELP.HLB;1 DDIF$VIEW.DECW$BOOK;1 DECNET-PLUS-V8_4.RELEASE_NOTES;1 DECNET_LOC_REGISTER.HLB;1 DECNET_MIGRATE.HLB;1 DECNET_REGISTER_COMMANDS.HLB;1 DECNET_REGISTER_FORMS.HLB;1 DECRAM$HELP.HLB;1 DECW$BOOKREADER.DECW$BOOK;1 DECW$CALC.DECW$BOOK;1 DECW$CALENDAR.DECW$BOOK;1 DECW$CARDFILER.DECW$BOOK;1 DECW$CLOCK.DECW$BOOK;1 DECW$DECSOUND.DECW$BOOK;1 DECW$DXMCOLOR_HELP.DECW$BOOK;1 DECW$DXMHELP_HELP.HLB;1 DECW$DXMPRINTWGT_HELP.DECW$BOOK;1 DECW$HELPHELP.HLB;1 DECW$MAIL.DECW$BOOK;1 DECW$MESSAGEPANEL.DECW$BOOK;1 DECW$MOTIFH017.RELEASE_NOTES;1 DECW$MOTIF_OSF_BUG_LIST_V12.TXT;1 DECW$MULTIBUFFER.TXT;1 DECW$MWM.DECW$BOOK;1 DECW$NOTEPAD.DECW$BOOK;1 DECW$PAINT.DECW$BOOK;1 DECW$PRINTSCREEN.DECW$BOOK;1 DECW$PRINTWGT.HLB;1 DECW$PUZZLE.DECW$BOOK;1 DECW$SHAPE.TXT;1 DECW$TERMINAL.DECW$BOOK;1 DECW$VUE.DECW$BOOK;1 DECW$XINPUT.TXT;1 DISKQUOTA.HLB;1 DNS$CPHELP.HLB;1 DSMDECDNS.DECW$BOOK;1 DTEHELP.HLB;1 DTSDTR.HLB;1 EDFHLP.HLB;1 EDTHELP.HLB;1 EDTVT100.DOC;1 EDTVT200.DOC;1 EDTVT52.DOC;1 EFI$HELP.HLB;1 ELV$HELP.HLB;1 ESS$INFOSERVER.HLB;1 ESS$LADCP.HLB;1 ESS$LASTCPHELP.HLB;1 EVE$HELP.HLB;1 EVE$KEYHELP.HLB;1 EXAMPLES.DIR;1 EXCHNGHLP.HLB;1 GALAXY_GUIDE.DECW$BOOK;1 GSP$SDA_HELP.HLB;1 HELPLIB.HLB;5 HPBINARYCHECKER.RELEASE_NOTES;1 ICC$SDA.HLB;1 INSTALHLP.HLB;1 ISCSI$SDA_HELP.HLB;1 KERBEROS030.RELEASE_NOTES;1 KRB$ADMIN_HELP.HLB;1 KRB$USER_HELP.HLB;1 LAN$HELP.HLB;1 LANCP$HELP.HLB;1 LAN_COUNTERS_AND_FUNCTIONS.TXT;1 LATCP$HELP.HLB;1 LD$HELP.HLB;1 LDAPACME$README-STD.TXT;1 LES$SDAHELP.HLB;1 LMCP$HLB.HLB;1 MAILHELP.HLB;1 MIME$HELP.HLB;1 MNRHELP.HLB;1 MSA_UTIL_HELP.HLB;1 MSGHLP$LIBRARY.MSGHLP$DATA;1 NCLHELP.HLB;1 NCPHELP.HLB;1 NET$CONFIGURE_HELP.HLB;1 NET$MGMT_HELP.HLB;1 NET$SDA.HLB;1 OPENVMSDOC_COMMENTS.TXT;1 PATCHHELP.HLB;1 PE$HELP.HLB;1 PHONEHELP.HLB;1 PPPD$HELP.HLB;1 REGCP$HELP.HLB;1 SANCP.HLB;1 SAS_UTIL_HELP.HLB;1 SCACP$HELP.HLB;1 SDA.HLB;1 SHWCLHELP.HLB;1 SSL014.RELEASE_NOTES;1 SYSGEN.HLB;1 SYSMANHELP.HLB;1 TCPIP$FTP_HELP.HLB;1 TCPIP$NSLOOKUP_HELP.HLB;1 TCPIP$SDA.HLB;1 TCPIP$TELNET_HELP.HLB;1 TCPIP$UCP_HELP.HLB;1 TCPIP.MSGHLP$DATA;1 TCPIP057.RELEASE_NOTES;1 TCPIP057_RELEASE_NOTES.PS;1 TECO.HLB;1 TFF$TFUHELP.HLB;1 TNT033.RELEASE_NOTES;1 TPUHELP.HLB;1 UAFHELP.HLB;1 UCM$HELP.HLB;1 UNSUPPORTED.DIR;1 USB$SDA_HELP.HLB;1 VMSDOC.DIR;1 WBEM_SERVICES_V2-9X.RELEASE_NOTES;1 WWPPSHLP.HLB;1 XFC$SDA.HLB;1 Total of 128 files. Directory SYS$SYSDEVICE:[VMS$COMMON.SYSHLP.EXAMPLES] ACMEUTIL.C;1 ACMEUTIL.CLD;1 ACMEUTIL.COM;1 ACMEUTIL_SETUP.COM;1 ACME_EXAMPLE_DOI.H;1 ACME_EXAMPLE_DOI_ACME.C;1 ACME_EXAMPLE_DOI_BUILD.COM;1 ACME_EXAMPLE_DOI_MSG.MSG;1 ACME_EXAMPLE_README.TXT;1 ACME_PERSONA_BUILD.COM;1 ACME_PERSONA_EXT.C;1 ADDUSER.COM;1 ALIGN_FAULT_DEMO.C;1 ALPHA_LOGGER.C;1 BACKDEF.BAS;1 BACKDEF.FOR;1 BACKDEF.H;1 BACKDEF.MAR;1 BACKDEF.R32;1 BACKSTRUC.FOR;1 BACKSTRUC.H;1 BACKSTRUC.MAR;1 BACKSTRUC.R32;1 BACKUSER.COM;1 BAPIDEF.BAS;1 BAPIDEF.FOR;1 BAPIDEF.H;1 BAPIDEF.MAR;1 BAPIDEF.R32;1 CALC_SYSDISK_FREESPACE.COM;1 CDSA.DIR;1 CLASS.C;1 CLU_MOUNT_DISK.COM;1 COLLATED.C;1 CREATE_INFOSERVER_SERVICE.COM;1 CX.C;1 C_TEST_ROUTINES.C;1 DAYLIGHT_SAVINGS.COM;1 DB_READ.C;1 DB_REQUESTER.C;1 DB_SERVER.C;1 DB_USER.C;1 DCE.DIR;1 DECDTM$EXAMPLE1.COM;1 DECDTM$EXAMPLE1.FOR;1 DECDTM$EXAMPLE2.C;1 DECDTM$EXAMPLE2.COM;1 DECW.DIR;1 DISK_DRIVER.C;1 DNVPLUS.DIR;1 DTE_AT.C;1 EMULATOR_UTIL.C;1 ENCRYPT.DIR;1 EVE$ADVANCED.TPU;1 EVE$BUILD.TPU;1 EVE$CONSTANTS.TPU;1 EVE$CONSTANTS.UIL;1 EVE$CORE.TPU;1 EVE$DECWINDOWS.TPU;1 EVE$EDIT.TPU;1 EVE$EDT.TPU;1 EVE$EXTEND.TPU;1 EVE$EXTRAS.TPU;1 EVE$FILE.TPU;1 EVE$FORMAT.TPU;1 EVE$HELP.TPU;1 EVE$INTERNATIONALIZATION.TPU;1 EVE$MASTER.FILE;1 EVE$MENUS.TPU;1 EVE$MOUSE.TPU;1 EVE$OPTIONS.TPU;1 EVE$PARSER.TPU;1 EVE$SHOW.TPU;1 EVE$SYNONYMS.TPU;1 EVE$TERMINALS.TPU;1 EVE$VERSION.DAT;1 EVE$WIDGETS_MOTIF.UIL;1 EVE$WILDCARD.TPU;1 EVE$WINDOWS.TPU;1 EVE$WPS.TPU;1 EXAMPLE_F$GETDVI_2TB_DISK.COM;1 FDL_EXAMP.C;1 FDL_EXAMP.FDL;1 FILENAME_COMPARE.C;1 GCU$BALANCER.C;1 GCU$BALANCER.CLD;1 GCU$BALANCER.EXE;1 GKTEST.C;1 IO_PERFORM.C;1 KERBEROS.DIR;1 LAN$POPULATE.COM;1 LAT$RATING_BUILD.COM;1 LAT$RATING_CALC.C;1 LAT$RATING_DPT.MAR;1 LAVC$BUILD.COM;1 LAVC$FAILURE_ANALYSIS.MAR;1 LAVC$START_BUS.EXE;1 LAVC$START_BUS.MAR;1 LAVC$STOP_BUS.EXE;1 LAVC$STOP_BUS.MAR;1 LDAP_EXAMPLE.C;1 LIB$TABLE_PARSE_DEMO.COM;1 LMF$PPL_UNITS_ASSIGNMENT.COM;1 LRDRIVER.C;1 LRDRIVER.COM;1 LRDRIVER.H;1 MAGNETIC_TAPE.C;1 MBX$SDA.C;1 MGRMENU.COM;1 MONITOR.COM;1 MONITOR_CONVERT.C;1 MONITOR_CONVERT.EXE;1 MONSUM.COM;1 MSCPMOUNT.COM;1 MYTEST_LNK.COM;1 NSAPS.DAT;1 OLD_DAYLIGHT_SAVINGS.COM;1 OSIT$CMD_EXECUTOR.COM;1 OSIT$CMD_EXECUTOR.MAR;1 OSIT$CMD_SOURCE.CLD;1 OSIT$CMD_SOURCE.MAR;1 OSIT$ECHO.FOR;1 OSIT$RANDOM.C;1 OSIT$RECEIVER.PAS;1 OSIT$RECORD_STRUCTURES.FOR;1 OSIT$STORAGE.FOR;1 OSIT$TRANSMITTER.PAS;1 PARTITIONS.COM;1 PPPD.DIR;1 PREFER.CLD;1 PREFER.MAR;1 RAD.COM;1 RDB$SDA.C;1 RDB$SDA.COM;1 RDB$SDA.EXE;1 RDB_CMD.CLD;1 READ_VERIFY.C;1 READ_WRITE_TERMINAL.C;1 RESET_DEVICE_PROTECTION.COM;1 RESTUSER.COM;1 RMSJNL_EXAMPLE.C;1 RMSJNL_EXAMPLE.COB;1 RMSJNL_EXAMPLE.COM;1 RMSJNL_XABTID_EXAMPLE.C;1 SETUP_NCL_KEYPAD.COM;1 SET_ALIGN_REPORT.C;1 SNIA.DIR;1 SPL.COM;1 SSL.DIR;1 SUBMON.COM;1 SUBX.C;1 SX.C;1 SYS$AMCONFIG.DAT;1 SYS$NET_SERVICES_EXAMPLE.COM;1 SYSGTTSTR.MSG;1 TCPIP.DIR;1 USB.DIR;1 UWSS.C;1 UWSS_LNK.COM;1 UWSS_TEST.C;1 VMS$PASSWORD_POLICY.ADA;1 VMS$PASSWORD_POLICY.B32;1 VMS$PASSWORD_POLICY_LNK.COM;1 VMS_OSI.H;1 WORKING_SET.COM;1 XDPS.DIR;1 XTIUTIL.C;1 XTI_EXAMPLES.COM;1 Total of 168 files. $ Directory SYS$SYSDEVICE:[VMS$COMMON.SYSHLP.EXAMPLES.DECW] 7X14RK.BDF;1 ACCESSX.EXE;1 ACCESSX.TXT;1 ACCESSX.UID;1 ALLOBJS.H;1 APP.C;1 APP.H;1 AUTO-SQUEAL.AUD;1 BARK.BM;1 BASIC.H;1 BELLS.AUD;1 BIKE-HORN.AU;1 BIKE-HORN.AUD;1 BUILD_CUSTOMIZER.COM;1 CHALLENGER.GIF;1 CLIENT.UID;1 CLIENT.UIL;1 CLIENT_CB.C;1 CLIENT_CB.H;1 CLOCK.DDIF;1 COWS.AUD;1 CUSTOM.C;1 CUSTOM.DAT;1 CUSTOM.HLB;1 CUSTOM.HLP;1 CUSTOM.TXT;1 CUSTOM.UIL;1 CUSTOMIMAGE.DAT;1 CUTPASTE.C;1 CUTPASTE.EXE;1 CUTPASTE.UID;1 CUTPASTE.UIL;1 CUTPASTE_LOCAL.UIL;1 DECBURGER.C;1 DECBURGER.COM;1 DECBURGER.EXE;1 DECBURGER.HLB;1 DECBURGER.HLP;1 DECBURGER.UID;1 DECBURGER.UIL;1 DECBURGER_HELP.DECW$BOOK;1 DECBURGER_HELP.DECW$BOOKSHELF;1 DECW$CDPLAYER.C;1 DECW$CDPLAYER.DAT;1 DECW$CDPLAYER.EXE;1 DECW$CDPLAYER.H;1 DECW$CDPLAYER.UID;1 DECW$CDPLAYER.UIL;1 DECW$DXM_PORT.COM;1 DECW$DXM_PORT_CALL.EXE;1 DECW$DXM_PORT_CLASS.EXE;1 DECW$DXM_PORT_DATA.EXE;1 DECW$DXM_PORT_DRM.EXE;1 DECW$DXM_PORT_HILEVELS.EXE;1 DECW$DXM_PORT_INCLUDES.EXE;1 DECW$DXM_PORT_LOLEVELS.EXE;1 DECW$DXM_PORT_RESOURCES.EXE;1 DECW$DXM_PORT_UIL.EXE;1 DECW$FONT_ALIAS_KANJI.DAT;1 DECW$SECURITY_POLICY.TXT;1 DECW$TRANSPORT_CHANGES.TXT;1 DEMO_BUILD.COM;1 DIALOG.H;1 DIALOGS.C;1 DLG.C;1 DLG.H;1 DNDDEMO.C;1 DNDDEMO.EXE;1 DNDDEMO.H;1 DNDDRAW.C;1 DOG-HOWL.AUD;1 DOG.C;1 DOG.H;1 DOG.UID;1 DOG.UIL;1 DOGP.H;1 DOGS.C;1 DOGS.EXE;1 DOGS.UID;1 DOGS.UIL;1 DOG_ANIM.UIL;1 DOWN.BM;1 DXMDEFAULTS.DAT;1 ENCODEFONT.PS;1 FACTORY-WHISTLE.AUD;1 FILEE.H;1 FILEVIEW.C;1 FILEVIEW.COM;1 FILEVIEW.DAT;1 FILEVIEW.EXE;1 FILEVIEW.H;1 FILEVIEW.UID;1 FILEVIEW_ENGLISH.DAT;1 FILEVIEW_ENGLISH.UID;1 FILEVIEW_ENGLISH.UIL;1 FILEVIEW_FRENCH.DAT;1 FILEVIEW_FRENCH.UID;1 FILEVIEW_FRENCH.UIL;1 FILEVIEW_GERMAN.DAT;1 FILEVIEW_GERMAN.UID;1 FILEVIEW_GERMAN.UIL;1 FONTS.ALIAS;1 FROG.AUD;1 HEB8X13.BDF;1 HELLOINT.C;1 HELLOINT.EXE;1 HELLOINT.UID;1 HELLOINT.UIL;1 HELLOMOTIF.C;1 HELLOMOTIF.EXE;1 HELLOMOTIF.FOR;1 HELLOMOTIF.PAS;1 HELLOMOTIF.UID;1 HELLOMOTIF.UIL;1 HELP.TXT;1 ICO.C;1 ICO.EXE;1 ICON.XBM;1 IMAGE.C;1 JET-FLYBY.AUD;1 K14-1.BDF;1 LASER.AUD;1 LOCALSTRINGS.UID;1 LOCALSTRINGS_ENGLISH.UID;1 LOCALSTRINGS_ENGLISH.UIL;1 LOCALSTRINGS_FRENCH.UID;1 LOCALSTRINGS_FRENCH.UIL;1 LOCALSTRINGS_HEBREW.UID;1 LOCALSTRINGS_HEBREW.UIL;1 LOCALSTRINGS_JAPAN.UID;1 LOCALSTRINGS_JAPAN.UIL;1 MAIN.H;1 MAINE.H;1 MEMBERSHIP.TXT;1 MENU.UID;1 MENU.UIL;1 MENU_CB.C;1 MENU_CB.H;1 MOTIF.TXT;1 MOTIFANIM.C;1 MOTIFANIM.EXE;1 MOTIFANIM.UID;1 MOTIFANIM.UIL;1 MOTIFBUR.C;1 MOTIFBUR.EXE;1 MOTIFBUR.UID;1 MOTIFBUR.UIL;1 MOTIFBURGER.FOR;1 MOTIFBURGER.UIL;1 MOTIFBURGER_DEFS.FOR;1 MOTIFGIF.C;1 MOTIFGIF.EXE;1 MOTIFGIF.H;1 MOTIFLOGO.UIL;1 MOTIFSHELL.C;1 MOTIFSHELL.EXE;1 MOTIFSHELL.H;1 OBJCUBE.H;1 OBJICO.H;1 OBJOCTA.H;1 OBJPLANE.H;1 OBJPYR.H;1 PERIODIC.C;1 PERIODIC.DAT;1 PERIODIC.EXE;1 PERIODIC.UID;1 PERIODIC.UIL;1 PERIODIC_LOCAL.UIL;1 PICT.C;1 PICT.COM;1 PICT.EXE;1 PICT.H;1 PICTGLOB.H;1 PLANE.UID;1 PLANE.UIL;1 POLICE-WHISTLE.AUD;1 POLYINFO.H;1 PRINCIPLES.TXT;1 RESEARCH.TXT;1 SQUARE.C;1 SQUARE.H;1 SQUARE.UIL;1 SQUAREP.H;1 STREAM.FDL;1 STRINGS.UIL;1 SUPERMAN.UID;1 SUPERMAN.UIL;1 SUPERMAN1.XBM;1 SUPERMAN2.XBM;1 SUPERMAN3.XBM;1 SUPERMAN4.XBM;1 SUPERMAN5.XBM;1 SUPERMAN6.XBM;1 SVNMSAMPLE.C;1 SVNMSAMPLE.EXE;1 SVNMSAMPLESOURCE.C;1 TERRE.XBM;1 TEXT.C;1 TEXTE.H;1 TEXTEDIT.C;1 TEXTEDIT.EXE;1 TEXTEDIT.UID;1 TEXTEDIT.UIL;1 TFILE.C;1 TFILE.H;1 TK.C;1 TK.H;1 TKDEF.H;1 TOUCAN.GIF;1 TRIP.UID;1 TRIP.UIL;1 TRIP_CB.C;1 TRIP_CB.H;1 UILWMDCREATE.C;1 UILWMDCREATE.COM;1 UP.BM;1 UTILS.DIR;1 VFILE.C;1 VFILE.H;1 VTEXT.H;1 WELCOME.TXT;1 WHISTLE-DOWN.AUD;1 WHISTLE-UP.AUD;1 XGIF.H;1 XGIFLOAD.C;1 XLIBINTRO.C;1 XLIBINTRO.EXE;1 XLIBINTRO.FOR;1 XMAPDEF.C;1 XMAPDEF.EXE;1 XMDEMOS.DAT;1 XMDIALOGS.C;1 XMDIALOGS.EXE;1 XMEDITOR.C;1 XMEDITOR.EXE;1 XMFONTS.C;1 XMFONTS.EXE;1 XMFORC.C;1 XMFORC.EXE;1 XMFORM.C;1 XMFORM.EXE;1 XMGETRES.C;1 XMGETRES.EXE;1 XMLIST.C;1 XMLIST.EXE;1 XMMAP.C;1 XMMAP.EXE;1 XMPIANO.C;1 XMPIANO.EXE;1 XMPIANO.XBM;1 XMPROTOCOL.C;1 XMPROTOCOL.EXE;1 XMTER.C;1 XMTER.EXE;1 XMTRAVEL.C;1 XMTRAVEL.DAT;1 XMTRAVEL.EXE;1 XMTRAVEL.H;1 XSETROOT_CUST.C;1 Total of 259 files. $
B.2.7. Files in SYSLIB
Directory SYS$SYSDEVICE:[VMS$COMMON.SYSLIB] ACLEDIT.INI;1 ACLEDIT.TPU;1 ACLEDT$SECTION.TPU$SECTION;1 ACLEDTSHR.EXE;1 ARCH_DEFS.H;1 ARCH_DEFS.MAR;1 ARCH_DEFS.REQ;1 BACKUPSHR.EXE;1 BASIC$STARLET.TLB;1 BASRTL2_D53_TV_AV.EXE;1 BASRTL2_D56_TV_AV.EXE;1 BASRTL_D56_TV_AV.EXE;1 BASRTL_D56_V73_TV_AV.EXE;1 BLAS1RTL_D53_TV_AV.EXE;1 BLAS1RTL_D56_TV_AV.EXE;1 CDA$ACCESS.EXE;1 CDA$DTIF_TO_DDIF.EXE;1 CDA$WRITE_ANALYSIS.EXE;1 CDADEF.FOR;1 CDADEF.H;1 CDADEF.PAS;1 CDAMSG.FOR;1 CDAMSG.H;1 CDAMSG.PAS;1 CDAPTP.H;1 CDATRANS.H;1 CDATYP.H;1 CDDSHR.EXE;1 CDDSHR.TEMPLATE;1 CDE$LIBDTHELP.EXE;1 CDE$LIBDTHELP_TIE_SUPPORT.EXE;1 CDE$LIBDTSVC.EXE;1 CDE$LIBDTSVC_TIE_SUPPORT.EXE;1 CDE$LIBDTWIDGET.EXE;1 CDE$LIBDTWIDGET_TIE_SUPPORT.EXE;1 CDE$UNIX_ROUTINES.EXE;1 CDE$UNIX_ROUTINES_TIE_SUPPORT.EXE;1 CDI$SHR.EXE;1 CDI$SHR.STB;1 CDSA$AAL.OLB;1 CDSA$EAYCSP300_SHR.ESW;1 CDSA$EAYCSP300_SHR.EXE;1 CDSA$EBER_DER.OLB;1 CDSA$EICL.OLB;1 CDSA$EISL.OLB;1 CDSA$IN509CL300_SHR.ESW;1 CDSA$IN509CL300_SHR.EXE;1 CDSA$IN509TP300_SHR.ESW;1 CDSA$IN509TP300_SHR.EXE;1 CDSA$INCSSM300_SHR.ESW;1 CDSA$INCSSM300_SHR.EXE;1 CDSA$INFFDL300_SHR.ESW;1 CDSA$INFFDL300_SHR.EXE;1 CDSA$INHRSDUMMY_SHR.ESW;1 CDSA$INHRSDUMMY_SHR.EXE;1 CDSA$INHRSEMM_SHR.ESW;1 CDSA$INHRSEMM_SHR.EXE;1 CDSA$INHRSPWBSP_SHR.ESW;1 CDSA$INHRSPWBSP_SHR.EXE;1 CDSA$INSPKICLTP300_SHR.ESW;1 CDSA$INSPKICLTP300_SHR.EXE;1 CDSA$INTELAC_SHR.ESW;1 CDSA$INTELAC_SHR.EXE;1 CDSA$KEYMGR.OLB;1 CDSA$MAF_ACL.OLB;1 CDSA$MAF_BSAFE_SHR.ESW;1 CDSA$MAF_BSAFE_SHR.EXE;1 CDSA$MDS300_SHR.ESW;1 CDSA$MDS300_SHR.EXE;1 CDSA$MDS_SHIM.OLB;1 CDSA$MDS_UTIL.OLB;1 CDSA$MDS_UTIL_API.OLB;1 CDSA$PORT.OLB;1 CDSA$PORT_SHR.EXE;1 CDSA$REVOKE_LIBSHR.ESW;1 CDSA$REVOKE_LIBSHR.EXE;1 CDSA$VALIDATE_EMM_SHR.ESW;1 CDSA$VALIDATE_EMM_SHR.EXE;1 CDSA$VALIDATE_LIBSHR.ESW;1 CDSA$VALIDATE_LIBSHR.EXE;1 CDSA$VALIDATE_SHR.ESW;1 CDSA$VALIDATE_SHR.EXE;1 CLIMAC.REQ;1 CLUE$SDA.EXE;1 CMA$LIB_SHR.EXE;1 CMA$OPEN_LIB_SHR.EXE;1 CMA$OPEN_RTL.EXE;1 CMA$RTL.EXE;1 CMA$TIS_SHR.EXE;1 CMA$TIS_SHR_D56_TV_AV.EXE;1 CML.OLB;1 CNX$SDA.EXE;1 COBRTL_D56_TV_AV.EXE;1 COMPRESS$SHR.EXE;1 CONVSHR.EXE;1 CONVSHR_OLD.EXE;1 CRFSHR.EXE;1 CTF$ALIAS_ANALYZE.EXE;1 CTF$CSMA-CD_TRACEPOINTS.DAT;1 CTF$CTI_ANALYZE.EXE;1 CTF$DECNET_TRACEPOINTS.DAT;1 CTF$DNA_ANALYZE.EXE;1 CTF$DUMP_ANALYZE.EXE;1 CTF$ESEVENT_ANALYZE.EXE;1 CTF$IEEE8022_ANALYZE.EXE;1 CTF$IEEE8023_ANALYZE.EXE;1 CTF$KEY.INIT;1 CTF$KEY.TEMPLATE;1 CTF$MOP_ANALYZE.EXE;1 CTF$NAME_TABLE.DAT;2 CTF$NAME_TABLE.DAT;1 CTF$NSPTP_ANALYZE.EXE;1 CTF$NSP_ANALYZE.EXE;1 CTF$NSP_TRACEPOINTS.DAT;1 CTF$OSITP_ANALYZE.EXE;1 CTF$OSVCM_ANALYZE.EXE;1 CTF$ROUTING_ANALYZE.EXE;1 CTF$ROUTING_TRACEPOINTS.DAT;1 CTF$SCL_ANALYZE.EXE;1 CTF$TPCONS_ANALYZE.EXE;1 CTF$VOTS_ANALYZE.EXE;1 CXXL$011_SHR.EXE;1 CXXL$011_SHRTASK_AV.EXE;1 CXXL$011_SHR_AV.EXE;1 CXXL$011_TASK_AV.EXE;1 CXXL$64_011_SHR.EXE;1 CXXL$64_LANGRTL.EXE;1 CXXL$64_RWRTL.EXE;1 CXXL$LANGRTL.EXE;1 CXXL$RWRTL.EXE;1 DBG$HA.UID;1 DBG$HA_KERNEL.EXE;1 DBG$HA_MAIN.EXE;1 DBLRTL_D56_TV_AV.EXE;1 DCE$KERNEL.EXE;1 DCE$LIB_SHR.EXE;1 DCE$SOCKSHR_DNET_IV.EXE;1 DCE$SOCKSHR_DNET_OSI.EXE;1 DCE$SOCKSHR_IP.EXE;1 DCLTABLES.EXE;337 DCLTABLES.TEMPLATE;1 DCXSHR.EXE;1 DDIF$CC_VIEWSHR.EXE;1 DDIF$DECW_VIEWSHR12.EXE;1 DDIF$READ_TEXT.EXE;1 DDIF$VIEW.CLD;1 DDIF$VIEWSHR.EXE;1 DDIF$VIEWSHR12.EXE;1 DDIF$WRITE_PS.EXE;1 DDIF$WRITE_TEXT.EXE;1 DDIFDEF.FOR;1 DDIFDEF.H;1 DDIFDEF.PAS;1 DDTM$TX.OBJ;1 DDTM$XA.EXE;1 DDTM$XA_RECOVERY.OBJ;1 DDTM$XA_RM.OBJ;1 DDTM$XA_SS.EXE;1 DDTM$XG.EXE;1 DDTM$XG_SS.EXE;1 DDTM_XA.H;1 DEBUG.EXE;1 DEBUGSHR.EXE;1 DEBUGSRVSHR.EXE;1 DEBUGUISHR.EXE;1 DEC$BASRTL.EXE;1 DEC$COBRTL.EXE;1 DEC$COBRTL_AV.EXE;1 DEC$FORRTL.EXE;1 DEC$FORRTL_AV.EXE;1 DECC$RTLDEF.TLB;1 DECC$SHR.AIIF;1 DECC$SHR.EXE;1 DECC$SHRP.EXE;1 DECDTM$SDA.EXE;1 DECW$AILSHR.EXE;1 DECW$AILSHRR5.EXE;1 DECW$AILSHRR5_TIE_SUPPORT.EXE;1 DECW$AILSHR_TIE_SUPPORT.EXE;1 DECW$BKRSHR.EXE;1 DECW$BKRSHR12.EXE;1 DECW$BOOKREADER_PROLOG.PS;1 DECW$CALENDAR_PROLOG.PS;1 DECW$CURSOR.H;1 DECW$D2DXLIBSHR.EXE;1 DECW$D2DXLIBSHR_TIE_SUPPORT.EXE;1 DECW$DRM_PRIV.EXE;1 DECW$DRM_RADEON.EXE;1 DECW$DWTLIBSHR.EXE;1 DECW$DWTLIBSHR_TIE_SUPPORT.EXE;1 DECW$DWTMSG.FOR;1 DECW$DWTMSG.PAS;1 DECW$DWTMSG_TIE_SUPPORT.EXE;1 DECW$DXMLIBSHR.EXE;1 DECW$DXMLIBSHR12.EXE;1 DECW$DXMLIBSHR12_TIE_SUPPORT.EXE;1 DECW$DXMLIBSHR_TIE_SUPPORT.EXE;1 DECW$ICELIB.EXE;1 DECW$ICELIB_PTHREAD.EXE;1 DECW$ICELIB_PTHREAD_TIE_SUPPORT.EXE;1 DECW$ICELIB_TIE_SUPPORT.EXE;1 DECW$LBXUTIL.EXE;1 DECW$LCNLIBSHR.EXE;1 DECW$LOGINOUT.EXE;1 DECW$MAILSHR.EXE;1 DECW$MAILSHR12.EXE;1 DECW$MESA3DSHR_RADEON.EXE;1 DECW$MOTIF.FOR;1 DECW$MOTIF.PAS;1 DECW$MRMLIBSHR12.EXE;1 DECW$MRMLIBSHR12_TIE_SUPPORT.EXE;1 DECW$OPENGLUSHR_V11.EXE;1 DECW$OPENGLUTSHR.EXE;1 DECW$PEN_BUILD.COM;1 DECW$PRINTWGTSHR.EXE;1 DECW$SECURITY.EXE;1 DECW$SECURITY_VMS.EXE;1 DECW$SERVER_DDX_CFB.EXE;1 DECW$SERVER_DDX_CFB16.EXE;1 DECW$SERVER_DDX_CFB32.EXE;1 DECW$SERVER_DDX_FB.EXE;1 DECW$SERVER_DDX_MFB.EXE;1 DECW$SERVER_DDX_RADEON.EXE;1 DECW$SERVER_DDX_XAA.EXE;1 DECW$SERVER_DIX.EXE;1 DECW$SERVER_DRI.EXE;1 DECW$SERVER_SOUND.EXE;1 DECW$SESSIONSHRP.EXE;1 DECW$SETSHODIS.H;1 DECW$SETSHODISSHR.EXE;1 DECW$SMSHR.EXE;1 DECW$SMSHR_TIE_SUPPORT.EXE;1 DECW$SVEXT_D2DX_EXTENSIONS.EXE;1 DECW$SVEXT_DBE.EXE;1 DECW$SVEXT_DEC_XTRAP.EXE;1 DECW$SVEXT_GLX_RADEON.EXE;1 DECW$SVEXT_GLX_SW.EXE;1 DECW$SVEXT_LBX.EXE;1 DECW$SVEXT_MULTI_BUFFERING.EXE;1 DECW$SVEXT_SEC_XAG.EXE;1 DECW$SVEXT_XIE.EXE;1 DECW$SVEXT_XINERAMA.EXE;1 DECW$SVEXT_XKB.EXE;1 DECW$TERMINALSHR.EXE;1 DECW$TERMINALSHR12.EXE;1 DECW$TRANSPORT_COMMON.EXE;1 DECW$TRANSPORT_DECNET.EXE;1 DECW$TRANSPORT_LAT.EXE;1 DECW$TRANSPORT_LOCAL.EXE;1 DECW$TRANSPORT_TCPIP.EXE;1 DECW$UILCOMPILER.CLD;1 DECW$UILSHR.EXE;1 DECW$UILSHR_TIE_SUPPORT.EXE;1 DECW$WML_TOKENS.DAT;1 DECW$XAUSHR.EXE;1 DECW$XEXTLIBSHR.EXE;1 DECW$XEXTLIBSHR_TIE_SUPPORT.EXE;1 DECW$XKEYSYMDB.DAT;1 DECW$XLIBDEF.FOR;1 DECW$XLIBDEF.PAS;1 DECW$XLIBMSG.FOR;1 DECW$XLIBMSG.H;1 DECW$XLIBMSG.PAS;1 DECW$XLIBSHR.EXE;1 DECW$XLIBSHR_TIE_SUPPORT.EXE;1 DECW$XMLIBSHR.EXE;1 DECW$XMLIBSHR12.EXE;1 DECW$XMLIBSHR12_TIE_SUPPORT.EXE;1 DECW$XMLIBSHR_TIE_SUPPORT.EXE;1 DECW$XMULIBSHR.EXE;1 DECW$XMULIBSHRR5.EXE;1 DECW$XMULIBSHRR5_TIE_SUPPORT.EXE;1 DECW$XMULIBSHR_TIE_SUPPORT.EXE;1 DECW$XPORTMAC.R32;1 DECW$XPORTMSG.R32;1 DECW$XPORT_PTHREAD.EXE;1 DECW$XPORT_SERVICES.EXE;1 DECW$XTLIBSHRR5.EXE;1 DECW$XTLIBSHRR5_TIE_SUPPORT.EXE;1 DECW$XTRAPLIBSHR.EXE;1 DECW$XTRAPLIBSHRR5.EXE;1 DECW$XTRAPLIBSHRR5_TIE_SUPPORT.EXE;1 DECW$XTRAPLIBSHR_TIE_SUPPORT.EXE;1 DECW$XTSHR.EXE;1 DECW$XTSHR_TIE_SUPPORT.EXE;1 DECWINDOWS.OLB;1 DELTA.EXE;1 DELTA.OBJ;1 DGIT$LIBSHR.EXE;1 DGIT$LIBSHR12.EXE;1 DISMNTSHR.EXE;1 DIVA$LIB_SHR.EXE;1 DIVA$WGT_SHR.EXE;1 DKLOG$SDA.EXE;1 DNS$RTL.EXE;1 DNS$RTL_V.EXE;1 DNS$RTL_VMS.EXE;1 DNSDEF.BAS;1 DNSDEF.FOR;1 DNSDEF.H;1 DNSDEF.MAR;1 DNSDEF.PAS;1 DNSDEF.PLI;1 DNSDEF.R32;1 DNSDEF_V.ADA;1 DNSDEF_V.BAS;1 DNSDEF_V.FOR;1 DNSDEF_V.H;1 DNSDEF_V.MAR;1 DNSDEF_V.PAS;1 DNSDEF_V.PLI;1 DNSDEF_V.R32;1 DNSDEF_VMS.BAS;1 DNSDEF_VMS.FOR;1 DNSDEF_VMS.H;1 DNSDEF_VMS.MAR;1 DNSDEF_VMS.PAS;1 DNSDEF_VMS.PLI;1 DNSDEF_VMS.R32;1 DNSMSG.BAS;1 DNSMSG.FOR;1 DNSMSG.H;1 DNSMSG.MAR;1 DNSMSG.PAS;1 DNSMSG.PLI;1 DNSMSG.R32;1 DNSMSG_V.ADA;1 DNSMSG_V.BAS;1 DNSMSG_V.FOR;1 DNSMSG_V.H;1 DNSMSG_V.MAR;1 DNSMSG_V.PAS;1 DNSMSG_V.PLI;1 DNSMSG_V.R32;1 DNSMSG_VMS.BAS;1 DNSMSG_VMS.FOR;1 DNSMSG_VMS.H;1 DNSMSG_VMS.MAR;1 DNSMSG_VMS.PAS;1 DNSMSG_VMS.PLI;1 DNSMSG_VMS.R32;1 DPML$SHR.EXE;1 DPML$SHR_AV.EXE;1 DSMDECDNS.DAT;1 DSMDECDNS.UID;1 DTE_DMCL.EXE;1 DTI$SHARE.EXE;1 DTIFDEF.FOR;1 DTIFDEF.H;1 DTIFDEF.PAS;1 DTKSHR.EXE;1 DTSS$RUNDOWN.EXE;1 DTSS$SHR.EXE;1 DTSS$SHRD.EXE;1 DVR$DECW_DEF.H;1 DVR$DECW_PTP.H;1 DVR$MSG.H;1 DVRCDEF.H;1 DVRCINT.H;1 DVRCPTP.H;1 DVRMSG.H;1 DVRWDEF.H;1 DYNAMICPROFILE.EXE;1 EDTSHR.EXE;1 ENCRYPSHR.EXE;1 ENCRYPT$ALG$AES.EXE;1 ENCRYPT$ALG$DES.EXE;1 ENCRYPT$ALG$KEY.EXE;1 EPC$FACILITY.TEMPLATE;1 EPC$FACILITY.TLB;1 EPC$SHR.EXE;1 EPC$SHR.TEMPLATE;1 EVE$SECTION.TPU$SECTION;1 EVE$WIDGETS_MOTIF.UID;1 EVE.DAT;1 EXC$SDA.EXE;1 FC$SDA.EXE;1 FDLSHR.EXE;1 FLT$SDA.EXE;1 FORDEF.FOR;1 FORIOSDEF.FOR;1 FORRTL2_TV_AV.EXE;1 FORRTL_D56_TV_AV.EXE;1 GSP$SDA.EXE;1 GSS$RTL.EXE;1 GSS$RTL32.EXE;1 HBA.CONF;1 HBAAPITEST.EXE;1 HBA_VMS.EXE;1 HPBINARYCHECKER_SHR.EXE;1 HPIPMI_API.EXE;1 HPIPMI_API.H;1 HPIPMI_TYPES.H;1 HPVM_API_PUBLIC.H;1 HYPERSORT.EXE;1 ICC$SDA.EXE;1 IMAGELIB.OLB;1 IMG$SHRLIB.EXE;1 IMG$SHRLIB12.EXE;1 IMG$SHRLIB_NOX.EXE;1 IMGDMP.EXE;1 INIT$SHR.EXE;1 IO$SDA.EXE;1 IOGEN$AVIO_CONFIG.EXE;1 IOGEN$CISS_CONFIG.EXE;1 IOGEN$COREIO_CONFIG.EXE;1 IOGEN$EISA_CONFIG.EXE;1 IOGEN$FBUS_CONFIG.EXE;1 IOGEN$FIBRE_CONFIG.EXE;1 IOGEN$ISA_CONFIG.EXE;1 IOGEN$PCI_CONFIG.EXE;1 IOGEN$PCMCIA_CONFIG.EXE;1 IOGEN$SAS_CONFIG.EXE;1 IOGEN$SCSI_CONFIG.EXE;1 IOGEN$SHARE.EXE;1 IOGEN$TURBO_CONFIG.EXE;1 IOGEN$VTI_COMBO_CONFIG.EXE;1 IOGEN$XMI_CONFIG.EXE;1 IPC$SDA.EXE;1 IPC$SHARE.EXE;1 ISCSI$SDA.EXE;1 JKT$AMAC_AXP_AV.EXE;1 JKT$DECC_RTL_AXP_AV.EXE;1 JKT$SYS_PUBVEC.EXE;1 KRB$ACME_KRB_DOI_ACMESHR.EXE;1 KRB$RTL.EXE;1 KRB$RTL32.EXE;1 LAN$SDA.EXE;1 LANIDEF.MLB;1 LANUDEF.MLB;1 LAT$SHR.EXE;1 LBRSHR.EXE;1 LBRSHR_AV.EXE;1 LCK$SDA.EXE;1 LDAP$SHR.EXE;1 LDAPACME$LDAP-STD_ACMESHR.EXE;1 LES$ACP_CODE_V30.EXE;1 LES$NETMANSHR.EXE;1 LES$SDA.EXE;1 LIB.INCLUDE;1 LIB.MLB;1 LIB.R64;1 LIB.REQ;1 LIBBASECONSOLIDATEDSTATUS.EXE;1 LIBBLADEOAPROVIDER.EXE;1 LIBCERTIFICATEPROVIDER.EXE;1 LIBCHASSISPROVIDER.EXE;1 LIBCIMUTILS.EXE;1 LIBCIMXMLINDICATIONHANDLER.EXE;1 LIBCMPICPPIMPL.EXE;1 LIBCMPIPROVIDERMANAGER.EXE;1 LIBCOMPUTERSYSTEMCHASSIS.EXE;1 LIBCOMPUTERSYSTEMPROVIDER.EXE;1 LIBCPUAL.EXE;1 LIBCPUPROVIDER.EXE;1 LIBCSCHASSISPROVIDER.EXE;1 LIBEMSWRAPPERPROVIDER.EXE;1 LIBEVENTCONSUMERMANAGER.EXE;1 LIBEVENTINDICATIONCONSUMER.EXE;1 LIBFAL.EXE;1 LIBFIRMWAREREVISION.EXE;1 LIBFMPROVIDERWRAPPER.EXE;1 LIBFWRAL.EXE;1 LIBGS.EXE;1 LIBHASCAL.EXE;1 LIBHASCOMMON.EXE;1 LIBHBAAPI.EXE;1 LIBHEALTHSTATEPROVIDER.EXE;1 LIBHPNPARPROVIDER.EXE;1 LIBHPVM.EXE;1 LIBHPVMGUEST.EXE;1 LIBHPVMPROVIDER.EXE;1 LIBICODPROVIDERMODULE.EXE;1 LIBIPPROVIDERMODULE.EXE;1 LIBLANCSPROVIDER.EXE;1 LIBLANINDPROVIDER.EXE;1 LIBLANINSTANCEPROVIDER.EXE;1 LIBMAL.EXE;1 LIBMANAGEMENTPROCESSOR.EXE;1 LIBMEMPROVIDER.EXE;1 LIBMPPROVIDER.EXE;1 LIBOAMANAGER.EXE;1 LIBOPENVMS_EMS_INDEX_READER.EXE;1 LIBOSPROVIDER.EXE;1 LIBOTS.AIIF;1 LIBOTS.EXE;1 LIBOTS.STB;1 LIBOTS2.EXE;1 LIBOTS2_AV.EXE;1 LIBOTS_AV.EXE;1 LIBPEGCLIENT.EXE;1 LIBPEGCLIUTILS.EXE;1 LIBPEGCOMMON.EXE;1 LIBPEGCOMPILER.EXE;1 LIBPEGCONFIG.EXE;1 LIBPEGEXPORTCLIENT.EXE;1 LIBPEGGETOOPT.EXE;1 LIBPEGLISTENER.EXE;1 LIBPEGPROVIDER.EXE;1 LIBPEGRUNTIME.EXE;1 LIBPROCESSPROVIDER.EXE;1 LIBRTL.AIIF;1 LIBRTL.DSF;1 LIBRTL.EXE;1 LIBRTL.STB;1 LIBRTL2_D56_TV_AV.EXE;1 LIBRTL_D56_TV_AV.EXE;1 LIBSNMPINDICATIONHANDLER.EXE;1 LIBSTATECHANGEINDICATIONPROVIDER.EXE;1 LIBSTATECHANGEUTILS.EXE;1 LIBUTILIZATIONPROVIDER.EXE;1 LIB_ADA_SUBSET.TLB;1 LNM$SDA.EXE;1 MAILSHR.EXE;1 MAILSHRP.EXE;1 MMESHR.EXE;1 MONTORSHR.EXE;1 MOP.OLB;1 MOUNTSHR.EXE;1 MSGHLP$ENGLISH.EXE;1 MSGHLP$SHARE.EXE;1 MTHRTL_D53_TV_AV.EXE;1 MTHRTL_D53_V73_TV_AV.EXE;1 MTHRTL_D56_TV_AV.EXE;1 MTHRTL_D56_V73_TV_AV.EXE;1 MTX$SDA.EXE;1 NCL$GLOBALSECTION.DAT;1 NCLSHR.EXE;1 NCS$LIBRARY.NLB;1 NCSSHR.EXE;1 NCSSHR_AV.EXE;1 NET$CMISE.EXE;1 NET$EVD_RELAY_FORMATTER.EXE;1 NET$NISCS_LAA.EXE;1 NET$NISCS_LAA.STB;1 NET$PROCESS_EMAA.EXE;1 NET$ROUTING_ACPSHR.EXE;1 NET$SDA.EXE;1 NET_CMISE.H;1 NET_EXTERNALS.ADA;1 NET_EXTERNALS.BAS;1 NET_EXTERNALS.FOR;1 NET_EXTERNALS.H;1 NET_EXTERNALS.L32;1 NET_EXTERNALS.MLB;1 NET_EXTERNALS.PAS;1 NET_EXTERNALS.PLI;1 NET_INTERNALS.A;1 NISCS_LAA.EXE;1 NMLSHR.EXE;1 NTA$SECSHR.EXE;1 NTA$SECSHRP.EXE;1 NTA$SECSHR_MON.EXE;1 NTA.TLB;1 OSIT$LIBRARY.EXE;1 OSIT$LIBRARY.OLB;1 OSIT.ADA;1 OSIT.FOR;1 OSIT.H;1 OSIT.L32;1 OSIT.MAR;1 OSIT.MLB;1 OSIT.PAS;1 OSIT.PEN;1 OSIT.PLI;1 OSIT.R32;1 OSIT.SDI;1 OSITMSG.H;1 PAS$RTL.EXE;1 PAS$RTL_AV.EXE;1 PASRTL_D56_TV_AV.EXE;1 PCS$SDA.EXE;1 PCSI$SHR.EXE;1 PE$SDA.EXE;1 PKD$SDA.EXE;1 PKM$SDA.EXE;1 PKR$SDA.EXE;1 PPLRTL.EXE;1 PRF$SDA.EXE;1 PSH$SDA.EXE;1 PTD$SERVICES_SHR.EXE;1 PTHREAD$DBGSHR.EXE;1 PTHREAD$RTL.AIIF;1 PTHREAD$RTL.EXE;1 PTHREAD$SDA.EXE;1 PWIP$SDA.EXE;1 REG$MSGSHR.EXE;1 RMISHR.EXE;1 RMS$SDA.EXE;1 RPGRTL_TV_AV.EXE;1 SCNRTL_TV_AV.EXE;1 SCRSHR.EXE;1 SDA$SHARE.EXE;1 SDARMS$SHARE.EXE;1 SECURESHR.EXE;1 SECURESHRP.EXE;1 SECURESHR_JACKET.EXE;1 SHAD$SDA.EXE;1 SMBSRVSHR.EXE;1 SMGSHR.EXE;1 SMGSHR.STB;1 SMI$OBJSHR.EXE;1 SMI$SHR.EXE;1 SORTSHR.EXE;1 SPISHR.EXE;1 SPL$SDA.EXE;1 SSL$LIBCRYPTO_SHR.EXE;1 SSL$LIBCRYPTO_SHR32.EXE;1 SSL$LIBSSL_SHR.EXE;1 SSL$LIBSSL_SHR32.EXE;1 STARLET.INCLUDE;1 STARLET.MLB;1 STARLET.OLB;5 STARLET.R64;1 STARLET.REQ;1 STARLETPAS.TLB;1 STARLETSD.TLB;1 STARLET_RECENT_ADA_SUBSET.TLB;1 SUMSHR.EXE;1 SWIS$SDA.EXE;1 SYS$BASE_IMAGE.AIIF;1 SYS$ICBM.EXE;1 SYS$LIB_C.TLB;1 SYS$PUBLIC_VECTORS.AIIF;1 SYS$PUBLIC_VECTORS.EXE;1 SYS$SETBOOTSHR.EXE;1 SYS$SSISHR.EXE;1 SYS$SSISHRP.EXE;1 SYS$STARLET_C.TLB;1 TCPIP$ACCESS_SHR.EXE;1 TCPIP$CFS_SHR.EXE;1 TCPIP$DNFS_MOUNT_SHR.EXE;1 TCPIP$ESNMP_SHR.EXE;1 TCPIP$INETDEF.ADA;1 TCPIP$INETDEF.BAS;1 TCPIP$INETDEF.FOR;1 TCPIP$INETDEF.H;1 TCPIP$INETDEF.MAR;1 TCPIP$INETDEF.PAS;1 TCPIP$INETDEF.PLI;1 TCPIP$INETDEF.R32;1 TCPIP$IPC_SHR.EXE;1 TCPIP$LIBPCAP_SHR.EXE;1 TCPIP$LPD_SHR.EXE;1 TCPIP$PPPD_CALLOUT.EXE;1 TCPIP$RPCXDR.H;1 TCPIP$RPCXDR_SHR.EXE;1 TCPIP$SCTP_SHR.EXE;1 TCPIP$SDA.EXE;1 TCPIP$SMTP_MAILSHR.EXE;1 TCPIP$TEMPLATES.TLB;1 TDC$APISHR$I_V840-0203-0020.EXE;1 TDC$LIBSHR$I_V840-0203-0020.EXE;1 TECOSHR_TV_AV.EXE;1 TFFSHR.EXE;1 TIE$EMULAT_TV_AV.EXE;1 TIE$SHARE.AIIF;1 TIE$SHARE.EXE;1 TIE$VAXEMULAT_AV.EXE;1 TIE$VAXEMULAT_STUBS_AV.EXE;1 TNIODEF.ADA;1 TNIODEF.BAS;1 TNIODEF.FOR;1 TNIODEF.H;1 TNIODEF.MAR;1 TNIODEF.PAS;1 TNIODEF.PLI;1 TNIODEF.R32;1 TPAMAC.REQ;1 TPU$CCTSHR.EXE;1 TPU$DEBUG.TPU;1 TPU$MOTIFSHR.EXE;1 TPU.DAT;1 TPUSHR.EXE;1 TQE$SDA.EXE;1 TR$SDA.EXE;1 TRACE.EXE;1 TX.H;1 UCX$ACCESS_SHR.EXE;1 UCX$ESNMP_SHR.EXE;1 UCX$INETDEF.ADA;1 UCX$INETDEF.BAS;1 UCX$INETDEF.FOR;1 UCX$INETDEF.H;1 UCX$INETDEF.MAR;1 UCX$INETDEF.PAS;1 UCX$INETDEF.PLI;1 UCX$INETDEF.R32;1 UCX$IPC_SHR.EXE;1 UCX$RPCXDR_SHR.EXE;1 USB$SDA.EXE;1 UTC.H;1 UTIL$SHARE.EXE;1 UVMTHRTL_D53_TV_AV.EXE;1 UVMTHRTL_D53_V73_TV_AV.EXE;1 UVMTHRTL_D56_TV_AV.EXE;1 UVMTHRTL_D56_V73_TV_AV.EXE;1 VAXCRTLG_D56_TV_AV.EXE;1 VAXCRTLG_D56_V73_TV_AV.EXE;1 VAXCRTL_D56_TV_AV.EXE;1 VAXCRTL_D56_V73_TV_AV.EXE;1 VMS$FORMAT_AUDIT_SYSTEM.EXE;1 VMS$PASSWORD_DICTIONARY.DATA;1 VMS$VMS_ACMESHR.EXE;1 VMS$VOLATILE_PRIVATE_INTERFACES.OLB;1 VMSDEBUGUIL.UID;1 VMS_EXECLET_LNK.OPT;1 VUE$MASTERSHR.EXE;1 WWPPS.PCF;1 XA.H;1 XFC$SDA.EXE;1 XIE$SHRLIB.EXE;1 XIE$SHRLIB_TIE_SUPPORT.EXE;1 XNL$DEF.FOR;1 XNL$DEF.PAS;1 XNL$MSG.FOR;1 XNL$MSG.PAS;1 XNL$SHR.EXE;1 XNL$SHR12.EXE;1 XNL$SHR12_TIE_SUPPORT.EXE;1 XNL$SHR_TIE_SUPPORT.EXE;1 XTI$DNETSHR.EXE;1 XTI$IPSHR.EXE;1 XTI$OSISHR.EXE;1 XTI$XTILIB.EXE;1 XTI.H;1 XTRAPPROTO_TIE_SUPPORT.EXE;1 XX$SDA.EXE;1 Total of 728 files. $
B.2.8. Files in SYSMGR
Directory SYS$SYSDEVICE:[VMS$COMMON.SYSMGR] ACME$START.COM;1 ACME$START.TEMPLATE;1 AGEN$NEW_NODE_DEFAULTS.TEMPLATE;1 AGEN$NEW_SATELLITE_DEFAULTS.TEMPLATE;1 AMDS$DIAGNOSTICS.COM;1 AMDS$DRIVER_ACCESS.DAT;1 AMDS$DRIVER_ACCESS.TEMPLATE;1 AMDS$DRIVER_ACCESS.TEMPLATE_OLD;3 AMDS$LOGICALS.COM;1 AMDS$LOGICALS.TEMPLATE;1 AMDS$LOGICALS.TEMPLATE_OLD;3 AMDS$SYSTARTUP.TEMPLATE;1 BOOT_OPTIONS.COM;1 CCL$ISV_CALLOUTS.TXT;1 CDE$STARTUP.COM;1 CDRECORD.COM;1 CDSA$SYMBOLS.COM;1 CLUSTER_CONFIG.COM;1 CLUSTER_CONFIG_LAN.COM;1 CREATE_SPECIAL_ACCOUNTS.COM;1 CTF$STARTUP.COM;1 DBLSTRTUP.COM;1 DCE$RPC_SHUTDOWN.COM;1 DCE$RPC_STARTUP.COM;1 DECNET_DNS_REGISTER.COM;1 DECNET_DNS_TOWERS.COM;1 DECNET_LOC_REGISTER.COM;1 DECNET_REGISTER_DECDNS.COM;1 DECW$ATOMCONTROL.TEMPLATE;1 DECW$CONSOLE.COM;1 DECW$DEFAULT_DESKTOP.COM;1 DECW$DEFAULT_DESKTOP.COM_OLD;1 DECW$DEVICE.COM;1 DECW$DEVICE_CONFIG_COMMON.COM;1 DECW$DEVICE_CONFIG_GH.COM;1 DECW$EURO_APPS_SETUP.TEMPLATE;1 DECW$EURO_SERVER_SETUP.TEMPLATE;1 DECW$FS_CONFIG.DAT;1 DECW$GETPARAMS.COM;1 DECW$INSTALL_IMAGES.COM;1 DECW$LBXPROXY.COM;1 DECW$LBXPROXY.DECW$PMCFG;1 DECW$LBXPROXY_SUB.COM;1 DECW$LOGICALS.COM;1 DECW$MWM.COM;1 DECW$PRIVATE_APPS_SETUP.TEMPLATE;1 DECW$PRIVATE_SERVER_SETUP.TEMPLATE;1 DECW$RGB.DAT;1 DECW$SETPARAMS.COM;1 DECW$STARTAPPS.COM;1 DECW$STARTI18N.COM;1 DECW$STARTLIBS.COM;1 DECW$STARTSERVER.COM;1 DECW$STARTSM.COM;1 DECW$STARTUP.COM;1 DECW$START_PROXY.COM;1 DECW$SYLOGIN.TEMPLATE;1 DNS$CLERK_CLUSTER.NCL;1 DNS$CONFIGURE.COM;1 DTSS$CONFIG.COM;1 DTSS$CONFIG_TEMPLATE.DAT;1 EDTINI.TEMPLATE;1 GALAXY.GCR;1 GCU$ACTIONS.COM;1 GICAP$CONFIG.COM;1 ICAP$CLI_UTILS.COM;1 ICAP$CONFIG.COM;1 ICC$ADD_REGISTRY_TABLE.COM;1 ICC$CREATE_SECURITY_OBJECT.COM;1 ISA_CONFIG.TEMPLATE;1 ISCSI$ISNS_SERVERS.TEMPLATE;1 ISCSI$MANUAL_TARGETS.TEMPLATE;1 ISIS$CONFIGURE.COM;1 ISIS$CONFIGURE_HELP.COM;1 JBC$DST_COMMAND.COM;1 KRB$LOGICALS.COM;1 KRB$SYMBOLS.COM;1 LAT$SYSTARTUP.COM;1 LAT$SYSTARTUP.TEMPLATE;1 LIB$DT_STARTUP.COM;1 LMF$COMPLIANCE_REPORT.COM;1 LOGIN.COM;1 LOGIN.TEMPLATE;1 NET$APPLICATION_SHUTDOWN.TEMPLATE;1 NET$AUTOGEN.COM;1 NET$CONFIGURE.COM;1 NET$DNS_CLERK_STARTUP.NCL;1 NET$DNS_CLERK_STOP.NCL;1 NET$DTSS_CLERK_STARTUP.NCL;1 NET$DTSS_CLERK_STARTUP.NCL_OLD;1 NET$EVENT_LOCAL.TEMPLATE;1 NET$LOGICALS.TEMPLATE;1 NET$SHUTDOWN.COM;1 REG$CONFIG.COM;1 RTTLOAD.COM;1 SECURITY.AUDIT$JOURNAL;1 SMISERVER.COM;1 SYCONFIG.COM;1 SYCONFIG.TEMPLATE;1 SYLOGICALS.COM;1 SYLOGICALS.TEMPLATE;1 SYLOGIN.COM;1 SYLOGIN.TEMPLATE;1 SYPAGSWPFILES.COM;1 SYPAGSWPFILES.TEMPLATE;1 SYS$INDICTMENT_POLICY.COM;1 SYS$INDICTMENT_POLICY.TEMPLATE;1 SYS$NET_SERVICES_TCPIP.COM;1 SYSECURITY.COM;1 SYSECURITY.TEMPLATE;1 SYSHUTDWN.COM;1 SYSHUTDWN.TEMPLATE;1 SYSHUTDWN_0010.COM;1 SYSHUTDWN_0010.TEMPLATE;1 SYSTARTUP_VMS.COM;1 SYSTARTUP_VMS.TEMPLATE;1 TCPIP$BINDSETUP.COM;1 TCPIP$BINDSETUP_HELP.TXT;1 TCPIP$BIND_CLUSTER_SETUP.COM;1 TCPIP$BIND_SHUTDOWN.COM;1 TCPIP$BIND_STARTUP.COM;1 TCPIP$BOOTP_SHUTDOWN.COM;1 TCPIP$BOOTP_STARTUP.COM;1 TCPIP$CALLBACKS.COM;1 TCPIP$CONFIG.COM;1 TCPIP$CUSTOMER_SERVICE_SHUTDOWN.COM;1 TCPIP$CUSTOMER_SERVICE_STARTUP.COM;1 TCPIP$DEFINE_COMMANDS.COM;1 TCPIP$DHCP_BOOTPTODHCP.COM;1 TCPIP$DHCP_CLIENT_SHUTDOWN.COM;1 TCPIP$DHCP_CLIENT_STARTUP.COM;1 TCPIP$DHCP_CLUSTER_SHUTDOWN.COM;1 TCPIP$DHCP_CLUSTER_STARTUP.COM;1 TCPIP$DHCP_SETUPCOMMANDS.COM;1 TCPIP$DHCP_SHUTDOWN.COM;1 TCPIP$DHCP_STARTUP.COM;1 TCPIP$DHCP_V50_V51_DBROLL.COM;1 TCPIP$FAILSAFE_SHUTDOWN.COM;1 TCPIP$FAILSAFE_STARTUP.COM;1 TCPIP$FINGER_SHUTDOWN.COM;1 TCPIP$FINGER_STARTUP.COM;1 TCPIP$FTP_CLIENT_SHUTDOWN.COM;1 TCPIP$FTP_CLIENT_STARTUP.COM;1 TCPIP$FTP_SHUTDOWN.COM;1 TCPIP$FTP_STARTUP.COM;1 TCPIP$IMAP_SHUTDOWN.COM;1 TCPIP$IMAP_STARTUP.COM;1 TCPIP$INET_DRIVER_SHUTDOWN.COM;1 TCPIP$INET_DRIVER_STARTUP.COM;1 TCPIP$INET_SHUTDOWN.COM;1 TCPIP$INET_STARTUP.COM;1 TCPIP$IP6_SETUP.COM;1 TCPIP$IPSEC_SHUTDOWN.COM;1 TCPIP$IPSEC_STARTUP.COM;1 TCPIP$LBROKER_SHUTDOWN.COM;1 TCPIP$LBROKER_STARTUP.COM;1 TCPIP$LOCKD_SHUTDOWN.COM;1 TCPIP$LOCKD_STARTUP.COM;1 TCPIP$LPD_SHUTDOWN.COM;1 TCPIP$LPD_SHUTDOWN.COM_OLD;2 TCPIP$LPD_STARTUP.COM;1 TCPIP$LPD_STARTUP.COM_OLD;2 TCPIP$METRIC_SHUTDOWN.COM;1 TCPIP$METRIC_STARTUP.COM;1 TCPIP$NFS_CLIENT_SHUTDOWN.COM;1 TCPIP$NFS_CLIENT_STARTUP.COM;1 TCPIP$NFS_SHUTDOWN.COM;1 TCPIP$NFS_STARTUP.COM;1 TCPIP$NTP_SHUTDOWN.COM;1 TCPIP$NTP_STARTUP.COM;1 TCPIP$PCNFS_SHUTDOWN.COM;1 TCPIP$PCNFS_STARTUP.COM;1 TCPIP$POP_SHUTDOWN.COM;1 TCPIP$POP_STARTUP.COM;1 TCPIP$PORTMAPPER_SHUTDOWN.COM;1 TCPIP$PORTMAPPER_STARTUP.COM;1 TCPIP$PROXY_SHUTDOWN.COM;1 TCPIP$PROXY_STARTUP.COM;1 TCPIP$PWIP_DRIVER_SHUTDOWN.COM;1 TCPIP$PWIP_DRIVER_STARTUP.COM;1 TCPIP$REXEC_SHUTDOWN.COM;1 TCPIP$REXEC_STARTUP.COM;1 TCPIP$RLOGIN_SHUTDOWN.COM;1 TCPIP$RLOGIN_STARTUP.COM;1 TCPIP$RMT_CHECK_ACCESS.COM;1 TCPIP$RMT_SHUTDOWN.COM;1 TCPIP$RMT_STARTUP.COM;1 TCPIP$RSH_SHUTDOWN.COM;1 TCPIP$RSH_STARTUP.COM;1 TCPIP$SMTP_SHUTDOWN.COM;1 TCPIP$SMTP_STARTUP.COM;1 TCPIP$SNMP_SHUTDOWN.COM;1 TCPIP$SNMP_STARTUP.COM;1 TCPIP$SSH_CLIENT_SHUTDOWN.COM;1 TCPIP$SSH_CLIENT_STARTUP.COM;1 TCPIP$SSH_SHUTDOWN.COM;1 TCPIP$SSH_STARTUP.COM;1 TCPIP$STATD_SHUTDOWN.COM;1 TCPIP$STATD_STARTUP.COM;1 TCPIP$SYMBOLS.COM;1 TCPIP$TELNETSYM_SHUTDOWN.COM;1 TCPIP$TELNETSYM_STARTUP.COM;1 TCPIP$TELNET_SHUTDOWN.COM;1 TCPIP$TELNET_STARTUP.COM;1 TCPIP$TFTP_SHUTDOWN.COM;1 TCPIP$TFTP_STARTUP.COM;1 TCPIP$UCP_SHUTDOWN.COM;1 TCPIP$UCP_STARTUP.COM;1 TCPIP$V51_CONVERSION.COM;1 TCPIP$XDM_SHUTDOWN.COM;1 TCPIP$XDM_STARTUP.COM;1 TFF$SYSTARTUP.COM;1 TFF$SYSTARTUP.TEMPLATE;1 TNT$UTILITY.COM;1 UCX$CONFIG.COM;1 UCX$STARTUP.COM;1 USB$STARTUP.COM;1 UTC$CONFIGURE_TDF.COM;1 UTC$TIMEZONE_SETUP.COM;1 UTC$TIME_SETUP.COM;1 VMS$AUDIT_SERVER.DAT;1 VMS$IMAGES_MASTER.DAT;1 VMSIMAGES.DAT;1 WELCOME.TEMPLATE;1 WELCOME.TXT;1 Total of 225 files. $
B.2.9. Files in SYSMSG
Directory SYS$SYSDEVICE:[VMS$COMMON.SYSMSG] CDA$ACCESSMSG.EXE;1 CDDVD$MSG.EXE;1 CLIUTLMSG.EXE;1 CTF$MESSAGES.EXE;1 CXXL$MSG_SHR.EXE;1 DBGTBKMSG.EXE;1 DBL$MSG.EXE;1 DCE$RPC_MSG.EXE;1 DDIF$VIEWMSG.EXE;1 DDTM$XG_MSG.EXE;1 DECC$MSG.EXE;1 DECW$DWTMSG.EXE;1 DECW$DWTMSG_TIE_SUPPORT.EXE;1 DECW$ICELIBMSG.EXE;1 DECW$ICELIBMSG_TIE_SUPPORT.EXE;1 DECW$LOGINMSG.EXE;1 DECW$TERMINALMSG.EXE;1 DECW$TRANSPORTMSG.EXE;1 DECW$XERRORDB.DAT;1 DECW$XLIBMSG.EXE;1 DECW$XLIBMSG_TIE_SUPPORT.EXE;1 DIVA$LIB_MSG.EXE;1 DNS$MSG.EXE;1 DNS$MSG_V.EXE;1 DNS$MSG_VMS.EXE;1 EFI$MSG.EXE;1 ELVMSG.EXE;1 ENCRYPT$_MSG.EXE;1 EPC$MSG.EXE;1 EPC$MSG.TEMPLATE;1 FILMNTMSG.EXE;1 GENCATMSG.EXE;1 ICONVMSG.EXE;1 LATMSG.EXE;1 LD$MSG.EXE;1 LES$ACP_MESSAGES_V30.EXE;1 LES$NM_MESSAGES.EXE;1 LMCP$MSG.EXE;1 LMF_MESSAGE.EXE;1 LOCALEMSG.EXE;1 NETWRKMSG.EXE;1 OSIT$VOTS_MSG.EXE;1 PAS$MSG.EXE;1 PPLMSG.EXE;1 PPPDMSG.EXE;1 PRGDEVMSG.EXE;1 RPG$MSG.EXE;1 SCN$MSG.EXE;1 SHRIMGMSG.EXE;1 SORTMSG.EXE;1 SYSMGTMSG.EXE;1 SYSMSG.EXE;1 TCPIP$MSG.EXE;1 TDF$MSG.EXE;1 TECOMSG.EXE;1 TPUMSG.EXE;1 USB$MSG.EXE;1 VMSINSTAL_LANGUAGE.COM;1 VMSLICENSE_LANGUAGE.COM;1 Total of 59 files.
B.2.10. Files in SYSTEST
Directory SYS$SYSDEVICE:[VMS$COMMON.SYSTEST] DECDTM_XA_IVP.EXE;1 DECDTM_XG_IVP.EXE;1 DECRAM$IVP.COM;1 DECW$IVP.COM;1 ENCRYPT$IVP.COM;1 ENCRYPTION.DIR;1 HTHREADS.EXE;1 OSIT$IVP.CLD;1 OSIT$IVP.EXE;1 OSIT$IVPINIT.COM;1 OSIT$IVPRESP.COM;1 OSIT$IVP_SUPPORT.COM;1 RADCHECK.EXE;1 SSL$IVP.COM;1 TCNTRL.CLD;1 TCPIP$IVP.COM;1 TCPIP.DIR;1 TDC$IVP.COM;1 TNT$IVP.COM;1 TNT.DIR;1 UETCDRO00.EXE;1 UETCLIG00.COM;1 UETCLIG00.DAT;1 UETCLIG00.EXE;1 UETDISK00.EXE;1 UETDNET00.COM;1 UETDNET00.DAT;1 UETFORT01.DAT;1 UETFORT01.EXE;1 UETFORT02.EXE;1 UETFORT03.EXE;1 UETINIT00.EXE;1 UETINIT01.EXE;1 UETLOAD00.DAT;1 UETLOAD02.COM;1 UETLOAD03.COM;1 UETLOAD04.COM;1 UETLOAD05.COM;1 UETLOAD06.COM;1 UETLOAD07.COM;1 UETLOAD08.COM;1 UETLOAD09.COM;1 UETLOAD10.COM;1 UETLOAD11.COM;1 UETMEMY01.EXE;1 UETNETS00.EXE;1 UETP.COM;1 UETPHAS00.EXE;1 UETSUPDEV.DAT;1 UETTAPE00.EXE;1 UETTTYS00.EXE;1 UETUNAS00.EXE;1 Total of 52 files.
B.2.11. Files in SYSUPD
Directory SYS$SYSDEVICE:[VMS$COMMON.SYSUPD] ACC.CLD;1 ACMELOGIN_POSTINSTAL_UPGRADE.COM;1 ACMELOGIN_PREINSTAL_UPGRADE.COM;1 ACME_DEV_KITS.BCK;1 ANALYZE.CLD;1 AUTOGEN.COM;1 BACKUP.CLD;1 CDSA$VERSIONS.COM;1 CIM_QUALIFIERS25.MOF;1 CIM_X25.MOF;1 CONVERT.CLD;1 COPY.CLD;1 CREATE.CLD;1 CREATE_IDX.EXE;1 CREATE_XML.EXE;1 CTF.CLD;1 DCLINT.CLD;1 DECNET_MIGRATE.EXE;1 DECNET_MIGRATE_LSE.ENV;1 DECW$COMPARE_VERSIONS.COM;1 DECW$FONTCOMPILER.CLD;1 DECW$GET_IMAGE_VERSION.COM;1 DECW$KITBLD.DAT;1 DECW$KITBLD.IDX;1 DECW$MKFONTDIR.COM;1 DECW$VERSIONS.COM;1 DELETE.CLD;1 DIAGNOSE_STUB.CLD;1 DIFF.CLD;1 DIRECTORY.CLD;1 DISMOUNT.CLD;1 DTSS$INSTALL_TIMEZONE_RULE.COM;1 DTSS$INSTALL_TIMEZONE_RULE.COM_OLD;1 DTSS$TIMEZONE_RULES.DAT_OLD;1 DUMP.CLD;1 EDIT.CLD;1 ENABLE.CLD;1 ENCRYPT.CLD;1 EXCHANGE.CLD;1 GENCAT.CLD;1 HELP.CLD;1 HP_GICAPPROVIDERREG.MOF;1 HP_ICAPPROVIDERREG.MOF;1 HP_ICODPROVIDERREG.MOF;1 I64VMS$PCSI_ASSEM_SYS$EFI.COM;1 I64VMS$PCSI_CHECK_MEM.COM;1 I64VMS$PCSI_EX_INS_PROCESSOR.COM;1 I64VMS$PCSI_EX_INS_PRODUCT.COM;1 I64VMS$PCSI_EX_REM_PROCESSOR.COM;1 I64VMS$PCSI_EX_REM_PRODUCT.COM;1 IA64_CHECKSUM.CLD;1 IA64_LINK.CLD;1 IA64_LMF.CLD;1 ICAP.MOF;1 ICAP_CLD.COM;1 ICONV.CLD;1 INIT.CLD;1 INSTALL.CLD;1 IOGEN$CLEANUP.EXE;1 KERBEROS.CLD;1 KRB$REMOVE.COM;1 KRB$V2_UPDATE.COM;1 KRB$VERSIONS.COM;1 LD.CLD;1 LIBDECOMP.COM;1 LIBRARIAN.CLD;1 LOCALE.CLD;1 MACRO_IA64.CLD;1 MAIL.CLD;1 MESSAGE.CLD;1 MONITOR.CLD;1 MOUNT.CLD;1 NCP_EMULATOR.TXT;1 NCS.CLD;1 NET$CONFIGURE_UPGRADE.COM;1 NET$CONVERT_DATABASE.EXE;1 NET$FIXUP_IDENTIFIERS.EXE;1 NET$PARSE_PREFIX.EXE;1 NET$PCSI_INSTALL.COM;1 NET$REMOVE_EMU.COM;1 NET_ISHFILTER.EXE;1 NPAR.MOF;1 NPARREG.MOF;1 PATCH.CLD;1 PCSI$CREATE_ACCOUNT.COM;1 PCSI$CREATE_NETWORK_OBJECT.COM;1 PCSI$CREATE_RIGHTS_IDENTIFIER.COM;1 PCSI$DELETE_ACCOUNT.COM;1 PCSI$DELETE_NETWORK_OBJECT.COM;1 PCSI$DELETE_RIGHTS_IDENTIFIER.COM;1 PCSI$EXTRACT_TLB.COM;1 PCSI$REGISTER_PRODUCT.COM;1 PCSI.CLD;1 PHONE.CLD;1 PPPD.CLD;1 RECOVER.CLD;1 REGISTER_PRIVILEGED_IMAGE.COM;1 RENAME.CLD;1 REPLY.CLD;1 RUN.CLD;1 RUNOFF.CLD;1 SEARCH.CLD;1 SET.CLD;1 SHOW.CLD;1 SORT.CLD;1 SPAWN.CLD;1 SPKITBLD.COM;1 STABACKIT.COM;1 START.CLD;1 SUBMIT.CLD;1 SWAPFILES.COM;1 SYNCH.CLD;1 TCPIP$CLEANUP.COM;1 TCPIP$PCSI_REMOVE.COM;1 TYPE.CLD;1 UCM.CLD;1 UNLOCK.CLD;1 VMS$CHKPWD.EXE;1 VMS$SYSTEM_IMAGES.COM;1 VMS$SYSTEM_IMAGES.IDX;1 VMSINSTAL.COM;1 VMSINSTAL_LMFGROUPS.COM;1 VMSKITBLD.DAT;1 VMSKITBLD.EFI$COM;1 VMSKITBLD.IDX;1 VMSKITBLD.XML;1 VMSKITBLD.XSD;1 VMSLICENSE.COM;1 VMSMPH.LOG;1 VMSMPH.TEMPLATE;1 XAUTH.CLD;1 ZIC.CLD;1 Total of 132 files. $
B.2.12. Files in VUE$LIBRARY
Directory SYS$SYSDEVICE:[VMS$COMMON.VUE$LIBRARY] SYSTEM.DIR;1 USER.DIR;1 Total of 2 files. Directory SYS$SYSDEVICE:[VMS$COMMON.VUE$LIBRARY.SYSTEM] SOUND$PROFILE.VUE$DAT;1 SOUND$VUE_STARTUP.COM;1 VUE$BOOKREADER.COM;1 VUE$CALCULATOR.COM;1 VUE$CALENDAR.COM;1 VUE$CARDFILER.COM;1 VUE$CBI.COM;1 VUE$CLOCK.COM;1 VUE$COMPARE.COM;1 VUE$COMPILE.COM;1 VUE$COPY.COM;1 VUE$CREATE_DIRECTORY.COM;1 VUE$CREATE_PUBLIC_PROFILE.COM;1 VUE$DCL_COMMAND.COM;1 VUE$DDIF_VIEWER.COM;1 VUE$DECTERM.COM;1 VUE$DELETE.COM;1 VUE$EDIT.COM;1 VUE$HELP.COM;1 VUE$ITERATE.COM;1 VUE$LINK.COM;1 VUE$MAIL.COM;1 VUE$MWM.COM;1 VUE$NOTEPAD.COM;1 VUE$PAINT.COM;1 VUE$PRINT.COM;1 VUE$PRINTSCREEN.COM;1 VUE$PROXYMANAGER.COM;1 VUE$PURGE.COM;1 VUE$PUZZLE.COM;1 VUE$RENAME.COM;1 VUE$RUN.COM;1 VUE$SEARCH.COM;1 VUE$SET_PROTECTION.COM;1 VUE$SUBPROCESS_INIT.COM;1 VUE$UTILS.COM;1 VUE$XAUTH.COM;1 VUE$XUI_WM.COM;1 Total of 38 files.
Appendix C. Alarm Messages
This appendix describes alarm messages that result from auditing various system events. See Chapter 10, "Security Auditing" for a discussion of the auditing system and see the relevant section in the VSI OpenVMS System Management Utilities Reference Manual for a description of the record format of audit messages.
The information included in the alarm message depends on the type of event. In all cases, the alarm message contains the operator communication manager (OPCOM) heading, which includes the date and time the alarm was sent. It contains the type of alarm event, the date and time the alarm event occurred, and the user who caused the event, as identified by the user name and process identification (PID). Other information contained in alarm messages is specific to the type of event that the alarm signaled.
Alarms Announcing an Object Access
/ENABLE qualifier of the SET
AUDIT command. You designate the object type with the
/CLASS qualifier. See Section 4.7, ''Auditing Protected Objects'' for a
description of object auditing. For
example:%%%%%%%%%%% OPCOM 17-SEP-2008 10:13:20.46 %%%%%%%%%%%
Message from user AUDIT$SERVER on FNORD
Security alarm (SECURITY) on FNORD, system id: 19728
Auditable event: Object access
Event time: 17-SEP-2008 10:13:20.09
PID: 30200117
Process name: Hobbit
Username: GREG
Process owner: [MTI,GREG]
Terminal name: RTA1:
Image name: DSA1:[GREG.TEST.ACCESS]ACCESS.EXE;50
Object class name: COMMON_EVENT_CLUSTER
Object name: FOO
Access requested: READ
Deaccess key: 808E3380
Status: %SYSTEM-S-NORMAL, normal successful completion
Privileges used: noneYou can also audit access through the use of GRPPRV, READALL, SYSPRV, or BYPASS privilege.
Alarms Requested by an ACL
/ENABLE qualifier of the SET
AUDIT command. For
example:%%%%%%%%%%% OPCOM 12-NOV-2008 10:53:16.34 %%%%%%%%%%% Message from user AUDIT$SERVER on FNORD Security alarm (SECURITY) and security audit (SECURITY) on FNORD, system id: 19681 Auditable event: Object deletion Event information: file deletion request (IO$_DELETE) Event time: 12-NOV-2008 10:53:16.30 PID: 20200158 Process name: FNORD$RTA2 Username: HUBERT Process owner: [LEGAL,HUBERT] Terminal name: RTA2: Image name: $1$DIA1:[SYS0.SYSCOMMON.][SYSEXE]DELETE.EXE Object class name: FILE Object owner: [SYSTEM] Object protection: SYSTEM:RWE, OWNER:RWE, GROUP:, WORLD: File name: _$1$DIA3:[USERS.HUBERT.TMP]FOO.BAR;2 File ID: (4134,20,0) Access requested: DELETE Sequence key: 0005E05F Status: %SYSTEM-F-NOPRIV, insufficient privilege or object protection violation
Alarms Due to Modification of the Authorization Databases
The Authorization class of security events is enabled by default. All changes to the rights database, the system user authorization file, and the network proxy authorization file immediately produce an audit event message.
%%%%%%%%%%% OPCOM 15-DEC-2008 12:27:17.44 %%%%%%%%%%% Message from user AUDIT$SERVER on LASSIE Security alarm (SECURITY) and security audit (SECURITY) on LASSIE, system id: 19661 Auditable event: Identifier modified Event time: 15-DEC-2008 12:27:17.43 PID: 00000113 Username: SYSTEM Image name: LASSIE$DMA0:[SYS0.SYSCOMMON.][SYSEXE]AUTHORIZE.EXE Identifier name: ROBINSON Identifier value: %X80010014 New attributes: RESOURCE
%%%%%%%%%%% OPCOM 18-DEC-2008 19:53:25.99 %%%%%%%%%%% Message from user AUDIT$SERVER on LASSIE Security alarm (SECURITY) and security audit (SECURITY) on LASSIE, system id: 19611 Auditable event: System UAF record addition Event time: 18-DEC-2008 19:53:25.98 PID: 20200B25 Username: SYSTEM Image name: $1$DUS0:[SYS0.SYSCOMMON.][SYSEXE]AUTHORIZE.EXE Object name: SYS$COMMON:[SYSEXE]SYSUAF.DAT;2 Object type: file User record added: COOPER Fields modified: FLAGS,PWDLIFETIME
%%%%%%%%%%% OPCOM 26-SEP-2008 15:12:35.95 %%%%%%%%%%% Message from user AUDIT$SERVER on FNORD Security alarm (SECURITY) and security audit (SECURITY) on FNORD, system id: 20300 Auditable event: System UAF record modification Event time: 26-SEP-2008 15:12:35.92 PID: 52C00119 Process name: Hobbit Username: GREG Process owner: [RTB,GREG] Terminal name: RTA2: Image name: $99$DUA0:[SYS0.SYSCOMMON.][SYSEXE]AUTHORIZE.EXE Object name: CLU$COMMON:<SYSEXE>SYSUAF.DAT;1 Object type: file User record: GREG Password: New: 7C5E4DA2 F19176AF Original: 7C5E4DA2 F19176AF Password date: New: 0 00:00:00.00 Original: 26-SEP-2008 15:12
Alarms Announcing Break-In Attempts
Break-in attempts are audited by default in the operating system; it audits dialup, local, remote, network and detached break-ins. Passwords used in break-in attempts are not displayed on security operator terminals, but they are logged to the security audit log file and can be displayed with the Audit Analysis utility.
%%%%%%%%%%% OPCOM 7-DEC-2008 14:33:20.69 %%%%%%%%%%%
Message from user AUDIT$SERVER on LASSIE
Security alarm (SECURITY) on LASSIE, system id: 19611
Auditable event: Dialup interactive breakin detection
Event time: 7-DEC-2008 14:33:20.68
PID: 00000052
Username: SNIDELY
Terminal name: _LTA13: (AV47C1/LC-2-10)Alarms Announcing Creation of an Object
/ENABLE qualifier of the SET AUDIT command. This
type of alarm notes the class of the object as well as its object name. For
example:%%%%%%%%%%% OPCOM 17-SEP-2008 10:13:20.29 %%%%%%%%%%%
Message from user AUDIT$SERVER on FNORD
Security alarm (SECURITY) on FNORD, system id: 19728
Auditable event: Object creation
Event time: 17-SEP-2008 10:13:20.01
PID: 30200117
Process name: Hobbit
Username: HUBERT
Process owner: [SST,HUBERT]
Terminal name: RTA1:
Image name: DSA1:[HUBERT.TEST.ACCESS]ACCESS.EXE;50
Object class name: COMMON_EVENT_CLUSTER
Object name: FOO
Status: %SYSTEM-S-NORMAL, normal successful completionAlarms Announcing Deaccess from an Object
/ENABLE qualifier of the SET AUDIT command.
This type of alarm notes the class of the object. For
example:%%%%%%%%%%% OPCOM 17-SEP-2008 10:13:38.34 %%%%%%%%%%%
Message from user AUDIT$SERVER on FNORD
Security alarm (SECURITY) on FNORD, system id: 19728
Auditable event: Object deaccess
Event time: 17-SEP-2008 10:13:38.31
PID: 30200117
Object class name: COMMON_EVENT_CLUSTER
Deaccess key: 808E3380Alarms Announcing Deletion of an Object
/ENABLE qualifier of the SET AUDIT command. This
type of alarm notes the class of the object as well as its object name. For
example:%%%%%%%%%%% OPCOM 17-SEP-2008 10:13:36.17 %%%%%%%%%%%
Message from user AUDIT$SERVER on FNORD
Security alarm (SECURITY) on FNORD, system id: 19728
Auditable event: Object access
Event time: 17-SEP-2008 10:13:36.08
PID: 30200117
Process name: Hobbit
Username: HUBERT
Process owner: [MTI,HUBERT]
Terminal name: RTA1:
Image name: DSA1:[HUBERT.TEST.ACCESS]ACCESS.EXE;50
Object class name: COMMON_EVENT_CLUSTER
Object name: FOO
Access requested: DELETE
Status: %SYSTEM-S-NORMAL, normal successful completion
Privileges used: noneAlarms Announcing Use of the Install Utility
/ENABLE
qualifier of the SET AUDIT command. Install alarms identify the type of
operation, the name of the image affected by the operation, the flags set by the Install
operation, and the privileges used. For
example:%%%%%%%%%%% OPCOM 7-DEC-2008 12:37:49.69 %%%%%%%%%%% Message from user AUDIT$SERVER on LASSIE Security alarm (SECURITY) on LASSIE, system id: 19661 Auditable event: Installed file addition Event time: 7-DEC-2008 12:37:49.68 PID: 00000113 Username: SYSTEM Object name: LASSIE$DMA0:[SYS0.SYSCOMMON.][SYSEXE]NCP.EXE;1 Object type: file INSTALL flags: /OPEN/HEADER_RESIDENT/SHARED
Alarms Announcing Logins
/ENABLE qualifier of the SET AUDIT command. You
can audit batch, dialup, local, remote, network, subprocess and detached login classes. This
type of alarm notes the class of login, the device used, the origin of the login (if it was
remote or network), the parent PID (if the login was subprocess), and the parent user name
(if the login was detached). For
example:%%%%%%%%%%% OPCOM 18-DEC-2008 18:49:40.09 %%%%%%%%%%%
Message from user AUDIT$SERVER on LASSIE
Security alarm (SECURITY) on LASSIE, system id: 19611
Auditable event: Batch process login
Event time: 18-DEC-2008 18:49:40.08
PID: 20002001
Username: LEWISAlarms Announcing Login Failures
/ENABLE qualifier of the SET AUDIT command. You
can audit the batch, dialup, local, remote, network, subprocess and detached login failure
classes. This type of alarm contains the class of login, the device used, a status message
detailing the reason for the failure, the origin of the login (if it was remote or network),
the parent PID (if the login was subprocess), and the parent user name (if the login was
detached). For
example:%%%%%%%%%%% OPCOM 7-DEC-2008 12:48:43.50 %%%%%%%%%%%
Message from user AUDIT$SERVER on LASSIE
Security alarm (SECURITY) on LASSIE, system id: 19611
Auditable event: Network login failure
Event time: 7-DEC-2008 12:48:43.49
PID: 0000011D
Username: DECNET
Remote nodename: TIGER Remote node id: 3218
Remote username: PROBER
Status: %LOGIN-F-INVPWD, invalid passwordAlarms Announcing Logouts
/ENABLE
qualifier of the SET AUDIT command. You can audit batch, dialup, local,
remote, network, subprocess and detached logout classes. This type of alarm contains the
class of logout, the device used, the origin of the login (if it was remote or network), and
the parent PID (if the login was subprocess). For
example:%%%%%%%%%%% OPCOM 18-DEC-2008 19:14:22.03 %%%%%%%%%%%
Message from user AUDIT$SERVER on LASSIE
Security alarm (SECURITY) on LASSIE, system id: 19611
Auditable event: Dialup interactive logout
Event time: 18-DEC-2008 19:14:22.02
PID: 20200001
Username: DANCER
Terminal name: _TTA1:Alarms Announcing Volume Mounts and Dismounts
/ENABLE qualifier of the SET AUDIT command. This
type of alarm contains the name of the image used to mount or dismount the volume, the
device used, the log file recording the operation, the volume name, its UIC and protection
code, and the flags set during the operation. For
example:%%%%%%%%%%% OPCOM 18-DEC-2008 17:43:26.94 %%%%%%%%%%% Message from user AUDIT$SERVER on CANINE Security alarm (SECURITY) on CANINE, system id: 19681 Auditable event: Volume mount Event time: 18-DEC-2008 17:43:26.04 PID: 00000038 Username: HOBBIT Image name: CANINE$DUA0:[SYS0.SYSCOMMON.][SYSEXE]VMOUNT.EXE;1 Object name: _CANINE$MUA0: Object type: device Object owner: [DEVO,HOBBIT] Object protection: SYSTEM:RWEDC, OWNER:RWEDC, GROUP:RWEDC, WORLD:RWEDC Logical name: TAPE$DBACK1 Volume name: DBACK1 Mount flags: /OVERRIDE=IDENT/MESSAGE
Alarms Reporting Use of Process Control System Services
/ENABLE qualifier of the SET
AUDIT command. This type of alarm reports the system service used to control a
process, the device used, the name of the process and its user name. For
example:%%%%%%%%%%% OPCOM 25-JUL-2008 16:07:09.20 %%%%%%%%%%% Message from user AUDIT$SERVER on FNORD Security alarm (SECURITY) on FNORD, system id: 20300 Auditable event: Process suspended ($SUSPND) Event time: 25-JUL-2008 16:07:08.77 PID: 30C00119 Process name: Hobbit Username: HUBERT Process owner: [LEGAL,HUBERT] Terminal name: RTA1: Image name: $99$DUA0:[SYS0.SYSCOMMON.][SYSEXE]SET.EXE Status: %SYSTEM-S-NORMAL, normal successful completion Target PID: 30C00126 Target process name: SMISERVER Target username: SYSTEM Target process owner: [SYSTEM]
Alarms Reporting Use of Privilege
/ENABLE qualifier of the SET AUDIT command. The
alarm reports the privilege used and what it was used to do. For
example:%%%%%%%%%%% OPCOM 17-SEP-2008 10:13:20.16 %%%%%%%%%%% Message from user AUDIT$SERVER on FNORD Security alarm (SECURITY) on FNORD, system id: 19728 Auditable event: Privilege used Event information: PRMCEB used to create permanent common event flag cluster ($ASCEFC) Event time: 17-SEP-2008 10:13:20.01 PID: 30200117 Process name: Hobbit Username: HUBERT Process owner: [MTI,HUBERT] Terminal name: RTA1: Image name: DSA1:[HUBERT.TEST.ACCESS]ACCESS.EXE;50 Event flag cluster name: FOO Privileges used: PRMCEB
Alarms Reporting Modification of a System Parameter
/ENABLE qualifier of the SET AUDIT command. This
type of alarm reports on both the active parameters and the parameters stored on disk. For
example:%%%%%%%%%%% OPCOM 25-JUL-2008 16:09:04.67 %%%%%%%%%%% Message from user AUDIT$SERVER on FNORD Security alarm (SECURITY) on FNORD, system id: 20300 Auditable event: SYSGEN parameter set Event time: 25-JUL-2008 16:09:04.65 PID: 30C00119 Process name: Hobbit Username: HUBERT Process owner: [LEGAL,HUBERT] Terminal name: RTA1: Image name: $99$DUA0:[SYS0.SYSCOMMON.][SYSEXE]SYSGEN.EXE Parameters write: SYS$SYSROOT:[SYSEXE]VAXVMSSYS.PAR;68 Parameters inuse: SYS$SYSROOT:[SYSEXE]VAXVMSSYS.PAR;68 NSA_PAGES: New: 15 Original: 10
Alarms Reporting a Change in System Time
/ENABLE qualifier of the SET AUDIT command. This
type of alarm reports the old and the new system time, the name of the user making the
modification, and the device used. For
example:%%%%%%%%%%% OPCOM 25-JUL-2008 16:08:25.23 %%%%%%%%%%% Message from user AUDIT$SERVER on FNORD Security alarm (SECURITY) on FNORD, system id: 20300 Auditable event: System time recalibrated Event time: 25-JUL-2008 16:08:25.21 PID: 30C00119 Process name: Hobbit Username: HUBERT Process owner: [LEGAL,HUBERT] Terminal name: RTA1: Image name: $99$DUA0:[SYS0.SYSCOMMON.][SYSEXE]SET.EXE New system time: 25-JUL-2008 16:08:25.19 Old system time: 25-JUL-2008 16:08:25.18
Alarms Resulting from Execution of the SET AUDIT Command
SET AUDIT command are automatically audited, and you
cannot disable it. The following alarm messages are examples of SET AUDIT
alarms:%%%%%%%%%%% OPCOM 12-NOV-2008 10:54:11.91 %%%%%%%%%%%
Message from user AUDIT$SERVER on FNORD
Security alarm (SECURITY) and security audit (SECURITY) on FNORD, system id: 19681
Auditable event: Security alarm state set
Event time: 12-NOV-2008 10:54:11.58
PID: 20200158
Alarm flags: ACL,AUTHORIZATION,CONNECTION
BREAKIN: (DIALUP,LOCAL,REMOTE,NETWORK,DETACHED)
LOGFAIL: (BATCH,DIALUP,LOCAL,REMOTE,NETWORK,
SUBPROCESS,DETACHED)Only one user can have the member name JONES; therefore JONES must belong to the EXEC group.
The exact range of system group numbers is determined by the security administrator in the setting of the system parameter MAXSYSGROUP. It can range as high as 37776 (octal).
This concern is also relevant to dialup connections.
Verify that the system parameter PQL_MPRCLM—the minimum subprocess limit—is set to 0.
Ensure that the system parameter PQL_MPRCLM is also set to 0.
If a 1 is displayed, the feature is enabled; a 0 indicates it is disabled.
Password synchronization is enabled by default.
An applications account used by multiple users is a good candidate for the DISRECONNECT flag to prevent the users from connecting to each other's processes.
The general purpose system manager often needs an authorized privilege set consisting of all privileges except BYPASS.
Any number of considerations might prompt this action, ranging from performance to licensing issues.
Setting the RESTRICTED flag for an account implicitly sets the DEFCLI flag.
This practice provides a shield between systems in a network if one node is penetrated. The fact that proxy logins provide admittance only to nonprivileged accounts at other nodes may help contain the extent of damage if one system in the network is penetrated.
It is easier for an intruder to impersonate a node when it is off the network.
Note that the user name and password that you specify must match the password defined for the object in the network database (described in Step 3).
Because AUTHORIZE enforces a user name limit of 12 characters, you must truncate the user name (and directory name) of the MIRROR object account to MIRRO$SERVER.
MOM has no associated user name.
In this respect, use of the subsystem identifiers is identical to the operation of images installed with privileges.