VSI OpenVMS x86-64 V9.2-3 Installation Guide
- Operating System and Version:
- VSI OpenVMS x86-64 Version V9.2-3
Preface
VMS Software, Inc. (VSI) is an independent software company licensed by Hewlett Packard Enterprise to develop and support the OpenVMS operating system.
1. Introducing OpenVMS x86-64 V9.2-3
This manual provides instructions for booting and installing (or upgrading to) VSI OpenVMS for x86-64 Version 9.2-3 (hereafter referred to as OpenVMS x86-64 V9.2-3) using an ISO file on guest virtual machines.
2. Intended Audience
Users of this manual are expected to obtain and reference any additional documentation specific to their hardware and environment. Users are expected to know how to identify the various devices involved in their installation and be familiar with the console commands that are available on their system and virtual machines.
Users should be familiar with the virtual machine environments they plan to use for running OpenVMS x86-64 V9.2-3 as a guest virtual machine.
Make sure you read the Release Notes, Installation Guide, and Boot Manager Guide prior to installing OpenVMS x86-64 V9.2-3.
3. Using the VSI Customer Portal
See the OpenVMS x86-64 V9.2-3 announcement email for information about how to log issues against the V9.2-3 release and how to use the VSI Services Portal at https://sp.vmssoftware.com.
4. Other Related Documentation
VSI OpenVMS TCP/IP Services V6.0 documentation at the VSI Documentation portal
Third-party documentation as cited throughout this document
Chapter 1. Preparing to Install VSI OpenVMS x86-64 V9.2-3
1.1. Tested Platforms
For information about supported virtual environments, see VSI OpenVMS x86-64 V9.2-3 Release Notes.
If you need more information on the platforms tested by VSI, refer to the documentation websites for each.
1.2. Recommended Settings for Virtual Machines
While the actual configuration of the VM should reflect your expected system usage, the expected system usage might be a hard thing to predict. However, the benefit of using a virtual machine is that you can always reconfigure it as needed for the current situation. VSI recommends that your OpenVMS x86-64 virtual machine be configured with the following minimum settings:
CPU that meets the following requirements:
Intel or AMD x86 CPU
64-bit Instruction set
NX processor bit (NX)
Streaming SIMD Extensions 4.1 (SSE4.1)
Virtualization Technology (VT-x)
XSAVE instructions?
Time Stamp Counter (TSC)
Advanced Programmable Interrupt Controller (APIC)
Memory Type Range Registers (MTRR)
Most Intel CPUs from 2016/AMD (Zen) CPUs from 2017 and later support these processor features.
Memory: 8 GB.
Note that if your installation fails due to the lack of memory, you can increase the amount of it for the duration of the installation and then, if needed, reduce it back.
Operating system: Other 64-bit.
A virtual disk for the system files. The disk must be at least 15 GB in size (for the supported disk types, see the VSI OpenVMS x86-64 V9.2-3 Release Notes). Optionally, if the disk space for the system files is limited, consider using a dump off system disk (DOSD) as described in the VSI OpenVMS x86-64 V9.2-3 Release Notes. The minimum disk size for the DOSD must at least be equal to the amount of RAM that your VM has.
- Boot Option:
Disable Secure Boot (if present).
Enable UEFI or EFI (BIOS is not supported).
Console Communication: serial port using a raw TCP connection for VMware and VirtualBox, or virsh for KVM VMs.
Note
Currently, only COM1 serial port is supported.
Note
Starting with version V9.2-3, OpenVMS x86-64 features the Guest Console as an alternative to serial ports. For more information, see Section 1.3, ''Guest Console''.
Optionally, an additional serial line for non-console login for VMware and VirtualBox virtual machines.
Network: Adapter Type or Device Model of E1000 and E1000e for ESXi, e1000 and e1000e for KVM; 82540EM, 82543GC, 82545EM (VirtualBox). Also, two para-virtualized NICs, virtio for KVM, and VMXNET 3 for ESXi. The new options in V9.2-3 are E1000e/e1000e, 82543GC, 82545EM, virtio, and VMXNET 3.
Note
VSI strongly advises against manual configuration of DECnet MAC address on any interface.
CD/DVD device (physical or virtual) with the OpenVMS installation kit (the .ISO file) assigned to it.
Minimum number of CPUs: 2.
Chipset, where offered: ICH9 (VirtualBox); Q35 (KVM).
1.3. Guest Console
In previous versions of OpenVMS x86-64, all console interactions required a legacy serial port device. Starting with version 9.2-3, OpenVMS x86-64 features the Guest Console – an alternative specifically designed for customers who are unable to use serial ports. The Guest Console provides the necessary keyboard driver and terminal emulator functionalities to allow users to interact with the system from the initial boot through the operator login.
Note that the current implementation of the Guest Console provides a minimal terminal that lacks certain important features or supports them with limitations. For more information, refer to VSI OpenVMS x86-64 V9.2-3 Release Notes.
To enable the Guest Console, enter the following Boot Manager command:
BOOTMGR> OPA0
Note
If you plan to use VMware vMotion, ensure that no serial ports are configured. Instead, use the Guest Console.
1.4. Licensing
During the installation, you will be prompted to register Product Authorization Keys (PAKs) for the base operating environment and any layered products that are not already included in the base OS.
A PAK is represented as a text-structured file containing a series of named fields and
unique values that were generated by VSI. You have the option to register your PAKs
during the
installation
or after the installation is complete. VSI recommends that you register your PAKs after
the installation by
renaming
the PAK file(s) that VSI
provided
with a .COM
extension
and then executing that file; this will register all your licenses at once.
Thereafter,
you must either issue the LICENSE LOAD command or
reboot
OpenVMS to make them active. If you choose to register your PAKs
during the installation, you can either type the values of each
requested field, or copy-and-paste the values into the console line by line (assuming
your console connection supports this action, such as using a terminal emulator).
Below is an example of what a PAK might look like:
$ LICENSE REGISTER OPENVMS-X86-BOE -
/ISSUER=VSI -
/AUTHORIZATION=1-VSI-SAMPLAUTH-0001 -
/PRODUCER=VSI -
/UNITS=32 -
/TERMINATION_DATE=31-OCT-2023
/OPTIONS=(PCL,X86_64) -
/CHECKSUM=X-XXXX-XXXX-XXXX-XXXX
1.4.1. Installation Operating Environment
With the release of OpenVMS V9.2-3, a new convenience feature called the Installation Operating Environment (OE) has been introduced to streamline the setup process for freshly installed systems.
The Installation OE is a license that is limited in both scope and time and is generated during installation. It has a termination date of midnight of the 4th day after the date of installation. For example, if you install OpenVMS on Monday, the license will terminate at midnight on Friday. The Installation OE will be installed even if the customer chooses to register license PAKs during the installation dialogue. Note that only the following products are included in the Installation OE license:
The base OpenVMS operating system
TCP/IP Services for OpenVMS
DECnet end node
Note
An operating system installation takes place when the software is placed on the target disk without regard for any previous content on the target device. A system upgrade occurs when the target device contains a previous version of the OpenVMS operating system, and the new software is overlaid on the present content of the target disk. The Installation OE only applies to installations and not upgrades.
The benefits of the Installation OE include:
The ability to use a (virtual) serial terminal line to set up the system rather than requiring access to the system console terminal.
The ability to configure and start TCP/IP or DECnet network services which may then be used to copy files to the new node directly.
Removing the necessity to type in initial license PAKs by hand during installation.
Permitting DHCP configuration of TCP/IP. (Option during the installation dialogue.)
After the system is configured, you may delete or disable the OPENVMS-X86-INSTOE PAK to prevent messages about an expired PAK during boot.
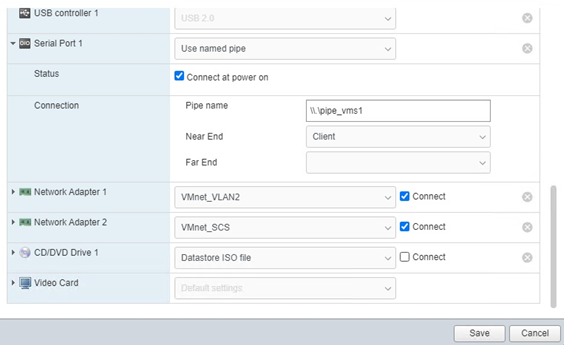
1.4.2. Using a Named Pipe Serial Port on VMware vSphere
Besides using the Guest Console, another option to use the serial port console on VMware vSphere hypervisor is to configure a named pipe. This is especially useful if a basic vSphere license is used instead of an Enterprise (Plus) license.
A named pipe forms a virtual connection between two virtual serial ports on virtual machines running on the same ESXi host. One of these virtual machines is your OpenVMS system, the other is any system (e.g. Windows or Linux) on which a terminal emulator is installed (management system).
You access the console on the OpenVMS system by first logging in to the management system and then using the terminal emulator to establish a connection to the serial port.
Using the named pipe functionality, map COM1/OPA0: on the OpenVMS system to a pipe on a management server on which a terminal emulator is installed.
\\.\pipe_name
\\.\pipe_namewhere
pipe_name is a
unique string for this connection. A good way to ensure the pipe_name
is unique is to name it pipe_<OpenVMS system
name>, e.g., pipe_vms1.Note
For the named pipe connection to work correctly, both the server and client must reside on the same host system.
The terminal emulator should be set for serial connection at 115200 baud.
The following two figures show how to set up pipes for a local terminal emulator-based console.
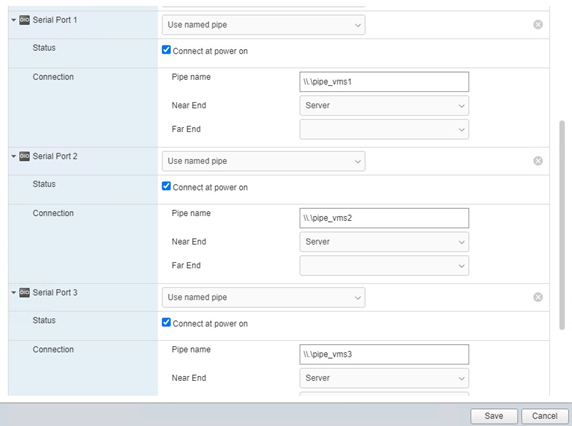
The following two figures show how to set up pipes between two local virtual machines where one plays the role of VMS console. This could be a virtual machine guest running any OS that supports a terminal emulator.
1.5. VSI DECnet
Install either VSI DECnet Phase IV or VSI DECnet-Plus on VSI OpenVMS x86-64 V9.2-3 and then configure the product you have chosen, just as you would for an OpenVMS Alpha or OpenVMS IA-64 release.
If you have DECnet Phase IV installed on your system and you want to use DECnet-Plus, you have to uninstall DECnet Phase IV and then install and configure DECnet-Plus.
Warning
If your DECnet installation was not part of the main installation procedure for OpenVMS x86-64, you must update the Memory Disk after you install DECnet. The Memory Disk update ensures that SYS$NETWORK_SERVICES.EXE is loaded on boot. Use the following command:
$ @SYS$UPDATE:SYS$MD.COM
After the next system reboot, you may want to purge the Memory Disk by using the following command:
$ PURGE SYS$LOADABLE_IMAGES:SYS$MD.DSK
If you install DECnet as part of the main OpenVMS x86-64 installation procedure, you do not need to update the Memory Disk. The Memory Disk is updated at the end of the OpenVMS x86-64 installation.
After DECnet has been installed and configured, you can set host and copy files to/from other systems running DECnet.
Chapter 2. Creating and Configuring a Virtual Machine
This chapter provides basic instructions for creating and configuring a guest virtual machine (VM) on VMware ESXi, KVM, and Oracle VirtualBox. In these instructions, VSI assumes that the application for managing the VM guests is already installed and configured.
2.1. Creating a VMware ESXi Virtual Machine
The instructions in this section were written for VMware ESXi 8.0. However, the general principles described here also apply to other VMware products, such as Workstation and Fusion.
To create a virtual machine on a VMware ESXi host, follow these steps:
Download, unzip, and copy the ISO file that contains VSI OpenVMS x86-64 V9.2-3 to a location that is locally accessible to the browser that you use to connect to the VMware ESXi host client.
In your browser, enter the ESXi host IP address to bring up the VMware ESXi environment. At the login screen, provide your user credentials and log in.
On the left side of the VMware ESXi window, go to Navigator > Storage. On the right side of the window, click Datastore browser.
- In the Datastore browser pop-up window, perform the following procedure:
Click the datastore where you would like to save the ISO kit, then click Upload and navigate to the ISO kit (which should be on your browser's local system).
Click Open.
Note
Once the upload starts, you can close the Datastore browser window.
To create a virtual machine using the ISO file, go to the Host menu, then click Create/Register VM.
In the New virtual machine window, perform the following steps:
On the Select creation type: Create a new virtual machine page, click Next.
On the Select a name and guest OS page, specify the following information:
Name – set the name for your virtual machine. Keep in mind, the name must be unique in your environment.
Compatibility – VSI recommends accepting the default value.
Guest OS family – select Other.
Guest OS version – select Other (64-bit).
Сlick Next.
On the Select storage page, select the datastore that will contain the disk image(s) and files for your VM. Click Next.
On the Customize settings page, click Virtual Hardware and specify values for the following fields:
CPU – set the number of CPUs for your VM (for the values recommended by VSI, refer to Section 1.2, ''Recommended Settings for Virtual Machines'').
Cores per Socket – select a value appropriate for your VM and licensing needs.
Note
The Sockets field updates automatically depending on the number of cores per socket that you select.
Memory/RAM – set the appropriate amount of RAM for your VM (for the values recommended by VSI, refer to Section 1.2, ''Recommended Settings for Virtual Machines'').
SCSI Controller 0 – if this controller does not exist, and you would like to add it to your VM, click the Add other device button, above the CPU field. Then, select SCSI controller from the dropdown menu. Then, make sure LSI Logic Parallel is selected from the list. Other SCSI controllers are not supported in the current release.
SATA Controller 0 – if this controller does not exist, and you would like to add it to your VM, click the Add other device button, above the CPU field. Then, select SATA controller from the dropdown menu.
Hard disk 1 – select disk type and set the size (for the VSI recommendation, refer to Section 1.2, ''Recommended Settings for Virtual Machines''). Also, set the following parameters:
Controller location on the left side – select the controller you are planning to use: SATA or SCSI.
- Controller location on the right side – select the bus and LUN assignment for your disk (or accept the default value).
Note
If you are using a version of VMware ESXi earlier than 8, make sure not to use the same bus/LUN setting for any of your disks and/or CD-ROMs. ESXi 8 automatically sets different LUNs if they accidentally coincide.
Disk Provisioning – select the Thick provisioned, lazily zeroed option.
To add an additional disk, perform the following steps and specify the following settings:
Click the Add hard disk button just above the CPU field.
Select New standard hard disk.
New Hard disk – select disk type and set the size.
Controller location on the left side – select the controller you are planning to use: SATA or SCSI.
Controller location on the right side – select the bus and LUN assignment for your disk (or accept the default value).
Note
Make sure not to use the same bus/LUN setting for any of your disks and/or CD-ROMs.
Disk Provisioning – select the Thick provisioned, lazily zeroed option.
Network Adapter 1 – ensure that the correct adapter is selected from the drop-down list. The correct adapter depends on your environment.
Adapter Type – select the network adapter E1000, E1000e, or VMXNET 3 from the list.
CD/DVD Drive 1 – select the Datastore ISO file value.
In the Datastore browser pop-up window, navigate to the VSI OpenVMS ISO file that you uploaded earlier and click Select.
CD/DVD Media – ensure the path to the ISO is correct.
Controller location on the left side – ensure the correct controller is selected for a CD/DVD.
Controller location on the right side – select the bus and LUN assignment for a CD/DVD.
Decide on a method to manage your VM's console communication. You can configure a serial port (A) or use the Guest Console (B).
Follow the steps below for each method:
If you prefer using a virtual serial port connection, your VM must have an active serial port, so that you can connect to it later using a terminal emulator.
For more guidance on using the terminal emulator, refer to the section "Terminal Emulator Tips" in the Boot Manager guide.
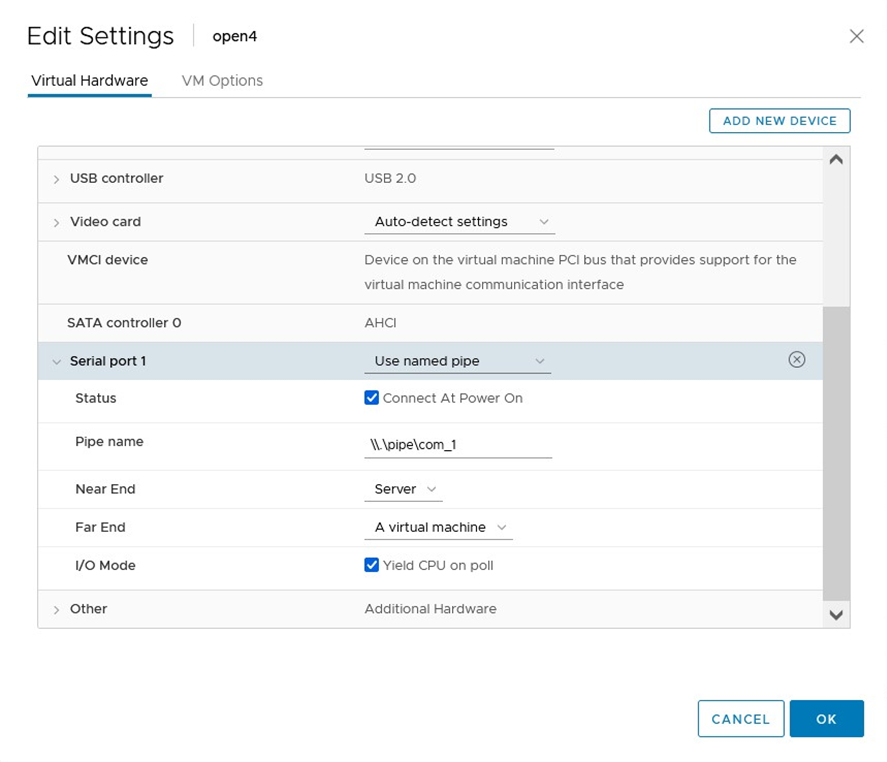
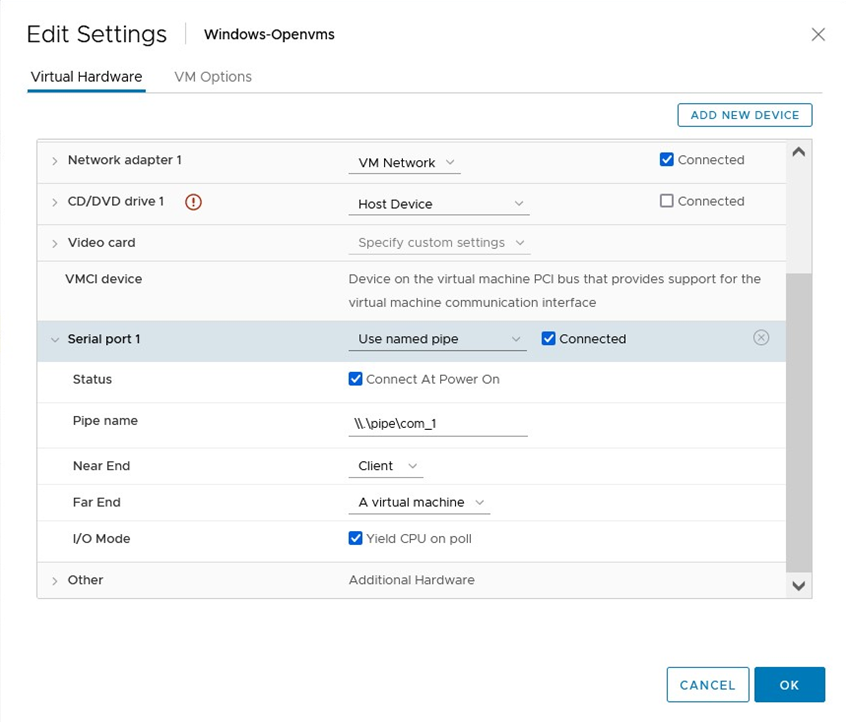
If you are using VMware ESXi, you will have to map this serial port to a valid TCP/IP port. If you are using any other VMware hypervisor, you may need to use a named pipe connection. Both methods are described below. Follow these steps:
Click Add other device.
Select Serial port.
From the New Serial Port dropdown list, select Use network if you plan to use your serial port with a TCP/IP port. If you plan to use your serial port with a named pipe, select Use named pipe.
Note
Note that using named pipes requires that your terminal emulator utility reside on your VM host system. To use named pipes over a different network node, you will need to use a Named Pipe Proxy server.
If you selected Use network in the previous step, type
tcp://<your ESXi host IP>:<port
                                                  ID>
in the Connection Port URI field. The port ID must be unique on the ESXi host. Once you are satisfied with the URI, click anywhere in the window to validate the URI format and remove the warning.If you selected Use named pipe, type
\\.\pipe\pipe_namein the Pipe name field. The pipe name must be unique for each VM.Connection Direction – ensure that Server is selected.
If you prefer to use the Guest Console feature, finish configuring your VM. Instructions on how to switch to Guest Console will be provided in the next chapter.
On the Customize settings page, click VM Options and specify the following information:
Click Boot Options to expand the settings.
Enable UEFI secure boot – make sure this checkbox is not checked.
Force BIOS setup – make sure this checkbox is checked.
Click Next.
On the Ready to complete page, review the settings. If everything is correct, click Finish.
2.1.1. Completing Your VMware ESXi Virtual Machine Configuration
Once you have created your VM, go to the Virtual Machines area in the VMware ESXi environment and select the VM you created.
Warning
Attempting to perform the steps below before your VM is created and listed under the Virtual Machines area will result in an unusable VM.
Edit the settings for your VM. Click the VM Options button.
Navigate to Boot Options > Firmware and set the value to EFI.
Navigate to Advanced > Configuration Parameters and from the Edit Configuration set the following parameters accordingly:
Key Value efi.quickBoot.enabled FALSE efi.serialconsole.enabled? TRUE efi.shell.activeByDefault TRUE Note
If you are using a version of VMware ESXi earlier than 8, make sure your capitalization is done as specified in the table above.
Click Save.
Your VM information, hardware configuration, and power controls will now be displayed. Click the Power on button at the top.
After the power on process is successfully completed, you will see the blue BIOS screen of your VM in the console preview pane in the top left.
Note
On VMware ESXi 8, when an OpenVMS VM is launched, it immediately enters the boot manager instead of BIOS. To get into BIOS, you need to force the VM to do this by enabling the following setting:
Navigate to VM Options > Boot Options > Force BIOS Setup. The next time the virtual machine boots, force entry into the BIOS setup screen.
Click anywhere in the console preview pane to open up the ESXi browser console to the VM. The platform Boot Manager screen will be displayed. If needed, configure the screen size (in the menu, navigate to Boot Manager screen > Enter setup > Configure screen size > Set screen size > Commit changes and exit > Exit Boot Maintenance Manager).
Navigate to Enter setup > Configure boot options > Enable or disable boot options and disable all lines except the EFI Internal Shell (Unsupported option). An example is shown below:
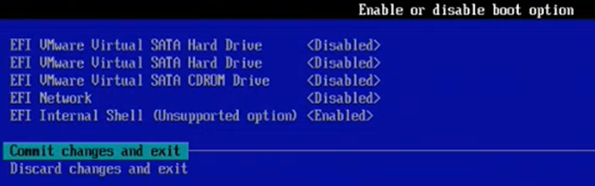
Select Commit changes and exit > Exit the Boot Maintenance Manager.
On the Boot Manager screen, select EFI Internal Shell (Unsupported option), and press Enter.
Important
On ESXi, some users may experience problems when trying to establish a connection to a VMware console. To remedy this, you must enable a firewall rule using the ESXi CLI:
Display the ESXi firewall rule for
remoteSerialPortusing the command:esxcli network firewall ruleset rule list -r remoteSerialPort
Enable the rule by using the command:
esxcli network firewall ruleset set -r remoteSerialPort -e true
For information about working with ESXi firewall, refer to the official VMware documentation.
Your virtual machine is now ready to have VSI OpenVMS x86-64 installed on it. See Chapter 3, "Installing and Upgrading VSI OpenVMS x86-64 V9.2-3 on a Guest Virtual Machine".
2.2. Creating a KVM/QEMU Virtual Machine
Note
The following instructions have been written for KVM/QEMU 5.2.
To create a virtual machine on KVM/QEMU, follow these steps:
Download, unzip, and copy the ISO file that contains VSI OpenVMS x86-64 V9.2-3 to a location that is locally accessible to the KVM host server.
Run the Virtual Machine Manager and select File > New Virtual Machine from the main menu. The Create a new Virtual Machine wizard opens.
Select Local install media (ISO image or CDROM) and click Forward.
Click Browse.
In the Locate ISO media volume window, click the Browse Local button, then navigate to the ISO file that contains VSI OpenVMS x86-64 V9.2-3, select it, and click Open.
Uncheck the Automatically detect from the installation media/source checkbox, type in the search box Generic, and select the value that has the words "unknown" or "generic" in parenthesis. Click Forward.
Select the amount of memory and number of CPUs to use for your VM (for the values recommended by VSI, refer to Section 1.2, ''Recommended Settings for Virtual Machines''). Click Forward.
Click Select or create custom storage, then click Manage, and create the storage volumes for your VM disk images. Be sure to select the desired volume, then click Choose Volume. Click Forward.
Give your virtual machine a name, review your VM's settings, and check the Customize configuration before install checkbox. Click the arrow next to Network Selection and verify that your system is using a Bridge device with the appropriate Device name. Then, click Finish.
2.2.1. Completing Your KVM/QEMU Virtual Machine Configuration
Once you have created your VM, a <VM_name> on QEMU/KVM window opens. Then, set the following settings:
Go to Overview, set the following settings:
From the Chipset dropdown, select Q35.
From the Firmware dropdown, select the most basic UEFI x86_64:/usr/share/OVMF/*CODE.* option.
Click Apply.
If you are planning to use SCSI disks, click the Add Hardware button located at the lower left.
Go to Controller.
From the Type drop-down list, select SCSI.
Ensure the Model drop-down list is set to virtio-scsi.
Click Apply.
Go to IDE Disk 1 > Disk bus.
For the Disk bus, select either SATA, SCSI, or virtio – whichever is appropriate for your environment. Other disk controller types are currently not supported.
Click Apply.
To add an additional disk (as recommended by VSI, see Section 1.2, ''Recommended Settings for Virtual Machines''), click Add Hardware in the lower left corner of the screen, then perform the following steps:
Go to Storage.
Select or create custom storage – will allow you to create a disk volume and specify the desired storage location, size, name, and disk format.
Click Manage.
On the left side of the Locate or create storage window, select the storage pool that you want to use or create a new one by clicking the button below the list.
After selecting the storage pool, go to the central area of the Locate or create storage window and click the button to add a volume.
In the Add a Storage Volume window, specify the name, format, and capacity for the storage volume.
Enable the Allocate entire volume now checkbox.
Click Finish.
Select your volume and click Choose Volume.
Make sure that Device type: is set to Disk device.
From the Bus Type drop-down list, select either SCSI, SATA, or virtio. Other disk controller types are currently not supported.
From the Cache mode: drop-down list, select Writethrough.
Click Finish.
Repeat these steps for each additional disk you are planning to add to your configuration.
Go to IDE CDROM 1.
To specify Source path, click Browse, navigate to the ISO file that contains VSI OpenVMS x86-64 V9.2-3, and select it. Then, click the Choose Volume button.
For the Disk bus, select either SATA or SCSI – whichever is appropriate for your environment. Other disk controller types are currently not supported.
Click Apply.
When you have created and configured your devices, go to Boot Options.
Enable the Enable boot menu option.
Check the devices from which you want to boot (CDROM and the system disk, in most cases).
Click Apply.
- Decide on a method to manage your VM's console communication. You can configure a serial port (a) or use the Guest Console (b). Follow the steps below for each method:
To set up the serial port, click Add Hardware again, then select Serial. Make sure that the Pseudo TTY (pty) type is selected. Accept the defaults for other parameters.
If you prefer to use the Guest Console feature, finish configuring your VM. Instructions on how to switch to Guest Console will be provided in the next chapter.
Go to NIC:<your_mac_address>
From the Device model: dropdown, select e1000e or virtio.
Note
If you want to use e1000, you should click the field that shows e1000e and delete the e at the end, so that only e1000 remains.
Click Apply.
Click Begin Installation.
The Virtual Machine Manager Console will now show either the EFI
Shell>prompt or theBOOTMGR>prompt. This depends on the operating system on which KVM is installed and on the firmware .BIN file that was selected when the VM was created.Regardless of which prompt is displayed, type
EXITand immediately press the ESC key repeatedly until the blue platform Boot Manager screen is displayed.Navigate to Boot Manager, then select the EFI Internal Shell option, and press ENTER.
You will see the EFI Shell prompt now. Enter
map fs*to display just the file systems available on your VM one page at a time.Inspect this list of file systems and locate the one that maps to the ISO file that contains VSI OpenVMS x86-64 V9.2-3. Since that ISO has been set up as a CDROM, the file system that maps to it will be labeled as CDROM. As an example, we will assume that the file system we want is
FS0:.- At the
Shell>prompt, enter the following command:FS0:\efi\vms\vms_bootmgr
After this, you should see the VSI Boot Manager screen.
Your virtual machine is now ready to have VSI OpenVMS x86-64 installed on it. See Chapter 3, "Installing and Upgrading VSI OpenVMS x86-64 V9.2-3 on a Guest Virtual Machine".
2.3. Creating a VirtualBox Virtual Machine
Note
The following instructions have been written for VirtualBox 7.0 installed on a Windows desktop. If you are using a different system, your installation settings may vary slightly.
To create a virtual machine in Oracle VM VirtualBox, follow these steps:
Download, unzip, and copy the ISO file that contains VSI OpenVMS x86-64 V9.2-3 to a location that is locally accessible to the browser used to connect to the VirtualBox host.
Run Oracle VM VirtualBox and select Machine > New from the main menu. The Create Virtual Machine wizard opens.
On the Virtual machine Name and Operating System page of the wizard, do the following:
Set the Name and Folder for your VM.
In the ISO Image field, specify the path to your OpenVMS ISO file.
In the Type dropdown, select Other.
In the Version dropdown, select Other/Unknown (64-bit).
Click Next.
On the Hardware page of the wizard, set the Base Memory for your virtual machine (for the values recommended by VSI, refer to Section 1.2, ''Recommended Settings for Virtual Machines''). Click Next.
On the Virtual Hard disk (for the values recommended by VSI, refer to Section 1.2, ''Recommended Settings for Virtual Machines'') set the size of your virtual hard disk. Make sure the fixed size option is enabled. Click Next.
Click Finish.
You have created your VirtualBox virtual machine. Now, you must properly configure it before you can install VSI OpenVMS x86-64 V9.2-3.
2.3.1. Completing Your VirtualBox Virtual Machine Configuration
To prepare your virtual machine for VSI OpenVMS x86-64 installation, follow these steps:
Once you have created your VM, right-click it and select Settings from the menu.
In the Settings window, do the following:
Go to System > Motherboard and specify the following settings:
From the Chipset dropdown, select ICH9. If you select any other chipset, OpenVMS will not install.
Make sure the Enable I/O APIC and Enable EFI options are checked.
Note
Your virtual machine must boot from UEFI, not BIOS.
Go to Storage.
In the Storage Devices area of the Settings window, you will see the default IDE controller and two devices: the hard disk that you created in the previous topic and the optical drive containing the VSI OpenVMS V9.2-3 ISO file. IDE disk controllers are currently not supported, so you must change the controller type to either AHCI (SATA) or LsiLogic. To do so, perform the following steps:
Click the IDE controller to select it.
In the Attributes area on the right side of the Settings window, select AHCI or LsiLogic from the Type dropdown list.
Enter an appropriate name in the Name field.
Click the hard disk to display its attributes and make sure that it is now marked appropriately as SATA or LsiLogic.
Click the optical drive to display its attributes and make sure that it is now marked appropriately as SATA or LsiLogic.
Go to Network.
Click the Attached to dropdown and select Host-only Adapter.
Сlick Advanced.
From the Adapter type dropdown, select Intel PRO/1000 MT Server.
- Decide on a method to manage your VM's console communication. You can configure a serial port (i) or use the Guest Console (ii). Follow the steps below for each method:
If you prefer using a virtual serial port connection, your VM must have an active serial port, so that you can connect to it later using a terminal emulator. For guidance on using the terminal emulator, refer to the section "Terminal Emulator Tips" in the Boot Manager guide.
To configure a serial port on your VM, follow these steps:
Go to Serial Ports.
Check Enable Serial Port.
Set Port Mode to TCP.
Uncheck Connect to existing pipe/socket.
In the Path/Address field, type the port number that you want to use. In this example, we will use port 2023.
If you prefer to use the Guest Console feature, finish configuring your VM. Instructions on how to switch to Guest Console will be provided in the next chapter.
Click OK to apply the changes and close the Settings window.
Your virtual machine is now ready to have VSI OpenVMS x86-64 installed on it. See Chapter 3, "Installing and Upgrading VSI OpenVMS x86-64 V9.2-3 on a Guest Virtual Machine".
Starting with the V9.2-3 release, OpenVMS x86-64 supports the VMware VMDirectPath I/O feature, which can be configured on your ESXi virtual machine. For more information see Appendix C, "Using Physical Fibre Channel Devices As Data Disks".
Chapter 3. Installing and Upgrading VSI OpenVMS x86-64 V9.2-3 on a Guest Virtual Machine
This chapter provides instructions on booting and installing VSI OpenVMS V9.2-3 on a guest VM, regardless of which hypervisor you are using.
For the first installation of VSI OpenVMS as a guest VM, continue with Section 3.1, ''Installing VSI OpenVMS x86-64 V9.2-3''. For upgrading an existing VMS installation on a VM, skip to Section 3.2, ''Upgrading to VSI OpenVMS x86-64 V9.2-3''.
3.1. Installing VSI OpenVMS x86-64 V9.2-3
Before you install VSI OpenVMS x86-64 V9.2-3 on your virtual machine, ensure it has been created and configured as directed in Chapter 2, "Creating and Configuring a Virtual Machine" of this document. Once you have created and powered on your VM (or clicked Begin Installation if you are using QEMU/KVM), follow these steps:
Depending on your hypervisor of choice and the boot options settings of your VM, you will either see the UEFI
Shell>prompt: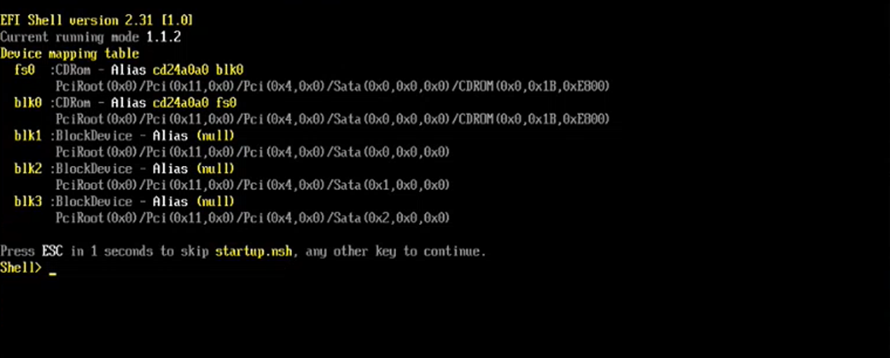
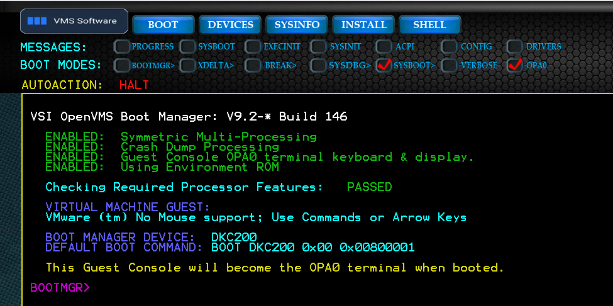
or the VSI Boot Manager screen:
If you see the UEFI
Shell>prompt, do the following:At the
Shell>prompt, entermap fs*to display all the file systems available on your VM.Locate the file system that maps to the VSI OpenVMS V9.2-3 ISO file. Since that ISO has been set up as a CDROM, the file system that maps to it will be labeled as CDROM as well. As an example, we will assume that the file system we want is FS0.
At the
Shell>prompt, enterFS0:\efi\vms\vms_bootmgr.
After this, you should see the VSI Boot Manager screen.
If you plan to use the Guest Console feature instead of a serial port, enable the Guest Console by entering the command
BOOTMGR> OPA0or selecting the OPA0 checkbox with the arrow keys and pressing Enter.You will see the following message indicating that the Guest Console is enabled:ENABLED: Guest Console OPA0 terminal (use local keyboard & display instead of serial port). The Guest Console provides a minimal OPA0 terminal (no scrolling or cut-and-paste). SET TERM/PAGE to a value two lines larger than the Guest Console display for use with editors.
At the
BOOTMGR>prompt, typeDEVICESto display the list of available VMS-bootable devices.From the list, identify the device that contains the ISO file with the new version of VSI OpenVMS (it will be labeled as a CDROM or DVD). Enter
BOOT <device_name>, where <device_name> is the name of the disk that contains your ISO file (not the name of the ISO file itself). As an example, we enterBOOT DKA100. After the progress meter reaches 100%, what you see depends on whether you are using the Guest Console or not. If you are using a serial port, you should see the following screen:
In this case, continue with the next step.
If you are using the Guest Console, you should see the installation menu now. In this case, go to step 7.
Establish a remote connection to your VM via a terminal emulator. Depending on your hypervisor of choice, VSI recommends using the following methods:
On VMware hypervisors, you can choose to connect via Telnet or a named pipe, depending on how you set up your VM earlier (see step 9 of the Creating a VMware ESXi Virtual Machine section).
On KVM, perform the following procedure:
Make sure that the serial console is enabled and started on the host server.
Make sure that virsh is connected to the hypervisor that you are using.
Start virsh and enter the command
console
                                        VMname
, whereVMnameis the name of the VM that you want to connect to.
On VirtualBox, connect via Telnet using the serial port of your VM (see the Completing Your VirtualBox Virtual Machine Configuration section) and the IP address of the host system.
Warning
If you are utilizing VMware Workstation or VMware Fusion as your hypervisor, be advised that virtual serial port support is not available via the GUI. For more information, refer to the Release Notes.
Note
If you are on ESXi, make sure that the port used by your VM can go through the ESXi firewall. If you are having trouble at this stage, contact the ESXi administator in your company.
When theBOOTMGR>prompt appears, your terminal emulator should automatically connect to your VM. However, if that does not happen, you can initiate command output to the serial port manually by entering the command:BOOTMGR> COM nwhere n is the serial port number that your VM uses.Upon connecting, you should see the VSI OpenVMS installation menu and/or the
Enter CHOICE or ? for help: (1/2/3/4/5/6/7/8/9/?)prompt:Note
If this prompt does not appear, and the output appears blank or unchanging, press Enter. The prompt should now appear. To see the OpenVMS installation menu, type
?, hit Enter, then hit Enter again.Important
VSI OpenVMS x86-64 V9.2-3 does not support installation menu items number 3, 5, and 7. Also, do not use item number 6 unless directly instructed otherwise.
Enter
1to start the installation process.Since this a new installation, answer
INITIALIZEto theDo you want to INITIALIZE or to PRESERVE?question.At the
Enter device name for target disk:prompt, enter the name of the disk where you want to install VSI OpenVMS.To display a list of available devices, enter
?. You can also enter??which will display a list of devices with their volume label and size. As an example, we will enterDKA0:.At the
Enter volume label for target system diskprompt, enter the label that you want to assign to your system disk. As an example, we will entersystemDisk.You will see the
Do you want to enable hard links?question. This choice is up to you and depends on how you are using or plan to use your OpenVMS setup. For more information about hard links, see VSI OpenVMS System Manager’s Manual, Volume 1.A summary of your choices will be displayed, as well as a prompt asking you to confirm your choice. Enter
YESif no changes are needed orNOto re-enter the disk label and your choice for hard-links. For brevity and readability, similar prompts will not be mentioned again in this document.After the target disk has been initialized and mounted, you will be prompted with the question
Do you want to create or validate boot options?. The default isYES. Then, you will be asked to create the SYSTEM password. Set and confirm the password for your SYSTEM account. The password must be a minimum of 15 characters.Warning
If everything is working correctly, you should not see any characters in your output while you enter your password.
If, however, you see any output or get an error at this stage, this could be a terminal emulator issue or a Telnet issue. Make sure that Telnet is operating in character mode and that your terminal emulator is forcing the local echo off.
Ensure that both the Implicit CR and Implicit LF options are unchecked in your terminal emulator software.
At the
Enter SCSNODE:prompt, enter a unique name for your OpenVMS system with a maximum length of 6 characters. As an example, we will enterx86.Next, you will see the
Do you plan to use DECnet?prompt. DECnet is a family of products that allows OpenVMS systems to communicate with each other (for more information, see VSI DECnet-Plus for OpenVMS Introduction and User's Guide). This choice is up to you and depends on how you are planning to use your OpenVMS setup.Note
If you answer
NO, you will be asked to specify a value for the SCSSYSTEMID parameter. This parameter is an ID number that each OpenVMS system has on a network. Make sure that each SCSSYSTEMID is unique amongst the systems on your network.If you answer
YES, the value for SCSSYSTEMID will be calculated based on the DECnet address that you enter when prompted for it.Depending on your response to the previous question, you will be prompted for either the DECnet IV address, or the SCSSYSTEMID value. Enter a value that is unique in your environment.
The next several prompts will ask you to specify the time zone information for your system. Enter appropriate values.
After setting the time zone information, you will see the
Do you want to
                        automatically configure and start up TCP/IP & SSH?
prompt. The default option isNO. If you answerYES, and there is a running DHCP server on the network, all network adapters assigned to your VM will be configured with dynamic IP addresses provided by that DHCP server.Note
If you intend to use your local network on OpenVMS immediately after installation (which is enabled by the Installation OE license: see Section 1.4.1, ''Installation Operating Environment''), make sure to manually verify that your network is functioning properly.
Then you will see the
Do you want to register any Product Authorization
                        Keys?
prompt. VSI recommends that you answerNOand register your Product Authorization Keys (PAKs) after the installation is complete.Important
VSI provides PAKs in the form of text files containing DCL code. You cannot run that code during the OpenVMS installation. If you choose to register your PAKs now, you must manually type the values for each of the fields exactly as they appear in the PAK for each license that you need to register.
However, once the installation has completed and the system has rebooted twice, you will be able to register your PAKs all at once (see this step).
Starting with VSI OpenVMS V9.2-3 release, you can now copy your PAKs over the network after installation using the Installation OE license, which activates networking and other essential OpenVMS features needed for initial setup for 5 days. For more details check Section 1.4.1, ''Installation Operating Environment''.
Next, you will see the
Do you want to install DECwindows Motif for
                        OpenVMS X86-64 V1.8-2?
prompt. DECWindows Motif is a graphical user interface for VSI OpenVMS. The answer is up to you, because it depends on how you plan to use your VSI OpenVMS setup.Next, you will be prompted about installing DECnet products which allow OpenVMS systems to communicate and share resources with each other.
First, you will see the
Do you want to install DECnet-Plus for OpenVMS
                        X86-64 V9.2-G?
prompt. If you answerNO, you will see theDo you want to install DECnet Phase IV for OpenVMS X86-64 V9.2-3?prompt. Note that you cannot install both products. Your choice to install one of them or neither of them depends on how you plan to use your VSI OpenVMS setup.Give an answer to the
Do you always want detailed descriptions?question. The answer is entirely up to you. As an example, we will sayNO.The product kit validation will proceed, and then the configuration phase starts. Then, you will see the
Do you
                        want the defaults for all options?
question. If you answerYES(which is recommended), the following components will be installed or performed automatically:DECdtm Distributed Transaction Manager
Support for DECnet-Plus or DECnet (Phase IV) for OpenVMS
Programming Support:
Debugger Utility
Image Dump Utility
Macro libraries
MACRO-32 Migration Compiler
TLB intermediary form of STARLET
C Header Files
VMS text libraries of Ada declarations
RMS Journaling Recovery Utility
System Programming Support:
Delta Debugger
System Dump Analyzer Utility
Miscellaneous Symbol Table Files
Utilities:
Phone Utility
XPG4 Internationalization Utilities
World-Wide PostScript Printing Subsystem
Bliss Require Files
Example Files
Message Facility Files (HELP/MESSAGE)
UETP Files
DECwindows Server Support:
DECwindows Workstation files
Video fonts:
100 dots-per-inch video fonts
Euro base support
Euro 100 dots-per-inch video fonts
Delete any obsolete OpenVMS files
Delete files archived by OpenVMS remedial kits
However, if you prefer not to install some of these components, answer
NO, and the system will prompt you about installing each component individually. If any subcomponent is not desired, you must first choose to install the main component, and then you will be asked about each subcomponent. In most cases, this level of customization is no longer necessary and may destroy some important system components. It is recommended to avoid this unless absolutely required.As the configuration phase progresses, some products may require the system to be rebooted. Answer
YESto theCan the system be REBOOTED after the installation completes?question. A reboot is a necessary part of the installation process. If you answerNO, the installtion will abort.At this stage, if you previously answered
NOto theDo you want the defaults for all options?question (see above), you will see additional prompts asking you to confirm or reject the installation of subcomponents of some of the layered products.Once the installation procedure has configured the layered products and their options, you will see the
Do you want to review the options?prompt. The answer is up to you. As an example, we will answerNO.
After the
Portion done:meter reaches 100%, a list of installed products will be displayed, followed by post-installation information for some of the products. Once the system updates the memory disk (which may take a minute), the installation procedure is complete. You will see thePress Return to continue...prompt. Press Enter.Next, you will see the VSI OpenVMS installation menu and the
Enter CHOICE or ? for help: (1/2/3/4/5/6/7/8/9/?)prompt. Enter9to shut down the system.The system will shut down and display the
**** Hit any key to reboot system ****prompt. Press any key to reboot the system.Depending on your hypervisor of choice, you will either see the VSI Boot Manager screen or the UEFI screen. If you see the VSI Boot Manager screen, proceed to the next step.
If you see the UEFI
Shell>prompt, do the following:At the
Shell>prompt, entermap fs*to display all the file systems available on your VM.Find the file system for the newly installed system disk. If the correct file system is not readily apparent, use the file system for the CD-ROM device which had the installation ISO mapped to it.
At the
Shell>prompt, enter, for example,FS1:\efi\vms\vms_bootmgr.
The VSI Boot Manager screen should now be displayed.
At the
BOOTMGR>prompt, enterDEVICES. All VMS bootable devices will be listed.At the
BOOTMGR>prompt, enterBOOT <system_disk_name>, where <system_disk_name> is the disk that you specified as the target disk for the OpenVMS installation (in this step). The OpenVMS volume label for the device should be identified as the one you used for your target device, not for the CD-ROM/DVD device. In this example, we will enterBOOT DKA0. The system will boot up, runAUTOGEN, then automatically perform a shutdown, and reboot. Please take note of, and investigate, any warnings thatAUTOGENmay display.When you see the
BOOTMGR>prompt again, typeDEVICESto show what bootable devices are available, then enterBOOT <system_disk_name>one more time and wait for the system to boot. Press Enter when you see an output similar to the one below, indicating the completion of the OpenVMS boot process:
At the
Username:prompt, type insystem.At the
Password:prompt, enter in the password that you had previously set for the SYSTEM account (see this step).You have successfully installed OpenVMS. If you did not register any of your licenses during installation (which is recommended), you must do so now.
You can register your PAKs in one of two ways:
Use the
SYS$UPDATE:VMSLICENSE.COMprocedure to enter the data for each PAK individually.Create a COM file, copy the contents of all your PAKs into it, and then execute the file by entering
@fileName.COM.
Starting with VSI OpenVMS V9.2-3, if you already have a license COM file on another machine on your network, you can transfer it to the machine where you just installed OpenVMS. This is enabled by the Installation OE license that is now automatically installed with OpenVMS. Note, however, that this also requires a properly configured and functioning network. For more information see Section 1.4.1, ''Installation Operating Environment''.
After you have registered your licenses, you must enter the
LICENSE LOADcommand (or reboot your VM) in order to be able to use the installed products.
You have successfully installed OpenVMS and registered your licenses. If you chose not to configure OpenSSH and TCP/IP services automatically during installation, you must manually configure these products or verify the configuration now. Following the instructions in Chapter 4, "Networking Options".
3.2. Upgrading to VSI OpenVMS x86-64 V9.2-3
This section describes how to upgrade to OpenVMS V9.2-3 from OpenVMS V9.2-2 or E9.2-3. Upgrading from an earlier version of OpenVMS is not possible, a fresh install of OpenVMS V9.2-3 must be performed in that case.
Warning
If you are using VSI OpenVMS V9.2-1 and want to upgrade to VSI OpenVMS V9.2-3, you must upgrade to VSI OpenVMS V9.2-2 first.
Warning
Before performing the upgrade, ensure that the system disk is properly dismounted from all other nodes in the cluster.
Failure to follow this precaution may result in getting the following error messages on the reboot after the installation:
%SYSINIT-E- unable to mount the system disk
%SYSINIT-E- error mounting system device
status = 0072832C
.
.
.
** Bugcheck code = 0000036C: PROCGONE, Process not in system
It is not possible to upgrade VSI OpenVMS on a shadowed system disk, the procedure will always fail. You will need to disable shadowing on the system disk before you can upgrade the operating system.
If you are utilizing a non-shadowed system disk, you can proceed directly to the upgrade procedure Section 3.2.2, ''Upgrading a Non-Shadowed System Disk''.
3.2.1. Creating a Non-Shadowed Target Disk From a Shadowed Disk
This section describes how to disable shadowing on an existing shadowed system disk, so that it can be used as a target disk for the upgrade.
Caution
VSI strongly recommends that you make a backup copy of the system disk before upgrading it.
To disable shadowing on a system disk, follow these steps:
Enter the command
@SYS$SYSTEM:SHUTDOWNto shut down the system booted from the shadowed system disk that you want to upgrade.The system will ask you several questions. Give appropriate answers, but make sure to answer
NOwhen asked for permission to perform an automatic reboot.Once you have shut down the system, you will need to perform a conversational (interactive) boot of the system disk that you want to upgrade. Begin the process by entering the following command at the UEFI Shell prompt:
Shell> fsn:\efi\vms\vms_bootmgrwhere
fsnis the file system associated with the shadowed system disk device that you want to upgrade. If you do not know which file system you need, enter the commandmap fs*to display all file systems available on your VM and look for the one associated with the shadowed system disk that you want to upgrade.Once you have selected the file system that you want to work with (for example,
fs1) and entered the command mentioned in the previous step, you will see theBOOTMGR>prompt.On the boot manager startup screen, you will see the default boot command template, similar to the following:
DEFAULT BOOT COMMAND: BOOT your_device 0xnn 0Xnnnnnnnnwhere
0xnnstands for the root and0Xnnnnnnnnstands for the flags that you can specify.To perform a conversational boot, you must boot from your system disk with the root set to 0 and the boot flag set to 1. To do so, enter the following command, which is based on the template that you saw on your boot manager screen (bear in mind that yours might be slightly different):
BOOTMGR> BOOT your_device 0 1You will see the
SYSBOOT>prompt.At the
SYSBOOT>prompt, enter the following command to disable volume shadowing on your system disk:SYSBOOT> SET SHADOW_SYS_DISK 0
At the
SYSBOOT>prompt, enterCONTINUEto resume the boot procedure.After the boot completes, log in to the SYSTEM account.
Shutdown the system by entering the command:
$ @SYS$SYSTEM:SHUTDOWNWhen asked whether an automatic system reboot should be performed, answer
NO.
You now have a non-shadowed system disk that you can use for the upgrade. Go to Section 3.2.2, ''Upgrading a Non-Shadowed System Disk'' to begin the upgrade procedure.
3.2.2. Upgrading a Non-Shadowed System Disk
To upgrade to VSI OpenVMS x86-64 V9.2-3 from VSI OpenVMS x86-64 V9.2-2 and E9.2-3, follow these steps:
Download, unzip, and copy the VSI OpenVMS x86-64 V9.2-3 ISO file to an area that is locally accessible to your hypervisor.
Note
VSI recommends that you make a backup copy of the system disk and shut down the OpenVMS operating system before you start the upgrade procedure.
In your virtual machine management application, select the virtual machine that you want to upgrade to VSI OpenVMS x86-64 V9.2-3 and power it off. Then, bring up the screen to edit its settings.
Find the CD-ROM/DVD device that your virtual machine is using and change the ISO file associated with the optical drive to the V9.2-3 ISO file.
Save the changes and close the settings window.
Power on your VM. Depending on your hypervisor of choice and the boot options settings of the VM, you will either see the UEFI
Shell>prompt:or the VSI Boot Manager screen:
If you see the UEFI
Shell>prompt, do the following:At the
Shell>prompt, entermap fs*to display the file systems available on your VM.Locate the file system that maps to the VSI OpenVMS V9.2-3 ISO file. Since that ISO has been set up as a CD-ROM, the file system that maps to it will be labeled as CDROM as well. As an example, we will assume that the file system we want is FS0.
- At the
Shell>prompt, enter the following command:FS0:\efi\vms\vms_bootmgr
After this, you should see the VSI Boot Manager screen.
If you plan to use the Guest Console instead of a serial port, enable the Guest Console now by entering the command:
BOOTMGR> OPA0
At the
BOOTMGR>prompt, typeDEVICESto display the list of available VMS-bootable devices.Note
In certain scenarios, the list of devices displayed at this moment might be inaccurate. If the list does not include the device that contains the ISO file with the new version of VSI OpenVMS, type
EXITand, immediately after that, repeatedly press the Esc key on your keyboard until you see the KVM boot manager screen. Once you see that screen, select the Continue option and press Enter. Then, typeDEVICESat theBOOTMGR>prompt again. Now, the list should be correct.From the list, identify the device that contains the ISO file with the new version of VSI OpenVMS (it will be labelled as a CD-ROM or DVD) and enter
BOOT <device-name>. As an example,BOOT DKA200. After the progress meter reaches 100%, what you see depends on whether you are using the Guest Console or not. If you are using a serial port, you should see the following screen:In this case, continue with the next step.
If you are using the Guest Console, you should see the installation menu now. In this case, go to step 11.
Establish a remote connection to your VM via a terminal emulator. There are various methods to establish a remote connection. One of them is to connect via Telnet using the IP address of the host system and the serial port of your VM. However, if this method does not work for you, you can also use named pipes.
In the serial port setup of your VM guest and in your terminal utility, define your named pipe as
\\.\pipe\pipe_name, wherepipe_nameis simply a unique name you provide. Using named pipes requires that your terminal utility reside on your VM host system. To use named pipes over a different network node, you will need to use a Named Pipe Proxy server.When theBOOTMGR>prompt appears, your terminal emulator should automatically connect to your VM. However, if that does not happen, you can initiate command output to the serial port manually by entering the command:BOOTMGR> COM nwhere n is the serial port number that your VM uses.Warning
If you are utilizing VMware Workstation or VMware Fusion as your hypervisor, be advised that virtual serial port support is not available via the GUI. For more information, refer to the Release Notes.
Note
If you are working on KVM, you can establish a secure connection to the host via SSH, then create serial ports and connect to them using
virshcommands. For details, see the official documentation for your Linux distribution.If you are on ESXi, make sure that the port used by your VM can go through the ESXi firewall. If you are having trouble at this stage, contact the ESXi administator in your company.
Upon connecting, you should see the
Enter CHOICE or ? for help: (1/2/3/4/5/6/7/8/9/?)prompt.Note
If this prompt does not appear, and the output appears blank or unchanging, press Enter. The prompt should now appear. To see the OpenVMS installation menu, type
?, hit Enter, then hit Enter again.Important
VSI OpenVMS x86-64 V9.2-3 does not support installation menu items number 3, 5, and 7. Also, do not use item number 6, unless directly instructed otherwise.
If VSI X86VMS OPENSSH V8.9-1G or earlier version is not currently installed on your system, skip this step.
Important
When upgrading to VSI OpenVMS V9.2-3, the procedure will abort if the VSI X86VMS OPENSSH V8.9-1G or earlier product is currently installed on your system. Additional issues may occur if VSI OpenSSH has not been properly configured.
Before you go on, make sure you know the name of the system disk you want to upgrade. If you do not know the system disk, follow the steps below.
In the VSI OpenVMS installation menu, select
8 - Execute DCL commands and procedures.- At the
$$$prompt, type the following command to display the list of available disks:show devices dk
If you are unsure which system disk to upgrade, you may need to mount each of the local disks individually until you locate the desired one. That system disk will be referred to as <system_disk> later on in these instructions.
Type
LOGOUTto return to the VSI OpenVMS installation menu.
To uninstall VSI x86VMS OpenSSH V8.9-1G or earlier product, perform the following procedure:
In the VSI OpenVMS installation menu, enter
6 - Remove installed products.At the prompt for the target disk, enter the disk name for the <system disk> that you will be upgrading.
Accept the default answer for the detailed description prompt.
You will see a list of installed products. Enter the item number that represents the VSI X86VMS OPENSSH V8.9-1G or earlier product.
Answer
YESto theDo you want to continue?question.Important: Answer
NOto each of theDo you want to terminate?questions.When the product is removed, you will see the
Press Return to continue...prompt. Press Enter.You will see the VSI OpenVMS installation menu.
- During an OpenVMS upgrade, if you have VSI OpenSSH V8.9-1H01 installed on your system, you will see a message similar to the following:
%PCSI-E-EXERMVFAIL, product supplied EXECUTE REMOVE procedure failed -CREATE-E-DIRNOTCRE, !AS directory file not created %PCSI-E-OPFAILED, operation failed Terminating is strongly recommended. Do you want to terminate? [YES]
Ignore this message. AnswerNOand continue the upgrade procedure as normal. Enter
1to start the upgrade procedure.Since this is an upgrade and not a fresh installation, answer
PRESERVEto theDo you want to INITIALIZE or to PRESERVE?question.At the
Enter device name for target disk:prompt, enter the name of the disk where your current version of VSI OpenVMS is installed. If you are not sure which disk that is, enter??to display a list of the disks with volume names.You will see a message stating the current label of the selected disk. Specify whether you want to keep the label or change it.
If your system does not have any patches installed that have recovery data available, skip to the next step.
If your system does have at least one such patch installed, you will see an output informing you of which patches have recovery data available. Then, you will see the
Do you want to continue?prompt. AnswerYES.At this stage, the system will output a list of installed products and state how each of the products is going to be handled by the upgrade procedure.
If DECnet-Plus is not installed on your system, you will see a prompt to install it. The answer is up to you. Note that if you have DECnet IV installed and choose to install DECnet Plus, DECnet IV will be removed.
Give an answer to the
Do you always want detailed descriptions?question. In this example, we will answerNO.The product kit validation will proceed and then the configuration phase starts. You will then see the
Do you want the defaults for all options?question. If you answerYES(which is recommended), the following components will be installed or performed automatically:DECdtm Distributed Transaction Manager
Support for DECnet-Plus or DECnet (Phase IV) for OpenVMS
Programming Support:
Debugger Utility
Image Dump Utility
Macro libraries
MACRO-32 Migration Compiler
TLB intermediary form of STARLET
C Header Files
VMS text libraries of Ada declarations
RMS Journaling Recovery Utility
System Programming Support:
Delta Debugger
System Dump Analyzer Utility
Miscellaneous Symbol Table Files
Utilities:
Phone Utility
XPG4 Internationalization Utilities
World-Wide PostScript Printing Subsystem
Bliss Require Files
Example Files
Message Facility Files (HELP/MESSAGE)
UETP Files
DECwindows Server Support:
DECwindows Workstation files
Video fonts:
100 dots-per-inch video fonts
Euro base support
Euro 100 dots-per-inch video fonts
Delete any obsolete OpenVMS files
Delete files archived by OpenVMS remedial kits
However, if you prefer not to install some of these components, answer
NO, and the system will prompt you about installing each component individually. If any subcomponent is not desired, you must first choose to install the main component, and then will be asked about each subcomponent. In most cases, this level of customization is no longer necessary and may destroy some important system components. It is recommended to avoid this unless absolutely required.Note
Depending on what other components are currently installed or not installed on your system, you might get additional prompts asking for your consent to install them.
As the configuration phase starts and progresses, some of the products may require the system to be rebooted. If you see the
Can the system be REBOOTED after the installation completes?question, always answer YES, because answering NO will abort the upgrade.Once the upgrade procedure has configured the layered products and their options, you will see the
Do you want to review the options?prompt. The answer is entirely up to you. As an example, we will answerNO.As the execution phase starts and progresses, you will see several PCSI messages along with the
Do you want to continue?prompt for one or more of the products that will be installed. AnswerYESto all such prompts.After the
Portion donemeter reaches 100%, you will see the list of installed and uninstalled products followed by post-installation information for some of them. Once the system updates the memory disk (which may take a minute), the upgrade procedure is complete. You will see thePress Return to continue...prompt. Press Enter.You will see the VSI OpenVMS installation menu and the
Enter CHOICE or ? for help: (1/2/3/4/5/6/7/8/9/?)prompt. Enter9to shut down the system.The system will shut down and display the
**** Hit any key to reboot system ****prompt. Press any key to reboot the system.Depending on your hypervisor of choice, you will either see the VSI Boot Manager screen, or the UEFI screen. If you see the VSI Boot Manager screen, proceed to the next step.
If you see the UEFI
Shell>prompt, do the following:At the
Shell>prompt, entermap fs*to display all the file systems available on your VM.Find the file system for the newly upgraded system disk. If the correct file system is not readily apparent, use the file system for the CD-ROM device which had the installation ISO mapped to it.
At the
Shell>prompt, enter, for example,FS1:\efi\vms\vms_bootmgr
The VSI Boot Manager screen should now be displayed.
At the
BOOTMGR>prompt, typeDEVICESto display the list of available VMS-bootable devices.At the
BOOTMGR>prompt, enterBOOT <system_disk_name>, where <system_disk_name> is the disk that you specified as the target disk for the OpenVMS upgrade (in this step). The OpenVMS volume label for the device should be identified as the one you used for your target device, not for the CDROM/DVD device. In this example, we will enterBOOT DKA0. The system will boot up, runAUTOGEN, then automatically perform a shutdown and reboot. Please take note of, and investigate, any warnings thatAUTOGENmay display.When you see the
BOOTMGR>prompt again, typeDEVICESto show what bootable devices are available, then enterBOOT <system_disk_name>one more time and wait for the system to boot. Press Enter when you see an output similar to the one below:Log into the system.
Now you should register your new licenses, if necessary. To do so, you can either use the SYS$UPDATE:VMSLICENSE.COM procedure to enter the data for each license individually, or you can create a COM file, copy all of your license scripts into it, and then execute the file by entering
@fileName.COM. After you have registered your licenses, you must enter theLICENSE LOADcommand or reboot your VM.
You have successfully upgraded to VSI OpenVMS x86-64 V9.2-3.
Chapter 4. Networking Options
This chapter provides information about networking options and instructions for configuring DECnet Phase IV, VSI TCP/IP Services, and VSI OpenSSH on OpenVMS x86-64 V9.2-3.
4.1. Setting Up DECnet Phase IV
If you chose to install DECnet Phase IV, you must configure this software using the NETCONFIG command procedure. For more information, see the DECnet for OpenVMS Guide to Networking.
Once you have configured DECnet Phase IV, edit SYS$COMMON:[SYSMGR]SYSTARTUP_VMS.COM so that the software starts when the system reboots. You can have the software start interactively or in batch mode by making one of the following changes:
Locate and uncomment the line:
$!$ START/NETWORK DECNET
So it now appears as:
$ START/NETWORK DECNET
To start the network in a batch job (speeds up startup), locate and uncomment the line:
$!$ SUBMIT SYS$MANAGER:STARTNET.COM
So it now appears as:
$ SUBMIT SYS$MANAGER:STARTNET.COM
For more DECnet Phase IV documentation, visit VSI Documentation Portal.
4.2. Configuring VSI TCP/IP Services
This section provides information on configuring VSI TCP/IP Services 6.0 with a dynamic IP address provided by a DHCP server. This setup is only necessary if the automatic configuration option was not selected during installation, and you now are planning to configure the system to use a DHCP address.
Important
The procedure below assumes you already have a network with a running DHCP server. It also assumes that your virtual machine is running and you have established a connection to the machine via a terminal emulator.
To configure VSI TCP/IP Services and DHCP, follow these steps:
At the
$prompt, enter@TCPIP$CONFIG.From the
Configuration optionsmenuSelect
1 - Core environment.From the
VSI TCP/IP Services for OpenVMS Core Environment Configuration MenuSelect
2 – Interfaces.From the
VSI TCP/IP Services for OpenVMS Interface & Address Configuration Menu.Select
1 - IE0 Menu (EIA0: TwistedPair 1000mbps).From the
VSI TCP/IP Services for OpenVMS Interface IE0 Configuration Menu (Node: MIKEY):Select
3 - Enable DHCP client to manage address on IE0.Answer
YESto theConfigure IE0 as the DHCP PRIMARY? (Y,N,HELP)question.From the
DHCP_CLIENT configuration options:Select
1 - Enable service on this node.Exit the
VSI TCP/IP Services for OpenVMS Interface & Address Configuration Menu.Exit the
VSI TCP/IP Services for OpenVMS Core Environment Configuration Menu.Exit the
VSI TCP/IP Services for OpenVMS Configuration Menu.Optional: To make sure everything works correctly so far, ping a known IP address. Do not close your terminal emulator window.
4.3. Configuring VSI OpenSSH
After the installation has successfully completed, follow these steps:
Start OpenSSH SSH server by executing the following command:
$ @SYS$STARTUP:SSH$STARTUP
The name of the TCP/IP service for the OpenSSH SSH server is “SSHD<port>”, where <port> is the TCP port number the OpenSSH server is configured to listen on. For example, if OpenSSH is configured to listen on TCP port 222, the service name is SSHD222.
Include the commands displayed at the end of the installation procedure into the SYSTARTUP_VMS.COM file to ensure that OpenSSH components are correctly started when OpenVMS is booted. Details regarding the migration procedure initiated at the end of the installation are provided below.
To have all necessary symbols defined by the time of login, add the following command to either the system-wide login procedure (SYS$MANAGER:SYLOGIN.COM) or a user's LOGIN.COM procedure:
$ @SSH$ROOT:[BIN]SSH$DEFINE_COMMANDS.COM
Note
If you plan to allow users with SSH connected sessions to shutdown the system, do not invoke the SSH$SHUTDOWN.COM from within the site-specific SYS$MANAGER:SYSHUTDWN.COM procedure. The SSH shutdown will delete the process executing the shutdown and leave the system in an inconsistent state with logins and SSH disabled, along with some other parts of the system shutdown, but nothing left running to complete the shutdown or reboot.
Note
The command procedure SSH$ROOT:[BIN]SSH$DEASSIGN_COMMANDS.COM can be used to un-define these command symbols.
If SSH$DEFINE_COMMANDS.COM is run with the parameter "ALL" the
following additional commands will be defined. These commands are intended primarily for
administrative purposes:
SSHSTARTStarts and creates (if necessary) the OpenSSH services. Before running this command, check the file SSH$ROOT:[ETC]SSHD_CONFIG to ensure that the SSH server configuration details are correct. If you would like to modify the client configuration, edit the SSH$ROOT:[ETC]SSH_CONFIG file before starting the services.
SSHSTO*PStops OpenSSH services. If the parameter "
ALL" is specified, the service definitions will also be deleted from the TCP/IP configuration.SSHSH*OWShow details of running OpenSSH processes including SSH connections, number of connected clients, etc. Note that each client connection consists of two processes, namely a process named
SSHD_BGxxxxx(wherexxxxxis the number of the associated BG device) and a user process with a name that either matches the username or begins with the stringFTAxxx_followed by the username (for example,FTA110_SMITH). The name of the user process may of course be changed by the user.SSHVER*SIONDisplays the information about the various OpenSSH programs, including version details and other related data.
Note
When the TCP/IP service is restarted, the OpenSSH server may become unresponsive and stop accepting new connections. To restore the OpenSSH server after a TCP/IP restart, manually restart OpenSSH by executing the following command:
$ @SYS$STARTUP:SSH$STARTUP
Appendix A. Installing From a Web Server
VSI OpenVMS x86-64 V9.2-2 or higher can be installed from a web server. This feature can be useful when you have many installations to do for systems (both VMs and bare-metal) that may not have DVD readers.
Note
Web server based installation is not the method VSI prefers, but it provides an attractive option for many customers who may already be familiar with the procedures.
A.1. Web Server Preparation
Your internal company web server can be used to serve installations. Due to the variety of available web servers, this document will focus on general setup steps only. It is assumed that the web server is accessible to your VM host and that your guest's network configuration is able to access this same network.
The first two files listed below can be found in the EFI partition of any installed
VSI OpenVMS V9.2-2 (or higher) system disk at
fsx:\EFI\VMS\, or they can be copied from an
Installation Kit DVD.
Establish a
/netboot/directory on your web server.In binary mode, copy the following files from the VSI FTP server to your web server’s /netboot/ directory:
VMS_BOOTMGR.EFI - The Boot Manager
VMS_IMG.BMP - The Boot Manager background image (optional but nice to have)
{installation-kit}.ISO - The VSI OpenVMS Installation Kit
Note
If the host operating system does not recognize VSI OpenVMS file versions, you will need to rename the files to remove the semicolon and version numbers after copying them to your web server. Note also that some web servers are case-sensitive.
Once these files are posted to your web server, you must next prepare the target system/guest.
A.2. Virtual Machine Target System Preparation (VMS_KITBOOT)
Note
Web server based installation is not the VSI preferred installation method, but it
provides an attractive option for many customers who may already be familiar with
the procedures. The VMS_KITBOOT Utility is an optional
feature. This utility is available for download from VSI or it can be copied from
an
installed system. The utility is
loosely coupled to the Boot Manager's INSTALL button and command,
primarily intended to support future update procedures. If such web server access is
unwanted, instances of the file (VMS_KITBOOT.EFI) can be
deleted from the EFI Partition of bootable VSI OpenVMS disks. If the file is
deleted, the Boot Manager INSTALL button and command will simply
be non-functional.
UEFI firmware provides HTTP/S protocols to support connection to web servers. The legacy PXE (Pre-eXecution Environment) protocol is being phased out in favor of more capable boot protocols. The most popular of these protocols is known as iPXE. For more information about iPXE, refer to http://www.ipxe.org.
VSI provides a small UEFI-based web server boot utility based on iPXE protocol; the
utility is called VMS_KITBOOT.EFI. This file can be found in
the EFI partition of any installed VSI OpenVMS V9.2-2 (or higher) system disk at
fsx:\EFI\VMS\ or it can be copied from an
Installation Kit DVD. VSI Support can also provide this image upon request.
Note
VMS_KITBOOT requires that your target system/guest be located on a network segment which has a DHCP Server. If DHCP is not available, you cannot use this method. HPE DL systems can still use the WEBCLIENT method described earlier as it does not require DHCP.
VMS_KITBOOT.EFI automates most of the web server boot process. When launched from the UEFI Shell of your VM guest, the VMS_KITBOOT utility will identify your system hardware, configure a suitable network device, prompt for the IP address of your web server and handle the connection and download protocol for the Installation Kit. When VMS_KITBOOT has finished downloading the kit it will launch the VSI OpenVMS Boot Manager to boot the installation procedure.
Note
If these procedures, in addition to any firewall you might be using, present a security concern, you have the option of installing from a DVD image rather than a web server.
VMS_KITBOOT.EFI can be executed from any UEFI file system disk, for example fs0:. A simple way to do this is to copy the file onto a FAT-formatted USB stick assigned to your target system/guest. VM users can also use a pre-packaged Virtual Disk containing this file in common virtual disk formats.
- VMS_KITBOOT.VMDK
VirtualBox Virtual Disk containing the utility.
- VMS_KITBOOT.QCOW2
A KVM Virtual Disk containing the utility.
- VMS_KITBOOT.EFI
The utility by itself. Copy to a UEFI fsx: device or USB Stick.
Note
If you choose to use the .efi version, as opposed to a
pre-packaged virtual disk, you must create a USB stick containing
VMS_KITBOOT.EFI on a system that supports the FAT32
file system (such as a Windows PC) as this is the file system expected by UEFI. Or
if your guest already has access to another EFI partition, you can put this file in
that partition. If you already have another disk with VSI OpenVMS installed on it,
you can execute VMS_KITBOOT directly from the UEFI
Shell> prompt.
If you do not already have the file, FTP (in binary mode) the appropriate version of VMS_KITBOOT.xxx to your guest folder directory on the VM host. Each guest will require its own copy of VMS_KITBOOT, or you can share a hard drive containing the utility among multipleguests if they have a common host.
- When you start your guest and reach the UEFI Shell, launch VMS_KITBOOT using the following command:
Shell> vms_kitboot
VMS_KITBOOT will prompt you for the IPv4 (xx.xx.xx.xx) address of your web server and the full file path to the Installation Kit
/netboot/{kitfile}.iso. You can also use a named address (mywebserver.mycompany.com), but the use of numeric address will avoid a DNS lookup. The web server should respond by downloading the required installation images.For an initial web server based installation, one of the downloaded files is the full Installtion Kit (the .ISO file). This large file can take several minutes to download depending on the speed of your network. Once the file has been downloaded, the installation proceeds much faster than it would if each file were read individually.
Note
Installation and particularly installation over a network, requires sufficient physical memory to support UEFI firmware, the VMS_KITBOOT utility, the OpenVMS installation kit, the OpenVMS Boot Manager, and the installed operating system. Currently, 16GB is recommended and the minimum is 10GB.
If the download fails due to lack of memory, return to your guest setup and increase the amount of memory allocated to the guest. Once the installation completes, you can reduce the memory if you like.
When the download completes, the Boot Manager should appear and automatically initiate a boot of the Installation Kit. Note that the memory-resident Installation Kit image will appear as DMM1: to VSI OpenVMS during the installation.
Continue with the VSI OpenVMS Installation Menu.
Appendix B. Sample Installation and Upgrade Logs
This appendix provides a sample installation log for VSI OpenVMS x86-64 V9.2-3 installation.
Note
Depending on the choices that you make during the installation, as well as your hypervisor of choice, certain parts of your log might look different.
B.1. Sample Installation Log
Below is the sample installation log.
%%%%%%%%%%% VSI OpenVMS (tm) x86-64 Console %%%%%%%%%%%
_______________________________________________
THE GUEST CONSOLE HAS BEEN SUSPENDED
USE A TERMINAL UTILITY FOR OPA0 ACCESS
_______________________________________________
VSI Primary Kernel SYSBOOT
%SYSBOOT-I-VMTYPE, Booting as a VMware (tm) Guest
VMS Software, Inc. OpenVMS (TM) x86_64 Operating System, V9.2-3
Copyright 2024 VMS Software, Inc.
MDS Mitigation active, variant verw(MD_CLEAR)
%SMP-I-CPUTRN, CPU #1 has joined the active set.
%SMP-I-CPUTRN, CPU #5 has joined the active set.
%SMP-I-CPUTRN, CPU #2 has joined the active set.
%SMP-I-CPUTRN, CPU #3 has joined the active set.
%SMP-I-CPUTRN, CPU #4 has joined the active set.
Installing required known files...
Configuring devices...
%EIA0, Link up: 1000 mbit, 00-0C-29-80-62-C9
****************************************************************
You can install or upgrade the OpenVMS X86-64 operating system
or you can install or upgrade layered products that are included
on the OpenVMS X86-64 distribution media.
You can also execute DCL commands and procedures to perform
"standalone" tasks, such as backing up the system disk.
Please choose one of the following:
1) Upgrade, install or reconfigure OpenVMS X86-64 Version V9.2-3
2) Display layered products that this procedure can install
3) Install or upgrade layered products
4) Show installed products
5) Reconfigure installed products
6) Remove installed products
7) Find, Install or Undo patches; Show or Delete Recovery Data
8) Execute DCL commands and procedures
9) Shut down this system
Enter CHOICE or ? for help: (1/2/3/4/5/6/7/8/9/?) 1
***********************************************************
This procedure will ask a series of questions.
() - encloses acceptable answers
[] - encloses default answers
Type your response and press the <Return> key. Type:
? - to repeat an explanation
^ - to change prior input (not always possible)
Ctrl/Y - to exit the installation procedure
There are two choices for installation/upgrade:
Initialize - Removes all software and data files that were
previously on the target disk and installs OpenVMS X86-64.
Preserve -- Installs or Upgrades OpenVMS X86-64 on the target disk
and retains all other contents of the target disk.
* Note: You cannot use preserve to install OpenVMS X86-64 on a disk on
which any other operating system is installed. This includes
implementations of OpenVMS for other architectures.
Do you want to INITIALIZE or to PRESERVE? [PRESERVE] init
You must enter the device name for the target disk on which
OpenVMS X86-64 will be installed.
Enter device name for target disk: (? for choices) ?
Device Name Device Type Name Volume Label Size (blocks/xB)
------------ ------------------------- -------------- --------------------
DKA0: VMware Virtual disk
DKA300: VMware Virtual disk
For volume label and device size enter ??
Enter device name for target disk: (? for choices) DKA0
DKA0: is now labeled X86SYS.
Do you want to keep this label? (Yes/No) [Yes]
OpenVMS V9.0 and later requires that the target system disk be
initialized with On-Disk Structure Level 5 (ODS-5).
Hard links can be enabled on ODS-5 disks. WBEM Services for OpenVMS
does not require hard links. (? for more information)
Do you want to enable hard links? (Yes/No/?) y
You have chosen to install OpenVMS X86-64 on a new disk.
The target system disk, DKA0:, will be initialized
with structure level 5 (ODS-5).
Hard links WILL be enabled.
The disk will be labeled X86SYS.
Any data currently on the target system disk will be lost.
Is this OK? (Yes/No) y
Initializing and mounting target....
Creating page file....
Boot options in the EFI Boot Manager boot option menu can provide a
convenient way to boot your system. The installation procedure can
automatically create a new boot option (if none exists) or validate
existing boot options.
Do you want to create or validate boot options? (Yes/No) [Yes]
You must enter a password for the SYSTEM account.
The password must be a minimum of 15 characters in length, and
may not exceed 31 characters. It will be checked and verified.
The system will not accept passwords that can be guessed easily.
The password will not be displayed as you enter it.
Password for SYSTEM account:
Re-enter SYSTEM password for verification:
For your system to operate properly, you must set two parameters:
SCSNODE and SCSSYSTEMID.
SCSNODE can be from 1 to 6 letters or numbers. It must contain at
least one letter.
If you plan to use DECnet, SCSNODE must be the DECnet Phase IV
node name, or the DECnet-Plus (Phase V) node synonym.
If you have multiple OpenVMS systems, the SCSNODE on each system
must be unique.
Enter SCSNODE: ES4002
If you plan to use DECnet, SCSSYSTEMID must be set based on the
DECnet Phase IV address.
Do you plan to use DECnet? (Yes/No) [Yes]
DECnet Phase IV addresses are in the format
DECnet_area_number.DECnet_node_number
DECnet_area_number is a number between 1 and 63.
DECnet_node_number is a number between 1 and 1023.
If you plan to use DECnet WITHOUT Phase IV compatible addresses,
enter 0.0.
Enter DECnet (Phase IV) Address: [1.1] 1.617
SCSSYSTEMID will be set to 1641.
This was calculated as follows:
(DECnet_area_number * 1024) + DECnet_node_number
Configuring the Local Time Zone
TIME ZONE SPECIFICATION -- MAIN Time Zone Menu "*" indicates a menu
0* GMT
1* AFRICA 17) EST 33) IRAN 49) PORTUGAL
2* AMERICA 18) EST5EDT 34) ISRAEL 50) PRC
3* ANTARCTICA 19* ETC 35) JAMAICA 51) PST8PDT
4* ARCTIC 20* EUROPE 36) JAPAN 52) ROC
5* ASIA 21) FACTORY 37) KWAJALEIN 53) ROK
6* ATLANTIC 22) GB-EIRE 38) LIBYA 54) SINGAPORE
7* AUSTRALIA 23) GB 39) MET 55) TURKEY
8* BRAZIL 24) GMT-0 40* MEXICO 56) UCT
9* CANADA 25) GMT 41* MIDEAST 57) UNIVERSAL
10) CET 26) GMT0 42) MST 58* US
11* CHILE 27) GMTPLUS0 43) MST7MDT 59) UTC
12) CST6CDT 28) GREENWICH 44) NAVAJO 60) W-SU
13) CUBA 29) HONGKONG 45) NZ-CHAT 61) WET
14) EET 30) HST 46) NZ 62) ZULU
15) EGYPT 31) ICELAND 47* PACIFIC
16) EIRE 32* INDIAN 48) POLAND
Press "Return" to redisplay, enter "=" to search or "?" for help, or
Select the number above that best represents the desired time zone: 20
EUROPE Time Zone Menu "*" indicates a menu
0* RETURN TO MAIN TIME ZONE MENU
1) AMSTERDAM 18) HELSINKI 35) MOSCOW 52) STOCKHOLM
2) ANDORRA 19) ISLE_OF_MAN 36) NICOSIA 53) TALLINN
3) ASTRAKHAN 20) ISTANBUL 37) OSLO 54) TIRANE
4) ATHENS 21) JERSEY 38) PARIS 55) TIRASPOL
5) BELFAST 22) KALININGRAD 39) PODGORICA 56) ULYANOVSK
6) BELGRADE 23) KIEV 40) POLAND 57) UZHGOROD
7) BERLIN 24) KIROV 41) PORTUGAL 58) VADUZ
8) BRATISLAVA 25) KYIV 42) PRAGUE 59) VATICAN
9) BRUSSELS 26) LISBON 43) RIGA 60) VIENNA
10) BUCHAREST 27) LJUBLJANA 44) ROME 61) VILNIUS
11) BUDAPEST 28) LONDON 45) SAMARA 62) VOLGOGRAD
12) BUSINGEN 29) LUXEMBOURG 46) SAN_MARINO 63) WARSAW
13) CHISINAU 30) MADRID 47) SARAJEVO 64) ZAGREB
14) COPENHAGEN 31) MALTA 48) SARATOV 65) ZAPOROZHYE
15) DUBLIN 32) MARIEHAMN 49) SIMFEROPOL 66) ZURICH
16) GIBRALTAR 33) MINSK 50) SKOPJE
17) GUERNSEY 34) MONACO 51) SOFIA
Press "Return" to redisplay, enter "=" to search or "?" for help, or
Select the number above that best represents the desired time zone: 14
You selected EUROPE / COPENHAGEN as your time zone.
Is this correct? (Yes/No) [YES]: y
Configuring the Time Differential Factor (TDF)
Default Time Differential Factor for standard time is 1:00.
Default Time Differential Factor for daylight saving time is 2:00.
The Time Differential Factor (TDF) is the difference between your
system time and Coordinated Universal Time (UTC). UTC is similar
in most respects to Greenwich Mean Time (GMT).
The TDF is expressed as hours and minutes, and should be entered
in the hh:mm format. TDFs for the Americas will be negative
(-3:00, -4:00, etc.); TDFs for Europe, Africa, Asia and Australia
will be positive (1:00, 2:00, etc.).
This time zone supports daylight saving time.
Is this time zone currently on daylight saving time? (Yes/No): n
Enter the Time Differential Factor [1:00]:
NEW SYSTEM TIME DIFFERENTIAL FACTOR = 1:00
Is this correct? [Y]:
The target disk of this installation may be set up
to automatically configure the TCP/IP network stack
as a DHCP client, and to start up TCP/IP and SSH when
the system is booted.
If this option is chosen: The TCP/IP and SSH start up
procedures will be run by the operating system provided
start up command procedure that runs SYSTARTUP_VMS.COM.
The TCP/IP and SSH start up procedures will be executed
before SYSTARTUP_VMS.COM is executed.
A DHCP server is required.
Do you want to automatically configure and start up TCP/IP & SSH? (Yes/No) [No]
If you have Product Authorization Keys (PAKs) to register,
you can register them now.
Do you want to register any Product Authorization Keys? (Yes/No) [Yes] n
The following products are part of the OpenVMS installation;
they will be installed along with the OpenVMS operating system:
o Availability Manager (base) for OpenVMS X86-64
o TCP/IP Services for OpenVMS X86-64
o KERBEROS for OpenVMS X86-64
o SSL3 V3.0-15 for OpenVMS X86-64 (based on OpenSSL V3.0.15)
o SSL111 V1.1-1W for OpenVMS X86-64 (based on OpenSSL V1.1.1w)
o OpenSSH for OpenVMS X86-64
o 64-bit PERL for OpenVMS X86-64
You can also install the following optional products along with the
OpenVMS operating system:
o DECwindows Motif for OpenVMS X86-64
o DECnet-Plus for OpenVMS X86-64
o DECnet Phase IV for OpenVMS X86-64
If you want to change your selections, you can do so later in the
installation by answering "NO" to the following question:
"Do you want the defaults for all options?"
Do you want to install DECwindows Motif for OpenVMS X86-64 V1.8-2?
(Yes/No) [Yes]
The DECnet-Plus kit is provided with the OpenVMS operating system kit.
DECnet Phase IV applications are supported by DECnet-Plus.
DECnet Phase IV is also provided as an option.
If you install DECnet-Plus and TCP/IP you can run DECnet
applications over a TCP/IP network. Please refer to the
VSI DECnet-Plus for OpenVMS Planning Guide for information
on running DECnet over TCP/IP.
Do you want to install DECnet-Plus for OpenVMS X86-64 V9.2-G?
(Yes/No) [Yes]
The installation operation can provide brief or detailed descriptions.
In either case, you can request the detailed descriptions by typing ?.
Do you always want detailed descriptions? (Yes/No) [No]
Performing product kit validation of signed kits ...
%PCSI-I-VSIVALPASSED, validation of DMM1:[VMS$COMMON]VSI-X86VMS-VMS-V0902-3-2.PC
ucceeded
%PCSI-I-VSIVALPASSED, validation of DMM1:[KITS.DWMOTIF_SUPPORT_X860923_KIT]VSI-X
PORT-V0902-3-1.PCSI$COMPRESSED;1 succeeded
%PCSI-I-VSIVALPASSED, validation of DMM1:[KITS.AVAIL_MAN_BASE_KIT]VSI-X86VMS-AVA
-3-1.PCSI$COMPRESSED;1 succeeded
%PCSI-I-VSIVALPASSED, validation of DMM1:[KITS.TCPIP]VSI-X86VMS-TCPIP-V0600-26-1
1 succeeded
%PCSI-I-VSIVALPASSED, validation of DMM1:[KITS.SSL3]VSI-X86VMS-SSL3-V0300-15-1.P
succeeded
%PCSI-I-VSIVALPASSED, validation of DMM1:[KITS.KERBEROS]VSI-X86VMS-KERBEROS-V030
SSED;1 succeeded
%PCSI-I-VSIVALPASSED, validation of DMM1:[KITS.SSL111]VSI-X86VMS-SSL111-V0101-1W
D;1 succeeded
%PCSI-I-VSIVALPASSED, validation of DMM1:[KITS.OPENSSH]VSI-X86VMS-OPENSSH-V0809-
SED;1 succeeded
%PCSI-I-VSIVALPASSED, validation of DMM1:[KITS.PERL540]VSI-X86VMS-PERL540-V0540-
ED;1 succeeded
%PCSI-I-VSIVALPASSED, validation of DMM1:[KITS.DWMOTIF]VSI-X86VMS-DWMOTIF-V0108-
ED;1 succeeded
%PCSI-I-VSIVALPASSED, validation of DMM1:[KITS.DECNET_PLUS]VSI-X86VMS-DECNET_PLU
COMPRESSED;1 succeeded
%PCSI-I-VSIVALPASSED, validation of DMM1:[KITS.DECNET_PHASE_IV_X860923_KIT]VSI-X
E_IV-V0902-3-1.PCSI$COMPRESSED;1 succeeded
The following product has been selected:
VSI X86VMS OPENVMS V9.2-3 Platform (product suite)
Configuration phase starting ...
You will be asked to choose options, if any, for each selected product and for
any products that may be installed to satisfy software dependency requirements.
Configuring VSI X86VMS OPENVMS V9.2-3: OPENVMS and related products Platform
Copyright 2015-2024 VMS Software, Inc.
VMS Software, Inc.
Do you want the defaults for all options? [YES]
Availability Manager (base) for OpenVMS X86-64
TCP/IP Services for OpenVMS X86-64
* Product VSI X86VMS TCPIP V6.0-26 requires a system reboot.
* Product VSI X86VMS AVAIL_MAN_BASE V9.2-3 recommends a system reboot.
Can the system be REBOOTED after the installation completes? [YES]
KERBEROS for OpenVMS X86-64
SSL3 V3.0-15 for OpenVMS X86-64 (based on OpenSSL V3.0.15)
SSL111 V1.1-1W for OpenVMS X86-64 (based on OpenSSL V1.1.1w)
OpenSSH for OpenVMS X86-64
64-bit PERL for OpenVMS X86-64
Do you want to review the options? [NO]
Execution phase starting ...
The following products will be installed to destinations:
VSI X86VMS AVAIL_MAN_BASE V9.2-3 DISK$X86SYS:[VMS$COMMON.]
VSI X86VMS DECNET_PLUS V9.2-G DISK$X86SYS:[VMS$COMMON.]
VSI X86VMS DWMOTIF V1.8-2 DISK$X86SYS:[VMS$COMMON.]
VSI X86VMS DWMOTIF_SUPPORT V9.2-3 DISK$X86SYS:[VMS$COMMON.]
VSI X86VMS KERBEROS V3.3-3 DISK$X86SYS:[VMS$COMMON.]
VSI X86VMS OPENSSH V8.9-1J DISK$X86SYS:[VMS$COMMON.]
VSI X86VMS OPENVMS V9.2-3 DISK$X86SYS:[VMS$COMMON.]
VSI X86VMS PERL540 V5.40-0 DISK$X86SYS:[VMS$COMMON.]
VSI X86VMS SSL111 V1.1-1W DISK$X86SYS:[VMS$COMMON.]
VSI X86VMS SSL3 V3.0-15 DISK$X86SYS:[VMS$COMMON.]
VSI X86VMS TCPIP V6.0-26 DISK$X86SYS:[VMS$COMMON.]
VSI X86VMS VMS V9.2-3 DISK$X86SYS:[VMS$COMMON.]
Portion done: 0%...10%...20%...30%...40%...50%...60%...70%
Restoring STARTUP.NSH file(s)...
No files restored
...80%...90%
%PCSI-I-PRCOUTPUT, output from subprocess follows ...
% - Execute SYS$MANAGER:TCPIP$CONFIG.COM to proceed with configuration of
% VSI TCP/IP Services for OpenVMS.
%
Portion done: 100%
The following products have been installed:
VSI X86VMS AVAIL_MAN_BASE V9.2-3 Layered Product
VSI X86VMS DECNET_PLUS V9.2-G Layered Product
VSI X86VMS DWMOTIF V1.8-2 Layered Product
VSI X86VMS DWMOTIF_SUPPORT V9.2-3 Layered Product
VSI X86VMS KERBEROS V3.3-3 Layered Product
VSI X86VMS OPENSSH V8.9-1J Layered Product
VSI X86VMS OPENVMS V9.2-3 Platform (product suite)
VSI X86VMS PERL540 V5.40-0 Layered Product
VSI X86VMS SSL111 V1.1-1W Layered Product
VSI X86VMS SSL3 V3.0-15 Layered Product
VSI X86VMS TCPIP V6.0-26 Layered Product
VSI X86VMS VMS V9.2-3 Operating System
VSI X86VMS OPENVMS V9.2-3: OPENVMS and related products Platform
VSI X86VMS TCPIP V6.0-26: VSI TCP/IP Services for OpenVMS.
VSI X86VMS SSL3 V3.0-15: SSL3 for OpenVMS X86-64 V3.0-15 (Based on OpenSSL
Insert the following lines in SYS$MANAGER:SYSTARTUP_VMS.COM:
@SYS$STARTUP:SSL3$STARTUP.COM
Insert the following lines in SYS$MANAGER:SYSHUTDWN.COM:
@SYS$STARTUP:SSL3$SHUTDOWN.COM
Review the Installation Guide and Release Notes for post install directi
Review the Installation Guide and Release Notes for post upgrade verific
.
Refer to SYS$HELP:SSL30-15-X86.RELEASE_NOTES for more information.
Check the release notes for current status of the product.
VSI X86VMS KERBEROS V3.3-3
Configure and set up Kerberos
If Kerberos will be run on this system, but has not been
used previously, you need to perform the following steps.
o Run the Kerberos configuration procedure:
@SYS$STARTUP:KRB$CONFIGURE.COM
o Add the following line to SYS$MANAGER:SYSTARTUP_VMS.COM:
$ @SYS$STARTUP:KRB$STARTUP
o Add the following line to SYS$MANAGER:SYLOGIN.COM:
$ @SYS$MANAGER:KRB$SYMBOLS
VSI X86VMS SSL3 V3.0-15: SSL3 for OpenVMS X86-64 V3.0-15 (Based on OpenSSL 3
Insert the following lines in SYS$MANAGER:SYSTARTUP_VMS.COM:
@SYS$STARTUP:SSL3$STARTUP.COM
Insert the following lines in SYS$MANAGER:SYSHUTDWN.COM:
@SYS$STARTUP:SSL3$SHUTDOWN.COM
Review the Installation Guide and Release Notes for post install direction
Review the Installation Guide and Release Notes for post upgrade verificat
Refer to SYS$HELP:SSL30-15-X86.RELEASE_NOTES for more information.
VSI X86VMS SSL111 V1.1-1W: SSL111 for OpenVMS X86-64 V1.1-1W (Based on OpenS
Review the Installation Guide and Release Notes for post install direction
Review the Installation Guide and Release Notes for post upgrade verificat
Refer to SYS$HELP:SSL111-W-X86.RELEASE_NOTES for more information.
VSI X86VMS PERL540 V5.40-0
Post-installation tasks are required for Perl for OpenVMS.
To use the Perl provided with this kit, run the following set-up
command procedure, assuming you installed in SYS$COMMON.
$ @sys$common:[perl-5_40]perl_setup.com
You may wish to put that command in SYS$MANAGER:SYLOGIN.COM to
make Perl available to all users on the system.
Perl includes its own help system called perldoc. Type
$ perldoc perldoc
for the documentation to perldoc itself. Type
$ perldoc perldelta
for the changes that are new in version V5.40-0 of Perl.
There are many Perl-related resources on the web; point your
browser at:
http://www.perl.org
to get started, and thank you for using Perl for OpenVMS.
VSI X86VMS DECNET_PLUS V9.2-G: DECnet-Plus V9.2-G for OpenVMS X86
Release notes are available in SYS$HELP:HPE_DECNET-Plus-V84.RELEASE_NOTES
DECNET_OSI.RELEASE_NOTES
%PCSI-I-SYSTEM_REBOOT, executing reboot procedure ...
Shutdown/reboot deferred when this product is
installed as part of the O/S installation/upgrade
%PCSI-I-SYSTEM_REBOOT, executing reboot procedure ...
Running SYS$UPDATE:SYS$MD.COM to update the memory disk...
Created memory disk DKA0:[VMS$COMMON.SYS$LDR]SYS$MD.DSK;1
- using 188528 blocks in 1 extent with 25683 spare blocks
- mounted on LDM5019: with volume label MD2430435F0A
- contains OpenVMS V9.2-3
%LD-I-UNIT, Allocated device is LDM5020:
%LMFINSTALL-I-SUCCESS, License installed with 6 units, Termination: 4-NOV-2024
The EFI Boot Manager menu includes multiple Boot Options
for DKA0:
Boot Options cannot be created or validated automatically.
Please use the OpenVMS X86-64 Boot Manager to ensure that you
have a valid Boot Option for this system.
You can run the OpenVMS X86-64 Boot Manager by choosing the DCL
option from the main menu and then execute this command:
$$$ @SYS$MANAGER:BOOT_OPTIONS
You can also execute this command from a properly privileged
account after booting your OpenVMS X86-64 system.
The installation is now complete.
When the newly installed system is first booted, a special
startup procedure will be run. This procedure will:
o Configure the system for standalone or OpenVMS Cluster operation.
o Run AUTOGEN to set system parameters.
o Reboot the system with the newly set parameters.
You may shut down now or continue with other operations.
Process X86VMS_INSTALL logged out at 30-OCT-2024 22:03:21.95
Press
                        Return to continue...
****************************************************************
You can install or upgrade the OpenVMS X86-64 operating system
or you can install or upgrade layered products that are included
on the OpenVMS X86-64 distribution media.
You can also execute DCL commands and procedures to perform
"standalone" tasks, such as backing up the system disk.
Please choose one of the following:
1) Upgrade, install or reconfigure OpenVMS X86-64 Version V9.2-3
2) Display layered products that this procedure can install
3) Install or upgrade layered products
4) Show installed products
5) Reconfigure installed products
6) Remove installed products
7) Find, Install or Undo patches; Show or Delete Recovery Data
8) Execute DCL commands and procedures
9) Shut down this system
Enter CHOICE or ? for help: (1/2/3/4/5/6/7/8/9/?) 9
Shutting down the system
VSI Dump Kernel - Handles Shutdown/Reboot/Crash Dumps
** Error logs not dumped, system disk is write locked.
SYSTEM SHUTDOWN COMPLETE
**** Hit any key to reboot
                        system ****
Restarting the system...
Attempting to start up from:
> EFI Virtual disk (0.0)... unsuccessful.
> EFI Internal Shell (Unsupported option)...
EFI Shell version 2.70 [1.0]
Current running mode 1.1.2
Device mapping table
fs0 :CDRom - Alias cd27a0a0 blk0
PciRoot(0x0)/Pci(0x11,0x0)/Pci(0x3,0x0)/Sata(0x0,0x0,0x0)/CDROM(0x0,0
fs1 :Removable HardDisk - Alias hd19a0b blk1
PciRoot(0x0)/Pci(0x10,0x0)/Scsi(0x0,0x0)/HD(1,GPT,11920D44-970A-11EF-,0x266530,0x3E800)
blk0 :CDRom - Alias cd27a0a0 fs0
PciRoot(0x0)/Pci(0x11,0x0)/Pci(0x3,0x0)/Sata(0x0,0x0,0x0)/CDROM(0x0,0
blk1 :Removable HardDisk - Alias hd19a0b fs1
PciRoot(0x0)/Pci(0x10,0x0)/Scsi(0x0,0x0)/HD(1,GPT,11920D44-970A-11EF-,0x266530,0x3E800)
blk2 :BlockDevice - Alias (null)
PciRoot(0x0)/Pci(0x11,0x0)/Pci(0x3,0x0)/Sata(0x0,0x0,0x0)
blk3 :Removable HardDisk - Alias (null)
PciRoot(0x0)/Pci(0x10,0x0)/Scsi(0x0,0x0)/HD(2,GPT,11920D43-970A-11EF-,0x30,0x266500)
blk4 :Removable HardDisk - Alias (null)
PciRoot(0x0)/Pci(0x10,0x0)/Scsi(0x0,0x0)/HD(3,GPT,11920D44-970A-11EF-,0x2A4D30,0x195B2AF)
blk5 :Removable BlockDevice - Alias (null)
PciRoot(0x0)/Pci(0x10,0x0)/Scsi(0x0,0x0)
Shell> FS1:Removable BlockDevice - Alias (null)
PciRoot(0x0)/Pci(0x10,0x0)/Scsi(0x3,0x0)
fs1:\> cd efi\vms
Press ESC in 2 seconds to skip startup.nsh, any other key to continue.
fs1:\EFI\VMS> vms_bootmgr
Scanning devices and preparing the OpenVMS Boot Manager Build 146...
VSI OpenVMS Boot Manager: V9.2-* Build 146
ENABLED: Symmetric Multi-Processing
ENABLED: Crash Dump Processing
ENABLED: Legacy Serial Port Console for remote COM 1
ENABLED: Using Environment ROM
Checking Required Processor Features: PASSED
VIRTUAL MACHINE GUEST:
VMware (tm) No Mouse support; Use Commands or Arrow Keys
BOOT MANAGER DEVICE: DKA0
DEFAULT BOOT COMMAND: BOOT DKA0 0x00 0x00000000
CONNECT A REMOTE TERMINAL SESSION NOW.
Enter the TERMINAL command for remote connection assistance.
BOOTMGR> DEVICES
BOOTABLE DEVICES:
B = BootMgr Device, V = Default VMS Boot Device. Set BOOTMGR flag for path info
BV DKA0 (HD) = FS0 UEFI: V9_2_3 VMS: X86SYS 14336 MB SCSI Disk
DKB0 (DVD) = FS1 UEFI: V9_2_3 VMS: None 1511 MB SATA DVD
BOOTMGR> BOOT DKA0
Booting...
%%%%%%%%%%% VSI OpenVMS (tm) x86-64 Console %%%%%%%%%%%
_______________________________________________
THE GUEST CONSOLE HAS BEEN SUSPENDED
USE A TERMINAL UTILITY FOR OPA0 ACCESS
_______________________________________________
VSI Primary Kernel SYSBOOT
%SYSBOOT-I-VMTYPE, Booting as a VMware (tm) Guest
VMS Software, Inc. OpenVMS (TM) x86_64 Operating System, V9.2-3
Copyright 2024 VMS Software, Inc.
MDS Mitigation active, variant verw(MD_CLEAR)
%DECnet-I-LOADED, network base image loaded, version = 05.92.07
%DECnet-W-ZEROLEN, length of file is zero -- SYS$SYSROOT:[SYSEXE]NET$CONFIG.DAT
%SMP-I-CPUTRN, CPU #4 has joined the active set.
%SMP-I-CPUTRN, CPU #2 has joined the active set.
%SMP-I-CPUTRN, CPU #1 has joined the active set.
%SMP-I-CPUTRN, CPU #5 has joined the active set.
%SMP-I-CPUTRN, CPU #3 has joined the active set.
Installing required known files...
Configuring devices...
%RUN-S-PROC_ID, identification of created process is 00000024
%STARTUP-E-NOPAGFIL, No page files have been successfully installed.
%SYSTEM-I-BOOTUPGRADE, security auditing disabled
%%%%%%%%%%% OPCOM 30-OCT-2024 23:02:54.88 %%%%%%%%%%%
Operator _ES4002$OPA0: has been enabled, username SYSTEM
%%%%%%%%%%% OPCOM 30-OCT-2024 23:02:54.88 %%%%%%%%%%%
Operator status for operator _ES4002$OPA0:
CENTRAL, PRINTER, TAPES, DISKS, DEVICES, CARDS, NETWORK, CLUSTER, SECURITY,
LICENSE, OPER1, OPER2, OPER3, OPER4, OPER5, OPER6, OPER7, OPER8, OPER9, OPER10,
OPER11, OPER12
%%%%%%%%%%% OPCOM 30-OCT-2024 23:02:54.91 %%%%%%%%%%%
Logfile has been initialized by operator _ES4002$OPA0:
Logfile is ES4002::SYS$SYSROOT:[SYSMGR]OPERATOR.LOG;1
%%%%%%%%%%% OPCOM 30-OCT-2024 23:02:54.91 %%%%%%%%%%%
Operator status for operator ES4002::SYS$SYSROOT:[SYSMGR]OPERATOR.LOG;1
CENTRAL, PRINTER, TAPES, DISKS, DEVICES, CARDS, NETWORK, CLUSTER, SECURITY,
LICENSE, OPER1, OPER2, OPER3, OPER4, OPER5, OPER6, OPER7, OPER8, OPER9, OPER10,
OPER11, OPER12
%%%%%%%%%%% OPCOM 30-OCT-2024 23:02:55.14 %%%%%%%%%%%
Message from user SYSTEM on ES4002
%JBC-E-OPENERR, error opening SYS$COMMON:[SYSEXE]QMAN$MASTER.DAT;
%%%%%%%%%%% OPCOM 30-OCT-2024 23:02:55.15 %%%%%%%%%%%
Message from user SYSTEM on ES4002
-RMS-E-FNF, file not found
%SYSTEM-I-BOOTUPGRADE, security server not started
%SYSTEM-I-BOOTUPGRADE, ACME server not started
%%%%%%%%%%% OPCOM 30-OCT-2024 23:02:55.31 %%%%%%%%%%%
Message from user SYSTEM on ES4002
TDF-I-SETTDF TDF set new timezone differential
NET$STARTUP, Network not started due to UPGRADE boot
%SYSTEM-I-BOOTUPGRADE, Coordinated Startup not performed
%EIA0, Link up: 1000 mbit, 00-0C-29-80-62-C9
AUTOGEN will now be run to compute the new system parameters. The system
will then shut down and reboot, and the installation or upgrade will be
complete.
After rebooting you can continue with such system management tasks as:
Configuring networking software (TCP/IP Services, DECnet, other)
Using SYS$MANAGER:CLUSTER_CONFIG.COM to create an OpenVMS Cluster
Creating FIELD, SYSTEST and SYSTEST_CLIG accounts if needed
%AUTOGEN-I-BEGIN, GETDATA phase is beginning.
%AUTOGEN-I-NEWFILE, Previous contents of SYS$SYSTEM:CLU$PARAMS.DAT have
been copied to SYS$SYSTEM:CLU$PARAMS.OLD. You may wish to purge
SYS$SYSTEM:CLU$PARAMS.OLD.
%AUTOGEN-I-NEWFILE, Previous contents of SYS$SYSTEM:CLU$PARAMS.DAT have
been copied to SYS$SYSTEM:CLU$PARAMS.OLD. You may wish to purge
SYS$SYSTEM:CLU$PARAMS.OLD.
%AUTOGEN-I-NEWFILE, Previous contents of SYS$SYSTEM:CLU$PARAMS.DAT have
been copied to SYS$SYSTEM:CLU$PARAMS.OLD. You may wish to purge
SYS$SYSTEM:CLU$PARAMS.OLD.
%AUTOGEN-I-NEWFILE, A new version of SYS$SYSTEM:PARAMS.DAT has been created.
You may wish to purge this file.
%AUTOGEN-I-END, GETDATA phase has successfully completed.
%AUTOGEN-I-BEGIN, GENPARAMS phase is beginning.
%AUTOGEN-I-NEWFILE, A new version of SYS$MANAGER:VMSIMAGES.DAT has been created.
You may wish to purge this file.
%AUTOGEN-I-NEWFILE, A new version of SYS$SYSTEM:SETPARAMS.DAT has been created.
You may wish to purge this file.
%AUTOGEN-I-END, GENPARAMS phase has successfully completed.
%AUTOGEN-I-BEGIN, GENFILES phase is beginning.
%SYSGEN-I-CREATED, SYS$SYSROOT:[SYSEXE]SYS$ERRLOG.DMP;2 created
%SYSGEN-I-CREATED, DKA0:[SYS0.SYSEXE]SYSDUMP.DMP;1 created
Extending DKA0:[SYS0.SYSEXE]SYSDUMP.DMP to 16246490 blocks will take
approximately 80 seconds. Please wait ...
%SYSGEN-I-EXTENDED, DKA0:[SYS0.SYSEXE]SYSDUMP.DMP;1 extended
... done.
******************
%AUTOGEN-W-REPORT, Warnings were detected by AUTOGEN. Please review the
information given in the file SYS$SYSTEM:AGEN$PARAMS.REPORT
******************
%AUTOGEN-I-REPORT, AUTOGEN has produced some informational messages which
have been stored in the file SYS$SYSTEM:AGEN$PARAMS.REPORT. You may
wish to review the information in that file.
%AUTOGEN-I-END, GENFILES phase has successfully completed.
%AUTOGEN-I-BEGIN, SETPARAMS phase is beginning.
%SYSGEN-W-SETMAX, value set to maximum for parameter GH_EXEC_CODE
%%%%%%%%%%% OPCOM 30-OCT-2024 23:05:54.10 %%%%%%%%%%%
Message from user SYSTEM on ES4002
%SYSGEN-I-WRITECUR, CURRENT system parameters modified by process ID 00000023 in
to file SYS$SYSROOT_MD:[SYSEXE]X86_64VMSSYS.PAR;2
%AUTOGEN-I-SYSGEN, parameters modified
%AUTOGEN-I-END, SETPARAMS phase has successfully completed.
%AUTOGEN-I-BEGIN, REBOOT phase is beginning.
The system is shutting down to allow the system to boot with the
generated site-specific parameters and installed images.
The system will automatically reboot after the shutdown and the
upgrade will be complete.
SHUTDOWN -- Perform an Orderly System Shutdown
on node ES4002
%SHUTDOWN-I-BOOTCHECK, performing reboot consistency check...
%SHUTDOWN-I-CHECKOK, basic reboot consistency check completed
%SHUTDOWN-I-OPERATOR, this terminal is now an operator's console
%SHUTDOWN-I-DISLOGINS, interactive logins will now be disabled
%SET-I-INTSET, login interactive limit = 0, current interactive value = 0
%SHUTDOWN-I-STOPQUEUES, the queues on this node will now be stopped
%%%%%%%%%%% OPCOM 30-OCT-2024 23:05:54.54 %%%%%%%%%%%
Message from user SYSTEM on ES4002
%JBC-E-OPENERR, error opening SYS$COMMON:[SYSEXE]QMAN$MASTER.DAT;
%%%%%%%%%%% OPCOM 30-OCT-2024 23:05:54.54 %%%%%%%%%%%
Message from user SYSTEM on ES4002
-RMS-E-FNF, file not found
SHUTDOWN message on ES4002 from user SYSTEM at ES4002 Batch 23:05:54
ES4002 will shut down in 0 minutes; back up soon. Please log off node ES4002.
Reboot system with AUTOGENerated parameters
%SHUTDOWN-I-STOPUSER, all user processes will now be stopped
%SHUTDOWN-I-STOPCPU, the secondary processors will now be stopped
%SMP-I-CPUTRN, CPU #1 was removed from the active set.
%SMP-I-CPUTRN, CPU #2 was removed from the active set.
%SMP-I-CPUTRN, CPU #3 was removed from the active set.
%SMP-I-CPUTRN, CPU #4 was removed from the active set.
%SMP-I-CPUTRN, CPU #5 was removed from the active set.
%SHUTDOWN-I-REMOVE, all installed images will now be removed
%SET-I-PSXROOSET, system POSIX root set to SYS$SYSDEVICE:[000000]
%SHUTDOWN-I-DISMOUNT, all volumes will now be dismounted
%%%%%%%%%%% OPCOM 30-OCT-2024 23:05:54.80 %%%%%%%%%%%
Message from user SYSTEM on ES4002
STARTUP, ES4002 shutdown was requested by the operator.
VSI Dump Kernel - Handles Shutdown/Reboot/Crash Dumps
** Dumping error logs to the system disk (ES4002$DKA0:)
** Error logs dumped to ES4002$DKA0:[SYS0.SYSEXE]SYS$ERRLOG.DMP
** (used 36 out of 128 available blocks)
Restarting the system...
Attempting to start up from:
> EFI Virtual disk (0.0)... unsuccessful.
> EFI Internal Shell (Unsupported option)...
EFI Shell version 2.70 [1.0]
Current running mode 1.1.2
Device mapping table
fs0 :CDRom - Alias cd27a0a0 blk0
PciRoot(0x0)/Pci(0x11,0x0)/Pci(0x3,0x0)/Sata(0x0,0x0,0x0)/CDROM(0x0,0
fs1 :Removable HardDisk - Alias hd19a0b blk1
PciRoot(0x0)/Pci(0x10,0x0)/Scsi(0x0,0x0)/HD(1,GPT,11920D44-970A-11EF-,0x266530,0x3E800)
blk0 :CDRom - Alias cd27a0a0 fs0
PciRoot(0x0)/Pci(0x11,0x0)/Pci(0x3,0x0)/Sata(0x0,0x0,0x0)/CDROM(0x0,0
blk1 :Removable HardDisk - Alias hd19a0b fs1
PciRoot(0x0)/Pci(0x10,0x0)/Scsi(0x0,0x0)/HD(1,GPT,11920D44-970A-11EF-,0x266530,0x3E800)
blk2 :BlockDevice - Alias (null)
PciRoot(0x0)/Pci(0x11,0x0)/Pci(0x3,0x0)/Sata(0x0,0x0,0x0)
blk3 :Removable HardDisk - Alias (null)
PciRoot(0x0)/Pci(0x10,0x0)/Scsi(0x0,0x0)/HD(2,GPT,11920D43-970A-11EF-,0x30,0x266500)
blk4 :Removable HardDisk - Alias (null)
PciRoot(0x0)/Pci(0x10,0x0)/Scsi(0x0,0x0)/HD(3,GPT,11920D44-970A-11EF-,0x2A4D30,0x195B2AF)
blk5 :Removable BlockDevice - Alias (null)
PciRoot(0x0)/Pci(0x10,0x0)/Scsi(0x0,0x0)
Shell> :Removable BlockDevice - Alias (null)
Shell> FS1:PciRoot(0x0)/Pci(0x10,0x0)/Scsi(0x3,0x0)
fs1:\> cd efi\vmsconds to skip startup.nsh, any other key to continue.
fs1:\EFI\VMS> vms_bootmgr
Scanning devices and preparing the OpenVMS Boot Manager Build 146...
VSI OpenVMS Boot Manager: V9.2-* Build 146
ENABLED: Symmetric Multi-Processing
ENABLED: Crash Dump Processing
ENABLED: Legacy Serial Port Console for remote COM 1
ENABLED: Using Environment ROM
Checking Required Processor Features: PASSED
VIRTUAL MACHINE GUEST:
VMware (tm) No Mouse support; Use Commands or Arrow Keys
BOOT MANAGER DEVICE: DKA0
DEFAULT BOOT COMMAND: BOOT DKA0 0x00 0x00000000
CONNECT A REMOTE TERMINAL SESSION NOW.
Enter the TERMINAL command for remote connection assistance.
BOOTMGR> DEVICES
BOOTABLE DEVICES:
B = BootMgr Device, V = Default VMS Boot Device. Set BOOTMGR flag for path info
BV DKA0 (HD) = FS0 UEFI: V9_2_3 VMS: X86SYS 14336 MB SCSI Disk
DKB0 (DVD) = FS1 UEFI: V9_2_3 VMS: None 1511 MB SATA DVD
BOOTMGR> BOOT DKA0
Booting...
%%%%%%%%%%% VSI OpenVMS (tm) x86-64 Console %%%%%%%%%%%
_______________________________________________
THE GUEST CONSOLE HAS BEEN SUSPENDED
USE A TERMINAL UTILITY FOR OPA0 ACCESS
_______________________________________________
VSI Primary Kernel SYSBOOT
%SYSBOOT-I-VMTYPE, Booting as a VMware (tm) Guest
VMS Software, Inc. OpenVMS (TM) x86_64 Operating System, V9.2-3
Copyright 2024 VMS Software, Inc.
MDS Mitigation active, variant verw(MD_CLEAR)
%DECnet-I-LOADED, network base image loaded, version = 05.92.07
%DECnet-W-ZEROLEN, length of file is zero -- SYS$SYSROOT:[SYSEXE]NET$CONFIG.DAT
%SMP-I-CPUTRN, CPU #2 has joined the active set.
%SMP-I-CPUTRN, CPU #5 has joined the active set.
%SMP-I-CPUTRN, CPU #4 has joined the active set.
%SMP-I-CPUTRN, CPU #3 has joined the active set.
%SMP-I-CPUTRN, CPU #1 has joined the active set.
%STDRV-I-STARTUP, OpenVMS startup begun at 30-OCT-2024 23:07:31.49
%EIA0, Link up: 1000 mbit, 00-0C-29-80-62-C9
%RUN-S-PROC_ID, identification of created process is 00000404
%RUN-S-PROC_ID, identification of created process is 00000405
%SET-I-NEWAUDSRV, identification of new audit server process is 0000040B
%%%%%%%%%%% OPCOM 30-OCT-2024 23:07:33.64 %%%%%%%%%%%
Operator _ES4002$OPA0: has been enabled, username SYSTEM
%%%%%%%%%%% OPCOM 30-OCT-2024 23:07:33.64 %%%%%%%%%%%
Operator status for operator _ES4002$OPA0:
CENTRAL, PRINTER, TAPES, DISKS, DEVICES, CARDS, NETWORK, CLUSTER, SECURITY,
LICENSE, OPER1, OPER2, OPER3, OPER4, OPER5, OPER6, OPER7, OPER8, OPER9, OPER10,
OPER11, OPER12
%%%%%%%%%%% OPCOM 30-OCT-2024 23:07:33.68 %%%%%%%%%%%
Logfile has been initialized by operator _ES4002$OPA0:
Logfile is ES4002::SYS$SYSROOT:[SYSMGR]OPERATOR.LOG;2
%%%%%%%%%%% OPCOM 30-OCT-2024 23:07:33.68 %%%%%%%%%%%
Operator status for operator ES4002::SYS$SYSROOT:[SYSMGR]OPERATOR.LOG;2
CENTRAL, PRINTER, TAPES, DISKS, DEVICES, CARDS, NETWORK, CLUSTER, SECURITY,
LICENSE, OPER1, OPER2, OPER3, OPER4, OPER5, OPER6, OPER7, OPER8, OPER9, OPER10,
OPER11, OPER12
%%%%%%%%%%% OPCOM 30-OCT-2024 23:07:33.84 %%%%%%%%%%%
Message from user AUDIT$SERVER on ES4002
%AUDSRV-I-NEWSERVERDB, new audit server database created ( PC 00000000.8001A365)
%%%%%%%%%%% OPCOM 30-OCT-2024 23:07:33.87 %%%%%%%%%%%
Message from user SYSTEM on ES4002
%JBC-E-OPENERR, error opening SYS$COMMON:[SYSEXE]QMAN$MASTER.DAT;
%%%%%%%%%%% OPCOM 30-OCT-2024 23:07:33.87 %%%%%%%%%%%
Message from user SYSTEM on ES4002
-RMS-E-FNF, file not found
%%%%%%%%%%% OPCOM 30-OCT-2024 23:07:33.89 %%%%%%%%%%%
Message from user AUDIT$SERVER on ES4002
%AUDSRV-I-REMENABLED, resource monitoring enabled for journal SECURITY
%%%%%%%%%%% OPCOM 30-OCT-2024 23:07:33.97 %%%%%%%%%%%
Message from user AUDIT$SERVER on ES4002
%AUDSRV-I-NEWOBJECTDB, new object database created ( PC 00000000.8001FA80)
%%%%%%%%%%% OPCOM 30-OCT-2024 23:07:34.12 %%%%%%%%%%%
Message from user SYSTEM on ES4002
%ACME-I-SERVERSTART, ACME_SERVER starting
%%%%%%%%%%% OPCOM 30-OCT-2024 23:07:34.15 %%%%%%%%%%%
Message from user SYSTEM on ES4002
%SECSRV-I-SERVERSTARTINGU, security server starting up
%%%%%%%%%%% OPCOM 30-OCT-2024 23:07:34.15 %%%%%%%%%%%
Message from user SYSTEM on ES4002
%SECSRV-I-CIACRECLUDB, security server created cluster intrusion database
%%%%%%%%%%% OPCOM 30-OCT-2024 23:07:34.15 %%%%%%%%%%%
Message from user SYSTEM on ES4002
%SECSRV-I-CIASTARTINGUP, breakin detection and evasion processing now starting up
%%%%%%%%%%% OPCOM 30-OCT-2024 23:07:37.16 %%%%%%%%%%%
Message from user SYSTEM on ES4002
%SECSRV-I-PROXYSTARTINGUP, proxy processing now starting up
%%%%%%%%%%% OPCOM 30-OCT-2024 23:07:37.17 %%%%%%%%%%%
Message from user SYSTEM on ES4002
%SECSRV-E-NOPROXYDB, cannot find proxy database file NET$PROXY.DAT
%RMS-E-FNF, file not found
%%%%%%%%%%% OPCOM 30-OCT-2024 23:07:42.18 %%%%%%%%%%%
Message from user SYSTEM on ES4002
TDF-I-SETTDF TDF set new timezone differential
Copyright 2023 VMS Software, Inc.
%NET$STARTUP-W-NONETCONFIG, this node has not been configured to run DECnet-Plus
for OpenVMS
use SYS$MANAGER:NET$CONFIGURE.COM if you wish to configure DECnet
%NET$STARTUP-I-OPERSTATUS, DECnet-Plus for OpenVMS operational status is OFF
%DECdtm-F-NODECnet, the TP_SERVER process was not started because either:
o DECnet-Plus is not started or is not configured, or
o The SYS$NODE_FULLNAME logical name is not defined
This could be because when you installed DECnet-Plus and were prompted
for the system's full name, you specified a local name instead of a
DECdns or Domain name.
If you want to use DECdtm services, make sure that DECnet-Plus is started and
configured and that SYS$NODE_FULLNAME is defined, then use the following
command to start the TP_SERVER process:
$ @SYS$STARTUP:DECDTM$STARTUP.COM
%STARTUP-I-AUDITCONTINUE, audit server initialization complete
%%%%%%%%%%% OPCOM 30-OCT-2024 23:07:43.32 %%%%%%%%%%%
Message from user AUDIT$SERVER on ES4002
Security alarm (SECURITY) and security audit (SECURITY) on ES4002, system id: 16
41
Auditable event: Audit server starting up
Event time: 30-OCT-2024 23:07:43.29
PID: 00000403
Username: SYSTEM
The OpenVMS system is now executing the site-specific startup commands.
%%%%%%%%%%% OPCOM 30-OCT-2024 23:07:43.65 %%%%%%%%%%%
Message from user AUDIT$SERVER on ES4002
Security alarm (SECURITY) and security audit (SECURITY) on ES4002, system id: 16
41
Auditable event: Identifier added
Event time: 30-OCT-2024 23:07:43.65
PID: 00000403
Process name: STARTUP
Username: SYSTEM
Process owner: [SYSTEM]
Image name: ES4002$DKA0:[SYS0.SYSCOMMON.][SYSEXE]AUTHORIZE.EXE
Identifier name: SYS$NODE_ES4002
Identifier value: %X80010000
Attributes: none
Posix UID: -2
Posix GID: -2 (%XFFFFFFFE)
%UAF-I-RDBADDMSG, identifier SYS$NODE_ES4002 value %X80010000 added to rights da
tabase
%DECW$DEVICE-I-NODEVICE, no graphics devices found.
%%%%%%%%%%% OPCOM 30-OCT-2024 23:07:43.77 %%%%%%%%%%%
Message from user AUDIT$SERVER on ES4002
Security alarm (SECURITY) and security audit (SECURITY) on ES4002, system id: 16
41
Auditable event: Identifier added
Event time: 30-OCT-2024 23:07:43.77
PID: 00000403
Process name: STARTUP
Username: SYSTEM
Process owner: [SYSTEM]
Image name: ES4002$DKA0:[SYS0.SYSCOMMON.][SYSEXE]AUTHORIZE.EXE
Identifier name: DECW$WS_QUOTA
Identifier value: %X80010001
Attributes: none
Posix UID: -2
Posix GID: -2 (%XFFFFFFFE)
%UAF-I-RDBADDMSG, identifier DECW$WS_QUOTA value %X80010001 added to rights data
base
%%%%%%%%%%% OPCOM 30-OCT-2024 23:07:43.82 %%%%%%%%%%%
Message from user AUDIT$SERVER on ES4002
Security alarm (SECURITY) and security audit (SECURITY) on ES4002, system id: 16
41
Auditable event: Identifier added
Event time: 30-OCT-2024 23:07:43.82
PID: 00000403
Process name: STARTUP
Username: SYSTEM
Process owner: [SYSTEM]
Image name: ES4002$DKA0:[SYS0.SYSCOMMON.][SYSEXE]IMGDMP_RIGHTS.EXE
;1
Identifier name: IMGDMP$READALL
Identifier value: %X90390001
Attributes: none
Posix UID: -2
Posix GID: -2 (%XFFFFFFFE)
%PROCDUMP-I-CREATED, rights identifier IMGDMP$READALL successfully created
%%%%%%%%%%% OPCOM 30-OCT-2024 23:07:43.83 %%%%%%%%%%%
Message from user AUDIT$SERVER on ES4002
Security alarm (SECURITY) and security audit (SECURITY) on ES4002, system id: 16
41
Auditable event: Identifier added
Event time: 30-OCT-2024 23:07:43.83
PID: 00000403
Process name: STARTUP
Username: SYSTEM
Process owner: [SYSTEM]
Image name: ES4002$DKA0:[SYS0.SYSCOMMON.][SYSEXE]IMGDMP_RIGHTS.EXE
;1
Identifier name: IMGDMP$PROTECT
Identifier value: %X90390002
Attributes: RESOURCE
Posix UID: -2
Posix GID: -2 (%XFFFFFFFE)
%PROCDUMP-I-CREATED, rights identifier IMGDMP$PROTECT successfully created
%SET-I-INTSET, login interactive limit = 64, current interactive value = 0
%RUN-S-PROC_ID, identification of created process is 00000412
%%%%%%%%%%% OPCOM 30-OCT-2024 23:07:43.96 %%%%%%%%%%%
Message from user SYSTEM on ES4002
%SMHANDLER-S-STARTUP, server management event handler startup
SYSTEM job terminated at 30-OCT-2024 23:07:45.93
Accounting information:
Buffered I/O count: 3111 Peak working set size: 13824
Direct I/O count: 1790 Peak virtual size: 279232
Page faults: 4329 Mounted volumes: 0
Charged CPU time: 0 00:00:01.26 Elapsed time: 0 00:00:14.60B.2. Sample Upgrade Log
Below is the sample upgrade log.
You must enter 1, 2, 3, 4, 5, 6, 7, 8, 9 or ?!
Enter CHOICE or ? for help: (1/2/3/4/5/6/7/8/9/?) 1
***********************************************************
This procedure will ask a series of questions.
() - encloses acceptable answers
[] - encloses default answers
Type your response and press the <Return> key. Type:
? - to repeat an explanation
^ - to change prior input (not always possible)
Ctrl/Y - to exit the installation procedure
There are two choices for installation/upgrade:
Initialize - Removes all software and data files that were
previously on the target disk and installs OpenVMS X86-64.
Preserve -- Installs or Upgrades OpenVMS X86-64 on the target disk
and retains all other contents of the target disk.
* Note: You cannot use preserve to install OpenVMS X86-64 on a disk on
which any other operating system is installed. This includes
implementations of OpenVMS for other architectures.
Do you want to INITIALIZE or to PRESERVE? [PRESERVE]
You must enter the device name for the target disk on which
OpenVMS X86-64 will be installed.
Enter device name for target disk: (? for choices) ?
Device Name Device Type Name Volume Label Size (blocks/xB)
------------ ------------------------- -------------- --------------------
DKB0: VMware Virtual disk
DKB100: VMware Virtual disk
For volume label and device size enter ??
Enter device name for target disk: (? for choices) dkb0
DKB0: is now labeled 4012SYS.
Do you want to keep this label? (Yes/No) [Yes]
OpenVMS X86-64 will be upgraded on DKB0:.
Boot options in the EFI Boot Manager boot option menu can provide a
convenient way to boot your system. The installation procedure can
automatically create a new boot option (if none exists) or validate
existing boot options.
Do you want to create or validate boot options? (Yes/No) [Yes]
The following products are part of the OpenVMS installation;
if necessary they will be installed or upgraded along with the
OpenVMS operating system.
o Availability Manager (base) for OpenVMS X86-64
o TCP/IP Services for OpenVMS X86-64
o KERBEROS for OpenVMS X86-64
o SSL3 V3.0-15 for OpenVMS X86-64 (based on OpenSSL V3.0.15)
o SSL111 V1.1-1W for OpenVMS X86-64 (based on OpenSSL V1.1.1w)
o OpenSSH for OpenVMS X86-64
o 64-bit PERL for OpenVMS X86-64
If necessary, the following optional products will also be upgraded
along with the OpenVMS operating system.
o DECwindows Motif for OpenVMS X86-64
o DECnet-Plus for OpenVMS X86-64
o DECnet Phase IV for OpenVMS X86-64
If you want to add or delete optional products, you can do so later
in the upgrade by answering "NO" to the following question:
"Do you want the defaults for all options?"
Availability Manager (base) for OpenVMS X86-64
is installed on your system. It will be upgraded.
TCP/IP Services for OpenVMS X86-64
is installed on your system. It will be upgraded.
KERBEROS for OpenVMS X86-64
is installed on your system. It will be upgraded.
SSL3 V3.0-15 for OpenVMS X86-64 (based on OpenSSL V3.0.15)
is installed on your system. It will be upgraded.
SSL111 V1.1-1W for OpenVMS X86-64 (based on OpenSSL V1.1.1w) V1.1-1W
is already installed on your system. An upgrade is not required.
OpenSSH for OpenVMS X86-64
is installed on your system. It will be upgraded.
64-bit PERL for OpenVMS X86-64 is required.
It will be installed.
DECwindows Motif for OpenVMS X86-64
is installed on your system. It will be upgraded.
DECnet-Plus for OpenVMS X86-64
is installed on your system. It will be upgraded.
DECnet Phase IV for OpenVMS X86-64 is not installed on your system.
It will not be installed.
The installation operation can provide brief or detailed descriptions.
In either case, you can request the detailed descriptions by typing ?.
Do you always want detailed descriptions? (Yes/No) [No]
Preserving existing copies of STARTUP.NSH if found...
No STARTUP.NSH files were found in the EFI system partition file
Performing product kit validation of signed kits ...
%PCSI-I-VSIVALPASSED, validation of DMM1:[VMS$COMMON]VSI-X86VMS-VMS-V0902-3-2.PCSI$COMPRESSED;1 succeeded
%PCSI-I-VSIVALPASSED, validation of DMM1:[KITS.DWMOTIF_SUPPORT_X860923_KIT]VSI-X86VMS-DWMOTIF_SUPPORT-V0902-3-1.PCSI$COMPRESSED;1 succeeded
%PCSI-I-VSIVALPASSED, validation of DMM1:[KITS.AVAIL_MAN_BASE_KIT]VSI-X86VMS-AVAIL_MAN_BASE-V0902-3-1.PCSI$COMPRESSED;1 succeeded
%PCSI-I-VSIVALPASSED, validation of DMM1:[KITS.TCPIP]VSI-X86VMS-TCPIP-V0600-26-1.PCSI$COMPRESSED;1 succeeded
%PCSI-I-VSIVALPASSED, validation of DMM1:[KITS.SSL3]VSI-X86VMS-SSL3-V0300-15-1.PCSI$COMPRESSED;1 succeeded
%PCSI-I-VSIVALPASSED, validation of DMM1:[KITS.KERBEROS]VSI-X86VMS-KERBEROS-V0303-3-1.PCSI$COMPRESSED;1 succeeded
%PCSI-I-VSIVALPASSED, validation of DMM1:[KITS.SSL111]VSI-X86VMS-SSL111-V0101-1W-1.PCSI$COMPRESSED;1 succeeded
%PCSI-I-VSIVALPASSED, validation of DMM1:[KITS.OPENSSH]VSI-X86VMS-OPENSSH-V0809-1J-1.PCSI$COMPRESSED;1 succeeded
%PCSI-I-VSIVALPASSED, validation of DMM1:[KITS.PERL540]VSI-X86VMS-PERL540-V0540-0-1.PCSI$COMPRESSED;1 succeeded
%PCSI-I-VSIVALPASSED, validation of DMM1:[KITS.DWMOTIF]VSI-X86VMS-DWMOTIF-V0108-2-1.PCSI$COMPRESSED;1 succeeded
%PCSI-I-VSIVALPASSED, validation of DMM1:[KITS.DECNET_PLUS]VSI-X86VMS-DECNET_PLUS-V0902-G-1.PCSI$COMPRESSED;1 succeeded
%PCSI-I-VSIVALPASSED, validation of DMM1:[KITS.DECNET_PHASE_IV_X860923_KIT]VSI-X86VMS-DECNET_PHASE_IV-V0902-3-1.PCSI$COMPRESSED;1 succeeded
The following product has been selected:
VSI X86VMS OPENVMS V9.2-3 Platform (product suite)
Configuration phase starting ...
You will be asked to choose options, if any, for each selected product and for
any products that may be installed to satisfy software dependency requirements.
Configuring VSI X86VMS OPENVMS V9.2-3: OPENVMS and related products Platform
Copyright 2015-2024 VMS Software, Inc.
VMS Software, Inc.
Do you want the defaults for all options? [YES]
Availability Manager (base) for OpenVMS X86-64
TCP/IP Services for OpenVMS X86-64
* Product VSI X86VMS TCPIP V6.0-26 requires a system reboot.
* Product VSI X86VMS AVAIL_MAN_BASE V9.2-3 recommends a system reboot.
Can the system be REBOOTED after the installation completes? [YES]
KERBEROS for OpenVMS X86-64
SSL3 V3.0-15 for OpenVMS X86-64 (based on OpenSSL V3.0.15)
SSL111 V1.1-1W for OpenVMS X86-64 (based on OpenSSL V1.1.1w)
OpenSSH for OpenVMS X86-64
64-bit PERL for OpenVMS X86-64
Do you want to review the options? [NO]
Execution phase starting ...
The following products will be installed to destinations:
VSI X86VMS AVAIL_MAN_BASE V9.2-3 DISK$4012SYS:[VMS$COMMON.]
VSI X86VMS DECNET_PLUS V9.2-G DISK$4012SYS:[VMS$COMMON.]
VSI X86VMS DWMOTIF V1.8-2 DISK$4012SYS:[VMS$COMMON.]
VSI X86VMS DWMOTIF_SUPPORT V9.2-3 DISK$4012SYS:[VMS$COMMON.]
VSI X86VMS KERBEROS V3.3-3 DISK$4012SYS:[VMS$COMMON.]
VSI X86VMS OPENSSH V8.9-1J DISK$4012SYS:[VMS$COMMON.]
VSI X86VMS OPENVMS V9.2-3 DISK$4012SYS:[VMS$COMMON.]
VSI X86VMS PERL540 V5.40-0 DISK$4012SYS:[VMS$COMMON.]
VSI X86VMS SSL3 V3.0-15 DISK$4012SYS:[VMS$COMMON.]
VSI X86VMS TCPIP V6.0-26 DISK$4012SYS:[VMS$COMMON.]
VSI X86VMS VMS V9.2-3 DISK$4012SYS:[VMS$COMMON.]
The following products will be removed from destinations:
VMSPORTS X86VMS PERL534 T5.34-0 DISK$4012SYS:[VMS$COMMON.]
VSI X86VMS AVAIL_MAN_BASE V9.2-2 DISK$4012SYS:[VMS$COMMON.]
VSI X86VMS DECNET_PLUS V9.2-E DISK$4012SYS:[VMS$COMMON.]
VSI X86VMS DWMOTIF V1.8 DISK$4012SYS:[VMS$COMMON.]
VSI X86VMS DWMOTIF_SUPPORT V9.2-2 DISK$4012SYS:[VMS$COMMON.]
VSI X86VMS KERBEROS V3.3-2A DISK$4012SYS:[VMS$COMMON.]
VSI X86VMS OPENSSH V8.9-1G DISK$4012SYS:[VMS$COMMON.]
VSI X86VMS OPENVMS V9.2-2 DISK$4012SYS:[VMS$COMMON.]
VSI X86VMS SSL3 V3.0-11 DISK$4012SYS:[VMS$COMMON.]
VSI X86VMS TCPIP V6.0-23 DISK$4012SYS:[VMS$COMMON.]
VSI X86VMS VMS V9.2-2 DISK$4012SYS:[VMS$COMMON.]
Portion done: 0%
Device is DISK$4012SYS:[SYS0.SYSCOMMON.SYS$STARTUP], now upgrade remove running.
..
Unless you elect to retain them when prompted,
this utility will delete the following:
- OpenSSH configuration files.
- OpenSSH default OpenVMS accounts (SSH$SSH, SSH$SSHD).
Delete OpenSSH configuration files? [y/n]: [n]
Disabling TCPIP services...
No services found
Deleting SSH$ROOT: directory tree...
SSH$ROOT: directory tree successfully removed
from SYS$SYSDEVICE:[SYS0.SYSCOMMON.OPENSSH]
...10%...20%...30%...40%...50%...60%...70%
Restoring STARTUP.NSH file(s)...
No files restored
...80%...90%
%PCSI-I-PRCOUTPUT, output from subprocess follows ...
% - Execute SYS$MANAGER:TCPIP$CONFIG.COM to proceed with configuration of
% VSI TCP/IP Services for OpenVMS.
%
Portion done: 100%
The following products have been installed:
VSI X86VMS AVAIL_MAN_BASE V9.2-3 Layered Product
VSI X86VMS DECNET_PLUS V9.2-G Layered Product
VSI X86VMS DWMOTIF V1.8-2 Layered Product
VSI X86VMS DWMOTIF_SUPPORT V9.2-3 Layered Product
VSI X86VMS KERBEROS V3.3-3 Layered Product
VSI X86VMS OPENSSH V8.9-1J Layered Product
VSI X86VMS OPENVMS V9.2-3 Platform (product suite)
VSI X86VMS PERL540 V5.40-0 Layered Product
VSI X86VMS SSL3 V3.0-15 Layered Product
VSI X86VMS TCPIP V6.0-26 Layered Product
VSI X86VMS VMS V9.2-3 Operating System
The following products have been removed:
VMSPORTS X86VMS PERL534 T5.34-0 Layered Product
VSI X86VMS AVAIL_MAN_BASE V9.2-2 Layered Product
VSI X86VMS DECNET_PLUS V9.2-E Layered Product
VSI X86VMS DWMOTIF V1.8 Layered Product
VSI X86VMS DWMOTIF_SUPPORT V9.2-2 Layered Product
VSI X86VMS KERBEROS V3.3-2A Layered Product
VSI X86VMS OPENSSH V8.9-1G Layered Product
VSI X86VMS OPENVMS V9.2-2 Platform (product suite)
VSI X86VMS SSL3 V3.0-11 Layered Product
VSI X86VMS TCPIP V6.0-23 Layered Product
VSI X86VMS VMS V9.2-2 Operating System
VSI X86VMS OPENVMS V9.2-3: OPENVMS and related products Platform
VSI X86VMS TCPIP V6.0-26: VSI TCP/IP Services for OpenVMS.
VSI X86VMS SSL3 V3.0-15: SSL3 for OpenVMS X86-64 V3.0-15 (Based on OpenSSL 3.0.15)
Insert the following lines in SYS$MANAGER:SYSTARTUP_VMS.COM:
@SYS$STARTUP:SSL3$STARTUP.COM
Insert the following lines in SYS$MANAGER:SYSHUTDWN.COM:
@SYS$STARTUP:SSL3$SHUTDOWN.COM
Review the Installation Guide and Release Notes for post install directions.
Review the Installation Guide and Release Notes for post upgrade verification suggestions.
Refer to SYS$HELP:SSL30-15-X86.RELEASE_NOTES for more information.
Check the release notes for current status of the product.
VSI X86VMS KERBEROS V3.3-3
Configure and set up Kerberos
If Kerberos will be run on this system, but has not been
used previously, you need to perform the following steps.
o Run the Kerberos configuration procedure:
@SYS$STARTUP:KRB$CONFIGURE.COM
o Add the following line to SYS$MANAGER:SYSTARTUP_VMS.COM:
$ @SYS$STARTUP:KRB$STARTUP
o Add the following line to SYS$MANAGER:SYLOGIN.COM:
$ @SYS$MANAGER:KRB$SYMBOLS
VSI X86VMS SSL3 V3.0-15: SSL3 for OpenVMS X86-64 V3.0-15 (Based on OpenSSL 3.0.15)
Insert the following lines in SYS$MANAGER:SYSTARTUP_VMS.COM:
@SYS$STARTUP:SSL3$STARTUP.COM
Insert the following lines in SYS$MANAGER:SYSHUTDWN.COM:
@SYS$STARTUP:SSL3$SHUTDOWN.COM
Review the Installation Guide and Release Notes for post install directions.
Review the Installation Guide and Release Notes for post upgrade verification suggestions.
Refer to SYS$HELP:SSL30-15-X86.RELEASE_NOTES for more information.
VSI X86VMS PERL540 V5.40-0
Post-installation tasks are required for Perl for OpenVMS.
To use the Perl provided with this kit, run the following set-up
command procedure, assuming you installed in SYS$COMMON.
$ @sys$common:[perl-5_40]perl_setup.com
You may wish to put that command in SYS$MANAGER:SYLOGIN.COM to
make Perl available to all users on the system.
Perl includes its own help system called perldoc. Type
$ perldoc perldoc
for the documentation to perldoc itself. Type
$ perldoc perldelta
for the changes that are new in version V5.40-0 of Perl.
There are many Perl-related resources on the web; point your
browser at:
http://www.perl.org
to get started, and thank you for using Perl for OpenVMS.
VSI X86VMS DECNET_PLUS V9.2-G: DECnet-Plus V9.2-G for OpenVMS X86
Release notes are available in SYS$HELP:HPE_DECNET-Plus-V84.RELEASE_NOTES
and SYS$HELP:VSI_DECNET_OSI.RELEASE_NOTES
%PCSI-I-SYSTEM_REBOOT, executing reboot procedure ...
Shutdown/reboot deferred when this product is
installed as part of the O/S installation/upgrade
%PCSI-I-SYSTEM_REBOOT, executing reboot procedure ...
Running SYS$UPDATE:SYS$MD.COM to update the memory disk...
Created memory disk DKB0:[VMS$COMMON.SYS$LDR]SYS$MD.DSK;2
- using 188560 blocks in 1 extent with 25692 spare blocks
- mounted on LDM5673: with volume label MD2430424F9B
- contains OpenVMS V9.2-3
The EFI Boot Manager menu includes multiple Boot Options
for DKB0:
Boot Options cannot be created or validated automatically.
Please use the OpenVMS X86-64 Boot Manager to ensure that you
have a valid Boot Option for this system.
You can run the OpenVMS X86-64 Boot Manager by choosing the DCL
option from the main menu and then execute this command:
$$$ @SYS$MANAGER:BOOT_OPTIONS
You can also execute this command from a properly privileged
account after booting your OpenVMS X86-64 system.
The upgrade is now complete.
When the newly upgraded system is first booted, a special
startup procedure will be run. This procedure will:
o Run AUTOGEN to set system parameters.
o Reboot the system with the newly set parameters.
You may shut down now or continue with other operations.Appendix C. Using Physical Fibre Channel Devices As Data Disks
Starting with the V9.2-3 release, OpenVMS x86-64 supports the VMware VMDirectPath I/O feature, which allows VMware ESXi virtual machines to directly access the physical PCI devices of the host system, bypassing the virtualization layer. The use of this feature enables direct access to fibre channel disks, which can significantly improve the performance of shared data disks in a cluster.
Restrictions
Booting OpenVMS from a Fibre Channel disk is currently not possible.
The VMware VMDirectPath I/O feature is not compatible with the VMware vMotion feature.
To configure your VM to use physical Fibre Channel disks of the host system, complete the following steps:
Make sure that a supported Fibre Channel HBA (Host Bus Adapter) card is installed into your server and configured on your host system. OpenVMS V9.2-3 only supports the HPE SN1100Q Fibre Channel HBA. For information on how to install and configure a Fibre Channel HBA, refer to the documentation for your system hardware.
In the top-left part of the ESXi window, expand Host, then click Manage.
In the Manage area, switch to the Hardware tab, then click PCI Devices.
Select the devices that represent the ports of your Fibre Channel HBA and click Toggle passthrough.
Power off the VM that you are going to work with and bring up the Edit Settings window for it.
In the Edit Settings window, click Add other device, then PCI Device.
Click the drop-down list next to your new PCI device and select one of the ports of your Fibre Channel HBA.
Create as many PCI devices as there are ports on your Fibre Channel HBA and map each device to a different port.
On the left side of the Edit Settings window, click Memory, then enable the Reserve all guest memory (All locked) option.
Save the changes and close the Edit Settings window.
Power on your VM and boot OpenVMS.
Ensure that OpenVMS has access to the Fibre Channel HBA(s) on your host system by entering the following command:
$ SHOW DEVICE /FULL FG
You should see an output similar to the following:
Device FGA0:, device type YOUR_DEVICE, is online, shareable, error
              logging is enabled.

.
.
.

Device FGB0:, device type YOUR_DEVICE, is online, shareable, error
              logging is enabled.

.
.
.
Log into the management interface of your Fibre Channel storage device and map the volumes created there to the HBA that your VM is using. For information on how to create and map Fibre Channel volumes, refer to the documentation provided with your storage device.
Identify and configure the volumes you have mapped by entering the following command:
$ MCR SYSMAN IO AUTOCONFIGURE/LOG
You should see an output similar to the following:
%SYSMAN-I-OUTPUT, command execution on node MM2442
%IOGEN-I-PREFIX, searching for ICBM with prefix SYS$
%IOGEN-I-SCSIPOLL, scanning for devices through SCSI port PKA0
%IOGEN-I-SCSIPOLL, scanning for devices through SCSI port PKB0
%IOGEN-I-FIBREPOLL, scanning for devices through FIBRE port FGA0
%IOGEN-I-FIBREPOLL, scanning for devices through FIBRE port FGB0
When using VBox or VMware Workstation on Windows, be aware that Windows 11 has Hyper-V enabled by default, which can cause various issues.
Set this parameter if you intend to use a virtual serial port. Skip, if you plan to use the Guest Console.