VSI Datatrieve User Guide
- Software Version:
- VSI Datatrieve T7.4-3
- Operating System and Version:
- VSI OpenVMS Alpha Version 8.4-2L1 or higher
VSI OpenVMS IA-64 Version 8.4-1H1 or higher
VSI OpenVMS x86-64 Version 9.2-3 or higher
Preface
This manual explains the concepts and terminology of VSI Datatrieve. It discusses how to define domains, records, tables, and procedures and how to catalog them in the CDD/Repository Dictionary system. It describes various ways of managing data stored in RMS files, Oracle Rdb/VMS, and Oracle DBMS databases and how to retrieve information from them.
1. About VSI
VMS Software, Inc. (VSI) is an independent software company licensed by Hewlett Packard Enterprise to develop and support the OpenVMS operating system.
2. Intended Audience
This manual is intended for people who have no prior experience with Datatrieve. It provides information on the basic tasks of managing information with Datatrieve and can help you get started with Datatrieve applications.
3. Related Documents
For further information on the topics covered in this manual, you can refer to:
VSI Datatrieve Installation Guide
Describes the installation procedure for VSI Datatrieve. The manual also explains how to run User Environment Test Packages (UETPs), which test Datatrieve product interfaces, such as the interface between Datatrieve and Rdb/VMS.
VSI Datatrieve Reference Manual
Contains reference information for Datatrieve.
4. VSI Encourages Your Comments
You may send comments or suggestions regarding this manual or any VSI document by sending electronic mail to the following Internet address: <docinfo@vmssoftware.com>. Users who have VSI OpenVMS support contracts through VSI can contact <support@vmssoftware.com> for help with this product.
5. OpenVMS Documentation
The full VSI OpenVMS documentation set can be found on the VMS Software Documentation webpage at https://docs.vmssoftware.com.
6. Conventions
The following conventions are used in this manual:
| Convention | Meaning |
|---|---|
|
Ctrl/x |
A sequence such as Ctrl/x indicates that you must hold down the key labeled Ctrl while you press another key or a pointing device button. |
|
… |
A horizontal ellipsis in examples indicates one of the
following possibilities:
|
| ⋮ |
A vertical ellipsis indicates the omission of items from a code example or command format; the items are omitted because they are not important to the topic being discussed. |
|
() |
In command format descriptions, parentheses indicate that you must enclose the options in parentheses if you choose more than one. |
|
[] |
In command format descriptions, brackets indicate optional choices. You can choose one or more items or no items. Do not type the brackets on the command line. However, you must include the brackets in the syntax for OpenVMS directory specifications and for a substring specification in an assignment statement. |
|
| |
In command format descriptions, vertical bars separate choices within brackets or braces. Within brackets, the choices are options; within braces, at least one choice is required. Do not type the vertical bars on the command line. |
|
Bold type |
Bold type represents the name of an argument, an attribute, or a reason. It also represents the introduction of a new term. |
|
Italic type |
Italic type indicates important information, complete titles
of manuals, or variables. Variables include information that
varies in system output (Internal error
number), in command lines
( |
|
UPPERCASE TYPE |
Uppercase type indicates the name of a routine, the name of a file, or the abbreviation for a system privilege. |
|
|
Monospace type indicates code examples and interactive screen displays. In the C programming language, monospace type in text identifies the following elements: keywords, the names of independently compiled external functions and files, syntax summaries, and references to variables or identifiers introduced in an example. |
|
Bold monospace type indicates a command, command qualifier, or statement. |
|
- |
A hyphen at the end of a command format description, command line, or code line indicates that the command or statement continues on the following line. |
|
Numbers |
All numbers in text are assumed to be decimal unless otherwise noted. Nondecimal radixes—binary, octal, or hexadecimal—are explicitly indicated. |
7. References to Products
The Datatrieve documentation to which this manual belongs often refers to the following products by their abbreviated names:
Oracle Common Data Dictionary/Repository software is referred to as CDD/Repository.
VSI Datatrieve software is referred to as Datatrieve.
Oracle Rdb/VMS software is referred to as Rdb/VMS.
VSI Terminal Data Management System software is referred to as TDMS.
VSI Forms Management System software is referred to as FMS.
VSI DECforms software is referred to as DECforms.
This manual uses the terms relational database or relational source to refer to Oracle Rdb/VMS.
Part I. General Datatrieve Concepts
Chapter 1. Introduction to Datatrieve
Warning
The content of this manual does not yet reflect the VSI Datatrieve T7.4-3 migration from the Common Data Dictionary (CDD) to the VSI Data Dictionary (VDD).
The Datatrieve language is designed to simplify the tasks of data definition, management, and retrieval. This chapter introduces the basic elements of the Datatrieve language.
1.1. What Is Datatrieve?
Datatrieve is an interactive language and report-writing tool for managing information organized as collections of interrelated data (databases). You use Datatrieve to query and report on a database. Datatrieve can access three types of databases:
File-structured databases that you set up with Datatrieve, OpenVMS Record Management Services (RMS), or a programming language
Databases that you create using Oracle Rdb/VMS
Databases that you create using Oracle Database Management System (DBMS)
Datatrieve is a fourth-generation language. Its syntax is more similar to English than that of COBOL and BASIC, and it has a strong non-procedural aspect. It executes commands as you type them, and you can often simply tell Datatrieve what information you want by name, instead of specifying how to obtain that information.
Datatrieve lets you define records and store record definitions separately from the procedures that use them. You can then write any number of procedures that use the records you have defined, without redefining the record each time.
Datatrieve also lets you create data definitions, called view domains, that can access either a subset of the fields in one data file or a combination of fields from more than one file. View domains can help you reduce the number of statements that you have to write when retrieving data.
Datatrieve provides the same data storage capabilities that you have with other languages. It can store and retrieve data using existing data files of most types that are supported by RMS. It can also create sequential and multikey indexed files, but not relative files.
Datatrieve also handles other common language functions automatically, without the need for language statements. For instance, Datatrieve:
Finds data files, opens them, and performs input/output operations
Labels columns in an output display
Converts data types
Formats data for output
Handles conditions such as end-of-file and matching
As a result, you can save many lines of code, get applications running quickly, and have code that is more readable than languages such as COBOL or BASIC.
Using the Datatrieve Call Interface, you can include Datatrieve functions in a program written in another language. The Call Interface is used most often in two ways:
You can use the linkage section of your program to do file access entirely through Datatrieve. In this way, the calling program does not need to specify the structure of the data, and you do not need to relink programs when the data files change.
You can write a program that passes commands and statements to Datatrieve. The program can present the user with a customized interface, such as a menu. In this way, you can "hide" Datatrieve from users who do not know how to use its commands and statements.
Datatrieve does not give you all the options available with other languages. For example:
Datatrieve lets you set up data hierarchies such as the repeating fields generated by a COBOL OCCURS clause, although retrieving data from repeating fields is not as easy as retrieving data from other types of fields. Datatrieve does not have a system of subscripts or indexes that lets you explicitly specify an occurrence in a repeating field. Be sure you consider this fact before you decide to use the Datatrieve OCCURS clause.
The Datatrieve language does not contain clauses such as BLOCK SIZE and CONTIGUOUS BEST TRY that let you optimize files for best response time. If you are setting up or maintaining large data files, therefore, you should use the utilities provided by RMS to load and maintain these files. See Chapter 22, "Improving Datatrieve Performance" for more information on optimizing Datatrieve performance.
Datatrieve procedures are not compiled when they are stored. Every time you execute a Datatrieve procedure, Datatrieve processes each statement or command in sequential order, as if you were entering each one interactively. The advantage in using procedures, therefore, is more a matter of convenience than speed of execution.
Examples in this manual show you how to create your own file-structured databases and how to access data stored in Oracle DBMS and relational databases. The term database is sometimes used in other documentation to refer only to data stored by database management systems such as Oracle DBMS or the Oracle relational database products. For the remainder of this document, database is used to refer to data stored in files.
1.2. Commands and Statements
During an interactive Datatrieve session, you control Datatrieve operations by entering a series of commands and statements:
Commands let you define the Datatrieve basic data structures, such as domains, records, files, tables, and procedures. Datatrieve stores this information in the CDD/Repository dictionary. You can assign appropriate access privileges to different types of users to control access to dictionary data.
Statements, on the other hand, let you manage data by storing, modifying, and erasing records. You also use statements to retrieve and display selected data through precise queries.
Besides this difference in function, commands and statements also differ in structure:
A command consists of a keyword, which is the command name (such as
READYorSHOW), and may include other elements, such as additional keywords, dictionary path names, and definition clauses. You can enter commands only at Datatrieve command level, when you see the DTR> prompt. You cannot combine a command with another command or with a statement to form a compound command.A statement also consists of a keyword, which is the statement name, and may include other elements such as additional keywords, record selection expressions, value expressions, and Boolean expressions. Unlike commands, statements can be combined to form compound statements.
Statements and commands cannot use path names in place of given names. The
FINISHcommand is the only exception to this rule.
A compound statement is two or more
statements you combine in a BEGIN-END statement or a
THEN statement. You can use a compound statement anywhere
you can use a simple statement. Datatrieve executes each statement of a compound
statement in consecutive order.
Every Datatrieve command and statement consists of one or more of the following elements:
Command or statement name
Other keywords
Names, which identify items associated with values
Expressions, which specify values or create record streams
A terminator, which signals the end of a command or statement
A continuation character, which allows a command or statement to be continued on the next input line
A comment, which allows you to enter text with a command or statement
You can perform complex or repetitive tasks by nesting statements within other
statements. With the REPEAT, FOR, and
WHILE statements, you can form repeating loops. With the
IF-THEN-ELSE and CHOICE statements,
you can do conditional transfers or branching.
The VSI Datatrieve Reference Manual contains complete descriptions of the commands and statements of Datatrieve.
1.3. Command Files and Datatrieve Procedures
Most applications of Datatrieve involve sequences of commands and statements that recur regularly.
You can use OpenVMS command files in Datatrieve in much the same way you use Datatrieve procedures. There are three major differences between the two.
Procedures are stored in the data dictionary, and command files are stored in an OpenVMS directory.
Procedures are invoked by entering a colon and the procedure name, and command files are invoked by entering
@followed by the file name.Command file invocations are parsed by Datatrieve as commands and therefore cannot be included in
BEGIN-END,IF-THEN-ELSE, or other compound statements.
1.4. Character Set
Every element of a Datatrieve command or statement must be constructed of characters from the Datatrieve character set. The Sort Order Appendix in the VSI Datatrieve Reference Manual lists the characters in the Datatrieve character set.
Note
Datatrieve accepts lowercase letters as input but converts them to uppercase letters before analyzing the syntax of your input. Datatrieve preserves lowercase letters only in character string literals enclosed in quotation marks.
Similarly, Datatrieve treats hyphens as lowercase underscores. It accepts hyphens as input characters but converts them to underscores before analyzing the syntax of your input. To use the hyphen (-) as a minus sign, you must separate the two expressions in the subtraction with spaces. Otherwise, Datatrieve treats "-" as a hyphen.
1.5. Keywords
Most keywords are elements of commands or statements. In this manual, Datatrieve keywords are printed in uppercase letters.
Keywords are restricted to the positions shown in syntax formats of commands and statements. Do not use keywords as names of domains, records, fields, dictionary tables, domain tables, views, databases, database instances, collections, procedures, or variables.
You can create a unique set of custom-tailored keywords. You can define these keywords to be synonyms for Datatrieve keywords or to create your own.
See the DECLARE SYNONYM section in the
VSI Datatrieve Reference Manual for more information about these
methods of defining
synonyms.
1.6. Names
A Datatrieve name is a character string used to identify one of the following items:
|
Collection |
Dictionary table |
Field |
Procedure |
Variable |
|
Database |
Domain |
Plot |
Record |
View domain |
|
Database instance |
Domain table |
Port |
Table |
A Datatrieve name can be from 1 through 31 characters long and can contain letters, digits, hyphens (-), underscores (_) and dollar signs ($). Datatrieve names, however, must conform to the following set of restrictions:
Must begin with a letter.
Must end with a letter or digit.
Cannot be a keyword.
You can continue a name from one input line to another by typing a hyphen (-) and pressing Return. The following list shows some valid Datatrieve names:
- TOTAL_SALARY
- YACHTS
- PRICE_PER_POUND
- YEAR-TO-DATE_EARNINGS_FOR_1980
The following list shows some invalid Datatrieve names:
- TOTAL (Duplicates a keyword)
- 1980_EARNINGS (Does not begin with a letter)
- PRICE-PER-POUND($/LB) (Contains illegal characters)
- YEAR-TO-DATE_EARNINGS_FOR_FY_1980 (Contains too many characters)
1.7. Termination and Continuation Characters
Datatrieve has two termination characters, the semicolon (;) and the carriage return (Return), and a continuation character, the hyphen (-).
A terminator signals the end of a command or statement. The formal terminator in Datatrieve is the semicolon (;). You can enter several commands on the same input line if you separate each from the next with a semicolon. If you enter more than one command on an input line, Datatrieve does not begin processing those commands until you press the Return key.
Note
The semicolon is also used as part of the dictionary path name to denote versions of dictionary objects. The semicolon in the dictionary path name is always followed by the version number. An example of this format is CDD$TOP.HOLMES.YACHTS;1.
You can enter SET NO SEMICOLON to turn off the semicolon
requirement.
You can terminate commands and statements, except the
DEFINE and DELETE commands and the
DECLARE statement, by pressing the
Return key when the syntax of the command or statement is
complete.
If the SET PROMPT command is in effect and you press the
Return key before the syntax of a statement or command is
complete, Datatrieve prompts you for the next element in the syntax.
1.8. Entering Long Command Lines
You can make sure you will be able to continue your command by pressing the Return key at the following points in your command line:
After a comma
In the middle of a string of required keywords
In the middle of value expressions and Boolean expressions
After a hyphen (-) that is used as a continuation character
You can use the hyphen (-) at the end of an input line to continue your command or statement on the next input line. Datatrieve does not check the syntax of your input until you press the Return key at the end of a line that does not end with a hyphen. Therefore, if the command line you are entering ends in a hyphen, you must end the command line with a semicolon.
If an input line ends with a complete word, enter a space before typing the hyphen and pressing the Return key. If you do not enter a space after the complete word or at the beginning of the next line, Datatrieve considers the characters at the end of the first line and those at the beginning of the next to be one string of characters.
If you have to change input lines in the middle of a name, keyword, or any other character string, you must use a hyphen to shift your input to the next line. The maximum number of characters in an input line extended by hyphens is 255.
1.9. Comments
You can include a comment in an input line by preceding the comment with an exclamation point (!) and ending it by pressing the Return key. The comment can include any characters on your keyboard except escape and control characters.
You can also use the exclamation point in procedures and command files to document their functions. When you invoke a procedure that contains comments, Datatrieve suppresses the comments. The comments in procedures, however, are stored in the data dictionary as part of the procedure definition.
When you invoke a command file, Datatrieve displays the comment lines in the
command file if the SET VERIFY command is in effect. To
suppress the display, enter a SET NO VERIFY or SET
NOVERIFY command. See the section on the SET
command in the
VSI Datatrieve Reference Manual for more information.
1.10. Current Objects
The current Datatrieve object is the last
collection established using the FIND command, no matter what
you have readied in the meantime.
The current collection is known as CURRENT, so this name can be used in place of the name allotted (if there is one). Statements expecting a collection name will assume CURRENT if nothing else is provided.
1.11. Using Help
The Datatrieve HELP command provides on-line information
about the use of Datatrieve commands, statements, and language elements.
When you enter HELP or a question mark
(?) in response to the DTR> prompt, Datatrieve
displays a list of topics to choose from.
If you already know which topic you want, you can enter it on the same line as
the HELP command. For example, if you want information on
defining a domain, enter the HELP command as follows:
DTR> HELP DEFINE DOMAIN
Note
HELP ERROR follows somewhat different rules. See Section 1.11.1, ''Getting Help on Errors'' for information on how to use HELP
ERROR.
When you are in the help facility, press the PF2 key on the
auxiliary keypad or enter VIDEO as the topic. This displays
information on the screen-oriented Help facility and explains how to scan the
Datatrieve help messages. You can move through the text by using the arrow
keys:
Press the up and down arrows to scroll the help text backward and forward.
Press the left and right arrows to display the previous or next complete help screen.
You can type a question mark (?) to redisplay the current
help topics.
If you enter HELP HELP, Datatrieve displays more detailed
information on the HELP command.
When the topic you have selected contains subtopics, Datatrieve asks if you want information on a subtopic.
If you are at one of the subtopic levels of help, you can press the Return key to move up a level. The prompt displayed tells you at what level of help you are.
Enter Ctrl/Z to exit from help. This returns you to the Datatrieve prompt DTR>.
1.11.1. Getting Help on Errors
When Datatrieve displays an error message, you can type HELP
ERROR and Datatrieve displays the help text pertaining to that
error. For example:
DTR>FIND PERSONNEL"PERSONNEL" is not a readied source, collection, or list. DTR>HELP ERROR"PERSONNEL" is not a readied source, collection, or list. ERROR NOTDOMAIN EXPLANATION: The source for a Datatrieve collection must be a readied domain, relation, or DBMS record; a collection; or a list. USER ACTION: Check that you have spelled all names correctly. Ready the appropriate record source, if necessary, and reenter the statement. Topic? Ctrl/Z DTR>
Note
Datatrieve always gives you information on the last error you made, even if it was many commands ago.
If you have not made any error during a Datatrieve session, entering
HELP ERROR gives you a display of all the error
topics. To get the same display after you have made an error, you may enter
ERROR when you are at the Topic? prompt
in help.
1.11.2. Using Datatrieve Help in a DECwindows Environment
Datatrieve provides several ways of obtaining help in a DECwindows environment:
You can get help on any of the objects displayed in the main application window by following these steps:
Press MB1 and drag the pointer to the object on which you want help.
Hold down the Help key on the keyboard.
Release MB1.
This spawns a separate DECwindows help window on your screen. You can select the Help menu for information on using help in a DECwindows environment and for information on each of the menus, objects, and menu items in the Datatrieve main application window.
You can get help on Datatrieve terms by typing the
HELPcommand at the DTR> prompt. If you invoke help this way, Datatrieve spawns a separate DECterm window that displays a list of the Datatrieve help topics.Before you can perform any help-related operations in the window, you may find that you have to set input focus to your help window by clicking on the window.
The DECterm window that contains your Datatrieve help can remain on your screen throughout your Datatrieve session.
Note that you cannot use the resize button in the DECterm help window. If you want to adjust the size of this help window display, you must use the
SET HELP_LINEScommand. See the VSI Datatrieve Reference Manual for more information.To dismiss the help window, perform one of the following operations:
Select the Quit item from the Commands menu in the Datatrieve Help facility.
Press Return until you have exited from help.
Enter Ctrl/Z.
1.12. Guide Mode
Guide Mode is a self-documenting aid available whenever you are at the DTR> prompt. Guide Mode has two functions:
To complete typing an entry for you
To prompt you for a legitimate entry
To enter Guide Mode, type:
DTR> SET GUIDE
Note
If you are using anything but a VT100, VT200, VT300, or compatible terminal, or a DECterm window, Datatrieve displays an error message that tells you your terminal type is invalid. Datatrieve then returns you to the DTR> prompt.
As you enter each word of a command or statement, you can still enter the word as you usually do. As soon as you have typed enough letters to uniquely identify a command or statement, you can press the space bar and Guide Mode completes the entry for you and prompts you for the next word. At the end of a line, press the Return key and Guide Mode goes to the next line.
When Guide Mode is waiting for your input, you can press the question mark (?) key. Guide Mode then displays a list of all the words you can use at that point.
Datatrieve also supplies you with Advanced Guide Mode which functions like Guide Mode except that more words are available as prompts. To enter this type of Guide Mode, enter the following command:
DTR> SET GUIDE ADVANCED
The choice of words provided by Advanced Guide Mode is made when Datatrieve is
installed. By default, the PLOT and REPORT
statements, and the use of a colon (:) to invoke a procedure,
are available in Advanced Guide Mode only. The following words are available at
both levels by default:
|
FIND |
MODIFY |
|
|
READY |
SELECT |
SET |
|
SHOW |
SORT |
STORE |
The easiest way to learn about Guide Mode is to use it. You may find it particularly helpful when you are starting to use Datatrieve. Experiment with it and use it the way it helps you the most.
1.13. Using Editors Within Datatrieve
Within Datatrieve, you can use one of the following editors:
EDT, which provides a basic editing interface and a predefined keypad with a variety of useful editing functions. EDT is the default editor within Datatrieve in the command line interface. The EDT editor cannot be used in a DECwindows environment.
DEC Text Processing Utility (DECTPU), which allows multiple buffers and windows. DECTPU allows you to tailor your editing interface to your individual editing style. DECTPU is the default editor for Datatrieve in a DECwindows environment.
VSI Language-Sensitive Editor (LSE), which has all the features of DECTPU but also allows you to use Datatrieve LSE templates. These templates guide you to enter correct Datatrieve commands and statements. LSE may not be available on all systems.
Note that you can also edit from the DCL and at CDD/Repository levels. At the DCL level, you can use your choice of editors depending on what is installed on your system. At the CDD/Repository level, you can use the Dictionary Management Utility (DMU) or the Common Dictionary Operator (CDO) to edit dictionary objects. See the documentation for your particular editor and for CDD/Repository for further information.
1.13.1. Changing the Default Editor
EDT is the default editor for Datatrieve when it is used as a command line interface. DECTPU is the default editor for Datatrieve in a DECwindows environment. EDT cannot be used in a DECwindows environment.
To change the default editor, use the ASSIGN command:
You must use a three-character acronym, (EDT, TPU, or LSE) when you assign
an editor to DTR$EDIT.
You can assign an editor to DTR$EDIT in one of two ways:
Use the function FN$CREATE_LOG from within Datatrieve:
DTR> FN$CREATE_LOG ("DTR$EDIT", "LSE")When you assign DTR$EDIT with FN$CREATE_LOG, the assignment lasts only during that Datatrieve session. After you exit from Datatrieve, the previous default editor is again the default editor.
Use the
DEFINEcommand at the DCL level:$ DEFINE DTR$EDIT LSE
When you assign DTR$EDIT with the DCL
DEFINEcommand, the assignment lasts only until you log out. After you log out, the previous default editor is again the default editor.
To assign an editor as your default editor whenever you use Datatrieve,
include the DEFINE command in your
LOGIN.COM file.
In addition to DTR$NOWINDOWS and DTR$EDIT, you can define other logical names for the Datatrieve environment. See the VSI Datatrieve Reference Manual for more details.
1.14. Using the Datatrieve EDIT Command
You can enter the EDIT command within Datatrieve without
specifying a dictionary path name. Datatrieve then invokes your default editor
and loads the previous command or statement into the main text buffer of the
editor.
This feature is most useful if the previous command or statement contains an
error. The following list shows how you can use EDIT to
correct such an error:
Enter the
EDITcommand with no argument; Datatrieve loads the previous command or statement into the main text buffer.Edit the previous command or statement to correct the error.
Enter the
EXITcommand; Datatrieve executes the commands and statements that are in the editor’s main buffer.
In the following example, assume you did not want to include the argument
BEAM:
DTR> FIND YACHTS WITH BUILDER = "GRAMPIAN"
DTR> PRINT ALL LOA,
CON> BEAM,
CON> DISP/2000 ("DISP/2000")
DTR>
To correct the mistake, type the EDIT command without an
argument at the DTR> prompt; this recalls all the lines of the previous
PRINT statement. Next, edit the statement, eliminating
the BEAM argument. After you exit from the editor, Datatrieve
executes the corrected statement.
You can use the EDIT command and the arrow keys to recall
and edit the previous line. However, when you recall non-hyphenated commands or
statements that are continued over more than one line, the
EDIT command and the arrow keys function
differently:
The
EDITcommand recalls the entire last command or statement even if it spans more than one line.The arrow keys recall only a single line of a non-hyphenated, continued command or statement; they do not recall the entire command or statement.
If you are working in a DECwindows environment, you can use the Last Command item of the Edit menu of the main application window to edit your most recently executed command. If you do, Datatrieve loads the command or statement into its default editing window.
1.14.1. Editing a Dictionary Object Specified by Path Name
To create new dictionary definitions, you can use the
DEFINE command either within an editor or at the
DTR> prompt. You can also use the Application Design Tool (ADT).
To modify existing dictionary objects from within Datatrieve, enter the
EDIT command followed by the dictionary path name of
the object:
DTR> EDIT CDD$TOP.DTR$LIB.DEMO.YACHTS
The editor then loads the specified definition into a text buffer, which is a temporary storage area where editing operations take place.
1.14.2. Editing by Types of Objects Within Datatrieve
You can specify one or more types of object definitions with the
Datatrieve EDIT command. This allows you to edit all the
domains, plots, procedures, records, or tables from your current default
dictionary directory.
Datatrieve places the object types in the edit buffer in the order you specify. You can then edit all the objects using your assigned editor. In the following example, Datatrieve places the record object definitions in the edit buffer before the domain object definitions:
DTR> EDIT ALL RECORDS, DOMAINS
1.14.3. Using EDIT to Recover From a System Failure
If you exit an editing session abnormally, for example if you enter a
Ctrl/Y or if the operating system fails, Datatrieve
places a journal file for the editing session in your default OpenVMS
directory. You can then recover the editing session by using the
EDIT command with the RECOVER clause. The last
several keystrokes may be missing:
DTR> EDIT YACHTS_CDO RECOVER;
To recover an aborted session, enter exactly the same line you entered when you started the session but add the RECOVER argument at the end of the line:
DTR> EDIT CDD$TOP.DTR$LIB.DEMO.YACHTS
       .
       .
       .! System failure
       .
       .
DTR> EDIT CDD$TOP.DTR$LIB.DEMO.YACHTS RECOVER
Journal files have default file types, depending on which editor you are using. You do not need to specify the journal file type when you are recovering an aborted session. You should know what the file type is, though, so you do not inadvertently delete the journal file before you recover the session. The following table shows the default file types for each of the editors:
| Editor | Default Journal File Type |
|---|---|
| EDT | .JOU |
| LSE | .TJL |
| DECTPU | .TJL |
If you are editing more than one type of object, Datatrieve creates a journal file using the name of the first object type:
DTR> EDIT ALL DOMAINS, RECORDS
In the preceding example, Datatrieve creates a journal file called DOMAINS.JOU.
The
VSI Datatrieve Reference Manual contains complete information on
the EDIT command.
1.15. Editing in a DECwindows Environment
With the DECwindows interface, you can only use the DECTPU or LSE editor (you cannot use the EDT editor). You can invoke the editor in any of the following ways:
By using the
EDITcommand at the DTR> prompt, as you do when you use Datatrieve as a command line interfaceBy choosing the Edit item of the Actions menu of the Dictionary Navigator window
By choosing the Last Command item of the Edit menu, to invoke the editor for editing the previous command or statement
You can then use the editor to edit dictionary objects or the previous command or statement.
After you complete your editing session, you can exit from the editor or you can retain your DECTPU or LSE editing window for future editing sessions, thus avoiding the overhead of activating the editing window each time. To retain the editing window, perform the following steps:
Select the File menu and choose the Save option. The changes you made will be written to a temporary file.
Click on the Datatrieve application window. Datatrieve reads in your changes from the temporary file. The editing window will remain on the screen.
The next time you invoke the editor, perform the following steps:
Issue the edit command, either at the DTR> prompt or from the Dictionary Navigator Actions menu.
Leaving the Datatrieve window selected, click on the File menu in the editing window, and choose Open Selected. The editor reads the temporary file into your editing buffer.
If you accidentally click on the LSE or DECTPU window before choosing
Open Selected, you will break the
connection between Datatrieve and the editing window. To reestablish the
connection, you must reset input focus on the Datatrieve or Dictionary Navigator
window, and reinvoke the editor by reentering your EDIT
command.
While you are editing using LSE or DECTPU, you can set input focus on your Datatrieve main application window and enter commands. This does not affect your editing session.
1.16. Setting Up a CDD/Repository Environment
Before you use Datatrieve for the first time, create an OpenVMS subdirectory for your Datatrieve data files. Next, run the NEWUSER program. This program performs the following tasks:
Copies sample data files into the OpenVMS directory you are currently using
Defines a dictionary directory
Copies record and domain definitions for the sample data files into that dictionary directory
Assigns the editor of your choice, and sets your preference for whether Datatrieve should be invoked as a command-line or a DECwindows interface
To run the NEWUSER program, make sure you are using the OpenVMS subdirectory you just created then enter the following command:
$ @DTR$LIBRARY:NEWUSER
The program responds with the following information:
NEWUSER helps new users to get started with DATATRIEVE. It gives
you the necessary files to perform the introductory examples
in the VSI DATATRIEVE User Guide and VSI DATATRIEVE Reference Manual.

    NEWUSER is working... It will take a few minutes.
    All data copied successfully.

    The following commands have been defined for you but you will need to
    add them to your LOGIN.COM file for the next time you log in:

$       define/process cdd$default "cdd$top.dtr$users.user"
$       define dtr$edit editor
$       define decw$display node::0

user is your username
editor is your choice of EDT, LSE, or TPU editor
node is your node-name

If you need help, see the person responsible for DATATRIEVE on your system.
The results you get when you run the NEWUSER program may differ slightly from those in the previous example. If the display shows that NEWUSER has run successfully, add the indicated line to your LOGIN.COM file.
1.17. Improving Screen Displays and Controlling Output
When you display records, you might find that the fields from each record do not all fit on one display line on your terminal screen. The result is that some fields wrap to the next line and that headers for some fields either do not appear at all or are inserted in available space between other headers. A display like this is not very attractive and often difficult to read.
If you are interested in seeing only a subset of the fields in a record, you
can try listing the names of the fields you want to see following the
PRINT command. If these fit on one line, your problem is
solved. If they do not, or if you want to see the entire record, see the
following sections, which discuss some other things you can try.
1.17.1. Adjusting Screen Width and the Columns Page Setting
If your terminal screen width is set to 80 characters (the default setting most people have), you can increase this to 132 characters if you are working on a character-cell terminal or to 255 characters if you are using Datatrieve with DECwindows. The extra columns might be enough to accommodate what you want to look at.
Changing screen width on a character-cell terminal is a 2-step process.
You use the function FN$WIDTH to tell the operating
system to adjust your screen display, and you use the command SET
COLUMNS_PAGE to tell Datatrieve to space its output across the
specified number of columns. The order in which you do the steps does not
matter:
DTR> FN$WIDTH (132) DTR> SET COLUMNS_PAGE=132
The reduced character size that comes with the 132-character setting is
not to everyone’s liking. In addition, some record displays require more
than 132 columns. If you want to set your screen width back to 80 columns,
use the FN$WIDTH function and the SET
COLUMNS_PAGE command again, specifying 80 in place of
132.
If you are running Datatrieve with DECwindows, you can allow for up to 255 characters to be displayed on one line of output. Your work station terminal cannot display all 255 characters at any one time, but you can use the horizontal scrolling feature of DECwindows to let you see that area of text that extends beyond the limits of the screen. To set column width in a DECwindows environment, use the COLUMNS_PAGE item of the SETUP pull-down menu. For information on using Datatrieve with DECwindows, see Section 1.11.2, ''Using Datatrieve Help in a DECwindows Environment''.
1.17.2. Using the LIST Statement
The LIST statement displays each field from the record
on a separate line. Rather than displaying a column header for each field,
it prints the field name followed by a colon (:) and then the field
contents. The LIST statement can improve the readability
of long record displays:
DTR> FIND EMPLOYEES WITH EMPLOYEE_ID = "00181"
[1 record found]
DTR> SELECT
DTR> PRINT
ADDRESS
SOCIAL LAST FIRST
ID NAME NAME INIT DATA ZIP SEX
SECURITY
00181 Reynolds Louis E Apartment 78C
63 Derry Rd. Milton NH 03851 M 393 98 1984
12/11/52
DTR> LIST
EMPLOYEE_Id : 00181
LAST_NAME : Reynolds
FIRST_NAME : Louis
MIDDLE_INITIAL : E
ADDRESS_DATA : Apartment 78C
STREET : 63 Derry Rd.
TOWN : Milton
STATE : NH
ZIP : 03851
SEX : M
SOCIAL_SECURITY : 393 98 1984
BIRTHDAY : 12/11/52
DTR>1.17.3. Writing a Simple Procedure to Segment Record Display
If you plan to print an entire record from a domain or view frequently, you can write a short procedure to display the record neatly on more than one line. The following example shows a simple procedure, followed by its output. The procedure prints a string literal of 80 underscores to set off each line. The last hyphen in the first line of the literal is a continuation character, which tells Datatrieve that the literal is continued on the next line:
DTR> SHOW PRINT_EMP
PROCEDURE PRINT_EMP
BEGIN
PRINT "_____________________________________________________________________-
___________"
PRINT EMPLOYEE_ID, LAST_NAME, FIRST_NAME, MIDDLE_INITIAL
PRINT "_____________________________________________________________________-
___________"
PRINT ADDRESS_DATA, STREET, TOWN, STATE, ZIP
PRINT "_____________________________________________________________________-
___________"
PRINT SEX, SOCIAL_SECURITY, BIRTHDAY
PRINT "_____________________________________________________________________-
___________"
END
END_PROCEDURE
DTR> FIND EMPLOYEES WITH EMPLOYEE_ID = "00181"
[1 record found]
DTR> SELECT
DTR> PRINT
ADDRESS SOCIAL
ID LAST FIRST INIT DATA ZIP SEX SECURITY
NAME NAME
00181 Reynolds Louis E Apartment 78C
63 Derry Rd. Hudson NH 03851 M 393 98 1984
12/11/52
DTR> PRINT_EMP
_______________________________________________________________________________
ID LAST FIRST INIT
NAME NAME
00181 Reynolds Louis E
_______________________________________________________________________________
ADDRESS
DATA STREET TOWN STATE ZIP
Apartment 78C 63 Derry Rd. Hudson NH 03851
_______________________________________________________________________________
SOCIAL
SEX SECURITY BIRTHDAY
M 393 98 1984 12/11/52
_______________________________________________________________________________
DTR>This method is effective when you are displaying one record at a time. It is not very helpful when you want to print more than one record with a single statement. In this case, Datatrieve only prints the column headers for the first record displayed.
1.17.4. Using Concatenation Characters to Conserve Line Space
Sometimes you can conserve space in a display line by using the concatenation characters (|, ||, and |||) to join fields and literals into a continuous text string. The difference between the three concatenation characters is the way they treat trailing spaces in the value that precedes them and whether they add any spaces between values they join:
A single bar (|) does nothing to the values except join them.
A double bar (||) suppresses any trailing spaces in the value that precedes it and does nothing to the value that follows it.
A triple bar (|||) suppresses any trailing spaces in the value that precedes it, inserts one space, and does nothing to the value that follows it.
When you join fields and literals this way, you form a concatenation value expression. As is the case
with any value expression that is neither a field name nor a statistical
value expression based on one field name, Datatrieve does not supply a
default header for the result. If you want one, you must supply a column
header in your PRINT statement. In the following example,
a procedure using concatenation value expressions logically groups fields
from each record in EMPLOYEES so that groups of records display
in more readable form:
DTR> SHOW CONCATENATE PROCEDURE CONCATENATE BEGIN PRINT SKIP PRINT EMPLOYEE_ID|||FIRST_NAME|||MIDDLE_INITIAL|||LAST_NAME, PRINT SKIP PRINT ADDRESS_DATA||" "|STREET||", "|TOWN||", PRINT "|STATE|||ZIP, PRINT SKIP PRINT SEX (-), SOCIAL_SECURITY (-) USING XXX_XX_XXXX, PRINT BIRTHDAY (-) END END_PROCEDURE DTR> FOR FIRST 3 EMPLOYEES :CONCATENATE 00164 Alvin A Toliver 146 Parnell Place, Chocorua, NH 03817 M 763-08-0064 3/28/47 00165 Terry D Smith 120 Tenby Dr., Chocorua, NH 03817 M 179-97-8016 5/15/54 00166 Rick Dietrich 19 Union Square, Boscawen, NH 03301 M 902-87-8080 3/20/54 DTR>
You can also use concatenation characters to create text literals that are longer than 253 characters. Because you are allowed to enter only up to 255 characters in a Datatrieve command or statement, most of the values you are joining should be entered as field names rather than text literals. When you display the combined values, you must tell Datatrieve how many characters of the string you want on each display line. Use the T edit-string character followed by a repeat count to do this:
DTR> DECLARE A PIC X(80). DTR> DECLARE B PIC X(80). DTR> DECLARE C PIC X(80). DTR> DECLARE D PIC X(80). DTR> DECLARE E PIC X(80). DTR> ! DTR> PRINT *.A|||_*.B|||_*.C|||_*.D USING T(40) Enter A: When DATATRIEVE joins the values in A, B, C, D, Enter B: and E, it suppresses any trailing spaces in Enter C: A, B, C, and D and inserts one space. It Enter D: displays their combined values using up to 40 Enter E: characters per line and without breaking words. When DATATRIEVE joins the values in A, B, C, D, and E, it suppresses any trailing spaces in A, B, C, and D and inserts one space. It displays their combined values using up to 40 characters per line and without breaking words. DTR>
1.18. Using the Computer Based Training Package
For new users, Datatrieve provides a bundled CBT package, which explains the basic concepts required both to use Datatrieve and to understand the terminology used in the documentation. Before running the training, the following symbol definitions must be added to your LOGIN.COM:
EASY :== $EASY$PROGRAM:SOLORPT.EXE LOADDRAW :== $EASY$PROGRAM:LOADDRAW.EXE
Then run the following command file:
$ @EASY$PROGRAM:SETUP.COM
To run the training, enter the following command:
$ EASY
The course is entirely self-explanatory, so no further instruction is needed here.
Part II. Data Definitions (Describing Data)
Chapter 2. Record Definitions
In Datatrieve, you define a record and the logical relationships between fields
with the DEFINE RECORD command. To define the logical record, you
combine field definition clauses that specify the characteristics of each field.
This combination of fields determines the structure of the record and represents the
relationships between the items of data you store in the fields.
You can have Datatrieve write the record definition if you use the interactive Application Design Tool (ADT). However, because ADT does not provide all the available field definition clauses, you cannot define all types of records.
This chapter explains the various elements of a record definition and the record and field definition clauses you use to define records for Datatrieve domains. See the VSI Datatrieve Reference Manual for detailed descriptions of these clauses.
2.1. Defining a Record
After you decide what fields you want to associate with a domain, you can create a record definition to describe them. There are several reasons why you might want to know the explicit way to define a record:
If you want to create a record definition to use with a data file that already exists, you have to match field definitions to the way they are stored.
If you want to include field-level definitions defined using the CDO utility of CDD/Repository, you cannot use ADT to include such definitions.
If you want to use Datatrieve clauses such as VALID IF and COMPUTED BY in your definition, you cannot use ADT.
A record definition consists of one or more field definitions. Each field definition describes the field and its relationship to other fields in the record. Every field definition contains at least three parts:
A level number, which specifies the relationship between the field and other fields in the record
A field name, which identifies the field
A period (.), which signals the end of the field definition
Most field definitions also contain one or more field definition clauses.
The relationship between the fields in the record is made explicit by the level numbers assigned to the fields in the record definition. These numbers help to determine the field levels.
2.1.1. Field Levels
Every field in a record definition has a level number which specifies its relationship to the other fields in the record. A group field that contains all other fields in a record is at the first (top) level. In the YACHT record, BOAT contains all other fields in the record and is at the top level.
TYPE and SPECIFICATIONS are both at the second level because they are subordinate to BOAT. Any field subordinate to a second-level field is at the third level, and so on. Thus, MANUFACTURER and MODEL are at the third level.
2.1.2. Level Numbers
Datatrieve recognizes the levels of fields in a record definition according to the level numbers you assign to each field. The level number is the first element of a field definition. Level numbers are 1- or 2-digit numbers, ranging from 1 to 65. The number of the highest possible level is 01, and the number of the lowest possible level is 65. Leading zeroes, as in 01 and 05, do not affect the value of the level number.
The level number of the top-level field must be the smallest one assigned
to any field in the record definition, and no other field can have the same
level number as the top-level field. The level number usually assigned to
the top-level field is 01. Any field with a higher-level number is
subordinate to the top-level field. The following example shows the use of
level numbers for fields in the YACHT record definition:
01 BOAT
03 TYPE
06 MANUFACTURER
06 MODEL
03 SPECIFICATIONS
06 RIG
06 LENGTH_OVER_ALL
06 DISPLACEMENT
06 BEAM
06 PRICEIn the record definition for YACHTS, BOAT is the
top-level field and is thus the only field with the level number
01. TYPE and SPECIFICATIONS are
group fields at the same level and have the same 03 level
number. The seven elementary fields are all at the 06 level.
Notice that level numbers need not be consecutive. Only the relative value
of level numbers determines the relationship between fields.
2.1.3. Elementary and Group Fields
An elementary field is a basic unit of data. It contains no other field within it. A group field, on the other hand, contains one or more other fields. Every record definition must meet the following requirements for including elementary and group fields:
A record definition must contain at least one elementary field.
If a record contains more than one elementary field, it must contain a group field that includes all other fields in the record.
A group field must contain at least one other field—either elementary or group.
A group field can contain both elementary and group fields.
The CDO format dictionary treats group fields as records. For more information on CDO and group fields, see Chapter 20, "Using Datatrieve With a CDO Format Dictionary".
2.1.4. Field Classes
Datatrieve classifies every field by the type of data it contains or the way in which it stores data. The following table summarizes the field classes and their content for elementary and group fields:
| Field Type | Class | Content |
|---|---|---|
| Elementary | Alphabetic | Uppercase and lowercase letters and spaces. |
| Alphanumeric | Any combination of characters. | |
| Numeric | Any combination of digits and an optional sign (+ or -). | |
| DATE | A date. | |
| COMPUTED BY | None; the field definition specifies a value expression, but no value is stored in the record. | |
| Group | Alphanumeric | The values of the fields contained in the group field. |
2.1.5. Field Names
In addition to a level number, every field in a record must have a field name. You use the field name to identify the field in Datatrieve statements. A field name must conform to the Datatrieve rules for names, described in Section 1.6, ''Names''.
Datatrieve uses the field name when printing the field’s content. If you
include the QUERY_HEADER clause in the field
definition, Datatrieve uses the query header, instead of the field name, to
make the column header. You can override the printing of the field name or
query header by specifying a column header modifier as part of a print list
element in PRINT, SUM, and
REPORT statements.
The same field name can appear more than once in a record definition. Duplicate field names, however, must belong to different group fields.
Note
When you specify a duplicate field name in your Datatrieve statements,
you have to qualify it so that Datatrieve knows which of the fields in
the record you want. A record could contain two fields called NAME, for
example. If one were in the group field DEPT and the other in the group
field PROJECT, you would have to type PRINT DEPT.NAME
or PRINT PROJECT.NAME.
2.1.6. Differences Between Record Name and Top-Level Field
The name you type following DEFINE RECORD specifies the
name under which the definition is stored in a dictionary directory. The
only time you use the record name is when you want to do something with the
definition itself—look at it, edit it, delete it, and so forth. You never
use a record name in the Datatrieve statements that handle data.
The first field name in a record definition is always the top-level field, a field that includes all the other fields in the record. In most statements that handle data, you rarely need to specify the top-level field; specifying the domain name usually gets you all the fields in the record. In some complex statements, however, you might want to specify all the fields in the record when the syntax requires a field name. Typing the name of the top-level field in this situation can save you many keystrokes.
This means that you should specify the same name for the top-level field as you want for the record definition. You do not have to do this, but it makes it easy to avoid mistakes later on. Field names should be descriptive of the data stored in the field rather than abbreviations that are easy to type. That makes the record definition easy to follow and maintain.
Datatrieve lets you both describe fields adequately and also abbreviate names for speed and ease of use. Add a QUERY_NAME clause to an elementary field definition to specify a shorter name you can use in place of the field name when typing Datatrieve statements. Example 2.1, ''Level Numbers in the YACHT Record Definition'' has several examples of the QUERY_NAME clause. The keyword IS is optional when you type a QUERY_ NAME clause.
When you define a query name for a field, you can use the query name as a replacement for the field name in any Datatrieve statements or clauses that refer to the field.
2.2. Using Column Headers
When you display data, Datatrieve uses the names you choose for the elementary fields in the record definition as default column headers for the stored values. If you segment the field name with underscores or hyphens, Datatrieve automatically uses multiple lines for the column header. This way, each segment in the name appears on a separate line in the display.
You can change the default column headers by adding a QUERY_HEADER clause to your elementary field definition. Example 2.1, ''Level Numbers in the YACHT Record Definition'' contains several examples of a QUERY_HEADER clause. The keyword IS is optional. You must enclose the header you select in quotation marks; use a slash (/) to indicate that the following header segment should appear on the next line, for example "EMP"/"ID".
As long as your field names are descriptive of the data in the field, the main reason you want to add a QUERY_HEADER clause to the record definition is to optimize use of line space in your display. Some descriptive field names are longer than the values in the field. In Example 2.1, ''Level Numbers in the YACHT Record Definition'', MIDDLE_INITIAL is an example of such a field.
The following example illustrates how several fields from EMPLOYEES_REC would display without the QUERY_HEADER clauses in Example 2.1, ''Level Numbers in the YACHT Record Definition'':
DTR> READY EMPLOYEES DTR> PRINT ID, NAME, TOWN, STATE OF FIRST 5 EMPLOYEES EMPLOYEE LAST FIRST MIDDLE ID NAME NAME INITIAL TOWN STATE 00164 Toliver Alvin A Chocorua NH 00165 Smith Terry D Chocorua NH 00166 Dietrich Rick Boscawen NH 00167 Kilpatrick Janet Marlow NH 00168 Nash Norman Meadows NH DTR>
Now the same display with the QUERY_HEADER clauses in Example 2.1, ''Level Numbers in the YACHT Record Definition'':
DTR> PRINT ID, NAME, TOWN, STATE OF FIRST 5 EMPLOYEES EMP ID LAST NAME FIRST NAME I TOWN STATE 00164 Toliver Alvin A Chocorua NH 00165 Smith Terry D Chocorua NH 00166 Dietrich Rick Boscawen NH 00167 Kilpatrick Janet Marlow NH 00168 Nash Norman Meadows NH DTR>
2.2.1. Using FILLER Fields
You can specify the keyword FILLER as the name of an elementary or group field. You might want to specify FILLER if you:
Do not need certain fields in a data file for a particular application
Want to control record display to mask certain data (not for security reasons, just for display purposes)
Want to reserve space in the physical record of the data file for future use
The rules for defining fields named FILLER are the same as those for other fields. Unlike other fields, however, you can use the name FILLER for more than one field in the same group field.
Like other fields, a field named FILLER must have a level number. It can
also contain field definition clauses. When you use the
PRINT, LIST,
MODIFY, STORE,
REPORT, and SUM statements to
retrieve, update, or store the contents of a record, values in FILLER fields
are not affected.
The DISPLAY statement, however, displays all the
contents of a group field, regardless of the field names in the record
definition. As a result, you should not use the name FILLER as a means of
protecting sensitive information stored in physical records (use view
domains for this purpose).
If FILLER is the name of a group field, you cannot gain access to the data in the physical record by either of the following two methods:
Using a name for that group field. Datatrieve does not recognize FILLER as a field name.
Retrieving for output whole records or group fields containing the group field named FILLER. Datatrieve stops its access of fields in a group when it encounters the name FILLER, and it moves to the next field at the same level or at a higher level.
You can, however, retrieve values from the elementary and group fields included in a group field named FILLER. Each of those fields has its own valid name, and you can retrieve the value by specifying that name in a record selection expression, a print list, or a field list.
Note
You can create unnamed fields in the Common Data Dictionary Data Definition Language using the "*" construct. Datatrieve treats these unnamed fields as FILLER fields.
2.2.2. Overriding Column Header Defaults With the PRINT Statement
If the column header Datatrieve uses is longer than the largest value that can appear in a field, you can conserve some space in your display line by doing one of three things:
Edit the record definition to include a QUERY_HEADER clause that specifies a header no longer than the length of the field.
Specify another header for the field in your
PRINTstatement.If the field REVIEW_CODE were a 1-character field, for example, you could enter
PRINT REVIEW_CODE ("C")orPRINT REVIEW_CODE ("R"/"C")to make sure the header for the field is also one character in length.Specify in your
PRINTstatement that the field values are displayed without a header.You do this by typing the field name followed by a hyphen enclosed in parentheses, (-). For example,
PRINT REVIEW_CODE (-).
2.3. The Important Field Definition Clauses
This section explains how you tell Datatrieve about storage criteria; that is, what kind of characters are stored in a field and the maximum number of characters allowed in that field.
Every time you define an elementary field in your record definition, you must specify either a PICTURE (PIC, for short) or USAGE clause to tell Datatrieve what kind of characters are stored in the field and how many characters can fit.
2.3.1. Specifying a PIC Clause
A PIC clause starts with the keyword PIC and ends with a string of picture characters. Although you type a space after the word PIC, you cannot put a space anywhere in the string of picture characters that follows.
Example 2.1, ''Level Numbers in the YACHT Record Definition'' shows that all the PIC clauses contain the character X, sometimes followed by a number in parentheses. The X indicates that the field can contain any text character, roughly equivalent to any character you can type with a typewriter keyboard. The number in parentheses is a repeat count. For example, X(20) means that a maximum of 20 text characters can be stored in the field. A repeat count is an option generally used when defining fields longer than three characters. When defining shorter fields, most people type a picture string character for each character in the field; for example, PIC X, PIC XX, or PIC XXX.
The following table lists and describes all the characters you can use in a PIC clause except the parentheses and number to designate repeat count. You can use the X or A characters to define fields, such as names, that need to contain a wide range of characters. You use the characters 9, V, and maybe S or P to define fields, such as salary amount, on which you want to perform arithmetic operations:
| Field Class | PIC Char | Meaning |
|---|---|---|
| Alphabetic | A | Represents one alphabetic character in the field. |
| Alphanumeric | X | Represents one character in the field. |
| Numeric | 9 | Represents one digit in the field. You can specify from 1 to 31 digits for a numeric field. |
| S | Indicates that a sign (+ or -) is stored in the field. A picture string can have only one S and it must be the leftmost character. | |
| V | Indicates an implied decimal point. The decimal point does not occupy a character position in the field, but Datatrieve uses its location to align data in the field. A picture string can contain only one V. | |
| P | Specifies a decimal scaling position. Each P represents a distance in digits from an implied decimal point. A P can appear at the right or left of the picture string. A V is unnecessary for any picture string containing a P. |
2.3.1.1. Defining Alphanumeric (X) and Alphabetic (A) Fields
Alphanumeric (X) fields are best for just about all fields, unless you want to use the field values in arithmetic calculations.
Most people avoid defining alphabetic (A) fields. You cannot store hyphens, commas, periods, or numbers in alphabetic fields. Notice, however, that some names contain these characters:
SMITH-JONES ARCO, INC. TEA-FOR-2 CATERING
Datatrieve has three relational operators especially designed for accessing text field values: CONTAINING, NOT CONTAINING, and STARTING WITH. You can also use the standard operators such as EQUALS, BETWEEN, GREATER_THAN, LESS_THAN, and so forth to access text field values in a range.
2.3.1.2. Defining Numeric Fields
As you can see by looking at Table 2.2, ''Picture String Characters'', you can be more specific about the format of fields that contain only numbers. Depending on what characters you combine in the string, the field can contain only positive values or both positive and negative values. It can contain only integers or both integers and numbers with fractions. The following table explains how to use numeric picture strings:
| Picture String | You Cannot Store: | You Can Store: | Resulting Output: |
|---|---|---|---|
|
999 |
1000, -2.1, 2.5, "2" |
|
|
|
S9(4) |
10000, 2.5, -3.41, A_B |
|
|
|
9(4)V99 |
-2, 1.314, 99999, 50% |
|
|
|
V99 |
1.5, -.45, 22, .2 |
|
|
|
S9V9(4) |
-78, .78902, $2.45 |
|
|
|
9(5)PPP |
123450000, 21123.999 |
|
|
|
PPP9(5) |
12345, 1.3 |
|
|
The picture character 9 represents places where significant digits can appear. The picture character P represents a digit you consider insignificant. Only zero can logically occupy a P position. If someone stores 12345 in a field defined as PIC 99PPP, the value is stored as 12000.
As you can see from Table 2.3, ''Relating Numeric Picture Strings to Stored Values'', you use either V or P as a character to mark the position of the decimal point, but V is the only character you can use to insert a decimal point between 9s in the string.
You can define numeric picture strings from 1 to 31 digits long. Length in digits is the sum of all the 9s (and Ps, if any) in the picture string.
2.3.2. The USAGE Clause
Every field definition has a USAGE clause, even if you do not explicitly specify one. USAGE DISPLAY is the default. It is the only usage that can apply to alphabetic and alphanumeric fields, and the one that applies to numeric fields unless you tell Datatrieve otherwise.
When the storage criteria for a numeric field are defined only with a PIC clause (PIC S99V99, for example), that field has display usage. You can do arithmetic calculations on a numeric field with display usage with no loss of precision, as long as any resulting values can be represented by 31 or fewer digits.
All the other USAGE options exist to give greater precision when defining and handling fields that contain numbers. Some of these options define fields that a variety of languages can process. This is important when you plan to create a data file that will be accessed not only by Datatrieve, but also by programs written in languages such as COBOL, BASIC, and FORTRAN.
A table in the USAGE clause section of the VSI Datatrieve Reference Manual lists and describes all the USAGE types supported by Datatrieve.
2.3.3. Date Fields
If you are defining a field to store dates, specify USAGE DATE for that field. Datatrieve, for example, correctly stores any of the following entries in a USAGE DATE field:
28/MAR/1946 MAR 28 1946 March 28, 1946 3/28/46
When you display a date value, Datatrieve formats it by default as DD-Mmm-YYYY. Any of the preceding entries would be displayed as 28-Mar-1946, unless you specified an EDIT_STRING clause to change this default.
2.3.4. Virtual (Computed) Fields
When a field you are defining can be calculated by other field values or by values stored in a Datatrieve table, you can define it as a virtual field. A virtual field does not occupy any space in storage and so can reduce the size of your data files. The field value is calculated each time you access it with a Datatrieve statement.
Define a virtual field with the COMPUTED BY clause. Do not confuse the Datatrieve COMPUTED BY clause with the COMPUTED BY clause of other products such as CDD/Repository. The value computation can include the name of one or more fields in the record definition or it might be accessed in a Datatrieve table.
In the following example, GROSS_SALARY and
DEDUCTIONS are fields that appear in the same record
definition as NET_SALARY:
05 NET_SALARY COMPUTED BY GROSS_SALARY - DEDUCTIONS.
The following example specifies a value using STATES_TABLE, a
dictionary table that pairs the 2-character state code with the full name of
the state (MA with Massachusetts, for example):
10 STATE_NAME COMPUTED BY STATE VIA STATES_TABLE.
You can use the COMPUTED BY clause only to describe elementary fields.
Many COMPUTED BY fields are better defined as variables that use the values in a record rather than as fields in the record definition. (A variable is a field you can define as necessary to get a particular value you need for a display or report.)
This is especially true if the value you want to calculate uses a constant (such as tax rate) that is likely to change. It is also important when using DECforms, because DECforms cannot handle Datatrieve COMPUTED BY fields.
Consider doing the calculation outside the record definition if you find you are adding fields to your record that are likely to change, in order to satisfy the needs of a virtual field you want to compute.
2.3.5. Using COMPUTED BY Fields
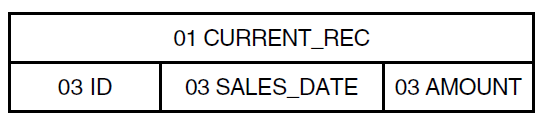
You can also use COMPUTED BY fields to compute a fiscal quarter from a date value. The following examples use the domain CURRENT_SALES. The record includes a field for the salesperson’s ID, the date of the sale, and the amount of the sale. The figure below illustrates the structure of the record:
The record definition is as follows:
DTR> SHOW CURRENT_REC
RECORD CURRENT_REC USING
01 CURRENT_REC.
03 ID PIC IS 9(5).
03 SALES_DATE USAGE DATE.
03 AMOUNT PIC IS 9(5)V99
EDIT_STRING IS $$$,$$$.99.
03 QTR COMPUTED BY
(FORMAT SALES_DATE USING NN) VIA QTR_TABLE
EDIT_STRING IS "Q"9.
;
DTR>The QTR field calculates the fiscal quarter from the date field
SALES_DATE through a dictionary table.
The FORMAT value expression in QTR returns the numerical value for the month of SALES_DATE. Datatrieve evaluates the COMPUTED BY clause, looking up this value in a table and finding the numerical value for the fiscal quarter.
Datatrieve then displays this value, preceding the quarter number with the
letter Q. The table QTR_TABLE is defined as follows:
DTR> SHOW QTR_TABLE
TABLE QTR_TABLE
QUERY_HEADER IS "QTR"
EDIT_STRING IS 9
1 : 3
2 : 3
3 : 3
4 : 4
5 : 4
6 : 4
7 : 1
8 : 1
9 : 1
10 : 2
11 : 2
12 : 2
END_TABLEThe preceding table assumes that the first quarter begins on July 1, the second on September 1, and so on.
The CHOICE or IF-THEN-ELSE value expressions increase the flexibility of COMPUTED BY fields because you can assign values based on conditional tests. You might want to display the sales amounts for each quarter in a separate column. You could define the following four virtual fields for the sales of different quarters:
05 Q1_SALES COMPUTED BY IF QTR EQ 1 THEN AMOUNT ELSE 0. 05 Q2_SALES COMPUTED BY IF QTR EQ 2 THEN AMOUNT ELSE 0. 05 Q3_SALES COMPUTED BY IF QTR EQ 3 THEN AMOUNT ELSE 0. 05 Q4_SALES COMPUTED BY IF QTR EQ 4 THEN AMOUNT ELSE 0.
The values of the virtual fields for quarterly sales are either 0 or the sales amount, depending on the value for QTR.
You can also include a COMPUTED BY field in the record to calculate total sales based on the information in the quarterly summaries:
05 TOTAL_SALES COMPUTED BY
(Q1_SALES + Q2_SALES + Q3_SALES + Q4_SALES).Now you can produce the desired output by entering a
SUM statement:
DTR> SHOW SUMMING
PROCEDURE SUMMING
READY CURRENT_SALES
FIND CURRENT_SALES
SUM Q1_SALES ("Q1") USING $$$$,$$$.$$ ,
Q2_SALES ("Q2") USING $$$$,$$$.$$ ,
Q3_SALES ("Q3") USING $$$$,$$$.$$ ,
Q4_SALES ("Q4") USING $$$$,$$$.$$ ,
TOTAL_SALES ("TOTAL") USING $$$$,$$$.$$ BY ID
END_PROCEDURE
DTR> :SUMMING
ID Q1 Q2 Q3 Q4 TOTAL
11111 $2,150.91 $2,807.11 $2,748.39 $2,389.90 $10,096.31
12345 $7,805.69 $3,801.44 $9,973.94 $8,672.99 $30,254.06
22222 $5,693.29 $3,836.24 $7,274.76 $6,325.88 $23,130.17
23456 $10,311.18 $1,447.40 $13,175.40 $11,456.87 $36,390.85
33333 $7,679.00 $6,854.45 $9,812.05 $8,532.22 $32,877.72
34567 $2,338.91 $14,294.89 $2,988.61 $2,598.79 $22,221.20
44444 $8,868.17 $10,890.45 $11,331.55 $9,853.52 $40,943.69
45678 $8,999.99 $11,339.01 $11,499.99 $9,999.99 $41,838.98
55555 $23,288.42 $1,979.92 $29,757.42 $25,876.02 $80,901.78
56789 $11,111.06 $14,197.04 $14,197.46 $12,345.62 $51,851.18
66666 $9,000.01 $21,832.99 $11,500.01 $10,000.01 $52,333.02
77777 $6,593.10 $30,463.98 $8,424.52 $7,325.67 $52,807.27
88888 $4,500.00 $38,694.00 $5,750.00 $5,000.00 $53,944.00
99999 $4,499.99 $44,249.51 $5,749.99 $4,999.99 $59,499.48
$112,839.72 $206,688.43 $144,184.09 $125,377.47 $589,089.71
DTR>Note that this procedure uses the SUM statement to
generate totals across each row for the different ID numbers.
2.3.6. Using the REDEFINES Clause
The COMPUTED BY clause defines a field that occupies no space in a record. The REDEFINES clause takes another look at storage space that already exists. In the following example, CODE_FOR_SOMETHING is a value that is generally displayed and stored as a unit; however, users sometimes need to identify sections of the field:
03 CODE_FOR_SOMETHING PIC X(6). 03 SEGMENT_THE_CODE REDEFINES CODE_FOR_SOMETHING. 06 FIELD1 PIC X(3). 06 FIELD2 PIC X(3).
Note that a field redefining another must follow the field it is redefining. Both fields must have the same level number. In addition, the REDEFINES clause must immediately follow the field name in the field definition.
Datatrieve always considers group fields to be alphanumeric. This means when you use a group field name in a statement, Datatrieve looks at all the fields in the group as though you had defined them with Xs. This is true even if you used 9s or a numeric USAGE clause to define every subordinate item. If you want to define a field as numeric, but also want it to contain subordinates, you must redefine the field. In the following example, PART_NUMBER is a numeric field that has been redefined in two ways to identify subordinate fields:
05 PART_NUMBER PIC 9(10). 05 PART_NUMBER_PARTS REDEFINES PART_NUMBER. 10 PRODUCT_GROUP PIC 99. 10 PRODUCT_YEAR PIC 99. 10 ASSEMBLY_CODE PIC 9. 10 SUB_ASSEMBLY PIC 99. 10 PART_DETAIL PIC 999. 05 PART_NUMBER_GROUPS REDEFINES PART_NUMBER. 10 PRODUCT_GROUP_ID PIC 9(4). 10 PART_DETAIL_ID PIC 9(6).
If you change the record definition later on to add new clauses or fields, you have to be very careful not to disrupt the relationship between a field and its redefinitions.
2.3.7. Specifying Fixed and Variable Occurrence Lists
You can define a list field to specify multiple occurrences of its
subordinate field or fields. Records containing such repeating fields are
called hierarchical records. In Datatrieve
syntax, repeating fields are also called lists. Fields subordinate to the list are called list items. A record storing information about a
family, for example, can define a list field to store information about
children. In the following record definition, KIDS is a list
field:
DTR> SHOW FAMILY_REC
RECORD FAMILY_REC
01 FAMILY.
03 PARENTS.
06 FATHER PIC X(10).
06 MOTHER PIC X(10).
03 NUMBER_KIDS PIC 99 EDIT_STRING IS Z9.
03 KIDS OCCURS 0 TO 10 TIMES DEPENDING ON NUMBER_KIDS.
06 EACH_KID.
09 KID_NAME PIC X(10) QUERY_NAME IS KID.
09 AGE PIC 99 EDIT_STRING IS Z9.
;
DTR>If you display records defined this way, you can see that records vary in
the number of values stored in the fields KID_NAME and
AGE:
DTR> READY FAMILIES
DTR> PRINT FIRST 3 FAMILIES
NUMBER KID
FATHER MOTHER KIDS NAME AGE
JIM ANN 2 URSULA 7
RALPH 3
JIM LOUISE 5 ANNE 31
JIM 29
ELLEN 26
DAVID 24
ROBERT 16
JOHN JULIE 2 ANN 29
JEAN 26
DTR>The field KIDS is a variable occurrence
list because the number of values in each record for fields
subordinate to KIDS depends on a value stored in another field
in the record (NUMBER_KIDS). Variable occurrence list fields
must be the last set of fields in the record definition. Therefore, you can
define only one variable occurrence list field in a record
definition.
You can also define a fixed occurrence
list. In this case, the number of values in each record for
fields subordinate to the list field is specified explicitly in the OCCURS
clause itself. If FAMILY_REC were altered to define
a fixed occurrence list, the definition for KIDS would be as
follows:
03 KIDS OCCURS 10 TIMES.
If you display records containing a fixed-length list, "empty" occurrences occupy space in the display. This can take the form of blank lines between records (if all the list subordinates are text fields) or columns of zeros (under fields defined as numeric). The advantage of defining a list that is fixed-length rather than variable-length is that it does not have to be the last set of fields in the record definition. While it is not recommended, you can also define any number of fixed-length lists within a variable-length list.
Accessing fields subordinate to an OCCURS field takes time to master. It is also difficult to restructure a domain when you want to add to or reorganize the fields subordinate to a list field.
Datatrieve sees each set of list values as an inner record within the record. You must treat the field defined with the OCCURS clause as you would a domain name. If you tried to specify KIDS, for example, in a Datatrieve statement where you normally specify a field name, Datatrieve might tell you that KIDS is undefined or used out of context. The following example illustrates this problem and one way to get around it:
DTR> READY FAMILIES
DTR> PRINT FATHER, KID_NAME OF FAMILIES
"KID_NAME" is undefined or used out of context.
DTR> PRINT ALL FATHER, ALL KID_NAME OF KIDS OF FAMILIES
KID
FATHER NAME
JIM URSULA
RALPH
JIM ANNE
JIM
ELLEN
DAVID
ROBERT
JOHN ANN
JEAN
JOHN Ctrl/C
^C
Execution terminated by operator.
DTR>You may have to specify list fields in a record definition if you are trying to create a Datatrieve record definition for a data file that already exists. If you do specify an OCCURS field and it contains more than one subordinate item, be sure you specify a top group subordinate to the OCCURS item itself. EACH_KID is an example of such a field in FAMILY_REC. This gives you a group field name that you can use like a field name. Chapter 12, "Accessing Data the Expert Way: Using RSEs and View Domains" provides more information on accessing fields subordinate to list fields.
When setting up your own database, however, you should avoid list fields. The set of domains for the personnel system in Chapter 3, "Defining Domains" provides an example of how to do this. Each salary history and job history entry for an employee is stored as a separate record. These entries are kept out of the record in the central employee domain by putting them in separate domains. If you are wondering how you can uniquely identify each record from the SALARY_HISTORY and JOB_HISTORY domains, the answer is to define a group field key for the data file. Chapter 4, "Defining Data Files" gives you more information on this topic.
2.3.8. Defining Sublists
Although you can use only one OCCURS DEPENDING clause in a record definition, you can define any number of fixed-length lists within a variable-length list.
The sample record definition PET_REC is an extension of the
FAMILY record that illustrates sublists. The repeating
field PET occurs twice for each child, so each child in each
family can record the data for two pets they own:
DTR> SHOW PETS
DOMAIN PETS USING PET_REC ON PET.DAT;
DTR> SHOW PET_REC
RECORD PET_REC
01 FAMILY.
03 PARENTS.
06 FATHER PIC X(10).
06 MOTHER PIC X(10).
03 NUMBER_KIDS PIC 99 EDIT_STRING IS Z9.
03 KIDS OCCURS 0 TO 10 TIMES DEPENDING ON NUMBER_KIDS.
06 EACH_KID.
09 KID_NAME PIC X(10) QUERY_NAME IS KID.
09 KID_AGE PIC 99 EDIT_STRING IS Z9.
09 PET OCCURS 2 TIMES.
13 PET_NAME PIC X(10).
13 PET_AGE PIC 99.
;
DTR> READY PETS
DTR> PRINT FIRST 2 PETS
NUMBER KID KID PET PET
FATHER MOTHER KIDS NAME AGE NAME AGE
JIM LORAINE 2 GARY 24 POP 03
SODA 04
SUE 23 MOUSE 03
SHORTY 08
JIM ANN 2 URSULA 7 SQUEEKY 03
FRANK 07
RALPH 3 00
00
DTR>See Chapter 13, "Reporting Hierarchical Records" for details on hierarchies, in particular Section 13.1, ''Retrieving Values From Repeating Fields''.
2.4. Formatting Field Values Using the EDIT_STRING Clause
You can always specify the output format of an elementary field value by
including an edit string in a PRINT statement. If you want
this information in a record definition, you use the
EDIT_STRING clause. Example 2.1, ''Level Numbers in the YACHT Record Definition''
includes an edit string for the field SOCIAL_SECURITY
(EDIT_STRING IS XXXBXXBXXXX) to display the value
with a space between segments of the field. It also includes an edit string for
the field BIRTHDAY to replace the Datatrieve default of
DD-Mmm-YYYY (EDIT_STRING
IS NN/DD/YY). This is how those fields would display
without the edit string:
DTR> READY EMPLOYEES
DTR> PRINT NAME, SOCIAL_SECURITY,
CON> BIRTHDAY OF FIRST 1 EMPLOYEES
SOCIAL
LAST NAME FIRST NAME I SECURITY BIRTHDAY
Toliver Alvin A 763080064 28-Mar-1947
DTR>This is how those same fields display with the edit strings in Example 2.1, ''Level Numbers in the YACHT Record Definition'':
DTR> READY EMPLOYEES
DTR> PRINT NAME, SOCIAL_SECURITY,
CON> BIRTHDAY OF FIRST 1 EMPLOYEES
SOCIAL
LAST NAME FIRST NAME I SECURITY BIRTHDAY
Toliver Alvin A 763 08 0064 3/28/47
DTR>If you do not supply an EDIT_STRING clause for a numeric field, Datatrieve uses the PIC clause to format the field value. If the PIC clause contains a V or P, Datatrieve displays the value with a decimal point in the correct position. You usually want to include an EDIT_STRING clause for numeric fields that:
Include a fractional component and that do not indicate decimal point position in the PIC clause
Include a sign that you want to display (even if there is one in the PIC clause)
Store money values
Tables in the EDIT_STRING section of the VSI Datatrieve Reference Manual illustrate examples of using editing characters for text, numeric, and date fields.
2.5. Defining Data with Datatrieve and CDD/Repository
Field definition clauses identify the data type of the values to be stored in the field. With few exceptions, data types are equivalent for Datatrieve, the Common Data Dictionary Data Definition Language utility (CDDL), and the Common Dictionary Operator Utility (CDO). The following table lists both sets of data types:
| CDD/Repository Data Type | Datatrieve Data Type |
|---|---|
| BYTE? | BYTE? |
| WORD? | WORD? |
| LONGWORD? | LONGWORD? |
| QUADWORD? | QUAD? |
| OCTAWORD? | — |
| F_FLOATING | REAL (COMP-1) |
| D_FLOATING | DOUBLE (COMP-2) |
| G_FLOATING | G_FLOATING |
| H_FLOATING | H_FLOATING |
| COMPLEX | — |
| UNSINGED NUMERIC | PIC 9(n) |
| LEFT OVERPUNCHED NUMERIC | PIC S9(m)V9(n) SIGN LEADING |
| LEFT SEPARATE NUMERIC | PIC S9(m)V9(n) SIGN LEADING SEPARATE |
| RIGHT OVERPUNCHED NUMERIC | PIC S9(m)V9(n) SIGN TRAILING |
| RIGHT SEPARATE NUMERIC | PIC S9(m)V9(n) SIGN TRAILING SEPARATE |
| PACKED DECIMAL | PIC 9(m)V9(n) PACKED |
| ZONED NUMERIC | PIC S9(n) ZONED |
| BIT | — |
| DATE | DATE |
| TEXT | PIC A(n), PIC X(n) |
| UNSPECIFIED | PIC X(n) name FILLER |
| VARIANTS? | REDEFINES |
| VARYING STRING | — |
| COMPUTED BY DATATRIEVE? | COMPUTED BY |
| DEFAULT_VALUE FOR DATATRIEVE? | DEFAULT VALUE |
| EDIT_STRING FOR DATATRIEVE? | EDIT_STRING |
| MISSING_VALUE FOR DATATRIEVE? | MISSING VALUE |
| — | PICTURE |
| QUERY_HEADER FOR DATATRIEVE? | QUERY_HEADER |
| QUERY_NAME FOR DATATRIEVE? | QUERY_NAME |
| VALID FOR DATATRIEVE IF? | VALID IF |
| ALIGNED | ALLOCATION |
| ARRAY | — |
| BASE | — |
| DIGITS ... FRACTIONS? | SCALE n |
| INITIAL_VALUE | — |
| OCCURS | OCCURS n TIMES |
| OCCURS ... DEPENDING | OCCURS n TO m TIMES DEPENDING ON? |
| SCALE | SCALE n |
Note that the CDDL keyword STRUCTURE is analogous in function to Datatrieve level numbers for fields.
You cannot extract and edit a record definition defined using the VARIANT
field of the CDDL unless each VARIANT field has a STRUCTURE
statement. If the CDDL record definition includes a STRUCTURE field description
statement for each VARIANT field, you can extract and edit the record
definition. See Example 2.1, ''Level Numbers in the YACHT Record Definition'' for a sample record definition.
DTR> DEFINE RECORD EMPLOYEES_REC USING DFN> ! ^ ^ ^ DFN> ! required name of optional DFN> ! keywords definition keyword DFN> ! DFN> 01 EMPLOYEES_REC . DFN> ! ^ ^ ^ DFN> ! level name of end of field DFN> ! number top-level field definition DFN> ! DFN> 05 EMPLOYEE_ID PIC X(5) DFN> ! ^ ^ ^ DFN> ! level name of field defini- DFN> ! number field tion clause DFN> ! DFN> QUERY_NAME IS ID DFN> ! ^ DFN> ! field defini- DFN> ! tion clause DFN> ! DFN> QUERY_HEADER IS "EMP"/"ID" . DFN> ! ^ ^ DFN> ! field defini- end of field DFN> ! tion clause definition DFN> ! DFN> 05 EMPLOYEE_NAME QUERY_NAME IS NAME. DFN> ! ^ DFN> ! This group field contains the three elementary fields DFN> ! that follow it. DFN> ! DFN> 10 LAST_NAME PIC X(14) DFN> QUERY_NAME IS L-NAME DFN> QUERY_HEADER IS "LAST NAME". DFN> 10 FIRST_NAME PIC X(10) DFN> QUERY_NAME IS F-NAME DFN> QUERY_HEADER IS "FIRST NAME". DFN> 10 MIDDLE_INITIAL PIC X DFN> QUERY_NAME IS INIT DFN> QUERY_HEADER IS "I". DFN> ! ^ DFN> ! Note that all fields subordinate to EMPLOYEE_NAME DFN> ! have level numbers with larger values. DFN> ! DFN> 05 EMPLOYEE_ADDRESS. DFN> 10 ADDRESS_DATA PIC X(20). DFN> 10 STREET PIC X(25). DFN> 10 TOWN PIC X(20). DFN> 10 STATE PIC X(2). DFN> 10 ZIP PIC X(5). DFN> 05 SEX PIC X DFN> VALID IF SEX = "M" OR DFN> SEX = "F". DFN> 05 SOCIAL_SECURITY PIC X(9) DFN> QUERY_NAME IS SS DFN> EDIT_STRING XXXBXXBXXXX DFN> VALID IF SS BETWEEN DFN> "1" AND "999999999". DFN> 05 BIRTHDAY USAGE DATE DFN> EDIT_STRING IS NN/DD/YY. DFN> ; DTR> ! ^ DTR> ! end of record definition DTR> ! DTR>
Many of the field definitions in this record are probably used by other applications in the company. Fields like LAST_NAME and FIRST_NAME can be used in many applications. By storing and using only one field-level definition for items with company-wide application, you can ensure data consistency throughout the company. The CDO utility of CDD/Repository offers field-level definition capability for records you want to store in a CDO format dictionary. Datatrieve lets you take advantage of this CDD/Repository feature by letting you include CDO-defined field level definitions in your Datatrieve record definition.
Datatrieve performs best if you choose key fields for indexed records wisely. This is especially important when you use the CROSS clause. Chapter 22, "Improving Datatrieve Performance" has information on key optimization.
2.5.1. Including Validation Requirements
You can specify a VALID IF clause to make sure a value is correct before it is stored in a record field. Example 2.1, ''Level Numbers in the YACHT Record Definition'' includes VALID IF clauses for the fields SEX and SOCIAL_SECURITY to limit the values these fields can contain. Because these fields are text fields, the acceptable values are enclosed in quotation marks. Values for numeric fields would not be enclosed in quotation marks.
You can specify a VALID IF clause only for an elementary field.
2.5.2. Initializing Field Values
Datatrieve automatically initializes a text field to spaces and a numeric field to zero if you do not assign it a value when storing a record. If you want a field initialized to any other value, use the DEFAULT VALUE clause to specify your preference. Example 2.1, ''Level Numbers in the YACHT Record Definition'' does not contain this clause.
One way to use DEFAULT VALUE is with date fields. If the field should
reflect the date a record is stored, you can specify the value expression
"TODAY" as its default value:
03 DATE_IN USAGE DATE DEFAULT "TODAY".
As you can see from the example, the word VALUE is an optional keyword.
2.6. Specifying Values to Be Ignored in Statistical Computations
You can define a MISSING VALUE clause to mark that no value is stored in a field. Datatrieve ignores fields containing the missing value marker when computing averages, standard deviations, and minimum and maximum values.
Numeric fields are automatically initialized to zero if no value is stored in them. It is fairly common for records to be stored in incomplete form. If a field storing a salary contains zero, for example, it usually means that the salary data has not been stored, not that the employee is working solely for fun. If you are averaging the salaries of all current employees in a given job category, you do not want records with these "empty" salary fields to affect your results. You can include the MISSING VALUE clause in the field definition to make sure that salaries equal to zero are ignored:
05 SALARY_AMOUNT PIC 9(6)V99
EDIT_STRING IS $$$$,$$$.$$
MISSING VALUE IS 0.Do not use the DEFAULT VALUE clause along with the MISSING VALUE clause unless they specify the same value. If they specify different values, Datatrieve initializes an empty field to the default value and includes that value in statistical computations.
2.7. Including CDO-Defined Field-Level Definitions
You can create the CDO field definitions in one of two ways:
By exiting Datatrieve and using the CDO utility to define the definitions you want
By using the Datatrieve CDO command to pass commands to the CDO utility
You should note that you can only define elementary fields in CDO. If you want
to make use of group fields, you use the CDO DEFINE RECORD
command to create a record that includes the elementary fields that you would
use in a group field definition. You can include the CDO record definition in a
Datatrieve record definition as a group field.
An example in Chapter 20, "Using Datatrieve With a CDO Format Dictionary" shows a
CDO_ADDRESSES domain that points to the record
ADDRESSES_REC.
ADDRESSES_REC uses the FROM clause of the
Datatrieve DEFINE RECORD command to include the CDO-defined
objects LAST_NAME, FIRST_NAME,
and ADDRESS_GROUP_FIELD:
DTR> SET DICTIONARY DISK$1:[KIRK.DTR]SAMPLE
DTR> SHOW ADDRESSES_REC
RECORD ADDRESSES_REC
01 ADDRESSES_REC.
03 FULL_NAME.
05 FROM FIELD LAST_NAME.
05 FROM FIELD FIRST_NAME.
05 MIDDLE_INIT PIC X.
03 FROM GROUP ADDRESS_GROUP_FIELD.
;
DTR>ADDRESSES_REC is composed of two group fields:
FULL_NAME and ADDRESSES_GROUP_FIELD. The group
field FULL_NAME includes three elementary fields, two of which were
defined using CDO. The CDO-defined fields are LAST_NAME and
FIRST_NAME. You can display their CDO definitions in Datatrieve
using the Datatrieve CDO command:
DTR> CDO SHOW FIELD LAST_NAME, FIRST_NAME Definition of field LAST_NAME | Data type text size is 20 characters Definition of field FIRST_NAME | Data type text size is 15 characters DTR>
The field MIDDLE_INIT is not defined in CDO. It is local to Datatrieve and exists only as part of a record definition. The group field FULL_NAME consists of a mix of CDO-defined fields and the local field MIDDLE_INIT.
The group field ADDRESS_GROUP_FIELD is actually defined in CDO as a record. It contains the elementary fields displayed in the following example:
DTR> CDO SHOW RECORD ADDRESS_GROUP_FIELD Definition of record ADDRESS_GROUP_FIELD | Contains field STREET_NUMBER | Contains field STREET | Contains field CITY | Contains field STATE | Contains field ZIP_CODE DTR>
The terms FIELD and GROUP used in the syntax of the FROM clause are required Datatrieve keywords. The term FIELD indicates that the CDO object specified in the clause is an elementary field. The term GROUP indicates that the CDO record definition is used in Datatrieve as a group field.
Note that if you define a new version of the field or record referred to in the FROM clause, your record will still point to the original version. You must redefine your record if you want it to access the new version.
2.8. Editing Record Definitions
When you edit a record definition, you see the keyword REDEFINE where DEFINE
used to be. The REDEFINE RECORD command follows the same
rules as DEFINE RECORD. REDEFINE RECORD,
however, automatically creates a new version of an existing record
definition.
The DEFINE RECORD command works only when the dictionary
directory contains no record definition with the specified name.
If you want to modify a record definition that is being used with an existing data file, read the section on restructuring domains in Section 4.7.3, ''Restructuring a Domain''.
When you use the Datatrieve EDIT command to edit a data
definition stored in a CDD/Repository dictionary, Datatrieve extracts the
CDD/Repository definition or definitions to an editing buffer. You can then edit
the definition using the default editor specified by the logical
DTR$EDIT.
You can use the EDIT command in Datatrieve to update a CDO
format domain definition to have it point to the newest version of a particular
record definition. This is particularly important because if a domain was
defined with relationships, those relationships point to specific versions of
dictionary objects. Relationships are not automatically propagated to new
versions of objects. When a newer version of a record is created, the owner
domain (if it was defined with the RELATIONSHIPS clause of the DEFINE
DOMAIN command) still points to the old version of the
record.
For example, the domain YACHTS_CDO owns record
YACHT_CDO_REC;2. After
YACHT_CDO_REC is redefined to create
YACHT_CDO_REC;3, the domain
YACHTS_CDO still points to the definition
YACHT_CDO_REC;2. To update the relationship so that
the domain YACHTS_CDO now points to
YACHT_CDO_ REC;3, you must redefine
YACHTS_CDO. You can update the relationship by
entering the Datatrieve command EDIT YACHTS_CDO. Remove the
version number before exiting the editor.
Chapter 3. Defining Domains
This chapter helps you analyze the requirements for a Datatrieve application so that you can translate those requirements into Datatrieve code. The sample application is a personnel system for an engineering firm.
3.1. Reviewing the Requirements
The following pages contain the "Data Requirements Study" for the sample personnel system referred to in this book.
Data Requirements Study
Personnel System
Purpose
Like any other personnel system, this one must maintain employee data, answer on-line inquiries and create reports.
System Requirements
System requirements relate to the devices that your application will be receiving data from and sending data to. System requirements also take into account whether or not your application will be receiving and sending information across a computer network:
For data entry: All data will be entered at the terminal.
For reports: Reports will be displayed at a video terminal or printed at a hardcopy terminal or printer.
For distributed processing: This system will be autonomous. It will not share data with other computer systems.
Report Requirements
What information your database contains depends to a large extent on the reports you want it to produce. This personnel system must generate the following reports:
Individual employee report: Given an employee, list the detailed data pertaining to him or her.
Employee listings: Given a field or combination of fields in the employee record, list all the employees by that field. For example, list all employees by department, manager, or job title.
Job category report: List all the job categories. Show the following information:
Job code and job title
Salary range
Average actual salary for employees in the category
Names of employees in the category
Actual salary and wage class for each employee
Department report: List employees, job titles, salaries, and dates of last performance reviews by department. This report is intended for department managers.
Salary and job history: List employees, all the jobs they have held in the company, and the dates of their performance reviews.
Educational background: List the college training completed by an employee, colleges attended, degrees and the dates they were received, and degree fields.
Miscellaneous reports: Provide small, ad hoc reports generated from the personnel list format, such as address lists.
On-line Inquiry Requirements
On-line inquiry to a personnel database must be restricted to information that the person making the inquiry has a right to see. In this system, the following employees can access the information listed:
Supervisors and department managers can access data that applies to their subordinates.
Other employees can access only the names, job titles, and departments of company personnel.
Database Updating Requirements
Requirements for data update include how the data is maintained and how the system ensures the data is valid. This personnel system has the following updating requirements:
On-line maintenance: Personnel department employees will add, delete, or modify employee records on-line. The system does not need to process transaction files to update the information stored in the domains.
Automatic validation: The system must provide a way to make sure that department codes are valid and there are no duplicate employee identification numbers.
3.2. Analyzing the Data
At this stage of your application, you want to generate a list of the pieces of information your database should contain. There are a number of ways you can do this, but you might find it easiest to follow these steps:
Sketch out what you expect the reports to look like. The fields in the reports determine to a large extent the fields you will store in records.
Some fields depend on other fields. That is, there is a one-to-one correspondence between them. For example, every job code is associated with only one job title. Identify these fields. You might be better off storing these paired values in a Datatrieve table and putting only the smallest or key value in a record.
Some fields can be calculated from other fields. For example, age can be calculated from birth date. Fields like average salary and salary midpoints for a job category can be calculated from existing salaries and minimum and maximum salaries.
You can specify a field calculated from others in the same record as a COMPUTED BY field in the record definition. COMPUTED BY fields do not take up storage space because their values are calculated at the time you access a record. COMPUTED BY fields are discussed in Section 2.1, ''Defining a Record''. If the calculated field appears in only one report, however, you might decide to create it as part of the procedure that produces the report rather than specifying it in a record definition.
Your goal at this point is to determine the minimum number of fields that you want to put in a record definition and which fields you want to take up space in storage.
Compile a list of data fields. Next to each field you might note the following information (if it applies to that field):
Any field with which it has a one-to-one correspondence
Any fields from which it can be calculated
Whether each value stored in the field must be unique
What makes values for the field valid ones
Determine the most efficient way to organize the fields into domains and tables.
The following table shows a list of fields you might start with when creating a personnel system. A number of fields would appear in more than one report. Some of them would probably never appear in the same report together. At this point, you want to know how many pieces of data you have to work with rather than how you are going to group them:
| Field | Unique? | Depends On | Valid If: | Calculated? |
|---|---|---|---|---|
| EMPLOYEE_ID | Yes | - | 5 digits | - |
| LAST_NAME | - | - | - | - |
| FIRST_NAME | - | - | - | - |
| MIDDLE_INITIAL | - | - | - | - |
| ADDRESS_DATA | - | - | - | - |
| EMP_STREET | - | - | - | - |
| EMP_TOWN | - | - | - | - |
| EMP_STATE | - | - | - | - |
| EMP_ZIP | - | - | - | - |
| SEX | - | - | M or F | - |
| SOCIAL_SECURITY | Yes | - | - | - |
| BIRTHDAY | - | - | Valid date | - |
| JOB_CODE | Yes | - | - | - |
| JOB_TITLE | - | JOB_CODE | - | - |
| MINIMUM_SALARY | - | - | - | - |
| MAXIMUM_SALARY | - | - | - | - |
| SALARY_MIDPOINT | - | - | - | Min and Max Salary |
| WAGE_CLASS | - | - | - | - |
| DEPARTMENT_CODE | Yes | - | - | - |
| DEPARTMENT_NAME | - | DEPARTMENT_CODE | - | - |
| JOB_START | - | - | Valid date | - |
| JOB_END | - | - | Valid date | - |
| REVIEW_CODE | - | - | - | - |
| SALARY_AMOUNT | - | - | - | - |
| SALARY_START | - | - | Valid date | - |
| SALARY_END | - | - | Valid date | - |
| REVIEW_DATE | - | - | Valid date | - |
| SUPERVISOR_ID | - | - | - | - |
| DEGREE | - | - | - | - |
| DEGREE_FIELD | - | - | - | - |
| DATE_GIVEN | - | - | Valid date | - |
| COLLEGE_NAME | - | - | - | - |
Expect that field requirements will change as you think about organizing them into domains or tables. This list of fields does not take into account, for example, special fields to indicate whether a record contains current or historical information.
3.3. Grouping Fields Into Domains and Tables
After you know what fields you will need for your application, you have to decide how best to group them.
Datatrieve gives you a variety of methods to look at data stored in different locations. You should therefore pay special attention to ease of maintenance and logical grouping of fields when you put together a record.
Aim to put a field in only one place, unless you plan to use it as a link to related information stored somewhere else. Employee names, for example, are best stored in only one place. Employee ID numbers, however, probably need to be stored in several locations.
When you group fields together, consider grouping fields that contain generic data apart from fields that contain specific data. Job information, for example, can be generic (the same for each job code) or employee-specific. Generic information, such as wage class and minimum salary, can go in one domain. Employee-specific information, such as start date and review code, can go in another domain. If you keep generic data apart from specific data, you save storage space. If job entries for employees include wage class and minimum salary, values for these fields will be stored in many records when they need to be stored in only a few.
The following figure shows one way you could organize the fields in the sample personnel system. Above each grouping is the domain name that will eventually associate the record definition describing the fields with the data file that will store them:
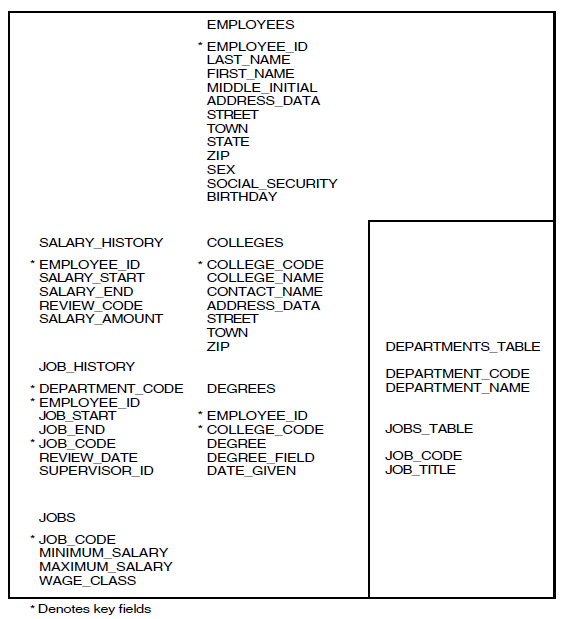
The fields preceded by an asterisk (*) indicate fields that you can use in Datatrieve statements to link data in one domain with data in the other domains. When grouping fields into domains for your own applications, you should note the following points about pivotal fields like these:
They are the only fields that are stored in more than one place.
They are codes that can easily be made unique (and, unlike names, can stay that way). Many are likely to be primary keys for the data files to which they correspond. You cannot modify the value of primary key fields.
Their values can be a set number of characters. It is easier to write statements that can check for valid values in fields that are always a set number of ordered characters.
3.4. Defining a Domain
A domain is the heart of the Datatrieve process. It performs the following functions:
Relates a record definition to a data file
Gives a name to that relationship (domain name)
After you create the record and domain definitions and define the data file, you use the domain name to access the file.
You can also create domain definitions that point to data stored on other computer systems and in Oracle DBMS and relational databases.
The following example illustrates the process for creating a domain
definition. The definition relates the sample record definition from
EMPLOYEES_REC with the file EMPLOYEES.DAT. The
domain name EMPLOYEES identifies this relationship:
DTR> ! Set dictionary location to the directory that will store
DTR> ! the domain definition.
DTR> !
DTR> SET DICTIONARY CDD$TOP.PERSONNEL
DTR> !
DTR> ! Define the domain.
DTR> !
DTR> DEFINE DOMAIN EMPLOYEES USING
DFN> EMPLOYEES_REC ON EMPLOYEES.DAT;
DTR> !
DTR> ! Display the listing of domains in
DTR> ! the directory PERSONNEL.
DTR> !
DTR> SHOW DOMAINS
Domains:
* EMPLOYEES;1
DTR> ! Display the domain definition.
DTR> !
DTR> SHOW EMPLOYEES
DOMAIN EMPLOYEES USING EMPLOYEES_REC ON EMPLOYEES.DAT;
DTR> ! Decide to make the file specification more complete.
DTR> !
DTR> EDIT EMPLOYEES
. . .
. . .
. . .
DTR> SHOW EMPLOYEES
DOMAIN EMPLOYEES USING EMPLOYEES_REC ON DBA2:[BELL]EMPLOYEES.DAT;
DTR>As you can see from the example, you use the DEFINE DOMAIN
command to begin a domain definition. The following sections provide rules and
suggestions for naming the domain and specifying the record and file.
3.5. Naming the Domain
The name you choose for a domain must follow the rules that apply to any given name in the dictionary. The domain name:
Must begin with a letter
Must end with a letter or digit
Can contain 1 to 31 characters
Can contain only letters, digits, dollar signs ($), underscores (_), and hyphens (-)
When you enter a name, Datatrieve interprets lowercase letters as uppercase and a hyphen as an underscore. Datatrieve displays names in this format.
If you prefer, you can specify a full dictionary path name for a domain name. This lets you store a domain definition in a directory other than the one at which you are currently located. In Example 3.1, ''Defining a Sample Domain'', the user had the option of using the full path name CDD$TOP.PERSONNEL.EMPLOYEES in place of the partial path name EMPLOYEES to store the definition in the PERSONNEL dictionary directory. If the user had set the default dictionary setting to a dictionary directory other than PERSONNEL, a full path name, such as CDD$TOP.PERSONNEL.EMPLOYEES, or a relative path name would be necessary for storing the definition in the PERSONNEL dictionary directory. Because Datatrieve stored the EMPLOYEES definition in PERSONNEL, you know the user must have at least P (PASS_THRU) and E (EXTEND) privileges in the ACL associated with that DMU format dictionary directory.
A full path name is part of the definition, however, and has to be edited if you or someone else moves the definition later on. Most people define a domain using only the given name. Section 19.9.3, ''Using Logical Names'' describes how to abbreviate path names using logicals.
3.6. Specifying the Record Name
The rules that apply to the record name are the same as those for the domain name. If the record definition is (or will be) in a dictionary directory other than the one where you are storing the domain definition, you must specify a full path name for the record definition. Otherwise, you can specify the given name.
If you are specifying a full path name for a record definition in a directory that is not in your private branch of the dictionary, make sure you have P (PASS_THRU) and S (SEE) access privileges to that record definition if the definition is in a DMU format dictionary or S (SHOW) privilege if the definition is in a CDO format dictionary. You do not need these privileges to put the path name in your definition, but you need them in order to ready the domain.
3.7. Specifying the Data File
The name of the data file is an OpenVMS file specification. File names are not governed by the CDD/Repository rules for naming things; they follow OpenVMS rules.
3.7.1. Determining Which Parts of the File Specification to Include
The shortest form you can use for a file specification in a domain definition is a file name (EMPLOYEES, for example). When you use this short form, Datatrieve appends the file type .DAT to the name. When you ready a domain whose definition includes only a file name (or only a file name and type), Datatrieve expects to find the data file in your default OpenVMS directory.
If you include a full file specification in place of the short form, you can ready the domain without first setting your OpenVMS directory default to the directory containing the file.
Note
If your installation uses more than one computer system, a file specification can start with a node name. If you want to use a data file on another system, do not append a node name along with username and password criteria to your file specification. Datatrieve works very slowly when you access distributed data this way.
Section 19.9.3, ''Using Logical Names'' describes how to abbreviate file specifications using logicals.
3.7.2. Avoiding Problems When Naming Files
If you break one of the OpenVMS rules governing file specifications, you
can still store the domain definition. When you try to create the file with
the DEFINE FILE command, however, you will get an error
message from RMS telling you about the problem.
If you are creating the domain in order to use a data file that already exists and the file specification is incorrect, you will get an error message when you try to ready the domain. If the file is in a directory other than your own, you will need the appropriate OpenVMS access privileges to both the directory where the file is located and to the file itself before you can ready the domain.
3.8. Using the WITH RELATIONSHIPS Clause
One of the key differences between a domain defined for a DMU format
dictionary and one defined for a CDO format dictionary is that you can define
CDO format objects with relationships. The WITH RELATIONSHIPS clause is part of
the syntax of the Datatrieve DEFINE DOMAIN command. The
syntax of the DEFINE DOMAIN command varies for the type of
domain you are defining: RMS domain, view domain, relational domain, or remote
domain. See the
VSI Datatrieve Reference Manual for specific information on defining
specific types of domains.
When you add the WITH RELATIONSHIPS clause to the definition of a CDO format domain, Datatrieve sets up relationships among relevant dictionary objects. The following list describes the relationships set up for each type of domain:
- RMS domain
Relationships are set up between the domain and the record definition specified for the domain in the domain definition.
- View domain
Relationships are set up between the view domain and any domains that are listed in the view domain definition and the records, fields, and databases referred to by those domains.
- Relational domain
Relationships can be used only on relational domains which directly refer to a relational database. The relationship that is created is between the relational domain and the CDD$DATABASE created when the relational database definition was integrated in a CDO format dictionary and the relation referred to by the domain.
- Remote domain
Relationships are set up between the domain being defined and the domain on the remote node.
Datatrieve does not currently support relationships with Oracle DBMS domains.
When you define a domain using the WITH RELATIONSHIPS clause, you must be sure that you define objects in a particular order. In a relationship, one object is an owner and one is a member of the relationship. An owner object uses or depends on another object. A member object is used by another object.
When defining an object with relationships, the member object must exist before the owner object can be defined. Keep in mind, too, that all objects of a relationship must be stored in a CDO format dictionary. The following list identifies specific requirements for each type of domain:
An RMS domain definition requires that the record referred to in the domain definition exist at the time the domain is defined.
A relational domain requires that the relational database referred to in the domain definition exist at the time the domain is defined.
A view domain requires that the domain or domains referred to in the view definition exist in a CDO format dictionary at the time the view is defined. If a view definition refers to a domain in the DMU, then Datatrieve performs the definition, but issues a warning message indicating that domains in the DMU format will not be part of the relationship.
A remote domain requires that the remote node referred to in the definition be accessible, that CDD/Repository be installed on the remote node, and that the domain referred to in the definition already exist in a CDO format dictionary.
You should also note that relationships between objects are version specific; relationships are not automatically propagated to newer versions of member objects. When you create a new version of a record, the owner domain still points to the old version of the record.
To update the relationship, you can redefine the owner (domain) definition by editing the domain definition and removing the version number following the record (or member) name. Exit the editing buffer immediately. Datatrieve updates the version numbers for you.
If a domain definition includes a partial (or relative) record path name and contains a WITH RELATIONSHIPS clause, Datatrieve treats it differently than a similar domain defined without relationships. If a domain is defined without relationships, the record that is used depends upon your default dictionary setting at the time you ready the domain.
The default dictionary directory is DISK$1:[KIRK.DTR]PERSONNEL_CDO.SALARIED when the domain in the following example is defined:
DTR> DEFINE DOMAIN EMPLOYEES USING - CON> SALARIED.EMPLOYEE_REC - CON> ON EMP.DAT;
In this case, only the partial path name SALARIED.EMPLOYEE_REC,
not the full path name, is stored in the domain definition. If the default
directory is set to
DISK$1:[KIRK.DTR]PERSONNEL_CDO.CONTRACT before the
EMPLOYEES domain is readied, Datatrieve looks for the following record
definition:
DISK$1:[KIRK.DTR]PERSONNEL_CDO.CONTRACT.SALARIED.EMPLOYEE_REC.
This occurs because, without relationships, Datatrieve resolves the path name
when it readies the domain rather than when it defines it.
If the EMPLOYEES domain is defined using the WITH RELATIONSHIPS clause, then
Datatrieve establishes the relationships with the record when the domain is
defined rather than when the domain is readied. For example, if the default
directory is set to
DISK$1:[KIRK.DTR]PERSONNEL_CDO.SALARIED and the
DEFINE DOMAIN command is used, then no matter where the
default directory is set to, the domain definition for the domain
DISK$1:[KIRK.DTR]SALARIED.EMPLOYEES always points
to the record definition
DISK$1:[KIRK.DTR]SALARIED.EMPLOYEES_REC.
DTR> DEFINE DOMAIN EMPLOYEES - CON> USING SALARIED.EMPLOYEE_REC ON EMP.DAT - CON> WITH RELATIONSHIPS ; DTR>
As mentioned earlier, when you define a domain with relationships, Datatrieve creates the relevant CDD/Repository objects (CDD$DATABASE, CDD$RMS_DATABASE, MCS_BINARY, and CDD$FILE_DEFINITION) for you. You have the option of creating some of these objects yourself, using the CDO utility. If you do, you can then define a Datatrieve domain based on the CDD$DATABASE object you created through CDO. To do so, you must first define and store the record in a CDO format directory, then define the CDD$RMS_DATABASE object and the CDD$DATABASE object with the CDO utility. See the VSI Datatrieve Reference Manual for more information.
Chapter 4. Defining Data Files
Once you store domain and record definitions in a dictionary directory, you can create a file in an OpenVMS directory to contain your data. You omit this step, of course, if you created domain and record definitions to access a data file that already exists.
You use the DEFINE FILE command to create a data file. The
following example first displays domain and record definitions
(EMPLOYEES and EMPLOYEES_REC), and then creates the
data file (EMPLOYEES.DAT):
DTR> SHOW EMPLOYEES
DOMAIN EMPLOYEES USING EMPLOYEES_REC ON DBA2:[BELL]EMPLOYEES.DAT;
DTR> SHOW EMPLOYEES_REC
RECORD EMPLOYEES_REC USING
01 EMPLOYEES_REC.
05 EMPLOYEE_ID PIC X(5)
QUERY_NAME IS ID
QUERY_HEADER IS "ID".
05 EMPLOYEE_NAME QUERY_NAME IS NAME.
10 LAST_NAME PIC X(14)
QUERY_NAME IS L_NAME
QUERY_HEADER IS "LAST NAME".
10 FIRST_NAME PIC X(10)
QUERY_NAME IS F_NAME
QUERY_HEADER IS "FIRST NAME".
10 MIDDLE_INITIAL PIC X
QUERY_NAME IS INIT
QUERY_HEADER IS "I".
05 EMPLOYEE_ADDRESS QUERY_NAME IS ADDRESS.
10 ADDRESS_DATA PIC X(20).
. . .
. . .
. . .
DTR> DEFINE FILE FOR EMPLOYEES KEY = ID (NO DUP)
DTR>Unlike the other DEFINE commands, DEFINE
FILE is not creating a definition. It does not, therefore, specify the
name of the file, but points to the domain definition that does (EMPLOYEES). It also
does not require the semicolon or END_ clause that must
terminate other DEFINE commands. The keyword FOR is
optional.
Example 4.1, ''Defining a Data File'' creates an indexed file because it specifies a field in
the record (ID) as a key. If the command were simply DEFINE FILE FOR
EMPLOYEES, it would have created a sequential file. The differences
between indexed and sequential files are discussed in Organizing Files and Defining
Indexed Files.
4.1. Organizing Files
Datatrieve allows you to define indexed or sequential files for your data. Sequential files require less storage, but Datatrieve must search records one by one according to their physical order in the file. This organization may be optimal in certain cases. For example, a domain’s records may contain a field for the current date, and so records are physically arranged in the order in which they are stored. If you access groups of records in chronological order, you may find this organization efficient.
4.1.1. Selecting the Primary Key
The field you select for a primary key should be one whose values do not change. Thus primary key fields are often a code of some kind: ID number, invoice number, customer code, product code, and so forth. The codes can remain constant even if someone decides to change the name or other characteristics associated with the record. In fact, using when using RMS files Datatrieve does not allow users modify values in primary key fields. So if you must change a primary key value, you have to erase the whole record and store it again with the changed key value.
The primary key for a file should be able to uniquely identify each record. This means you should avoid the DUP characteristic for the primary key field even though Datatrieve lets you use it. There are two reasons for this guideline:
If at any time in the future you want to modify the records in the file based on information contained in another data file (transaction file processing), you will probably need a record-to-record match. This is impossible to get if you cannot specify a field or group of fields that is common to both files and that identifies only one record that is in the file you are changing.
Retrieving data using a key field that contains many duplicate values can slow Datatrieve response time. The primary key is the one you will be using most often to associate records stored in more than one file. You will want this operation to proceed as quickly as possible.
If your application is limited to one small data file, choose any field you want for a primary key and allow duplicate values if that is necessary.
Records are stored in ascending order according to the value of the
primary key. The DEFINE FILE command in Example 4.1, ''Defining a Data File'' specifies that records are stored so that the record
with the lowest value for EMPLOYEE_ID is positioned
first in the file and the record with the highest value for
EMPLOYEE_ID is last in the file.
The order of the values in the primary key field is the default sort order for the data file. This is the order
in which records are displayed when you enter the PRINT
command followed by the domain name. Chapter 11, "Accessing Data the Easy Way: Using Collections" and Chapter 12, "Accessing Data the Expert Way: Using RSEs and View Domains" discuss how you can change the sort order of
records for a particular operation.
4.1.2. Selecting Alternate Keys
If you expect to frequently ask Datatrieve to search for records based on values in fields other than the primary key field, you can define those fields as alternate keys. A name associated with a record (LAST_NAME from the EMPLOYEES domain, for example) is one field often selected as an alternate key.
Do not specify as a key any field that may contain many duplicate values. A field such as SEX is an example of a poor key choice. When Datatrieve has to process many duplicate values, a key-based search can sometimes take longer than a sequential one.
Confine your alternate key choices to fields you expect to use frequently when retrieving records. From the file maintenance point of view, the fewer keys you define, the better.
4.1.3. Selecting Group Field Keys
You might want to select a group field key when no single elementary field can uniquely identify each record in the file.
Suppose that your file stores information about products manufactured by a
number of vendors. For each vendor, there is more than one product and you
cannot be sure that different vendors select differing product codes. If you
need to ensure that one field identifies only one product, you can specify
as a primary key a group field (PRODUCT_ID) that contains both
vendor and product codes:
05 PRODUCT_ID. 10 VENDOR_CODE PIC X(5). 10 PRODUCT_CODE PIC X(20).
The following restrictions apply when you specify group field keys:
When you access the file using the key name, Datatrieve uses only the first elementary field in the key for indexed access.
Using the PRODUCT_ID example, Datatrieve directly finds the records with the matching VENDOR_CODE, and then sequentially searches those records to find the matching PRODUCT_CODE. The partial sequential search through records means that access by group field key proceeds more slowly than access by elementary field key. The performance difference is only significant when trying to pull together large numbers of records.
The first elementary field in the group must be alphanumeric, or Datatrieve does not perform key-based searching.
If you defined VENDOR_CODE as PIC 9(5), for example, Datatrieve would sort through records one by one to find the records you ask for. This performance lag could become problematic.
You cannot specify a list field as a key.
4.2. Defining Indexed Files
In almost all cases, it is better to define an indexed file because:
You can delete records only from an indexed file.
Only indexed files have keys.
Record access is faster when you can specify a key field to help Datatrieve find a record. When Datatrieve cannot use a key field, it has to perform an exhaustive search through the file for the record or records you want.
You can define more than one key for an indexed file. If you do, the first key you specify is the primary key and the others are alternate keys.
You cannot change the value of a primary key field. For each alternate key, however, you can choose whether or not users can modify the value in the key field after a record is stored (CHANGE or NO CHANGE). CHANGE is a default key characteristic for alternate keys.
For both primary and alternate keys, you can choose whether or not users can store more than one record with the same value in the key field (DUP or NO DUP). NO DUP is a default key characteristic for primary keys and DUP is the default for alternate keys.
The following command explicitly specifies all key characteristics, although the characteristics specified are the Datatrieve defaults for primary and alternate keys:
DEFINE FILE FOR EMPLOYEES KEY = ID (NO CHANGE, NO DUP), KEY = L_NAME (CHANGE, DUP)
4.3. Defining Sequential Files
Records in a sequential file are positioned in the order they are written to
the file. If you enter the PRINT command followed by the
domain name, the first record displayed is the first one stored in the file. The
last record displayed is the last one stored.
Sequential files have the advantage that report-writing procedures sometimes work more quickly when Datatrieve is processing records stored in a sequential file.
On the other hand, you cannot delete records from sequential files. You can approximate a delete operation for a sequential file by modifying all elementary field values to contain nothing but spaces or zeros. The "pseudo-erase" you must use with a sequential file, however, is time-consuming, wastes storage space, and can show up in displays and reports as a blank line. Also, record update and data retrieval operations proceed more slowly because Datatrieve must always exhaustively search the file for each record you need.
4.4. Designing Files
You create sequential or indexed RMS files in Datatrieve with the
DEFINE FILE command. If a file is large and randomly
accessed, you may want to optimize the file for better performance by using the
format of the DEFINE FILE command that includes the USING
fdl-file-spec clause. The USING
fdl-file-spec clause specifies that the file attributes
included in an existing file, defined using File Definition Language (FDL), be
used to create the RMS file. Such attributes can tune your RMS file for better
performance. See Section 4.4.1, ''Using EDIT/FDL to Design Your File'' for more information on using
EDIT/FDL.
If you do not use the USING fdl-file-spec clause, Datatrieve uses a default for an RMS file with the following parameters:
A bucket size of 2 (512-byte) disk blocks
A contiguous allocation of 3 blocks
Global buffer count of 0
File extent of 0 blocks
These RMS defaults can cause data in a large indexed file to become scattered over your disk, requiring time-consuming I/O operations.
Two important considerations are bucket size and index structure. These two file attributes are related; that is, the smaller the bucket size, typically the deeper the index structure. Frequently, a major problem is that bucket size is too large, and the resulting index structure is too flat.
A bucket is the unit of transfer between storage devices and I/O buffers in memory. Bucket size is the number of blocks in a bucket. A bucket size can be from 1 to 63 blocks (each block containing 512 bytes). As a general rule, a small bucket size is optimal for randomly accessed records. (However, buckets must contain enough room for record insertion or else bucket splitting occurs. Bucket splitting fragments your data and increase I/O overhead and time.)
A flat file has an index structure with only one level. If your file contains more than a few hundred records, a single level index bucket (also called a root bucket) can be very large. A large root bucket results in slow access time for a particular data record. The following figure shows the structure of a flat file:
Flat file structure and non-optimal bucket size may be the most significant reasons for slow access time. A file with two or three levels of index structure and smaller bucket size allows you to access data much more quickly. The following figure shows a file with two index levels:
The following sections describe RMS utilities that help you design a file with more optimal bucket size and index depth. They also explain how to optimize other file attributes such as global buffers.
4.4.1. Using EDIT/FDL to Design Your File
The RMS Edit/FDL utility (EDIT/FDL) creates and modifies files that contain specifications for RMS data files. The specifications are written in File Definition Language (FDL), and the files are called FDL files.
Using EDIT/FDL, you can experiment with attributes that are critical to the record-processing performance of your Datatrieve file. This is especially useful with large, indexed Datatrieve files. EDIT/FDL calculates the file allocation, file extent, and bucket size, thus optimizing I/O operations and minimizing file fragmentation. The Edit/FDL utility is described in detail in the VSI OpenVMS Record Management Utilities Reference Manual.
4.4.2. Creating the Data File
After you exit the Edit/FDL utility, EDIT/FDL creates a file definition
containing the attributes you described. The file has the default type
.FDL. When you create a Datatrieve data file,
you can specify that the attributes you include in the FDL file be applied
to your Datatrieve data file. You can do this from within Datatrieve using a
variation of the DEFINE FILE command in the following
format:
DEFINE FILE [FOR] domain-name USING fdl-file-spec
From outside of Datatrieve, you can use the Create/FDL utility to specify that the attributes included in an existing FDL file be used in the creation of your RMS file, for example:
CREATE/FDL = fdl-file-spec file-spec.dat
The file file-spec.dat is the empty data
file you are creating using the RMS Create/FDL utility. The utility uses the
file and record attributes you defined in the FDL file specification to
create this data file.
4.5. Planning for File Maintenance
The term file maintenance in this section refers to the methods you employ to optimize file storage requirements and to improve Datatrieve response time. The discussion provides an overview of the topic and is not a detailed explanation. For more information, refer to Chapter 22, "Improving Datatrieve Performance" and to the VSI OpenVMS Record Management Services Reference Manual.
4.5.1. Using RMS Utilities to Load and Maintain Files
If you are creating large data files or indexed files that contain many keys, you should use OpenVMS Record Management Services (RMS) utilities to create and load your files and to periodically maintain them. Doing this can improve Datatrieve response time. Using RMS utilities, you can accomplish the following maintenance tasks:
Consolidate disk storage of data and indexes.
Fewer read operations are required to a disk when the data and indexes are not scattered among many sections of the disk. (Data and indexes can get scattered as you update and add to the file.)
Adjust parameters for input-output operations so that they best accommodate the size of the record.
The transfer of more than one record at a time is often better for input-output operations. One record at a time is the Datatrieve default.
4.6. Defining Data Files for CDO Format Domains
You can determine the storage space assigned to your file by specifying one or
more of the following arguments with the DEFINE FILE command:
ALLOCATION, SUPERSEDE, MAX, KEY, and USING fdl-file-spec.
When you use the DEFINE FILE command to create a data file
for a domain that is stored in a CDO format dictionary and that is defined with
the WITH RELATIONSHIPS clause, Datatrieve creates a special CDD/Repository
entity called a CDD$FILE_DEFINITION file. This entity
contains information on the characteristics of your data file. A
CDD$FILE_DEFINITION definition can also be created
using the CDO utility’s DEFINE RMS_DATABASE command.
When you enter a DEFINE FILE command for a domain defined
using the WITH RELATIONSHIPS clause, you should be aware of the following
information on how Datatrieve uses the information on the DEFINE
FILE command line:
If the
DEFINE FILEcommand line contains no arguments other than the domain name, Datatrieve checks to see if there is a CDD$FILE_DEFINITION entity already associated with the domain. If Datatrieve finds a CDD$FILE_DEFINITION entity, Datatrieve uses the RMS file parameters stored in that entity when it defines the file. If Datatrieve does not find a CDD$FILE_DEFINITION entity, it creates the data file using the default RMS file parameters and then creates a CDD$FILE_DEFINITION entity to reflect those parameters.If the
DEFINE FILEcommand line contains one or more of the arguments listed in theDEFINE FILEsyntax (ALLOCATION, SUPERSEDE, MAX, KEY, USING fdl-file-spec) and a CDD$FILE_DEFINITION is already associated with the specified domain, Datatrieve compares the arguments with the contents of the CDD$FILE_DEFINITION entity. If the argument you listed was an FDL file specification, Datatrieve compares the RMS parameters of the FDL file with the contents of the existing CDD$FILE_DEFINITION entity.If the new arguments and the CDD$FILE_DEFINITION entity do not match or if the domain does not own a CDD$FILE_DEFINITION entity, Datatrieve creates a CDD$FILE_DEFINITION that reflects the new
DEFINE FILE(or FDL) arguments.Datatrieve also creates a new version of the domain that points to the new CDD$FILE_DEFINITION. If the domain is a CDD$DATABASE domain, Datatrieve uses the file parameters you specified when defining the RMS_DATABASE using the CDO utility. Datatrieve does not update the CDD$FILE_DEFINITION entity of a CDD$DATABASE domain and it ignores any arguments on the
DEFINE FILEcommand line for a CDD$DATABASE domain.
The following example of a DEFINE FILE command contains all
but the MAX option from this section. The domain definition specifies the file
DBA2:[BELL]FAMILY.DAT;1. Note that you specify a
KEY clause last:
DTR> DEFINE FILE FOR FAMILIES ALLOCATION = 30,
SUPERSEDE,
KEY = FATHER (DUP)For more information on CDO format dictionaries, see Chapter 20, "Using Datatrieve With a CDO Format Dictionary".
4.7. Restructuring Data
You might want to create new domains with data from existing ones in order to:
Add new fields to the record definition associated with the domain
Change field definitions to affect the values stored in the data file
Rearrange the fields in the record definition
Combine data from two or more domains
Create a copy of a domain for testing
Change the file organization
Change the index structure (key fields)
Create a domain that contains a subset of records contained in another domain
4.7.1. Changing Only File Organization, Storage Options, and Keys
Example 4.2, ''Restructuring a Domain to Change File Organization'' illustrates a procedure to follow when you want to make the following changes but do not want to lose data you have already stored:
Change file organization from sequential to indexed or the reverse.
Add, delete, or change keys for an indexed file.
Reserve more storage space for future file expansion (ALLOCATION clause).
Reserve maximum storage space for each variable-length record (MAX clause).
The following example changes the file EMPLOYEES.DAT from indexed to sequential. Comment lines explain the next input line:
DTR> ! Set up READ access to the original domain. Use an alias DTR> ! to identify the relationship between the record definition and DTR> ! the old file. (OLD is the alias in this example.) DTR> ! DTR> READY EMPLOYEES AS OLD DTR> ! DTR> ! Create an empty file with the DEFINE FILE command of your DTR> ! choice. DTR> ! DTR> DEFINE FILE FOR EMPLOYEES DTR> ! DTR> ! Set up WRITE access to your restructured domain. Use an alias DTR> ! to identify the relationship between the record definition and DTR> ! the new file. (NEW is the alias in this example.) DTR> ! DTR> READY EMPLOYEES AS NEW WRITE DTR> ! DTR> ! Store records in the new file with a Restructure statement. DTR> ! DTR> NEW = OLD DTR> ! DTR> ! End access to NEW and OLD. DTR> ! DTR> FINISH NEW, OLD DTR> ! DTR> ! You can now ready the domain with its given name and can DTR> ! access records in the new file. DTR>
The file the domain uses depends on how it is specified in the domain definition:
If no version number is included on the file specification in the domain definition (usually it is not), then the domain uses the file of that name with the highest version number in the directory where it is stored.
If a version number is included in the file specification in the domain definition, note the version number. Restructuring a domain that contains a file specification with a version number involves a step not included in Example 4.2, ''Restructuring a Domain to Change File Organization''. After you ready OLD for READ access but before you define a new file, edit the domain definition to remove the version number from the file specification. Then continue with the
DEFINE FILEcommand.
4.7.2. Changing Fields Defined in the Record Definition
You can make some record definition changes without performing a restructure operation. You can:
Add, change, or remove QUERY_HEADER, QUERY_NAME and EDIT_STRING clauses.
Change field names
If you have any procedures stored that use the old field or query names, remember to change these names in the procedures.
Add DEFAULT or MISSING VALUE clauses.
It is your responsibility, however, to make sure the value you specify agrees with any default values already stored in the file.
Add group fields.
Be careful when adding group fields if the record contains REDEFINES fields. Before adding group fields, you might want to review the rules that apply to the REDEFINES clause. See the VSI Datatrieve Reference Manual for more information.
4.7.3. Restructuring a Domain
You must restructure a domain if you want to do any of the following:
Add new fields to the record.
Change the order of the fields in the record.
Increase the size of a field.
Eliminate some fields from the record.
Decrease the size of a field or change its data type.
If you decrease the size of a field or change the type of data it stores, the existing values in records for that field can be truncated or stored incorrectly. This is just a warning. You can still decrease field size if you:
Plan to store new values for that field in all the records
Intend to decrease the size a text field (a field with Xs or As in the PIC clause) that has too many character positions for any values it needs to store
How you create the new domain depends on whether you want to keep the old domain. To keep the old domain when creating the new domain:
Define the new domain, its record, and its data file.
Ready the new domain for WRITE access and the old domain for READ access.
Use the Datatrieve Restructure statement to transfer field values from the old data file to the new one.
If you want to use any existing procedures on the new domain, you must edit them if they refer to fields not included in the new domain.
If the existing procedures refer only to fields included in the new domain, you need not change the procedures; you can ready the new domain with the old domain name as an alias (READY NEW AS OLD) and execute the existing procedures.
If you do not want to keep the old domain, you can still use the old procedures:
Define the new domain (NEW), record (NEW_REC), and file (NEW.DAT).
Use the Restructure statement to transfer the data from the old domain (OLD) to the new one (NEW).
Delete the definition of the old domain (OLD).
Enter another domain definition that uses the old domain name (OLD), the new record definition (NEW_REC), and the new data file (NEW.DAT):
DTR> DEFINE DOMAIN OLD USING NEW_REC ON NEW.DAT; DTR>
Check the old procedures for any references to field names not included in the new record definition and edit where necessary.
Note
You cannot use Datatrieve to restructure Oracle DBMS or relational domains. You must use RDO or the SQL interface to Rdb/VMS to restructure relational domains. You must use the Oracle DBMS DDL compilers and the DBO utility to restructure databases. However, you can store data from Oracle DBMS or relational domains in RMS domains.
The following example illustrates the steps you follow to change the size of the ZIP field in EMPLOYEES_REC from 5 to 9 characters:
DTR> ! If NO EDIT_BACKUP is in effect during your DATATRIEVE DTR> ! session (SHOW EDIT will tell you if it is), DTR> ! the following command will ensure that the old version DTR> ! of your record definition is not deleted. DTR> ! DTR>SET EDIT_BACKUPDTR> ! DTR> ! Set up READ access to the original domain. Use an alias DTR> ! to identify the relationship between the record definition and DTR> ! the old file. (OLD is the alias in this example.) DTR> ! DTR>READY EMPLOYEES AS OLDDTR> ! DTR> ! Edit the record definition. Do not change any field names. DTR> ! If you do, DATATRIEVE will not be able to store the field DTR> ! values. You can edit the record definition to change field DTR> ! names after the restructure operation is completed. DTR> ! DTR>EDIT EMPLOYEES_REC. . . . . . . . . DTR> ! DTR> ! DTR> ! Create an empty file with the DEFINE FILE command of your DTR> ! choice. DTR> ! DTR>DEFINE FILE FOR EMPLOYEES KEY = EMPLOYEE_IDDTR> ! DTR> ! Set up WRITE access to the restructured domain. Use an alias DTR> ! to identify the relationship between the record definition and DTR> ! the new file. (NEW is the alias in this example.) DTR> ! DTR>READY EMPLOYEES AS NEW WRITEDTR> ! DTR> ! Store records in the new file with a Restructure statement. DTR> ! DTR>NEW = OLDDTR> ! DTR> ! End access to OLD and NEW. DTR> ! DTR>FINISH OLD, NEWDTR> ! DTR> ! You can now ready the domain with its given name and DTR> ! DATATRIEVE accesses records in the new file. DTR>
The data file and the record definition the domain uses depends on how it is specified in the domain definition.
4.8. A Sample Domain
PROJECTS is a sample domain supplied in the CDD$TOP.DTR$LIB.DEMO dictionary:
DTR> SET DICTIONARY CDD$TOP.DTR$LIB.DEMO DTR> SHOW PROJECTS, PROJECT_REC DOMAIN PROJECTS USING PROJECT_REC ON PROJECT; RECORD PROJECT_REC 01 PROJECT_REC. 03 PROJ_CODE PIC 9(3) QUERY_NAME IS CODE. 03 PROJ_NAME PIC X(10) QUERY_NAME IS NAME. 03 MANAGER_NUM PIC 9(5) QUERY_NAME IS NUM. ;
The data file PROJECT.DAT is a sequential file and contains these records:
DTR> PRINT PROJECTS PROJ PROJ MANAGER CODE NAME NUM 002 GROUNDS 00006 005 BUILDING 2 00003 008 SHED 00002 018 RESEARCH 00006 037 PUB REL 00008 073 MATERIALS 00002
The following sections use this sample domain to illustrate ways to restructure data.
4.9. Adding Fields to a Record Definition
To create a new domain with two fields added to PROJECT_REC:
Define a new domain:
DTR> DEFINE DOMAIN NEW_PROJECTS DFN> USING NEW_PROJECT_REC ON NEWPROJ;
Edit the record definition to change the name of the record and add the desired field definitions:
DTR> EDIT PROJECT_REC
After you exit the editor, define a new data file for NEW_PROJECTS. This example creates an indexed file to replace the sequential file associated with PROJECTS:
DTR> DEFINE FILE FOR NEW_PROJECTS KEY=PROJ_CODE
You are now ready to transfer the data from the old domain to the new one.
4.10. Entering Data in the New File
To transfer data from the old domain to the new one, you must first ready both domains. Ready the new domain for WRITE or EXTEND access, and ready the old one for READ access. Then use the Restructure statement to transfer the data:
DTR> READY NEW_PROJECTS WRITE DTR> READY PROJECTS DTR> NEW_PROJECTS = PROJECTS DTR>
For each field name in NEW_PROJECT_REC that matches a field name in PROJECTS_REC, the Restructure statement transfers field values from each record in PROJECTS to a record in NEW_PROJECTS. For a field in the new record definition that does not match a field in the old one, Datatrieve initializes the field according to its data type and its field definition. For more information see the section on Restructure Statement in the VSI Datatrieve Reference Manual.
The data file associated with your new domain now has records in it. When you display the contents of the new domain on your terminal, you can see the two new fields and the same values contained in the PROJECTS domain:
DTR> PRINT NEW_PROJECTS PROJ PROJ PROJ MANAGER MGR NUM NAME COST NUM NAME 002 GROUNDS $0.00 00006 005 BUILDING 2 $0.00 00003 008 SHED $0.00 00002 018 RESEARCH $0.00 00006 037 PUB REL $0.00 00008 073 MATERIALS $0.00 00002 DTR>
4.11. Creating Record Subsets
You can create the new domain from a subset of the old domain’s records. You specify the limiting conditions in the RSE of the Restructure statement. For example, you can limit a domain to the projects of two managers:
DTR> READY NEW_PROJECTS WRITE DTR> READY PROJECTS DTR> NEW_PROJECTS = PROJECTS WITH MANAGER_NUM EQ 2, 6 DTR> PRINT NEW_PROJECTS PROJ PROJ PROJ MANAGER MGR NUM NAME COST NUM NAME 002 GROUNDS $0.00 00006 008 SHED $0.00 00002 018 RESEARCH $0.00 00006 073 MATERIALS $0.00 00002 DTR>
Note that the Restructure statement relies on record definitions having the
same field names. If you want to change field names, you can either edit the
record definition after the restructure operation or use a STORE
USING statement instead of the Restructure statement. Chapter 13, "Reporting Hierarchical Records" contains an example of using STORE
USING to restructure data.
4.12. Combining Data From Two or More Domains
Another reason for creating a new domain is to combine the data from two or
more existing domains. If you frequently use the same CROSS clause to form
record streams and you cannot use a view domain because you need to store
records in the domain, you can define a new domain to meet your needs. For
example, when you enter data in the file of NEW_PROJECTS, you can
also include the names of the managers from another domain,
MANAGERS:
DTR> SHOW MANAGERS, MANAGER_REC DOMAIN MANAGERS USING MANAGER_REC ON MGR; RECORD MANAGER_REC USING 01 MANAGER. 03 MANAGER_NUM PIC 9(5). 03 MGR_NAME PIC X(8). ; DTR>
Displaying the records from MANAGERS shows that values in the
field MANAGER_NUM correspond to the values in the
MANAGER_NUM field in the domain PROJECTS:
DTR> READY MANAGERS; PRINT MANAGERS MANAGER MGR NUM NAME 00002 BLOUNT 00003 GERBLE 00005 GORFF 00006 PUFFNER 00008 FEBNELL DTR>
Using a CROSS clause in the RSE of the Restructure statement, you
can match MANAGERS records with the corresponding
PROJECTS records. The OVER clause allows you to
match those records with matching values in the MANAGER_NUM fields.
You must ready all three domains to transfer the data from PROJECTS
and MANAGERS to NEW_PROJECTS:
DTR> READY NEW_PROJECTS WRITE DTR> READY PROJECTS DTR> READY MANAGERS DTR> NEW_PROJECTS = PROJECTS CROSS CON> MANAGERS OVER MANAGER_NUM DTR>
Displaying the records in NEW_PROJECTS shows the result of the
Restructure with a CROSS clause in the RSE. Notice that the value of
PROJ_COST in each record is 0; the field did not
exist in either of the source domains:
DTR> PRINT NEW_PROJECTS PROJ PROJ PROJ MANAGER MGR NUM NAME COST NUM NAME 002 GROUNDS $0.00 00006 PUFFNER 005 BUILDING 2 $0.00 00003 GERBLE 008 SHED $0.00 00002 BLOUNT 018 RESEARCH $0.00 00006 PUFFNER 037 PUB REL $0.00 00008 FEBNELL 073 MATERIALS $0.00 00002 BLOUNT DTR>
Sometimes you might need to merge records from two domains that store the same
data using different field names. In this case, you cannot simply ready the two
domains and use a Restructure statement (domain-name1 =
domain-name2) to store the records from one data file
into the other. You must use the FOR statement and a
STORE statement that explicitly stores each elementary
field. If the two domains you are merging have the same names, you have to use
an alias clause when you ready them.
In the following example, the domains have different names, so the alias
clause is unnecessary. All the records from EMPLOYEES_BOSTON are
being stored in EMPLOYEES_ALL. In the STORE
statement, the field names for EMPLOYEES_ALL are left of the equal
sign (=) and the field names for EMPLOYEES_BOSTON are on the
right:
DTR> READY EMPLOYEES_BOSTON
DTR> READY EMPLOYEES_ALL SHARED WRITE
DTR> FOR EMPLOYEES_BOSTON
CON> STORE EMPLOYEES_ALL USING
CON> BEGIN
CON> EMPLOYEE_ID = EMP_ID
CON> LAST_NAME = NAME_LAST
CON> FIRST_NAME = NAME_FIRST
CON> MIDDLE_INITIAL = INIT
. . .
. . .
. . .
CON> ENDThis operation uses statements that have not been discussed so far in this
book. Refer to Chapter 8, "Maintaining Data" for more information about the
STORE statement.
4.13. Using the Alias Clause to Restructure a Domain
You can use the alias clause to restructure a domain. When you use this method, you can make use of the difference between the record definition in the dictionary and the record definition controlling a readied domain in your workspace. For example, when you ready YACHTS as OLD_YACHTS, the record definition YACHT is associated with the data file YACHT.DAT.
If you then edit and redefine the format of the record definition YACHT, this change to the record is not associated with the readied domain (OLD_YACHTS); it is only associated with YACHTS the next time you ready the domain.
This method lets you make use of the difference between the record definition in the dictionary and the record definition controlling a readied domain in your
workspace. The change in the record definition does not take effect until you
use the FINISH command to finish the domain and the
READY command to ready it again. Simply readying the
domain again does not activate the new record definition.
You can make use of this fact if you want to change a record definition or change the type of file organization of a domain’s data file. The following steps show you how to change the record definition or file type without redefining the domain. In both cases, you define a new data file and transfer the data with the Restructure statement:
Ready the domain as an alias:
DTR> READY YACHTS AS OLD_YACHTS DTR> SHOW READY Ready sources: OLD_YACHTS: Domain, RMS sequential, protected read <CDD$TOP.INVENTORY.YACHTS;1> No loaded tables. DTR>Change the record definition with the
EDIT record-path-namecommand, creating a later version of the same record definition.Define a new data file for the domain. This creates a new version of the file associated with the readied domain but does not interfere with the link between the domain you already readied and the original version of the data file. Do not use the SUPERSEDE option of the
DEFINE FILEcommand:DTR> DEFINE FILE FOR YACHTS KEY = TYPE DTR>
Ready the domain as a different alias and specify the WRITE access mode. The
READYcommand uses the new version of the record definition and opens the new data file created by theDEFINE FILEcommand:DTR> READY YACHTS AS NEW_YACHTS WRITE DTR> SHOW READY Ready sources: NEW_YACHTS: Domain, RMS indexed, protected write <CDD$TOP.INVENTORY.YACHTS;1> OLD_YACHTS: Domain, RMS sequential, protected read <CDD$TOP.INVENTORY.YACHTS;1> No loaded tables. DTR>Now use the Restructure statement to move the data from the original data file to the new one. Datatrieve transfers data from fields in the original data file into fields with the same names in the new data file:
DTR> NEW_YACHTS = OLD_YACHTS DTR>
4.14. Changing the Organization of a Data File
You can use the alias clause of the READY command to change
the organization of a data file associated with a domain. The following example
replaces the indexed data file associated with YACHTS with a
sequential data file:
DTR> READY YACHTS AS OLD DTR> DEFINE FILE FOR YACHTS DTR> READY YACHTS AS NEW WRITE DTR> NEW = OLD DTR> FIND NEW [113 records found] DTR>
Chapter 5. Defining Tables
This chapter explains how to create and use dictionary tables and domain tables. Dictionary and domain table definitions can be stored either in the DMU or in the CDO format dictionary of the CDD/Repository dictionary system.
Both types of Datatrieve tables associate pairs of values. A dictionary table might pair zip codes with corresponding towns and states, for example. A domain table might associate employee identification numbers with employee names.
To save storage space, store the shorter of the two values in several domains in your database and store the longer value only in a dictionary table or in one domain that is the base for a domain table. You can access the longer values through the table with simple clauses that are easy to remember.
You can also validate field values by using a table. This table function is useful when you need to store the same field in more than one domain. Using a table, you can make sure that the employee identification number for a particular employee is the same in all the places it is stored.
You create both types of Datatrieve tables with the DEFINE
TABLE command. The syntax for the command differs, depending on the
kind of table you want to create. The name you choose for a table definition cannot
duplicate the name of another object in the compatibility dictionary. Table names
must conform to the following conventions:
Must begin with a letter
Can consist only of letters, digits, hyphens, and underscores
Must not duplicate a Datatrieve keyword
Must not contain blanks
Must be from 1 to 31 characters long
Must end with a letter or digit
The examples that follow refer to definitions created specifically for the sample personnel system described in Chapter 3, "Defining Domains". These definitions are not included as part of the sample definitions that Datatrieve provides in either NEWUSER.COM or CDD$TOP.DTR$LIB.DEMO. You cannot duplicate the results described in this chapter using the sample PERSONNEL database that is included in the CDD$TOP.DTR$LIB.DEMO.RDB directory.
5.1. Creating Dictionary Tables
Datatrieve responds faster when you use a dictionary table than when you use a domain table. That is because the table definition itself specifies all the value pairs you want to access.
The following example creates the dictionary table AREA_CODE_TABLE. This table pairs telephone area code values with corresponding state codes. The comment lines give you information about the next requirement or option in the command:
DTR> ! Start your definition with the keywords DEFINE TABLE, DTR> ! followed by the name you want for the table. DTR> ! DTR> DEFINE TABLE AREA_CODE_TABLE DFN> ! DFN> ! You can include the optional QUERY_HEADER clause to specify DFN> ! a column header for table values when you display them. DFN> ! DFN> QUERY_HEADER IS "STATE" DFN> ! DFN> ! You should include the optional EDIT_STRING clause to specify DFN> ! how you want table values displayed. If you omit this clause DFN> ! and do not include an edit string in a PRINT statement, DFN> ! DATATRIEVE uses X(80) to display the values. DFN> ! DFN> EDIT_STRING IS X(20) DFN> ! DFN> ! Now enter the value pairs. The colon ( : ) is required to DFN> ! separate values in the pair. Any spaces before and after DFN> ! the colon are optional. You need the quotation marks to DFN> ! preserve lowercase values or to enter values that are more DFN> ! than one word (General Sales, for example). DFN> ! DFN> "603" : "NH" DFN> "617" : "MA" DFN> "201" : "NJ" DFN> ! DFN> ! The ELSE clause is optional. If you include it, DATATRIEVE DFN> ! substitutes it for any values it finds in a domain and cannot DFN> ! find in the table. If you omit it, DATATRIEVE displays an DFN> ! error message when it cannot find the value in the table. DFN> ! DFN> ELSE "OOPS" DFN> ! DFN> ! You must end your definition with the keyword END_TABLE. DFN> ! DFN> END_TABLE DTR>
You can see how your table works with some simple PRINT
statements that include a VIA clause. Note how the value associated with the
ELSE clause tells you when an area code value is not listed in the table:
DTR> PRINT "603" VIA AREA_CODE_TABLE STATE NH DTR> PRINT "111" VIA AREA_CODE_TABLE STATE OOPS
As you define a dictionary table, Datatrieve checks for syntax errors. For
example, if you enter a semicolon (;) in place of the required colon (:),
Datatrieve prints an error message on your terminal and aborts the
DEFINE TABLE command. To correct the error, type
EDIT and press the Return key. You
cannot follow EDIT with the name of the table until your
definition is stored. Remember that while you are using the editor, Datatrieve
does not check for syntax errors. If you get an error message when you exit the
editor, you can immediately type EDIT and press the
Return key to try again.
5.2. Modifying the Table
Now modify your PHONES records to include some area codes, making sure that
you include at least one area code that is not in the table. The last time you
modified data in PHONES, you only wanted to change one record. The following
example includes a FOR statement (read it as "FOR every
PHONES record"), so Datatrieve lets you add all the area codes:
DTR> READY PHONES MODIFY
DTR> FOR PHONES
CON> BEGIN
CON> PRINT
CON> MODIFY USING AREA_CODE = *.AREA_CODE
CON> PRINT
CON> END
LAST FIRST AREA PHONE
NAME NAME CODE NUMBER
BELL LISA 555-8275
Enter AREA_CODE: 603
LAST FIRST AREA PHONE
NAME NAME CODE NUMBER
BELL LISA 603 555-8275
CLERC PHYLLIS 555-9907
Enter AREA_CODE: 603
CLERC PHYLLIS 603 555-9907
LINTE JANE 555-5678
Enter AREA_CODE: 603
LINTE JANE 603 555-5678
SCHUTZ BONNIE 555-8712
Enter AREA_CODE: 617
SCHUTZ BONNIE 617 555-8712
WINTLOW JOHN 555-6789
Enter AREA_CODE: 205
WINTLOW JOHN 205 555-6789You can now use a VIA AREA_CODE_TABLE expression to
display the state that corresponds to the area code for each record.
PHONES_REC, as it appears in the PRINT
statement of the following example, refers to the top-level field in the record
definition rather than the record name as it is stored in the dictionary:
DTR> FOR FIRST 5 PHONES
CON> PRINT ALL PHONES_REC, AREA_CODE VIA AREA_CODE_TABLE
LAST FIRST AREA PHONE
NAME NAME CODE NUMBER STATE
BELL LISA 603 555-8275 NH
CLERC PHYLLIS 603 555-9907 NH
LINTE JANE 603 555-5678 NH
SCHUTZ BONNIE 617 555-8712 MA
WINTLOW JOHN 205 555-6789 OOPSTables can save you a great deal of storage redundancy when they contain data that you use with more than one domain. Tables also help you validate fields that must be stored in more than one domain. In a set of domains used by the personnel department in a company, for example, the employee number would need to be stored in more than one domain.
5.3. Creating Domain Tables
A domain table definition contains a pair of field names; it does not contain all the value pairs you want to associate. The values for the fields are stored in the data files associated with domains. Usually several domains contain values for the shorter field and only one domain contains values for the longer field. In the sample personnel system used in this book, for example, several domains contain EMPLOYEE_ID values but only the EMPLOYEES domain contains EMPLOYEE_NAME values.
The following example defines the domain table WHO_IS_IT that
associates EMPLOYEE_ID with EMPLOYEE_NAME:
DTR> ! Start your definition with DEFINE TABLE, followed by the DTR> ! name of your table. Then enter FROM, followed by the name DTR> ! of the domain containing both fields you want to relate. DTR> ! DTR> DEFINE TABLE WHO_IS_IT FROM EMPLOYEES DFN> ! DFN> ! You can include the optional QUERY_HEADER clause to specify DFN> ! a column header for table values when you display them. If DFN> ! the column header uses fewer character positions than the DFN> ! associated table value, you can include spaces to position DFN> ! the header where you want it. DFN> ! DFN> QUERY_HEADER IS " EMPLOYEE NAME " DFN> ! DFN> ! You should include the optional EDIT_STRING clause to specify DFN> ! how you want table values displayed. If you omit this clause DFN> ! and do not include an edit string in a PRINT statement, DFN> ! DATATRIEVE uses X(80) to display the values. DFN> ! DFN> EDIT_STRING IS X(36) DFN> ! DFN> ! Now enter the field names. The colon ( : ) is required to DFN> ! separate them. Any spaces before and after the colon are DFN> ! optional. The keyword USING is also optional. DFN> ! DFN> USING EMPLOYEE_ID : EMPLOYEE_NAME DFN> ! DFN> ! The ELSE clause is optional. If you include it, DATATRIEVE DFN> ! substitutes it for any values it finds in one domain and cannot DFN> ! find in the other (table) domain. If you omit it, DATATRIEVE DFN> ! displays an error message when it cannot find the value in the DFN> ! domain on which the table is based. Use quotation marks to pre- DFN> ! serve lowercase letters or if the ELSE value contains spaces. DFN> ! DFN> ELSE "ID not in EMPLOYEES." DFN> ! DFN> ! You must end your definition with the keyword END_TABLE. DFN> ! DFN> END_TABLE DTR>
5.4. Using Tables
Tables are useful in record definitions both for validation and for saving storage space. The record for PERSONNEL can be improved by using tables. The current definition of PERSONNEL_REC contains the following field definition:
05 EMPLOYEE_STATUS PIC IS X(11)
QUERY_NAME IS STATUS
QUERY_HEADER IS "STATUS"
VALID IF STATUS EQ "TRAINEE","EXPERIENCED".EMPLOYEE_STATUS is an 11-byte field that takes only two values:
TRAINEE or EXPERIENCED. Rather than storing the 11
bytes for each record, you could use a table to translate the value for a 1-byte
status code. This technique saves 10 bytes of storage per record and reduces
time for data entry.
The following example shows the definition for the dictionary table
STATUS_TABLE:
DTR> DEFINE TABLE STATUS_TABLE DFN> E : EXPERIENCED DFN> T : TRAINEE DFN> END_TABLE
You can now edit PERSONNEL_REC, deleting the EMPLOYEE_STATUS field and adding two new fields that reference the table. EMP_STATUS_CODE validates entries for the status code by checking the table. EMP_STATUS, a virtual field, translates these code entries to either "EXPERIENCED" or "TRAINEE":
05 EMP_STATUS_CODE PIC X
QUERY_NAME IS S_CODE
VALID IF EMP_STATUS_CODE IN STATUS_TABLE.
05 EMP_STATUS COMPUTED BY
EMP_STATUS_CODE VIA STATUS_TABLE.Because the new definition defines a record with 10 fewer bytes, you need to
define a new file for PERSONNEL. The following procedure illustrates how to
define a new file for PERSONNEL and restructure the data to match the new record
definition with the STORE USING statement:
DTR> SHOW RESTRUCTURE_PERSONNEL
PROCEDURE RESTRUCTURE_PERSONNEL
READY PERSONNEL AS OLD
DEFINE FILE FOR PERSONNEL KEY = ID
READY PERSONNEL AS NEW WRITE
FOR O IN OLD STORE N IN NEW USING
BEGIN
N.ID = O.ID
CHOICE
O.EMPLOYEE_STATUS = "EXPERIENCED" THEN
N.EMP_STATUS_CODE = "E"
O.STATUS = "TRAINEE" THEN
N.EMP_STATUS_CODE = "T"
END_CHOICE
N.FIRST_NAME = O.FIRST_NAME
N.LAST_NAME = O.LAST_NAME
N.DEPT = O.DEPT
N.START_DATE = O.START_DATE
N.SALARY = O.SALARY
N.SUP_ID = O.SUP_ID
END
END_PROCEDURE
DTR>5.5. Using Datatrieve Tables
Table definitions, like all dictionary objects created by Datatrieve, have associated ACLs that determine who can use them. For more information on ACLs, see the appendix on Access Privileges Tables in the VSI Datatrieve Reference Manual.
5.5.1. Accessing Values in Tables
When you access a table, it is loaded into your Datatrieve workspace where
it remains until you either remove it or exit the session. The SHOW
READY command displays the names of any tables currently in
your workspace.
If the table is loaded into your Datatrieve workspace at the time you edit
the definition, you must remove the table from your workspace and access it
again before the changes you made can take effect. To remove a table from
your workspace, enter RELEASE followed by the table
name.
You use the Datatrieve keywords IN, NOT IN, and VIA to access table values. The following example illustrates how these keywords work:
DTR> READY JOB_HISTORY
DTR> ! Form a collection of all records in JOB_HISTORY whose
DTR> ! department codes are not in the table.
DTR> !
DTR> FIND ALL JOB_HISTORY WITH DEPARTMENT_CODE NOT IN
CON> DEPARTMENTS_TABLE
[705 records found]
DTR> !
DTR> ! Print values for two fields in the collection’s records
DTR> ! and append a related field to each record by accessing the
DTR> ! table. Note that the value in the ELSE clause of the table
DTR> ! definition appears.
DTR> !
DTR> PRINT ALL EMPLOYEE_ID, DEPARTMENT_CODE,
CON> DEPARTMENT_CODE VIA DEPARTMENTS_TABLE
EMPLOYEE DEPARTMENT DEPARTMENT
ID CODE NAME
00164 MBMN Invalid Dept.
00164 MCBM Invalid Dept.
00165 ELGS Invalid Dept.
00165 PHRN Invalid Dept.
00166 MB Ctrl/C
^C
Execution terminated by operator.
DTR> !
DTR> ! Assume these values are valid department codes that you
DTR> ! need to add to the table. By reducing the current collection
DTR> ! to unique department code values and then printing the
DTR> ! reduced collection, you get a list of what needs to be
DTR> ! added to DEPARTMENTS_TABLE.
DTR> !
DTR> REDUCE TO DEPARTMENT_CODE
DTR> PRINT ALL
DEPARTMENT
CODE
ELEL
ELGS
ELMC
MBMF
MBMN
.
.
.
DTR>You edit your table definition by entering EDIT
followed by the table name. Your table definition is copied to an editing
buffer, where you can make the changes you want.
5.5.2. Validating Values With Tables
By referring to a dictionary or domain table in a VALID IF clause in a record definition, you can validate data entered for a field before it is stored in a record:
DTR> SHOW JOB_HISTORY_REC
RECORD JOB_HISTORY_REC USING
01 JOB_HISTORY_REC.
05 DEPARTMENT_CODE PIC X(4)
VALID IF DEPARTMENT_CODE IN
DEPARTMENTS_TABLE.
05 EMPLOYEE_ID PIC X(5)
VALID IF EMPLOYEE_ID IN
WHO_IS_IT.
05 JOB_CODE PIC X(4).
05 JOB_START USAGE DATE.
05 JOB_END USAGE DATE.
05 REVIEW_DATE USAGE DATE.
05 SUPERVISOR_ID PIC X(5).
;
DTR> ! When users store or modify records in the
DTR> ! JOB_HISTORY domain, DATATRIEVE checks a
DTR> ! value entered for DEPARTMENT_CODE against
DTR> ! codes in DEPARTMENTS_TABLE and a value entered
DTR> ! for EMPLOYEE_ID against codes in WHO_IS_IT.
DTR> !
DTR> READY JOB_HISTORY WRITE
DTR> STORE JOB_HISTORY
Enter DEPARTMENT_CODE: XXXX
Validation error for field DEPARTMENT_CODE.
Re-enter DEPARTMENT_CODE: SALE
Enter EMPLOYEE_ID: 00000
Validation error for field EMPLOYEE_ID.
Re-enter EMPLOYEE_ID: 00168
Enter JOB_CODE:
. . .
. . .
. . .
DTR>5.5.3. Using Domain Tables Based on Relational Sources
Before you issue any command that calls a domain table based on a relational source, you must end access to the relational source. This is a restriction that exists with relational sources.
5.6. Choosing Between Dictionary and Domain Tables
To decide which type of table to use, keep the following guidelines in mind:
Dictionary tables lend themselves to interactive updates. You add or change entries to the table directly by editing the table definition. In addition, Datatrieve works faster with dictionary tables than with domain tables.
Because a domain table does not contain the pairs of values it relates, it is automatically updated when the associated fields of its domain are changed. For applications where the values associated by a table change often, a domain table can be easier to maintain. Any statement that changes or adds records to the domain that is the basis for the table will also update the table itself.
Part III. Data Management (Storing, Managing, Reading, Erasing, RSEs)
Chapter 6. Starting and Ending Access to Data
This chapter explains data access when you are using domains associated with OpenVMS Record Management Services (RMS) data files.
You access data with a READY command, which contains the name
of the domain or domains associated with the records you want to see. The
SHOW READY command tells you what domains are currently
readied and what options were selected for their use. You end access to data with a
FINISH command or by exiting your Datatrieve session.
The following example shows some sample READY and
FINISH commands for a Datatrieve session. It also shows how a
user who needs to store data for a new employee might first check information stored
in the JOBS domain and JOBS_TABLE table:
DTR> SHOW DOMAINS
Domains:
* COLLEGES;1 * DEGREES;1 * EMPLOYEES;1 * JOBS;1
* JOB_HISTORY;1 * SALARY_HISTORY;1
DTR> READY JOBS
DTR> SHOW FIELDS FOR JOBS
JOBS
JOB
JOB_CODE <Character string, primary key>
MINIMUM_SALARY <Number>
MAXIMUM_SALARY <Number>
WAGE_CLASS <Character string>
DTR> PRINT JOB_CODE, JOB_CODE VIA JOBS_TABLE, MINIMUM_SALARY,
CON> MAXIMUM_SALARY, WAGE_CLASS OF JOBS WITH JOB_CODE CONTAINING
CON> "GM"
JOB JOB MINIMUM MAXIMUM WAGE
CODE TITLE SALARY SALARY CLASS
APGM Associate Programmer $15,000.00 $24,000.00 4
PRGM Programmer $20,000.00 $35,000.00 4
SPGM Systems Programmer $25,000.00 $50,000.00 4
DTR> READY EMPLOYEES SHARED WRITE, JOB_HISTORY SHARED WRITE,
CON> SALARY_HISTORY SHARED WRITE
DTR> SHOW READY
Ready sources:
SALARY_HISTORY: Domain, RMS indexed, shared write
<CDD$TOP.PERSONNEL.SALARY_HISTORY;1>
JOB_HISTORY: Domain, RMS indexed, shared write
<CDD$TOP.PERSONNEL.JOB_HISTORY;1>
EMPLOYEES: Domain, RMS indexed, shared write
<CDD$TOP.PERSONNEL.EMPLOYEES;1>
JOBS: Domain, RMS indexed, protected read
<CDD$TOP.PERSONNEL.JOBS;1>
Loaded tables:
JOBS_TABLE: Dictionary table
<CDD$TOP.PERSONNEL.JOBS_TABLE;2>
DTR> FINISH JOBS
DTR> RELEASE JOBS_TABLE
DTR> SHOW READY
Ready sources:
SALARY_HISTORY: Domain, RMS indexed, shared write
<CDD$TOP.PERSONNEL.SALARY_HISTORY;1>
JOB_HISTORY: Domain, RMS indexed, shared write
<CDD$TOP.PERSONNEL.JOB_HISTORY;1>
EMPLOYEES: Domain, RMS indexed, shared write
<CDD$TOP.PERSONNEL.EMPLOYEES;1>
No loaded tables.
DTR> STORE EMPLOYEES; STORE JOB_HISTORY; -
CON> STORE SALARY_HISTORY
. . .
. . .
. . .
DTR> FINISH
DTR> SHOW READY
No ready sources.
No loaded tables.
DTR>6.1. Readying Domains
When you ready a domain, Datatrieve loads the record definition associated
with the domain into your workspace and opens the associated data file. In
addition to the domain name, a READY command can include the
following:
An alternate name (alias) for the domain while you are using it
The access options other users have to a domain while you are using it (PROTECTED, SHARED, or EXCLUSIVE)
The access mode you need for the operation you want to perform (READ, WRITE, MODIFY, or EXTEND)
You have to specify an alias only if two domains with the same given name will
be ready at the same time. This situation can occur when you are accessing
domains stored in different dictionary directories and when you are
restructuring your database. In the command READY EMPLOYEES AS NEW
WRITE, for example, NEW is an alias. When you ready a domain under
an alias, you must use the alias rather than the domain’s given name in any
subsequent statements or commands during that session. Datatrieve does not
recognize the readied domain if you use the given name.
PROTECTED is the access option that applies if you do not specify one. PROTECTED means that if other users ready the domain while you are using it, they can use it only to retrieve and display data. They cannot modify, erase, or add records.
READ is the access mode that applies if you do not specify one. READ means that you can use the domain only to retrieve and display data. You cannot store, erase, or modify records without readying the domain again to specify a new access mode.
In addition to the domain definition privileges, you also need privileges to an associated record definition.
For more information on access modes and options, see the VSI Datatrieve Reference Manual.
6.1.1. Readying Domains Defined With Relationships
When you ready a domain, Datatrieve determines the dictionary source of
the domain through the path name used in the READY
command. If you use only the domain’s given name, Datatrieve searches the
contents of your default directory. If you use a relative path name,
Datatrieve searches the directory relative to your default directory.
If a CDO format domain was defined using the WITH RELATIONSHIPS clause of
the Datatrieve DEFINE DOMAIN command, you may receive
informational messages when you ready that domain. CDD/Repository flags an
object with a message if the object has been affected by a change to another
object. For example, if you modify a record definition, CDD/Repository
attaches a message to any domain definition that refers to that record. When
you go to ready that domain, Datatrieve displays the message.
Suppose, for example, that the domain YACHTS_CDO was
originally defined with the relationships clause using the record
YACHT_CDO_REC;1, which was later redefined to produce
YACHT_CDO_REC;2. If you ready YACHTS_CDO, you
receive a message as in the following example:
DTR> READY YACHTS_CDO "YACHTS_CDO" uses an entity which has new versions, triggered by RECORD entity "DISK$1:[KIRK.DTR]SAMPLE.YACHT_CDO_REC;2". [Record is 41 bytes long.] DTR>
This message is informational. It lets you know that a discrepancy may exist between versions of the objects. While you may be able to continue working in Datatrieve, this is unwise until you have checked the update to determine whether it created a discrepancy between the actual layout of the data and that expected by Datatrieve. because you may find that your data is invalid.
You might also receive messages in situations like the following:
The domain YACHTS_CDO is defined using the record YACHT_CDO_REC. It contains a field PRICE;1, which was changed through CDO with the CDO
CHANGEcommand (which modifies an object, but does not create a new version). This would generate a message indicating that the record YACHT_CDO_REC may be invalid because of the change to the PRICE field.The view domain SAILBOATS_CDO refers to the domain YACHTS_CDO, which refers to the record YACHT_CDO_RECDatatrieve, described in the previous example (in which the PRICE field was changed). When you ready SAILBOATS_CDO, you receive the same message you received when you readied YACHTS_CDO.
6.1.2. Readying a CDD$RMS_DATABASE
If you use the CDO utility to define a
CDD$DATABASE based upon a
CDD$RMS_DATABASE and a record defined using the
CDO utility, Datatrieve lets you ready that database directly. For example,
the CDO utility was used to define the record
CDO_REC. The CDO utility was then used to
define a CDD$RMS_DATABASE called
CDO_RMS based on
CDO_REC; the CDO DEFINE
DATABASE command was used to define the database
CDO_DB. To ready this database in Datatrieve,
the following command would be used:
DTR> READY CDO_DB
For more information on the CDD$DATABASE and CDD$RMS_DATABASE, see Chapter 20, "Using Datatrieve With a CDO Format Dictionary".
6.1.3. Defining Your Own Default Access
Datatrieve provides the following access options by default, depending on
the source you are readying, if you do not supply an access option on the
READY command line:
PROTECTED (RMS sources)
SNAPSHOT (Relational sources)
SHARED (Oracle DBMS sources)
If you want to define your own default access option, use the logical name DTR$READY_MODE.
Datatrieve checks the definition of
DTR$READY_MODE only when an access option is
not found on the READY command line. You can assign a
default to DTR$READY_MODE as follows:
Use the Datatrieve function FN$CREATE_LOG. The following example changes the
READYaccess of the RMS domainYACHTSfrom its default,PROTECTED, toSHAREDaccess:DTR> FN$CREATE_LOG ("DTR$READY_MODE", "SHARED") DTR> FINISH DTR> READY YACHTS DTR> SHOW READY Ready sources: YACHTS: Domain, RMS indexed, shared read <_CDD$TOP.DTR32.DAB.YACHTS;3>Use the DCL
DEFINEcommand as follows:$ DEFINE DTR$READY_MODE "SHARED"
Use a combination of a synonym and a logical assignment:
DTR> DECLARE SYNONYM EXCL FOR EXCLUSIVE DTR> FN$CREATE_LOG ("DTR$READY_MODE", "EXCL") DTR> READY YACHTS DTR> SHOW READY Ready sources: YACHTS: Domain, RMS indexed, exclusive read <CDD$TOP.DTR32.DAB.YACHTS;3>
If you define DTR$READY_MODE using FN$CREATE_LOG, the definition lasts only until the end of the Datatrieve session. You can change the definition during the session, however.
See the VSI Datatrieve Reference Manual for information about access option error handling.
6.2. Finishing Domains
Use the FINISH command to end your control over one or more
domains. If you specify more than one domain name in the
FINISH command, enter commas to separate the domain
names. If you enter the keyword FINISH by itself, or if you
enter FINISH ALL, you end your control over all the domains
you have readied.
Finishing domains is especially important if you have readied any domains with the PROTECTED or EXCLUSIVE access option and other users access those domains. The PROTECTED option keeps other users from updating the data file. The EXCLUSIVE access option locks out other users entirely. In addition, if you ready a domain with the EXCLUSIVE access option and that domain is the base for a domain table, you must finish the domain before you can use the domain table.
6.3. Controlling the Input of Dates and Currency
You can define OpenVMS logical names to control the way Datatrieve handles the interpretation of dates and currency symbols. You can control the format Datatrieve uses to interpret the input of dates by defining the logical name DTR$DATE_INPUT. This logical name affects only the interpretation of the input of dates and has nothing to do with the edit strings used for the output of dates.
You define DTR$DATE_INPUT with a three-character string containing one D for day, one M for month, and one Y for year. Enclose the three-character string in quotation marks.
The command DEFINE DTR$DATE_INPUT "MDY" defines a date
input of 03/12/09 as March 12, 1909. MDY is the default interpretation
Datatrieve uses for input of dates if you do not define
DTR$DATE_INPUT.
The following table shows the different combinations you can use:
| Format | Input | Definition |
|---|---|---|
|
"MDY" |
03/12/09 |
March 12 1909 |
|
"DMY" |
03/12/09 |
December 3 1909 |
|
"YDM" |
03/12/09 |
September 12 1903 |
|
"YMD" |
03/12/09 |
December 9 1903 |
|
"DYM" |
03/12/09 |
September 3 1912 |
|
"MYD" |
03/12/09 |
March 9 1912 |
The format you choose also controls the format Datatrieve uses to convert six-digit numeric strings (such as 810210) to dates.
You can define DTR$DATE_INPUT at the DCL command
level, or you can put the appropriate DEFINE command in your
login command file. The following table shows the three logical names you can
define to control the currency defaults of the OpenVMS operating system.
| Logical Name | Default |
|---|---|
| SYS$CURRENCY | $ |
| SYS$DIGIT_SEP | , |
| SYS$RADIX_POINT | . |
The following examples demonstrate the effects of redefining these logical names. In the first example, you redefine the default values:
$ DEFINE SYS$CURRENCY "# " $ DEFINE SYS$DIGIT_SEP "." $ DEFINE SYS$RADIX_POINT ","
In the next example, you can see the results of the changed definitions:
DTR> DECLARE NUM PIC 9(6)V99. DTR> NUM = 12345.67 DTR> PRINT NUM USING $$$,$$$.99 NUM # 12.345,67
Chapter 7. Record Selection Expressions
The following list shows typical operations you perform when you access data:
Displaying a group of records (
PRINT,LIST,REPORT, orPLOTstatements)Forming a temporary collection of records (
FINDstatement)Updating or changing a group of records (
MODIFYstatement)
Before performing any operations, you must select target records using a record selection expression (RSE). The RSE identifies which records you want to work with and forms a record stream, that is, a group of records from a domain or collection. Datatrieve performs the specified operation on every record in the record stream.
The selected records can come from any of the following sources:
Domains
Collections
Lists
Relational database sources
Oracle DBMS records
Access member or owner records of a Oracle DBMS set, (MEMBER, OWNER, or WITHIN clauses)
This chapter illustrates all these operations. In addition, a form of the RSE allows you to access list items from hierarchical records. This is discussed in Chapter 13, "Reporting Hierarchical Records".
7.1. The RSE Format
A record selection expression has the following format:
The format for rse-source is as follows:
The domain-name includes Oracle DBMS domains, relational domains, RMS domains, view domains, and network domains. Note that the MEMBER, OWNER, and WITHIN set-name syntax is used only with an Oracle DBMS domain name or Oracle DBMS record name.
You can use RSEs in all of the following Datatrieve statements:
|
|
|
|
|
|
|
|
|
|
|
|
|
|
Restructure |
In addition, you can use RSEs to specify subsets of records when you define view domains. See Chapter 12, "Accessing Data the Expert Way: Using RSEs and View Domains" for more information on RSEs in view domain definitions.
The format diagram shows that the RSE contains one required element and seven optional elements. The following sections describe each element.
7.2. Specifying the Source of Records
The name of the record source is the only required element in an RSE. You must specify one of the five possible sources of the record stream:
Domain name
Collection name
List name
Rdb relation name
Oracle DBMS record name
This element tells Datatrieve which RMS, relational database, or Oracle DBMS domain, collection, list, relation, or Oracle DBMS record contains the records to search when forming a record stream.
You can use record selection expressions to access remote data, but the RSEs cannot contain expressions that Datatrieve must evaluate on the remote node.
7.2.1. Domains as Sources of Record Streams
You can use the given name of a domain in an RSE to specify the source of
records Datatrieve searches when forming a record stream. Do not use a full
or relative dictionary path name for the domain. Use the given name of any
type of Datatrieve domain or alias you specify in the
READY command.
Before you can use a domain name in an RSE, you must ready the domain with
a READY command. For example:
DTR> READY YACHTS
DTR> PRINT YACHTS
LENGTH
OVER
MANUFACTURER MODEL RIG ALL WEIGHT BEAM PRICE
ALBERG 37 MK II KETCH 37 20,000 12 $35,000
ALBIN 79 SLOOP 26 4,200 10 $17,900
. . .
. . .
. . .
DTR>7.2.2. Collections as Sources of Record Streams
You can use the name of a collection in an RSE to specify the source of
records Datatrieve searches when forming a record stream. Before you can use
a collection in an RSE, you must establish the collection with a
FIND statement.
The following example uses the keyword CURRENT to refer to
the collection you most recently formed:
DTR> READY YACHTS
DTR> FIND YACHTS
[113 records found]
DTR> PRINT CURRENT
LENGTH
OVER
MANUFACTURER MODEL RIG ALL WEIGHT BEAM PRICE
ALBERG 37 MK II KETCH 37 20,000 12 $35,000
ALBIN 79 SLOOP 26 4,200 10 $17,900
. . .
. . .
. . .
DTR>The following example uses the name of a named collection to specify the source of records:
DTR> FIND BIG_ONES IN YACHTS WITH LOA > 40
[8 records found]
DTR> PRINT BIG_ONES WITH PRICE NE 0
LENGTH
OVER
MANUFACTURER MODEL RIG ALL WEIGHT BEAM PRICE
CHALLENGER 41 KETCH 41 26,700 13 $51,228
COLUMBIA 41 SLOOP 41 20,700 11 $48,490
GULFSTAR 41 KETCH 41 22,000 12 $41,350
ISLANDER FREEPORT KETCH 41 22,000 13 $54,970
OLYMPIC ADVENTURE KETCH 42 24,250 13 $80,500
DTR>7.2.3. Lists as Sources of Record Streams
You can use the name of the list in an RSE to retrieve, modify, and report data in the items of a list in a hierarchical domain. By using a list name to specify the source of records for an RSE, you can form a record stream from the list items in a single record.
The following example uses a SELECT statement to pick
out the particular record containing the list. The RSE, FIRST 1
KIDS, then identifies the first item from the KIDS
list of the selected record:
DTR> READY FAMILIES DTR> FIND FAMILIES [14 records found] DTR> SELECT DTR> PRINT AGE OF FIRST 1 KIDS AGE 7 DTR>
The following example uses a FOR statement to form a
stream of target records containing the list. The RSE, KIDS WITH AGE
GT 20, then identifies the children who are older than
20:
DTR> FOR FAMILIES WITH NUMBER_KIDS = 2 CON> PRINT KID_NAME, AGE OF KIDS WITH AGE GT 20 KID NAME AGE ANN 29 JEAN 26 MARTHA 30 TOM 27 DTR>
You cannot establish a valid record context in a MODIFY
statement by using an RSE containing only an OF clause and a list name. For
example:
DTR> READY FAMILIES WRITE DTR> MODIFY EACH_KID OF FIRST 1 KIDS "KIDS" is undefined or used out of context DTR>
If you include the MODIFY statement in a
FOR statement, you establish context and Datatrieve
modifies the record. For example:
DTR> READY FAMILIES WRITE DTR> FOR FAMILIES MODIFY EACH_KID OF FIRST 1 KIDS Enter KID_NAME:
You cannot erase from an OCCURS list. You must use the
MODIFY statement to change or erase fields from a
list. For example:
DTR> ERASE ALL OF KIDS "KIDS" is undefined or used out of context DTR>
You can reduce the complexity of working with lists by entering the
SET SEARCH command. This command invokes the
Datatrieve Context Searcher, thereby simplifying the job of providing the
context for referring to items within lists. See Chapter 13, "Reporting Hierarchical Records" for more information about using hierarchical records.
If you establish a valid record context with a SELECT
statement or a FOR statement, you can specify a
MODIFY statement using an RSE clause containing a
list name. For example:
DTR> FOR FIRST 2 FAMILIES [Looking for statement] CON> MODIFY EACH_KID OF KIDS Enter KID_NAME: Ctrl/Z Execution terminated by operator DTR> FIND FIRST 2 FAMILIES [2 records found] DTR> SELECT DTR> MODIFY EACH_KID OF KIDS Enter KID_NAME: Ctrl/Z Execution terminated by operator DTR>
7.2.4. Using Relations and Oracle DBMS Records as Sources of Record Streams
You can use the given name of a relation or Oracle DBMS record to specify the source of records Datatrieve searches when forming a record stream. Do not use a full or relative dictionary path name for the relation or Oracle DBMS record. Use the given name.
Before you can use a relation or Oracle DBMS record name in an RSE, you
must ready the database with a READY command. For
example:
DTR> READY PARTS_DB
Three optional clauses of the RSE (MEMBER, OWNER, and WITHIN) specify access to records in Oracle DBMS sets on the basis of set relationships. You can use the MEMBER, OWNER, and WITHIN clauses only to refer to Oracle DBMS domains and Oracle DBMS views.
Restrictions:
When you use a context variable in a MEMBER, OWNER, or WITHIN clause, that context variable cannot refer to a record stream of items in a list or to a collection of such items. Lists are repeating fields in hierarchical records or hierarchical views.
The Oracle DBMS record type associated with the Oracle DBMS domain or collection specified in the RSE must be a valid member type of the specified set type.
You must use a valid context variable or the name of a collection with a selected record. The context variable must identify a record occurrence of a domain with a Oracle DBMS record type that participates in the specified set type.
If the SYSTEM owns the set, you do not need to establish a context for the set. If the set is not owned by the SYSTEM and the context name is not present, Datatrieve determines the set occurrence for evaluating the rest of the RSE by using the most recent single record context of a domain with a record type that participates in the specified set type.
7.2.5. MEMBER Clause
The MEMBER clause lets you access the member records of a set. Conceptually, you are telling Datatrieve to "look down" from your current position and find the members of the set that are linked to that record.
Examples:
The following example selects a record from the domain
DIVISIONS and prints all the records from the domain
EMPLOYEES owned by that selected record through the set
CONSISTS_OF:
DTR> FIND DIVISIONS
DTR> SELECT 3
DTR> PRINT EMPLOYEES MEMBER CONSISTS_OF
Phone
Ident Last Name----------- First Name Number Loc
99998 PAYNE RONALD 8902345 23456
DTR>The following example creates a collection from EMPLOYEES and
PART_S. Each record in the collection contains all the
fields from a record in EMPLOYEES and all the fields from a
record in PART_S. Datatrieve joins each record from
EMPLOYEES with each PART_S record that the
record in EMPLOYEES owns through the set
RESPONSIBLE_FOR:
DTR> FIND EMPLOYEES CROSS PART_S MEMBER RESPONSIBLE_FOR DTR> PRINT EMP_LAST_NAME, PART_DESC OF CURRENT [66 records found] DTR>
The following example defines a hierarchical Oracle DBMS view using one
field from the Oracle DBMS domain DIVISIONS and two fields from
the Oracle DBMS domain EMPLOYEES:
DTR> DEFINE DOMAIN WHOLE_DIVISION DEF> OF DIVISIONS, EMPLOYEES USING DEF> 01 DIV OCCURS FOR DIVISIONS. DEF> 02 DIV_NAME FROM DIVISIONS. DEF> 02 WORKERS OCCURS FOR EMPLOYEES MEMBER CONSISTS_OF. DEF> 04 EMP_ID FROM EMPLOYEES. DEF> 04 EMP_NAME FROM EMPLOYEES. DEF> ; DTR>
7.2.6. OWNER Clause
In contrast to the MEMBER clause, the OWNER clause instructs Datatrieve to "look up" from your current position in the database to find the owner record of a set.
Restrictions:
If you try to access the owner record of a set owned by the SYSTEM, Datatrieve displays an error message.
Examples:
The following example creates a collection. Each record in the collection has data from three records:
A component record
The part record that owns the component record in the set
PART_USED_ONThe part record that owns the component record in the set
PART_USES
DTR> FIND A IN COMPONENTS CROSS CON> PART_S OWNER PART_USED_ON CROSS CON> PART_S OWNER OF A.PART_USES [119 records found] DTR>
The following example prints the field DIV_NAME from
DIVISIONS and the field EMP_NAME from
EMPLOYEES. For each record in DIVISIONS, the
example lists the EMPLOYEES record that owns the
MANAGES set and the DIVISIONS record that is a
member of that set. The print list item ALL EMP_NAME OF
EMPLOYEES is an inner print list and has the following general
form:
ALL print-list OF rse
The inner print list contains an RSE, and you can use it to create a context for the items in a list of a hierarchical record or a hierarchical view. For example:
DTR> FOR DIVISIONS
CON> PRINT DIV_NAME, ALL EMP_LAST_NAME OF
CON> EMPLOYEES OWNER OF MANAGES
Division Name------- Last Name-----------
LA34 DEVELOPMENT ZAHAN
SOFTWARE SCHATZEL
RM05 DEVELOPMENT ZOPF
ENG BUILD & TEST THOMPSON
VT100 DEVELOPMENT DALE
.
.
.
DTR>7.2.7. WITHIN Clause
The WITHIN clause gives you access to the member records or the owner record of a Oracle DBMS set.
You can use a WITHIN clause to replace a MEMBER clause or an OWNER clause. You can also replace a WITHIN clause with a MEMBER clause or an OWNER clause, depending on the relationship between the record and the set in which it participates. Use WITHIN when you do not need to specify whether you are looking for an OWNER or MEMBER.
Examples:
The following example uses the CROSS clause of the RSE and
prints data from PART_S, SUPPLIES, and
VENDORS. Datatrieve uses the sets PART_INFO
and VENDOR_SUPPLY to associate PART_S records with
SUPPLY and VENDOR records:
DTR> PRINT PART_S CROSS SUP IN SUPPLIES WITHIN
CON> PART_INFO CROSS
CON> VENDORS WITHIN SUP.VENDOR_SUPPLY
Part Unit
Number ------------Part Description---------- St Price
CE-3556-78 VT100 NON REFLECTIVE SCREEN G $26
$20 NO G MEMO 14 02321332
U.S. SEALS R.R. BINGHAM
132 MAIN ST.
MOLINE, ILL
816,884,5398
AS-1110-85 1N970B DIODE G $20
$17 NO G REPR 2 12345678
HIGH ENERGY CORP GIADONE ALEX
500 DOVER RD.
MAYNARD, MA
617,555,6666
.
.
.
DTR>The following example prints the name of each group next to the name of each employee in that group:
DTR> FOR DIVISIONS
CON> FOR EMPLOYEES WITHIN CONSISTS_OF
CON> PRINT DIV_NAME, EMP_LAST_NAME
Division Name------- Last Name-----------
LA34 DEVELOPMENT FRATUS
SOFTWARE HUTCHINGS
SOFTWARE IACOBONE
SOFTWARE PASCAL
RM05 DEVELOPMENT PAYNE
ENG BUILD & TEST FRASER
ENG BUILD & TEST HORYMSKI
ENG BUILD & TEST HUMPHRY
ENG BUILD & TEST MASE
ENG BUILD & TEST PARVIA
.
.
.
DTR>7.3. Displaying All the Records in a Domain
If a domain does not contain many records, you may want to display all of the records. In that case, you use the simplest form of an RSE, the domain name by itself. Since you want Datatrieve to print all of the records in that domain, you do not use any clauses of the RSE to select specific records. For example:
DTR> READY PERSONNEL
DTR> PRINT PERSONNEL
FIRST LAST START SUP
ID STATUS NAME NAME DEPT DATE SALARY ID
00012 EXPERIENCED CHARLOTTE SPIVA TOP 12-Sep-1972 $75,892 00012
00891 EXPERIENCED FRED HOWL F11 9-Apr-1976 $59,594 00012
02943 EXPERIENCED CASS TERRY D98 2-Jan-1980 $29,908 39485
12643 TRAINEE JEFF TASHKENT C82 4-Apr-1981 $32,918 87465
32432 TRAINEE THOMAS SCHWEIK F11 7-Nov-1981 $26,723 00891
34456 TRAINEE HANK MORRISON T32 1-Mar-1982 $30,000 87289
38462 EXPERIENCED BILL SWAY T32 5-May-1980 $54,000 00012
38465 EXPERIENCED JOANNE FREIBURG E46 20-Feb-1980 $23,908 48475
39485 EXPERIENCED DEE TERRICK D98 2-May-1977 $55,829 00012
48475 EXPERIENCED GAIL CASSIDY E46 2-May-1978 $55,407 00012
48573 TRAINEE SY KELLER T32 2-Aug-1981 $31,546 87289
49001 EXPERIENCED DAN ROBERTS C82 7-Jul-1979 $41,395 87465
49843 TRAINEE BART HAMMER D98 4-Aug-1981 $26,392 39485
78923 EXPERIENCED LYDIA HARRISON F11 19-Jun-1979 $40,747 00891
83764 EXPERIENCED JIM MEADER T32 4-Apr-1980 $41,029 87289
84375 EXPERIENCED MARY NALEVO D98 3-Jan-1976 $56,847 39485
87289 EXPERIENCED LOUISE DEPALMA G20 28-Feb-1979 $57,598 00012
87465 EXPERIENCED ANTHONY IACOBONE C82 2-Jan-1973 $58,462 00012
87701 TRAINEE NATHANIEL CHONTZ F11 28-Jan-1982 $24,502 00891
88001 EXPERIENCED DAVID LITELLA G20 11-Nov-1980 $34,933 87289
90342 EXPERIENCED BRUNO DONCHIKOV C82 9-Aug-1978 $35,952 87465
91023 TRAINEE STAN WITTGEN G20 23-Dec-1981 $25,023 87289
99029 EXPERIENCED RANDY PODERESIAN C82 24-May-1979 $33,738 87465
DTR>After you ready the domain, the PRINT PERSONNEL statement
displays all the records in the PERSONNEL domain. The source for
the RSE is PERSONNEL, the name of the domain.
To indicate clearly that you want the record stream to include all the
records, you can include the keyword ALL before the source of the RSE. Because
the ALL is optional, PRINT ALL PERSONNEL is equivalent to
PRINT PERSONNEL.
7.4. Limiting the Number of Records in the Record Stream
There are several ways to limit the number of records in the record stream. One way is to restrict the record stream to the first n records in the domain or collection. This type of RSE is useful when you know the order of records and the exact number of records you wish to access.
To specify the number of records in the record stream, type FIRST followed by a number before typing the source for the RSE. For example:
DTR> PRINT FIRST 5 PERSONNEL
FIRST LAST START SUP
ID STATUS NAME NAME DEPT DATE SALARY ID
00012 EXPERIENCED CHARLOTTE SPIVA TOP 12-Sep-1972 $75,892 00012
00891 EXPERIENCED FRED HOWL F11 9-Apr-1976 $59,594 00012
02943 EXPERIENCED CASS TERRY D98 2-Jan-1980 $29,908 39485
12643 TRAINEE JEFF TASHKENT C82 4-Apr-1981 $32,918 87465
32432 TRAINEE THOMAS SCHWEIK F11 7-Nov-1981 $26,723 00891
DTR>In this case, the RSE is FIRST 5 PERSONNEL. Datatrieve displays
the first five records in PERSONNEL, according to their order in
the data file. An RSE can have the form FIRST n
domain-name or FIRST
n
collection-name. If
n is larger than the number of records in the domain or
collection, Datatrieve displays all the records in that source.
7.5. Joining Records From Two or More Sources
RSEs let you work with records from different sources. The CROSS clause of the RSE lets you form record streams by combining data from two or more sources of records. It forms temporary relationships between records stored in different data files based on the relationship between field values in the different files. Joining records with the CROSS clause allows you to treat the data as though it derived from one data file.
With the CROSS clause, you can perform the following tasks:
Combine records from several domains, collections, or both.
Compare and combine records from one domain.
Substitute a single statement for nested
FORloops when comparing records.Flatten hierarchical domains to ease access to the items in hierarchical lists. Chapter 13, "Reporting Hierarchical Records" discusses hierarchical domains.
7.5.1. Using CROSS to Combine Two Domains
Suppose you want to find the prices of individual boats in the
YACHTS domain that belong to boat owners stored in the
OWNERS domain. You want to combine OWNERS
records with YACHTS records that have the same
MODEL and MANUFACTURER. The RSE that forms
this temporary combination of records is on the second input line of the
following PRINT statement. The group field
TYPE, which includes both MANUFACTURER and
MODEL, is the primary key for the YACHT.DAT
file. It is defined as NO DUP; as a result, no two boats can have the same
value for TYPE:
DTR> PRINT NAME, TYPE, PRICE OF CON> YACHTS CROSS OWNERS OVER TYPE NAME MANUFACTURER MODEL PRICE STEVE ALBIN VEGA $18,600 HUGH ALBIN VEGA $18,600 JIM C&C CORVETTE ANN C&C CORVETTE JIM ISLANDER BAHAMA $6,500 ANN ISLANDER BAHAMA $6,500 STEVE ISLANDER BAHAMA $6,500 HARVEY ISLANDER BAHAMA $6,500 TOM PEARSON 10M DICK PEARSON 26 JOHN RHODES SWIFTSURE DTR>
The OVER TYPE phrase takes the place of WITH
OWNERS.TYPE =
YACHTS.TYPE. This RSE forms a record stream of
11 records.
The following figure illustrates the way Datatrieve joins records from two domains. Datatrieve reads each record from the first source trying to find matches on the TYPE field. When Datatrieve finds a match, it joins the record from OWNERS with the record from YACHTS:

You can use CROSS to join two domains on the same remote node. However, you cannot join domains on different nodes.
7.5.2. Joining Records From Collections Based on the Same Domain
In many cases, you will want to combine and compare records from the same domain. For instance, you may want to find those yachts built by different builders but with the same kind of rigging, or you may want to find any trainees who make more than experienced employees. In crosses like these, you must distinguish separate record selection expressions that refer to the same domain.
Datatrieve provides several ways to perform such crosses. One way is to use an alias to rename a domain. This operation temporarily creates two domains from one so you can ready and join them as if they were two separate sources.
When you use the CROSS clause to form and combine two collections from the same domain, you must establish context for both collections. In order for Datatrieve to join records from collections based on a single domain, you must ready the domain twice, once using an alias. Otherwise, Datatrieve does not include records from both sources in the join.
The following example shows what happens when you ready
YACHTS once, form two collections,
AMERICAN_YACHTS and ALBIN_YACHTS, and join the
collections with a CROSS clause:
DTR> READY YACHTS
DTR> FIND AMERICAN_YACHTS IN YACHTS WITH
CON> BUILDER = "AMERICAN"
[2 records found]
DTR> FIND ALBIN_YACHTS IN YACHTS WITH BUILDER = "ALBIN"
[3 records found]
DTR> LIST AMERICAN_YACHTS CROSS ALBIN_YACHTS OVER RIG
MANUFACTURER : ALBIN
MODEL : 79
RIG : SLOOP
LENGTH_OVER_ALL : 26
DISPLACEMENT : 4,200
BEAM : 10
PRICE : $17,900
MANUFACTURER : ALBIN
MODEL : 79
RIG : SLOOP
LENGTH_OVER_ALL : 26
DISPLACEMENT : 4,200
BEAM : 10
PRICE : $17,900
.
.
.Datatrieve does not include the records with BUILDER =
"AMERICAN" in the join.
If you ready the source domain twice, once under an alias, Datatrieve correctly joins the records from both sources. In the following example, Datatrieve treats each collection as though it originated from a different domain:
DTR> READY YACHTS, YACHTS AS EXTRA
DTR> FIND AMERICAN_YACHTS IN YACHTS WITH
CON> BUILDER = "AMERICAN"
[2 records found]
DTR> FIND ALBIN_YACHTS IN EXTRA WITH BUILDER = "ALBIN"
[3 records found]
DTR> LIST AMERICAN_YACHTS CROSS ALBIN_YACHTS OVER RIG
MANUFACTURER : AMERICAN
MODEL : 26
RIG : SLOOP
LENGTH_OVER_ALL : 26
DISPLACEMENT : 4,000
BEAM : 08
PRICE : $9,895
MANUFACTURER : ALBIN
MODEL : 79
RIG : SLOOP
LENGTH_OVER_ALL : 26
DISPLACEMENT : 4,200
BEAM : 10
PRICE : $17,900
.
.
.If at any time you forget how you have used an alias, use the
SHOW READY command to see the domain name behind the
alias. For example:
DTR> READY YACHTS, YACHTS AS EXTRA
DTR> SHOW READY
Ready sources:
EXTRA: Domain, RMS sequential, protected read
<CDD$TOP.DTR$LIB.DEMO.YACHTS;1>
YACHTS: Domain, RMS sequential, protected read
<CDD$TOP.DTR$LIB.DEMO.YACHTS;1>
No loaded tables.7.5.3. Using CROSS to Cross a Domain With Itself
Another way to compare and combine records from the same source is to use
the CROSS clause (without aliases), nested FOR loops, or
view domains. See the FOR statement section in the
VSI Datatrieve Reference Manual for more information about
nested FOR loops. View domains are discussed Chapter 12, "Accessing Data the Expert Way: Using RSEs and View Domains". This section explains how to use CROSS to
compare records from the same domain.
Consider the question of how to find the yachts whose manufacturers make boats with more than one type of rigging. To do this, you need to loop through the YACHTS domain twice. First, you must search through all yachts and group them by manufacturer. Then, you must search through these collections to find those yachts with different riggings.
You can cross and compare the necessary record streams in a single RSE containing a CROSS clause:
DTR> PRINT BUILDER, A.RIG, RIG OF A IN YACHTS CROSS
[Looking for name of domain, collection, or list]
CON> YACHTS OVER BUILDER WITH A.RIG GT RIG
MANUFACTURER RIG RIG
AMERICAN SLOOP MS
CHALLENGER SLOOP KETCH
CHALLENGER SLOOP KETCH
GRAMPIAN SLOOP KETCH
.
.
.
PEARSON SLOOP KETCH
DTR>The variable A (A IN YACHTS) is called a
context variable. A context variable is
a temporary name that identifies a record stream to Datatrieve. See Appendix A, "Name Recognition and Single Record Context" for detailed information about how Datatrieve
establishes and interprets context variables.
In the previous example, Datatrieve establishes two sources, one called
A IN YACHTS and the other called YACHTS. The
OVER clause controls the comparison of records from the two sources. For
each record from the source A IN YACHTS, Datatrieve retrieves
only the records from the source YACHTS that have the same
BUILDER value as the record from A IN YACHTS.
The Boolean expression WITH A.RIG GT RIG selects from the
record stream the pairs of records that have different values for
RIG. The resulting record stream contains information only
about builders who make more than one type of rig.
You could use the Boolean expression WITH A.RIG NE RIG to select the records with two different RIG values. However, if you use NE instead of GT, you get two combinations for every pair of records that meet the criteria of the RSE. Using the GT operator eliminates this duplication.
One advantage this method has over nested FOR loops is
that the statement with the CROSS clause is shorter than an equivalent
statement with a FOR loop. The two methods take
approximately the same amount of time to process.
7.6. Identifying the Records That Meet a Test
Often you are interested in grouping similar records together, regardless of their physical position in the data file. You can restrict the record stream to those records that satisfy a specific condition by using the WITH clause of the RSE. Different types of WITH clauses reflect different types of relationships among the values of the same field for different records. Records can be grouped if they are related by the following conditions:
There is a pattern to the characters comprising the field values
The field values fall into a specified range
The value for a field is or is not missing
A field value can or cannot be found in a table
7.6.1. Comparing Records by Pattern Recognition
You can group records if the characters of a field value match or do not match a specified value. For example:
DTR> PRINT YACHTS WITH RIG = "MS"
LENGTH
OVER
MANUFACTURER MODEL RIG ALL WEIGHT BEAM PRICE
AMERICAN 26-MS MS 26 5,500 08 $18,895
EASTWARD HO MS 24 7,000 09 $15,900
FJORD MS 33 MS 33 14,000 11
LINDSEY 39 MS 39 14,500 12 $35,900
ROGGER FD M/S MS 35 17,600 11
DTR>This statement causes Datatrieve to examine each record of the
YACHTS domain, displaying only those records with the value
MS for the RIG field.
When you use EQUAL (or = or EQ), NOT EQUAL (NE), or CONTAINING (CONT), you can list more than one value expression in the same Boolean expression. The following queries specify a group of value expressions for Datatrieve to compare with each field value:
DTR> PRINT YACHTS WITH BUILDER = "ALBIN", "ALBERG"
LENGTH
OVER
MANUFACTURER MODEL RIG ALL WEIGHT BEAM PRICE
ALBIN 79 SLOOP 26 4,200 10 $17,900
ALBIN BALLAD SLOOP 30 7,276 10 $27,500
ALBIN VEGA SLOOP 27 5,070 08 $18,600
ALBERG 37 MK II KETCH 37 20,000 12 $36,951
DTR> PRINT YACHTS WITH RIG NE "SLOOP", "KETCH"
LENGTH
OVER
MANUFACTURER MODEL RIG ALL WEIGHT BEAM PRICE
AMERICAN 26-MS MS 26 5,500 08 $18,895
EASTWARD HO MS 24 7,000 09 $15,900
FJORD MS 33 MS 33 14,000 11
LINDSEY 39 MS 39 14,500 12 $35,900
ROGGER FD M/S MS 35 17,600 11
DTR>Note that the EQUAL ( = ) and NOT_EQUAL operators are case-sensitive:
DTR> FIND YACHTS WITH BUILDER = "Albin" [0 records found] DTR> FIND YACHTS WITH BUILDER NOT_EQUAL "Albin" [113 records found]
However, the CONT or CONTAINING operator is indifferent to the case of the letters and searches only for a particular sequence of letters. This operator also finds matches if there is agreement with a substring derived from the field value. The CONT operator finds the "ALBIN" records if you specify "Albin" or "bin" (a three-letter substring) or any other string of letters unique to ALBIN:
DTR> FIND YACHTS WITH BUILDER CONT "Albin" [3 records found] DTR> FIND YACHTS WITH BUILDER CONT "bin" [3 records found]
When you want to find records with a field value starting with a
particular substring, use the STARTING WITH relational operator. For
example, you might want to display data on all builders beginning with the
substring "AL":
DTR> PRINT YACHTS WITH BUILDER STARTING WITH "AL"
LENGTH
OVER
MANUFACTURER MODEL RIG ALL WEIGHT BEAM PRICE
ALBERG 37 MK II KETCH 37 20,000 12 $36,951
ALBIN 79 SLOOP 26 4,200 10 $17,900
ALBIN BALLAD SLOOP 30 7,276 10 $27,500
ALBIN VEGA SLOOP 27 5,070 08 $18,600
DTR>Note that the STARTING WITH relational operator is also case-sensitive.
7.6.2. Grouping Records When Values Fall Within a Range
Datatrieve lets you use the following relational operators to test if a field value for a record falls within a specified range:
GREATER_THAN (>, GT, or AFTER)
GREATER_EQUAL (GE)
LESS_THAN (<, LT, or BEFORE)
LESS_EQUAL (LE)
BETWEEN (BT)
AFTER
BEFORE
The following example uses the GREATER_EQUAL operator:
DTR> PRINT PERSONNEL WITH SALARY GREATER_EQUAL 54000
FIRST LAST START SUP
ID STATUS NAME NAME DEPT DATE SALARY ID
00012 EXPERIENCED CHARLOTTE SPIVA TOP 12-Sep-1972 $75,892 00012
00891 EXPERIENCED FRED HOWL F11 9-Apr-1976 $59,594 00012
38462 EXPERIENCED BILL SWAY T32 5-May-1980 $54,000 00012
39485 EXPERIENCED DEE TERRICK D98 2-May-1977 $55,829 00012
48475 EXPERIENCED GAIL CASSIDY E46 2-May-1978 $55,407 00012
84375 EXPERIENCED MARY NALEVO D98 3-Jan-1976 $56,847 39485
87289 EXPERIENCED LOUISE DEPALMA G20 28-Feb-1979 $57,598 00012
87465 EXPERIENCED ANTHONY IACOBONE C82 2-Jan-1973 $58,462 00012The BETWEEN operator is the equivalent of the GREATER_EQUAL and LESS_EQUAL operators combined. It searches for records with field values that are within the range specified or equal to either of the value expressions that determine the range:
DTR> PRINT PERSONNEL WITH SALARY BETWEEN 30000 AND 54000
FIRST LAST START SUP
ID STATUS NAME NAME DEPT DATE SALARY ID
12643 TRAINEE JEFF TASHKENT C82 4-Apr-1981 $32,918 87465
34456 TRAINEE HANK MORRISON T32 1-Mar-1982 $30,000 87289
38462 EXPERIENCED BILL SWAY T32 5-May-1980 $54,000 00012
48573 TRAINEE SY KELLER T32 2-Aug-1981 $31,546 87289
49001 EXPERIENCED DAN ROBERTS C82 7-Jul-1979 $41,395 87465
78923 EXPERIENCED LYDIA HARRISON F11 19-Jun-1979 $40,747 00891
83764 EXPERIENCED JIM MEADER T32 4-Apr-1980 $41,029 87289
88001 EXPERIENCED DAVID LITELLA G20 11-Nov-1980 $34,933 87289
90342 EXPERIENCED BRUNO DONCHIKOV C82 9-Aug-1978 $35,952 87465
99029 EXPERIENCED RAINED PODERESIAN C82 24-May-1979 $33,738 87465Two additional relational operators that separate records according to ranges are BEFORE and AFTER. These operators are useful for comparing values for date fields. BEFORE can be used interchangeably with LESS_THAN, and AFTER can be substituted for GREATER_THAN. For example:
DTR> PRINT PERSONNEL WITH START_DATE
CON> AFTER "1-Jan-1981"
FIRST LAST START SUP
ID STATUS NAME NAME DEPT DATE SALARY ID
12643 TRAINEE JEFF TASHKENT C82 4-Apr-1981 $32,918 87465
32432 TRAINEE THOMAS SCHWEIK F11 7-Nov-1981 $26,723 00891
34456 TRAINEE HANK MORRISON T32 1-Mar-1982 $30,000 87289
48573 TRAINEE SY KELLER T32 2-Aug-1981 $31,546 87289
49843 TRAINEE BART HAMMER D98 4-Aug-1981 $26,392 39485
87701 TRAINEE NATHANIEL CHONTZ F11 28-Jan-1982 $24,502 00891
91023 TRAINEE STAN WITTGEN G20 23-Dec-1981 $25,023 87289
DTR>This query finds all employees who started after January 1,
1981. If an employee had started on that date, the record would
not have been included.
7.6.3. Grouping Records Based on a MISSING VALUE Clause
If a missing value for a field is defined in the record definition using the MISSING VALUE IS field definition clause, you can search for records that either have or do not have the missing value.
For example, in the PERSONNEL domain, a MISSING VALUE clause
has been included in the record definition of the SUP_ID field.
That missing value is set as zero. You can form an RSE that asks Datatrieve
to search for any records containing the MISSING VALUE:
DTR> FIND PERSONNEL WITH SUP_ID MISSING [0 records found]
You can also ask Datatrieve to search for records in which a field does not contain the MISSING VALUE you specified in the record definition:
DTR> FIND PERSONNEL WITH SUP_ID NOT MISSING [23 records found] DTR>
7.6.4. Grouping Records by Reference to a Table
Some domains are associated with domain or dictionary tables that refer to one of the fields in the record. You can form an RSE that causes Datatrieve to look up the field value in the table. If the field value is in the table, Datatrieve includes the record in the record stream. The following example shows a table-based RSE:
PERSONNEL WITH SUP_ID IN SUP_TABLE
Records with supervisor identification numbers in the SUP_TABLE are included in the record stream.
7.6.5. Setting Up Multiple Tests With Compound Booleans
To set up multiple tests for records, you can join two or more Boolean expressions using the Boolean operators (AND, OR, NOT, BUT).
The following examples show the use of Boolean operators. The first query
shows that Bruno Donchikov is the only employee who started
before January 1, 1979 and is earning less than
$36,000:
DTR> PRINT PERSONNEL WITH START_DATE BEFORE
CON> "1-Jan-1979" AND SALARY LT 36000
FIRST LAST START SUP
ID STATUS NAME NAME DEPT DATE SALARY ID
90342 EXPERIENCED BRUNO DONCHIKOV C82 9-Aug-1978 $35,952 87465The next query displays data on all employees who are either in the
TOP department or earning more than
$54,000:
DTR> PRINT PERSONNEL WITH DEPT = "TOP" OR SALARY > 54000
FIRST LAST START SUP
ID STATUS NAME NAME DEPT DATE SALARY ID
00012 EXPERIENCED CHARLOTTE SPIVA TOP 12-Sep-1972 $75,892 00012
00891 EXPERIENCED FRED HOWL F11 9-Apr-1976 $59,594 00012
39485 EXPERIENCED DEE TERRICK D98 2-May-1977 $55,829 00012
48475 EXPERIENCED GAIL CASSIDY E46 2-May-1978 $55,407 00012
84375 EXPERIENCED MARY NALEVO D98 3-Jan-1976 $56,847 39485
87289 EXPERIENCED LOUISE DEPALMA G20 28-Feb-1979 $57,598 00012
87465 EXPERIENCED ANTHONY IACOBONE C82 2-Jan-1973 $58,462 00012
DTR>The next query displays data on all employees who earn more than
$54,000 but who are also in the TOP
department:
DTR> PRINT PERSONNEL WITH SALARY > 54000 BUT DEPT = "TOP"
FIRST LAST START SUP
ID STATUS NAME NAME DEPT DATE SALARY ID
00012 EXPERIENCED CHARLOTTE SPIVA TOP 12-Sep-1972 $75,892 00012
DTR>7.7. Finding a Unique Field Value in a Record Stream
Frequently, a record stream contains several records that have the same values for a specific field. To find the unique field values (that is, to eliminate duplicate field values from the record stream), use the REDUCED TO clause of the RSE.
Up to this point, the RSE clauses have let you limit the number of records in
the record stream. The REDUCED TO clause of the RSE lets you limit the fields
within each record in the record stream. For example, if you want to know the
names of all of the departments in the PERSONNEL domain, you can
use the following query:
DTR> FIND PERSONNEL REDUCED TO DEPT [7 records found] DTR> PRINT CURRENT DEPT C82 D98 E46 F11 G20 T32 TOP
To process the RSE, Datatrieve searches the values for DEPT and finds seven unique values. Datatrieve then generates a collection of seven records with values for the DEPT field only.
Sometimes you want to know all the unique combinations of values for several
fields in the record. To find the combinations of values for DEPT
and STATUS, use the RSE "PERSONNEL REDUCED TO DEPT,
STATUS":
DTR> FIND PERSONNEL REDUCED TO DEPT, STATUS [12 records found] DTR> PRINT CURRENT DEPT STATUS C82 EXPERIENCED C82 TRAINEE D98 EXPERIENCED D98 TRAINEE E46 EXPERIENCED F11 EXPERIENCED F11 TRAINEE G20 EXPERIENCED G20 TRAINEE T32 EXPERIENCED T32 TRAINEE TOP EXPERIENCED
The REDUCED TO clause is a powerful tool for forming relational queries. For example, the following query uses two RSEs to display the names of all the supervisors and the departments they manage:
DTR> FOR A IN PERSONNEL REDUCED TO SUP_ID
[Looking for statement]
CON> PRINT DEPT, NAME, ID OF PERSONNEL WITH ID = A.SUP_ID
FIRST LAST
DEPT NAME NAME ID
TOP CHARLOTTE SPIVA 00012
F11 FRED HOWL 00891
D98 DEE TERRICK 39485
E46 GAIL CASSIDY 48475
G20 LOUISE DEPALMA 87289
C82 ANTHONY IACOBONE 87465
DTR>This query finds every employee who is a supervisor, that is, whose ID equals
one of the values specified by the REDUCED TO clause. The RSE "A IN
PERSONNEL REDUCED TO SUP_ID" asks Datatrieve to develop a record
stream (A) with all of the supervisor IDs. Then for each supervisor
ID, Datatrieve searches through all the PERSONNEL records again for
matches on the ID field. When Datatrieve finds a match, it displays the
ID, NAME, and DEPT of the
employee.
To do this, the RSE must include a context variable, A, to refer
to the SUP_ID of the first record stream. The context variable is
then used in the Boolean expression ID = A.SUP_ID.
If you used the Boolean expression ID = SUP_ID, Datatrieve would consider SUP_ID to be a field in the records of the second record stream. Datatrieve would then find all employees whose personal ID is the same as their supervisor’s ID (that is, all employees who supervise themselves). The value expression A.SUP_ID unambiguously refers to a field value from records in the first record stream.
See Appendix A, "Name Recognition and Single Record Context" for more information about context variables.
7.8. Sorting the Record Stream by Field Values
When you use a PRINT statement to display a record stream,
the order of the records is determined by the keys defined for the data file.
However, you can use the SORTED BY clause of the RSE to impose a different sort
order on the record stream.
For example, the records in PERSONNEL are already sorted by ID, the primary key for the data file. However, if you are interested in the employees for each department, you can sort the records by DEPT.
To break down each department into experienced workers and trainees, specify
STATUS as an additional sort key. The following query sorts the first nine
PERSONNEL records according to DEPT and
STATUS:
DTR> PRINT FIRST 9 PERSONNEL SORTED BY DEPT, STATUS
FIRST LAST START SUP
ID STATUS NAME NAME DEPT DATE SALARY ID
87465 EXPERIENCED ANTHONY IACOBONE C82 2-Jan-1973 $58,462 00012
90342 EXPERIENCED BRUNO DONCHIKOV C82 9-Aug-1978 $35,952 87465
99029 EXPERIENCED RAINED PODERESIAN C82 24-May-1979 $33,738 87465
49001 EXPERIENCED DAN ROBERTS C82 7-Jul-1979 $41,395 87465
12643 TRAINEE JEFF TASHKENT C82 4-Apr-1981 $32,918 87465
02943 EXPERIENCED CASS TERRY D98 2-Jan-1980 $29,908 39485
39485 EXPERIENCED DEE TERRICK D98 2-May-1977 $55,829 00012
84375 EXPERIENCED MARY NALEVO D98 3-Jan-1976 $56,847 39485
49843 TRAINEE BART HAMMER D98 4-Aug-1981 $26,392 39485
DTR>The SORTED BY clause overrides the order of the records in the data file, but it does not change the physical order of the records in the data file.
You can also sort a record stream according to a value expression based on a
field value. For example, you could sort by the year of START_DATE
by using the value expression FN$YEAR (START_DATE) as a sort
key:
DTR> READY PERSONNEL
DTR> FIND FIRST 9 PERSONNEL SORTED BY
CON> FN$YEAR (START_DATE)
DTR> PRINT ALL ID, NAME, SALARY,
CON> (FN$YEAR (START_DATE))
CON> ("EMPLOYED"/"SINCE") USING 9999
FIRST LAST EMPLOYED
ID NAME NAME SALARY SINCE
00012 CHARLOTTE SPIVA $75,892 1972
87465 ANTHONY IACOBONE $58,462 1973
84375 MARY NALEVO $56,847 1976
00891 FRED HOWL $59,594 1976
39485 DEE TERRICK $55,829 1977
48475 GAIL CASSIDY $55,407 1978
90342 BRUNO DONCHIKOV $35,952 1978
99029 RAINED PODERESIAN $33,738 1979
87289 LOUISE DEPALMA $57,598 1979
DTR>The SORTED BY clause lets you produce reports with data records divided into
groups. In the last example, using the value expression FN$YEAR (START_
DATE) as a sort key lets you report on employees grouped by the year
they were first employed. For more information on creating such control group
reports, see Chapter 14, "Using the Report Writer". For information on Datatrieve
functions such as FN$YEAR, see the
VSI Datatrieve Reference Manual.
Chapter 8. Maintaining Data
This chapter discusses storing, erasing, and modifying records stored in OpenVMS Record Management Services (RMS) data files.
Refer to Chapter 13, "Reporting Hierarchical Records" for information on modifying records with repeating fields (fields defined with an OCCURS clause in the record definition).
8.1. Using the STORE Statement
You can create a record in the data file with the STORE
statement. You can also use the STORE statement to assign
values to fields. When you enter a STORE statement followed
by a domain name, Datatrieve prompts you for the values of each field in the
record. If you enter a field list or the USING clause, Datatrieve prompts you to
enter only the specified fields. Datatrieve does not prompt you to enter
REDEFINES or COMPUTED BY fields.
To store records in a domain, you must first ready it for either write or extend access. If you choose write access, you can also print and modify records in the domain. Ready the domain with the shared option if you know other users might be storing, modifying, or erasing records in that domain at the same time you are. For example:
DTR> READY EMPLOYEES SHARED WRITE
DTR>
DTR> READY OWNERS WRITE
DTR> STORE OWNERS
Enter NAME: BILL
Enter BOAT_NAME: GLOOM
Enter BUILDER: DOWN EAST
Enter MODEL: 32T
DTR> FIND OWNERS WITH BOAT_NAME = "GLOOM"
[1 record found]
DTR> SELECT; PRINT
BOAT
NAME NAME BUILDER MODEL
BILL GLOOM DOWN EAST 32T
DTR>When you respond to a Datatrieve prompt, you must supply a value, a space, or a Tab character, not a value expression. You cannot supply the name of a variable or a field and expect Datatrieve to use the value associated with the variable or the value associated with the field. Datatrieve interprets the name in either case as a character string literal and uses the literal as the value when making the assignment.
8.2. The Effect of TAB on Prompts From STORE Statements
Datatrieve takes the following actions when you respond with a
Tab and Return to a prompt from a
STORE statement:
If the field has a default value specified in its field definition, Datatrieve uses the default value to initialize the field.
If the field has a missing value but not a default value specified in its field definition, Datatrieve uses the missing value to initialize the field.
If the field has a default value and a missing value specified in its field definition, Datatrieve uses the default value to initialize the field.
If the field has neither a default value nor a missing value specified in its field definition, Datatrieve initializes numeric fields as zero and alphabetic and alphanumeric fields as spaces.
8.3. Using Direct Assignments
In the USING clause you specify only those fields you want to change. When you
store values in the fields of a new record Datatrieve uses the values you assign
to initialize the fields specified in the USING clause. To initialize the fields
that you do not include in the USING clause, Datatrieve acts as if you responded
with a Tab and Return to a prompt from a
STORE statement. The following example shows the
different actions Datatrieve takes when you assign a limited number of values
with the USING clause of a STORE statement:
DTR> SHOW TEST_1
DOMAIN TEST_1 USING TEST_REC ON TEST1.DAT;
DTR> SHOW TEST_REC
RECORD TEST_REC USING
01 TOP.
03 DEF_VAL1 PIC X(7)
DEFAULT VALUE IS "DEFAULT".
03 MISS_VAL1 PIC X(7)
MISSING VALUE IS "MISSING".
03 BOTH_1 PIC X(7)
DEFAULT VALUE IS "DEFAULT"
MISSING VALUE IS "MISSING".
03 NEITHER_STR PIC X(3).
03 NEITHER_NUM PIC 999.
03 DEF_VAL2 PIC X(7)
DEFAULT VALUE IS "DEFAULT".
03 MISS_VAL2 PIC X(7)
MISSING VALUE IS "MISSING".
03 BOTH_2 PIC X(7)
DEFAULT VALUE IS "DEFAULT"
MISSING VALUE IS "MISSING".
;
DTR> READY TEST_1 WRITE
DTR> STORE TEST_1 USING
[Looking for statement]
CON> BEGIN
[Looking for statement]
CON> DEF_VAL1 = "ONE"
CON> MISS_VAL1 = "TWO"
CON> BOTH_1 = "THREE"
CON> END
DTR> FIND TEST_1
[1 record found]
DTR> PRINT ALL
DEF MISS BOTH NEITHER NEITHER DEF MISS BOTH
VAL1 VAL1 1 STR NUM VAL2 VAL2 2
ONE TWO THREE 000 DEFAULT MISSING DEFAULT
DTR> STORE TEST_1
Enter DEF_VAL1: FOUR
Enter MISS_VAL1: FIVE
Enter BOTH_1: SIX
Enter NEITHER_STR: Tab
Enter NEITHER_NUM: Tab
Enter DEF_VAL2: Tab
Enter MISS_VAL2: Tab
Enter BOTH_2: Tab
DTR> FIND TEST_1;SELECT LAST; PRINT
DEF MISS BOTH NEITHER NEITHER DEF MISS BOTH
VAL1 VAL1 1 STR NUM VAL2 VAL2 2
FOUR FIVE SIX 000 DEFAULT MISSING DEFAULT
DTR>8.4. Using Datatrieve Prompts
There are two ways you can get Datatrieve to prompt you for values:
Using forms of the
MODIFYstatement that do not require a USING clauseIncluding a prompting value expression in the Assignment statements within the USING clause (for example, USING LAST_NAME = *."last name")
Having Datatrieve prompt you to enter values has the following advantages:
You do not have to type in all the Assignment statements.
If you enter an invalid value or one that is too large for the field, Datatrieve displays an error message and reprompts so you can try again.
You do not have to enter non-numeric values in quotation marks. In fact, Datatrieve treats quotation marks as part of the value, so you should not use them unless they are actually part of the field value.
If you press Tab and then the Return key in response to a prompt for a field value, Datatrieve leaves the value of the field unchanged, regardless of any DEFAULT or MISSING values defined for the field. This can be useful if you are prompted to enter values for fields you decide not to change.
If you respond with Ctrl/Z to a prompt for a field value, Datatrieve does not change any field in the record you are currently changing. This is useful if you realize you made a mistake entering earlier values for that record.
Remember, however, that entering Ctrl/Z does not affect records you have finished modifying, only the one you are working with when you enter Ctrl/Z. Ctrl/Z also aborts the statement being executed.
Using prompting value expressions within the USING clause of a
MODIFY statement is a very flexible method for assigning
values to fields.
In the following example, the double asterisk prompt means that the user is prompted to enter one field value that applies to all the records in the collection. The single asterisk prompt means that the user is prompted to enter a field value for each record:
DTR> SET NO PROMPT
DTR> READY YACHTS MODIFY
DTR> FIND YACHTS WITH BEAM = 0
[5 records found]
DTR> FOR CURRENT MODIFY USING
CON> BEGIN
CON> PRINT SPECS
CON> LOA = **.LOA
CON> DISP = *.WEIGHT
CON> BEAM = *.BEAM
CON> PRICE = PRICE * 1.1
CON> END
LENGTH
OVER
RIG ALL WEIGHT BEAM PRICE
SLOOP 32 9,500 00
Enter LOA: 33
Enter WEIGHT: 12000
Enter BEAM: 10
SLOOP 32 11,000 00 $29,500
Enter WEIGHT: Tab
Enter BEAM: 11
SLOOP 31 13,600 00 $32,500
Enter WEIGHT: 15000
Enter BEAM: 12
SLOOP 35 23,200 00
Enter WEIGHT: Tab
Enter BEAM: 13
SLOOP 32 14,900 00 $34,480
Enter WEIGHT: Tab
Enter BEAM: 9
DTR> PRINT ALL
LENGTH
OVER
MANUFACTURER MODEL RIG ALL WEIGHT BEAM PRICE
METALMAST GALAXY SLOOP 33 12,000 10
O’DAY 32 SLOOP 33 11,000 11 $32,450
RYDER S. CROSS SLOOP 33 15,000 12 $35,750
TA CHIAO FANTASIA SLOOP 33 23,200 13
WRIGHT SEAWIND II SLOOP 33 14,900 09 $37,928
DTR>You must respond to a prompt with a value rather than a value expression. For example, if you want to increase a price field by ten percent and let Datatrieve do the calculation, you must use direct assignment.
Datatrieve will not let you enter PRICE * 1.1 in response to a prompt. If you are writing a procedure that needs this flexibility, you can prompt for part of the value expression. For example, you can prompt for the price increase and include the arithmetic calculation of the new value for PRICE in your Assignment statement (PRICE = PRICE * *."price increase").
In the USING clauses of STORE, you can use prompting value
expressions to control the input to records in data files. You can use two forms
of prompting value expressions: *.prompt and
**.prompt. These value expressions let you control
Datatrieve prompts for input.
Both forms of prompting value expressions require you to respond by entering values, not value expressions. You cannot enter the names of variables or fields, and you cannot enter expressions from Datatrieve tables or arithmetic, statistical, or concatenated expressions. You must enter numeric or character string literals appropriate to the data type of the field for which you are supplying a value. Do not enclose character string literals in quotation marks when you supply a value to a prompt. If you do, Datatrieve treats the quotation marks as part of the value.
If a *.prompt is part of a USING clause in a
STORE statement, Datatrieve prompts you for a value each
time it executes the statement. If the STORE statement is in
a REPEAT, FOR, or WHILE loop, Datatrieve prompts you each time it executes the
loop.
With the **.prompt, Datatrieve prompts you only once, regardless of how many times it executes the loop. The **.prompt is useful for assigning one value to a number of records when you have to assign unique values to other fields in each of those records.
8.5. Modifying Data
When you modify records, you must ready the associated domain for modify or write access. Then perform the following five steps:
Decide on a record source (domain or collection).
Specify the records you want from the record source.
Specify the fields whose values you want to change.
Assign new values to those fields.
Optionally, specify any validation requirements that are not part of the record definition.
The following example shows you how to change one DEPT value in
the PERSONNEL domain. In this case, you work with records directly
from the domain and change all records containing the value. Note that you
specify the record source and the record you want in the
MODIFY statement itself:
DTR> READY PERSONNEL MODIFY DTR> PRINT LAST_NAME, DEPT OF PERSONNEL WITH DEPT = "F11" LAST NAME DEPT HOWL F11 SCHWEIK F11 HARRISON F11 CHONTZ F11 DTR> MODIFY PERSONNEL -CON> WITH DEPT = "F11"
CON> USING DEPT =
CON> "F12"
DTR> DTR> PRINT LAST_NAME, DEPT OF PERSONNEL WITH DEPT = "F12" LAST NAME DEPT HOWL F12 SCHWEIK F12 HARRISON F12 CHONTZ F12
| Specifies the record source |
| Selects records |
| Specifies the field |
| Assigns a value |
Note that you cannot modify the value of an indexed key field if either of the following conditions exist:
The indexed field is the primary key.
The indexed field is an alternate key defined with the NO CHANGE attribute.
8.6. Modifying Records in the CURRENT Collection
Forming a collection and then using that collection as the record source for a
modify operation is generally easier than trying to include the record selection
syntax in the same Datatrieve statement that specifies fields and assigns
values. The FIND statement forming the collection specifies
the record source and does most of the work to select the records you
want.
You can then use PRINT ALL to check the contents of the
entire collection before and after the modify operation. You can also select a
record and then use PRINT to display the same information for
a particular record.
Note
While it may be easier to use a collection as a record source, Datatrieve generally works more slowly when retrieving records from collections. For more information on optimizing Datatrieve queries, see Chapter 22, "Improving Datatrieve Performance". See Chapter 11, "Accessing Data the Easy Way: Using Collections" for a discussion on disadvantages of using collections.
8.6.1. Modifying a Selected Record in the CURRENT Collection
After you form a collection and display the records it contains, use the
SELECT statement to pick the record to be modified.
SELECT 1 specifies the first record displayed,
SELECT 2 specifies the second record displayed, and
so forth. After you enter your SELECT statement, print
the results to make sure you have the record you want. If you discover you
picked the wrong record, you can enter SELECT NONE and
reenter a SELECT statement with a corrected record
occurrence value.
You have a choice of the following formats to modify the selected record:
MODIFY [VERIFY [USING] validation-statement]Datatrieve prompts you once for each elementary field in the record
definition and changes the field values to the ones you enter. You can
simply type MODIFY and press the Return
key, and Datatrieve gives you the opportunity to change each field in the
selected record:
MODIFY field [,...] [VERIFY [USING] validation-statement]
Datatrieve prompts you once for each elementary field that you name and
once for each elementary field that is subordinate to each group field you
name. The values of those fields are changed to the ones you enter. For
example, if you want to change only LAST_NAME and
ZIP in a PERSONNEL record, you can enter MODIFY LAST_NAME,
ZIP. Then Datatrieve prompts you only for those fields:
MODIFY USING assignment-statement [VERIFY [USING] validation-statement]
The Assignment statement in the USING clause may be a series of
PRINT and Assignment statements that you include in a
BEGIN-END block.
If you name an elementary field in an Assignment statement, Datatrieve changes its value to the one you specify. For example:
DTR> MODIFY USING FIRST_NAME = "CASSANDRA" DTR>
If you name a group field, Datatrieve gives you an error message stating "illegal assignment to a group field."
You are prompted to enter a value for a field only when the Assignment statement contains a prompting value expression for the field value.
Use the following format to modify fields subordinate to a field defined with an OCCURS clause in a record definition or a view definition (for a detailed description of this format, see Chapter 13, "Reporting Hierarchical Records"):
FIND list-field SELECT n MODIFY item-field [VERIFY [USING] validation-statement]
Use the following format to modify all occurrences of fields subordinate to a field defined with an OCCURS clause in a record definition or a view definition (for a detailed description of this format, see Chapter 13, "Reporting Hierarchical Records"):
MODIFY [ALL] list-item OF list
8.6.2. Modifying All Records in the CURRENT Collection
If you want to change values in all the records of the CURRENT collection, you have the choice of the following formats:
MODIFY ALL [VERIFY [USING] validation-statement]Datatrieve prompts you once for each field in the record definition. The values you enter for fields change those fields in every record in the collection. Use this format with care when your collection contains more than one record. Rarely do you want to make every field in every record identical.
MODIFY ALL field [, . . . ] [VERIFY [USING] validation-statement]
Datatrieve prompts you once for each elementary item specified or implied by the field name or names you specify. The values you enter for fields change those fields in every record in the collection.
Use this format with care when the CURRENT collection contains more than
one record. If you enter the statement MODIFY ALL
LAST_NAME and respond to the Datatrieve prompt by entering
SMITH, every record in the CURRENT collection then contains SMITH in the
LAST_NAME field. You use this format only to
change values that you want to be identical among records in the collection.
For example, you might want to modify a field like
SUPERVISOR_ID in a collection of records for
employees who share the same supervisor:
MODIFY ALL USING assignment-statement [VERIFY [USING] validation-statement]
The Assignment statement in this format can be a series of
PRINT and Assignment statements in a
BEGIN-END block.
If you name an elementary field in an Assignment statement, Datatrieve changes its value in every record in the collection. If you name a group field, Datatrieve changes the value of each elementary field in the group in every record in the collection.
You are prompted to enter a value for a field only when the Assignment statement contains a prompting value expression.
This format of the MODIFY statement has the same effect
as the preceding format. For example, if you enter the statement
MODIFY ALL USING LAST_NAME = "SMITH", every record in
the CURRENT collection contains SMITH in the
LAST_NAME field.
8.7. Modifying All Records in a Record Selection Expression
Section 8.6, ''Modifying Records in the CURRENT Collection'' showed that when you work with the CURRENT
collection or a selected record, the MODIFY statement does
not need to contain a record source or to identify which particular records to
modify. You can display records and change values using relatively few
keystrokes.
When you do not want the MODIFY statement to assume a
CURRENT collection or a selected record for the modify operation, you have to
specify both the record source and exactly which records you want to change as
an RSE. You must include the RSE either in the MODIFY
statement itself or in the FOR statement component of a
compound statement that also includes the MODIFY statement.
If you plan for a display of records before and after the modify operation, you
must include PRINT statements as well.
Modifying records in an RSE is the best method to use when writing procedures. Usually, procedures contain compound statements, and you cannot use the Datatrieve statements that create and manipulate collections in compound statements. Writing compound statements that modify data is not difficult if you keep in mind the logical steps to a modify operation and make sure you include all of them in the statements you form.
You must first ready a domain with either modify or write access before you can modify any records it contains. Use the shared option if you want to let other users store, erase, or modify records in the domain at the same time you are accessing it.
There are three methods you can use to modify records. You can modify:
All of the records in the CURRENT collection
A selected record in a collection
All of the records in an RSE
Using any of these methods, you can specify the fields you want to change. If you do not specify the fields to be changed, Datatrieve prompts you for all the record fields.
Note
Use care when modifying record fields pulled from more than one domain, when you are modifying records in a view based on more than one domain or in an RSE containing a CROSS clause. In these cases, if the field you are changing is stored in more than one data file, you are updating only one of those files for each field value you enter.
In the sample personnel system used in this book, the domains are set up to minimize duplicate fields. If, however, you are modifying a field that needs to be changed in nine domains, you cannot escape entering the change nine times without some fairly complex statements.
The following example illustrates how to modify records using a collection:
DTR> ! Change the value of the field CONTACT_NAME in one record DTR> ! from the COLLEGES domain. DTR> ! DTR> READY COLLEGES MODIFY DTR> FIND COLLEGES WITH CONTACT_NAME CONTAINING "LYNCH" [2 records found] DTR> LIST ALL COLLEGE_CODE : QUIN COLLEGE_NAME : Quinnipiac College CONTACT_NAME : George C. Lynch ADDRESS_DATA : STREET : TOWN : Hamden STATE : NH ZIP : 06152 COLLEGE_CODE : STAN COLLEGE_NAME : Stanford Univ. CONTACT_NAME : Carol Lynch ADDRESS_DATA : STREET : TOWN : Stanford STATE : CA ZIP : DTR> ! DTR> ! Select the record to be modified from the collection. DTR> ! DTR> SELECT 1 DTR> ! DTR> ! If you want to be prompted to enter a value for every field DTR> ! in the record, simply enter the keyword MODIFY. If you DTR> ! want to be prompted to enter values only for specific fields, DTR> ! follow the keyword MODIFY with the names of those fields. DTR> ! Remember to include a comma between field names if there is DTR> ! more than one of them. DTR> ! DTR> MODIFY CONTACT_NAME Enter CONTACT_NAME: Hayward C. Dublin DTR> LIST COLLEGE_CODE : QUIN COLLEGE_NAME : Quinnipiac College CONTACT_NAME : Hayward C. Dublin ADDRESS_DATA : STREET : TOWN : Hamden STATE : NH ZIP : 06152 DTR> ! DTR> ! Create a collection in which all records should have the DTR> ! same values for a field. In the following example, two DTR> ! JOB_HISTORY records have missing values in the SUPERVISOR_ID DTR> ! field. Both records are for employees who have the same DTR> ! supervisor, and you want to enter one value for DATATRIEVE DTR> ! to store in both records. DTR> ! DTR> FIND JOB_HISTORY WITH CON> DEPARTMENT_CODE = "ELEL" AND JOB_CODE = "EENG" AND CON> JOB_END MISSING [2 records found] DTR> PRINT ALL EMPLOYEE JOB JOB JOB DEPARTMENT SUPERVISOR ID CODE START END CODE ID 00238 EENG 2-Feb-1982 ELEL 00428 EENG 10-Jan-1982 ELEL DTR> ! DTR> ! In this case, enter MODIFY ALL followed by the field name or DTR> ! names you want to change. DATATRIEVE prompts you once for DTR> ! each field you specify and changes all the records in the DTR> ! collection. DTR> ! DTR> MODIFY ALL SUPERVISOR_ID Enter SUPERVISOR_ID: 00356 DTR> PRINT ALL EMPLOYEE JOB JOB JOB DEPARTMENT SUPERVISOR ID CODE START END CODE ID 00238 EENG 2-Feb-1982 ELEL 00356 00428 EENG 10-Jan-1982 ELEL 00356
If you modify records in collections, be careful when using the keyword ALL.
As shown in Example 8.1, ''Modifying Records by First Creating a Collection'', you enter MODIFY ALL
only when you want all the records in the collection to contain identical values
in one or more fields. If you include an RSE in a MODIFY
statement (MODIFY ... OF EMPLOYEES, for example), you get the
same results for that RSE as you do for collections with MODIFY
ALL—you are asking Datatrieve to store identical values in all the
records.
If you want to put different field values in each collection record (without
selecting each record in turn), you must set up a FOR loop.
In the following sample statement, the keyword PRINT allows
you to look at each record before and after you enter changes. Depending on what
you want to display and change, you can specify field names following the
keywords PRINT and MODIFY:
FOR CURRENT
BEGIN
PRINT
MODIFY
PRINT
ENDThe following example modifies records directly from a domain rather than a
collection using a FOR statement RSE:
DTR> SHOW CHANGE_SUPERS
!
! This procedure allows a user to change supervisor IDs for one
! or more current records in JOB_HISTORY. The user is prompted
! to enter the outdated supervisor ID and the department code.
! DATATRIEVE then displays a record, prompts the user to enter
! a new supervisor ID, and displays the changed record. The user
! is returned to the DTR> prompt if DATATRIEVE cannot find any
! records that meet the requirements in the FOR statement RSE.
!
PROCEDURE CHANGE_SUPERS
READY JOB_HISTORY SHARED MODIFY
FOR JOB_HISTORY WITH SUPERVISOR_ID = *."old supervisor" AND
DEPARTMENT_CODE = *."department code" AND JOB_END MISSING
BEGIN
PRINT EMPLOYEE_ID, EMPLOYEE_ID VIA WHO_IS_IT, SUPERVISOR_ID
MODIFY USING SUPERVISOR_ID = *."new supervisor"
PRINT EMPLOYEE_ID, EMPLOYEE_ID VIA WHO_IS_IT, SUPERVISOR_ID PRINT SKIP
END
FINISH JOB_HISTORY
END_PROCEDURE
DTR> :CHANGE_SUPERS
Enter department code: SALE
Enter old supervisor: 00200
EMPLOYEE SUPERVISOR
ID EMPLOYEE NAME ID
00208 Sciacca Joe V 00200
Enter new supervisor: 00504
EMPLOYEE SUPERVISOR
ID EMPLOYEE NAME ID
00208 Sciacca Joe V 00200
00233 Mathias Susan N 00200
Enter new supervisor: 00497
00233 Mathias Susan N 00497
. . .
. . .
. . .8.7.1. Modifying Records Controlled by a FOR Statement
The FOR statement lets you modify each record in a
record stream. The FOR statement creates a stream of
records that are processed, one by one, by the next statement. In a modify
operation, that next statement can be either a MODIFY
statement or a BEGIN-END block that includes a
MODIFY statement.
For example, if you enter FOR YACHTS WITH BUILDER = "ALBIN"
MODIFY, you can change every field in every record that
specifies Albin as the manufacturer.
If you enter FOR YACHTS WITH BUILDER = "ALBIN" MODIFY
PRICE, for example, you can change only the price field in
every record that specifies Albin as the manufacturer.
If you enter FOR PERSONNEL WITH ID = EMPLOYEE_VARIABLE MODIFY
USING, for example, you can change values in every record for
as many fields as have Assignment statements. The statement in the USING
clause can be a BEGIN-END block that contains the
PRINT and Assignment statements you want Datatrieve
to apply to each record in the record stream. Datatrieve does not prompt for
values unless you include prompting value expressions in the Assignment
statements.
The following statement uses this format:
FOR PERSONNEL WITH ID = EMPLOYEE_VARIABLE
MODIFY USING
BEGIN
PRINT ID, EMPLOYEE_NAME, DEPT, SUP_ID, SKIP
FIRST_NAME = *."first name (all caps) or TAB character"
LAST_NAME = *."last name (all caps) or TAB character"
DEPT = *."department code (all caps) or TAB character"
SUP_ID = *."supervisor ID number or TAB character"
PRINT SKIP, ID, EMPLOYEE_NAME, DEPT, SUP_ID
ENDThe FOR rse statement limits the
record stream to the record that has an ID field matching the contents of a
variable called EMPLOYEE_VARIABLE. The statements
inside the BEGIN-END block within the USING clause do the
following:
Print the values of the fields that are being changed
Prompt the user to modify only certain fields of the record
Print the new values of the fields that were modified
The procedure FOR_RSE_MODIFY, which includes this statement,
uses EMPLOYEE_VARIABLE to check that the user entered an
existing employee ID:
DTR> SHOW FOR_RSE_MODIFY
PROCEDURE FOR_RSE_MODIFY
SET ABORT
DECLARE EMPLOYEE_VARIABLE PIC 9(5).
EMPLOYEE_VARIABLE = *."employee ID number"
WHILE NOT ANY PERSONNEL WITH ID = EMPLOYEE_VARIABLE
BEGIN
PRINT SKIP
PRINT "Invalid employee number."
DECLARE GET_OUT PIC X(5).
GET_OUT = *."any letter if you want to stop, TAB to try again"
IF GET_OUT NOT = "" THEN
ABORT "Exit from procedure" ELSE
EMPLOYEE_VARIABLE = *."employee ID number"
END
READY PERSONNEL MODIFY
SET NO ABORT
FOR PERSONNEL WITH ID = EMPLOYEE_VARIABLE
MODIFY USING
BEGIN
PRINT ID, EMPLOYEE_NAME, DEPT, SUP_ID, SKIP
FIRST_NAME = *."first name (all caps) or TAB character"
LAST_NAME = *."last name (all caps) or TAB character"
DEPT = *."department code (all caps) or TAB character"
SUP_ID = *."supervisor ID number or TAB character"
PRINT SKIP, ID, EMPLOYEE_NAME, DEPT, SUP_ID
END
FINISH PERSONNEL
END_PROCEDURE
DTR>See Chapter 10, "Using Datatrieve Procedures" for information on procedures, Chapter 9, "Compound Statements" for information on compound statements, and Chapter 13, "Reporting Hierarchical Records" for more information on using hierarchies.
If you include the CURRENT collection as the RSE in a
FOR statement, you can display all the records that
are changed by entering PRINT ALL. This is useful when
the RSE that gathers the records to be modified can no longer locate them
after the modify operation.
Refer to Chapter 22, "Improving Datatrieve Performance" for more detailed information about improving Datatrieve response time.
8.7.2. Including the RSE Within the MODIFY Statement
Including the records to be modified as part of the
MODIFY statement is somewhat trickier than specifying
the same information in FIND, FIND and
SELECT, or FOR statements.
Depending on what you want to do, you must specify the RSE immediately after
the keyword MODIFY (or MODIFY ALL), or
you must write the RSE at the end of the statement. It is, therefore, easier
to make syntax errors when you try to include an RSE in the
MODIFY statement.
You should not include an RSE within a MODIFY statement
that changes hierarchical records (records that contain a list field or
records from a view domain that accesses more than one simple domain). If
you do, Datatrieve may trap you in an endless loop of "Re-enter" prompts for
the repeating field values.
You cannot specify different field values for each record in the
MODIFY statement RSE as you can when you modify
records using a FOR statement RSE. The
MODIFY statement RSE means you supply only one value
for each elementary field you specify by name or imply with a group field
name. The value you enter applies to every record. Therefore, make sure you
specify records that should contain identical values for the field or fields
you are changing.
Keeping these cautions in mind, you can choose among the following formats:
MODIFY [ALL] [VERIFY [USING] validation-statement] OF rse
Warning
Use with care. If you simply enter a domain name, you can make every record in the domain identical.
MODIFY [ALL] field [, . . . ] [VERIFY [USING] validation-statement] OF rse
MODIFY [ALL] rse USING assignment-statement [VERIFY [USING] validation-statement]
MODIFY [ALL] USING assignment-statement [VERIFY [USING] validation-statement] OF rse
The Assignment statement in these formats can also be a series of
Assignment and PRINT statements in a
BEGIN-END block.
8.8. Ensuring Valid Values
Datatrieve always checks the record definition that applies to the record you are changing to ensure that new field values have the correct length and data type. It also applies any VALID IF clauses in the record definition to the changed field values. Datatrieve displays an error message and leaves the existing field value untouched if a modify operation tries to enter a value that the record definition does not allow.
The VERIFY clause of the MODIFY statement lets you
supplement the validation requirements in the record definition. It can also
help you enforce security measures for modification procedures. The validation
statement can be a series of statements within a BEGIN-END
block.
The VERIFY clause in the following example ensures that the first and last names entered for an employee begin with a capital letter:
DTR> FOR PERSONNEL WITH
CON> ID = *."ID number for record being changed"
CON> MODIFY VERIFY USING
CON> BEGIN
CON> WHILE FIRST_NAME NOT BT "A" AND "Z"
CON> BEGIN
CON> PRINT SKIP, "Invalid first name"
CON> FIRST_NAME = *."first name using CAPS"
CON> END
CON> WHILE LAST_NAME NOT BT "A" AND "Z"
CON> BEGIN
CON> PRINT SKIP, "Invalid last name"
CON> LAST_NAME = *."last name using CAPS"
CON> END
.
.
.
CON> END
DTR>Note that Datatrieve does all verification only after all the data is entered for the record being modified.
8.8.1. Erasing Records
You must first ready a domain with write access before you can erase any records it contains.
There are three ways you can erase records:
A selected record in a collection
All of the records in the CURRENT collection
All of the records in an RSE
You cannot erase records in a view based on more than one domain or
records specified by an RSE that contains a CROSS clause. Although you can
erase records in a view that contains a subset of fields from more than one
domain, remember that you are erasing all the fields in those records, not
just the ones you see in the view. The same holds true for a collection
record that results from a REDUCED TO clause or a REDUCE
statement.
If you want to delete only one or a few records, it is easiest to isolate records in a collection. The following example illustrates how to erase records using a collection:
DTR> ! Erase one of the DEGREES records for the employee with
DTR> ! ID number 00183.
DTR> !
DTR> READY DEGREES SHARED WRITE
DTR> FIND DEGREES WITH EMPLOYEE_ID = "00183"
[5 records found]
DTR> PRINT
No record selected, printing whole collection.
EMPLOYEE COLLEGE DEGREE DATE
ID CODE DEGREE FIELD GIVEN
00183 Associates Arts 3-Jul-1964
00183 Masters Elect. Engrg. 16-Aug-1965
00183 Masters Applied Math 3-Jul-1965
00183 Bachelors Arts 14-Jun-1965
00183 MIT Ph.D. Elect. Engrg. 20-May-1965
DTR> !
DTR> ! The first record in the collection is the one to be erased.
DTR> !
DTR> SELECT 1
DTR> PRINT
EMPLOYEE COLLEGE DEGREE DATE
ID CODE DEGREE FIELD GIVEN
00183 Associates Arts 3-Jul-1964
DTR> ERASE
DTR> !
DTR> ! The SHOW CURRENT command indicates the selected record
DTR> ! has been erased. Remember, however, the address pointer
DTR> ! value for that record is still part of the collection.
DTR> ! Therefore, the value for "number of records" in the
DTR> ! collection always stays the same, no matter how many
DTR> ! records you erase from the data file.
DTR> !
DTR> SHOW CURRENT
Collection CURRENT
Domain: DEGREES
Number of Records: 5
Selected Record: 1 (Erased)
DTR> PRINT ALL
EMPLOYEE COLLEGE DEGREE DATE
ID CODE DEGREE FIELD GIVEN
00183 Masters Elect. Engrg. 16-Aug-1965
00183 Masters Applied Math 3-Jul-1965
00183 Bachelors Arts 14-Jun-1965
00183 MIT Ph.D. Elect. Engrg. 20-May-1965
DTR> !
DTR> ! The first record in the PRINT ALL display is still
DTR> ! ordinal position 2 in the collection. Ordinal position 1
DTR> ! still belongs to the erased record. This is important to
DTR> ! remember if you are working with collections from which
DTR> ! you have erased records. If your SELECT statement
DTR> ! specifies an ordinal position that belongs to an erased
DTR> ! record, DATATRIEVE tells you it cannot find the record.
DTR> !
DTR> SELECT 1
Selected record not found.
DTR> !
DTR> ! If you want to erase all the records in the CURRENT
DTR> ! collection, simply enter ERASE ALL.
DTR> !
DTR> FIND DEGREES WITH EMPLOYEE_ID = "00489"
[3 records found] DTR> PRINT
No record selected, printing whole collection.
EMPLOYEE COLLEGE DEGREE DATE
ID CODE DEGREE FIELD GIVEN
00489 Bachelors Arts 11-Jun-1983
00489 Masters Elect. Engrg. 9-Mar-1983
00489 MIT Masters Applied Math 11-Jun-1983
DTR> ERASE ALL
DTR> PRINT ALL
DTR>Chapter 9. Compound Statements
There are two kinds of statements: simple statements and compound statements. While a simple statement specifies an elementary operation, a compound statement contains one or more subordinate statements and a control structure.
If you begin a statement with any of the following keywords, Datatrieve recognizes it as a compound statement:
REPEATFORBEGINIFCHOICEWHILE
When you use the keyword THEN to join two statements, you also
create a compound statement.
You use compound statements to process one or more records in an RSE.
The following template illustrates a compound statement. By substituting a phrase for a real statement, the templates make it easier for you to focus on which statements are subordinate to others:
IF this-condition-is-true THEN BEGIN Do-task-1 ... Do-task-2 ... . . . . . . . . . And-finally ... END ELSE Do-task-10 ...
As shown in the template, a compound statement can contain other compound statements. The template uses indentation to show which statements are contained in others. Datatrieve does not require indentation, but you will find that compound statements are easier to read if you include it.
Note
Even if compound statements can contain other compound statements, they can
never contain commands or FIND, SELECT,
DROP, SORT, or
REDUCE statements. Datatrieve accepts these only as
simple statements.
The following sections discuss each type of compound statement.
9.1. Using the REPEAT Statement
A REPEAT statement causes Datatrieve to execute the next
statement a specified number of times. In response to the following statement,
Datatrieve prompts you to enter field values for each of five records:
REPEAT 5 STORE EMPLOYEES
The number of times Datatrieve executes the subordinate statement can be
specified as an expression rather than an integer; for example, REPEAT
(FIELD1 * 4). If you use an expression, it must result in a
positive whole number when Datatrieve evaluates it.
9.2. Using the FOR Statement
A FOR statement causes Datatrieve to execute the next
statement on each of the records in an RSE. The following FOR
statement causes Datatrieve to print each of the records in DEGREES
that contain PRDU in the COLLEGE_CODE field:
FOR DEGREES WITH COLLEGE_CODE = "PRDU"
PRINT9.3. Using a BEGIN-END Block
A BEGIN-END statement (also called a
BEGIN-END block) causes Datatrieve to treat several
statements as one statement. A BEGIN-END block defines the
set of statements that must execute for each record in an RSE or each time a
condition is true:
FOR EMPLOYEES WITH EMPLOYEE_ID = *."employee number"
BEGIN
LIST EMPLOYEE_ID, EMPLOYEE_NAME, EMPLOYEE_ADDRESS
MODIFY EMPLOYEE_NAME, EMPLOYEE_ADDRESS
LIST EMPLOYEE_ID, EMPLOYEE_NAME, EMPLOYEE_ADDRESS
ENDA BEGIN-END block inside a REPEAT
statement causes Datatrieve to repeat an entire sequence of statements. If you
want to store numerous records using selected fields, you can use a
BEGIN-END block to repeat the sequence of prompting
statements:
REPEAT 20 STORE JOBS USING
BEGIN
JOB_CODE = *.JOB_CODE
JOB_TITLE = *.JOB_TITLE
END9.4. Using the Keyword THEN
The keyword THEN joins two statements; it is most useful
when you have two or three simple operations to perform in a loop:
FOR JOB_HISTORY WITH EMPLOYEE_ID = "00205" PRINT THEN MODIFY THEN PRINT
9.5. Using the WHILE Statement
A WHILE statement tells Datatrieve to repeat the
subordinate statement as long as a specified condition is true.
The condition specified in the WHILE statement takes the
form of a Boolean (relational) expression. Datatrieve Evaluation of Compound
Boolean Expressions tells you more about creating simple and complex Boolean
expressions and using variables. In the following example, NUM LE 4
is a Boolean expression:
DTR> DECLARE NUM PIC 99.
DTR> DECLARE ITS_SQUARE COMPUTED BY NUM * NUM.
DTR> WHILE NUM LE 4
CON> BEGIN
CON> PRINT NUM, ITS_SQUARE
CON> NUM = NUM + 1
CON> END
ITS
NUM SQUARE
00 0
01 1
02 4
03 9
04 16
DTR>Note that NUM is a variable field name. You cannot specify a
record field name on the left side of a Boolean expression when setting up a
condition in a WHILE statement. If you need to put a record
field name in that position, you must prompt the user to enter one
(WHILE *.field name ...).
9.6. Using IF-THEN and IF-THEN-ELSE Statements
An IF-THEN-ELSE statement causes Datatrieve to execute one
of two statements, depending on whether a condition is true or not. The
THEN component contains the simple or compound statement
to be executed when the expression is true. The ELSE
component is optional and it specifies the simple or compound statement to be
executed when the expression is false.
When you combine statements with IF-THEN-ELSE, you can omit
the keyword THEN because Datatrieve knows an
IF component is always incomplete. When you include an
ELSE component, however, you cannot omit the keyword
ELSE or put it on a line following the
THEN statement. Type ELSE on the same
line as the last part of the THEN statement. This is how you
tell Datatrieve that you are not entering a simple IF-THEN
statement.
The following example illustrates how to include an
IF-THEN-ELSE statement in a procedure:
DTR> SHOW REVIEW_DATES
PROCEDURE REVIEW_DATES
READY JOB_HISTORY
!
DECLARE CUT_OFF_DATE USAGE DATE.
CUT_OFF_DATE = *."date six months ago"
!
FOR JOB_HISTORY WITH SUPERVISOR_ID = *."supervisor ID" AND
JOB_END MISSING SORTED BY REVIEW_DATE
!
IF REVIEW_DATE < CUT_OFF_DATE
THEN PRINT EMPLOYEE_ID, EMPLOYEE_ID VIA WHO_IS_IT,
REVIEW_DATE, " Needs a review" ELSE
PRINT EMPLOYEE_ID, EMPLOYEE_ID VIA WHO_IS_IT,
REVIEW_DATE, " Review up-to-date"
!
FINISH JOB_HISTORY
RELEASE WHO_IS_IT, CUT_OFF_DATE
END_PROCEDURE
DTR> :REVIEW_DATES
Enter date six months ago: 1/9/83
Enter supervisor ID: 00267
EMPLOYEE REVIEW
ID EMPLOYEE NAME DATE
00497 Weist Robert 30-Sep-1982 Needs a review
00419 Clarke Aruwa Q 15-Dec-1982 Needs a review
00355 Gutierrez Joe 1-Jan-1983 Needs a review
00184 Frydman Louie T 5-Jan-1983 Needs a review
00464 Aaron Alvin 9-Jan-1983 Review up-to-date
00216 Lobdell Arleen Y 13-Apr-1983 Review up-to-date
00244 Boyd Ann B 24-Apr-1983 Review up-to-date
00283 Dallas Paul 4-May-1983 Review up-to-date
00200 Ziemke Al F 21-May-1983 Review up-to-date
00501 Gramby Terry 7-Jun-1983 Review up-to-date
00241 Keisling Edward 3-Jul-1983 Review up-to-date
DTR>9.7. Using the CHOICE Statement
A CHOICE statement causes Datatrieve to execute one of a
series of statements depending on the evaluation of a Boolean expression
associated with each statement.
The CHOICE statement is a good substitute for nested
IF-THEN-ELSE statements:
IF A > B THEN PRINT "A’s bigger" ELSE
IF A = B THEN PRINT "A’s the same size" ELSE
IF A < B THEN PRINT "A’s smaller" ELSE
PRINT "A’s a strange duck"
CHOICE
A > B THEN PRINT "A’s bigger"
A < B THEN PRINT "A’s smaller"
ELSE PRINT "A’s the same"
END_CHOICEThe ELSE clause is optional in a CHOICE
statement. You can also omit the keyword THEN, although doing
so makes the statement more difficult to read.
The following example illustrates the use of a CHOICE
statement in a procedure.
DTR> SHOW REVIEW_DATES_TWO
PROCEDURE REVIEW_DATES_TWO
READY JOB_HISTORY
!
DECLARE CURRENT_DATE USAGE DATE.
CURRENT_DATE = "TODAY"
!
FOR JOB_HISTORY WITH SUPERVISOR_ID = "00267" AND
JOB_END MISSING SORTED BY REVIEW_DATE
CHOICE
!
! GE 210 days is 7 months or more...
!
CURRENT_DATE - REVIEW_DATE GE 210 THEN
PRINT EMPLOYEE_ID, REVIEW_DATE,
"At least one month overdue"
!
! BT 209 AND 180 days is between 7 and 6 months...
!
CURRENT_DATE - REVIEW_DATE BT 209 AND 180 THEN
PRINT EMPLOYEE_ID, REVIEW_DATE,
"A few weeks overdue"
!
! BT 179 AND 150 days is between 6 and 5 months...
!
CURRENT_DATE - REVIEW_DATE BT 179 AND 150 THEN
PRINT EMPLOYEE_ID, REVIEW_DATE,
"Not overdue, but schedule"
!
! No one else needs a performance review...
!
ELSE PRINT EMPLOYEE_ID, REVIEW_DATE,
"Reviewed recently"
END_CHOICE
!
FINISH JOB_HISTORY
END_PROCEDURE
DTR>9.7.1. RUNNING COUNT and RUNNING TOTAL Used With Conditional Statements and Expressions
You must be careful when using the RUNNING COUNT and RUNNING TOTAL
statistical operators within conditional statements or expressions, which in
turn are embedded inside of loops or compound statements. Using these
statistical operators in a CHOICE statement or expression
or in an IF-THEN-ELSE statement or expression could
produce unexpected results in the RUNNING COUNT or RUNNING TOTAL
accumulator.
The key reason for this is that each reference to RUNNING COUNT or RUNNING TOTAL causes Datatrieve to maintain a separate internal accumulator for that reference.
If the CHOICE alternatives or the
IF-THEN-ELSE alternatives include separate
accumulators and if these alternatives are not evaluated an equal number of
times, the accumulated values may not match, and can produce unexpected
results.
The following example illustrates the problem:
DTR>SHOW RTT
PROCEDURE RTT
READY YACHTS
FOR FIRST 3 YACHTS BEGIN
PRINT CHOICE
RUNNING COUNT NE 2 "NOT EQUAL 2"
RUNNING COUNT EQ 2 "EQUAL 2"
ELSE "NO MATCH"
END_CHOICE
END
END_PROCEDURE
DTR>:RTT
NOT EQUAL 2
NO MATCH
NOT EQUAL 2In the previous example, the first time the CHOICE
expression is evaluated, it finds a condition that matches the requirements
of the first CHOICE alternative, therefore it does not
evaluate the second condition. The RUNNING COUNT value for the first
CHOICE alternative is set to 1.
The second time CHOICE expression is evaluated, the
first CHOICE condition is not met and the second
CHOICE alternative is considered. However, since the
second CHOICE alternative is also based on a RUNNING
COUNT statistical operator, a separate accumulator is used and the value in
this accumulator is now set to 1.
Datatrieve is now maintaining two separate accumulators; one for each of
the RUNNING COUNT statistical operators listed in the
CHOICE statement alternatives. The first accumulator
has a value of 2 at this point and the second accumulator has a value of
1.
Depending on the sequencing of the CHOICE statement
alternatives, it is possible that the alternatives are not evaluated an
identical number of times. It is for this reason that the second
CHOICE condition in the previous example is not met
either, and the condition in the ELSE clause is
executed.
The following example provides a workaround to the problem. In this case, the use of a variable forces Datatrieve to use a single accumulator:
DTR>SHOW RTT_WORKAROUND
PROCEDURE RTT_WORKAROUND
READY YACHTS
DECLARE X PIC 99.
FOR FIRST 3 YACHTS BEGIN
X = RUNNING COUNT
PRINT CHOICE
X NE 2 "NOT EQUAL 2"
X EQ 2 "EQUAL 2"
ELSE "NO MATCH"
END_CHOICE
END
END_PROCEDURE
DTR>:RTT_WORKAROUND
NOT EQUAL 2
EQUAL 2
NOT EQUAL 29.8. Avoiding Looping Mistakes
You can create an infinite loop by setting up a condition that is always true. The following is a simple example:
WHILE 0 < 1 PRINT "This is an infinite loop. Enter CTRL/C to stop it."
You can create the same sort of situation when you use expressions that
contain variables whose values you do not control. Refer back to the examples
for the WHILE statement in Section 9.5, ''Using the WHILE Statement''. If
the values of the condition variables (MORE_RECORDS and
NUM) were changed outside the BEGIN-END block subordinate to
the WHILE statement, an infinite loop would result.
Chapter 10. Using Datatrieve Procedures
A procedure is a fixed sequence of Datatrieve commands and statements you create, name, and store in a DMU or CDO format dictionary. Procedures are useful when you plan to execute a series of Datatrieve commands and statements frequently.
10.1. Defining a Procedure
To define a procedure, enter the DEFINE PROCEDURE command
at Datatrieve command level:
DEFINE PROCEDURE DTRUSR$DISK:[DTRUSERS]ROSSI.procedure-nameDatatrieve then prompts with DFN> to indicate that it expects a procedure
definition. Enter the commands or statements that form the procedure definition.
Datatrieve continues to prompt with DFN> until you enter the keyword
END_PROCEDURE on a line by itself. For example:
DTR> DEFINE PROCEDURE BIG_YACHTS DFN> READY YACHTS DFN> FIND BIGGIES IN YACHTS - DFN> WITH LOA GT 40 SORTED BY BUILDER DFN> PRINT ALL DFN> END_PROCEDURE DTR>
Datatrieve procedure definitions can be stored either in the DMU or in the CDO format dictionary. When defining a procedure, you must set default to a CDD/Repository dictionary directory, or you must specify a full dictionary path name in your procedure definition.
10.2. Editing a Procedure
Some errors may occur during execution of the procedure. A typing error, for instance, can result in a syntax error in an otherwise correctly formatted command. If an error occurs during execution, Datatrieve prints an error message and terminates the procedure. You can correct the error by using an editor. Invoke the editor with the following command:
EDIT procedure-nameThe EDIT command puts your entire DEFINE
command in the edit buffer. You may have to repeat this process several times to
take care of all the syntax mistakes in your procedure definition.
Creating procedures in stages can save you the frustration of searching through a large number of lines of input to find a missing quotation mark or period.
Note
Once you have stored a procedure for the first time, you must specify the
name of the procedure the next time you enter the EDIT
command. This is because the EDIT command calls the last
command you entered, which in this case is the DEFINE
PROCEDURE command. However, the DEFINE
command produces an error when the named object already exists in the
dictionary directory.
By specifying the procedure name with the EDIT command,
a REDEFINE PROCEDURE command is placed at the top of the
definition copied to your edit buffer. If your last command was
REDEFINE PROCEDURE, entering the
EDIT command by itself causes no problems.
10.3. Invoking a Procedure
You invoke a procedure by preceding its name with the keyword
EXECUTE or with a colon (:).
To invoke a procedure stored in the DMU format dictionary, you must have P (PASS_THRU), S (SEE), and E (EXECUTE_EXTEND) access to it. To invoke a procedure stored in the CDO format dictionary, you must have S (SHOW) access to the dictionary and to the procedure definition. You cannot invoke a procedure during an ADT, EDIT, or Guide Mode session. You cannot include a procedure in a domain, record, or table definition.
The content of a procedure determines where you can invoke it. In general, you can invoke a procedure anywhere you can use the commands or statements contained in the procedure. For example, if the procedure contains Datatrieve commands and statements, you can invoke it at the Datatrieve command level:
DTR> :BIG_YACHTS
You can invoke a procedure from the OpenVMS command level. For example:
$ DATATRIEVE "EXECUTE BIG_YACHTS
After Datatrieve executes the last command or statement in the file, you are automatically returned to the system prompt.
You can use the colon to execute a procedure from the OpenVMS level, but you must precede it with a double quote:
$ DATATRIEVE ":BIG_YACHTS
If you are running Datatrieve in a DECwindows environment and you want to
invoke a Datatrieve procedure, you may want to use the DCL
DATATRIEVE command with the /INTERFACE =
CHARACTER_CELL qualifier. The benefit of doing this is that the
Datatrieve main application window will not be displayed on your screen while
the procedure is being executed.
The following example shows how the DATATRIEVE command
would be used in the command file:
$ TYPE STOREEMP.COM
$ DATATRIEVE/INTERFACE=CHARACTER_CELL -
"EXECUTE CDD$TOP.PERSONNEL.STORE_EMPLOYEES"
$ PRINT/QUEUE=SYS$PRINT AUDIT.LOG
$ @STOREEMP.COM
. . .
. . .
. . .
$10.4. Contents of a Procedure
A procedure can contain any number of the following Datatrieve elements:
Full Datatrieve commands and statements
Command and statement clauses and arguments
Comments
10.4.1. Commands and Statements
When you execute BIG_YACHTS, the result is the same as
entering the READY command and the
FIND and PRINT statements at
command level:
DTR> :BIG_YACHTS
LENGTH
OVER
MANUFACTURER MODEL RIG ALL WEIGHT BEAM PRICE
CHALLENGER 41 KETCH 41 26,700 13 $51,228
COLUMBIA 41 SLOOP 41 20,700 11 $48,490
GULFSTAR 41 KETCH 41 22,000 12 $41,350
ISLANDER FREEPORT KETCH 41 22,000 13 $54,970
NAUTOR SWAN 41 SLOOP 41 17,750 12
NEWPORT 41 S SLOOP 41 18,000 11
OLYMPIC ADVENTURE KETCH 42 24,250 13 $80,500
PEARSON 419 KETCH 42 21,000 13
DTR>10.4.2. Arguments and Clauses
Besides full commands and statements, a procedure can contain a single argument or clause from a command or statement. For example, it can contain a record selection expression:
DTR> DEFINE PROCEDURE BIG_YACHTS_RSE DFN> BIGGIES IN YACHTS WITH LOA GT 40 SORTED BY BUILDER DFN> END_PROCEDURE DTR>
Having separated the PRINT keyword from the record
selection expression, you can invoke the procedure to complete a
PRINT statement:
DTR> PRINT ALL :BIG_YACHTS_RSE
LENGTH
OVER
MANUFACTURER MODEL RIG ALL WEIGHT BEAM PRICE
CHALLENGER 41 KETCH 41 26,700 13 $51,228
COLUMBIA 41 SLOOP 41 20,700 11 $48,490
GULFSTAR 41 KETCH 41 22,000 12 $41,350
ISLANDER FREEPORT KETCH 41 22,000 13 $54,970
NAUTOR SWAN 41 SLOOP 41 17,750 12
NEWPORT 41 S SLOOP 41 18,000 11
OLYMPIC ADVENTURE KETCH 42 24,250 13 $80,500
PEARSON 419 KETCH 42 21,000 13You can use this procedure in any command or statement containing an RSE argument.
10.4.3. Comments
When you define a procedure, you can include comments, which Datatrieve stores in the dictionary.
Include comments that are not displayed during execution by placing an exclamation point (!) at the beginning of each comment line.
10.5. Turning Off the "Looking for..." Messages
If you use the Return key to hold Datatrieve back from
processing the input, rather than the hyphen continuation character (see Section 1.8, ''Entering Long Command Lines''), you can turn off (but still get a CON>
prompt) by entering the SET NO PROMPT command:
DTR> READY FAMILIES
DTR> PRINT FAMILIES WITH
[Looking for Boolean expression]
CON> FATHER = "JIM" AND
[Looking for Boolean expression]
CON> MOTHER = "ANN"
NUMBER KID
FATHER MOTHER KIDS NAME AGE
JIM ANN 2 URSULA 8
RALPH 4
DTR> SET NO PROMPT
DTR> PRINT FAMILIES WITH
CON> FATHER = "JIM" AND
CON> MOTHER = "ANN"
NUMBER KID
FATHER MOTHER KIDS NAME AGE
JIM ANN 2 URSULA 8
RALPH 4
DTR>10.6. Aborting Procedures
You can use the SET ABORT or SET NO
ABORT commands to control what happens if Datatrieve encounters an
error condition when processing a procedure.
When SET ABORT is in effect, Datatrieve exits a procedure
when either of the following conditions is true:
It finds an error condition, specified by the
ABORTstatement, when trying to execute one of the statements or commands in the procedureIt processes a Ctrl/Z or Ctrl/C entered by the user who invokes the procedure
If either of these conditions is true and SET NO ABORT is
in effect, Datatrieve does not exit the procedure. It does abort the statement
it is executing but continues processing any remaining statements and
commands.
You may want SET ABORT in effect when your procedure
readies domains that contain the data you want to access. If those domains
cannot be readied, there is no point in continuing with the rest of the
procedure. If SET NO ABORT were in effect, Datatrieve would
produce error messages as it processed any statements referring to the domains.
The default setting in Datatrieve is SET NO ABORT. You can
ensure that SET ABORT is in effect by including that
statement in the procedure definition.
On the other hand, SET NO ABORT should be in effect if your
procedure prompts users to enter values for more than one record. In this case,
you can expect someone to enter Ctrl/Z to keep an entry for one
of the records from being stored. You want users to reenter the looping cycle so
they can store or change more records. If SET ABORT is in
effect, Datatrieve aborts the remainder of a procedure or command file when you
enter Ctrl/Z.
The ABORT statement lets you specify an error condition
appropriate for the operation you are performing. The ABORT
statement terminates execution of the compound statement or statements
containing it and can print a message explaining the termination.
Statements to control and specify error conditions can be numerous and complex
in large scale applications. This section is designed only to introduce you to
the topic. Some restrictions that apply to the ABORT
statement are not listed here. For more detailed information on handling error
conditions, read the sections on the SET command and the
ABORT statement in the
VSI Datatrieve Reference Manual.
10.7. Executing a Procedure Repeatedly
You can invoke a procedure in a REPEAT statement to execute
it a number of times or in a FOR statement to apply it to a
record stream.
To repeat the entire procedure, enclose the procedure call or the procedure
definition in a BEGIN-END block. For example, the following
sequence of statements puts a procedure call in a BEGIN-END
block and repeats the procedure 5 times:
DTR> REPEAT 5 BEGIN [Looking for statement] CON> :HEAVY_SLOOP CON> END DTR>
The following example includes a FOR statement and a
BEGIN-END block in a procedure definition and invokes the
procedure in a REPEAT statement:
DTR> SHOW HEAVY_SLOOP
PROCEDURE HEAVY_SLOOP
FOR YACHTS WITH BUILDER = *."MANUFACTURER"
BEGIN
IF RIG = "SLOOP" AND DISP GE 10000
PRINT BOAT
END
END_PROCEDURE
DTR> REPEAT 3 :HEAVY_SLOOP
Enter MANUFACTURER: CAL
LENGTH
OVER
MANUFACTURER MODEL RIG ALL WEIGHT BEAM PRICE
CAL 3-30 SLOOP 30 10,500 10
CAL 35 SLOOP 35 15,000 11
Enter MANUFACTURER: PEARSON
PEARSON 10M SLOOP 33 12,441 11
PEARSON 35 SLOOP 35 13,000 10
PEARSON 36 SLOOP 37 13,500 11
PEARSON 39 SLOOP 39 17,000 12
Enter MANUFACTURER: NAUTOR
NAUTOR SWAN 41 SLOOP 41 17,750 12
DTR>If you invoke a procedure in a FOR statement, you must use
the same technique: enclose the call or the procedure definition in a
BEGIN-END block. For example:
FOR rse BEGIN :procedure-name END
If you use a procedure in a compound statement, do not include any commands or
a FIND, SELECT, DROP,
SORT, or REDUCE statement in that
procedure. Datatrieve does not accept commands or any of these statements in
BEGIN-END blocks or other compound statements; it accepts
them only as simple statements.
In addition, when a FIND statement is in a procedure,
Datatrieve does not display a message to tell you how many records it found for
the collection. If Datatrieve finds no records that meet the specifications in
the FIND statement RSE, a subsequent
SELECT statement will produce an error message.
10.8. Generalizing Procedures
You can generalize procedures so that they operate on numerous domains. Be sure that the generalized procedure refers to an alias rather than to the domain name.
For example, you might want to keep separate domains for boats from different geographical areas, perhaps the domains WEST_YACHTS, EAST_YACHTS, and SOUTH_YACHTS (which of course have the same record definition and data file format).
When you ready each domain, rename it with an alias, using the AS clause in
the READY command. To create the alias
ALL_YACHTS for the domain WEST_YACHTS, respond to
the DTR> prompt with this READY command:
DTR> READY WEST_YACHTS AS ALL_YACHTS DTR>
10.9. Protecting Procedures
When you define a procedure, Datatrieve stores the procedure definition in your default dictionary directory and creates an access control list for the procedure. Datatrieve automatically stores one access control list entry that specifies your username as the only valid identification and grants you DMU or CDO access privileges. The DMU access privileges are: C (CONTROL), D (LOCAL_DELETE), E (EXTEND/EXECUTE), H (HISTORY), M (MODIFY), R (READ), S (SEE), U (UPDATE), and W (WRITE) access privileges. The CDO access privileges are: R (READ), W (WRITE), M (MODIFY), E (EXTEND), S (SHOW), U (CHANGE+DEFINE), D (DELETE), C (CONTROL), OPERATOR, and ADMINISTRATOR.
You can modify the access control list to give various types of access privilege to other users. To execute the procedure, a user must have the following privileges: for DMU, P (PASS_THRU), S (SEE), and E (EXTEND/EXECUTE); for CDO, S (SHOW) access to the dictionary and to the procedure.
10.10. Getting a Procedure to Work the Way You Want
The SET VERIFY and OPEN commands are
useful when you are troubleshooting problems with procedures.
The SET VERIFY command displays input from OpenVMS command
files and the editing buffer as they are processed. The SET NO
VERIFY command turns off this input display. The SHOW
SET_UP command tells you whether SET VERIFY or
SET NO VERIFY is in effect during your Datatrieve
session.
The SET VERIFY and SET NO VERIFY
commands are also DCL settings. The default for your Datatrieve session is
whichever one is in effect at DCL level when you invoke Datatrieve.
The SET VERIFY command does not display statements and
commands from Datatrieve procedures as they are processed. You can, however,
create your Datatrieve procedure as an OpenVMS command file so you can take
advantage of the SET VERIFY command. To do so, take the
following actions:
Write your procedure definition to a command file using the following format:
EXTRACT procedure-name ON filename.COM
Exit Datatrieve and edit the command file to remove the following lines:
DELETE procedure-name; REDEFINE procedure-name END_PROCEDURE
Invoke Datatrieve again and execute the command file:
@filename
When SET VERIFY is active, you will then be able to see
where errors occur in the procedure code. With this method you can also check
the correct execution of loops and compound statements. When you have finished
editing the command file and it works the way you want, you can edit it one more
time to insert the following:
REDEFINE procedure-nameas the first line of the file.END_PROCEDUREas the last line of the file.
At the Datatrieve command level, you can then execute the command file a final time to create it as a new version of your Datatrieve procedure.
Although you can use command files rather than procedures, there are disadvantages to using command files. For example:
You cannot execute command files inside a compound statement, such as a
FORstatement.You lose advantages, such as history and access control lists, that are available for dictionary objects.
10.10.1. Writing a Session Log to a File
You can use the OPEN command to create a log file of
your Datatrieve session in your OpenVMS directory. After you execute a
command file, you can close this file with a close command and exit
Datatrieve to print it. This is useful when you are troubleshooting a long
command file or one that produces much output. In the following example,
PROBLEMS.LOG is the log file name:
DTR> OPEN PROBLEMS.LOG
DTR> SET VERIFY
DTR> @MYFILE
. . .
. . .
. . .
DTR> CLOSE ! Do not enter the file name after CLOSE.
DTR> SET NO VERIFY
DTR> EXIT
$ PRINT/QUEUE=SYS$PRINT PROBLEMS.LOGIf in your log session you make calls to other products or if you use a
function like the FN$DCL to request information
from another product, that information is not written to the file specified
by the OPEN command. A listing of your log session
displays your Datatrieve commands, but does not include the output generated
by the other product.
10.11. Invoking a Command File From Datatrieve
From within Datatrieve, you invoke a command file stored in an OpenVMS
directory by preceding the file specification with an at sign
(@). To invoke a command file, you must enter it on a
line by itself, for example:
DTR> @BIGBOAT.COM
You need not enter Datatrieve to invoke a command file. You can invoke a
command file from the DCL level. This is particularly useful if you are working
in a DECwindows environment and you do not want to display the Datatrieve main
application window while the command file is executing. To invoke
PRT.COM in this manner, you would enter the following
command:
$ DATATRIEVE/INTERFACE=CHARACTER_CELL "@PRT"
After Datatrieve executes the last command or statement in the file, you are automatically returned to the system prompt.
Chapter 11. Accessing Data the Easy Way: Using Collections
This chapter looks at the advantages and disadvantages of retrieving data using
collections. Chapter 12, "Accessing Data the Expert Way: Using RSEs and View Domains" explains how to retrieve data without
using collections. A Datatrieve collection is a
group of records you gather from one or more sources with a FIND
statement. Usually, record sources are readied domains. A collection stays in your
workspace until it is superseded by another collection or until you remove
it.
Datatrieve considers that most statements apply to a record selected from a collection unless you say otherwise. There are also some statements that apply only to collections. Working with collections, therefore, usually means that your statements can be simple and short. You do not always have to tell Datatrieve where to look for data and can focus on what you want to do with it.
The following example illustrates creating a collection and some of the things you can do with it:
DTR> ! To find out how many employees have been willing to commute
DTR> ! from Massachusetts, create a collection of employee
DTR> ! records with MA listed as the state.
DTR> !
DTR> READY EMPLOYEES
DTR> FIND EMPLOYEES WITH STATE = "MA"
[36 records found]
DTR> !
DTR> ! DATATRIEVE groups these records in a collection named
DTR> ! CURRENT.
DTR> !
DTR> SHOW COLLECTIONS
Collections:
CURRENT
DTR> !
DTR> ! You can type PRINT ALL to display the records in CURRENT.
DTR> !
DTR> !)
DTR> PRINT ALL
ADDRESS SOCIAL
ID LAST NAME FIRST NAME INIT DATA ZIP SEX SECURITY
00174 Myotte Daniel V
95 Princeton Rd. Bennington MA 03442 M 246 68 2816
1/17/48
00175 Siciliano George
109 Old New Boston Rd. Farmington MA 03835 M 136 17 0800
5/25/41
00191 Pfeiffer Karen I
143 Hudson Rd. Marlborough
. . .
. . .
. . .
DTR> !
DTR> ! You do not need all the information in the record. You can use
DTR> ! the REDUCE statement to specify a combination of field
DTR> ! values that makes each record unique and to eliminate fields
DTR> ! you are not interested in. (You would include ID if you
DTR> ! suspect there might be employees with the same name living
DTR> ! in the same town.)
DTR> !
DTR> REDUCE TO NAME, TOWN, STATE
DTR> !
DTR> ! Order the records in the collection according to
DTR> ! town.
DTR> !)
DTR> SORT BY TOWN
DTR> !
DTR> ! Display the reordered records so only town and name
DTR> ! print on your screen.
DTR> !
DTR> PRINT ALL TOWN, NAME
TOWN LAST NAME FIRST NAME INIT
Bennington Delano Al F
Bennington Comstock Frederick E
Bennington Mistretta Kathleen G
Bennington Rodrigo Lisa
Bennington Turner Alan
Bennington Lynch Mary F
Bennington Chandler Christine E
Bennington Boutin Janis S
Bennington Rothwell Dean
Bennington Myotte Daniel V
Bennington Siciliano Jesse W
Boston Harrison Lisa
Boston Staples Jerry Z
Boston Roberts Joseph V
. . .
. . .
. . .
DTR>11.1. Specifying Records in a Collection
Example 11.1, ''Creating and Using a Collection'' uses the statement FIND EMPLOYEES WITH STATE
= "MA" to form a collection. EMPLOYEES WITH STATE = "MA" is a
record selection expression (RSE). The simplest RSE specifies only a record
source. The statement, FIND EMPLOYEES, for example, creates a
collection that contains all the records in the EMPLOYEES domain, rather than
only those that specify MA in the STATE field.
You can include six options in an RSE to specify the records you want. When
you include more than one option, you must specify them in the order they appear
in the following list, in which a FIND statement example
illustrates each option:
Record number restriction
DTR> FIND FIRST 5 EMPLOYEES
A name for the group of records from each record source
DTR> FIND A IN EMPLOYEES
A match of records from more than one source
DTR> FIND EMPLOYEES CROSS JOB_HISTORY DTR> OVER EMPLOYEE_ID
Record contents restriction
DTR> FIND JOB_HISTORY WITH JOB_END MISSING
Field restriction
DTR> FIND SALARY_HISTORY REDUCED TO EMPLOYEE_ID, CON> DEPARTMENT_CODE, JOB_CODE
Record order
DTR> FIND EMPLOYEES SORTED BY LAST_NAME
The following FIND statement shows you the order of these
options when all of them appear in the same RSE. Using data from the
EMPLOYEE and JOB_HISTORY domains, the statement
creates a collection that contains current job information for 10
employees:
DTR> FIND FIRST 10 A IN EMPLOYEES CROSS CON> B IN JOB_HISTORY OVER CON> EMPLOYEE_ID WITH JOB_END MISSING REDUCED TO CON> EMPLOYEE_ID, LAST_NAME, DEPARTMENT_CODE, CON> JOB_CODE SORTED BY DEPARTMENT_CODE, LAST_NAME
When using collections, you do not have to enter statements like that one; instead, you can start out with a collection that contains more records than you need. You can then order the records and fields, eliminate fields, or remove records from the collection in separate steps until you get exactly the data you want.
The following sections explain in more detail how you create and work with collections.
11.2. Forming and Naming Collections
You must ready a domain (using any access mode other than EXTEND) before you can form a collection from it.
When the FIND statement executes, Datatrieve creates a
collection consisting of the records specified in the RSE and names the
collection CURRENT. Unless the FIND statement executes inside
a procedure, Datatrieve also tells you how many records it finds.
If you specify a name for the group of records in the FIND
statement RSE, the collection has two names: CURRENT and the name you specify.
You can refer to the collection by the name CURRENT or by the name you
specify:
DTR> READY SALARY_HISTORY
DTR> FIND BIG_WIGS IN SALARY_HISTORY WITH
CON> SALARY_END MISSING AND SALARY_AMOUNT GT 50000
[38 records found]
DTR> SHOW CURRENT
Collection BIG_WIGS
Domain: SALARY_HISTORY
Number of Records: 38
No Selected Record
DTR> SHOW COLLECTIONS
Collections:
BIG_WIGS (CURRENT)When you use a FIND statement to form another collection,
the new collection becomes the CURRENT collection. You can refer to the old
collection only by the name you gave it. If you did not name the old collection,
Datatrieve deletes it when the new one is formed.
11.3. Choosing a Target Record for an Operation
You can use the SELECT statement to establish a target
record for an operation. This is useful when you want to erase or modify one or
a few records from a data file. When you establish a selected record, you can
type PRINT, ERASE, or
MODIFY, and Datatrieve will know you are referring to the
selected record. If you want to do something to the whole collection rather than
the selected record, include the keyword ALL (PRINT ALL,
MODIFY ALL, or ERASE ALL, for
example):
DTR> READY EMPLOYEES MODIFY DTR> FIND EMPLOYEES WITH LAST_NAME CONTAINING "SMITH" [2 records found] DTR> PRINT ALL LAST_NAME, ID, STREET, TOWN, STATE LAST NAME ID STREET TOWN STATE Smith 00165 120 Tenby Dr. Chocorua NH Smith 00209 163 Lowell Rd. Bristol NH DTR> SELECT DTR> PRINT LAST_NAME, ID LAST NAME ID Smith 00165 DTR> MODIFY LAST_NAME Enter LAST_NAME: Overton DTR> PRINT LAST_NAME, ID LAST NAME ID Overton 00165 DTR> PRINT ALL LAST_NAME, ID LAST NAME ID LAST NAME ID Overton 00165 Smith 00209 DTR>
The following is a complete list of SELECT options with an
example for each:
Select the first record in the collection:
SELECT FIRST
Select the record in the collection positioned immediately after the current selected record:
SELECT NEXT
This is the default. When you type
SELECT, Datatrieve selects the next record in the collection. If you have not established a selected record, Datatrieve selects the first record in the collection when you typeSELECTorSELECT NEXT(see Example 11.2, ''PRINT ALL Example'').Select the record in the collection positioned immediately before the current selected record:
SELECT PRIOR
Select the last record in the collection:
SELECT LAST
Select the record whose ordinal position you specify:
SELECT 5
The example specifies the fifth record in the collection. You can use an expression in place of an integer as long as the expression resolves to an integer value (COUNTER_FIELD + 1, for example, where COUNTER_FIELD contains 0 or an integer).
"Unselect" a record for a collection:
SELECT NONE
This option releases your control over your current selected record so that other users can access it.
Name the collection from which you want to select (or unselect) a record:
SELECT 2 MY_COLLECTION
The example specifies the second record in the collection named
MY_COLLECTION. If you do not name a collection in aSELECTstatement, Datatrieve selects the record from the CURRENT collection.Specify a WITH clause:
SELECT FIRST MY_COLLECTION WITH LAST_NAME = "SMITH"
The example specifies the first record in
MY_COLLECTIONthat hasSMITHin theLAST_NAMEfield.
You can establish more than one selected record but only one for each collection. When you enter a statement that applies to a selected record, Datatrieve carries out the requested operation on the record you most recently selected. If your statement cannot apply to the most recently selected record, Datatrieve tries to carry out the operation on a selected record for another collection.
Datatrieve continues to check selected records you have available, in reverse order of their selection, until it can either execute the statement or determine an error condition.
11.4. Restricting Record Fields in a Collection
As an alternative to putting a REDUCED TO clause in the
FIND statement RSE, you can use a
REDUCE statement to keep only the fields you want to work
with in a collection. The following example illustrates the use of the
REDUCE statement:
DTR> READY EMPLOYEES DTR> FIND EMPLOYEES WITH SEX = "F" [105 records found] DTR> ! You can control record display by specifying fields in the DTR> ! PRINT statement. This does not change the records in the DTR> ! collection. DTR> !) DTR> PRINT ALL EMPLOYEE_ID, NAME, STATE ID LAST NAME FIRST NAME INIT STATE 00167 Kilpatrick Janet NH 00169 Gray Susan O NH 00171 D’Amico Aruwa NH 00172 Peters Janis K NH 00179 Vermouth Meg NH 00185 Stadecker Hope E NH 00186 Watters Cora NH 00188 Clarke Karen G NH 00191 Pfeiffer Karen I MA 00192 Connolly Christine NH 00194 Morrison Mary Lou U NH 00196 Clarke Mary NH 00197 Ctrl/C ^C Execution terminated by operator. DTR> ! DTR> ! The REDUCE statement changes the records in the collection DTR> ! to unique combinations of the fields you specify. DTR> ! Duplicate values, if any exist, no longer appear in the DTR> ! collection. The first REDUCE statement that follows does not DTR> ! change the number of records in the collection. Its purpose DTR> ! is to reduce the number of fields each record contains. The DTR> ! second REDUCE statement that follows does change the number DTR> ! of records in the collection. It illustrates the power of DTR> ! reducing a collection to unique values. DTR> ! DTR> REDUCE TO EMPLOYEE_ID, NAME, STATE DTR> PRINT ALL ID LAST NAME FIRST NAME INIT STATE 00167 Kilpatrick Janet NH 00169 Gray Susan O NH 00171 D’Amico Aruwa NH 00172 Peters Janis K NH 00179 Vermouth Meg NH 00185 Stadecker Hope E NH 00Ctrl/C ^C Execution terminated by operator. DTR> REDUCE TO STATE DTR> PRINT ALL STATE MA NH DTR>
The REDUCE statement is useful handy when your collection
data results from crossing records from two or more domains. A cross operation
produces records with one or more duplicate fields. You can use the
REDUCE statement to make sure that all fields are unique.
See Section 11.6, ''Forming a Collection From Two or More Record Sources'' for more information.
11.5. Sorting Records in a Collection
As an alternative to putting a SORTED BY clause in a FIND
or PRINT statement RSE, you can use the
SORT statement to put collection records in the order you
want. The following example illustrates the use of the SORT
statement:
DTR> ! Assume you want to find out the employee distribution within
DTR> ! job codes in each department.
DTR> !
DTR> READY JOB_HISTORY
DTR> FIND JOB_HISTORY WITH JOB_END MISSING
[338 records found]
DTR> PRINT ALL
EMPLOYEE JOB JOB JOB DEPARTMENT SUPERVISOR REVIEW
ID CODE START END CODE ID DATE
00164 DMGR 21-Sep-1981 MBMN 00359 14-Jul-1983
00165 DGFR 8-Mar-1981 MBMF 00358 1-Jan-1983
00166 APGM 12-Aug-1981 MBMS 00229 7-Feb-1983
00167 APGM 26-Aug-1981 MBMN 00359 21-Feb-1983
00168 SPGM 18-Feb-1982 MGVT 00267 15-Jun-1983
00169 SPGM 28-Mar-1981 SUNE 00354 17-Jul-1983
00170 SCTR 26-Nov-1980 Ctrl/C
^C
Execution terminated by operator.
DTR> !
DTR> ! Usually, you want your records displayed according to the way
DTR> ! you sorted them. The following PRINT statement does this. It
DTR> ! also retrieves the name for each employee from the domain table
DTR> ! WHO_IS_IT.
DTR> !
DTR> PRINT ALL DEPARTMENT_CODE, JOB_CODE, EMPLOYEE_ID,
CON> EMPLOYEE_ID VIA WHO_IS_IT
DEPARTMENT JOB EMPLOYEE
CODE CODE ID EMPLOYEE NAME
ADMN DSUP 00472 Delano Al F
ADMN EENG 00300 Gramby Marjorie
ADMN EENG 00188 Clarke Karen G
ADMN JNTR 00330 Williams Christine B
. . .
. . .
. . .
ADMN VPSD 00415 Mistretta Kathleen G
ELEL APGM 00377 Lobdell Lawrence V
ELEL EENG 00238 Flynn Peter
ELEL EENG 00428 Augusta Thomas
ELEL GFER 00231 Clairmont Rick
ELEL GFER 00240 Johnson Bill R
ELEL GFER 00461 Boutin George
ELEL GFER 00222 Lasch Norman
. . .
. . .
. . .
DTR>If you specify more than one field by which you want to sort the records, remember always to include a comma to separate the fields in your list.
11.6. Forming a Collection From Two or More Record Sources
You form a collection from two or more record sources by including a CROSS
clause in a FIND statement RSE:
DTR> ! Assume you want to find out which jobs one employee has
DTR> ! held in the company.
DTR> !
DTR> READY EMPLOYEES, JOB_HISTORY
DTR> FIND EMPLOYEES CROSS JOB_HISTORY
DTR> OVER EMPLOYEE_ID WITH
CON> EMPLOYEE_ID = "00472"
[1 record found]
DTR> PRINT
No record selected, printing whole collection.
ADDRESS SOCIAL
ID LAST NAME FIRST NAME INIT DATA ZIP SEX SECURITY
00472 Delano Al F
114 Princeton Rd. Bennington MA 03442 M 005 89 7164
3/03/29 00472 DSUP 27-Apr-1981 ADMN 00225
DTR> ! This is tough to read, a normal occurrence when you are
DTR> ! crossing records. Note that the value 00472 appears twice.
DTR> ! That is because each record in the collection results from
DTR> ! crossing two records, each of which has a value for EMPLOYEE_ID.
DTR> ! You can use the REDUCE statement to get rid of duplicate values
DTR> ! and pare the data down to the fields which interest you.
DTR> !
DTR> REDUCE TO EMPLOYEE_ID, NAME, DEPARTMENT_CODE,
DTR> JOB_CODE, JOB_START
DTR> PRINT
No record selected, printing whole collection.
DEPARTMENT JOB JOB
ID LAST NAME FIRST NAME INIT CODE CODE START
00472 Delano Al F ADMN DSUP 27-Apr-1981
DTR>The sources for the records you want to cross can be either domains or other collections. Read on the disadvantages of using collections, however, before you decide to cross collections.
11.7. Removing Records From a Collection
Take the following steps for each record you want to remove from a collection:
Select the record
Type
PRINTto make sure you selected the right recordType
DROPto remove that record
The DROP statement does not erase the record from storage,
only from the collection:
DTR> FIND EMPLOYEES WITH LAST_NAME CONTAINING "BURTON"
[2 records found]
DTR> PRINT ALL ID, LAST_NAME, FIRST_NAME
ID LAST NAME FIRST NAME
00237 Burton Frederick
00417 Burton Kathleen
DTR> SELECT 2
DTR> PRINT ID, LAST_NAME, FIRST_NAME
ID LAST NAME FIRST NAME
00417 Burton Kathleen
DTR> DROP
DTR> SHOW CURRENT
Collection CURRENT
Domain: EMPLOYEES
Number of Records: 2
Selected Record: 2 (Dropped)
DTR> PRINT ALL ID, LAST_NAME, FIRST_NAME
ID LAST NAME FIRST NAME
00237 Burton Frederick
DTR>11.8. Removing Collections From Your Workspace
The RELEASE command removes collections from your
workspace. The RELEASE ALL command removes all collections.
The RELEASE command, followed by one or more collection
names, removes the collections you specify:
DTR> SHOW COLLECTIONS
Collections:
COLL (CURRENT)
DEG
EMP
DTR> RELEASE DEG
DTR> SHOW COLLECTIONS
Collections:
COLL (CURRENT)
EMP
DTR>Remember that RELEASE ALL removes more than just
collections; it also removes from your workspace all declared variables, all
loaded tables, and any forms product definitions you have accessed. You load
table and form definitions simply by accessing them but variables have to be
declared again.
In addition, when you finish a domain from which a collection is formed, you also release the collection. If you need to change the access mode to a domain in order to do something to the records in a collection, ready the domain again with a new access mode. Do not finish it first.
11.9. Disadvantages of Using Collections
There are two disadvantages to using collections:
There are restrictions that apply to the use of collection-oriented statements in compound statements.
This means that your options are limited when designing procedures that manipulate collections and selected records. You cannot use
FIND,SORT,REDUCE, andDROPstatements inFOR,REPEAT,THEN,WHILE, orBEGIN-ENDstatements.As an alternative to the
SORTandREDUCEstatements, you can use the REDUCED TO and SORTED BY clauses in the RSE of theFINDstatement that creates the collection. There is no equivalent forDROP, however. In addition, theSELECTstatement can produce unexpected results when included in a compound statement.Datatrieve does not use keyed access when a collection is the record source. This means that all search, cross, and sort operations that manipulate records in collections are done sequentially, even when you base them on fields that are index keys for a data file. If you are processing a collection of 50 or fewer records, the slower performance of sequential searches might not bother you. If you are doing complicated operations on a collection of 500 or more records, the response time might be unacceptable.
To get around this problem, put your key-based operations in the RSE of any
FINDstatement that creates a large collection from a domain. In addition, avoid creating collections from other collections when the latter contain thousands of records.For cross operations, use only key-based access. Crossing records in collections can be time consuming, even when the collections each contain fewer than 50 records.
Chapter 12. Accessing Data the Expert Way: Using RSEs and View Domains
This chapter explains how to specify records in a compound statement beginning
with FOR or in a statement, such as PRINT,
that carries out the operation you want to perform.
The chapter also tells you how to define and use view domains. A view domain is a data definition that contains a subset of fields from one domain or a combination of fields from two or more domains. Using a view domain, you can get results that otherwise require complex statements.
You might want to work with records directly from domains for one or both of the following reasons:
You are working with large numbers of records and want fast access.
You are using compound statements to process records.
In the absence of these conditions, the use of collections might be preferable.
12.1. Ensuring Fast Access
When you use the FIND statement to create a collection, you
are not removing records from files or copying records to a temporary storage
area. The FIND statement creates pointer values for each
record in the collection indicating where its data is located in a file (or
files, if the collection record resulted from a cross operation). Whenever
Datatrieve must search through records in a collection, it must process every
pointer value and look at all the places where associated data is stored.
You can often get Datatrieve to respond more quickly when you work directly with domains. You achieve faster response time by specifying a readied domain as the record source and an index key field as the criteria for any searching, sorting, and crossing that you want done. In this case, Datatrieve can use the indexes associated with data files to find the records you want. It does not have to check every record in the data file to see which ones meet your needs.
The following example contrasts two ways to perform the same operation. The operation retrieves records for current employees in a manufacturing department, sorts the records by job code, and displays selected fields from the records:
DTR> READY JOB_HISTORY
DTR> !
DTR> !The next input illustrates data retrieval by first
DTR> ! forming a collection and then manipulating and displaying
DTR> ! the data it contains. The first FIND statement uses
DTR> ! key-based access. The second FIND statement and the SORT
DTR> ! statement access records using collection pointer values.
DTR> ! WHO_IS_IT is a domain table that links EMPLOYEE_ID with
DTR> ! EMPLOYEE_NAME.
DTR> !
DTR> FIND JOB_HISTORY WITH DEPARTMENT_CODE = "MBMN"
[36 records found]
DTR> FIND CURRENT WITH JOB_END MISSING
[13 records found]
DTR> SORT BY JOB_CODE
DTR> PRINT ALL JOB_CODE, EMPLOYEE_ID,
CON> EMPLOYEE_ID VIA WHO_IS_IT
JOB EMPLOYEE
CODE ID EMPLOYEE NAME
APGM 00275 DuBois Alvin Q
APGM 00449 Leger Carol
APGM 00167 Kilpatrick Janet
DGFR 00349 Chandler Christine E
DMGR 00164 Toliver Alvin A
DSUP 00344 Kawell Edward H
EENG 00198 Gehr Leslie
EENG 00447 Potter Beverly O
GFER 00329 Rodrigo Jerry D
MENG 00410 Klein Walter X
SANL 00366 Harrington Russ J
SANL 00433 Glackemeyer Jodie
SPGM 00217 Siciliano James X
DTR> !
DTR> ! The following input includes everything you need to do in
DTR> ! one PRINT statement. Note that when you do this, the record
DTR> ! selection and sorting is specified last, following the
DTR> ! keyword OF. You always specify record selection clauses
DTR> ! last when you put them inside the statement that carries out
DTR> ! the operation you want to perform.
DTR> !
DTR> PRINT JOB_CODE, EMPLOYEE_ID,
CON> EMPLOYEE_ID VIA WHO_IS_IT OF
CON> JOB_HISTORY WITH DEPARTMENT_CODE = "MBMN" AND
CON> JOB_END MISSING SORTED BY JOB_CODE
JOB EMPLOYEE
CODE ID EMPLOYEE NAME
APGM 00275 DuBois Alvin Q
APGM 00449 Leger Carol
. . .
. . .
. . .
SPGM 00217 Siciliano James X
DTR>12.2. Creating RSEs
Chapter 11, "Accessing Data the Easy Way: Using Collections" listed and described the options you have when
including a record selection expression (RSE) in a FIND
statement. These options and the order in which you can specify them are the
same for any statement that can contain an RSE.
Here are some examples of RSEs in FOR,
PRINT, and MODIFY
statements:
PRINT FIRST 10 DEGREES FOR DEGREES SORTED BY DEGREE_FIELD PRINT DEGREE_FIELD, DEGREE, COLLEGE_CODE PRINT DEGREES WITH COLLEGE_CODE = "STAN" FOR SAMPLE IN FIRST 10 DEGREES WITH COLLEGE_CODE = "STAN" PRINT EMPLOYEE_ID, DEGREE, DEGREE_FIELD PRINT NAME, ADDRESS OF FIRST 2 EMPLOYEES MODIFY JOB_END OF JOB_HISTORY WITH JOB_END MISSING AND EMPLOYEE_ID = "00192"
The following example includes all the RSE options in one
PRINT statement. The statement joins records stored in
three different places to display information about past jobs and salaries for
an employee. When you include an RSE in a PRINT statement, as
in the example, the order of fields listed in a REDUCED TO clause also specifies
the order in which fields are displayed. When you include a REDUCED TO clause in
a FOR statement RSE, any subordinate PRINT
statement must specify the field display order when it differs from the way
those fields are stored in records.
The WITH clause restricts the data to one employee and also matches salary data to a job. The section on value expressions and boolean expressions in the VSI Datatrieve Reference Manual tells you more about using the BETWEEN operator and including more than one condition in a WITH clause.
The SORTED BY clause ensures that the most recent job and salary data displays first:
PRINT EMPLOYEES CROSS JOB_HISTORY OVER EMPLOYEE_ID CROSS SALARY_HISTORY OVER EMPLOYEE_ID WITH (EMPLOYEE_ID = "00168") AND (SALARY_START BETWEEN JOB_START AND JOB_END) REDUCED TO LAST_NAME, DEPARTMENT_CODE, JOB_CODE, JOB_START, SALARY_START, SALARY_AMOUNT SORTED BY DECREASING JOB_START, DECREASING SALARY_START
Here is the data that the PRINT statement displays:
DEPARTMENT JOB JOB SALARY SALARY LAST NAME CODE CODE START START AMOUNT Nash SUWE PRGM 23-Feb-1979 10-Oct-1981 $27,126.00 Nash SUWE PRGM 23-Feb-1979 15-Oct-1980 $25,057.00 Nash SUWE PRGM 23-Feb-1979 21-Oct-1979 $23,919.00 Nash SUWE PRGM 23-Feb-1979 23-Feb-1979 $23,605.00 Nash ENG PRGM 30-Oct-1977 26-Aug-1978 $21,520.00 Nash ENG PRGM 30-Oct-1977 30-Oct-1977 $20,883.00 Nash ELMC APGM 1-Jul-1975 21-Apr-1977 $15,977.00 Nash ELMC APGM 1-Jul-1975 24-Aug-1976 $15,851.00 Nash ELMC APGM 1-Jul-1975 1-Jul-1975 $15,179.00
Section 12.4, ''Creating View Domains'' shows you how to use a view domain to display this data in a more readable format.
12.3. Working With Multiple Records
Example 12.1, ''Including RSEs in Statements'' specifies operations that can be performed on more
than one record. When you specify iterative operations, you are creating what is
sometimes called a loop. In Example 12.2, ''Accessing Values in List Fields'', you specify a group of
records and tell Datatrieve to do a print operation for each record in the
group. The RSE defines a loop because it specifies more than one record for an
operation. In Example 12.2, ''Accessing Values in List Fields'', the WHILE statement
defines a loop even though the RSE specifies one record. All operations
contained in the WHILE statement can execute more than once
depending on a variable value under the control of the person executing the
procedure.
In these examples, the loops are intentional and help get work done more quickly and efficiently; however, the record processing loops in the following areas can cause problems:
List fields
FORstatementsCROSS clauses
The following sections discuss these areas in more detail.
12.3.1. Lists: Using the "Record" Within the Record
Section 12.3, ''Working With Multiple Records'' discussed looping problems that you should learn to avoid. This section discusses looping you must learn to include.
When a record definition includes a list field (defined by the OCCURS clause), it means that fields subordinate to the list field can contain more than one value (or occurrence) per record. If you need to access a particular value in a list field, you must create a loop to get at it. You do this by treating the list field as you would a record source, so that Datatrieve can recognize and process the fields it contains.
The following example uses the FAMILIES domain in
CDD$TOP.DTR$LIB.DEMO to illustrate how you can
access values in list fields:
DTR> READY FAMILIES MODIFY
DTR> PRINT FIRST 5 FAMILIES
NUMBER KID
FATHER MOTHER KIDS NAME AGE
JIM ANN 2 URSULA 7
RALPH 3
JIM LOUISE 5 ANNE 31
JIM 29
ELLEN 26
DAVID 24
ROBERT 16
JOHN JULIE 2 ANN 29
JEAN 26
JOHN ELLEN 1 CHRISTOPHR 1
ARNIE ANNE 2 SCOTT 20
BRIAN 20
DTR> !
DTR> ! The SHOW FIELDS command reveals that the group field
DTR> ! EACH_KID and the elementary fields KID_NAME and AGE
DTR> ! are subordinate to the list field KIDS.
DTR> !
DTR> SHOW FIELDS FOR FAMILIES
FAMILIES
FAMILY
PARENTS
FATHER <Character string>
MOTHER <Character string>
NUMBER_KIDS <Number>
KIDS <List>
EACH_KID
KID_NAME (KID) <Character string>
AGE <Number>
DTR> !
DTR> ! If you want to put an RSE in a PRINT statement, you can
DTR> ! set up a double loop by putting two RSEs at the end of
DTR> ! the statement--the first for the list field and the second
DTR> ! for the domain. For each OF RSE clause, put an ALL before
DTR> ! the field name (or list of field names) that you want to
DTR> ! display.
DTR> !
DTR> PRINT ALL ALL EACH_KID OF KIDS OF FIRST 1 FAMILIES
KID
NAME AGE
URSULA 7
RALPH 3
DTR> !
DTR> ! You can also set up a list field loop when you use the
DTR> ! FOR statement. In this case, after the first FOR statement
DTR> ! that contains the RSE for the domain, enter a second FOR
DTR> ! statement that contains the RSE for the list. (If you were
DTR> ! trying to get at an item in a list field subordinate to
DTR> ! another list field, you would need three FOR statements--
DTR> ! one for the domain, one for the outer list, and one for the
DTR> ! inner list.)
DTR> !
DTR> FOR FIRST 1 FAMILIES
CON> FOR KIDS
CON> PRINT EACH_KID
KID
NAME AGE
URSULA 7
RALPH 3
DTR>12.3.2. FOR Statement Looping Errors
When you include an RSE in a FOR statement, make sure
you do not put an RSE in a statement subordinate to the
FOR statement. In the following example, the user
forgot to enter a SORTED BY clause in the FOR statement
RSE and thought the clause could go in a PRINT statement
RSE to make up for the oversight. In this case, Datatrieve uses the
PRINT statement RSE as the record specification and
the FOR statement RSE as a counter. It displays the
requested information but repeats the display as many times as there are
records in COLLEGES:
DTR> FOR COLLEGES
CON> PRINT COLLEGE_NAME, TOWN,
ZIP OF COLLEGES SORTED BY ZIP
Bates College Lewiston 04240
Colby College Waterville 04563
University of Maine Orono 04913
. . .
. . .
. . .
U. of Southern California San Diego 98431
Bates College Lewiston 04240
Colby College Waterville 04563
University of Maine Orono 04913
. . .
. . .
. . .
U. of Southern California San Diego 98431
Bates College Lewiston 04240
. . .
. . .
. . .Either of the following statements would have produced correct results:
DTR> FOR COLLEGES SORTED BY ZIP CON> PRINT COLLEGE_NAME, TOWN, ZIP DTR> PRINT COLLEGE_NAME, TOWN, ZIP OF CON> COLLEGES SORTED BY ZIP
12.3.3. CROSS Clause Looping Errors
For each CROSS clause that joins data stored in different locations, include an OVER clause to specify a field Datatrieve can use to match records for the join. When you want to limit the values that fields can contain, include a WITH clause:
EMPLOYEES CROSS JOB_HISTORY OVER EMPLOYEE_ID CROSS SALARY_HISTORY OVER EMPLOYEE_ID WITH EMPLOYEE_ID = "00168"
If you omit the first OVER clause in the example, you are telling
Datatrieve to take the first record from EMPLOYEES and join it
to each record in JOB_HISTORY, then take the second record from
EMPLOYEES and join it to each record in
JOB_HISTORY, and so forth. If EMPLOYEES contains 350
records and JOB_HISTORY contains 800 records,
Datatrieve produces 280,000 hybrid records for the first cross operation. It
then takes each of those 280,000 records and uses them for the second cross
operation. If you also omit the second OVER clause and
SALARY_HISTORY contains 1200 records,
Datatrieve produces a total of 280,000 times 1200 hybrid records.
Datatrieve interprets the clause OVER EMPLOYEE_ID as WITH EMPLOYEE_ID = EMPLOYEE_ID. In fact, the RSEs in the following example are equivalent to the one in the previous example. The first RSE names each record source (A, B, and C) and uses these names to qualify the EMPLOYEE_ID fields in each component of the WITH clause. The second RSE uses the top-level field names in each record source to qualify the EMPLOYEE_ID fields:
A IN EMPLOYEES CROSS B IN JOB_HISTORY CROSS C IN SALARY_HISTORY WITH (B.EMPLOYEE_ID = A.EMPLOYEE_ID) - AND (C.EMPLOYEE_ID = B.EMPLOYEE_ID) EMPLOYEES CROSS JOB_HISTORY CROSS SALARY_HISTORY WITH (JOB_HISTORY_REC.EMPLOYEE_ID = EMPLOYEES_REC.EMPLOYEE_ID) - AND (SALARY_HISTORY_REC.EMPLOYEE_ID = JOB_HISTORY_REC.EMPLOYEE_ID)
Before you enter an RSE that includes one or more CROSS clauses, check your input to make sure you included a corresponding number of OVER clauses or a corresponding number of equivalent conditions in a WITH clause. If you inadvertently start a runaway cross operation, you can enter Ctrl/C to stop it.
12.4. Creating View Domains
A view is a special type of domain that lets you select some (or all) fields in some (or all) records from one or more domains. Using a view, you can refer to fields and field values in different domains without duplicating their records or data.
You define a view by creating a domain definition for it in the dictionary. A view lets you read and modify selected field values. Because there is no data stored for a view, you cannot store or erase the records you retrieve with a view. Although you can combine records from various domains with the CROSS clause of the RSE, a view is the only type of domain that you can define in the dictionary for working with data in more than one domain.
You define a view with the DEFINE DOMAIN command.
Because you can define a view with any RSE that you might type interactively, view domains are convenient substitutes for typing complex record selection expressions you use often.
One of the greatest advantages of a view is that you can use it to combine fields from a relational database with fields from RMS (file-structured) domains and Oracle DBMS domains. You can have a single view that brings together data from these different types of databases.
A view domain is also a convenient way to create a dynamic hierarchy. By using the OCCURS FOR clause, you can create temporary list fields. You then have the ability to display data in hierarchical form without being tied to hierarchical records for other tasks.
You can define a view so that users can access a subset of fields from a long record. You might want to do this for one of two reasons:
The records you want to access contain more fields than you want to use. Without a view, you must include a list of fields in
PRINTandMODIFYstatements to restrict data display and access. After you define the view, you can use the view name inREADYandPRINTstatements to get the access you need.You want users to be able to access a file that contains some data they have no right to see. In this case, you can define a view that specifies the fields these users are allowed to see.
You can also define a view so that you or other users can access data stored in more than one place. In this case, the view performs what would otherwise require one or more CROSS clauses in a fairly complex statement.
12.5. Views Using Subsets of Records
A view lets you work with a specific subset of records from another domain. For instance, you may want to work with the records for yachts that are ketches only and no other rig type. The following example shows a view definition that allows you to work with four fields of the yachts that are ketches:
DTR> DEFINE DOMAIN KETCHES
DFN> OF YACHTS BY
DFN> 01 KETCH OCCURS FOR YACHTS WITH RIG EQ "KETCH".
DFN> 03 TYPE FROM YACHTS.
DFN> 03 LOA FROM YACHTS.
DFN> 03 PRICE FROM YACHTS.
DFN> ;
DTR> READY KETCHES
DTR> PRINT FIRST 4 KETCHES
LENGTH
OVER
MANUFACTURER MODEL ALL PRICE
ALBERG 37 MK II 37 $36,951
CHALLENGER 41 41 $51,228
FISHER 30 30
FISHER 37 37
DTR>The view domain KETCHES, which is based on the single domain
YACHTS, is not hierarchical because there is only one
OCCURS FOR clause.
You cannot store or erase records in a view, but in all other aspects you can use a view just as you would any other domain. For example:
DTR> READY KETCHES MODIFY
DTR> FIND KETCHES WITH PRICE EQ 0
[4 records found]
DTR> PRINT ALL
LENGTH
OVER
MANUFACTURER MODEL ALL PRICE
FISHER 30 30
FISHER 37 37
PEARSON 365 36
PEARSON 419 42
DTR> FOR CURRENT PRINT THEN MODIFY PRICE
LENGTH
OVER
MANUFACTURER MODEL ALL PRICE
FISHER 30 30
Enter PRICE: $30,000
FISHER 37 37
Enter PRICE: 45,000
PEARSON 365 36
Enter PRICE: 32000
PEARSON 419 42
Enter PRICE: 54000
DTR> PRINT ALL
LENGTH
OVER
MANUFACTURER MODEL ALL PRICE
FISHER 30 30 $30,000
FISHER 37 37 $45,000
PEARSON 365 36 $32,000
PEARSON 419 42 $54,000
DTR> FINISH
DTR>Views using a subset of records are also useful with Oracle DBMS domains and relational domains.
12.6. Views Using Subsets of Fields
One type of view lets you refer to a subset of fields from the records of
another domain. For example, the record definition for YACHTS
contains seven elementary fields and three group fields:
DTR> SHOW YACHT
RECORD YACHT USING
01 BOAT.
03 TYPE.
06 MANUFACTURER PIC X(10)
QUERY_NAME IS BUILDER.
06 MODEL PIC X(10).
03 SPECIFICATIONS
QUERY_NAME SPECS.
06 RIG PIC X(6)
VALID IF RIG EQ "SLOOP","KETCH","MS","YAWL".
06 LENGTH_OVER_ALL PIC XXX
VALID IF LOA BETWEEN 15 AND 50
QUERY_NAME IS LOA.
06 DISPLACEMENT PIC 99999
QUERY_HEADER IS "WEIGHT"
EDIT_STRING IS ZZ,ZZ9
QUERY_NAME IS DISP.
06 BEAM PIC 99 MISSING VALUE IS 0.
06 PRICE PIC 99999
MISSING VALUE IS 0
VALID IF PRICE>DISP*1.3 OR PRICE EQ 0
EDIT_STRING IS $$$,$$$.
;
DTR>If you want to work with only a few fields of the record, you can define a
view that lets you look at just the fields in YACHTS that you need,
without duplicating field values:
DTR> DEFINE DOMAIN MAKERS DFN> OF YACHTS BY DFN> 01 BOAT OCCURS FOR YACHTS. DFN> 03 TYPE FROM YACHTS. DFN> 03 RIG FROM YACHTS. DFN> ; DTR> READY MAKERS DTR> PRINT FIRST 10 MAKERS MANUFACTURER MODEL RIG ALBERG 37 MK II KETCH ALBIN 79 SLOOP ALBIN BALLAD SLOOP ALBIN VEGA SLOOP AMERICAN 26 SLOOP AMERICAN 26-MS MS BAYFIELD 30/32 SLOOP BLOCK I. 40 SLOOP BOMBAY CLIPPER SLOOP BUCCANEER 270 SLOOP DTR>
12.7. Views Using More Than One Domain
Views can also use more than one domain. There are two general ways different domains can be combined in a view:
Combine record streams by using more than one OCCURS FOR clause. Each OCCURS FOR clause has its own RSE, and Datatrieve creates a hierarchical relationship between the record streams specified in each RSE. For example, the sample domain SAILBOATS uses two OCCURS FOR clauses to create a hierarchical relationship between two record streams:
DTR> SHOW SAILBOATS DOMAIN SAILBOATS OF YACHTS, OWNERS USING 01 SAILBOAT OCCURS FOR YACHTS. 03 BOAT FROM YACHTS. 03 SKIPPERS OCCURS FOR OWNERS WITH TYPE = BOAT.TYPE. 05 NAME FROM OWNERS. ;See Chapter 13, "Reporting Hierarchical Records" for more information on using hierarchies.
Use a CROSS clause in the RSE of the OCCURS FOR clause to refer to more than one domain. The remainder of this section discusses using the CROSS clause in a view domain.
To illustrate how to use the CROSS clause to combine records from more than
one domain, recall the CROSS example in Section 7.5, ''Joining Records From Two or More Sources''. This
PRINT statement displays the NAME field from
the OWNERS domain and the TYPE and PRICE
fields from the corresponding records in the YACHTS domain:
DTR> PRINT NAME, TYPE, PRICE OF CON> YACHTS CROSS OWNERS OVER TYPE NAME MANUFACTURER MODEL PRICE STEVE ALBIN VEGA $18,600 HUGH ALBIN VEGA $18,600 JIM C&C CORVETTE ANN C&C CORVETTE JIM ISLANDER BAHAMA $6,500 ANN ISLANDER BAHAMA $6,500 STEVE ISLANDER BAHAMA $6,500 HARVEY ISLANDER BAHAMA $6,500 TOM PEARSON 10M DICK PEARSON 26 JOHN RHODES SWIFTSURE DTR>
You can define a view domain, CROSS_SAILBOATS, to get the same results:
Include the RSE "YACHTS CROSS OWNERS OVER TYPE" after the OCCURS FOR clause.
Specify the fields you want to include in the domain—NAME, TYPE, and PRICE—in the FROM clauses of the view domain.
The following example shows the definition for CROSS_SAILBOATS.
It shows how a simple PRINT statement produces the same
results as the previous PRINT statement that used the CROSS
clause:
DTR> SHOW CROSS_SAILBOATS
DOMAIN CROSS_SAILBOATS OF YACHTS, OWNERS USING
01 SAILBOAT OCCURS FOR YACHTS CROSS OWNERS OVER TYPE.
03 NAME FROM OWNERS.
03 TYPE FROM YACHTS.
03 PRICE FROM YACHTS.
;
DTR> READY CROSS_SAILBOATS
DTR> PRINT CROSS_SAILBOATS
NAME MANUFACTURER MODEL PRICE
STEVE ALBIN VEGA $18,600
HUGH ALBIN VEGA $18,600
JIM C&C CORVETTE
ANN C&C CORVETTE
JIM ISLANDER BAHAMA $6,500
ANN ISLANDER BAHAMA $6,500
STEVE ISLANDER BAHAMA $6,500
HARVEY ISLANDER BAHAMA $6,500
TOM PEARSON 10M
DICK PEARSON 26
JOHN RHODES SWIFTSURE
DTR>12.7.1. Creating Hierarchies With View Domains
You can also use a view domain to display data in the FOLKS and CHILDREN domains. By using two OCCURS FOR clauses in the view domain definition, you create a hierarchical relationship between FOLKS and CHILDREN. Printing the records in the view domain gives a display similar to the original FAMILIES domain.
The following example shows a view domain, FAMILY_VIEW, that
simulates the structure of the original hierarchical domain
FAMILIES using the flat domains FOLKS and
CHILDREN:
DTR> SHOW FAMILY_VIEW
DOMAIN FAMILY_VIEW OF FOLKS, CHILDREN USING
01 PARENTS OCCURS FOR FOLKS.
03 FATHER FROM FOLKS.
03 MOTHER FROM FOLKS.
03 KIDS OCCURS FOR CHILDREN WITH ID = FOLK_REC.ID.
05 KID_NAME FROM CHILDREN.
05 AGE FROM CHILDREN.
;
DTR> PRINT FAMILY_VIEW
KID
FATHER MOTHER NAME AGE
ARNIE ANNE SCOTT 2
BRIAN 0
BASIL MERIDETH BEAU 28
BROOKS 26
ROBIN 24
JAY 22
WREN 17
JILL 20
EDWIN TRINITA ERIC 16
SCOTT 11
.
.
.
ROB DIDI 0
SHEARMAN SARAH DAVID 0
TOM ANNE PATRICK 4
SUZIE 6
TOM BETTY MARTHA 30
TOM 27
DTR>12.8. Using Views With Remote Domains
The use of views with remote domains is not recommended because certain operations, such as the use of collections, will not work with remote domains. To avoid possible problems with views, you should be sure that the view definition and all domains mentioned in the view definition reside on the same node. A similar restriction applies to the use of operations involving CROSS clauses.
You can accomplish this in one of two ways:
Be sure that the view and the domains mentioned in the view definition all reside on the remote node. Then, on your local node, define a remote (or network) domain that points to the view at the remote location.
If the source file subsystem you are using (RMS, Oracle DBMS, or Rdb/VMS) supports remote access, you may instead be able to use the subsystem distributed access facility to accomplish the desired results.
For example, you can define the view and all the domains on the local node; however, to access a remote RMS file, the domain definitions would specify the full OpenVMS file specification of the RMS file on the remote node, as in the following example:
DTR>DEFINE DOMAIN LOCAL_DOM_EX USING LOCAL_REC_EX CON>ON REMNOD::DISK:[REMOTE_DIR]REMOTE_FILE.DAT;
In this case, you would not be using Datatrieve remote access at all, but the remote access provided by RMS.
12.9. Access Privileges Needed for Using Views
To ready a view for any task, you need the appropriate ACL privileges from the following list:
The view itself
The directory in which the view is located
Each domain that the view accesses
You also need the appropriate OpenVMS privileges for all data files associated with the domains on which the view is based and for the OpenVMS directories storing those files.
In short, you cannot ready the view if they do not have sufficient privileges to ready the domains on which the view is based.
Chapter 19, "Using Datatrieve With the CDD/Repository Dictionary System" discusses access privileges in greater detail.
12.9.1. Restrictions on Views With No Physical Record Source
Datatrieve cannot perform operations involving collections nor can it
execute MODIFY or DELETE statements,
if such collections or statements refer to relational database views that
have no underlying physical record source in the relational database.
Specifically, these views include the following:
Views defined by the SQL interface to Rdb/VMS that include GROUP BY or UNION clauses
Views defined by either the Relational Database Operator (RDO) or the SQL interface to Rdb/VMS that include functions such as SUM in the view definition.
Such views are formed by creating a temporary table of data grouped together from one or more input streams and by any associated functions that are referred to in the definition; they are not formed by combining physical records.
Such relational views have no database keys because they do not represent specific physical records in the database. Datatrieve uses database keys for operations involving collections. Such operations include the following:
Performing a
PRINTorLISTcommand on a collection.Using
MODIFYorDELETEstatements. SuchMODIFYorDELETEstatements may or may not refer to collections.
Because these relational views do not have a database key, Datatrieve cannot perform such operations on them.
If an operation cannot be performed on a relational view of this type, Rdb/VMS returns the following error message:
RDMS-F-VIEWNORET, view cannot be retrieved by database key.
In addition, the Datatrieve statement referring to the view is not executed.
When Datatrieve is run with a future release of Rdb/VMS you will no longer receive the RDMS message; instead, Datatrieve will produce the following error message:
Illegal operation for relational view source <...>.
Once this future release of Rdb/VMS becomes available, all Datatrieve
statements that do not directly require a database key should execute
successfully. PRINT and LIST commands
that refer directly to this type of view, rather than to a collection, will
succeed. FIND statements will also succeed, however,
operations based on collections formed from the FIND
statement will fail.
| Option | Pros | Cons |
|---|---|---|
|
Collections (statements that begin with the keywords
| ||
|
When you create a collection the RSE in the
|
You do not have the advantage of indexed access to records in a collection. If the collection contains many records and you need to perform complex operations on those records, Datatrieve performance is going to be slower than if you used key-based access to a domain. On the other hand, if the collection gathers together only a few records from a domain that contains thousands of records, you might get faster performance using one or more collections as the basis for your operations. The performance factor aside, you either cannot or should not use collection-oriented statements in compound statements. In most procedures, this limits what you can do with collections. | |
|
RSEs in statements other than
| ||
|
This option gives you the greatest flexibility. You can specify the records you want to process in compound statements. You can specify either collections or domains as the record sources in the RSE. To get the best response time from Datatrieve, include in the RSE key-based access to a domain or use a small collection when its records come from very large domains. |
You must learn to tell Datatrieve what records you
want in one RSE. Remember, however, you can type
| |
|
Defining and using views | ||
|
You can also use a view to mask the data in certain fields from users who do not need to see it. Select the fields you want the user to see from each underlying domain and define a view that uses only those fields. |
As users must also have access to the underlying domains, views cannot keep users from retrieving sensitive data directly from those domains. One important disadvantage of using views lies in the danger of modifying records from multiple sources. You must be careful when you modify values in a view based on more than one domain. If the field you are changing is stored in more than one data file, you are updating only one of those files for each field value you enter. If the view refers to a second domain based on the value of a field in the first domain, a change to a field value in the first domain can cause Datatrieve to select an unexpected record from the second domain. When you use a form to modify such a view, the field value you see on the screen may not be the value you are actually modifying. | |
Observe the following cautions and restrictions when you use views that refer to more than one domain:
Try to avoid updating with a view.
Set up view domains that minimize duplicate fields.
Remember that when a view contains more than one OCCURS FOR clause, each OCCURS FOR clause after the first creates a list field. All the rules and restrictions for handling hierarchical data apply to those fields.
Do not modify a field in a view that uses the FORM IS clause when that field forms the basis for selecting records from a second domain.
Chapter 13. Reporting Hierarchical Records
This chapter describes various methods for retrieving and manipulating the data stored in hierarchical records. Hierarchical records are records that contain a list (repeating) field. The list field specifies the number of items in the list with an OCCURS clause. Each list item is subordinate to the list field. The list items are on a lower logical level than the other fields of the record.
The following figure illustrates the structure of the hierarchical record EMP_REC. Each record contains data on the previous jobs held by a particular employee. Data on each job is stored as an item of the JOB_HISTORY list:
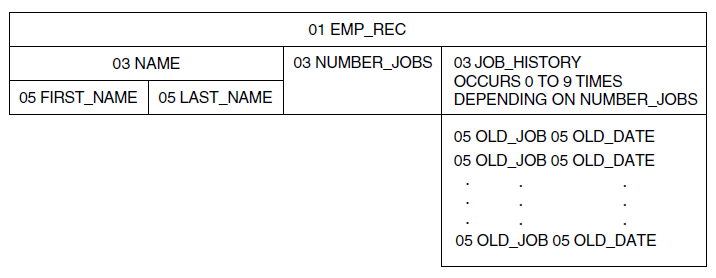
The OCCURS clause of a hierarchical record designates either a fixed-length or a variable-length list. For variable-length lists, the list field’s definition includes an OCCURS DEPENDING clause. This indicates that the number of items in the list depends on the value of another field. For example, the length of the JOB_HISTORY list in EMP_REC depends on the value stored in NUMBER_JOBS.
If you have a domain like EMPLOYEE with hierarchical records, you may want access to individual items from the list to compare their values or to find associated values in a table. In this example, each list item has two components: the code for the old job (OLD_JOB) and the date the job began (OLD_DATE). The domain table JOB_TITLE_TABLE contains translations for job codes stored in OLD_JOB. For more information on using Datatrieve tables, see Chapter 5, "Defining Tables".
13.1. Retrieving Values From Repeating Fields
When you retrieve a value from a record containing a repeating field, you cannot always apply the same statements you do for other records.
Using the FAMILY record described in Chapter 2, "Record Definitions", if you form a collection, you can print information on fathers and mothers but not children:
DTR> FIND FAMILIES
[13 records found]
DTR> PRINT ALL FATHER
FATHER
JIM
JIM
.
.
.
DTR> PRINT ALL MOTHER
MOTHER
ANN
LOUISE
.
.
.
DTR> PRINT ALL EACH_KID
"EACH_KID" is undefined or used out of context
DTR> PRINT ALL KIDS
"KIDS" is undefined or used out of context
DTR> PRINT ALL KIDS OF FAMILIES
PRINT ALL KIDS OF FAMILIES
^
Expected end of statement, encountered "OF".To retrieve information about the children, you can apply one of the following methods to set up a Datatrieve context:
Use a
FINDstatement to establish a context for the list. Then use aSELECTstatement to identify one record in the collection.Use nested
FORloops with RSEs. The outerFORloop forms a target stream of hierarchical records and the innerFORloop forms a stream of list items within a hierarchical record.Use inner print lists (ALL print-list OF rse) to form a stream of list items within a record stream.
The following sections describe these methods for retrieving items from lists.
13.1.1. Using FIND and SELECT
You use the FIND statement to find all the records in
the file that meet your specifications. Then you can use the
SELECT statement to request any one of these
records:
DTR> READY FAMILIES
DTR> FIND FAMILIES
[14 records found]
DTR> SELECT 3; PRINT
NUMBER KID
FATHER MOTHER KIDS NAME AGE
JOHN JULIE 2 ANN 29
JEAN 26When you have selected a record that contains a list, you can treat the list as though it were a source of records like a domain or collection. You can continue as follows:
DTR> PRINT KIDS KID NAME AGE ANN 29 JEAN 26
You can also combine the FIND and
SELECT statements to single out one list item. Then
the context of the selected list item allows you to use the list item name
by itself in a PRINT statement. Continue the previous
example by forming a collection of the KIDS list field and
selecting a list item from the collection:
DTR> FIND KIDS [2 records found] DTR> SELECT 2; PRINT KID NAME AGE JEAN 26
You can use the same technique to get at nested repeating fields, such as
the PET field in the hierarchical record
PET_REC:
DTR> READY PETS
DTR> ! Form a collection of the records
DTR> ! in the PETS domain:
DTR> FIND PETS
[3 records found]
DTR> SELECT 3; PRINT
NUMBER KID KID PET PET
FATHER MOTHER KIDS NAME AGE NAME AGE
JIM LOUISE 5 ANNE 31 FRANK 14
FRANK 14
JIM 29 00
00
ELLEN 26 00
00
DAVID 24 00
00
ROBERT 16 00
00
DTR> ! Next, form a collection of the "records" in the
DTR> ! KIDS repeating field:
DTR> FIND KIDS
[5 records found]
DTR> SELECT 1; PRINT
KID KID PET PET
NAME AGE NAME AGE
ANNE 31 FRANK 14
FRANK 14
DTR> ! Third, form a collection of the "records"
DTR> ! in the PET repeating field:
DTR> FIND PET
[2 records found]
DTR> ! Finally, you can print a field subordinate to
DTR> ! the nested repeating field PET:
DTR> SELECT 1; PRINT PET_AGE
PET
AGE
14You cannot retrieve the value of repeating fields from more than one
record using only FIND and SELECT
statements.
13.1.2. Using Nested FOR Loops
To retrieve values from list items by nesting FOR
loops, start from the top of the hierarchy and work toward the list items
you want to retrieve.
The FOR statement preceding the
PRINT statement in the following example loops
through all the records in FAMILIES. For each of those records,
the RSE in the PRINT statement retrieves only the first
child whose AGE is less than 10:
DTR> FOR FAMILIES [Looking for statement] CON> PRINT KID_NAME OF FIRST 1 KIDS WITH AGE < 10 KID NAME URSULA CHRISTOPHR SCOTT DAVID PATRICK DTR>
The OF rse clause in the
PRINT statement serves the same purpose as a nested
FOR rse statement. The inner RSE
(FIRST 1 KIDS WITH AGE < 10) identifies items from the
list field KIDS that are included within a
FAMILIES record identified by the outer FOR
rse statement.
The equivalent statement using nested FOR
rse statements is as follows:
FOR FAMILIES FOR FIRST 1 KIDS WITH AGE < 10 PRINT KID_NAME
For nested repeating fields, use the same technique, but nest
FOR statements more than one level. The following
example uses the hierarchical domain PETS as the record source
for the outer FOR loop. The repeating field
KIDS is the source for the second FOR
loop, and the nested repeating field PET is the source for the
innermost FOR loop. The example prints the
MOTHER and KID_NAME fields to show which
PET record and KIDS occurrence the
PET occurrence comes from:
DTR> FOR PETS WITH ANY KIDS
CON> BEGIN
CON> PRINT MOTHER
CON> FOR KIDS WITH ANY PET
CON> BEGIN
CON> PRINT COL 10, KID_NAME
CON> FOR PET WITH PET_AGE GT 2
CON> PRINT COL 20, PET_NAME, PET_AGE
CON> END
CON> END
MOTHER
LORAINE
KID
NAME
GARY
PET PET
NAME AGE
POP 03
SODA 04
SUE
MOUSE 03
SHORTY 08
ANN
URSULA
SQUEEKY 03
FRANK 07
RALPH
LOUISE
ANNE
FRANK 14
FRANK 14
JIM
ELLEN
DAVID
ROBERT
DTR>13.1.3. Using Inner Print Lists
The simplest way to print a repeating field is to print the entire record containing the repeating field:
DTR> READY FAMILIES
DTR> PRINT FIRST 1 FAMILIES
NUMBER KID
FATHER MOTHER KIDS NAME AGE
JIM ANN 2 URSULA 7
RALPH 3
DTR>To print selected fields from the record, you must specify a print list in
the PRINT statement. Print lists consist of field names
or other value expressions and modifiers. To specify a list item in a print
list, you must use an inner print list, which has the following
format:
ALL print-list OF rse
In the print-list clause of the inner print list, you
include the list items you want to display. The OF rse
clause of the inner print list creates a context for the item in the
hierarchical list. The following example prints the name of the mother and
information about her children for the first FAMILIES
record:
DTR> ! ________________________________
DTR> ! | print-list |
DTR> ! | ________________________|
DTR> ! | | Inner Print List ||
DTR> ! | | ___________ ||
DTR> ! | | |print-list | ||
DTR> ! | | | | ||
DTR> PRINT MOTHER, ALL KID_NAME, AGE OF KIDS OF FIRST 1 FAMILIES
KID
MOTHER NAME AGE
ANN URSULA 7 !All children from first family
RALPH 3In this example, ALL KID_NAME, AGE OF KIDS is an inner print
list. It is also an element of the outer print list that includes the field
MOTHER as another element. This outer print list is
associated with the target record stream formed by the OF FIRST 1
FAMILIES clause.
If the inner print list is the first element in the outer print list, you
must precede the inner print list with another mandatory keyword,
ALL. The following example is similar to the previous one.
However, it displays information about children in the first
FAMILIES record first, then prints the mother’s
name:
DTR> PRINT ALL ALL KID_NAME, AGE OF KIDS, CON> MOTHER OF FIRST 1 FAMILIES KID NAME AGE MOTHER URSULA 7 ANN RALPH 4 DTR>
There is only one difference between this format and the previous one: you
need an extra ALL when the first print list element in the
outer print list is an inner print list.
There are two important points to remember when working with inner print lists:
To Datatrieve, an inner print list is just another print-list element in the outer print list.
An inner print list establishes context for items in a list.
While inner print lists can complicate statements, they allow you to control completely how Datatrieve displays repeating fields. By using the repeating field as the source for an RSE in an inner print list, you can specify which occurrences of the repeating field Datatrieve displays.
The following example retrieves only the information from the first
occurrence of the repeating field KIDS from a single record. It
uses a third print list to display information from the nested repeating
field PET:
DTR> PRINT MOTHER, !Print list for rse-3
CON> ALL KID_NAME, KID_AGE, !Print list for rse-2
CON> ALL PET_NAME, PET_AGE - !Print list for rse-1
CON> OF FIRST 1 PET - !rse-1, uses PET as record source
CON> OF FIRST 1 KIDS - !rse-2, uses KIDS as record source
CON> OF PETS WITH MOTHER = "ANN" !rse-3, uses PETS as record source
KID KID PET PET
MOTHER NAME AGE NAME AGE
ANN URSULA 7 SQUEEKY 03 !First pet of first child of
!family whose mother is Ann
DTR>Using nested inner print lists may require nesting the keyword ALL as
well. If the inner print list is the first element in the outermost print
list, you must precede it with as many ALL keywords as there are OF
rse phrases in the PRINT
statement.
13.1.4. Using Context Searcher
You can save yourself the difficulty of typing complex inner print lists when dealing with lists and sublists. The Datatrieve Context Searcher helps you get access to list items. It constructs inner print lists for you once you establish a single record context for it to work on. When you use the name of a list or sublist item (even sublist items at the sixth level of a hierarchical record), it searches through the names of list items, constructing the inner print lists needed to retrieve the value.
You activate the Context Searcher with the SET SEARCH
command. When you invoke Datatrieve, SET NO SEARCH is in
effect unless you have a SET SEARCH command in your
DTR$STARTUP file.
The following example shows how the Context Searcher simplifies one of the previous examples that used inner print lists:
DTR> SET SEARCH
DTR> READY FAMILIES
DTR> ! Compare with results from
DTR> ! PRINT MOTHER, ALL KID_NAME OF KIDS, FATHER OF FIRST 1 FAMILIES
DTR> PRINT MOTHER, KID_NAME, FATHER OF FIRST 1 FAMILIES
Not enough context. Some field names resolved by Context Searcher.
KID
MOTHER NAME FATHER
ANN URSULA JIM
RALPH JIM13.1.5. Flattening Hierarchies
Another way to simplify retrieving values from repeating fields is to "flatten" the hierarchical structure of the record. To flatten a hierarchy means to repeat all fields in the record for each occurrence of the repeating field.
There are several ways to search the repeating (list) fields of a hierarchical record:
Use nested
FORstatements to access list items in the same way as other elementary fields.Use the CROSS clause to join the domain with the field controlling the list. This puts every field on the same logical level and creates virtual records with one list item per record.
Use
SET SEARCHto activate the Datatrieve Context Searcher and then report on that data.Use the
REPORTstatement, providing context by means of inner print lists in thePRINTstatement. See Section 16.7.2, ''Using the REPORT Statement to Report List Data'' for more information.
The following sections describe each of these in more detail.
Flattening the hierarchical domain FAMILIES would mean repeating the FATHER, MOTHER, NUMBER_KIDS, and the entire list within KIDS fields for each occurrence of the KIDS repeating field. The next two examples compare how the first two records of FAMILIES look when first displayed normally and then flattened.
The normal display is as follows:
NUMBER KID
FATHER MOTHER KIDS NAME AGE
JIM ANN 2 URSULA 7
RALPH 3
JIM LOUISE 5 ANNE 31
JIM 29
ELLEN 26
DAVID 24
ROBERT 16The flattened display is as in the following example:
NUMBER KID KID
FATHER MOTHER KIDS NAME AGE NAME AGE
JIM ANN 2 URSULA 7 URSULA 7
RALPH 3
JIM ANN 2 URSULA 7 RALPH 3
RALPH 3
JIM LOUISE 5 ANNE 31 ANNE 31
JIM 29
ELLEN 26
DAVID 24
ROBERT 16
JIM LOUISE 5 ANNE 31 JIM 29
JIM 29
ELLEN 26
DAVID 24
ROBERT 16
JIM LOUISE 5 ANNE 31 ELLEN 26
JIM 29
ELLEN 26
DAVID 24
ROBERT 16
JIM LOUISE 5 ANNE 31 DAVID 24
JIM 29
ELLEN 26
DAVID 24
ROBERT 16
JIM LOUISE 5 ANNE 31 ROBERT 16
JIM 29
ELLEN 26
DAVID 24
ROBERT 16All the fields repeat, including the entire KIDS list, for
each occurrence of the repeating field KIDS. The repetition of
the KIDS list in the flattened display makes it cumbersome and
hard to read. For a more readable display, you can limit the fields to only
those you want to see, as shown in the next sections.
You can flatten hierarchies in three different ways to achieve the same results:
With the CROSS clause
With inner print lists
With nested
FORloops
The following sections discuss these methods.
13.1.6. Using the CROSS Clause
To create the flattened display in the previous example, use a
PRINT statement with the CROSS
clause:
DTR> PRINT FAMILIES CROSS KIDS
NUMBER KID KID
FATHER MOTHER KIDS NAME AGE NAME AGE
JIM ANN 2 URSULA 7 URSULA 7
RALPH 3
JIM ANN 2 URSULA 7 RALPH 3
RALPH 3
.
.
.
EDWIN TRINITA 2 ERIC 16 ERIC 16
SCOTT 11
EDWIN TRINITA 2 ERIC 16 SCOTT 11
SCOTT 11
DTR>Datatrieve treats KIDS as a domain in this statement. For
each record in the KIDS domain, Datatrieve prints the
corresponding record from the FAMILIES domain (including the
list field KIDS in those records) and the KIDS
record.
You can limit the flattened FAMILIES records displayed by the CROSS clause by using the same techniques you use with two separate domains. Datatrieve joins the appropriate KIDS records with the corresponding FAMILIES record. Limit the display to joining FAMILIES to the first two records of the KIDS domain:
DTR> PRINT FIRST 2 FAMILIES CROSS KIDS ! FIRST 2 in this
! statement refers to the KIDS
! domain, not FAMILIES.
NUMBER KID KID
FATHER MOTHER KIDS NAME AGE NAME AGE
JIM ANN 2 URSULA 7 URSULA 7
RALPH 3
JIM ANN 2 URSULA 7 RALPH 3
RALPH 3
DTR>Limit the display to joining FAMILIES with the
KIDS record containing "URSULA":
DTR> PRINT FAMILIES CROSS KIDS WITH KID_NAME CONTAINING "URSULA"
NUMBER KID KID
FATHER MOTHER KIDS NAME AGE NAME AGE
JIM ANN 2 URSULA 7 URSULA 7
RALPH 3
DTR>The preceding displays included the KIDS repeating field and
all the list items it contained. To keep from seeing the entire
KIDS list for each KIDS record displayed,
specify only the fields you want displayed in the PRINT
statement:
DTR> PRINT FATHER, MOTHER, NUMBER_KIDS, KID_NAME,
DTR> AGE OF FAMILIES CROSS KIDS
NUMBER KID
FATHER MOTHER KIDS NAME AGE
JIM ANN 2 URSULA 7
JIM ANN 2 RALPH 3
.
.
.
EDWIN TRINITA 2 ERIC 16
EDWIN TRINITA 2 SCOTT 11
DTR>You can nest CROSS clauses to retrieve records from nested repeating
fields. The following statement uses the PETS domain, which has
the nested repeating field PET within the repeating field
KIDS. It prints the first four records in the
PET domain joined with KIDS domain, which is
itself joined with the PETS domain. The statement prints only
the elementary fields of the flattened PETS record, omitting
the list fields:
DTR> PRINT FATHER, MOTHER, NUMBER_KIDS, -
CON> KID_NAME, KID_AGE, PET_NAME, PET_AGE
CON> OF FIRST 4 PETS CROSS KIDS CROSS PET
NUMBER KID KID PET PET
FATHER MOTHER KIDS NAME AGE NAME AGE
JIM LORAINE 2 GARY 24 POP 03
JIM LORAINE 2 GARY 24 SODA 04
JIM LORAINE 2 SUE 23 MOUSE 03
JIM LORAINE 2 SUE 23 SHORTY 08
DTR>If you often need to retrieve values in a repeating field of the same
domain, you can set up a view domain that contains the flattened records.
For instance, you could define a view, FLAT_FAMILY_VIEW, that
uses a CROSS clause to flatten the FAMILIES
records:
DTR> SHOW FLAT_FAMILY_VIEW
DOMAIN FLAT_FAMILY_VIEW
OF FAMILIES USING
01 FLAT_FAMILY OCCURS FOR FAMILIES CROSS KIDS.
03 FATHER FROM FAMILIES.
03 MOTHER FROM FAMILIES.
03 NUMBER_KIDS FROM FAMILIES.
03 KID_NAME FROM FAMILIES.
03 AGE FROM FAMILIES.
;
DTR>You can then use simple PRINT statements to retrieve
the repeating field values you need:
DTR> READY FLAT_FAMILY_VIEW
DTR> PRINT FIRST 2 FLAT_FAMILY_VIEW
NUMBER KID
FATHER MOTHER KIDS NAME AGE
JIM ANN 2 URSULA 7
JIM ANN 2 RALPH 3
DTR> PRINT FLAT_FAMILY_VIEW WITH AGE GT 30
NUMBER KID
FATHER MOTHER KIDS NAME AGE
JIM LOUISE 5 ANNE 31
JEROME RUTH 4 ERIC 32
HAROLD SARAH 3 CHARLIE 31
HAROLD SARAH 3 HAROLD 35
DTR>13.1.7. Using Inner Print Lists
For any PRINT statement you use with the CROSS clause,
there is an equivalent PRINT statement using inner print
lists that produces the same results. The PRINT
statements in the following example show the inner print lists that
duplicate the results of examples in the previous section:
DTR> ! Duplicate the PRINT FAMILIES CROSS KIDS statement:
DTR> PRINT ALL ALL FAMILY, EACH_KID OF KIDS OF FAMILIES
NUMBER KID KID
FATHER MOTHER KIDS NAME AGE NAME AGE
JIM ANN 2 URSULA 7 URSULA 7
RALPH 3
JIM ANN 2 URSULA 7 RALPH 3
RALPH 3
.
.
.
EDWIN TRINITA 2 ERIC 16 ERIC 16
SCOTT 11
EDWIN TRINITA 2 ERIC 16 SCOTT 11
SCOTT 11
DTR> ! Duplicate the PRINT FIRST 2 FAMILIES CROSS KIDS statement:
DTR> PRINT ALL ALL FAMILY, EACH_KID OF FIRST 2 KIDS OF FIRST 1 FAMILIES
NUMBER KID KID
FATHER MOTHER KIDS NAME AGE NAME AGE
JIM ANN 2 URSULA 7 URSULA 7
RALPH 3
JIM ANN 2 URSULA 7 RALPH 3
RALPH 3
DTR> ! Duplicate the PRINT FAMILIES CROSS KIDS WITH
DTR> ! KID_NAME CONTAINING "URSULA" statement:
DTR> PRINT ALL ALL FAMILY, EACH_KID -
CON> OF KIDS WITH KID_NAME CONTAINING "URSULA" OF FAMILIES
NUMBER KID KID
FATHER MOTHER KIDS NAME AGE NAME AGE
JIM ANN 2 URSULA 7 URSULA 7
RALPH 3
DTR> ! Duplicate the PRINT FATHER, MOTHER, NUMBER_KIDS,
DTR> ! KID_NAME, AGE OF FAMILIES CROSS KIDS statement:
DTR> PRINT ALL ALL FATHER, MOTHER, NUMBER_KIDS, KID_NAME, AGE -
CON> OF KIDS OF FAMILIES
NUMBER KID
FATHER MOTHER KIDS NAME AGE
JIM ANN 2 URSULA 7
JIM ANN 2 RALPH 3
.
.
.
EDWIN TRINITA 2 ERIC 16
EDWIN TRINITA 2 SCOTT 11
DTR> ! Duplicate the PRINT FATHER, MOTHER, NUMBER_KIDS, KID_NAME, KID_AGE,
DTR> ! PET_NAME, PET_AGE OF FIRST 4 PETS CROSS KIDS CROSS PET statement
DTR> PRINT ALL ALL ALL FATHER, MOTHER, NUMBER_KIDS, KID_NAME, KID_AGE, -
CON> PET_NAME, PET_AGE OF FIRST 4 PET OF KIDS OF FIRST 1 PETS
NUMBER KID KID PET PET
FATHER MOTHER KIDS NAME AGE NAME AGE
JIM LORAINE 2 GARY 24 POP 03
JIM LORAINE 2 GARY 24 SODA 04
JIM LORAINE 2 SUE 23 MOUSE 03
JIM LORAINE 2 SUE 23 SHORTY 08
DTR>13.1.8. Using Nested FOR Statements
For any PRINT statement you use with the CROSS clause,
there are equivalent nested FOR statements that produce
the same results. The nested FOR statements in the
following example duplicate the results of statements with the CROSS clause
in the previous section:
DTR> ! Duplicate the PRINT FAMILIES CROSS KIDS statement:
DTR> FOR FAMILIES FOR KIDS PRINT FAMILY, EACH_KID
NUMBER KID KID
FATHER MOTHER KIDS NAME AGE NAME AGE
JIM ANN 2 URSULA 7 URSULA 7
RALPH 3
JIM ANN 2 URSULA 7 RALPH 3
RALPH 3
.
.
.
EDWIN TRINITA 2 ERIC 16 ERIC 16
SCOTT 11
EDWIN TRINITA 2 ERIC 16 SCOTT 11
SCOTT 11
DTR> ! Duplicate the PRINT FIRST 2 FAMILIES CROSS KIDS statement:
DTR> FOR FIRST 1 FAMILIES FOR FIRST 2 KIDS PRINT FAMILY, EACH_KID
NUMBER KID KID
FATHER MOTHER KIDS NAME AGE NAME AGE
JIM ANN 2 URSULA 7 URSULA 7
RALPH 3
JIM ANN 2 URSULA 7 RALPH 3
RALPH 3
DTR> ! Duplicate the PRINT FAMILIES CROSS KIDS WITH
DTR> ! KID_NAME CONTAINING "URSULA" statement:
DTR> FOR FAMILIES FOR KIDS WITH KID_NAME CONTAINING "URSULA" -
CON> PRINT FAMILY, EACH_KID
NUMBER KID KID
FATHER MOTHER KIDS NAME AGE NAME AGE
JIM ANN 2 URSULA 7 URSULA 7
RALPH 3
DTR> ! Duplicate the PRINT FATHER, MOTHER, NUMBER_KIDS, KID_NAME, AGE
DTR> ! OF FAMILIES CROSS KIDS statement:
DTR> FOR FAMILIES FOR KIDS PRINT FATHER, MOTHER,
DTR>) NUMBER_KIDS, KID_NAME, AGE
NUMBER KID
FATHER MOTHER KIDS NAME AGE
JIM ANN 2 URSULA 7
JIM ANN 2 RALPH 3
.
.
.
EDWIN TRINITA 2 ERIC 16
EDWIN TRINITA 2 SCOTT 11
DTR> ! Duplicate the
DTR> ! PRINT FATHER, MOTHER, NUMBER_KIDS,
DTR> ! KID_NAME, KID_AGE, PET_NAME, PET_AGE -
DTR> ! OF FIRST 4 PETS CROSS KIDS CROSS PET statement
DTR> FOR FIRST 1 PETS FOR KIDS FOR FIRST 4 PET -
CON> PRINT FATHER, MOTHER, NUMBER_KIDS,
CON> KID_NAME, KID_AGE, PET_NAME, PET_AGE
NUMBER KID KID PET PET
FATHER MOTHER KIDS NAME AGE NAME AGE
JIM LORAINE 2 GARY 24 POP 03
JIM LORAINE 2 GARY 24 SODA 04
JIM LORAINE 2 SUE 23 MOUSE 03
JIM LORAINE 2 SUE 23 SHORTY 08
DTR>13.2. Modifying Values Stored in Repeating Fields
The techniques used to retrieve data from repeating fields can be adapted for modifying data. This section shows two methods of modifying data stored in repeating fields:
Use
FINDandSELECTstatements to establish context, and then use theMODIFYstatement.Use
FORstatements in combination with theMODIFYstatement to establish context with nested record streams.
13.2.1. Modifying Repeating Field Values With FIND and SELECT
When you try to change the values stored in repeating fields, you encounter the same complications that occur when retrieving data from repeating fields. For instance, you cannot directly modify a field subordinate to a repeating field. Once you have selected a record that contains a repeating field, follow these steps:
Use the
FINDstatement to create a collection of the occurrences of the repeating field.Use the
SELECTstatement to single out one of those occurrences.Use the
MODIFYstatement to change the value of the desired field of the occurrence you selected.
The following example uses this method. It modifies the AGE
field in the repeating field KIDS in the FAMILIES
domain:
DTR> ! Create a named collection from FAMILIES domain:
DTR> FIND FIRST 1 FAM IN FAMILIES
[1 record found] DTR> PRINT ALL
NUMBER KID
FATHER MOTHER KIDS NAME AGE
JIM ANN 2 URSULA 8
JIM ANN 2 RALPH 3
DTR> ! Select a record from the named collection:
DTR> SELECT
DTR> MODIFY AGE ! But AGE is subordinate to KIDS list field, so:
"AGE" is undefined or used out of context.
DTR> ! So, create another collection from the list field KIDS:
DTR> FIND KIDS
[2 records found]
DTR> ! Now select an occurrence of the list field,
DTR> ! in this case the second:
DTR> SELECT 2
DTR> PRINT
KID
NAME AGE
RALPH 3
DTR> MODIFY AGE ! Now you can modify the AGE field
Enter AGE: 4
DTR> ! Check to see that the field was really modified:
DTR> PRINT
KID
NAME AGE
RALPH 4
DTR> RELEASE CURRENT
DTR> PRINT
NUMBER KID
FATHER MOTHER KIDS NAME AGE
JIM ANN 2 URSULA 8
JIM ANN 2 RALPH 4
DTR>Note that when you modify a selected record, the field you specify
following MODIFY can never be the OCCURS field itself. In
the preceding example, this means that you cannot enter MODIFY
KIDS. If you want to modify all the fields in each occurrence
of the repeating field, you can enter the name of a top-level group field
subordinate to the OCCURS field (not all record definitions contain such a
field), or you can specify all the elementary fields subordinate to the
OCCURS field. In the context of the preceding example, this means that you
can enter MODIFY EACH_KID (group field) or
MODIFY KID_NAME, AGE (list of elementary fields) in
order to enter a value for each elementary field in the list
occurrence.
13.2.2. Modifying Repeating Field Values With FOR and MODIFY
You can modify values stored in repeating fields without using collections
by nesting record streams with the FOR and
MODIFY statements.
Remember that you can treat the repeating field, or list, as a source of records like a domain or collection. Two formats for nesting record streams based on repeating fields have different results in modifying values:
FOR rse MODIFY list-rse USING assignment-statement
In this format, list-rse is a record selection expression that uses the repeating field as the record source. The first RSE specifies the record source and specific records to be modified. The list-rse specifies the repeating field and the particular occurrences in the list to be modified.
You supply only one value for each field you specify in the USING clause.
If the list-rse specifies more than one occurrence in
the list, each field value you supply applies to them all. The following
example modifies the name of one child in the FAMILIES
domain:
DTR> ! Use SET NO PROMPT to turn off the DTR> ! "[Looking for...]" prompts DTR> SET NO PROMPT DTR> ! The outer RSE specifies a single record DTR> ! from the FAMILIES domain: DTR> FOR FAMILIES WITH FATHER = "TOM" AND MOTHER = "ANNE" CON> ! The inner RSE within the MODIFY statement uses the CON> ! repeating field KIDS as a record source and CON> ! specifies a single occurrence of KIDS. Had it CON> ! specified more occurrences, they all would be CON> ! modified with the value specified in the USING clause: CON> MODIFY KIDS WITH KID_NAME = "PATRICIA" USING CON> BEGIN CON> ! Print the occurrence of KIDS specified: CON> PRINT CON> ! Change the value of the subordinate field KID_NAME: CON> KID_NAME = "PATRICK" CON> ! Print the modified occurrence of KIDS: CON> PRINT CON> END KID NAME AGE PATRICIA 4 KID NAME AGE PATRICK 4 DTR>
With this format, you can modify only a single occurrence of a repeating field or give all occurrences specified in the list-rse the same value. The next format shows how to process independently more than one occurrence in the same statement:
FOR rse FOR list-rse MODIFY [field-name [,. ] ]
Use this format to independently process more than one occurrence of a repeating field in the same statement. When you use this format, Datatrieve prompts you to enter field values for as many times as there are occurrences of the repeating field.
If you do not specify field names, Datatrieve prompts you to enter values for all fields subordinate to the repeating field.
The following example uses this format to change the value of all the
occurrences of the KIDS repeating field in the first
FAMILIES record:
DTR> FOR FIRST 1 FAMILIES
! The RSE in the outer FOR statement
CON> ! specifies a single record in
CON> ! FAMILIES. If it specified more,
CON> ! DATATRIEVE would prompt for
CON> ! values for repeating fields in each
CON> ! record.
CON>
CON> FOR KIDS ! The inner FOR statement specifies
CON> ! all occurrences of KIDS in the
CON> ! record or records in the outer
CON> ! FOR statement. It could have
CON> ! limited the RSE to a single
CON> ! occurrence of the repeating field.
CON> BEGIN
CON> PRINT
CON> MODIFY AGE ! The MODIFY statement specifies that
CON> ! only the AGE field subordinate to
CON> ! the KIDS repeating field will be
CON> ! changed.
CON> PRINT
CON> END
KID
NAME AGE
URSULA 7
Enter AGE: 8
KID
NAME AGE
URSULA 8
RALPH 3
Enter AGE: 4
RALPH 4
DTR>13.2.3. Modifying Every Repeating Field Value With OF
If you want to change the values of all occurrences of fields subordinate to a repeating field, you can add the keyword OF, followed by the name of the repeating field. Use this general format:
MODIFY [ALL] list-item OF list
Datatrieve prompts you to enter a value for the field you specify
following the MODIFY statement or for each of its
elementary items if you specify a group field.
Note that this format differs from the preceding one by including the OF list clause. When you include this clause, you modify all occurrences in the list at once. The following example illustrates this condition:
DTR> FIND FAMILIES WITH FATHER = "ARNIE"
[1 record found]
DTR> PRINT
No record selected, printing whole collection.
NUMBER KID
FATHER MOTHER KIDS NAME AGE
ARNIE ANNE 2 SCOTT 2
BRIAN 0
DTR> ! Oops... Scott and Brian are twenty-year-old twins!
DTR> SELECT
DTR> MODIFY AGE
"AGE" is undefined or used out of context.
DTR> MODIFY AGE OF KIDS
Enter AGE: 20
DTR> PRINT
NUMBER KID
FATHER MOTHER KIDS NAME AGE
ARNIE ANNE 2 SCOTT 20
BRIAN 2013.2.4. Changing the Length of a Variable-Length List
If you define a repeating field with the OCCURS DEPENDING clause, you may be able to change the number of list items (the number of times a repeating field repeats), depending on how you define the data file for the domain:
The most restrictive case is a data file that you define without the MAX or KEY clauses. This creates a sequential file with variable-length records. In such a file, you can change only the number of list items up to the value you first store in the field referred to in the OCCURS DEPENDING clause. You cannot exceed that number because Datatrieve determines the length of each record when you first store it.
If you specify the MAX clause when defining the data file (whether the file is indexed or sequential), you create a file with fixed-length records. In a domain based on such a file, you can change the number of list items only up to the maximum value specified in the OCCURS DEPENDING clause. You cannot exceed that value, because the MAX clause in the file definition causes Datatrieve to create a fixed-length RMS file based on the maximum value in the OCCURS DEPENDING clause.
The least restrictive case is a data file you define using the KEY clause but not the MAX clause. This creates an indexed file with variable-length records. In such a file, you can change the number of list items to any number you want. The following example shows how to increase the number of list items for a domain based on an indexed file with variable-length records:
DTR> READY INDEXED_FAMILIES WRITE DTR> FIND FIRST 1 INDEXED_FAMILIES [1 Record found] DTR> PRINT No record selected, printing whole collection NUMBER KID FATHER MOTHER KIDS NAME AGE JIM ANN 2 URSULA 7 JIM ANN 2 RALPH 3 DTR> SELECT DTR> MODIFY NUMBER_KIDS Enter NUMBER_KIDS: 4 DTR> FIND KIDS [4 records found] DTR> SELECT 3 DTR> MODIFY Enter KID_NAME: NICKY Enter AGE: 2 DTR> SELECT 4 DTR> MODIFY Enter KID_NAME: TAM Enter AGE: 1 DTR> PRINT FIRST 1 INDEXED_FAMILIES NUMBER KID FATHER MOTHER KIDS NAME AGE JIM ANN 4 URSULA 7 RALPH 3 NICKY 2 TAM 1 DTR>
13.3. Creating Hierarchies With Multiple RSEs
The complications that occur when you have to retrieve or modify data stored in repeating fields make it a good idea to avoid using hierarchical records. However, you can have the benefits of hierarchical records without the disadvantages by creating hierarchies from flat records. There are several advantages to hierarchies based on flat records:
Because they are based on flat records, you avoid the complications of retrieving and modifying data stored in records with repeating fields. You can simply print or modify fields directly in domains based on the flat records.
Like records with repeating fields, they let you display a parent/child relationship between data when you want to.
They offer more flexibility because the parent/child relationship is not imposed by the record definition.
There is no limit to the number of occurrences of the child record stream. In records with repeating fields, the OCCURS clause limits how many values a repeating field can store.
There are three techniques for combining record streams to form hierarchies:
View domains
Inner print lists
Nested
FORstatements
Each of the techniques creates a hierarchical relationship without using repeating fields in a record definition. Instead, they nest record streams from separate domains to create the one-to-many relationship characteristic of a hierarchy.
13.3.1. Using Nested FOR Statements to Create Dynamic Hierarchies
You can also create dynamic hierarchies by nesting FOR
statements. Although nested FOR statements are logically
equivalent to inner print lists or view domains with nested OCCURS clauses,
Datatrieve displays the data differently.
The following example uses nested FOR statements to
retrieve the same information that printing the SAILBOATS view
domain retrieves:
DTR> FOR YACHTS
CON> BEGIN
CON> PRINT BOAT
CON> FOR OWNERS WITH TYPE = BOAT.TYPE
CON> PRINT NAME
CON> END
LENGTH
OVER
MANUFACTURER MODEL RIG ALL WEIGHT BEAM PRICE
ALBERG 37 MK II KETCH 37 20,000 12 $36,951
ALBIN 79 SLOOP 26 4,200 10 $17,900
ALBIN BALLAD SLOOP 30 7,276 10 $27,500
ALBIN VEGA SLOOP 27 5,070 08 $18,600
OWNER
NAME
STEVE
HUGH
AMERICAN 26 SLOOP 26 4,000 08 $9,895
AMERICAN 26-MS MS 26 5,500 08 $18,895
.
.
.
DTR>You can control the printing format to make the display similar to that
produced by printing the SAILBOATS view domain:
DTR> FOR YACHTS
CON> BEGIN
CON> PRINT BOAT
CON> FOR OWNERS WITH TYPE = BOAT.TYPE
CON> PRINT COL 60, NAME (-)
CON> END
LENGTH
OVER
MANUFACTURER MODEL RIG ALL WEIGHT BEAM PRICE
ALBERG 37 MK II KETCH 37 20,000 12 $36,951
ALBIN 79 SLOOP 26 4,200 10 $17,900
ALBIN BALLAD SLOOP 30 7,276 10 $27,500
ALBIN VEGA SLOOP 27 5,070 08 $18,600
STEVE
HUGH
AMERICAN 26 SLOOP 26 4,000 08 $9,895
AMERICAN 26-MS MS 26 5,500 08 $18,895
DTR>13.4. Flat Versus Hierarchical Records
When defining a record, you can choose to use lists (hierarchies) or to break off each list item into separate records (flat files). It is usually easier to access data in flat files than in hierarchical files. This point can be illustrated with the sample domain FAMILIES.
The data stored in FAMILIES could be organized in flat records or in
hierarchical records. FAMILIES happens to use a hierarchical record
organization, a record containing the repeating list field KIDS. The following
figure illustrates the structure of the record FAMILY:
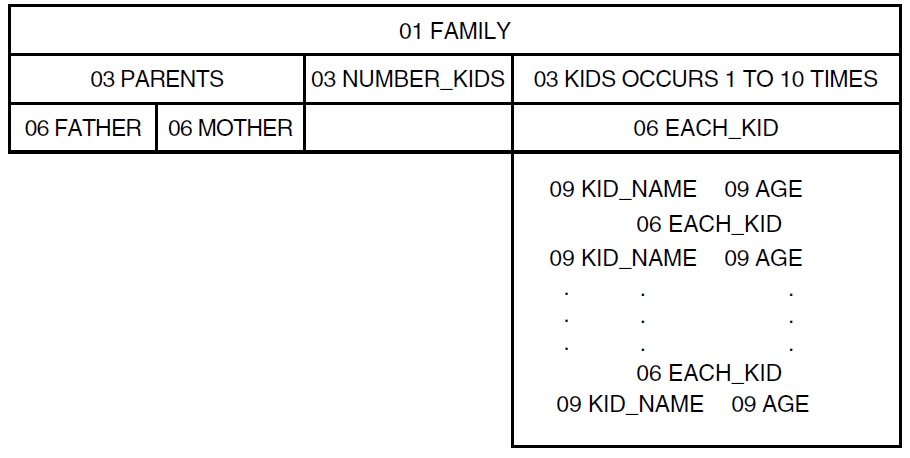
Datatrieve supports lists or hierarchies created using the OCCURS clause in record definitions. You can consider the list field to be a small domain within each record of the large domain. For example, you can view each record in FAMILIES as containing several KIDS records. To access one of the KIDS records, you must do two things:
Identify a specific record in FAMILIES.
Identify the KIDS record within that FAMILIES record.
In the following example, two FOR loops are required to
modify ELLEN’s age:
DTR> FOR FAMILIES WITH FATHER = "JIM" - CON> AND MOTHER = "LOUISE" CON> FOR KIDS WITH KID_NAME = "ELLEN" CON> MODIFY AGE Enter AGE: 26 DTR>
Sometimes nested FOR loops are not sufficient to access
data stored in a list. If you want to sort all the records in
FAMILIES by the age of the children, you must first flatten the
records in FAMILIES with the CROSS clause:
DTR> FOR FAMILIES CROSS KIDS SORTED BY AGE
CON> PRINT PARENTS, KID_NAME, AGE
KID
FATHER MOTHER NAME AGE
SHEARMAN SARAH DAVID 0
JOHN ELLEN CHRISTOPHR 0
ARNIE ANNE BRIAN 0
ARNIE ANNE SCOTT 2
JIM ANN RALPH 3
TOM ANNE PATRICK 4
.
.
.
DTR>An alternative to this complex syntax and high performance overhead is to organize the records in a flat file to begin with, as the following figure shows:
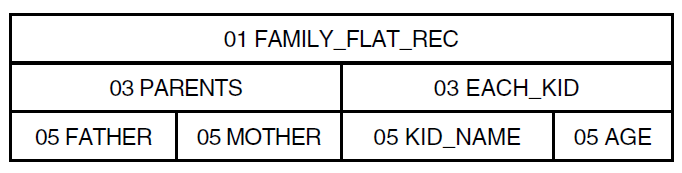
The complete record definition of the FAMILY_FLAT_REC record is
as follows:
DTR> SHOW FAMILY_FLAT_REC
RECORD FAMILY_FLAT_REC USING
01 FAMILY_REC.
03 PARENTS.
05 FATHER PIC X(10).
05 MOTHER PIC X(10).
03 EACH_KID.
05 KID_NAME PIC X(10).
05 AGE PIC 99
EDIT_STRING IS Z9.
;
DTR>Each record of FAMILY_FLAT has elementary fields for
FATHER, MOTHER, KID_NAME, and
AGE. This simplifies the task of modifying a child’s age. For
example, to modify Ellen’s age, enter the following:
DTR> MODIFY AGE OF FAMILY_FLAT WITH FATHER = "JIM" AND CON> KID_NAME = "ELLEN"
To sort by the age of children, enter the following:
DTR> PRINT FAMILY_FLAT SORTED BY AGE
As FAMILY_FLAT does not have hierarchical records like FAMILIES, Datatrieve does not have to flatten records before sorting them. This gives you better performance along with easier access to data. There are additional costs, however, for storing the same parent information with each child in the family. This issue is discussed in Chapter 22, "Improving Datatrieve Performance".
13.4.1. Restructuring a Hierarchical File to a Flat File
You can use a Restructure statement to convert the records in FAMILIES to
FAMILY_FLAT. After defining the domain, record,
and file for FAMILY_FLAT, enter the following
statements:
DTR> READY FAMILIES DTR> READY FAMILY_FLAT WRITE DTR> FAMILY_FLAT = FAMILIES CROSS KIDS
The Restructure statement contains a CROSS clause so that each child is in
a separate record, paralleling the structure of
FAMILY_FLAT. A PRINT
statement displays the records of FAMILY_FLAT:
DTR> PRINT FAMILY_FLAT
KID
FATHER MOTHER NAME AGE
SHEARMAN SARAH DAVID 0
JOHN ELLEN CHRISTOPHR 0
ARNIE ANNE BRIAN 0
ARNIE ANNE SCOTT 2
JIM ANN RALPH 3
TOM ANNE PATRICK 4
JIM ANN URSULA 7
JIM ANN RALPH 3
JIM LOUISE ANNE 31
JIM LOUISE JIM 29
JIM LOUISE ELLEN 26
JIM LOUISE DAVID 24
JIM LOUISE ROBERT 16
JOHN JULIE ANN 29
.
.
.
HAROLD SARAH HAROLD 35
HAROLD SARAH SARAH 27
EDWIN TRINITA ERIC 16
EDWIN TRINITA SCOTT 11
DTR>Now all of the data for parents and their children has been stored in
FAMILY_FLAT, but one problem remains. In
joining FAMILIES on the list field KIDS, you leave out any records in
FAMILIES of couples with no children. In fact, there is one such record in
FAMILIES:
DTR> PRINT FAMILIES WITH NOT ANY KIDS
NUMBER KID
FATHER MOTHER KIDS NAME AGE
ROB DIDI 0This record from FAMILIES is not included in the record
stream formed by FAMILIES CROSS KIDS because the
KIDS list is empty. As a result, the Restructure statement
does not store the data about ROB and DIDI in
FAMILY_FLAT:
DTR> FIND FAMILY_FLAT WITH FATHER = "ROB" [0 records found] DTR>
To include records of parents without children in
FAMILY_FLAT, you need a separate storing operation:
DTR> FOR A IN FAMILIES WITH NOT ANY KIDS [Looking for statement] CON> STORE FAMILY_FLAT USING PARENTS = A.PARENTS
Now the transfer of data from FAMILIES to
FAMILY_FLAT is complete:
DTR> PRINT FAMILY_FLAT WITH FATHER = "ROB"
KID
FATHER MOTHER NAME AGE
ROB DIDI
DTR>13.4.2. Defining Several Smaller Related Records
Though Datatrieve lets you define very large records, you may be better off dividing a large record into several smaller related records. If you include all the fields in one large record, you can access any portion of the data by readying only one domain. However, if you need information from only one field, Datatrieve still must read through the large record.
Another problem with large, all-inclusive records is that several records can duplicate the same information. Not only is this expensive to store, but you may have problems when updating data if you do not change the information in all the relevant records.
This problem could occur with the FAMILY_FLAT records discussed in the previous section. Parent information is stored in each child’s record. If the marital status of the parents should change, each of the children’s records would have to be updated. You can avoid this problem by storing parent data in one domain (FOLKS) and children’s data in a second domain (CHILDREN).
The two domains could each have an ID field, representing an ID assigned
to each set of parents. In the FOLKS domain, you store the ID along with the
parents’ names. In the CHILDREN domain, you store the parent ID along with
the children’s names. The record definitions of FOLK_REC and
CHILD_REC are as follows:
DTR> SHOW FOLK_REC
RECORD FOLK_REC USING
01 FOLK_REC.
03 ID PIC 99
EDIT_STRING IS Z9.
03 PARENTS.
05 FATHER PIC X(10).
05 MOTHER PIC X(10).
;
DTR> SHOW CHILD_REC
RECORD CHILD_REC USING
01 CHILD_REC.
03 ID PIC 99
EDIT_STRING IS Z9.
03 KID_NAME PIC X(10).
03 AGE PIC 99
EDIT_STRING IS Z9.
;
DTR>When you need information about both parents and children, you can join the FOLKS records with the CHILDREN records over the common ID field. The following figure illustrates the result of this relational join. The boldface lines enclose the suggested key fields:

13.4.3. Restructuring Large Records Into Smaller Ones
Datatrieve simplifies the conversion of large records to several smaller records. This point is illustrated by converting the larger records of FAMILY_FLAT to the smaller records of FOLKS and CHILDREN.
Both FOLKS and CHILDREN have an ID field that indicates a unique set of
parents. Because FAMILY_FLAT has duplicate
occurrences for sets of parents (one for each of their children), you need
to determine the unique sets of parents in the records of
FAMILY_FLAT before assigning ID values. Use the
REDUCED TO clause in the record selection expression to find the unique
values. Then use a STORE USING statement to store values
in FOLKS, assigning values for ID with RUNNING COUNT. The following
Datatrieve session uses these statements:
DTR> READY FAMILY_FLAT DTR> READY FOLKS WRITE DTR> FOR A IN FAMILY_FLAT REDUCED TO PARENTS CON> STORE FOLKS USING CON> BEGIN CON> ID = RUNNING COUNT CON> FATHER = A.FATHER CON> MOTHER = A.MOTHER CON> END
As this example shows, the STORE USING statement is
another way to restructure a domain. A PRINT statement
displays the records in the new domain FOLKS:
DTR> PRINT FOLKS ID FATHER MOTHER 1 ARNIE ANNE 2 BASIL MERIDETH 3 EDWIN TRINITA 4 GEORGE LOIS 5 HAROLD SARAH 6 JEROME RUTH 7 JIM ANN 8 JIM LOUISE 9 JOHN ELLEN 10 JOHN JULIE 11 ROB DIDI 12 SHEARMAN SARAH 13 TOM ANNE 14 TOM BETTY
To store records in the related CHILDREN domain, you need the
ID and parent data from FOLKS and the children
data from FAMILY_FLAT. The record selection expression
FAMILY_FLAT CROSS FOLKS OVER PARENTS gives you all the
necessary information. You can use this RSE as the right-hand part of a
Restructure statement for the CHILDREN domain:
DTR> READY FAMILY_FLAT, FOLKS DTR> READY CHILDREN WRITE DTR> CHILDREN = FAMILY_FLAT CROSS FOLKS OVER PARENTS
A PRINT statement displays the records in the new
CHILDREN domain:
DTR> PRINT CHILDREN
KID
ID NAME AGE
1 SCOTT 2
1 BRIAN 0
2 BEAU 28
2 BROOKS 26
2 ROBIN 24
.
.
.
11 0
12 DAVID 0
13 PATRICK 4
13 SUZIE 6
14 MARTHA 30
14 TOM 27Note that for ID number 11, a record was stored without a
child’s name. This is the record for ROB and DIDI,
the only couple in the database without children. Because this record is
stored in CHILDREN, Datatrieve is able to match a
FOLKS record and a CHILDREN record for
ROB and DIDI. As a result, Datatrieve includes
information about ROB and DIDI when the
FOLKS and CHILDREN domains are joined over the
ID field:
DTR> FOR FOLKS CROSS CHILDREN OVER ID
CON> PRINT FATHER, MOTHER, ID, KID_NAME, AGE
KID
FATHER MOTHER ID NAME AGE
ARNIE ANNE 1 SCOTT 2
ARNIE ANNE 1 BRIAN 0
BASIL MERIDETH 2 BEAU 28
.
.
.
ROB DIDI 11 0
.
.
.
DTR>Part IV. Data Presentation
Chapter 14. Using the Report Writer
The Datatrieve Report Writer helps you display and accurately summarize data managed by Datatrieve. You can define Datatrieve procedures to produce these reports whenever they are needed, and in a variety of output formats. For more information, refer to Chapter 15, "Report Writer Formats".
Note that definitions for Oracle DBMS or relational database examples are included in special subdictionaries of CDD$TOP.DTR$LIB.DEMO. For more information on how to use the Report Writer with Oracle DBMS and relational databases, see Section 16.8.1, ''Accessing Oracle DBMS Data With Datatrieve''.
14.1. What the Report Writer Can Do
The Report Writer helps you organize your data in a clear, readable format and present it in the form of boardroom-quality documents. It can do the following:
Print a report name centered at the top of the page
Set up column headings
Print the current date at the upper right
Print page numbers at the upper right
Allow a choice of print attribute for every report element
Print a detail line for each record
Print a summary line for a group of data (for example, yachts by the same builder)
Allow the use of different typefaces for totals, averages and statistics
Print a summary line for the entire report (for example, yachts by several builders)
The report in the figure below was produced with the Report Writer. Each number corresponds to one of the features in the previous list.
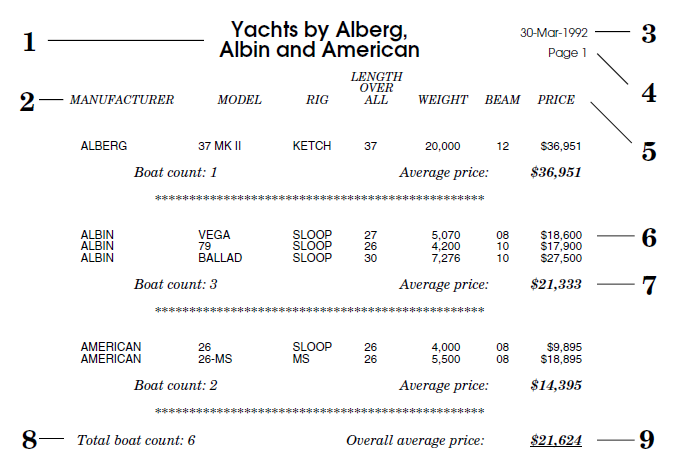
The Report Writer can also produce character-cell reports and formats compatible with database and spreadsheet applications such as DECwrite, DECdesign, or DECchart.
14.2. Designing a Report With the Report Writer
You create a Datatrieve report with a series of Report Writer statements called a report specification. A report specification controls the format and determines the content of a report. Some types of statement are required for a valid report specification, and others are optional:
A report specification must begin with a
REPORTstatement, in which you can specify the data for the report, the file or device to which Datatrieve writes the report and the format of the report.A report specification may contain
DECLARE_ATTstatements to control text elements (font family, character size, weight, slant, underline), complementing or overriding the default attributes.A report specification may contain
SETstatements to control page formats and assign column and report headings. The Report Writer uses its built-in default assignments for theSETstatements you do not include.A report specification can include a single
PRINTstatement in a report specification as well as severalATstatements. ThePRINTstatement indicates detail lines to be printed in the report.ATstatements indicate summary or header lines.Note
The Report Writer
PRINTstatement is different from the regularPRINTstatement in Datatrieve. In the Report Writer, you list the fields or value expressions that you want to display. You cannot sayPRINT CURRENTorPRINT YACHTS, because CURRENT and YACHTS are not field names or value expressions. To find out the field names and query names in the record definition, use theSHOW FIELDScommand. For example:DTR> SHOW FIELDS FOR YACHTS YACHTS BOAT TYPE <Primary key> MANUFACTURER (BUILDER) <Character string, primary key> MODEL <Character string, alternate key> SPECIFICATIONS (SPECS) RIG <Character string> LENGTH_OVER_ALL (LOA) <Character string> DISPLACEMENT (DISP) <Number> BEAM <Number> PRICE <Number>A report specification must end with an
END_REPORTstatement. The following table identifies the Report Writer statements:Table 14.1. Summary of Report Writer Statements Statement Function AT BOTTOM Displays summary lines at the bottom of a report, page, or control group. AT TOP Displays header lines at the top of a report, page, or control group. DECLARE_ATT Specifies text attributes used by the ATT argument of PRINTandSETstatements.END_REPORT Indicates the end of a report specification. PRINT Displays value expressions for each detail line of a report. REPORT Invokes the Report Writer and specifies the data you want to report and the output device. SET Sets the page format for a report.
14.3. Identifying the Data and Invoking the Report Writer
Reports usually highlight only a portion of the available information. To report specific data, you must identify it to Datatrieve and invoke the Report Writer. Follow these steps:
Ready the domains containing the data you wish to report. For example:
DTR> READY YACHTS DTR>
Identify the data within the domain on which you will report. This enables you to limit the number of records in the report and to sort the records if you desire. You can identify the data in one of two ways: with a
FINDstatement or with a record selection expression (RSE) in aREPORTstatement. As a general rule, use aFINDstatement when you need the collection of data for other purposes during a Datatrieve session. However, if you need the set of data only for the report, identify the data with an RSE in theREPORTstatement.The following example shows a
FINDstatement that forms a sorted collection from theYACHTSdomain:DTR> FIND YACHTS WITH LOA > 40 SORTED BY BEAM [8 records found] DTR>
Enter the
REPORTstatement to invoke the Report Writer. The following are validREPORTstatements:REPORT– When you omit the RSE from theREPORTstatement, the Report Writer reports on the records in the CURRENT collection and writes the report on your terminal:DTR> REPORT RW>
REPORT ON file-spec– The followingREPORTstatement asks the Report Writer to report on the CURRENT collection and to write the report to a file namedBIGYAT.LIS:DTR> REPORT ON BIGYAT RW>
REPORT rse– If you did not form a collection with aFINDstatement, you must identify a record stream with theREPORTstatement, for example:DTR> REPORT YACHTS WITH LOA > 40 SORTED BY BEAM RW>
14.3.1. Exiting From the Report Writer
You invoke the Report Writer with a REPORT statement,
and you normally exit with an END_REPORT statement. The
following example represents such a report:
DTR> REPORT YACHTS WITH BUILDER = "ALBIN"
RW> PRINT BOAT
RW> END_REPORT
12-Apr-1992
Page 1
LENGTH
OVER
MANUFACTURER MODEL RIG ALL WEIGHT BEAM PRICE
ALBIN 79 SLOOP 26 4,200 09 $15,000
ALBIN BALLAD SLOOP 30 7,276 09 $27,500
ALBIN VEGA SLOOP 27 5,070 09 $18,600Datatrieve processes the report specification and produces the report if there are no errors. If the report specification contains any prompts, the Report Writer prompts you for the needed information before producing the report.
If Datatrieve detects an error in your Report Writer statements, it displays an error message and returns you to Datatrieve command level.
To force an exit from the Report Writer and return to Datatrieve command level, you can enter Ctrl/C as a response to a RW> prompt or in the middle of an input line:
DTR> READY YACHTS
DTR> REPORT YACHTS
DTR> Ctrl/C
Execution terminated by operator
DTR>14.4. Setting Up the Report Heading
The report heading consists of the report name, date, and page number. You can
let the Report Writer use the default format, or you can specify a report
heading with SET statements.
The Report Writer provides the following default format for the report heading:
Report Name – The Report Writer produces a report without a name unless you include a
SET REPORT_NAMEstatement.Date – The Report Writer prints the current system date in the upper right corner of the page. It uses the format DD-Mmm-YYYY (for example, 21-Jan-1992).
Page number – The Report Writer prints the page number of the report directly under the date. Regardless of the lengths of the date string and the page number, the Report Writer aligns the first character of the page number under the first character of the date. It uses the format Page n. For example:
21-Jan-1992 Page 1
Use the SET REPORT_NAME statement to name your report. Be
sure to enclose the name in quotation marks. The Report Writer centers this name
on the first printed line at the top of the page. For example:
RW> SET REPORT_NAME =
RW> "ACCOUNTS PAYABLE FOR BOCK’S YACHTS"
RW> END_REPORT
DTR>
ACCOUNTS PAYABLE FOR BOCK’S YACHTS 21-Jan-1992
Page 1You are not limited to report names of one line. To produce a report name of two or more lines, enclose each segment of the report name in quotation marks and separate each segment from the next with a slash (/). For example:
RW> SET REPORT_NAME = RW> "ACCOUNTS PAYABLE"/"FOR BOCK’S YACHTS"
This statement produces the following report heading:
ACCOUNTS PAYABLE 18-Apr-1992
FOR BOCK’S YACHTS Page 1The SET statement can also be used to set printing
attributes for individual elements of the header. You can also use the
SET options for controlling output onto paper, for
example the number of lines to a page, or the paper size. See Chapter 15, "Report Writer Formats" for further details.
14.5. Printing Detail Lines and Column Headers
Detail lines are the formatted lines of data in a report. Each detail line contains information about an individual record from a domain. The Report Writer arranges the data in columns, and the column headers indicate what the data items represent.
The Report Writer PRINT statement produces a detail line in
the report for every record in the current collection or in the specified record
stream. A detail line can cover several lines on the report page, depending on
the content and format you specify. You can include only one
PRINT statement in a report specification.
Print-list elements include field names, numeric and character-string literals, and arithmetic and statistical expressions. You can also specify horizontal and vertical spacing (SPACE, TAB n, COL n, SKIP, NEW_PAGE), as well as edit strings, print attributes (ATT) and column headers.
With the Report Writer PRINT statement, you can specify
three characteristics of the detail lines:
The content of the detail lines:
Values of fields from records identified either by a
FINDor by a record selection expression in theREPORTstatementValue expressions
The format of the print items in the detail lines:
Order of each print item
Column position of each print item
Edit string format for each print item
Text attributes for each print item
The column headings for each print item
Section 16.5, ''Changing the Content of the Detail Line'' provides further information on detail lines.
14.5.1. Column Headers for Print Items
Datatrieve displays column headers at the top of the report and at the top of each page. If a query header has been defined for a field or variable, the Report Writer uses the query header as the default column header; otherwise, the Report Writer uses the field or variable name as the default.
Datatrieve allows you to override this default by suppressing the column header (by using the hyphen (-) character), or by specifying a new column header. To include a two-line column header, use the slash (/) between quoted strings. For example:
DTR> REPORT FIRST 1 YACHTS
RW> PRINT MANUFACTURER("BOAT"/"BUILDER"),
MODEL (-), LOA,
RW> RIG, PRICE (-) RW> END_REPORT
DTR>This statement produces the following report:
5-May-1992
Page 1
LENGTH
BOAT OVER
BUILDER ALL RIG
ALBERG 37 MK II 37 KETCH $36,95114.6. Creating Title Pages and Other Special Headings
You can enhance your reports with attractive title pages and headings. Use the
AT TOP OF REPORT and AT TOP OF PAGE
statements to produce these effects.
14.6.1. Creating a Title Page
The AT TOP OF REPORT statement allows you to produce a
title page before any detail lines are printed. When you use this statement,
you suppress the default report heading on the first page of the report.
This enables you to design the first page as a special title page without
detail lines. The next page includes the report and column headers and is
numbered Page 1.
The following example shows how to produce a title page for a report as
well as create the report that shows the salaries of employees at Bock’s
Yachts from departments D98, E46, and
T32. The title page includes the company name, the warning
CONFIDENTIAL: FOR OFFICIAL EYES ONLY, and the company
motto. In the example, the date and page number do not appear until the next
page of the report.
Follow these steps:
| Identify the data for the report in the |
| Include NEW_PAGE as the last print item
of your |
DTR> SET NO PROMPT DTR> REPORT PERSONNEL WITH DEPT = "D98", "E46", "T32"
The following example illustrates the title page. The body of the report follows the title page:
* * * * * * * * * * * * * * * * * * *
* *
* *
* SALARY REPORT *
* *
* FOR BOCK’S YACHTS *
* *
* *
* * * * * * * * * * * * * * * * * * *
CONFIDENTIAL:
FOR OFFICIAL
EYES ONLY
-------------------------------------
OUR MOTTO: A YACHT FOR EVERY WORKER
-------------------------------------
14-May-1992
Page 1
ID STATUS NAME DEPT SALARY
02943 EXPERIENCED CASS TERRY D98 $29,908
34456 TRAINEE HANK MORRISON T32 $30,000
38462 EXPERIENCED BILL SWAY T32 $54,000
38465 EXPERIENCED JOE FREIBURG E46 $23,908
39485 EXPERIENCED DEE TERRICK D98 $55,829
48475 EXPERIENCED GAIL CASSIDY E46 $55,407
48573 TRAINEE SY KELLER T32 $31,546
49843 TRAINEE BART HAMMER D98 $26,392
83764 EXPERIENCED JIM MEADER T32 $41,029
84375 EXPERIENCED MARY NALEVO D98 $56,847
DTR>14.7. Creating End-of-Page or End-of-Report Summaries
You can instruct the Report Writer to calculate summary statistics for any
column in the report. Use the AT BOTTOM OF PAGE or the
AT BOTTOM OF REPORT statement for end-of-page or
end-of-report summaries. An AT BOTTOM OF
field-name statement can generate
summaries on groups within the report.
In the following example, an AT BOTTOM OF DEPT statement
groups records according to department. Within this statement, you can use one
or more of the Datatrieve statistical operators to summarize data about the
employees in each department.
The example shows how Bock’s Yachts keeps salary records for employees in
various departments with the PERSONNEL domain. The firm groups the
data according to departments so that it can make financial comparisons.
The report displays information on all employees in departments
D98, E46, and T32 within the company.
It indicates the total salary for each department and keeps a running total for
the salary for the three departments combined.
Follow these steps:
| Sort the records according to the sort key |
| Use an |
| Indicate the values to be printed in each detail line. Use a
concatenation expression, indicated by three vertical lines, to allow
exactly one space between the values of |
| Summarize salary information on each department with an |
DTR> SHOW SALARY_REPORT PROCEDURE SALARY_REPORT REPORT PERSONNEL WITH DEPT = "D98","E46","T32" SORTED BY DEPT
The following example shows the report produced by this specification:
DTR> :SALARY_REPORT
SALARY REPORT 14-May-1992
Page 1
DEPT ID NAME SALARY
D98
02943 CASS TERRY $29,908
39485 DEE TERRICK $55,829
49843 BART HAMMER $26,392
84375 MARY NALEVO $56,847
D98 TOTAL: $168,976
***********************************
OVERALL TOTAL: $168,976
E46
38465 JOE FREIBURG $23,908
48475 GAIL CASSIDY $55,407
E46 TOTAL: $79,315
***********************************
OVERALL TOTAL: $248,291
T32
34456 HANK MORRISON $30,000
38462 BILL SWAY $54,000
48573 SY KELLER $31,546
83764 JIM MEADER $41,029
T32 TOTAL: $156,575
***********************************
OVERALL TOTAL: $404,86614.7.1. Creating Special Page Headings
The AT TOP OF PAGE statement lets you print special
headings for your report. You are not limited to the two line heading at the
top of the page. But when you use this statement, you are suppressing the
default report and column headings on every page. If you want either of
these headings on the page, you must include
REPORT_HEADER or
COLUMN_HEADER in the print list for the
AT TOP OF PAGE statement.
The following example produces the salary report for Bock’s yachts without
a title page but with the report heading: SALARY REPORT FOR BOCK’S
YACHTS, surrounded by asterisks. It includes the date and page
number, as well as the appropriate column headings:
DTR> REPORT PERSONNEL WITH DEPT = "D98", "E46", "T32" ON BOCKS.PS FORMAT PS
RW> DECLARE_ATT ATT1 FAMILY=COURIER, SIZE=14, BOLD, NO ITALIC
RW> DECLARE_ATT ATT2 FAMILY=AVANTGARDE, SIZE=14, BOLD, ITALIC
RW> DECLARE_ATT ATT3 BOLD
RW> SET COLUMN_HEADER = ATT ATT3
RW> AT TOP OF PAGE PRINT
RW> REPORT_HEADER, SKIP 2,
RW> COL 20, ATT ATT1, "* * * * * * * * * * * * * * * * *", SKIP,
RW> COL 20, "*", COL 66, "*", SKIP,
RW> COL 20, "*", COL 66, "*", SKIP,
RW> COL 20, "*",
RW> COL 35, ATT ATT2, "SALARY REPORT",
RW> COL 66, ATT ATT1, "*", SKIP,
RW> COL 20, "*",
RW> COL 32, ATT ATT2, "FOR BOCK’S YACHTS",
RW> COL 66, ATT ATT1, "*", SKIP,
RW> COL 20, "*", COL 66, "*", SKIP,
RW> COL 20, "*", COL 66, "*", SKIP,
RW> COL 20, "* * * * * * * * * * * * * * * * *", SKIP 2,
RW> COLUMN_HEADER
RW> PRINT ID, STATUS, FIRST_NAME|||LAST_NAME ("NAME"), DEPT, SALARY
RW> END_REPORTThe following figure shows the report produced by this specification:
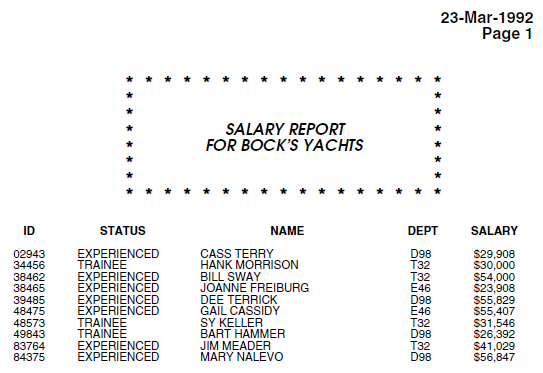
Note that the REPORT_HEADER print item produces
both the date and page number. There is no report name on the same line as
the date because the SET REPORT_NAME statement is not
used. Then, after skipping two lines, the Report Writer prints the special
heading as specified in the AT TOP OF PAGE statement. If
this were a multipage report, each successive page would have this
heading.
Using this technique, you can design a special billing form with the
company heading, with labels for charges and charge descriptions. If the
data for each bill is in a single record, you can include
NEW_PAGE as the last print item in the
PRINT statement. Then each page contains one
customer’s bill.
You can also apply this technique to replicate an existing standard form. Specify the appropriate character strings, column numbers, and field values as print list items. Finally, include NEW_PAGE as the last print-list item.
14.8. Producing Row Totals
Sometimes, reports require totals across the fields of a detail line. For example, you might have a payroll record indicating gross salary and deductions. You want to design a payroll report to print a detail line for each employee, indicating gross salary, deductions, and net salary. To compute net salary, you need to subtract the deductions from the gross salary for each detail line.
Though Datatrieve does not have an operator to total rows, as it does for columns, it is often possible to write a report specification that generates row totals. Specify an additional print item for the detail line by indicating the formula for net salary. The Report Writer then produces a column of totals for each row.
The following figure shows the structure of the record WAGES_REC
for the WAGES domain. WAGES is used in the example
that follows:

The following example shows how the Famous Circus Trainer School uses the
WAGES domain to display a report showing each employee’s weekly
wages, deductions, and net pay. The totals of each of the following are
displayed at the bottom of the report: GROSS_PAY,
FICA, STATE_TAX, FEDERAL_TAX, and
NET_PAY.
To solve this problem, follow these steps:
| Use this formula for the net pay column: GROSS_PAY - (FICA + FEDERAL_TAX + STATE_TAX)) |
| Compute the totals of the field values with an |
DTR> SET NO PROMPT
DTR> REPORT WAGES
RW> SET REPORT_NAME = "FAMOUS CIRCUS TRAINER SCHOOL"/
RW> "WEEKLY WAGE REPORT"
RW> SET COLUMNS_PAGE = 70
RW> PRINT LAST_NAME, GROSS_PAY, FICA,
RW> FEDERAL_TAX, STATE_TAX,
RW> GROSS_PAY - (FICA + FEDERAL_TAX + STATE_TAX)
RW> ("NET PAY") USING $$,$$$.99
RW> AT BOTTOM OF REPORT PRINT SKIP 2,
RW> COL 1, "TOTAL:",
RW> TOTAL GROSS_PAY USING $$$,$$$.99,
RW> TOTAL FICA USING $$$,$$$.99,
RW> TOTAL FEDERAL_TAX USING $$$,$$$.99,
RW> TOTAL STATE_TAX USING $$$,$$$.99,
RW> TOTAL (GROSS_PAY - (FICA + FEDERAL_TAX + STATE_TAX))
RW> USING $$$,$$$.99
RW> END_REPORT
FAMOUS CIRCUS TRAINER SCHOOL 19-Apr-1992
WEEKLY WAGE REPORT Page 1
LAST GROSS FEDERAL STATE
NAME PAY FICA TAX TAX NET PAY
BLAKESLEY $1,000.00 $103.86 $204.77 $.01 $691.36
JAMES $1,500.00 $145.87 $297.98 $54.32 $1,001.83
HILLS $500.00 $52.93 $79.75 $32.98 $334.34
JONES $999.99 $103.85 $204.76 $57.90 $633.48
MEADE $1,900.98 $145.87 $375.98 $75.90 $1,303.23
NAPRAVA $9,500.00 $145.87 $999.84 $106.90 $8,247.39
TOTAL: $15,400.97 $698.25 $2,163.08 $328.01 $12,211.63
DTR>An alternate solution is to edit the record definition to define a new
COMPUTED BY field, NET_PAY. Then, include NET_PAY as
one of the print items in the PRINT statement. The following
is a sample field definition:
10 NET_PAY COMPUTED BY
(GROSS_PAY - (FICA + FEDERAL_TAX + STATE_TAX))
EDIT_STRING IS $$$,$$$.99.This approach saves typing if you need the value for the net salary in several different reports. Then if the formula changes, you have to change it in only one place—the record definition.
14.9. Developing a Procedure for a Report
Report statements are usually stored as procedures. A report that is defined
as a procedure lets you generate a required report whenever you want, without
having to type in a new report statement. Defining procedures for reports with
relational databases becomes especially important, as the RSEs can become very
complex. The following report takes data from six domains in the
PERSONNEL database to create a report. Follow these
steps:
| Define a procedure using the |
| Ready all the domains that contain the data needed in your report. |
| Declare a global variable to contain the value |
| Invoke the Report Writer and create an RSE containing records from all the domains you readied. Note that you use the |
| Use the The prompting value expression lets the user specify the department or departments contained in the report. Note that, by specifying |
| Assign the output of the Report Writer to a file in the desired directory. |
| Give the report a name. |
| Prompt the user to enter a request for information on another employee. |
DTR> DEFINE PROCEDURE ACTIVE_EMPLOYEES_REPORTDFN> JOB_END MISSING AND DFN> SALARY_END MISSING AND DFN> WORK_STATUS.STATUS_CODE EQ "1" AND DFN> SALARY_AMOUNT > 15000 - CON> SORTED BY DEPARTMENT_CODE, LAST_NAME, - CON> SALARY_AMOUNT ON DB2:[DEPT]DEPT.LIS
DFN> SET REPORT_NAME = "Current Employees by Dept"
DFN> AT TOP OF DEPARTMENT_CODE PRINT SKIP, COL 1, DFN> FN$UPCASE(DEPARTMENT_NAME) (-), SKIP DFN> AT TOP OF EMPLOYEE_ID PRINT SKIP, COL 1, DFN> FIRST_NAME|||LAST_NAME (-) DFN> PRINT COL 1, JOB_TITLE,JOB_START, DFN> WAGE_CLASS, SALARY_AMOUNT, STATUS_CODE DFN> AT BOTTOM OF DEPARTMENT_CODE PRINT DFN> "************************************************" DFN> END_REPORT DFN> MORE_DEPT = DFN> *."Y to see more Departments , N to end report"
DFN> MORE_DEPT = FN$UPCASE(MORE_DEPT) DFN> END DFN> END_PROCEDURE DTR> :ACTIVE_EMPLOYEE_REPORT Enter Department Code: ADMN Enter Y to see more Departments, N to end report: N DTR> exit $ TYPE Dept.lis Current Employees by Dept 3-May-1992 Page 1 JOB JOB WAGE SALARY STATUS TITLE START CLASS AMOUNT CODE CORPORATE ADMINISTRATION Karen Clarke Electrical Engineer 8-Apr-1982 4 $21,093.00 1 Al Delano Dept. Supervisor 27-Apr-1981 4 $39,531.00 1 Marjorie Gramby Electrical Engineer 11-Feb-1982 4 $23,856.00 1 Karen Gramby Vice President 8-Jun-1980 4 $75,113.00 1 Lisa Harrison Vice President 2-Jul-1980 4 $77,307.00 1 James Herbener Vice President 26-Jun-1980 4 $83,905.00 1 Johanna MacDonald Vice President 17-Nov-1980 4 $84,147.00 1 ********************************************************
You can customize the report by using one or more prompting value expressions or prompts. The prompt consists of an asterisk and a period, followed by a character string enclosed in quotation marks. For example, you could include the statement:
SET REPORT_NAME = *."report name enclosed in quot. marks"
After the user invokes the procedure, the terminal displays the following prompt:
Enter report name enclosed in quot. marks:
Datatrieve does not finish processing the report until the user enters a report name.
You can also include prompts for page width and length, maximum report size, output device, and other features relating to the report. See Chapter 15, "Report Writer Formats" for more details on designing a report with the Report Writer.
The following example shows how to define a procedure
(YACHT_PER_LB) to produce a report on all yachts by a selected
builder. The report includes columns for these fields:
MANUFACTURER, MODEL, DISP
("WEIGHT"), and PRICE. In addition, there is a
special column indicating the price per pound of each yacht. Note that the
procedure is set up to allow the user to select at the time of execution: the
builder, output device, name of the report, page width, page length, and the
maximum number of pages in the report.
Follow these steps:
| Use the |
| Ready the domain |
| Identify the data you wish to report within the
|
| Allow the user to name the report by including a prompt with the
|
| Control the page width with a |
| Control the page length with a |
| Limit the overall length of the report with a |
| Specify the items in each detail line with a |
| End with an |
| Clear your workspace with a |
| End the procedure with an |
| To invoke the procedure, type the following: DTR> :YACHT_PER_LB |
The following Datatrieve statements produce the report. The number after each statement corresponds to one of the steps:
DTR> DEFINE PROCEDURE YACHT_PER_LBDFN> FINISH YACHTS
DFN> END_PROCEDURE
DTR> :YACHT_PER_LB
Enter the columns per page: 60 Enter the lines per page: 55 Enter the maximum pages for the report: 10 Enter report name in quotes: "YACHTS BY AMERICAN" Enter the builder: AMERICAN Enter device: TT: YACHTS BY AMERICAN 17-Apr-1992 Page 1 MANUFACTURER MODEL WEIGHT PRICE PRICE/LB AMERICAN 26 4,000 $9,895 $2.47 AMERICAN 26-MS 5,500 $18,895 $3.44
Chapter 15. Report Writer Formats
The Report Writer allows you to produce reports in different formats. This chapter provides you with information on how to:
select different formats to fulfill your presentation needs.
control the layout of your report in different formats.
select the print characteristics within your report.
use the RW to export your data to a spreadsheet.
15.1. Report Writer Formats
By default, the Report Writer displays the report on your terminal (or exports it to a specified file), using the standard character-cell text format. This is a page-based format encoded as a sequence of characters, without applying printing attributes such as font type, underlining etc. This format is suitable for a wide range of applications, particularly when simple reports are required for viewing on the screen, or on systems that have limited capabilities. However, by using the FORMAT clause, several other output formats are available, making it possible to pass report data to a variety of other applications. These formats include PostScript™ for high-quality printout, and DTIF (a CDA format) which by using suitable converters will allow Report Writer output to be imported by, for example, LOTUS 1-2-3™. The table provides a list of all the formats available:
| Format | Explanation | Output Type |
|---|---|---|
| DDIF? | The CDA format for page-based documents. DDIF allows files produced by the Report Writer to be processed directly, for example, by DECwrite, DECpresent, or conversion to other formats. | page |
| PS | PostScript™, produced by conversion from DDIF to obtain high quality printout. | page |
| null | The default ASCII format produced by the Report Writer. Format encoded as ASCII characters. | page |
| TEXT | Format encoded as ASCII characters, with ANSI escape sequences that produce certain attributes on terminals and printers. | page |
| DTIF? | The CDA format for tables. DTIF allows files produced by the Report Writer to be processed directly, for example, by DECdecision, DECchart, or conversion to other formats. | table |
In order to make the production of reports in the different formats as easy as
possible, the syntax of the REPORT statement is the same for
all the formats. This means that the same REPORT statement
that is used to produce a report in a particular format may be re-used in its
entirety to produce a report in a different format by simply changing the value
of the FORMAT clause. Of course, some statements within the REPORT procedure may
assume different meanings, or be ignored altogether, when using different
formats. For example, the AT BOTTOM OF PAGE statement is
ignored in a DTIF report, as there is no concept of page in a table-based
report.
All the techniques described for creating reports in general work perfectly
well for any of the output formats. The only difference is that where a format
allows it, the DECLARE_ATT statement can be added to change
the font attributes of the headers and body text listed by
PRINT or SET statements in page-based
reports (see Section 15.2.1, ''Changing Font Attributes in a Report'').
For all formats (except TEXT), it is compulsory to provide the ON clause in
the REPORT statement, specifying the output file for the
report, because formats produced using CDA will not be output to the terminal.
The ON clause is required even if the REPORT statement is
contained within an ON statement.
15.1.1. Page-Based or Table-Based Formats
Datatrieve is capable of producing a variety of formats; these formats fulfill a variety of user needs: passing the output data to a spreadsheet, presenting the data in a professional-looking fashion, or interacting with publishing tools.
Because they may be addressing different needs, not all formats will contain the same information. For example, a format that outputs to a spreadsheet will contain no pagination information, and may have its data encoded to the highest degree of accuracy and separately from the edit string. On the other hand, a format that prints on a laser printer will structure the data in pages, in a form that is ready for presentation and carrying print attributes that are not contained in a format that is suitable for character-cell devices. The most important distinction to make is between Page-based and Table-based reports.
Page-based reports are used to print on paper, or to export to editors and
word-processors (such as DECwrite or DECTPU). The report is therefore
formatted according to the paper size you specify, the size of the various
fields and their printing attributes. The Report Writer will format columns
and introduce page breaks as appropriate. Data is presented in its printable
format, just like in the output of a Datatrieve PRINT
statement.
Table-based reports are used when data is to be used as input to other applications, most commonly to spreadsheets (such as DECdecision or LOTUS 1-2-3™) or charting applications (such as DECchart). In these reports, data is stored as a matrix, arranged in rows (corresponding to record fields) and columns (corresponding to records). There is no concept of pages, and layout in not very significant; on the other hand, data is coded in its "raw" form, so that maximum accuracy in calculations is guaranteed, and edit strings are coded separately.
15.1.2. Digital’s Compound Document Architecture (CDA)
The variety of report formats produced by Datatrieve is a result of Datatrieve’s support of the Compound Document Architecture (CDA). This architecture, which is supported by a wide range of products (Digital and third-party), allows the encoding of documents that are made up of text content, images, graphics, table data or document layout information. This architecture is implemented across a range of operating systems and hardware, and therefore allows the documents produced to be interchangeable on different platforms.
Another important feature of CDA is its Converter Architecture, which uses DDIF and DTIF as its intermediate format and allows transformation of documents from one format to another: for example, an SGML file can be converted to PostScript™, passing via DDIF. This implies that, if the CDA Converter Library is installed on your system, the DDIF report produced by Datatrieve may be converted to a very wide range of formats.
It is important to note that, for a DDIF or DTIF report, some of the contents (for example, layout or edit string information) is subject to interpretation by the receiving application. An application such as DECwrite may therefore represent a document making different choices from those of a third-party converter. Datatrieve tries to make its output as general-purpose as possible, but it cannot predict how the user will subsequently process the file; some inconsistencies may unfortunately arise, due to the extreme flexibility of these formats.
15.2. Producing High-Quality Printouts
When you use a format such as PostScript™ or DDIF, you have the capability to select the font family, size, and attributes you want to apply to a particular field or range of fields. This control, combined with the use of suitable printers or software applications, results in professional-looking output. These formats also allow different paper sizes to be used, while the report is still correctly laid out.
15.2.1. Changing Font Attributes in a Report
All text printed in a report is created by either a SET
statement (for example SET DATE) or by a
PRINT statement. You can change the font attributes
(size, type, underline, and so on) for each of these by using
DECLARE_ATT statements.
The application of print attributes takes place in two stages: first, a
DECLARE_ATT statement specifies a name for a set of
attributes that specify the typeface; then an ATT clause is inserted before
the item to be printed using this typeface.
DTR> REPORT YACHTS ON YACHT.PS FORMAT PS RW> DECLARE_ATT PRICE_ATT FAMILY=AVANTGARDE, SIZE=14, UNDERLINE RW> PRINT MODEL, ATT PRICE_ATT, PRICE RW> END_REPORT
The above example results in the field MODEL being printed
using the default attributes (a plain 10-point Helvetica font), while the
field PRICE is printed using an underlined 14-point
Avantgarde font. Note that attributes only change the print
characteristics that are specified in the DECLARE_ATT
statements, and leave the others unchanged.
DTR> REPORT YACHTS ON YACHT.PS FORMAT PS RW> DECLARE_ATT MODEL_ATT BOLD RW> DECLARE_ATT PRICE_ATT SIZE=14, UNDERLINE RW> PRINT BUILDER, ATT MODEL_ATT, MODEL, ATT PRICE_ATT, PRICE RW> END_REPORT
The above example results in the field BUILDER being printed
using the default attributes, the field MODEL using a
bold 10-point Helvetica font, and the field
PRICE using and underlined
14-point Helvetica font.
Attributes can be set for page header elements by specifying an ATT clause
in the relevant SET statement (see Example 15.1, ''Example Report Changing Font Types for the Output'').
With this simple but powerful mechanism, Datatrieve provides its users
(even those with only a character-cell terminal at their disposal) with
control over printing quality, in a way which is normally only available
from applications with a specialized graphical interface. For example, the
user has the possibility of highlighting whole columns (by putting an ATT
clause inside a detail print list) or singling out totals (by using an ATT
clause in an AT BOTTOM statement). The report in the
following example shows a number of DECLARE_ATT
statements used to define all the elements needed to print out the example
used in Figure 15.1, ''Sample PostScript™ Output'':
DTR> REPORT PAYABLES WITH INVOICE_DUE NOT MISSING -
RW> SORTED BY AGE ON AGING_REPORT.PS FORMAT PS
RW>
RW> DECLARE_ATT TITLE FAMILY = TIMES, SIZE = 24, BOLD, NO ITALIC
RW> DECLARE_ATT DATE_PAGE FAMILY = TIMES, SIZE = 14, NO BOLD, ITALIC
RW> DECLARE_ATT COL_HDR FAMILY = TIMES, SIZE = 12, BOLD, ITALIC
RW> DECLARE_ATT DETAIL FAMILY = NC_SCHOOLBOOK, SIZE = 10
RW> DECLARE_ATT TOT_ACCNTS FAMILY = HELVETICA, SIZE = 12, NO BOLD
RW> DECLARE_ATT TOTAL FAMILY = HELVETICA, SIZE = 14, BOLD
RW> DECLARE_ATT ULINE UNDERLINE
RW> DECLARE_ATT NO_ULINE NO UNDERLINE
RW> DECLARE_ATT GRAND_TOTAL FAMILY = HELVETICA, SIZE = 14,
RW> BOLD, ITALIC
RW>
RW> SET COLUMNS_PAGE = 70
RW> SET REPORT_NAME = ATT TITLE, "ACCOUNTS PAYABLE"/ "Aging Report"
RW> SET DATE = ATT DATE_PAGE, "3-JUN-1991"
RW> SET NUMBER = ATT DATE_PAGE
RW> SET COLUMN_HEADER = ATT COL_HDR
RW>
RW> PRINT ATT DETAIL, AGE ("A"/"G"/"E"), INVOICE_DUE,
RW> TYPE, WHSLE_PRICE
RW>
RW> AT BOTTOM OF PAGE PRINT
RW> SKIP, COL 20, ATT TOT_ACCNTS, "Number of accounts:",
RW> SPACE, COUNT (-) USING Z9,
RW> COL 53, ATT TOTAL, "Total:",
RW> ATT ULINE, TOTAL WHSLE_PRICE USING $$$$,$$$, SKIP
RW>
RW> AT BOTTOM OF REPORT PRINT
RW> ATT GRAND_TOTAL, COL 15, "Total number of accounts:",
RW> SPACE, ATT ULINE, COUNT (-) USING Z9, ATT NO_ULINE,
RW> COL 53, "Total:", ATT ULINE, TOTAL WHSLE_PRICE USING $$$$,$$$
RW> END_REPORTThe example output in the following figure shows how a normal report has
been altered to take advantage of the attributes defined by the
DECLARE_ATT statements:
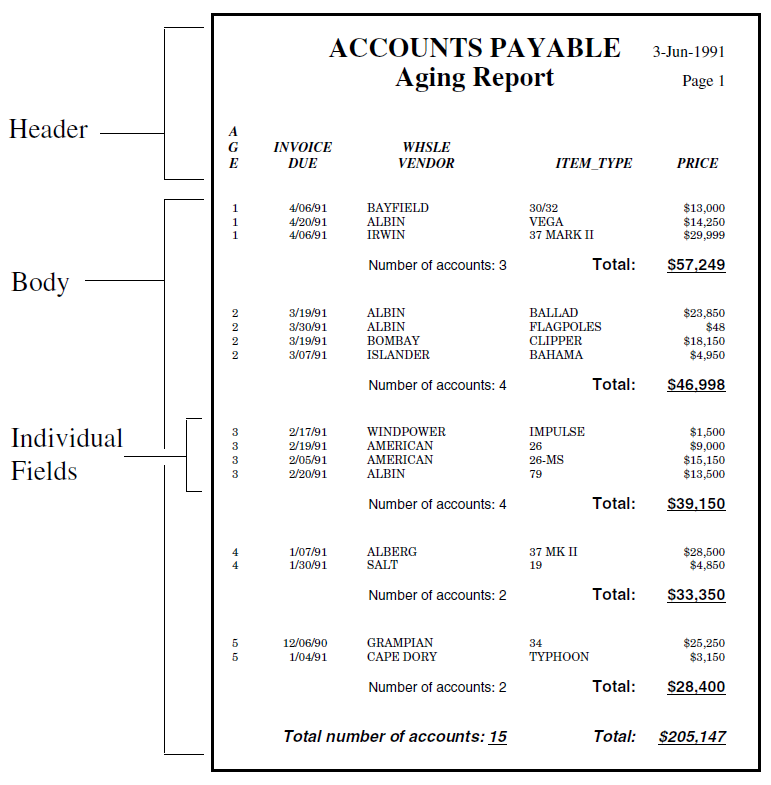
The defaults for header and body font attributes can be changed by
defining the logical names DTR$RW_HEADER_ATTRIBUTES
and DTR$RW_BODY_ATTRIBUTES, which use the same
syntax as the DECLARE_ATT statement. Note that the
defaults are reapplied at the start of each new line. Thus, to use a
24-point
italic
Courier font as the default for titles, the following
definition should be applied before invoking Datatrieve:
$ DEFINE DTR$RW_HEADER_ATTRIBUTES "FAMILY=COURIER, SIZE=24, ITALIC"
It is also important to note that ATT clauses only override the specific attributes that they list (Family, Size, and Italic in the example above), and that the defaults are reapplied at the beginning of each new record.
15.2.2. Proportionally-Spaced Fonts
When producing text-format reports, it was customary to assume that all
characters occupy the same amount of space (meaning that monospaced text was
used). This assumption, which is true for the Datatrieve
PRINT statement, works well on character-cell devices
such as terminals, but does not necessarily hold true for all reports. When
you use a format such as PostScript™ or DDIF, Datatrieve allows you to
choose font families, which are proportionally spaced, in which different
characters take up different amounts of space.
When proportionally-spaced fonts are used, it is difficult to predict how much space a printable string will occupy. A given string will take up 20% more space when printed with a 12-point font that with a 10-point font, even if the font family is the same. Furthermore, a field that is defined by a PIC X(5) can contain "WWWWW" and "iiiii" as values, and these will take up very different amounts of space when printed using a proportionally spaced font.
Since a Datatrieve report’s layout is resolved before the actual data is read, estimates of the amount of space occupied by the various fields are made on the basis of their PIC or EDIT_STRING, as well as on the attributes and fonts selected. In the cases where the value is known (a text constant), the exact amount of space is calculated. If, on the other hand, you are printing a record field of which only the edit string is known, an algorithm will work out the average width for an arbitrary value for this field, using the given font and attributes.
It is important to note that it may be difficult to predict the exact width of a column under these conditions, and some experimenting may be required in order to achieve optimum results. This is particularly true for reports written in text format but which you now want to produce in DDIF or PostScript™ output formats from the same procedure. Discrepancies in the layout must be expected, but can be corrected by using different fonts and positioning fields differently. In some cases, use of a different edit string may be desirable.
The character alignment methods used for monospaced fonts (COLUMNS_PAGE and LINES_PAGE) are not applicable for proportional fonts because the size of the font and the width of the characters affects the physical size of the line. In the case of non-TEXT formats, use the paper size attributes (PAPER_SIZE, PAPER_HEIGHT, and PAPER_WIDTH) instead. Datatrieve will automatically adjust the number of lines or characters to fit within these values. Specifying PAPER_HEIGHT and PAPER_WIDTH allows you to adjust the format on the page, but require you to know the dimensions of the paper you are printing onto.
15.2.3. Changing Paper Size
Specifying a paper size is often convenient, because the Report Writer
automatically fits the report onto the specified paper. The
SET statement is used for this purpose. Most common
paper sizes are available, and a chart showing all the options is provided
in the SET (Report Writer) section of the
VSI Datatrieve Reference Manual.
The order of SET statements is important, as they
override each other. For example, the following results in the paper
dimensions being set to 7 by 10 inches, because the
PAPER_WIDTH argument overrides the (9 inch)
value for width set by the PAPER_SIZE argument:
DTR> SET PAPER_SIZE = SEVEN_BY_NINE DTR> SET PAPER_WIDTH = 10 IN
15.2.4. Formatting for DDIF and PostScript™
There are some other factors to keep in mind when using DDIF or
PostScript™ formats. In these formats, a page is no longer viewed as a
matrix of column and lines to be determined with SET
COLUMNS_PAGE and SET LINES_PAGE, as in a
TEXT report. Instead, think of the page as a physical object: a rectangular
sheet of paper, whose size is determined by using SET
PAPER_HEIGHT and SET PAPER_WIDTH, or
SET PAPER_SIZE if you are using a standard paper
size. Note that the report writer allows for a margin all around the page
perimeter when formatting the report. The SET
PAPER_ORIENTATION statement allows the user to choose between
landscape and portrait format. SET COLUMNS_PAGE and
SET LINES_PAGE are ignored.
Since SET COLUMNS_PAGE is ignored, the interpretation
of formatting clauses such as COL, SPACE, and TAB is also different. Imagine
that the page is divided in 80 "columns" of equal width if the orientation
is PORTRAIT, or 132 "columns" if LANDSCAPE. These "columns" do not
necessarily represent the width of a character, but rather a reference grid
used to specify a horizontal position on the line.
The COL n clause will print the next print object starting on the nth column of the grid.
The SPACE n clause will print the next print object starting on the nth column of the grid, counting from the end of the last print object.
The TAB n clause will print the next object starting n tab stops from the end of the last printed object. Tab stops are those columns whose number is a multiple of 8.
The use of different fonts may also affect the height of the printed lines: for a print list, the line height is determined by the height of the largest field. For this reason, the number of lines on the page cannot be set by the user: it is calculated by the report writer on the basis of the page size and the space taken up by the different lines.
15.3. Using the TEXT Format
When the FORMAT clause is not specified, a character-cell report is produced,
which simply encodes ASCII text (which assumes a monospaced font is used), the
page size being determined by the SET COLUMNS_PAGE
and SET LINES_ PAGE statements. Attributes set by ATT
clauses are ignored, and the formatting clauses TAB, COL, and SPACE have the
same meaning as in a PRINT statement.
Certain print attributes have however been made available to the
character-cell terminal users too. When TEXT is selected as the format for the
report, the user may set print attributes using the
DECLARE_ATT mechanism previously described. Clearly,
different font families and sizes cannot be applied in a character-cell
environment, and these will be ignored; but you can set the print attributes
BOLD, UNDERLINE, and REVERSE.
In this format, output is identical to that of the default format, except that
ANSI escape sequences are inserted in the ASCII text, in order to produce the
desired output on terminals and printers that support ANSI escape sequences. The
VT200, VT300, VT400, and DECterm series of terminals all support these
attributes. If the output is viewed on a device or application that does not
process escape sequences, it will appear to be filled with spurious characters.
In this case, the default format should be used. Both TEXT formats ignore the
SET PAPER_WIDTH, SET PAPER_HEIGHT,
SET PAPER_SIZE, and SET
PAPER_ORIENTATION statements.
It is also important to note that not all output devices support all ANSI escape sequences. In some cases, it may therefore seem that Datatrieve does not process print attributes correctly, but they are simply ignored by the output device. For example, a number of printers do not support the REVERSE attribute.
15.3.1. Formatting TEXT Reports
One of the main advantages of the Report Writer is its ease of formatting.
You can include SET statements to specify the number of
columns and lines per page (for a TEXT format), or you can specify a
standard paper size (for any format), within which the Report Writer will
fit the report. It is also possible to set the maximum number of lines or
pages in a report.
15.3.2. Changing the Default Page Width and Length
The Report Writer provides the following default page dimensions for character-cell reports:
Page width: 80 columns
Page length: 60 lines
For example, if you do not want the default format of 80 columns per page,
you can specify the number of columns by including a SET
COLUMNS_PAGE statement within your report specification. To
set the page width at 60 columns, enter the following
command:
RW> SET COLUMNS_PAGE = 60
If you specify a width that is greater than 80, it is advisable to adjust the column width of your terminal screen. For VT100-, VT200-, VT300-, VT400-family or DECterm terminals, use FN$WIDTH(n) at the Datatrieve command level to specify the number of columns that can be shown across the terminal screen. For this function, n can be as large as 132. For example:
DTR> FN$WIDTH(132) . . . RW> SET COLUMNS_PAGE = 132
15.4. Reporting Data for Spreadsheets
In a DTIF report, the Report Writer assumes that the data is to be presented as a table rather than as a printable document, and therefore simplifies the layout; there are therefore some considerations that the user must keep in mind. It is always best to design a simple report, without sophisticated presentation styles.
15.4.1. Formatting Spreadsheets
The main issue for a DTIF report is that one record should, as far as possible, occupy one row only, and all contents within any one column should be homogeneous. This means that the SKIP clause is ignored and totals and statistics are aligned with their corresponding fields. Sometimes a record is forced to occupy more that one row by the order in which the fields are specified in the printlists. For example:
DTR> REPORT FIRST 6 YACHTS SORTED BY BUILDER ON YACHT.TABLE FORMAT DTIF RW> PRINT MODEL, PRICE RW> AT BOTTOM OF BUILDER PRINT RW> "Average price for "|||BUILDER, AVERAGE PRICE RW> END_REPORT
This example might yield a table such as this:
MODEL PRICE
37 MK II $36,951
Average price for ALBERG
$36,951
79 $17,900
BALLAD $27,500
VEGA $18,600
Average price for ALBIN
$21,333
26 $9,895
26-MS $18,895
Average price for AMERICAN
$14,395In the above report, columns were assigned for MODEL and
PRICE. Since the string "Average price..."
could not fall under either of the two columns, it was assigned to a third
column. The fact that the string was followed by the PRICE field, which was
assigned to a previous column, causes the Report Writer to create a new
row.
The above example may seem to indicate that layout in DTIF format is hard to manage, and that this problem is compounded by the fact that the formatting clauses COL, SPACE, and TAB are also ignored and have no effect on the report. However, when designing a report for output to a spreadsheet, you must always keep in mind the final use of the report: while Datatrieve will attempt to make the most of what it is given, it is best to leave out sophisticated presentation styles from a DTIF report, and produce reports that contain all the data required using a simple and effective layout.
Chapter 16. Report Writer Advanced Techniques
You may often need to report not only on a body of data but also on the groups within it. For example, you could report on employees sorted by department, with summary totals for each department as well as for all employees. Groups of sorted records are called control groups. A control group is a series of sorted data records that have the same value in one or more fields.
16.1. Dividing Data Records Into Control Groups
When you sort a group of records, you choose at least one field as the sort key.
Control groups are formed by sorting on a key where the number of unique values for a sort key is smaller than the number of sorted records. For example, a company of 500 employees may have only 10 departments (10 unique values for DEPT). When you sort the employee records by the department code (DEPT), you create 10 control groups.
The following figure shows the logical structure of the record
PERSONNEL_REC for the PERSONNEL domain.
PERSONNEL is used in the example that follows:

The following REPORT statement identifies all records from
three specific departments and establishes DEPT as the sort key for
the records. Datatrieve then sorts the records according to the department
code:
DTR> REPORT PERSONNEL WITH DEPT = "D98", "E46",
RW> "T32" SORTED BY DEPT
RW> SET COLUMNS_PAGE = 70
RW> PRINT ID, DEPT, FIRST_NAME, LAST_NAME, SALARY
RW> END_REPORT
14-May-1992
Page 1
FIRST LAST
ID DEPT NAME NAME SALARY
02943 D98 CASS TERRY $29,908
39485 D98 DEE TERRICK $55,829
49843 D98 BART HAMMER $26,392
84375 D98 MARY NALEVO $56,847
38465 E46 JOANNE FREIBURG $23,908
48475 E46 GAIL CASSIDY $55,407
34456 T32 HANK MORRISON $30,000
38462 T32 BILL SWAY $54,000
48573 T32 SY KELLER $31,546
83764 T32 JIM MEADER $41,029
DTR>If the desired field is the primary key for the records, or if you have formed
and sorted a collection, you do not need to sort the records again within the
REPORT statement. If the records are not already sorted,
you can sort them within the REPORT statement. Once the
records are sorted, you can use an AT TOP OF
field-name or an AT BOTTOM OF
field-name statement to create control
groups based on the values of the field specified.
Remember that to form control groups based on a sort key, you must sort the
records by a field and use the same field name in the AT TOP
OF or AT BOTTOM OF statement. The field name
you use must be either a field name specified in the record description or a
variable name created in a DECLARE statement. See Chapter 2, "Record Definitions" for more information on variables.
16.1.1. Developing Levels of Control Groups Using Multiple Sort Keys
It is possible for one control group to contain other control groups based on the values of other sort keys. For example, you could sort a personnel file by department and by type of employee as specified in the STATUS field. Each department group contains several control groups for the types of employees within that department.
The following example also uses the PERSONNEL domain. It shows the two types of employees that work at Bock’s Yachts: experienced workers and trainees. The STATUS field takes one of two values: EXPERIENCED or TRAINEE. The report shows salaries for each department and for each type of employee within a given department.
Follow these steps:
Sort the records according to two sort keys, DEPT and STATUS.
Print the field values of the detail line. Use a concatenation expression (| | |) to allow exactly one space between FIRST_NAME and LAST_NAME. Specify a header for the full name ("NAME"). See Example 16.1, ''Control Group Report Based on Two Sort Keys''.
DTR> READY PERSONNEL
DTR> FIND PERSONNEL WITH DEPT = "D98","T32" SORTED
BY DEPT, STATUS
[8 records found]
DTR> PRINT ID, FIRST_NAME|||LAST_NAME ("NAME"), SALARY
OF CURRENT
ID NAME SALARY
02943 CASS TERRY $29,908
84375 MARY NALEVO $56,847
39485 DEE TERRICK $55,829
49843 BART HAMMER $26,392
83764 JIM MEADER $41,029
38462 BILL SWAY $54,000
34456 HANK MORRISON $30,000
48573 SY KELLER $31,54616.2. Reporting Data Grouped by Date
There are several ways to develop reports grouped by date. One simple way is to edit the record definition to form a new field, called, for example, AGE, which gives the age of an account in months. Then produce a control group report sorted by AGE.
Another way to produce the accounts payable report is to form control groups
where all INVOICE_DUE fields contain the same month and
year. For example, you might want information on all accounts due in April of
1992, in May of 1992, and so on. Figure 16.2, ''Field Structure of PAYABLES_REC'' shows the logical
structure of the record PAYABLES_REC for the PAYABLES
domain used in the example that follows:

Producing this report requires a different technique. You identify the month and year portion from each value of INVOICE_DUE with the FORMAT value expression. Then, group records with the same value for the month and year of INVOICE_DUE. Follow these steps:
| Declare a variable ( |
| Identify the data with a |
| Begin each month’s report on a new page numbered 1 with the
|
| Indicate the content of the detail lines with a
|
| Summarize each month’s accounts with an |
The procedure MONTHLY_ACCT_RPT generates one report for each
month’s accounts payable:
DTR> SHOW MONTHLY_ACCT_RPT PROCEDURE MONTHLY_ACCT_RPT DECLARE ACCT_MONTH COMPUTED BY
Running the procedure produces a multipage report. Each month’s accounts payable begins on a new Page 1. The following example shows three pages from the report. To save space, the pages are printed together here:
ACCOUNTS PAYABLE 3-Nov-1991
Page 1
INVOICE WHSLE
DUE VENDOR ITEM_TYPE PRICE
12/01/91 GRAMPIAN 34 $25,250
12/30/91 CAPE DORY TYPHOON $3,150
NUMBER OF ACCOUNTS: 2 TOTAL: $28,400
ACCOUNTS PAYABLE 3-Nov-1991
Page 1
INVOICE WHSLE
DUE VENDOR ITEM_TYPE PRICE
1/02/92 ALBERG 37 MK II $28,500
1/25/92 SALT 19 $4,850
1/31/92 AMERICAN 26-MS $15,150
NUMBER OF ACCOUNTS: 3 TOTAL: $48,500
.
.
.
ACCOUNTS PAYABLE 3-Nov-1991
Page 1
INVOICE WHSLE
DUE VENDOR ITEM_TYPE PRICE
4/01/92 BAYFIELD 30/32 $13,000
4/01/92 IRWIN 37 MARK II $29,999
4/15/92 ALBIN VEGA $14,250
NUMBER OF ACCOUNTS: 3 TOTAL: $57,24916.3. Reporting Group Summaries Only
Control groups allow you to separate groups of detail lines and to print group
summaries. However, sometimes you may want only the summary information for the
groups. You can produce a report with summary lines and no detail lines using
either the Report Writer or the SUM statement described in
Chapter 2, "Record Definitions".
You can produce a report consisting only of summary lines for control groups
with the AT BOTTOM OF field-name
statement.
The following example creates a report showing salary information for each department in Bock’s Yachts. It includes the number of employees in each department, the total salary, and the average salary. Finally, for the entire company, it indicates total number of employees, total salary, and average salary.
Follow these steps:
| Use |
| Use |
| Use |
The following report specification is enclosed in the procedure
SALARY_TOTALS (to create this procedure, use a DEFINE
PROCEDURE command):
DTR> SHOW SALARY_TOTALS PROCEDURE SALARY_TOTALS READY PERSONNEL REPORT PERSONNEL SORTED BY DEPT SET REPORT_NAME = *."a report name" SET COLUMNS_PAGE = 60 AT BOTTOM OF DEPT PRINT COL 10, DEPT,
16.4. Summarizing Data
As a general rule, it is best not to use AT TOP statements
for summarizing data. These statements are for printing special headings in the
report.
The following functions are available for summary lines:
AVERAGE
COUNT
Maximum value (MAX)
Minimum value (MIN)
Standard deviation (STD_DEV)
TOTAL
Two other functions, RUNNING COUNT and RUNNING TOTAL, provide running
summaries within each detail line. They can be included in a
PRINT statement. See Section 16.5.2, ''Value Expressions'' on value
expressions for more information. They can also be used to compute running
summaries of the groups within the report in an AT BOTTOM OF
field-name statement:
16.4.1. COUNT, AVERAGE, and TOTAL
The following figure shows the logical structure of the record
SALES_REC for the SALES domain, used in the
example that follows:

MONTHS_EMP has the following field definition:
05 MONTHS_EMP COMPUTED BY ("TODAY" - START_DATE)/30
EDIT_STRING IS ZZ9.MONTHS_EMP is a COMPUTED BY field based on the
value of START_DATE and the date value expression
"TODAY", representing the current system date. See the
VSI Datatrieve Reference Manual for more information on the date
value expression "TODAY".
In the example of Section 16.4.2, ''Maximum Value, Minimum Value, and Standard Deviation'', the Acme Computer Company has a SALES domain that stores data about the members of its sales force. The report shows the name, starting date, months employed, and amount sold for each salesperson at Acme Computer. The bottom of the report indicates the number of salespeople, the total amount sold, and the average amount sold.
Summary reports using Datatrieve statistical functions are useful for
financial analysis. The AT BOTTOM statement lets you
produce summary lines with the total number of salespeople (COUNT), and the
AVERAGE and TOTAL amounts sold (AVERAGE and TOTAL). The AVERAGE and TOTAL of
AMOUNT automatically print in the AMOUNT column with the edit string you
indicated.
16.4.2. Maximum Value, Minimum Value, and Standard Deviation
To show the maximum and minimum values of selected fields, use the
statistical operators MAX and MIN on the field names. You can also print the
standard deviation of numeric fields. Use the operator
STD_DEV with an AT BOTTOM
statement.
The following example also indicates the maximum amount sold, the minimum amount sold, and the standard deviation of the amount sold:
DTR> READY SALES
DTR> REPORT SALES
RW> SET REPORT_NAME = "ACME COMPUTER"/
"DETAILED SALES REPORT"
RW> SET COLUMNS_PAGE = 60
RW> PRINT SALES_NAME, START_DATE, MONTHS_EMP, AMOUNT
RW> AT BOTTOM OF REPORT PRINT SKIP 2,
RW> COL 10, "SALES FORCE:", SPACE, COUNT (-) USING Z9,
RW> COL 38, "TOTAL:", TOTAL AMOUNT USING $$$$,$$$.99,
RW> COL 38, "AVERAGE:", AVERAGE AMOUNT USING $$,$$$.99
RW> END_REPORT
ACME COMPUTER 2-Jul-1991
DETAILED SALES REPORT Page 1
SALES START MONTHS
NAME DATE EMP AMOUNT
ANNE DINNAN 1-Apr-1990 3 $2,389.90
NANCY ROTHBLATT 1-May-1990 2 $6,325.88
LINDA REINE 15-Dec-1989 7 $8,532.22
WAYNE SMITH 1-Feb-1990 5 $9,853.52
JAMES STORER 15-May-1989 14 $25,876.02
SANDY LEVINE 15-Nov-1989 8 $10,000.01
SEYMOUR KIMMELMAN 15-Feb-1990 5 $7,325.67
JOSEPH FREDERICK 1-Mar-1990 4 $5,000.00
RICK LANGHART 15-Mar-1990 4 $4,999.99
WILLIAM SULLIVAN 15-Oct-1991 9 $8,672.99
DAN DERRICK 16-Nov-1989 8 $11,456.87
LYDIA BARNET 1-Jun-1990 1 $2,598.79
HENRY MAILER 15-Dec-1989 7 $9,999.99
DENNIS MCADOO 1-Aug-1989 11 $12,345.62
SALES FORCE: 14 TOTAL: $125,377.47
AVERAGE: $8,955.53
MAXIMUM: $25,876.02
MINIMUM: $2,389.90
STD DEV: $5,153.85The example uses AT BOTTOM statements to produce
overall page and report summaries. AT BOTTOM statements
can also be used to divide your data records into groups. You can then
compile statistics about groups of records, as well as the entire
report.
16.5. Changing the Content of the Detail Line
A detail line can have two types of print items. The first type is the value of a field from the record. One example is the value of the PRICE field from YACHTS. The second type is a value expression. Value expressions may be derived from field values, or they may be literals or variables. Some examples of value expressions derived from field values are PRICE/DISP (price per pound) or PRICE * 1.1 (10% markup on price).
16.5.1. Field Values
You determine the content of the detail line by indicating which fields from the record should be printed. You can specify either elementary fields or group fields. In the case of a group field, each of its elementary fields is printed in a separate column.
16.5.2. Value Expressions
You can create additional detail line items computed from other field values with arithmetic or statistical operators. In addition, you can include other value expressions such as literals or variables.
The following example displays the model, current price, and a new price
10% higher than the current price for the first five
records in the YACHTS domain. It includes the literal
"BARGAIN" on each detail line. It also specifies
appropriate column headers:
DTR> REPORT FIRST 5 YACHTS
RW> SET COLUMNS_PAGE = 60
RW> SET REPORT_NAME = "BOCK’S YACHTS"/"PRICE LIST"
RW> PRINT TYPE, PRICE ("CURRENT"/"PRICE"),
RW> PRICE * 1.1 ("SUGGESTED"/"PRICE") USING $$$,$$$,
RW> "BARGAIN" ("COMMENT")
RW> END_REPORT
BOCK’S YACHTS 27-Apr-1987
PRICE LIST Page 1
CURRENT SUGGESTED
MANUFACTURER MODEL PRICE PRICE COMMENT
ALBERG 37 MK II $36,951 $40,646 BARGAIN
ALBIN 79 $17,900 $19,690 BARGAIN
ALBIN BALLAD $27,500 $30,250 BARGAIN
ALBIN VEGA $18,600 $20,460 BARGAIN
AMERICAN 26 $9,895 $10,885 BARGAINThe edit string clause, USING $$$,$$$, specifies the output
format for the PRICE * 1.1 field. You need to use one more
dollar sign than the maximum number of digits for the field value. See Section 16.5.5, ''Edit String Format of Print Items'' for more information on edit string
format.
You can also maintain running statistics. It is possible to keep a running count of the detail lines or a running total of the values of selected fields.
The following figure shows the logical structure of the record
PAYABLES_REC for the PAYABLES domain.
PAYABLES is used in the example that follows:

In the following example, Bock’s Yachts has an accounts payable domain to
collect data on unpaid bills. When the company orders goods, it stores a
record indicating the manufacturer, the wholesale price of the goods, and
the order number. It leaves the fields for INVOICE_DUE and
BILL_PAID blank. A MISSING VALUE has been
defined in the record for these fields, along with a string that is printed
when the value is missing.
When an invoice for the goods is received, the company modifies the record to indicate the invoice date. After Bock’s Yachts pays the bill, it modifies the record to indicate the payment date. The report shows all unpaid bills for which invoices have been received, sorted by the invoice date. It keeps a running count of bills and a running total of the amount owed:
DTR> REPORT PAYABLES WITH BILL_PAID MISSING AND
RW> ITEMS_RECEIVED NOT MISSING AND
RW> INVOICE_DUE NOT MISSING SORTED BY INVOICE_DUE
RW> SET REPORT_NAME = "BOCK’S YACHTS"/"ACCOUNTS PAYABLE"
RW> SET COLUMNS_PAGE = 65
RW> PRINT RUNNING COUNT ("COUNT"),
RW> MANUFACTURER, ITEMS_RECEIVED,
RW> INVOICE_DUE, BILL_PAID, WHSLE_PRICE, COL 55,
RW> RUNNING TOTAL WHSLE_PRICE ("TOTAL"/"OWED")
USING $$$,$$$
RW> END_REPORT
BOCK’S YACHTS 19-Apr-1991
ACCOUNTS PAYABLE Page 1
ITEMS INVOICE BILL WHSLE TOTAL
COUNT VENDOR RECEIVED DUE PAID PRICE OWED
1 CAPE DORY 2/15/91 12/30/90 NOT PAID $3,150 $3,150
2 SALT 3/01/91 1/25/91 NOT PAID $4,850 $8,000
3 AMERICAN 11/05/90 2/14/91 NOT PAID $9,000 $17,000
4 ALBIN 6/21/90 2/15/91 NOT PAID $13,500 $30,500
5 ALBIN 8/22/90 3/14/91 NOT PAID $23,850 $54,350
6 BAYFIELD 8/04/90 4/01/91 NOT PAID $13,000 $67,350
7 IRWIN 3/01/91 4/01/91 NOT PAID $29,999 $97,34916.5.3. Format of Fields in the Detail Lines
The Report Writer determines a default format for each print item based on
the edit string or picture clauses in the record definition or variable
declaration. However, you can, at your option, control the format within the
PRINT statement.
16.5.4. Column Position of Print Items
The Report Writer automatically sets up the column spacing, based on field, header, and page widths. If you want to change the default spacing, you can specify the print position of any or all of the print items. In either case, if you do not leave enough room for the column headers and data items, the Report Writer wraps the detail line. That is, it prints some items on a second line, including column headers as space permits.
If you choose to specify print positions, you can do the following:
Specify the column number where the Report Writer begins to print each item
Require spacing between columns by including a SPACE n element in the
PRINTstatement
The following example uses the first option to display the same fields
from PAYABLES; however, each field begins at 15
space intervals because the column number is specified:
RW> PRINT COL 1, WHSLE_PRICE, COL 16, ITEMS_RECEIVED,
RW> COL 31, INVOICE_DUE, COL 45, BILL_PAID
.
.
.
WHSLE ITEMS INVOICE BILL
PRICE RECEIVED DUE PAID
$40,000 NO GOODS NO INVCE NOT PAID
$28,500 5/24/90 1/02/91 6/15/90
$13,500 6/21/90 2/15/91 NOT PAIDThe following example displays the same fields but uses a SPACE
n element to specify only 3
spaces between columns:
RW> PRINT WHSLE_PRICE , SPACE 3, ITEMS_RECEIVED,
RW> SPACE 3, INVOICE_DUE, SPACE 3, BILL_PAID
.
.
.
WHSLE ITEMS INVOICE BILL
PRICE RECEIVED DUE PAID
$40,000 NO GOODS NO INVCE NOT PAID
$28,500 5/24/90 1/02/91 6/15/90
$13,500 6/21/90 2/15/91 NOT PAID16.5.5. Edit String Format of Print Items
If you declare an edit string for a field in the record definition, the Report Writer uses that edit string to format the print item. If you are setting up print items derived from field values, the Report Writer sets up its own edit string.
16.6. Printing a Variety of Detail Lines in One Report
Sometimes, you may want to print different types of detail lines in the same
report. For example, you might want to print a column indicating whether a
salesperson is experienced or a trainee, depending on the number of months on
the sales force. A logical approach would be to test the value of
MONTHS_EMP. If MONTHS_EMP
is greater than 6, Datatrieve should print an "experienced worker" detail line.
Otherwise, Datatrieve should print a "trainee" detail line. But you cannot
include conditional statements or more than one PRINT
statement within a report specification.
To generate this type of report with the Datatrieve Report Writer, you must take a different approach. This section presents two ways to solve this type of problem, each using the CHOICE value expression.
The following figure shows the logical structure of the record
SALES_REC for the SALES domain. SALES
is used in the example that follows:

In the following example, the Acme Computer Company divides its sales force into two categories. Trainees are those who have been employed for fewer than six months. Experienced workers have been employed for six months or more. Each salesperson’s commission depends on how long he or she has been employed, as well as the amount sold, as illustrated in the table below:
| Months Employed | Amount Sold | Commission Percent | Rating |
|---|---|---|---|
| GT 6 | GT 10000 | 12% | Above quota |
| GT 6 | LE 10000 | 7% | Below quota |
| LE 6 | GT 5000 | 10% | Above quota |
| LE 6 | LE 5000 | 5% | Below quota |
The report displays the name, months employed, total sales, commission percentage, total commission, and rating (above quota or below quota) for each salesperson.
An analysis of the report requirements shows that you need six values for each detail line of the report:
Three desired values are field values contained in the input record: the salesperson’s name (SALES_NAME), months employed (MONTHS_EMP), and amount sold (AMOUNT).
Two other values must be assigned depending on the months employed and sales amount: the salesperson’s rating (above quota or below quota) and the commission percentage.
The final value (total commission) can be computed from the values for AMOUNT and COMM_PCT by using the following formula: (AMOUNT * COMM_PCT) / 100. You can either add a new COMPUTED BY field or variable (COMMISSION), or you can include the formula directly in the
PRINTstatement.
In effect, you can print a detail line for a salesperson only after testing for months employed and total sales. This problem is representative of a common need within report writing: testing field values to derive new values and printing both the field and the derived values on the same detail line.
To solve this type of problem, use the CHOICE value expression to conduct a series of tests for each record based on values of MONTHS_EMP and AMOUNT. You can do this in either of two ways:
Edit the original record definition to set up two new COMPUTED BY fields for COMM_PCT and RATING. Use the CHOICE value expression in the COMPUTED BY clause.
Use the CHOICE value expression within the
PRINTstatement. Datatrieve tests for the values of MONTHS_EMP and AMOUNT while processing each record.
16.6.1. CHOICE Value Expression in COMPUTED BY Fields
One way to solve the testing problem is to edit the record definition before invoking the Report Writer. You need to add two new COMPUTED BY fields: COMM_PCT and RATING. Use the CHOICE value expression within the COMPUTED BY clause. For more information on the CHOICE value expression, see the VSI Datatrieve Reference Manual.
Since these are virtual fields whose values are not actually stored, you
are not changing the size of the record. Therefore, there is no need to
restructure the domain. The following shows the resulting change in
SALES_REC:
DTR> SHOW SALES_REC
RECORD SALES_REC USING
01 SALESREC.
05 ID PIC IS 9(5).
05 SALES_NAME PIC IS X(20).
05 START_DATE USAGE IS DATE.
05 MONTHS_EMP COMPUTED BY ("TODAY" - START_DATE)/30
EDIT_STRING IS ZZ9.
05 AMOUNT PIC IS 9(5)V99
QUERY_NAME IS AMT
EDIT_STRING IS $$$,$$$.99.
05 COMM_PCT COMPUTED BY
CHOICE
(MONTHS_EMP LE 6 AND AMOUNT > 5000) THEN 10
(MONTHS_EMP LE 6) THEN 05
(AMOUNT > 10000) THEN 12
ELSE 07
END_CHOICE
EDIT_STRING IS Z9% .
05 RATING COMPUTED BY
CHOICE
(MONTHS_EMP LE 6 AND AMOUNT > 5000) THEN "ABOVE QUOTA"
(AMOUNT > 10000) THEN "ABOVE QUOTA"
ELSE "BELOW QUOTA"
END_CHOICE
EDIT_STRING IS X(11).
;The figure below shows the new structure of SALES_REC with
the addition of the two COMPUTED BY fields:

Follow these steps to produce a control group report on sales commission:
| Declare a variable to compute the commission. |
| Report the records in |
| Name the report. |
| At the top of each group, print the values for
|
| Print the field values, specifying appropriate column headers where necessary. |
| Summarize the data about the sales personnel in each
commission-percentage category with an |
| Summarize the data about the entire sales force with an
|
The following is the procedure COMM_REPORT that produces the
desired report:
DTR> SHOW COMM_REPORT PROCEDURE COMM_REPORT READY SALES DECLARE COMMISSION COMPUTED BY
The following figure shows the report produced by
COMM_REPORT:
SALES COMMISSION REPORT 2-Jul-1990
Page 1
COMM SALES MONTHS
RATING PCT NAME EMP AMOUNT COMMISSION
BELOW QUOTA 5%
ANNE DINNAN 3 $2,389.90 $119.50
RICK LANGHART 4 $4,999.99 $250.00
LYDIA BARNET 1 $2,598.79 $129.94
JOSEPH FREDERICK 4 $5,000.00 $250.00
NUMBER: 4 TOTAL SALES: $14,988.68 $749.53
BELOW QUOTA 7%
WILLIAM SULLIVAN 9 $8,672.99 $607.11
LINDA REINE 7 $8,532.22 $597.26
HENRY MAILER 7 $9,999.99 $700.00
NUMBER: 3 TOTAL SALES: $27,205.20 $1,904.36
ABOVE QUOTA 10%
NANCY ROTHBLATT 2 $6,325.88 $632.59
WAYNE SMITH 5 $9,853.52 $985.35
SEYMOUR KIMMELMAN 5 $7,325.67 $732.57
NUMBER: 3 TOTAL SALES: $23,505.07 $2,350.51
ABOVE QUOTA 12%
DAN DERRICK 8 $11,456.87 $1,374.82
JAMES STORER 14 $25,876.02 $3,105.12
SANDY LEVINE 8 $10,000.01 $1,200.00
DENNIS MCADOO 11 $12,345.62 $1,481.47
NUMBER: 4 TOTAL SALES: $59,678.52 $7,161.42
****************************************************************
SALES FORCE: 14 TOTAL SALES: $125,377.47 $12,165.73
DTR>Note that if you try to duplicate this report, the results may differ because the COMM_PCT field is based on length of employment, which is in turn dependent on the date the report is produced.
16.6.2. CHOICE Value Expression Within a PRINT Statement
If you do not edit the record definition, you can still produce a sales
commission report by using the CHOICE value expression in the Report Writer
PRINT statement. You need to use it three times: for
determining the rating, the commission percentage, and the commission.
Because these are not fields in the record definition, you must also specify
appropriate headings and edit strings.
When you use the CHOICE value expression to calculate the commission, you use a slightly different formula than before. You can multiply AMOUNT by the decimal equivalent of the commission percentage. As such, there is no need to divide the result by 100.
Because you have not defined a field for commission percentage, you cannot
produce a control group report sorted by the values for commission
percentage. Therefore, the report specification does not have an AT
BOTTOM OF field-name statement. However,
you can still generate the same detail lines as before with the
PRINT statement.
The following procedure SALES_RPT uses the
CHOICE value expression three separate times in the same
PRINT statement:
DTR> SHOW SALES_RPT
PROCEDURE SALES_RPT
READY SALES
REPORT SALES
SET REPORT_NAME = "SALES COMMISSION REPORT"
PRINT SALES_NAME, MONTHS_EMP, AMOUNT,
CHOICE
(MONTHS_EMP LE 6 AND AMOUNT > 5000) THEN 10
(MONTHS_EMP LE 6) THEN 05
(AMOUNT > 10000) THEN 12
ELSE 07
END_CHOICE ("COMM"/"PCT") USING Z9%,
CHOICE
(MONTHS_EMP LE 6 AND AMOUNT > 5000) THEN (.1 * AMOUNT)
(MONTHS_EMP LE 6) THEN (.05 * AMOUNT)
(AMOUNT > 10000) THEN (.12 * AMOUNT)
ELSE (.07 * AMOUNT)
END_CHOICE ("COMMISSION") USING $$,$$$.99,
CHOICE
(MONTHS_EMP LE 6 AND AMOUNT > 5000) THEN "ABOVE QUOTA"
(AMOUNT > 10000) THEN "ABOVE QUOTA"
ELSE "BELOW QUOTA"
END_CHOICE ("RATING")
END_REPORT
FINISH SALES
END_PROCEDURERunning SALES_RPT produces the following report:
DTR> :SALES_RPT
SALES COMMISSION REPORT 2-Jul-1990
Page 1
SALES MONTHS COMM
NAME EMP AMOUNT PCT COMMISSION RATING
ANNE DINNAN 3 $2,389.90 5% $119.50 BELOW QUOTA
NANCY ROTHBLATT 2 $6,325.88 10% $632.59 ABOVE QUOTA
LINDA REINE 7 $8,532.22 7% $597.26 BELOW QUOTA
WAYNE SMITH 5 $9,853.52 10% $985.35 ABOVE QUOTA
JAMES STORER 14 $25,876.02 12% $3,105.12 ABOVE QUOTA
SANDY LEVINE 8 $10,000.01 12% $1,200.00 ABOVE QUOTA
SEYMOUR KIMMELMAN 5 $7,325.67 10% $732.57 ABOVE QUOTA
JOSEPH FREDERICK 4 $5,000.00 5% $250.00 BELOW QUOTA
RICK LANGHART 4 $4,999.99 5% $250.00 BELOW QUOTA
WILLIAM SULLIVAN 9 $8,672.99 7% $607.11 BELOW QUOTA
DAN DERRICK 8 $11,456.87 12% $1,374.82 ABOVE QUOTA
LYDIA BARNET 1 $2,598.79 5% $129.94 BELOW QUOTA
HENRY MAILER 7 $9,999.99 7% $700.00 BELOW QUOTA
DENNIS MCADOO 11 $12,345.62 12% $1,481.47 ABOVE QUOTA
DTR>These sales commission reports illustrate the flexibility of COMPUTED BY
fields and PRINT statements that include the CHOICE value
expression. As you consider more complex reports, you may need to test each
record to generate detail line items. Using the CHOICE value expression is
the most direct way to produce this type of report.
16.7. Using Report Writer to Flatten Hierarchies
You can use the Report Writer to report hierarchical records by activating the
Context Searcher (using the SET SEARCH command) or by using
inner print lists for the list items.
16.7.1. Accessing List Items With the SET SEARCH Command
The Context Searcher is able to locate each
OLD_JOB entry, even though each entry is
embedded within a list. Here is the procedure HIER_REPORT that
produces the report:
DTR> SHOW HIER_REPORT
PROCEDURE HIER_REPORT
READY EMPLOYEE
SET SEARCH
REPORT EMPLOYEE
SET COLUMNS_PAGE = 70
SET REPORT_NAME = "EMPLOYEE HISTORY REPORT"
PRINT NAME, OLD_JOB,
(OLD_JOB VIA JOB_TITLE_TABLE)("JOB"/"TITLE"), OLD_DATE
END_REPORT
FINISH EMPLOYEE
END_PROCEDURERunning the procedure produces a message from the Context Searcher, followed by the report:
DTR> :HIER_REPORT
Not enough context. Some field names
resolved by Context Searcher.
EMPLOYEE HISTORY REPORT 28-Apr-1990
Page 1
LAST FIRST OLD JOB EFFECTIVE
NAME NAME JOB TITLE DATE
FOSTER DANA A03 SENIOR ACCOUNTANT 12-Dec-1989
A02 INTERNAL AUDITOR 11-Dec-1988
A01 ACCOUNTANT 10-Dec-1987
MOODY JOAN M03 MANUFACTURING MGR 12-Nov-1989
M03 MANUFACTURING MGR 14-Nov-1988
M03 MANUFACTURING MGR 12-Oct-1987
M02 ASSEMBLER 11-Nov-1986
M01 APPRENTICE 21-Oct-1985
M01 APPRENTICE 22-Oct-1984
CASADAY JULIAN A02 INTERNAL AUDITOR 10-Jan-1990
A01 ACCOUNTANT 9-Jan-1989
DENN RONALD M03 MANUFACTURING MGR 12-Dec-1989
M02 ASSEMBLER 14-Dec-1988
M01 APPRENTICE 11-Dec-1987
M01 APPRENTICE 10-Dec-1986
DEPALMA LOUISE S03 MARKETING ANALYST 11-Jan-1990
S02 SALES MANAGER 10-Jan-1989
S02 SALES MANAGER 11-Dec-1987
DTR>This approach differs from the first solution because it does not flatten the hierarchy. Each name appears just once. Only the fields within the list have multiple occurrences, depending on the entry made for NUMBER_JOBS.
The Context Searcher provided Datatrieve with the proper context. For more information about context in Datatrieve, see Appendix A, "Name Recognition and Single Record Context".
16.7.2. Using the REPORT Statement to Report List Data
You can produce the employee history report with the
REPORT statement without invoking the Context
Searcher or flattening the hierarchy. However, you must provide the proper
context for Datatrieve within the PRINT statement by
using inner print lists for the list items.
The following PRINT statement uses inner print lists to
specify the relationship between the list items and the list field:
PRINT NAME, ALL OLD_JOB, OLD_JOB VIA JOB_TITLE_TABLE,
OLD_DATE OF JOB_HISTORYHIER_REPORT2, which includes this PRINT
statement, contains the report specification for the employee history
report:
DTR> SHOW HIER_REPORT2 PROCEDURE HIER_REPORT2 READY EMPLOYEE REPORT EMPLOYEE SET COLUMNS_PAGE = 70 SET REPORT_NAME = "EMPLOYEE HISTORY REPORT" PRINT NAME, ALL OLD_JOB, OLD_JOB VIA JOB_TITLE_TABLE, OLD_DATE OF JOB_HISTORY END_REPORT END_PROCEDURE DTR>
The output is the same as the previous report.
16.8. Using Report Writer With Other Database Products
Datatrieve provides you with an easy-to-use query language and Report Writer for the Digital family of relational database management systems. If Oracle Rdb/VMS is installed on your system, you can use the same Datatrieve commands and statements for most tasks whether you are working with data stored in RMS files or in the relational databases.
See Chapter 7, "Record Selection Expressions" for more basic information about using Datatrieve to access records in Oracle DBMS databases.
The following command sets the default dictionary directory to the directory that contains the database domain definitions used in this section:
DTR> SET DICTIONARY CDD$TOP.DTR$LIB.DEMO.DBMS
16.8.1. Accessing Oracle DBMS Data With Datatrieve
To demonstrate accessing and reporting Oracle DBMS data with Datatrieve, this chapter uses the PARTS sample database included with both Oracle DBMS and Datatrieve. See the documentation that accompanies Oracle DBMS for more details on the PARTS database.
The Oracle DBMS domains defined in the specified dictionary directory were
created when the UETP (User Environment Test Package) which tests the
Datatrieve interface to Oracle DBMS was run. Perform a
SHOW command to see what was defined by the
UETP:
DTR> SHOW PARTS_DB DATABASE PARTS_DB USING SUBSCHEMA DTR_SUBSCHEMA OF SCHEMA PARTS ON DTR$LIBRARY:DTRPARTDB; DTR>
You can ready the database directly and use Oracle DBMS records as sources in your Datatrieve queries, or you can ready Oracle DBMS domains individually.
There are several Oracle DBMS domains that are associated with
PARTS_DB. These are CLASSES, COMPONENTS,
DIVISIONS, EMPLOYEES, PART_S, QUOTES, SUPPLIES, and
VENDORS. You can use several SHOW commands to see how
these domains were defined. Each of the definitions refers to
PARTS_DB.
The examples in this section use Oracle DBMS domains. If the Oracle DBMS database definition or domains are not in the specified dictionary directory, see the person responsible for Datatrieve at your site.
16.8.2. Writing a Simple Report With Oracle DBMS Data
The Datatrieve Report Writer is a useful tool for writing reports with data stored through Oracle DBMS. You can define Oracle DBMS domains based on records in a Oracle DBMS database. Then use the Datatrieve data access and formatting capabilities to report on the data.
The following example uses the EMPLOYEES and
DIVISIONS domains, defined in Datatrieve from the PARTS
database.
The example shows how to develop a procedure to report personnel information on all the employees in a given division. The total number of employees working in that division is displayed at the bottom of the report.
The information on divisions can be found in the DIVISIONS
domain. All personnel information on all employees in all divisions can be
found in the EMPLOYEES domain. First, ready the two domains.
Second, with a SHOW FIELDS command, display the field
structure of the records in these domains:
DTR> READY EMPLOYEES, DIVISIONS
DTR> SHOW FIELDS FOR EMPLOYEES, DIVISIONS
EMPLOYEES
EMPLOYEE
EMP_ID (ID) <Number>
EMP_LAST_NAME (LAST_NAME) <Character string>
EMP_FIRST_NAME (FIRST_NAME) <Character string>
EMP_PHONE (PHONE_NUMBER) <Number>
EMP_LOC (LOCATION) <Character string>
DIVISIONS
DIVISION
DIV_NAME <Character string>
DTR>In the definition of the procedure to locate employees in a particular division, follow these steps:
| Use a |
| Select the record to give Datatrieve the proper context for further queries. |
| Report all records of |
| Use a prompt with |
| Print each record in the specified record stream from
|
| Summarize the number of records with an |
| End with an |
The procedure EMPLOYEE_RPT is as follows:
DTR> SHOW EMPLOYEE_RPT PROCEDURE EMPLOYEE_RPT READY DIVISIONS, EMPLOYEES FIND DIVISIONS WITH DIV_NAME = *."the division"
To produce the report, invoke the procedure and respond to the prompts:
DTR> :EMPLOYEE_RPT
Enter the division: VT100 DEVELOPMENT
Enter report name: "VT100 DEVELOPMENT EMPLOYEES"
VT100 DEVELOPMENT EMPLOYEES 19-May-1992
Page 1
Ident Last First Phone
Name Name Number Loc
65437 FRANK BEBI 456-8901 89012
12333 HOFFMAN MIKE 456-8901 89012
54332 IGLESIAS RAFAEL 234-6789 67890
TOTAL EMPLOYEES: 3
DTR>16.9. Accessing Oracle Relational Databases With Datatrieve
To demonstrate accessing and reporting relational source data with Datatrieve, this chapter uses the PERSONNEL sample database installed with Datatrieve. This database is similar to the sample PERSONNEL database installed with Oracle Rdb/VMS but contains only a subset of the relations and records in that database.
The relational domains defined in the specified dictionary directory were
created by the Datatrieve installation procedure. To see the sample data, set
your default to the proper dictionary and perform a SHOW
command:
DTR> SHOW ALL
Domains:
COLLEGES;1 DEGREES;1 DEPARTMENTS;1 DEPARTMENT_STAFF;1
EMPLOYEES;1 EMPLOYEE_EDUCATION;1 JOBS;1
JOB_HISTORY;1 SALARY_HISTORY;1 WORK_STATUS;1
Procedures:
EMPLOYEE_INFO;1 READY_PERSONNEL;1 READY_PERSONNEL_WRITE;1
SALARY_REPORT;1
Tables:
DEPARTMENT_TABLE;1 NAME_TABLE;1
Databases:
PERSONNEL
The default directory is CDD$TOP.DTR$LIB.DEMO.RDB
No established collections.
No ready sources.
No loaded tables.Note that the sample directory contains domain definitions for each relation
in the PERSONNEL database. To access data in a relational database, you can
define and ready domains for each relation. The following example shows the
contents of a single domain definition and then readies all the domains in the
PERSONNEL database:
DTR> SHOW COLLEGES
DOMAIN COLLEGES
USING COLLEGES OF DATABASE PERSONNEL;
DTR> READY COLLEGES, DEGREES, DEPARTMENTS, EMPLOYEES, -
JOBS, JOB_HISTORY, SALARY_HISTORY, WORK_STATUSThe following figure shows the relations and fields for the sample
PERSONNEL database for which Datatrieve domains are defined.
Some examples in this chapter refer to the relations and field names in the
PERSONNEL database:
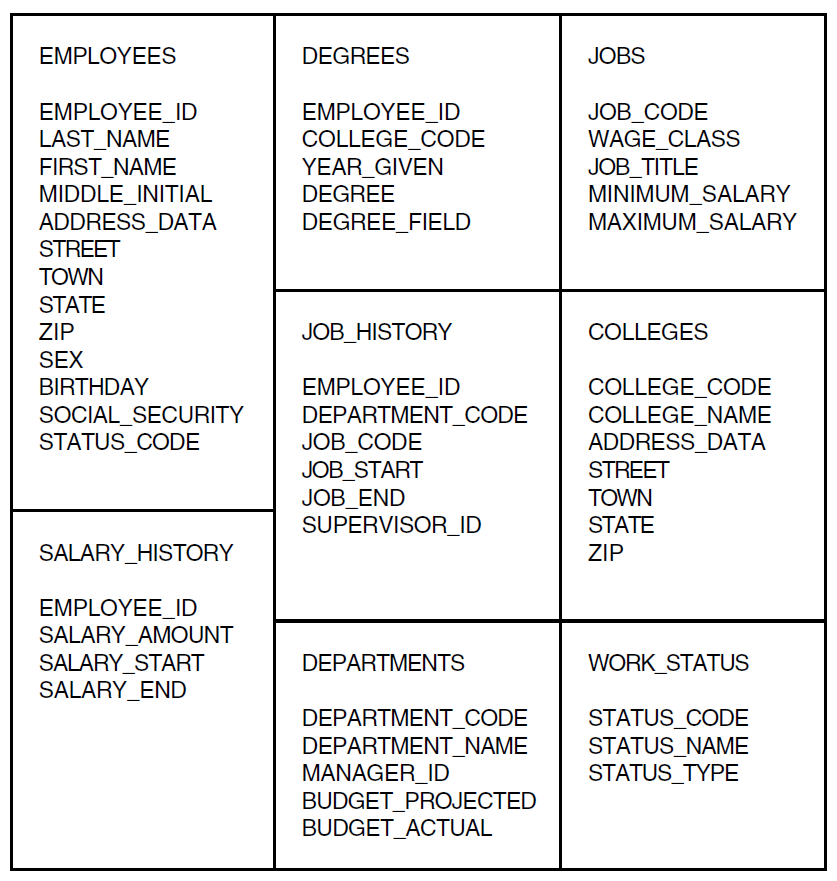
Rather than define domains for each relation, you can define a Datatrieve
database definition for the relational database and then ready that database
definition. The following example shows a database definition and the results of
the READY database command. Notice that the relations are
readied directly by the READY database command; there are no
domain definitions:
DTR> DEFINE DATABASE PERSONNEL ON DTR$LIBRARY:PERSONNEL;
DTR> SHOW DATABASES
Databases:
PERSONNEL;1
DTR> READY PERSONNEL
DTR> SHOW READY
Ready sources:
WORK_STATUS: Relation, Rdb, snapshot read, consistency
<CDD$TOP.DTR$LIB.DEMO.RDB.PERSONNEL;1>
SALARY_HISTORY: Relation, Rdb, snapshot read, consistency
<CDD$TOP.DTR$LIB.DEMO.RDB.PERSONNEL;1>
JOB_HISTORY: Relation, Rdb, snapshot read, consistency
<CDD$TOP.DTR$LIB.DEMO.RDB.PERSONNEL;1>
JOBS: Relation, Rdb, snapshot read, consistency
<CDD$TOP.DTR$LIB.DEMO.RDB.PERSONNEL;1>
EMPLOYEES: Relation, Rdb, snapshot read, consistency
<CDD$TOP.DTR$LIB.DEMO.RDB.PERSONNEL;1>
DEPARTMENTS: Relation, Rdb, snapshot read, consistency
<CDD$TOP.DTR$LIB.DEMO.RDB.PERSONNEL;1>
DEGREES: Relation, Rdb, snapshot read, consistency
<CDD$TOP.DTR$LIB.DEMO.RDB.PERSONNEL;1>
COLLEGES: Relation, Rdb, snapshot read, consistency
<CDD$TOP.DTR$LIB.DEMO.RDB.PERSONNEL;1>
No loaded tables.
DTR>16.10. Writing a Simple Report With Relational Data
The Datatrieve Report Writer is a useful tool for generating reports with data stored in one of the Digital relational database products. You can define relational domains based on relations in a relational database or access the relations directly. Then you can use the Datatrieve data access and formatting capabilities to report on the data.
The following example uses the JOB_HISTORY and EMPLOYEES domains to print all those employees who work in selected departments. Notice with relational databases that you frequently use the CROSS clause to combine related data stored in one or more relations.
Follow these steps to create this report:
| Ready the |
| Invoke the Report Writer and form an RSE of all the employees in the
|
| Sort the record stream alphabetically by department name. |
| Give the report a name with the |
| Print the department code from the |
| Print the employee id, the name, and the start date for the current job for each employee in each department. |
| End the report specification with an |
DTR> READY JOB_HISTORY, EMPLOYEES
Chapter 17. Using Datatrieve Plots
To use Datatrieve plots, you must have a Digital terminal that supports ReGIS graphics. Check your owner’s manual to determine if your terminal supports ReGIS graphics.
Datatrieve graphics can be used on character cell terminals or on workstations that are running DECwindows software.
If you are running Datatrieve in a DECwindows environment, you should note that when you invoke the graphics utility with a plot statement, Datatrieve spawns a separate DECterm window from the main application window to display the plot. You enter a plot statement at the command line of the main application window. If you want to enter additional plot statements, they are also entered at the DTR> prompt in the command line area of the main application window. All plots are displayed in the same DECterm window. The display created by the plot statement remains in the DECterm window until you perform one of the following actions:
Dismiss the window by selecting the Quit option of the Commands menu of the DECterm window in which the plot is displayed.
Exit Datatrieve.
Your terminal may have either a monochrome monitor or a color monitor. If you have a monochrome monitor, you should set it so it displays light characters on a dark background screen. All plots will then be completely visible.
You can also use a color monitor for a color representation of the plots. The owner’s manual for your color monitor tells you how to connect the terminal.
Invoke Datatrieve and enter the following Datatrieve command:
DTR> SET PLOTS CDD$TOP.DTR$LIB.PLOTS
The SET PLOTS command points to the CDD/Repository dictionary
directory that contains the plot definitions. Datatrieve uses these plot definitions
to produce plots, graphs, and charts from your data. You must issue the SET
PLOTS command before using any Datatrieve plot statements.
Next, enter the PLOT MONITOR statement:
DTR> PLOT MONITOR
The PLOT MONITOR statement displays the word GREEN in green,
RED in red, and BLUE in blue. The word SYNC appears on the screen to indicate that
Datatrieve has reset the terminal to its default color settings after the red,
green, and blue have been displayed.
If the names of the colors do not correspond to the color in which they are displayed (for example, if the word RED is displayed in the color green), you have incorrectly attached the cables. Refer to the owner’s manual for your monitor to make sure the cables from the video terminal match the proper connectors on the monitor.
To change the colors of plots on a color monitor, invoke the procedure, PALETTE, from the dictionary directory CDD$TOP.DTR$LIB.PLOTS.
17.1. Hardcopy Output Devices
To produce hardcopy output of Datatrieve plots, use a Digital hardcopy device that supports ReGIS graphics.
See the owner’s manual for information on ReGIS printers and how to attach the printer to your terminal. The owner’s manual documents typical operations, such as connecting cables and checking the status of communication switches, baud rate (speed), and parity value for the printer.
17.2. Steps to Take Before Using Datatrieve Plots
To use Datatrieve plots, invoke Datatrieve and specify the dictionary directories that contain the domains and record definitions you want to use and the Datatrieve plots:
DTR> SET DICTIONARY CDD$TOP.DTR$LIB.DEMO DTR> SET PLOTS CDD$TOP.DTR$LIB.PLOTS
The Datatrieve installation procedure contains questions about storing the necessary information to produce plots. If your site uses Datatrieve plots, your installer responded to these questions to store the information in the dictionary directory CDD$TOP.DTR$LIB.PLOTS. See your system manager if you cannot access the plot information in CDD$TOP.DTR$LIB.PLOTS.
If you use the same dictionary directory for plots each time you enter
Datatrieve, you can include a SET PLOTS command in your
Datatrieve startup command file (see Chapter 4, "Defining Data Files" for more
information on startup command files). After you have issued the SET
PLOTS command, you can access any of the plots, regardless of the
dictionary directory you specify in the SET DICTIONARY
command.
Note
Do not delete any of the plots in CDD$TOP.DTR$LIB.PLOTS.
All of the plots described in this manual call one or more plots to perform functions such as clearing the screen and labeling axes. If you delete any of the plots from the PLOTS dictionary directory, plots calling the deleted plots will not work.
17.3. Changing From a PRINT Statement to a Plot Statement
The Datatrieve PRINT statement allows you to display data
in a tabular format. Plots produced with the Datatrieve plot statements help you
present the same data in a more manageable and accessible format. This format
can clarify the relationship among data, enhancing your reports and
presentations.
Thus, with the PRINT statement you must first decide how
you will specify the data that the plot statement will use. You have two
options:
Form a collection using the
FINDstatement.Specify the record stream using a record selection expression (RSE) in the plot statement.
This section uses ANNUAL_REPORT (a sample domain
installed during the Datatrieve installation procedure). Set your dictionary
default to the DEMO directory in the dictionary and ready the
ANNUAL_REPORT domain as follows:
DTR> SET DICTIONARY CDD$TOP.DTR$LIB.DEMO DTR> READY ANNUAL_REPORT
17.3.1. Plot Statement Using Data From a Collection
The plot statement consists of the keyword PLOT, the
name of a plot, and the optional word USING. The word ALL is required when
you plot data contained in the current collection.
The following example shows a finished plot statement for a shaded line
graph. The statement works on the data in the current collection formed by
the FIND statement:
DTR> FIND ANNUAL_REPORT SORTED BY DATE
DTR> PLOT MULTI_SHADE USING ALL FORMAT
CON> DATE USING Y(4),
CON> REVENUE ("Gross Revenue"),
CON> EQUIPMENT_SALES ("Equipment Sales"),
CON> SERVICES ("Software and Support") THEN
CON> PLOT CROSS_HATCH17.3.2. Plot Statement Using Data From RSE
The following plot statement consists of the keyword
PLOT, the name of a plot, and the optional word
USING. The word ALL is optional because you are using the RSE, not data from
the current collection.
This plot statement uses the identical data used in the previous plot statement. Instead of using the data from the current collection, however, this statement uses the data formed by the RSE:
DTR> PLOT MULTI_SHADE USING ALL FORMAT
CON> DATE USING Y(4),
CON> REVENUE ("Gross Revenue"),
CON> EQUIPMENT_SALES ("Equipment Sales"),
CON> SERVICES ("Software and Support") OF
CON> ANNUAL_REPORT SORTED BY DATE THEN
CON> PLOT CROSS_HATCH17.3.3. Same Plot Produced by FIND Statement and RSE
The Section 17.3.1, ''Plot Statement Using Data From a Collection'' and Section 17.3.2, ''Plot Statement Using Data From RSE''
sections showed plot statements that used the same data; one formed the data
using the FIND statement to form a current collection,
the other used an RSE. Both plot statements produce the plot shown in the
figure below:
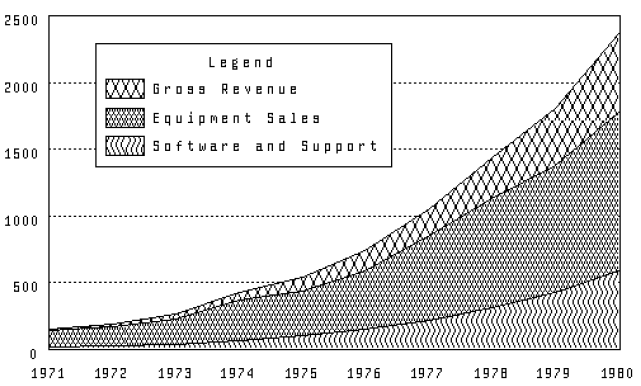
Note
Some plot statements, such as PLOT STACKED_BAR and
PLOT MULTI_SHADE, require relative shading of
various fields. Printers cannot reproduce all the different shades
produced by your terminal. The PLOT CROSS_HATCH
statement converts the different gray levels into crosshatched
shadings.
17.4. Five Types of Relationship
There are five basic types of plot relationships. In the following table, the recommended type of plot for each relationship is listed first:
| Type of Relationship | Suggested Plots |
|---|---|
| Time comparisons | Line, Scatter, Bar, Histogram |
| Parts of the whole | Pie, Bar |
| Comparison of several items | Bar, Pie |
| Comparison of two sets of values | Line, Scatter, Bar, Log Scale |
| Number of times a value occurs across a range of possibilities | Histogram |
The following sections discuss each of these relationships and the recommended plots to use.
17.4.1. Time Comparisons (Line, Scatter, Bar Charts)
Time comparisons illustrate the relationship between a period of time and changes in your data. These changes include:
Increases/Decreases
Trends
Use a line graph or bar chart to illustrate time comparisons. For example, these sentences illustrate relationships best plotted in time comparison plots:
Annual figures for revenue and inventory have increased for the past ten years.
The number of employees in our company has decreased during the past six months.
Use PLOT MULTI_LINE to portray trends of up to three
sets of values over time.
If you want to emphasize trends, use PLOT MULTI_SHADE,
which shades the areas beneath the lines with different shades or
patterns.
The PLOT DATE_Y statement creates a scattergraph that
shows a chronological trend. The PLOT DATE_LOGY statement
also creates a time-related scattergraph, but uses a logarithmic scale for
the vertical (Y) axis.
Bar charts are also useful to illustrate time comparisons. The following table shows the types of charts you can use for various applications:
| Type of Chart | Application |
|---|---|
| Simple Bar | Trend of one factor over time |
| Clustered Bars | Trends of two factors over time |
| Stacked Bar | Totals or sums of totals (not percentages) |
| Histogram | Changes over time |
17.4.2. Parts of the Whole (Pie, Bar Chart)
A plot showing parts of a whole may indicate:
Percentages
Portions
Market shares
Use a pie or bar chart to illustrate the relationship of parts to a whole. For example, these sentences describe relationships illustrating parts of the whole:
What percentage do trainees and experienced employees represent in department C82?
What percentage of total employees earn less than $30,000 annually? Between $30,000 and $45,000? Greater than $45,000?
17.4.3. Comparing Several Items (Bar, Pie Chart)
You can compare several items to illustrate differences within a particular group. For example, you might want to compare differences within each of the following topics:
Corporations
People
Projections
This type of comparative relationship does not include the element of time.
Use a bar chart or pie chart to illustrate the comparison of several items. For example, these sentences describe the comparison of several items:
What is the salary of each employee, by employee name, in department T32?
What are the average prices of the yachts that each manufacturer builds?
What are the total salaries of all employees in each department, by department name?
17.4.4. Comparing Multiple Values (Line, Scatter, Bar Chart)
A comparison of two or more sets of values illustrates how the changes in one set are related to the changes in the other set.
Use the line graph, scattergraph, or bar chart to portray the relationship between values. For example, these sentences illustrate the relationship between two sets of values:
What is the displacement of each yacht relative to its price?
What is the overall length of each yacht relative to its beam?
What are the annual report figures for research relative to those for revenue?
If the relationship shows relative changes that are drastically different, use the logarithmically scaled scattergraphs.
17.4.5. Frequency Distribution (Histogram)
Frequency distribution shows the number of times a value occurs across a range of possibilities. The Y axis totals the number of times a value occurs (the frequency). The X axis lists the range of possibilities.
Frequency represents the number of occurrences of related values within a specified range. Distribution is a range of continuous variables, such as salaries, ages, or types of yachts.
Use the PLOT HISTO statement to plot frequency
distribution. For example, these sentences illustrate frequency
distribution:
What is the distribution of annual salaries among the number of employees working in department T32?
What is the distribution of yachts in each length-over-all category?
17.5. Designing and Improving Plots
Once you choose which type of plot is appropriate for your purpose, you can improve your plots by correctly designing and controlling the appearance of the final display.
17.5.1. Guidelines for Designing Plots
The following guidelines provide the basic framework for a successful design and presentation. These guidelines apply to both oral and written presentations:
Define your audience.
The purpose of any presentation, including one using plots, is to convey information clearly and accurately to a specific audience. You should first define the audience who will be using your plot. Consider the following questions:
What is the technical level of the people reading the plots? Does your audience understand the terminology of the subject matter? Should you use more common synonyms?
Does your audience understand logarithms in plot scales? Avoid logarithmic scales if you are not sure of your audience. If you feel you must use logarithmic scales, plan to explain how they function.
Be explicit.
Each plot should be self-explanatory. Provide explicit labels and titles to describe the information displayed in the plot.
Keep the format simple.
Convey your graphic message simply and clearly. Choose the important points you want to make and emphasize only those key points in your plots.
Follow the standards of your business or audience.
Be aware of the standards used by your profession or audience and follow them.
In general, the sequence of the fields that you plot is important, especially with line graphs and bar charts:
Line graphs
Because of the way Datatrieve "paints" the screen with
PLOT MULTI_SHADE, you should place the field with the highest values first, the field with the second highest values next, and the field with the lowest values last. Such sequencing allows Datatrieve to paint the screen without overwriting any values.See Section 18.2.3, ''PLOT MULTI_SHADE'' for more information.
Bar charts
Unlike line graph values, the values in bar charts are not overwritten. You may, however, want to sort the bars of the chart.
If your bar chart was produced by the
PLOT BAR,PLOT BAR_AVERAGE,PLOT RAW_BAR, orPLOT HISTOstatement, take one of the following actions:Use the
PLOT BAR_ASCENDINGstatement to sort and replot the bars in ascending order.Use the
PLOT SORT_BARstatement to sort and replot the bars in descending order.
If your bar chart was produced using the
PLOT MULTI_BARstatement, you may want to place the field with the lowest value first. Edit the statement in the former example to reorder the fields and to insert aPLOT CROSS_HATCHstatement.
17.6. Labels With Datatrieve Plots
There are several different types of labels used with Datatrieve plots. Datatrieve produces default labels for plots; in addition, you can specify and alter particular labels. The following sections discuss default, specified, and altered labels.
17.6.1. Default Labels
Datatrieve produces two different types of default labels: those for plots with X and Y axes, and those for pie charts.
For plots with X and Y axes, Datatrieve labels the axes using the field name or other value expression from the arguments. For example, the following
PLOT BARstatement uses the argumentsBEAMandPRICE. The resulting plot has the labelBEAMon the X axis and the labelPRICEon the Y axis.DTR> PLOT BAR ALL BEAM, PRICE OF CON> YACHTS WITH PRICE NE 0
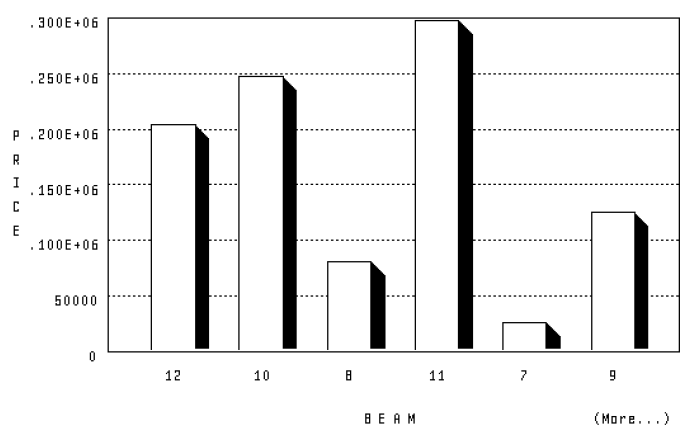
In addition to the labels that summarize the X and Y axes, Datatrieve supplies reference points in the plot:
In the preceding plot, Datatrieve supplies reference points for the bars on the X axis. The reference points show each bar’s width in feet: 12, 10, 8, 11, 7, and 9.
Datatrieve also supplies the reference points on the Y axis showing the increasing price: 50000, .100E+06, .150E+06, .200E+06, .250E+06, .300E+06.
Notice that these prices use scientific notation. Datatrieve uses scientific notation to display reference points greater than 100,000. See Section 17.6.3, ''Eliminating Scientific Notation'' for information on customizing these labels.
Datatrieve produces various labels for pie charts:
For a
PLOT PIEorPLOT VALUE_PIEstatement, Datatrieve prints the percentage and a label for groups with a large enough slice to accommodate these labels. Groups with a small percentage (and thus a small slice) might not have a label or percentage displayed.For the
PLOT RAW_PIEstatement, the field name or other value expressions you specified as arguments are used in the labels:If you use value expressions for arguments, you specify the label by including a label string with the argument (see Section 17.6.2, ''Specifying Label Strings'' for more information on specifying label strings).
If you use field names for the arguments, Datatrieve uses the field name for the label.
In both of the preceding cases, Datatrieve then prints the percentage and a label for arguments with a large enough slice to accommodate these labels. Arguments with a small percentage (and thus a small slice) might not have a label or percentage displayed.
17.6.2. Specifying Label Strings
Instead of using the default labels for plots with an X and Y axis, you
can specify a label string with the argument of the plot statement. To
specify a label string, put a quoted string inside parentheses after the
field name or other value expression. For example, you can specify the label
Width instead of BEAM:
DTR> PLOT BAR ALL BEAM ("Width"), PRICE OF
CON> YACHTS WITH PRICE NE 0The result is displayed in the example plot in Section 17.6.3, ''Eliminating Scientific Notation''.
17.6.3. Eliminating Scientific Notation
By default, Datatrieve uses scientific notation when labeling reference points greater than 100,000. To eliminate this scientific notation, divide the argument by either 100 or 1000. Which number you divide by is your choice and depends on the situation. For example, prices are generally shown in thousands instead of hundreds. Follow the standards of your profession or business.
Be sure to supply a label string showing what the new gradations represent:
DTR> PLOT BAR ALL BEAM ("Width"),
CON> PRICE/1000 ("Price in 1000s") OF
CON> YACHTS WITH PRICE NE 0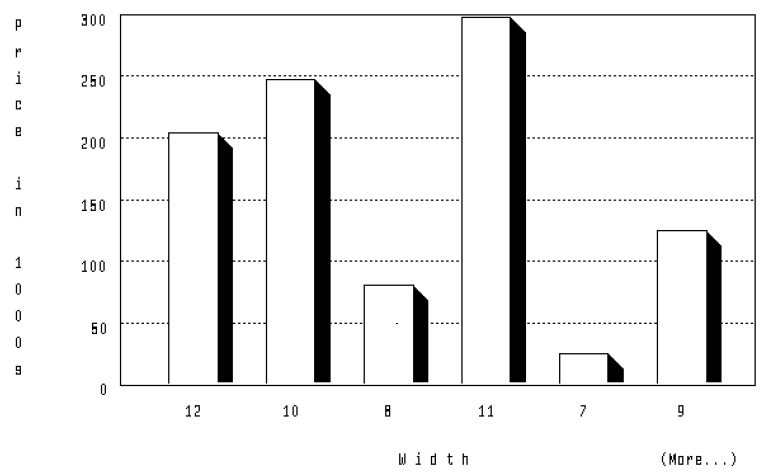
17.7. Using Datatrieve Plots With Other Database Products
This section demonstrates the use of Datatrieve plots with the following Digital database products:
Oracle DBMS
Oracle Rdb/VMS
17.7.1. Using Datatrieve Plots With Oracle DBMS
You can use Datatrieve graphics with any Oracle DBMS database.
Section 17.7.2, ''Using Datatrieve Plots With Oracle Rdb/VMS'' uses the sample Oracle DBMS PARTS database and the associated Oracle DBMS domains that are located in the dictionary directory CDD$TOP.DTR$LIB.DEMO.DBMS.
With Datatrieve graphics, you can plot data from the Oracle DBMS PARTS database to display graphic representations of information pertaining to the usage, ordering, and cost of various parts and supplies.
Set the dictionary default to the directory that contains the database definitions used in this section:
DTR> SET DICTIONARY CDD$TOP.DTR$LIB.DEMO.DBMS
Once your database or any of its records have been properly defined, you have the option of readying the database directly or of readying any of the domains created from its records.
The following commands establish a collection of all departments involved in product development:
DTR> READY EMPLOYEES, DIVISIONS DTR> FIND DIVISIONS WITH DIV_NAME CONT "DEVELOPMENT" [7 records found] DTR>
Next, entering the PLOT VALUE_PIE statement gives you a
pie chart. Each section of the chart represents the percentage of employees
associated with each product:
DTR> PLOT VALUE_PIE ALL DIV_NAME ("Department"),
CON> COUNT OF EMPLOYEES MEMBER CONSISTS_OF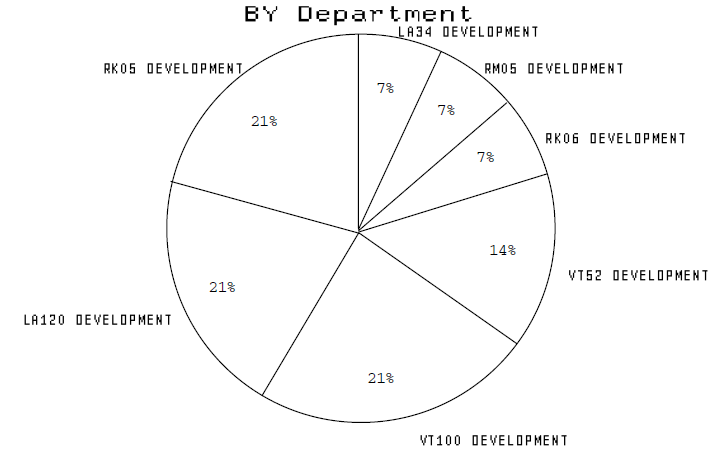
In addition to common hierarchies such as EMPLOYEES and DIVISIONS, Oracle
DBMS also lets you model more complex relationships. For example the records
SUPPLIES, VENDORS, and PART_S might contain a large
amount of data about the parts and the vendors who supply the parts. The
PART_S record contains a field that specifies
the price for each part. A PRINT statement can tell you
what the price is for each part, but a plot statement allows you to compare
at a glance the relative price of each supplier. To plot the relative price
of each supplier, perform the following tasks:
Ready all three Oracle DBMS domains. These
READYstatements also ready the set relationships between the records:DTR> READY SUPPLIES, VENDORS, PART_S DTR>
Flatten the Oracle DBMS hierarchy using the CROSS clause. As the record
PART_Slinks theSUPPLIESandVENDORSrecords, you must flatten two different hierarchies. You can use aFINDstatement with two CROSS clauses, as follows:DTR> FIND SUPPLIES CROSS VENDORS OWNER CON> VENDOR_SUPPLY CROSS PART_S OWNER PART_INFO [65 records found] DTR>
Plot the average part price by supplier as follows:
DTR> PLOT BAR_AVERAGE ALL VEND_NAME, PART_PRICE THEN CON> PLOT SORT_BAR

The previous plot statements produce two successive displays because of
the THEN clause. The second of these displays, the PLOT
SORT_BAR, shows the average price of parts for each supplier
sorted in descending order by price.
17.7.2. Using Datatrieve Plots With Oracle Rdb/VMS
You can use Datatrieve graphics with Oracle Rdb/VMS.
The examples and references in this section refer to the sample Rdb/VMS PERSONNEL database installed with Datatrieve. You can use the Rdb/VMS PERSONNEL sample database to plot data from personnel records to display graphic representations of a corporate personnel structure.
Set the dictionary default to the directory that contains the database definitions used in this section:
DTR> SET DICTIONARY CDD$TOP.DTR$LIB.DEMO.RDB
Once you have set the dictionary default to the appropriate directory, you can begin using the Rdb/VMS PERSONNEL database and the various domains that have been created from the relations of the database.
To begin, you must ready the database, either directly or, if the database or any of its relations have been defined as Datatrieve domains, you can ready the relevant domains.
In the following example, the information being plotted is contained in a
single relation, JOBS, which has been defined as a Datatrieve
domain. The example uses PLOT MULTI_BAR to create a chart
showing the minimum and maximum salaries for each job code. Note that
dividing by 1000 eliminates the default scientific notation
labeling on the vertical (Y) axis:
DTR> READY JOBS
DTR> PLOT MULTI_BAR ALL JOB_CODE ("Job Code"),
DTR> MINIMUM_SALARY/1000 ("Minimum in 1000’s"),
DTR> MAXIMUM_SALARY/1000 ("Maximum in 1000’s") OF
DTR> JOBS SORTED BY JOB_CODE THEN
DTR> PLOT CROSS_HATCH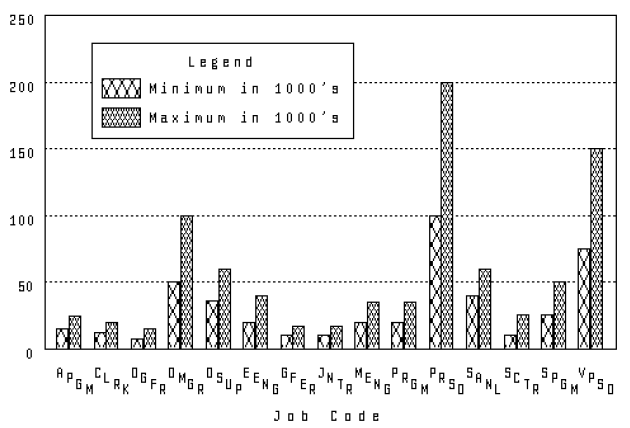
You can also use Datatrieve plot statements to plot data from more than one relation or domain by using the Datatrieve CROSS clause. The CROSS clause of the record selection expression joins the relations or domains that share a common field name. You could also create a view domain of fields from two or more frequently used relations or domains.
The relations used in the following example are JOB_HISTORY
and JOBS; both are defined as domains. They share a common
field name, JOB_CODE, through which you can link the two
domains using the CROSS clause. Using the PLOT VALUE_PIE
statement, you can create a pie chart showing the percentage of employees
that work at a given type of job:
DTR> READY JOB_HISTORY, JOBS DTR> FIND JOB_HISTORY CROSS JOBS OVER JOB_CODE DTR> PLOT VALUE_PIE ALL JOB_TITLE, EMPLOYEE_ID
Note that when a percentage is below a certain minimum, Datatrieve does not display a label. This avoids overwriting when pie wedges are small.
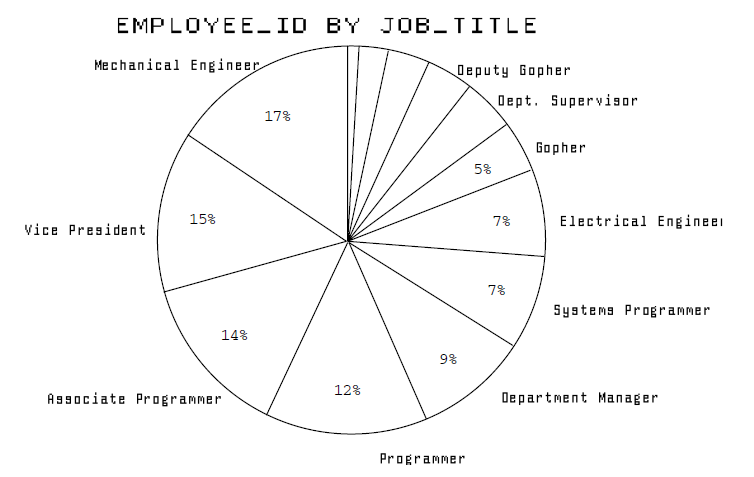
Chapter 18. Datatrieve Plot Types
Datatrieve provides five basic types of plots. You should be familiar with these types and your options before choosing a plot to present your data.
The five basic types of plots are:
Bar charts
Scatter graphs
Line graphs
Pie charts
Utility plots
18.1. Bar Charts
Datatrieve bar charts represent quantities as rectangular bars with heights proportional to the values of the fields or expressions represented. You can use a bar chart to compare values of fields or expressions.
The PLOT BAR statements generally require two arguments.
The arguments can be either field names or other value expressions:
The first argument provides the values for the horizontal (X) axis and groups all records that share the same value for the argument.
The second argument provides the values for the vertical (Y) axis. Values are totaled for each group of records specified by the first argument.
Datatrieve produces bar charts of up to six bars. If there are more than six
bars, Datatrieve breaks the data into separate charts containing a maximum of
six bars. The notice (More...) appears at the bottom right of the screen if
additional bars remain to be plotted. To display the additional charts, type
PLOT NEXT_BAR.
Use the PLOT SORT_BAR statement to sort and replot bars in
descending order. Use the PLOT BAR_ASCENDING statement to
sort and replot bars in ascending order.
18.1.1. PLOT BAR
The PLOT BAR statement produces a simple bar
chart.
Example:
Create a collection from the PERSONNEL domain. Then create a
bar chart showing the salary of each employee. Note that the keyword
ALL is required because the plot statement refers to the
collection created by the first statement:
DTR> FIND PERSONNEL SORTED BY DEPT, LAST_NAME DTR> PLOT BAR ALL LAST_NAME, SALARY
18.1.2. PLOT BAR_AVERAGE
The PLOT_BAR_AVERAGE statement creates a simple bar
chart showing the average value of a particular field or value expression.
The resulting chart shows the average value of each group identified on the
horizontal (X) axis.
Example:
Using the PERSONNEL domain, create a bar chart showing the
average salary of each department:
DTR> PLOT BAR_AVERAGE ALL DEPT, SALARY OF PERSONNEL
18.1.3. PLOT HISTO
The PLOT HISTO statement produces a histogram showing
the frequency distribution of values in a given field or value expression.
The horizontal (X) axis identifies the different values found in the field
or value expression for a group of records. The vertical (Y) axis shows the
number of records that contain the value.
Arguments and Notes:
The PLOT HISTO statement takes one argument. That
argument can be a field name or other value expression. The argument
provides the values for the horizontal (X) axis and groups the records
according to the value or field specified by the argument.
Example:
Use data from the YACHTS domain to plot a histogram showing
the total number of yachts for each beam size:
DTR> PLOT HISTO BEAM OF YACHTS SORTED BY BEAM
18.1.4. PLOT MULTI_BAR
Creates a chart with bars grouped in clusters. Each bar in the cluster
represents a field name or other value expression. Each cluster can contain
as many as three bars. Unlike most bar charts, the PLOT
MULTI_BAR statement does not specify a limit on the number of
records or clusters it will group on a single chart. It tries to plot all of
the records or clusters onto a single graph. If there is room, the
PLOT MULTI_BAR statement prints a legend identifying
what values each bar in the cluster represents. If there is not enough
space, you must use the PLOT LEGEND statement to display
the legend separately.
Arguments and Notes:
The PLOT MULTI_BAR statement takes from two to four
arguments. Arguments can be field names or other value expressions:
The first argument provides the common value that groups the clustered bars. It also labels the bars along the horizontal (X) axis.
The remaining arguments provide the values for the vertical (Y) axis. These values determine the height of each bar. These arguments must evaluate to numbers.
The difference between the PLOT MULTI_BAR and
PLOT MULTI_BAR_GROUP statements is the first
argument, which also labels the horizontal (X) axis:
With the
PLOT MULTI_BAR_GROUPgroup, each bar or cluster of bars represents the totals from a number of records. ThePLOT MULTI_BAR_GROUPstatement groups the values of the subsequent arguments based on the first argument.Unlike the
PLOT MULTI_BAR_GROUPstatement, thePLOT MULTI_BARstatement uses the first argument to produce a bar or cluster of bars for each unique record. In Example 1, each year corresponds to only one value for SERVICES, one value for EQUIPMENT_SALES, and one value for REVENUE.
The PLOT MULTI_BAR statement does not group the records
or sort the bars. If you want a specific order, sort the record stream (for
example, FIND domain-name SORTED BY
field-name).
The PLOT STACKED_BAR statement is a related plot that
plots data similar to that used with the PLOT MULTI_BAR
statement in a stacked bar format.
PLOT MULTI_BAR is restricted in the number of records
it can plot. If the statement contains two arguments, Datatrieve can plot
approximately 450 records; for three arguments, it can plot approximately
250 records; and for four arguments, it can plot approximately 175 records.
Before using the PLOT MULTI_BAR statement with a large
number of records or clusters, consider the effect this will have on the
chart readability.
Example 1:
Create a collection from the ANNUAL_REPORT domain. Then use
the PLOT MULTI_BAR statement to display a plot that shows
the revenue from equipment sales and services and the total revenue for each
year. Then use the PLOT CROSS_HATCH statement to clearly
differentiate bars in each cluster:
DTR> FIND ANNUAL_REPORT SORTED BY DATE DTR> PLOT MULTI_BAR ALL FORMAT CON> DATE USING Y(4), CON> SERVICES, EQUIPMENT_SALES, REVENUE THEN CON> PLOT CROSS_HATCH
Example 2:
Using the PERSONNEL domain, plot a multibar chart showing the
value of each salary record and its corresponding department. The resulting
bar chart shows the salary for each employee without using the employee’s
name. It allows you to see the ranges of employees’ salaries:
DTR> PLOT MULTI_BAR ALL DEPT ("Department"),
CON> SALARY/1000 ("Salary in 1000s") OF
CON> PERSONNEL WITH DEPT = "C82", "F11", "T32"Compare this example to the similar example in Section 18.1.5, ''PLOT MULTI_BAR_GROUP''. The PLOT MULTI_BAR_GROUP
statement plots the same data but groups and totals the salaries for each
department.
18.1.5. PLOT MULTI_BAR_GROUP
Creates a chart with bars grouped in clusters. Each cluster can contain up
to three bars. The PLOT MULTI_BAR_GROUP statement groups
the records according to the argument you specify for the horizontal (X)
axis. It plots the sum of each of the subsequent arguments along the
vertical (Y) axis.) The PLOT MULTI_BAR_GROUP statement
does not sort the bars. If you want a specific order, sort the record stream
(for example, FIND domain-name SORTED BY
field-name). If there is room, the
PLOT MULTI_BAR_GROUP statement prints a legend
identifying what values each bar in the cluster represents. If there is not
enough space, you must use the PLOT LEGEND statement to
display the legend separately.
Arguments and Notes:
The PLOT MULTI_BAR_GROUP statement takes up to four
arguments. These arguments can be field names or other value
expressions:
The first argument labels the horizontal (X) axis. This argument is used to group records that share the same value for this argument.
Each of the next three arguments is totaled and plotted as a bar. The total values are represented along the vertical (Y) axis.
These arguments must evaluate to numbers.
See Section 18.1.4, ''PLOT MULTI_BAR'' for an explanation of the differences
between PLOT MULTI_BAR and PLOT
MULTI_BAR_GROUP.
Most bar charts plot a maximum of six bars per chart. The PLOT
MULTI_BAR_GROUP statement, however, plots all the bars in one
chart. Before using the PLOT MULTI_BAR_GROUP statement
with a large number of records, consider the effect this will have on the
readability of the chart.
The PLOT MULTI_BAR_GROUP statement is restricted in the
number of records it can plot. If the statement contains two arguments,
Datatrieve can plot approximately 450 records; for three arguments, it can
plot approximately 250 records; and for four arguments, it can plot
approximately 175 records. Again, plots generated with the PLOT
MULTI_BAR_GROUP statement with a large number of records would
be very difficult to read.
Example 1:
Use the PERSONNEL domain and the PLOT
MULTI_BAR_GROUP statement to plot the total salaries of
employees who report to the departments F11, C82,
and T32:
DTR> FIND PERSONNEL WITH DEPT = "F11", "C82", "T32"
DTR> PLOT MULTI_BAR_GROUP ALL DEPT ("Department"),
CON> SALARY / 1000 ("Salaries / 1000") THEN
CON> PLOT CROSS_HATCHCompare this example to the similar example in the PLOT
MULTI_BAR section:
The
PLOT MULTI_BAR_GROUPstatement plots the same data but groups and totals the salaries for each department.The
PLOT MULTI_BARstatement produces a bar showing the value of each salary record and its corresponding department. The bars show each employee’s salary without using the employee’s name.
Example 2:
Use the YACHTS domain and establish a collection of the first
20 yachts. Then use the PLOT MULTI_BAR_GROUP statement to
plot the total prices of those yachts according to their builder. Divide the
total prices by 1000 to avoid scientific notation. The keyword
ALL is required because the plot statement refers to the
collection created by the first statement:
DTR> FIND FIRST 20 YACHTS WITH PRICE NE 0
DTR> PLOT MULTI_BAR_GROUP ALL BUILDER,
CON> PRICE/1000 ("Price in 1000s") THEN
CON> PLOT CROSS_HATCH
18.1.6. PLOT NEXT_BAR
A bar chart can contain up to six bars. The PLOT
NEXT_BAR statement plots the next six bars. The notice
(More...) appears in the lower right corner of a chart if additional bars
remain to be plotted.
Arguments and Notes:
The PLOT NEXT_BAR statement takes no argument.
To see all the remaining bars, continue entering the PLOT NEXT_
BAR statement after each chart is plotted. The bars have all
been charted when the notice (More...) no longer appears.
If you use the PLOT NEXT_BAR statement with the
PLOT TITLE statement and either the PLOT
SORT_BAR or PLOT BAR_ASCENDING statements,
enter the statements in this sequence:
PLOT BARPLOT TITLEPLOT SORT_BAR(orPLOT BAR_ASCENDING)PLOT NEXT_BAR
If you enter the PLOT TITLE statement after the
PLOT SORT_ BAR statement (or the PLOT
BAR_ASCENDING statement), the sorting will not appear in the
subsequent plots produced by the PLOT NEXT_BAR
statement.
18.1.7. PLOT RAW_BAR
Creates a simple bar chart from value expressions you supply. The
PLOT RAW_BAR statement evaluates each argument and
plots its value as the height of a bar.
Arguments and Notes:
The PLOT RAW_BAR statement takes from 1 to 24
arguments:
You can provide data values for arguments, as shown in the examples below.
The
PLOT RAW_BARstatement does not use field values from a stream of records. You can select a record and use field names as value expressions, or you can use variables, numbers, and arithmetic expressions. If you include value expressions that are not field names, you should provide a label string with each one.
Example 1:
Plot a bar chart by supplying specific data values for arguments. The resulting bar chart plots the values you supplied:
DTR> PLOT RAW_BAR 200 ("Food"), 80 ("Utilities"),
CON> 450 ("Rent"), 175 ("Car Loan")Example 2:
Using the YACHTS domain and the PLOT
RAW_BAR statement, count and plot the number of yachts
according to their length (LOA). The resulting bar chart shows
the count of yachts according to length. It labels each bar with the labels
you supplied:
DTR> PLOT RAW_BAR COUNT OF YACHTS -
CON> WITH LOA LT 25 ("Basic Yachts"),
CON> COUNT OF YACHTS WITH -
CON> LOA BT 25 AND 35 ("Midsize Yachts"),
CON> COUNT OF YACHTS WITH LOA GT 35 ("Luxury Liners")
Example 3:
The following example shows how you can select a record with the
PLOT RAW_BAR statement. Using
ANNUAL_REPORT, select the first record in the collection
and plot the services, equipment sales, and revenue for that record. The
resulting bar chart shows the values for each of those arguments:
DTR> FIND ANNUAL_REPORT DTR> SELECT 1 DTR> PLOT RAW_BAR ALL SERVICES, CON> EQUIPMENT_SALES, REVENUE
18.1.8. PLOT STACKED_BAR
The PLOT STACKED_BAR statement creates a bar chart with
one to three shaded values stacked on top of each other.
If there is room, Datatrieve prints a legend explaining which bars
represent which values. If Datatrieve does not print the legend, you can
produce it by subsequently typing PLOT LEGEND.
Arguments and Notes:
The PLOT STACKED_BAR statement takes two to four
arguments, which can be field names or other value expressions:
The first argument labels the bars on the horizontal (X) axis.
Each of the next three arguments must evaluate to numbers. The values of each argument are plotted in a unique shade in the stacked bars and determine the height on the vertical (Y) axis.
Most bar charts plot a maximum of six bars per chart. However, the
PLOT STACKED_BAR statement plots all the bars in one
chart. Before using the PLOT STACKED_BAR statement with a
large number of records, consider the effect this will have on the chart’s
readability.
The PLOT STACKED_BAR statement is restricted in the
number of records it can plot. If the statement contains two arguments,
Datatrieve can plot up to approximately 480 records; for three arguments, it
can plot approximately 260 records; and for four arguments, it can plot
approximately 180 records. Again, plots generated with the PLOT
STACKED_BAR statement with a large number of records would be
very difficult to read.
The PLOT STACKED_BAR statement is similar to the
PLOT MULTI_BAR statement. Both statements plot three
values. The PLOT MULTI_BAR statement plots the values in
clusters, side-by-side, while the PLOT STACKED_BAR
statement plots the values on top of each other.
The PLOT STACKED_BAR statement does not group the
records or sort the bars. You can specify a particular order by sorting the
record stream (for example, FIND domain-name
SORTED BY field-name).
The PLOT STACKED_BAR statement only accepts positive or
zero numeric numbers. If you enter negative numbers, Datatrieve returns
incorrect results or error messages.
Example 1:
Establish a collection from the domain YACHTS. Enter
LOA as the first argument to label the horizontal (X) axis.
Enter the arguments BEAM and DISP to be plotted as
stacked bars. The values of these last two arguments determine the height of
the bars on the vertical (Y) axis. The keyword ALL is required
because the plot statement refers to the collection created by the first
statement.
In the resulting plot, the scale on the vertical (X) axis applies to both arguments you supplied. For example, the first bar shows the figures for a 34-foot long Grampian. The lower crosshatch pattern for the bar indicates the yacht is 10 feet wide. The upper crosshatch pattern indicates the yacht weighs 6 tons:
DTR> FIND YACHTS WITH BUILDER EQ "GRAMPIAN"
DTR> PLOT STACKED_BAR ALL LOA ("Length in Feet"),
CON> BEAM ("Width in Feet"),
CON> DISP / 2000 ("Weight in Tons") THEN
CON> PLOT CROSS_HATCHExample 2:
Using the domain ANNUAL_REPORT, enter DATE as
the first argument to label the horizontal (X) axis. Enter the arguments
EQUIPMENT_SALES, SERVICE, and
NET_INCOME to be plotted as stacked bars. The last three
arguments determine the height of the bars on the vertical (Y) axis.
The resulting plot shows the annual figures for equipment sales, services, and net income. Each figure is plotted in a unique crosshatched pattern, with the figures for each year stacked on top of each other. The plot includes a legend identifying each crosshatch pattern:
DTR> PLOT STACKED_BAR ALL DATE, CON> EQUIPMENT_SALES, SERVICES, NET_INCOME OF CON> ANNUAL_REPORT SORTED BY DATE THEN CON> PLOT CROSS_HATCH
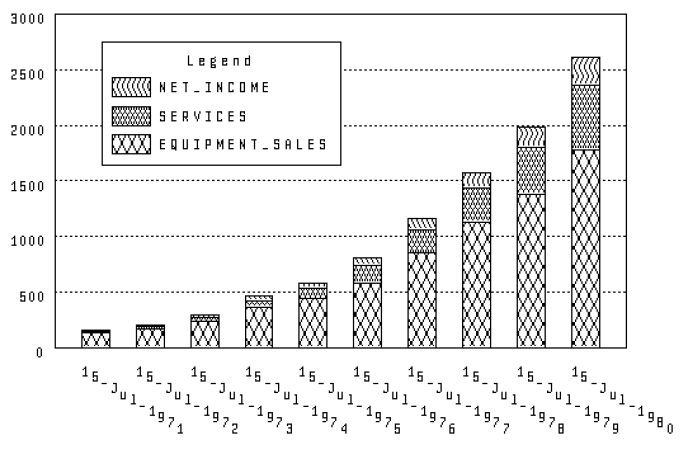
18.2. Line Graphs
Line graphs plot points and also connect the points with lines. You can use a scattergraph or line graph to compare values in fields or expressions.
The LINE statements take two to four arguments. The
arguments can be field names or other value expressions and must be
numeric:
The first argument is used to label the horizontal (X) axis.
The values for each of the next three arguments determine location of the points on the horizontal (X) and vertical (Y) axis. These points are connected, determining the lines of the graph.
The LINE statements do not sort the records. You can
specify a particular order by sorting the record stream (for example,
FIND domain-name SORTED BY
field-name).
If there is room, Datatrieve prints a legend identifying what each line
represents. If Datatrieve does not print the legend, you can produce it by
subsequently typing the PLOT LEGEND statement.
18.2.1. PLOT MULTI_LINE
The PLOT MULTI_LINE statement produces a line graph
that plots up to three uniquely marked lines.
Arguments and Notes:
The PLOT MULTI_SHADE statement produces a shaded
multiline graph.
Example 1:
Use ANNUAL_REPORT to plot a 2-line graph without a legend.
Specify DATE as the first argument to label the horizontal (X)
axis. Specify SERVICES and NET_INCOME as the last
two arguments; they will be plotted as uniquely marked lines. The keyword
ALL is required because the plot statement refers to the
collection created in the first line.
The resulting plot shows how NET_INCOME and
SERVICES increase over time:
DTR> FIND ANNUAL_REPORT SORTED BY DATE DTR> PLOT MULTI_LINE ALL FORMAT CON> DATE USING Y(4), CON> SERVICES, NET_INCOME
Example 2:
Create a collection using the ANNUAL_REPORT domain sorted by
date. Specify DATE as the first argument to label the
horizontal (X) axis. Specify REVENUE, INVENTORIES,
and EQUIPMENT_SALES as the last three arguments. These will
each be plotted as uniquely marked lines. The keyword ALL is required
because the plot statement refers to the collection created by the first
statement.
The resulting graph shows the increases in revenue, inventories, and equipment sales between 1971 and 1980. The lines of the graph emphasize the trends:
DTR> FIND ANNUAL_REPORT SORTED BY DATE DTR> PLOT MULTI_LINE ALL FORMAT CON> DATE USING Y(4), CON> REVENUE, INVENTORIES, EQUIPMENT_SALES
18.2.2. PLOT MULTI_LR
The PLOT MULTI_LR statement plots a line graph with up
to three linear regression lines.
The PLOT MULTI_LR statement plots points based on the
arguments you provided. Those points are uniquely marked. The PLOT
MULTI_LR statement then uses these points and draws linear
regression lines using the least squares method, which determines a straight
line through a set of points so that the sum of the squares of the distances
of the points from the line is a minimum.
Arguments and Notes:
The PLOT MULTI_LR statement takes two to four
arguments. These arguments can be field names or other value expressions and
must be numeric:
The first argument is used to label the horizontal (X) axis.
The values for each of the next three arguments determine location of the points on the horizontal (X) and vertical (Y) axis.
The PLOT MULTI_LR statement does not sort the records.
You can specify a particular order by sorting the record stream (for
example, FIND domain-name SORTED BY
field-name).
Example:
Using the ANNUAL_REPORT domain, plot a 3-line linear
regression graph with a legend.
The resulting plot shows the increase in equipment sales, services, and net income between 1971 and 1980. The linear regression lines help to emphasize trends:
DTR> PLOT MULTI_LR ALL FORMAT DATE USING Y(4), CON> EQUIPMENT_SALES, SERVICES, NET_INCOME OF CON> ANNUAL_REPORT
18.2.3. PLOT MULTI_SHADE
The PLOT MULTI_SHADE statement creates a shaded
multiple line graph with up to three unique shades.
Rather than actually plotting points and lines like the PLOT
MULTI_LINE statement, the PLOT MULTI_SHADE
statement fills in the area below where the line would appear. The
PLOT MULTI_SHADE statement performs the following
sequence:
Produces a unique shaded area below the line of the values for the second argument
Overwrites the first shaded area with a uniquely shaded area for the third argument
Overwrites the first and second shaded areas with a uniquely shaded area for the fourth argument
Arguments and Notes:
Datatrieve plots the shaded area for the last three arguments in the order you enter them.
To avoid completely overwriting the smaller shaded areas, you should first
determine the size of the values in the fields. Use the
PRINT statement to print the fields and look at the
data. You should then enter the arguments in decreasing order of
size.
The PLOT MULTI_SHADE statement then plots the arguments
with the larger values first. It subsequently plots the arguments with
smaller values over the larger values. You can then see all the shaded
areas, not just the largest.
The PLOT MULTI_SHADE statement does not sort the
records. If you want a specific order, sort the record stream (for example,
FIND domain-name SORTED BY
field-name).
Example:
Using the ANNUAL_REPORT domain, specify DATE as
the first argument, labeling the horizontal (X) axis. Enter the remaining
arguments in decreasing order.
The PLOT MULTI_SHADE statement uses the values for the
last three arguments to shade the area below each line. It produces the
shaded areas in the order you entered the arguments. Because you entered the
arguments in decreasing order, all shaded areas appear in the plot:
DTR> PLOT MULTI_SHADE ALL FORMAT DATE USING Y(4), CON> REVENUE, EQUIPMENT_SALES, SERVICES OF CON> ANNUAL_REPORT SORTED BY DATE THEN CON> PLOT CROSS_HATCH
18.3. Scattergraphs
Scattergraphs plot points based on their horizontal and vertical coordinates.
The scattergraphs statements take two arguments. The arguments can be field names or other value expressions:
The first argument is plotted on the horizontal (X) axis. It must contain a date value.
The second argument is plotted on the vertical (Y) axis.
Each pair of value expressions in the scattergraph is represented by a plus sign (+).
With logarithmic scaling, each successive unit of length on the scaled axis covers a wider range of numbers. This helps to make trends more apparent.
18.3.1. PLOT DATE_LOGY
The PLOT DATE_LOGY statement creates a scattergraph
using date values on the horizontal (X) axis and a logarithmic scale on the
vertical (Y) axis.
The PLOT DATE_LOGY statement sorts the records in
ascending order by date before plotting them.
Arguments and Notes:
The Y argument of the PLOT DATE_LOGY statement must
contain a value expression greater than zero for each record in the record
stream. Datatrieve uses a logarithmic scale to plot these values on the
vertical (Y) axis.
Example:
This example uses the DATE and REVENUE fields
from ANNUAL_REPORT to show the trend that total revenue has
increased in the period from 1971 to 1980. In this case the keyword
ALL is optional because the RSE is specified in the
OF clause:
DTR> PLOT DATE_LOGY ALL DATE, REVENUE OF ANNUAL_REPORT
18.3.2. PLOT DATE_Y
The PLOT DATE_Y statement creates a scattergraph that
shows a chronological trend.
The statement sorts the records by date before plotting them.
Arguments and Notes:
The Y argument must contain a value expression greater than zero for each record in the record stream or collection.
Example 1:
Create a scattergraph using the PLOT DATE_Y statement
and the ANNUAL_REPORT domain. The resulting plot emphasizes the
trend that the number of employees has increased over a period of
time:
DTR> PLOT DATE_Y ALL DATE, EMPLOYEES OF CON> ANNUAL_REPORT WITH EMPLOYEES GT 0
Example 2:
Use the PLOT DATE_Y statement with an RSE to create a
scattergraph using the START_DATE and SALARY
fields from PERSONNEL. The resulting plot emphasizes the trend
that employees who have been with the company for a longer period of time
have higher salaries.
In this case the keyword ALL is optional because the RSE is
specified in the OF clause:
DTR> PLOT DATE_Y ALL START_DATE, CON> SALARY OF PERSONNEL WITH SALARY GT 0
18.3.3. PLOT LOGX_LOGY
The PLOT LOGX_LOGY statement produces a scattergraph
that uses logarithmic scaling for both the horizontal (X) and vertical (Y)
axes.
Arguments and Notes:
Both X and Y arguments must contain numeric values greater than zero for each record in the plot.
Example 1:
Using a collection from the YACHTS domain, create a
scatter-graph that shows the relationship between weight and cost for all
yachts. The resulting scattergraph demonstrates the trend that heavy boats
cost more than light ones.
The keyword ALL is required because the plot statement refers
to the collection created by the first statement. Note that you can ensure
that values for the plot arguments are greater than zero by including
appropriate relational operators in the FIND
statement:
DTR> FIND YACHTS WITH PRICE GT 0 AND DISP GT 0
DTR> PLOT LOGX_LOGY ALL DISP -
CON> ("Weight in Pounds"), PRICE ("Price")Example 2:
Using YACHTS, create a scattergraph that shows the
relationship between length and width (beam size) for all yachts in the
collection. The keyword ALL is required because the plot
statement refers to the collection created by the first statement:
DTR> FIND YACHTS WITH PRICE GT 0 AND BEAM GT 0 DTR> PLOT LOGX_LOGY ALL LOA, BEAM
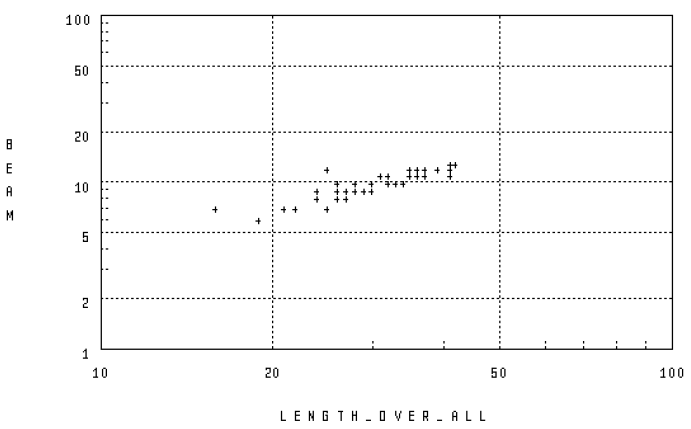
18.3.4. PLOT LOGX_Y
The PLOT LOGX_Y statement produces a scattergraph that
uses logarithmic scaling for the horizontal (X) axis.
Arguments and Notes:
The X argument must contain numeric values greater than zero for all records in the collection or record stream.
Example 1:
Using the YACHTS domain, create a scattergraph using the
PLOT LOGX_Y statement that shows the relationship
between weight and length for all yachts. The resulting scattergraph
demonstrates the trend that as weight increases so does length:
DTR> PLOT LOGX_Y ALL DISP ("Weight"),
CON> LOA ("Length") OF YACHTS WITH DISP GT 0Example 2:
Create a collection from the YACHTS domain. Use the
PLOT LOGX_Y statement to create a scattergraph
showing the relationship between weight and beam. Add a linear regression
line with the PLOT LR statement to emphasize the trend
that heavier yachts have wider beams. Note that you can ensure that values
for the plot arguments are greater than zero by including relational
operators in the RSE:
DTR> FIND YACHTS WITH DISP GT 0 AND BEAM GT 0 DTR> PLOT LOGX_Y ALL DISP, BEAM THEN DTR> PLOT LR
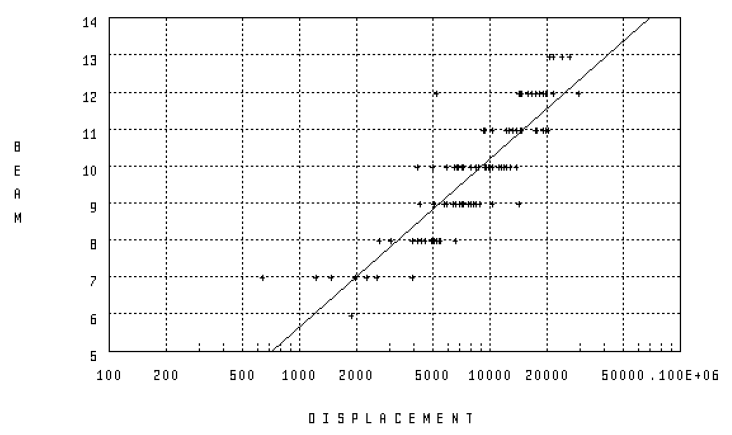
18.3.5. PLOT X_LOGY
The PLOT X_LOGY statement plots points according to
their values on the horizontal (X) and vertical (Y) axes.
Arguments and Notes:
Note the vertical (Y) axis uses a logarithmic scale. The second (Y) argument must be numeric and greater than zero for each record.
Example 1:
Establish a collection using YACHTS. Use the PLOT
X_LOGY statement to plot the beam sizes and prices. The
keyword ALL is required because the plot statement refers to
the collection created by the first statement.
The resulting plot shows how prices increase as beam size increases. It includes a linear regression line to emphasize the trend:
DTR> FIND YACHTS WITH PRICE GT 0 AND BEAM GT 0
DTR> PLOT X_LOGY ALL BEAM,
CON> PRICE/1000 ("Price in 1000s") THEN
CON> PLOT LRExample 2:
Use the PLOT X_LOGY statement to plot research funding
and revenue from the ANNUAL_REPORT domain.
The resulting plot shows how revenue increases as research funding increases. The points are connected to emphasize the trend:
DTR> PLOT X_LOGY ALL RESEARCH, REVENUE OF CON> ANNUAL_REPORT THEN CON> PLOT CONNECT

18.3.6. PLOT X_Y
The PLOT X_Y statement plots points according to their
values on the horizontal (X) and vertical (Y) axis.
Arguments and Notes:
The second argument must be numeric and greater than zero for each record.
Example:
Establish a collection using YACHTS. Use the PLOT
X_Y statement to plot the displacement and prices. The keyword
ALL is required because the plot statement refers to the
collection created by the first statement. Dividing the PRICE
argument by 1000 eliminates the default scientific notation
that Datatrieve uses to display large numbers.
The resulting plot shows how the prices increase as displacement increases. It includes a linear regression line to emphasize the trend:
DTR> FIND YACHTS WITH PRICE GT 0 AND BEAM GT 0
DTR> PLOT X_Y ALL DISP,
CON> PRICE/1000 ("Price in 1000s") THEN
CON> PLOT LR
18.4. Pie Charts
Datatrieve pie charts represent quantities as slices of a pie proportional to the whole pie. You can use a pie chart to compare values of fields or expressions.
The label and percentage represented by the portion is printed for groups where the slice is large enough to accommodate these labels. Groups with a small percentage (and thus a small slice) might not have a label or percentage displayed.
The PLOT PIE statement groups and counts the number of
occurrences for each unique field value or value expression. It then calculates
what percentage of the whole each group represents. It plots these percentages
as slices of a pie chart with each slice proportional to the sum of the
slices.
In contrast, the PLOT VALUE_PIE statement groups records,
calculates the total value of the field name or other value expression (value,
not number or count), and then plots this total value as a percentage of the
whole pie.
18.4.1. PLOT PIE
The PLOT PIE statement groups records according to the
argument you provide. It then calculates what percentage of the whole each
group represents.
Arguments and Notes:
The PLOT PIE statement takes one argument, which can be
a field name or other value expression.
You can specify a title other than the default title by using the
PLOT TITLE statement.
You can also customize the title by including a label string following the field name or other value expression:
DTR> PLOT PIE DEPT ("Department") OF PERSONNELExample 1:
Use the PLOT PIE statement to plot a pie chart using
the PERSONNEL domain.
The total count of records for each department is calculated. These totals are plotted as percentages proportional to the total of all departments:
DTR> PLOT PIE DEPT OF PERSONNEL

Example 2:
Using the PERSONNEL domain, use the PLOT
PIE statement to plot the employees in department
C82 according to status.
Datatrieve calculates the total count of employees for each status
(TRAINEE and EXPERIENCED). These totals are
plotted as percentages relative to the total of all employees in department
C82:
DTR> PLOT PIE ALL STATUS OF CON> PERSONNEL WITH DEPT = C82
18.4.2. PLOT RAW_PIE
The PLOT RAW_PIE statement evaluates each argument,
then calculates what percentage of the whole each argument
represents.
Arguments and Notes:
The PLOT RAW_PIE statement takes from 1 to 24
arguments:
You can provide data values for arguments, as shown in the examples below.
The
PLOT RAW_PIEstatement does not use field names from a stream of records. You can select a record and use field names as value expressions, or you can use variables, numbers, and arithmetic expressions. If you include value expressions that are not field names, you should provide a label string with each one.
Example 1:
Using the PERSONNEL domain and the PLOT
RAW_PIE statement, count and plot the number of employees
according to the salary groupings you specify.
The resulting pie chart shows the count of employees according to the salary groupings you specified. The slices are labeled with the label strings you supplied:
DTR> PLOT RAW_PIE COUNT OF PERSONNEL WITH
CON> SALARY LT 30000("Underpaid"),
CON> COUNT OF PERSONNEL WITH
CON> SALARY BT 30000 45000 ("Not Starving"),
CON> COUNT OF PERSONNEL WITH
CON> SALARY GT 45000 ("Need Tax Shelters")Example 2:
Plot a pie chart by supplying specific data values and labels for arguments. The resulting pie chart plots the values you supplied. Note that the percentages and labels are printed only for the slices large enough to accommodate these labels:
DTR> PLOT RAW_PIE 70 ("Seventy"), 20 ("Twenty"),
CON> 4 ("Four"), 3 ("Three"), 2 ("Two"), 1 ("One")
18.4.3. PLOT VALUE_PIE
After grouping records according to the first argument, the PLOT
VALUE_PIE statement totals the values specified by the second
argument. Each total value is plotted as a percentage (slice) of the pie
proportional to the total of the other slices.
The PLOT VALUE_PIE statement produces a default title
for the entire plot showing "argument-2 by argument-1."
Arguments and Notes:
The PLOT VALUE_PIE statement takes two arguments, which
can be field names or other value expressions:
The first argument groups the records.
The second argument specifies which values will be totaled.
You can specify a title other than the default title by using the
PLOT TITLE statement.
You can also customize the title by including a label string following the field name or other value expression:
DTR> PLOT VALUE_PIE DEPT ("Department"),
CON> SALARY ("Salary Distribution") OF PERSONNELExample:
Using the domain ANNUAL_REPORT, plot what percentage the
total salaries of each department represent proportional to the total
salaries of the whole company. Specify DEPT as the first
argument and SALARY as the second argument.
The PLOT VALUE_PIE statement plots the total salaries
of each department as separate pie slices. Each pie slice represents a
percentage proportional to the total salaries of all departments:
DTR> PLOT VALUE_PIE ALL DEPT, SALARY OF PERSONNEL
18.5. Utilities
Datatrieve utility plot statements let you enhance and manipulate other plots.
For example, the PLOT TITLE statement lets you add a title
for your plot. The PLOT HARDCOPY statement produces hardcopy
output of a plot you have already produced (if your terminal is connected to a
Digital-supported ReGIS hardcopy output device). The PLOT BIG
statement also lets you produce hardcopy output, but the output is four times
larger than PLOT HARDCOPY output.
Unless otherwise stated, Utility statements take no arguments.
18.5.1. PLOT BAR_ASCENDING
The PLOT BAR_ASCENDING statement uses the data from the
bar chart you have just created and sorts bars in ascending order.
Arguments and Notes:
If you use the PLOT BAR_ASCENDING statement with the
PLOT TITLE and PLOT NEXT_BAR
statements, enter the statements in the following sequence:
PLOT BARPLOT TITLEPLOT BAR_ASCENDINGPLOT NEXT_BAR
If you enter the PLOT TITLE statement after the
PLOT BAR_ASCENDING statement, the sorting will not
appear in the subsequent plots produced by PLOT
NEXT_BAR.
18.5.2. PLOT BIG
The PLOT BIG statement prints an enlarged version of
the most recent plot on the graphics printer attached to your terminal. This
plot is four times the size of a plot printed with the PLOT
HARDCOPY statement.
Datatrieve prints a separate legend for each plot created with a
PLOT BIG statement after it prints the plot. This
occurs even if the plot already includes the legend.
Arguments and Notes:
If you plan to use a PLOT MULTI_BAR, PLOT
MULTI_SHADE, or PLOT STACKED_BAR statement,
then use the PLOT CROSS_HATCH statement before using the
PLOT BIG statement. Otherwise, all plotted elements
print out as solid black.
If you are using a printer with fan-fold (continuous) paper (not
individual pages), the PLOT BIG statement does not
advance the paper after printing the plot. Before issuing another
PLOT BIG statement, you should advance the paper feed
of your printer.
Once you have entered the PLOT BIG statement, the
terminal will not respond to any additional commands or statements until the
printer is almost finished printing the plot.
The PLOT BIG statement can be used only with a VT125
terminal connected to a compatible printer. You cannot use PLOT
BIG with VT240, VT330, and VT340 terminals. To get large plots
with VT240, VT330, or VT340 terminals, change the graphics set-up option
Compressed Print to Expanded Print and use the PLOT
HARDCOPY statement.
18.5.3. PLOT CONNECT
The PLOT CONNECT statement takes the scattergraph you
have just created and connects the points.
The statement connects points in the order Datatrieve processed them.
Arguments and Notes:
If you want to control the order in which the points are plotted, use a
SORT statement or a SORTED BY expression in the RSE
you use to form the collection of data to be plotted.
Use the PLOT SHADE statement to shade the area below
the points.
Example:
See Section 18.3.5, ''PLOT X_LOGY'' for an example.
18.5.4. PLOT CROSS_HATCH
The PLOT CROSS_HATCH statement is the only way to
differentiate bar elements and shaded areas in hardcopy printouts of
multiple bar charts.
The PLOT CROSS_HATCH statement changes each of the
shading variations in multiple bar charts to a unique crosshatch pattern.
The crosshatching enhances the distinction among the displays of different
field names or other value expressions.
From one to three different crosshatch patterns are assigned to each of the arguments plotted against the vertical (Y) axis of a multiple bar chart.
Arguments and Notes:
The PLOT CROSS_HATCH statement can assign no more than
three pattern variations. It is therefore not appropriate for raw bar charts
or pie charts, which can plot more than three elements.
Examples:
See the examples for Section 18.1.8, ''PLOT STACKED_BAR'' and Section 18.2.3, ''PLOT MULTI_SHADE''.
18.5.5. PLOT HARDCOPY
The PLOT HARDCOPY statement produces a hardcopy
printout of the most recently generated plot.
The statement prints a separate legend for the plot after it prints the plot. This occurs even if the plot already includes the legend as output.
Arguments and Notes:
Your terminal does not respond to any commands or statements until the printer is almost finished printing the plot.
If you are using a printer with fan-fold (continuous) paper (not
individual pages), the PLOT HARDCOPY statement does not
advance the paper feed after printing the plot. Before issuing another
PLOT HARDCOPY statement, you should advance the paper
feed of your printer.
If you want to use the PLOT HARDCOPY statement with one
of the following plots, you should use the PLOT
CROSS_HATCH statement before issuing the PLOT
HARDCOPY statement:
PLOT MULTI_BARPLOT MULTI_BAR_GROUPPLOT MULTI_SHADEPLOT STACKED_BAR
The PLOT CROSS_HATCH statement differentiates bars or
shaded areas that are otherwise indistinguishable when printed.
The PLOT BIG statement produces a hardcopy printout
with a plot four times the size of the plot produced using the PLOT
HARDCOPY statement.
Example:
Create a multiple bar chart using data from the ANNUAL_REPORT
domain. Note that on the terminal screen, the bars are differentiated by
varying shades. This differentiation is not present in a hardcopy of the
plot. Next, use the PLOT CROSS_HATCH statement to
differentiate the bars for the hardcopy printout:
DTR> FIND FIRST 5 ANNUAL_REPORT SORTED BY DATE DTR> PLOT MULTI_BAR ALL DATE, REVENUE, CON> EQUIPMENT_SALES, SERVICES THEN CON> PLOT CROSS_HATCH DTR> PLOT HARDCOPY
18.5.6. PLOT LEGEND
When you issue a PLOT LEGEND statement, Datatrieve
clears the screen to display the legend for the plot.
DTR> PLOT LEGEND
Displays the legend for certain plots that do not have enough room for the
legend. The PLOT LEGEND statement takes the most recently
created plot, creates a legend for the plot, and displays the legend on a
cleared screen.
Arguments and Notes:
The PLOT BIG and PLOT HARDCOPY
statements automatically send the plot and a separate legend to the printer
as output.
If you are creating a multiple bar, multishade, or stacked bar plot, use
the PLOT CROSS_HATCH statement to provide unique
crosshatch patterns to differentiate the elements in each plot. The
crosshatch patterns appear in the legend, further enhancing the distinction
among the plotted elements.
18.5.7. PLOT LIMITS_X and PLOT LIMITS_Y
Lets you specify the minimum and maximum range limits of the data to be plotted on the horizontal (X) axis (LIMITS_X), or on the vertical (Y) axis (LIMITS_Y). Datatrieve replots the most recent plot using a subset of the original data. This subset is determined by the low and high values specified in the plot statement.
Arguments and Notes:
Low-value is the value expression, based on the values on the horizontal (LIMITS_X) axis, or on the vertical (LIMITS_Y) axis, of the base plot, that determines the lowest value of the data to be plotted. High-value is the value expression, based on the values on the axis of the base plot, that determines the highest value of the data to be plotted.
If you use zero as either your low or high value, the corresponding statement returns the value plotted in the original base plot.
If you omit either argument, the statement uses the corresponding argument
from the previous PLOT LIMITS_X or PLOT
LIMITS_Y statement.
By default, Datatrieve bases the scaling of plot values on the total range of the data values provided as input for the plot.
If no data values fall within the limits you specify, Datatrieve creates a plot with no values plotted.
The minimum and maximum values specified set the limits for filtering out the data used in the base plot. The range of values Datatrieve replots on the X axis reflects the actual high and low values of the data that get through the filter, not the high and low limits specified as parameters.
You can use the
PLOT LIMITS_Xstatement repeatedly to vary the subset of data Datatrieve uses to replot the previous plot.The following examples show the syntax variations common to the
PLOT LIMITS_Xstatement:DTR> FIND YACHTS WITH PRICE NE 0 DTR> PLOT X_Y ALL LOA, PRICE DTR> ! DTR> ! Original range limits for this example are 15 and 45. DTR> ! Examples are cumulative. DTR> ! DTR> PLOT LIMITS_X 20, 40 DTR> ! DATATRIEVE ignores LOA values less than 20 and greater DTR> ! than 40 when it replots the base plot data. DTR> ! DTR> PLOT LIMITS_X 25 DTR> ! The minimum LOA value for the data plotted is 25; DTR> ! the maximum value stays the same (40). DTR> ! DTR> PLOT LIMITS_X ,35 DTR> ! The minimum LOA value for the data plotted stays the DTR> ! same (25); the maximum value is 35. DTR> ! DTR> PLOT LIMITS_Y 15000 DTR> ! The minimum LOA value for the data plotted is 15000; DTR> ! the maximum value stays the same (50000). DTR> ! DTR> PLOT LIMITS_Y ,40000 DTR> ! The minimum LOA value for the data plotted stays the DTR> ! same (15000); the maximum value is 40000. DTR> ! DTR> PLOT LIMITS_Y 20000,0 DTR> ! The minimum LOA value is 20000; the maximum value DTR> ! returns to the original value of the base plot DTR> ! (100000). DTR> ! DTR> PLOT LIMITS_Y 0,0 DTR> ! Both minimum and maximum values are returned to the DTR> ! values plotted by the original PLOT X_Y statement DTR> ! (0, 100000).
Datatrieve ignores date values unless they are expressed as a year both in
the base plot and in the PLOT LIMITS_X statement. For
example, you can use YYYY for a date field, but not
DD_MMM_YYYY.
You cannot use scientific notation for the low and high values.
The PLOT LIMITS_X or PLOT LIMITS_Y
statement must be placed before any other utility plot statements or you
will lose the characteristics added with those plot statements. The
statement replots the previous plot using the data limits you specify. Any
utility plots used to enhance the old base plot are ignored. The only
exceptions are the PLOT TITLE statement and the other
PLOT LIMITS statement. If you use the PLOT
LIMITS statement after the PLOT TITLE
statement, Datatrieve retains the title specified in the PLOT
TITLE statement. If you use the statement after the other
PLOT LIMITS statement, the line specified in that
previous PLOT LIMITS statement remains in the final
plot.
18.5.8. PLOT LR
The PLOT LR statement plots a linear regression line on
the scattergraph you have just created. The linear regression plot uses the
least squares method to determine the regression line. The least squares
method determines a straight line through a set of points so that the sum of
the squares of the distances of the points from the line is a minimum. The
resulting line is the "best fit" for a set of points.
Examples:
See Section 18.3.6, ''PLOT X_Y'' for example.
18.5.9. PLOT MONITOR
Displays the words RED, GREEN, and BLUE on your color monitor with their appropriate colors. You use it to verify that the red, green, and blue cable connectors are correctly attached to the back of the color monitor. The words are listed vertically on the color monitor.
The word SYNC appears on the screen to indicate that Datatrieve has reset the terminal to the terminal’s default color settings after the words RED, GREEN, and BLUE have been displayed.
Arguments and Notes:
If the names of the colors do not correspond to the color in which they are displayed (for example, the word RED is displayed in the color green), you may not have attached the color cable connectors correctly. Make sure the cables from the video terminal match the proper connectors on the monitor. See Chapter 17, "Using Datatrieve Plots" for more information on how to get started with Datatrieve plots.
Use the PLOT MONITOR statement only with a color
terminal. If you use the PLOT MONITOR statement with a
monochrome terminal that has light lettering and a dark background, the
light lettering may change to the color of the dark background, essentially
blacking out your screen.
18.5.10. PLOT PAUSE
The PLOT PAUSE statement delays processing the next
statement for several seconds during your Datatrieve plots session.
Arguments and Notes:
Even though this plot appears to be very simple, you must still use
a VT125
or equivalent terminal with
the PLOT PAUSE statement.
Example:
The following example shows how you can use the PLOT
PAUSE statement to view one plot before Datatrieve processes
the next plot statement:
Datatrieve executes the
PLOT X_Ystatement. It then produces the scattergraph plot:DTR> PLOT X_Y ALL EQUIPMENT_SALES, CON> INVENTORIES OF ANNUAL_REPORT THEN CON> PLOT PAUSE THEN CON> PLOT CONNECT
Due to the
PLOT PAUSEstatement, Datatrieve now pauses for several seconds. It then executes the next plot statement,PLOT CONNECT.
18.5.11. PLOT REFERENCE_X and PLOT REFERENCE_Y
The PLOT REFERENCE_X statement adds a solid line at the
point you specify on the horizontal (X) axis of the most recently generated
plot.
The PLOT REFERENCE_Y statement adds a similar line at
the point you specify on the vertical (Y) axis.
Datatrieve adds to the existing plot when you plot a reference line; it
does not replot it. Datatrieve adds a reference line to the most recently
generated plot for each use of the PLOT REFERENCE
statement.
Datatrieve returns an error message for entries that fall outside the
range of values for the horizontal (PLOT REFERENCE_X) or
vertical (PLOT REFERENCE_Y) axis.
Arguments and Notes:
The PLOT REFERENCE statements take an argument,
n, which is a value expression identifying the
value of the relevant axis where you want Datatrieve to draw a solid
reference line. The value of n must be within the range
of the X or Y values on the plot.
Be sure that the values on the relevant axis are numeric.
Look at the X labels on the existing plot to see what units are used for X values. Use the same units for the n value in the
PLOT REFERENCEstatement.Use the
PLOT REFERENCEstatements repeatedly to add multiple reference lines along the relevant axis of an existing plot.You cannot draw reference lines for date values or string values.
You cannot specify a scientific notation value for the coordinate of a reference line.
Datatrieve uses scientific notation for labels with integer values greater than 100,000. In addition, Datatrieve rounds some real number values from the vertical (Y) axis or uses scientific notation values rounded to three digits.
You can avoid this scientific notation by dividing the argument for the Y axis by 1000.
Example:
Create a collection from the YACHTS domain. Use the
PLOT X_Y statement to create a scattergraph showing
the trend that as LOA increases, so does price. Then select a
value from the range of values along the horizontal (X) axis at which you
want to draw a solid reference line. Use that value as the argument of the
PLOT REFERENCE_X statement. Next select a value from
the vertical (Y) axis and use it with the PLOT
REFERENCE_Y statement to plot a reference line along the
vertical (Y) axis:
DTR> FIND YACHTS WITH PRICE NE 0 DTR> PLOT X_Y ALL LOA, PRICE THEN CON> PLOT REFERENCE_X 33 THEN CON> PLOT REFERENCE_Y 33000
This example produces a base scattergraph, plots a reference line on top of the base graph for the horizontal (X) axis, then plots a reference line on top of that for the vertical (Y) axis.
18.5.12. PLOT RE_PAINT
Restores the most recent plot to your screen. After you generate a plot, it can become distorted for a number of reasons:
Datatrieve scrolls up the existing plot with each new command or statement you issue other than a plot statement.
On some terminals, if the plot is large enough (such as a pie chart), typing a subsequent command can overwrite the plot displayed on your screen.
In each of the previous situations, the PLOT RE_PAINT
statement restores the most recent plot to your screen.
Arguments and Notes:
Datatrieve erases the existing plot from your terminal as soon as you issue a new plot statement. Therefore, in the following sequence, Datatrieve restores the subsequent, most recent plot, not the first plot:
You enter a plot statement
You enter a subsequent plot statement
You enter a
PLOT RE_PAINTstatement
18.5.13. PLOT SHADE
After producing a line or scattergraph, enter the PLOT
SHADE statement. The PLOT SHADE statement
shades the area beneath the points in the graph, emphasizing trends.
Arguments and Notes:
You can also use the PLOT CONNECT statement to
emphasize trends in your data. It connects the points in a
scattergraph.
Example:
The following example shows a typical application of the PLOT
SHADE statement:
Enter one of the plot statements to generate a scattergraph. This example uses the
PLOT DATE_Ystatement:DTR> PLOT DATE_Y ALL DATE ("Year"), CON> EQUIPMENT_SALES ("Equipment") OF ANNUAL_REPORTEnter the
PLOT SHADEstatement. The area below the points is now shaded for emphasis:DTR> PLOT SHADE
18.5.14. PLOT SORT_BAR
The PLOT SORT_BAR statement sorts the bars of the
histogram or bar chart by descending height.
Arguments and Notes:
If you use the PLOT TITLE statement with the
PLOT NEXT_BAR and the PLOT
SORT_BAR statements, enter the statements in the following
sequence:
PLOT BARPLOT TITLEPLOT SORT_BARPLOT NEXT_BAR
If you enter the PLOT TITLE statement after
PLOT SORT_BAR, the sorting will not appear in the
subsequent plots produced by the PLOT NEXT_BAR
statement.
Example:
The following example shows a typical application of the PLOT
SORT_BAR statement:
Use the
PERSONNELdomain to plot a simple bar chart showing the total salaries for the first six departments. The keywordALLis required because the plot statement refers to the collection created by the first statement. Dividing theSALARYargument by1000eliminates default scientific notation that Datatrieve uses to display large numbers:DTR> FIND FIRST 6 PERSONNEL DTR> PLOT BAR ALL DEPT, - CON> SALARY/1000 ("Salary in 1000s")Enter the
PLOT SORT_BARstatement to sort the bars of the chart by descending height:DTR> PLOT SORT_BAR
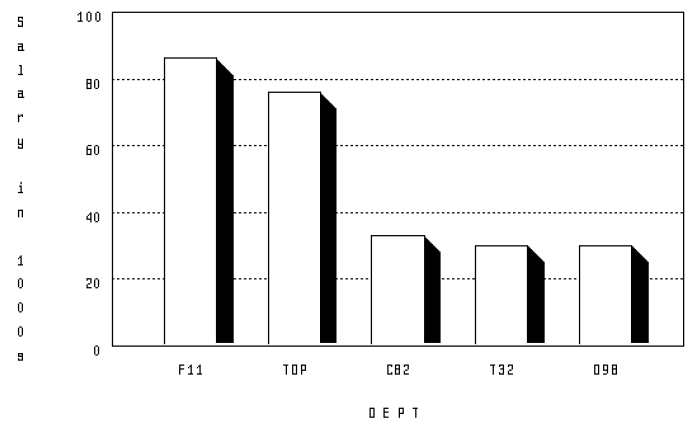
18.5.15. PLOT TITLE
The PLOT TITLE statement replots the previous plot and
shrinks the vertical (Y) dimension to make room for a title at the top of
the plot. Additional lines in the title mean more reduction of the vertical
dimension.
The statement centers each line of the plot title.
Arguments and Notes:
The PLOT TITLE statement requires a "text" string,
which is a character string enclosed in matching quotation marks. The text
for a plot title can be up to three lines long, with a slash (/) separating
the lines of text. A single title line cannot exceed 49 characters including
blanks. Each segment of a multiple line title must be enclosed in quotation
marks. For example:
PLOT TITLE "text line 1"/"text line 2"/"text line 3"
Use the PLOT TITLE statement before any other utility
plot statements. The PLOT TITLE statement replots the
base plot and adds a title. If you have used a utility plot to add any
utility features (for example, a linear regression line or hatching) to a
base plot, you lose those additions when Datatrieve repaints the base plot
to add the title. You can use the PLOT TITLE statement
before or after the PLOT LIMITS_X statement and the
PLOT LIMITS_Y statement, however.
If you use the PLOT TITLE statement with the
PLOT NEXT_BAR statement and either the PLOT
SORT_BAR or PLOT BAR_ASCENDING statements,
enter the statements in this sequence:
PLOT BARPLOT TITLEPLOT SORT_BAR(orPLOT BAR_ASCENDING)PLOT NEXT_BAR
If you enter the PLOT TITLE statement after
PLOT SORT_BAR or PLOT
BAR_ASCENDING, the sorting will not appear in the subsequent
plots produced by PLOT NEXT_BAR.
Example:
Using the PERSONNEL domain and the PLOT
BAR statement, create a base plot showing the total salary for
each department. Dividing the SALARY argument by
1000 eliminates the default scientific notation that
Datatrieve uses to display large numbers.
Use the PLOT TITLE statement to add a title that also
helps label the units of measure.
DTR> PLOT BAR ALL DEPT, SALARY/1000 OF CON> PERSONNEL SORTED BY DEPT DTR> PLOT TITLE "Salaries"/ - CON> "by Department"/"(in Thousands)"
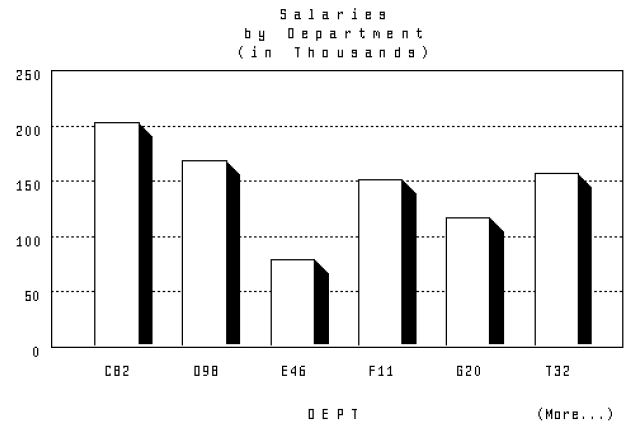
18.5.16. PLOT WOMBAT
Displays a picture of a wombat.
Arguments and Notes:
Type HELP WOMBAT for more information about
wombats.
18.6. Using Utilities With Other Plot Statements
The following figure shows which utility plot can be used with each plot, and vice versa. The columns list the plots, while the rows represent the utilities. Each number corresponds to a plot type, which are listed below:
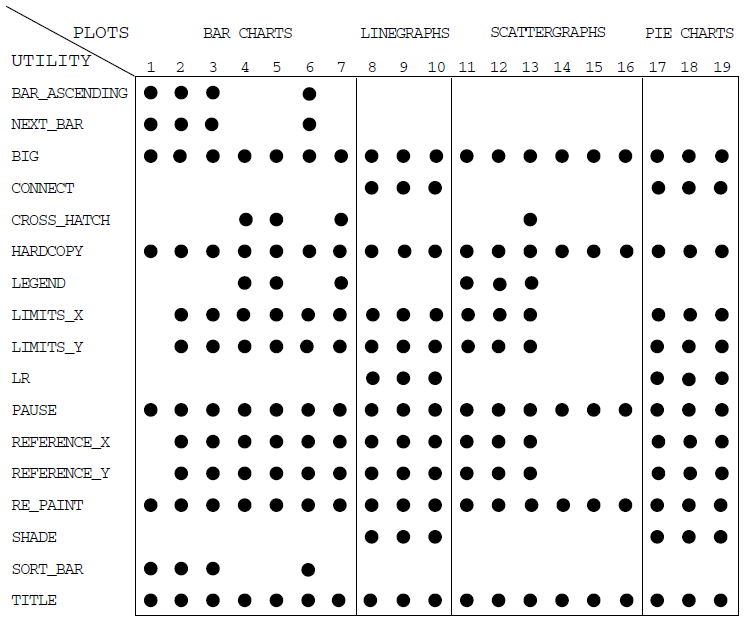
Notice that PLOT NEXT_BAR is a bar plot, but behaves like a
utility plot. Therefore it is in a row, not in a column.
|
N° |
Corresponding Plot |
N° |
Corresponding Plot |
N° |
Corresponding Plot |
|---|---|---|---|---|---|
| 1 |
PLOT BAR | 8 |
PLOT MULTI_LINE | 15 |
PLOT X_LOGY |
| 2 |
PLOT BAR_AVERAGE | 9 |
PLOT MULTI_LR | 16 |
PLOT X_Y |
| 3 |
PLOT HISTO | 10 |
PLOT MULTI_SHADE | 17 |
PLOT PIE |
| 4 |
PLOT MULTI_BAR | 11 |
PLOT DATE_LOGY | 18 |
PLOT RAW_PIE |
| 5 |
PLOT MULTI_BAR_GROUP | 12 |
PLOT DATE_Y | 19 |
PLOT VALUE_PIE |
| 6 |
PLOT RAW_BAR | 13 |
PLOT LOGX_LOGY | ||
| 7 |
PLOT STACKED_BAR | 14 |
PLOT LOGX_Y |
Part V. Advanced Topics
Chapter 19. Using Datatrieve With the CDD/Repository Dictionary System
19.1. What is the CDD/Repository Dictionary System?
CDD/Repository is a central repository for Datatrieve data definitions. The CDD/Repository system:
Ensures the integrity of shared metadata
Keeps information about the location of each definition
Controls the access to each definition
Keeps track of what happens to each definition
Provides access to both CDO and DMU format dictionaries and definitions
The CDD/Repository dictionary system can be used by traditional OpenVMS programming languages such as BASIC, COBOL, or FORTRAN, as well as by Datatrieve. CDD/Repository does not deal with data, instead it keeps central data definitions (metadata) that a variety of languages can use.
19.2. The CDD/Repository Dictionary System Structure
The CDD/Repository dictionary system provides you with access to a single logical dictionary. The logical dictionary can be composed of one or more physical dictionaries that can be distributed on one device, on different devices on a single node, on different nodes on an OpenVMS cluster, and on local or wide area networks. Datatrieve lets you store data definitions in the CDD/Repository dictionary system using Datatrieve commands. However, you should be familiar with the dictionary formats available to you.
CDD/Repository allows you to store your definitions in one of two dictionary formats: CDO or DMU. Although CDO format definitions are all coded differently from DMU format definitions, this difference is not apparent to you as a Datatrieve user. The sections that follow describe the features of both of these formats.
19.2.1. CDO Format Dictionaries
Through Datatrieve, you can store definitions for Datatrieve record, domain, table, procedure, database, and port definitions in a CDO format dictionary. CDO format dictionaries let you store definitions and information about how some of those definitions are related. Using CDO, you can also store field-level definitions, which you can include in your Datatrieve record definitions using a special FROM clause.
If you define Datatrieve records and domains in a CDO format dictionary,
you can take advantage of the CDD/Repository feature that lets you establish
relationships between certain
dictionary objects. Note that Datatrieve uses the term
objects to refer to definitions stored in the
dictionary;
CDD/Repository
documentation uses the term entities to refer to the
same definitions. Relationships track how data
descriptions are shared. You can use the CDO utility to display the names of
objects that may be affected by any changes that you make to metadata if
relationships have been created for those objects. If you use the CDO
utility of CDD/Repository to define metadata, these relationships are
created automatically. If you define your metadata through Datatrieve, you
must use the RELATIONSHIPS clause of the DEFINE DOMAIN
command or the FROM clause of the DEFINE RECORD command
to establish relationships. See Chapter 20, "Using Datatrieve With a CDO Format Dictionary" for examples
of this feature.
CDO keeps track of dictionary definition usage. Through CDO, you can show which dictionary objects make use of a particular definition so that you can identify which definitions are affected when you or someone else changes a definition. You can store these definitions only in DMU format dictionary directories. See Chapter 21, "Using Datatrieve With a DMU Format Dictionary" for more information.
19.2.2. DMU Format Dictionaries
DMU format dictionaries let you store the definitions of Datatrieve records, domains, tables, procedures, databases, ports, and plots. Outside of Datatrieve, you can manipulate the DMU format definitions with the DMU, CDDL, or CDDV utilities that are supplied with CDD/Repository .
19.2.3. Distinguishing CDO Objects From DMU Objects in the SHOW Command
Datatrieve uses an asterisk (*) to differentiate DMU objects from CDO
objects when they are displayed in response to a SHOW
DOMAINS, SHOW RECORDS, or SHOW
ALL command. The asterisk appears in front of the name of each
DMU object.
The following example displays all of the domains found in the dictionary
directory CDD$TOP.DTR$LIB.DEMO:
DTR> SET DICTIONARY CDD$TOP.DTR$LIB.DEMO DTR> SHOW DOMAINS Domains: * ACCOUNT_BALANCES;1 * ANNUAL_REPORT;1 * FAMILIES;1 * KETCHES;1 * OWNERS;1 * OWNERS_SEQUENTIAL;1 * PAYABLES;1 * PERSONNEL;1 * PETS;1 * PROJECTS;1 * SAILBOATS;1 * SALES;1 * YACHTS;1 * YACHTS_SEQUENTIAL;1 DTR>
Differentiation is particularly important when you are using the compatibility dictionary. If your default dictionary directory is set to a compatibility dictionary directory that includes both CDO definitions and DMU definitions, the DMU definitions would be differentiated from CDO definitions by the asterisk.
You may want to suppress the asterisk in some instances where one of your
existing applications uses callable Datatrieve. For example, you may have an
application that calls Datatrieve to display the names of DMU format domains
and records. If that application is not formatted to handle the asterisks,
you can use the DTR$SHOW logical to suppress the
asterisk. You can do this by assigning a value of SUPPRESS_STAR
to the DTR$SHOW logical using either the DCL
DEFINE or ASSIGN command, as
follows:
$ DEFINE DTR$SHOW SUPPRESS_STAR
You cannot assign a value to DTR$SHOW using the FN$CREATE_LOG function. To be sure the logical is properly defined, you must assign a value to DTR$SHOW before you invoke Datatrieve.
19.3. The Compatibility Dictionary
CDD/Repository also provides a special CDO format dictionary, called the compatibility dictionary, which coordinates DMU format definitions and CDO format definitions. The compatibility dictionary provides a logical view of two physically separate dictionaries: the DMU format dictionary and the CDO format dictionary (usually located in SYS$COMMON:[CDDPLUS]). Both of these dictionaries are created when CDD/Repository is installed on your system. The compatibility dictionary lets you:
Continue to use your DMU format dictionary definitions
Create new CDO format definitions that can be read by products that support DMU format dictionaries only
Create new definitions that can be accessed by products that support CDO format dictionaries
Definitions created in the compatibility dictionary can be read by products that support either the DMU format dictionary or the CDO format dictionary.
Your DMU format dictionary structure is mapped to the directory structure in the compatibility dictionary, and vice versa. For example, when you create a new directory in the compatibility dictionary, the new directory is listed in your DMU hierarchy, just as your DMU format dictionary structure is visible from the CDO utility. A translation utility provided by CDD/Repository translates CDD$TOP to be the equivalent of the anchor of your compatibility dictionary. For example, if your compatibility dictionary is stored in SYS$COMMON:[CDDPLUS] and you create a directory called PERSONNEL, you can refer to this directory with either of the following naming conventions:
CDD$TOP.PERSONNEL
SYS$COMMON:[CDDPLUS]PERSONNEL
As the compatibility dictionary is a CDO format dictionary, you can create and store CDO format definitions in it. However, because of the overlapping of DMU dictionary structure and compatibility dictionary structure, you cannot store a new definition in the compatibility dictionary that has a path name that is identical to the path name of an object in the DMU.
To access the compatibility dictionary, you can use the system logical name
CDD$COMPATIBILITY to represent the anchor for the
compatibility dictionary. You can confirm where your compatibility dictionary is
located by using the SHOW LOGICAL command at the DCL
prompt:
$ SHOW LOGICAL CDD$COMPATIBILITY "CDD$COMPATIBILITY" = "SYS$COMMON:[CDDPLUS] (LNM$SYSTEM_TABLE)
19.4. Datatrieve and CDD/Repository
Datatrieve provides both read and write access to objects stored in CDO. Using Datatrieve commands, you can define objects in the CDO format dictionary. By defining record and domain definitions in CDO, you can create relationships between a record and a domain (you cannot create relationships for port definitions). Using the CDO utility, you can use these relationships to track which records or domains will be affected by any changes to a definition.
You can also use the FROM clause of the Datatrieve DEFINE
RECORD command to take advantage of the CDO utility’s field level
definition capability. A field defined using the CDO utility can be included in
a Datatrieve record definition with the FROM clause. When you include a FROM
clause in a record definition stored in a CDO format dictionary, relationships
are also created between the field definition and the record. For more
information on the FROM clause, see Chapter 20, "Using Datatrieve With a CDO Format Dictionary" and the
VSI Datatrieve Reference Manual.
Datatrieve also provides access to the CDO utility through the
CDO command. The argument of the Datatrieve
CDO command is a text string that represents a CDO
command. When you invoke the Datatrieve CDO command,
Datatrieve passes the command line in the argument to CDO. See Chapter 20, "Using Datatrieve With a CDO Format Dictionary" for more information.
Although CDD/Repository allows you to change Digital supplied protocols, changing Datatrieve protocols is not recommended. If an unknown element is found while parsing data returned by CDD/Repository, Datatrieve may display the DTR$_INVBUF (Invalid Metadata Buffer) error message.
19.5. Integrating CDO and DMU Definitions in Applications
One of the features of using Datatrieve with CDD/Repository is that you can integrate definitions from both dictionaries in your applications. By integrating definitions from CDO and DMU format dictionaries, you can take advantage of CDO features such as pieces tracking and field-level definitions, while using your existing DMU definitions.
19.6. How Datatrieve Determines Dictionary Destination
Datatrieve generally determines the destination or location of a given definition based upon the format of a path name specified in a command, statement, or existing definition.
A path name uniquely identifies a dictionary directory or dictionary object in the CDD/Repository hierarchy. A full path name, or fully qualified path name, starts with the name of a top-level CDD/Repository directory (either CDD$TOP or an anchor) and includes the names of all directories that lead to the object or directory you want to specify. The name of each object or directory in the path name is separated from another object or directory name by a period. CDD$TOP.DTR$LIB.DEMO.YACHTS is an example of a fully qualified DMU format path name. MYNODE::DISK1:[KIRK.DTR]SAMPLE.YACHTS_CDO is an example of a full path name for a CDO format definition.
A relative path name, also called a partial path name, is a shortened form of a full path name. It includes only those directory names that are needed to uniquely identify an object or directory, relative to your default dictionary location. See Chapter 20, "Using Datatrieve With a CDO Format Dictionary" and Chapter 21, "Using Datatrieve With a DMU Format Dictionary" for specific information on how Datatrieve treats relative path names in CDO and DMU format dictionaries.
A given name is the name of the object itself, not a full or partial path name.
In a DEFINE command, the path name determines in which
dictionary the object is defined. If the object being referred to in the
definition contains an anchor in its path name, Datatrieve uses the CDO format
dictionary specified by the anchor. If the object’s path name begins with
CDD$TOP, Datatrieve uses the DMU format dictionary.
If the object is referred to by a relative or partial path name or by a given
name, Datatrieve determines the target dictionary based upon your current
default dictionary setting.
Datatrieve fetches objects from both DMU and CDO format dictionaries of the compatibility dictionary, regardless of the format of the path name you enter.
19.7. Converting DMU Definitions to CDO Format Definitions
Existing DMU format definitions are not automatically converted to CDO format when you install CDD/Repository ; however, you can convert DMU format definitions to CDO using one of the following methods:
The Datatrieve
EDITcommandThe Datatrieve
EXTRACTcommand
You can essentially convert a definition from DMU format to CDO format by
moving your DMU format definition to a CDO format dictionary directory. If, for
example, you extract a definition from a DMU format dictionary to a command file
and then execute that command file in a CDO format dictionary, the new object in
the CDO format dictionary is in CDO format. If you performed a
SHOW of the object in the CDO format dictionary, however,
it would appear identical to the old DMU definition. It is the internal
representations of DMU format definitions and CDO format definitions that are
different. These differences are not reflected in the source text of the
definition that you see when you display the definition. Understanding this is
important when you convert your definitions.
When you convert your definitions, you should be sure that references to other objects are clearly defined. By converting the definition from DMU format to CDO format, you have moved the definition to a new dictionary directory. You may also want to update references to all objects mentioned in the definition to be sure that Datatrieve will recognize the location of these objects relative to the dictionary directory setting of your converted definition. This is especially true of objects identified by relative or partial path names.
Also when you convert your definitions, you should keep in mind that you cannot store a definition in the compatibility dictionary if it has a path name identical to a definition in the DMU format dictionary. You must either provide a new
name for the object being converted or delete the object stored in the DMU format dictionary.
If you choose to delete the object stored in the DMU format dictionary, you
should purge the DMU dictionary before you extract or edit the definition. If
you are editing the definition, be sure to add the DELETE
dmu-object-name command to your edit
buffer. This command should be placed on the line preceding the
REDEFINE command. If you are extracting the definition,
the EXTRACT command adds the DELETE
command to the source text it produces, which can then be used as a Datatrieve
command procedure.
You should note that VSI does not recommend that you convert all of the record and domain definitions in your DMU format dictionary to CDO format at one time. It is better to create new applications using definitions in CDO format and convert definitions in existing applications to CDO format in cases where a new application uses part of an existing one.
The following sections describe the methods for converting definitions in more detail.
19.7.1. Using the Datatrieve EDIT Command to Convert Definitions
The Datatrieve EDIT command copies the source text of
the object or objects you specify into an editing buffer. It also invokes
your default editor to let you edit the definitions. You can then change the
DMU path name of the object to a CDO format path name. You can also update
references to any other objects mentioned in the definition to be sure that
Datatrieve will correctly identify the location of the object. When you exit
the editor, Datatrieve stores the definition in the dictionary directory
specified by the CDO format path name.
The EDIT command is recommended for editing one or two
definitions at a time. If you want to convert a large number of definitions
at one time, you should use the EXTRACT command (see
Section 19.7.2, ''Using the Datatrieve EXTRACT Command to Convert Definitions'').
19.7.2. Using the Datatrieve EXTRACT Command to Convert Definitions
Another way to convert one or more definitions is to use the Datatrieve
EXTRACT command to load all of the definitions you
specify into a command file in your OpenVMS directory. The
EXTRACT command is recommended for converting
multiple definitions at a single time.
With the EXTRACT command you can load multiple
definitions into the command file using one of the following methods:
Specifying the path names of one or more objects, separating each object with a comma (,)
Specifying all objects of a given type (DOMAINS, RECORDS), separating each object type with a comma (,)
Once your definitions are stored in the command file you can edit the file or you can print out the file to examine the definitions more closely for necessary changes. When you edit the command file, you should check the path names of the definitions to be sure that the definitions are identified as you want them to be listed in the new CDO dictionary directory. When you have finished editing the definitions, execute the command file in an appropriate CDO format dictionary directory.
19.8. Choosing a Dictionary Format
If you want to take advantage of the CDD/Repository features offered by the CDO utility, you should store new object definitions in the CDO format dictionary. You may also want to convert existing DMU format object definitions to CDO format. You can convert DMU definitions either through CDO or through Datatrieve. CDO can only convert record and domain definitions. Moreover, neither Datatrieve nor CDO can change references to other objects that may be contained in the definition. For example:
DTR> DEFINE DOMAIN YACHTS USING CON> CDD$TOP.DTR$LIB.DEMO_YACHT ON YACHT.DAT
The domain definition can be converted, but the reference to the record definition in DMU is left unchanged.
You may want to continue using DMU format definitions if the following conditions exist:
Your existing DMU format dictionary contains a large number of applications that you do not want to convert to CDO format immediately.
Your applications refer to products that use only DMU format definitions.
If you choose to work with CDO format definitions, refer to Chapter 20, "Using Datatrieve With a CDO Format Dictionary", which describes how Datatrieve works with the CDO format dictionary.
If you want to work with DMU format definitions, refer to Chapter 21, "Using Datatrieve With a DMU Format Dictionary", which describes how Datatrieve works with DMU format definitions.
19.9. Creating and Using CDD/Repository Path Names
Every dictionary definition has a full name that uniquely identifies it. The full name of each definition includes three parts: the dictionary origin, the path, and the version number. The following list describes these parts:
The dictionary origin is the root of the dictionary. In CDO format dictionaries, the dictionary origin is represented by an anchor. An anchor specifies the OpenVMS directory where the CDO dictionary hierarchy is stored. It can optionally consist of node, device, and directory components. If you are referring to a directory or an object on a remote node, you might choose to use a fully translated anchor, which contains all three components; otherwise, you need only use as much of the anchor as is necessary to determine the relative location of your target directory or object. MYNODE::DISK$1:[KIRK.DTR] is an example of a fully qualified anchor. If your default directory is already set to node MYNODE::DISK$1, then you need not include the node name or the device.
In DMU format dictionaries, the dictionary origin is represented by the CDD$TOP node. The CDD$TOP directory is found at the top of every DMU format node and is created when CDD/Repository is installed. You specify the path name of a directory or object by linking together the names of all the directories starting with CDD$TOP and ending with the given name of the target directory or object. Each name in the path name is separated from the others by a period.
In the compatibility dictionary, the dictionary origin is represented by an anchor, usually called SYS$COMMON:[CDDPLUS].
A path name consists of one or more directory names separated by periods and ending with an object name. Path names reflect the hierarchy of your dictionary. You can have two or more objects with the same given name; however, they must reside in different directories or have different version numbers. Note, however that you cannot store a new definition in the DMU format dictionary that has a path name identical to the full path name of an object in the CDD/Repository compatibility dictionary. The definitions in the DMU format dictionary and the compatibility dictionary overlap and therefore definitions stored in each of those dictionaries must have unique names.
The version number is similar to an OpenVMS file version. It is separated from the path name by a semicolon (;). CDD/Repository allows you to create multiple versions of object definitions (but not directory definitions). The version number uniquely identifies the specific version of the object definition you are referring to.
The version number can be an absolute version number or a relative version number. With an absolute version number, Datatrieve operates on the object with the specified version number; for example, YACHTS_CDO;3. With a relative version number, Datatrieve operates on the object at a specified number below the highest version; for example, YACHTS_CDO;-1 (you cannot use this specification with either the
DEFINEcommand or theREDEFINEcommand).If you do not include a version number, Datatrieve operates on the highest version of the object. Note, however, that if you omit the version number, but include the semicolon, Datatrieve considers the semicolon the end of the command or statement.
19.9.1. Rules for Naming CDD/Repository Objects and Directories
The following list identifies the rules to which CDD/Repository names must conform:
An anchor can contain up to either 205 or 235 characters. The maximum number of characters is determined by the length of the longest CDO directory name. For example, the anchor can contain no more than:
205 characters, if the longest CDO directory name contains 31 characters.
235 characters, if the longest CDO directory name contains 1 character.
In a dictionary path name, the maximum number of characters in each element is 31. Elements in dictionary path names may be either directory names or object names. Note that for CDO format dictionaries, the maximum total number of characters in a path name, including version number, is either 65,300 or 65,330, depending on the length of the longest CDO directory name in the anchor, as mentioned previously;
For individual directories and objects in path names, the following rules apply:
Dictionary directory names must begin with a letter (A-Z).
Directory names can contain only letters, digits, dollar signs ($), underscores (_), or hyphens (-).
Directory names must end with either a letter or a digit (A-Z, 0-9).
Object names can include alphanumeric characters from the DIGITAL Multinational Character Set (DMCS), including underscores (_), hyphens (-), and dollar signs ($).
Object names should not begin with three letters and a dollar sign ($). You should especially avoid using DTR$, which is reserved for use by Datatrieve.
Datatrieve converts lowercase letters in names to uppercase. Datatrieve also treats an underscore and a hyphen as the same character. If you type yachts-cdo for the name of an object, Datatrieve interprets the string as YACHTS_CDO and that is how the name is displayed. Note, however, that Datatrieve does not perform case conversion on actual data stored in individual fields. Datatrieve stores field values as you typed them. You should therefore understand the distinction between the names you give data definitions (metadata) and actual values stored in data files (data).
19.9.2. Abbreviating CDD/Repository Path Names
You do not always need to use fully qualified dictionary path names to identify directories and objects in your CDD/Repository dictionary. The form of the abbreviated path name you use depends on where the target directory or object is relative to your current position in the CDD/Repository dictionary system. Relative path name is the proper term for abbreviated path names.
In an anchor, you need to specify the node name or device name only when the object or the directory you want is located in a dictionary on a different node or device than yours. If you are working on node MYNODE and the device DISK$1, then you can use the OpenVMS directory name [KIRK.DTR] as the anchor. Note, however, that if you do not use an anchor at all, DTR uses the anchor that specifies your default directory.
Looking down the tree structure from the dictionary directory where you have set your default, you need to specify only the portion of the path name below the level of your current directory location. If the full path name of the object is:
NODE::DISK$1:[KIRK.DTR]PERSONNEL.SALARIED.EMP
and you have set your default to:
NODE::DISK$1:[KIRK.DTR]PERSONNEL
you can refer to the object EMP with either of the following path names:
[KIRK.DTR]PERSONNEL.SALARIED.EMP SALARIED.EMP
If you are looking downward in the DMU format dictionary tree structure (away from CDD$TOP), you have to specify only the portion of the path name below the level of your current dictionary location.
If you have to "back up" toward CDD$TOP to get to your target directory or object, you can substitute a hyphen (-) in your path name for each directory name leading to CDD$TOP until you have entered one for the first dictionary directory common to both your current location and the path name you want to specify. Remember that if the command line you are entering ends in the hyphen, you should end the command line with a semicolon (;). Datatrieve interprets a hyphen at the end of a command as a continuation character.
See Section 19.10, ''Setting Dictionary Location'' for examples on using relative path names and on using hyphens in path names to "back up" toward the anchor or CDD$TOP to get to your target directory.
19.9.3. Using Logical Names
Another way to abbreviate path names is to use logical names in dictionary path names to refer to objects or directories. You can also use logical names to create search lists.
You can define logicals at DCL level or use the Datatrieve function
FN$CREATE_LOG. At the DCL level, you create
logical names for your session using the ASSIGN command
or the DEFINE command. You can add those commands to your
LOGIN.COM file to create the logical names each
time you log in to your account. You can also create logical names through
Datatrieve using the FN$CREATE_LOG function;
logical names defined in this way are in effect only for the length of your
Datatrieve session. See
VSI Datatrieve Reference Manual for details on using the
FN$CREATE_LOG function.
19.9.3.1. Logical Names in Dictionary Path Names
You can use logical names as a shorthand way of specifying files or directories that you use frequently. You may have a command in your LOGIN.COM that defines CDD$DEFAULT as the dictionary directory setting that Datatrieve sets for you when you invoke Datatrieve. You may also have used the system logical CDD$COMPATIBILITY as a logical name for the directory of your system compatibility dictionary. CDD/Repository creates this logical in its startup command procedure.
You may want to create logicals to represent anchors, or to represent the full path names of dictionary directories that you use often.
To define a logical for a dictionary directory with the fully qualified name URNODE::DISK$2:[BRUN.DATA]BUDGET, you could use the following command:
$ DEFINE BUDGET_DICT "URNODE::DISK$2:[BRUN.DATA]BUDGET"
You can include the definition in your
LOGIN.COM so that the logical is defined
each time you log in. Then, whenever you want to change your default
directory to URNODE::DISK$2:[BRUN.DATA]BUDGET,
use the Datatrieve SET DICTIONARY command as
follows:
DTR> SET DICTIONARY BUDGET_DICT
DTR> SHOW DICTIONARY
The default directory is BUDGET_DICT
=URNODE::DISK$2:[BRUN.DATA]BUDGET
DTR>To change back to your CDD$DEFAULT directory, enter the following command:
DTR> SET DICTIONARY CDD$DEFAULT
DTR> SHOW DICTIONARY
The default directory is CDD$DEFAULT
=MYNODE::DISK$1:[KIRK.DTR]PERSONNEL_CDO
DTR>You can form valid dictionary path names by combining logical names
with the names of dictionary directories and objects. You must put the
logical name first, followed by the given names. For example, if your
CDD$DEFAULT directory is set to
MYNODE::DISK$1:[KIRK.DTR]PERSONNEL_CDO and you want to
ready the EMPLOYEES domain cataloged in the
SALARIED directory, but you do not want to change
default directories, you can enter the following
READY command:
DTR> READY CDD$DEFAULT.SALARIED.EMPLOYEES
DTR> SHOW READY
Ready sources:
EMPLOYEES: Domain, RMS indexed, protected read
<=DISK$1:[KIRK.DTR]PERSONNEL_CDO.SALARIED.EMPLOYEES;1>
No loaded tables.
DTR> SHOW DICTIONARY
The default directory is DISK$1:[KIRK.DTR]PERSONNEL_CDO
DTR>You must not define your own logical names to begin with three letters and a dollar sign ($). You especially must avoid defining your own logical names beginning with DTR$, which is reserved for use by Datatrieve.
19.9.3.2. Using Logicals for Search Lists
You can also use logicals to access more than one physical dictionary by using search list logical names to identify physical dictionary areas that you want to treat as a single dictionary. You create a search list when you assign one or more dictionary areas to a logical name. The following example shows how a search list is created:
$ DEFINE MY_DICT DISK$1:[KIRK.DTR]- _$ PERSONNEL_CDO.SALARIED,- _$ DISK$1:[KIRK.DTR]PERSONNEL_CDO.CONTRACT.CONTRACT_EMP,- _$ URNODE::DISK$2:[BRUN.DATA]BUDGET
If you specify the logical name for your search list in the
SET DICTIONARY command, the first area specified
in the search list becomes your default dictionary area. Commands that
directly affect definitions, such as DEFINE, affect
only definitions in the first dictionary area in the search list.
Searching commands such as SHOW, search through all
areas in the search list, as in the following example:
DTR> SET DICTIONARY MY_DICT
DTR> SHOW DICTIONARY
The default dictionary is MY_DICT
= DISK$1:[KIRK.DTR]PERSONNEL_CDO.SALARIED
= DISK$1:[KIRK.DTR]PERSONNEL_CDO.CONTRACT.CONTRACT_EMP
= URNODE::DISK$2:[BRUN.DATA]BUDGET
DTR> SHOW DOMAINS
Domains:
EMPLOYEES;1 CONTRACT_EMPLOYEES;1 ENG_BUDGET;1
MIS_BUDGET;1 WRIT_BUDGET;1 EQUIP_ACC;1 PURC_ACC;1
SALES_ACC;1
DTR>In this example, Datatrieve searched the list of domain definitions in all four of the directories listed in the search list. The order in which Datatrieve displays the names is determined by the order of the directories listed in the search list definition. For example, the domain EMPLOYEES is located in the following dictionary directory:
DISK$1:[KIRK.DTR]PERSONNEL_CDO.SALARIED;
the domain CONTRACT_EMPLOYEES is located in
DISK$1:[KIRK.DTR]PERSONNEL_CDO.CONTRACT.CONTRACT_EMP
and so on.
You can associate a search list with the logical name CDD$DEFAULT. First you should assign a search list to a logical name, then assign the logical name to CDD$DEFAULT. Your initial default is the first dictionary area specified in the search list. You can also assign a search list to CDD$DEFAULT.
Note
Search lists are designed primarily for use with CDO format dictionaries. If you mix both CDO and DMU format dictionary definitions in a search list, you may get unexpected results.
19.10. Setting Dictionary Location
When you invoke Datatrieve, your location is the dictionary directory assigned to the logical name CDD$DEFAULT. If you do not have an assignment for CDD$DEFAULT, then when you invoke Datatrieve your dictionary location is CDD$TOP.
To move from one dictionary directory to another, use the Datatrieve
SET DICTIONARY command. You can use either a full or a
relative path name to specify the dictionary destination or you can use a
properly defined logical name. You can also use the logical name
CDD$DEFAULT to return to the directory you assigned
to it:
DTR> SET DICTIONARY DISK$1:[KIRK.DTR]SAMPLE DTR> SHOW DICTIONARY The default dictionary is DISK$1:[KIRK.DTR]SAMPLE DTR> SET DICTIONARY CDD$DEFAULT DTR> SHOW DICTIONARY The default dictionary is DISK$1:[KIRK.DTR]PERSONNEL_CDO DTR> SET DICTIONARY CONTRACT.CONTRACT_EMP DTR> SHOW DICTIONARY The default dictionary is DISK$1:[KIRK.DTR]PERSONNEL_CDO.CONTRACT.CONTRACT_EMP
You can use a hyphen in your path name for each directory name leading to the top-level directory in the dictionary until you have entered a hyphen for the first dictionary directory common to both your current location and the path name you want to specify. Remember, if the command line you are entering ends in a hyphen, you must end the command line with a semicolon. Datatrieve interprets a hyphen at the end of a command line as a continuation character. Additionally, you cannot use a hyphen in an anchor:
DTR> SHOW DICTIONARY The default dictionary is DISK$1:[KIRK.DTR]PERSONNEL_CDO.CONTRACT.CONTRACT_EMP DTR> SET DICTIONARY -.-.SALARIED DTR> SHOW DICTIONARY The default dictionary is DISK$1:[KIRK.DTR]PERSONNEL_CDO.SALARIED DTR> SET DICTIONARY -; DTR> SHOW DICTIONARY The default dictionary is DISK$1:[KIRK.DTR]PERSONNEL_CDO
You can also use search list logicals when setting your default dictionary
directory. In the following example, MY_DICT is a logical name that
represents a search list.
DTR> SET DICTIONARY MY_DICT
DTR> SHOW DICTIONARY
The default dictionary is MY_DICT
= DISK$1:[KIRK.DTR]PERSONNEL_CDO.SALARIED
= DISK$1:[KIRK.DTR]PERSONNEL_CDO.CONTRACT.CONTRACT_EMP
= URNODE::DISK$2:[BRUN.DATA]BUDGET
DTR>You should note that the Datatrieve SET DICTIONARY command
controls the default dictionary directory setting used by the
CDO command. When you enter a SET
DICTIONARY command, the default dictionary used by the
CDO command is also changed. However, a CDO SET
DEFAULT command does not change your current Datatrieve default
dictionary directory setting. For more information on the CDO
command, see Section 20.7, ''The Datatrieve CDO Command''.
19.11. Deleting, Purging, and Extracting Definitions
Use the DELETE command to erase definitions from dictionary
directories. When you delete a definition stored in the DMU format dictionary,
you must always include an explicit version number and a semicolon to end the
command. This means that the DELETE command contains two
semicolons:
DTR> SHOW RECORDS
Records:
* PHONES_REC;3 * PHONES_REC;2 * PHONES_REC;1
DTR> DELETE PHONES_REC;1;
DTR> SHOW RECORDS
Records:
* PHONES_REC;3 * PHONES_REC;2
DTR>However, when you delete a definition stored in the CDO format dictionary, you can chose not to include a version number. In this case Datatrieve deletes the highest version number of the named object. Such a command requires only a semicolon:
DTR> SHOW RECORDS
Records:
YACHT_CDO_REC;5 YACHT_CDO_REC;4 YACHT_CDO_REC;3
YACHT_CDO_REC;2 YACHT_CDO_REC;1
DTR> DELETE YACHT_CDO_REC;
DTR> SHOW RECORDS
Records:
YACHT_CDO_REC;4 YACHT_CDO_REC;3 YACHT_CDO_REC;2
YACHT_CDO_REC;1
DTR>To delete dictionary definitions you need DELETE access to the dictionary. See the VSI Datatrieve Reference Manual for more information on access privileges and protection.
You can get rid of outdated versions of definitions using one of two methods:
You can explicitly delete each version of the definition you do not want to keep.
You can use the
PURGEcommand to delete all but the highest version or specified versions of the definition.
To purge CDD/Repository objects, set your dictionary location to the directory
containing the definitions you want to purge. Enter the PURGE
command or the PURGE command with the KEEP argument to delete
outdated versions of definitions. Note, however, that you cannot purge a
definition that is member of a relationship. To determine whether an object is a
member in an existing relationship, you can use the CDO
command in Datatrieve to call the CDO utility’s SHOW USES
command. This CDD/Repository command displays a list of any objects that own the
specified definition. See Chapter 20, "Using Datatrieve With a CDO Format Dictionary" for more
information.
The following example shows how to purge all but the two highest versions of
PHONES_REC in the PRACTICE directory:
DTR> SHOW DICTIONARY
The default directory is CDD$TOP.DTR$USERS.BELL
DTR> SET DICTIONARY CDD$TOP.DTR$USERS.BELL.PRACTICE
DTR> SHOW RECORDS
Records:
* PHONES_REC;4 * PHONES_REC;3 * PHONES_REC;2
DTR> PURGE PHONES_REC KEEP = 2
DTR> SHOW RECORDS
Records:
* PHONES_REC;4 * PHONES_REC;3If you want to move a definition to another dictionary directory or send it to
another user on your system, you can use the EXTRACT command
to copy the definition into an OpenVMS file that you can execute or send. You
(or the other user) can then use the at sign (@) to store the
definition at a new dictionary location.
Note that you should check to be sure there is nothing in the new directory with the same name as the definition you want to copy. If there were, you would edit one of the definitions to change the object name. Note, too, that if the record definition is stored in a CDO format dictionary and it contains a CDO field-level definition in a FROM clause, you may have to edit the definition to point to the correct location of the field-level definition.
The following example shows how to copy the definition SALES_REC
in the directory CDD$TOP.DTR$LIB.DEMO to the file
TEMP.COM; set the dictionary location; and store the
SALES_REC definition in the new dictionary directory. Note the
use of the SHOW ALL command to be sure there is nothing in
the directory with the same name as the definition in
TEMP.COM:
DTR> SET DICTIONARY CDD$TOP.DTR$LIB.DEMO
DTR> SHOW RECORDS
Records:
* ACCOUNT_BALANCES_REC;1 * ANNUAL_REC;1 * DAB;1
* FAMILY_REC;1 * OWNER_RECORD;1 * PAYABLES_REC;1 * PERSONNEL_REC;1
* PET_REC;1 * PROJECT_REC;1 * SALES_REC;1 * YACHT;1
DTR> EXTRACT SALES_REC ON TEMP.COM
DTR> SET DICTIONARY CDD$TOP.DTR$USERS.BELL
DTR> SHOW ALL
Domains:
* ACCOUNT_BALANCES;1 * FAMILIES;1 * OWNERS;1
* PERSONNEL;1 * PETS;1 * PROJECTS;1 * YACHTS;1
Records:
* ACCOUNT_BALANCES_REC;1 * FAMILY_REC;1 * OWNER_RECORD;1
* PERSONNEL_REC;1 * PET_REC;1 * PROJECT_REC;1 * YACHT;1
The default directory is CDD$TOP.DTR$USERS.BELL
No established collections.
No ready sources.
No loaded tables.
DTR> @TEMP.COM
Element "SALES_REC" not found in dictionary.
[Record is 35 bytes long.]
Element to be redefined not found in dictionary - new element defined.
DTR> SHOW RECORDS
Records:
* ACCOUNT_BALANCES_REC;1 * FAMILY_REC;1 * OWNER_RECORD;1
* PERSONNEL_REC;1 * PET_REC;1 * PROJECT_REC;1 * SALES_REC;1
YACHT;1
DTR>The messages resulting from the store operation at the new location are
informational and do not indicate a problem. The extract operation automatically
puts DELETE and REDEFINE commands before
the definition in TEMP.COM. In the directory BELL,
nothing can be deleted or redefined as a new version, which Datatrieve reports.
The REDEFINE command still stores the definition for
you.
You should note that if you use the EXTRACT command to move
record definitions from one directory to another, you could be affecting any
domain definitions that refer to the record you are moving. When you define a
domain, Datatrieve stores a full path name of the record specified in the domain
definition. If you extract a record and move it to a new directory, the existing
domain definition no longer points to the location of the record. You must edit
the domain definition to specify the correct path name of the record in its new
location.
Also, if you use the EXTRACT command to move record
definitions, you should check those definitions for CDO field-level definitions
in FROM clauses. If the extracted record does include a FROM clause, be sure
that the field-level definition to which the record points is also stored in the
new dictionary directory or that you specify a full path name for the field in
the FROM clause.
Chapter 20. Using Datatrieve With a CDO Format Dictionary
The CDD/Repository dictionary system offers you a single logical dictionary that provides access to one or more physical CDO dictionaries. These dictionaries can be distributed on different devices on a single node, on different nodes of a OpenVMS cluster, or on local or wide area networks.
CDO format dictionaries offer you the ability to store data definitions in any one of a number of user-created CDO dictionaries set up anywhere on the system or network. You can also store definitions in the CDO compatibility dictionary, which is created automatically when CDD/Repository is installed on your system.
Datatrieve lets you store record, domain, procedure, table, database, and port definitions in CDO format dictionaries. Using CDO with Datatrieve, you can take advantage of the CDD/Repository feature that allows you to establish relationships between some CDO dictionary objects. These relationships track how data descriptions are shared. You can use this feature to see what data definitions are affected when you or someone else makes changes to a definition.
CDO format dictionaries also allow for field-level definitions. Datatrieve lets you use a special FROM clause in record definitions to include field level definitions defined through the CDO utility in your Datatrieve record.
20.1. Organization of a CDO Format Dictionary
The structure of an individual CDO format dictionary and the DMU format dictionary is similar. Each dictionary is organized as a hierarchy of dictionary directories and dictionary entities. Datatrieve refers to dictionary entities as objects. These terms are used interchangeably throughout the Datatrieve documentation. Dictionary directories are similar to OpenVMS directories in that they organize information within the hierarchy. Data definitions are dictionary objects. Each dictionary can have a number of dictionary directories and any number of objects. As in DMU format dictionaries, dictionary directories are parents. Children of dictionary directories can include other directories or objects.
The following figure illustrates a sample user-created CDO format dictionary. Text in boxes indicates directories. Text without boxes indicates object names:
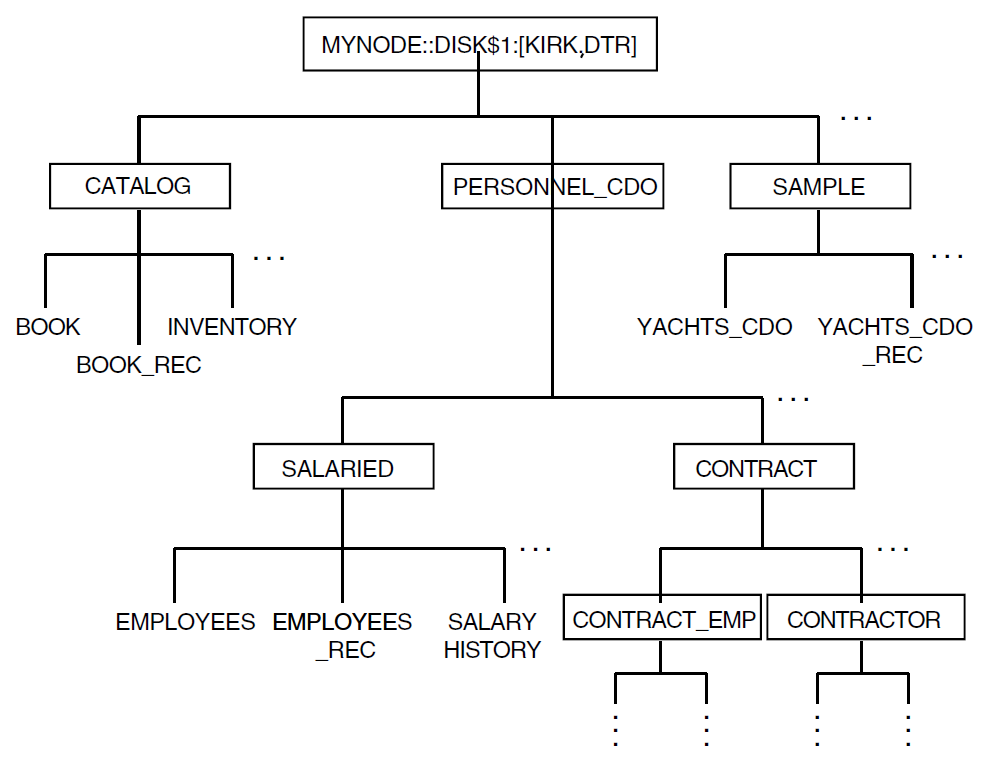
All directories and objects are descendants of a user-created dictionary
MYNODE::DISK$1:[KIRK.DTR], which was created using the CDO
utility.
20.2. Displaying Information About Directories, Objects, and Session Defaults
The Datatrieve SHOW command displays information about data
definitions stored in dictionary directories (the Datatrieve
PRINT and LIST statements, on the
other hand, display actual data, not data definitions). For more information on
the SHOW command, see the
VSI Datatrieve Reference Manual.
20.3. Creating Dictionaries and Dictionary Directories
On installation, CDD/Repository creates a DMU dictionary for you. It also creates a CDO compatibility dictionary. You can use the compatibility dictionary to store your own CDO definitions or you can create another physical CDO dictionary on your own system or on another device on a OpenVMS cluster. To define a new physical CDO dictionary, you must take the following actions:
Create a new OpenVMS directory.
Create a CDO dictionary using the
DEFINE DICTIONARYcommand of the CDO utility in CDD/Repository .
You can create the new OpenVMS directory at DCL level, or you can spawn a
subprocess from Datatrieve using either the FN$SPAWN
function or the FN$DCL function to create the OpenVMS
directory. You should not store any other files in the directory that contains
your CDO dictionary. If you should delete a CDO dictionary using the
DELETE DICTIONARY command of the CDO utility, all files
in the OpenVMS anchor directory are deleted.
To define the new dictionary, you must use the CDO utility. You can access the
CDO utility through Datatrieve with the Datatrieve CDO
command, or you can invoke the CDO utility at the DCL level. Be sure that you
invoke CDO from an OpenVMS directory that does not contain a dictionary (an
OpenVMS directory that contains an entry for
CDD$PROTOCOLS indicates that a CDO dictionary is
stored there).
In the following example, the new OpenVMS directory is created at DCL level.
To create the new dictionary, the user invoked Datatrieve and then used the
CDO command to create the new dictionary in that OpenVMS
directory:
$ SET DEFAULT DISK$3:[CORPORATE]
$ CREATE/DIRECTORY [.CDO_LIBRARY]
$ DATATRIEVE/INTERFACE=CHARACTER_CELL
VSI DATATRIEVE V6.0
DEC Query and Report System
Type HELP for help
DTR> SHOW DICTIONARY
The default dictionary is DISK$1:[KIRK.DTR]PERSONNEL_CDO
DTR> CDO DEFINE DICTIONARY DISK$3:[CORP.CDO_LIB]
DTR> CDO DIRECTORY DISK$3:[CORP.CDO_LIB]
Directory DISK$3:[CORP.CDO_LIB]
CDD$PROTOCOLS DIRECTORY
DTR> SET DICTIONARY DISK$3:[CORP.CDO_LIB]
DTR> SHOW DICTIONARY
The default dictionary is DISK$3:[CORP.CDO_LIB]
DTR> SHOW ALL
Domains:
Records:
Procedures:
Tables:
Dictionaries:
CDD$PROTOCOLS
The default dictionary is DISK$3:[CORP.CDO_LIB]
No established collections.
No ready sources.
No loaded tables.
DTR>CDD/Repository creates the directory CDD$PROTOCOLS automatically when you create a new CDO dictionary. It contains definitions that describe the types of objects and attributes that you use in your data descriptions. These definitions are essential to the functioning of your dictionary and should not be changed or deleted.
To create dictionary directories to append to your new dictionary or to an
existing dictionary, use the Datatrieve DEFINE DICTIONARY
command.
Note
The CDO DEFINE DICTIONARY command is used to create new
CDO format dictionaries. The Datatrieve DEFINE DICTIONARY
command is used to create dictionary directories. If you want to create
dictionary directories through the CDO utility, use the CDO DEFINE
DIRECTORY command.
You can define the new dictionary directory by using either a full path name or the directory’s given name. If you define the directory using a full path name, then you need not set your default directory to the directory from which you want to create your new directory. If you use just the given name, then Datatrieve appends the new directory to your default directory.
The following example uses a given name to append the directory
CATALOG to the dictionary anchor
DISK$1:[KIRK.DTR]:
DTR> SHOW DICTIONARY
The default directory is DISK$3:[CORP.CDO_LIB]
DTR> DEFINE DICTIONARY CATALOG
DTR> SHOW DICTIONARIES
Dictionaries:
CDD$PROTOCOLS CATALOG
DTR>Because CDD/Repository allows for multiple CDO format dictionaries, you may
accidentally try to create a directory in a dictionary that does not exist. In
such a case, the DEFINE DICTIONARY command fails and you
receive a message saying that the CDO dictionary in which you tried to define
the directory does not exist.
20.4. Deleting CDO Dictionaries and Dictionary Directories
You cannot delete any of your CDO dictionaries or dictionary directories with
the Datatrieve DELETE command. You must use the Datatrieve
CDO command to access the CDO utility or you must exit
Datatrieve and invoke the CDO utility. Then you can use the CDO DELETE
DIRECTORY and DELETE DICTIONARY commands to
delete the appropriate definition.
You must be the owner of a directory or the system manager to delete a directory definition. Before you delete a dictionary directory, you must empty the directory of its contents. You may want to delete existing definitions in the directory or to move the definitions to other directories. If you choose to move the definitions, be sure that definitions of other dictionary objects that point to the object you are moving are changed to point to the new location.
The following example uses the Datatrieve CDO command to
access the CDO utility, and then uses the CDO DELETE command
to delete the directory CATALOG. The CDO utility’s
/LOG qualifier displays an informational message to
indicate that the directory is deleted:
DTR> SHOW DICTIONARY
The default dictionary is DISK$3:[CORP.CDO_LIB]CATALOG
DTR> SHOW ALL
Domains:
BOOK;1 INVENTORY;1
Records:
BOOK_REC;1
Procedures:
Tables:
Dictionaries:
The default directory is DISK$3:[CORP.CDO_LIB]CATALOG
No established collections.
No ready sources.
No loaded tables.
DTR> DELETE BOOK;1;
DTR> DELETE BOOK_REC;1;
DTR> DELETE INVENTORY;1;
DTR> SHOW ALL
Domains:
Records:
Procedures:
Tables:
Dictionaries:
The default directory is DISK$3:[CORP.CDO_LIB]CATALOG
No established collections.
No ready sources.
No loaded tables.
DTR> SET DICTIONARY DISK$3:[CORP.CDO_LIB]
DTR> CDO DELETE DIRECTORY/LOG CATALOG
%CDO-I-DIRDEL, directory CATALOG deleted
DTR>You cannot delete a CDO dictionary if it has an object that is used by a
definition in a different dictionary. For example, you cannot delete a
dictionary if it contains a record definition that is used by a domain in a
different dictionary. If you are uncertain whether any objects in the dictionary
have relationships, you can use the SHOW USED_BY,
SHOW USES, and SHOW WHAT_IF commands
of the CDO utility to display a list of objects affected by relationships. You
can access these commands through Datatrieve with the Datatrieve
CDO command. For more information on the Datatrieve
CDO command, see Section 20.7, ''The Datatrieve CDO Command''.
Before you delete a dictionary, be sure you know whether any of the objects in
that dictionary had relationships to objects in other dictionaries. The CDO
DELETE DICTIONARY command deletes all objects in the
dictionary as well as any relationships between objects in the dictionary and in
other dictionaries.
Note, too, that the CDO DELETE DICTIONARY command deletes
all files in the specified OpenVMS anchor directory, including any files
unrelated to the dictionary that you may have stored there.
The following example displays the contents of the anchor directory to be sure
that all elements have been appropriately moved or deleted. It then deletes the
dictionary DISK$3:[CORP.CDO_LIB] using the CDO utility:
DTR> SET DICTIONARY DISK$3:[CORP.CDO_LIB] DTR> SHOW ALL Domains: Records: Procedures: Tables: Dictionaries: The default directory is DISK$3:[CORP.CDO_LIB] No established collections. No ready sources. No loaded tables. DTR> EXIT $ DICTIONARY OPERATOR CDO>DELETE DICTIONARY/LOG DISK$3:[CORP.CDO_LIB]. %CDO-I-DICDEL, dictionary DISK$3:[CORP.CDO_LIB] deleted CDO> EXIT $
When you use the CDO utility’s /LOG qualifier, a message is
issued indicating that the dictionary has been deleted.
20.5. Defining Datatrieve Objects for CDO Format Dictionaries
You can store Datatrieve record, domain, procedure, table, database, and port definitions in a CDO format dictionary. If you choose to store these definitions in CDO format, you can automatically create a CDO format definition by setting your default dictionary to a CDO format dictionary and defining an object using the given name of the object you want to create (a given name is the name of the object itself, not a full or partial path name).
If your default is set to a CDO format dictionary directory, you can also use a relative path name to store a definition in a directory relative to your default CDO directory.
If you are in the compatibility dictionary, you can specify a CDO format
definition by using a CDO style path name in your object definition, or by using
an anchor in a SET DICTIONARY command before defining new
objects.
Datatrieve determines the dictionary format of your definition by reading the path name or by looking at your default dictionary directory. If your default dictionary directory is in a CDO format dictionary and the path name stored in the definition is a given name or a relative path name, then Datatrieve defines the object in CDO format.
You can define most CDO format domains either with or without the optional WITH RELATIONSHIPS clause. You cannot define Datatrieve port definitions with relationships.
If you use the WITH RELATIONSHIPS clause in your Datatrieve domain definition, you can take advantage of the pieces tracking feature of CDD/Repository. To take full advantage of this feature, you should be aware of some of the work that Datatrieve does for you when it creates and stores CDO format definitions.
When you define an RMS domain with relationships, Datatrieve creates the necessary CDO objects that let you take advantage of the relationships feature. These objects include the following:
CDD$DATABASE
MCS_BINARY
CDD$RMS_DATABASE
CDD$FILE_DEFINITION
The CDD$DATABASE object points to the MCS_BINARY object that contains the name of the file used by your Datatrieve domain definition. Remember that a Datatrieve domain definition links the description of the data (a record) to the file containing the actual data. The CDD$DATABASE also points to a CDD$RMS_DATABASE object. The CDD$RMS_DATABASE object points to the record definition specified in the domain definition.
The CDD$RMS_DATABASE object may also point to a
CDD$FILE_DEFINITION object (although the
CDD$FILE_DEFINITION object is not created until you
define the data file with the Datatrieve DEFINE FILE
command). The CDD$FILE_DEFINITION object describes an
RMS file. It lists attributes for the RMS file as specified in the
DEFINE FILE command. If your Datatrieve DEFINE
FILE command refers to an FDL file, Datatrieve builds the
CDD$FILE_DEFINITION file based on the attributes
listed in the FDL file. For more information on using FDL files in Datatrieve,
see Chapter 4, "Defining Data Files".
If you use Datatrieve to define a domain with relationships, you should note
that while Datatrieve creates the CDD$DATABASE,
CDD$RMS_DATABASE,
MCS_BINARY, and
CDD$FILE_DEFINITION objects, it does not make
entries for these objects in the CDO directory. If you invoke the CDO
DIRECTORY command, the display that it creates does not
include an entry for the objects created by the Datatrieve DEFINE
DOMAIN command. You can make entries for these objects using the
CDO ENTER command. However, to make these directory entries,
you must know the name of the object for which you are creating an entry.
Datatrieve names these objects by appending a suffix to the given name of the
domain. The suffix consists of two to four letters preceded by a dollar sign
($). These are displayed in the table below:
|
Object Created by Datatrieve |
Suffix Appended by Datatrieve |
Example |
|---|---|---|
| CDD$DATABASE | $DB | YACHTS_CDO$DB |
| CDD$RMS_DATABASE | $RMS | YACHTS_CDO$RMS |
| MCS_BINARY | $FILE | YACHTS_CDO$FILE |
| CDD$FILE_DEFINITION | $FD | YACHTS_CDO$FD |
If you are defining a domain based upon a relational database source, then the CDD$DATABASE for that object was created by the utility used to create that database.
You can create a CDD$DATABASE using the CDO utility rather than letting Datatrieve create it for you. If you do, you can then use Datatrieve to define a domain based upon that CDD$DATABASE. In such a case, the WITH RELATIONSHIPS clause is a required part of the domain definition.
Defining domains and records without the WITH RELATIONSHIPS clause is very similar to defining objects as you would for a DMU format dictionary; however, these definitions are written in CDO format and stored in CDO dictionaries.
Section 20.5.1, ''Defining Datatrieve Domains in CDO Format'', Section 20.5.2, ''Defining Datatrieve Records in CDO Format'', and Section 20.5.3, ''DEFINE Command for CDO Format Domains'' discuss concerns and features specific to individual Datatrieve define commands.
20.5.1. Defining Datatrieve Domains in CDO Format
One of the key differences between a domain defined for a DMU format
dictionary and one defined for a CDO format dictionary is that you can
define CDO format objects with relationships. The WITH RELATIONSHIPS clause
is part of the syntax of the Datatrieve DEFINE DOMAIN
command. The syntax of the DEFINE DOMAIN command varies
for the type of domain you are defining: RMS domain, view domain, relational
domain, or remote domain. See Section 3.8, ''Using the WITH RELATIONSHIPS Clause'' for information on
defining specific types of domains.
20.5.2. Defining Datatrieve Records in CDO Format
When you define a record in Datatrieve, that record is made up of a
combination of group or elementary fields. Fields, in essence, are part of
the record definition, and do not exist independently of it. The record
PHONES_REC shows a typical Datatrieve record
definition:
DTR> SHOW PHONES_REC
RECORD PHONES_REC
01 PHONES_REC.
05 FULL_NAME QUERY_NAME IS NAME.
10 LAST_NAME PIC X(20)
QUERY_NAME IS L.
10 FIRST_NAME PIC X(15)
QUERY_NAME IS F.
05 AREA_CODE PIC X(3)
QUERY_NAME IS AREA.
05 PHONE_NUMBER PIC X(8)
QUERY_NAME IS NUMBER.
;
DTR>Each of the fields in PHONES_REC is part of the
record. These fields are defined as part of the Datatrieve DEFINE
RECORD command.
The CDO utility of CDD/Repository offers you field-level definition capability. With the CDO utility, you can define individual fields that exist apart from any record definition. When you define records using either the CDO utility or Datatrieve, you can use these CDO-defined fields in your record definition. This allows you to store just one copy of a particular field-level definition that can be used by a number of different products or programs.
A company may have many applications that include the fields FULL_NAME, FIRST_NAME, and LAST_NAME. To ensure that each translation of those fields is consistent throughout the company, you may want to have a single company-wide definition for each of those definitions. CDD/Repository offers this capability.
In the following example, the CDO utility is used to define the fields
FIRST_NAME and LAST_NAME. In CDO, only
elementary fields can be defined at field level. The group field
FULL_NAME is defined as a record and includes the
FIRST_NAME and LAST_NAME fields. At the DCL
level, the command DICTIONARY OPERATOR invokes the CDO
utility:
$ DICTIONARY OPERATOR CDO> DEFINE FIELD FIRST_NAME cont> DATA TYPE IS TEXT SIZE IS 15. CDO> DEFINE FIELD LAST_NAME cont> DATA TYPE IS TEXT SIZE IS 20. CDO> DEFINE RECORD FULL_NAME. cont> FIRST_NAME. cont> LAST_NAME. cont> END FULL_NAME RECORD. CDO> EXIT $
In Datatrieve, you can take advantage of this CDD/Repository feature by
using the FROM clause of the Datatrieve DEFINE RECORD
command. With the FROM clause, you can create a record
PHONES_REC_CDO that uses the individual field definitions
FIRST_NAME and LAST_NAME. The word
GROUP is a Datatrieve keyword; it indicates that the CDO
record definition FULL_NAME is used in Datatrieve as a group
field definition. Note that because FULL_NAME is stored in the
default directory, neither a device nor a directory specification need be
included in the field name:
DTR> DEFINE RECORD PHONES_REC_CDO USING DFN> 01 PHONES_REC_CDO. DFN> 05 FROM GROUP FULL_NAME. DFN> 05 AREA_CODE PIC X(3) DFN> QUERY_NAME IS AREA. DFN> 05 PHONE_NUMBER PIC X(8) DFN> QUERY_NAME IS NUMBER. DFN> ; DTR>
The following example uses the CDO-defined field-level definitions
FIRST_NAME and LAST_NAME. It also uses
MIDDLE_INIT, which is a field that is local to Datatrieve.
As MIDDLE_INIT is defined in Datatrieve, you cannot use the
FULL_NAME group field used in the previous example.
Instead, this record definition uses the group field NAME,
which is also local to Datatrieve. To complete the record definition, this
example includes the ADDRESS_GROUP_FIELD record that was
created in the Datatrieve CDO Command with the CDO
utility:
DTR> DEFINE RECORD ADDRESSES_REC USING DFN> 01 ADDRESSES_REC. DFN> 03 NAME. DFN> 05 FROM FIELD LAST_NAME. DFN> 05 FROM FIELD FIRST_NAME. DFN> 05 MIDDLE_INIT PIC X. DFN> 03 FROM GROUP ADDRESS_GROUP_FIELD. DFN> ; DTR>
Note that if you should update a version of a field-level definition, you may also have to update the record definition to reflect the field’s new version number. You can do this by editing the record definition and then immediately exiting from the editor.
When you use a FROM clause to include field-level definitions in your
Datatrieve record definition, you are also establishing relationships
between the field definition and the record definition. You can then perform
pieces tracking on these objects using the CDO utility’s SHOW
USES and SHOW USED_BY commands.
20.5.3. DEFINE Command for CDO Format Domains
Datatrieve checks each DEFINE FILE command for special
arguments that affect the characteristics of your data file regardless of
which dictionary your domain is stored in. When you define a data file for a
Datatrieve domain that is defined in a CDO format dictionary but without
relationships, the process for defining the data file is similar to defining
a data file for a DMU format domain.
20.6. Readying CDO Format Domains
When you ready a domain, Datatrieve determines the dictionary source of the
domain through the path name used in the READY command. If
you use only the domain’s given name, Datatrieve searches the contents of your
default directory. If you use a relative path name, Datatrieve searches the
directory relative to your default directory.
If a CDO format domain was defined using the WITH RELATIONSHIPS clause of the
Datatrieve DEFINE DOMAIN command, you may receive
informational messages when you ready that domain. CDD/Repository flags an
object with a message if the object has been affected by a change to another
object. For example, if you modify a record definition, CDD/Repository attaches
a message to any domain definition that refers to that record. When you go to
ready that domain, Datatrieve displays the message.
For example, the domain YACHTS_CDO was originally defined with
the relationships clause using the record YACHT_CDO_REC;1. Later,
YACHT_CDO_REC is redefined to produce
YACHT_CDO_REC;2. If you ready YACHTS_CDO, you
receive a message as in the following example:
DTR> READY YACHTS_CDO "YACHTS_CDO" uses an entity which has new versions, triggered by RECORD entity "DISK$1:[KIRK.DTR]SAMPLE.YACHT_CDO_REC;2". [Record is 41 bytes long.] DTR>
This message is informational. It lets you know that there may be some discrepancy between versions of the objects. You should check that all your definitions are consistent before going on, otherwise you may find that your data is invalid.
You might also receive messages in situations like the following if the domain was defined with relationships:
YACHTS_CDO is defined using the record YACHT_CDO_REC. It contains a field PRICE;1, which was changed through CDO with the CDO
CHANGEcommand (which modifies an object, but does not create a new version). This would generate a message indicating that the record YACHT_CDO_REC may be invalid because of the change to the PRICE field.The view domain SAILBOATS_CDO refers to the domain YACHTS_CDO, which refers to YACHT_CDO_REC described in the previous example (in which the PRICE field was changed). When you ready SAILBOATS_CDO, you receive the same message you received when you readied YACHTS_CDO.
You can use the CDO utility’s SHOW NOTICES command to
display messages that may be attached to any specified object. If you want to
clear the messages after you display them, use the CDO utility’s CLEAR
NOTICES
command.
If you use the CDO utility to define a CDD$DATABASE
based upon a CDD$RMS_DATABASE and a record defined
using either the CDO utility or Datatrieve, you can ready that database
directly. For instance, a previous example used the CDO utility to define the
record CDO_REC. The CDO utility was then used to define
a CDD$RMS_DATABASE called
CDO_RMS based on CDO_REC.
The CDO utility’s CDO DEFINE DATABASE command was then used
to define the database CDO_DB. To ready this database
in Datatrieve, you would enter the following command:
DTR> READY CDO_DB
For more information on the CDD$DATABASE and CDD$RMS_DATABASE, see Section 20.5, ''Defining Datatrieve Objects for CDO Format Dictionaries''.
20.7. The Datatrieve CDO Command
Although you can create CDO format definitions using Datatrieve, some of the
benefits of CDO format definitions can only be seen by directly manipulating the
CDO utility. Datatrieve lets you do this with its CDO
command, which lets you communicate directly with the CDO utility.
The Datatrieve CDO command takes as an argument a text
string that represents a CDO utility command. The command is then sent to the
CDO utility and any output generated by the command is displayed on your
terminal.
The Datatrieve CDO command is useful if you have defined
domains with the WITH RELATIONSHIPS clause. When you establish relationships
between certain Datatrieve objects, you can perform pieces-tracking on those
objects. This lets you see what objects might be affected by any changes that
you or another user may make to an object that is part of a relationship.
With the Datatrieve CDO command you can define new CDO
dictionaries and field-level definitions without leaving your Datatrieve
session.
In the following examples, the Datatrieve CDO command
creates field-level definitions of address elements. It then creates a record
definition ADDRESS_GROUP_FIELD that will be used later as a group
field in a Datatrieve record definition. Field-level definitions are a feature
of CDD/Repository . You can use CDO-created field-level definitions when you
define a Datatrieve record. Group fields must be defined as records in CDO. See
Section 20.5.2, ''Defining Datatrieve Records in CDO Format'' for more information:
DTR> CDO DEFINE FIELD STREET_NUMBER - CON> DATA TYPE IS TEXT - CON> SIZE IS 5. DTR> CDO DEFINE FIELD STREET - CON> DATA TYPE IS TEXT - CON> SIZE IS 25. DTR> CDO DEFINE FIELD CITY - CON> DATA TYPE IS TEXT - CON> SIZE IS 25. DTR> CDO DEFINE FIELD STATE - CON> DATA TYPE IS TEXT - CON> SIZE IS 2. DTR> CDO DEFINE FIELD ZIP_CODE - CON> DATA TYPE IS TEXT - CON> SIZE IS 9. DTR> CDO DEFINE RECORD ADDRESS_GROUP_FIELD. - CON> STREET_NUMBER. - CON> STREET. - CON> CITY. - CON> STATE. - CON> ZIP_CODE. - CON> END RECORD. DTR>
You can also display these definitions using the Datatrieve
CDO command with the text of the CDO utility’s
SHOW RECORD command, as follows:
DTR> CDO SHOW RECORD ADDRESS_GROUP_FIELD Definition of record ADDRESS_GROUP_FIELD | Contains field STREET_NUMBER | Contains field STREET | Contains field CITY | Contains field STATE | Contains field ZIP_CODE DTR>
The following example uses Datatrieve to define a record that uses the
ADDRESS_GROUP_FIELD record. The definitions
LAST_NAME and FIRST_NAME
are defined in Section 20.5.2, ''Defining Datatrieve Records in CDO Format''. The next step is to use the
Datatrieve DEFINE DOMAIN command using the WITH RELATIONSHIPS
clause to provide a domain definition upon which pieces-tracking can be
performed:
DTR> DEFINE RECORD ADDRESSES_REC USING DFN> 01 ADDRESSES_REC. DFN> 03 FULL_NAME. DFN> 05 FROM FIELD LAST_NAME. DFN> 05 FROM FIELD FIRST_NAME. DFN> 05 MIDDLE_INIT PIC X. DFN> 03 FROM GROUP ADDRESS_GROUP_FIELD. DFN> ; DTR> DEFINE DOMAIN CDO_ADDRESSES USING ADDRESSES_REC - CON> ON ADDRESSES.DAT WITH RELATIONSHIPS ;
The Datatrieve CDO command can now be used to take
advantage of the CDO utility’s SHOW USES, SHOW
USED_BY, and SHOW WHAT_IF commands to display
information on how objects are related. In the following example, the
SHOW USES and SHOW USED_BY commands
are used to display information on the CDO fields and the record defined earlier
in this section:
DTR> CDO SHOW USES STREET_NUMBER Owners of DISK$1:[KIRK.DTR]SAMPLE.STREET_NUMBER;1 | DISK$1:[KIRK.DTR]SAMPLE.ADDRESS_GROUP_FIELD;1 (Type : RECORD) | | via CDD$DATA_AGGREGATE_CONTAINS | ADDRESS_GROUP_FIELD (Type : RECORD) | | via CDD$DATA_AGGREGATE_CONTAINS DTR> CDO SHOW USED_BY ADDRESS_GROUP_REC Members of DISK$1:[KIRK.DTR]SAMPLE.ADDRESS_GROUP_REC;1 | DISK$1:[KIRK.DTR]SAMPLE.STREET_NUMBER;1 (Type : FIELD) | | via CDD$DATA_AGGREGATE_CONTAINS | DISK$1:[KIRK.DTR]SAMPLE.STREET;1 (Type : FIELD) | | via CDD$DATA_AGGREGATE_CONTAINS | DISK$1:[KIRK.DTR]SAMPLE.CITY;1 (Type : FIELD) | | via CDD$DATA_AGGREGATE_CONTAINS | DISK$1:[KIRK.DTR]SAMPLE.STATE;1 (Type : FIELD) | | via CDD$DATA_AGGREGATE_CONTAINS | DISK$1:[KIRK.DTR]SAMPLE.ZIP_CODE;1 (Type : FIELD) | | via CDD$DATA_AGGREGATE_CONTAINS DTR>
You should note that the Datatrieve SET DICTIONARY command
controls the default dictionary directory setting used by the
CDO command. When you enter a SET
DICTIONARY command, the default dictionary directory used by the
CDO command is also changed. However, a CDO SET
DEFAULT command does not change your current Datatrieve default
dictionary directory setting.
Chapter 21. Using Datatrieve With a DMU Format Dictionary
When you create data definitions (metadata), Datatrieve stores those definitions in the CDD/Repository data dictionary. Prior to Datatrieve Version 5.0, all Datatrieve data definitions were stored in a DMU format dictionary.
If no DMU format dictionary exists on your system, CDD/Repository creates one; if a DMU format dictionary does exist, CDD/Repository uses the existing dictionary. You can have only one DMU format dictionary on your system.
Your DMU format dictionary lets you store the definitions of Datatrieve records, domains, tables, procedures, databases, ports, and plots. You can manipulate these definitions through Datatrieve or through the DMU utility. To access the DMU utility, you can spawn a subprocess while in Datatrieve using the Datatrieve FN$SPAWN or FN$DCL function or you can exit Datatrieve and invoke the DMU utility. See Chapter 23, "Access Control Lists and Datatrieve Protection" for information on setting protection for DMU as well as CDO format dictionaries.
21.1. Organization of the DMU Format Dictionary
The DMU format dictionary is organized as a hierarchy of dictionary directories and dictionary objects. Dictionary directories are similar to OpenVMS directories in that they organize information within the hierarchy. Data definitions are dictionary objects. The definitions are contained in the directories just as files are contained in OpenVMS directories, and they are located at the ends of the branches in the hierarchy.
The DMU hierarchical structure is like a family tree. Dictionary directories are the parents, and their children include other directories, as well as dictionary objects.
The following figure illustrates a sample DMU format dictionary. Text in boxes indicates directories and text without boxes indicates objects. An ellipsis (...) indicates that the branching continues, but is not shown in the figure (few DMU directories are small and symmetrical enough to fit neatly on a single page). Many of the examples in this document are drawn from this sample dictionary and its associated data definitions:
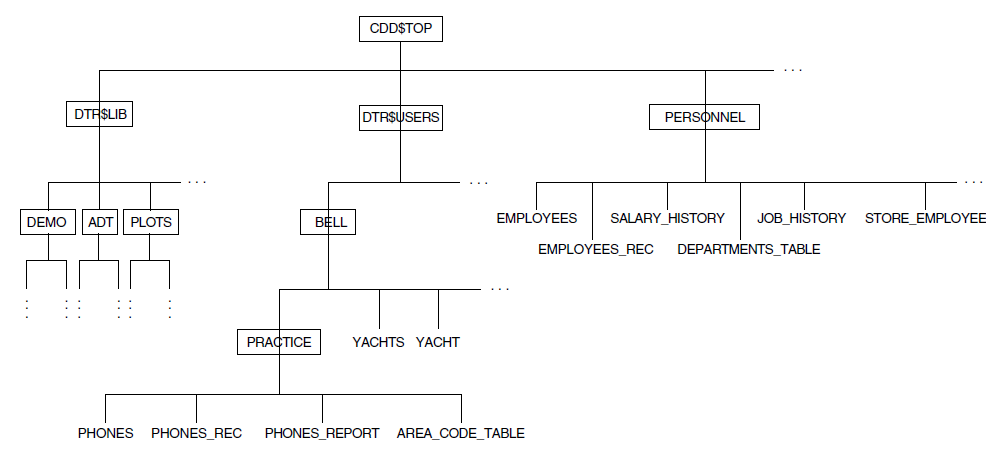
You can see that all DMU directories and objects are descendants of CDD$TOP. The CDD$TOP directory is found at the top of every DMU format dictionary and is created when CDD/Repository is installed.
DTR$USERS is a directory under CDD$TOP that can be created during Datatrieve installation as a parent directory for the private directories of Datatrieve users. BELL is a directory created by the Datatrieve NEWUSER program. It contains the sample definitions copied into it by the NEWUSER program, as well as the PRACTICE directory created by user Bell to store the definitions PHONES and PHONES_REC.
DTR$LIB is a directory under
CDD$TOP that, along with its subdirectories and the
definitions they contain, is always created by the Datatrieve installation
procedure. Later on, you might want to use the Datatrieve SET
DICTIONARY and SHOW commands to become familiar
with what the DTR$LIB branch of the DMU format
dictionary contains. You should never create a dictionary directory or store
your own definitions anywhere in the DTR$LIB branch of
the DMU format dictionary. DTR$LIB and all of its
descendants are deleted and rebuilt each time a Datatrieve installation takes
place.
In this sample DMU dictionary, PERSONNEL is a directory under CDD$TOP that contains the definitions for the personnel system examples used in this book.
Note
This PERSONNEL directory is not included with the sample domains and databases provided with Datatrieve or with the NEWUSER program. Although the structure of the sample database described here is similar to the sample Rdb/VMS database, PERSONNEL (found in DTR$LIB.DEMO.RDB), you cannot reproduce the examples in this book by using that database.
21.2. Creating DMU Format Dictionary Directories
You can append new directories to your branch of the DMU format dictionary
with the DEFINE DICTIONARY command.
Depending on the privileges you have, you might find that you can create directories in other branches of the DMU format dictionary; check with your CDD/Repository manager before you do this. For best CDD/Repository management, users on a system should coordinate where they create directories and store definitions. In addition, some branches of the DMU format dictionary, especially those created by Digital products, are periodically deleted and rebuilt. If you store definitions in these branches, you could eventually lose them. The Datatrieve installation creates the DTR$LIB branch of the DMU format dictionary, for example, and you should not store definitions there.
If you specify only the given name of the new directory, Datatrieve appends the directory to the one at which you are currently located:
DTR> SHOW DICTIONARY
The default directory is CDD$TOP.DTR$USERS.BELL
DTR> DEFINE DICTIONARY SALES
DTR> SHOW DICTIONARIES
Dictionaries:
PRACTICE SALES
DTR>21.3. Deleting Dictionary Directories
You cannot delete any of your DMU directories directly from the Datatrieve command level. To delete a DMU dictionary directory, you can perform one of the following actions:
Use the FN$SPAWN function to invoke the DMU utility and use the DMU
DELETEcommand.Exit Datatrieve, invoke the DMU utility, and use the DMU
DELETEcommand.
The following example shows how to delete the PRACTICE directory
by exiting Datatrieve and invoking the DMU utility:
$ RUN SYS$SYSTEM:DMU DMU> SHOW DEFAULT CDD$TOP.DTR$USERS.BELL DMU> SET DEFAULT PRACTICE DMU> LIST AREA_CODE_TAB;1 <CDD$TABLE> PHONES;1 <DTR$DOMAIN> PHONES_REC;4 <CDD$RECORD> PHONES_REPORT;9 <DTR$PROCEDURE> DMU> DELETE *;* DMU> LIST %DMU-E-NONODFND, no directories or objects found DMU> SET DEFAULT CDD$TOP.DTR$USERS.BELL DMU> LIST/TYPE=DIRECTORY PRACTICE SALES DMU> DELETE PRACTICE DMU> LIST/TYPE=DIRECTORY SALES DMU> EXIT $
Note that the directory was emptied of all its contents before being deleted. If the directory had contained subdirectories, those too would have had to be deleted before the directory could be deleted.
The DMU utility also has a DELETE/ALL command that can wipe
out an entire branch of the DMU format dictionary in one line of input. A user
needs a special DMU privilege (GLOBAL_DELETE) to be
able to use this command. The average CDD/Repository user does not get this
privilege by default and usually is not assigned it by the person who manages
the CDD/Repository dictionary system. See Chapter 19, "Using Datatrieve With the CDD/Repository Dictionary System" for
more information on DMU and CDO dictionary privileges.
21.4. Using CDD/Repository to Design Department-Wide or System-Wide Applications
The CDD/Repository utilities provide more options than Datatrieve for directory organization and maintenance and for access control. Using CDD/Repository utilities, for example, you can organize a branch of the DMU format dictionary as a subdictionary and assign it to a disk that you can remove from a disk drive for maximum security. You must also use CDD/Repository utilities to inspect and maintain auditing information (history lists). The CDD/Repository DMU utility also has an Access Control List (ACL) editor that simplifies creation and maintenance of ACLs.
Chapter 22. Improving Datatrieve Performance
Datatrieve performance depends on many factors. Among them are file organization, selection of keys, optimizing record definitions, and forming queries that take advantage of key optimization. This chapter explains techniques you can use to reduce Datatrieve response time.
22.1. Redesign and Maintenance
It is important to maintain files you use in Datatrieve applications, particularly if they are large indexed files. If you have added or deleted many records, changed the number of indexed keys, or adjusted the size of your records, you may have a badly fragmented file or a file bucket size or global buffer count that may be causing poor I/O performance.
The easiest way to maintain your files is to invoke the following command on the data file:
$ ANALYZE/RMS_FILE/FDL
ANALYZE will create an FDL file for the data file, containing some analysis sections. Then, invoke the following command:
$ EDIT/FDL/ANALYSIS=fdl_file_specThis command begins an interactive session in which the analysis information in the input file is used to obtain an optimized output file.
22.1.1. Adding Data to the File
After you redesign your file, you will want to move data from the existing file into a new data file. It is best to use the RMS CONVERT utility to load large files. It is much faster than Datatrieve and loads data more optimally.
Use the following command line to create a data file using your new .FDL file to describe the new file and to load that new file with data from the old file:
CONVERT/FDL=filespec.fdl oldfile.dat newfile.dat
For more information on file tuning and RMS utilities, refer to the VSI OpenVMS Guide to OpenVMS File Applications.
22.2. Using the OPTIMIZE Qualifier to Improve Performance
The OPTIMIZE qualifier allows you to optimize record
definitions. This greatly reduces the CPU time needed to ready a domain that
refers to the record.
When you specify the OPTIMIZE qualifier with the
DEFINE RECORD or REDEFINE RECORD
command, Datatrieve stores its internal representation of the record (called the
field tree) in the dictionary. This means Datatrieve does not have to
reconstruct the field tree each time you ready a domain that refers to the
record. Datatrieve constructs a new field tree only when the record is redefined
using the OPTIMIZE qualifier.
Datatrieve does not perform this optimization by default. When defining a new
record, you must specify the OPTIMIZE qualifier to optimize a
record. To optimize existing record definitions, you must redefine the records
(using the EDIT or EXTRACT command) and
include the OPTIMIZE qualifier.
If you use CDDL or CDO records, you can also take advantage of the
OPTIMIZE qualifier. You can use the Datatrieve
EDIT or EXTRACT command to convert
CDDL or CDO record definitions to the Datatrieve format. To do this, use the
EDIT or EXTRACT command, then add the
OPTIMIZE qualifier to each occurrence of the
REDEFINE RECORD command line.
It is possible that a new version of Datatrieve may require the field tree to
be stored in a different format and will no longer be able to use the field tree
stored by previous versions of Datatrieve. If this occurs, Datatrieve will
ignore the older version field tree when you enter a READY
command and will display the following message:
Record <...> uses old record format. Processing will continue, but for optimization you must redefine the record.
You can restore optimization to your record by redefining the record using the
EDIT or EXTRACT commands.
There are performance and storage tradeoffs you should consider before using
the OPTIMIZE qualifier.
As previously mentioned, the major benefit of the OPTIMIZE
qualifier is the decrease in CPU time when readying a domain with an optimized
record.
Records with a greater number of fields tend to show a greater amount of improvement.
Using the OPTIMIZE qualifier increases the CPU time
necessary to define a record. The elapsed CPU time for a DEFINE
RECORD command increases anywhere from a few percentage points to
nearly double the time. The smaller percentage increases occur for records with
a smaller number of fields.
You can avoid increased record definition time by not using the
OPTIMIZE qualifier while designing a record. Instead,
edit the final version of the record and add the OPTIMIZE
qualifier. This way you still benefit from the READY
performance improvements. Note also that the increase in definition time is
essentially a one-time occurrence. Once you define your record, you experience
the improved performance each time you ready a domain that uses that
record.
When a record is optimized, the space used by the record definition in the
dictionary may increase. In general, records with a greater number of fields
will have a greater percentage increase. Note, too, that the DEFINE
FILE command also needs to build a field tree from record
definitions. Its performance will also improve by optimizing records.
22.3. Choosing Optimal Queries
Once you establish the file organization, you should try to choose queries that are most efficient. A query is a request for Datatrieve to identify all the records that satisfy a specified condition. The following sections indicate guidelines for optimal queries.
22.3.1. Using EQUAL Rather Than CONTAINING
One way to optimize a query is to select a more efficient Boolean expression. A Boolean expression that tests records with the EQUAL (=) relational operator is more efficient than a Boolean with CONTAINING (CONT). This rule is most significant if the Boolean expression references a key field:
DTR> PRINT YACHTS WITH BUILDER = "PEARSON" DTR> PRINT YACHTS WITH BUILDER CONT "PEARSON"
Although both queries yield the same results, the first query is about twice as fast as the second one.
Datatrieve gives optimal performance in the first case because the query specifies an exact match for the MANUFACTURER (BUILDER) field, the first elementary field of the key field TYPE. Datatrieve conducts a fast search through the index to retrieve the desired records.
In the second case, Datatrieve must search sequentially through all values of BUILDER looking for matches with the string following CONT. Datatrieve must check all substrings of each BUILDER value that are equal in length to the string specified in the Boolean expression.
To take advantage of the increased efficiency of EQUAL (=), you must specify a value that matches the field value exactly. EQUAL (=) is case-sensitive, but CONT is not case-sensitive. In the last example, if a record had the value "Pearson" for BUILDER, only the second query would find the record.
To get around the case-sensitivity problem, you can use the Datatrieve function FN$UPCASE in procedures that store data to ensure that all text fields are entered as uppercase. Then you can be sure a search using the EQUAL operator will find all the records you want to locate. Otherwise, to use the EQUAL operator you must remember the case of each character of a field value.
22.3.2. Using STARTING WITH Rather Than CONTAINING
To improve performance, you can sometimes substitute the STARTING WITH relational operator for CONTAINING. This operator allows you to find records in which the beginning substring of the field value exactly matches the specified value expression. If you name a key field in the query, Datatrieve is able to use a key-based index. Remember that this operator is case-sensitive.
Of the following two queries, the first query is more efficient because of
the keyed access. Datatrieve does not have to check all possible substrings
of each BUILDER value:
DTR> PRINT YACHTS WITH BUILDER STARTING WITH "ALB"
LENGTH
OVER
MANUFACTURER MODEL RIG ALL WEIGHT BEAM PRICE
ALBERG 37 MK II KETCH 37 20,000 12 $36,951
ALBIN 79 SLOOP 26 4,200 10 $17,900
ALBIN BALLAD SLOOP 30 7,276 10 $27,500
ALBIN VEGA SLOOP 27 5,070 08 $18,600
DTR> PRINT YACHTS WITH BUILDER CONTAINING "ALB"
LENGTH
OVER
MANUFACTURER MODEL RIG ALL WEIGHT BEAM PRICE
ALBERG 37 MK II KETCH 37 20,000 12 $36,951
ALBIN 79 SLOOP 26 4,200 10 $17,900
ALBIN BALLAD SLOOP 30 7,276 10 $27,500
ALBIN VEGA SLOOP 27 5,070 08 $18,600
DTR>22.3.3. Using Domains Rather Than Collections in an RSE
Datatrieve cannot use indexes to retrieve records from a collection. In general, then, to get the best performance on key-based queries, use a domain rather than a collection as the source for the RSE.
The section Section 22.3.2, ''Using STARTING WITH Rather Than CONTAINING'' noted that Datatrieve can do a
keyed retrieval if you use the STARTING WITH relational operator. The
potential gain in performance is lost if you form a collection. For example,
the following queries use STARTING WITH, but Datatrieve uses
the key-based index only in the first case:
DTR> PRINT YACHTS WITH BUILDER STARTING WITH "AL" DTR> FIND YACHTS; PRINT CURRENT WITH BUILDER - CON> STARTING WITH "AL"
The first query is substantially faster for two reasons. In the first case
Datatrieve needs to access the physical data once, while in the latter case
it needs to get the record keys first, and then go back to the physical data
to evaluate the RSE. The second reason is that Datatrieve must do a search
through the index of YACHTS. Datatrieve must do an exhaustive
search in the second case.
22.3.4. Using the CROSS Clause and Nested FOR Loops
If you have two domains that share a common field, you can relate their
records either with the CROSS clause or with nested FOR
loops. For example, the YACHTS and PAYABLES
domains share the field TYPE. The following queries search for
records from these two sources:
DTR> PRINT PAYABLES CROSS YACHTS OVER TYPE
The query has the form PRINT rse.
The same results can be achieved with nested FOR loops.
For example:
DTR> FOR A IN PAYABLES CON> FOR YACHTS WITH TYPE = A.TYPE CON> PRINT A.PAYABLE, BOAT
This query is processed about as fast as the previous example with CROSS. Datatrieve is able to use the key-based index to YACHTS. Note these features of the two queries:
Domains are used rather than collections as record sources, so that Datatrieve can use its key-based index to the records of YACHTS.
The OVER clause uses TYPE, a key field only for YACHTS. Because TYPE is not a key field in PAYABLES, the queries specify PAYABLES before YACHTS.
The YACHTS record stream contains many more records than PAYABLES and is best placed in the second position in each query.
The next sections explain why these principles affect Datatrieve performance.
22.3.5. Choosing Domains or Collections as Record Sources
To form a query that relates two record sources, you can use either collections or domains. Keep in mind that Datatrieve can do keyed access only for domains and only if the domain is other than the first record source specified.
In other words, when you use CROSS or nested FOR loops
to access two domains and you relate those domains through a common key
field, Datatrieve can use keyed access for searching the second domain in
the CROSS clause or the domain in the second FOR
loop.
If all other conditions are equal, it is better to use a domain name rather than a collection name in the second position of a key-based relational query. There is one more factor to consider, however: collections are efficient to use if you need to refer back to the same group of records in the same Datatrieve session. In such a case, you may get better performance by forming and naming a collection, so that Datatrieve does not have to retrieve the same group of records over and over again.
Be aware of this tradeoff when choosing a record source. You gain efficiency with a domain when you can use keyed access. On the other hand, you gain efficiency with a collection if you reduce the number of times Datatrieve must isolate the same small group from a large body of records. A collection can also reduce the number of records in the record stream and help improve the performance of CROSS.
22.3.6. Choosing the Order of Domain Names in the CROSS Clause
Datatrieve can use a key-based index only for the second domain specified in the CROSS clause.
When using the CROSS clause, you can relate two domains that have a common
field. You can specify this field in the OVER clause or in a Boolean
expression that is part of the WITH clause. If this field is a key for only
one of the domains, you get a faster response if you specify that domain
second in the CROSS clause. In the following example, the clause OVER
TYPE is equivalent to WITH TYPE = TYPE:
DTR> PRINT PAYABLES CROSS YACHTS OVER TYPE DTR>
YACHTS is listed second because TYPE is a key
field only for YACHTS, not for PAYABLES. If
PAYABLES had been listed second, Datatrieve response would
have been substantially slower. The query as shown is more than ten times
faster than if you list PAYABLES after
YACHTS.
A second guideline is to specify the smaller record stream first in the CROSS clause:
DTR> PRINT BOAT, NAME, BOAT_NAME OF OWNERS - CON> CROSS YACHTS OVER TYPE
This query is more than twice as fast as the same query with the order of the domains reversed. Because the YACHTS record stream is much larger than the OWNERS record stream, you can save time by allowing Datatrieve to use the key-based index for YACHTS. Datatrieve gets each record in OWNERS, a relatively small number, and then evaluates the OVER clause by means of the index to YACHTS.
If the reverse order is used, Datatrieve gets each record in YACHTS (113 in all) and then evaluates the OVER clause by means of the index to OWNERS. Because there are only 10 OWNERS records, a search through the key-based index does not save much time. In the other case, a search through the YACHTS index saves a search through all 113 YACHTS records.
What is crucial is the number of records in each record stream, not the records in the record source. If you are only interested in Alberg’s yachts, it is more efficient to place YACHTS WITH BUILDER = "ALBERG" in the first position. Datatrieve evaluates the Boolean expression using the index to BUILDER and finds one record. Then Datatrieve loops through the OWNERS records only once to join the two record streams. Although the record source (the YACHTS domain) has many records, the record stream based on the source is very small.
These principles are important when you use CROSS with more than two domains. Assume that you have domains A, B, and C and you relate them in the following expression:
PRINT A CROSS B OVER X CROSS C OVER Y
If X is a key for B, and Y is a key for C, Datatrieve uses both keys in evaluating the entire expression. Datatrieve does not use the keys if X is a key only for A, and Y is a key only for B.
For example, you could relate the three domains PAYABLES,
OWNERS, and YACHTS. OWNERS and
YACHTS both have TYPE as a key field, so
Datatrieve is able to use both the index to OWNERS and the
index to YACHTS in evaluating the following expression:
DTR> FOR PAYABLES CROSS OWNERS OVER TYPE CROSS YACHTS OVER TYPE
DTR> PRINT TYPE, RIG, NAME, BOAT_NAME, PRICE, WHSLE_PRICE
BOAT WHSLE
MANUFACTURER MODEL RIG NAME NAME PRICE PRICE
ALBIN VEGA SLOOP STEVE DELIVERANCE $18,600 $14,250
ALBIN VEGA SLOOP HUGH IMPULSE $18,600 $14,250
ISLANDER BAHAMA SLOOP JIM POTEMKIN $6,500 $4,950
ISLANDER BAHAMA SLOOP ANN POTEMKIN $6,500 $4,950
ISLANDER BAHAMA SLOOP STEVE POTEMKIN $6,500 $4,950
ISLANDER BAHAMA SLOOP HARVEY MANANA $6,500 $4,950
DTR>22.3.7. Order of Domains in Nested FOR Loops
Nested FOR loops can produce the same results as CROSS
clauses, and rules similar to those for the CROSS clause apply to nested
FOR loops. When using nested FOR
loops, you should place the domain with the key field in the second or inner
FOR loop; for example:
DTR> FOR A IN PAYABLES CON> FOR YACHTS WITH TYPE = A.TYPE CON> PRINT A.ORDR_NUM, BOAT, A.INVOICE_DUE, CON> A.BILL_PAID
This query is about ten times faster than the query in the following example:
DTR> FOR A IN YACHTS CON> FOR PAYABLES WITH TYPE = A.TYPE CON> PRINT ORDR_NUM, A.BOAT, INVOICE_DUE, BILL_PAID
In the first case, Datatrieve knows that the YACHTS records
are ordered according to TYPE. Datatrieve can do a fast search
through the index to YACHTS for matches on TYPE
before executing the PRINT statement. This makes the
process in the first case substantially faster than the process in the
second case.
In the second case, Datatrieve must evaluate the Boolean expression
WITH TYPE = A.TYPE without the benefit of a key-based index
because TYPE is not a key field for PAYABLES. For
each record in YACHTS, Datatrieve must do a search through all
of the PAYABLES records to find matches on TYPE.
The same rule holds concerning the relative size of the two record
streams. If one record stream has many more records than the other and both
have the same key field, you should place the larger record stream in the
second (inner) FOR loop.
22.3.8. Nested FOR Loops Followed by a Conditional Statement
Try to avoid using nested FOR loops to control the
execution of a conditional statement. The following example removes the
Boolean expression from the RSE and places it within an
IF-THEN statement. It is extremely
inefficient:
DTR> FOR A IN PAYABLES CON> FOR YACHTS CON> BEGIN CON> IF TYPE = A.TYPE AND LOA > 40 THEN CON> PRINT A.PAYABLE, BOAT CON> END
Datatrieve gets one record from YACHTS and one from
PAYABLES. It tests for the truth of the condition
TYPE = A.TYPE AND LOA > 40. Because
PAYABLES contains 30 records and YACHTS
contains 113, Datatrieve must go through this procedure 30 x 113 (3390)
times. Because Datatrieve is evaluating the conditions for every record of
YACHTS individually, the index to YACHTS based
on TYPE is not used.
The query is improved when the test is part of the WITH clause of the RSE (or in the OVER clause of CROSS). Datatrieve does not have to get every record of YACHTS 30 times. For each of the 30 PAYABLES records, Datatrieve can do a fast search through the index to YACHTS.
Wherever possible, you should include conditional tests as Boolean expressions within the RSE. This effectively limits the number of records that Datatrieve has to process; for example:
DTR> FOR A IN PAYABLES CROSS YACHTS OVER CON> TYPE WITH LOA > 40 CON> PRINT A.PAYABLE, BOAT
22.4. Performance Enhancements for Certain CDD/Repository Dictionary Operations
Datatrieve determines which dictionary interface it will use based on the use of full dictionary path names that specify which dictionary interface is to be accessed or on the default dictionary path name. In general, you can achieve better performance when the dictionary interface call matches the dictionary format of the object you are accessing.
In all cases, Datatrieve will operate correctly no matter which interface you use. However, you can influence the performance of these operations by using the full path name or by appropriately setting the default path name.
For example, if YACHTS is a DMU format object, then the command READY
CDD$TOP.DTR$LIB.DEMO.YACHTS will achieve better performance than
the command READY
SYS$COMMON:[CDDPLUS]DTR$LIB.DEMO.YACHTS.
The commands affected by the new strategy are READY,
DELETE, PURGE, and
SHOW. The conditions that effect performance improvements
include dictionary organization, the use of full dictionary path names in
commands or statements, and appropriate use of the SET
DICTIONARY command or the CDD$DEFAULT
value.
However, note that there are some additional considerations in the behavior of
the SHOW command that do not apply to the commands mentioned
in the previous note. These considerations apply only to the use of a DMU format
path name for a dictionary that may also contain certain CDO format
objects:
If your default dictionary path name is in DMU format and if there are any CDD$DATABASE objects in your dictionary (databases which have been defined using the CDO utility), then the CDD$DATABASE objects will not be shown when you do a
SHOW DATABASESor aSHOW ALLcommand.You must use a default dictionary path name in CDO format to
SHOWthese objects; you can also display these objects by using an appropriate CDOSHOWcommand .If your default dictionary path name is in DMU format and if there are shareable fields in your dictionary (fields which have been defined using the CDO utility), then these fields will be included as records when you do a
SHOW RECORDScommand or in the records section of theSHOW ALLcommand.Although these shareable fields may be shown as records, you will not be allowed to manipulate these objects as records within Datatrieve.
You must use a default dictionary path name in CDO format if you want to filter these shareable fields from the
SHOW RECORDSdisplay.
Both of these differences are due to limitations in the use of the DMU call interface itself. These are the only situations where the use of two different dictionary style path names give you different results.
22.5. Performance Enhancements for Databases
When using Datatrieve to work with Oracle DBMS databases, keep in mind the following considerations:
Unless you specify otherwise, Datatrieve always starts reading database areas at page one, line one. Oracle DBMS is designed to optimize access paths to records through set chain pointers, indexes, and hashing algorithms. Use a set name whenever possible to optimize your database access paths and prevent sequential reads of database areas.
To minimize record locking, be sure to issue
COMMITorROLLBACKstatements regularly to explicitly end database transactions. Locks prevent other users from accessing a record and can prevent access to other records because that record contains pointer information that also gets locked.
When using Datatrieve with a relational database or Datatrieve with Report Writer statements or both, additional database buffers can improve performance significantly. The number of buffers can be adjusted by defining RDM$BIND_BUFFERS prior to readying a relational database.
22.6. Timing Procedures to Improve Efficiency
The recommendations in the previous sections were verified by timing alternative procedures with Datatrieve timing functions, FN$INIT_TIMER and FN$SHOW_TIMER. The first of these functions initializes a timer, and the second calculates the elapsed time. A good comparative measure is the CPU time expended by several alternative procedures that produce the same output. You may find that the extra effort needed to time procedures may be repaid by improved performance.
If you will be invoking a procedure frequently and have a choice between two queries, you can time each query to see which one is most efficient. To save CPU time, you might include only a subset of the records in your tests.
For example, suppose you want to display information on manufacturers who make
boats with more than one type of rig. This kind of query requires that you
compare records within the same domain, YACHTS. The following inefficient
solution, which uses nested FOR loops followed by a
conditional, requires Datatrieve to search and compare the 113 records in
YACHTS 113 times:
DTR> SHOW TIME1E PROCEDURE TIME1E FN_$INIT_TIMER FOR A IN YACHTS FOR B IN YACHTS IF B.BUILDER = A.BUILDER AND B.RIG GT A.RIG THEN PRINT B.BUILDER, A.RIG, B.RIG FN_$SHOW_TIMER END_PROCEDURE
However, a PRINT statement with a CROSS clause in an RSE
achieves the same result and reduces the amount of the CPU time to about
one-sixteenth of the time required by the previous example. The following
procedure shows the more efficient solution:
DTR> SHOW TIME1B PROCEDURE TIME1B FN_$INIT_TIMER PRINT BUILDER, A.RIG, RIG OF A IN YACHTS CROSS B IN YACHTS OVER BUILDER WITH A.RIG GT B.RIG FN_$SHOW_TIMER END_PROCEDURE
In these procedures, FN$INIT_TIMER starts timing the processing
of the records and FN$SHOW_TIMER displays the elapsed time
following completion of the processing.
22.7. Datatrieve Evaluation of Compound Boolean Expressions
Datatrieve sets up a priority when it evaluates compound Boolean expressions that include key fields. For any domain, the key that is chosen depends on the following three factors in order of priority:
Exact or range retrieval:
Exact retrievals use EQUAL or STARTING WITH.
Bounded range retrievals use BT.
Range retrievals use GT, GE, LE, or LT.
Key is NO DUP or DUP
Primary or alternate key
Keyed retrieval is performed on Boolean expressions that use the relational operators EQUAL, STARTING WITH, BEFORE, AFTER, GT, GE, LE, LT, or BT.
Note that with range or bounded range retrievals, Datatrieve cannot use keyed retrieval if the data type specified in the Datatrieve field definition has no corresponding data type in RMS. For example, RMS has no direct equivalent for the Datatrieve COMP-5 data type. In such cases, Datatrieve searches the file sequentially and does its own key value comparisons.
22.8. Summary of Rules
The following guidelines can help you take advantage of the ability of Datatrieve to use a key-based index to retrieve records:
When defining data, make the field most commonly used in queries the primary key. If that field does not uniquely determine a record, combine it with another field so the combined fields uniquely determine a record. Allowing duplicate values of a primary key slows performance.
If you decide to make a group field the primary key, the order of the subordinate elementary fields is important. The field most commonly used in queries should be the first elementary field listed. Remember that Datatrieve cannot do keyed access on group field keys that contain numeric items.
If other fields will often be used with the primary key in queries, you can designate them as alternate keys.
Use EQUAL (=) instead of CONTAINING (CONT) in the Boolean expression of an RSE when searching for records based on a key field value.
When searching for field values beginning with a specified substring, use STARTING WITH instead of CONTAINING (CONT). This rule is most important when your search is based on a key field.
Datatrieve allows you to relate records from the same domain or from two
different domains with the CROSS clause or nested FOR loops.
When the relationship is based on a key field of at least one of the domains,
keep the following guidelines in mind:
If the field is a key for only one of the domains, make sure that domain is not specified first in the CROSS clause or included in the first
FORloop.Use a domain rather than a collection as the second record source. Datatrieve cannot do keyed access on collections. A collection, however, can help performance when it greatly reduces the number of records that Datatrieve must evaluate in a relational query. In addition, forming and naming a collection is useful if you need to use the same subset of records several times within a Datatrieve session.
Try not to use a conditional statement following nested
FORloops or following aFORloop that contains an RSE with a CROSS clause. A better approach is to include the conditional test in a Boolean expression within the RSE in the CROSS clause or in the secondFORloop.When relating two or more record streams, do not specify the largest record stream in the first position of the CROSS clause or in the first
FORloop.
Chapter 23. Access Control Lists and Datatrieve Protection
The Oracle CDD/Repository dictionary system provides a mechanism for controlling access to the definitions you store in it. However, the data dictionary is designed to protect data definitions and procedures from browsing and unauthorized use; it is not designed to intercept and prevent intentional, determined assaults.
You should use the access control lists of the dictionary with the OpenVMS access and file security mechanisms to augment the overall security strategy for your data processing system.
23.1. Access Control Lists
The key to the CDD/Repository system of protection is the access control list (ACL). An ACL controls access to the information within data dictionaries. CDD/Repository provides Datatrieve users with access privileges that control the type of access a user or class of users can have to the objects in a data dictionary. For example, you can control whether a user can create, modify, delete, or show a dictionary object, or use it in procedures. You can also control manipulation of dictionaries using an ACL.
The Dictionary Management Utility (DMU) format dictionary and the Common Dictionary Operator (CDO) format dictionary differ in their implementation of ACL protections. The major difference is that the CDO ACL protection applies only to objects and dictionary directories. The CDO concept of protection does not involve path name levels. The DMU concept of protection includes a hierarchical path name structure. In the DMU dictionary, the ACL of a dictionary directory can also control what access users can have to the descendants of that directory.
Other differences between the CDO and DMU implementations of ACL protections are noted throughout this chapter and in the applicable command sections.
23.1.1. An Overview of ACL Entries
Every directory and object in the DMU format dictionary and every CDO format dictionary and object can have an access control list. An ACL consists of zero or more ACL entries. Each entry in an access control list performs two functions:
It identifies individual users or classes of users to whom the ACL entry applies.
It specifies the access privileges of the individual users or classes of users to whom the ACL entry applies.
An ACL entry affects your access privileges to a directory or object only if all the entry’s user identification criteria match the characteristics of your process. A CDO ACL can identify you by your OpenVMS username or your user identification code (UIC). A DMU ACL can identify you by your OpenVMS username, your UIC, a password, your terminal number, or your job class. See Section 23.2.1, ''User Identification Criteria'' for further details about user identification criteria.
You can make the user identification criteria specific or general. In one ACL entry, you can control the access privileges of a single user or all users, depending on the user identification criteria you include in the entry.
A user’s process must match all of the user identification criteria specified in the ACL. If some of the user identification criteria apply to a process but some do not, then the process will not be given access.
23.1.2. Displaying an Access Control List
Use the SHOWP command to display the contents of an
ACL.
You can use the SHOWP command to display the ACL for
any DMU object or directory to which you have C (CONTROL) and P (PASS_THRU)
access. You can use the SHOWP command to display the ACL
for any CDO object to which you have S (SHOW) access. For example, when user
Jones enters a SHOWP command for
CDD$TOP, Datatrieve displays the ACL of
CDD$TOP:
DTR> SHOWP CDD$TOP
1: [*,*], Username: " JONES"
Grant - CPSX, Deny - DEHMRUW, Banish - FG
DTR>As the ACL indicates, Jones has four privileges at
CDD$TOP: C (CONTROL), P
(PASS_THRU), S (SEE), and X (EXTEND).
When Jones enters the SHOWP command in the following
example, Datatrieve displays the ACL of the requested CDO format
dictionary:
DTR> SHOWP SYS$COMMON:[CDDPLUS.PERSONNEL]
1: [*,*], Username: "CASADAY"
Grant - RWMESUDC, Deny - none
ACCESS=READ+WRITE+MODIFY+EXTEND+SHOW+DEFINE
+CHANGE+DELETE+CONTROL
2: [*,*]
Grant - S, Deny - RWMEUDC
ACCESS=SHOW
DTR>As the ACL indicates, CASADAY has eight Datatrieve privileges
to this CDO dictionary: R (READ), W (WRITE),
M (MODIFY), E (EXTEND), S (SHOW),
U (CHANGE + DEFINE), D (DELETE), and
C (CONTROL). All other users only have the S
(SHOW) privilege.
Alternatively, you can show your privileges by using the SHOW
PRIVILEGES command. In the following example, Jones’
privileges to CDD$TOP are shown:
DTR> SHOW PRIVILEGES FOR CDD$TOP
Privileges for CDD$TOP
C (CONTROL) - may issue DEFINEP, SHOWP, DELETEP commands
P (PASS_THRU) - may use given name of directory or object
in pathname
S (SEE) - may see (read) dictionary
X (EXTEND) - may create directory or object within
directory
DTR>You can use SHOW PRIVILEGES only to display your
privileges for a given dictionary path name. If there are ACL entries for
other users, use the SHOWP command to display the
information.
23.1.3. Hierarchical Protection in the DMU Dictionary
The access to every directory or object in the DMU dictionary (except the root directory, CDD$TOP) can be controlled by more than one Access control list — its own and the access control lists of its ancestors.
In the DMU data dictionary, every directory and object has a full dictionary path name that begins with CDD$TOP, contains all the directories (in hierarchical order) that are ancestors of the directory or object in question, and ends with the given name of that directory or object.
Each segment of a dictionary path name has an ACL associated with it. Each of those ACLs can change your access privileges because your access privileges accumulate as you move along a hierarchical path in the DMU dictionary. In effect, you inherit the access privileges from the ancestors of an object or directory, modified by the ACL of the dictionary or object you are trying to access.
23.1.4. Accumulation of Privileges in the DMU Dictionary
DMU privileges are passed on from higher directories to lower directories.
The following figure illustrates a sample DMU path that shows how access
privileges can accumulate. It is the path for the YACHTS domain
in the INFO directory. The column on the right entitled
Cumulative indicates the privileges in effect at different
levels of the data dictionary:
Each of the four segments of this path name has an ACL. In the following
example, Jones uses the SHOWP command to display the ACL
for a given path name. The example specifies only one user identification
criterion: the OpenVMS username, JONES. Each ACL has only one
entry.
Following each ACL is the list of privileges that Jones has for each segment of the path name. The list of privileges expands or shrinks according to the distribution of privileges in each ACL. Section 23.2.7, ''Datatrieve and CDD/Repository Privilege Specification'' explains the meaning of the various privileges.
DTR> SHOWP CDD$TOP
1: [*,*], Username: "JONES"
Grant - CPSX, Deny - DEHMRUW, Banish - FGThe ACL indicates that Jones has four privileges at CDD$TOP:
C (CONTROL), P (PASS_THRU), S
(SEE), and X (EXTEND).
DTR> SHOWP CDD$TOP.INVENTORY
1: [*,*], Username: "JONES"
Grant - EMRW, Deny - none, Banish - noneFor INVENTORY, Jones has eight privileges: the four
privileges from CDD$TOP and E
(DTR_EXTEND/EXECUTE), M (DTR_MODIFY), R
(DTR_READ), and W (DTR_WRITE) from
INVENTORY.
DTR> SHOWP CDD$TOP.INVENTORY.INFO
1: [*,*], Username: "JONES"
Grant - FU, Deny - none, Banish - noneFor INFO, Jones has nine privileges: the four privileges from
CDD$TOP, the four privileges from INVENTORY,
and U (UPDATE) from INFO. However, Jones does not
have F (FORWARD) privilege. Even though the ACL for
INFO tries to grant Jones the F (FORWARD)
privilege, the grant has no effect because F (FORWARD) was one
of the privileges banished by the ACL for CDD$TOP. Once a
privilege is banished, it can never be granted by any descendant of the
directory whose ACL banished it.
DTR> SHOWP CDD$TOP.INVENTORY.INFO.YACHTS
1: [*,*], Username: "JONES"
Grant - none, Deny - U, Banish - noneFor YACHTS, Jones has only eight privileges: the four
privileges from CDD$TOP and the four privileges from
INVENTORY. Jones does not have U (UPDATE)
access to YACHTS. Even though the ACL for INFO
granted it, the ACL for YACHTS denied it. The SHOW
PRIVILEGES command can also be used to display Jones’
privileges for the YACHTS directory as follows:
DTR> SHOW PRIVILEGES Privileges for CDD$TOP.INVENTORY.INFO.YACHTS;1 R (DTR_READ) - may ready for READ, use SHOW and EXTRACT W (DTR_WRITE) - may ready for READ, WRITE, MODIFY, or EXTEND M (DTR_MODIFY) - may ready for READ, MODIFY E (DTR_EXTEND_EXECUTE) - may ready to EXTEND, or access table or procedure C (CONTROL) - may issue DEFINEP, SHOWP, DELETEP commands P (PASS_THRU) - may use given name of directory or object in pathname S (SEE) - may see (read) dictionary X (EXTEND) - may create directory or object within directory DTR>
When you use the SHOW PRIVILEGES command, Datatrieve
displays your privileges according to the path name specified. Datatrieve
takes into account the applicable ACL entries of the parent
directories.
23.1.5. Combinations of DMU ACL Entries
In Figure 23.2, ''DMU Privilege Inheritance in a Four-Level Hierarchy'', the ACL for the four segments of CDD$TOP.PERSONNEL.SERVICE.SALARY_RECORD demonstrates how combinations of user identification criteria at different levels of the dictionary hierarchy control access to data descriptions. The user identification criteria in these ACL entries match the characteristics of four individual users: Casaday, Kellerman, Foster, and Jones. Figure 23.2, ''DMU Privilege Inheritance in a Four-Level Hierarchy'' illustrates the privileges at each level of the dictionary for each of the four users. The explanation following each set of ACL entries describes which ACL at a given level applies to each of the four users.
The following example shows the privileges at CDD$TOP for
user CASADAY:
DTR> SHOWP CDD$TOP
1: [*,*], Username: "CASADAY"
Grant - CDHPSX, Deny - none, Banish - none
2: [*,*]
Grant - P, Deny - CDEHMRSUWX, Banish - FG
DTR>Casaday, the system manager, is responsible for organizing and maintaining the data dictionary, and so retains all the access privileges granted by default. Casaday inherits these privileges at each hierarchy level.
To protect the data dictionary against modification or redundancy, Casaday grants only PASS_THRU to all other users, including Kellerman, Foster, and Jones. In addition, Casaday banishes FORWARD and GLOBAL_DELETE to ensure that no other user can create subdictionary files or delete large portions of the dictionary. For example:
DTR> SHOWP CDD$TOP.PERSONNEL
1: [*,*], Username: "CASADAY"
Grant - CDHPSX, Deny - none, Banish - none
2: [*,*], Password: "SEMISECRET"
Grant - HS, Deny - CDEFGMRUWX, Banish - none
3: [*,*]
Grant - none, Deny - none, Banish - CDEFGHMPRSUWX
DTR>As the record definitions in the PERSONNEL subdictionary are
sensitive, Casaday included a password, "SEMISECRET", as a user
identification criterion to restrict access. Kellerman, who is responsible
for all the records in the personnel department, and Foster, an applications
programmer who uses personnel record definitions, know the password and so
have PASS_THRU (inherited from
CDD$TOP), HISTORY, and SEE privileges to the
subdictionary. Jones, who works in sales, does not know the password and so
has no access to PERSONNEL or any of its children. Only the third ACL entry
applies to Jones, and this entry banishes all the access privileges.
The relative position of Access control lists entries is significant.
CDD/Repository stops searching the user identification criteria in the ACL
entries as soon as it finds a match. In the following example, if entries
2 and 3 were reversed, only Casaday would have
any access privileges at PERSONNEL. All other processes would
match the second entry, which banishes all privileges. Therefore,
CDD/Repository would discontinue the user identification search before
reaching entry 3, the one granting access to those using the
password:
DTR> SHOWP CDD$TOP.PERSONNEL.SERVICE
1: [*,*], Username: "CASADAY"
Grant - CDHPSX, Deny - none, Banish - none
2: [*,*], Password: "SECRET"
Grant - HS, Deny - DEMRUWX, Banish - C
3: [*,*]
Grant - none, Deny - none, Banish - CDEFGHMPRSUWX
DTR>Confidential employee record definitions are stored in the
SERVICE directory. Casaday has added a new password,
"SECRET", to limit the number of personnel department users
with access to this directory. Authorized users like Kellerman and Foster
now have access to this directory only when they include the appropriate
passwords in the dictionary path name:
CDD$TOP.PERSONNEL(SEMISECRET).SERVICE(SECRET)
Failure to include either password results in the banishment of all
privileges, because the Access control lists entry 3 for
CDD$TOP.PERSONNEL or
CDD$TOP.PERSONNEL.SERVICE applies. Users are
unable to proceed further, even if the next level grants all privileges to
all users. Unauthorized users, like Jones, have no access to this directory
because ACL entry 3 banishes all privileges.
Unlike CDD$TOP, PERSONNEL, or
SERVICE, SALARY_RECORD is a dictionary object
that holds a record definition. This difference is reflected in the new
default privileges that the SHOWP command indicates for
Casaday in the following example:
DTR> SHOWP CDD$TOP.PERSONNEL.SERVICE.SALARY_RECORD
1: [*,*], Username: "CASADAY"
Grant - CDEHMRSUW, Deny - none, Banish - none
2: [*,*], Username: "KELLERMAN"
Grant - DEMRUW, Deny - none, Banish - none
3: [*,*], Username: "FOSTER"
Grant - ER, Deny - none, Banish - none
DTR>ACL entry 2 grants Kellerman the privileges needed to
maintain the SALARY_RECORD definition. Foster, whose process
matches the third access control list entry, inherits
PASS_THRU, HISTORY, and SEE from
SERVICE. Foster also receives
DTR_EXTEND and
DTR_READ, which allow Foster to ready the
domain associated with SALARY_RECORD.
Unauthorized users, such as Jones, are not covered by any of the ACL
entries. Jones still has no privileges, having inherited none from the
parent directory SERVICE.
23.1.6. Protection in the CDO Dictionary
The Datatrieve CDO protection concept includes protection of dictionaries and dictionary objects. Datatrieve handles ACLs for the CDO format dictionary much as it handles ACLs for the DMU format dictionary, with two important conceptual differences:
There is no equivalent to the Datatrieve DMU privilege PASS_THRU in the CDO format dictionary. Suppose you have two CDO format dictionaries, one in the main directory [CDDPLUS] and one in the subdirectory [CDDPLUS.PUBLIC]. If you have S (SHOW) privilege to the dictionary in [CDDPLUS.PUBLIC] but not to the dictionary in [CDDPLUS], you will be able to access the data dictionary in [CDDPLUS.PUBLIC]. You do not need any Datatrieve ACL privileges to pass through the main directory as long as the OpenVMS directory protections on the main directory and subdirectory allow you access.
Unlike the DMU format dictionary, there is no concept of inheritance or accumulation of privileges in the CDO format dictionary. You have only the privileges listed in the ACL of each dictionary or object.
The only type of ACL that can restrict access to another object is an ACL on a data dictionary. You must have the S (SHOW) privilege on a CDO format dictionary to see its contents. You must have the U (CHANGE) privilege on a dictionary to define or delete its objects.
Like DMU ACL entries, the relative position of Access control lists
entries is significant. CDD/Repository searches the user identification
criteria in the ACL in order. As soon as a match is found, CDD/Repository
stops searching the list. In the following example, only Casaday has access
privileges to SYS$COMMON:[CDDPLUS.PERSONNEL]. All other
processes match the second entry, which denies all privileges.
CDD/Repository would discontinue the user identification search before
reaching entry 3, which grants access to users with the UIC
[100,*]:
DTR> SHOWP SYS$COMMON:[CDDPLUS.PERSONNEL]
1: [*,*], Username: "CASADAY" Grant - RWMESUDC, Deny - none
ACCESS=READ+WRITE+MODIFY+EXTEND+SHOW+DEFINE
+CHANGE+DELETE+CONTROL
2: [*,*]
Grant - none, Deny - RWMESUDC ACCESS=none
3: [100,*]
Grant - S, Deny - RWMEUDC ACCESS=SHOW
DTR>23.1.7. Summary of ACL Results
The following list summarizes the effects of ACLs on access to DMU format dictionaries and objects:
Users have all Datatrieve privileges unless the privileges are specifically denied or banished by an entry in the ACL of a segment of a dictionary path name used in a Datatrieve command, in a procedure invocation, or in a Datatrieve table invocation.
A user’s access privileges to an object or directory are inherited from its ancestors as modified by its own ACL.
If an access privilege is banished by an entry in the ACL of a dictionary directory, that privilege cannot be restored to a user by any entry in the Access control lists of any descendant of that directory.
An ACL entry applies to a user only if all the user identification criteria match the characteristics of the user’s process.
CDD/Repository begins its search of an Access control lists with entry 1 and ends its search as soon as it finds the first entry for which the characteristics of the user’s process match all the user identification criteria.
The following list summarizes the effects of ACLs on access to CDO format dictionaries and objects:
If only the GRANT clause is specified, a user has the privileges listed. All other privileges are denied.
If only the DENY clause is specified, a user is denied all privileges listed. All other privileges are granted.
If both GRANT and DENY clauses are specified, privileges are granted and denied in the order in which they appear. For example, a privilege which is granted and then denied will be denied. Any privileges not listed are denied.
An ACL entry applies to a user only if all the user identification criteria match the characteristics of the user’s process.
CDD/Repository begins its search of an Access control lists with entry 1 and ends its search as soon as it finds the first entry for which the characteristics of the user’s process match all the user identification criteria.
If one or more ACL entries exist and none of them match the characteristics of the user’s process, the user is denied access.
If no ACL entries exist, all users are granted all access privileges.
23.2. The Parts of an ACL Entry
An entry in the ACL of a dictionary object or directory has two parts:
The user identification criteria
The privilege specification
The user identification criteria determine the user or class of users to whom the entry applies. CDD/Repository compares the user identification criteria with the characteristics of the user’s process and with any passwords appended to the given name of the object or directory.
The privilege specification can grant, deny, or banish (in a DMU ACL) the access privileges of the user or class of users to whom the entry applies.
The following sections discuss identification criteria and access privileges.
23.2.1. User Identification Criteria
An ACL entry applies to a user only if all the user identification criteria are satisfied. CDD/Repository searches the ACL from the beginning and uses the first entry whose user identification criteria are satisfied.
If the user identification criteria in all entries of an ACL are specific, none of the entries might apply to a user. If no entry matches and the object is in a DMU dictionary, the user has the same privileges to the object or directory as to the parent of the object or directory. If the object is in a CDO dictionary, the user has no access to it.
The last entry in an ACL should apply to all users and assign as few privileges as are consistent with user needs and the integrity of the data definitions those privileges affect.
You can use four criteria for identifying users:
VMS username
VMS User Identification Code (UIC)
Password (DMU dictionary only)
Terminal number (DMU dictionary only) or job class
In a DMU ACL entry, you can specify one option from each of these four categories. You can include a username, a UIC, a password, and a terminal number or job class. You do not have to specify all four criteria, but you must specify at least one option from any of the four categories.
In a CDO ACL entry, you can specify a username, a UIC, or a job class. Passwords and terminal numbers have no equivalence in the CDO dictionary.
You must include at least one user identification criterion per ACL entry in either a DMU or a CDO ACL.
23.2.2. Identifying Users by User name
Each ACL entry can contain one identification criterion based on the OpenVMS username. Specifying a username in an ACL entry limits the entry to one user or to a group of users who log in with the same username. For example:
USER = KELLERMAN
If you specify a username in an ACL entry on an object in a CDO format dictionary, the username is translated to the UIC and not retained. When you show the ACL entry, you will see the UIC.
23.2.3. Identifying Users by the UIC
In an ACL entry, you can specify the UIC in several ways:
By specifying all the digits or characters of both parts of the UIC, you can identify one or more users who log in with the same UIC associated with their process. For example:
UIC = [240,240]
For numeric UICs, you can use the asterisk (*) wildcard in place of the group number to identify all group numbers and in place of the member number group to identify all member numbers.
The following example identifies users with the numeric UICs [240,101], [240,300], [240,544], [240,777]:
UIC = [240,*]
By using asterisks in place of both groups of digits in the numeric UIC, you identify all users, regardless of their UICs, as follows:
UIC = [*,*]
For alphanumeric UICs, you can use the asterisk (*) wildcard in place of the member name in an alphanumeric UIC but not in place of the group name.
The following example uses the alphanumeric UICs
[MYGROUP,MYSELF].MYGROUPis equivalent to[212,*]andMYSELFis equivalent to[212,370]. The valid UIC specifications are as follows:UIC = [MYGROUP,MYSELF] UIC = [MYGROUP] UIC = [MYSELF] UIC = [MYGROUP,*] UIC = [212,370] UIC = [212,*] UIC = [*,*]
You must include the comma and enclose the UIC specification in brackets or angle brackets. If you specify no UIC for an ACL entry, CDD/Repository supplies [*,*] as a default.
23.2.4. Identifying Users by Rights Identifiers
Rights identifiers are another basic concept in the OpenVMS operating system. A rights identifier is a single text string enclosed in brackets. The system manager defines a rights identifier in the system rights database. The identifier can indicate individuals or members of a particular group. For example, your system manager might define the following rights identifier to indicate the members of an accounting division of your company:
[ACCTGID]
When you specify a rights identifier with the DEFINEP
command, you can use only identifiers that are currently in the system
rights database. Your system manager can check a valid identifier using the
Authorize utility:
$ RUN AUTHORIZE UAF> SHOW/ID ACCTGID
In an ACL entry, you can specify a rights identifier just as you specify a UIC. For example, you can specify the rights identifier ACCTGID as follows:
UIC = [ACCTGID]
23.2.5. Identifying Users by the Password
If an ACL entry for a directory or object in the DMU format dictionary defines a password, the password can be specified as part of the given name of the directory or object. Using a password identifies the user or group of users who know the password.
When you need access privileges to a directory or object granted by an ACL entry containing a password, you can specify the password in two ways:
Enclose the password in parentheses and place it after the given name or full path name of the directory or object. For example, to enter the password
SAILOR:YACHTS;1(SAILOR) CDD$TOP.INVENTORY(SECRET).YACHTS;1(SAILOR)
Enter an asterisk in parentheses after the given name of the directory or object. This asterisk in place of the password causes Datatrieve to prompt for the password. For example:
DTR> SHOWP YACHTS (*) Enter password for YACHTS:
When editing objects that require passwords, remember that you must also
edit the REDEFINE command and explicitly enter the
password. For example, you enter the following EDIT
command with the password SECRET:
DTR> EDIT SECRET_REC (SECRET)
Datatrieve places the record definition
(SECRET_REC) in the editing buffer. It then
inserts a REDEFINE command at the top of the record
definition. For example:
REDEFINE RECORD SECRET_REC USING
01 TOP.
.
.
.
;The REDEFINE command would fail, however, unless you
explicitly entered the password when you edited it. For example:
REDEFINE RECORD SECRET_REC (SECRET) USING
01 TOP.
.
.
.
;Note that once the password is part of the source definition, you do not
have to explicitly enter it in subsequent edits. Datatrieve places it in the
editing buffer automatically. However, the password will also be visible
when you use the SHOW command to show the object (unless
you use the asterisk in parentheses as described in this section).
23.2.6. Identifying Users by the Terminal Number or Job Class
You can identify users by their terminal line numbers in an ACL entry in the DMU format dictionary, and by their job class in an ACL entry in either format dictionary. You can specify users in the following ways:
In the DMU format dictionary, you can identify users who work from a particular terminal line. You specify the terminal number in the format TTnn[:] as follows:
TERMINAL = TTH6
You can identify all users whose terminal lines are hard-wired to your local system. Use the keyword LOCAL:
TERMINAL = LOCAL
You can identify all users whose processes are running on anything other than a hard-wired line. By using the keyword NONLOCAL you can identify all processes using dial-up lines, running in batch mode, using DECnet and running as remote terminals, and using the Distributed Data Manipulation Facility to run Datatrieve from a remote node in a network of OpenVMS systems. For example:
TERMINAL = NONLOCAL
You can identify all batch processes by using the keyword BATCH:
TERMINAL = BATCH
You can identify all processes using the Distributed Data Manipulation Facility to run Datatrieve from a remote node in a network of OpenVMS systems. Use the keyword NETWORK:
TERMINAL = NETWORK
23.2.7. Datatrieve and CDD/Repository Privilege Specification
The second part of an ACL entry determines the access allowed to a user who matches the user identification criteria.
In ACL entries on objects or directories in the DMU format dictionary, the privilege specification controls changes to the access privileges the user inherits from the parent of the object or directory. CDD/Repository can make three types of changes to a user’s list of inherited privileges in the DMU format dictionary:
The GRANT clause can add any privileges that have not previously been banished.
The DENY clause can remove any privileges the user had to the parent directory.
The BANISH clause can deny a privilege to a directory or object. A privilege banished by the ACL of a directory can never be granted by any entry in the ACL of any descendant of that directory. The BANISH clause is only valid in ACL entries for DMU format dictionaries.
If no entry in the ACL of an object or directory matches the user, CDD/Repository makes no changes to the privileges the user has to the parent directory.
CDD/Repository can either grant or deny privileges to dictionaries or objects in the CDO format dictionary:
The GRANT clause can give any privilege. You must grant a right for the user to have that right. Any privilege not specifically granted is denied.
The DENY clause can specifically deny any privilege. Because the user is denied all access rights not specifically granted, you do not have to specify this clause.
If an ACL exists and no match is found for the user, CDD/Repository denies access to the user. If no ACL exists, the user is granted all access rights. One of the appendixes in the VSI Datatrieve Reference Manual contains tables listing the access privileges.
23.3. Creating ACL Entries
You can create ACL entries for dictionary objects and directories in four ways:
Datatrieve
DEFINEPcommand. See Section 23.3.2, ''Sequence Number in the DEFINEP Command'' for detailed information about theDEFINEPcommand.DEFINE PROTECTIONcommand of the CDO.SET PROTECTION/EDITcommand of the DMU.SET PROTECTIONcommand of the DMU.
23.3.1. Suggestions for Assigning Privileges
For many applications, users need only DTR_READ, PASS_THRU, and SEE to access the data definitions in the DMU format dictionary. In the CDO format dictionary, many users need only the READ and SHOW privileges. Consider restricting most users to these privileges to safeguard the data dictionary. The following list offers additional suggestions:
Restricting full access at the top level of the DMU format dictionary hierarchy, CDD$TOP, to the system manager or data administrator responsible for organizing and maintaining the directory hierarchy. Limit all other users to PASS_THRU.
Distributing control over the next level in the DMU format dictionary hierarchy. If, for example, your dictionary is organized by department, give each department manager the privileges needed to manage his or her portion of the hierarchy.
Organizing your DMU format dictionaries so that each dictionary directory is owned by the people who need to use it. Use OpenVMS security along with CDD/Repository ACL protection to safeguard both CDO and DMU dictionary directories.
Making full access more widespread at the second level below CDD$TOP, where some data definitions are stored and where some users have personal directories assigned to them. Grant DTR_READ, PASS_THRU, SEE, and HISTORY or their CDO equivalents, READ and SHOW, to those users who need only to access record definitions and record audit trail information in history list entries. For those users with personal directories, you can include CONTROL, LOCAL_DELETE, and EXTEND as well.
Denying access privileges to all other users. Create a last ACL entry for users with a UIC = [*,*] to deny all privileges (DENY = ALL). By taking this action, you prevent other users from inheriting privileges from higher directories. This catch-all entry ensures that only the users specified in the other ACL entries have access to that part of the dictionary.
You should be especially careful about granting CONTROL, FORWARD, and GLOBAL_DELETE privileges:
CONTROL allows users to use the
DEFINEPcommand. Therefore, CONTROL is equivalent in effect to having all access privileges. At the top levels of the hierarchy, limit CONTROL to the system manager or data administrator.FORWARD (DMU only) allows users to create subdictionary files. Subdictionaries can be more secure than dictionary directories, but they require more time for I/O operations, and they are charged against FILLM, your OpenVMS open file limit. Whether or not you choose to use subdictionaries, you should limit the ability to create them to the system manager or data administrator.
GLOBAL_DELETE (DMU only) allows users to delete a directory or subdictionary and all of its descendants. You should deny GLOBAL_DELETE to all users except the system manager or data administrator.
As a general rule, you should grant users only those privileges they need to work in their portions of the data dictionary. Remember, however, that CDD/Repository access privileges do not block access when a user has OpenVMS BYPASS privilege; such users have full access to the entire data dictionary.
23.3.2. Sequence Number in the DEFINEP Command
The sequence number of an ACL entry indicates its position in the ACL. Entry 1 is at the top of the ACL, and the entry with the largest number is at the bottom. The position of entries in the ACL can be important. Illogical orders of entries can create serious problems for all users of a dictionary object or directory. For example, if the first entry in a DMU ACL denies P (PASS_THRU) access to all users, no one can use the directory or object, and no one without a privileged OpenVMS account can change the ACL to correct the faulty entry.
In the DEFINEP command, the sequence number indicates
the position in the ACL you want the entry to have. The sequence number of
an ACL entry is not absolute, but only relative to the position of the entry
in the ACL. When ACL entries are added or deleted, the sequence numbers of
the remaining entries can change. Specifying a sequence number in the
DEFINEP command has the following effects:
If the sequence number in the
DEFINEPcommand is smaller than the number of entries already in the ACL, CDD/Repository changes the sequence numbers of entries whose number is equal to or greater than the number specified in theDEFINEPcommand. For example, if the ACL has four entries and you enter a sequence number of 3 in theDEFINEPcommand, the sequence numbers of the original entries numbered 3 and 4 change to 4 and 5.If the sequence number in the
DEFINEPcommand is larger than the number of entries in the ACL, CDD/Repository changes the sequence number of the new entry to 1 greater than the previous number of entries in the ACL. For example, if the ACL has four entries in it and you enter a sequence number of 7 in theDEFINEPcommand, CDD/Repository changes the sequence number of the entry to 5 because it is now the fifth entry in the ACL.
The following example illustrates using the DEFINEP
command to add an ACL entry to the middle of a DMU ACL list:
DTR> SHOWP FOR PERSONNEL
1: [*,*], Username: "JONES"
Grant - RSW, Deny - none, Banish - none
2: [*,*], Password: "SECRET", Username: "DENN"
Grant - C, Deny - none, Banish - none
3: [*,*]
Grant - none, Deny - P, Banish - none
DTR> DEFINEP FOR CDD$TOP.PERSONNEL 2
[Looking for define privilege option]
CON> PW = JUNCO, USER = METES, TERMINAL = NONLOCAL,
[Looking for define privilege option]
CON> GRANT = EMPRSWUX, BANISH = G
DTR> SHOWP FOR CDD$TOP.PERSONNEL
1: [*,*], Username: "JONES"
Grant - RSW, Deny - none, Banish - none
2: [*,*], Password: "JUNCO", Terminal: "NONLOCAL",
Username: "METES"
Grant - EMPRSUWX, Deny - none, Banish - G
3: [*,*], Password: "SECRET", Username: "DENN"
Grant - C, Deny - none, Banish - none
4: [*,*]
Grant - none, Deny - P, Banish - none
DTR>Refer to Section 23.2.1, ''User Identification Criteria'' and Section 23.2.7, ''Datatrieve and CDD/Repository Privilege Specification'' for a discussion of the user identification criteria and the privilege specifications.
For more information about the DEFINEP command, see the
DEFINEP section in the
VSI Datatrieve Reference Manual.
23.4. Removing Entries From an ACL
You can remove entries from an ACL by using one of the following commands:
Datatrieve
DELETEPcommand. For more information about theDEFINEPcommand, see theDEFINEPsection in the VSI Datatrieve Reference Manual.DELETE PROTECTIONcommand of the CDD/Repository CDO.SET PROTECTION/EDITcommand of the DMU.DELETE/PROTECTIONcommand of the DMU.
To remove a DMU ACL entry with the DELETEP command, you
must have at least P (PASS_THRU) and C (CONTROL) access
to the object or directory whose ACL you want to change. To remove a CDO ACL
entry you must have at least S (SHOW) and C (CONTROL) access to the object or
dictionary.
The DELETEP command has the following format:
DELETEP path-name sequence-number
The path-name is the given name, full dictionary path
name, or relative path name of the object or dictionary whose ACL you want to
change. The sequence-number is the sequence number of the
entry in the ACL. To be sure you remove the correct entry from the ACL, enter a
SHOWP command before entering a
DELETEP command.
When you remove an ACL entry from any position but the last in the list, the
sequence numbers of all the entries between the one removed and the end of the
list are reduced by 1. The DELETEP command in the following
example removes the second entry from the DMU ACL for
CDD$TOP.PERSONNEL:
DTR> SHOWP CDD$TOP.PERSONNEL(SECRET)
1: [*,*], Username: "JONES"
Grant - RSW, Deny - none, Banish - none
2: [*,*], Password: "JUNCO", Terminal: "NONLOCAL",
Username: "METES"
Grant - EMPRSUWX, Deny - none, Banish - G
3: [*,*], Password: "SECRET", Username: "DENN"
Grant - C, Deny - none, Banish - none
4: [*,*]
Grant - none, Deny - P, Banish - none
DTR> DELETEP CDD$TOP.PERSONNEL(SECRET) 2
DTR> SHOWP CDD$TOP.PERSONNEL(SECRET)
1: [*,*], Username: "JONES"
Grant - RSW, Deny - none, Banish - none
2: [*,*], Password: "SECRET", Username: "DENN"
Grant - C, Deny - none, Banish - none
3: [*,*]
Grant - none, Deny - P, Banish - none
DTR>When entry number 2 is removed, entry 3 becomes 2 and entry 4 becomes 3. As the sequence numbers are relative to the position of the entries in the ACL, the numbers adjust to close any gaps and preserve the sequential numbering of the entries.
For more information about the DEFINEP command, see the
DEFINEP section in the
VSI Datatrieve Reference Manual.
Appendix A. Name Recognition and Single Record Context
When you use a field name as a value expression and you display, modify, or erase one or more records, Datatrieve determines exactly which record or records are the targets of the action you propose.
For each of these actions, Datatrieve must first determine the context within which the action occurs. The context is the set of conditions that govern the way Datatrieve recognizes field names and determines which records are the targets of Datatrieve statements. Understanding the way Datatrieve manages context is especially important when you begin nesting Datatrieve statements.
A.1. Establishing the Context for Name Recognition
Datatrieve does not require that every field name be unique. You can use the same name in several record definitions. You can even use the same name several times in the same record definition, as long as the fields with identical names do not have the same level number in one group field.
For example, both the YACHTS and OWNERS domains have group fields named TYPE, and both group fields contain elementary fields to which you can refer with the names BUILDER and MODEL (in YACHTS, Datatrieve recognizes the query name BUILDER as equivalent to MANUFACTURER. Other query names for YACHTS are SPECS, LOA, and DISP). Figure A.1, ''Duplicate Field Names in YACHTS and OWNERS'' shows the fields in both domains and points out the duplicate names.
When you work with several record streams from the same domain, the field names in all record streams are identical. Whether you form collections or record streams of records from the YACHTS domain, Datatrieve has a mechanism for identifying which record to act on when you want to retrieve or change data from only one field of one record:
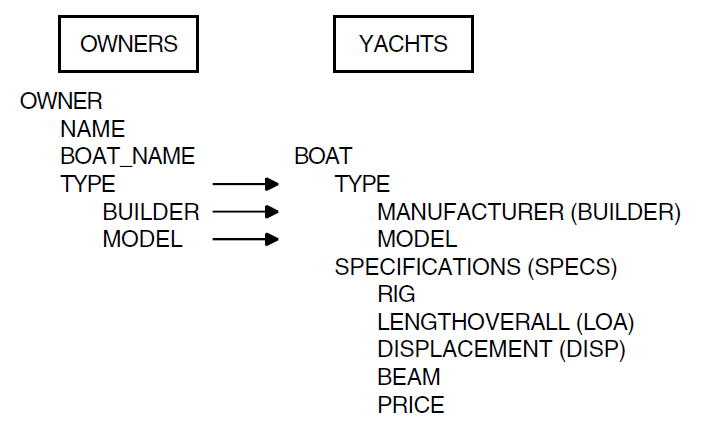
When you understand the way Datatrieve establishes the context for recognizing names, you can use the names of domains, fields, collections, and variables to form the simple and the complex relationships Datatrieve provides. One of the keys to mastering the use of context is understanding the two Datatrieve context stacks.
A.1.1. The Right Context Stack
When you issue a statement, Datatrieve builds a context stack: a linked list that controls the Datatrieve search for names to match the ones you use in statements. The context stack consists of context blocks, or lists of names. These context blocks are linked together by pointers that control the sequence of the Datatrieve search for values to associate with the names you use in statements.
Datatrieve searches the right context stack for values to associate with names you use in print lists, Boolean expressions, and the right side of Assignment statements such as x = y. The left context stack is discussed later in this appendix.
A.1.1.1. The Content of a Context Block
When you use a record selection expression, Datatrieve creates a context block to establish a context for name recognition. That context block contains, among other things, a list of names.
At the top of the list is a slot for the name of a context variable (see Section A.1.2.1, ''Context Variables as Field Name Qualifiers''). Next is the name of the domain referred to in the record selection expression. The rest of the list contains the names of fields in the record associated with that domain. Those field names are arranged according to the field tree associated with that record. The field tree contains the names of all the group fields, elementary fields, COMPUTED BY fields, REDEFINES fields, and lists in the record and preserves the hierarchical relationships among them.
When Datatrieve searches for a name in the context stack, it looks for a value to associate with that name. The search ends, and Datatrieve takes the associated value when it finds the first name that matches the one in your statement.
A Datatrieve name can consist of several names joined together (see Section A.1.2.2, ''Other Field Name Qualifiers''). They resemble dictionary path names in form and function. To be recognized, these compound or qualified names you supply must represent a valid path through the hierarchy of a context block and the field tree it contains.
When Datatrieve encounters a name, it begins its search in the context block on top of the stack. Datatrieve first looks at the slot in the context block reserved for a collection name or the name of a context variable. For unnamed CURRENT collections, this slot contains the name CURRENT. For named CURRENT collections, the name CURRENT and the collection name are equivalent. Named collections that are not the CURRENT collection have the collection name in this slot.
If the top block on the context stack refers to a record stream, this slot is empty unless you use a context variable in the RSE that forms the record stream. The context variable gives a record stream a temporary name; this name fills the first slot in the context block for these named record streams.
If Datatrieve finds that the first segment of a qualified name matches the name in the collection name/context variable slot, it continues its search in that block for a match for the rest of the name. If the name in your statement does not match the name in the collection name/context variable slot, or if that slot is empty, Datatrieve continues to look through the first context block to find a match.
Next in the context block is the name of the source of the records to
which that block refers. For collections and record streams, that source can
be the domain name or the name of a list for hierarchical records. The
source can also be the name of a collection if you use the collection as the
basis for a record stream in a FOR statement and use a
context variable.
If the source name does not match the name in your statement, Datatrieve next looks for the name in the slot reserved for names.
Next Datatrieve looks at the name of the top-level (the 01 level) field
name. If no match occurs, Datatrieve looks at each succeeding field name in
the order they are displayed when you enter a SHOW FIELDS
command. That order can take you through the entire hierarchy of the field
tree, traversing first the left branch and then the right wherever there is
a branching point in the hierarchy.
If Datatrieve finds no match in the first block on the context stack, it goes to the next context block on the stack and begins its search there.
Datatrieve stops its search as soon as it finds an exact match for the name in your statement. Then it associates the value assigned to the name on the context stack with the name of the field in your statement.
If Datatrieve finds no match for the name in any of the context blocks, it displays a message on your terminal that the field name is either undefined or used out of context. The only remedies are to change the context so that the name in your statement resolves properly or to remove any ambiguity by qualifying the name further with group field names or context variables.
For the sake of clarity, the following description of the various types of context blocks starts with the bottom of the context stack, that is, with the context block that Datatrieve checks last.
A.1.1.2. Global Variables
The bottom context block contains the names of any global variables you have established and have not released. This block is different from the others on the stack because its content is not determined by a record selection expression. Nevertheless, Datatrieve treats the name of a global variable as though it were the name of a field in a simple record. Just as Datatrieve associates the value of a field with the field name, Datatrieve associates the value of a global variable with its name.
Datatrieve looks at the global variables last when trying to find a name
to match one in your statement. No two global variables can have the same
name. When you issue a DECLARE statement at command level
(indicated by the DTR> prompt), Datatrieve checks the names of the global
variables you have declared. If it finds one with the same name, it releases
the old variable and its value and replaces it with the new one. Datatrieve
initializes the new variable with a default value, a missing value, a zero,
or a space depending on the clauses you include in the
DECLARE statement.
A.1.1.3. Collections
The next higher set of blocks in the context stack refers to existing collections. Each collection with a block on the context stack must have one record singled out as a selected record. Although a collection can have a number of records in it, only one of those records can be used in the search for the context of a name. Datatrieve can assign only one value to the name. Consequently, that one value can come from only one of the records in the collection.
Remember, the reason for resolving the context of a name you use in a
statement is to assign to the name a value for use in the statement. For an
existing collection, you can designate one record at a time as the selected
record for that collection. The SELECT statement lets you
designate the selected record in a collection by relative reference (FIRST,
NEXT, PRIOR, LAST, and WITH Boolean) or by absolute reference to the
position number of the record in the collection. A collection has a block on
the context stack only if it has a selected record.
If you have more than one existing collection with a selected record, the
block immediately above the one for global variables refers to a named
collection with a selected record. That collection is the one you formed
with a FIND statement before you formed any of the other
collections that have selected records.
The rest of the context blocks for the collections with selected records
are ordered according to the sequence in which you formed them, not the
order in which you entered the SELECT statements to
establish the selected records.
If the CURRENT collection has a selected record, the context stack contains a block referring to the CURRENT collection. That block is above the blocks of all other collections; that is, Datatrieve searches for names in the context block of the CURRENT collection before it searches the context block of any other collection.
The key to understanding the way Datatrieve recognizes names is that except for the global variables, the context stack is ordered on a "last-in, first-out" basis. The most recently formed context block is the one Datatrieve searches first.
You do not have to rely on your memory to recall the order in which you
formed your existing collections. You need only issue a SHOW
COLLECTIONS command. Datatrieve displays the most recently
formed collection (always the CURRENT collection, whether it has a name or
not) at the top of the list and the "oldest" one at the bottom.
With the SHOW collection-name
command, you can inspect each existing collection to see how many records
are in the collection, whether it has a selected record, and, if it does,
what the position number of the selected record is in the collection.
If Datatrieve searches the context stack and does not find a match for the name in your statement, it displays an error message that may seem puzzling unless you understand the way Datatrieve forms the context stack:
Field "name" is undefined or used out of context
You may know the name has been defined and that it is the name of a field in a record associated with one or more existing collections. If, however, none of the collections containing that field have selected records, Datatrieve cannot tell if the field is defined or not.
If a collection containing the named field has no selected record, that collection has no block on the context stack. Consequently, Datatrieve neither finds a match for the field name nor has a way of discovering from the search of the context stack if the field name is defined at all.
The order of context blocks at the higher levels of the context stack depends on the order in which Datatrieve encounters the elements containing names associated with values. The order of the following sections does not imply any relative position on the stack. Only the order in which Datatrieve encounters those elements determines their order on the stack.
A.1.1.4. Record Streams
Before Datatrieve looks at the context block of the most recently formed collection with a selected record, it looks at the context blocks created explicitly in the statement. One type of context block created by a statement refers to the field names of a record stream formed by a statement.
Context blocks of record streams act differently from those of
collections. The context block for a collection stays on the stack as long
as the collection has a selected record. The context block of a collection
is removed from the stack only if you release the collection or remove its
selected record with a DROP statement.
The context block for a record stream, however, stays on the stack only as long as the statement containing it is being executed. When Datatrieve finishes processing the statement, the block added to the stack is removed from the context stack and is not available when Datatrieve rebuilds the stack after it encounters the next statement.
Only three statements make lasting changes to the context stack:
FINDThe
FINDstatement can remove the CURRENT collection from the context stack by forming a new CURRENT collection. The new CURRENT collection releases the old collection but does not put a block on the context stack because a newly formed collection has no selected record.SELECTThe
SELECTstatement puts a collection on the context stack by establishing a selected record.SELECTcannot change the relative order of collections on the stack. That order is determined by the relative order in which you formed the collections with theFINDstatement.DROPThe
DROPstatement removes collections from the context stack by dropping the selected record from the collection. TheSHOW collection-namecommand still notes the position number of the previously selected record, but a parenthetical note points out that the record has been dropped:DTR> SHOW CURRENT Collection CURRENT Domain: YACHTS Number of Records: 113 Selected Record: 57 (Dropped) DTR>The selected record has been removed from the collection and cannot be retrieved unless you form a new collection that contains it.
These three statements, however, share a restriction that separates them
from all other statements: You cannot use FIND,
SELECT, or DROP statements in
compound statements. They must be entered at command level by themselves.
Furthermore, these statements do not form temporary record streams; they
affect only collections.
You can, however, have several context blocks for record streams on the
context stack at one time. The block for a record stream stays on the
context stack until Datatrieve finishes the statement. As you can nest
statements in FOR loops, BEGIN-END
blocks, IF-THEN-ELSE statements, THEN
statements, and WHILE statements, the inner statements
can form record streams before Datatrieve finishes the outermost
statement.
Datatrieve has to keep the context of outer statements separate from that of inner ones. It keeps them separate by putting a block on the context stack when it encounters an element that requires one. Datatrieve begins processing compound statements with the outermost statement and works progressively toward the innermost one. The context blocks it forms for elements in the innermost statement are at the top of the stack when the innermost statement is being processed.
When Datatrieve finishes processing the innermost statements, it removes the blocks created by that statement. Datatrieve works its way back out toward the outermost statement, removing blocks created by statements as soon as it finishes processing the statement.
For example, in the case of nested FOR loops, the
context block for the innermost FOR loop is higher in the
stack than the blocks for the outer loops. When Datatrieve completes the
execution of the innermost loop, it removes the context block of that
FOR statement, leaving those of the outer
FOR statements on the stack. As Datatrieve completes
each loop, the context block for that loop is removed from the stack. This
same pattern of events applies to statements in BEGIN-END
blocks.
When a statement that forms a record stream is followed by a second statement that is not contained in the first, Datatrieve removes the context block created for the first statement from the stack and puts a context block for the second statement in its place.
For example, in a BEGIN-END block, one
PRINT statement containing an OF
rse clause follows another. The context block of
the first statement is in effect only during the execution of that first
statement. That block is replaced by the one for the second
PRINT statement when Datatrieve begins processing the
second statement.
Datatrieve handles the context block of a FOR loop the
same way it handles statements containing an OF rse
clause.
Datatrieve creates four other types of context blocks that affect the order of the context stack: those for local variables, VERIFY clauses, VALID IF clauses, and context variables.
A.1.1.5. Local Variables
Local variables are variables defined in compound statements. A local
variable and its effect on the context stack last only from the
DECLARE statement that defines it until Datatrieve
completes the execution of the statement containing the
DECLARE statement.
A.1.1.6. VERIFY Clause in the STORE Statement
Like the context for local variables, the context for resolving field
names in a VERIFY clause of the STORE statement is
short-lived. The STORE statement does not access or
change any existing record. Consequently, for each STORE
statement Datatrieve creates a context block to associate the field names
with the values in the new record. Datatrieve executes the VERIFY clause
after you have assigned values to all the fields prescribed by the syntax of
the statement, but before Datatrieve stores the record in the data
file.
A.1.1.7. VALID IF Clause in a Record Definition
When you assign a value to a field name in either a
STORE or MODIFY statement,
Datatrieve looks in the appropriate record definition for a VALID IF clause.
If the value is unacceptable according to the conditions specified in the
VALID IF clause, Datatrieve displays a message on your terminal and
reprompts you for an acceptable value. It uses the same context to associate
the field name with your response to the reprompt. The context for resolving
field names in the VALID IF clause is established in one of two ways:
By the context block set up for the
STOREstatementBy the context block set up for the
MODIFYstatement
In either case, the value associated with the field name is the one just
assigned to it by your response to a prompt or by an Assignment statement in
the USING clause of the STORE or
MODIFY statement.
Datatrieve executes the VERIFY clause only after the values you assign meet the conditions of VALID IF clauses in the record definition. As a result, there can be no conflict between the context established for these two clauses. The context for the VALID IF clause no longer exists when Datatrieve executes the VERIFY clause.
A.1.2. Using Context Variables and Qualified Field Names
The ways of establishing context discussed to this point deal with resolving the connections between names and values by finding the first instance of a valid field name or variable name. When several context blocks on the stack contain fields with the same names, you need a way to skip over some instances of the name to get to the field that contains the value you want to retrieve.
Datatrieve gives you two methods of forcing name recognition: context variables and qualified field names. Although they require different actions from you, these two methods have an underlying similarity.
A.1.2.1. Context Variables as Field Name Qualifiers
A context variable is a dummy variable specified in a record selection expression for the purpose of name recognition. When Datatrieve encounters a context variable, it puts a new block on the context stack. That new block connects the name of the context variable with the field names and values of the records identified by the record selection expression.
The context established by the context variable lasts until Datatrieve completes the execution of the statement containing the record selection expression in which the context variable occurs. However, that context does not affect any outer loops or nesting statements that contain the statement in which you use the context variable.
A context variable, however, does affect all inner statements nested in the statement that contains the record selection expression in which the context variable occurs. You can use the context variable as a prefix for each field name of the records identified by the record selection expression. Citing a field name with a context variable prefix can make a field name unique, even when the domains and field trees of a record in a record stream are identical.
Putting a prefix on a field name produces a qualified field name. The context variable must be the first prefix added to a field name.
A.1.2.2. Other Field Name Qualifiers
Using other qualifiers as prefixes to field names is the second method of overriding the Datatrieve default of name recognition.
Although Datatrieve does not require that each field name be unique, each fully qualified field name must be unique. The fully qualified field name consists of the domain name, the top-level group field name, the names of any group field to which the elementary field belongs, and the elementary field name. You must separate each element of the fully qualified name from the next with a period.
For example, in the domain YACHTS, the fully qualified field
name of MODEL is as follows:
YACHTS.BOAT.TYPE.MODEL
You can use these elements in any combination that preserves their hierarchical order to distinguish the MODEL field in YACHTS from the MODEL field in another domain, such as OWNERS.
When Datatrieve encounters a qualified field name, it searches the context stack for the first match of the name you specify. For example, if you use BOAT.MODEL in a record selection expression, Datatrieve searches the context stack for the first valid occurrence of the name BOAT and searches the branches of the hierarchy under BOAT for the first valid occurrence of the name MODEL.
The success of the search is not jeopardized because you omit the group field name TYPE from the qualified name of MODEL. Datatrieve searches the entire hierarchy under BOAT until it finds the first valid occurrence of TYPE. When an intermediary group field name is omitted, Datatrieve searches the hierarchy according to the order in which the fields of the record were defined.
Fully qualified field names are adequate when working with two or more domains that share elementary or group field names, or both. However, when you work with two record streams from the same domain, you must further qualify the field name with a context variable. This extra qualification is especially necessary when dealing with lists in hierarchical records.
Suppose you want to display information about all builders who build boats
with more than one type of rig. YACHT is the given name of the record
associated with the domain YACHTS. The field tree of YACHT has
the following structure:
YACHTS
01 BOAT
     03 TYPE
          06 MANUFACTURER
          06 MODEL
     03 SPECIFICATIONS
          06 RIG
          06 LENGTH_OVER_ALL
          06 DISPLACEMENT
          06 BEAM
06 PRICEYou can print the desired information with nested FOR
loops. For each boat from the outer FOR statement, you
want Datatrieve to loop through all the boats and find all the ones with the
same builder. For each one it finds, you want it to compare its rig with the
rig of the boat from the outer loop. Then you want to separate the ones for
which the rigs are not the same. At first, you might be tempted to use the
following statement to produce the desired list:
DTR> SET NO PROMPT DTR> FOR YACHTS CON> FOR YACHTS WITH BUILDER = BUILDER AND CON> RIG NE RIG CON> PRINT BUILDER, RIG, RIG DTR>
After a long search for records, Datatrieve displays no records. The
problem is that the syntax in the previous example asks Datatrieve to look
for a boat with a rig that is not equal to itself—an obvious contradiction.
Both of the fields named RIG resolve to the record stream formed by the
second FOR statement. The name BUILDER also resolves to
the same record stream.
What happens when you enter the previous example is that Datatrieve takes the first record from YACHTS but does not look at any of the values in its fields. Then it looks at every record in YACHTS and discovers that for every one of them, the name of the builder equals itself, but that no rig is not equal to itself. Thus every record in YACHTS fails to meet the condition set by the statement.
Datatrieve then takes the second record in YACHTS and once again goes
through all the boats, finding that the two values are always equal to
themselves and thus fail to meet the impossible demands of the statement.
And so it goes for each record: two comparisons for 113 times 113 records,
and no records meet the self-contradictory conditions. The problem is how to
get Datatrieve to look at the builder and rig of the outer
FOR statement when making the comparison. The context
variable provides one solution:
DTR> FOR A IN YACHTS
CON> FOR YACHTS WITH BUILDER = A.BUILDER
AND RIG NE A.RIG
CON> PRINT BUILDER, A.RIG, RIG
MANUFACTURER RIG RIG
AMERICAN SLOOP MS
AMERICAN MS SLOOP
CHALLENGER SLOOP KETCH
.
.
.
PEARSON KETCH SLOOP
PEARSON KETCH SLOOP
DTR>In this case, the use of the context variable A forces Datatrieve to look
to the record stream formed by the outer FOR statement.
At the same time, Datatrieve recognizes the unqualified names, RIG and
BUILDER, in the context established by the most recent RSE, the one in the
second FOR statement. The conditions in the second
FOR statement are no longer impossible and
information from 62 records is displayed.
The way Datatrieve treats the unqualified names in this example
illustrates another rule for context resolution: The left-hand member of a
Boolean expression must resolve to the record selection expression of which
it is a part. If you start the Boolean in the second FOR
statement with A.BUILDER, Datatrieve tells you that
A.BUILDER is undefined or used out of
context.
You can add a second context variable in the previous example to make sure the resolution of the names is explicitly stated:
DTR> FOR A IN YACHTS
CON> FOR B IN YACHTS WITH B.BUILDER = A.BUILDER AND
B.RIG NE A.RIG
CON> PRINT B.BUILDER, A.RIG, B.RIGYou gain two advantages by specifying the second context variable. The first advantage is clarity of representation. The second advantage is the certainty of getting an error message from Datatrieve if you make a syntax error. Using the second context variable, however, does not allow you to violate the rule for resolving field names on the left side of Boolean expressions.
A.1.2.3. The Effect of the CROSS Clause on Name Recognition
You can use the CROSS clause of the record selection expression to produce
the same record stream as the nested FOR statements in
the previous example. The CROSS clause, however, is not constrained by the
rule for resolving field names on the left side of Boolean
expressions.
With the CROSS clause, you can establish more than one context variable (and, hence, more than one context block) in a record selection expression. This is the syntax of the CROSS clause:
The format for rse-source is as follows:
Datatrieve creates a context block for each source in the CROSS clause.
The names in all such context blocks resolve to the same record selection
expression. Consequently, adequately qualified names in the Booleans of the
record selection expression can appear on either the right-hand or left-hand
side of any of the Booleans. For example, any of the following statements
produces the same result as the nested FOR statements of
the previous example:
DTR> FOR A IN YACHTS CROSS B IN YACHTS WITH CON> B.BUILDER = A.BUILDER AND B.RIG NE A.RIG_ CON> PRINT B.BUILDER, A.RIG, B.RIG DTR> FOR A IN YACHTS CROSS B IN YACHTS WITH CON> A.BUILDER = B.BUILDER AND A.RIG NE B.RIG CON> PRINT B.BUILDER, A.RIG, B.RIG DTR> FOR A IN YACHTS CROSS YACHTS WITH CON> BUILDER = A.BUILDER AND RIG NE A.RIG CON> PRINT BUILDER, A.RIG, RIG DTR> FOR A IN YACHTS CROSS YACHTS WITH CON> A.BUILDER = BUILDER AND A.RIG NE RIG CON> PRINT BUILDER, A.RIG, RIG
In cases where the sources specified in the CROSS clause share a field name, you can use the OVER clause to simplify the context specification. The field name specified in the OVER clause must exist in the records of all the sources specified in the CROSS clause. The following two statements are equivalent to the preceding ones:
DTR> FOR A IN YACHTS CROSS YACHTS OVER BUILDER WITH CON> RIG NE A.RIG CON> PRINT BUILDER, A.RIG, RIG DTR> FOR A IN YACHTS CROSS YACHTS OVER BUILDER WITH CON> A.RIG NE RIG CON> PRINT BUILDER, A.RIG, RIG
To resolve field names in a record selection expression containing a CROSS clause, Datatrieve looks first at the context block for the last source specified in the CROSS clause. If that block contains no match for the field name, it begins looking at the context blocks for the other sources, working its way toward the block for the first source in the clause.
Consequently, when referring to fields from two or more identical sources, only those fields from the last source in the CROSS clause can remain unqualified. In such cases, you must use context variables to establish the appropriate context for fields from the other sources in the clause.
A.1.3. The Left Context Stack for Assignment Statements
When you make Assignment statements at the Datatrieve command level or as part
of STORE or MODIFY statements, Datatrieve
must assign values to the field or variable you intend. It uses the left context
stack to associate the values you supply with the fields and variables to which
you want the values assigned. Blocks on the left context stack are for records
and variables that you can update.
Whenever Datatrieve begins to process a statement, the left context stack contains the global variables you have declared and not released. Any local variables you declare in compound statements are also on the left context stack. The local variables are removed when the statement in which you declared them ends.
Local and global variables are on both stacks. Each type of variable has a value that can be assigned to a field or another variable; hence, they are on the right context stack. Both can be updated with new values you assign them; hence, they are on the left context stack.
Context blocks for a record you want to modify are also on both context
stacks. The record has a value you can use in Boolean expressions and Assignment
statements. In a MODIFY statement you can update that value.
Because a field is on both stacks at the same time, you can use the old value of
the field to calculate the new value. You can use the following form of
Assignment statement:
DTR> MODIFY USING PRICE = PRICE * 1.1 DTR>
Datatrieve retrieves the old value of PRICE associated with the name on the right context stack and multiplies the old PRICE by a constant. It then associates that value with the name PRICE on the left context stack and updates the value of the PRICE field.
When you enter a STORE statement, the only context block
for the new record is on the left context stack. No record exists yet, and, of
course, no values are associated with its fields. The fields can only receive
values.
However, as soon as Datatrieve associates a value with a field, you can move that value to the right context stack and use it on the right side of Assignment statements. You can make this shift before you finish assigning values to all the fields of the new record. In fact, you can use the values of new fields to calculate the values Datatrieve stores in other new fields in the same record.
To shift newly stored values to the right context stack, include a context
variable with the domain name when you enter the STORE
statement:
DTR> STORE A IN YACHTS USING . . .
Then, in the USING clause, use the context variable to qualify the names of any field whose value you want to use on the right side of an Assignment statement:
DTR> STORE A IN YACHTS USING CON> BEGIN CON> F1 = value-expression CON> F2 = value-expression CON> F3 = A.F1 + A.F2 CON> END DTR>
The context variable allows you to associate a field name on the right context stack with its new value as soon as you assign the value to the field. You cannot, however, use a field name on the right side of an Assignment statement until you have assigned a value to the field.
You can combine STORE and MODIFY
statements to keep an audit trail of changes made to records in a domain and to
change statistical records when you store new records.
To form an audit trail, you need a domain for the audit records. This domain can use the same record definition as the original domain but it must have its own domain definition and its own data file. Here is a simple example:
DTR> SHOW AUDIT_YACHTS DOMAIN AUDIT_YACHTS USING YACHT ON AUD_YACHT; DTR> FOR A IN YACHTS MODIFY USING CON> BEGIN CON> BUILDER = *.BUILDER CON> MODEL = *.MODEL CON> RIG = *.RIG CON> LOA = *.LOA CON> DISP = *.WEIGHT CON> BEAM = *.BEAM CON> PRICE = *.PRICE CON> STORE B IN AUDIT_YACHTS USING CON> B.BOAT = A.BOAT CON>END Enter BUILDER:
If you have a VERIFY USING clause in the MODIFY statement,
you should put the STORE statement as the last statement in
the VERIFY clause. If you put the VERIFY clause after the
STORE statement and the VERIFY clause aborts the change,
you have a record of the change but you have not changed the record. You can
also embed a MODIFY statement in a STORE
statement.
In the following example, the embedded MODIFY statement
updates a record of the last date a new record was added to the data file and
records the TYPE field of the record stored. The file
LAST.DAT is a sequential file with one record in it:
DTR> SHOW LAST_ENTRY DOMAIN LAST_ENTRY USING LAST_REC ON LAST.DAT; DTR> SHOW LAST_REC RECORD LAST_REC USING 01 TOP. 03 LAST_DATE USAGE DATE. 03 TYPE PIC X(20). ; DTR> STORE A IN YACHTS USING CON> BEGIN CON> BUILDER = *.BUILDER CON> MODEL = *.MODEL CON> RIG = *.RIG CON> LOA = *.LOA CON> DISP = *.DISP CON> BEAM = *.BEAM CON> PRICE = *.PRICE CON> MODIFY B IN LAST_ENTRY USING CON> BEGIN CON> LAST_DATE = "TODAY" CON> B.TYPE = A.TYPE CON> END CON> END Enter BUILDER:
With the proper use of context variables, you can also store or change data in fields shared by two or more domains.
A.2. Single Record Context
The Datatrieve statements PRINT, MODIFY, and
ERASE can act on one record at a time or on an entire record
stream or collection. The records on which they act are called target records. You
can identify target records for these statements in four ways:
A
SELECTstatement identifies one target record in a collection.The keyword ALL in a statement, without an OF rse clause, makes all records in a collection the targets of the statement.
An OF rse clause in the statement forms a target record stream.
The RSE clause in a
FORstatement forms a stream of target records for the statement contained in theFORloop.
A.2.1. The SELECT Statement and the Single Record Context
Before discussing the SELECT statement and context, a short
review of facts about collections is in order.
Datatrieve keeps a list of the collections you form with the
FIND statement. The most recent one formed is always at
the top of the list and is called the CURRENT collection. The only other
collections on the list are the ones to which you assign a name when you form
them. If you do not assign a name to the CURRENT collection, the next collection
you form becomes the new CURRENT collection. Datatrieve discards the old CURRENT
collection unless you give it a name when you form it.
With the RELEASE command, you can remove a collection from
that list. If you release the CURRENT collection, the next one on the list
becomes the CURRENT collection.
No collection on this list, however, is represented by a block on the context
stack unless you use the SELECT statement to single out one
record in the collection. When you select a record in a collection, Datatrieve
puts a block for that collection on the context stack. If every existing
collection has a selected record, then Datatrieve keeps a block on the context
stack for each of those collections.
The relative ages of the collections with selected records determine the order of context blocks for collections. The "oldest" collection with a selected record is the bottom of the context stack. Because the CURRENT collection is always the "youngest," its context block, if it has one, is nearest the top.
This order of context blocks for collections establishes the order Datatrieve
uses not only for recognizing field names, as previously described, but also for
identifying single target records. When you enter the most abbreviated forms of
the PRINT, MODIFY, and
ERASE statements, Datatrieve looks on the context stack
for the first valid single record context to carry out the specified action. It
looks for the "youngest" collection with a selected record and either prints the
record, erases it, or changes it.
The following sequence of examples illustrates the effect of the
SELECT and DROP statements on single
record context and the subsequent actions of the PRINT,
MODIFY, and ERASE statements. Form a
collection of records from the YACHTS domain, call it
BIGGIES, select the third record as the target record, and
display it:
DTR> READY YACHTS WRITE
DTR> FIND BIGGIES IN YACHTS WITH LOA > 40
[8 records found]
DTR> SELECT 3
DTR> PRINT
LENGTH
OVER
MANUFACTURER MODEL RIG ALL WEIGHT BEAM PRICE
GULFSTAR 41 KETCH 41 22,000 12 $41,350
DTR>Store a new record in the YACHTS domain and form a collection
that consists of that one record. Later, you can modify and erase this
record:
DTR> STORE YACHTS Enter MANUFACTURER: HINKLEY Enter MODEL: BERMUDA 40 Enter RIG: YAWL Enter LENGTH_OVER_ALL: 40 Enter DISPLACEMENT: 20000 Enter BEAM: 12 Enter PRICE: 82,000 DTR> FIND YACHTS WITH BUILDER = "HINKLEY" [1 record found] DTR>
You now have two collections, CURRENT (the younger) and
BIGGIES (the older):
DTR> SHOW COLLECTIONS
Collections:
CURRENT
BIGGIES
DTR> SHOW CURRENT
Collection CURRENT
Domain: YACHTS
Number of Records: 1
No Selected Record
DTR> SHOW BIGGIES
Collection BIGGIES
Domain: YACHTS
Number of Records: 8
Selected Record: 3
DTR>The CURRENT collection has no selected record, but
BIGGIES still does. Consequently, when you type
PRINT and press the Return key again,
Datatrieve prints the record in the first valid single record context, that is,
the selected record in BIGGIES:
DTR> PRINT
LENGTH
OVER
MANUFACTURER MODEL RIG ALL WEIGHT BEAM PRICE
GULFSTAR 41 KETCH 41 22,000 12 $41,350
DTR>When you type SELECT and press the Return
key, Datatrieve selects the first and only record in the CURRENT
collection. Now when you type PRINT and press the
Return key, the single record context has changed. Now the
selected record in the CURRENT collection is the target record of
the PRINT statement:
DTR> SELECT
DTR> PRINT
LENGTH
OVER
MANUFACTURER MODEL RIG ALL WEIGHT BEAM PRICE
HINKLEY BERMUDA 40 YAWL 40 20,000 12 $82,000
DTR> SHOW CURRENT
Collection CURRENT
Domain: YACHTS
Number of Records: 1
Selected Record: 1Now modify the price of the target record and display the result. The
MODIFY and PRINT statements both act
on the record in the first valid single record context, that is, the selected
record in the CURRENT collection:
DTR> MODIFY PRICE
Enter PRICE: 75,000
DTR> PRINT
LENGTH
OVER
MANUFACTURER MODEL RIG ALL WEIGHT BEAM PRICE
HINKLEY BERMUDA 40 YAWL 40 20,000 12 $75,000
DTR>Now type ERASE and press the Return key.
The ERASE statement also acts on the record in the first
valid single record context, and the record for the HINKLEY boat is
removed from the data file YACHT.DAT. Even though you erase the
only record in the collection, Datatrieve does not discard the
collection.
It takes note that you have erased the selected record and removes the context block for the CURRENT collection from the context stack.
You can verify the change in single record context by typing
PRINT and pressing Return. The selected
record from BIGGIES is again in the first valid single record
context:
DTR> ERASE
DTR> SHOW CURRENT
Collection CURRENT
Domain: YACHTS
Number of Records: 1
Selected Record: 1 (Erased)
DTR> PRINT
LENGTH
OVER
MANUFACTURER MODEL RIG ALL WEIGHT BEAM PRICE
GULFSTAR 41 KETCH 41 22,000 12 $41,350
DTR>If you type MODIFY or ERASE and press
the Return key and no existing collection has a selected
record, Datatrieve displays a message that there is no target record for the
action you propose:
DTR> ERASE No target record for ERASE. DTR> MODIFY No target record for MODIFY. DTR>
However, if you type PRINT and press the
Return key and no existing collection has a selected
record, Datatrieve displays a message that there is no selected record and then
prints out the whole collection:
DTR> FIND YACHTS WITH BUILDER = "ALBIN"
[3 records found]
DTR> PRINT
No record selected, printing whole collection
LENGTH
OVER
MANUFACTURER MODEL RIG ALL WEIGHT BEAM PRICE
ALBIN 79 SLOOP 26 4,200 10 $17,900
ALBIN BALLAD SLOOP 30 7,276 10 $27,500
ALBIN VEGA SLOOP 27 5,070 08 $18,600
DTR>You can change the single record context with the DROP
statement. The DROP statement removes the selected record
from a collection but does not erase the record from the data file. When you
type DROP and press the Return key, and the
CURRENT collection has no selected record, Datatrieve displays a message on your
terminal:
DTR> FIND BIGGIES IN YACHTS WITH LOA > 40 [8 records found] DTR> DROP No collection with selected record for DROP.
If the CURRENT collection has a selected record, the DROP
statement removes that record from the collection when you type
DROP and press the Return key. If other
collections have selected records, you must specify the collection name in the
DROP statement.
The CURRENT collection is BIGGIES. Select and display the first
record in BIGGIES and form a new CURRENT collection of boats built
by Albin:
DTR> SELECT; PRINT
LENGTH
OVER
MANUFACTURER MODEL RIG ALL WEIGHT BEAM PRICE
CHALLENGER 41 KETCH 41 26,700 13 $51,228
DTR> FIND YACHTS WITH BUILDER = "ALBIN"
[3 records found]
DTR>Now select, display, and drop the first record of the CURRENT collection. Then
enter a SHOW CURRENT command to see how Datatrieve records
the results of your actions. The SELECT creates a single
record context for the current collection; thus, the target record of the
PRINT statement is the selected record in the
CURRENT collection, not in BIGGIES:
DTR> SELECT
DTR> PRINT
LENGTH
OVER
MANUFACTURER MODEL RIG ALL WEIGHT BEAM PRICE
ALBIN 79 SLOOP 26 4,200 10 $17,900
DTR> DROP
DTR> SHOW CURRENT
Collection CURRENT
Domain: YACHTS
Number of Records: 3
Selected Record: 1 (Dropped)
DTR>When you drop a selected record from a collection, you change the single record context. The context block for that collection is removed from the context stack.
Consequently, when you type PRINT and press the
Return key again, Datatrieve displays the selected record
in BIGGIES, the record in the first valid single record
context:
DTR> PRINT
LENGTH
OVER
MANUFACTURER MODEL RIG ALL WEIGHT BEAM PRICE
CHALLENGER 41 KETCH 41 26,700 13 $51,228
DTR>Unlike PRINT, MODIFY, and
ERASE, the DROP statement does not act
on the record in the first valid single record context. You have already dropped
the selected record in the CURRENT collection. When you type
DROP and press the Return key again,
Datatrieve displays a message on your terminal and does not drop the selected
record in BIGGIES. Since BIGGIES is not the CURRENT
collection, you have to specify its name in the DROP
statement:
DTR> DROP
Target record has already been dropped.
DTR> DROP BIGGIES
DTR> SHOW BIGGIES
Collection BIGGIES
Domain: YACHTS
Number of Records: 8
Selected Record: 1 (Dropped)
DTR>Now you have no valid single record context. When you type
PRINT and press Return, Datatrieve
displays the whole CURRENT collection because there is no selected record in
either of the two existing collections. Since you dropped one record from the
CURRENT collection, it contains only two records now:
DTR> PRINT
No record selected, printing whole collection
LENGTH
OVER
MANUFACTURER MODEL RIG ALL WEIGHT BEAM PRICE
ALBIN BALLAD SLOOP 30 7,276 10 $27,500
ALBIN VEGA SLOOP 27 5,070 08 $18,600
DTR>To show that you have not erased the record dropped from the CURRENT
collection, form and display a new CURRENT collection of boats by
Albin:
DTR> FIND YACHTS WITH BUILDER = "ALBIN"
[3 records found]
DTR> PRINT ALL
LENGTH
OVER
MANUFACTURER MODEL RIG ALL WEIGHT BEAM PRICE
ALBIN 79 SLOOP 26 4,200 10 $17,900
ALBIN BALLAD SLOOP 30 7,276 10 $27,500
ALBIN VEGA SLOOP 27 5,070 08 $18,600
DTR>A.2.2. The CURRENT Collection as Target Record Stream
The preceding example shows the effect of the keyword ALL on a
PRINT statement that does not contain an OF
rse clause.
Although Datatrieve acts on only one record at a time, you can identify more
than one record for a single Datatrieve statement to act on. With the keyword
ALL, you can make every record in the CURRENT collection the target of a single
PRINT, MODIFY, or
ERASE statement. Such a statement, however, cannot also
contain an OF rse clause.
If you have a CURRENT collection and type PRINT ALL and
press the Return key, Datatrieve displays the whole CURRENT
collection. If you have no CURRENT collection, Datatrieve displays a message on
your terminal. To illustrate this effect, release all collections and enter the
statement PRINT ALL:
DTR> SHOW COLLECTIONS
Collections:
CURRENT
BIGGIES
DTR> RELEASE CURRENT, BIGGIES
DTR> SHOW COLLECTIONS
No established collections.
DTR> PRINT ALL
A current collection has not been established.
DTR>Datatrieve displays the same message on your terminal when you have no CURRENT
collection and you enter either an ERASE ALL or a
MODIFY ALL statement.
When you have a CURRENT collection and you enter an ERASE
ALL statement, Datatrieve removes every record in the CURRENT
collection from the data file. Although frequently useful, this operation can
jeopardize valuable data if you use it carelessly.
The various forms of the MODIFY ALL statement change the
data in each record of the CURRENT collection (see the MODIFY
statement in the
VSI Datatrieve Reference Manual). Make a collection of the first
three yachts with no listed price. Display the CURRENT collection, modify the
PRICE to $30,000, display the results of the
change, and change the price back to zero using a different form of the
MODIFY ALL statement:
DTR> FIND FIRST 3 YACHTS WITH PRICE = 0
[3 records found]
DTR> PRINT ALL
LENGTH
OVER
MANUFACTURER MODEL RIG ALL WEIGHT BEAM PRICE
BLOCK I. 40 SLOOP 39 18,500 12
BUCCANEER 270 SLOOP 27 5,000 08
BUCCANEER 320 SLOOP 32 12,500 10
DTR> MODIFY ALL PRICE
Enter PRICE: 30,000
DTR> PRINT ALL
LENGTH
OVER
MANUFACTURER MODEL RIG ALL WEIGHT BEAM PRICE
BLOCK I. 40 SLOOP 39 18,500 12 $30,000
BUCCANEER 270 SLOOP 27 5,000 08 $30,000
BUCCANEER 320 SLOOP 32 12,500 10 $30,000
DTR> MODIFY ALL USING PRICE = 0; PRINT ALL
LENGTH
OVER
MANUFACTURER MODEL RIG ALL WEIGHT BEAM PRICE
BLOCK I. 40 SLOOP 39 18,500 12
BUCCANEER 270 SLOOP 27 5,000 08
BUCCANEER 320 SLOOP 32 12,500 10
DTR>If your collection contains many records and you mistakenly enter an
ERASE ALL or MODIFY ALL statement, you
can enter a Ctrl/C to prevent all the records in the CURRENT
collection from being erased or changed. How many records get erased or changed
under such circumstances depends on the speed with which you enter the
Ctrl/C, the processing load on your system, and the
priority of your process.
A.2.3. The OF rse Clause and Target Record Streams
The OF rse clause in a PRINT,
ERASE, or MODIFY statement lets you
create a new context for that statement. The OF rse clause
specifies a target record stream that overrides any context established for your
existing collections. For each such OF rse clause,
Datatrieve puts a new block on the context stack. When Datatrieve completes
execution of the statement, it removes that block from the context stack.
The following example contrasts the effect of PRINT,
PRINT ALL, and PRINT OF
rse (when the PRINT
statement does not include a list of fields, you can omit the OF from the
statement). The record selection expression here is FIRST 3 YACHTS WITH
PRICE = 0. This RSE identifies a new target record stream for the
PRINT statement that overrides the CURRENT collection as
a target record stream. It also overrides the single record context of the
selected record in the CURRENT collection:
DTR> FIND FIRST 3 YACHTS
[3 records found]
DTR> SELECT; PRINT
LENGTH
OVER
MANUFACTURER MODEL RIG ALL WEIGHT BEAM PRICE
ALBERG 37 MK II KETCH 37 20,000 12 $36,951
DTR> PRINT ALL
LENGTH
OVER
MANUFACTURER MODEL RIG ALL WEIGHT BEAM PRICE
ALBERG 37 MK II KETCH 37 20,000 12 $36,951
ALBIN 79 SLOOP 26 4,200 10 $17,900
ALBIN BALLAD SLOOP 30 7,276 10 $27,500
DTR> PRINT FIRST 3 YACHTS WITH PRICE = 0
LENGTH
OVER
MANUFACTURER MODEL RIG ALL WEIGHT BEAM PRICE
BLOCK I. 40 SLOOP 39 18,500 12
BUCCANEER 270 SLOOP 27 5,000 08
BUCCANEER 320 SLOOP 32 12,500 10
DTR>To reduce the risk to your data, Datatrieve forces you to include both
keywords ALL and OF when using the OF rse clause in
MODIFY and ERASE statements. Although
the results are not shown here, you must type MODIFY and
ERASE statements to resemble the following examples. The
record selection expression used in these statements is PHONES WITH DEPT =
"32T":
DTR> MODIFY ALL OF PHONES WITH DEPT = "32T"
DTR> MODIFY ALL DEPT OF PHONES WITH DEPT = "32T"
DTR> MODIFY ALL USING DEPT = *."NEW DEPT" OF
PHONES WITH DEPT = "32T"
DTR> ERASE ALL OF PHONES WITH DEPT = "32T"Unless you include Assignment statements in the USING clause of a
MODIFY statement, Datatrieve prompts you once to supply a
value for each elementary field specified or implied in the statement. After you
respond to the last of the prompts, Datatrieve begins to change each of the
records in the CURRENT collection to correspond to the values you supplied to
the prompts. You can prevent any changes from taking effect by entering
Ctrl/Z when responding to any of the prompts.
A.2.4. FOR Statements and Target Record Streams
You can use FOR statements to create target record streams
for the Datatrieve statements that use single record context. Using
FOR loops has an advantage over using target record
streams formed by the OF rse clause and the target record
stream formed of the CURRENT collection by the keyword ALL.
The FOR statement lets you work with each record
individually; you do not have to perform the same operation on all target
records. By putting STORE and MODIFY
statements and prompting value expressions in a FOR loop, you
can act on each member of a record stream or collection one at a time.
When you put a MODIFY statement in a FOR
statement, Datatrieve prompts you once for each field in the record if you do
not specify a field list or a USING clause in the MODIFY
statement.
This FOR statement creates a record stream of boats that
have no price listed. The MODIFY statement prompts you to
supply a price for each record in the record stream. You can put a unique value
in the PRICE field for each boat:
DTR> READY YACHTS MODIFY DTR> FOR YACHTS WITH PRICE MISSING MODIFY PRICE Enter PRICE: 12900 Enter PRICE: 15600 Enter PRICE:
Another valuable feature of FOR loops is the complex
relationships you create between record streams when you include one
FOR loop inside another. Each FOR
statement puts a block on the context stack. As a result, you can use the
context mechanism to transfer values between records.
By putting a MODIFY statement inside two
FOR statements, you can automatically update master
records with the data from periodic transaction records:
DTR> FOR A IN DAILY_TRANSACTIONS CON> FOR B IN MASTER_DATA WITH B.ACCOUNT = A.ACCOUNT CON> MODIFY USING CON> BEGIN CON> MASTER_BAL = MASTER_BAL - WITHDRAW + DEPOSIT CON> TOT_WITHDRAW = TOT_WITHDRAW + WITHDRAW CON> TOT_DEPOSIT = TOT_DEPOSIT + DEPOSIT CON> END DTR>
The Boolean expression in this example limits the record stream for the inner
FOR statement to one record.
You can also create nested FOR statements in which
Datatrieve executes a series of statements at each level of nesting. For each
owner record in the next example, Datatrieve asks you if you want to modify the
SPECS field of every boat in the YACHTS inventory
built by the manufacturer of the owner’s boat. The third time through the outer
loop, Datatrieve again begins the cycle of prompting for the boats by
Albin because the third person in the OWNERS
domain also owns a boat by Albin. Notice that the record changed
during the second loop appears during the third:
DTR>FOR OWNERS
CON>BEGIN
CON> PRINT SKIP, BUILDER, SKIP
CON> FOR YACHTS WITH BOAT.BUILDER = OWNER.BUILDER
CON> BEGIN
CON> PRINT SPECS
CON> IF *."DO YOU WANT TO CHANGE THIS" CONT "Y"
CON> THEN MODIFY SPECS
CON> END
CON>END
BUILDER
ALBERG
LENGTH
OVER
RIG ALL WEIGHT BEAM PRICE
KETCH 37 20,000 12 $36,000
Enter DO YOU WANT TO CHANGE THIS: N
ALBIN
SLOOP 26 4,200 10 $17,900
Enter DO YOU WANT TO CHANGE THIS: N
SLOOP 30 7,276 10 $27,500
Enter DO YOU WANT TO CHANGE THIS: N
SLOOP 27 5,070 08 $18,600
Enter DO YOU WANT TO CHANGE THIS: Y
Enter RIG: KETCH
Enter LENGTH_OVER_ALL: 35
Enter DISPLACEMENT: 17000
Enter BEAM: 12
Enter PRICE: 33000
ALBIN
SLOOP 26 4,200 10 $17,900
Enter DO YOU WANT TO CHANGE THIS: N
SLOOP 30 7,276 10 $27,500
Enter DO YOU WANT TO CHANGE THIS: N
KETCH 35 17,000 12 $33,000
Enter DO YOU WANT TO CHANGE THIS: N
C&C
SLOOP 31 8,650 09
Enter DO YOU WANT TO CHANGE THIS: Ctrl/Z
Execution terminated by operator
DTR>Appendix B. Datatrieve Restrictions and Usage Notes
This appendix contains information on restrictions and usage notes of interest to advanced users of Datatrieve.
B.1. Datatrieve Usage and OpenVMS Disk Quota Considerations
Datatrieve needs several workfiles to maintain internal information. These workfiles are defined as RMS temporary, delete-on-close files. One of the workfiles is SYS$SCRATCH:DTRWORK.TMD. The workfiles were designated as temporary for two reasons:
They are always deleted when closed and are therefore usually invisible to the user.
They allow Datatrieve to be run from an account where the user does not have WRITE access to the directory. That is, temporary files do not have directory entries created; therefore, the user does not need WRITE access to a particular directory to create this type of temporary file.
Using such files has a disadvantage. If disk quotas are used, OpenVMS must charge the use of the temporary file to some resource. The algorithm used by the file system is to try to charge it to the parent directory. However, because there is no parent directory for temporary files, OpenVMS then charges it to the default UIC for the process.
Therefore, when you add entries to the quota file, you must also add an entry for each default UIC that a Datatrieve user will use. Otherwise, invocation of Datatrieve fails and a %SYSTEM-F-ABORT message is generated.
B.2. Restriction on Concatenating Double-Precision Numbers
Datatrieve may truncate floating-point numbers when you concatenate them with
string values. Datatrieve uses a different default size for string representation of
floating-point numbers than it uses for manipulating floating-point numbers.
Datatrieve uses 18 digits to internally store a double precision number. However,
when Datatrieve represents a floating-point number as a string, it uses 10 digits.
The following example illustrates how Datatrieve uses 10 characters for the string
representation of the floating-point number N2:
DTR> DECLARE N2 DOUBLE.
DTR> N2 = 1.1
DTR> PRINT N2
N2
1.1000E+00You can specify more than 10 digits by using an edit string. To get Datatrieve to
use 20 digits, for example, use an edit string in the
PRINT statement, as follows:
DTR> PRINT N2 USING X(20)
This difference between string representation and internal storage of floating-point numbers can lead to confusion when you use concatenation expressions. When you concatenate the floating-point number and a string value, Datatrieve treats the floating-point number as a string and uses 10 digits for the number. This is shown in the following example:
DTR> PRINT ’A’ || N2 || ’B’ A1.1000000000
Datatrieve first determines how many characters to allow for the completed concatenation. In this example, Datatrieve calculates an edit string of 13 characters for the entire concatenation string (10 for the string representation of the floating-point number, 1 for a potential sign value, 1 for the A character, and 1 for the B character).
For the purpose of calculating the length of the concatenation, Datatrieve has treated the floating-point number as a 10-character string. For intermediate calculations, however, Datatrieve maintains a length of 18 for the floating-point pieces. When Datatrieve prints each part of the concatenated expression, it allows a character for A, then 18 characters for the floating-point number. The result in this case is a concatenated string of length 20. As Datatrieve allowed only 13 characters for the whole concatenation, it truncates the remaining zeros in N2 and the string B.
Datatrieve must use 18 digits for the floating-point number to maintain precision for any possible intermediate calculations. That is, in order to maintain precision so that a concatenation such as PRINT ’A’ | | (N2 + N2 + N2) | | ’B’ results in an accurate value for N2 + N2 + N2, Datatrieve uses the 18 digits internally while calculating the intermediate results.
You can force Datatrieve to fit all the characters in the 13-character concatenation string that it initially allowed when it calculated the total space. To do this, use a FORMAT value expression to specify 11 characters for the floating-point number:
DTR> PRINT ’A’ || (FORMAT N2 USING X(11)) || ’B’ A1.100000000B
To force Datatrieve to allow enough characters for a completed concatenation that
includes all 18 digits of the floating-point number, use an edit string that allows
20 characters for the entire concatenated string:
DTR> PRINT ’A’ || N2 || ’B’ USING X(20) A1.1000000000000000B
B.3. Errors During STORE and MODIFY Statement Execution
When an error occurs during the processing of STORE or
MODIFY statements with either prompted input or Assignment
statements, Datatrieve sets the value of the field being stored or modified to
0.
In the following example, a data conversion overflow error causes this unexpected
change in the value of the DISPLACEMENT field shown under the query
header WEIGHT:
DTR> FIND FIRST 1 YACHTS
DTR> PRINT
LENGTH
OVER
MANUFACTURER MODEL RIG ALL WEIGHT BEAM PRICE
ALBERG 37 MK II KETCH 37 20,000 12 $36,951
DTR> MODIFY CURRENT USING DISPLACEMENT =
CON> DISPLACEMENT * 0.83333333333333333333
Data conversion overflow.
Field "DISPLACEMENT" may contain an incorrect value due
to error during STORE or MODIFY.Even though there is a data conversion error, Datatrieve continues to process the
modify operation and sets the value of DISPLACEMENT to
0:
DTR> PRINT
LENGTH
OVER
MANUFACTURER MODEL RIG ALL WEIGHT BEAM PRICE
ALBERG 37 MK II KETCH 37 0 12 $36,951In some cases, using a VALID IF clause prevents the incorrect assignment of 0 to
the field being stored or modified. For example, define X in your
record definition as follows:
03 X PIC 9(5) VALID IF X > 0.
Then, when an error occurs during a modification, the VALID IF clause traps the assignment of 0 to the field and causes the modify operation to stop:
DTR> MODIFY CURRENT USING X = X * 0.83333333333333333333 Validation error for field X. DTR>
Then you can reissue the MODIFY statement so that the data
conversion error does not occur.
B.4. Restriction on Missing Values and Default Values
Datatrieve stores missing and default values in the dictionary as character strings or integers. If you specify a value in exponent notation in a MISSING VALUE or DEFAULT VALUE clause, Datatrieve treats it as an integer.
The following field definition does not specify a character string, so Datatrieve attempts to store it as an integer:
03 ZZZ REAL MISSING IS 1E+30.
Datatrieve cannot store this value as an integer because any value with an exponent greater than 17 exceeds the space allotted for integers. Therefore, Datatrieve returns an error message.
In early versions of Datatrieve, the attempt to store a missing or a default value with such a large exponent resulted in an access violation. With newer versions, Datatrieve does not return an access violation error but stores the value in the dictionary as a very large integer. There is no error at definition time, but Datatrieve does return an error at run time. When you attempt a store operation involving this missing value, Datatrieve returns the error message "Illegal ASCII numeric" or "Data conversion overflow" for MISSING VALUE or DEFAULT VALUE fields defined with large exponents.
If you wish to specify a number with an exponent as a missing or a default value, VSI recommends that you specify that number as a character string:
03 ZZZ REAL MISSING IS "1E+30".
B.5. Restriction on Modifying Facility-Specific Definitions
Datatrieve and a number of other Digital products store definitions in the CDD/Repository dictionary system. However, clauses used by one facility may not always be used by another facility. For example, COBOL 88 level definitions and INDEXED FOR COBOL are facility-specific clauses which are ignored by Datatrieve.
If your definitions include such facility-specific clauses, you must be sure that those definitions are edited or redefined using only a facility which supports the clauses included in the definition. You must not, for example, use Datatrieve to edit or redefine a record definition that includes COBOL 88 level field clauses. If you do, the facility-specific clauses will not be included in the redefined version of the definition.
B.6. Spurious Divide-by-Zero Errors
Sometimes Datatrieve gives unwarranted divide-by-zero error messages. For performance optimization, Datatrieve evaluates invariant expressions outside of any loops that contain them. You can create some loops that cause Datatrieve to treat a division operation as an invariant expression that is not related to the test you enter to prevent division by zero. In such loops, Datatrieve performs the division before the test and divides by zero anyway.
The following example results in an unwarranted divide-by-zero error. Even though
there is an explicit test to prevent a divide-by-zero error, the calculation is
performed before that test is made. In this case, Datatrieve sees the
PRINT statement, rather than the division operation, as
dependent on the test:
FOR A IN YACHTS
FOR YACHTS WITH TYPE EQ A.TYPE
IF BEAM NE 0
THEN PRINT A.LOA/A.BEAMThe following example illustrates a way to work around this problem. In this case, Datatrieve recognizes that the division operation is dependent on the test:
DECLARE H H_FLOATING.
FOR A IN YACHTS
BEGIN
IF BEAM NE 0
THEN H = A.LOA / A.BEAM
FOR YACHTS WITH TYPE = A.TYPE
PRINT H
ENDB.7. Execution out of Sequence in Procedures
When you invoke command files or specify editing commands in a Datatrieve procedure, the sequence of execution is as follows:
The statements of the procedure.
Command files. Changes resulting from an
EDITcommand do not become effective until after the procedure statements execute.
The following example illustrates how Datatrieve evaluates and executes the statements of a procedure before the command file:
PRINT "first one" @PROC2 PRINT "third one" ! The command file PROC2 contains: PRINT "second one"
The result is:
first one third one second one
In the next example, the procedure includes edit commands and an invocation of an edited procedure:
DEFINE PROCEDURE TESTEDIT PRINT "start" Edit TEST1 . . . :TEST1 Print "end" END_PROCEDURE
In this case, the editing changes are not effective until after the word
"end" has been printed. The invocation of TEST1 would
use the version of TEST1 before any changes were made.
B.8. Interactive Users Can Set Stack Size
Interactive users can change their Datatrieve stack size by using a logical name.
Assign the stack size value to the logical name
DTR$STACK_SIZE using the DCL DEFINE
command:
$ DEFINE DTR$STACK_SIZE "200"
Assign the stack size before you invoke Datatrieve. Changes to the stack size must be made before Datatrieve is initialized (initialization takes place after you invoke Datatrieve and before you see the Datatrieve prompt on the screen). Do not use the Datatrieve FN$CREATE_LOG function to assign the stack size because the function is executed after the initialization.
Stack sizes cannot be smaller than 100 pages or larger than 500 pages. The default stack size is 100 pages; this is used if you do not assign the logical or if the assignment is invalid. If you assign a value of less than 100 to the logical name DTR$STACK_SIZE, a stack size of 100 is used. The stack size of 500 is used if you assign a value greater than 500 to the logical name DTR$STACK_ SIZE.
Datatrieve may return an access violation error in situations where a stack size of 100 pages is not sufficient. Such situations may occur if you:
Have more than 293 elements in a
PRINTstatementUse more than 400 operands with the EQUAL operator in a Boolean expression
Define a very large record, such as a record definition whose source is in a very large RMS file (greater than 900 blocks)
Define a very complex record, such as one containing many REDEFINE clauses or many levels of nested COMPUTED BY clauses
Define an optimized record with a large number of fields
The items in the previous list are instances where you might want to increase the stack size.
After entering the DCL DEFINE command, you can verify the stack
size by invoking Datatrieve with the /DEBUG qualifier, as shown
in the following example. Datatrieve displays an informational message showing the
current stack size:
$ DEFINE DTR$STACK_SIZE "150" $ DATATRIEVE/INTER=CHAR/DEB VSI DATATRIEVE stack size is 150. VSI DATATRIEVE V6.0 DEC Query and Report System Type HELP for help DTR>
Raise the stack size only when necessary. Increasing the stack size proportionately increases the virtual memory allocated by your process.
B.9. Clarification About Using Prompting Value Expressions
You cannot use a prompting value expression in place of a field name in Datatrieve statements. When you use a prompting value expression, Datatrieve treats the input as a character string literal. In the following example, Datatrieve prints all the yachts but treats LOA as a string literal and does not sort on the basis of values in the field LOA:
DTR> PRINT YACHTS SORTED BY *."FIELD"
Enter FIELD: LOA
LENGTH
OVER
MANUFACTURER MODEL RIG ALL WEIGHT BEAM PRICE
ALBERG 37 MK II KETCH 37 20,000 12 $36,951
NORTHERN 29 SLOOP 29 7,250 09 $20,975
CHRIS-CRAF CARIBBEAN SLOOP 35 18,000 11 $37,850
.
.
.Can be unsigned (default) or signed.
Can only be signed.
For CDDL only.
CDO omits the word "DATATRIEVE".
CDO omits the words "FOR DATATRIEVE".
FRACTIONS is only available in CDDL.
No other field definition can follow the last elementary field in the group field containing this clause.
DDIF and DTIF output can be converted to a multitude of different formats using the CDA converter. See the CDA documentation for further details.