VSI ACMS for OpenVMS Writing Server Procedures
- Software Version:
- ACMS for OpenVMS Version 5.3-3
- Operating System and Version:
- VSI OpenVMS Alpha Version 8.4-2L1 or higher
VSI OpenVMS IA-64 Version 8.4-1H1 or higher
Preface
1. About VSI
VMS Software, Inc. (VSI) is an independent software company licensed by Hewlett Packard Enterprise to develop and support the OpenVMS operating system.
2. Intended Audience
This document is intended for those who will:
Write step procedures for ACMS tasks
Write ACMS initialization, termination, and cancellation procedures
Debug ACMS tasks and procedures
Integrate ACMS with a third-party database
To program the ACMS system, you need a beginner’s knowledge of a programming language that conforms to the OpenVMS Calling Standard – COBOL or BASIC, for example. If you are using Oracle CODASYL DBMS or Oracle Rdb, you also need a beginner's knowledge of database programming. You do not need extensive experience with OpenVMS programming tools or system programming.
3. Document Structure
This manual contains the following chapters and appendixes:
| Part I,''User Information'' | |
| Chapter 1, "Introduction to Server Procedures" | Introduces ACMS application programming by explaining procedure server terminology, the kinds of programs you write, the ACMS tools you use to write and debug ACMS application programs, and the programming tools supplied by related products. |
| Chapter 2, "Writing Initialization, Termination, and Cancel Procedures" | Explains how to write initialization, termination, and cancel procedures for ACMS tasks. |
| Chapter 3, "Writing Step Procedures" | Presents recommendations for writing step procedures, including naming and structuring step procedures, using workspaces, handling errors in step procedures, and performing terminal I/O from a procedure server. |
| Chapter 4, "Accessing Resource Managers" | Explains how to write procedures for tasks that use Oracle Rdb databases with SQL, Oracle Rdb with RDO, Oracle CODASYL DBMS databases, and RMS files. |
| Chapter 5, "Using Message Files with ACMS Tasks and Procedures" | Explains how to create message files for ACMS task groups. |
| Chapter 6, "Building Procedure Server Images" | Explains how to build procedure server images. |
| Chapter 7, "Debugging Tasks and Procedures" | Explains how to debug tasks, including tasks called by user-written agent programs, as well as procedures called by tasks. |
| Chapter 8, "Debugging an Application in an ACMS Run-Time Environment" | Provides guidelines to transition procedures so that they run in the ACMS run-time environment. |
| Part II,''Reference Material'' | |
| Chapter 9, "ACMS Programming Services" | Provides reference material for the ACMS programming services. |
| Chapter 10, "ACMS Task Debugger Commands" | Provides reference material for the ACMS Task Debugger commands. |
| Part III,''Appendixes'' | |
| Appendix A, "Summary of ACMS System Workspaces" | Describes the ACMS system workspaces. |
| Appendix B, "Libraries Included in AVERTZ Sample Procedures" | Lists the libraries referred to in the AVERTZ procedures that are used as examples in the manual. |
| Appendix C, "Superseded Features" | Describes superseded features. |
4. ACMS Help
ACMS and its components provide extensive online help.
DCL level help
Enter
HELP ACMSat the DCL prompt for complete help about theACMScommand and qualifiers, and for other elements of ACMS for which independent help systems do not exist. DCL level help also provides brief help messages for elements of ACMS that contain independent help systems (such as the ACMS utilities) and for related products used by ACMS (such as DECforms or Oracle CDD/Repository).ACMS utilities help
Each of the following ACMS utilities has an online help system:
ACMS Debugger ACMSGEN Utility
ACMS Queue Manager (ACMSQUEMGR)
Application Definition Utility (ADU)
Application Authorization Utility (AAU)
Device Definition Utility (DDU)
User Definition Utility (UDU)
Audit Trail Report Utility (ATR)
Software Event Log Utility Program (SWLUP)
The two ways to get utility-specific help are:
Run the utility and type
HELPat the utility prompt.Use the DCL
HELPcommand. At the "Topic?" prompt, type@followed by the name of the utility. Use the ACMS prefix, even if the utility does not have an ACMS prefix (except for SWLUP). For example:Topic? @ACMSQUEMGR Topic? @ACMSADU
However, do not use the ACMS prefix with SWLUP:
Topic? @SWLUP
Note
Note that if you run the ACMS Debugger Utility and then type
HELP, you must specify a file. If you ask for help from the DCL level with@, you do not need to specify a file.ACMSPARAM.COM and ACMEXCPAR.COM help
Help for the command procedures that set parameters and quotas is a subset of the DCL level help. You have access to this help from the DCL prompt, or from within the command procedures.
LSE help
ACMS provides ACMS-specific help within the LSE templates that assist in the creation of applications, tasks, task groups, and menus. The ACMS- specific LSE help is a subset of the ADU help system. Within the LSE templates, this help is context-sensitive. Type
HELP/IND (PF1-PF2)at any placeholder for which you want help.Error help
ACMS and each of its utilities provide error message help. Use
HELP ACMS
       ERRORS
from the DCL prompt for ACMS error message help. UseHELP ERRORSfrom the individual utility prompts for error message help for that utility.Terminal user help
At each menu within an ACMS application, ACMS provides help about terminal user commands, special key mappings, and general information about menus and how to select tasks from menus.
Forms help
For complete help for DECforms or TDMS, use the help systems for these products.
5. Related Documents
Read VSI ACMS for OpenVMS Getting Started before using this guide; this book provides an introduction to developing applications with ACMS and DECforms software. It explains the basic concepts and facilities of ACMS and other products needed for developing ACMS applications. The collection of examples in this book shows the development of a complete ACMS application and explains how to install and run the application.
The following table lists the documents in the VSI ACMS for OpenVMS documentation set.
| ACMS Information | Description |
|---|---|
| VSI ACMS Version 5.0 for OpenVMS Installation Guide | Description of installation requirements, the installation procedure, and postinstallation tasks. |
| VSI ACMS for OpenVMS Getting Started | Overview of ACMS software and documentation. Tutorial for developing a simple ACMS application. Description of the AVERTZ sample application. |
| VSI ACMS for OpenVMS Concepts and Design Guidelines | Description of how to design an ACMS application. |
| VSI ACMS for OpenVMS Writing Applications | Description of how to write task, task group, application, and menu definitions using the Application Definition Utility. Description of how to write and migrate ACMS applications on an OpenVMS system. |
| VSI ACMS for OpenVMS Writing Server Procedures | Description of how to write programs to use with tasks and how to debug tasks and programs. |
| VSI ACMS for OpenVMS Systems Interface Programming | Description of using Systems Interface (SI) Services to submit tasks to an ACMS system. |
| VSI ACMS for OpenVMS ADU Reference Manual | Reference information about the ADU commands, phrases, and clauses. |
| VSI ACMS for OpenVMS Quick Reference | List of ACMS syntax with brief descriptions. |
| VSI ACMS for OpenVMS Managing Applications | Description of authorizing, running, and managing ACMS applications, and controlling the ACMS system. |
| VSI ACMS for OpenVMS Remote Systems Management Guide | Description of the features of the Remote Manager for managing ACMS systems, how to use the features, and how to manage the Remote Manager. |
| Online help | Online help about ACMS and its utilities. |
The following documentation is also useful:
VSI DECforms Guide to Commands and Utilities
Explains how to create DECforms forms and design DECforms panels.
VSI OpenVMS Debugger Manual and VSI OpenVMS Command Definition, Librarian, and Message Utilities
Describes how to use the OpenVMS Debugger and the Message Utility.
VSI COBOL User Manual and VSI COBOL Reference Manual
Explains the COBOL statements and compiler used to write ACMS application programs.
VSI BASIC User Manual and VSI BASIC Reference Manual
Explains the BASIC statements and compiler used to write ACMS application programs.
6. OpenVMS Documentation
The full VSI OpenVMS documentation set can be found on the VMS Software Documentation webpage at https://docs.vmssoftware.com.
7. VSI Encourages Your Comments
You may send comments or suggestions regarding this manual or any VSI document by sending electronic mail to the following Internet address: <docinfo@vmssoftware.com>. Users who have VSI OpenVMS support contracts through VSI can contact <support@vmssoftware.com> for help with this product.
8. Conventions
The following conventions are used in this manual:
| Ctrl/x | A sequence such as Ctrl/x indicates that you must press and hold the key labeled Ctrl while you press another key or a pointing device button. |
| PF1 x | A sequence such as PF1 x indicates that you must first press and release the key labeled PF1 and then press and release another key or a pointing device button. |
| Return | In the HTML version of this document, this convention appears as brackets rather than a box. |
| . . . |
A horizontal ellipsis in examples indicates one of the following possibilities:
|
| ⋮ | A vertical ellipsis indicates the omission of items from a code example or command format; the items are omitted because they are not important to the topic being discussed. |
Monospace text | Monospace type indicates code examples and interactive screen displays. In the C programming language, monospace type in text identifies the following elements: keywords, the names of independently compiled external functions and files, syntax summaries, and references to variables or identifiers introduced in an example. In the HMTL version of this document, this text style may appear as italics. |
| - | A hyphen at the end of a command format description, command line, or code line indicates that the command or statement continues on the following line. |
| numbers | All numbers in text are assumed to be decimal unless otherwise noted. Nondecimal radixes—binary, octal, or hexadecimal—are explicitly indicated. |
| bold text | Bold text represents the introduction of a new term or the name of an argument, an attribute, or a reason. In the HMTL version of this document, this text style may appear as italics. |
| italic text | Italic text indicates important information, complete titles of manuals, or variables.
Variables include information that aries in system output (Internal error
number), in command lines
(/PRODUCER=name), and in command parameters in
text (where dd represents the predefined code for the device
type). |
| UPPERCASE | Uppercase text indicates the name of a routine, the name of a file, the name of a file protection code, or the abbreviation for a system privilege. In command format descriptions, uppercase text is an optional keyword. |
| UPPERCASE | In command format descriptions, uppercase text that is underlined is required. You must include it in the statement if the clause is used. |
| lowercase | In command format descriptions, a lowercase word indicates a required element. |
| <lowercase> | In command format descriptions, lowercase text in angle brackets indicates a required clause or phrase. |
| ( ) | In command format descriptions, parentheses indicate that you must enclose the options in parentheses if you choose more than one. |
| [ | | ] | In command format descriptions, vertical bars within square brackets indicate that you can choose any combination of the enclosed options, but you can choose each option only once. |
| { | | } | In command format descriptions, vertical bars within braces indicate that you must choose one of the options listed, but you can use each option only once. |
9. References to Oracle Products
VSI ACMS documentation set, to which this document belongs, refers to the following Oracle products by their full and abbreviated names:
| Full product name | Shortened product name |
|---|---|
| Oracle Common Data Dictionary | CDD |
| Oracle Rdb | Rdb |
| Oracle Database/DBMS | DBMS |
| Oracle Trace | Trace |
Part I. User Information
This part contains tutorial information about writing procedures and creating message files for ACMS servers. This part also contains information about building procedure server images, debugging tasks and server procedures, and running tasks in the ACMS run-time environment.
Chapter 1. Introduction to Server Procedures
Step procedures
Specialized procedures: initialization, termination, and cancel procedures
Each section in the chapter includes references to other chapters or manuals where you can find more detailed information about these topics.
1.1. Procedure Server Terminology
A number of terms used in this chapter can be confusing because they all contain the word "server", and they are similar-sounding. Because these terms are used throughout this and other ACMS manuals, it is important to understand the differences among them.
A procedure server is a term used in ACMS to describe a number of the specific concepts, which are represented in Figure 1.1, ''Procedure Server Terminology''.
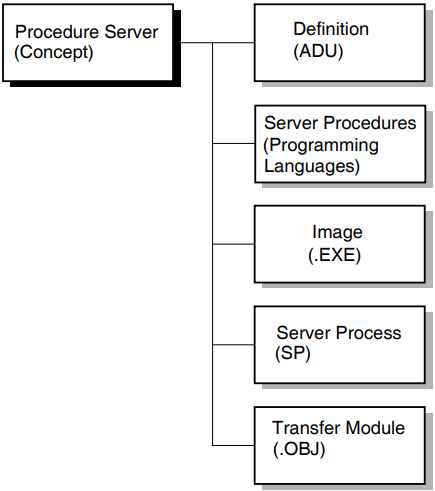
A procedure server definition is ADU syntax used to describe the server procedures and the server image. A procedure server definition is a part of a task group definition.
- Server procedures are programs or subroutines written in 3GL languages that conform to the OpenVMS calling standard. A procedure performs a particular kind of work for an ACMS task. The two kinds of server procedures used in ACMS tasks are the following:
Initialization, termination, and cancel procedures
Step procedures
These two types of server procedures are explained in the next section.
A procedure server image (.EXE) is the executable code that actually does the work for an ACMS processing step; it is, in fact, an OpenVMS image. A procedure server image runs in a procedure server process.
A procedure server process (SP) is an OpenVMS process created according to the characteristics defined for a server in ACMS task group and application definitions. Server processes are started and stopped, as needed, by the Application Execution Controller (EXC) process.
When the EXC starts a procedure server, it creates a server process, activates and loads the procedure server image, and runs any initialization procedure defined for the server.
A procedure server transfer module is an object module created for a procedure server as a result of building an ACMS task group definition. When you build a task group, ADU produces a procedure server transfer module for each server defined in the task group.
Note
The two types of servers in an ACMS environment are procedure servers and DCL servers. See VSI ACMS for OpenVMS Writing Applications for information about DCL servers.
1.2. Understanding Server Procedures
A server procedure is a program written in a 3GL programming language, such as COBOL, that conforms to the OpenVMS calling standard. A procedure performs a particular kind of work for an ACMS task. The two types of procedures in ACMS are described in the next two sections.
1.2.1. Initialization, Termination, and Cancel Procedures
Initialization, termination, and cancel procedures make up one type of server procedure. These procedures open files, bind databases, close files, and do cleanup work when an ACMS task is canceled.
Initialization, termination, and cancel procedures do work related to a server process rather than work related to a specific task. The Application Execution Controller (EXC) calls each of them at various times:
An initialization procedure is called when a server process starts.
A termination procedure is called when a server process stops.
A cancel procedure is called when a task is canceled.
Initialization, termination, and cancel procedures for a server are declared in a task group definition. You can have only one initialization, termination, and cancel procedure in each server definition.
      REPLACE GROUP VR_TASK_GROUP
       .
       .
       .
      SERVER IS VR_SERVER:
           INITIALIZATION PROCEDURE IS VR_INIT;
           TERMINATION PROCEDURE IS VR_TERM;
           PROCEDURES ARE
           .
           .
           .
      END SERVER;
      END DEFINITION;
The declaration of a cancel procedure, if included in the example, would follow the identification of the initialization and termination procedures and would be similar to them.
Chapter 2, "Writing Initialization, Termination, and Cancel Procedures" contains more information and examples of initialization, termination, and cancel procedures.
1.2.2. Step Procedures
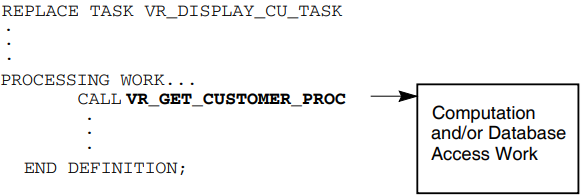
A step procedure is a second type of server procedure. A step procedure is a subroutine that does the computational and database access work for a processing step in an ACMS task. It is invoked by means of a call statement in a processing step, and it returns control to the calling task when it completes.
Figure 1.2, ''Call to a Step Procedure in a Task Definition'' shows a call to a step procedure in a processing step of a task definition. The step procedure in the example is VR_GET_CUSTOMER_PROC.
             REPLACE GROUP VR_TASK_GROUP
              .
              .
              .
             SERVER IS VR_SERVER:
                  INITIALIZATION PROCEDURE IS VR_INIT;
                  TERMINATION PROCEDURE IS VR_TERM;
                  PROCEDURES ARE
                                 VR_GET_CUSTOMER_PROC,
                  .
                  .
                  .
             END SERVER;
             END DEFINITION;
1.3. Naming and Structuring a Server Procedure
Assign a unique name to a server procedure.
The name or entry point used for each procedure must be unique among all procedures in a procedure server. You must use the same name to call the procedure in the processing step in the task definition.
Example 1.3, ''Processing Step in a Task Definition'' shows a simplified example of a task definition with a processing step that calls a step procedure.Example 1.3. Processing Step in a Task Definition REPLACE TASK VR_DISPLAY_CU_TASK . . . GET_CUSTOMERS: PROCESSING CALL VR_GET_CUSTOMER_PROC USING VR_CUSTOMER_WKSP, VR_CU_ARRAY_WKSP; . . .The CALL clause shows that you want to run a procedure named VR_GET_CUSTOMER_PROC. The USING keyword names two workspaces that the procedure uses: VR_CUSTOMER_WKSP and VR_CU_ARRAY_WSKP. The task definition does not change regardless of the language you use to write the procedure.
For a more detailed explanation of the processing step, see VSI ACMS for OpenVMS Writing Applications.
Structure a step procedure as an externally callable subprogram or function.
For example, in COBOL you write step procedures as subprograms. Like any other COBOL subprogram, a step procedure begins with an Identification Division that gives the 1- to 31-character name of the procedure. The name of the procedure corresponding to the GET_CUSTOMERS processing step definition shown in Example 1.3, ''Processing Step in a Task Definition'' is VR_GET_CUSTOMER_PROC. For example:IDENTIFICATION DIVISION. PROGRAM-ID. VR_GET_CUSTOMER_PROC.
1.4. Programming Services and Tools
ACMS provides programming services and tools to assist you in writing procedures. Chapter 3, "Writing Step Procedures" explains how to use programming services in writing step procedures. Chapter 9, "ACMS Programming Services" contains reference information about all ACMS programming services.
ACMS tools that you can use to debug tasks and server procedures include the ACMS Task Debugger, online server debugging, and server process dumps. Chapter 7, "Debugging Tasks and Procedures" and Chapter 8, "Debugging an Application in an ACMS Run-Time Environment" contain information about debugging ACMS tasks and server procedures.
The OpenVMS operating system also provides tools used to create procedure servers: the OpenVMS Message Facility, the OpenVMS Linker, and the OpenVMS Debugger. Chapter 5, "Using Message Files with ACMS Tasks and Procedures", Chapter 6, "Building Procedure Server Images", and Chapter 7, "Debugging Tasks and Procedures" explain the use of these tools.
Chapter 2. Writing Initialization, Termination, and Cancel Procedures
Initialization procedures
Initialization procedures can open the files and bind to the databases that step procedures in the server use.
Termination procedures
Termination procedures can perform application-specific server termination processing, such as unmapping a global section. Note that Rdb, DBMS, and RMS automatically release databases and close files when a process runs down.
Cancel procedures
Cancel procedures can perform a variety of functions with ACMS tasks, such as freeing non-transaction-based resources and rolling back active database transactions or recovery units. In most cases, their use is discouraged and can be avoided by following the guidelines that are discussed in Section 2.4.1, ''Guidelines for Avoiding Cancel Procedures''. However, in some situations they are required; see Section 2.4.2, ''Situations in Which Using Cancel Procedures Is Unavoidable'' for more information.
2.1. Writing Initialization Procedures
Use initialization procedures to open the files or bind to the databases that are subsequently used by the step procedures running in the server. Files and databases are most frequently opened by initialization procedures with shared access so that other processes on the system, including other server processes, can also access the data. However, it is more efficient to use exclusive access in those cases where only a single server process needs to access a file or database.
By forcing the server to bind to the database in the initialization procedure, you ensure that the database is accessible, that is, that the database file or files exist and can be accessed by the application.
The overhead of binding to a database or opening a file is incurred at initialization time rather than at task execution time.
Any database recovery can be performed as part of application startup.
If the application is being restarted after a system crash, the database may need to be recovered because of that crash. By forcing the server to bind to the database in the initialization procedure, you force the database recovery to be performed as part of the application startup processing, rather than as part of the first task that uses that server process.
The initialization procedure can report any errors encountered while binding to the database.
If the database is not accessible, or for some reason cannot be recovered after a crash, then you can ensure that the application startup fails because the database is unusable.
The use of an initialization procedure for a server is optional. If you do specify an initialization procedure, ACMS calls the procedure every time it starts a new process for the server. ACMS can start server processes when an application is first started and also while an application is running if additional server processes are required to handle the load placed on the application by the users. If you do not specify an initialization procedure, ACMS starts the server process without performing any application-specific initialization processing.
The processing that is performed in an initialization procedure depends on which database you are using. See the database-specific sections in this chapter for more information.
2.1.1. Guidelines for Writing Initialization Procedures
An initialization procedure must return a status value to the server process to indicate whether the initialization procedure completed successfully.
All languages that follow the OpenVMS calling standard supply a method of returning a status value from a subprogram or function. For example, in COBOL, use the GIVING clause of the Procedure Division header to return a status value to ACMS. Include the status-result definition in the Working Storage Section and in the Procedure Division header:WORKING-STORAGE SECTION. 01 status-result PIC S9(9) COMP. PROCEDURE DIVISION GIVING status-result.
With BASIC, specify the data type returned with the FUNCTION statement, and assign a value to the function name. This example shows that the status value returned to ACMS has a longword data type:FUNCTION LONG pers_upd_server_init_proc
If the server initialization procedure completes successfully, return a success status indicating that the server process is ready to use. If the procedure detects an error condition, return a failure status indicating that the server process cannot be used. If you open more than one file or database, return a success value only if the initialization procedure opened all the files and databases successfully.
In an initialization procedure, signal errors detected during initialization processing.
When an initialization procedure signals an error, ACMS writes additional information about the error condition to the ACMS audit trail log. Use the following services to signal the error condition:Resource manager
Service used to signal error condition
Rdb with SQL
SQL$SIGNAL
Rdb with RDO
LIB$CALLG and LIB$SIGNAL with the Rdb RDB$MESSAGE_VECTOR array
DBMS
DBM$SIGNAL
RMS files
LIB$SIGNAL with the RMS STS and STV error codes
If the initialization procedure signals a fatal OpenVMS status, ACMS writes the error to the audit trail log and stops the server process. However, if the procedure signals an error or warning OpenVMS status, then ACMS continues executing the initialization procedure after writing the error to the audit trail log. Therefore, an initialization procedure should always return a failure status when it detects an error, even if it signals the error condition.
An initialization procedure cannot assign initial values to fields in group or user workspaces.
Because ACMS does not pass workspaces to initialization procedures, there is no way to assign initial values to fields in workspaces.
2.1.2. Binding or Attaching to Databases
In an initialization procedure, you can bind or attach to a database in three ways. The following sections describe these methods and explain how to decide which of them is appropriate to your application.
To bind to a database, start and end a dummy database transaction in the initialization procedure. The examples below illustrate attaching to an Rdb database using SQL; however, the same techniques also apply when accessing an Rdb database using RDO and when accessing a DBMS database.
Bind to the database
The following COBOL code extract causes a simple bind to the database:EXEC SQL WHENEVER SQLERROR GO TO sql-error-handler END-EXEC. EXEC SQL SET TRANSACTION READ WRITE END-EXEC. EXEC SQL COMMIT END-EXEC. SET ret-stat TO SUCCESS. EXIT PROGRAM. sql-error-handler. MOVE Rdb$LU_STATUS TO ret-stat CALL "SQL$SIGNAL" EXIT PROGRAM.Start a transaction and, additionally, reserve the relations that will be used by the step procedures in the server.
Using this method, you also force Rdb to read in the metadata associated with those relations, in addition to just binding to the database. Doing this at application startup time means that this overhead is incurred once – when the application starts – rather than each time a step procedure in a server process first accesses a relation.Note
If the procedures in the server perform only read-access transactions against the database, specify READ ONLY access when you start the transaction.
The following code extract causes the process to bind to the database and causes the metadata for the named relations to be read in.EXEC SQL WHENEVER SQLERROR GO TO sql-error-handler END-EXEC. EXEC SQL SET TRANSACTION READ WRITE RESERVING reservations, vehicles, vehicle_rental_history FOR SHARED WRITE, sites, regions FOR SHARED READ END-EXEC. EXEC SQL COMMIT END-EXEC. SET ret-stat TO SUCCESS. EXIT PROGRAM. sql-error-handler. MOVE Rdb$LU_STATUS TO ret-stat CALL "SQL$SIGNAL" EXIT PROGRAM.Store a dummy record in a relation and then delete it by rolling back the database transaction or recovery unit.
When you use this method, you force Rdb to create the recovery-unit journal file (.RUJ) during application startup rather than as part of the first task that uses the server process. Furthermore, if the .RUJ file cannot be created for some reason, then the application does not start.Note
Rdb and DBMS do not use an .RUJ file for read-only transactions. Therefore, this step is not necessary if the procedures in the server perform only read-access transactions against the database.
The following code extract forces Rdb to create the .RUJ file for the process:EXEC SQL WHENEVER SQLERROR GO TO sql-error-handler END-EXEC. EXEC SQL SET TRANSACTION READ WRITE RESERVING reservations, vehicles, vehicle_rental_history FOR SHARED WRITE, sites, regions FOR SHARED READ END-EXEC. EXEC SQL INSERT INTO reservations ( reservation_id ) VALUES ( :zero_reservation_id ) END-EXEC. EXEC SQL ROLLBACK END-EXEC. SET ret-stat TO SUCCESS. EXIT PROGRAM. sql-error-handler. MOVE Rdb$LU_STATUS TO ret-stat CALL "SQL$SIGNAL" EXIT PROGRAM.
The following sections contain examples of initialization procedures and explanations of how to write code for Rdb and DBMS databases and for RMS files. See the Rdb, DBMS, and RMS documentation for further information on accessing a database or file.
2.1.3. Initialization Procedures for Rdb Databases Using SQL
The initialization procedure for a server that uses an Rdb database attaches to the database by starting and ending a dummy transaction. Note that to attach fully to the database, you must start a transaction, store a dummy record, and roll back the transaction, as explained in Section 2.1.2, ''Binding or Attaching to Databases''.
The initialization procedure for a server using an Rdb database must declare the database accessed by the step procedures in the server. The database declaration in the initialization procedure must be the same as the database declarations in the step procedures in the server. To declare the database using SQL, use the DECLARE SCHEMA statement. Always use the DECLARE SCHEMA statement to name the database you are using before you use other statements that access the database.
In SQL, you start a transaction using the SET TRANSACTION statement. Section 2.1.3.1, ''Specifying the Access Mode and Relations Used by the Server'' describes how to specify the access mode and relations used by the step procedures in the server. If the database transaction cannot be started, log the failure in the ACMS audit trail log by calling SQL$SIGNAL, and then return the failure status to ensure that ACMS stops the server process.
Section 2.1.3.2, ''Using COBOL'' illustrates an initialization procedure written in COBOL that uses SQL. See the SQL documentation for more information about using SQL to access Rdb databases.
2.1.3.1. Specifying the Access Mode and Relations Used by the Server
When you start the dummy transaction in the initialization procedure, specify the access mode used by the step procedures in the server. If the procedures in the server perform only read-access transactions against the database, specify READ ONLY access when you start the transaction. Specify READ WRITE access if any step procedures also write or update records in the database.
Name all the relations used by the step procedures in the server to cause Rdb to read in the metadata for those relations when you start the transaction. For each relation, specify READ access if the procedures only read information from the relation. Otherwise, specify WRITE access if any of the procedures write or update records in the relation.
         EXEC SQL
                 SET TRANSACTION READ WRITE
                 RESERVING
                     reservations, vehicles, vehicle_rental_history
                         FOR SHARED WRITE,
                     sites, regions
                         FOR SHARED READ
END-EXEC. &RDB& START_TRANSACTION READ_WRITE
&RDB& RESERVING
&RDB& reservations, vehicles, vehicle_rental_history
&RDB& FOR SHARED WRITE,
&RDB& sites, regions
&RDB& FOR SHARED READ2.1.3.2. Using COBOL
DATA DIVISION.
WORKING-STORAGE SECTION.
.
.
EXEC SQL
DECLARE EXTERNAL SCHEMA FILENAME AVERTZ_DATABASE:VEHICLE_RENTALS
END-EXEC.IDENTIFICATION DIVISION.
**************************************************************
PROGRAM-ID. VR-UPDATE-INIT.
* *
* Version: 01 *
* Edit: 00 *
* Authors: 00 *
* *
**************************************************************
**************************************************************
* F U N C T I O N A L D E S C R I P T I O N *
* *
* This procedure is the initialization procedure for the *
* AVERTZ update server. It is used to the open the *
* vehicle rental database. *
* *
**************************************************************
ENVIRONMENT DIVISION.
CONFIGURATION SECTION.
**************************************************************
DATA DIVISION.
**************************************************************
WORKING-STORAGE SECTION.
*
* Return status to pass to ACMS
*
01 RET-STAT PIC S9(9) COMP.
01 ZERO_RESERVATION_ID PIC S9(9) VALUE 0.
*
* Define the SQL return status
*
01 SQLCODE PIC S9(9) COMP.
01 RDB$MESSAGE_VECTOR EXTERNAL.
03 Rdb$LU_NUM_ARGUMENTS PIC S9(9) COMP.
03 Rdb$LU_STATUS PIC S9(9) COMP.
03 Rdb$ALU_ARGUMENTS OCCURS 18 TIMES.
05 Rdb$LU_ARGUMENTS PIC S9(9) COMP.
*
* Declare the database.
*
EXEC SQL
DECLARE EXTERNAL SCHEMA FILENAME AVERTZ_DATABASE:VEHICLE_RENTALS
END-EXEC.
***********************************************************
PROCEDURE DIVISION GIVING RET-STAT.
***********************************************************
MAIN SECTION.
000-OPEN_DB.
*
* Start a recovery unit to force Rdb to bind to the database and read
* in the metadata for the specified relations used by this server.
*
EXEC SQL
SET TRANSACTION READ WRITE
RESERVING
RESERVATIONS, VEHICLES, VEHICLE_RENTAL_HISTORY
FOR SHARED WRITE,
SITES, REGIONS
FOR SHARED READ
END-EXEC.
IF SQLCODE < ZERO
THEN
MOVE RDB$LU_STATUS TO RET-STAT
CALL "SQL$SIGNAL"
GO TO 100-EXIT-PROGRAM
END-IF.
*
* Force Rdb to create the .RUJ file for this server by inserting a
* dummy record into the reservations relation.
*
EXEC SQL
INSERT INTO RESERVATIONS
(
RESERVATION_ID
)
VALUES (
:ZERO_RESERVATION_ID
)
END-EXEC.
IF SQLCODE < ZERO
THEN
MOVE RDB$LU_STATUS TO RET-STAT
CALL "SQL$SIGNAL"
GO TO 100-EXIT-PROGRAM
END-IF.
*
* Roll back the recovery unit, deleting the dummy record.
*
EXEC SQL
ROLLBACK
END-EXEC.
IF SQLCODE < ZERO
THEN
MOVE RDB$LU_STATUS TO RET-STAT
CALL "SQL$SIGNAL"
GO TO 100-EXIT-PROGRAM
END-IF.
SET RET-STAT TO SUCCESS.
100-EXIT-PROGRAM.
EXIT PROGRAM.2.1.4. Initialization Procedures for Rdb Databases Using RDO
The initialization procedure for a server that uses an Rdb database attaches to the database by starting and ending a dummy transaction. Note that to attach fully to the database, you must start a transaction, store a dummy record, and roll back the transaction, as explained in Section 2.1.2, ''Binding or Attaching to Databases''.
&RDB& INVOKE DATABASE FILENAME "avertz_database:vehicle_rentals"
Start the dummy database transaction by using the START_TRANSACTION statement, which causes Rdb to attach to the database. See Section 2.1.3.1, ''Specifying the Access Mode and Relations Used by the Server'' for information on how to specify the access mode and relations that are used by the server when you start the transaction. If the step procedures in the server write or modify records in the database, use the STORE statement to write a dummy record to the database to force Rdb to create an .RUJ file. Finally, use the ROLLBACK statement to end the dummy transaction and delete the dummy record.
If an error occurs, log the failure in the ACMS audit trail log by signaling the error information in the RDB$MESSAGE_VECTOR array using the LIB$CALLG and LIB$SIGNAL OpenVMS RTL services; then return the failure status to ensure that ACMS stops the server process. For more information on signaling Rdb errors, refer to the Rdb documentation.
FUNCTION LONG vr_update_init
!+
! Update server initialization procedure.
!-
!+
! Declare database.
!-
&RDB& INVOKE DATABASE FILENAME "avertz_database:vehicle_rentals"
!+
! Declare OpenVMS RTL routines.
!-
EXTERNAL LONG FUNCTION LIB$SIGNAL, &
LIB$CALLG
!+
! Start a database transaction to force Rdb to attach to
! the database and read in the metadata for the specified
! relations used by this server.
!-
         &RDB& START_TRANSACTION READ_WRITE
         &RDB&   RESERVING
         &RDB&       reservations, vehicles, vehicle_rental_history
         &RDB&           FOR SHARED WRITE,
         &RDB&       sites, regions
         &RDB&           FOR SHARED READ
&RDB& ON ERROR
CALL LIB$CALLG( Rdb$MESSAGE_VECTOR, &
LOC( LIB$SIGNAL ) BY VALUE )
EXIT FUNCTION Rdb$LU_STATUS
&RDB& END_ERROR
!+
! Force Rdb to create the .RUJ file for this server by
! inserting a dummy record into the RESERVATIONS relation.
!-
&RDB& STORE r IN reservations USING
&RDB& ON ERROR
CALL LIB$CALLG( Rdb$MESSAGE_VECTOR, &
LOC( LIB$SIGNAL ) BY VALUE )
EXIT FUNCTION Rdb$LU_STATUS
&RDB& END_ERROR
&RDB& r.RESERVATION_ID = "00000000"
&RDB& END_STORE
!+
! Roll back the database transaction, deleting the dummy record.
!-
&RDB& ROLLBACK
&RDB& ON ERROR
CALL LIB$CALLG( Rdb$MESSAGE_VECTOR, &
LOC( LIB$SIGNAL ) BY VALUE )
EXIT FUNCTION Rdb$LU_STATUS
&RDB& END_ERROR
!+
! Set return status to success and return.
!-
vr_update_init = 1%
END FUNCTION2.1.5. Initialization Procedures for DBMS Databases
The initialization procedure for a server that uses a DBMS database binds to the database by starting and ending a dummy transaction. Note that to bind fully to the database, you must start a transaction, store a dummy record, and roll back the transaction, as explained in Section 2.1.2, ''Binding or Attaching to Databases''.
The initialization procedure for a server using a DBMS database must name the database accessed by the step procedures in the server. The database declaration in the initialization procedure must be the same as the database declarations in the step procedures in the server.
Note
If you create the database with the OPEN=MANUAL
attribute, you must open the database manually using the
DBO/OPEN command before a server process can access
it. Opening a database manually may also be more efficient even if you
create the database with the OPEN=AUTOMATIC attribute.
For more information on the DBO/OPEN command, refer to
the DBMS documentation.
2.1.5.1. Using COBOL
DATA DIVISION.

SUB-SCHEMA SECTION.

DB  DEFAULT_SUBSCHEMA
    WITHIN "PERS_CDD.PERSONNEL_SCHEMA"
    FOR "PERS_DB:PERSONNEL".
The subschema named – in this case, the default subschema for the PERSONNEL database – must be the same used by the step procedures in the server. You can use more than one database or subschema at a time. However, this manual discusses the use of only one subschema for a server.
WORKING-STORAGE SECTION.

01  status_result               PIC S9(5) COMP.

PROCEDURE DIVISION GIVING status_result.

DECLARATIVES.
DML-FAILURE SECTION.
    USE FOR DB-EXCEPTION.
010-DBM-FAILURE.
    MOVE DB-CONDITION TO status_result.
    CALL "DBM$SIGNAL".
    EXIT PROGRAM.
END DECLARATIVES.MAIN SECTION.
000-start.
SET status_result TO SUCCESS.
READY CONCURRENT UPDATE.
MOVE "000000" TO emp_badge_number.
STORE employee_record.
ROLLBACK.If you do not end the database transaction in the initialization procedure, the first procedure that uses this server fails with a DBM$_ALLREADY error.
IDENTIFICATION DIVISION.
PROGRAM-ID. pers_upd_server_init_proc.

ENVIRONMENT DIVISION.

DATA DIVISION.
SUB-SCHEMA SECTION.

DB  DEFAULT_SUBSCHEMA
WITHIN "PERS_CDD.PERSONNEL_SCHEMA"
FOR "PERS_DB:PERSONNEL".

WORKING-STORAGE SECTION.

01  status_result               PIC S9(5) COMP.

PROCEDURE DIVISION GIVING status_result.

DECLARATIVES.
DML-FAILURE SECTION.
USE FOR DB-EXCEPTION.
010-DBM-FAILURE.
MOVE DB-CONDITION TO status_result.
CALL "DBM$SIGNAL".
EXIT PROGRAM.
END DECLARATIVES.


MAIN SECTION.

000-start.
SET status_result TO SUCCESS.

READY CONCURRENT UPDATE.
MOVE "000000" TO emp_badge_number.
STORE employee_record.
ROLLBACK.

999-end.
EXIT PROGRAM.
2.1.5.2. Using BASIC
     # INVOKE DEFAULT_SUBSCHEMA -
              WITHIN PERS_CDD.PERSONNEL_SCHEMA -
              FOR PERS_DB:PERSONNEL -
( RECORDS ) # READY CONCURRENT UPDATE
employee_record::emp_badge_number = "000000"
# STORE employee_record
# ROLLBACK FUNCTION LONG pers_upd_server_init_proc
%INCLUDE "pers_files:pers_common_defns"
# INVOKE DEFAULT_SUBSCHEMA -
WITHIN PERS_CDD.PERSONNEL_SCHEMA -
FOR PERS_DB:PERSONNEL -
( RECORDS )
pers_upd_server_init_proc = persmsg_success
     # READY CONCURRENT UPDATE
     employee_record::emp_badge_number = "000000"
     # STORE employee_record
     # ROLLBACK
END FUNCTION
2.1.6. Initialization Procedures for RMS Files
An initialization procedure for a server process using RMS opens the files used by the step procedures in the server. The file definitions used in the initialization procedure must be the same as the definitions used in other procedures using those files. If you use a language that assigns channels, the channel number must also be the same in the initialization and step procedures.
If the step procedures in the server require only read access to a file, then open the file for read access only. If the step procedures in the server write to a file, then open the file for read/write access. Specify shared access if more than one server process needs access to the file.
If your step procedures need to lock multiple records in a single record stream or retain record locks after writing or updating a record, you must specify explicit lock control when you open a file.
2.1.6.1. Using COBOL
ENVIRONMENT DIVISION.

INPUT-OUTPUT SECTION.
FILE-CONTROL.
SELECT  emp_file
ORGANIZATION INDEXED
ACCESS RANDOM
ASSIGN TO "emp_file:employee.dat".


SELECT  hist_file
ORGANIZATION INDEXED
ACCESS RANDOM
ASSIGN TO "hist_file:history.dat".

I-O-CONTROL.
APPLY LOCK-HOLDING ON emp_file,
hist_file.


DATA DIVISION.

FILE SECTION.
FD      emp_file
EXTERNAL
DATA RECORD IS employee_record
RECORD KEY emp_badge_number OF employee_record.
COPY "pers_cdd.employee_record" FROM DICTIONARY.

FD      hist_file
EXTERNAL
DATA RECORD IS history_record
RECORD KEY hist_badge_number OF history_record.
COPY "pers_cdd.history_record" FROM DICTIONARY.
I-O-CONTROL.
APPLY LOCK-HOLDING ON emp_file,
hist_file.WORKING-STORAGE SECTION. 01 file-status PIC XX IS EXTERNAL.
WORKING-STORAGE SECTION.

01  status_result               PIC S9(5) COMP.

PROCEDURE DIVISION GIVING status_result.

DECLARATIVES.
employee_file SECTION.
USE AFTER STANDARD ERROR PROCEDURE ON emp_file.
employee_file_handler.
CALL "LIB$SIGNAL" USING BY VALUE RMS-STS OF emp_file,
BY VALUE RMS-STV OF emp_file.
MOVE RMS-STS OF emp_file TO status_result.
EXIT PROGRAM.


history_file SECTION.
USE AFTER STANDARD ERROR PROCEDURE ON hist_file.
history_file_handler.
CALL "LIB$SIGNAL" USING BY VALUE RMS-STS OF hist_file,
BY VALUE RMS-STV OF hist_file.
MOVE RMS-STS OF hist_file TO status_result.
EXIT PROGRAM.
END DECLARATIVES.
MAIN SECTION.

000-start.
SET status_result TO SUCCESS.

OPEN I-O emp_file ALLOWING ALL.
OPEN I-O hist_file ALLOWING ALL.

999-end.
EXIT PROGRAM.
See the COBOL documentation for more information on using RMS files with COBOL.
IDENTIFICATION DIVISION.
PROGRAM-ID. pers_upd_server_init_proc.

ENVIRONMENT DIVISION.


INPUT-OUTPUT SECTION.
FILE-CONTROL.
SELECT  emp_file
ORGANIZATION INDEXED
ACCESS RANDOM
ASSIGN TO "emp_file:employee.dat".


SELECT  hist_file
ORGANIZATION INDEXED
ACCESS RANDOM
ASSIGN TO "hist_file:history.dat".


I-O-CONTROL.
APPLY LOCK-HOLDING ON emp_file,
hist_file.

DATA DIVISION.

FILE SECTION.
FD      emp_file
EXTERNAL
DATA RECORD IS employee_record
RECORD KEY emp_badge_number OF employee_record.
COPY "pers_cdd.employee_record" FROM DICTIONARY.

FD      hist_file
EXTERNAL
DATA RECORD IS history_record
RECORD KEY hist_badge_number OF history_record.
COPY "pers_cdd.history_record" FROM DICTIONARY.


WORKING-STORAGE SECTION.

01  status_result               PIC S9(5) COMP.

PROCEDURE DIVISION GIVING status_result.


DECLARATIVES.
employee_file SECTION.
USE AFTER STANDARD ERROR PROCEDURE ON emp_file.

employee_file_handler.
CALL "LIB$SIGNAL" USING BY VALUE RMS-STS OF emp_file,
BY VALUE RMS-STV OF emp_file.
MOVE RMS-STS OF emp_file TO status_result.
EXIT PROGRAM.

history_file SECTION.
USE AFTER STANDARD ERROR PROCEDURE ON hist_file.

history_file_handler.
CALL "LIB$SIGNAL" USING BY VALUE RMS-STS OF hist_file,
BY VALUE RMS-STV OF hist_file.
MOVE RMS-STS OF hist_file TO status_result.
EXIT PROGRAM.
END DECLARATIVES.


MAIN SECTION.

000-start.
SET status_result TO SUCCESS.

OPEN I-O emp_file ALLOWING ALL.
OPEN I-O hist_file ALLOWING ALL.

999-end.
EXIT PROGRAM.
2.1.6.2. Using BASIC
The examples in this section show a BASIC initialization procedure that opens an Employee file and a History file.
     %INCLUDE "pers_files:pers_common_defns"
     %INCLUDE %FROM %CDD "pers_cdd.employee_record"
%INCLUDE %FROM %CDD "pers_cdd.history_record" !+
! Common definitions for the PERSONNEL application.
!-
!+
! Channel numbers.
!-
DECLARE LONG CONSTANT emp_file = 1%
DECLARE LONG CONSTANT hist_file = 2%
!+
! Frequently used BASIC error codes.
!-
DECLARE LONG CONSTANT basicerr_wait_exhausted = 15%
DECLARE LONG CONSTANT basicerr_duplicate_key = 134%
DECLARE LONG CONSTANT basicerr_record_locked = 154%
DECLARE LONG CONSTANT basicerr_record_not_found = 155%
DECLARE LONG CONSTANT basicerr_deadlock = 193%
!+
! Personnel application messages
!-
EXTERNAL LONG CONSTANT persmsg_success
EXTERNAL LONG CONSTANT persmsg_empexists
EXTERNAL LONG CONSTANT persmsg_empnotfound
EXTERNAL LONG CONSTANT persmsg_emplocked
EXTERNAL LONG CONSTANT persmsg_empchanged
EXTERNAL LONG CONSTANT persmsg_empdeleted
!+
! Frequently used system services
!-
EXTERNAL LONG FUNCTION SYS$GETTIM
!+
! ACMS, OpenVMS system and RMS status codes
!-
EXTERNAL LONG CONSTANT ACMS$_TRANSTIMEDOUT
EXTERNAL LONG CONSTANT RMS$_NRU
EXTERNAL LONG CONSTANT RMS$_DDTM_ERR MAP ( emp_map ) employee_record emp_rec
MAP ( hist_map ) history_record hist_rec WHEN ERROR IN
pers_upd_server_init_proc = persmsg_success
OPEN "emp_file:employee.dat" &
FOR INPUT AS FILE # emp_file, &
ORGANIZATION INDEXED FIXED, &
ALLOW MODIFY, &
ACCESS MODIFY, &
UNLOCK EXPLICIT, &
MAP emp_map, &
PRIMARY KEY emp_rec::emp_badge_number
OPEN "hist_file:history.dat" &
FOR INPUT AS FILE # hist_file, &
ORGANIZATION INDEXED FIXED, &
ALLOW MODIFY, &
ACCESS MODIFY, &
UNLOCK EXPLICIT, &
MAP hist_map, &
PRIMARY KEY hist_rec::hist_badge_number
USE
pers_upd_server_init_proc = VMSSTATUS
EXIT HANDLER
END WHENThe procedures that run in PERS_UPD_SERVER use explicit lock control to handle record locks to ensure the consistency of the Employee and History files. For this reason, the OPEN statement contains an UNLOCK EXPLICIT clause. Any record accessed by any procedure in the task group remains locked until it is explicitly unlocked with an UNLOCK or FREE statement.
FUNCTION LONG pers_upd_server_init_proc
%INCLUDE "pers_files:pers_common_defns"
%INCLUDE %FROM %CDD "pers_cdd.employee_record"
%INCLUDE %FROM %CDD "pers_cdd.history_record"
     MAP ( emp_map ) employee_record emp_rec
     MAP ( hist_map ) history_record hist_rec
     WHEN ERROR IN
         pers_upd_server_init_proc = persmsg_success
         OPEN  "emp_file:employee.dat"                           &
                     FOR INPUT AS FILE # emp_file,               &
                     ORGANIZATION INDEXED FIXED,                 &
                     ALLOW MODIFY,                               &
                     ACCESS MODIFY,                              &
                     UNLOCK EXPLICIT,                            &
                     MAP emp_map,                                &
                     PRIMARY KEY emp_rec::emp_badge_number

         OPEN  "hist_file:history.dat"                           &
                     FOR INPUT AS FILE # hist_file,              &
                     ORGANIZATION INDEXED FIXED,                 &
                     ALLOW MODIFY,                               &
                     ACCESS MODIFY,                              &
                     UNLOCK EXPLICIT,                            &
                     MAP hist_map,                               &
                     PRIMARY KEY hist_rec::hist_badge_number
     USE
         pers_upd_server_init_proc = VMSSTATUS
         EXIT HANDLER
     END WHEN
END FUNCTION
2.2. Writing Termination Procedures
Termination procedures perform application-specific cleanup work for a server process. Note that Rdb, DBMS, and RMS automatically release databases and close files when a process runs down.
The use of a termination procedure for a server is optional. If you do specify a termination procedure for a server, ACMS calls the termination procedure whenever a server process runs down. The only exception is when a server process is forced to run down as the result of a task cancellation; in that case, by default, ACMS does not call the termination procedure. However, by using the ALWAYS EXECUTE TERMINATION PROCEDURE ON CANCEL clause when you define the server in the task group definition, you can force ACMS to call the termination procedure when a server is run down due to a task cancellation. If you do not specify a termination procedure, ACMS runs down the server process without performing any application-specific termination processing.
ACMS runs down server processes when an application is stopped and when more processes than the minimum defined for the server have been started and the extra processes are not needed to handle users' demands. As with initialization procedures, have termination procedures do work specific to the server process rather than task-related work. Termination procedures do the same kind of work for server processes that use Rdb and DBMS databases and RMS files.
Have termination procedures return a status value to the server process to indicate whether the termination procedure completed successfully.
If you do not return a status value, the termination continues, but a message that the termination routine has failed is logged in the audit trail log.
A termination procedure cannot assign values to fields in group or user workspaces.
Because ACMS does not pass workspaces to termination procedures, there is no way to move data to fields in workspaces.
The following sections contain examples of termination procedures. They describe how to write code for Rdb and DBMS databases, and for RMS files.
2.2.1. Termination Procedures for Rdb Databases Using SQL
You do not need to write a termination procedure for a server that uses an Rdb database. When a server process stops, Rdb automatically releases the database used by the process, rolling back a database transaction if one is still active.
An incorrectly coded step procedure does not perform all necessary updates and does not commit a database transaction.
There is an outstanding database transaction when a task is canceled and you specify that termination procedures be called for cancels.
In general, if there is a chance that your termination procedure will be called when there is an outstanding database transaction and you are going to use the FINISH verb, include a ROLLBACK verb before the FINISH verb.
Because a transaction is not usually active when the termination procedure runs, the termination procedure should ignore any error from the ROLLBACK verb. Any error returned by the FINISH verb is used as the return status of the termination procedure.
 IDENTIFICATION DIVISION.
 **************************************************************
 PROGRAM-ID. PERS-TERM-PROC.
 **************************************************************
 *         F U N C T I O N A L   D E S C R I P T I O N        *
 *                                                            *
 *   This procedure is used to close the PERSONNEL database.  *
 *                                                            *
 **************************************************************
 ENVIRONMENT DIVISION.
 CONFIGURATION SECTION.
 **************************************************************
 DATA DIVISION.
 **************************************************************


 WORKING-STORAGE SECTION.
 *
 * return status
 *
 01 RET-STAT     PIC S9(9) COMP.
 *
 * Define the SQL return status
 *
 01 SQLCODE      PIC S9(9) COMP.
 *
 EXEC SQL
 DECLARE EXTERNAL SCHEMA FILENAME personnel_database:employees
 END-EXEC.


 **************************************************************
 PROCEDURE DIVISION GIVING RET-STAT.
 **************************************************************
 MAIN SECTION.

 000-CLOSE_DB.

         SET RET-STAT TO SUCCESS.
 *
 * <<<<Insert application-specific cleanup here>>>>
 *
         EXEC SQL ROLLBACK END-EXEC.
         EXEC SQL FINISH END-EXEC.
         IF SQLCODE < ZERO
         THEN
             MOVE RDB$LU_STATUS TO RET-STAT
             CALL "SQL$SIGNAL"
     END-IF.

 100-EXIT-PROGRAM.
         EXIT PROGRAM.
For more information about SQL, refer to the SQL documentation.
2.2.2. Termination Procedures for Rdb Databases Using RDO
You do not need to write a termination procedure for a server that uses an Rdb database. When a server process stops, Rdb automatically releases the database used by the process, rolling back a database transaction if one is still active.
An incorrectly coded step procedure does not perform all necessary updates and does not commit a database transaction.
There is an outstanding database transaction when a task is canceled and you specify that termination procedures be called for cancellations.
In general, if there is a chance that your termination procedure will be called when there is an outstanding database transaction, and you are going to use the FINISH verb, include a ROLLBACK verb before the FINISH verb.
     !
     ! <<<<Insert application-specific cleanup here>>>>
     !
     &RDB&   ROLLBACK
     &RDB&   ON ERROR
                 personnel_term_proc = persmsg_success
     &RDB&   END_ERROR

     &RDB&   FINISH
     &RDB&   ON ERROR
                 personnel_term_proc = RDB$LU_STATUS
     &RDB&   END_ERROR
2.2.3. Termination Procedures for DBMS Databases
You do not need to write a termination procedure for a server that uses a DBMS database. When a server process stops, DBMS automatically unbinds the database used by the process, rolling back a database transaction if one is still active. This section illustrates how to unbind from a DBMS database using the DBMS UNBIND embedded DML statement. Note that there is no UNBIND statement in the COBOL language.
     FUNCTION LONG pers_upd_server_term_proc

     %INCLUDE "pers_files:pers_common_defns"

     !
     ! <<<<Insert application-specific cleanup here>>>>
     !
     # INVOKE DEFAULT_SUBSCHEMA -
              WITHIN PERS_CDD.PERSONNEL_SCHEMA -
              FOR PERS_DB:PERSONNEL -
              ( RECORDS )

     # ROLLBACK ( TRAP ERROR )
     # UNBIND

     pers_upd_server_term_proc = persmsg_success

     END FUNCTION
If a database transaction is active when a step procedure explicitly unbinds from a database, DBMS returns an error. Therefore, use the ROLLBACK statement to roll back an outstanding transaction. Because there is not usually a transaction active when a termination procedure is executed, ignore any error returned by the ROLLBACK statement. Finally, use the UNBIND statement to unbind from the database.
2.2.4. Termination Procedures for RMS Files
You do not need to write a termination procedure for a server that uses RMS files. When a server process stops, RMS automatically closes any files that the process has opened. A termination procedure for an RMS server simply closes each open file used by the server, returning a failure status if an error is detected.
2.2.4.1. Using COBOL
 IDENTIFICATION DIVISION.
 PROGRAM-ID. pers_upd_server_term_proc.


 ENVIRONMENT DIVISION.


 INPUT-OUTPUT SECTION.
 FILE-CONTROL.
 SELECT  emp_file
         ORGANIZATION INDEXED
         ACCESS RANDOM
         ASSIGN TO "emp_file:employee.dat".

 SELECT  hist_file
         ORGANIZATION INDEXED
         ACCESS RANDOM
         ASSIGN TO "hist_file:history.dat".


 I-O-CONTROL.
 APPLY LOCK-HOLDING ON emp_file,
                       hist_file.

 DATA DIVISION.

 FILE SECTION.
 FD      emp_file
         EXTERNAL
         DATA RECORD IS employee_record
         RECORD KEY emp_badge_number OF employee_record.
 COPY "pers_cdd.employee_record" FROM DICTIONARY.


 FD      hist_file
         EXTERNAL
         DATA RECORD IS history_record
         RECORD KEY hist_badge_number OF history_record.
 COPY "pers_cdd.history_record" FROM DICTIONARY.


 WORKING-STORAGE SECTION.

 01  status_result               PIC S9(5) COMP.

 PROCEDURE DIVISION GIVING status_result.

 DECLARATIVES.
 employee_file SECTION.
     USE AFTER STANDARD ERROR PROCEDURE ON emp_file.

 employee_file_handler.
         CALL "LIB$SIGNAL" USING BY VALUE RMS-STS OF emp_file,
                                 BY VALUE RMS-STV OF emp_file.
         MOVE RMS-STS OF emp_file TO status_result.

 history_file SECTION.
     USE AFTER STANDARD ERROR PROCEDURE ON hist_file.

 history_file_handler.
         CALL "LIB$SIGNAL" USING BY VALUE RMS-STS OF hist_file,
                                 BY VALUE RMS-STV OF hist_file.
         MOVE RMS-STS OF hist_file TO status_result.
 END DECLARATIVES.


 MAIN SECTION.

 000-start.
     SET status_result TO SUCCESS.
 *
 * <<<<Insert application-specific cleanup here>>>>
 *
     CLOSE emp_file.
     CLOSE hist_file.

 999-end.
     EXIT PROGRAM.
2.2.4.2. Using BASIC
     FUNCTION LONG pers_upd_server_term_proc

     %INCLUDE "pers_files:pers_common_defns"


     !
     ! <<<<Insert application-specific cleanup here>>>>
     !

     WHEN ERROR IN
         pers_upd_server_term_proc = persmsg_success
         CLOSE # emp_file
         CLOSE # hist_file
     USE
         pers_upd_server_term_proc = VMSSTATUS
         EXIT HANDLER
     END WHEN

     END FUNCTION
2.3. Server Process Rundown
One way to achieve high system performance is to avoid stopping and restarting servers. In addition to the overhead of OpenVMS process creation, starting a server also involves running the server initialization procedure that binds to databases and opens files. Perform these operations as infrequently as possible.
On the other hand, if your server is interrupted and left in an unpredictable state as a result of a task cancellation, it is best to run down the server process and start a new one.
Run down on cancel only if the cancel caused the server to be interrupted
With this option, ACMS runs down the server process only if the execution of a server procedure was interrupted due to the task cancellation. For example, if a task is retaining context in a server, but the server is not actually executing a procedure at the time of the cancel, ACMS does not run down the server.
Always run down on cancel
With this option, ACMS always runs down the server process if the task is canceled while it has context in the server. This option can cause unnecessary server process rundowns. For example, if a task is retaining context in a server when it is canceled, ACMS always runs down the server process, even if the task was not actually executing a server procedure at the time of the cancel. Running down a server in this situation is not necessary because a server procedure was not actually interrupted; therefore, the server is in a predictable state.
Do not run down on cancel
With this option, under normal conditions ACMS never runs down the server process if the task is canceled while it has context in the server. However, note that under certain conditions, such as when a server procedure generates a fatal OpenVMS exception, ACMS always runs down a server process. Use this option only when you can guarantee that all context in the server can be cleaned up. Failure to clean up all server context can result in the failure of a subsequent task that uses the server process.
In most cases, the recommended option is to run down down on cancel only if the cancel caused a server procedure to be interrupted. This option balances the need for good performance with the need to run down servers that are in an unpredictable state.
- Define the rundown option as a server subclause in your task group definition. The choices of syntax are:
- RUNDOWN ON CANCEL IF INTERRUPTED
- RUNDOWN ON CANCEL
- NO RUNDOWN ON CANCEL
If you do not specify a rundown attribute, the default is RUNDOWN ON CANCEL.
Override the rundown attribute that you specified in your task group definition by returning a status from a cancel procedure. In two instances, ACMS overrides the option that you specify. If a fatal error is generated in procedure code, or if a channel is left open to a device when a procedure finishes, ACMS always runs down the server process. See Section 2.4, ''Using Cancel Procedures'' for more information on writing server cancel procedures.
|
Rundown Characteristic |
RUNDOWN ON CANCEL |
RUNDOWN ON CANCEL IF INTERRUPTED |
NO RUNDOWN ON CANCEL | |||
|---|---|---|---|---|---|---|
|
Server executing during cancel? |
No |
Yes |
No |
Yes |
No |
Yes |
|
ACMS$RAISE_ |
N/A |
Run down |
N/A |
Not run down |
N/A |
Not run down |
|
ACMSAD$REQ_ |
N/A |
Run down |
N/A |
Run down |
N/A |
Not run down |
|
Retain context and cancel task in action step |
Run down |
N/A |
Not run down |
N/A |
Not run down |
N/A |
|
Fatal error generated in procedure code |
N/A |
Run down |
N/A |
Run down |
N/A |
Run down |
|
Channel open to device error created from procedure |
N/A |
Run down |
N/A |
Run down |
N/A |
Run down |
|
All other cancels |
Run down |
Run down |
Not run down |
Run down |
Not run down |
Not run down |
2.4. Using Cancel Procedures
This section first discusses the traditional reasons for using cancel procedures. The section then provides guidelines for writing procedures to avoid using cancel procedures, describes situations in which cancel procedures are unavoidable, and explains how to use the $SETAST system service to avoid canceling a task during critical portions of a procedure. This section also describes the conditions under which cancel procedures are called and explains how to write a cancel procedure.
Cleaning up procedure execution
This might involve closing a channel that was opened to a terminal or to a temporary work file.
Freeing non-transaction-based resources
Any transaction-based resources, such as record locks, that a procedure acquires are automatically freed when a transaction ends, whether the transaction commits or aborts. However, if a procedure acquires resources outside a distributed transaction, then the server process must release those resources if the server is to remain active (and not run down) following an exception. Following are examples of situations in which you need to release resources:Releasing locks
For example, if a step procedure takes out a lock on a resource by calling the OpenVMS $ENQ lock manager service directly, then that lock must subsequently be released by a call to the $DEQ service. If a task executes to completion normally, then the step procedure that acquired the lock can release it; if the task retains context in the server, another step procedure called later can release the lock. However, if the task is canceled, then the server cancel procedure must free the lock if the server process is to remain active and if other task instances need to acquire the lock.
Freeing memory
Another example is when a step procedure calls LIB$GET_VM to allocate memory for a task instance. Because the memory is required to execute only the current task instance, it must subsequently be freed by a call to LIB$FREE_VM. If a task executes to completion normally, then the step procedure that allocated memory can free memory; if the task retains context in the server, another step procedure called later on can free the allocated memory. However, if the task is canceled, then the server cancel procedure must free memory if the server process is to remain active. Failure to free memory eventually results in the server running out of virtual memory.
Closing channels
As a third example, you might need to open a channel to a terminal in a step procedure. Although generally not recommended, some applications require a procedure running in a procedure server to perform terminal I/O. However, if the task is canceled while the procedure has a channel open to the terminal, ACMS cannot close the channel. For this reason, if a task uses a processing step that does terminal I/O from a procedure server, ACMS always runs down the server process if the task is canceled and the server still has channels open to the terminal device.
To avoid ACMS running down the server, you can use a cancel procedure to close the channel to the terminal. Note that if any channels are left open to the terminal, then ACMS overrides both the return status of the cancel procedure and the NO RUNDOWN clause of the server definition. ACMS also cancels the task and runs down the server if a step procedure ends normally but leaves a channel still open to the terminal.
Rolling back an active database transaction or a recovery unit
A cancel procedure is needed to roll back active database transactions or recovery units under the following conditions:If the step procedures in the server directly control Rdb or DBMS database transactions or RMS recovery units
If the database transactions or recovery units do not participate in a distributed transaction controlled from the task definition
If a task is canceled while retaining context in the server between processing steps
If the server is not run down as a result of the task being canceled
A cancel procedure is not necessary if the server is run down as a result of the task being canceled. This is because the database transaction or recovery unit is automatically rolled back as a result of the server process running down. However, it is more efficient to allow a server to remain active if a task is canceled while retaining context but not executing in the server. In this case, it is advantageous to use a cancel procedure to roll back the database transaction or recovery unit so that the server can then be used by another task instance. Note that the recommended option is to allow a server process to run down if ACMS is forced to interrupt a step procedure in order to process a task cancellation.
2.4.1. Guidelines for Avoiding Cancel Procedures
There are two important reasons for avoiding cancel procedures. First, cancel procedures can adversely affect application performance. Also, it is often difficult to write a cancel procedure that performs the necessary cleanup operations, chiefly because an exception can be raised at any time while a task is executing. Therefore, it is recommended that wherever possible you avoid designing and writing tasks and step procedures that require server cancel procedures to clean up server processes following an exception.
Control database transactions and recovery units with transaction steps in the task definition.
Resource managers automatically roll back active database transactions and recovery units participating in a distributed transaction if that transaction rolls back. Therefore, you do not need to write a cancel procedure to do this if all database transactions and recovery units participate in distributed transactions that are controlled by the task definition.Note
When using Rdb with RDO, or RMS, you must use a cancel procedure if you allow a server process to remain active after a task cancellation. See Section 2.4.2, ''Situations in Which Using Cancel Procedures Is Unavoidable'' for more information.
Allow server processes to run down following an exception.
In most cases, if an exception requires ACMS to interrupt a step procedure while it is executing, allowing the server process to run down as part of the exception-handling sequence has the advantage that OpenVMS automatically performs most, if not all, of the necessary cleanup operations. For example, when a process is run down, OpenVMS automatically closes any channels that are still open. Also, any locks currently owned by the process are freed.
Avoid operations that require cleanup.
For example, if you use task workspaces to store data rather than allocate memory using LIB$GET_VM, then you do not need a cancel procedure to free memory allocated in this way.
However, some applications may require that a step procedure acquire a nondistributed-transaction-based resource. For example, a step procedure may need to acquire an OpenVMS lock using the $ENQ service before performing a critical operation. Using the $DEQ service, the step procedure releases the lock as soon as the operation has been completed.
When an exception is raised, ACMS immediately interrupts a server process. If the code is interrupted during the time that the server process has acquired the lock, the server may not have the opportunity to call the $DEQ service. Since the server is using an OpenVMS lock, OpenVMS automatically releases the lock when the server process runs down. However, if the server is using an application-specific mechanism to maintain locks on resources, then running down a server process on an exception does not solve the problem; the resource is still locked.
Section 2.4.3, ''Using $SETAST to Prevent Procedure Server Interruption'', discusses how to prevent the interruption of a procedure server while it is executing. Section 2.3, ''Server Process Rundown'' explains the conditions under which a procedure is run down.
2.4.2. Situations in Which Using Cancel Procedures Is Unavoidable
As mentioned earlier, whenever possible avoid designing and writing step procedures that require server cancel procedures. However, in certain circumstances, using a cancel procedure is unavoidable.
     &RDB& START_TRANSACTION
     &RDB&   DISTRIBUTED_TRANSACTION DISTRIBUTED_TID dist_tid
     &RDB&   READ_WRITE RESERVING cust_control FOR SHARED WRITE

     &RDB& FOR FIRST 1% c IN cust_control
     &RDB&   GET
     &RDB&       cust_num = c.next_cust_num
     &RDB&   END_GET
             next_cust_num = cust_num + 1%
     &RDB&   MODIFY c USING
     &RDB&       c.next_cust_num = next_cust_num
     &RDB&   END_MODIFY
     &RDB& END_FOR
     GET # emp_file,                                             &
         KEY # 0 EQ emp_wksp::emp_badge_number,                  &
         ALLOW NONE
     MOVE TO # emp_file, emp_wksp
UPDATE # emp_fileIf the first processing step starts a database transaction or a recovery unit that is ended in the second processing step, you must write a cancel procedure to roll back the database transaction or recovery unit before the server can be used by another task.
If the first processing step locks records in an RMS file outside a recovery unit and those records are unlocked by the second processing step, you must write a cancel procedure to unlock the records before the server can be used by another task.
See Section 2.4.6, ''Writing a Cancel Procedure'' for information on writing server cancel procedures.
2.4.3. Using $SETAST to Prevent Procedure Server Interruption
Note
If you call the $SETAST system service to disable AST delivery in order to prevent ACMS from interrupting a step procedure, then you must ensure that you call the $SETAST system service to reenable AST delivery before the end of the step procedure. If you leave AST delivery disabled after the end of a step procedure, the server process can hang.
However, setting this window does not guarantee that an event such as a system crash does not interrupt the critical code. Also, this solution does not apply to programs running in DCL servers because the DCL server process handles all cancel requests in supervisor mode.
A lock is granted to the server process.
The step procedure completes the critical operation.
The $DEQ service releases the lock.
AST delivery is reenabled.
In this example, if the process is never able to acquire the lock, then the task cancellation
sequence can never complete because ACMS can never interrupt the server process. The
only way to complete the task cancellation sequence is to delete the server process
manually using the DCL STOP command.
 Disable AST delivery
 Call $ENQ service in order to acquire an OpenVMS lock using an
 event flag and using an IOSB.
 If $ENQ returns SS$_NORMAL (we are waiting for the lock to be granted),
 then

        Call the $SETIMR service to set a timer.  Pass the same event
        flag that was passed to the $ENQ service.

        Call the $WAITFR service to wait for the event flag passed to
        the two services.  When this service finishes, it means that
        either the $ENQ service has completed or the timer has expired.
        To determine which has occurred, check the IOSB passed to the
        $ENQ service.  If the status in the IOSB is non-zero, the $ENQ
        service completed.

 If $ENQ service completed
 then
        Cancel the timer
 else
        Cancel lock request by calling $DEQ

        Enable ASTs
        Call ACMS$RAISE_NONREC_EXCEPTION to cancel the task

 If the $ENQ service completed unsuccessfully,
 then

        Enable ASTs

        Call ACMS$RAISE_NONREC_EXCEPTION to cancel the task

 else

        Execute the critical code

        Release the locking by calling the $DEQ service

        Enable ASTs
2.4.4. Conditions Under Which Cancel Procedures Are Called
Stated simply, ACMS calls the cancel procedure defined for each server in which a task is retaining context if either a transaction exception or a nonrecoverable exception is raised while a task is executing. ACMS does not call a server cancel procedure if a step exception is raised while a task is executing and the task handles the exception. If, however, a task does not handle a step exception, and a transaction exception or a nonrecoverable exception is raised as a result, ACMS calls a server cancel procedure, as stated. VSI ACMS for OpenVMS Writing Applications, in its discussion of these conditions as they affect ADU syntax, includes specific examples of task definition syntax.
A step exception is raised that is not handled by the task.
ACMS does not call cancel procedures if a step exception is raised while a task is executing and the exception is handled by the task. However, if the step exception is not handled by the task, then a transaction or nonrecoverable exception is raised, and ACMS calls server cancel procedures.
A task is canceled from an action clause in a task definition.
ACMS conditionally calls cancel procedures if a nonrecoverable exception is raised due to a task executing a CANCEL TASK clause. ACMS calls cancel procedures only if the task is maintaining context in one or more server processes when the nonrecoverable exception is raised.
ACMS processes the server context action before it processes the CANCEL TASK clause. Therefore, if the server context action in the action clause is RELEASE SERVER CONTEXT [IF ACTIVE SERVER CONTEXT], the task will no longer have context in the server, so ACMS does not call server cancel procedures. However, if the server context action is RETAIN SERVER CONTEXT [IF ACTIVE SERVER CONTEXT] or NO SERVER CONTEXT ACTION, and the task has context in one or more servers, then ACMS calls cancel procedures.
A distributed transaction fails to prepare successfully.
This transaction exception can occur only while a task is executing a COMMIT TRANSACTION clause. Because the server context action of a transaction step must be RELEASE SERVER CONTEXT [IF ACTIVE SERVER CONTEXT], ACMS does not call cancel procedures in this case.
Other transaction or nonrecoverable exceptions are raised.
Excluding the exception conditions already described, ACMS always calls cancel procedures when a transaction or nonrecoverable exception is raised. For example, ACMS calls cancel procedures in any server in which the task is maintaining context:If the transaction timeout specified for a task expires before a distributed transaction completes and a step procedure does not complete before ACMS interrupts it
If a user presses Ctrl/Y to cancel a task
If an operator uses the
ACMS/CANCEL TASKcommand to cancel the task
2.4.5. Cancel Procedures in Distributed and Nondistributed Transactions
In nondistributed transactions
The server cancel procedure defined for the server is called before executing a database transaction or recovery-unit action, such as COMMIT or ROLLBACK, as specified in the task definition.
In distributed transactions
Due to the asynchronous nature of transaction aborts, you cannot predict when cancel procedures are called.
Section 2.3, ''Server Process Rundown'' discusses the conditions under which ACMS runs down a server process.
2.4.6. Writing a Cancel Procedure
             .
             .
             .
   SERVER IS
     pers_upd_server:
        .
        .
       CANCEL PROCEDURE IS pers_upd_server_can_proc;
        .
        .
        .
   END SERVER;
ACMS calls the cancel procedure PERS_UPD_SERVER_CAN_PROC under the conditions discussed in Section 2.4.4, ''Conditions Under Which Cancel Procedures Are Called''.
    CANCEL PROCEDURE IS pers_upd_server_can_proc;
NO RUNDOWN ON CANCEL;ACMS$_RNDWN
If the cancel procedure returns ACMS$_RNDWN, ACMS runs down the server process even if the server definition declared NO RUNDOWN. If a cancel procedure cannot release the resources allocated to the server, it can return ACMS$_RNDWN to ensure that ACMS runs down the process and releases the resources.
ACMS$_NRNDWN
If the cancel procedure returns ACMS$_NRNDWN, under normal conditions ACMS does not run down a server, regardless of whether or not the task is executing in the server process at the time an exception is raised. However, ACMS always runs down a server process if a step procedure signals a fatal OpenVMS exception or leaves channels open to a terminal device.
ACMS$_RNDWNIFINT
If a cancel procedure returns ACMS$_RNDWNIFINT, ACMS runs down the server process only if the task is executing in the server process at the time an exception is raised. If the task is only maintaining context in the server at the time an exception is raised, then the server process remains active.
Cancel procedures do not have access to workspaces. Store any information that might be needed by the cancel procedure in global variables while a step procedure is executing. The information is then available to the cancel procedure when it executes.
The following sections illustrate cancel procedures for a server accessing an Rdb database using RDO and for a server accessing an RMS file.
2.4.6.1. Cancel Procedure for Rdb with RDO
If you access an Rdb database using RDO in a distributed transaction
If you allow the server to remain active when a task is canceled, you must use a cancel procedure to roll back the default database transaction that Rdb starts if a step procedure accesses the database after a distributed transaction aborts.
If you write a task that retains context in a server between two processing steps
If you allow the server to remain active when a task is canceled between two processing steps, you must use a cancel procedure to roll back the database transaction started in the first processing step.
     FUNCTION LONG vr_update_cancel
     !+
     ! Invoke database.
     !-
     &RDB& INVOKE DATABASE FILENAME "avertz_database:vehicle_rentals"

     !+
     ! Cancel procedure return status.
     !-
     EXTERNAL LONG CONSTANT ACMS$_RNDWNIFINT
     EXTERNAL LONG CONSTANT ACMS$_RNDWN


     !+
     ! Rdb error ROLLBACK status code.
     !-
     EXTERNAL LONG CONSTANT RDB$_BAD_TRANS_HANDLE

     !+
     ! Error logging routines
     !-
     EXTERNAL LONG FUNCTION LIB$SIGNAL
     EXTERNAL LONG FUNCTION LIB$CALLG


     !+
     ! Assume success.
     !-
     vr_update_cancel = ACMS$_RNDWNIFINT


     !+
     ! ROLLBACK an outstanding database transaction. Ignore a
     ! transaction-not-active error. For all other errors, log
     ! the error and return ACMS$_RNDWN to ensure the server
     ! runs down.
     !-
     &RDB& ROLLBACK
     &RDB&   ON ERROR
                 IF Rdb$LU_STATUS <> RDB$_BAD_TRANS_HANDLE
                 THEN
                     CALL LIB$CALLG( Rdb$MESSAGE_VECTOR,             &
                                     LOC( LIB$SIGNAL ) BY VALUE )
                     vr_update_cancel = ACMS$_RNDWN
                 END IF
     &RDB&   END_ERROR

     END FUNCTION
2.4.6.2. Cancel Procedure for RMS Files
If you access an RMS file in a distributed transaction
If you allow the server to remain active when a task is canceled, you must use a cancel procedure to unlock any records that a step procedure locks after a distributed transaction aborts.
If you write a task that retains context in a server between two processing steps
If you allow the server to remain active when a task is canceled between two processing steps, you must use a cancel procedure to unlock any records locked by the first processing step.
 IDENTIFICATION DIVISION.
 PROGRAM-ID. pers_upd_server_can_proc.

 ENVIRONMENT DIVISION.


 INPUT-OUTPUT SECTION.
 FILE-CONTROL.
 SELECT  emp_file
         ORGANIZATION INDEXED
         ACCESS RANDOM
         ASSIGN TO "emp_file:employee_file.dat".


 SELECT  hist_file
         ORGANIZATION INDEXED
         ACCESS RANDOM
         ASSIGN TO "hist_file:history_file.dat".

 I-O-CONTROL.
 APPLY LOCK-HOLDING ON emp_file,
                       hist_file.


 DATA DIVISION.

 FILE SECTION.
 FD      emp_file
         EXTERNAL
         DATA RECORD IS employee_record
         RECORD KEY emp_badge_number OF employee_record.
 COPY "pers_cdd.employee_record" FROM DICTIONARY.


 FD      hist_file
         EXTERNAL
         DATA RECORD IS history_record
         RECORD KEY hist_badge_number OF history_record.
 COPY "pers_cdd.history_record" FROM DICTIONARY.


 WORKING-STORAGE SECTION.

 01  status_result               PIC S9(5) COMP.

 01  ACMS$_RNDWNIFINT            PIC S9(5) COMP
                                 VALUE IS EXTERNAL ACMS$_RNDWNIFINT.
 01  ACMS$_RNDWN                 PIC S9(5) COMP
                                 VALUE IS EXTERNAL ACMS$_RNDWN.

 PROCEDURE DIVISION GIVING status_result.


 DECLARATIVES.
 employee_file SECTION.
     USE AFTER STANDARD ERROR PROCEDURE ON emp_file.
 employee_file_handler.
         CALL "LIB$SIGNAL" USING BY VALUE RMS-STS OF emp_file,
                                 BY VALUE RMS-STV OF emp_file
         MOVE ACMS$_RNDWN TO status_result.
         EXIT PROGRAM.
 history_file SECTION.
     USE AFTER STANDARD ERROR PROCEDURE ON hist_file.
 history_file_handler.
         CALL "LIB$SIGNAL" USING BY VALUE RMS-STS OF hist_file,
                                 BY VALUE RMS-STV OF hist_file
         MOVE ACMS$_RNDWN TO status_result.
         EXIT PROGRAM.
 END DECLARATIVES.


 MAIN SECTION.

 000-start.
     UNLOCK emp_file ALL RECORDS.
     UNLOCK hist_file ALL RECORDS.
     MOVE ACMS$_RNDWNIFINT TO status_result.

 999-end.
     EXIT PROGRAM.
     FUNCTION LONG pers_upd_server_can_proc

     %INCLUDE "pers_files:pers_common_defns"

     EXTERNAL LONG CONSTANT ACMS$_RNDWNIFINT
     EXTERNAL LONG CONSTANT ACMS$_RNDWN


     WHEN ERROR IN
         FREE # emp_file
         FREE # hist_file
         pers_upd_server_can_proc = ACMS$_RNDWNIFINT
     USE
         pers_upd_server_can_proc = ACMS$_RNDWN
         EXIT HANDLER
     END WHEN

     END FUNCTION
Chapter 3. Writing Step Procedures
This chapter discusses writing step procedures for ACMS tasks. The suggestions in this chapter apply to users of all languages and all data management systems. The material in this chapter provides a basis for Chapter 4, "Accessing Resource Managers", which contains information and examples specific to Rdb software using SQL, Rdb using RDO, DBMS software, and RMS software.
Using workspaces with step procedures
Explains how tasks use workspaces to pass data between processing steps and exchange steps, and describes the ACMS-supplied system workspaces.
Using procedures in distributed transactions
Tells how to write new step procedures and how to migrate existing procedures to participate in distributed transactions.
Returning status to the task definition
Discusses how to return status to the task definition using a status return facility or a user-defined workspace.
Handling error conditions
Discusses how step procedures handle error conditions by processing error messages and raising recoverable and nonrecoverable exceptions.
Performing terminal I/O from a procedure server
Explains how programs that run in procedure servers can perform I/O directly to a terminal, which is useful for preexisting programs that you convert to single-step tasks.
3.1. Using Workspaces with Step Procedures
An ACMS task uses workspaces to pass information between the task definition and step procedures and DECforms forms. Workspaces are temporary data storage areas, which are passed to step procedures as parameters. Workspaces are passed by reference (that is, the address is passed), with write access.
Figure 3.1, ''How ACMS Applications Use Workspaces '' illustrates the way a task uses workspaces to pass data between a form and a step procedure. Once a workspace and its fields have been declared (in CDD, for example), you can use a form to input data and store it in workspace fields. You can then pass that data to a database or RMS file for storage.
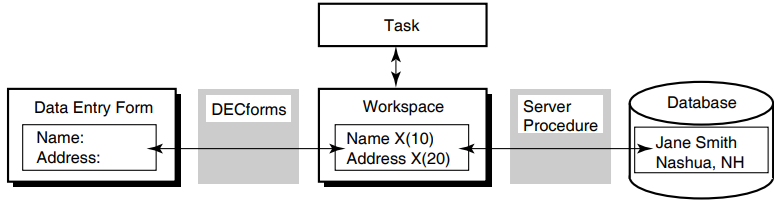
3.1.1. Using ACMS-Supplied System Workspaces
ACMS provides special-purpose task workspaces, called system workspaces, which contain information about the state of a task. This information might be useful to the step procedures called by the task.
ACMS$SELECTION_STRING
This workspace makes information from an ACMS menu available to the task, forms, and step procedures. You can also use this workspace to pass parameters to DCL command procedures.
Appendix A, "Summary of ACMS System Workspaces" and VSI ACMS for OpenVMS Writing Applications contain more information about this workspace.
ACMS$PROCESSING_STATUS
A task can use the fields of this workspace to determine the completion status of a step procedure. In addition, ACMS stores information about exceptions in this workspace.
Section 3.3, ''Returning Status to the Task Definition'', Chapter 5, "Using Message Files with ACMS Tasks and Procedures", and Appendix A, "Summary of ACMS System Workspaces" contain more information about using this workspace.
ACMS$TASK_INFORMATION
ACMS stores task execution information such as task ID, sequence number, and task name in this workspace. You can use this workspace, for example, to determine the name of the device from which a task was submitted (for security reasons) or to ascertain whether the task was submitted from a remote node.
Appendix A, "Summary of ACMS System Workspaces" contains reference information about this workspace.
Note
Step procedures must not modify the contents of the ACMS$PROCESSING_STATUS or ACMS$TASK_INFORMATION workspaces. Step procedures can, however, modify the contents of the ACMS$SELECTION_STRING workspace.
3.1.2. Identifying Workspaces
Note
If the programming language you use does not support CDD, you must also define the workspace records in the step procedure.
 REPLACE TASK VR_DISPLAY_CU_TASK

 USE WORKSPACES VR_CUSTOMERS_WKSP,


                       .
                       .
                       .
 BLOCK WORK WITH FORM I/O IS


 GET_CUSTOMERS:
   PROCESSING
       CALL VR_GET_CUSTOMER_PROC USING VR_CUSTOMERS_WKSP,
                 .
                 .
                 .
 END DEFINITION;
To receive the contents of the workspace named in the task definition, the programming language you use must be able to receive parameters from the calling program. For example, in COBOL, the parameters used to pass information are defined in the Linkage Section and are named in the Procedure Division header.
 IDENTIFICATION DIVISION.
 ***********************************************************
 PROGRAM-ID. VR-GET-CUSTOMER-PROC IS INITIAL.
 .
 .
 .


 LINKAGE SECTION.
 *
 * Copy CUSTOMERS record from the CDD
 *


 EXEC SQL INCLUDE FROM DICTIONARY
             'AVERTZ_CDD_WKSP:VR_CUSTOMERS_WKSP'
 END-EXEC.
 .
 .
 .


 PROCEDURE DIVISION USING VR_CUSTOMERS_WKSP,
                           .
                           .
                           .
                    GIVING RET-STAT.
 DEFINE RECORD VR_CUSTOMERS_WKSP.
 .
 .
 .
 CUSTOMER_ID.
 CU_LAST_NAME.
 CU_FIRST_NAME.
 CU_MIDDLE_INITIAL.
 CU_FIRST_ADDRESS_LINE.
 .
 .
 .
END RECORD. DEFINE FIELD CU_LAST NAME DATATYPE TEXT SIZE IS 20
INITIAL VALUE IS " ".See the CDD documentation for additional information on assigning initial values.
3.2. Using Procedures in Distributed Transactions
This section discusses the considerations to keep in mind when you write a procedure that accesses a resource manager in a distributed transaction.
A resource manager controls shared access to a set of recoverable resources on behalf of application programs. A resource is a set of one or more data items in a database or an RMS file. The term recoverable means that all updates to the resources either can be made permanent or can be undone, and that the integrity of the resources can be recovered after a failure such as a system crash.
Participation of a procedure in a distributed transaction
Use of database transactions or recovery units with distributed transactions
Obtaining the Transaction ID
Retaining context in distributed transactions
Migrating existing step procedures to participate in distributed transactions
3.2.1. Determining the Participation of a Procedure in a Distributed Transaction
- When a processing step that executes within a block delimiting a distributed transaction calls a procedure, that procedure automatically participates in the distributed transaction. For example:
 BLOCK WITH TRANSACTION
     PROCESSING
         CALL    vr_store_cu_proc
         IN      vr_cu_update_server
         USING   vr_control_wksp,
                 vr_customers_wksp,
                 vr_trans_wksp;
            .
            .
            .
 END BLOCK WORK;
       .
       .
       .
Because the processing step executes within the bounds of a distributed transaction, the server automatically participates in the distributed transaction.
- When a processing step that delimits a distributed transaction calls a procedure, that procedure automatically participates in the distributed transaction. For example:
 PROCESSING WITH TRANSACTION
     CALL    vr_store_cu_proc
     IN      vr_cu_update_server
     USING   vr_control_wksp,
             vr_customers_wksp,
             vr_trans_wksp;
           .
           .
           .
Use this method if a single step procedure needs to update multiple resources. For example, you might choose this method for a procedure that updates an RMS file as well as an Rdb database. You can also use this method if a task has only one step, which is a processing step.
- You can explicitly exclude a procedure server from a distributed transaction by using the WITH NONPARTICIPATING SERVER phrase on the processing step of a task definition:
PROCESSING WITH NONPARTICIPATING SERVER
See VSI ACMS for OpenVMS Writing Applications for more information on writing definitions of tasks that use distributed transactions.
In ACMS, you can start a distributed transaction in either an agent program, a task, or a step procedure. VSI ACMS for OpenVMS Concepts and Design Guidelines explains the relative advantages and disadvantages of starting a distributed transaction in each of these locations.
You can also start a distributed transaction in a task and, from that task, call a procedure that acts as an agent. The agent program can call a task on a remote node, and the called task can access databases locally on that node, thus reducing network traffic and increasing the efficiency of the application.
Note
Do not call the $START_TRANS, $END_TRANS, or $ABORT_TRANS system services from a step procedure that is participating in a distributed transaction started by a task or an agent program. If you do call these services under these conditions, they either return an error status or hang until the task is canceled by the terminal user or system operator.
3.2.2. Using Database Transactions or Recovery Units with Distributed Transactions
The unit of interaction with a database that begins with a start-transaction statement is called a database transaction. The Rdb and DBMS documentation refer to this unit as a transaction. A set of RMS recoverable operations is referred to as a recovery unit. To avoid possible confusion with the term distributed transactions, this manual uses the term database transaction when referring to this unit for Rdb and DBMS database products and recovery unit when referring to this unit for RMS files. The term database transaction is used whether transactions are distributed or nondistributed.
|
Database product |
Statement that starts a distributed transaction |
|---|---|
|
Rdb using SQL |
SET TRANSACTION |
|
Rdb using RDO |
START_TRANSACTION |
|
DBMS |
READY |
Instructions for starting database transactions are in Chapter 4, "Accessing Resource Managers".
Note that RMS files that are marked for recovery participate automatically in a distributed transaction; in other words, no special syntax is necessary.
The DML verbs COMMIT or ROLLBACK commit or roll back an independent database transaction or a recovery unit that is not participating in a distributed transaction. However, a database transaction that participates in a distributed transaction is automatically committed or rolled back when the distributed transaction ends. Therefore, you cannot use the COMMIT or ROLLBACK DML verbs to end a database transaction that participates in a distributed transaction. The COMMIT and ROLLBACK verbs fail and return an error if you try to use them to end a database transaction that is participating in a distributed transaction.
Important
Always specify a lock timeout interval when you use Rdb or DBMS in a distributed transaction. This ensures that ACMS can successfully cancel a task that is waiting for a database lock. By specifying a lock timeout interval, you ensure that the task is canceled as soon as the timeout interval expires. If you do not specify a lock timeout interval, ACMS cannot cancel the task until the lock is granted. See Chapter 4, "Accessing Resource Managers" for more information on specifying a lock timeout interval.
3.2.3. Obtaining the Transaction ID (TID)
ACMS automatically obtains a transaction ID (TID) when you start a distributed transaction. Whenever a step procedure is called as part of a distributed transaction, ACMS establishes the TID as the default TID of the server process.
For an Rdb or DBMS database transaction to participate in a distributed transaction, you must explicitly pass the TID to Rdb or DBMS when you start the database transaction. In contrast, RMS automatically accesses the TID for files that are marked for recovery-unit journaling. Therefore, no special action is necessary; a step procedure does not need to obtain the TID when using RMS with distributed transactions.
CALL "ACMS$GET_TID" USING CS-TID GIVING RET_STAT.
See Chapter 9, "ACMS Programming Services" for full details on the ACMS$GET_TID service. See Chapter 4, "Accessing Resource Managers" for information on how to pass the TID to Rdb and DBMS.
3.2.4. Retaining Server Context in Distributed Transactions
Context must be retained in a server that participates in a distributed transaction until the end of the transaction. At the end of the distributed transaction, the task must release context in all the servers that participated in the transaction. ADU automatically supplies default server context actions for transaction steps and steps that participate in distributed transactions. See VSI ACMS for OpenVMS Writing Applications for more information about server context.
A task definition can contain multiple processing steps that call one or more server procedures in the same server within a single distributed transaction. Within a single task, a single server process is used for all the processing steps that call step procedures in the same server. In this case, the first step procedure called within a distributed transaction must ready a database for the current procedure and any subsequent step procedures called by the task. For example, if the first step procedure accesses an Rdb database, the procedure must reserve those relations that are required by the current procedure as well as those relations that are required by subsequent step procedures.
A different situation occurs when a task calls another task as part of a distributed transaction. The called task does not share server context with the parent task; the parent and called tasks use different server processes. Therefore, the first procedure called by the called task must ready a database for the current and any subsequent server procedures used by the called task.
Both the Rdb and DBMS database products support only a single active database transaction in one process at a time. Therefore, once a server participates in a distributed transaction, the server must remain reserved to the distributed transaction until the transaction ends. See VSI ACMS for OpenVMS Writing Applications for more information about retaining server context.
3.2.5. Migrating Existing Step Procedures to Participate in Distributed Transactions
Pass the TID to Rdb or DBMS when you access the database.
Remove any COMMIT or ROLLBACK syntax in the step procedure.
The distributed transaction must start and end in the same place, that is, in the action clause of the task step that starts the distributed transaction.
If you perform neither of the above steps, the task appears to execute correctly; however, the end of the distributed transaction is not coordinated with the end of the database transaction. This occurs because Rdb or DBMS does not know that you want the database operation to participate in the transaction if you do not pass the TID. Therefore, the database transaction starts and ends as it did before the task was changed to use distributed transactions.
If you perform the first step but not the second, the COMMIT or ROLLBACK statement returns an error. By specifying the TID, you include your database operation in the distributed transaction. You cannot use the COMMIT or ROLLBACK verbs to end a database transaction that is participating in a distributed transaction.
3.3. Returning Status to the Task Definition
Use the status return facility provided for subprograms or functions in the language used. This is the most common method.
Place status information directly in a user-defined workspace that is passed as a parameter to the procedure.
Note
ACMS requires initialization, termination, and cancel procedures to return a status. If they do not return status, results are unpredictable.
3.3.1. Returning Status with a Status Return Facility
PROCEDURE DIVISION GIVING status-result.
- ACMS$L_STATUS
- ACMS$T_SEVERITY_LEVEL
- ACMS$T_STATUS_TYPE
- ACMS$T_STATUS_MESSAGE
ACMS then sets the values of the fields ACMS$T_SEVERITY_LEVEL and ACMS$T_STATUS_TYPE to correspond to the return status value in ACMS$L_STATUS.
|
Status Type |
Binary Value |
Meaning |
|---|---|---|
|
G |
1 |
GOOD – Represents successful completion of a step procedure. |
|
B |
0 |
BAD – Represents the failure of a step procedure. |
|
Severity Level |
Binary Value |
Meaning |
|---|---|---|
|
S |
001 |
SUCCESS |
|
I |
011 |
INFORMATION |
|
W |
000 |
WARNING |
|
E |
010 |
ERROR |
|
F |
100 |
FATAL |
|
? |
Other |
Invalid severity level |
A task can check the ACMS$T_STATUS_TYPE or the ACMS$T_SEVERITY_LEVEL field to determine what action to take.
|
Field |
Initial value |
|---|---|
|
ACMS$L_STATUS |
1 (normal successful completion) |
|
ACMS$T_SEVERITY_LEVEL |
S (SUCCESS) |
|
ACMS$T_STATUS_TYPE |
G (GOOD) |
|
ACMS$T_STATUS_MESSAGE |
Spaces |
Note
ACMS puts information into the ACMS$PROCESSING_STATUS workspace whether or not your procedure explicitly returns a status. You must be careful to use this workspace in a task definition only when your procedure returns a status. Otherwise, the results are unpredictable.
3.3.2. Returning Status in User-Defined Workspaces
Returning status to a task in a user-defined workspace is useful if you return a value to DECforms that determines what message DECforms displays.
 CDO> SHOW RECORD pers_cdd.task_control/FULL
 Definition of record TASK_CONTROL
 |   Contains field           STEP_STATUS
 |   |   Datatype                 text size is 8 characters
     .
     .
     .
In Example 3.4, ''Record Description for TASK_CONTROL'', STEP_STATUS is an 8-character text field into which the step procedure writes a character string indicating whether or not it has completed successfully. The task uses the step status field to determine the completion status of the step procedure. The task uses the contents of the workspace field to determine what to do next.
Note
ACMS does not initialize workspaces every time it begins a step procedure. Therefore, you must ensure that a step procedure stores the correct status before it completes. For example, the step procedure illustrated in Example 3.5, ''COBOL Procedure for Returning Status in a User-Defined Workspace'' always initializes the status to SUCCESS at the beginning. This is necessary if a user incorrectly enters a badge number that is already on file for an employee. After the user corrects the mistake, the step procedure is called again, and the WRITE operation succeeds. In this case, the step procedure must return a success status to ensure that the task continues normally when the step procedure completes.
3.3.2.1. COBOL Procedure for Returning Status in a User-Defined Workspace
 IDENTIFICATION DIVISION.
 PROGRAM-ID. pers_add_employee_proc.

 ENVIRONMENT DIVISION.

 INPUT-OUTPUT SECTION.
 FILE-CONTROL.
 SELECT  emp_file
         ORGANIZATION INDEXED
         ACCESS RANDOM
         ASSIGN TO "emp_file:employee.dat".

 I-O-CONTROL.
 APPLY LOCK-HOLDING ON emp_file.

 DATA DIVISION.

 FILE SECTION.
 FD      emp_file
         EXTERNAL
         DATA RECORD IS employee_record
         RECORD KEY emp_badge_number OF employee_record.
 COPY "pers_cdd.employee_record" FROM DICTIONARY.
 WORKING-STORAGE SECTION.

 LINKAGE SECTION.
 COPY "pers_cdd.task_control" FROM DICTIONARY.
 COPY "pers_cdd.employee_record" FROM DICTIONARY
     REPLACING ==employee_record== BY ==emp_wksp_record==.

 PROCEDURE DIVISION USING task_control, emp_wksp_record.
 MAIN SECTION.

 000-start.
     MOVE "SUCCESS" TO step_status OF task_control.
     WRITE employee_record FROM emp_wksp_record
         ALLOWING NO OTHERS
         INVALID KEY
             MOVE "DUPLICAT" TO step_status OF task_control
         NOT INVALID KEY
             UNLOCK emp_file ALL RECORDS
     END-WRITE.

 999-end.
     EXIT PROGRAM.
3.3.2.2. BASIC Procedure for Returning Status in a User-Defined Workspace
     FUNCTION LONG pers_add_employee_proc(                       &
                                 task_control task_ctrl_wksp,    &
                                 employee_record emp_wksp )

     %INCLUDE "pers_files:pers_common_defns"

     %INCLUDE %FROM %CDD "pers_cdd.employee_record"
     %INCLUDE %FROM %CDD "pers_cdd.task_control"

     MAP ( emp_map ) employee_record emp_rec

     WHEN ERROR IN
         task_ctrl_wksp::step_status = "SUCCESS"
         MOVE TO # emp_file, emp_wksp
         PUT # emp_file
         UNLOCK # emp_file
     USE
         SELECT ERR
             CASE basicerr_duplicate_key
                 task_ctrl_wksp::step_status = "DUPLICAT"
             CASE ELSE
                 CALL ACMS$RAISE_NONREC_EXCEPTION( RMSSTATUS( emp_file ) )
                 EXIT HANDLER
         END SELECT
     END WHEN

     END FUNCTION
3.4. Handling Error Conditions
Display a form that asks the user for an employee number.
Call a procedure to read the data for that employee.
The step procedure reads the record; it then checks the status of the read operation and performs one of the following:If the read operation succeeds, returns a success status.
If a recoverable error occurs, returns a failure status.
If a nonrecoverable error occurs, cancels the task.
- Check the status from the step procedure:
If the step procedure succeeds, execute the next exchange step.
If the step procedure fails, repeat the first exchange step.
Display a form that shows the employee's record and asks the user for changes to the record information.
Call a procedure to rewrite the changed employee information.
The step procedure rewrites the record; it then checks the status of the rewrite operation and performs one of the following:If the rewrite operation succeeds, returns a success status.
If a recoverable error occurs, returns a failure status.
If a nonrecoverable error occurs, cancels the task.
- Check the status from step procedure:
If the step procedure succeeds, exit the task with a success status.
If the step procedure fails, repeat the second exchange step.
See VSI ACMS for OpenVMS Writing Applications for information about how to write task definitions.
For recoverable errors that are handled by the action part of the processing step, return a failure status using a status return facility or a status field in a user-defined workspace. See Section 3.3.1, ''Returning Status with a Status Return Facility'' and Section 3.3.2, ''Returning Status in User-Defined Workspaces'' for information on returning status from a step procedure to a task.
For recoverable errors that are handled by the exception handler part of the processing step or an outer-block step in the task, raise a transaction or step exception.
For recoverable transaction errors that are handled by an exception handler on the transaction step or an outer-block step in the task, raise a transaction exception.
The following sections discuss processing error messages in step procedures and raising exceptions in step procedures.
3.4.1. Processing Error Messages
If a step procedure detects a recoverable error, you must inform users of the problem. With this information, they can then decide how to continue.
In the task
In the form
In the step procedure
3.4.1.1. Using a Message File in the Task Definition
Using this method, you retrieve the error message text from a message file in the task definition based on the OpenVMS return status from the step procedure. You use a return status facility to return the status from the step procedure to the task, as discussed in section Section 3.3.1, ''Returning Status with a Status Return Facility''.
ACMS stores the return status in the ACMS$PROCESSING_STATUS workspace, which the task can check and then retrieve error message text from the message file, as explained in Chapter 5, "Using Message Files with ACMS Tasks and Procedures". This is the most common method for returning information about a recoverable error condition from the step procedure to the task.
"Employee ID already exists on file"
In the step procedure, return the failure status associated with the error condition.
For example, in COBOL:MOVE persmsg_empexists TO return_status. GO TO 999-end.
For example, in BASIC:EXIT FUNCTION persmsg_empexists
In the task definition, check the return status from the procedure in the ACMS$PROCESSING_STATUS workspace.
If the step procedure returns an error status, retrieve the error message text based on the return status and go to an exchange step that displays the error message on the form. For example:PROCESSING WORK IS CALL pers_add_employee_proc USING task_control, employee_record ACTION IS IF ( ACMS$T_STATUS_TYPE = "B" ) THEN GET ERROR MESSAGE; GOTO STEP get_new_employee_data; END IF;
3.4.1.2. Using a Message File in the Step Procedure
Using this method, you retrieve the error message text from a message file in the step procedure.
Use OpenVMS system services or run-time library (RTL) routines to retrieve and process the error message text in the step procedure. See VSI OpenVMS System Services Reference Manual and VSI OpenVMS RTL Library (LIB$) Manual for more information on using the OpenVMS Formatted ASCII Output (FAO) facility.
"Employee ID: 123456, last name: SMITH, already exists on file"
A disadvantage of this method is that you might have to modify a step procedure if you need to change the error message text. If the order of FAO arguments does not change when you modify the error message, then you do not need to modify the step procedure. However, if the order of the FAO arguments does change, then you must modify and recompile the step procedure, and relink the procedure server image.
- Define a field in a user-defined workspace to hold the error message text. For example:
task_status_msg DATATYPE TEXT 80.
In the step procedure, use the SYS$GETMSG and SYS$FAO system services, or the LIB$SYS_GETMSG and LIB$SYS_FAO RTL routines to obtain and process the error message text.
For example, in COBOL:. . . DATA DIVISION. WORKING-STORAGE SECTION. 01 persmsg_empexists PIC S9(5) COMP VALUE IS EXTERNAL persmsg_empexists. 01 msg_format_string PIC X(80). 01 text_only_flag PIC S9(5) COMP VALUE IS 1. 01 sts PIC S9(5) COMP. 01 return_status PIC S9(5) COMP. . . . PROCEDURE DIVISION ... GIVING return_status. . . . * * Call LIB$SYS_GETMSG to get error message text associated with * the 'employee already exists' error. Note that we use 1 as the * message text flag since we want only the message text, not the * facility code or severity level. * CALL "LIB$SYS_GETMSG" USING BY REFERENCE persmsg_empexists OMITTED, BY DESCRIPTOR msg_format_string, BY REFERENCE text_only_flag GIVING sts. IF sts IS FAILURE THEN CALL "LIB$STOP" USING BY VALUE sts END-IF. * * Call LIB$SYS_FAO to format the 'employee already exists' error * message text to include the employee's badge number and last * name, using the message text as the FAO control string. * CALL "LIB$SYS_FAO" USING BY DESCRIPTOR msg_format_string, OMITTED, BY DESCRIPTOR task_status_msg, BY DESCRIPTOR emp_badge_number, BY DESCRIPTOR emp_last_name GIVING sts. IF sts IS FAILURE THEN CALL "LIB$STOP" USING BY VALUE sts END-IF. * * Return failure status to task. Note that the task simply uses * the return status as a success/failure indicator; it does not * use the value of the return status to process the message text. * MOVE persmsg_empexists TO return_status. GO TO 999-end.For example, in BASIC:. . . EXTERNAL LONG FUNCTION LIB$SYS_GETMSG, & LIB$SYS_FAO EXTERNAL LONG CONSTANT persmsg_empexists DECLARE STRING msg_format_string, & LONG sts . . . !+ ! Call LIB$SYS_MSGMSG to error message text associated with the ! 'employee already exists" error. Note that we use 1 as the ! message text flag since we only want the message text, not the ! facility code or severity level. !- sts = LIB$SYS_GETMSG( persmsg_empexists, & 0% BY VALUE, & msg_format_string, & 1% ) IF ( sts AND 1% ) = 0% THEN CALL LIB$STOP( sts BY VALUE ) END IF !+ ! Call LIB$SYS_FAO to format the 'employee already exists' error ! message text to include the employee's badge number and last ! name, using the message text as the FAO control string. !- sts = LIB$SYS_FAO( msg_format_string, & 0% BY VALUE, & task_ctl_rec::task_status_msg, & emp_rec::emp_badge_number, & TRM$( emp_rec::emp_last_name ) ) IF ( sts AND 1% ) = 0% THEN CALL LIB$STOP( sts BY VALUE ) END IF !+ ! Return failure status indicator to task. Note that the task ! simply uses the return status as a success/failure indicator, ! it does not use the value of the return status to process the ! message text. !- EXIT FUNCTION persmsg_empexistsIn the task definition, check the return status from the procedure in the ACMS$PROCESSING_STATUS workspace.
If the step procedure returns a failure status, then go to an exchange step that displays the error message from the step procedure on the form. For example:PROCESSING WORK IS CALL pers_add_employee_proc USING task_control, employee_record ACTION IS IF ( ACMS$T_STATUS_TYPE = "B" ) THEN GOTO STEP get_new_employee_data; END IF;
3.4.1.3. Using Hard-Coded Messages in the Form
Using this method, you return a status indicator that is processed by the form in a field in a user-defined workspace. See Section 3.3.2, ''Returning Status in User-Defined Workspaces'' for more information on returning status in a field in a user-defined workspace.
The advantage of this method is that you do not need to use message files or OpenVMS system services or RTL routines to return error messages to users. The disadvantage is that you must always modify the form if you need to change the format of an error message.
- Define a field in a user-defined workspace to hold the status indicator. For example:
step_status DATATYPE TEXT 8.
In the step procedure, return a status indicator in the STEP_STATUS field in the user-defined workspace.
For example, in COBOL:MOVE "DUPLICAT" TO step_status OF task_control. GO TO 999-end.
For example, in BASIC:task_ctrl_wksp::step_status = "DUPLICAT" EXIT FUNCTION
In the task definition, check the status indicator field in the user-defined workspace.
If the step procedure returns a failure indicator, then go to an exchange step that uses a form to display an error message based on the status indicator returned by the step procedure. For example:PROCESSING WORK IS CALL pers_add_employee_proc USING task_control, employee_record ACTION IS IF ( task_control.step_status <> "SUCCESS" ) THEN GOTO STEP get_new_employee_data; END IF;
3.4.1.4. Using Hard-Coded Messages in the Step Procedure
Using this method, you construct the complete error message directly in the step procedure. You use literal message text stored in the procedure, formatting variable error messages, if necessary.
The advantage of this method is that you do not need to use message files or OpenVMS system services or RTL routines to return error messages to users. The disadvantage is that you must always modify and recompile the step procedure and relink the procedure server image if you need to change the format of an error message.
- Define a field in a user-defined workspace to hold the error message text. For example:
task_status_msg DATATYPE TEXT 80.
In the step procedure, construct the error message in the message text field.
The following example in COBOL formats an error message and then returns a failure status to the task:* * Format 'Employee already exists' error message. * MOVE SPACES TO task_status_msg. STRING "Employee ID: " DELIMITED BY SIZE emp_badge_number DELIMITED BY " " " (last name: " DELIMITED BY SIZE emp_last_name DELIMITED BY " " ") already exists on file" DELIMITED BY SIZE INTO task_status_msg. SET status-result TO FAILURE. GO TO 999-end.The following example in BASIC formats an error message and then returns a failure status to the task:! ! Format 'Employee already exists' error message. ! task_ctl_rec::task_status_msg = & "Employee ID: " + & emp_rec::emp_badge_number + & " (last name: " + & TRM$( emp_rec::emp_last_name ) + & ") already exists on file" EXIT FUNCTION 0- In the task definition call to the procedure, test the ACMS$PROCESSING_STATUS workspace, and go to an exchange step that displays the error message on the form if an error occurs. For example:
 PROCESSING
     WORK IS
         CALL pers_add_employee_proc USING
                     task_control,
                     employee_record
     ACTION IS
         IF ( ACMS$T_STATUS_TYPE = "B" )
         THEN
             GOTO STEP get_new_employee_data;
         END IF;
3.4.2. Raising Exceptions in Step Procedures
ACMS$RAISE_STEP_EXCEPTION
ACMS$RAISE_TRANS_EXCEPTION
ACMS$RAISE_NONREC_EXCEPTION
The ACMS exception services differ in an important way from the superseded ACMSAD$REQ_CANCEL service. Whereas the ACMSAD$REQ_CANCEL service immediately cancels the current task and does not return control to the step procedure, the ACMS exception services all return control to the step procedure after setting the appropriate exception condition. This allows the step procedure to clean up any context in the server and to complete normally.
Allowing the step procedure to complete before raising the exception in the task means that ACMS does not have to interrupt the server process. Therefore, if a step procedure uses one of the exception services to raise an exception, and you have specified that your server is to be run down on cancel only if it is interrupted, ACMS does not need to run down the server process. See Section 2.3, ''Server Process Rundown'' for details on how to specify when ACMS should run down your server.
Note
For all servers, VSI recommends specifying that ACMS run down the server only if it is interrupted. Using this attribute does not, however, change the effect of using the ACMSAD$REQ_CANCEL service. Because the ACMSAD$REQ_CANCEL service causes the server to be interrupted, ACMS runs down the server in this situation. For this reason, use ACMS$RAISE_NONREC_EXCEPTION instead of ACMSAD$REQ_CANCEL.
3.4.2.1. Raising Recoverable Exceptions in Step Procedures
You can handle task execution errors in the exception handler part of a step, as explained in VSI ACMS for OpenVMS Writing Applications. This manual discusses how to raise exceptions only in step procedures.
Step exception
Transaction exception
ACMS$RAISE_STEP_EXCEPTION
A step procedure raises a step exception by calling this service. You call this service to raise an exception that can be handled by the exception handler part of the processing step or an outer-block step. A step procedure might raise a step exception if, for example, a procedure called from a processing step in a nested block detects an error condition that must be handled by the exception handler on the outer block step.
The following example shows the COBOL code in the error-handling section of a procedure.CALL "ACMS$RAISE_STEP_EXCEPTION" USING BY REFERENCE RET-STAT.
ACMS$RAISE_TRANS_EXCEPTION
A step procedure that is participating in a distributed transaction can use the ACMS$RAISE_TRANS_EXCEPTION service to raise a transaction exception if a resource manager returns a recoverable error – for example, a dead-lock error condition. Note that you cannot call the ACMS$RAISE_TRANS_EXCEPTION service in a step procedure that is not participating in a distributed transaction.
When a step procedure raises a transaction exception, the exception falls under the control of the exception handler part of the transaction step or outer-block step, if one exists. The following example shows the COBOL code in a procedure that raises a transaction exception:SQL_ERROR_HANDLER. IF (RDB$LU_STATUS = RDB$_DEADLOCK) OR (RDB$LU_STATUS = RDMS$_DEADLOCK) OR (RDB$LU_STATUS = RDB$_LOCK_CONFLICT) OR (RDB$LU_STATUS = RDMS$_LCKCNFLCT) OR (RDB$LU_STATUS = RDMS$_TIMEOUT) THEN CALL "ACMS$RAISE_TRANS_EXCEPTION" USING BY REFERENCE ACMS$_TRANSTIMEDOUT ELSE CALL "LIB$CALLG" USING BY REFERENCE Rdb$MESSAGE_VECTOR, BY VALUE LIB$SIGNAL CALL "ACMS$RAISE_NONREC_EXCEPTION" USING BY REFERENCE RDB$LU_STATUS END-IF.
Chapter 9, "ACMS Programming Services" contains reference information regarding recoverable exception services.
3.4.2.2. Raising Nonrecoverable Exceptions in Step Procedures
A fatal OpenVMS exception condition generated by the procedure
ACMS raises a nonrecoverable exception if a step procedure generates a fatal exception. For example, if you use the the OpenVMS RTL service LIB$STOP to signal an error, or if an exception is raised by the hardware (perhaps as the result of an access violation), then ACMS raises a nonrecoverable exception and cancels the task.Note
ACMS always runs down a server process if a step procedure generates a fatal OpenVMS exception condition.
A call to ACMS$RAISE_NONREC_EXCEPTION
A step procedure calls this programming service when an error occurs from which neither the step procedure nor the task can recover. When a step procedure calls this service, ACMS raises a nonrecoverable exception and unconditionally cancels the current task.
You call the ACMS$RAISE_NONREC_EXCEPTION service as you do any OpenVMS run-time service, by using a CALL statement in COBOL, for example. No arguments are required in the call. You can, however, include an optional argument describing the reason for the cancellation. The argument is a read-only longword, passed by reference.
The following example shows the COBOL code in a procedure that raises a nonrecoverable exception.CALL "ACMS$GET_TID" USING CS-TID GIVING ret-stat. IF ret-stat IS NOT SUCCESS THEN CALL "ACMS$RAISE_NONREC_EXCEPTION" USING ret-stat. GO TO 999-end.Chapter 9, "ACMS Programming Services" contains reference information regarding the nonrecoverable exception service.
3.5. Performing Terminal I/O from a Procedure Server
One of the major advantages of implementing an application with ACMS is that you can easily separate your terminal I/O from your database I/O by performing all terminal I/O in exchange steps and all database I/O in processing steps. Following these guidelines has many advantages; two of the major ones are better performance and the ability to distribute tasks over multiple nodes.
Application developers find, however, that some situations require them to do terminal I/O in a processing step – for example, if they are incorporating an existing program into an application. Sometimes it is simpler to make an existing program a single-step task that does terminal I/O than to convert the program to a multiple-step task, which requires removing the terminal I/O from the program and placing it in exchange steps. For this reason, although it is not recommended, ACMS supports doing terminal I/O from processing steps. This section describes the limitations and restrictions involved.
ACMS does not automatically associate a terminal channel with the server process. If a procedure is to do terminal I/O, it must open and close the channel it uses each time it is called. The terminal channel cannot be retained across processing steps, even if the task retains server context. If the procedure does not close the channel before it completes, ACMS cancels the task and runs down the server process.
For a server process to perform terminal I/O, the task must pass the terminal to that process. In single-step tasks, the default is to pass the terminal to the server process. In multiple-step tasks, however, the default is not to pass the terminal to the server process, regardless of whether the server is a DCL server or a procedure server.
Note
Because distributed tasks cannot perform terminal I/O in processing steps, you cannot distribute a task that contains TERMINAL I/O (or REQUEST I/O) syntax in a processing step of the task definition.
A procedure that does terminal I/O must open the terminal channel it uses; the channel cannot be opened in the initialization procedure.
You can use any terminal I/O calls that allow you to open a terminal channel explicitly. Two examples of these are the DECforms FORMS$ENABLE and the TDMS TSS$OPEN services.
Do not use programming statements such as DISPLAY and ACCEPT in COBOL, or INPUT and PRINT in BASIC.
Do not use the OpenVMS LIB$GET_INPUT and LIB$PUT_OUTPUT services.
Do not use the RTL screen management services.
Provide a cancel procedure for the server handling the procedure. It is recommended that the cancel procedure either close any open terminal channel when the task is canceled or allow the server process to run down when the task is canceled.
Chapter 4. Accessing Resource Managers
This chapter explains how to write step procedures that access several of the resource managers you can use with ACMS applications: Oracle Rdb using SQL, and Oracle Rdb using RDO, DBMS, and RMS.
The primary example in the chapter shows how to access an Rdb database using SQL with a procedure that participates in a distributed transaction. Examples showing how to access other resource managers supported by ACMS with distributed transactions are partial; they contain only syntax that is different from the SQL example.
The COBOL step procedure that is the principal example in this chapter is part of the AVERTZ Sample Application. The step procedure VR_COMPLETE_CHECKOUT_PROC participates in a distributed transaction that starts and ends in the parent task. Figure 4.1, ''Calling the Procedure VR_COMPLETE_CHECKOUT_PROC'' shows where VR_COMPLETE_CHECKOUT_PROC fits into the AVERTZ Sample Application. The figure shows the ACMS menu, from which users can select the Reservation Task or the Checkout Task as two of three tasks displayed on the menu. Both the Reservation Task and the Checkout Task can call the Complete Checkout Task, which, in turn, calls the procedure VR_COMPLETE_CHECKOUT_PROC.
See VSI ACMS for OpenVMS Concepts and Design Guidelines for a description of the AVERTZ sample application and VSI ACMS for OpenVMS Writing Applications for a description of VR_COMPLETE_CHECKOUT_TASK. For further explanation of VR_COMPLETE_CHECKOUT_PROC. see Section 4.1, ''Using SQL with Rdb''.

4.1. Using SQL with Rdb
This section describes how to write step procedures using the Structured Query Language (SQL) interface to Rdb. The techniques used with SQL are similar to those used in developing tasks and server procedures using Relational Data Manipulation Language (RDML).
See the SQL documentation for general information regarding SQL.
The main example in this chapter, shown in Example 4.7, ''COBOL Procedure Using SQL with Rdb'', is a COBOL step procedure called VR_COMPLETE_CHECKOUT_PROC, which accesses an Rdb database using SQL. The procedure is part of the AVERTZ sample application.
| If the customer chooses to check out the car, the task calls the procedure VR_COMPLETE_CHECKOUT_PROC to complete the checkout process. |
| If the customer cancels the reservation, the task calls the procedure VR_CANCEL_RS_PROC to cancel the reservation. |
| The task calls another procedure, VR_WRITE_HIST_RECORD_PROC, which writes the completion of the checkout or the cancellation to the database. |
REPLACE TASK avertz_cdd_task:vr_complete_checkout_task
USE WORKSPACES vr_control_wksp,
.
.
.
TASK ARGUMENTS ARE vr_sendctrl_wksp WITH ACCESS READ,
.
.
.
BLOCK WORK WITH TRANSACTION
NO I/O
!
perform:
!+
!-
! Perform the checkout process or cancel the reservation depending
! on the user's choice.
!
PROCESSING
SELECT FIRST TRUE
(vr_control_wksp.ctrl_key = "OK"):
 CALL PROCEDURE vr_complete_checkout_proc
IN vr_update_server
USING vr_reservations_wksp,
vr_vehicles_wksp,
vr_control_wksp;
(vr_control_wksp.ctrl_key = "CANCL"):
CALL PROCEDURE vr_complete_checkout_proc
IN vr_update_server
USING vr_reservations_wksp,
vr_vehicles_wksp,
vr_control_wksp;
(vr_control_wksp.ctrl_key = "CANCL"):
 CALL PROCEDURE vr_cancel_rs_proc
IN vr_update_server
USING vr_reservations_wksp,
vr_control_wksp;
END SELECT;
.
.
.
! Write to the history record to record the completion of the checkout or the
! the cancellation of the reservation.
!
PROCESSING
CALL PROCEDURE vr_cancel_rs_proc
IN vr_update_server
USING vr_reservations_wksp,
vr_control_wksp;
END SELECT;
.
.
.
! Write to the history record to record the completion of the checkout or the
! the cancellation of the reservation.
!
PROCESSING
 CALL PROCEDURE vr_write_hist_record_proc
IN vr_log_server
USING vr_hist_wksp,
vr_reservations_wksp;
.
.
.
!
END BLOCK;
!
END DEFINITION;
CALL PROCEDURE vr_write_hist_record_proc
IN vr_log_server
USING vr_hist_wksp,
vr_reservations_wksp;
.
.
.
!
END BLOCK;
!
END DEFINITION;4.1.1. Using Embedded SQL Statements in Step Procedures
Begin each statement with the EXEC SQL flag.
Remember that the EXEC SQL flag can occur at the beginning of only the first line of a multiline SQL statement. Follow the rules of the programming language you are using to continue SQL statements from one line to the next.
Regardless of the rules of the language you are using for parameter names, specify underscores rather than hyphens when entering names of database entities.
In COBOL, flag the end of an SQL statement with the END-EXEC keyword. Place a period after END-EXEC if a COBOL statement in the same position requires a period.
Example 4.2, ''Declaring the Database'' contains examples illustrating each of these guidelines.
For other high-level languages, the rules for beginning and ending SQL statements in step procedures vary. See the SQL documentation for more information about beginning and ending SQL statements in step procedures.
Before you can use SQL to access a database, you must declare the database. You do this in each server procedure that accesses the database. If you are using COBOL, name the Rdb database in the Working-Storage Section of the Data Division of your procedure using the DECLARE SCHEMA statement. This must appear in the procedure before you can use other SQL statements to reference data in the database.
 ************************************************************
 DATA DIVISION.
 ************************************************************
 WORKING-STORAGE SECTION.
 *
 *  Return status to pass to ACMS
 *
 01 RET-STAT      PIC S9(9) COMP.
 01 RSTAT         PIC S9(9) COMP.


 .
 .
 .
 *
 *  Declare the database schema.
 *
 EXEC SQL
    DECLARE EXTERNAL SCHEMA FILENAME AVERTZ_DATABASE:VEHICLE_RENTALS
 END-EXEC.
4.1.2. Using SQL with Distributed Transactions
When you use SQL with a distributed transaction, you must pass the transaction ID (TID) to SQL on each executable DML verb using an SQL context structure.
Define an SQL context structure
Obtain the TID and store it in the context structure
Pass the context structure to SQL using embedded SQL and SQL module language.
See Example 4.7, ''COBOL Procedure Using SQL with Rdb'' for a complete example of using precompiled SQL in a distributed transaction using COBOL. See the SQL documentation for information on how to define and use an SQL context structure.
4.1.2.1. Defining an SQL Context Structure
In your procedure, you must define a context structure that holds the TID associated with the distributed transaction.
     WORKING-STORAGE SECTION.
                .
                .
                .
     01 context-structure.
             02 cs-version           PIC S9(9) COMP VALUE 1.
             02 cs-type              PIC S9(9) COMP VALUE 1.
             02 cs-length            PIC S9(9) COMP VALUE 16.
             02 cs-tid               PIC X(16).
             02 cs-end               PIC S9(9) COMP VALUE 0.
                .
                .
. WORKING-STORAGE SECTION.
.
.
.
EXEC SQL
INCLUDE 'AVERTZ_SOURCE:VR_CONTEXT_STRUCTURE_INCLUDE.LIB'
END-EXEC.
.
.
.Appendix B, "Libraries Included in AVERTZ Sample Procedures" contains the contents of the libraries referred to in examples from the AVERTZ sample application in this manual.
     RECORD sql_context_structure
         LONG sqlctx_version
         LONG sqlctx_type
         LONG sqlctx_length
         STRING sqlctx_tid = 16
         LONG sqlctx_end
     END RECORD sqlctx_structure


     DECLARE sql_context_structure sqlcs

     sqlcs::sqlctx_version = 1%
     sqlcs::sqlctx_type = 1%
     sqlcs::sqlctx_length = 16%
sqlcs::sqlctx_end = 0%%INCLUDE "pers_files:pers_sqlctx"
4.1.2.2. Storing the TID in the SQL Context Structure
You must call the ACMS$GET_TID service to obtain the TID and store it in the SQL context structure before you access the database.
     CALL "ACMS$GET_TID" USING BY REFERENCE cs-tid
                         GIVING ret-stat.
     IF ret-stat IS NOT SUCCESS
     THEN
         CALL "ACMS$RAISE_NONREC_EXCEPTION"
                         USING BY REFERENCE ret-stat
         GO TO 999-end
     END-IF.
     sts = ACMS$GET_TID( sqlcs::sqlctx_tid BY REF )
     IF ( sts AND 1% ) = 0% THEN
         CALL ACMS$RAISE_NONREC_EXCEPTION( sts )
         EXIT FUNCTION
     END IF
4.1.2.3. Passing the Context Structure to SQL
Using precompiled SQL
When you use precompiled SQL, the context structure is passed using the CONTEXT parameter on the EXEC SQL phrase.
The following code segment illustrates how to pass the context structure using precompiled SQL:EXEC SQL USING CONTEXT :context-structure SET TRANSACTION READ WRITE RESERVING reservations FOR SHARED WRITE, rental_classes,sites,regions FOR SHARED READ END-EXEC.Using SQL module language
When you use SQL module language, you must pass the context structure as an argument on the call to the SQL procedure. When you compile the SQL module, you must use the
/CONTEXTswitch to generate an implicit context parameter for each procedure that participates in a distributed transaction. The context argument is always generated as the last argument in the argument list; therefore, always pass the context structure as the last argument when you call the SQL procedure.The following code segment illustrates the module header and the first procedure in an SQL module language program for use by a BASIC program:– Header section MODULE pers_appl_procs LANGUAGE BASIC AUTHORIZATION RDB$DBHANDLE – Declare schema DECLARE PARTS SCHEMA FOR FILENAME 'pers_db:personnel' – Start transaction procedure PROCEDURE start_new_employee_trans SQLCODE; – Start the transaction SET TRANSACTION READ_WRITE RESERVING employees FOR SHARED WRITE, history FOR SHARED WRITE; – Additional procedures . . .The following code segment illustrates how to call the START_NEW_EMPLOYEE_TRANS SQL procedure from a BASIC program. Note that the SQL context structure is passed as the last argument in the call to the SQL procedure.. . . CALL start_new_employee_trans( sqlsts, sqlcs ) . . .
4.1.3. Starting and Ending SQL Database Transactions
You start an SQL database transaction by using a SET TRANSACTION statement. However, the way in which you start the database transaction depends on whether the database transaction is part of a distributed transaction.
This section describes how to start a database transaction that is part of a distributed transaction and how to start and end an independent database transaction. In addition, this section discusses various access modes that you can specify when starting a database transaction.
4.1.3.1. Starting an SQL Database Transaction that is Part of a Distributed Transaction
     EXEC SQL USING CONTEXT :context-structure
         SET TRANSACTION READ WRITE
         RESERVING reservations FOR SHARED WRITE,
                   rental_classes,sites,regions FOR SHARED READ
END-EXEC.Note
You must specify the SQL context structure on every SQL verb that is executed within the distributed transaction. The step procedure does not function correctly if you omit the SQL context structure on an SQL statement.
Because the SQL database transaction is participating in a distributed transaction, Rdb automatically commits or rolls back the database transaction when the distributed transaction ends. Therefore, you must not use the COMMIT or ROLLBACK verbs to end the database transaction.
4.1.3.2. Starting and Ending an Independent SQL Database Transaction
     EXEC SQL USING CONTEXT
         SET TRANSACTION READ WRITE
         RESERVING reservations FOR SHARED WRITE,
                   rental_classes,sites,regions FOR SHARED READ
     END-EXEC.
     IF step-proc-status IS SUCCESS
     THEN
         EXEC SQL
             COMMIT
         END-EXEC
     ELSE
         EXEC SQL
             ROLLBACK
         END-EXEC
     END-IF.
4.1.3.3. Using Rdb Transaction Mode and Lock Mode Specifications
Specify the transaction mode and the lock mode when you start an Rdb database transaction.
The transaction mode specifies how the step procedure accesses the database. If the step procedure only reads records from the database, specify READ ONLY when you start the database transaction. Otherwise, specify READ WRITE in step procedures that read, write, and modify records in the database.
Note
When you use an Rdb database, any records you access are not locked until you modify them. Once a record has been modified, it remains locked until the end of the transaction.
The lock mode specifies how the step procedure accesses specific relations in the database. To reduce contention in the database, specify explicitly which relations you access in the database when you start an Rdb transaction. For each relation, specify read or write access to the relation depending on the access the server requires. For example, if the step procedure only reads records, specify READ access. If the server procedure reads, writes, and modifies records in the relation, specify WRITE access.
Refer to the Rdb documentation for an explanation of the Rdb share modes and the defaults for the keywords you use with the SET TRANSACTION statement in SQL and with the START_TRANSACTION statement in RDO and RDML.
      EXEC SQL USING CONTEXT :CONTEXT-STRUCTURE
              SET TRANSACTION READ WRITE
               .
               .
               .
              RESERVING  RESERVATIONS,
                         VEHICLES,
                         VEHICLE_RENTAL_HISTORY
              FOR        SHARED WRITE,
                         RENTAL_CLASSES,
                         SITES,
                         REGIONS
              FOR        SHARED READ
      END-EXEC.
The RESERVATIONS, VEHICLES, and VEHICLE_RENTAL_HISTORY relations are reserved for SHARED WRITE, which means that no other user can modify the records you are updating once they have been modified; other users can, however, read records that you are reading or modifying. Until you commit a modification, other users read the original version of the record.
Also shown in Example 4.3, ''Lock Specification Example'', the RENTAL_CLASSES, SITES, and REGIONS relations are reserved for SHARED READ; this means that other users can read and modify the same records that you are accessing in the relation.
ACMS tasks typically perform a transaction with SHARED access because the database is shared by more than one server process. You might occasionally need to lock an entire relation when you access it; if you need to do so, refer to the SQL documentation on PROTECTED and EXCLUSIVE access.
4.1.3.4. Using an Rdb Wait Mode Specification
The SQL SET TRANSACTION and RDO START_TRANSACTION statements also allow you to specify a wait mode. Using the wait mode, you specify how Rdb handles the situation if it encounters a locked relation or record while accessing the database. If you specify WAIT, the default, Rdb waits until the lock can be granted before continuing. If you specify NOWAIT, Rdb immediately returns an error if it encounters a lock.
As a server logical name in the application definition
In an application-specific logical name table
In the system logical name table
In a group logical name table
    LOGICAL NAME IS
         RDM$BIND_LOCK_TIMEOUT_INTERVAL = "10";
Important
If you are using distributed transactions, always specify a lock timeout interval to ensure that ACMS can successfully cancel a task that is waiting for a database lock. By specifying a lock timeout interval, you ensure that the task will be canceled as soon as the timeout interval expires. If you do not specify a lock timeout interval, the task cannot be canceled until the lock is granted.
4.1.4. Reading from a Database
The procedure VR_COMPLETE_CHECKOUT_PROC from the AVERTZ Sample Application illustrates the use of SQL statements in reading information from an Rdb database. As part of the processing associated with checking out a car, the procedure must find the current odometer reading for the selected vehicle. It does this by selecting the record with the highest odometer reading from the VEHICLE_RENTAL_HISTORY relation. Because the vehicle history record might contain a null value, the procedure uses an indicator parameter to determine whether or not an odometer reading has been retrieved.
Example 4.4, ''Indicator Array for Null Values'' illustrates how the procedure VR_COMPLETE_CHECKOUT_PROC declares an indicator array (for a subsequent STORE operation) and an indicator parameter (for the SELECT operation). You need to include this when a read operation on the database might return a null value. Example 4.4, ''Indicator Array for Null Values'' shows one way this can appear in a COBOL program.
 *
 * Indicator array for null values
 *
 01 VR_VRH_IND_ARRAY.
    05 VR_VRH_IND OCCURS 6 TIMES  PIC S9(4) COMP.
01 VR_VRH_IND1 PIC S9(4) COMP. GET-ODOMETER-READING.
* Get the last return odometer reading for the vehicle being
* checked out from the database. If not found, ignore it.
.
.
.
EXEC SQL USING CONTEXT :CONTEXT-STRUCTURE
SELECT MAX(RETURN_ODOMETER_READING)INTO
:VR_VEHICLE_RENTAL_HISTORY_WKSP.CHECKOUT_ODOMETER_READING
INDICATOR :VR_VRH_IND1
FROM VEHICLE_RENTAL_HISTORY
WHERE VEHICLE_ID = :VR_VEHICLES_WKSP.VEHICLE_ID
END-EXEC.
4.1.5. Writing to a Database
                       .
                       .
                       .
         MOVE NEG-ONE TO VR_VRH_IND(5).
         MOVE NEG-ONE TO VR_VRH_IND(6).
                       .
                       .
                       .


 UPDATE-RESERVATION.
 *
 * Update the reservation in the database
 *
         EXEC SQL USING CONTEXT :CONTEXT-STRUCTURE
            UPDATE RESERVATIONS
               SET CREDIT_CARD_NO = :VR_RESERVATIONS_WKSP.CREDIT_CARD_NO,
                   CREDIT_CARD_TYPE_ID =
                      :VR_RESERVATIONS_WKSP.CREDIT_CARD_TYPE_ID,
                   RESERV_STATUS_FLAG = :C-ONE,
                   RESERV_MODIFIC_FLAG =
                      :VR_RESERVATIONS_WKSP.RESERV_MODIFIC_FLAG,
                   BILL_RENTAL_CLASS_ID =
                      :VR_RESERVATIONS_WKSP.BILL_RENTAL_CLASS_ID,
                   VEHICLE_EXPECTED_RETURN_DATE =
                      :VR_RESERVATIONS_WKSP.VEHICLE_EXPECTED_RETURN_DATE
               WHERE RESERVATION_ID = :VR_RESERVATIONS_WKSP.RESERVATION_ID
         END-EXEC.


 *
 * Update the vehicle record in the database
 *
 UPDATE-VEHICLES.
         EXEC SQL USING CONTEXT :CONTEXT-STRUCTURE
            UPDATE VEHICLES
               SET CURRENT_SITE_ID =
                      :VR_RESERVATIONS_WKSP.VEHICLE_CHECKOUT_SITE_ID,
                   AVAILABLE_FLAG = :C-ZERO
               WHERE VEHICLE_ID = :VR_VEHICLES_WKSP.VEHICLE_ID
         END-EXEC.


 *
 * Write a new vehicle_rental_history record to the database
 *
         EXEC SQL USING CONTEXT :CONTEXT-STRUCTURE
            INSERT INTO VEHICLE_RENTAL_HISTORY
               VALUES (:VR_VEHICLE_RENTAL_HISTORY_WKSP:VR_VRH_IND)
         END-EXEC.
4.1.6. Handling Errors
You typically write an error handler to process errors returned by Rdb when starting and ending a database transaction and when accessing data in the database. When you use Rdb with SQL, you have normal direct access to the same status values as you do when you use Rdb with RDO. The Rdb return status values are inherently compatible with OpenVMS usage.
Some Rdb errors are expected and are handled by resuming normal program execution. For example, Rdb returns an end-of-stream error when the last record in a record stream has been processed. In this case, the program can resume execution and process the records that have been read. Rdb can also return a number of recoverable errors that the program should check for and handle. For example, if Rdb returns a deadlock error, you might want to roll back the transaction and process the transaction again. Finally, Rdb can return a number of nonrecoverable errors. For example, a disk on which one of the database storage areas resides might fail. In this case, the program cannot continue until the problem has been resolved.
A distributed transaction can abort at any time. If a transaction aborts while a step procedure is executing, Rdb automatically rolls back an active database transaction. However, the step procedure will receive an error the next time it executes an SQL statement in a database transaction that was participating in the distributed transaction. Therefore, an error handler for a step procedure should check for and handle the errors that Rdb returns in this situation.
Typically, you want to retry a transaction automatically in the event of a recoverable error condition such as a deadlock, lock-conflict, lock-timeout, or transaction-timeout error. Rdb returns deadlock, lock-conflict, and lock-timeout errors to your step procedure when you access the database. In contrast, if a distributed transaction times out, the distributed transaction is aborted and ACMS raises a transaction exception in the task. In this case, Rdb returns an error if the step procedure accesses the database after the transaction has aborted.
Handling recoverable errors
If an error handler in a step procedure detects a recoverable error condition, such as a deadlock, lock-conflict or lock-timeout error, it calls the ACMS$RAISE_TRANS_EXCEPTION service to raise a transaction exception using the ACMS$_TRANSTIMEDOUT exception code. If a distributed transaction does not complete within the specified time limit, ACMS also raises a transaction exception using the ACMS$_TRANSTIMEDOUT exception code. Therefore, using ACMS$_TRANSTIMEDOUT as the exception code in the step procedure means that the exception handler in the task definition has to test for only a single exception code in order to handle all recoverable transaction exceptions.
If you detect a recoverable error in a step procedure using an independent database transaction that is not participating in a distributed transaction, you can roll back the database transaction and repeat the transaction in the step procedure.
Handling transaction aborts
If a distributed transaction aborts while a step procedure is executing, Rdb returns one of a number of error status values. If a step procedure detects one of these errors, it raises a transaction exception using the error status. If the error was due to a distributed transaction aborting, ACMS overrides the exception in the task. However, if Rdb returns the error due to some other problem, the task is canceled with the specified exception code.
Handling nonrecoverable errors
If an unexpected error occurs, the procedure uses the LIB$CALLG RTL routine to call LIB$SIGNAL to signal the error information returned by Rdb. If the procedure signals a fatal OpenVMS status, ACMS writes the error to the audit trail log, cancels the task, and runs down the server process. However, if the procedure signals an error or a warning OpenVMS status, ACMS continues executing the step procedure after writing the error to the audit trail log. The error handler also calls the ACMS$RAISE_NONREC_EXCEPTION service to ensure that the task is canceled.
- In the Working-Storage Section, the procedure obtains the structure for SQLCODE and RDB$MESSAGE_VECTOR:
EXEC SQL INCLUDE SQLCA END-EXEC.
- In the Procedure Division, the step procedure instructs SQL to execute the instructions in the SQL_ERROR_HANDLER paragraph if an error occurs:
EXEC SQL WHENEVER SQLERROR GO TO SQL-ERROR-HANDLER END-EXEC. - In the SQL_ERROR_HANDLER paragraph, the procedure checks the error condition. If a recoverable error occurred, the procedure raises a transaction exception using ACMS$_TRANSTIMEDOUT as the exception code. If the distributed transaction aborted, the procedure raises a transaction exception using the error status returned by Rdb. If any other error occurred, the procedure signals the error information in the Rdb$MESSAGE_VECTOR structure and raises a nonrecoverable exception.
SQL-ERROR-HANDLER. EVALUATE TRUE WHEN ( ( Rdb$LU_STATUS = RDB$_DEADLOCK ) OR ( Rdb$LU_STATUS = RDMS$_DEADLOCK ) OR ( Rdb$LU_STATUS = RDB$_LOCK_CONFLICT ) OR ( Rdb$LU_STATUS = RDMS$_LCKCNFLCT ) OR ( Rdb$LU_STATUS = RDMS$_TIMEOUT ) ) CALL "ACMS$RAISE_TRANS_EXCEPTION" USING BY REFERENCE ACMS$_TRANSTIMEDOUT WHEN ( ( RdB$LU_STATUS = RDB$_SYS_REQUEST_CALL ) OR ( Rdb$LU_STATUS = RDB$_BAD_TRANS_HANDLE ) OR ( Rdb$LU_STATUS = RDB$_DISTABORT ) OR ( Rdb$LU_STATUS = RDB$_REQ_SYNC ) OR ( Rdb$LU_STATUS = RDB$_READ_ONLY_TRANS ) ) CALL "ACMS$RAISE_TRANS_EXCEPTION" USING BY REFERENCE Rdb$LU_STATUS WHEN OTHER CALL "LIB$CALLG" USING BY REFERENCE Rdb$MESSAGE_VECTOR, BY VALUE LIB$SIGNAL CALL "ACMS$RAISE_NONREC_EXCEPTION" USING BY REFERENCE Rdb$LU_STATUS END-EVALUATE. - The task definition uses an exception handler action that repeats the transaction step up to five times if a recoverable transaction error occurs:
. . . EXCEPTION HANDLER SELECT FIRST TRUE OF ( ACMS$L_STATUS = vr_update_error ): MOVE "TRAGN" TO vr_sendctrl_wksp.sendctrl_key; GOTO STEP fix_cust_info;BOLDvr_control_wksp.retry_count < 5: REPEAT STEP; NOMATCH: GET MESSAGE INTO vr_control_wksp.messagepanel; MOVE "ACTWT" TO vr_sendctrl_wksp.sendctrl_key, " " TO vr_control_wksp.ctrl_key; GOTO STEP disp_stat; END SELECT; . . .
For detailed information on SQL error handling, see the SQL documentation.
4.1.7. Compiling Procedures that Use SQL
You use the SQL precompiler, SQLPRE, when you compile a procedure containing embedded SQL statements. The SQL precompiler processes the embedded SQL statements in your program, producing an intermediate host-language source file, which it then submits to the host-language compiler to produce an object module.
The SQL precompiler command line includes both precompiler and host-language compiler
qualifiers. For the precompiler, include a qualifier to specify in which host
language the source is written; you can, optionally, include other qualifiers. On
the command line, also include any language compiler qualifiers (such as
LIST or DEBUG) that you want in effect
when the precompiler submits the preprocessed source file to the language compiler.
For more information on SQL precompiler qualifiers, see the SQL documentation.
$SCOB == "$SQLPRE/COBOL"
$SCOB/LIST VR_COMPLETE_CHECKOUT_PROC
Note
Do not make changes to the language source module created by the SQL precompiler and then use the language compiler directly to compile that source module. This rule applies even if you want to make source changes that do not affect SQL statements because the next precompilation of the original embedded SQL module overwrites the changes you make to the temporary language source module generated by the precompiler.
Chapter 6, "Building Procedure Server Images" explains how to link procedures that use SQL.
4.1.8. COBOL Step Procedure Using SQL with Rdb
Example 4.7, ''COBOL Procedure Using SQL with Rdb'' contains a complete COBOL procedure that accesses an Rdb database using SQL.
Uses the ACMS$GET_TID service to obtain the TID associated with the transaction
Starts a database transaction (with the SET TRANSACTION statement)
For the vehicle being checked out, gets the last odometer reading from the database
Updates the car rental reservation in the database
Updates the vehicle record in the database
Writes a new vehicle rental history record to the database
Returns a value to the calling task
Handles any errors encountered in the execution of the procedure
 IDENTIFICATION DIVISION.
 **************************************************************
 PROGRAM-ID. VR-COMPLETE-CHECKOUT-PROC.
 *                                                            *
 *               Version:        01                           *
 *               Edit:           00                           *
 *               Authors:        00                           *
 *               Called from:    VR_COMPLETE_CHECKOUT_TASK    *
 *                                                            *
 **************************************************************

 **************************************************************
 *         F U N C T I O N A L   D E S C R I P T I O N        *
 *                                                            *
 *   This procedure is called from the VR_COMPLETE_CHECKOUT_  *
 *   TASK and is used to write a completed reservation record *
 *   an updated vehicle record and a new vehicle_rental_his-  *
 *   tory record to the VEHICLE_RENTALS database.             *
 **************************************************************
 ENVIRONMENT DIVISION.
 **************************************************************
 DATA DIVISION.
 **************************************************************


 WORKING-STORAGE SECTION.
 *
 * Return status to pass to ACMS
 *
 01 RET-STAT     PIC S9(9) COMP.
 01 RSTAT        PIC S9(9) COMP.


 *
 * External variables
 *
 01 RDMS$_DEADLOCK        PIC S9(9) COMP VALUE IS EXTERNAL RDMS$_DEADLOCK.
 01 RDB$_DEADLOCK         PIC S9(9) COMP VALUE IS EXTERNAL RDB$_DEADLOCK.
 01 RDMS$_LCKCNFLCT       PIC S9(9) COMP VALUE IS EXTERNAL RDMS$_LCKCNFLCT.
 01 RDB$_LOCK_CONFLICT    PIC S9(9) COMP VALUE IS EXTERNAL RDB$_LOCK_CONFLICT.
 01 RDMS$_TIMEOUT         PIC S9(9) COMP VALUE IS EXTERNAL RDMS$_TIMEOUT.
 01 ACMS$_TRANSTIMEDOUT   PIC S9(9) COMP VALUE IS EXTERNAL ACMS$_TRANSTIMEDOUT.
 01 RDB$_SYS_REQUEST_CALL PIC S9(9) COMP VALUE IS EXTERNAL RDB$_SYS_REQUEST_CALL.
 01 RDB$_BAD_TRANS_HANDLE PIC S9(9) COMP VALUE IS EXTERNAL RDB$_BAD_TRANS_HANDLE.
 01 RDB$_DISTABORT        PIC S9(9) COMP VALUE IS EXTERNAL RDB$_DISTABORT.
 01 LIB$SIGNAL            PIC S9(5) COMP VALUE IS EXTERNAL LIB$SIGNAL.


 *
 * Indicator array for null values
 *
 01 VR_VRH_IND_ARRAY.
    05 VR_VRH_IND OCCURS 6 TIMES PIC S9(4) COMP.
 01 VR_VRH_IND1                  PIC S9(4) COMP.
 * External status variables for VR messages.
 *
 EXEC SQL INCLUDE
         'AVERTZ_SOURCE:VR_MESSAGES_INCLUDE.LIB'
 END-EXEC.


 *
 * Literals
 *
 EXEC SQL INCLUDE
         'AVERTZ_SOURCE:VR_LITERALS_INCLUDE.LIB'
 END-EXEC.
 *
 * Define the SQL return status
 *
 EXEC SQL INCLUDE
         'AVERTZ_SOURCE:VR_SQL_STATUS_INCLUDE.LIB'
 END-EXEC.


 *
 * Declare the global transaction context structure. This is required for SQLPRE
 *
 EXEC SQL INCLUDE
         'AVERTZ_SOURCE:VR_CONTEXT_STRUCTURE_INCLUDE.LIB'
 END-EXEC.
 *
 * Get structure for SQLCODE and RDB$MESSAGE_VECTOR.
 *
 EXEC SQL INCLUDE SQLCA END-EXEC.


 *
 * Declare the database schema
 *
 *
 * Copy VEHICLE_RENTAL_HISTORY from the CDD
 *
 EXEC SQL INCLUDE FROM DICTIONARY
             'AVERTZ_CDD_WKSP:VR_VEHICLE_RENTAL_HISTORY_WKSP'
 END-EXEC.


 *
 EXEC SQL
    DECLARE EXTERNAL SCHEMA FILENAME AVERTZ_DATABASE:VEHICLE_RENTALS
 END-EXEC.

 **************************************************************
 LINKAGE SECTION.


 *
 * Copy RESERVATIONS from the CDD
 *
 EXEC SQL INCLUDE FROM DICTIONARY
             'AVERTZ_CDD_WKSP:VR_RESERVATIONS_WKSP'
 END-EXEC.
 *
 * Copy VEHICLES from the CDD
 *
 EXEC SQL INCLUDE FROM DICTIONARY
             'AVERTZ_CDD_WKSP:VR_VEHICLES_WKSP'
 END-EXEC.
 * Copy CONTROL workspace from the CDD - used to handle DDTM timeout
 *
 EXEC SQL INCLUDE FROM DICTIONARY
             'AVERTZ_CDD_WKSP:VR_CONTROL_WKSP'
 END-EXEC.


 **************************************************************
 PROCEDURE DIVISION USING VR_RESERVATIONS_WKSP,
                          VR_VEHICLES_WKSP,
                          VR_CONTROL_WKSP
                    GIVING RET-STAT.
 **************************************************************


 MAIN-PROGRAM.

         SET RET-STAT TO SUCCESS.

         IF INCREMENT_RETRY_COUNT OF VR_CONTROL_WKSP = "Y"
         THEN
                 ADD 1 TO RETRY_COUNT OF VR_CONTROL_WKSP
         END-IF.

         CALL "ACMS$GET_TID" USING CS-TID GIVING RET-STAT.
         IF RET-STAT IS NOT SUCCESS THEN
                 CALL "ACMS$RAISE_NONREC_EXCEPTION" USING BY REFERENCE RET-STAT
                 GO TO EXIT-PROGRAM
         END-IF.


 *
 * Update the required record fields and DECLARE The appropriate null indicators
 *
         MOVE VEHICLE_CHECKOUT_SITE_ID OF VR_RESERVATIONS_WKSP TO
            CHECKOUT_SITE_ID OF VR_VEHICLE_RENTAL_HISTORY_WKSP.
         MOVE VEHICLE_ID OF VR_VEHICLES_WKSP TO
            VEHICLE_ID OF VR_VEHICLE_RENTAL_HISTORY_WKSP.
         MOVE RESERVATION_ID OF VR_RESERVATIONS_WKSP TO
            RESERVATION_ID OF VR_VEHICLE_RENTAL_HISTORY_WKSP.
         MOVE NEG-ONE TO VR_VRH_IND(5).
         MOVE NEG-ONE TO VR_VRH_IND(6).


 * Set up to trap errors returned by SQL;  the precompiler will generate the
 * necessary tests
 *
         EXEC SQL
            WHENEVER SQLERROR GO TO SQL-ERROR-HANDLER
         END-EXEC.


 * Start the database transaction
 *
         EXEC SQL USING CONTEXT: CONTEXT_STRUCTURE
                 SET TRANSACTION READ WRITE
                 EVALUATING RS_VALID_BILL_RENTAL_CLASS AT VERB TIME,
                 RS_VALID_VEHICL_CHKOUT_SITE_ID AT VERB TIME,
                 VE_VALID_CURRENT_SITE_ID AT VERB TIME,
                 VRH_VALID_VEHICLE_ID AT VERB TIME,
                 VRH_VALID_PRIMARY_KEY AT VERB TIME
                 RESERVING RESERVATIONS,VEHICLES,VEHICLE_RENTAL_HISTORY
                    FOR SHARED WRITE,
                 RENTAL_CLASSES,SITES,REGIONS FOR SHARED READ
         END-EXEC.


 *
 *
 GET-ODOMETER-READING.
 * Get the last return odometer reading for the vehicle being checked out
 * from the database.  If not found, ignore it.
         EXEC SQL WHENEVER NOT FOUND CONTINUE END-EXEC.

         EXEC SQL USING CONTEXT :CONTEXT-STRUCTURE
            SELECT MAX(RETURN_ODOMETER_READING)INTO
                  :VR_VEHICLE_RENTAL_HISTORY_WKSP.CHECKOUT_ODOMETER_READING
                     INDICATOR :VR_VRH_IND1
               FROM VEHICLE_RENTAL_HISTORY
               WHERE VEHICLE_ID = :VR_VEHICLES_WKSP.VEHICLE_ID
         END-EXEC.


 UPDATE-RESERVATION.
 * Update the reservation in the database
 *
         EXEC SQL USING CONTEXT :CONTEXT-STRUCTURE
            UPDATE RESERVATIONS
               SET CREDIT_CARD_NO = :VR_RESERVATIONS_WKSP.CREDIT_CARD_NO,
                   CREDIT_CARD_TYPE_ID =
                      :VR_RESERVATIONS_WKSP.CREDIT_CARD_TYPE_ID,
                   RESERV_STATUS_FLAG = :C-ONE,
                   RESERV_MODIFIC_FLAG =
                      :VR_RESERVATIONS_WKSP.RESERV_MODIFIC_FLAG,
                   BILL_RENTAL_CLASS_ID =
                      :VR_RESERVATIONS_WKSP.BILL_RENTAL_CLASS_ID,
                   VEHICLE_EXPECTED_RETURN_DATE =
                      :VR_RESERVATIONS_WKSP.VEHICLE_EXPECTED_RETURN_DATE
               WHERE RESERVATION_ID = :VR_RESERVATIONS_WKSP.RESERVATION_ID
         END-EXEC.


 * Update the vehicle record in the database
 *
 UPDATE-VEHICLES.
 *
         EXEC SQL USING CONTEXT :CONTEXT-STRUCTURE
            UPDATE VEHICLES
               SET CURRENT_SITE_ID =
                      :VR_RESERVATIONS_WKSP.VEHICLE_CHECKOUT_SITE_ID,
                   AVAILABLE_FLAG = :C-ZERO
               WHERE VEHICLE_ID = :VR_VEHICLES_WKSP.VEHICLE_ID
         END-EXEC.


 * Write a new vehicle_rental_history record to the database
 *
         EXEC SQL USING CONTEXT :CONTEXT-STRUCTURE
            INSERT INTO VEHICLE_RENTAL_HISTORY
               VALUES (:VR_VEHICLE_RENTAL_HISTORY_WKSP:VR_VRH_IND)
         END-EXEC.

 * All database activity was successful; commit the transaction in the task
 *

         MOVE CHKOUTCOM TO RET-STAT.

         GO TO EXIT-PROGRAM.

 * Error handling


 SQL-ERROR-HANDLER.

     EVALUATE TRUE
         WHEN ( ( Rdb$LU_STATUS = RDB$_DEADLOCK ) OR
                ( Rdb$LU_STATUS = RDMS$_DEADLOCK ) OR
                ( Rdb$LU_STATUS = RDB$_LOCK_CONFLICT ) OR
                ( Rdb$LU_STATUS = RDMS$_LCKCNFLCT ) OR
                ( Rdb$LU_STATUS = RDMS$_TIMEOUT ) )
             CALL "ACMS$RAISE_TRANS_EXCEPTION" USING
                         BY REFERENCE ACMS$_TRANSTIMEDOUT


         WHEN ( ( RdB$LU_STATUS = RDB$_SYS_REQUEST_CALL ) OR
                ( Rdb$LU_STATUS = RDB$_BAD_TRANS_HANDLE ) OR
                ( Rdb$LU_STATUS = RDB$_DISTABORT ) OR
                ( Rdb$LU_STATUS = RDB$_REQ_SYNC ) OR
                ( Rdb$LU_STATUS = RDB$_READ_ONLY_TRANS ) )
             CALL "ACMS$RAISE_TRANS_EXCEPTION" USING
                         BY REFERENCE Rdb$LU_STATUS


         WHEN OTHER
             CALL "LIB$CALLG" USING
                         BY REFERENCE Rdb$MESSAGE_VECTOR,
                         BY VALUE LIB$SIGNAL
             CALL "ACMS$RAISE_NONREC_EXCEPTION" USING
                         BY REFERENCE Rdb$LU_STATUS
     END-EVALUATE.


 EXIT-PROGRAM.
         EXIT PROGRAM.
4.2. Using Precompiled RDO or RDML with Rdb
This section describes how to write step procedures that access an Rdb database using precompiled RDO or RDML.
A step procedure that accesses an Rdb database on behalf of an ACMS task is similar to any Rdb program that accesses a database. This section explains how to start an Rdb database transaction and how to access data in an Rdb database using RDO.
4.2.1. Using RDO Statements in Step Procedures
&RDB& INVOKE DATABASE FILENAME "avertz_database:vehicle_rentals"
The database you name must be the same in all the step procedures, and in the initialization and termination procedures and cancel procedures in the server.
4.2.2. Starting and Ending RDO Database Transactions
You start an RDO database transaction by using a START_TRANSACTION statement. However, the way in which you start the database transaction depends on whether the database transaction is part of a distributed transaction.
Important
See Section 4.1.3.3, ''Using Rdb Transaction Mode and Lock Mode Specifications'' for information on transaction and lock mode specifications. See Section 4.1.3.4, ''Using an Rdb Wait Mode Specification'' for important information on transaction wait modes.
4.2.2.1. Starting an RDO Database Transaction that is Part of a Distributed Transaction
Note
For a procedure that accesses an Rdb database to participate in a distributed transaction, the database transaction must start in the procedure, not in the task definition.
            .
            .
            .
 WORKING-STORAGE SECTION.


 &RDB& INVOKE DATABASE FILENAME "avertz_database:vehicle_rentals"

 01 dist_tid.
    03 tid_data                  PIC X(16).
 01 sts                          PIC S9(5) COMP.
       .
       .
       .


 PROCEDURE DIVISION.
 MAIN SECTION.
       .
       .
       .
     CALL "ACMS$GET_TID" USING BY REFERENCE dist_tid
                         GIVING sts.
     IF sts IS FAILURE
     THEN
         CALL "ACMS$RAISE_NONREC_EXCEPTION" USING BY REFERENCE sts
         GO TO 999_end
     END-IF.


     &RDB& START_TRANSACTION DISTRIBUTED_TRANSACTION
     &RDB&   DISTRIBUTED_TID dist_tid READ_WRITE
     &RDB&   RESERVING reservations FOR SHARED WRITE,
     &RDB&            rental_classes,sites,regions FOR SHARED READ
     &RDB&   ON ERROR
                 GO TO 900-rdb-error
     &RDB&   END_ERROR.
           .
           .
           .
     .
     .
     .
     &RDB& INVOKE DATABASE FILENAME "avertz_database:vehicle_rentals"

     RECORD dist_tid_structure
         STRING tid_data = 16
     END RECORD


     DECLARE dist_tid_structure dist_tid

     sts = ACMS$GET_TID( dist_tid )
     IF ( sts AND 1% ) = 0%
     THEN
         CALL ACMS$RAISE_NONREC_EXCEPTION( sts )
         EXIT FUNCTION sts
     END IF


     &RDB& START_TRANSACTION DISTRIBUTED_TRANSACTION
     &RDB&   DISTRIBUTED_TID dist_tid READ_WRITE
     &RDB&   RESERVING reservations FOR SHARED WRITE,
     &RDB&             rental_classes,sites,regions FOR SHARED READ
     &RDB&   ON ERROR
                 GOSUB check_rdb_error
                 EXIT FUNCTION Rdb$LU_STATUS
     &RDB&   END_ERROR
           .
           .
           .
Because the RDO database transaction is participating in a distributed transaction, Rdb automatically commits or rolls back the database transaction when the distributed transaction ends. Therefore, you must not use the COMMIT or ROLLBACK verbs to end the database transaction in the step procedure.
4.2.2.2. Starting and Ending an Independent RDO Database Transaction
     &RDB& START_TRANSACTION
     &RDB&   RESERVING reservations FOR SHARED WRITE,
     &RDB&             rental_classes,sites,regions FOR SHARED READ
     &RDB&   ON ERROR
                 .
                 .
                 .
     &RDB&   END_ERROR
     IF sts IS SUCCESS
     THEN
         &RDB& COMMIT
     ELSE
         &RDB& ROLLBACK
     END-IF.
4.2.3. Reading from a Database
The examples in this section illustrate how to read a record from a database and retrieve the data from the record.
             .
             .
             .
     MOVE vr_sirecnotfnd TO return_status.
     &RDB& FOR s IN sites WITH s.site_id = site_id
     &RDB&   ON ERROR
                 GO TO 900-rdb-error
     &RDB&   END_ERROR
     &RDB&   GET
     &RDB&       ON ERROR
                     GO TO 900-rdb-error
     &RDB&       END_ERROR
     &RDB&       vr_sites_wksp = s.*
     &RDB&   END_GET
             SET return_status TO SUCCESS
     &RDB& END_FOR.
             .
             .
             .
             .
             .
             .
     vr_find_site_proc = vr_sirecnotfnd
     &RDB& FOR s IN sites WITH s.site_id = sites::site_id


     &RDB&   ON ERROR
                 GOSUB check_rdb_error
                 EXIT FUNCTION Rdb$LU_STATUS
     &RDB&   END_ERROR


     &RDB&   GET
     &RDB&       ON ERROR
                     GOSUB check_rdb_error
                     EXIT FUNCTION Rdb$LU_STATUS
     &RDB&       END_ERROR
     &RDB&       sites = s.*


     &RDB&   END_GET
             vr_find_site_proc = 1%
     &RDB& END_FOR
             .
             .
             .
The error handlers used in these examples are shown in Section 4.2.5, ''Handling Errors''.
4.2.4. Writing to a Database
The examples in this section illustrate how to modify an existing record in a database using the MODIFY statement and how to store a new record in a database using the STORE statement.
Reads the customer ID control record
Saves the next available customer ID number
Increments the ID number and updates the control record
Stores the new record in the CUSTOMERS relation
                 .
                 .
                 .
 *
 * Obtain new customer ID number
 *
     &RDB& FOR i IN cu_id_inc_control
     &RDB&   ON ERROR
                 GO TO 900-rdb-error
     &RDB&   END_ERROR
 *
 * Retrieve next available ID number from control record
 *
     &RDB&   GET
     &RDB&       ON ERROR
                     GO TO 900-rdb-error
     &RDB&       END_ERROR
     &RDB&       customer_id = i.max_customer_id
     &RDB&   END_GET


 *
 * Increment next available ID number and update control record
 *
     &RDB&   MODIFY i USING
     &RDB&       ON ERROR
                     GO TO 900-rdb-error
     &RDB&       END_ERROR
     &RDB&       i.max_customer_id = i.max_customer_id + 1
     &RDB&   END_MODIFY
     &RDB& END_FOR


 *
 * Store new customer record
 *
     &RDB& STORE c IN customers USING
     &RDB&   ON ERROR
                 GO TO 900-rdb-error
     &RDB&   END_ERROR
     &RDB&   c.last_name = cu_last_name;
     &RDB&   c.first_name = cu_first_name;


                       .
                       .
                       .
     &RDB&   c.driver_license_region_id =
     &RDB&                       cu_driver_license_region_id;
     &RDB&   c.driver_license_country_id =
     &RDB&                       cu_driver_license_country_id
     &RDB& END_STORE
              .
              .
              .
                 .
                 .
                 .
     !
     ! Obtain new customer ID number
     !
     &RDB& FOR i IN cu_id_inc_control
     &RDB&   ON ERROR
                 GOSUB check_rdb_error
                 EXIT FUNCTION Rdb$LU_STATUS
     &RDB&   END_ERROR


             !
             ! Retrieve next available ID number from control record
             !
     &RDB&   GET
     &RDB&       ON ERROR
                     GOSUB check_rdb_error
                     EXIT FUNCTION Rdb$LU_STATUS
     &RDB&       END_ERROR
     &RDB&       cust::customer_id = i.max_customer_id
     &RDB&   END_GET


             !
             ! Increment next available ID number and update record
             !
     &RDB&   MODIFY i USING
     &RDB&       ON ERROR
                     GOSUB check_rdb_error
                     EXIT FUNCTION Rdb$LU_STATUS
     &RDB&       END_ERROR
     &RDB&       i.max_customer_id = i.max_customer_id + 1%
     &RDB&   END_MODIFY
     &RDB& END_FOR


     !
     ! Store new customer record
     !
     &RDB& STORE c IN customers USING
     &RDB&   ON ERROR
                 GOSUB check_rdb_error
                 EXIT FUNCTION Rdb$LU_STATUS
     &RDB&   END_ERROR


     &RDB&   c.last_name = cust::cu_last_name;
     &RDB&   c.first_name = cust::cu_first_name;
                         .
                         .
                         .


     &RDB&   c.driver_license_region_id =
     &rdb&                   cust::cu_driver_license_region_id;
     &RDB&   c.driver_license_country_id =
     &rdb&                   cust::cu_driver_license_country_id
     &RDB& END_STORE
4.2.5. Handling Errors
You typically write an error handler to process errors returned by Rdb when starting and ending a database transaction and when accessing data in the database. Handling error conditions using RDO with Rdb is very similar to using SQL with Rdb. This section describes the differences between RDO and SQL when using distributed transactions. See Section 4.1.6, ''Handling Errors'' for information on handling errors using SQL.
Note
Chapter 2, "Writing Initialization, Termination, and Cancel Procedures" discusses how to write a server cancel procedure that is used to roll back the default database transaction that Rdb starts if a procedure executes an RDO statement after a distributed transaction has aborted.
     EXTERNAL LONG CONSTANT RDB$_LOCK_CONFLICT
                       .
                       .
                       .
     EXTERNAL LONG FUNCTION LIB$SIGNAL
                       .
                       .
                       .


 check_rdb_error:
     SELECT Rdb$LU_STATUS
         CASE    RDB$_DEADLOCK,                                  &
                 RDMS$_DEADLOCK,                                 &
                 RDB$_LOCK_CONFLICT,                             &
                 RDMS$_LCKCNFLCT,                                &
                 RDMS$_TIMEOUT
             CALL ACMS$RAISE_TRANS_EXCEPTION( ACMS$_TRANSTIMEDOUT )


         CASE    RDB$_SYS_REQUEST_CALL,                          &
                 RDB$_BAD_TRANS_HANDLE,                          &
                 RDB$_DISTABORT,                                 &
                 RDB$_READ_ONLY_TRANS,                           &
                 RDB$_REQ_SYNC
             CALL ACMS$RAISE_TRANS_EXCEPTION( Rdb$LU_STATUS )

         CASE    ELSE
             CALL LIB$CALLG( Rdb$MESSAGE_VECTOR,                 &
                             LOC( LIB$SIGNAL ) BY VALUE )
             CALL ACMS$RAISE_NONREC_EXCEPTION( Rdb$LU_STATUS )
     END SELECT
     RETURN
        .
        .
        .
4.2.6. Compiling Rdb Procedures that Use RDO
You use the RDO precompiler, RDBPRE, when you compile a procedure containing embedded RDO statements. The RDO precompiler processes the embedded RDO statements in your program, producing an intermediate host language source file, which it then submits to the host language compiler to produce an object module.
The RDO precompiler command line includes both precompiler and host language compiler
qualifiers. For the precompiler, include a qualifier to specify in which host
language the source is written; you can, optionally, include other qualifiers. On
the command line, also include any language compiler qualifiers (such as
LIST or DEBUG) that you want in effect
when the precompiler submits the preprocessed source file to the language compiler.
For more information on RDO precompiler qualifiers, see the Rdb documentation.
$RCOB == "$RDBPRE/COBOL"
$RCOB/LIST VR_FIND_SITE_RDO_PROC
Note
Do not make changes to the language source module created by the RDO precompiler and then use the language compiler directly to compile that source module. This rule applies even if you want to make source changes that do not affect RDO statements because the next precompilation of the original embedded RDO module overwrites the changes you make to the temporary language source module generated by the precompiler.
Chapter 6, "Building Procedure Server Images" explains how to link procedures that use RDO.
4.3. Using DBMS
A procedure for an ACMS task that accesses a DBMS database is similar to any DBMS program that accesses a database. For example, the procedure uses the same DBMS DML (Data Manipulation Language) statements, such as MOVE and STORE. It handles errors by testing against DBMS error conditions.
4.3.1. Using DBMS DML Statements in Step Procedures
COBOL supports DBMS DML statements as part of the COBOL language. However, if you are using DBMS with another language, such as BASIC, you use the DBMS DML precompiler to process the DML statements in your program in much the same way as you do when you use SQL or RDO with Rdb.
The DBMS DML precompiler uses a prefix character to distinguish DML statements from host language statements. The default prefix character is the pound-sign (#) character. For information on DML statements, refer to the DBMS documentation.
 DB  DEFAULT_SUBSCHEMA
     WITHIN "PERS_CDD.PERS_DBMS_SCHEMA"
FOR "PERS_DB:PERS_DBMS". # INVOKE DEFAULT_SUBSCHEMA -
WITHIN PERS_CDD.PERS_DBMS_SCHEMA -
FOR PERS_DB:PERSONNEL -
( RECORDS )The database and subschema you name must be the same in all the procedures linked into the server.
4.3.2. Starting and Ending a DBMS Database Transaction
You start a DBMS database transaction by using a READY statement. However, the way in which you start the database transaction depends on whether the database transaction is part of a distributed transaction. In the READY statement, you can specify the realms the step procedure accesses in the database. If you do not specify one or more realms, DBMS readies all the realms in the subschema.
This section describes how to start a database transaction that is part of a distributed transaction and how to start and end an independent database transaction. In addition, it discusses various access modes that you can specify when starting a database transaction.
4.3.2.1. Starting a DBMS Database Transaction that Is Part of a Distributed Transaction
Note
For a procedure that accesses a DBMS database to participate in a distributed transaction, the database transaction must start in the procedure, not in the task definition.
     CALL "DBQ$INTERPRET" USING
             BY DESCRIPTOR "READY CONCURRENT UPDATE FOR TRANSACTION",
             BY REFERENCE dist_tid
             GIVING return_status.
     IF return_status IS FAILURE
     THEN
         CALL "DBM$SIGNAL"
     END-IF
See the COBOL and DBMS documentation for more information on starting a database transaction in COBOL.
                .
                .
                .
     RECORD dist_tid_structure
         STRING tid_data = 16
     END RECORD
     DECLARE dist_tid_structure dist_tid
                .
                .
                .
     sts = ACMS$GET_TID( dist_tid BY REF )

     IF ( sts AND 1% ) = 0%                                      &
     THEN
         CALL ACMS$RAISE_NONREC_EXCEPTION( sts )
     END IF

     # READY CONCURRENT UPDATE FOR TRANSACTION dist_tid
                  .
                  .
                  .
Important
For a DBMS database transaction to participate in a distributed transaction, you must specify the TID in the READY verb. If you omit it, the task does not function correctly.
4.3.2.2. Starting and Ending an Independent DBMS Database Transaction
READY CONCURRENT RETRIEVAL.
# READY CONCURRENT RETRIEVAL
       .
       .
       .
     IF sts IS SUCCESS
     THEN
         COMMIT
     ELSE
         ROLLBACK
     END-IF.
       .
       .
. .
.
.
IF ( sts AND 1% ) = 1%
THEN
# COMMIT
ELSE
# ROLLBACK
END IF
.
.
.4.3.2.3. Using DBMS Access and Allow Mode Specifications
You can specify the access mode and allow mode when you start a DBMS database transaction. The access mode specifies how the step procedure accesses the database. If the step procedure only reads records from the database, specify RETRIEVAL when you start the database transaction. Specify UPDATE in step procedures that read, write, and modify records in the database. If you do not specify an access mode, the default is RETRIEVAL access, which means that you can only read records from the database. Using RETRIEVAL mode in a procedure that does not update records reduces database contention.
The allow mode specifies how you will allow other processes to access the database. The default is PROTECTED, which means that other processes can read records from the database, but they cannot modify existing records or store new records in the database. Specify PROTECTED if a single process only needs write-access to the database. If multiple processes need write-access to the database, specify CONCURRENT mode. DBMS also supports BATCH and EXCLUSIVE allow modes.
Refer to the DBMS documentation for more information on database access and allow modes.
4.3.2.4. Using a DBMS Wait Mode Specification
When you create or modify a database, you can specify how DBMS handles the situation if it
encounters a locked record while accessing the database. If you use the
/WAIT_RECORD_LOCKS qualifier on the
DBO/CREATE or DBO/MODIFY command, DBMS
waits until the lock can be granted before continuing. If you use the
/NOWAIT_RECORD_LOCKS qualifier, DBMS immediately returns
an error if it encounters a lock. You can override the wait-mode specification
at run time by using the DBM$BIND_WAIT_RECORD_LOCKS
logical name.
As a server logical name in the application definition
In an application-specific logical name table
In the system logical name table
In a group logical name table
    LOGICAL NAME IS
         DBM$BIND_LOCK_TIMEOUT_INTERVAL = "10";
Important
If you are using distributed transactions, always specify a lock timeout interval to ensure that ACMS can successfully cancel a task that is waiting for a database lock. By specifying a lock timeout interval, you ensure that the task is canceled as soon as the timeout interval expires. If you do not specify a lock timeout interval, the task cannot be canceled until the lock is granted.
4.3.3. Reading from a Database
The examples in this section illustrate how to read a record from a DBMS database and return the data to the task in a workspace.
 IDENTIFICATION DIVISION.
 PROGRAM-ID. pers_find_employee_proc.


 ENVIRONMENT DIVISION.


 DATA DIVISION.
 SUB-SCHEMA SECTION.


 DB  DEFAULT_SUBSCHEMA
     WITHIN "PERS_CDD.PERS_DBMS_SCHEMA"
     FOR "PERS_DB:PERS_DBMS".


 WORKING-STORAGE SECTION.

 01 return_status                PIC S9(5) COMP.
 01 error_cond                   PIC S9(5) COMP.

 COPY "pers_files:pers_common_defns".


 LINKAGE SECTION.
 COPY "pers_cdd.employee_record" FROM DICTIONARY
     REPLACING ==employee_record== BY ==emp_wksp_record==.

 PROCEDURE DIVISION USING emp_wksp_record GIVING return_status.


 MAIN SECTION.

 000-start.
     MOVE emp_badge_number OF emp_wksp_record TO
          emp_badge_number OF employee_record.

     READY CONCURRENT RETRIEVAL.

     FETCH FIRST WITHIN ALL_EMPLOYEES
                 USING emp_badge_number OF employee_record


     ON ERROR
         CALL "LIB$MATCH_COND" USING
                 BY REFERENCE DB-CONDITION,
                 BY REFERENCE DBM$_END,
                 BY REFERENCE DBM$_DEADLOCK,
                 BY REFERENCE DBM$_LCKCNFLCT,
                 BY REFERENCE DBM$_TIMEOUT
                 GIVING error_cond


         EVALUATE error_cond
             WHEN 1
                 MOVE persmsg_empnotfound TO return_status
             WHEN 2 THRU 4
                 MOVE persmsg_emplocked TO return_status
             WHEN OTHER
                 CALL "DBM$SIGNAL"
                 CALL "ACMS$RAISE_NONREC_EXCEPTION" USING
                             BY REFERENCE DB-CONDITION
         END-EVALUATE


     NOT ON ERROR
         MOVE employee_record TO emp_wksp_record
         MOVE persmsg_success TO return_status
     END-FETCH.

     COMMIT.

 999-end.
     EXIT PROGRAM.
Example 4.9, ''Step Procedure in BASIC that Reads a DBMS Record'' illustrates a simple step procedure written in BASIC that reads a record from a personnel database. The procedure extends the previous COBOL example by including logic to retry the transaction automatically if the employee's record is locked. The procedure first initializes a transaction retry-counter and moves the record key from the task workspace into the user work area (UWA). It then starts a database transaction, reads the record from the database, and ends the transaction. Finally, the procedure moves the employee's record from the UWA into the task workspaces and returns a success status.
     FUNCTION LONG pers_find_employee_proc( employee_record emp_wksp )

     OPTION HANDLE=SEVERE

     %INCLUDE "pers_files:pers_common_defns"
     %INCLUDE %FROM %CDD "pers_cdd.employee_record"


     DECLARE LONG retry_count

     # INVOKE DEFAULT_SUBSCHEMA -
              WITHIN PERS_CDD.PERS_DBMS_SCHEMA -
              FOR PERS_DB:PERS_DBMS -
              ( RECORDS )


     WHEN ERROR IN
         retry_count = 0%
         employee_record::emp_badge_number = emp_wksp::emp_badge_number


 start_db_trans:
         # READY CONCURRENT RETRIEVAL
         # FETCH FIRST WITHIN ALL_EMPLOYEES USING emp_badge_number
         # COMMIT

         emp_wksp = employee_record
         pers_find_employee_proc = persmsg_success


     USE
         SELECT LIB$MATCH_COND( DBM_COND, DBM$_END,                      &
                                          DBM$_DEADLOCK,                 &
                                          DBM$_LCKCNFLCT,                &
                                          DBM$_TIMEOUT )
             CASE 1          ! DBM$_END
                 pers_find_employee_proc = persmsg_empnotfound


             CASE 2, 3, 4    ! DBM$_DEADLOCK, DBM$_LCKCNFLCT, DBM$_TIMEOUT
                 IF retry_count < 5%                                     &
                 THEN
                     retry_count = retry_count + 1%
                     # ROLLBACK ( TRAP ERROR )
                     CONTINUE start_db_trans
                 ELSE
                     pers_find_employee_proc = persmsg_emplocked
                 END IF


             CASE ELSE
                 EXIT HANDLER
         END SELECT
         # ROLLBACK ( TRAP ERROR )
     END WHEN

     END FUNCTION
4.3.4. Writing to a Database
This section illustrates how to store a new record in a DBMS database and how to update a record in a DBMS database.
Example 4.10, ''Step Procedure in COBOL that Updates a DBMS Record'' explains how to store a new record in a DBMS database. The PERS_ADD_EMPLOYEE_PROC procedure stores a new record in the employee set using the information that is entered by the user and passed to the procedure in a task workspace.
 IDENTIFICATION DIVISION.
 PROGRAM-ID. pers_add_employee_proc.

 ENVIRONMENT DIVISION.

 DATA DIVISION.
 SUB-SCHEMA SECTION.


 DB  DEFAULT_SUBSCHEMA
     WITHIN "PERS_CDD.PERS_DBMS_SCHEMA"
     FOR "PERS_DB:PERS_DBMS".


 WORKING-STORAGE SECTION.

 01 return_status                PIC S9(5) COMP.
 01 error_cond                   PIC S9(5) COMP.
 01 dist_tid.
    03 tid_data                  PIC X(16).


 COPY "pers_files:pers_common_defns".

 LINKAGE SECTION.
 COPY "pers_cdd.employee_record" FROM DICTIONARY
     REPLACING ==employee_record== BY ==emp_wksp_record==.


 PROCEDURE DIVISION USING emp_wksp_record GIVING return_status.

 DECLARATIVES.
 dml-failure SECTION.
     USE FOR DB-EXCEPTION.
 010-dbm-failure.
         .
         .
         .
     EXIT PROGRAM.
 END DECLARATIVES.


 MAIN SECTION.

 000-start.
     CALL "ACMS$GET_TID" USING
                 BY REFERENCE dist_tid
                 GIVING return_status.
     IF return_status IS FAILURE
     THEN
         CALL "ACMS$RAISE_NONREC_EXCEPTION" USING
                 BY REFERENCE return_status
         EXIT PROGRAM
     END-IF.


     CALL "DBQ$INTERPRET" USING
             BY DESCRIPTOR "READY CONCURRENT UPDATE FOR TRANSACTION",
             BY REFERENCE dist_tid
             GIVING return_status.
     IF return_status IS FAILURE
     THEN
         CALL "DBM$SIGNAL"
     END-IF


     MOVE emp_wksp_record TO employee_record.
     CALL "SYS$GETTIM" USING
             BY REFERENCE emp_last_update OF employee_record
             GIVING return_status.
     IF return_status IS FAILURE
     THEN
         CALL "LIB$STOP" USING BY VALUE return_status
     END-IF.

     STORE employee_record.

     MOVE persmsg_success TO return_status.

 999-end.
     EXIT PROGRAM.
Example 4.11, ''Step Procedure in BASIC that Updates a DBMS Record'' illustrates how to update a record in a DBMS database. The PERS_CHANGE_EMPLOYEE_PROC procedure updates a record in the employee set using the information that is entered by the user and passed to the procedure in a task workspace. To conserve resources, the task does not retain server context while the user is modifying the employee's information. Therefore, the procedure must ensure that the information in the record has not changed while the user was updating the information on the screen.
     FUNCTION LONG pers_change_employee_proc( employee_record emp_wksp )

     OPTION HANDLE=SEVERE

     %INCLUDE "pers_files:pers_common_defns"
     %INCLUDE %FROM %CDD "pers_cdd.employee_record"


     RECORD dist_tid_structure
         STRING tid_data = 16
     END RECORD
     DECLARE dist_tid_structure dist_tid

     DECLARE LONG sts


     # INVOKE DEFAULT_SUBSCHEMA -
              WITHIN PERS_CDD.PERS_DBMS_SCHEMA -
              FOR PERS_DB:PERS_DBMS -
              ( RECORDS )


     sts = ACMS$GET_TID( dist_tid BY REF )
     IF ( sts AND 1% ) = 0%                                              &
     THEN
         CALL ACMS$RAISE_NONREC_EXCEPTION( sts )
     END IF


     WHEN ERROR IN
         employee_record::emp_badge_number = emp_wksp::emp_badge_number
         # READY CONCURRENT UPDATE FOR TRANSACTION dist_tid
         # FETCH FIRST WITHIN ALL_EMPLOYEES -
                       USING emp_badge_number
         IF employee_record::emp_last_update =                           &
            emp_wksp::emp_last_update                                    &
         THEN
             employee_record = emp_wksp
             sts = SYS$GETTIM( employee_record::emp_last_update BY REF )
             IF ( sts AND 1% ) = 0%                                      &
             THEN
                 CALL LIB$STOP( sts )
             END IF
             # MODIFY employee_record
             pers_change_employee_proc = persmsg_success
         ELSE
             pers_change_employee_proc = persmsg_empchanged
         END IF


     USE
        .
        .
        .
     END WHEN

     END FUNCTION
4.3.5. Handling Errors
You typically write an error handler to process errors returned by DBMS when accessing records in a database. The examples in Section 4.3.3, ''Reading from a Database'' and Section 4.3.4, ''Writing to a Database'' illustrate how to handle some of the standard errors, such as record-not-found, that DBMS can return when you read, write, or update a record in a database. In addition, also be aware of the error conditions that can occur when you are using DBMS in distributed transactions.
Some DBMS errors are expected and are handled by resuming normal program execution. For example, DBMS returns an end-of-collection error if a procedure reads past the last record in a set. In this case, the program can resume execution and process the records that have been read. DBMS can also return a number of recoverable errors that the program should check for and handle. For example, if DBMS returns a deadlock error, you might want to roll back the transaction and process the transaction again. Finally, DBMS can return a number of nonrecoverable errors. For example, a disk on which one of the database storage areas resides might fail. In this case, the program cannot continue until the problem has been resolved.
A distributed transaction can abort at any time. If a transaction aborts while a step procedure is executing, DBMS automatically rolls back an active database transaction. However, the step procedure will receive an error the next time it executes a DML statement in a database transaction that was participating in the distributed transaction. Therefore, an error handler for a step procedure should check for and handle the errors that DBMS returns in this situation.
Typically, you want to retry a transaction automatically in the event of a recoverable error condition such as a deadlock, lock-timeout or transaction timeout error. If DBMS detects deadlock or lock-timeout error conditions, it returns an error to your step procedure when you access the database. In contrast, if a distributed transaction times out, the distributed transaction is aborted, and ACMS raises a transaction exception in the task. In this case, DBMS returns an error if the step procedure accesses the file after the transaction has aborted.
Handling recoverable errors
If an error handler in a step procedure detects a recoverable error condition, such as a deadlock or lock-timeout error, it calls the ACMS$RAISE_TRANS_EXCEPTION service to raise a transaction exception using the ACMS$_TRANSTIMEDOUT exception code. If a distributed transaction does not complete within the specified time limit, ACMS also raises a transaction exception using the ACMS$_TRANSTIMEDOUT exception code. Therefore, using ACMS$_TRANSTIMEDOUT as the exception code in the step procedure means that the exception handler in the task definition has to test for only a single exception code in order to handle all recoverable transaction exceptions.
If you detect a recoverable error in a step procedure that is using an independent database transaction that is not participating in a distributed transaction, you can roll back the database transaction and repeat the transaction in the step procedure.
Handling transaction aborts
If a distributed transaction aborts while a step procedure is executing, DBMS returns one of a number of error status values. If a step procedure detects one of these errors, it raises a transaction exception using the error status. If the error was due to a distributed transaction aborting, ACMS overrides the exception in the task. However, if DBMS returns the error due to some other problem, the task is canceled with the specified exception code.
Handling nonrecoverable errors
If an unexpected error occurs, the procedure signals the error information returned by DBMS. If the procedure signals a fatal OpenVMS exception, ACMS writes the error to the audit trail log, cancels the task, and runs down the server process. However, if the procedure signals an error or a warning OpenVMS status, ACMS continues executing the step procedure after writing the error to the audit trail log. The error handler also calls the ACMS$RAISE_NONREC_EXCEPTION service to ensure that the task is canceled.
        .
        .
        .
 WORKING-STORAGE SECTION.

 01 return_status                PIC S9(5) COMP.
 01 error_cond                   PIC S9(5) COMP.
 01 dist_tid.
    03 tid_data                  PIC X(16).
        .
        .
        .
 PROCEDURE DIVISION USING emp_wksp_record GIVING return_status.


 DECLARATIVES.
 dml-failure SECTION.
     USE FOR DB-EXCEPTION.


 010-dbm-failure.
     CALL "LIB$MATCH_COND" USING
                 BY REFERENCE DB-CONDITION,
                 BY REFERENCE DBM$_DUPNOTALL,
                 BY REFERENCE DBM$_DEADLOCK,
                 BY REFERENCE DBM$_LCKCNFLCT,
                 BY REFERENCE DBM$_TIMEOUT,
                 BY REFERENCE DBM$_PARTDTXNERR,
                 BY REFERENCE DBM$_NOTIP,
                 BY REFERENCE DBM$_DTXNABORTED
                 GIVING error_cond


     EVALUATE error_cond
         WHEN 1
             MOVE persmsg_empexists TO return_status
         WHEN 2 THRU 4
             CALL "ACMS$RAISE_TRANS_EXCEPTION" USING
                             BY REFERENCE ACMS$_TRANSTIMEDOUT
         WHEN 5 THRU 7
             CALL "ACMS$RAISE_TRANS_EXCEPTION" USING
                             BY REFERENCE DB-CONDITION
         WHEN OTHER
             CALL "DBM$SIGNAL"
             CALL "ACMS$RAISE_NONREC_EXCEPTION" USING
                             BY REFERENCE DB-CONDITION


     END-EVALUATE
     EXIT PROGRAM.
 END DECLARATIVES.
        .
        .
        .
        .
        .
        .
     WHEN ERROR IN
         employee_record::emp_badge_number = emp_wksp::emp_badge_number
         # READY CONCURRENT UPDATE FOR TRANSACTION dist_tid
         # FETCH FIRST WITHIN ALL_EMPLOYEES -
                       USING emp_badge_number


         IF employee_record::emp_last_update =                           &
            emp_wksp::emp_last_update                                    &
         THEN
             employee_record = emp_wksp
             sts = SYS$GETTIM( employee_record::emp_last_update BY REF )
             IF ( sts AND 1% ) = 0%                                      &
             THEN
                 CALL LIB$STOP( sts )
             END IF
             # MODIFY employee_record
             pers_change_employee_proc = persmsg_success


         ELSE
             pers_change_employee_proc = persmsg_empchanged
         END IF


     USE
         SELECT LIB$MATCH_COND( DBM_COND, DBM$_END,                      &
                                          DBM$_DEADLOCK,                 &
                                          DBM$_LCKCNFLCT,                &
                                          DBM$_TIMEOUT,                  &
                                          DBM$_PARTDTXNERR,              &
                                          DBM$_NOTIP,                    &
                                          DBM$_DTXNABORTED )


             CASE 1          ! DBM$_END
                 pers_change_employee_proc = persmsg_empdeleted

             CASE 2, 3, 4    ! DBM$_DEADLOCK, DBM$_LCKCNFLCT, DBM$_TIMEOUT
                 CALL ACMS$RAISE_TRANS_EXCEPTION( ACMS$_TRANSTIMEDOUT )

             CASE 5, 6, 7    ! DBM$_PARTDTXNERR, DBM$_NOTIP, DBM$_DTXNABORTED
                 CALL ACMS$RAISE_TRANS_EXCEPTION( VMSSTATUS  )


             CASE ELSE
                 EXIT HANDLER
         END SELECT
     END WHEN
        .
        .
        .
4.3.6. Compiling DBMS Procedures
If you are using COBOL, use the COBOL compiler to compile your procedure. However, if you are using another programming language, such as BASIC, use the DBMS DML precompiler when you compile a procedure containing embedded DML statements. The DML precompiler processes the embedded DML statements in your program, producing an intermediate host language source file, which it then submits to the host language compiler to produce an object module.
The DML precompiler command line includes both precompiler and host language compiler
qualifiers. For the precompiler, use the /LANGUAGE qualifier to
specify in which host language the source is written; you can, optionally, include
other qualifiers. On the command line, include any language compiler qualifiers
(such as LIST or DEBUG) that you want in
effect when the precompiler submits the preprocessed source file to the language
compiler using the /OPTION qualifier. For more information on DML
precompiler qualifiers, see the DBMS documentation.
$DML/LANGUAGE=BASIC/OPTION="/LIST" PERS_CHANGE_EMPLOYEE_PROC
Note
Do not make changes to the language source module created by the DML precompiler and then use the language compiler directly to compile that source module. This rule applies even if you want to make source changes that do not affect DML statements because the next precompilation of the original embedded DML module overwrites the changes you make to the temporary language source module generated by the precompiler.
Chapter 6, "Building Procedure Server Images" explains how to link procedures that use DML.
4.4. Using RMS
This section describes how to write step procedures that access RMS files. A step procedure that accesses an RMS file on behalf of an ACMS task is similar to any other program that uses RMS to access a file.
The RMS Journaling layered product provides recovery-unit journaling, after-image journaling, and before-image journaling for RMS sequential, relative, and Prologue 3 indexed files. If you have installed the RMS Journaling product, you can use recovery-unit journaling and distributed transactions to coordinate modifications to records in RMS files with modifications to records in Rdb and DBMS databases. If you do not have the RMS Journaling product, modifications to RMS files will not be coordinated with modifications to Rdb and DBMS databases. See RMS Journaling for OpenVMS Manual for more information on RMS journaling.
This section first discusses how to access RMS files that are marked for recovery-unit journaling. The section then illustrates how to read, write, and modify records in an RMS file. Note that there are no special considerations for using RMS files that are marked for after-image journaling or before-image journaling or for using files that are not journaled.
4.4.1. Using Files Marked for RMS Recovery-Unit Journaling
Note
Processing steps that participate in a distributed transaction must not make calls to the RMS Recovery Unit services ($START_RU, $PREPARE_RU, $COMMIT_RU, $END_RU, and $ABORT_RU). Any attempt to intermix these services with distributed transactions leads to unpredictable results.
In contrast, if you access an RMS file marked for recovery-unit journaling outside a distributed transaction, you must start a transaction in the step procedure. Use the OpenVMS transactions services $START_TRANS, $END_TRANS, and $ABORT_TRANS to start and end a transaction in a step procedure. Note that the OpenVMS transaction services have superseded the RMS Recovery Unit services. See RMS Journaling for OpenVMS Manual for more information on using the OpenVMS transaction services and RMS recovery-unit journaling.
4.4.2. Reading RMS Records
The examples in this section illustrate how to read a record from an RMS file and return the data to the task in a workspace.
Each example reads a record from a file containing employee records using a key from a field in a workspace. If the record exists, the procedure returns a success status to the task. If the record does not exist, the procedure returns a failure status. Because the PERS_FIND_EMPLOYEE_PROC procedure executes in a server that opens the employee file for read-only access, there is no need to use manual locking statements.
 IDENTIFICATION DIVISION.
 PROGRAM-ID. pers_find_employee_proc.
        .
        .
        .
 DATA DIVISION.


 FILE SECTION.
 FD      emp_file
         EXTERNAL
         DATA RECORD IS employee_record
         RECORD KEY emp_badge_number OF employee_record.
 COPY "pers_cdd.employee_record" FROM DICTIONARY.
        .
        .
        .


 LINKAGE SECTION.
 COPY "pers_cdd.employee_record" FROM DICTIONARY
     REPLACING ==employee_record== BY ==emp_wksp_record==.

 PROCEDURE DIVISION USING emp_wksp_record GIVING return_status.
 MAIN SECTION.


 000-start.
     MOVE persmsg_success TO return_status.
     MOVE emp_badge_number OF emp_wksp_record TO
          emp_badge_number OF employee_record.
     READ emp_file RECORD INTO emp_wksp_record
         KEY IS emp_badge_number OF employee_record
         INVALID KEY
             MOVE persmsg_empnotfound TO return_status
             GO TO 999-end
     END-READ.


        .
        .
        .
 999-end.
     EXIT PROGRAM.
     FUNCTION LONG pers_find_employee_proc( employee_record emp_wksp )

     %INCLUDE "pers_files:pers_common_defns"
     %INCLUDE %FROM %CDD "pers_cdd.employee_record"


     MAP ( emp_map ) employee_record emp_rec


     WHEN ERROR IN
         GET # emp_file,                                         &
             KEY # 0 EQ emp_wksp::emp_badge_number
         MOVE FROM # emp_file, emp_wksp
         pers_find_employee_proc = persmsg_success


     USE
         SELECT ERR
             CASE basicerr_record_not_found
                 pers_find_employee_proc = persmsg_empnotfound
             CASE ELSE
                 CALL ACMS$RAISE_NONREC_EXCEPTION( RMSSTATUS( emp_file ) )
                 EXIT HANDLER
         END SELECT
     END WHEN

     END FUNCTION
4.4.3. Writing and Updating RMS Records
This section explains how to write a new record into an RMS file and how to update a record in an RMS file.
 IDENTIFICATION DIVISION.
 PROGRAM-ID. pers_add_employee_proc.

        .
        .
        .
 DATA DIVISION.


 FILE SECTION.
 FD      emp_file
         EXTERNAL
         DATA RECORD IS employee_record
         RECORD KEY emp_badge_number OF employee_record.


 COPY "pers_cdd.employee_record" FROM DICTIONARY.
        .
        .
        .


 LINKAGE SECTION.
 COPY "pers_cdd.employee_record" FROM DICTIONARY
     REPLACING ==employee_record== BY ==emp_wksp_record==.


 PROCEDURE DIVISION USING emp_wksp_record GIVING return_status.
 MAIN SECTION.


 000-start.
     CALL "SYS$GETTIM" USING
             BY REFERENCE emp_last_update OF emp_wksp_record
             GIVING return_status.
     IF return_status IS FAILURE
     THEN
         CALL "LIB$STOP" USING BY VALUE return_status
     END-IF.


     MOVE persmsg_success TO return_status.
     WRITE employee_record FROM emp_wksp_record
         ALLOWING NO
         INVALID KEY
             MOVE persmsg_empexists TO return_status
         NOT INVALID KEY
             UNLOCK emp_file ALL RECORDS
     END-WRITE.
        .
        .
        .
 999-end.
     EXIT PROGRAM.
Example 4.15, ''Step Procedure in BASIC that Updates an RMS Record'' illustrates how to update a record in an RMS file. The PERS_CHANGE_EMPLOYEE_PROC procedure updates a record in an employee file using the information that is entered by the user and passed to the procedure in a task workspace. To conserve resources, the task does not retain server context while the user is modifying the employee's information. Therefore, the procedure must ensure that the information in the record has not changed while the user was updating the information on the screen.
The procedure first rereads the original record in the file and then uses a time-stamp stored in the record to ensure that the version read in this procedure is the same as the version read previously by the PERS_FIND_EMPLOYEE_PROC procedure. If the record has been updated, the procedure returns an error and unlocks the record. If the record has not been changed, the procedure copies the data from the task workspace record to the file record, calls SYS$GETTIM to retrieve the current system time, and updates the current record.
     FUNCTION LONG pers_change_employee_proc( employee_record emp_wksp )

     %INCLUDE "pers_files:pers_common_defns"
     %INCLUDE %FROM %CDD "pers_cdd.employee_record"


     DECLARE LONG sts

     MAP ( emp_map ) employee_record emp_rec


     WHEN ERROR IN
         GET # emp_file,                                         &
             KEY # 0 EQ emp_wksp::emp_badge_number,              &
             ALLOW NONE,                                         &
             WAIT 20
         IF emp_rec::emp_last_update = emp_wksp::emp_last_update &


         THEN
             MOVE TO # emp_file, emp_wksp
             sts = SYS$GETTIM( emp_rec::emp_last_update BY REF )
             IF ( sts AND 1% ) = 0%                              &
             THEN
                 CALL LIB$STOP( sts )
             END IF
             UPDATE # emp_file
             pers_change_employee_proc = persmsg_success


         ELSE
             pers_change_employee_proc = persmsg_empchanged
         END IF
         UNLOCK # emp_file


     USE
         SELECT ERR
             CASE    basicerr_record_not_found
                 pers_change_employee_proc = persmsg_empdeleted
             CASE    basicerr_record_locked,                             &
                     basicerr_deadlock,                                  &
                     basicerr_wait_exhausted
                 pers_change_employee_proc = persmsg_emplocked
             CASE    ELSE
                 CALL ACMS$RAISE_NONREC_EXCEPTION( RMSSTATUS( emp_file ) )
                 EXIT HANDLER
         END SELECT
     END WHEN

     END FUNCTION
4.4.4. Handling Errors
You typically write an error handler to process errors returned by RMS when accessing records in a file. The examples in Section 4.4.2, ''Reading RMS Records'' and Section 4.4.3, ''Writing and Updating RMS Records'' illustrate how to handle some standard errors, such as record-not-found, that RMS can return when you read, write, or update a record in an RMS file. In addition, also be aware of the error conditions that can occur when you use RMS files in distributed transactions.
Some RMS errors are expected and are handled by resuming normal program execution. For example, RMS returns an end-of-file error if a procedure reads past the last record in a file. In this case, the program can resume execution and process the records that have been read. RMS can also return a number of recoverable errors that the program should check for and handle. For example, if RMS returns a deadlock error, you might want to roll back the transaction and process the transaction again. Finally, RMS can return a number of nonrecoverable errors. For example, a disk on which a file resides might fail. In this case, the program cannot continue until the problem has been resolved.
A distributed transaction can abort at any time. For example, if the PERS_CHANGE_EMPLOYEE_PROC procedure shown in Section 4.4.3, ''Writing and Updating RMS Records'' participates in a distributed transaction, the transaction could time out while the procedure is reading the original copy of the employee's record or while updating the record with the new information. If a transaction aborts while a step procedure is executing, RMS automatically rolls back an active recovery unit. If a step procedure reads a record from the file after a distributed transaction has aborted, RMS completes the operation successfully if the record exists and is not locked by another process. However, the step procedure receives an error if it executes a recoverable operation, such as a write or update operation, on the file. Therefore, an error handler for a step procedure should check for and handle the errors that RMS returns in this situation.
If you use RMS in a distributed transaction, you must write a server cancel procedure to release any records that might be read and locked by a step procedure after a distributed transaction aborts. See Chapter 2, "Writing Initialization, Termination, and Cancel Procedures" for more information on writing server cancel procedures.
Typically, you want to retry a transaction automatically in the event of a recoverable error condition such as a deadlock, lock-timeout or transaction timeout error. RMS returns deadlock and lock-timeout errors to your step procedure when you access the file. In contrast, if a distributed transaction times out, the distributed transaction is aborted, and ACMS raises a transaction exception in the task. In this case, RMS returns an error if the step procedure accesses the file after the transaction has aborted.
Handling recoverable errors
If an error handler in a step procedure detects a recoverable error condition, such as a deadlock or lock-timeout error, it calls the ACMS$RAISE_TRANS_EXCEPTION service to raise a transaction exception using the ACMS$_TRANSTIMEDOUT exception code. If a distributed transaction does not complete within the specified time limit, ACMS also raises a transaction exception using the ACMS$_TRANSTIMEDOUT exception code. Therefore, using ACMS$_TRANSTIMEDOUT as the exception code in the step procedure means that the exception handler in the task definition has to test for only a single exception code in order to handle all recoverable transaction exceptions.
Handling transaction aborts
If a distributed transaction aborts while a step procedure is executing, RMS returns one of a number of error status values. If a step procedure detects one of these errors, it raises a transaction exception using the error status. If the error was due to a distributed transaction aborting, ACMS overrides the exception in the task. However, if RMS returns the error due to some other problem, the task is canceled with the specified exception code.
If you detect a recoverable error in a step procedure that is using an independent recovery unit that is not participating in a distributed transaction, you can roll back the recovery unit and repeat the recovery unit in the step procedure.
Handling nonrecoverable errors
If an unexpected error occurs, the procedure signals the error information returned by RMS. If the procedure signals a fatal OpenVMS exception, ACMS writes the error to the audit trail log, cancels the task, and runs down the server process. However, if the procedure signals an error or warning OpenVMS status, ACMS continues executing the step procedure after writing the error to the audit trail log. The error handler also calls the ACMS$RAISE_NONREC_EXCEPTION service to ensure that the task is canceled.
    .
    .
    .
 PROCEDURE DIVISION USING emp_wksp_record GIVING return_status.


 DECLARATIVES.
 employee_file SECTION.
     USE AFTER STANDARD ERROR PROCEDURE ON emp_file.


 employee_file_handler.
     EVALUATE TRUE
         WHEN    ( ( RMS-STS OF emp_file = RMS$_RLK ) OR
                   ( RMS-STS OF emp_file = RMS$_DEADLOCK ) )
             CALL "ACMS$RAISE_TRANS_EXCEPTION" USING
                         BY REFERENCE ACMS$_TRANSTIMEDOUT
         WHEN    ( ( RMS-STS OF emp_file = RMS$_NRU ) OR
                   ( RMS-STS OF emp_file = RMS$_DDTM_ERR ) )
             CALL "ACMS$RAISE_TRANS_EXCEPTION" USING
                         BY REFERENCE RMS-STS OF emp_file


         WHEN    OTHER
             CALL "LIB$SIGNAL" USING
                         BY REFERENCE RMS-STS OF emp_file,
                         BY REFERENCE RMS-STV OF emp_file
             CALL "ACMS$RAISE_NONREC_EXCEPTION" USING
                         BY REFERENCE RMS-STS OF emp_file
     END-EVALUATE.
 END DECLARATIVES.


 MAIN SECTION.
 000-start.
     MOVE persmsg_success TO return_status.


     MOVE emp_badge_number OF emp_wksp_record TO
          emp_badge_number OF employee_record.
     READ emp_file RECORD
         ALLOWING NO OTHERS
         KEY IS emp_badge_number OF employee_record
         INVALID KEY
             MOVE persmsg_empdeleted TO return_status
             GO TO 999-end
     END-READ.


     IF emp_last_update OF employee_record = emp_last_update OF emp_wksp_record
     THEN
         CALL "SYS$GETTIM" USING
                 BY REFERENCE emp_last_update OF emp_wksp_record
                 GIVING return_status
         IF return_status IS FAILURE
         THEN
             CALL "LIB$STOP" USING BY VALUE return_status
         END-IF


         REWRITE employee_record FROM emp_wksp_record
             ALLOWING NO OTHERS
             INVALID KEY
                 CALL "ACMS$RAISE_NONREC_EXCEPTION"
                             USING RMS-STS OF emp_file
         END-REWRITE


     ELSE
         MOVE persmsg_empchanged TO return_status
     END-IF.

     UNLOCK emp_file ALL RECORDS.

 999-end.
     EXIT PROGRAM.
     FUNCTION LONG pers_change_employee_proc( employee_record emp_wksp )

     %INCLUDE "pers_files:pers_common_defns"
     %INCLUDE %FROM %CDD "pers_cdd.employee_record"


     DECLARE LONG sts

     MAP ( emp_map ) employee_record emp_rec


     WHEN ERROR IN
         GET # emp_file,                                         &
             KEY # 0 EQ emp_wksp::emp_badge_number,              &
             ALLOW NONE,                                         &
             WAIT 20
         IF emp_rec::emp_last_update = emp_wksp::emp_last_update &
         THEN
             MOVE TO # emp_file, emp_wksp
             sts = SYS$GETTIM( emp_rec::emp_last_update BY REF )
             IF ( sts AND 1% ) = 0%                              &
             THEN
                 CALL LIB$STOP( sts )
             END IF
             UPDATE # emp_file
             pers_change_employee_proc = persmsg_success


         ELSE
             pers_change_employee_proc = persmsg_empchanged
         END IF
         UNLOCK # emp_file


     USE
         SELECT ERR
             CASE    basicerr_record_not_found
                 pers_change_employee_proc = persmsg_empdeleted
             CASE    basicerr_record_locked,                             &
                     basicerr_deadlock,                                  &
                     basicerr_wait_exhausted
                 CALL ACMS$RAISE_TRANS_EXCEPTION( ACMS$_TRANSTIMEDOUT )


             CASE    ELSE
                 IF ( RMSSTATUS( emp_file ) = RMS$_NRU ) OR              &
                    ( RMSSTATUS( emp_file ) = RMS$_DDTM_ERR )            &
                 THEN
                     CALL ACMS$RAISE_TRANS_EXCEPTION( RMSSTATUS( emp_file ) )
                 ELSE
                     CALL ACMS$RAISE_NONREC_EXCEPTION( RMSSTATUS( emp_file ) )
                     EXIT HANDLER
                 END IF
         END SELECT
     END WHEN

     END FUNCTION
Chapter 5. Using Message Files with ACMS Tasks and Procedures
At times, tasks and procedures need to return messages to users telling them, for example, that information they requested is locked by another user, that information they typed is not valid for the file the task is using, or that other errors have occurred. You can simplify returning messages to users by setting up a message file that contains the text of messages you want to display. If you set up a message file, you can change the text of messages without having to recompile and relink the procedures and definitions in the application.
Creating a source file of messages, including setting up message file characteristics and writing messages
Using the
MESSAGEcommand to create two output files from your input message fileDisplaying user-defined messages by returning message names from procedures and using the GET MESSAGE clause to retrieve messages from the message file and display messages to users
For more information on creating message files than is in this chapter, see VSI OpenVMS Command Definition, Librarian, and Message Utilities Manual.
5.1. Creating Source Files of Messages
Statements that apply to the entire message source file; they define characteristics of the message file. These statements are in the first two lines of the following example.
Error messages, grouped by the facility to which they apply. These are in the remaining lines of the following example.
 .TITLE VRMSG Messages for AVERTZ
 .IDENT /Version 1.0/

 .FACILITY VR,1 / PREFIX=VR_

 .SEVERITY INFORMATION

 MULCURECFND <Multiple customer records found>
 MULRSRECFND <Multiple reservation records found>

 .END
The following sections explain how to write each part of a message source file. Example 5.1, ''Source File of Messages'' contains a complete message source file.
5.1.1. Setting Up Message File Characteristics
Module name
Listing title
Comments
The .TITLE statement defines the object module name, which is assigned to the object module when you compile the source file using the Message Utility. The object module does not need to have the same name as the source file or the file containing the object module, but it is common practice to do so. The maximum length of the module name is 31 characters.
.TITLE VRMSG Messages for AVERTZ
After the module name (here, VRMSG) is a listing title. If you use the
/LIST qualifier when compiling the source file, the listing title (in this
case, Messages for AVERTZ), appears at the top of each page of the .LIS file. The maximum length
of a listing title is 28 characters.
.IDENT /Version 1.0/
The Message Utility includes the literal string from the .IDENT statement in the object module name.
 ! History:
 !           V1.0    Created 12-May-91.
Comment text helps others understand the message file and documents the history of the file.
5.1.2. Writing Messages
A .FACILITY statement
.SEVERITY statements
A list of message names and their accompanying text
The following sections explain how to write these.
5.1.2.1. .FACILITY Statement
You must have at least one .FACILITY statement and one .END statement in a message file.
 .FACILITY VR,1
   .
   .
   .
 .END
Always include both a 1- to 9-character facility name and a facility number in each .FACILITY statement. In the example, VR is the facility name. Separate the facility name and the facility number with either a comma, one or more spaces, or tabs. The name used in a .FACILITY statement does not need to be unique in the message file.
The number in the .FACILITY statement must be a decimal value in the range of 1 to 2047. The facility number used must be unique for the facility name. In the example, 1 is the facility number. For a list of the qualifiers that you can use with the .FACILITY statement, see VSI OpenVMS Command Definition, Librarian, and Message Utilities Manual.
The .END statement has no parameters or qualifiers. Always end the file with an .END statement.
5.1.2.2. .SEVERITY Statements
SUCCESS
INFORMATION
WARNING
ERROR
FATAL (or SEVERE)
 .FACILITY VR,1
 .SEVERITY INFORMATION
   .
   .
   .
 .END
In message files for ACMS tasks, application developers can write the text of severity messages. In the AVERTZ sample application, most messages are either INFORMATION level or WARNING level messages. The messages for recoverable errors, for example, indicate that an error prevented the procedure from completing but that the user can recover from the error.
Chapter 3, "Writing Step Procedures" and VSI OpenVMS RTL Library (LIB$) Manual contain more information about severity levels.
5.1.2.3. Message Names and Text
Message name
A message name is part of a message symbol, which ACMS uses to retrieve messages from a message file. An explanation of message symbols follows.
Message text
Message text is the 1- to 255-byte text displayed on the screen for the terminal user. Enclose message text in angle brackets (< >) or in quotation marks (" "). For example:.FACILITY VR,1 .SEVERITY INFORMATION MULCURECFND <Multiple customer records found> MULRSRECFND <Multiple reservation records found> .END
Note
Never include $FAO directives in message text accessed by the GET MESSAGE clause. However, message text accessed directly by step procedures can include $FAO directives. See Chapter 3, "Writing Step Procedures" for details.
In the previous example, each message text follows a message name (MULCURECFND, for example). ACMS uses message symbols (rather than message names) to retrieve message text from the message file. The linker also uses message symbols to resolve the message symbols in step procedures.
When you compile a message source file, the Message Utility creates a symbol for each message by putting the facility code and an underscore (_) in front of each message name.
- You can define a shorter facility prefix in a message symbol by using a
/PREFIXqualifier with the .FACILITY statement. For example:.FACILITY VEHICLE,1 / PREFIX=VR_
If you define a prefix, the Message Utility then uses the prefix instead of the facility name when it creates the message symbol. For example:VR_MULCURECFND VR_MULRSRECFND
Message symbols must be unique in each message file and in all files used by an ACMS task group. If an ACMS application uses more than one task group, each message symbol must be unique in all files used by all task groups in that application.
- If you use message files, make sure that the symbols created by the Message Utility when you compile the message source file are the same as the message symbols you define in your procedures. For example:
 01  MULCURECFND              PIC S9(11) COMP
                              VALUE IS EXTERNAL VR_MULCURECFND.
 .TITLE VRMSG Messages for AVERTZ
 .IDENT /Version 1.0/

 .FACILITY VR,1 /PREFIX=VR_


 .SEVERITY INFORMATION
 MULCURECFND <Multiple customer records found>
 MULRSRECFND <Multiple reservation records found>
 VEUPGPRF    <Vehicle upgrade performed - no charge>
 VEDNGPRF    <Vehicle downgrade performed - rates adjusted>
 CURECUPD    <Customer record has been updated in database-hit RETURN to continue>
 CURECINS    <Customer record has been inserted in database>
 CHKINCOMP   <Vehicle Checking-in completed successfully - hit RETURN to continue>
 CHKOUTCOM   <Vehicle Checkout completed successfully - hit RETURN to continue>
 RESVCOMP    <Vehicle reservation completed successfully - hit RETURN to continue>
 VERECFND    <Vehicles/vehicles found in class requested, choose one>
 RESSUCCNCLD <Reservation successfully canceled - hit RETURN to continue>


 .SEVERITY WARNING
 CURECNOTFND  <Customer record not found>
 RCRECNOTFND  <Rental class record not found>
 RERECNOTFND  <Invalid state/country-reenter valid state/country names>
 RSRECNOTFND  <Reservation record not found >
 SIRECNOTFND  <Site record not found, press PF1 S for a list of sites>
 VERECNOTFND  <No vehicles available for checkout - hit RETURN to continue>
 VRHRECNOTFND <Vehicle rental history record not found>
 NOTCHKOUT    <Vehicle not checked out>
 RESCNCLD     <Reservation was canceled - reenter data or PF1 Q to quit>
 CARCHKIN     <Reservation archived,car checked in,paid in full>
 CARCHKOUT    <Vehicle has already been checked out - reenter data or PF1 Q to quit>
 RESCLOSED    <Reservation archived,car checked in,payment pending>
 DLRENOTFND   <Invalid Driver's license state/country>
 NOCANCEL     <Reservation cannot be canceled at this stage>
 INACTIVE     <Please enter data or task will be canceled due to inactivity>
 DDTM_TIMEOUT <The distributed transaction timed out --- please retry>


 .SEVERITY ERROR
 NO_DUP           <Duplicate database key>
 DEADLOCK         <Database deadlock>
 INTEG_FAIL       <Database integrity failure>
 LOCK_CONFLICT    <Database lock conflict>
 CAR_UNAVAILABLE  <Vehicle unavailable - hit RETURN to continue>
 CHK_CANCL_ERR    <Error in checkout or cancel reservation>
 HIST_WRITE_ERR   <Error in writing to history file>
 UPDATE_ERROR     <Error updating file>


 .SEVERITY FATAL
 BILLERR          <Bill computation error - canceling transaction>
 DB_FATAL         <Fatal database error - check audit log>
 ICRECNOTFND      <ID increment control record not found>

 .END
Example 5.1, ''Source File of Messages'' lists the messages available to tasks in the AVERTZ Vehicle Rental task group. For example, the example lists both CURECNOTFND and RCRECNOTFND under a .SEVERITY WARNING statement. When you compile the file, the Message Utility sets the low three bits of the longwords representing the message symbols to the binary value corresponding to WARNING level (000).
Regardless of what the error level was when the procedure trapped the error, if you return CURECNOTFND or RCRECNOTFND as status values of your procedure, the error level of the return status is WARNING. For information on returning status values, see Chapter 3, "Writing Step Procedures".
5.2. Compiling Message Files
The image (.EXE) file containing the message texts and their corresponding symbols. This file is a shared image.
Object module containing pointers to the .EXE message file.
Figure 5.1, ''Creating Message Files'' shows the steps you take and the files you create when you compile message files. Following the figure are numbered instructions that correspond to the numbers in the figure.
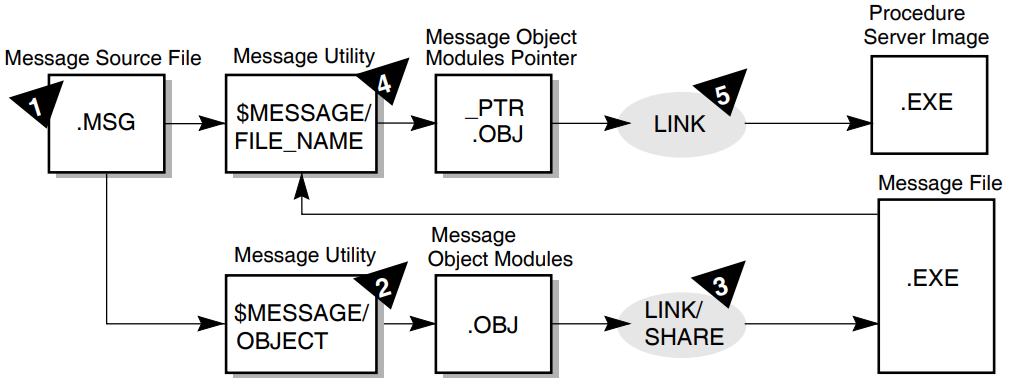
Edit a message file (.MSG) with an editor.
Follow the instructions in Section 5.1, ''Creating Source Files of Messages'' to create a source file containing the text of messages.
- Create the object module (.OBJ) containing the message text from the message file by running the Message Utility with the
/OBJECTqualifier. For example:$MESSAGE/OBJECT=VRMSG.OBJ VRMSG.MSGThe optional
/OBJECTqualifier defines the name of the object module. If you omit the qualifier (and do not use/NOOBJECT), the utility assigns the file name of the input file to the object module with a file type of .OBJ. The default file type for the input file is .MSG. - Create an .EXE message file by using the
LINKcommand with the/SHAREqualifier. For example:$LINK/SHARE=VRMSG.EXE VRMSG.OBJThe
/SHAREqualifier defines the name of the shareable image to be created by the Linker. If you omit the file name from the/SHAREqualifier, the Linker assigns the file name of the input file to the object module output file, giving the output file a file type of .EXE. The default file type for the input file is .OBJ. - Create an object module that points to the .EXE message file containing the message text by running the Message Utility again, using the
/FILE_NAMEqualifier with theMESSAGEcommand. For example:$MESSAGE/FILE_NAME=ACMS$EXAMPLES:VRMSG.EXE/OBJ=VRMSG_PTR VRMSGWhen you use this command, the Message Utility creates an object module named VRMSG_PTR.OBJ. This object module contains the message symbols from the source file, but points to VRMSG.EXE for the text corresponding to those symbols. The default file name for the text message file is the same file name as the source file; the default file type is .EXE.
Always include the device and directory specification for the text message file. Otherwise, ACMS looks for the text message file in the same directory as the ACMS software. Make sure that the name you use in the
/FILE_NAMEqualifier is the same as the name of the file you created with theLINKcommand. - After creating the pointer object module, link it into the procedure server images for all servers that handle tasks using that message file. The procedure server image contains all the modules for the procedure server, including step, initialization, and termination procedures; the message object module; and the server control object module created by the
BUILDcommand of the Application Definition Utility. For example:$LINK/DEBUG/EXE=VR_SERVER.EXE VR_SERVER.OBJ, -_$...,VRMSG_PTRThis example is an abbreviated version of the
LINKcommand. See Chapter 6, "Building Procedure Server Images" for instructions and examples of fullLINKcommands.
Do not link the text message file into the server image. The .EXE file created with the
MESSAGE command is separate from the server image, in the same way that a
run-time library is separate from a program.
MESSAGE and LINK commands to create a new text message
file (.EXE). You do not need to relink the procedure server image. For example:
$MESSAGE/OBJ=VRMSG.OBJ VRMSG.MSG$LINK/SHARE=VRMSG.EXE VRMSG.OBJ
If you change only the message text, you do not need to create a new object module pointer file. However, if you add a new message, delete a message, change the order of messages in the file, or change a message symbol, you must create a new object module pointer file and relink the server image to include that new module (steps 4 and 5). Otherwise, the symbols in the message file and in the server image do not correspond to one another.
5.3. Displaying User-Defined Messages
- Define all symbols that you want a procedure to return as external to the program. In COBOL, use the VALUE IS EXTERNAL clause in the procedure. For example:
 01  CURECNOTFND              PIC S9(11) COMP
                              VALUE IS EXTERNAL VR_CURECNOTFND.
In the previous example, the message name is CURECNOTFND; the message symbol is VR_CURECNOTFND.
In BASIC, use the EXTERNAL CONSTANT statement to define the message symbol in the procedure. For example:EXTERNAL LONG CONSTANT VR_CURECNOTFND
You can define return values either in the program or in a library file of values.
- In the procedure, move the message name into the return-status workspace. For example:
 SQL-NOT-FOUND.
 * If no customer record was found, return warning status.
         IF CTRL_KEY = "CUSID" THEN
                 MOVE CURECNOTFND TO RET-STAT
         . . .
         END-IF.
When a procedure returns a value in a return status field, ACMS does the following:Stores the return status values in ACMS$L_STATUS field of the ACMS$PROCESSING_STATUS workspace.
Sets the value of the ACMS$T_SEVERITY_LEVEL field; here, the value is set to W (warning).
Also sets the value of the ACMS$T_STATUS_TYPE field; here, the value is set to B (bad).
Chapter 3, "Writing Step Procedures" explains fields in the ACMS$PROCESSING_STATUS workspace.
Have the task definition check the ACMS$T_STATUS_TYPE field of the ACMS$PROCESSING_STATUS workspace.
Include the GET MESSAGE clause in the task definition to direct ACMS to store the error message associated with the message symbol in the ACMS$T_STATUS_MESSAGE workspace. For example:ACTION IS IF (ACMS$T_STATUS_TYPE = "B") THEN GET MESSAGE INTO vr_control_wksp.messagepanel; GOTO PREVIOUS EXCHANGE; END IF;According to the previous instructions, ACMS checks the ACMS$T_STATUS_TYPE field. If it is B (bad), ACMS retrieves the error message. ACMS then goes to the previous exchange step in the task definition to display the error message.
Chapter 6. Building Procedure Server Images
After writing procedures for ACMS tasks, you must compile and link those procedures. You compile procedures as you do any other program. However, you do not link and run ACMS procedures as you do an OpenVMS image, because ACMS procedures are not independent programs.
The first section of this chapter contains the steps necessary to build a procedure server image, including compiling and linking commands that you use to debug procedures later. The chapter also explains the run-time operation of server processes and describes the files that you need to create to debug an ACMS application. Finally, the chapter tells how to use a procedure object library.
6.1. Steps in Building a Procedure Server Image
Procedures that you write for ACMS tasks run under the control of ACMS. Each performs only part of the processing for a task; the task definition takes care of the rest of the processing. Before you can debug tasks and the procedures that run in those tasks, you need to link the object code of procedures together with the procedure server transfer module and the message object module. You link all of these into a procedure server image (.EXE).
Write the source code of the procedure.
Compile the source code into a procedure object module.
Create any message files you want to use; compile and link them.
Build the task group, which creates both a task group database (.TDB) and a procedure server transfer module (.OBJ).
Link the procedure server transfer module, server procedure object modules, and message pointer object modules to create a procedure server image.
Figure 6.1, ''Creating a Procedure Server Image'' shows the steps that you need to take and the files that you use when you create a procedure server image. The steps are labeled 1 through 5 in the diagram. The example in the figure is a procedure that is a COBOL program.
The following sections explain the steps for creating a procedure server image. The sections correspond to the steps in Figure 6.1, ''Creating a Procedure Server Image''.
6.1.1. Writing the Source Code of the Procedure
Follow the instructions in Chapter 3, "Writing Step Procedures" for writing step procedures. Follow the instructions in Chapter 2, "Writing Initialization, Termination, and Cancel Procedures" for writing initialization, termination, and cancel procedures.
6.1.2. Compiling the Source Code into a Procedure Object Module
Compiling step, initialization, termination, and cancel procedures is similar to compiling any program. You use the same commands, create the same output files, and expect the same kinds of errors, such as missing periods in COBOL or missing ampersands in BASIC. For information on compiling source programs and correcting compile-time errors, see the reference manual and user's guide for the language you are using.
COBOL command to compile a procedure, use the /DEBUG
qualifier in the command line:
$COBOL/DEBUG VR_FIND_SI_PROC
The file name of the procedure in the example is VR_FIND_SI_PROC.
Figure 6.2, ''Compiling Source Code into Object Modules'' shows the relationship between procedure source files and their file names when they are compiled to create object modules. These are the file names that you use when you link object modules in step 5. The example uses COBOL step, initialization, and termination procedures from the AVERTZ application.
6.1.3. Creating, Compiling, and Linking Message Files
Chapter 5, "Using Message Files with ACMS Tasks and Procedures" explains how to create, compile, and link message files. When you use the Message Utility a second time, you create a pointer object module, which is a file that you link into the procedure server image in step 5.
6.1.4. Building the Task Group
ADU>BUILD GROUP VR_TASK_GROUP
VSI ACMS for OpenVMS Writing Applications contains detailed instructions for building a task group.
EXAMINE and DEPOSIT
commands, include the /DEBUG qualifier with the BUILD
GROUP command. For example:
ADU>BUILD GROUP VR_TASK_GROUP/DEBUG
Chapter 7, "Debugging Tasks and Procedures" contains instructions for debugging tasks.
6.1.5. Linking the Object Code of Procedures
Link the object code of procedures with the procedure server transfer module into a procedure server image. Before linking, you can place files in a procedure object library. Doing so allows you to track insertion into the library and simplifies the job of creating a server image. Using procedure object libraries also reduces linking time. See Section 6.2, ''Using an Object Library for Procedures'' for more information about using an object library.
LINK DCL command to combine the following object modules into
an executable (.EXE) file: Procedure server transfer module created for that server by the
BUILDcommand of ADUAll step procedures for all tasks in the task group that use that server
Initialization, termination, and cancel procedures (if any) for the server
Any procedures called as cancel actions by tasks using the server
Figure 6.3, ''Linking Object Modules into a Procedure Server Image'' shows the relationship between the task group definition and object modules when they are linked to create a procedure server image.
LINK command: In the
LINKcommand, include all of the procedures that are named in the server definition in the task group.TheLINKcommand creates a server image named from the first module named in the command line, and places it in your default directory. Use the optional/EXEqualifier to explicitly assign a name to the server image. For example:$LINK/DEBUG/EXE=VR_SERVER.EXE ...In the example, the name assigned to the executable file is VR_SERVER.EXE. If you do not use the qualifier, the Linker uses the file name of the first object module in the
LINKcommand as the name of the server image. The default file type is .EXE.Include the
/DEBUGqualifier in theLINKcommand if you want to debug the procedures in the server.- Use the same name for the server image in the
LINKcommand as you do in the IMAGE clause of the task group definition. For example:REPLACE GROUP VR_TASK_GROUP . . SERVER IS PROCEDURE SERVER IMAGE IS "VR_SERVER.EXE";In theLINKcommand, the first object module that you name is the procedure server transfer module; in the example, it is called VR_SERVER.OBJ. You can assign a name to the procedure server transfer module in the task group definition, in the SERVER IS statement. For example:SERVER IS PROCEDURE SERVER IMAGE IS "VR_SERVER.EXE"; . . . DEFAULT OBJECT FILE IS "VR_SERVER.OBJ";You might also prefer to include a logical with file names. For example:PROCEDURE SERVER IMAGE IS "PRODUCTION:VR_SERVER.EXE";
If you plan to debug a server image later, do not use the
/NOTRACEBACKqualifier on theLINKcommand. You can still start the server with the Task Debugger if you link the server with/NOTRACEBACK. However, you cannot debug it because the OpenVMS Debugger cannot be invoked while a program linked without traceback information is running. Also, if you use theINTERRUPTcommand to access the OpenVMS Debugger in that server, the server stops.
LINK command example for a server that
uses SQL. $LINK/DEBUG/EXE=VR_SERVER.EXE VR_SERVER.OBJ,-_$ACMS$SAMPLES:VR_TERM,-_$ACMS$SAMPLES:VR_GET_CUSTOMER_PROC,-_$ACMS$SAMPLES:VR_MOVE_CU_PROC,-_$ACMS$SAMPLES:VR_INIT,-_$SYS$LIBRARY:SQL$USER/LIB
When linking a server image containing procedures called by tasks that use the WITH SQL RECOVERY phrase, you must reference the ACMS SQL library in SYS$LIBRARY immediately after the transfer vector object module name. As the last item, link the SQL library file that is found in SYS$LIBRARY. When you use the WITH SQL RECOVERY phrase in the task definition, if you do not reference the correct libraries in the correct order, you can receive unpredictable run-time errors.
LINK command for a server
image containing procedures called by tasks that use the WITH SQL RECOVERY phrase. $LINK/DEBUG/EXE=VR_SERVER.EXE VR_SERVER.OBJ,-_$SYS$LIBRARY:ACMSSQL/LIB,-_$ACMS$SAMPLES:VR_GET_CUSTOMER_PROC,-_$ACMS$SAMPLES:VR_MOVE_CU_PROC,-_$ACMS$SAMPLES:VR_INIT,-_$SYS$LIBRARY:SQL$USER/LIB
The ACMSSQL library is not required if the SQL database transactions are started by the step procedures in the server, not in the task definition.
 PSECT_ATTR=RDB$TRANSACTION_HANDLE,LCL,NOSHR
 PSECT_ATTR=RDB$DBHANDLE,LCL,NOSHR
Because of an Rdb restriction, the link is not upward compatible; therefore, you need to relink the server for each new version of Rdb.
6.2. Using an Object Library for Procedures
$LIBRARY/LIST/FULL library_name
Using a library also simplifies the job of creating a server image. Finally, using object libraries also reduces link time.
LIBRARY command to put the object modules in your procedure object
library. If the library does not exist, create it. For example:
$LIBRARY VR_PROC.OLB/CREATE
/INSERT qualifier in the
LIBRARY command. For example:
$LIBRARY/INSERT VR_PROC.OLB VR_FIND_SI_PROC.OBJ
The first name used in the LIBRARY command is the procedure object
library; its default file type is .OLB. The second name is the file containing the object module
to be placed in the library. In this case, the name of the file is VR_FIND_SI_PROC.OBJ in the
default device and directory.
/LIBRARY
qualifier to identify the object library when you link the server image. For example:
$LINK/DEBUG VR_SERVER, VR_PROC/LIBRARY
In this example, VR_SERVER is the name of the procedure server transfer module (.OBJ)
created by building the task group containing that server. The procedure object library is
identified as VR_PROC.OLB. By using the /LIBRARY qualifier, you indicate that
all modules referenced by VR_SERVER.OBJ are to be taken from the VR_PROC.OLB library and included
in the server image.
For more information on using a procedure object library, see VSI OpenVMS Command Definition, Librarian, and Message Utilities Manual.
Chapter 7. Debugging Tasks and Procedures
After writing server procedures for tasks, you need to test procedures for errors. You compile procedures as you would any other program, but, because ACMS procedures are not independent programs, you do not link, run, and debug server procedures as you would an OpenVMS image.
Server procedures run under the control of ACMS and perform only part of the processing for a task. The task definition takes care of the rest of the processing. You need to debug tasks and the procedures that are called by tasks at the same time to be sure that tasks and procedures work together as they should.
Using debugging tools
Preparing to use the ACMS Task Debugger
Using the ACMS Task Debugger to step through the execution of individual tasks
Using the OpenVMS Debugger to step through the execution of server procedures
Returning to the
ACMSDBG>promptDebugging tasks that are called by user-written agent programs
7.1. Using Debugging Tools
ACMS Task Debugger
The ACMS Task Debugger provides an environment for testing tasks and server procedures without building an entire ACMS application. The Task Debugger lets you control a task while the task is running. You can set breakpoints at the beginning of the task, at the beginning of any step in the task, at the action part of any step, and at the end of any step. Once you reach a breakpoint in the task, you can examine and deposit values in workspaces and then resume the execution of the task.
OpenVMS Debugger
The OpenVMS Debugger lets you control the procedures called by the task. You use the OpenVMS Debugger in the same way as you use it with any program. For example, you can use the OpenVMS Debugger to set a breakpoint in the procedure after the procedure reads a record; when you reach the breakpoint, you can examine and deposit data in variables and then resume execution of the procedure. You also use the OpenVMS Debugger to check whether your procedures perform properly or not and to debug DECforms escape routines.
DECforms Trace Facility
In addition to ACMS and OpenVMS facilities for debugging tasks, you can also use the DECforms trace facility. This facility logs processing information at run time to help you debug both your applications and your form. The trace facility uses the logical names FORMS$TRACE and FORMS$TRACE_FILE. See VSI DECforms Guide to Commands and Utilities for more information about the DECforms trace facility.
Start, stop, and assign logical names for the servers you are going to use
Start, stop, and step through a task
Display and change workspace contents while a task is running
When you select a task to debug, the ACMS Task Debugger starts the task. When the task reaches a breakpoint, you can enter commands to continue running the task, display the contents of workspaces, change the contents of workspaces, or display information about ACMS Task Debugger commands.
By examining and changing workspace contents, variable assignments, and other values, you can find most of the errors in the definitions or procedures for your tasks. You can look for inconsistencies between workspaces in form definitions, task definitions, and procedures. You can also check that logical names in procedures or definitions point to the correct files and that files have correct protection codes. Finally, you can check for error conditions that are not handled by the server procedures or the task definition.
7.2. Preparing to Use the ACMS Task Debugger
Prepare definitions and build a task group.
Prepare procedures by compiling and linking them.
Check to make sure that all the files you need are complete.
Define logical names and prepare DECforms escape routines for debugging, if necessary.
Before you debug, you need to check a number of quotas to make sure that the ACMS Task Debugger can be run. If you plan to debug using two terminals, you also need to complete additional preparatory steps. Finally, to debug a task called from a user-written agent program, you must complete additional preparatory steps, which are explained in Section 7.6, ''Debugging Tasks Called from a User-Written Agent Program''.
7.2.1. Preparing Definitions
Use the Common Dictionary Operator (CDO) Utility to define all fields, records, and workspaces used by the task.
Use DECforms to define all forms for the task.
Use the Application Definition Utility (ADU) to define the task and the task group.
Because tasks involve both code and definitions, it is important to understand all parts of the task to debug it. The primary definition you must understand is the task definition. For a detailed explanation of task definitions, see VSI ACMS for OpenVMS Writing Applications.
- Use the ADU
BUILDcommand to create a task group database from the task group definition. To use the ACMS Task DebuggerEXAMINEandDEPOSITcommands, include the/DEBUGqualifier with theBUILD GROUPcommand. For example:ADU>BUILD GROUP/DEBUG VR_TASK_GROUPYou can use the
EXAMINEandDEPOSITcommands to examine or deposit data into the workspaces when you debug the task.
7.2.2. Preparing Procedures
/DEBUG qualifier. Using the /DEBUG qualifier makes more
information available to the OpenVMS Debugger. For example:
$COBOL/DEBUG VR_FIND_SI_PROC$LINK. . ./DEBUG/EXE=VR_SERVER.EXE VR_SERVER.OBJ,-
After you compile and link the procedures called by a task, you can run the task in the ACMS Task Debugger. The task you run is a real one; when the task is in daily use, ACMS runs the same definitions and code as the ones you test.
To protect business data, you can set up test files to run against the task. For example, if your procedures use logical names to identify files, create a set of data files in another directory, and temporarily redefine the logical names to point to that directory. See Section 7.2.3, ''Defining Logical Names'' for an explanation of the two methods of defining logical names.
If you make a change in a server procedure, you must compile the server procedure and relink the server image to include the new object module.
If you revise a task or task group definition, you must rebuild the task group using ADU.
One of the difficult parts of debugging a task is making sure that all the files you need are complete. Chapter 6, "Building Procedure Server Images" explains the steps you take to build a procedure server image. After completing those steps, check that all the files are ready. Figure 7.1, ''Files Needed for Debugging'' shows the files needed for debugging and depicts how you produce those files from CDD definitions, source programs, and message source files.
|
Files |
Description |
|---|---|
|
DECforms form files |
Created using DECforms. |
|
Data files or database files for the task group |
Created and populated using either RMS, DBMS, or Rdb. |
|
Message files for the task group |
Created with the OpenVMS Message Utility. You need these files if your tasks use the GET MESSAGE clause. |
|
Procedure server images |
Created with the DCL |
|
Task group database |
Created with the |
7.2.3. Defining Logical Names
Most task groups and server procedures use OpenVMS logical names. If this is the case in your ACMS application, you must define these logical names before you start a debugging session. For example, the AVERTZ task group definition specifies that it uses the message file AVERTZ_DEFAULT:VRMSG.EXE. If the logical name AVERTZ_DEFAULT is not defined when you attempt to start the debugging session, the Task Debugger cannot find the message file, and therefore cannot start.
Some of the logical names used by your task group and server procedures might have already been defined. In the previous example, the AVERTZ application might be installed on your system in such a way that the necessary logical names are available to everyone on the system. In this case, you do not need to define any logical names in order to run the application. However, if the logical names are not defined, or if you want to test your own private copy of a file, you must define the logical names that point to that file. Also, be sure to define logical names in a way that does not affect other users on the system.
To define logical names, you need some information about the processes that are used in a
debugging session. When you use the ACMS/DEBUG task-group command, you run
the ACMS Task Debugger image in your process. For this reason, any logical names that are
available to your process are also available to the Task Debugger.
However, when the Task Debugger starts a server, it creates the server as a subprocess of your process. When this server process is created, it has access to the same logical name tables as the Task Debugger process, with the exception of the Task Debugger's process logical name table. Instead of using the Task Debugger process logical name table, each server is created with its own process logical name table.
Form files
Message files
Request library files
Logical names pointing to the procedure server image
Logical names used in server procedures
- To do this in a way that does not affect anyone else on the system, define the logical as a job logical name. For example:
$DEFINE/JOB AVERTZ_DEFAULT DSK$:[AVERTZ.PUBLIC] - Alternatively, define logical names in a user-defined logical name table. If the application uses a user-defined logical name table at run time, there is one less difference between the debugging environment and the run-time environment, which makes the transition between the two easier. Follow these steps:
Create the logical name table.
If a logical name table does not already exist, create it. To make the table shareable, specify the system directory as the parent table. For example:$CREATE/NAME_TABLE -_$/PARENT_TABLE=LNM$SYSTEM_DIRECTORY my_name_tableThis command requires the SYSPRV privilege. If you do not have this privilege, ask your system manager to create the table for you.
Define the logical name in the logical name table.
If the logical name is not defined in the table, define it:$DEFINE/TABLE=my_name_table AVERTZ_DEFAULT DSK$:[AVERTZ.PUBLIC]Include the logical name table in the list that the system searches.
If the logical name table is not included in the system default logical name table list, include it in the logical name table list for your process. For example:$DEFINE/TABLE=LNM$PROCESS_DIRECTORY LNM$FILE_DEV -_$LNM$PROCESS, LNM$JOB, my_name_table, LNM$GROUP, LNM$SYSTEMList the logical name tables in the same order as the name tables will be defined in the application definition.
See VSI OpenVMS User's Manual for more information on logical names and logical name tables.
If you want the logical name to be used only by the Task Debugger process, define the logical name as a process logical name.
If you want the logical name to be used only by the server process, define the logical name as a process logical name for the server subprocess. The only way to do this is to use the Task Debugger
ASSIGNcommand. See Section 7.3.2, ''Using the Task Debugger ASSIGN Command'' for details.
7.2.4. Preparing to Debug DECforms Escape Routines
If exchange steps in your tasks call DECforms, and DECforms, in turn, calls procedural
escapes, you need to debug escape routines. Because DECforms escape routines are written in an
OpenVMS programming language, you use the OpenVMS Debugger to debug escape routines. To have
more information available to you while you are debugging, compile escape routines using the
/DEBUG qualifier.
You must complete several preparatory steps before you debug DECforms escape routines. First, you must tell DECforms that you want to debug escape routines by defining the logical name FORMS$DEBUG_ESCAPE_ROUTINES to be true. This definition tells DECforms to activate the OpenVMS Debugger when it activates the escape routine image for the first time. Because DECforms invokes the OpenVMS Debugger only one time for each image, you must set breakpoints in your escape routines in order to debug them. See the DECforms documentation for more details on the FORMS$DEBUG_ESCAPE_ROUTINES logical name.
Note
Debugging escape routines is much easier if you link the routines into a separate image.
For an escape routine linked into a separate image:
Specify the location of the escape routine image. Do this by defining FORMS$IMAGE to point to the shared image that contains the escape routine. If you have more than one escape routine image, you can make FORMS$IMAGE a search list. Refer to the DECforms documentation for more information about defining this logical name.
ACMS uses the ACMS$ESC_RTN_node_application logical name at run time to avoid naming conflicts that can occur with multiple applications. However, the ACMS Task Debugger does not recognize this logical name because the task group that the Task Debugger uses does not have an application name. Instead, use the FORMS$IMAGE logical name.
For escape routines linked directly into the form image:
You must modify your escape routine code to debug it. The escape routine must initiate the debugging process by invoking the OpenVMS Debugger. Do this by signaling SS$_DEBUG from the escape routine. For example:01 debug_symbol pic S9(9) COMP VALUE EXTERNAL SS$_DEBUG . . . CALL 'LIB$SIGNAL' USING BY VALUE debug_symbol.
Remember to remove the signal of SS$_DEBUG when you finish debugging. If you do not define FORMS$DEBUG_ESCAPE_ROUTINES to be true, and you do not remove the code that signals SS$_DEBUG, your escape routine will hang.
7.2.5. Setting Up for Debugging with Two Terminals
Task I/O stream
The task I/O stream handles the terminal I/O defined for the task. For example, in an inquiry task that reviews car rental reservations, the task I/O stream handles the form that displays information about the reservations.
Debugger I/O stream
The debugger I/O stream handles the debugger commands and the information the debugger displays in response to those commands. For example, the debugger I/O stream handles the
ACMSDBG>Task Debugger prompt.
By default, both the task I/O stream and the debugger I/O are attached to the same terminal. This is necessary if you have only one terminal to use. However, if two terminals are available to you, you might want to use a separate terminal for each I/O stream. This is useful when you want to see the task output without having debugger prompts overwrite it.
SYS$INPUT – Where ACMS looks for task input
SYS$OUTPUT – Where ACMS sends task output
DBG$INPUT – Where the debugger looks for input
DBG$OUTPUT – Where the debugger sends output
OpenVMS defines the logical names SYS$INPUT and SYS$OUTPUT to be the name of your terminal when you log in (TTA1, for example). The logical names DBG$INPUT and DBG$OUTPUT default to SYS$INPUT and SYS$OUTPUT. If you do not reassign DBG$INPUT and DBG$OUTPUT, both I/O streams are attached to your terminal.
$DEFINE DBG$INPUT TTA6:$DEFINE DBG$OUTPUT TTA6:
In this example, the debug streams are assigned to terminal TTA6.
After setting up your I/O streams for two terminals, follow the instructions in the next section. The breakpoints you set, the commands you use, and the problems to look for are the same as when you debug from a single terminal. The only difference is that the terminal I/O and the debugger I/O display at different terminals. Before starting the debugger, make sure that no one is logged in at the other terminal. If anyone is logged in at the second terminal, the debugger cannot allocate and use that terminal.
7.2.6. Verifying that the ACMS Task Debugger Can Be Run
Quotas
For each of these, use the DCL commandSHOW PROCESS/QUOTA. Make sure that:The buffered I/O byte count quota (BYTLM) is at least 50,000.
The enqueue quota (ENQLM) is at least 2,000.
The open file quota (FILLM) is at least 96.
The subprocess quota (PRCLM) is adequate.
The workspace looker process (that is, the process activated if you use the
/WORKSPACEqualifier) and server processes are implemented as subprocesses. Make sure that your PRCLM is large enough to handle this.The AST limit (ASTLM) is at least 24.
The timer queue entry limit (TQELM) is at least 10.
See your system manager if you need higher quotas.
System parameters
Check with your system manager to make sure that the following system parameters have values equal to or greater than the ones indicated here:- PQL_DASTLM = 24
- PQL_DDIOLM = 20
- PQL_DBIOLM = 18
- PQL_MDIOLM = 20
7.3. Using the ACMS Task Debugger
When you have completed all of the preparations for debugging ACMS tasks and procedures, you are ready to debug a task. After you start the ACMS Task Debugger, assign any additional logical names that you need. Then you can start the servers needed by a task.
Before running a task in the Task Debugger, however, you usually set breakpoints so that you can check that information that should be in a workspace is actually there. You might also want to set breakpoints in procedures to debug them using the OpenVMS Debugger.
The following sections explain how to start the ACMS Task Debugger; use the Task Debugger
ASSIGN command; start, stop, and interrupt servers; set and remove
breakpoints in tasks; check values in workspaces; and debug transaction timeout codes. Debugging
procedures with the OpenVMS Debugger is described in Section 7.4, ''Using the OpenVMS Debugger''.
|
Control Character |
Function |
|---|---|
|
Ctrl/G |
Interrupts the current task (if any) and the current Task Debugger or OpenVMS Debugger
command, and returns to the Task Debugger prompt ( |
|
Ctrl/Z |
Equivalent to the If you press Ctrl/Z at an OpenVMS Debugger prompt, the debugger stops the server process you are running in and returns to the Task Debugger prompt. Any active tasks using that server are canceled. |
7.3.1. Starting the Task Debugger
ACMS/DEBUG command. For
example:$ACMS/DEBUG VR_TASK_GROUP/WORKSPACE
In the command, include the name of the task group database file (.TDB) containing the task or tasks you want to debug; in the example, the task group is VR_TASK_GROUP. You cannot debug more than one task group at a time. If the file is not in your default device and directory, include the device and directory specifications. The default file type is .TDB.
Use the /WORKSPACE qualifier with the ACMS/DEBUG
command to examine and deposit data in workspaces using the Task Debugger. If you do not include
the /WORKSPACE qualifier, you can still look at workspaces when a task is
running in a server. However, you must use /WORKSPACE if you want to look at
workspaces during exchange steps, during the action part of processing steps, or at the
beginning or end of the task.
Once the Task Debugger starts, it displays the ACMSDBG> prompt. You can then
enter any of the Task Debugger commands. Reference information on all the ACMS Task Debugger
commands is in Chapter 10, "ACMS Task Debugger Commands".
7.3.2. Using the Task Debugger ASSIGN Command
ACMS defines process logical names for a server based on logical names that you define
using the Task Debugger ASSIGN command. A logical name that you assign in the
Task Debugger takes effect only when the server starts. Therefore, if you assign a logical name
after a server starts, that name does not take effect.
DEFINE DCL command:
ACMSDBG>ASSIGN/SERVER=VR_UPDATE_SERVER [AVERTZ.UNAME] AVERTZ_DEFAULTACMSDBG>START VR_UPDATE_SERVER
Note that, unlike the DEFINE DCL command, the directory name precedes
the logical name in the Task Debugger ASSIGN command. The ACMS Task Debugger
ASSIGN command is patterned after the ASSIGN DCL command.
The ASSIGN command defines the logical name AVERTZ_DEFAULT to point to
the [AVERTZ.UNAME] directory rather than to the [AVERTZ.PUBLIC] directory. The
/SERVER qualifier names the server that can use this logical name:
VR_UPDATE_SERVER.
SET SERVER
command to indicate the server to which the ASSIGN commands apply. If you use
SET SERVER before the ASSIGN command, you do not need the
/SERVER qualifier. For
example:ACMSDBG>SET SERVER VR_UPDATE_SERVERACMSDBG>ASSIGN [AVERTZ.UNAME] AVERTZ_DEFAULT
The name included in the SET SERVER command or the
/SERVER qualifier must be the same name used for the server in the task
group definition.
7.3.3. Starting, Stopping, and Interrupting Servers
After starting the ACMS Task Debugger, the next step is to start the servers that handle the tasks you want to debug. The following sections explain how to start, stop, and interrupt servers.
7.3.3.1. Starting Servers
The ACMS Task Debugger automatically starts a server if it is needed to run a procedure called by the task.
Alternatively, you can start servers for tasks yourself. You might, for example, want to debug an initialization procedure without starting a task.
You might need multiple instances of a server when you use distributed transactions and the task-call-task feature. When you use distributed transactions, a called task that participates in a distributed transaction started by a parent task might need to use the same server as the parent task. Different server processes are started and allocated to the parent and to the called tasks.
The number of active servers allowed for a debugging session is limited. A user is allowed up to four times the number of servers defined in the task group that is being debugged. You can, however, allocate the total number of servers allowed to server instances in any manner you like. For example, if a task group has two servers, you can start eight server instances. You can, if you like, have eight instances of one server and none of the other.
START server-name command to start one or
more instances of one or more servers. The following examples show three alternative ways to
use the START command: - If both a parent and a called task use the same server (in this case, VR_SERVER), issue a command like the following one to start two instances of that server:
ACMSDBG>START VR_SERVER, VR_SERVER - If you will use only one of the servers defined for the task group, include that server name in the
STARTcommand:ACMSDBG>START VR_SERVER - If the tasks you are debugging use all the servers in a task group or if only one server is defined for a group, use the
/ALLqualifier in theSTARTcommand to start any servers that have not been started:ACMSDBG>START /ALLYou cannot use both the
/ALLqualifier and a server name in the sameSTARTcommand.
ACMSDBG>START VR_SERVERTerminal is in SERVER VR_SERVER VAX DEBUG Version V5.4-019 %DEBUG-I-INITIAL - language is COBOL, module set to 'VR_SERVER' DBG>
The first line after the START server command indicates that the ACMS
Task Debugger has transferred control of the debugging session to the server process. The
OpenVMS Debugger software displays an identifying line showing the version number. On a
separate line, the OpenVMS Debugger names the language it is using and the module where the
program is beginning. The program begins in the server transfer module, which is produced by
building the task group. Therefore, the language displayed comes from the server transfer
module rather than from your server procedure. The default language for the server transfer
module is COBOL. Following these messages, the OpenVMS Debugger displays the DBG>
prompt.
At this point, you can set breakpoints in the server using the OpenVMS Debugger. You might, for example, want to set a break at the server's initialization procedure. Instructions for using the OpenVMS Debugger are in Section 7.4, ''Using the OpenVMS Debugger''.
GO command:
DBG>GOServer VR_SERVER has been startedACMSDBG>
7.3.3.2. Stopping Servers
You use the Task Debugger
STOPcommand.You use the OpenVMS Debugger
EXITcommand.ACMS runs down a server due to a task cancellation.
STOP command. For example:
ACMSDBG>STOP VR_SERVERTerminal is in SERVER VR_SERVERServer VR_SERVER stoppedACMSDBG>
STOP command, only one instance is stopped. For example:
ACMSDBG>STOP VR_SERVERStopping only one instance of server VR_SERVERTerminal is in SERVER VR_SERVERServer VR_SERVER stoppedACMSDBG>
STOP/ALL command.
For example:
ACMSDBG>STOP/ALLTerminal is in SERVER VR_SERVERServer VR_SERVER stoppedTerminal is in SERVER VR_SERVERServer VR_SERVER stoppedTerminal is in SERVER DCL_SERVERServer DCL_SERVER stoppedACMSDBG>
If you use the STOP command, the termination procedure is run for the
server. If you want to debug the termination procedure, you must set a breakpoint at the
termination procedure. If you forget to do this when the server is first started or while you
are debugging step procedures, you can use the INTERRUPT command to bring
the OpenVMS Debugger up in the server.
STOP command while a task is active. If you want to
stop the server while a task is active, you can interrupt the server and use the
EXIT command at the OpenVMS Debugger prompt. Exiting the server while an
active task has context in the server causes the task to be canceled. For example:
ACMSDBG>INTERRUPT VR_SERVERTask is in SERVER VR_SERVERDBG>EXITTask is in the task debugger%ACMSDBG-I-SPDIED, Server VR_SERVER stopped unexpectedlyProcessing non-recoverable exception from step $STEP_1 in task VR_RESERVE_TASKException code text:%ACMS-E-TASK_SP_DIED, Cancel results from the server process dyingException code value: 16632498 (decimal), %X00FDCAB2 (hex)Task was canceled.ACMSDBG>
The previous example shows that the task is canceled due to a nonrecoverable error. The nonrecoverable error is that a server that the task was using stopped unexpectedly. The message also gives the decimal and hexadecimal values of the exception code.
Another reason a server stops is that a task is canceled while the task has context in the server, and the server is to run down as a result of a cancel. In this situation, the termination procedure is called only if you use the ALWAYS EXECUTE TERMINATION PROCEDURE clause in your server definition. See Chapter 2, "Writing Initialization, Termination, and Cancel Procedures" for details on how to determine if a server is run down on a cancel.
7.3.3.3. Interrupting Servers
You can use the INTERRUPT command to interrupt a server and transfer
control to the OpenVMS Debugger. After you enter this command, the OpenVMS Debugger displays
the DBG> prompt. You can then set breakpoints, examine addresses, or change values
in a server that has already been started. Beginning with ACMS Version 3.2, you can specify an
instance of a server that is allocated to a specific task. Reference information about this
command is in Chapter 10, "ACMS Task Debugger Commands".
If you do not specify a task with the INTERRUPT command, ACMS
interrupts the named server if the current task instance has context in that server. If the
task is not retaining context in the named server, or if no task is active, then ACMS
interrupts the first free server process belonging to the named server. This process is
allocated to the first task or first called task that calls a procedure in the named server.
INTERRUPT command. Following is an example of setting breakpoints for a
procedure after a Task Debugger INTERRUPT command.
ACMSDBG>INTERRUPT VR_SERVER/TASK=VR_RESERVE_CAR_TASKTerminal is in server VR_SERVERDBG>SET BREAK VR_FIND_SI_PROCMAINMAIN-SECTIONDBG>GOACMSDBG>
When you specify a task name, ACMS interrupts the process currently owned by that task. In
the previous example, ACMS interrupts the VR_SERVER owned by the called task,
VR_RESERVE_CAR_TASK. If the named task (in this case, VR_RESERVE_CAR_TASK) is not currently
retaining context in the named server (in this case, VR_SERVER), then the command returns an
error. The example also illustrates using Ctrl/G to return to the ACMS Task
Debugger prompt, ACMSDBG>.
/TASK qualifier and follows the rules for interrupting a
server when no task name is supplied. Note
If you use the INTERRUPT command, do not link the server image with
/NOTRACEBACK. If the server image was linked with
/NOTRACEBACK, and you try to access the server process with an
INTERRUPT command, the server process returns a fatal error and exits.
The debugger returns the Task Debugger prompt, ACMSDBG>. You must then use the
START command to restart the server.
INTERRUPT command to interrupt servers that are in
the process of starting or stopping. If you do, ACMS displays the following error message:
%ACMSDBG-E-SRVNOTUP, Server ... is not started
If there is a bug in your initialization procedure that causes it not to return, you
cannot stop the server. To debug the initialization procedure, you must use
Ctrl/G to display the ACMSDBG> prompt, and then exit from the
Task Debugger. When you start the Task Debugger again and attempt to start the server, set a
breakpoint at the initialization procedure so that you can debug it. Do the same for
termination procedures.
7.3.4. Setting and Removing Breakpoints in a Task
After you start the servers needed by a task for debugging, you are ready to start the task. However, you might want to set breakpoints before selecting the task.
A breakpoint is a selected place where the debugger stops a task. For example, the first time through a task, you might want to stop the task at the beginning of the action part of each exchange step. You can then check that the information that should be in a workspace is actually there.
SET BREAK command to set breakpoints in a task. For
example:ACMSDBG>SET BREAK VR_RESERVE_TASK
In this example, a breakpoint is set in the VR_RESERVE_TASK.
After you have used ACMS Task Debugger commands to examine and deposit data in workspaces,
set breakpoints, and so on, enter GO to continue processing from that
breakpoint in the task. Otherwise, the step or task cannot complete, and you cannot select
another task.
Set breakpoints in a task
Debug a task called by another task
Remove breakpoints from tasks
SET BREAK commands. Then use the at-sign (@) command to run the command
(.COM) file. For example:
ACMSDBG>@RESERVE_CAR_DBG.COM
Setting up a command file of common commands can make a debugging session much easier.
7.3.4.1. Setting Location and Event Breakpoints
Location breakpoints
Use the following format to define a location breakpoint:
task-name\step-name\locationIn the format above:Task-name is required.
Step-name is optional.
The default is the root step of the task.
Location is optional.
The default is the beginning of the step.
The step-name can be the one you define in the task definition. If you do not define a label for a step, ACMS assigns one. The label that ACMS assigns always has the format $STEP_n, where n is the number of the step. For example:$STEP_1
Step numbering continues sequentially from step to step rather than just for steps that do not have labels. A label supplied in a task definition replaces the ACMS label. ACMS assigns the name $TASK to the block step of a multiple-step task and to the only step in a single-step task.Note
To see a listing of step label names, use the ADU
DUMPcommand to obtain a dump of the task group database. Example 7.2, ''Sample Task Group Dump File'' contains part of a dump file.You can use four symbols for location breakpoints: $BEGIN, $ACTION, $HANDLER, and $END. Table 7.3, ''Location Breakpoint Symbols'' lists location symbols and explains the effect of using each of them.Table 7.3. Location Breakpoint Symbols Symbol
Explanation
$BEGIN
Breakpoint occurs at the start of the step.
$ACTION
Breakpoint occurs at the start of the action of the step. At this breakpoint, none of the actions for the step have been performed.
$HANDLER
Breakpoint occurs at the start of the exception handler action for the step. At this breakpoint, none of the exception handler actions for the step have been performed. The exception reason, however, has been moved to the ACMS$PROCESSING_STATUS workspace.
$END
Breakpoint occurs at the end of the step. At this breakpoint, the action clauses (if any) have been performed.
Event breakpoints
Use the following format to define an event breakpoint:
task-name\eventIn the format above:Task-name is required.
Event is required.
You can use two symbols for event breakpoints: $EXCEPTION and $CANCEL. Table 7.4, ''Event Breakpoint Symbols'' lists event symbols and explains the effect of using each of them.Table 7.4. Event Breakpoint Symbols Symbol
Explanation
$EXCEPTION
Breakpoint occurs as soon as an exception is raised in the task. At this breakpoint, the exception reason has not been moved to the ACMS$L_STATUS field in the workspace. ACMS displays information about the exception (type, reason code, and so on).
$CANCEL
Breakpoint occurs just before ACMS cancels the task. At this time, ACMS has called server cancel procedures but has not yet performed a task cancel action, if supplied.
At the $EXCEPTION breakpoint, ACMS has not yet updated the ACMS$PROCESSING_STATUS workspace with information about the exception. This allows you to examine the contents of the ACMS$PROCESSING_STATUS workspace at the time the exception occurred. Once you reach the $HANDLER breakpoint, ACMS has filled in the ACMS$PROCESSING_STATUS workspace with information about the exception. This enables you to examine the workspace before you execute the exception handler action.
Server cancel procedures are called after a task stops at the $EXCEPTION breakpoint and before a task stops at the $CANCEL breakpoint. Therefore, you must set a break at the $EXCEPTION breakpoint if you want to interrupt a server process in order to set a breakpoint in a server cancel procedure. Alternatively, you can use the OpenVMS Debugger to set a breakpoint in a server cancel procedure when you start the server process. Section 7.4, ''Using the OpenVMS Debugger'' contains instructions for using the OpenVMS Debugger.
The breakpoints you set depend on the task you are debugging. Breakpoints are often useful at the beginning of a task, at the action part of each step, and at the block action for a task. Setting breakpoints at these places helps you make sure that the work part of each step has put the right values into the workspaces it used.
In setting breakpoints, be sure to include backslashes (\) to separate task name, step
label, and symbol. Use the SHOW BREAK command to check the breakpoints
set.
                                        REPLACE TASK sample_task
                                          .
                                          .
                                          .
   sample_task\$BEGIN ----------->        BLOCK WITH DISTRIBUTED TRANSACTION
                                          get_number:
  -------------------------                 EXCHANGE
 | sample_task\$EXCEPTION  |                    .
 | When exception occurs   |                    .
  -------------------------                     .
  -------------------------
 | sample_task\$CANCEL     |
 | When cancellation occurs|
  -------------------------
                                          get_data:

   sample_task\get_data\$BEGIN –>          PROCESSING WORK IS
                                               CALL    sample_procedure
                                               .
                                               .
                                               .
   sample_task\get_data\$ACTION —>           ACTION IS
                                                  SELECT FIRST TRUE OF
                                                  .
                                             .
                                                  .
   sample_task\get_data\$END ------>              END SELECT;

                                          display_data;
                                             EXCHANGE
                                             .
                                             .
                                             .
                                          END BLOCK;

   sample_task\$ACTION -------------->    ACTION IS
                                             REPEAT STEP;

   sample_task\$HANDLER ------------->    EXCEPTION HANDLER ACTION
                                             .
                                             .
                                             .
   sample_task\$END ----------------->    END DEFINITION;
7.3.4.2. Using a Dump File
Names of servers
Tasks
Workspaces
Steps (in tasks)
ADU and use the DUMP GROUP command. For
example:ADU>DUMP GROUP VR_TASK_GROUP/OUTPUT=VR_TASK_GROUP.DMP
001 Step name : PERFORM 001 ----------------------------------------------------------------------- 001 STEP CHARACTERISTICS - 001 Step type : PROCESSING Step index : 0 . . . 001 STEP WORK - 001 1. Conditional : YES . . . 001 Processing server: VR_UPDATE_SERVER Server index : 1 001 The procedure vector index in the server image is 3 001 2 workspaces passed to the server - 001 Wksp. name: VR_RESERVATIONS_WKSP Wksp. index: 5 001 Wksp. size: 140 001 Wksp. name: VR_VEHICLES_WKSP Wksp. index: 7 001 Wksp. size: 71
001 STEP ACTION - 001 1. Conditional : YES 001 Comparison type : EQUAL 001 Data type : TEXT STRING 001 Source field information - 001 Source type : WORKSPACE FIELD 001 Wksp. name : ACMS$PROCESSING_STATUS . . . 001 Recovery action : NO RECOVERY ACTION 001 Transaction action: NO TRANSACTION ACTION 001 Context action : RETAIN SERVER CONTEXT IF ACTIVE 001 Sequencing action: RAISE EXCEPTION 001 Returning : A MESSAGE NUMBER 001 Message no. : 08018122 . . . 001 Error message will be put into the following workspace : 001 Wksp. name : VR_CONTROL_WKSP 001 Wksp. index : 0 001 Field offset : 11 001 Field size : 80 001 Move Action : NONE SPECIFIED . . .
| Use the task group name when you start the ACMS Task Debugger:
|
| Use the server name to start the server in ADU:
|
| Use the task name to select the task:
|
| Use the task name, the step name, and $BEGIN to set a breakpoint at the beginning of a
task:
|
| Use the task name, step name, and $ACTION to set a breakpoint at the action part of a
step:
|
7.3.4.3. Debugging a Task Called by Another Task
When debugging a task that is called by another task (parent task), use the SET
BREAK command to pause execution of the called task just as you do when you debug
any ACMS task. If you do not define breakpoints in the called task, then the task runs to
completion and returns control to the parent task.
If you use a STEP command at the point in the parent task where the
parent task calls another task, the Task Debugger steps into the called
task. Then use the STEP command to execute one exchange or processing step
at a time. The Task Debugger executes one step in the called task for each
STEP command issued.
ACMSDBG>SET BREAK called_task$ENDACMSDBG>GO
The commands in this example cause the Task Debugger to execute all the steps in the task
CALLED_TASK without waiting for you to issue the STEP command. After
reaching the breakpoint at the end of the called task, enter the STEP
command to have the Task Debugger resume stepping through the parent task.
7.3.4.4. Removing Breakpoints
CANCEL
BREAK command. For example:
ACMSDBG>CANCEL BREAK VR_RESERVE_CAR_TASK$BEGIN
/ALL qualifier. For example:
ACMSDBG>CANCEL BREAK/ALL=VR_RESERVE_CAR_TASK
This command removes all breakpoints in VR_RESERVE_CAR_TASK. If you do not include a task
name in the /ALL qualifier, the command removes all breakpoints in all
tasks.
7.3.5. Running a Task in the ACMS Task Debugger
SELECT command. For example:
ACMSDBG>SELECT VR_RESERVE_CAR_TASK
SELECT command must be the name of the task in
the task definition. For example: REPLACE GROUP VR_TASK_GROUP
.
.
.
TASKS ARE
RESERVE_CAR : TASK IS VR_RESERVE_CAR_TASK;SELECT command. For example:
ACMSDBG>SELECT DISPLAY_EMPLOYEE JONES
In this example, the Display Employee task expects an employee name to be passed to it in the ACMS$SELECTION_STRING workspace. If you enter a name after the task name, ACMS moves the name into the ACMS$SELECTION_STRING workspace and passes it to the task. For further explanation of the use of selection strings, see VSI ACMS for OpenVMS Writing Applications.
SELECT command, select only one task at a time. If you
have selected a task and it is still running, use the CANCEL TASK command to
stop the current task before starting another
one:ACMSDBG>CANCEL TASK
The CANCEL TASK command does not take any parameters or qualifiers. It
always stops the current task, if there is one. If the task has context in a server when it is
canceled, and if there is a cancel procedure defined for the server, the cancel procedure runs.
If there is a cancel action defined for the task, that action is performed after the server
cancel procedure, if any, runs.
When you select a task, the ACMS Task Debugger starts the task. Once the task reaches the first breakpoint, you can enter commands to continue running the task, display the contents of workspaces, change the contents of workspaces, or display information about ACMS Task Debugger commands.
7.3.6. Checking Values in Workspaces
You can use both the ACMS Task Debugger and the OpenVMS Debugger to check values in workspaces.
Initial values
Entered values
Values in ACMS$PROCESSING_STATUS
The following sections explain how to check the workspace values listed above.
7.3.6.1. Checking Initial Values
EXAMINE command to check the initial value of a workspace
field. For example:
ACMSDBG>EXAMINE CHECKOUT_SITE_ID OF VR_VEHICLE_RENTAL_HISTORY_WKSPCHECKOUT_SITE_ID of VR_CHECKIN_TASK\VR_VEHICLE_RENTAL_HISTORY_WKSP: 0
In this example, the initial value of the CHECKOUT_SITE_ID field is 0.
ACMSDBG>EXAMINE VR_VEHICLE_RENTAL_HISTORY_WKSPVR_CHECKIN_TASK\VR_VEHICLE_RENTAL_HISTORY_WKSPVEHICLE_ID: +0CHECKOUT_SITE_ID: +0RESERVATION_ID: +0. . .
To continue running the task after you check an initial workspace value, enter
GO after the ACMSDBG> prompt. The GO
command tells the Task Debugger to run the task until it reaches the next breakpoint.
7.3.6.2. Checking Entered Values
EXAMINE command to examine the
contents of workspaces to determine whether the task is functioning correctly. For example:
ACMSDBG>EXAMINE CHECKOUT_SITE_ID OF VR_VEHICLE_RENTAL_HISTORY_WKSPCHECKOUT_SITE_ID of VR_CHECKIN_TASK\VR_VEHICLE_RENTAL_HISTORY_WKSP: 1
ACMSDBG>EXAMINE VR_VEHICLE_RENTAL_HISTORY_WKSPVR_CHECKIN_TASK\VR_VEHICLE_RENTAL_HISTORY_WKSPVEHICLE_ID: +2CHECKOUT_SITE_ID: +1RESERVATION_ID: +26. . .
In this example, reservation 26 was correctly retrieved from the VEHICLE_RENTAL_HISTORY relation in the AVERTZ database. In this case, the car was rented from site number 1.
The order of the workspaces in the form definition and step procedures is the same as the order specified in the task definition.
The workspace definition is the same in the form definitions, the step procedures, and the task definition; if you have modified a workspace definition, be sure to rebuild all the components that reference the workspace.
The forms used by the task correctly return the necessary data in a RECEIVE or TRANSCEIVE operation.
The step procedures called by the task read the correct records from a database or a file.
7.3.6.3. Checking Values in the ACMS$PROCESSING_STATUS Workspace
You can check the contents of the ACMS$PROCESSING_STATUS workspace by using the
EXAMINE command. Using the EXAMINE command, you can make
sure that the workspace message field contains the correct message and that the correct error
codes are loaded into ACMS$T_STATUS_TYPE.
EXAMINE command to check that a procedure did what was
expected. For example, if a read was successful, a workspace should contain a value, and the
ACMS$T_SEVERITY_LEVEL field of the system workspace should contain
the value S, showing that the process was successful:
ACMSDBG>EXAMINE ACMS$T_SEVERITY_LEVELACMS$T_SEVERITY_LEVEL OF VR_RESERVE_CAR_TASK: S
For a detailed discussion of the ACMS$PROCESSING_STATUS workspace, see VSI ACMS for OpenVMS Writing Applications.
7.3.7. Debugging Transaction Timeout Code
In an ACMS application definition, you can specify a time limit within which a distributed transaction must complete. If the transaction does not end within the specified number of seconds, ACMS rolls back the transaction.
SET TRANSACTION_TIMEOUT secondsAfter you set a transaction timeout limit using this command, ACMS raises a transaction exception if a transaction does not complete in the specified amount of time.
CANCEL TRANSACTION_TIMEOUTWhen you have finished testing the task definition logic to handle transaction timeouts, you can use this command to cancel the transaction timeout period you set previously.
SHOW TRANSACTION_TIMEOUTYou can use this command to determine the current transaction timeout value.
By default, there is no transaction time limit. Chapter 10, "ACMS Task Debugger Commands" contains reference information about these commands.
7.3.8. Stopping the Task Debugger
EXIT command or Ctrl/Z at the
ACMSDBG> prompt to exit the Task Debugger and return to the DCL command-level
prompt: ACMSDBG>EXIT$
If you exit the Task Debugger while server processes are still active, these servers are stopped. If the server has a termination procedure defined for it, the termination procedure is executed.
If there is some reason that you do not want the server's termination procedure to run, you
can set a breakpoint at the termination procedure. When you reach the breakpoint, use the
EXIT command at the OpenVMS Debugger prompt to cause the server process to
exit without executing the termination procedure.
7.4. Using the OpenVMS Debugger
Start a server.
When a server is started, the server comes up under the control of the OpenVMS Debugger. See Section 7.3.3.1, ''Starting Servers'' for information on starting servers.
Issue the
INTERRUPTcommand.When the server is already started, you can use the ACMS Task Debugger
INTERRUPTcommand to transfer control to the OpenVMS Debugger in the server. See Section 7.3.3.3, ''Interrupting Servers '' for details.Set a breakpoint in the procedure code.
If you set a breakpoint in your procedure code at a time when the server is under the control of the OpenVMS Debugger, you return to the server when you reach this breakpoint.
Once you display the DBG> prompt, you can debug your procedure as you debug
procedures in any standalone program. You can enter any of the OpenVMS Debugger commands that are
valid for the language used. There are, however, situations in which the OpenVMS Debugger behaves
differently when you use it in an ACMS environment.
Using
SET BREAK/EXCEPTIONYou might want to use the
SET BREAK/EXCEPTIONcommand so that the debugger stops the program at any line where an error occurs. However, be sure to cancel the exception break before canceling a task. Otherwise, a breakpoint occurs in the ACMS code controlling the server process, with confusing messages from the Task Debugger.Using
SET WATCHand defining symbolsBecause workspace addresses can change during a task, be careful when using the OpenVMS Debugger
SET WATCHcommand. When you useSET WATCH, the debugger sets a watchpoint at a location in the workspace to watch an entity and to notify you if the value changes. Because the workspace can be in a different location for each task instance, the field you look at might be in a different location each time, and you might never get a watchpoint.A task can exit from a server process and later use the same server again with different workspace addresses. When a task reenters a server process, redefine symbols and reset watchpoints. Also, changing the contents of a workspace from the
ACMSDBG>prompt when the task is not using the server, or when it is using a different server, does not trigger a watchpoint set in the server.
For more information on how to set, display, and change breakpoints, see the VSI OpenVMS Debugger Manual. For features specific to a language, see the user's guide for that language.
7.5. Returning to the ACMSDBG> Prompt
ACMSDBG>
prompt. Following are situations in which you might want to display the ACMSDBG>
prompt: As you step through server code, you decide that you want to set a breakpoint in your task.
You must transfer control to the ACMS Task Debugger to set your task breakpoint.
As you step through a task, you might want to interrupt a server to set a breakpoint.
Once you set your breakpoint, you need to return control to the ACMS Task Debugger to continue stepping through the task.
Your server is in an infinite loop.
You need to transfer control to the ACMS Task Debugger so that you can use the
INTERRUPT SERVERcommand to get control of your server. Once you finish with your server code, you might need to return control to the ACMS Task Debugger again to cancel the task.
ACMDBG> prompt in all of these
situations. Note
In versions of ACMS prior to Version 3.2, you use Ctrl/C to display the
ACMSDBG> prompt.
7.6. Debugging Tasks Called from a User-Written Agent Program
Users who have written their own command process, called an agent program, must not only debug their ACMS task definitions and the high-level language step procedures called from the task definition, but also debug the flow of control between an agent program and an ACMS task.
Starting and stopping servers
Setting breakpoints
Examining and depositing data in workspaces
Assigning logical names for servers
Executing tasks
Important
The agent program and the ACMS Task Debugger must run on the same node.
Use the ACMS$SIGN_IN service in the agent program.
Do not use the default submitter when debugging tasks submitted by agent programs. The agent program must execute the ACMS$SIGN_IN service to obtain a submitter ID.
Set protection for remote terminals.
Set WORLD protection for remote terminals to read/write access. Check the protection set for remote terminals using the DCLSHOW DEVICEcommand:$SHOW DEV/FULL TTIf the terminal does not have WORLD:RW protection, then set the appropriate protection. For example:$SET PROT=W:RW/DEV TTCheck quotas, parameters, and logical names.
Make sure that system quotas and parameters are set using the values specified in Section 7.2.6, ''Verifying that the ACMS Task Debugger Can Be Run''. Also, make sure that any logical names used by the ACMS Task Debugger are defined. See Section 7.2.3, ''Defining Logical Names''.
Start the ACMS Task Debugger.
Use the
ACMS/DEBUGcommand to start the ACMS Task Debugger. With the command, include the/AGENT_HANDLEqualifier and a handle name (for the agent program) that is unique to the system on which you are debugging the task.The handle name must be a maximum of 39 characters. To ensure that the agent handle name is unique to the system, you can choose to include the PID of the task debugger or the user name of the person doing the debugging in the
/AGENT_HANDLEname.The following example shows how to start the Task Debugger using an agent handle named VR_26200E49 and a task group database called VR_TASK_GROUP:$ACMS/DEBUG/AGENT_HANDLE=VR_26200E49 VR_TASK_GROUPACMSDBG>When you start the Task Debugger and include the
/AGENT_HANDLEqualifier, you can select tasks from within the Task Debugger as well as submitting calls to ACMS tasks from an agent program. Select or submit only one task at a time.You can run more than one agent program consecutively or simultaneously with the Task Debugger, but only one agent program can select a task at one time. Also, you cannot use the ACMS Task Debugger
CANCEL TASKcommand to cancel tasks that are called by agent programs.Set up the ACMS Task Debugger environment.
After you start the ACMS Task Debugger, it returns its
ACMSDBG>prompt. You can then start servers (described in Section 7.3.3, ''Starting, Stopping, and Interrupting Servers'') and define the debugging environment to include items such as breakpoints (described in Section 7.3.4, ''Setting and Removing Breakpoints in a Task'').Accept calls to ACMS tasks from agent programs.
Use the ACMS Task DebuggerACCEPTcommand to have the ACMS Task Debugger accept calls from the agent program:ACMSDBG>ACCEPTAfter this command, the ACMS Task Debugger waits until the agent program selects a task. After the agent program selects a task, the task executes in the ACMS Task Debugger. Chapter 10, "ACMS Task Debugger Commands" describes all the ACMS Task Debugger commands.
You can use Ctrl/G to return to the
ACMSDBG>prompt to set more breakpoints, for example, or to exit from the debugger. To resume waiting for the task call, enter theGOcommand.TheACCEPTcommand accepts one task selection at a time from an agent program. To allow the ACMS Task Debugger to accept subsequent calls to tasks without reentering theACCEPTcommand for each task selection, use the/CONTINUOUSqualifier on theACCEPTcommand:ACMSDBG>ACCEPT/CONTINUOUSThis allows the ACMS Task Debugger to accept task selections from an agent program without entering the
ACCEPTcommand at the agent program's terminal each time.Define logical names for the application names used in the agent program.
To make tasks selected by the agent program run in the Task Debugger, define two process logical names before running the agent program.- Define the logical name ACMS$DEBUG_AGENT_TASK to be either TRUE (T or t), YES (Y or y), or an ASCII number with an odd value:
$DEFINE ACMS$DEBUG_AGENT_TASK Y - Assign a logical name for the application name used in the agent program. The agent program code contains actual application and task names that are defined in the application definition. However, because the agent program selects tasks in the ACMS Task Debugger, you can use logical names (rather than changing the names in the agent program) to associate the application name used in the agent program and the handle name for the debugger. The following example illustrates how to define the application name as a logical name that equates to the agent handle that you specified when you started the Task Debugger.
$DEFINE VR_APPL VR_26200E49In this case, VR_APPL is the application name used in the agent program, and VR_26200E49 is the agent handle name included on the
ACMS/DEBUGcommand when the debugger was started (see the example in step 4).The logical name is optional; if the application name is not defined as a logical name, then the application name in the agent program is used as the
/AGENT_HANDLEname. If the agent program cannot find a Task Debugger process with the appropriate handle name, the agent program returns an ACMS-E-SRVNOTFOUND error.
Do any preparation work necessary for DECforms.
Because DECforms runs in the agent process, do all DECforms setup in the agent process. Section 7.2.4, ''Preparing to Debug DECforms Escape Routines'' contains instructions for preparing to debug DECforms escape routines.
Run the agent program.
Remember that the agent program can select tasks in only one application. If the agent program's ACMS$GET_PROCEDURE_INFO service selects a task from a second application, the ACMS Task Debugger returns the ACMS-E-DBGMULTIPKGS error message.
Chapter 8. Debugging an Application in an ACMS Run-Time Environment
After debugging the tasks in a task group, you include the task group in an application definition and make the tasks available from a menu. Then you need to test the application as a single, working unit before releasing it for use in the ACMS run-time environment.
Because the ACMS Task Debugger runs in a different environment from an ACMS application, even the best-designed and best-developed application can encounter problems during the transition from one environment to another. To help you overcome this potential problem, ACMS allows you to debug servers executing in an active ACMS application. You can also request an OpenVMS process dump for a server that aborts execution due to system or programming errors and then analyze the output from the dump file.
Moving to an ACMS run-time environment
Checking files that you need to run tasks under ACMS
Debugging procedure servers in a run-time environment
Determining why a server stops unexpectedly
8.1. Moving from Debugging to a Run-Time Environment
When you make the transition from testing a task running under the ACMS Task Debugger to running the task in the ACMS run-time environment, check that logical names, server quotas and privileges, and file or database protections are set adequately for the run-time environment.
Logical names that were available to the server subprocess running under the ACMS Task Debugger are available to the ACMS run-time server process.
The server runs as a subprocess under the ACMS Task Debugger, but it runs as a detached process under the ACMS run-time environment. Therefore, logical names that were available to the server through logical name tables when it runs as a subprocess may not be available to the server when it runs as a detached process.
The Application Execution Controller and servers can run under user names different from each other and different from the one you used while debugging the task group. Because of this, determine the best way to define the logical names so that all processes that need them have access to them. You can define them:As system logical names
In a logical name table to which the server and application have access
As server logical names in the application definition for the server
Server quotas and privileges are adequate for the operations that the run-time server performs.
As discussed previously, the ACMS run-time server may run under a different user name than in the ACMS Task Debugger. Therefore, an operation that was performed successfully under the ACMS Task Debugger may not work at run time. This happens if the server user name does not have the quotas or privileges (if any) required for the operation.
If the user names are different, the quotas may be insufficient. Make sure that the quotas of the user name in the run-time environment are high enough.
Protection on files and databases allow access by the run-time server.
If the run-time server uses a different user name than the server that it ran under in the ACMS Task Debugger, files and databases that can be read and written to during debugging may not be available at run time.
Servers that perform terminal I/O during processing steps must explicitly open and close the terminal channel.
During debugging, the ACMS Task Debugger always makes the terminal available to the server subprocess. Therefore, procedures that successfully do terminal I/O during processing steps under the ACMS Task Debugger may not work when they are run under the ACMS run-time system. The task definition must explicitly make the terminal available to the server using the TERMINAL I/O phrase.
Logical names that translate to specific devices or files under the ACMS Task Debugger must translate to the appropriate devices or files when used during run time with the ACMS Application Execution Controller.
When a task uses logical names to determine which of several files or devices to access, take care that the logical names translate to the file or device you intend to access. Under the ACMS Task Debugger, for example, if you want to print or generate a hard copy of a DECforms form, the form listing goes to the device pointed to by the programmer's translation of the FORMS$PRINT_FILE logical name. Tasks running under the ACMS run-time environment, however, send their output to the device pointed to by the agent process's translation of the FORMS$PRINT_FILE logical name (for example, the CP process).
In addition, if the task is accessed remotely (such as when the submitter and the application are on different nodes), the output goes to the device pointed to by the remote agent process's translation of FORMS$PRINT_FILE (for example, the CP process).
Step procedures that open channels to the terminal must close them before ending.
In the run-time environment, if a step procedure opens a channel to the terminal but returns without closing it, ACMS cancels the task. However, ACMS cannot do this when you are using the Task Debugger because open channels could be due to debugging. Therefore, if you do not correctly close all channels to the terminal that you open in a step procedure, the task works in the Task Debugger but will be canceled at run time.
8.2. Checking Files Needed to Run Tasks Under ACMS
Application database
You create application database files with the ADU command
BUILD APPLICATION. These files contain information used by ACMS in running tasks.Menu database
You create menu database files when you use the ADU command
BUILD MENU. These files contain binary versions of menu definitions.
For a list of the files you need when you use the ACMS Task Debugger, see Table 7.1, ''Files Needed for Debugging'' and Figure 7.1, ''Files Needed for Debugging''.
8.3. Debugging Procedure Servers in the Run-Time Environment
Even though a task executes successfully in the ACMS Task Debugger environment, it may contain errors that do not show up until the task runs in a server in the ACMS run-time environment. For example, the server may go into an infinite loop, give incorrect output, or terminate prematurely.
ACMS provides the ACMS/DEBUG/SERVER operator command so that you can debug
servers as they execute in the ACMS run-time environment. Using this command, you can observe
the server process execution through the OpenVMS Debugger. This feature provides a way for you
to use OpenVMS Debugger commands to locate run-time programming or logic errors and other
bugs. If a server is looping, for example, you can step through a procedure and isolate bugs
in the live server just as though the server were running in the ACMS Task Debugger.
Once you have identified and corrected an error in a server, ACMS also provides the
ACMS/REPLACE SERVER operator command to replace the faulty server without
interrupting the live application.
ACMS/DEBUG/SERVER command. VSI ACMS for OpenVMS Managing Applications describes the
syntax for the ACMS/REPLACE SERVER operator commands. Note
Use ACMS/DEBUG/SERVER to debug only procedure servers. Do not use
this command to debug DCL servers.
8.3.1. Controlling Which Users Can Debug Servers
ACMS/DEBUG/SERVER command allows users to stop a server or
change the way it operates, you must provide a means of controlling which users can debug
servers. You provide this security by using logical names. For each user who can debug
servers, define the logical name
ACMS$DEBUG_SERVER_vmsusername as either
TRUE or YES. Note
The logical name ACMS$DEBUG_SERVER_vmsusername must be an executive mode logical.
$DEFINE/SYSTEM/EXEC ACMS$DEBUG_SERVER_SMITH YES
This example uses the /SYSTEM qualifier to define the logical name as a
system logical so that the user named SMITH can debug any server on the system.
Define the ACMS$DEBUG_SERVER_vmsusername logical at DCL level as shown in
the previous example, using the /SYSTEM, /GROUP, or
/TABLE qualifier. A user can debug any server on the system if
ACMS$DEBUG_SERVER_vmsusername is defined as an executive mode system
logical.
By using the /GROUP qualifier, you can restrict users to debugging only
servers in a particular group. You can also define the logical in a server logical name
table and point to it from the ACMS application definition. Use the
/TABLE qualifier on the DEFINE
ACMS$DEBUG_SERVER_vmsusername command if you define the
logical in a server logical name table.
You do not need to define the ACMS$DEBUG_SERVER_vmsusername logical if the user has the CMKRNL privilege. ACMS allows any user with the CMKRNL privilege to debug any server.
Although you can authorize several users to debug a server or servers, only one user can debug a server at a time.
8.3.2. Using the ACMS/DEBUG/SERVER Command
To debug a running server, you must link the server to include traceback information. This is
required for the OpenVMS Debugger to interrupt the server. By default, the OpenVMS Linker
links images with traceback. If the server was linked without traceback (that is, the
/NOTRACEBACK qualifier was used on the LINK
command), you must relink the server before you can debug it. Then you must replace the
server in the running application before continuing.
/TRACEBACK (the default), and you have either
defined the ACMS$DEBUG_SERVER_vmsusername logical
name or provided the CMKRNL privilege for the users who can debug the server, follow these steps
to debug the server: Use the
ACMS/SHOW SERVERcommand to get the server process name and process identification (PID). Use the process name or the server's PID when you start debugging the server.- Invoke the debugger by issuing the
ACMS/DEBUG/SERVERcommand, including either the server process name or the process ID. The following example starts the debugger for VR_SERVER, whose server process name is ACMS021SP001000:$ACMS/DEBUG/SERVER ACMS021SP001000DBG>Include the PID number with this command by specifying the PID number with the/PID=PID_numberqualifier. For example:$ACMS/DEBUG/PID=26000049DBG> Issue OpenVMS Debugger commands to debug the server code.
See VSI OpenVMS Debugger Manual for more information on using the OpenVMS Debugger commands.
Press Ctrl/G while debugging a server to interrupt the server and return control to the OpenVMS Debugger.
Using Ctrl/G is a handy way to interrupt the debugger, if you forgot to set a breakpoint and want to do it before continuing, for example. Use the
GOcommand orSTEPcommand to continue debugging the server.Use Ctrl/Z or the
EXITcommand to stop the debugging session from theDBG>prompt. When you complete a debugging session, you stop the server that you are debugging.
8.3.3. Replacing a Faulty Server
Correct the code.
Rebuild the server image.
Place the server image in the location specified in the SERVER IMAGE IS statement in the task group definition.
- Use the
ACMS/REPLACE SERVERoperator command to run down the server processes that are executing the faulty server code and create new processes running the corrected image. You can do this without interrupting the live application. For example:$ACMS/REPLACE SERVER VR_SERVER/CONFIRM
If a task has context in a server that you are replacing at the time the
REPLACE command is issued, the server does not run down until context
is released.
You must have OPER privilege to issue the ACMS/REPLACE SERVER command.
VSI ACMS for OpenVMS Managing Applications contains more information on replacing servers in a live application.
8.4. Determining Why Servers Stop Unexpectedly
Sometimes servers executing in a production environment stop unexpectedly. If you suspect that the server stopped as a result of system errors or errors in the step procedure, you need a way to trace the location of the error.
You can request ACMS to generate an OpenVMS process dump if a server stops unexpectedly. This produces a dump file that contains the context of the process when the server stopped. You can then analyze the contents of the dump file for clues as to why the server stopped.
To get a server process dump, you can include the SERVER PROCESS DUMP clause in the ACMS
application definition or use the ACMS/MODIFY APPLICATION command. These
two methods are explained in the next section.
8.4.1. Collecting Server Information in a Dump File
The initialization procedure, termination procedure, or a step procedure signals a FATAL (F) error.
The initialization procedure returns a bad status with a severity level of FATAL (F), ERROR (E), or WARNING (W).
Channels to the terminal are left open after the procedure returns control to the task definition.
If you have problems with a particular server, set up the server to provide server process dumps. Then run the task and try to reproduce the situation that causes the server to stop, so that ACMS generates a dump file for analyzing the problem.
First, enable or disable server process dumps in the application definition by using the
SERVER PROCESS DUMP clause. You can enable server process dumps in the running application
by using the ACMS/MODIFY APPLICATION operator command in an active
application. This command temporarily modifies the application definition parameters for the
current active application. If you stop and restart the application, the application
parameters are reset to their original values.
VSI ACMS for OpenVMS Managing Applications describes the ACMS/MODIFY APPLICATION command and its
qualifiers.
Another method of enabling server process dumps is to stop the application, replace the application definition with one that includes the SERVER PROCESS DUMP clause, rebuild the application, and then restart the application. This method permanently enables server process dumps for the server in the application definition.
.
.
.
SERVER ATTRIBUTES ARE
UPDATE_SERVER:
SERVER PROCESS DUMP;
END SERVER ATTRIBUTES;
.
.
.When the server terminates abnormally, ACMS writes the context for the server to a dump file located in the default directory for the server. The dump file has the same name as the server. At the same time that ACMS generates the dump file, it also writes a record to the ACMS audit trail log.
If, for some reason, ACMS is unable to generate a server process dump, ACMS writes an audit record to explain the failure. For example, there may be insufficient privileges for ACMS to write the dump file to the server's default directory.
See VSI ACMS for OpenVMS ADU Reference Manual for more information about including the server process dump qualifier in an application definition.
8.4.2. Analyzing Server Process Dumps
ANALYZE/PROCESS_DUMP to analyze the contents of a
server process dump file. For example:
$ANALYZE/PROCESS_DUMP/IMAGE=avertz_default:vr_update_server_.exe -_$vr_update_server.dmp
ANALYZE/PROCESS_DUMP returns an error if the server
process dump file and procedure server image are not located in the same directory. If you
encounter this problem, simply copy the procedure server image to the same directory as the
server process dump file, and reissue the ANALYZE/PROCESS_DUMP command. For
example:
$ANALYZE/PROCESS_DUMP/IMAGE=vr_update_server_.exe -_$vr_update_server.dmp
Be sure the dump file allows read (R) access before invoking the analyzer. For a complete
description of the debugger, see VSI OpenVMS Debugger Manual. VSI OpenVMS DCL Dictionary discusses using the
ANALYZE/PROCESS_DUMP DCL command.
Part II. Reference Material
This part of the manual contains reference materials on writing procedures and debugging ACMS tasks and procedures: ACMS programming services and ACMS Task Debugger commands.
Chapter 9. ACMS Programming Services
This chapter contains reference material for the programming services supplied by ACMS. Table 9.1, ''Summary of the ACMS Programming Services'' summarizes these services. The sections following the table list the services and provide detailed information about how to use each service.
|
Service |
Description |
|---|---|
|
ACMS$GET_TID |
Used by a server procedure to obtain the transaction ID currently associated with an executing task. |
|
ACMS$RAISE_NONREC_EXCEPTION |
Raises a nonrecoverable exception. This service is called if a step procedure detects an error from which it cannot recover. ACMS cancels the task when a step procedure raises a nonrecoverable exception. |
|
ACMS$RAISE_STEP_EXCEPTION |
Raises a step exception. This service is called if a step procedure detects an error from which it cannot recover, but which the task definition may be able to handle. |
|
ACMS$RAISE_TRANS_EXCEPTION |
Raises a transaction exception. This service is called if a step procedure detects an error from which it cannot recover, but which the task definition may be able to handle. |
Note
The raise-exception programming services differ in an important way from the superseded ACMSAD$REQ_CANCEL service; if a step procedure calls the ACMSAD$REQ_CANCEL service, the service immediately cancels the current task and does not return control to the step procedure.
In contrast, after storing the appropriate exception information, the raise-exception services all return control to the step procedure. Once the step procedure completes, the exception is raised in the task.
<name>.<access type><data type>.<pass mech>
comp_status.wl.r
|
Notation |
Symbol |
Meaning |
|---|---|---|
|
Access type |
r |
Read access only |
|
w |
Write and read access | |
|
Data type |
l |
Longword integer (signed) |
|
o |
Octaword integer (signed) | |
|
Passing mechanism |
r |
By reference |
For a complete explanation of all the OpenVMS data structures, data types, access mechanisms and passing mechanisms, see Guide to Creating OpenVMS Modular Procedures.
ACMS$GET_TID
ACMS$GET_TID — Used by a server procedure to obtain the transaction ID (TID) currently associated with an executing task.
Format
ACMS$GET_TID (tid.wo.r) Parameter
tid
Address of a 16-byte data structure into which ACMS writes the TID.
Return Status
|
Status |
Severity Level |
Description |
|---|---|---|
|
ACMS$_NORMAL |
Success |
Normal successful completion. |
|
ACMS$_TRANSNOTACT |
Error |
A distributed transaction is not active at this time. |
|
ACMS$_INSUFPRM |
Error |
Insufficient number of arguments supplied to this routine. You must specify a TID argument when you call ACMS$GET_TID. |
|
ACMS$_INVNUMARGS |
Error |
Too many arguments supplied to this service. Check the procedure and remove any extraneous arguments. |
|
ACMS$_NOGETTIDCANPROC |
Error |
Cannot obtain the transaction ID from a server cancel procedure. |
|
ACMS$_TASKNOTACTGT |
Fatal |
ACMS$GET_TID service may not be called when no task is active. |
Note
This service cannot be called by initialization, termination, or cancel procedures.
Examples
IDENTIFICATION DIVISION. PROGRAM-ID. VR-COMPLETE-CHECKOUT-PROC. ... DATA DIVISION. ... WORKING-STORAGE SECTION. * * Return status to pass to ACMS * 01 RET-STAT PIC S9(9) COMP. . . . * * Declare the global transaction context structure. This is * required for SQLPRE * EXEC SQL INCLUDE 'AVERTZ_SOURCE:VR_CONTEXT_STRUCTURE_INCLUDE.LIB' END-EXEC. . . . PROCEDURE DIVISION USING VR_RESERVATIONS_WKSP, VR_VEHICLES_WKSP GIVING RET-STAT. MAIN-PROGRAM. CALL "ACMS$GET_TID" USING CS-TID GIVING RET-STAT. . . .In this example from the AVERTZ sample application, the context structure is defined in the library VR_CONTEXT_STRUCTURE_INCLUDE.LIB.CS-TID is one field in that structure:
01 CONTEXT-STRUCTURE. 02 CS-VERSION PIC S9(9) COMP VALUE 1. 02 CS-TYPE PIC S9(9) COMP VALUE 1. 02 CS-LENGTH PIC S9(9) COMP VALUE 16. 02 CS-TID PIC X(16). 02 CS-END PIC S9(9) COMP VALUE 0.
ACMS$RAISE_NONREC_EXCEPTION
ACMS$RAISE_NONREC_EXCEPTION — Raises a nonrecoverable exception if a step procedure detects an error from which it cannot recover. ACMS cancels the current task when a nonrecoverable exception is raised.
Format
ACMS$RAISE_NONREC_EXCEPTION ([exception_code.rl.r]) Parameter
exception_code
Optional address of a longword containing the exception code.
Return Status
|
Status |
Severity Level |
Description |
|---|---|---|
|
ACMS$_NORMAL |
Success |
Normal successful operation; the nonrecoverable exception is raised and the task is canceled as soon as the step procedure completes. |
|
ACMS$_EXCPTNACTIVE |
Error |
An exception of the same or higher level has already been raised. The existing exception is raised in the task as soon as the step procedure completes. |
|
ACMS$_INVNONRECEXCCODE |
Error |
An invalid nonrecoverable exception code was passed to the service. A nonrecoverable exception is raised, and the task is canceled with the ACMS$_INVNONRECEXCCODE failure status as soon as the step procedure completes. |
|
ACMS$_NOEXCPTNCANPROC |
Error |
Cannot raise an exception from a server cancel procedure. |
|
ACMS$_TSKCANINVARGS |
Error |
Too many arguments were supplied to this service. A nonrecoverable exception is raised, and the task is canceled with the ACMS$_TSKCANINVARGS failure status as soon as the step procedure completes. |
|
ACMS$_TASKNOTACTNRE |
Fatal |
ACMS$RAISE_NONREC_EXCEPTION service may not be called when no task is active. |
Notes
If an exception code is not supplied, ACMS uses ACMS$_NONRECEXCPTN_PROCSVR; ACMS-E-NONRECEXCPTN_PROCSVR, "Exception resulted from a procedure server calling ACMS$RAISE_NONREC_EXCEPTION." If an exception code is supplied, it must be a failure status.
If an exception code is supplied that is not a failure status, then ACMS cancels the task with a status of ACMSEXC-E-INVNONRECEXCCODE, "Task canceled: invalid exception code passed to ACMS$RAISE_NONREC_EXCEPTION."
ACMS sets the appropriate exception information when this service is called; however, the exception is not raised in the task until the step procedure completes. Therefore, a step procedure should return as soon as possible after calling the ACMS$RAISE_NONREC_EXCEPTION service.
This service cannot be called from a cancel procedure or from an initialization or a termination procedure.
Example
IF RET-STAT NOT SUCCESS THEN
CALL "ACMS$RAISE_NONREC_EXCEPTION" GIVING RSTATIn this example, if the return status is not success, then the procedure raises a nonrecoverable exception in the task.
ACMS$RAISE_STEP_EXCEPTION
ACMS$RAISE_STEP_EXCEPTION — Raises a step exception if a step procedure detects an error from which it cannot recover but which the task definition may be able to handle. When a step procedure raises a step exception, the exception falls under the control of the exception handler defined for the processing step or outer-block step, if one exists.
Format
ACMS$RAISE_STEP_EXCEPTION ([exception_code.rl.r]) Parameter
exception_code
Optional address of a longword containing the exception code.
Return Status
|
Status |
Severity Level |
Description |
|---|---|---|
|
ACMS$_NORMAL |
Success |
Normal successful operation; the step exception is raised in the task as soon as the step procedure completes. |
|
ACMS$_EXCPTNACTIVE |
Error |
An exception of the same or higher level has already been raised. The existing exception is raised in the task as soon as the step procedure completes. |
|
ACMS$_INVSTPEXCCODE |
Error |
An invalid step exception code was passed to the service. A nonrecoverable exception is raised, and the task is canceled with the ACMS$_INVSTPEXCCODE failure status as soon as the step procedure completes. |
|
ACMS$_NOEXCPTNCANPROC |
Error |
Cannot raise an exception from a server cancel procedure. |
|
ACMS$_TSKCANINVARGS |
Error |
Too many arguments were supplied to this service. A nonrecoverable exception has been raised, and the task is canceled with the ACMS$_TSKCANINVARGS failure status as soon as the step procedure completes. |
|
ACMS$_TASKNOTACTSE |
Fatal |
ACMS$RAISE_STEP_EXCEPTION service may not be called when not task is active. |
Notes
If an exception code is not supplied, ACMS uses ACMS$_STPEXCPTN_PROCSVR; ACMS-E-STPEXCPTN_PROCSVR, "Exception resulted from a procedure server calling ACMS$RAISE_STEP_EXCEPTION." If an exception code is supplied, it must be a failure status.
If an exception code is supplied that is not a failure status, then ACMS cancels the task with a status of ACMSEXC-E-INVSTPEXCPTNCODE, "Task canceled: invalid step exception code passed to ACMS$RAISE_STEP_EXCEPTION."
ACMS stores the appropriate exception information when this service is called; however, the exception is not raised in the task until the step procedure completes. Therefore, a step procedure should return as soon as possible after calling the ACMS$RAISE_STEP_EXCEPTION service.
This service cannot be called from a cancel procedure or from an initialization or a termination procedure.
Example
SQL-ERROR-HANDLER.
CALL "ACMS$RAISE_STEP_EXCEPTION" USING
BY REFERENCE RET-STAT.In this example, the SQL error handler raises a step exception that is handled in the task.
ACMS$RAISE_TRANS_EXCEPTION
ACMS$RAISE_TRANS_EXCEPTION — Raises a transaction exception if a step procedure detects an error from which it cannot recover but which the task definition may be able to handle. When a step procedure raises a transaction exception, the exception falls under the control of the exception handler defined for the transaction step or outer-block step, if one exists.
Format
ACMS$RAISE_TRANS_EXCEPTION ([exception_code.rl.r]) Parameter
exception_code
Optional address of a longword containing the exception code.
Return Status
|
Status |
Severity Level |
Description |
|---|---|---|
|
ACMS$_NORMAL |
Success |
Normal successful operation; the transaction exception is raised in the task as soon as the step procedure completes. |
|
ACMS$_INVTRANSEXCCODE |
Error |
An invalid transaction exception code was passed to the service. A nonrecoverable exception has been raised, and the task is canceled with the ACMS$_INVTRANSEXCCODE failure status as soon as the step procedure completes. |
|
ACMS$_EXCPTNACTIVE |
Error |
An exception of the same or higher level has already been raised. The existing exception is raised in the task as soon as the step procedure completes. |
|
ACMS$_NOEXCPTNCANPROC |
Error |
Cannot raise an exception from a server cancel procedure. |
|
ACMS$_TRANSEXCNOTACT |
Error |
The ACMS$RAISE_TRANS_EXCEPTION service was called by a step procedure, but a transaction was not active. A nonrecoverable exception has been raised, and the task is canceled with the ACMS$_TRANSEXCNOTACT failure status as soon as the step procedure completes. |
|
ACMS$_TSKCANINVARGS |
Error |
Too many arguments were supplied to this service. A nonrecoverable exception has been raised, and the task is canceled with the ACMS$_TSKCANINVARGS failure status as soon as the step procedure completes. |
|
ACMS$_TASKNOTACTTE |
Fatal |
ACMS$RAISE_TRANS_EXCEPTION service may not be called when no task is active. |
Notes
If an exception code is not supplied, ACMS uses ACMS$_TRANSEXCPTN_PROCSVR; ACMS-E-TRANSEXCPTN_PROCSVR, "Exception resulted from a procedure server calling ACMS$RAISE_TRANS_EXCEPTION." If an exception code is supplied, it must be a failure status.
If an exception code is supplied that is not a failure status, then ACMS cancels the task with a status of ACMSEXC-E-INVTRANSEXCCODE, "Task canceled: invalid step exception code passed to ACMS$RAISE_TRANS_EXCEPTION."
If a step procedure calls the ACMS$RAISE_TRANS_EXCEPTION service when a transaction is not active, then ACMS cancels the task with a status of ACMS$_TRANSEXCNOTACT; ACMS-E-TRANSEXCNOTACT, "Task canceled: ACMS$RAISE_TRANS_EXCEPTION called when no transaction active."
ACMS sets the appropriate exception information when this service is called; however, the exception is not raised in the task until the step procedure completes. Therefore, a step procedure should return as soon as possible after calling the ACMS$RAISE_TRANS_EXCEPTION service.
This service cannot be called from a cancel procedure or from an initialization or a termination procedure.
Example
SQL-ERROR-HANDLER.
CALL "ACMS$RAISE_TRANS_EXCEPTION" USING
BY REFERENCE RDB$LU_STATUS.
EXIT PROGRAM.The previous example shows how to raise a transaction exception in the error-handling section of a COBOL procedure.
Chapter 10. ACMS Task Debugger Commands
This chapter lists the commands available with the ACMS Task Debugger. You can use these commands to run an ACMS task without starting an application, to control the task, and to examine and change the contents of the workspaces the task uses as it runs.
@ (At sign)
@ (At sign) — Runs the debugger commands contained in the named file. The file can contain any ACMS
Task Debugger command, including another at-sign command. When the ACMS Task Debugger reaches an
EXIT command or the end of the file, it returns control to the terminal or
command procedure that issued the at-sign command.
Format
@ file-spec Parameter
file-spec
The OpenVMS file specification of the command procedure to be run. The default device and directory are your current default device and directory. The default file type is .COM. Do not enclose the file specification in single or double quotation marks.
Notes
The ACMS Task Debugger does not recognize a SET VERIFY command. When the
command procedure runs, the commands in the file are not displayed on the terminal screen.
Include comments in the command file by preceding them with an exclamation mark (!).
Examples
ACMSDBG>@VRDBG.COMThis example shows how to run the command procedure whose file specification is VRDBG.COM; it is in the current default directory. The following example is a command procedure.
! Command procedure for debugging tasks using the VR_SERVER. ! ASSIGN /SERVER=VR_SERVER SYS$SAMPLE:VRFILE.DAT VR_FILE START VR_SERVER
In this example, the equivalence name SYS$SAMPLE:VRFILE.DAT is assigned to the process logical name VR_FILE for the server named VR_SERVER. The command file VRDBG.COM specifies this assignment.
ACCEPT
ACCEPT — Accepts calls from an agent program.
Format
ACCEPT [/qualifier] |
Command Qualifier |
Default |
|---|---|
|
/CONTINUOUS |
None |
Qualifier
- /CONTINUOUS
Specifies that the Task Debugger can accept multiple consecutive task selections from agent programs.
Notes
One or more agent programs can call tasks, but the ACCEPT command
accepts only one task selection at a time. You must type the ACCEPT command
each time you want the Task Debugger to accept another call from an agent program unless you
specify the /CONTINUOUS qualifier. The /CONTINUOUS
qualifier allows the Task Debugger to accept subsequent task calls without entering the
ACCEPT command each time. After you type the ACCEPT or
ACCEPT/CONTINUOUS command, the Task Debugger waits until the agent program
calls a task. Then the task executes in the Task Debugger.
Before the agent program calls a task, use Ctrl/G to return to the
ACMSDBG> prompt if you want to enter more Task Debugger commands before executing
the task. This discontinues the effect of the /CONTINUOUS qualifier. To
resume waiting for the task call, enter the GO command.
Tasks selected by agent programs cannot be canceled using the CANCEL
TASK command.
Example
ACMSDBG>ACCEPT/CONTINUOUS
This example allows the Task Debugger to accept consecutive calls to tasks without
reentering the ACCEPT command for each task selection.
ASSIGN
ASSIGN — Assigns a process logical name for a server.
Format
ASSIGN [/qualifier] equivalence-name
logical-name |
Command Qualifier |
Default |
|---|---|
|
/SERVER=server-name |
/SERVER=current-server |
Parameters
equivalence-name
The OpenVMS file specification or other string assigned to the logical name. The string must conform to the standards for equivalence names, which are explained in VSI OpenVMS DCL Dictionary.
logical-name
The 1- to 63-character process logical name assigned. The logical name must conform to the standards for logical names as explained in VSI OpenVMS DCL Dictionary.
Qualifier
- /SERVER=server-name
Names the server for which the logical name is assigned. The server name must be the same as the name used in a Task Debugger
STARTcommand; that is, it must be the name assigned to the server in the task group definition. The default server name is the one named in the most recentSET SERVERcommand.
Note
When ACMS starts a server, it creates the server with all the logical names specified up to that point. Therefore, to assign logical names for a server, assign them before starting the server.
Examples
ACMSDBG>ASSIGN SYS$SAMPLE:VRFILE.DAT VR_FILEIn this example, the equivalence name SYS$SAMPLE:VRFILE.DAT is assigned to the process logical name VR_FILE for the current server.
ACMSDBG>ASSIGN /SERVER=VR_SERVER SYS$SAMPLE:VRFILE.DAT VR_FILEIn this example, the equivalence name SYS$SAMPLE:VRFILE.DAT is assigned to the process logical name VR_FILE for the server named VR_SERVER.
CANCEL
      BREAK
CANCEL BREAK — Removes one or more breakpoints from a task or from all tasks.
Format
CANCEL BREAK [/qualifiers]
[breakpoint] |
Command Qualifier |
Default |
|---|---|
|
/ALL[=task-name] |
None |
Parameter
breakpoint
Names a breakpoint to cancel in the current task. See the entry for the SET BREAK command for the format of
this parameter.
Qualifier
- /ALL
Declares that all breakpoints in all tasks or in one task are to be canceled. If you include an equal sign (=) and task name in the
/ALLqualifier, the task name must be the name of the task in the task group definition.
Note
You must include either the /ALL qualifier or the
breakpoint parameter in the CANCEL BREAK command.
Examples
ACMSDBG>CANCEL BREAK VR_RESERVE_TASK$STEP_1$BEGINThis example shows how to cancel the breakpoint at the beginning of the first step of the Vehicle Rental Reserve Car Task, VR_RESERVE_TASK.
ACMSDBG>CANCEL BREAK/ALL=VR_RESERVE_TASKThis example shows how to cancel all task-level breakpoints in the task VR_RESERVE_TASK.
CANCEL TASK
CANCEL TASK — Cancels the current task.
Format
CANCEL TASK Notes
You can use the CANCEL TASK command at the ACMSDBG> prompt
when there is an active task that was started with the ACMSDBG SELECT
command. However, you cannot use this command to cancel a task that was submitted by an agent
program.
To display the ACMSDBG> prompt when you are not at a breakpoint or when you
are at an OpenVMS Debugger prompt, press Ctrl/G.
When you use this command, the OpenVMS Debugger runs the cancel action if any is defined for the task. If the task has context in a server when it is canceled, the cancel procedure (if any) for that server is also run.
Example
ACMSDBG>CANCEL TASK
This example shows how to cancel the current task.
CANCEL TRANSACTION_TIMEOUT
CANCEL TRANSACTION_TIMEOUT — Cancels any transaction timeout period previously set.
Format
CANCEL TRANSACTION_TIMEOUT Notes
You can use the CANCEL TRANSACTION_TIMEOUT command at the
ACMSDBG> prompt when you have already set a transaction timeout period. Use the
command when you have finished testing your transaction timeout handling.
Example
ACMSDBG>CANCEL TRANSACTION_TIMEOUT
This example shows how to cancel the current transaction timeout.
DEPOSIT
DEPOSIT — Puts a value into a workspace field.
Format
DEPOSIT [/qualifiers]
workspace-field-name=value Parameters
workspace-field-name
The name of a field in a workspace defined for the task. The value parameter is put into
this field. Use the symbol for current location (.) to indicate that the field named in the last
DEPOSIT or EXAMINE command is the field in which to put a
value.
value
The data put into the workspace field. The qualifiers used with the
DEPOSIT command define the length and data type of the value.
Qualifiers
When the Task Debugger receives a DEPOSIT command, it passes that
command directly to the OpenVMS Debugger. The qualifiers for the DEPOSIT
command are the same qualifiers available for the DEPOSIT command for the
OpenVMS Debugger. These qualifiers determine the data type used to display the information in
the workspace field. See VSI OpenVMS Debugger Manual for a list of available
qualifiers.
Notes
You can use the DEPOSIT command only if a task is active.
Both the Task Debugger and the OpenVMS Debugger look at the same copy of the workspace. If
you change a workspace value from the Task Debugger (ACMSDBG>), you see the changes
in the OpenVMS Debugger; if you change a workspace value from the OpenVMS Debugger
(DBG>), you see the changes in the Task Debugger.
Example
ACMSDBG>DEPOSIT RESERVATION_NUMBER = "000121"
This example shows how to deposit the 6-byte ASCII value 000121 in the RESERVATION_NUMBER field.
EXAMINE
EXAMINE — Displays the contents of a workspace field.
Format
EXAMINE [/qualifiers] workspace-field-name
[OF workspace-record-name] Parameters
workspace-field-name
The workspace field to be read by the EXAMINE command. Use the symbol
for current location (.) to indicate that the field named in the last DEPOSIT
or EXAMINE command is the field you want to examine.
workspace-record-name
If the workspace-field-name is not unique, use the
workspace-record-name to specify the name of the workspace that contains the field
you want to examine.
Qualifiers
When the ACMS Task Debugger receives an EXAMINE command, it passes that
command directly to the OpenVMS Debugger. The qualifiers for the EXAMINE
command are the same qualifiers as for the EXAMINE command for the OpenVMS
Debugger. These qualifiers determine the data type used to display information in the workspace
field. See VSI OpenVMS Debugger Manual for a list of available
qualifiers.
Notes
You can use the EXAMINE command only if a task is active.
Both the ACMS Task Debugger and the OpenVMS Debugger look at the task's copy of a workspace.
Example
ACMSDBG>EXAMINE RESERVATION_NUMBER OF VR_RECORDRESERVATION_NUMBER OF VR_RECORD: +121
This example shows how to display the contents of the RESERVATION_NUMBER field of the VR_RECORD workspace.
EXIT
EXIT — Ends the debugging session or ends the execution of commands in a command procedure.
If typed after the ACMSDBG> prompt, the EXIT command stops all
subprocesses started by the Task Debugger and returns to DCL command level. If included in a
command procedure, the EXIT command returns control to the command stream
that started the command procedure.
Format
EXIT Example
ACMSDBG>EXIT
This example shows how to end the current Task Debugger session.
GO
GO — Continues a task after a breakpoint. Also returns you to a server process from which
you have exited with Ctrl/G and continues any command after an
INTERRUPT command.
Format
GO Note
The GO command always restarts the task at the breakpoint where it
stopped.
Examples
ACMSDBG>SELECT VR_RESERVE_TASKTask breakpoint at VR_RESERVE_TASK$TASK$BEGINACMSDBG>GOThis example shows how to start the task VR_RESERVE_TASK, which breaks at $BEGIN on the root step. The
GOcommand restarts the task VR_RESERVE_TASK at that breakpoint.ACMSDBG>INTERRUPT VR_SERVERTask is in server VR_SERVERDBG>SET BREAK UPDATE_RECORDDBG>GOCtrl/G
ACMSDBG>GOThis example shows how to return to the OpenVMS Debugger prompt (
DBG>) so that you can set breakpoints or use other OpenVMS Debugger commands in the server VR_SERVER. The example then shows how to return to theACMSDBG>prompt and resume task execution.
HELP
HELP — Displays information about ACMS Task Debugger commands, step points, control characters, and symbols.
Format
HELP [topic] [...] Parameter
topic
A Task Debugger command, step point, or symbol about which information is available. Topics can have subtopics about which additional information is available.
Examples
ACMSDBG>HELPThis example shows how to display general information about the Task Debugger.
ACMSDBG>HELP EXAMINEThis example shows how to display information about how to use the Task Debugger
EXAMINEcommand.
INTERRUPT
INTERRUPT — Interrupts a server and gives control to the OpenVMS Debugger in that server
process. Use this command to get the DBG> prompt in order to set breakpoints,
examine addresses, or change values in a server that has already been started.
Format
INTERRUPT server-name [/qualifiers] |
Command Qualifier |
Default |
|---|---|
|
/[TASK=task-name] |
None |
Parameter
server-name
The name of a server in the task group definition. This parameter is required.
Qualifier
- /TASK
A called task that participates in a distributed transaction started by a parent task might need to use the same server as the parent task. In a distributed transaction, different server processes are started and allocated to the parent and to the called tasks. The
/TASKqualifier allows you to specify the server process that you want to interrupt.If you do not specify a task name, ACMS checks for an active task:If there is an active task, and the task has context in an instance of the specified server, ACMS interrupts that instance of the server.
If no task is active, or if the active task does not have context in the specified server, ACMS interrupts the first free instance of the specified server. The first free server instance is the process that ACMS uses the next time a task calls a procedure in this server.
If you specify a task name, then ACMS interrupts the server process currently owned by that task. If the named task is not currently retaining context in the named server, this command returns an error.
If you debug a recursive task, supplying a task name does not have any effect; the
/TASKqualifier is ignored and the rules for interrupting a server when no task name is supplied are followed.
Notes
The START server command must be completed before interrupting the
server. If you use Ctrl/G to return to the ACMSDBG> prompt before
the server is completely started, you will not be able to complete the server startup and will
experience unpredictable results.
When you finish with your debugging commands, type GO to resume the
execution of the server. Then press Ctrl/G to end the
INTERRUPT command and return to the Task Debugger ACMSDBG>
prompt.
When linking server images that you are going to debug, take the default of
/TRACEBACK. If you link a server with /NOTRACEBACK, you
cannot interrupt the server because the INTERRUPT command causes a fatal
error in the server. Instead, use the STOP command to stop the server and
return to the ACMSDBG> prompt. You can then relink and restart the server.
Example
ACMSDBG>INTERRUPT VR_SERVERTask is in server VR_SERVERDBG>SET BREAK UPDATE_RECORDDBG>GO
Ctrl/G
ACMSDBG>This example shows how to return to the OpenVMS Debugger prompt (DBG>) so that
you can set breakpoints or use other OpenVMS Debugger commands in the server VR_SERVER. The
example also shows how to return to the ACMSDBG> prompt in order to resume task
execution.
SELECT
SELECT — Selects and starts a task.
Format
SELECT task-name [selection-string] Parameters
task-name
The name of the task selected, which is assigned in the task group definition. This parameter is required.
selection-string
Additional information the Task Debugger passes to the task in the ACMS$SELECTION_STRING workspace. Enclose the selection string in quotation marks if the data has embedded spaces.
Note
Select only one task at a time. If a selected task has not completed yet, use
CANCEL TASK to end that task before selecting another.
Examples
ACMSDBG>SELECT VR_RESERVE_TASKThis example shows how to select and start the VR_RESERVE_TASK.
ACMSDBG>SELECT VR_RESERVE_TASK 000121This example shows how to start the VR_RESERVE_TASK. It also shows how to pass the decimal number 000121 to the ACMS$SELECTION_STRING workspace.
SET BREAK
SET BREAK — Sets a breakpoint in a task. Breakpoints can be set at specific locations or at specific events. Table 7.3, ''Location Breakpoint Symbols'' contains location breakpoint symbols. Table 7.4, ''Event Breakpoint Symbols'' contains event breakpoint symbols.
Format
SET BREAK task-name\step-name\location
SET BREAK task-name\event
Parameters
task-name
Always include a task name in the SET BREAK command.
step-name
The step in the task at which a breakpoint is set.
If you omit the step-name in a location breakpoint, the break is set at the root step.
location
Location breakpoint symbols are $BEGIN, $ACTION, $HANDLER, and $END.
If you omit the location, the breakpoint is set at the beginning of the step.
event
Event breakpoint symbols are $EXCEPTION and $CANCEL.
Notes
You can use the SET BREAK command from the ACMSDBG> prompt
only to set breakpoints in the task definition. Use the SET BREAK command
from the DBG> prompt to set breakpoints in user procedure code.
You can set breakpoints for tasks that are not active.
Examples
ACMSDBG>SET BREAK VR_RESERVE_TASKIn this example, a breakpoint is set at the beginning of the VR_RESERVE_TASK.
ACMSDBG>SET BREAK VR_RESERVE_TASK\$STEP_1\$BEGINIn this example, a location breakpoint is set at the beginning of the first step in VR_RESERVE_TASK.
ACMSDBG>SET BREAK VR_RESERVE_TASK\$CANCELIn this example, a
CANCELevent breakpoint is set. This breakpoint is reached when any event that causes a task cancellation occurs.
SET SERVER
SET SERVER — Names the server used as the default for the ASSIGN
command.
Format
SET SERVER server-name Parameter
server-name
The name of the server, taken from the task group definition, to set as the current server
for ASSIGN commands. This parameter is required.
Notes
The SET SERVER command does not affect which servers the
START and STOP commands handle.
The SET SERVER command has no default.
If you do not use the SET SERVER command, you must use the
/SERVER qualifier on the ASSIGN command.
Example
ACMSDBG>SET SERVER VR_SERVER
This example shows how to establish VR_SERVER as the current server for
ASSIGN commands.
SET TRANSACTION_TIMEOUT
SET TRANSACTION_TIMEOUT — Sets the current transaction timeout period. This allows you to verify that your task correctly handles a transaction timeout.
Format
SET TRANSACTION_TIMEOUT seconds Parameter
seconds
The number of seconds to set as the current transaction timeout limit. This parameter is required.
Notes
If you do not set a transaction timeout, your transactions will never time out.
Once a transaction timeout limit is set using this command, if a transaction does not complete in the specified amount of time, the Task Debugger raises a transaction exception.
Example
ACMSDBG>SET TRANSACTION_TIMEOUT 60
This example shows how to establish 60 seconds as the transaction timeout limit.
SHOW BREAK
SHOW BREAK — Displays breakpoints that have been set in the task.
Format
SHOW BREAK Example
ACMSDBG>SHOW BREAK
This example shows how to display all breakpoints that you have set (and not yet canceled) in the task during the current Task Debugger session.
SHOW SERVERS
SHOW SERVERS — Displays all servers that have started (and not stopped) in the current Task Debugger session.
Format
SHOW SERVERS Example
ACMSDBG>SHOW SERVERSVR_SERVER
This example shows that VR_SERVER is the only server currently running in this Task Debugger session.
SHOW TRANSACTION_TIMEOUT
SHOW TRANSACTION_TIMEOUT — Displays the value of the current transaction timeout.
Format
SHOW TRANSACTION_TIMEOUT EXAMPLE
ACMSDBG>SHOW TRANSACTION_TIMEOUTTransaction timeout value is 60 seconds
This example shows how to display the transaction timeout currently set.
SHOW VERSION
SHOW VERSION — Displays the version number of the Task Debugger.
Format
SHOW VERSION EXAMPLE
ACMSDBG>SHOW VERSIONACMS Task Debugger V5.0
This example shows how to display the version number of the Task Debugger image that the user is running.
START
START — Starts one or more instances of one or more servers.
Format
START [/qualifier] [server-name]
[,...] |
Command Qualifier |
Default |
|---|---|
|
/ALL |
None |
Parameter
server-name
The name of one or more servers, from the task group definition. Separate multiple server names with commas.
In most cases, you need only one instance of a server to be active. The instance that is started is used by each task that uses that server.
In a distributed transaction, however, a called task that participates in a distributed
transaction started by a parent task might need to use the same server as the parent task.
Different server processes are started and allocated to the parent and the called task. You can
use the START command to start multiple instances of the same server.
Qualifier
- /ALL
Starts all reusable servers defined in the task group database (.TDB) being used for the current debugger session.
Notes
Always include either a server name or /ALL in the
START command.
The servers named in the START command go through startup as if you were
starting them with the ACMS/START APPLICATION command. The Task Debugger runs
all initialization procedures and allocates group workspaces. If the server image was linked
with /DEBUG, the START server command gives control to the
OpenVMS Debugger in the server process.
The number of active server processes allowed for the debugging session is limited. A user is allowed up to four times the number of servers defined in the task group that is being debugged. The number of server instances allowed per server, however, is unlimited. If a task group has two servers, for example, you have can eight server instances started. If need be, you can have eight instances of one server and none of the other.
Examples
ACMSDBG>START VR_SERVER,VR_SERVERThis example shows how to start two processes for the server VR_SERVER.
ACMSDBG>START/ALLThis example shows how to start one instance of all servers defined in the task group database file (.TDB) used in the current debugger session.
STEP
STEP — Runs the task from the current breakpoint to the next task-level breakpoint. When
stepping through a task that was called by another task, the Task Debugger proceeds through all
the steps in the called task until the task completes. Control then returns to the parent task;
continue to enter the STEP command for the Task Debugger to step through the
parent task.
Format
STEP Note
This command is valid only when you select a task using the SELECT or
ACCEPT commands.
Example
ACMSDBG>STEP
This example shows how to move the current task to the next task-level breakpoint.
STOP
STOP — Stops one or more servers.
Format
STOP [/qualifier]
[server-name][,...] |
Command Qualifier |
Default |
|---|---|
|
/ALL |
None |
Parameter
server-name
The name of the server to stop. The name of the server comes from the task group definition. Separate multiple server names with commas.
Qualifier
- /ALL
Stops all instances of all servers included in the task group database file (.TDB) used in the current debugger session.
Notes
Use either the server-name parameter or the /ALL qualifier. If you use
the server-name parameter, ACMS stops a single server process and displays a message if other
server processes remain active for the same server.
The servers named in the STOP command go through shutdown as if you were
stopping them with the ACMS/STOP APPLICATION command. All termination
procedures are run.
Examples
ACMSDBG>STOP VR_SERVER,VR_UPDATE_SERVERThis example shows how to stop the servers VR_SERVER and VR_UPDATE_SERVER.
ACMSDBG>STOP/ALLThis example shows how to stop all servers defined in the task group database file (.TDB) used in the current debugger session.
Part III. Appendixes
This part of the manual contains supplemental information that may be useful when writing server procedures for ACMS applications.
Appendix A, "Summary of ACMS System Workspaces" contains a summary of ACMS system workspaces. Appendix B, "Libraries Included in AVERTZ Sample Procedures" lists the libraries included in the AVERTZ sample procedures. Appendix C, "Superseded Features" describes superseded features of ACMS.
Appendix A. Summary of ACMS System Workspaces
ACMS$PROCESSING_STATUS
ACMS$SELECTION_STRING
ACMS$TASK_INFORMATION
Each ACMS system workspace has a different purpose. All of the Common Data Definition Language (CDDL) record definitions for these workspaces are stored in the CDD$TOP.ACMS$DIR.ACMS$WORKSPACES directory in the CDD. This appendix lists these workspaces and explains the uses of each.
A.1. ACMS$PROCESSING_STATUS System Workspace
The ACMS$PROCESSING_STATUS workspace handles processing status information. It has four fields, each for a different part of that information. The CDD location of the CDDL record definition for this workspace is CDD$TOP.ACMS$DIR.ACMS$WORKSPACES.ACMS$PROCESSING_STATUS.
|
ACMS$L_STATUS | |
|
Type |
Signed longword |
|
Description |
Contains the return status from the last processing step. The initial value of the ACMS$L_STATUS field is set to 1 (SUCCESS) when a task is started. |
|
ACMS$T_SEVERITY_LEVEL | |
|
Type |
Text |
|
Size |
1 character |
|
Description |
Contains a single-character severity level code representing the return status in the ACMS$L_STATUS field. The characters this field can contain are: S (SUCCESS), I (INFORMATION), W (WARNING), E (ERROR), F (FATAL), or ? (OTHER). The initial value of ACMS$T_SEVERITY_LEVEL is S. |
|
ACMS$T_STATUS_TYPE | |
|
Type |
Text |
|
Size |
1 character |
|
Description |
Contains a single-character severity level code representing the return status in the ACMS$L_STATUS field. G indicates the low bit in the ACMS$L_STATUS field is set to 1. B indicates the low bit is clear. The initial value of the ACMS$T_STATUS_TYPE field is G. |
|
ACMS$T_STATUS_MESSAGE/ACMS$T_STATUS_MESSAGE_LONG | |
|
Type |
Text |
|
Size |
80/132 characters |
|
Description |
ACMS$T_STATUS_MESSAGE is an 80-character variant of the 132 character ACMS$T_STATUS_MESSAGE_LONG field. When you use the GET ERROR MESSAGE clause, this field contains the error message associated with the return status code in ACMS$L_STATUS. The ACMS$T_STATUS_MESSAGE_LONG field is set initially to spaces. |
A.2. ACMS$SELECTION_STRING System Workspace
The ACMS$SELECTION_STRING workspace handles strings passed by a task submitter (terminal user) at task selection time. This workspace has a single field. The CDD location of the CDDL record definition for this workspace is CDD$TOP.ACMS$DIR.ACMS$WORKSPACES.ACMS$SELECTION_STRING.
|
ACMS$T_SELECTION_STRING | |
|
Type |
Text |
|
Size |
255 characters |
|
Description |
Contains the selection string provided by a terminal user at task selection time. If the user does not provide a selection string, ACMS sets the field to spaces. If the task is queued, the first 32 bytes of the selection string contain the queued task element ID. |
A.3. ACMS$TASK_INFORMATION System Workspace
The ACMS$TASK_INFORMATION workspace handles task execution information. It has ten fields, each for a different part of that information. The CDD location of the CDDL record definition for this workspace is CDD$TOP.ACMS$DIR.ACMS$WORKSPACES.ACMS$TASK_INFORMATION.
|
ACMS$AL_TASK_ID | |
|
Type |
Signed longword array |
|
Size |
4 longwords |
|
Description |
Contains the task ID in binary format for the current task instance; the ACMS$AL_TASK_ID field is a four-element longword array. It is possible for two task instances to have the same value if the tasks are selected on two different nodes. To ensure a unique task identifier, use both the ACMS$AL_TASK_ID field and the ACMS$T_SUBMITTER_NODE field. |
|
ACMS$L_TASK_SEQUENCE_NUMBER | |
|
Type |
Signed longword |
|
Description |
Contains the number of the current task instance within the current task. This field always contains 1 when the task is initially selected from a menu. ACMS increments this number each time the user repeats the task or chains to another task, thus starting a new task instance without returning to the menu. |
|
ACMS$T_TASK_NAME | |
|
Type |
Text |
|
Size |
31 characters |
|
Description |
Contains the task name as defined in the application under which the task is running. ACMS does not update this field when one task chains to another. |
|
ACMS$T_TASK_IO_DEVICE | |
|
Type |
Text |
|
Size |
8 characters |
|
Description |
Contains the device name for the task submitter. For remote users, the device name is always NL:. For local request I/O or terminal I/O users, this field includes the terminal device name. For stream I/O or no I/O, this field is set to spaces. If this field contains a device name (not spaces or NL:), then the device can be used by the task to perform I/O from a processing step. |
|
ACMS$AL_TASK_SUBMITTER_ID | |
|
Type |
Signed longword array |
|
Size |
4 longwords |
|
Description |
Contains the current terminal user's identification code for the user who started the current task instance. This field is a four-element longword array. |
|
ACMS$T_TASK_USERNAME | |
|
Type |
Text |
|
Size |
12 characters |
|
Description |
Contains the OpenVMS user name for the terminal user who started the current task instance. For remote tasks, this is the name of the proxy. |
|
ACMS$T_SUBMITTER_NODE_NAME | |
|
Type |
Text |
|
Size |
15 characters |
|
Description |
Contains the DECnet node name for the task submitter. |
|
ACMS$L_CALL_SEQUENCE_NUMBER | |
|
Type |
Signed longword |
|
Description |
Contains the call sequence number of the currently called task. ACMS increments this number each time a task calls another task. |
|
ACMS$T_SIGN_IN_USERNAME | |
|
Type |
Text |
|
Size |
12 characters |
|
Description |
Contains the OpenVMS user name of the user on the submitter node. If a submitter selects a remote task, then the user name under which that task runs may be different from the user name under which the submitter signed in. The contents of the ACMS$T_TASK_USERNAME are based on the proxy lookup and user name defaulting mechanism and may differ from the ACMS$T_SIGN_IN_USERNAME field. If a submitter selects a local task, the ACMS$T_SIGN_IN_USERNAME field is the same as the ACMS$T_TASK_USERNAME field. To distinguish between users that have the same name but reside on different nodes, use the ACMS$T_SIGN_IN_USERNAME field with the ACMS$T_SUBMITTER_NODE_NAME field to log the user name and the node location. |
|
ACMS$T_SIGN_IN_DEVICE | |
|
Type |
Text |
|
Size |
8 characters |
|
Description |
Contains the name of the device that was supplied to ACMS when the submitter signed in. For applications using the ACMS command process, this field contains a terminal device name. For applications using a user-written command process (agent), this field can contain a terminal device name, the name of a nonterminal device that the agent is handling, or the NL: device specification. Use the ACMS$T_SIGN_IN_DEVICE field in conjunction with the ACMS$T_SUBMITTER_NODE_NAME field to log the device name and its node location. Use both fields to distinguish between devices that have the same name but reside on different nodes. |
Appendix B. Libraries Included in AVERTZ Sample Procedures
This appendix lists the contents of the libraries referred to in procedures that are part of the AVERTZ sample application.
B.1. VR_MESSAGES_INCLUDE.LIB
* * AVERTZ messages * * * Informational * 01 MULCURECFND PIC S9(9) COMP VALUE IS EXTERNAL VR_MULCURECFND. 01 MULRSRECFND PIC S9(9) COMP VALUE IS EXTERNAL VR_MULRSRECFND. 01 VEUPGPRF PIC S9(9) COMP VALUE IS EXTERNAL VR_VEUPGPRF. 01 VEDNGPRF PIC S9(9) COMP VALUE IS EXTERNAL VR_VEDNGPRF. 01 CURECUPD PIC S9(9) COMP VALUE IS EXTERNAL VR_CURECUPD. 01 CURECINS PIC S9(9) COMP VALUE IS EXTERNAL VR_CURECINS. 01 CHKINCOMP PIC S9(9) COMP VALUE IS EXTERNAL VR_CHKINCOMP. 01 CHKOUTCOM PIC S9(9) COMP VALUE IS EXTERNAL VR_CHKOUTCOM. 01 RESVCOMP PIC S9(9) COMP VALUE IS EXTERNAL VR_RESVCOMP. 01 VERECFND PIC S9(9) COMP VALUE IS EXTERNAL VR_VERECFND. 01 RESSUCCNCLD PIC S9(9) COMP VALUE IS EXTERNAL VR_RESSUCCNCLD. * * Warning * 01 CURECNOTFND PIC S9(9) COMP VALUE IS EXTERNAL VR_CURECNOTFND. 01 RCRECNOTFND PIC S9(9) COMP VALUE IS EXTERNAL VR_RCRECNOTFND. 01 RERECNOTFND PIC S9(9) COMP VALUE IS EXTERNAL VR_RERECNOTFND. 01 RSRECNOTFND PIC S9(9) COMP VALUE IS EXTERNAL VR_RSRECNOTFND. 01 SIRECNOTFND PIC S9(9) COMP VALUE IS EXTERNAL VR_SIRECNOTFND. 01 VERECNOTFND PIC S9(9) COMP VALUE IS EXTERNAL VR_VERECNOTFND. 01 VRHRECNOTFND PIC S9(9) COMP VALUE IS EXTERNAL VR_VRHRECNOTFND. 01 NOTCHKOUT PIC S9(9) COMP VALUE IS EXTERNAL VR_NOTCHKOUT. 01 RESCNCLD PIC S9(9) COMP VALUE IS EXTERNAL VR_RESCNCLD. 01 CARCHKIN PIC S9(9) COMP VALUE IS EXTERNAL VR_CARCHKIN. 01 CARCHKOUT PIC S9(9) COMP VALUE IS EXTERNAL VR_CARCHKOUT. 01 RESCLOSED PIC S9(9) COMP VALUE IS EXTERNAL VR_RESCLOSED. 01 DLRENOTFND PIC S9(9) COMP VALUE IS EXTERNAL VR_DLRENOTFND. 01 NOCANCEL PIC S9(9) COMP VALUE IS EXTERNAL VR_NOCANCEL. 01 INACTIVE PIC S9(9) COMP VALUE IS EXTERNAL VR_INACTIVE. 01 DDTM_TIMEOUT PIC S9(9) COMP VALUE IS EXTERNAL VR_DDTM_TIMEOUT. * * Error * 01 NO_DUP PIC S9(9) COMP VALUE IS EXTERNAL VR_NO_DUP. 01 DEADLOCK PIC S9(9) COMP VALUE IS EXTERNAL VR_DEADLOCK. 01 INTEG_FAIL PIC S9(9) COMP VALUE IS EXTERNAL VR_INTEG_FAIL. 01 LOCK_CONFLICT PIC S9(9) COMP VALUE IS EXTERNAL VR_LOCK_CONFLICT. 01 CAR_UNAVAILABLE PIC S9(9) COMP VALUE IS EXTERNAL VR_CAR_UNAVAILABLE. 01 CHK_CANCL_ERR PIC S9(9) COMP VALUE IS EXTERNAL VR_CHK_CANCL_ERR. 01 HIST_WRITE_ERR PIC S9(9) COMP VALUE IS EXTERNAL VR_HIST_WRITE_ERR. 01 UPDATE_ERROR PIC S9(9) COMP VALUE IS EXTERNAL VR_UPDATE_ERROR. * * Fatal * 01 BILLERR PIC S9(9) COMP VALUE IS EXTERNAL VR_BILLERR. 01 DB_FATAL PIC S9(9) COMP VALUE IS EXTERNAL VR_DB_FATAL. 01 ICRECNOTFND PIC S9(9) COMP VALUE IS EXTERNAL VR_RCRECNOTFND.
B.2. VR_LITERALS_INCLUDE.LIB
01 C-ZERO PIC X VALUE "0". 01 C-NINE PIC X VALUE "9". 01 C-ONE PIC X VALUE "1". 01 NEG-ONE PIC S9(4) COMP VALUE -1.
B.3. VR_SQL_STATUS_INCLUDE.LIB
* * Define the SQL return status * 01 SQL_NOTFOUND PIC S9(9) COMP VALUE +100. 01 SQL_NO_DUP PIC S9(9) COMP VALUE -803. 01 SQL_DLOCK PIC S9(9) COMP VALUE -913. 01 SQL_INTEGFAIL PIC S9(9) COMP VALUE -1001. 01 SQL_LOCK PIC S9(9) COMP VALUE -1003. 01 SQL_SELMORVAL PIC S9(9) COMP VALUE -811. *
B.4. VR_CONTEXT_STRUCTURE_INCLUDE.LIB
01 CONTEXT-STRUCTURE.
    02 CS-VERSION           PIC S9(9) COMP VALUE 1.
    02 CS-TYPE              PIC S9(9) COMP VALUE 1.
    02 CS-LENGTH            PIC S9(9) COMP VALUE 16.
    02 CS-TID               PIC X(16).
    02 CS-END               PIC S9(9) COMP VALUE 0.
Appendix C. Superseded Features
This appendix describes features used in earlier versions of ACMS. Although you can continue to use these features, they have been superseded by new features and are considered to be declining functionality.
ACMSAD$REQ_CANCEL
ACMSAD$REQ_CANCEL — Cancels a task. ACMS writes the task cancellation to the audit trail log. When you include a reason parameter, the call also writes the reason for the cancellation to the audit trail log. This programming service is a declining feature. Starting with ACMS Version 3.2, use ACMS$RAISE_NONREC_EXCEPTION to raise an exception that cancels a task.
Format
ACMSAD$REQ_CANCEL ([reason.rl.r]) Parameter
reason
Optional longword address of the reason for canceling, passed by reference as a read-only longword value.
Return Status
|
Status |
Severity Level |
Description |
|---|---|---|
|
ACMS$_NORMAL |
Success |
Normal successful completion. |
|
ACMS$_PENDING |
Informational |
Successful operation pending asynchronous completion. |
|
ACMS$_EXCPTNACTIVE |
Error |
An exception of the same or higher level has already been raised. The existing exception is raised in the task as soon as the step procedure completes. |
|
ACMS$_INVREQCANREASON |
Error |
Task canceled: invalid cancel reasons passed to ACMS$_INVREQCANREASON. |
|
ACMS$_NOCANCELCANPROC |
Error |
ACMSAD$REQ_CANCEL service may not be called from a server cancel procedure. |
|
ACMS$_TASKNOTACTRC |
Fatal |
ACMSAD$REQ_CANCEL service may not be called when no task is active. |
Notes
The optional parameter reason must be a condition value. For example, the parameter can be a symbol in a message file you have created, or it can be an OpenVMS or RMS condition value.
If a reason (that is, an exception code) is not supplied, ACMS uses ACMS$_CANCEL_PROCSVR, "Cancel resulting from procedure server calling ACMSAD$REQ_CANCEL." If a reason is supplied, it must be a failure status. If a reason is supplied that is not a failure status, then ACMS cancels the task with a status of ACMS$_INVCANCELREASON, "invalid cancel reason."
The behavior of ACMSAD$REQ_CANCEL depends on whether or not AST delivery is enabled. If the ACMSAD$REQ_CANCEL service is called with AST delivery enabled, then the nonrecoverable exception is raised immediately, and the service does not return to the procedure. If the ACMSAD$REQ_CANCEL service is called with AST delivery disabled, then the service returns ACMS$_PENDING, and the nonrecoverable exception is raised when AST delivery is once again enabled. Note that the step procedure must enable AST delivery before completing.
This service cannot be called from a cancel procedure or from an initialization or a termination procedure.
Examples
WORKING-STORAGE SECTION.
 01 CNCL_MSG      PIC S9(5)
                     VALUE IS EXTERNAL "MSG_CANCEL".

 PROCEDURE DIVISION.
 .
 .
 .
 CALL "ACMSAD$REQ_CANCEL" USING CNCL_MSG.
In this COBOL example, MSG_CANCEL is a message symbol in an external message file. CNCL_MSG is a data item declared with MSG_CANCEL as its value.
CALL ACMSAD$REQ_CANCEL
This BASIC example shows how to cancel the task with the default reason of ACMS$_ACMSTP_CALL, ACMSI-E-ACMSTP_CALL, "Cancel resulting from procedure server calling ACMSAD$REQ_CANCEL."