VSI X.25 for OpenVMS Utilities Guide
- Software Version:
- VSI X.25 for OpenVMS Version 2.1
- Operating System and Version:
- VSI OpenVMS IA-64 Version 8.4-1H1 or higher
VSI OpenVMS Alpha Version 8.4-2L1 or higher
Preface
1. About VSI
VMS Software, Inc. (VSI) is an independent software company licensed by Hewlett Packard Enterprise to develop and support the OpenVMS operating system.
2. Intended Audience
This manual is intended for anyone who performs the following tasks:
Use and manage X.25 Mail
Use a host-based PAD to connect to a remote system
Use an X.29 terminal to connect to a remote OpenVMS system
Manage X.29 communication links
The manual assumes that you have a basic knowledge of OpenVMS.
The manual also assumes that anyone connecting to a remote system has a basic knowledge of data communications, and understands the role of a PAD in X.29 communications.
For use and management of X.25 Mail, it is assumed that you understand and have some experience with OpenVMS Mail.
For management of X.29 communication links, it is assumed that you understand and have some experience with:
Data communications
Packet switching
Local Area Networks
Wide Area Networks
OpenVMS system management
X.25 for OpenVMS functionality
The CCITT X.29 recommendation
3. Document Structure
The guide consists of 12 chapters. For ease of use the chapters are divided into three parts:
Part I,''Using and Managing X.25 Mail'' describes how to use and manage X.25 Mail. Part I,''Using and Managing X.25 Mail'' consists of two chapters:
Chapter 1, "Using X.25 Mail" describes how to use X.25 Mail to send and receive mail over X.25. It also details how to simplify the use of X.25 Mail by setting up logical names for destination nodes.
Chapter 2, "Managing X.25 Mail" details how to set up and manage call templates and filters, to define system-wide logical names for remote DTE addresses, and how to secure your system to prevent unauthorized use of the X.25 Mail facility.
Part II,''Using X.29'' describes how to use X.29. Part II,''Using X.29'' consists of five chapters:
Chapter 3, "Using an X.29 Terminal to Connect to a Remote System" describes how to connect to a remote DTE.
Chapter 4, "Controlling the Connection to the Remote DTE" describes how you can control the way your connection to a remote DTE behaves when you connect to the remote DTE.
Chapter 5, "Using PAD Commands to Control the Host-Based PAD" describes how to change the characteristics of the host-based PAD during a PAD session.
Chapter 6, "Using the Host-Based PAD in CCITT Mode" describes how to use an X.29 terminal to connect to a remote system, using a host-based PAD in CCITT mode.
Chapter 7, "Using a Remote OpenVMS System to Control Your X.29 Terminal" describes how to use a remote OpenVMS system to control the behavior of your X.29 terminal.
Part III,''Managing X.29 Communications'' describes how to manage X.29. Some of the tasks described in this part will be useful for experienced users of X.29. Part III,''Managing X.29 Communications'' consists of five chapters:
Chapter 8, "Overview of Managing X.29" provides an introduction to managing X.29. It provides an overview of how to manage templates and filters, how to set, display and change X.29 terminal characteristics, and how to change the operation of a PAD. Specific details of these management tasks are given in the following chapters.
Chapter 9, "Setting Default X.29 Terminal Characteristics" details how to set up system-wide default characteristics for X.29 terminals.
Chapter 10, "Changing Default X.29 Terminal Characteristics" describes how to change the characteristics of an X.29 terminal during an X.29 session.
Chapter 11, "Displaying Terminal Characteristics" details how to display the characteristics of an X.29 terminal.
Chapter 12, "Spooling an X.29 Terminal" details how to set up an X.29 terminal as a spooled device.
Two appendices are also included:
Appendix A, "PAD Parameters" describes the PAD parameters.
Appendix B, "Host-Based PAD Initial Profile" contains the initial PAD parameter profile.
4. Related Documents
The following sections describe VSI DECnet-Plus for OpenVMS, VSI X.25 for OpenVMS, and VSI OpenVMS manuals that either directly describe the X.25 for OpenVMS software or provide related information.
VSI DECnet-Plus for OpenVMS Documentation
VSI OpenVMS DECnet-Plus Introduction and User's Guide
This manual provides general information on DECnet-Plus and describes the concept of packet switching data networks.
VSI OpenVMS DECnet-Plus Installation and Configuration
This manual describes how to install and configure VSI DECnet-Plus for OpenVMS software. For OpenVMS IA-64 and OpenVMS Alpha systems, this manual also describes how to install X.25 for OpenVMS software. Details on configuring X.25 for OpenVMS on OpenVMS IA-64 and OpenVMS Alpha systems are provided in the VSI X.25 for OpenVMS Configuration Guide. For OpenVMS VAX systems, this manual also describes how to install and configure the X.25 functionality provided by VSI DECnet-Plus for OpenVMS VAX.
VSI DECnet-Plus Network Management Guide
This manual provides conceptual and task information about managing and monitoring a DECnet-Plus network. In addition, the manual devotes a section to the management of X.25 entities used by DECnet operating over X.25 data links.
VSI OpenVMS DECnet-Plus Network Control Language Reference
This manual provides detailed information on the Network Control Language (NCL), which is used to manage X.25 for OpenVMS management entities.
VSI X.25 for OpenVMS Documentation
VSI X.25 for OpenVMS Configuration Guide (OpenVMS IA-64 and OpenVMS Alpha)
This manual explains how to configure X.25 for OpenVMS software on OpenVMS IA-64 and OpenVMS Alpha systems.
VSI X.25 for OpenVMS Security Guide
This manual describes the X.25 Security model and how to set up, manage, and monitor X.25 Security to protect your X.25 for OpenVMS system from unauthorized incoming and outgoing calls.
VSI X.25 for OpenVMS Problem Solving Guide
This manual provides guidance on how to analyze and correct X.25-related and X.29-related problems that may occur while using the X.25 for OpenVMS software. In addition, the manual describes loopback testing for LAPB data links.
VSI X.25 for OpenVMS Programming Guide
This manual describes how to write X.25 and X.29 programs to perform network operations.
VSI X.25 for OpenVMS Programming Reference
This manual provides reference information for X.25 and X.29 programmers. It is a companion manual to the VSI X.25 for OpenVMS Programming.
VSI X.25 for OpenVMS Accounting
This manual describes how to use X.25 Accounting to obtain performance records and information on how X.25 is being used on your system.
VSI X.25 for OpenVMS Installation Guide
This manual describes how to install VSI X.25 for OpenVMS V2.1 HPE servers running the OpenVMS operating system. This guide is intended for system managers who are responsible for installing VSI X.25 for OpenVMS V2.1.
VSI X.25 for OpenVMS Management Guide
This manual provides information applicable to the X.25 functionality provided by VSI X.25 for OpenVMS and VSI DECnet-Plus for OpenVMS VAX.
VSI X.25 for OpenVMS Utilities Guide
This manual describes how to use and manage X.25 Mail and how to use and manage a host-based PAD to connect to a remote system. It also describes how to manage the X.29 communication links used for both of these functions. In addition, this manual explains how to use OpenVMS DCL
SET TERMINAL/X29commands to manage remote host-based or network PADs.
VSI OpenVMS Documentation
5. OpenVMS Documentation
The full VSI OpenVMS documentation set can be found on the VMS Software Documentation webpage at https://docs.vmssoftware.com.
6. VSI Encourages Your Comments
You may send comments or suggestions regarding this manual or any VSI document by sending electronic mail to the following Internet address: <docinfo@vmssoftware.com>. Users who have VSI OpenVMS support contracts through VSI can contact <support@vmssoftware.com> for help with this product.
7. Terminology
|
VAX P.S.I. | X.25 for OpenVMS |
|---|---|
|
VAX P.S.I. |
X.25 for OpenVMS VAX |
|
Access system |
X.25 Client system |
|
Native system |
X.25 Direct Connect system |
|
Multihost system |
X.25 Connector system |
|
Gateway system |
X.25 Connector system |
|
Client system |
A client system of an X.25 Connector system (and therefore a client of the X25 Server management module on the X.25 Connector system.) |
|
Relay Client system |
A client system of an X.25 Relay system (and therefore a client of the X25 Relay management module on the X.25 Relay system.) |
|
Relay-Client |
A shorthand term for an X25 RELAY CLIENT management entity on an X.25 Relay system that contains management information about an actual Relay Client system. |
|
Relay system |
An X.25 Direct Connect or Connector system with the X.25 Relay module enabled. |
|
Server Client system |
Another term for a Client system. |
|
Server-Client |
A shorthand term for an X25 SERVER CLIENT management entity on an X.25 Connector system that contains management information about one or more actual X.25 Client systems. |
For more information about clients, servers, and relays in X.25 for OpenVMS, refer to the VSI X.25 for OpenVMS Configuration Guide and the VSI X.25 for OpenVMS Management Guide.
8. Conventions
|
Convention |
Meaning |
|---|---|
|
UPPERCASE and lowercase |
The OpenVMS operating system does not differentiate between lowercase and uppercase characters. Literal strings that appear in text, examples, syntax descriptions, and function descriptions can be entered using uppercase characters, lowercase characters, or a combination of both. In running text, uppercase characters indicate OpenVMS DCL commands and command qualifiers; Network Control Language (NCL) commands and command parameters; other product-specific commands and command parameters; network management entities; OpenVMS system logical names; and OpenVMS system service calls, parameters, and item codes. Leading uppercase characters, such as Protocol State, indicate management entity characteristics and management entity event names. Leading uppercase characters are also used for the top-level management entities known as modules. |
|
|
This typeface is used in interactive and code examples to indicate system output. In running text, this typeface is used to indicate the exact name of a device, directory, or file; the name of an instance of a network management entity; or an example value assigned to a DCL qualifier or NCL command parameter. |
|
|
In interactive examples, user input is shown in |
|
$ |
In this manual, a dollar sign ($) is used to represent the default OpenVMS user prompt. |
|
Ctrl/x |
In procedures, a sequence such as Ctrl/x indicates that you must hold down the key labeled Ctrl while you press another key or a pointing device button. |
|
Return |
In procedures, a key name is shown enclosed to indicate that you press the corresponding key on the keyboard. |
|
italic text |
Italic text indicates variables or book names. Variables include information that varies in system input and output. In discussions of event messages, italic text indicates a possible value of an event argument. |
|
bold text |
Bold text indicates an important term or important information. |
|
( ) |
In a command definition, parenthesis indicate that you must enclose the options in parenthesis if you choose more than one. Separate the options using commas. |
|
{ } |
In a command definition, braces are used to enclose sets of values. The braces are a required part of the command syntax. |
|
[ ] |
In a command definition, square brackets are used to enclose parts of the command that are optional. You can choose one, none, or all of the options. The brackets are not part of the command syntax. However, brackets are a required syntax element when specifying a directory name in an OpenVMS file specification. |
Part I. Using and Managing X.25 Mail
This part of the manual describes how to use and manage X.25 Mail. It consists of two chapters:
Chapter 1, "Using X.25 Mail" describes how to send and receive mail, and describes how to set up logical names to simplify the use of X.25 Mail.
Chapter 2, "Managing X.25 Mail" describes how to perform tasks such as managing templates, filters, and security, and how to define system-wide logical names for the addresses of remote DTEs.
Chapter 1. Using X.25 Mail
The X.25 Mail utility? is an extension to the OpenVMS Mail utility. It enables you to send mail to, and receive mail from, other OpenVMS systems across a PSDN. To do this, X.25 Mail utilizes OpenVMS Mail.
To use X.25 Mail, both the sending and receiving systems must run X.25 for OpenVMS and OpenVMS Mail.
This chapter comprises two sections:
Section 1.1, ''Sending and Receiving Mail'' describes how to send and receive mail using X.25 Mail.
Section 1.2, ''Using Logical Names for Addresses'' describes how to set up logical names to simplify the use of X.25 Mail.
1.1. Sending and Receiving Mail
Sending and receiving messages using X.25 Mail is very similar to the same tasks using OpenVMS Mail. The only difference is the form in which you specify the address of the recipient.
To send mail using X.25 Mail, do the following:
Invoke the OpenVMS Mail utility.
Enter the
SENDcommand.At the "To:" prompt, enter the address in the following format:
PSI%dte-class.dte-address::username
where:
dte-class is the name of the DTE class from which a member DTE will be used to send the mail.
If you do not specify a DTE class, X.25 Mail uses the DTE class specified in the X.25 Mail template. A template defines the values for the call parameters of outgoing calls. For details of the X.25 Mail template, which contains recommended values for the call parameters, refer to Chapter 2, "Managing X.25 Mail".
dte-address is the address of the DTE to which you are sending mail. The DTE address can consist of up to 15 characters. For details of the DTE address of the remote node you want to send mail to, ask your system manager.
username is the user name of the account to which you are sending mail.
The following example shows how to send mail using OpenVMS Mail over X.25 to user
LONG at DTE address 328740975776 in DTE class
CLASSY.
$ mail
MAIL> send
To: PSI%classy.328740975776::long
CC:
Subj: This month’s results
Enter your message below. Press CTRL/Z when complete, or CTRL/C to quit:
Hi there,
Have you got them yet?
JB
MAIL>
You can send one mail message to a mixture of destinations using X.25 Mail for some and OpenVMS Mail for others. Simply use the X.25 Mail address format for users you are contacting over X.25 and the OpenVMS Mail format for users you are contacting with OpenVMS Mail.
For example, in the following mail session, OpenVMS Mail is used to send the message
to user M_MONEY and X.25 Mail is used to send the message to users
JONES and EVANS.
$ mail
MAIL> send
To: BANK::M_MONEY,PSI%CLASSY.234273412345::JONES,EVANS
CC:
Subj: This month’s results
Enter your message below. Press CTRL/Z when complete, or CTRL/C to quit:
Hi there,
Have you got them yet?
JB
CTRL/Z
MAIL>
1.2. Using Logical Names for Addresses
You can simplify use of X.25 Mail by using logical names for combinations of DTE class
and DTE address. For example, suppose you assign the logical name SHORT to
the following combination:
DTE class: CLASSY
DTE address: 328740975776
By using this logical name, the following X.25 Mail address
CLASSY.328740975776::LONG
can be shortened to:
SHORT::LONG
There are two types of logical names you can use:
- System-wide logical names
These are set up by your system manager, and are available to any user on your system. System-wide logical names are useful for DTEs to which several users send mail using X.25 Mail. Chapter 2, "Managing X.25 Mail" contains further information about system-wide logical names.
- Personal logical names
These are logical names which you alone use to refer to particular DTEs. Section 1.2.1, ''Creating Personal Logical Names'' describes how to create your own logical names.
1.2.1. Creating Personal Logical Names
To create your own logical names for DTE addresses, create a private DTE logical name table, and add it to the system-wide DTE logical name table, do the following:
Create the private logical name table, using the DCL
CREATE/NAME_TABLEcommand. Refer to the relevant entry in the VSI OpenVMS DCL Dictionary Part One for details of this command.Add the DTE translations to this table with the command:
$ DEFINE/TABLE=table-name logical-name dte-class.dte-address
where:
table-name is the name of your table.
logical-name is the logical name you want to use.
dte-class is the local DTE class you want to use.
dte-address is the address of the remote DTE.
For example, to enter in a logical name table called
CONTACTSthe logical nameLONDONto send mail to DTE address23412345678through a DTE in classCLASS1, enter:$ DEFINE/TABLE=CONTACTS LONDON CLASS1.23412345678
Add your DTE logical name table to the system-wide DTE logical name table with the command:
$ DEFINE/TABLE=LNM$PROCESS_DIRECTORY PSI$DTE_DIRECTORY -
_$ table-name,PSI$DTE_TABLE
For example, to add the table
CONTACTSto the system-wide DTE logical name table, enter:$ DEFINE/TABLE=LNM$PROCESS_DIRECTORY PSI$DTE_DIRECTORY - _$ CONTACTS, PSI$DTE_TABLE
The logical names you have defined and the system-wide logical names now apply within your process.
Chapter 2. Managing X.25 Mail
2.1. Introduction
X.25 Mail provides a number of facilities that allow you to control the mail sent to and from your system and to make using X.25 Mail as easy as possible. For example, you can set up templates for outgoing calls, filters for incoming calls, and logical names for DTE addresses.
This chapter describes how to:
Manage templates
Manage filters
Define system-wide logical names for the addresses of remote DTEs
Manage security for X.25 Mail
2.2. Templates
Templates define the values for the call parameters of outgoing calls.
When you configure your system, a template called Default is set
up. It is possible to change the Default template, to give different
values to all outgoing calls. You can alter the existing call parameter values or add new
call parameters to the template.
It is also possible to create new templates for different types of outgoing calls. If you create a new template you should define the logical name PSI$MAIL_ TEMPLATE to point to the new template.
Note
If you do not define the logical name, X.25 Mail uses the Default
template.
The recommended method of creating and modifying templates for use by X.25 Mail is to run the X.25 configuration program, which includes a section for configuring templates. For details on configuring templates for X.25 for OpenVMS on OpenVMS IA-64 and OpenVMS Alpha systems, refer to the VSI X.25 for OpenVMS Configuration Guide. For details on configuring templates for DECnet-Plus for OpenVMS VAX systems, refer to the VSI OpenVMS DECnet-Plus Installation and Configuration manual.
Once created, a template can be modified using either the X.25 configuration program, or by issuing NCL commands interactively:
To make temporary changes to a template, issue NCL commands interactively. Any changes you make will be lost when the system is rebooted.
For details of modifying templates using NCL commands, refer to the VSI X.25 for OpenVMS Management Guide.
To make permanent changes to a template, run the X.25 configuration program. (Use the ADVANCED mode on OpenVMS IA-64 and OpenVMS Alpha systems.)
For details on using the X.25 configuration program on OpenVMS IA-64 and OpenVMS Alpha systems, refer to the VSI X.25 for OpenVMS Configuration Guide. For details on using the X.25 configuration program on DECnet-Plus for OpenVMS VAX systems, refer to the VSI OpenVMS DECnet-Plus Installation and Configuration manual.
2.3. Filters
Filters determine which applications receive an incoming call.
When you configure your system to include X.25 Mail support, a filter called
X25_MAIL is set up. If you want to modify any of the existing filter
attributes or add new attributes, you can modify the X25_MAIL filter.
Like templates, a filter can be modified using either the X.25 configuration program, or
by issuing NCL commands:
To make temporary changes to the filter, issue NCL commands interactively.
For details of modifying filters using NCL commands, refer to the VSI X.25 for OpenVMS Management Guide.
To make permanent changes to the filter, run the advanced mode of the X.25 configuration program.
For details on using the X.25 configuration program on OpenVMS IA-64 and OpenVMS Alpha systems, refer to the VSI X.25 for OpenVMS Configuration Guide. For details on using the X.25 configuration program on DECnet-Plus for OpenVMS VAX systems, refer to the VSI OpenVMS DECnet-Plus Installation and Configuration manual.
2.4. Defining Logical Names
You can send mail using X.25 Mail in the same way as sending mail using OpenVMS Mail except that you must specify a DTE address (rather than a node name) in response to the following prompt:
To:
DTE addresses are lengthy and difficult to remember. Therefore, it is a good idea to define logical names to point to DTE addresses. Users can then send mail by specifying a short name rather than a long string of numbers.
You can define personal logical names (refer to Chapter 1, "Using X.25 Mail"), or system-wide logical names (refer to Section 2.4.1, ''Defining System-Wide Logical Names'').
2.4.1. Defining System-Wide Logical Names
When the X.25 software is first invoked, it creates a logical name table, called PSI$DTE_TABLE, for DTE classes and DTE addresses. Any system-wide logical names you create must be entered into this table.
Each table entry in PSI$DTE_TABLE uses approximately 50 bytes of paged dynamic memory. You should ensure that the SYSGEN parameter PAGEDYN is set to a value high enough to allow you to add entries to the logical name table.
2.4.1.1. Logical Names for Outgoing Mail
To define a logical name for the address of a remote destination, use the following command:
$ DEFINE/TABLE=PSI$DTE_TABLE logical-name [dte-class.]dte-address
where:
| logical-name | is the logical name you want to use for the remote DTE. |
| dte-class | is the local DTE class you want to use. |
| dte-address | is the address of the remote DTE. |
If you do not specify the dte-class the default is used. The
default DTE class is defined either in the Default template or by
the logical name PSI$NETWORK.
Note
If you do not specify dte-class and a default DTE class has
not been defined either in the Default template or by defining
the PSI$NETWORK logical name, the call will fail.
The DTE class specified in the DEFINE/TABLE command is case
sensitive. If you want the DTE class to be entered in lowercase characters or a
mixture of lowercase and uppercase characters, enclose dte-class.dte-
address in quotes. If quotes are not used, the DTE class is entered in
uppercase characters.
2.4.1.2. Logical Names for Incoming Mail
If you want the DTE address of incoming mail to be displayed on your screen as a logical name, you must define the logical name as a separate entry in the X.25 logical name table in addition to the logical name you have set up for outgoing mail. To do this, place an entry in the X.25 logical name table having the following format:
$ DEFINE/TABLE=PSI$DTE_TABLE PSI$MAIL_DTE_[dte-class.]dte-address logical-name
For example, if you want the DTE class CLASSY with DTE address
23427341234567 to be known as ERIC for outgoing mail, and
incoming mail from the same source to appear as coming from ERIC, enter
the following DCL commands:
$ DEFINE/TABLE=PSI$DTE_TABLE ERIC CLASSY.23427341234567
$ DEFINE/TABLE=PSI$DTE_TABLE PSI$MAIL_DTE_CLASSY.23427341234567 ERIC
You can now address outgoing mail to DTE class CLASSY, DTE address
23427341234567, using the following simplified address:
To: PSI%ERIC::username
Incoming mail from DTE class CLASSY, DTE address
23427341234567 will be displayed as:
From: PSI%ERIC::username
Note
The DTE class specified in the DEFINE/TABLE command is case
sensitive. If you want the DTE class to be entered in lowercase characters or a
mixture of lowercase and uppercase characters, enclose dte-class.dte-
address in quotes. If quotes are not used, the DTE class is entered in
uppercase characters.
2.5. Security and X.25 Mail
In a DECnet-Plus for OpenVMS system, the configuration parameters and access control information for incoming X.25 Mail calls are contained in the object database. Users who want to use X.25 Mail to send mail must have the privilege NETMBX. This privilege allows users to assign a channel to the NET device, and is required to create a logical link to a remote node.
During configuration of the X.25 software, security information can be entered that defines which users are permitted to make and receive X.25 calls.
2.5.1. Security and Poor Man’s Routing
Using X.25 for OpenVMS, local and remote users have the potential to use OpenVMS Mail to send information across a PSDN to a remote destination. This can be achieved by specifying each node in the route from the source node to the destination node. This method of specifying routing information to send mail is known as Poor Man’s Routing (PMR).
Indiscriminate use of PMR by local and other users to send and forward mail via your local DTEs across a PSDN can lead to an increase in network costs.
X.25 Security includes a facility to restrict the use of PSDNs only to selected users, and to ensure that general users cannot use PMR to send mail across PSDNs. The following sections describe how PMR works, and show how you can use X.25 Security to restrict the use of PMR to prevent local and other users abusing your local DTEs and gaining access to PSDNs via those DTEs.
2.5.2. Preventing Poor Man’s Routing
Figure 2.1, ''X.25 Security and MAIL'' illustrates a typical network configuration consisting of 6 nodes and two PSDNs. In conjunction with descriptions in Section 2.5.2.1, ''Preventing Indiscriminate Use of OpenVMS Mail'' and Section 2.5.2.2, ''Preventing Indiscriminate Use of X.25 Mail'', this figure will be used to illustrate potential security problems caused by PMR and how such problems can be prevented.
2.5.2.1. Preventing Indiscriminate Use of OpenVMS Mail
In Figure 2.1, ''X.25 Security and MAIL'', users on Node B (a non-X.25 node) and Node A (an X.25 Connector node) in Paris can send and receive OpenVMS Mail to and from other nodes on their local DECnet.
Similarly, users on Node D (an X.25 Client node) and Node E (an X.25 Connector node) in London can send and receive OpenVMS Mail to and from other nodes on their local DECnet.
However, a user on Node B in Paris can also send OpenVMS Mail calls across PSDN1 to Node E in London (or any other node on that DECnet) using PMR and X.25 Mail. This can be achieved by specifying a mail command in the form:
MAIL> SEND TEXT.TXT
To: A::PSI%dte-class.remote-dte::user-name
where:
| dte-class | is the DTE class name (usually the network name). |
| remote-dte | is the remote DTE address of Node E. |

Note that in this example, Node A is charged for the X.25 call.
Normally, you would grant the rights identifier PSI$X25_USER to the processes and users who are permitted to make outgoing X.25 calls. This rights identifier ensures that other users cannot make outgoing X.25 calls.
However, for users on non-X.25 nodes in your network, PMR using an accessible X.25 Connector node can be used because outgoing X.25 calls use the DECnet MAIL object’s user name.
To prevent the indiscriminate use of PMR by users on non-X.25 nodes in your network, do not grant the DECnet MAIL process the PSI$X25_USER rights identifier.
To restrict the use of PMR only to specified remote DTEs, use X.25 Security to restrict X.25 Mail access only to the specified remote DTEs. You can do this by defining X.25 Mail as a local application and giving that application rights identifiers that allow restricted outgoing access only to known specific DTEs.
2.5.2.2. Preventing Indiscriminate Use of X.25 Mail
Incoming X.25 Mail to Non-X.25 Nodes
In Figure 2.1, ''X.25 Security and MAIL'', users on Node A in Paris could use PMR to send mail using X.25 Mail to remote nodes across PSDN1. They could send mail using X.25 Mail to a user on Node F in London (a non-X.25 node), by specifying each node in the route from their node to the destination node. For example, to send mail using X.25 Mail to a user on Node F, a mail command in the following format can be used:
MAIL> SEND TEXT.TXT
To: PSI%dte-class.remote-dte::F::user-name
where:
| dte-class | is the DTE class name (usually the network name). |
| remote-dte | is the remote DTE address of Node E. |
In this example, Node A is charged for the X.25 call.
Preventing Incoming X.25 Mail to Non-X.25 for OpenVMS Nodes on Your Network
X.25 Security performs remote DTE address verification on the X.25 Connector node for incoming X.25 Mail calls before X.25 Mail runs. However, the X.25 Connector node requires a DECnet logical link to forward mail to the non-X.25 nodes. This DECnet logical link requires NETMBX privilege.
To prevent remote DTEs using PMR to send mail to non-X.25 nodes in your network:
Create an account in which to run X.25 Mail. This should be a different account to the DECnet MAIL object account.
Grant the PSI$X25_USER rights identifier to the user name associated with the X25_MAIL object.
Do not grant the NETMBX privilege to the user name associated with the X25_MAIL application.
Note that this prevents all redirection of incoming X.25 Mail calls to non-X.25 nodes on your network.
Forwarding X.25 Mail Calls Via Connector Nodes
In Figure 2.1, ''X.25 Security and MAIL'', users on Node A in Paris (an X.25 node) could use Node E (an X.25 Connector node) in London to forward X.25 Mail calls to Node C in New York (an X.25 node), using a command of the form:
MAIL> SEND TEXT.TXT
To: PSI%dte-class1.remote-dte1::PSI%dte-class2.remote-dte2::
user-name
where:
| dte-class1 and dte-class2 | are the DTE class names for node E and C respectively. |
| remote-dte1 and remote-dte2 | are the remote DTE addresses of node E and C respectively. |
In this case, Node A is charged only for the X.25 call to Node E; Node E is charged for the X.25 call to Node C.
Indiscriminate use of your node by users on remote nodes to forward X.25 Mail calls could lead to large network costs for your system. In addition, it may be illegal to inadvertently forward third party traffic via your system.
Preventing Remote Nodes Using Your Node to Forward Third Party Traffic
You can prevent your node from forwarding third party traffic by setting up X.25 Security and privileges for incoming and outgoing calls:
Create an account in which to run X.25 Mail. This should be a different account from the DECnet MAIL object account.
Set up X.25 Security to restrict incoming X.25 Mail calls to accept only those calls from specified remote DTEs. You can do this by creating rights identifiers and access levels for incoming calls to the X25_MAIL application.
Set up X.25 Security to prevent outgoing X.25 Mail calls that use the user name associated with the X25_MAIL application.
Grant the PSI$X25_USER rights identifier to the user name associated with the X25_MAIL application.
Do not grant NETMBX privilege to the user name associated with the X25_MAIL application.
In this way, you can prevent remote nodes from using your node to forward third party traffic.
Part II. Using X.29
This part of the manual describes how to use an X.29 terminal to connect to a remote system, using a host-based PAD. It consists of five chapters:
Chapter 3, "Using an X.29 Terminal to Connect to a Remote System" describes how to connect to a remote DTE.
Chapter 4, "Controlling the Connection to the Remote DTE" describes how you can control the way your connection to a remote DTE behaves when you connect to the remote DTE.
Chapter 5, "Using PAD Commands to Control the Host-Based PAD" describes how to change the characteristics of the host-based PAD during a PAD session.
Chapter 6, "Using the Host-Based PAD in CCITT Mode" describes how to use an X.29 terminal to connect to a remote system, using a host-based PAD in CCITT mode.
Chapter 7, "Using a Remote OpenVMS System to Control Your X.29 Terminal" describes how to use a remote OpenVMS system to control the behavior of your X.29 terminal.
Chapter 3. Using an X.29 Terminal to Connect to a Remote System
The X.29 protocol defines the procedure for exchange of control information and user data between a Packet Assembler/Disassembler (PAD) and a remote packet-mode DTE.
This chapter describes how to use an X.29 terminal to connect to a remote system, using a host-based PAD. Figure 3.1, ''Connecting to a Remote System'' illustrates the connection between your X.29 terminal and the remote system.
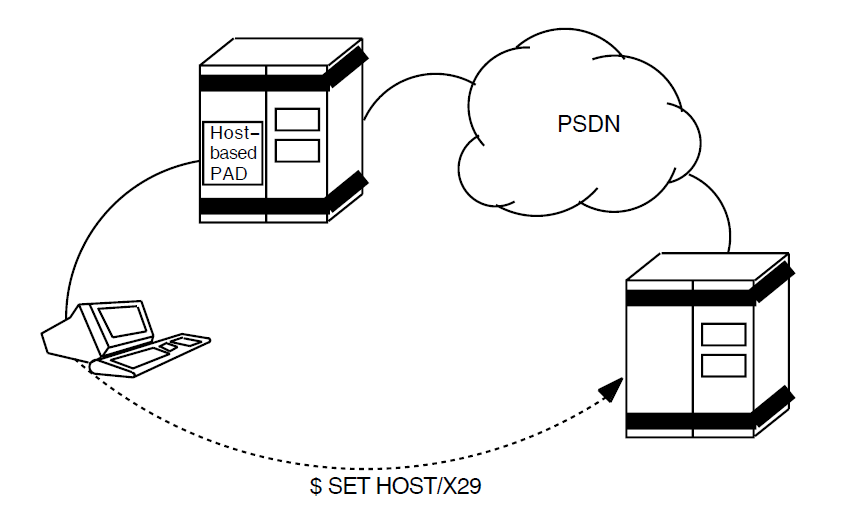
3.1. Connecting to a Remote System
To connect to a remote system, issue the following command:
$ SET HOST/X29 dte-class.dte-address
where:
dte-class is the name of the DTE class from which a member DTE will be used to connect to the remote DTE.
dte-address is the address of the DTE to which you want to connect. The DTE address can consist of up to 15 digits.
For example, to use a DTE in class CLASS_A to connect to a DTE with
address 7608657086, enter the command:
$ SET HOST/X29 CLASS_A.7608657086
You can simplify the SET HOST/X29 command by using a DTE logical
name instead of entering the DTE class and DTE address. For example, if the DTE you are
connecting to has the logical name PARIS, you can connect to that DTE with
the command:
$ SET HOST/X29 PARIS
Note that the logical name PARIS is defined using the command:
$ DEFINE/TABLE=PSI$DTE_TABLE PARIS CLASS_A.7608657086
Details of using and setting up DTE logical names are given in Section 1.2, ''Using Logical Names for Addresses''.
Note that if you do not specify a DTE class in the command line, X.25 for OpenVMS uses
the X29Login template on OpenVMS IA-64 and OpenVMS Alpha systems or the
Default template on OpenVMS VAX systems. For details of the
X29Login template, refer to Part III,''Managing X.29 Communications''.
You can control the characteristics of your connection to the remote DTE by adding
qualifiers to the SET HOST/X29 command. Chapter 4, "Controlling the Connection to the Remote DTE"
describes how to do this.
3.1.1. Including SET HOST/X29 in a Batch Job
You can include the SET HOST/X29 command in a batch job. If you
do, take note of the following points:
Data following the
SET HOST/X29command will be sent to the remote DTE as soon as the connection is established. If the remote DTE is an OpenVMS system, this data will be discarded (because there will not have been a prompt for the user name at this stage), and the login procedure will fail.The PAD will not clear a call if the PAD is running in batch mode. The remote DTE has to clear the call.
3.2. Disconnecting from a Remote System
There are two ways to disconnect from a remote system:
If the remote system is an OpenVMS system, type:
$ LOGOUT
Normally, this clears the call and returns you to your host system. If this does not clear the call, you must use the method described in the next item.
If the remote system does not clear the call when you log out:
Enter the PAD command mode by pressing the escape character. The default escape character is Ctrl/P, but if you have set a different escape character for your session, you should use that character. (Section 4.1.2, ''Setting the Escape Character'' describes how to set an escape character when you connect to a remote system.) If there is no escape character defined, press Ctrl/Y twice.
Enter the command:
PAD> CLEAR
The call will be cleared, and you will be returned to your host system.
3.3. Controlling Your Connection to the Remote DTE
When you connect to a remote DTE using the SET HOST/X29 command,
you can control the way in which:
The PAD interacts with your X.29 terminal. This is achieved by setting or changing PAD parameters. For example, you can control:
Whether your input is echoed back to you.
Whether messages from the PAD are displayed on your terminal.
Which ASCII characters the PAD will use for the Delete character and the Line-Delete character.
For a description of each of the PAD parameters and details of the values you can set, refer to Chapter 10, "Changing Default X.29 Terminal Characteristics".
You can set PAD parameters either when you invoke the
SET HOST/X29connection (refer to Section 4.1, ''Setting the Characteristics of the Host-Based PAD''), or during aSET HOST/X29session (refer to Chapter 5, "Using PAD Commands to Control the Host-Based PAD").There are several files that X.25 for OpenVMS automatically uses to set PAD parameters, and there are files that you can use to set PAD parameters. Section 3.3.1, ''Setting PAD Parameters Using the SET HOST/X29 Command'' describes these files, and how X.25 for OpenVMS uses them.
Data is passed between the host-based PAD and the remote DTE.
For example, this facility allows you to specify:
A closed user group (CUG) for the remote DTE.
Whether you want to use reverse charging.
The size of packet to be used.
You specify the characteristics of your connection from the host-based PAD to the remote DTE when you issue the
SET HOST/X29command. For a description of how to set the characteristics of this connection, refer to Section 4.2, ''Setting the Characteristics of the Connection to the Remote DTE''.
3.3.1. Setting PAD Parameters Using the SET HOST/X29 Command
When you establish a SET HOST/X29 connection, X.25 for OpenVMS
uses several files to set the PAD parameters. This results in some of the PAD parameters
being set and reset several times. In addition, the PAD parameters may be reset during
the X.29 session if you specify new values for one or more of the parameters.
If you want to control the behavior of the PAD during your SET
HOST/X29 session, you need to know:
Which files and command qualifiers X.25 for OpenVMS uses to set the PAD parameters.
In what order X.25 for OpenVMS processes these files and command qualifiers. This is important because each time X.25 for OpenVMS sets a PAD parameter, the new setting overrides any previous settings.
The files that X.25 for OpenVMS uses to set and reset PAD parameters are:
- The PAD initial profile
This file is supplied with X.25 for OpenVMS, and contains default values for some of the PAD parameters. These values are listed in Appendix B, "Host-Based PAD Initial Profile".
- The PSI$PAD_INIT file
PSI$PAD_INIT is a logical name that should be used to point to a PAD initialization file (if one has been set up). An initialization file is useful if you want to set certain PAD parameters and execute certain DCL commands each time you establish a
SET HOST/X29connection.To set up a PAD initialization file, create a file containing any PAD commands you want to issue each time you make a
SET HOST/X29connection. Then define the logical name PSI$PAD_INIT to point to your initialization file.- The PAD parameter profile file
The PAD parameter profile file contains a set of PAD parameter profiles. Each PAD parameter profile is a named list of settings for certain PAD parameters. PAD parameter profiles are useful if you regularly need to set certain PAD parameters to particular values, for example, to access a non-OpenVMS system.
If you have defined a PAD parameter profile for a remote system, you can set the parameters you need simply by naming the profile. You do not need to specify each parameter individually. You can specify PAD parameter profiles either in the
SET HOST/X29command line, or by issuing commands to the PAD during aSET HOST/X29session.For details of how to create and use a PAD parameter profile file, refer to Section 3.3.2, ''Creating the PAD Initialization File and PAD Parameter Profiles''.
In addition to the above files:
X.25 for OpenVMS reads certain PAD parameters (for example, SPEED) from your terminal’s characteristics.
You can set individual parameters yourself, either at the start of your
SET HOST/X29session, by using qualifiers to theSET HOST/X29command, or during your session, by issuing commands to the PAD.
Figure 3.2, ''Sequence in which PAD Parameters are Set After Issuing a SET HOST/X29
Command'' illustrates the order in which X.25 for OpenVMS processes
the files and qualifiers following a SET HOST/X29 command.
For example, if you specify a PAD parameter profile which gives parameter 4
(TIMEOUT) the value 10, and specify TIMEOUT individually as 20, TIMEOUT will take the
value 20, because the /PARAMETER qualifier is processed after the
/PROFILE qualifier.
The qualifiers to the SET HOST/X29 command are described in Chapter 4, "Controlling the Connection to the Remote DTE".

3.3.2. Creating the PAD Initialization File and PAD Parameter Profiles
3.3.2.1. Creating a PAD Initialization File
To set up a PAD initialization file, create a file containing any PAD commands you
want to issue each time you make a SET HOST/X29 connection. Then
define the logical name PSI$PAD_INIT to point to your initialization file.
3.3.2.2. Creating a PAD Profile File
The system-wide PAD profiles for your system are in the profile file
SYS$MANAGER:PSI$PAD_PROFILES.DAT.
They are usually created by the system manager, and are available for you to use when you use the host-based PAD to connect to a remote terminal.
You can create your own PAD profile file for sets of PAD parameter settings that
you frequently use. A PAD profile file consists of profile names and the parameter
settings associated with them. You do not have to set all the parameters in each
profile, only the ones that are specifically required. To create a PAD profile file,
create a file using a text editor, and enter a PROFILE command line
for each profile you want to create. The PROFILE command line
should be entered in the following format:
PROFILE profile-name parameter-list
where:
| profile-name | is the name of the profile. |
| parameter-list | is a list of parameter keywords and their values. |
If you specify a parameter, but no value, that parameter will be set to 1. If you put NO in front of a parameter (for example, NOEDIT), that parameter will be set to 0.
For example, the following example shows a profile called MACHINE_5
which sets the parameters:
- ECHO=1
- EDIT=0
- BREAK=2
- FORWARDING_CHARACTERS=2
!
! Profile for connection to Machine 5
!
PROFILE MACHINE_5 -
   ECHO, NOEDIT, BREAK=2, FORWARDING_CHARACTERS=2
Note that the hyphen after MACHINE_5 continues the
PROFILE command line onto the next line.
Refer to Chapter 10, "Changing Default X.29 Terminal Characteristics" for details of the PAD parameters and their values.
To use your profile file instead of the system profile file, define the logical name PSI$PAD_PROFILES to point to your file.
3.4. Specifying the Type of Log File for Your Session
If you want to create a log of your SET HOST/X29 session, you can
use one of two types of log file. These are the NETWORK log file and the TERMINAL log
file:
A NETWORK log file captures data on the network side of the host-based PAD. You can change the display format of a NETWORK log file.
A TERMINAL log file captures data that is displayed on your screen. Note that:
The TERMINAL log file is only suitable for use with the
TYPEandPRINTcommands - you are advised not to EDIT the file unless you are using the TECO editor.If you use the TERMINAL type of log file, the
/STAMPqualifier has no effect.
Note that you cannot change the log file type during a PAD session.
The type of log file is controlled by the logical name PSI$PAD_LOG. This logical name can be defined as either NETWORK or TERMINAL. If the logical name is not defined, the log file type defaults to TERMINAL.
If you specify a type other than NETWORK or TERMINAL, the PAD session will terminate and the following error message will be displayed:
%PAD-F-INITERROR, error occurred during initialization
-PAD-E-INVLOGTRAN, invalid translation of PSI$PAD_LOG logical name
Chapter 4. Controlling the Connection to the Remote DTE
You can control the way your connection to a remote DTE behaves, by adding qualifiers to
the SET HOST/X29 command. Section 4.1, ''Setting the Characteristics of the Host-Based PAD'' and Section 4.2, ''Setting the Characteristics of the Connection to the Remote DTE'' describe how to use the qualifiers to control the host-based PAD and
the connection between the X.25 for OpenVMS host-based PAD and the remote DTE. Section 4.3, ''Summary of the SET HOST/X29 Command Qualifiers'' provides a summary of the qualifiers for the SET
HOST/X29 command.
4.1. Setting the Characteristics of the Host-Based PAD
This section describes how to set the characteristics of the X.25 for OpenVMS
host-based PAD when you use the SET HOST/X29 command.
4.1.1. Setting PAD Parameters
You can specify the values of PAD parameters for a SET HOST/X29
session by:
Setting individual parameters.
Specifying one or more PAD parameter profiles, which specify values for specific parameters. This is useful if you regularly need to set certain PAD parameters to specific values, for example, to access a non-OpenVMS system.
Specifying a mixture of PAD parameter profiles and individual parameters. This facility is useful if you want to override parameter values specified in a profile.
Note that if the remote DTE is an OpenVMS system, some PAD parameters must have certain values for the NV device to operate normally. Refer to Table A.1, ''PAD Parameter Values Required by the NV Device'' for details of the required PAD parameter values.
4.1.1.1. Setting Individual Parameters
To set individual parameters, use the following qualifier:
/PARAMETERS=(parameter-list)
The variable parameter-list is a list of parameter keywords and their associated values. If you specify a parameter, but no value, that parameter is set to 1.
For example, to connect to a DTE called PARIS, setting TIMEOUT to
10, WRAP to 0, and DELETE to 1, enter:
$ SET HOST/X29/PARAMETERS=(TIMEOUT=10,NOWRAP,DELETE) PARIS
For details of the PAD parameters and their values, refer to Chapter 10, "Changing Default X.29 Terminal Characteristics".
4.1.1.2. Using a PAD Parameter Profile
PAD parameter profiles are lists of settings for certain PAD parameters. The PAD
profiles for your system are in the profile file
SYS$MANAGER:PSI$PAD_PROFILES.DAT.
The profiles are usually created by your system manager, and are available for you to use within your PAD session.
You can also create your own PAD parameter profiles. You may want to do this if you frequently use a set of parameters for which there is no system-wide profile. Creating a profile is described in Section 3.3.2, ''Creating the PAD Initialization File and PAD Parameter Profiles''.
To specify one or more PAD parameter profiles, use the following qualifier:
/PROFILE=profile-list
The variable profile-list is a list of PAD profiles. For
example, to connect to a DTE called PARIS, using two profiles called
MACHINE_2 and SYSTEM_A, enter:
$ SET HOST/X29/PROFILE=(MACHINE_2,SYSTEM_A) PARIS
Note that X.25 for OpenVMS processes the profiles in the order in which you
specify them in the profile list. Therefore in the example above, if
MACHINE_2 and SYSTEM_A specify different values for the
same parameter, the value from SYSTEM_A is used, because
SYSTEM_A was specified last and therefore overrides the value of the
corresponding parameter set by MACHINE_2.
4.1.1.3. Specifying PAD Profiles and Individual Parameters
To specify a mixture of PAD profiles and individual parameters, use both the
/PARAMETERS and /PROFILE qualifiers. For
example, to connect to a DTE called PARIS, using the profile
SYSTEM_A and specifying TIMEOUT as 10 and WRAP as
0, enter:
$ SET HOST/X29/PROFILE=SYSTEM_A/PARAMETERS=(TIMEOUT=10,NOWRAP) PARIS
4.1.2. Setting the Escape Character
You use the Escape character to disconnect from the remote terminal and enter PAD command mode. The Escape character is controlled by:
Specifying the Escape character you are going to use (if any). Use the
/PARAMETERSqualifier as described in Section 4.1.2.1, ''Specifying the Escape Character'' to specify the Escape character.Setting a value for the default Escape character. Use the
/DEFAULT_
                  ESCAPE_CHARACTER
qualifier as described in Section 4.1.2.2, ''Setting the Default Escape Character'' to set the Escape character.
4.1.2.1. Specifying the Escape Character
To specify the Escape character you are going to use (if any), use the qualifier
/PARAMETERS, listing the ESCAPE_CHARACTER parameter. The value
assigned to the ESCAPE_CHARACTER parameter specifies whether you use:
The default Escape character. To use the default Escape character, set ESCAPE_CHARACTER to
1.An alternative Escape character which you specify with the ESCAPE_ CHARACTER parameter. Refer to Chapter 10, "Changing Default X.29 Terminal Characteristics" for details of the values you can use.
No Escape character. To specify no Escape character, set ESCAPE_ CHARACTER to
0.
If you do not specify a value for the ESCAPE_CHARACTER parameter, the default Escape character is assumed.
4.1.2.2. Setting the Default Escape Character
You can set the default Escape character to a particular value (for example, if you want to use the current default Escape character for another purpose). To do this, use the following qualifier:
/DEFAULT_ESCAPE_CHARACTER=character
If you do not specify a default Escape character, the default Escape character is set to Ctrl/P.
You need to set an alternative default Escape character for your session if you are:
Accessing the PAD from a console terminal (if you are using a system console terminal, you can only use Ctrl/P if you set the terminal to LOCAL_DISABLE. Otherwise, you must not use Ctrl/P.
Using a networking product that uses Ctrl/P for another purpose.
To set a default Escape character, specify the character as a single letter that
represents a control character. For example, to specify Ctrl/J as the
default Escape character for your session on PARIS, enter:
$ SET HOST/X29/DEFAULT_ESCAPE_CHARACTER=J PARIS
Care should be taken when choosing a character as the default Escape character. For example, when used in combination with the Ctrl key, the characters S and Q are used for X-OFF and X-ON, and the "[" character is the ASCII escape character used in escape sequences.
4.1.3. Setting a Break Character
You can set a control character to have the same effect in your SET
HOST/X29 session as the Break key on a real X.29 terminal.
To do this, use the following qualifier:
/BREAK_CHARACTER=character
The variable character is a single letter that represents the control character.
For example, to use Ctrl/K as the Break key while
you are connected to a DTEcalled PARIS, enter:
$ SET HOST/X29/BREAK_CHARACTER=K PARIS
4.1.4. Using the PAD in OpenVMS Mode
To optimize communication with the remote DTE, you can use the PAD in OpenVMS mode. To set the PAD to OpenVMS mode, use the following qualifier:
/VMS_MODE
Note that when you are using the host-based PAD in OpenVMS mode, if your X.29 terminal is in local-echo mode, you will have the following facilities which are not available in host-echo mode:
Full line editing for the OpenVMS terminal driver is available locally.
The DELETE, LINE_DELETE, and REDISPLAY_LINE parameters are ignored.
If you use Ctrl/Y or Ctrl/X, a Reset will precede the character.
4.1.5. Controlling Access to the Command Language
If you include the SET HOST/X29 command in a command procedure,
you can prevent users of the procedure from using the command language of the remote
system, by controlling access to the command language interpreter. This is useful, for
example, if you are writing a command procedure to be used by a captive account, and do
not want users of that account to use the command language.
To prevent access to the command language, use the following qualifier:
/NOCLI
This will disable the PAD SPAWN command, and prevent users from
having access to the command language. (Note that /NOCLI does not
disable the ATTACH command.)
4.1.6. Logging Your Session
You can log your SET HOST/X29 session. To do this, use the
following qualifier:
/LOG=log-file
The variable log-file is the name of the file you want the log
written to. If you do not specify a log file, the log will be written to
PSIPAD.LOG in your default directory.
Note that to indicate that the logging refers specifically to a SET
HOST/X29 session, you must enter /LOG
after
/X29 in the SET HOST/X29 command.
There are two types of log file that you can create for your session: NETWORK and
TERMINAL. Section 3.4, ''Specifying the Type of Log File for Your Session'' describes the NETWORK and TERMINAL log files, and
describes how to specify which type you want to create. The default is
TERMINAL.
4.1.7. Displaying Call Statistics
When you return to your host system, information about the PAD session is displayed on your terminal. This information includes the duration of your call and CPU time used. To suppress this display, use the following qualifier:
/NOSTATISTICS
4.2. Setting the Characteristics of the Connection to the Remote DTE
When you connect to a remote terminal, you can add qualifiers to the SET
HOST/X29 command to set the characteristics of the connection between the X.25
for OpenVMS host-based PAD and the remote DTE. This can be achieved by specifying
individually the characteristics you want to set. This procedure is described in Section 4.2.1, ''Using a Local Subaddress'' to Section 4.2.1, ''Using a Local Subaddress''.
Note that if you do not specify a DTE class and DTE address in the SET
HOST/X29 command, X.25 for OpenVMS uses the X29Login
template on OpenVMS IA-64 and OpenVMS Alpha systems or the Default
template on OpenVMS VAX systems. In addition, any characteristics you specify using a
qualifier will override the value specified in the X29Login or
Default template.
Note that the availability of the facilities described in Section 4.2.1, ''Using a Local Subaddress'' to Section 4.2.1, ''Using a Local Subaddress'' depends on the network you are using. For details of the facilities supported by a specific network, see the documentation supplied by your network provider.
4.2.1. Using a Local Subaddress
If you want to tell the remote system that your connection comes from a specific subaddress, you can add the local subaddress to a DTE address. To do this, use the following qualifier:
/SUBADDRESS=string
The variable string specifies the subaddress for the local DTE.
4.2.2. Connecting to a DTE Within a Closed User Group
You can specify a closed user group for the remote DTE. To do this, use the following qualifier:
/CLOSED_USER_GROUP[=string]
The variable string is the name of the closed user group. The DTE address at the end of your command line will be considered as the address of a DTE within the closed user group.
Note that if you add the qualifier /CLOSED_USER_GROUP, but do not
specify a particular closed user group, the address of the remote DTE you specify at the
end of the SET HOST/X29 command line will be used as the name of the
closed user group.
4.2.3. Sending User Data
You can specify a string of user data to send to the remote DTE when the call is established. To do this, use the following qualifier:
/USER_DATA=string
The variable string is a string of up to 12 bytes of user data. Note that you can send up to 124 bytes of user data if you use the fast select facility (see Section 4.2.4, ''Using Fast Select'').
The user data is put into the call in ASCII, and follows the 4-byte protocol
identifier (specified by the /PROTOCOL_IDENTIFIER qualifier).
4.2.4. Using Fast Select
You can increase the maximum size of the User Data field from 12 to 124 bytes by requesting fast select. To do this, use the following qualifier:
/FAST_SELECT
4.2.5. Specifying Packet Size and Window Size
You can request a specific packet size and window size for the SET
HOST/X29 session. To do this, use the following qualifiers:
/PACKET_SIZE=number
/WINDOW_SIZE=number
For packet size, number is the packet size, and number must be:
Between 16 and 4096
A power of 2
Note that the maximum packet size that can be defined is determined by the network being used.
For window size, number is the window size. The size specified must be in the range 1-7, or 1-127 if extended sequence numbering is being used. Note that the availability of extended sequence numbering is determined by the network being used and your subscription options.
Note that if you request a packet size or window size that is not allowed for your network, the value may be altered to a legal value by the network, the remote DTE, or X.25 for OpenVMS.
If you do not specify a packet size or window size, the network defaults will be used.
4.2.6. Using Reverse Charging
You can request reverse charging on a call packet sent to a remote DTE. To do this, use the following qualifier:
/REVERSE_CHARGING
4.2.7. Requesting a Throughput Class
You can request a particular throughput class in the call packet. To do this, use the following qualifier:
/THRUPUT_CLASS=number
The variable number is the number of the throughput class.
4.2.8. Specifying Local Facilities
You can specify local facilities that are not covered by the X.25 for OpenVMS software. To do this, use the following qualifier:
/LOCAL_FACILITIES=facilities-list
The variable facilities-list is a list of entries in the local facilities field of the network connect block (NCB). Note that you must encode entries in facilities-list according to the CCITT X.25 Recommendations.
For further details of the NCB, see the VSI X.25 for OpenVMS Programming Guide and the VSI X.25 for OpenVMS Programming Reference manual.
Note that this field is not checked, and that the network may reject your call if you specify an invalid facility.
4.2.9. Using a Nonstandard X.29 Protocol Identifier
You can put a non-standard X.29 protocol identifier into the protocol identifier field of your call. To do this, use the following qualifier:
/PROTOCOL_IDENTIFIER=string
The variable string will be interpreted as a series of hexadecimal digits that fill the first four bytes of user data in the call packet.
For details of the values which are valid for a particular remote DTE, see your network manager.
4.3. Summary of the SET HOST/X29 Command Qualifiers
The following sections list the SET HOST/X29 command qualifiers,
with a summary of their defaults and uses. Table 4.1, ''SET HOST/X29 Qualifiers Which Control the PAD'' lists the command
qualifiers you can use to control the host-based PAD. Table 4.2, ''SET HOST/X29 Qualifiers Which Control the Connection'' lists the
command qualifiers you can use to control the connection between the host-based PAD and
the remote DTE.
|
/BREAK_CHARACTER=character /NOBREAK_CHARACTER ? Sets up a control character to represent the |
|
/CCITT /NOCCITT ? Uses the PAD in CCITT X.28 mode. |
|
/CLI ? /NOCLI
|
|
/DEFAULT_ESCAPE_CHARACTER=character /NODEFAULT_ESCAPE_CHARACTER Specifies the default escape character. The default is Ctrl/P. |
|
/LOG=file /NOLOG ? Sets up a log of the |
|
/PARAMETERS=(parameters-list) /NOPARAMETERS ? Specifies values for individual PAD parameters. See Chapter 10, "Changing Default X.29 Terminal Characteristics" for details of the PAD parameters and their values. |
|
/PROFILE=profile-list /NOPROFILE ? Specifies one or more PAD parameter profiles. |
|
/STATISTICS ? /NOSTATISTICS Shows the duration of the PAD session at the end of the call. |
|
/VMS_MODE /NOVMS_MODE ? Causes the PAD to enter OpenVMS mode. This qualifier applies to OpenVMS systems only. |
|
/CLOSED_USER_GROUP=string /NOCLOSED_USER_GROUP ? Specifies the name of a closed user group. |
|
/FACILITIES=facilities-list /NOFACILITIES ? Specifies a list of facilities for the local facilities field in the network connect block (NCB). |
|
/FAST_SELECT /NOFAST_SELECT ? Makes the call with fast select. |
|
/PACKET_SIZE=number /NOPACKET_SIZE ? Requests a specified packet size in the call packet. The packet size must be:
See Note. |
|
/PROTOCOL_IDENTIFIER /PROTOCOL_IDENTIFIER="01" ? Puts a nonstandard X.29 protocol identifier into the protocol identifier field of the call. |
|
/REVERSE_CHARGING /NOREVERSE_CHARGING ? Requests reverse charging. |
|
/SUBADDRESS=number /NOSUBADDRESS ? Specifies a local subaddress in the local outgoing call. |
|
/THRUPUT_CLASS=number /NOTHRUPUT_CLASS ? Requests a specified throughput class in the call packet. |
|
/USER_DATA=string /NOUSER_DATA ? Specifies a string of user data to send to the remote DTE (normally up to 12 bytes, up to 124 bytes if fast select is used). |
|
/WINDOW_SIZE=number /NOWINDOW_SIZE ? Requests a window size in the range 1-127. See Note. |
Note
If the window size or packet size you request are not supported by your network, the value you request will be altered to a value that is supported by the network.
Chapter 5. Using PAD Commands to Control the Host-Based PAD
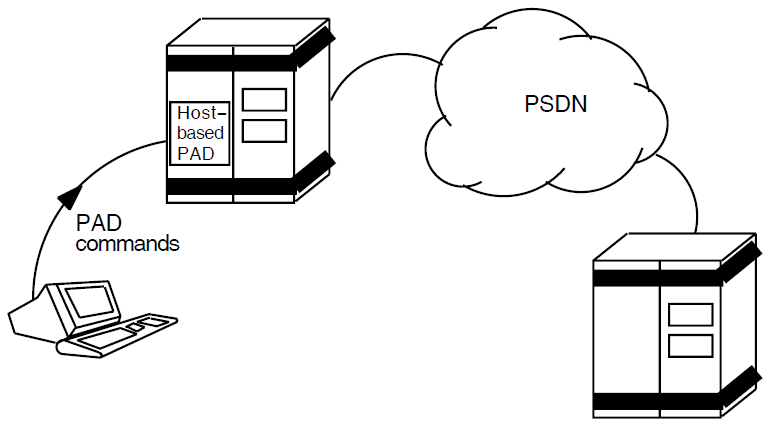
This chapter describes how to use PAD commands to control the X.25 for OpenVMS host-based PAD and modify its characteristics while you are using it to communicate with a remote DTE. Figure 5.1, ''Using PAD Commands to Change Characteristics of the Host–Based PAD'' illustrates your connection to the remote system, by means of the host-based PAD.
To change the characteristics of the host-based PAD, you must enter PAD command mode and use PAD commands to change the PAD parameters.
This chapter tells you how to:
Enter and leave PAD command mode (Section 5.1, ''Entering PAD Command Mode'' and Section 5.2, ''Leaving PAD Command Mode'').
Control a PAD session (Section 5.3, ''Controlling a PAD Session'').
Change the characteristics of the host-based PAD within a PAD session (Section 5.4, ''Changing the PAD Characteristics'').
Examine the characteristics of the host-based PAD within a PAD session (Section 5.5, ''Displaying the Characteristics of the Host-Based PAD'').
Section 5.6, ''Summary of PAD Commands'' provides a summary of the PAD commands you can use to control a PAD session and to change the characteristics of the host-based PAD.
5.1. Entering PAD Command Mode
To enter PAD command mode, press the Escape character. The default Escape character is Ctrl/P, but if you have set a different Escape character for your session, use that character. (Section 4.1.2, ''Setting the Escape Character'' describes how to set an Escape character when you connect to a remote system.) If there is no Escape character defined, press Ctrl/Y twice.
5.2. Leaving PAD Command Mode
5.2.1. Returning to Your SET HOST/X29 Session
To return to your session on the remote DTE, perform one of the following actions:
Enter the PAD command
CONTINUE.Enter the PAD command
EXIT.Press Ctrl/Z.
5.2.2. Clearing Your Call
To clear your call, enter the command CLEAR.
Note that the remote DTE can clear your call. If this happens, you have no way of letting the call continue.
5.3. Controlling a PAD Session
This section describes how you can use the PAD commands to control a PAD session.
You can request online help at any time by entering:
PAD> HELP
5.3.1. Creating a Subprocess
The host-based PAD allows you to create a subprocess without leaving the first
process. The PAD command is similar to the DCL SPAWN command:
PAD> SPAWN [command] [qualifiers]
The variable command is a command string of up to 132 characters. If you specify a command, the subprocess will execute the command and return to your PAD session.
You can add qualifiers to the SPAWN command to:
Execute a command file -
To execute a command file in the subprocess, use the following qualifier:
/INPUT=fileThe variable file specifies the command file. The subprocess will execute the command file, and return to your PAD session. If you specify a command string in addition to the command file, the command string will be processed before the file.
Write the results of a
SPAWNoperation to a file -To write the results of a
SPAWNoperation to a file, use the following qualifier:/OUTPUT=fileReturn to the PAD while the subprocess is running -
By default, the system waits until the subprocess in completed before returning you to the PAD.
To return to the PAD while the subprocess is running, use the following qualifier:
/NOWAITThe
/NOWAITqualifier should be used only if the/INPUTqualifier is specified. This combination of qualifiers ensures that only one process reads from the terminal at any given point in time.If you use the
/NOWAITqualifier interactively, you must make sure that the output from both the parent process and the subprocess do not appear on your terminal at the same time. To do this, ensure that you:Use the
/OUTPUTqualifier.Do not specify
SYS$COMMANDas the output file.
Specify a name for the subprocess -
To specify a unique name for the subprocess, use the following qualifier:
/PROCESS=subprocess-nameIf you specify a process name that already exists, an error message will be displayed.
If you do not add this qualifier, a unique process name will be generated from your user name and the number of your process; for example, if you are user
DUKEand the process is your first, the default subprocess name will beDUKE_1.Control copying of logical names and DCL symbols to the subprocess -
By default, the
SPAWNcommand copies to the subprocess all the logical names and logical name tables (except for those explicitly marked CONFINE or those created in executive or kernel mode) and DCL symbols associated with the process. The/[NO]LOGICAL_NAMESand/[NO]SYMBOLSqualifiers allow you to control whether or not the logical names and DCL symbols are copied to the subprocess.If you do not want the logical names to be copied to your subprocess, use the following qualifier:
/NOLOGICAL_NAMESIf you do not want the DCL symbols to be copied to your subprocess, use the following qualifier:
/NOSYMBOLS
For example, to create a subprocess called FRED and write the results
of FRED to a file called FRED.TXT, enter the following
command:
PAD> SPAWN/PROCESS=FRED/OUTPUT=FRED.TXT
5.3.2. Attaching to a Specified Process
You can attach your terminal to a specified process by using the
ATTACH command. For example, if you have previously spawned a
process, you can use the ATTACH command to return to that
process.
Use the ATTACH command in one of the following ways:
PAD> ATTACH process-name
PAD> ATTACH/IDENTIFICATION=pid
where process-name and pid are the process
name and the process identification (PID) of the process you want to attach to. For
example, to attach your terminal to a process called HARRY, enter the
following command:
PAD> attach harry
5.3.3. Defining and Deleting Keys
During the PAD session you can define and delete keys in the same way as you do with DCL. Your key definitions will last until you terminate the PAD session.
5.3.3.1. Defining a Key
To define a key, enter the following command:
PAD> DEFINE/KEY key-name "equivalence-string" [qualifiers]
where key-name is the name of the key you wish to define, and
equivalence-string corresponds to the command you want the key
to perform. You can add qualifiers to the DEFINE/KEY command
to:
Specify a state for the key you are defining -
To associate a state with the key you are defining, use the following qualifier:
/SET_STATE=state-nameThe variable state-name can be any alphanumeric string. If you omit or negate this qualifier, the current state remains unchanged. Refer to the relevant entry in the VSI OpenVMS DCL Dictionary Part One for further details of this qualifier.
Retain the state you have specified -
To retain the state you specify with the
/SET_STATEqualifier, use the following qualifier:/LOCK_STATESpecify a state which must be set to enable the key definition -
To specify a list of states, any one of which must be set for the key definition to work, use the following qualifier:
/IF_STATE=(state-name[,...])If you omit or negate this qualifier, the current state will be used. Refer to the relevant entry in the VSI OpenVMS DCL Dictionary Part One for further details of this qualifier.
Choose whether the equivalence string is echoed after you press the defined key -
To specify whether the equivalence string is echoed after you press the defined key, use the following qualifier:
/[NO]ECHORefer to the Note at the end of this section.
Choose whether you need to press Return as well as the defined key to execute the command -
To choose whether the key you define includes a Return or whether you need to follow the defined key with Return, use the following qualifier:
/[NO]TERMINATEBy default, the key you define will not include Return.
If you want to press Return in addition to the defined key to execute the command, add
/NOTERMINATEto theDEFINE/KEYcommand.
Note
You cannot specify both /NOECHO and
/NOTERMINATE when you define a key.
5.3.3.2. Deleting a Key Definition
To delete a key definition, enter the PAD DELETE/KEY command as
follows:
To delete a specific key definition, enter the following command:
PAD> DELETE/KEY key-name [/STATE=state-name]
where the
/STATEqualifier specifies the state for which you want the key definition to be deleted. If you omit or negate the/STATEqualifier, the key definition will be deleted in the current state.To delete all the key definitions for a particular state, enter the following command:
PAD> DELETE/KEY[/STATE=state-name]
This command deletes all the key definitions in the state you specify. If you omit or negate the
/STATEqualifier, only key definitions in the current state will be deleted.
5.3.4. Sending an Interrupt to the Remote DTE
To send an Interrupt to the remote DTE, use the following command:
PAD> INTERRUPT [data] [qualifier]
where data is a decimal number. If you do not specify a value for data, data will be set to 1.
You can make the PAD discard output from the remote DTE. To do this, use the following qualifier:
/DISCARD
By default, the PAD does not discard output from the remote DTE.
The effect of the interrupt on the remote DTE will depend on how the DTE is set up. For example, if the DTE is running X.25 for OpenVMS, the default is to treat the Interrupt as Ctrl/O.
Note that you cannot send a second Interrupt before the remote DTE and the PAD have completed handling the previous Interrupt. If you try to do this, the PAD will display:
%PAD-W-WARNINT, Previous interrupt incomplete
5.3.5. Sending a Reset to the Remote DTE
If you want to reset the virtual circuit between the PAD and the remote DTE (for example, if the line is slow), use the following command:
PAD> RESET [diagnostic]
where diagnostic consists of a decimal number between 0 and 255, which is placed in the Diagnostic field of the Reset.
Note that:
When you send a Reset, you may lose some of the data being transferred between the PAD and the remote DTE.
You cannot send a second Reset before the remote DTE and the PAD have completed handling the previous Reset. If you try to do this, the PAD will display:
%PAD-W-WARNRES, Previous reset incomplete
5.3.6. Executing a File of PAD Commands
If you want to execute a sequence of PAD commands repeatedly (for example, every time you use the PAD) you will find it useful to execute the commands in a command file. You can execute a file of PAD commands by using the following command:
PAD> @file
where file is the name of the file you want to execute. The file type defaults to .COM.
For example, to execute a sequence of PAD commands in a file called
BOB.COM, enter the following command:
PAD> @BOB
Note that if you place the EXIT command in the command file, the
file will finish processing at the EXIT command.
5.4. Changing the PAD Characteristics
This section describes how to change the characteristics of a host-based PAD.
5.4.1. Changing PAD Parameters
You can change the values of the PAD parameters during a SET
HOST/X29 session by doing one of the following:
Changing individual parameters.
Specifying one or more PAD parameter profiles, which set the values for certain parameters. This facility is useful if you regularly need to set PAD parameters to specific values, for example, to access a non-OpenVMS system.
Specifying a mixture of PAD parameter profiles and changing individual parameters. This facility is useful if you want to set parameters to the values specified in a profile, and also set values for other parameters.
Note that if the remote DTE is an OpenVMS system, certain PAD parameters must have specific values for the NV device to operate normally. For details of the required PAD parameter values refer to Table A.1, ''PAD Parameter Values Required by the NV Device''.
5.4.1.1. Changing the Values of Individual Parameters
To change the values of individual parameters, use the following command:
PAD> SET PARAMETERS parameter-value-list
where parameter-value-list is a list of parameters and parameter values. You can express each parameter in one of two ways:
The parameter keyword, for example, TIMEOUT
The parameter number, for example, 4 (the TIMEOUT parameter)
You can also mix the two formats on the same command line. The command line can contain any number of parameters (and associated values), but where more than one parameter is specified, each parameter must be separated from the next with a comma.
If you specify a keyword, but no value, the parameter will be set to 1. If you put NO in front of the keyword (for example, NOTIMEOUT), the parameter will be set to 0.
For example, to set TIMEOUT to 10, FORWARDING_CHARACTERS to
0, and DELETE to 1, enter the following command:
PAD> SET PARAMETERS TIMEOUT=10, NOFORWARDING_CHARACTERS, DELETE
Alternatively, you could enter the following:
PAD> SET PARAMETERS 4=10, 3=0, 16
This command is equivalent because TIMEOUT, FORWARDING_CHARACTERS and DELETE are parameters 4, 3, and 16, respectively.
For further details of the PAD parameters and their values, refer to Chapter 10, "Changing Default X.29 Terminal Characteristics".
5.4.1.2. Using a PAD Parameter Profile
PAD parameter profiles are lists of settings for certain PAD parameters. The PAD
profiles for your system are defined in the profile file
SYS$MANAGER:PSI$PAD_PROFILES.DAT. They are usually created by the
system manager, and are available for you to use within your PAD session.
You can create your own PAD parameter profiles for sets of parameters that you frequently use. Section 3.3.2, ''Creating the PAD Initialization File and PAD Parameter Profiles'' describes how to do this.
To set the PAD parameters to values contained in one or more profiles, use the following command:
PAD> SET PROFILE profile-name
where profile-name is the name of the PAD profile you want to use.
For example, to reset the PAD parameters to the values in a profile called
MACHINE_2, enter the following command:
PAD> SET PROFILE MACHINE_2
Note that the profile name you use must exactly match the name specified in the profile file; do not use any abbreviations.
You can also use the SET PROFILE command to reset the PAD
parameters to their default values (that is, the initial PAD profile). To do this,
enter the following command:
PAD> SET PROFILE/INITIAL
Details of the initial PAD profile are in Appendix B, "Host-Based PAD Initial Profile".
5.4.1.3. Using PAD Profiles and Resetting Individual Parameters
To specify a mixture of PAD profiles and individual parameters, use the
SET
                PROFILE
command to specify the profiles you want to use, then
use the SET PARAMETERS command to specify individual
parameters.
Note that if you want to use a particular profile, but set one of the parameters
in that profile to a different value, you must issue the SET
PROFILE command first, followed by the SET PARAMETERS
command, to reset the individual parameter.
5.4.2. Changing the Escape Character
You use the Escape character to disconnect from the remote terminal and enter PAD command mode. The Escape character is controlled by:
Specifying the Escape character you are going to use (if any). Use the
SET PARAMETERScommand as described in Section 5.4.2.1, ''Specifying the Escape Character'' to do this.Setting a value for the default Escape character. Use the
SET DEFAULT_
                  ESCAPE_CHARACTER
as described in Section 5.4.2.2, ''Changing the Default Escape Character'' to do this.
5.4.2.1. Specifying the Escape Character
To specify the Escape character you are going to use (if any), issue the command:
PAD> SET PARAMETERS ESCAPE_CHARACTER=[value]
where value is a single character.
The ESCAPE_CHARACTER parameter specifies whether you use:
The default Escape character -
To use the default Escape character, set ESCAPE_CHARACTER to
1.An alternative Escape character -
Specify an alternative escape character with the ESCAPE_CHARACTER parameter. Refer to Appendix A, "PAD Parameters" for details of the values you can use.
No Escape character -
To specify no Escape character, set ESCAPE_CHARACTER to
0.
If you do not specify a value for the ESCAPE_CHARACTER parameter, the Escape character is set to the default Escape character.
5.4.2.2. Changing the Default Escape Character
If you want to change the default Escape character to a new value (for example, if you want to use the current default Escape character for another purpose), enter the following command:
PAD> SET [NO]DEFAULT_ESCAPE_CHARACTER [character]
where character is a single letter that represents a control character.
For example, to change the default Escape character for your session to Ctrl/J, enter the following command:
PAD> SET DEFAULT_ESCAPE_CHARACTER J
The default for the default Escape character is Ctrl/P. Note that you cannot use Ctrl/P if you are accessing the PAD from a console terminal, or using a network product that uses Ctrl/P for some other purpose.
Care should be taken when choosing a character as the default Escape character. For example, when used in combination with the Ctrl key, the characters S and Q are used for X-OFF and X-ON, and the "[" character is the ASCII escape character used in escape sequences.
5.4.3. Setting or Changing the Break Character
You can set a control character to have the same effect in your SET
HOST/X29 session as the Break key on a real X.29 terminal.
To do this, use the command:
PAD> SET BREAK_CHARACTER character
where character is a single letter that represents a control character. For example, to use Ctrl/K as the Break key, enter the following command:
PAD> SET BREAK_CHARACTER K
To delete a Break character definition, enter the following command:
PAD> SET NOBREAK_CHARACTER
You can also use the SET BREAK command to change an existing
Break key to a new key. To do this, enter the following
commands:
PAD> SET NOBREAK_CHARACTER
PAD> SET BREAK_CHARACTER character
where character represents the control character for the new Break key.
5.4.4. Using the PAD in OpenVMS Mode
To optimize communication with the remote DTE, you can use the PAD in OpenVMS mode. To do this, enter the following command:
PAD> SET VMS_MODE
Note that you can only use this qualifier if the remote DTE is on an OpenVMS VAX system running VAX P.S.I. V3.0 or later, or an OpenVMS IA-64 or OpenVMS Alpha system running X.25 for OpenVMS.
Note that if your X.29 terminal is in local-echo mode, you will have the following facilities which are not available in host-echo mode:
Full line editing for the OpenVMS terminal driver is available locally.
The DELETE, LINE_DELETE and REDISPLAY_LINE parameters are ignored.
If you use Ctrl/Y or Ctrl/X, a Reset will precede the character.
5.4.5. Starting and Stopping a Log of Your SET HOST/X29 Session
To start a log of your session on the remote terminal, enter the following command:
PAD> SET LOG_FILE file [qualifier]
where file is the name of the file you want the log written to.
If you do not specify a log file, the log will be written to
PSIPAD.LOG in your default directory.
To end the log, enter the following command:
PAD> SET NOLOG_FILE
There are two types of log file you can use: NETWORK and TERMINAL. You need to
specify the type of log file you want to use when you issue the SET
HOST/X29 command. Section 3.4, ''Specifying the Type of Log File for Your Session'' describes the NETWORK and
TERMINAL log file types, and describes how to specify the type you want.
The default log file type is TERMINAL.
You can control whether or not the records in the log file are time-stamped and/or marked as they are received or transmitted. To do this, use the following qualifier:
/STAMP=value
The variable value can be:
| ALL |
The records will be time-stamped and marked as they are received or transmitted; |
| NONE |
The records will be neither time-stamped nor marked as they are received or transmitted; |
| TIME |
The records will be time-stamped as they are received or transmitted; or |
| SENSE |
The records will be marked as being either received or transmitted. |
The default is /STAMP=SENSE.
Note that if you are using the TERMINAL type of log file the
/STAMP qualifier has no effect.
5.4.6. Changing the PAD Prompt
To change the prompt for the PAD in command mode, enter the following command:
PAD> SET PROMPT prompt-string [qualifier]
The default, which is set unless you specify a prompt, is
PAD>.
You can control whether carriage and line feed characters are inserted before the prompt string. To do this, use the following qualifier:
/[NO]CARRIAGE_CONTROL
The default is /CARRIAGE_CONTROL.
5.4.7. Sending a File to the Remote DTE
You can send a file to the remote DTE, which the remote DTE will see as though the
characters in the file were being typed on the terminal. For example, you can issue a
DCL command, such as DIRECTORY, on the remote system.
To send a file to the remote DTE, enter the following command:
PAD> SET INPUT file [qualifier]
The variable file is the name of the file you want to send.
You can limit the maximum rate at which the file will be sent. To do this, use the following qualifier:
/SPEED=number
The variable number is the baud rate at which the file will be sent to the remote DTE. If you omit this qualifier, the data will be sent as rapidly as possible.
Note that:
When you use
SET INPUT, make sure the X.29 terminal has HOSTSYNC enabled in order to prevent the remote node receiving data too quickly. To enable HOSTSYNC, enter the DCL command:$ SET TERMINAL/HOSTSYNC
When you use
SET INPUTto read an RMS file, records longer than 512 bytes will be truncated, so you may lose data from this type of file.
5.5. Displaying the Characteristics of the Host-Based PAD
During a PAD session, you can examine the present settings of the PAD parameters and other information about the PAD and your use of it.
To see information about the PAD, use the PAD SHOW command. This
command allows you to examine:
The PAD parameters -
To display the values of all 22 PAD parameters issue the command:
PAD> SHOW PARAMETERS
To display selected PAD parameters issue the command:
PAD> SHOW PARAMETERS [parameter-list]
where parameter-list is a list of the keywords or numbers of the parameters you want to see.
You can add the qualifier
/NUMERICto display the parameter numbers instead of their names.The parameter settings contained in a profile -
PAD> SHOW PROFILE profile-name
The parameter settings contained in the PAD initial profile -
PAD> SHOW PROFILE/INITIAL
The control character you are using as the default Escape character -
PAD> SHOW DEFAULT_ESCAPE_CHARACTER
The control character (if any) you are using as the Break character -
PAD> SHOW BREAK_CHARACTER
Whether OpenVMS mode is enabled -
PAD> SHOW VMS_MODE
This command will also display whether the PAD is in local-echo or host-echo mode.
The name of the log file (if any) that contains a copy of the data you have sent or received during the PAD session -
PAD> SHOW LOG_FILE
The PAD prompt -
PAD> SHOW PROMPT
The name of the file you are sending to the remote DTE (if any) -
PAD> SHOW INPUT
Your keypad definitions -
PAD> SHOW KEY [key-name] [/STATE=(state-name)]
This command will display your keypad definitions. If you want to see the definition of a particular key, or the keypad definitions for a particular state, specify the key-name or state-name, respectively.
Information about the elapsed time of the call -
PAD> SHOW STATISTICS
This command presents the CPU time used, number of page faults, and buffered and direct I/O counts for the elapsed time of the call.
All the PAD settings -
PAD> SHOW ALL
This command presents the output of the following
SHOWcommands (in the order shown):PARAMETERS,DEFAULT_ESCAPE_CHARACTER,LOG_ FILE,STATISTICS,PROMPT,VMS_MODE, andBREAK_CHARACTER.
5.6. Summary of PAD Commands
The following tables list the PAD commands, with a summary of their defaults and uses. Table 5.1, ''Commands Used to Control a PAD Session'' lists the commands you use to control a PAD session, Table 5.2, ''Commands Used to Change the PAD Characteristics'' lists the commands which change the PAD parameters, and Table 5.3, ''Commands Used to Examine the PAD Characteristics'' lists the commands you use to examine the characteristics of the PAD. The PAD commands are listed in alphabetical order within each table.
|
ATTACH [process-name][/IDENTIFICATION=process-id] Attaches your terminal to a specified process. Specify either process-name or process-id. |
|
BREAK Simulates pressing the Break key. |
|
CLEAR Clears a call. |
|
CONTINUE Returns the PAD to data-transfer mode. |
|
DEFINE/KEY key-name "equivalence-string"[/[NO]ECHO] [/IF_STATE=(state-name[ . . . ])] [/[NO]LOCK_STATE][/[NO]SET_STATE=state- name] [/[NO]TERMINATE] Defines a key. The defaults are:
|
|
DELETE/KEY [key-name][/STATE=state-name] Cancels a key definition. The default state is the current state. |
|
EXIT Returns the PAD to data-transfer mode. |
|
HELP Displays online help. |
|
INTERRUPT [data] [/[NO]DISCARD] Sends an Interrupt to the remote DTE. The defaults are:
|
|
RESET [diagnostic] Sends a Reset to the remote DTE. |
|
SPAWN [command][/INPUT=file] [/[NO]LOGICAL_NAMES] [/OUTPUT=file][/PROCESS=subprocess-name] [/[NO]SYMBOLS] [/[NO]WAIT] Allows you to create a subprocess without leaving the first process. The defaults are:
If you do not specify a subprocess name, your subprocess will be given the name: username_process-number, where username is your user name, and process-number is the number of your process. |
|
SET [NO]BREAK_CHARACTER [control-character] Sets up a control character to simulate pressing the Break key in data-transfer mode. The default is NOBREAK_CHARACTER. |
|
SET [NO]DEFAULT_ESCAPE_CHARACTER [control-character] Sets the default escape character to a specified control character. The default for the default escape character is P (that is, Ctrl/P). |
|
SET INPUT filename [/SPEED=number] Allows the named file to be sent as though the characters were being typed on the remote terminal. Omitting the /SPEED qualifier lets the data be sent as fast as possible. |
|
SET [NO]LOG_FILE [file][/[NO]STAMP={ALL | NONE | TIME | SENSE}] Saves all the data you send and receive in a log file. The defaults are:
|
|
SET PARAMETERS parameter-value-list Sets PAD parameters. |
|
SET PROFILE profile-name Resets the PAD parameters to the values specified in the profile profile-name. |
|
SET PROFILE/INITIAL Returns to the default values for all the parameters (the PAD initial profile). |
|
SET PROMPT [prompt-string][/[NO]CARRIAGE_CONTROL] Changes the PAD prompt. The defaults are:
|
|
SET [NO]VMS_MODE Causes the host-based PAD to operate in OpenVMS mode. |
|
SHOW ALL Presents the output of the following show commands (in the order shown):
|
|
SHOW BREAK_CHARACTER Shows the control character that is being used as the Break character. |
|
SHOW DEFAULT_ESCAPE_CHARACTER Shows the control character that is being used as the default escape character. |
|
SHOW INPUT Shows the name of the input file. |
|
SHOW KEY key-name [/STATE=state-name] Displays your keypad definitions. |
|
SHOW LOG_FILE Names the file into which the data you send and receive is being copied. |
|
SHOW PARAMETERS [/NUMERIC][parameter-list] Displays the values of the PAD parameters. |
|
SHOW PROFILE profile-name Shows the parameter settings in the profile profile-name. |
|
SHOW PROFILE/INITIAL Shows the parameter settings in the initial profile. |
|
SHOW PROMPT Displays the PAD prompt. |
|
SHOW STATISTICS Presents information about the duration of the call. |
|
SHOW VMS_MODE Shows whether OpenVMS mode has been enabled. |
Chapter 6. Using the Host-Based PAD in CCITT Mode
This chapter describes how to connect to a remote system using the host-based PAD in CCITT mode (that is, the PAD’s user interface is compatible with CCITT standard X.28).
This chapter describes how to:
Connect to the host-based PAD (Section 6.1, ''Connecting to the Host-Based PAD'').
Control a PAD session (Section 6.2, ''Controlling a PAD Session'').
Change the characteristics of the host-based PAD within a PAD session (Section 6.3, ''Changing the PAD Characteristics'').
Examine the characteristics of the host-based PAD within a PAD session (Section 6.4, ''Displaying the Characteristics of the Host-Based PAD'').
6.1. Connecting to the Host-Based PAD
To connect to a remote system, using the host-based PAD in CCITT mode, enter the following command:
$ SET HOST/X29/CCITT [[dte-class].dte-address]
where:
dte-class is the name of the DTE class from which a member DTE will be used to connect to the remote DTE.
dte-address is the address of the DTE to which you want to connect. The DTE address can consist of up to 15 characters.
If you do not specify a DTE class, X.25 for OpenVMS will use the DTE class specified in the PAD template. If there is no DTE class specified in the PAD template, X.25 for OpenVMS will use the DTE class specified in the system default template. If neither template specifies a DTE class, the command will fail.
To simplify the command, you can replace dte-class and dte-address with a logical name. Refer to Section 1.2, ''Using Logical Names for Addresses'' for details of setting up and using logical names.
When you specify the remote DTE address, you can use any of the qualifiers described in Chapter 3, "Using an X.29 Terminal to Connect to a Remote System".
Note that specifying the remote DTE in the command line is optional. This gives you the option of connecting to the remote DTE in the usual way, or entering PAD command mode (from which you can make a call to the remote DTE). Section 6.1.1, ''Entering PAD Command Mode from the Local DTE'' and Section 6.1.2, ''Entering PAD Command Mode from the Remote DTE'' describe how to enter PAD command mode from the local and remote DTEs respectively.
6.1.1. Entering PAD Command Mode from the Local DTE
To enter PAD command mode from the local DTE, enter the following command:
$ SET HOST/X29/CCITT
Note that if you do not specify the remote DTE on the SET
HOST/X29/CCITT command line, you can only use the following qualifiers for
the SET HOST/X29/CCITT command:
- /LOG
- /PARAMETER
- /VMS_MODE
- /DEFAULT_ESCAPE_CHARACTER
- /BREAK_CHARACTER
- /PROFILE
- /STATISTICS
6.1.2. Entering PAD Command Mode from the Remote DTE
To enter PAD command mode from the remote DTE, press the Escape character. The default Escape character is Ctrl/P, but if you have set a different Escape character for your session, use that character. (Section 4.1.2, ''Setting the Escape Character'' describes how to set an Escape character when you connect to a remote DTE.) If there is no Escape character defined, press Ctrl/Y twice.
6.2. Controlling a PAD Session
This section describes how you can control a CCITT PAD session.
6.2.1. Connecting to a Remote DTE from the Host-Based PAD
To connect your terminal with a remote DTE, enter the following command:
PAD> A remote--dte
where remote-dte is the remote DTE specification, as described in Section 6.1, ''Connecting to the Host-Based PAD''. When the circuit is established, you will see the message:
%PAD-I-COM, Call connected
To start the login procedure for the remote DTE, enter the following command:
PAD> EXIT
6.2.2. Returning to the Remote DTE
To return from PAD command mode to your session on the remote DTE, enter the following command:
PAD> EXIT
If you type EXIT, and you have no call established on the remote DTE, your call will clear.
6.2.3. Determining Whether the PAD Is Free
To determine whether the PAD is free or in use, enter the following command:
PAD> STAT
%PAD-I-ENGAGED, PAD engaged
PAD>
The system message indicates whether the PAD is free or in use (engaged).
6.2.4. Clearing a Virtual Call
To clear all virtual calls in progress, enter the following command:
PAD> CLR
6.2.5. Putting Data in the Call Request Packet
If you want to put data into the user data field of the call request packet, enter the following command before you make the call:
PAD> U cccc
where cccc is up to 12 characters of data.
The characters must be printing characters, because the PAD discards non- printing characters.
Note that the PAD program converts all lowercase characters to uppercase and removes
all spaces. If you want to use lowercase characters and spaces for the data, use the
/USER_DATA qualifier to the SET HOST/X29
command.
6.2.6. Sending a Break Signal to the PAD
To send a Break signal to the host-based PAD, enter the following command:
PAD> BREAK
The action that occurs when a BREAK command is sent depends on
the value of parameter 7, the Break parameter. To see the value of parameter 7,
enter:
PAD> PAR? 7
For details of the values for parameter 7 refer to Chapter 10, "Changing Default X.29 Terminal Characteristics".
You need to use the BREAK command to send a Break signal to the
host-based PAD. This is because the OpenVMS terminal driver discards Break characters,
so any Break character typed at the terminal will be ignored by the PAD.
6.2.7. Sending an Interrupt to the Remote DTE
To send an Interrupt to the remote DTE, enter the following command:
PAD> INT
The effect of the interrupt on the remote DTE will depend on how the DTE is set up. For example, if the DTE is running X.25 for OpenVMS, it may ignore an interrupt.
Note that if you try to send a second Interrupt before the remote DTE and the PAD have completed handling the previous interrupt, the PAD will display:
%PAD-W-WARNINT, Previous interrupt incomplete
6.2.8. Sending a Reset to the Remote DTE
If you want to reset the virtual circuit between the PAD and the remote DTE (for example, if the line is slow), enter the following command:
PAD> RESET
Note that:
When you send a Reset, you may lose some of the data being transferred between the PAD and the remote DTE.
If you try to send a second Reset before the remote DTE and the PAD have finished handling the previous Reset, the PAD will display:
%PAD-W-WARNRES, Previous reset incomplete
6.3. Changing the PAD Characteristics
You can change the characteristics of individual PAD parameters by issuing the command:
PAD> SET parameter-list
where parameter-list is a list of parameter numbers and parameter values, in the form:
parameter-number:parameter-value
For example, to set the values of PAD parameters 3, 4, 5 and 10, to 48, 160, 0 and 132, respectively, enter the following command:
PAD> SET 3:48, 4:160, 5:0, 10:132
Alternatively, if you want to change some parameter values and have the new values displayed, enter the following command:
PAD> SET? parameter-list
For a description of the parameters and their values refer to Chapter 10, "Changing Default X.29 Terminal Characteristics".
Note that when you use the PAD in CCITT mode, you cannot use keywords to refer to the parameters. You have to reference the parameters by number.
6.4. Displaying the Characteristics of the Host-Based PAD
To display the current values for the PAD parameters, enter the following command:
PAD> PAR? [parameter-list]
where parameter-list is a list of PAD parameter numbers. If you do not specify a list of PAD parameter numbers, the PAD will display the values for all the parameters.
For example, to display the current values for PAD parameters 3, 4 and 9, enter the following command:
PAD> PAR? 3,4,9
For a description of the parameters and their values refer to Chapter 10, "Changing Default X.29 Terminal Characteristics".
Chapter 7. Using a Remote OpenVMS System to Control Your X.29 Terminal
This chapter describes how to use a remote OpenVMS system to control the behavior of your X.29 terminal.
To change the behavior of your X.29 terminal, enter the following command on the remote OpenVMS system:
$ SET TERMINAL/X29
Note that you can use the SET TERMINAL/X29 command to change the
characteristics of either a host-based PAD or a network PAD.
If you have sufficient privileges, you can also use the SET
TERMINAL/X29 command to change the characteristics of all remote X.29 terminals,
NV devices, and PADs on your system. Chapter 10, "Changing Default X.29 Terminal Characteristics" describes how to do
this.
This chapter describes how to:
Change the characteristics of your X.29 terminal and the PAD (Section 7.1, ''Changing the Behavior of Your X.29 Terminal'').
Examine the characteristics of the PAD and the X.29 terminal (Section 7.2, ''Examining the Characteristics of Your X.29 Terminal and the PAD'').
Section 7.3, ''Summary of the SET TERMINAL/X29 and SHOW TERMINAL/X29 Commands'' provides a summary of the SET TERMINAL/X29
and SHOW TERMINAL/X29 commands.
7.1. Changing the Behavior of Your X.29 Terminal
This section describes how you can use the SET TERMINAL/X29 command
to change:
Standard PAD parameters
Network-specific PAD parameters
The response of your terminal to Break and Interrupt messages
The display of information messages on your terminal
In addition, you can use the SET TERMINAL/X29 command to
alter:
PAD parameter templates. These control the behavior of the NV device (X.29 terminal driver) in host-echo mode, local-echo mode and at hangup.
The hold timer. This determines how long the NV device waits before it forwards a data packet to the PAD.
For information about changing the PAD parameter templates and the hold timer, refer to Chapter 10, "Changing Default X.29 Terminal Characteristics".
7.1.1. Changing the PAD Parameters
To change individual PAD parameters, enter:
$ SET TERMINAL/X29/PARAMETERS=(parameter-specification)
where parameter-specification is a list of parameters and parameter values. You can express each parameter in one of two ways:
The parameter keyword, for example, TIMEOUT
The parameter number, for example, 4 (the TIMEOUT parameter)
You can also mix the two formats on the same command line. Each command line can contain any number of parameters, but if more than one parameter is specified, separate one parameter from the next with a comma.
If you specify a keyword, but no value, the parameter will be set to 1. If you put NO in front of the keyword (for example, NOTIMEOUT), the parameter will be set to 0.
For example, to set TIMEOUT to 10, FORWARDING_CHARACTERS to
0, and DELETE to 1, enter the following command:
$ SET TERMINAL/X29/PARAMETERS=(TIMEOUT=10), NOFORWARDING_CHARACTERS, DELETE
Alternatively, you could enter:
$ SET TERMINAL/X29/PARAMETERS=(4=10, 3=0, 16)
This is because TIMEOUT, FORWARDING_CHARACTERS, and DELETE are parameters 4, 3, and 16, respectively.
For further details of the PAD parameters and their values refer to Chapter 10, "Changing Default X.29 Terminal Characteristics".
Note that some of the PAD parameters must have specific values for the NV device to operate normally. Refer to Table A.1, ''PAD Parameter Values Required by the NV Device'' for details of these PAD parameter values.
7.1.2. Changing and Setting Network-Specific PAD Parameters
Some networks have additional parameters that are not part of the CCITT X.3 1984 Recommendations. To set non-CCITT parameters, enter the following command:
$ SET TERMINAL/X29/NETWORK_SPECIFIC=(parameter-list)
where the parameter-list consists of numeric parameter identifiers and their values as pairs of numbers in a string. For example, to set parameter 120 to 35, parameter 24 to 19, and parameter 56 to 8, enter:
$ SET TERMINAL/X29/NETWORK_SPECIFIC=(120=35,24=19,56=8)
Note that the CCITT X.29 Recommendation specifies that network-specific parameters should be preceded by a 0=0 parameter pair. As some networks do not use this, X.25 for OpenVMS does not insert a 0=0 parameter pair. Therefore, you must explicitly specify the 0=0 parameter pair for any network where it is required. For example:
$ SET TERMINAL/X29/NETWORK_SPECIFIC=(0=0,120=35,24=19,56=8)
7.1.3. Controlling the Response of the X.29 Terminal Driver (NV Device) to Break and Interrupt Messages
You can control the NV device’s response to Break and Interrupt messages by using
the SET TERMINAL/X29 command with /BREAK and
/INTERRUPT qualifiers.
Before you use either of these qualifiers determine the value of PAD parameter 7 (BREAK). This parameter determines the action of the PAD to the Break key.
For example, when you use the host-based PAD, PAD parameter 7 is set up to send both a Break message and an Interrupt message. If you do not want both of these actions to occur, you will have to change the parameter.
To display the value of parameter 7, enter the following command:
$ SHOW TERMINAL/X29
To alter parameter 7, use the /PARAMETERS qualifier to the
SET TERMINAL/X29 command, as described in Section 7.1.1, ''Changing the PAD Parameters''.
There are two optional facilities you can specify as arguments to the
/BREAK and /INTERRUPT qualifiers to control your
NV device’s response to Break and Interrupt messages:
[NO]ACTION = (keyword[, . . . ])
The keyword specifies which of the following actions the NV device will take:
PURGE, which causes the NV device to purge the Received Data buffer;
RESET, which causes the NV device to send a reset to the PAD; or
CLEAR, which clears the call, restores the PAD to its initial profile and ends the PAD session.
Only actions you specify will be set.
[NO]STRING = "string".
The string value specifies a string of characters to send to the OpenVMS terminal driver as though they have been sent by the PAD. The string can contain any character sequence (for example, "abc"), but note that backslashes, control characters, and ASCII characters must be preceded with a backslash; for example:
Represent \ as "\\".
Represent control characters as "\^character". For example, represent Ctrl/K as "\^K".
Specify any character in ASCII by "\", followed by the ASCII code for that character.
The default value for a Break message is Ctrl/O. The default value for an Interrupt message is Ctrl/Y. If you enter NOSTRING, the string is set to a null value.
For example:
You can set up the NV device so that in response to a Break message it:
Sends a reset to the PAD.
Purges its own Received Data buffer.
Sends Ctrl/X to the OpenVMS terminal driver.
To do this, enter:
$ SET TERMINAL/X29/BREAK=(ACTION=(RESET,PURGE),STRING="\^X")
You can set up the NV device so that in response to an Interrupt it:
Sends a reset to the PAD.
Passes the string "abc" to the OpenVMS terminal driver.
To do this, enter:
$ SET TERMINAL/X29/INTERRUPT=(ACTION=RESET,STRING="abc")
7.1.4. Displaying Information Messages
To display informational messages sent to your X.29 terminal, enter the following command:
$ SET TERMINAL/X29/LOG
7.2. Examining the Characteristics of Your X.29 Terminal and the PAD
To display the characteristics of your X.29 terminal and the PAD, enter the following command:
$ SHOW TERMINAL/X29
This will display your terminal characteristics and the PAD parameters. By adding qualifiers to this command, you can:
Display the PAD parameters as numbers, rather than keywords (use the qualifier
/NUMERIC).Display the parameter templates in addition to the default display (add the qualifier
/FULL).
For a full description of this command, refer to Chapter 11, "Displaying Terminal Characteristics".
7.3. Summary of the SET TERMINAL/X29 and SHOW TERMINAL/X29 Commands
Table 7.1, ''SET TERMINAL/X29 Command Qualifiers'' and Table 7.2, ''SHOW TERMINAL/X29 Command Qualifiers'' list in alphabetical order the
qualifiers for the SET TERMINAL/X29 and SHOW
TERMINAL/X29 commands, respectively.
| Qualifier | Description |
|---|---|
| /BREAK | Controls the response of the NV device to an Indication-of- break message. |
| /[NO]HOLD_TIMER | Changes the value of the hold timer. Refer to Chapter 10, "Changing Default X.29 Terminal Characteristics" for details. |
| /INTERRUPT | Controls the response of the NV device to an Interrupt message. |
| /LOG | Displays informational messages. |
| /NETWORK_SPECIFIC | Changes non-CCITT PAD parameters. |
| /PARAMETERS | Changes individual PAD parameters. |
| /TEMPLATE | Changes the PAD parameter templates for host-echo, local-echo and hangup. Refer to Chapter 10, "Changing Default X.29 Terminal Characteristics" for details. |
| Qualifier | Description |
|---|---|
| /NUMERIC | Uses PAD parameter numbers instead of keywords in the display. |
| /FULL | Displays the PAD parameter keywords and their values, and also displays the PAD parameter templates. |
Part III. Managing X.29 Communications
This part of the manual describes how to manage X.29 communications. It consists of five chapters:
Chapter 8, "Overview of Managing X.29" provides a brief introduction to managing a PAD, an X.29 terminal, and the NV device.
Chapter 9, "Setting Default X.29 Terminal Characteristics" explains how to set up system-wide defaults for X.29 terminals.
Chapter 10, "Changing Default X.29 Terminal Characteristics" explains how to change the value of PAD parameters and the characteristics of the NV device.
Chapter 11, "Displaying Terminal Characteristics" explains how to display terminal characteristics using the SHOW TERMINAL command.
Chapter 12, "Spooling an X.29 Terminal" explains how to spool an X.29 terminal.
Chapter 8. Overview of Managing X.29
8.1. Introduction
The X.29 protocol defines the procedures for exchange of control information and user data between a Packet Assembler/Disassembler (PAD) and a remote packet-mode DTE. Figure 8.1, ''An X.29 Communications Link'' shows an example of an X.29 link.
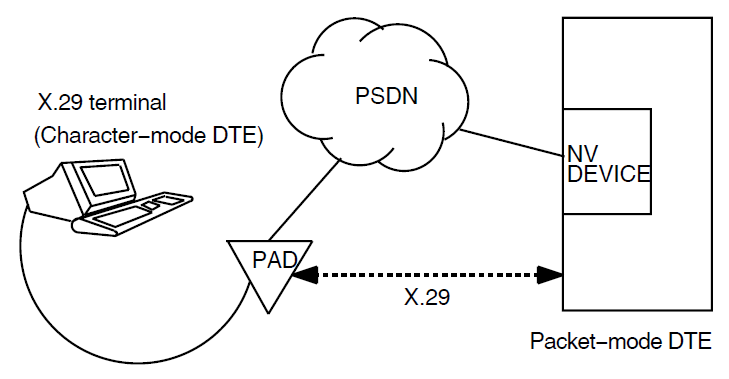
A packet-mode DTE that recognizes the X.29 protocol can use an X.29 program to communicate with a remote X.29 terminal. In X.29 communications, data passes between the X.29 terminal and the NV device through X.25 for OpenVMS. The NV device converts the data to the X.29 protocol.
This chapter describes the following tasks:
Managing X25 Access templates (Section 8.2, ''X25 Access Templates'')
Managing X25 Access filters (Section 8.3, ''X25 Access Filters'')
Changing the operation of the PAD (Section 8.4, ''PAD Operation'')
Setting and changing X.29 terminal characteristics (Section 8.5, ''Setting Default X.29 Terminal Characteristics'' and Section 8.6, ''Changing X.29 Terminal Characteristics'')
Spooling an X.29 terminal (Section 8.7, ''Spooling an X.29 Terminal'')
Creating a PAD profile file for outgoing connections (Section 8.8, ''Creating a System-Wide PAD Profile File for Outgoing Connections'')
8.2. X25 Access Templates
X25 Access Templates define the values for call parameters of outgoing calls.
When you configure your system to include X.29 support, a template called
X29Login (OpenVMS IA-64 and OpenVMS Alpha) or
Default (OpenVMS VAX) is set up. It is possible to change this
template, to give different values to all outgoing calls. You can alter the existing call
parameter values or add new call parameters to the template.
It is also possible to create new templates for different types of outgoing call. If you create a new template you should define the logical name PSI$X29_X25_ TEMPLATE to point to the new template.
The recommended way of creating and modifying templates is to run the X.25 configuration utility.
An alternative method of creating and modifying templates is to use the Network Control Language (NCL) utility. This utility can be used to make temporary or permanent changes to a template. It is recommended that:
To make temporary changes to a template, use NCL commands.
For details of creating and modifying X25 Access Templates using NCL, refer to the VSI X.25 for OpenVMS Management Guide.
To make permanent changes to a template, run the X.25 configuration program.
For details on configuring X25 Access Templates for X.25 for OpenVMS on OpenVMS IA-64 and OpenVMS Alpha systems, refer to the VSI X.25 for OpenVMS Configuration Guide. For details on configuring X25 Access Templates for DECnet-Plus for OpenVMS VAX systems, refer to the VSI OpenVMS DECnet-Plus Installation and Configuration manual.
8.3. X25 Access Filters
X25 Access Filters determine which applications receive the incoming calls.
When you configure your system to include X.29 support, a filter called
X29 (OpenVMS IA-64 and OpenVMS Alpha) or X29_LOGIN
(OpenVMS VAX) is set up. If you want to change any of the values or add more attributes,
you can modify this filter using the Network Control Language (NCL) utility. As in the
case of templates, this utility can be used to make either temporary or permanent changes
to the filter. It is recommended that:
To make temporary changes to the filter, use NCL commands.
For details of how to modify filters using NCL, refer to the VSI X.25 for OpenVMS Management Guide.
To make permanent changes to the filter, run the X.25 configuration program.
For details on configuring X25 Access Filters for X.25 for OpenVMS on OpenVMS IA-64 and OpenVMS Alpha systems, refer to the VSI X.25 for OpenVMS Configuration Guide. For details on configuring X25 Access Filters for DECnet-Plus for OpenVMS VAX systems, refer to the VSI OpenVMS DECnet-Plus Installation and Configuration manual.
8.4. PAD Operation
A PAD can operate in two modes:
Local-echo mode, in which characters typed at the terminal are echoed by the PAD.
Host-echo mode, in which characters typed at the terminal are sent across the PSDN, and echoed across the PSDN.
For each mode, some PAD parameters must be set to specific values for communication across the network. Other PAD parameters, which are optional, can be set to optimize or change features of communication across the network.
The NV device keeps a list of PAD parameters for each mode. Each list is called a PAD parameter template. Each PAD parameter template contains mandatory values for some parameters, and the user’s preferred values for other parameters.
Note
Do not confuse PAD parameter templates with the X25 Access Templates described in Section 2.2, ''Templates'' and Section 8.2, ''X25 Access Templates'', which define outgoing call parameters. Throughout this manual the term PAD parameter template refers to a list of PAD parameter values.
In addition to the PAD parameter templates for local-echo and host-echo mode, there is a PAD parameter template for use by the NV device when it receives a HANGUP request from the X.29 terminal.
Table 8.1, ''PAD Parameter Template Defaults'' shows the parameters which must be included in the PAD parameter templates for correct operation of the NV device. Make sure you include these parameters each time you modify the PAD parameter templates. Parameters which are not required in the PAD parameter templates, but which can be specified, are indicated by a dash (-).
Some of the values can be set by the user for one or more of the PAD parameter templates. This is indicated in the rightmost column.
| Parameter Number | Parameter Name | LOCAL_ ECHO | HOST_ ECHO | HANGUP | May Be Set By User? |
|---|---|---|---|---|---|
| 1 | ESCAPE_CHARACTER | - | - | - | Yes |
| 2 | ECHO | 1(On) | 0(Off) | 1(On) | Yes ? |
| 3 | FORWARDING_ CHARACTERS | - | - | - | Yes |
| 4 | TIMEOUT | 0(Off) | User’s value | 0(Off) | Yes ? |
| 5 | HOSTSYNC | - | - | - | Yes |
| 6 | MESSAGES | - | - | - | Yes |
| 7 | BREAK | - | - | - | Yes |
| 8 | DISCARD_OUTPUT | This parameter is set by the PAD to 0(Off). Do not include this parameter in any PAD parameter templates, and do not set this parameter. Setting it to 1(On) will cause all output to be discarded. | |||
| 9 | CRFILL | - | - | - | Yes |
| 10 | WRAP | - | 0(Off) | - | Yes ? |
| 11 | SPEED | Read-only parameter | No | ||
| 12 | TTSYNC | - | - | - | Yes |
| 13 | NEW_LINE | 4 | 0(Off) | - | No |
| 14 | LFFILL | - | - | - | Yes |
| 15 | EDIT | 1(On) | 0(Off) | - | No |
| 16 | DELETE | - | - | - | Yes |
| 17 | LINE_DELETE | - | - | - | Yes |
| 18 | REDISPLAY_LINE | - | - | - | Yes |
| 19 | DISPLAY_EDIT | - | - | - | Yes |
| 20 | RESTRICT_ECHO | - | - | - | Yes |
| 21 | PARITY | - | - | - | Yes |
| 22 | PAGE_WAIT | - | - | - | Yes |
8.5. Setting Default X.29 Terminal Characteristics
You can control your X.29 communications links by setting up system-wide default characteristics for X.29 terminals before you start X.25 for OpenVMS.
There are two ways to do this:
Use system logical names.
Use the system template command procedure to set up default PAD parameter templates:
SYS$MANAGER:X25$X29_SYSTEM_TEMPLATE.COM  (OpenVMS I64/OpenVMS Alpha)
SYS$EXAMPLES:PSI$X29_SYSTEM_TEMPLATE.COM (OpenVMS VAX)
The system template command procedure helps you set up all characteristics correctly. More experienced users may prefer to use system logical names. Refer to Chapter 9, "Setting Default X.29 Terminal Characteristics" for details of both methods.
8.6. Changing X.29 Terminal Characteristics
You can control your X.29 communications link by changing the default X.29 terminal characteristics for individual sessions after you have started X.25 for OpenVMS.
To do this, you need to change the PAD parameter values that control the operation of the NV device. There are two ways to change the PAD parameter values:
Use SET TERMINAL/X29 commands.
Use the user template command procedure:
SYS$MANAGER:X25$X29_USER_TEMPLATE.COM   (OpenVMS I64/OpenVMS Alpha)
SYS$EXAMPLES:PSI$X29_USER_TEMPLATE.COM  (OpenVMS VAX)
The user template command procedure helps you set up all characteristics correctly.
More experienced users may prefer to change terminal characteristics directly, using
SET TERMINAL/X29 commands. Refer to Chapter 10, "Changing Default X.29 Terminal Characteristics" for
details of both methods.
8.7. Spooling an X.29 Terminal
X.29 terminals, like local OpenVMS terminals, can be spooled or non-spooled. Spooled devices put requests into a queue; for example, a spooled printer puts print requests in a waiting line and prints the requests one after another. Refer to Chapter 12, "Spooling an X.29 Terminal" for details of how to set up your X.29 terminal as a spooled device.
8.8. Creating a System-Wide PAD Profile File for Outgoing Connections
You can create a file that records site-specific PAD profiles, each with a different name. These PAD profiles are useful if you are accessing non-OpenVMS systems at regular intervals. Non-OpenVMS systems often demand that your PAD parameters are set to particular values.
The file contains PROFILE commands with profile names and the
parameter settings associated with them. The PROFILE command should be
entered using the following format:
$ PROFILE profile-name parameter-list
where the variable profile-name is the name of the profile, and parameter-list is a list of parameters and their values.
You should set up a default profiles file called
PSI$PAD_PROFILES.DAT in the SYS$MANAGER:
directory. Use a text editor to create this file in the same way as you would create any
other file. You may use the comment character for inserting comments. Use a hyphen if you
continue a profile for more than one line. An example profile is shown below:
!
! Profile for connection to machine 5
!
PROFILE MACHINE_5 -
   ECHO, NOEDIT, BREAK=2, -
   FORWARDING_CHARACTERS=2
Here, the profile name is MACHINE_5 and the parameters that distinguish
the profile for this machine are: ECHO, NOEDIT,
BREAK=2, and FORWARDING_CHARACTERS=2.
For more information about using the system-wide PAD profile file and creating and using user-level PAD profile files, see Chapter 3, "Using an X.29 Terminal to Connect to a Remote System".
Chapter 9. Setting Default X.29 Terminal Characteristics
The SYSGEN parameters TTY_DEFCHAR and TTY_DEFCHAR2 define the default characteristics of the NV device when an OpenVMS system boots. However, you can set up system-wide defaults for X.29 terminals by defining some logical names before starting X.25 for OpenVMS.
9.1. X.29 Configuration Logical Names
Table 9.1, ''Logical Names and Example Settings'' lists the X.29 configuration logical names that are
available. The table shows the parameters each name represents. If you do not set up any
values, the X.25 startup command procedure, X25$STARTUP.COM (OpenVMS
IA-64 and OpenVMS Alpha systems) or PSI$STARTUP.COM (OpenVMS VAX
systems), uses the values given in Table 9.1, ''Logical Names and Example Settings'' to set up the NV
device.
| Logical Name | Parameter | Example Setting (Default Used by
X25$STARTUP.COM) |
|---|---|---|
| PSI$X29_PARAMETERS | PAD parameters | TIMEOUT=1 |
| PSI$X29_HOLD_TIMER | Hold timer | 0 |
| PSI$X29_INTERRUPT | Interrupt action |
|
| PSI$X29_BREAK | Break action |
|
| Hangup parameter template |
|
| Local-echo parameter template |
|
| Host-echo parameter template |
|
| X.29 terminal characteristics | /HANGUP/DIALUP |
Use the logical names as necessary to assign values to the relevant PAD parameters. These parameters will be set up when you run the X.25 startup command procedure.
For example, you can set any of the CCITT PAD parameters 1 to 22 using the logical name PSI$X29_PARAMETERS.
Note
Once the X.25 startup procedure runs, changing the logical name values has no effect. To change the parameters after X.25 startup, you must follow the procedures outlined in Chapter 10, "Changing Default X.29 Terminal Characteristics".
Table 9.2, ''Parameter Attributes'' shows the parameter attributes you can use with the logical names.
| Parameter Attributes ? | Definition |
|---|---|
| VALUE=X29-value | Sets a value for the parameter. The value must be either a number or the keywords ON (value=1) or OFF (value=0). |
| USER_VALUE | The last value set by a user program is used. For example, if this attribute applies to the TIMEOUT parameter and a program has set the TIMEOUT value to 20, 20 is kept as the parameter value. |
| IF_CHANGED | If the parameter value is the same as when the parameter was last sent, then the parameter is not sent again. |
| CALCULATED |
Calculates a value for the parameter. (Only used with WRAP and with ECHO in local-echo mode.) If this attribute applies to the WRAP parameter, the terminal width is the calculated value. If this attribute applies to the ECHO parameter, the PAD does not echo secret information (such as a password). |
| ADD_VALUE=number |
Can be used with USER_VALUE or CALCULATED. With USER_VALUE, X.25 for OpenVMS adds the number (specified in the ADD_VALUE parameter) to the user value. With CALCULATED, X.25 for OpenVMS adds the number to the calculated value. |
9.2. Setting System-Wide Defaults for X.29 Terminals
To use the logical names listed in Table 9.1, ''Logical Names and Example Settings'', issue the DCL
DEFINE command in the following format:
$ DEFINE logical-name equivalence-string
where the variable logical-name is one of those in Table 9.1, ''Logical Names and Example Settings'' and variable equivalence-string is a PAD parameter name, a parameter attribute (if required), and a value setting.
For example:
To start all X.29 terminals in local-echo mode, use:
$ DEFINE/SYSTEM PSI$X29_TERMINAL_CHARACTERISTICS -
_$ "/LOCAL_ECHO/NOECHO/HANGUP/DIALUP"
To ensure that all X.29 terminals use the system password and hangup, use:
$ DEFINE/SYSTEM PSI$X29_TERMINAL_CHARACTERISTICS -
_$ "/SYSPASSWORD/HANGUP"
To define a local-echo parameter template, specify the parameter values, and then define the local-echo parameter template, use:
$ TEMPLATE = "(PAR=ECHO,VAL=ON),(PAR=TIMEOUT,VAL=OFF), -
_$ (PAR=NEWLINE,VAL=4),(PAR=EDIT,VAL=ON)"
$ DEFINE/SYSTEM PSI$X29_LOCAL_ECHO_PARAMETER_TEMPLATE "’’TEMPLATE’"
In the above examples, the use of quotation marks follows DCL rules (refer to the VSI OpenVMS User's Manual or VSI OpenVMS DCL Dictionary Part One and Part Two).
9.2.1. Setting 7-Bit ASCII and Parity
You can set up your OpenVMS system to communicate with terminals that use 7-bit ASCII and even parity. To set up 7-bit even parity, use the following command:
$ DEFINE/SYSTEM PSI$X29_TERMINAL_CHARACTERISTICS "/NOEIGHT -
_$ /PARITY=EVEN"
When you set up 7-bit even parity you instruct the NV device to strip the eighth bit on input. On output, the eighth bit is replaced with even parity.
The NV device does not support odd parity. Also, if you specify 8-bit parity, the NV device has nowhere to put the parity bit and so parity does not affect what is sent and received.
9.3. Using the System Template Command Procedure
The system template command procedure lets you define system-wide defaults for all NV devices within the system. To use the command procedure, enter the following command:
$ @SYS$MANAGER:X25$X29_SYSTEM_TEMPLATE.COM parameter  (OpenVMS I64/OpenVMS Alpha)
$ @SYS$EXAMPLES:PSI$X29_SYSTEM_TEMPLATE.COM parameter (OpenVMS VAX)
where the variable parameter is one of the values given in Table 9.3, ''X25$X29_SYSTEM_TEMPLATE.COM Parameter Values''.
| Parameter Value | Description |
|---|---|
| DEFAULT | Sets the default template. |
| ECHO | As for DEFAULT except that the ECHO parameter in the local- echo template has the CALCULATED attribute (see Table 9.2, ''Parameter Attributes''). |
| WRAP | As for DEFAULT except that the WRAP parameter in the local- echo template has the CALCULATED attribute (see Table 9.2, ''Parameter Attributes''). |
| HELP | Tells you how to use this command procedure. |
For example, to set the default template on an OpenVMS IA-64 or OpenVMS Alpha system, use the system template command procedure as follows:
$ @SYS$MANAGER:X25$X29_SYSTEM_TEMPLATE DEFAULT
$ define psi$x29_host_echo_parameter_template -
_$ "(parameter=echo,value=off),(parameter=timeout,user_value), -
_$ (parameter=new_line,value=off),(parameter=wrap,value=off), -
_$ (parameter=edit,value=off)"
$ define psi$x29_local_echo_parameter_template -
_$ "(parameter=echo,value=on),(parameter=timeout,value=off), -
_$ (parameter=new_line,value=4),(parameter=edit,value=on)"
$ define psi$x29_hangup_parameter_template -
_$ "(parameter=echo,value=on),(parameter=edit,value=on)"
Chapter 10. Changing Default X.29 Terminal Characteristics
This chapter describes how to change the operation of the active NV device and, therefore, change the characteristics of X.29 terminals after you have started X.25 for OpenVMS.
To change the operation of the active NV device, you must change the value of the PAD parameters. This chapter explains how to:
Use
SET TERMINAL/X29commands to change individual PAD parameters, to change the Hold Timer, and to control the response of the NV device on Break and Interrupt.Use PAD parameter templates to control the NV device when the mode of the PAD changes.
10.1. Using the SET TERMINAL/X29 Command to Control X.29 Terminal Characteristics
You can change the values of PAD parameters and the characteristics of X.29 terminals
using the SET TERMINAL/X29 command. The format of this command
is:
$ SET TERMINAL/X29/qualifier [device-name]
where the variable device-name is the terminal device that you want to change. Omit the device name if you want to alter the characteristics of your own terminal.
You can use the /LOG qualifier with the SET
TERMINAL/X29 command to display information messages sent to the terminal, for
example, the terminal name and the state of the Hold Timer. Issue the command in the
form:
$ SET TERMINAL/X29/LOG
10.1.1. Changing Individual Parameters
You can change individual parameters by using the /PARAMETERS
qualifier with the SET TERMINAL/X29 command:
$ SET TERMINAL/X29/PARAMETERS=(parameter-value-list)
Refer to each parameter by its keyword or number. Using the negative form of the keyword sets the parameter to 0. Refer to the Chapter 7, "Using a Remote OpenVMS System to Control Your X.29 Terminal" for more information on changing individual parameters.
10.1.2. Changing the Hold Timer
The hold timer determines how long the NV device waits before forwarding a data
packet to the PAD. You can change the value of the hold timer by using the
/HOLD_TIMER qualifier with the SET TERMINAL/X29
command:
$ SET TERMINAL/X29/HOLD_TIMER=(n)where the value n is the number of timer units. Each unit is one tenth of a second. For example, the following command sets the hold timer to one fifth of a second:
$ SET TERMINAL/X29/HOLD_TIMER=(2)
If the hold timer is turned off (/NOHOLD_TIMER), the NV device
does not wait before forwarding a packet. Therefore, packets are only partly filled
before they are forwarded. Typically, this results in one line of output per packet and
can result in inefficient use of packets.
If the hold timer is set, packets contain more data but the delay in forwarding the packets is increased. Typically, this results in several lines of output per packet. Set a time that suits the way you use the PAD.
10.1.3. Controlling the Response of the NV Device to Break and Interrupt Messages
You can control the NV device’s response to Break and Interrupt messages by using
the SET TERMINAL/X29 command with /BREAK and
/INTERRUPT qualifiers.
Before you use either of these qualifiers, determine the value of PAD parameter 7 (BREAK). This parameter determines the reaction of the PAD to the Break key.
For example, when you use the host-based PAD, PAD parameter 7 is set up to send both a Break message and an Interrupt message. If you do not want both of these actions to occur, you will have to change the parameter.
To display the value of parameter 7, enter the following command:
$ SHOW TERMINAL/X29
To alter parameter 7, use the SET TERMINAL/X29/PARAMETERS
command, as described in Section 10.1.1, ''Changing Individual Parameters''.
There are two optional facilities you can specify to control your NV device’s response to Break and Interrupt messages:
[NO]ACTION
This specifies which of the following actions the NV device will take:
PURGE, which causes the NV device to purge the Received Data buffer.
RESET, which causes the NV device to send a reset to the PAD.
CLEAR, which clears the call, restores the PAD to its initial profile and ends the PAD session.
Only the actions you specify will be performed.
[NO]STRING "string".
This specifies a string of characters to send to the OpenVMS terminal driver as though they have been sent by the PAD. The string can contain any character sequence, for example, "abc". However, there is a special way to represent a backslash (\ ), control characters and ASCII characters:
Represent a backslash as two backslashes, that is: "\\".
Represent control characters as "\ ^character". For example, represent Ctrl/K as "\ ^K".
Specify any character in ASCII by "\ ascii". For example, represent the character A in ASCII as "\ 65".
The default value for a Break message is Ctrl/O. The default value for an Interrupt message is Ctrl/Y. If you enter NOSTRING, the string is set to a null value.
For example:
You can set up the NV device so that in response to a Break message it:
Sends a reset to the PAD
Purges its own Received Data buffer
Sends Ctrl/X to the OpenVMS terminal driver
To do this, enter the following command:
$ SET TERMINAL/X29/BREAK=(ACTION=(RESET,PURGE),STRING="\^X")
You can set up the NV device so that in response to an Interrupt it:
Sends a reset to the PAD
Passes the string "abc" to the OpenVMS terminal driver To do this, enter the following command:
$ SET TERMINAL/X29/INTERRUPT=(ACTION=RESET,STRING="abc")
10.2. Using PAD Parameter Templates to Control the NV Device
When the mode of the PAD changes, the NV device uses the appropriate template to
update the PAD parameters. Section 10.2.1, ''Specifying PAD Parameter Templates Using SET TERMINAL/X29'' describes how to specify PAD
parameter templates using the SET TERMINAL/X29 command. Section 10.2.2, ''Specifying PAD Parameter Templates Using the User Template Command
Procedure'' describes how to specify PAD parameter templates using the user
template command procedure.
10.2.1. Specifying PAD Parameter Templates Using SET TERMINAL/X29
To specify a PAD parameter template, issue the SET TERMINAL/X29
command in the following format:
$ SET TERMINAL/X29/TEMPLATE=template-name=template
The variable template-name is the name of the template you want to specify (LOCAL_ECHO, HOST_ECHO, or HANGUP) and template is the set of PAD parameter values to be assigned to that template.
The variable template consists of a set of parameter keywords, their values and attributes, and is defined in the following format:
((PARAMETER=name-or-number,[attribute]),
 (PARAMETER=name-or-number,[attribute]),
 (...))
Refer to Table 9.2, ''Parameter Attributes'' for a list of the available attributes.
The following example shows how to specify a LOCAL_ECHO parameter template:
$ SET TERMINAL/X29/TEMPLATE=LOCAL_ECHO=( -
_$ (parameter=echo,calculated), -
_$ (parameter=timeout,value=off), -
_$ (parameter=wrap,calculated,add_value=1), -
_$ (parameter=new_line,value=4), -
_$ (parameter=edit,value=on))
10.2.2. Specifying PAD Parameter Templates Using the User Template Command Procedure
You can use the user template command procedure to specify the default PAD parameter templates. Enter the following command:
$ @SYS$MANAGER:X25$X29_USER_TEMPLATE.COM parameter  (OpenVMS I64/OpenVMS Alpha)
$ @SYS$EXAMPLES:PSI$X29_USER_TEMPLATE.COM parameter (OpenVMS VAX)
The variable parameter can be DEFAULT, ECHO, or WRAP. These values are described in Table 9.3, ''X25$X29_SYSTEM_TEMPLATE.COM Parameter Values''.
$ @SYS$MANAGER:X25$X29_USER_TEMPLATE DEFAULT
$ set terminal/x29/template=( -
_$ host_echo= -
_$      (parameter=echo,value=off), -
_$      (parameter=timeout,user_value), -
_$      (parameter=new_line,value=off), -
_$      (parameter=wrap,value=off), -
_$      (parameter=edit,value=off), -
_$ local_echo= -
_$      (parameter=echo,value=on), -
_$      (parameter=timeout,value=off), -
_$      (parameter=new_line,value=4), -
_$      (parameter=edit,value=on), -
_$ hangup= -
_$      (parameter=echo,value=on), -
_$      (parameter=edit,value=on))
Chapter 11. Displaying Terminal Characteristics
You use the SHOW TERMINAL/X29 command to display the characteristics
of X.29 terminals.
11.1. Using the SHOW TERMINAL/X29 Command
The format of the SHOW TERMINAL/X29 command is:
$ SHOW TERMINAL/X29/qualifier [device-name:]
where the variable device-name is the name of the terminal device for which you want the characteristics displayed. Omit the device name if you want to display the characteristics of your own terminal.
There are two qualifiers you can use with the SHOW TERMINAL/X29
command:
/NUMERICdisplays the PAD parameters and their values in numeric form./FULLdisplays the PAD parameter templates as well as the PAD parameters and their values.
In the examples used in this chapter, the PAD parameters have been set up as shown in Table 11.1, ''PAD Parameter Settings''.
| Parameter | Setting | Notes |
|---|---|---|
| 1 | 1 | ESCAPE_CHARACTER: Escape to command mode on receipt of data-link-escape character. |
| 2 | 0 | ECHO: PAD does not echo. |
| 3 | 126 | FORWARDING_CHARACTERS: (64+32+16+8+4+2 = 126). Forwarding on filling a packet, Delete, and Control characters. |
| 4 | 1 | TIMEOUT=1: Timeout set at 1/20 of a second. |
| 5 | 1 | HOSTSYNC: For data transfer mode. |
| 6 | 5 | MESSAGES: PAD messages transmitted and PAD prompt in use. |
| 7 | 21 | BREAK: Interrupt and Indication-of-break sent to remote DTE, output to terminal discarded. |
| 8 | 0 | DISCARD_OUTPUT: Normal data delivery. |
| 9 | 0 | CRFILL: No padding. |
| 10 | 0 | WRAP: No line folding. |
| 11 | 14 | SPEED: Terminal speed is set to this value. |
| 12 | 1 | TTSYNC: Flow Control set. |
| 13 | 0 | NEW_LINE: No LF insertion. |
| 14 | 0 | LFFILL: No padding. |
| 15 | 0 | EDIT: No editing. |
| 16 | 127 | DELETE: ASCII code character used. |
| 17 | 21 | LINE_DELETE: Ctrl/U. |
| 18 | 18 | REDISPLAY_LINE: Ctrl/R. |
| 19 | 2 | DISPLAY_EDIT: Video terminal type display. |
| 20 | 254 |
RESTRICT_ECHO: No echo of editing keys, DELETE, or control characters except CR. |
| 21 | 0 | PARITY: No parity checking. |
| 22 | 0 | PAGE_WAIT: No page wait. |
11.2. Displaying PAD Parameters and Their Values
The example below shows the result of issuing the SHOW TERMINAL/X29
command:
$ SHOW TERMINAL/X29

X.29 Terminal: _NVA1:     Network.Remote DTE: 000056789010

   Interrupt action: String: ’\^Y’ Flags: Purge type ahead
   Break action:     String: ’\^O’ Flags: None
   Hold timer:       0

PAD parameters:
    PAD escape               No Echo
    Forward on buffer full   Forward on ’\^A’-’\^_’
    Forward on ’DEL’         Timeout 1
    Hostsync for data        PAD prompt
    PAD messages             Interrupt on break
    Send indication of break Discard output on break
    Normal output            No CRfill
    No Wrap                  Speed: 9600
    TTsync                   No Newlines
    No LFfill                No PAD Editing
    Delete char ’DEL’        Line delete ’\^U’
    Redisplay line ’\^R’     Scope edit display
    Do not echo ’\^A’-’\^L’  Do not echo ’\^N’-’\^_’
    Do not echo edit keys    Do not echo ’DEL’
    No Parity                No Page Wait
11.3. Displaying PAD Parameters and Their Values in Numeric Form
To display the PAD parameters and their values in numeric form for an X.29 terminal,
use the SHOW TERMINAL/X29/NUMERIC command:
$ SHOW TERMINAL/X29/NUMERIC

X.29 Terminal: _NVA1:     Network.Remote DTE: 000056789010

    Interrupt action: String: ’\^Y’ Flags: Purge type ahead
    Break action:     String: ’\^O’ Flags: None
    Hold timer:       0

PAD parameters:
      1 =   1 (Escape character)         2 =   0 (Echo)
      3 = 126 (Forwarding characters)    4 =   1 (Timeout)
      5 =   1 (Hostsync)                 6 =   5 (Messages)
      7 =  21 (Break)                    8 =   0 (Discard output)
      9 =   0 (CRfill)                  10 =   0 (Wrap)
     11 =  14 (Speed)                   12 =   1 (TTsync)
     13 =   0 (New line)                14 =   0 (LFfill)
     15 =   0 (Edit)                    16 = 127 (Delete)
     17 =  21 (Line delete)             18 =  18 (Redisplay line)
     19 =   2 (Display edit)            20 = 254 (Restrict echo)
     21 =   0 (Parity)                  22 =   0 (Page wait)
11.4. Displaying Parameter Templates and Terminal Characteristics
To display the PAD parameter templates and PAD parameter values for an X.29 terminal,
use the SHOW TERMINAL/X29/FULL command:
$ SHOW TERMINAL/X29/FULL

X.29 Terminal: _NVA1:     Network.Remote DTE: 000056789010

    Interrupt action: String: ’\^Y’ Flags: Purge type ahead
    Break action:     String: ’\^O’ Flags: None
    Hold timer:       0

Local echo parameter template:
        Parameter             Value   Flags
        ---------             -----   -----
        Echo                      1   None
        Timeout                   0   None
        New line                  4   None
        Edit                      1   None

Host echo parameter template:
        Parameter             Value   Flags
        ---------             -----   -----
        Echo                      0   None
        Timeout                   0   User value
        Wrap                      0   None
        New line                  0   None
        Edit                      0   None

Hangup parameter template:
        Parameter             Value   Flags
        ---------             -----   -----
        Echo                      1   None
        Timeout                   0   None
        Edit                      1   None

PAD parameters:
    PAD escape               No Echo
    Forward on buffer full   Forward on ’\^A’-’\^_’
    Forward on ’DEL’         Timeout 1
    Hostsync for data        PAD prompt
    PAD messages             Interrupt on break
    Send indication of break Discard output on break
    Normal output            No CRfill
    No Wrap                  Speed: 9600
    TTsync                   No Newlines
    No LFfill                No PAD Editing
    Delete char ’DEL’        Line delete ’\^U’
    Redisplay line ’\^R’     Scope edit display
    Do not echo ’\^A’-’\^L’  Do not echo ’\^N’-’\^_’
    Do not echo edit keys    Do not echo ’DEL’
    No Parity                No Page Wait
Chapter 12. Spooling an X.29 Terminal
12.1. Setting Up an X.29 Terminal as a Spooled Device
There are two ways to set up an X.29 terminal as a spooled device:
Log on over X.29 and execute a command procedure to spool the current terminal as a terminal queue.
Set up an X.29 destination that executes a command file to set up the NV device as a terminal queue.
Section 12.2, ''Command Procedure to Spool the Current Terminal'' and Section 12.3, ''Command Procedure to Set Up the NV Device as a Terminal Queue'' contain example command procedures that you can use to spool an X.29 terminal.
12.2. Command Procedure to Spool the Current Terminal
The following command procedure spools the current terminal as a terminal queue.
$  !
$  !  Spool current interactive terminal as a terminal queue
$  !
$  if f$mode() .eqs. "BATCH" then goto set_up_queue
$
$  priv = f$setprv("log_io,phy_io")
$  term_name = f$getdvi("TT:","tt_phydevnam") - "_" - ":"
$
$  !
$  !  Note that in a cluster this job must be submitted on a
$  !  queue which will run on the same node.
$  !
$  submit/noprint/parameter=’term_name -
    ’f$environment("procedure")
$
$  set terminal/permanent -
    /device=la100/pasthru/notypeahead/form/lower -
    /page=66/width=132/nowrap/nohangup/nomodem
$  if f$getdvi("TT:","tt_disconnect") then disconnect
$  if .not. f$getdvi("TT:","tt_disconnect") then logout
$  exit
$
$  set_up_queue:
$   set process/priv=(oper,phy_io)
$   wait 0:0:30
$   set device ’p1 /spooled
$   initialize/queue ’p1
$   start/queue ’p1/default=(flag=one,noburst)/prot=w=rw
$   exit
12.3. Command Procedure to Set Up the NV Device as a Terminal Queue
The following command procedure sets up the NV device as a terminal queue.
$  !
$  !  Command procedure for X29_SERVER destination
$  !  to spool terminal as a terminal queue
$  !
$
$  set process/privilege=(oper,phy_io)
$
$  open sys_net sys$net
$
$  read sys_net connect_message
$  close sys_net
$  unit = f$cvui(16,16,connect_message)  ! Get NV unit number
$
$  set terminal nva’unit’ /permanent -
    /device=la100/pasthru/notypeahead/form/lower -
    /page=66/width=132/nowrap/nohangup/nomodem
$
$  set device nva’unit’ /spooled
$
$  initialize/queue nva’unit’
$  start/queue nva’unit’ /default=(flag=one,noburst)/prot=w=rw
$
Appendix A. PAD Parameters
This appendix describes the standard PAD parameters. You can set all the PAD parameters, except for SPEED (Parameter 11), which is a read-only parameter.
However, note that if the remote DTE is an OpenVMS system, some of the PAD parameters must have certain values for the NV device to operate normally. Table A.1, ''PAD Parameter Values Required by the NV Device'' shows these PAD parameter values.
| State of the NV Device | Mandatory PAD Parameter Values | Recommended PAD Parameter Values |
|---|---|---|
| Local-echo mode | NEWLINE=4 |
ECHO=ON or CALCULATED FORWARDING_CHARACTERS= CR, Ctrl/Z, and Ctrl/Y TIMEOUT=OFF |
| Host-echo mode |
NEWLINE=0 ECHO=0 |
TIMEOUT - not OFF EDIT=0 |
| Hangup |
EDIT=1 ECHO=1 TIMEOUT=0 |
A.1. Parameter 1 (ESCAPE_CHARACTER)
Default=1 (Ctrl/P).
This parameter specifies the ASCII character that controls escape to PAD command mode. For example, a parameter value of 33 specifies ! (an exclamation mark) as the Escape character. Specify one of the following values:
| 0 | PAD does not enter command mode on receiving an Escape character. |
| 1 | PAD enters command mode on receiving the Escape character Ctrl/P. |
| 2 to 31 | Specify the Escape character. These values are extensions to the CCITT values. |
| 32 to 255 | Specify the Escape character. |
A.2. Parameter 2 (ECHO)
Default=1 (PAD echoes).
This parameter specifies whether the PAD echoes the input entered at the X.29 terminal.
Refer to Part III,''Managing X.29 Communications'' for details of the relationship between PAD echoing and the
OpenVMS local echoing characteristic (SET TERMINAL/LOCAL_ECHO). Specify
one of the following values:
| 0 | PAD does not echo. |
| 1 | PAD echo. |
A.3. Parameter 3 (FORWARDING_CHARACTERS)
Default=126 (2 + 4 + 8 + 16 + 32 + 64).
This parameter specifies the characters that cause data to be transmitted from the PAD to the remote DTE. The CCITT values are 0, 2, 6 (2 + 4), 18 (2 + 16), and 126 (2 + 4 + 8 + 16 + 32 + 64).
| 0 | Forward data whenever a packet is full. |
| 1 | Any alphanumeric character (from A to Z, a to z, or 0 to 9). |
| 2 | CR |
| 4 | ESC, BEL, ENQ, ACK |
| 8 | DEL, CAN, DC2 |
| 16 | EXT, EOT |
| 32 | HT, LF, VT, FF |
| 64 | Any control character not given previously. |
A.4. Parameter 4 (TIMEOUT)
Default=0 (No timeout).
This parameter specifies the Timeout value for forwarding data.
| 0 | Timeout. |
| 1 to 255 | Timeout value in units of 1/20 second. |
Note that if parameter 15 (EDIT) is set to 1, timeouts are disabled.
A.5. Parameter 5 (HOSTSYNC)
Default set by the HOSTSYNC terminal characteristic.
This parameter specifies whether the PAD sends XON and XOFF control characters to the X.29 terminal in data-transfer mode. The host-based PAD treats parameter values 1 and 2 in the same way. Specify one of the following values:
| 0 | No device control. |
| 1 | XON/XOFF device control in data-transfer mode. |
| 2 | XON/XOFF device control in both command mode and data-transfer mode. |
A.6. Parameter 6 (MESSAGES)
Default=5 (1 + 4).
This parameter specifies whether messages from the PAD are sent to the X.29 terminal. Permitted values are any combination of the following:
| 0 | PAD messages suppressed. |
| 1 | PAD messages transmitted. |
| 4 | (In command mode) PAD prompt transmitted. |
| 8 | PAD messages in nonstandard format. (This value is ignored by the host-based PAD.) |
A.7. Parameter 7 (BREAK)
Default=21 (1 + 4 + 16).
This parameter specifies the actions taken by the PAD when you enter a PAD
BREAK command or type the BREAK_CHARACTER. (The OpenVMS Terminal Driver does not
recognize Break , and so the host-based command PAD BREAK is used to
simulate the Break action.) Supported values are any combination of the following:
| 0 | No action. |
| 1 | PAD sends an Interrupt to the remote DTE. |
| 2 | PAD sends a Reset to the remote DTE. |
| 4 | PAD sends Indication–of–break to the remote DTE. |
| 8 | PAD enters command mode. |
| 16 | PAD discards output to the terminal. This setting automatically sets PAD Parameter 8 (PSI$K_X29_PAR_DISCARD) to value 1 (discard data from remote DTE). |
A.8. Parameter 8 (DISCARD_OUTPUT)
Default=0 (Normal data delivery).
This specifies whether the PAD sends output from NV to the X.29 terminal.
This performs a similar function to Ctrl/O. However, whereas Ctrl/O requests NV to discard all output to the PAD, this parameter, if set, requests the PAD to discard the output received from NV. Therefore, for reasons of efficiency and cost, Ctrl/O is preferred.
Specify one of the following values:
| 0 | Normal data delivery. |
| 1 | Discard data from remote DTE. |
A.9. Parameter 9 (CRFILL)
Default set by the CRFILL terminal characteristic.
This parameter specifies the number of padding characters that will be inserted after a Return. Supported values are:
| 0 | No padding. |
| 1 to 255 | Number of padding characters to send after a Return. |
Note that the host-based PAD never sends more than nine padding characters.
A.10. Parameter 10 (WRAP)
Default set by the WRAP terminal characteristic and terminal width.
This parameter specifies the character position on a line, at which the PAD inserts a Return. For example, setting a value of 80 requests the PAD to insert a Return after the 80th character, and continue the text that follows on a new line.
This parameter corresponds to the /WRAP and /WIDTH characteristics of the terminal. Set this parameter to 0 for correct operation of X.29 terminals on OpenVMS.
Otherwise, specify one of the following values:
| 0 | No wraparound. |
| 1 to 255 | Specifies the maximum line length that the PAD will print or echo. |
A.11. Parameter 11 (SPEED)
Default set by terminal speed.
This is a read-only parameter. The setting corresponds to the /SPEED characteristic of the terminal. Do not attempt to set this parameter.
The parameter takes the following values:
| Speed (bits/s) | Parameter Value | Speed (bits/s) | Parameter Value |
|---|---|---|---|
| 50 | 10 | 1200 | 3 |
| 75 | 5 | 75/1200 | 11 |
| 100 | 9 | 1800 | 7 |
| 110 | 0 | 2400 | 12 |
| 134.5 | 1 | 9600 | 14 |
| 150 | 6 | 19200 | 15 |
| 200 | 8 | 48000 | 16 |
| 300 | 2 | 56000 | 17 |
| 600 | 4 | 64000 | 18 |
A.12. Parameter 12 (TTSYNC)
Default set by the TTSYNC terminal characteristic.
This parameter specifies whether the PAD responds to XON and XOFF control characters sent from the X.29 terminal. Specify one of the following values:
| 0 | No flow control. |
| 1 | Flow control on: the PAD responds to XON and XOFF control characters from the terminal. |
A.13. Parameter 13 (NEW_LINE)
Default=0 (No LF inserted after Return).
This parameter specifies whether the PAD sends a LF with every Return received from the X.29 terminal for transmission to the remote DTE or received from the remote DTE for forwarding to the X.29 terminal.
Set this parameter to 0 for correct operation of X.29 terminals on OpenVMS.
Otherwise specify one, or a combination, of the following values:
| 0 | No LF inserted after CR. |
| 1 | LF inserted after every CR that is transmitted as data to the terminal. |
| 2 | LF inserted after every CR that is received as data to the terminal. |
| 4 | LF inserted after every CR that is echoed as data to the terminal. |
A.14. Parameter 14 (LFFILL)
Default set by the LFFILL terminal characteristic.
This parameter specifies the number of padding characters the PAD sends after a LF. Supported values are:
| 0 | No padding. |
| 1 to 255 | Number of padding characters to send after a Return. |
Note that the host-based PAD never sends more than nine padding characters.
A.15. Parameter 15 (EDIT)
Default=1 (Editing is permitted).
This parameter controls whether the PAD performs local editing when in data-transfer mode.
You should set this parameter only when the terminal is set to /LOCAL_ECHO. Specify one of the following values:
| 0 | No local editing in data transfer mode. |
| 1 | Editing dependent on PAD parameters 16, 17, 18. This setting suspends the Timeout value until editing is turned off at the terminal. |
A.16. Parameter 16 (DELETE)
Default=127 (DEL).
This parameter specifies the ASCII character that the PAD uses as the Delete character. This parameter is ignored unless Parameter 15 is set. Specify one of the following values:
| 0 | No delete character allowed. |
| 1 to 127 | ASCII character code to be used for delete. |
A.17. Parameter 17 (LINE_DELETE)
Default=21 (Ctrl/U).
This parameter specifies the ASCII character that the PAD uses as the Line-Delete character. This parameter is ignored unless Parameter 15 is set. Specify one of the following values:
| 0 | No Line-Delete character allowed. |
| 1 to 127 | ASCII character code to be used for Line-Delete character. |
A.18. Parameter 18 (REDISPLAY_LINE)
Default=18(Ctrl/R).
This parameter specifies the ASCII character that the PAD uses as the Line-Redisplay character. This parameter is ignored unless Parameter 15 is set. Specify one of the following values:
| 0 | No Line-Redisplay character allowed. |
| 1 to 127 | ASCII character code to be used for Line-Redisplay character. |
A.19. Parameter 19 (DISPLAY_EDIT)
Default set by the /HARDCOPY terminal characteristic.
This parameter controls the type of line editing display, as follows:
| 0 | No display for PAD editing. |
| 1 | Hardcopy type. |
| 2 | Video terminal type. |
| 8, 32 to 126 | ASCII character used to display editing. |
Note that this parameter is not used if parameter 6 (MESSAGES) = 0.
A.20. Parameter 20 (RESTRICT_ECHO)
Default=254 (2 + 4 + 8 + 16 + 32 + 64 + 128).
This parameter specifies which characters are not echoed. Permitted values are any combination of the following:
| 0 | All characters echoed. |
| 1 | CR |
| 2 | LF |
| 4 | VT, HT, FF |
| 8 | BEL, BS |
| 16 | ESC, ENQ |
| 32 | ACK, NAK, STX, SOH, EOT, ETB, ETX |
| 64 | The editing characters (as set by DELETE, LINE_DELETE, REDISPLAY_LINE). |
| 128 | DEL, and all other control characters not listed above. |
A.21. Parameter 21 (PARITY)
Default=0 (No parity).
This parameter controls parity generation and verification. Legal values are any combination of the following:
| 0 | None. |
| 1 | Parity checking (ignored by the host-based PAD). |
| 2 | Parity generation (ignored by the host-based PAD). |
A.22. A.22 Parameter 22 (PAGE_WAIT)
Default=0 (Page wait is disabled).
This parameter controls whether the PAD holds the display at the end of each page. Specify one of the following values:
| 0 | Page wait disabled. |
| 1 to 255 | Number of lines to display before waiting. |
Appendix B. Host-Based PAD Initial Profile
The host-based PAD supports the 22 parameters defined by the CCITT X.3 Recommendation (1984).
The values of the parameters for the PAD initial profile are shown in Table B.1, ''Host–Based PAD Initial Profile''.
| Parameter | Keyword | Value |
|---|---|---|
| 1 | ESCAPE_CHARACTER | 1 (Ctrl/P) |
| 2 | ECHO | 1 |
| 3 | FORWARDING_CHARACTERS | 126 |
| 4 | TIMEOUT | 0 |
| 5 | HOSTSYNC | Set by HOSTSYNC characteristic |
| 6 | MESSAGES | 5 |
| 7 | BREAK | 21 |
| 8 | DISCARD_OUTPUT | 0 |
| 9 | CRFILL | Set by CRFILL characteristic |
| 10 | WRAP | Set by WRAP characteristic and terminal width |
| 11 | SPEED | Set by terminal speed |
| 12 | TTSYNC | Set by TTSYNC characteristic |
| 13 | NEW_LINE | 0 |
| 14 | LFFILL | Set by LFFILL characteristic |
| 15 | EDIT | 1 |
| 16 | DELETE | 127 (Delete character) |
| 17 | LINE_DELETE | 21 (Crtl/U) |
| 18 | REDISPLAY_LINE | 18 (Crtl/R) |
| 19 | DISPLAY_EDIT | Set by HARCOPY characteristic |
| 20 | RESTRICT_ECHO | 254 |
| 21 | PARITY | 0 |
| 22 | PAGE_WAIT | 0 |
On DECnet-Plus for OpenVMS VAX systems, this utility used to be referred to as the P.S.I. MAIL utility.
This is the default value.
Users can only set this value in local-echo and hangup mode.
Users can only set this value in host-echo and hangup mode. Parameter 4 is set to the last value set by the user, or to 1 if the user specified no value.
Users can only set this value in local-echo mode.
Combinations other than those given here cause undefined results and are not recommended.